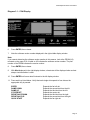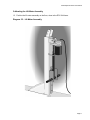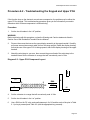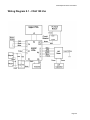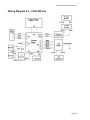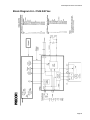
1
C544 Elliptical Fitness Crosstrainerl
C544 Elliptical Fitness Crosstrainer
Warning: This service manual is for use by Precor trained service providers only.
If you are not a Precor Trained Servicer, you must not attempt to service any Precor Product;
Call your dealer for service.
This document contains information required to perform the majority of troubleshooting, and
replacement procedures required to repair and maintain this product.
This document contains general product information, software diagnostic procedures (when
available), preventative maintenance procedures, inspection and adjustment procedures,
troubleshooting procedures, replacement procedures and electrical block and wiring diagrams.
To move directly to a procedure, click the appropriate procedure in the bookmark section to the
left of this page. You may “drag” the separator bar between this page and the bookmark section
to change the size of the page being viewed.
© 2003 Precor Incorporated
Unauthorized Reproduction and Distribution Prohibited By Law
Page 1
C544 Elliptical Fitness Crosstrainer
Section One - Things You Should Know
Right, Left, Front, and Back Conventions
In this manual, right, left, front, and back are from the perspective of a user standing on the EFX
544, facing the display enclosure.
Warning and Caution Statements and General Safety Guidelines
Warning statements indicate a particularly dangerous activity. Warning statements you will find in
this manual include:
•
To remove power from the EFX 544, the power cord must be disconnected from the wall
outlet. Always ensure that the EFX 544 is unplugged from the wall outlet when you inspect
or adjust the EFX 544, or when you isolate, remove, or replace an EFX 544 component.
•
Removing the covers exposes high voltage components and potentially dangerous
machinery. Exercise extreme caution when you perform maintenance procedures with the
hood removed.
•
During service operations you will be very close to moving machinery and high voltage
components. When you perform maintenance procedures with the covers removed, remove
jewelry (especially from ears and neck), tie up long hair, remove neck ties, and do not wear
loose clothing.
•
When the EFX 544 is operating, the capacitor will hold a lethal amount of charge. Do not
touch the capacitor as serious injury or death might result.
•
When the EFX 544 is turned off and the power cord is removed from the wall outlet, the
capacitor will hold voltage for 30–60 seconds. Allow the capacitor to discharge for a period
of one minute before you touch or work near the capacitor. Do not attempt to discharge the
capacitor by any other means.
•
Exercise caution when touching any wire or electrical component during EFX 544 operation.
•
Exercise extreme caution when working with the flywheels and/or the stairarms. Because of
the mass of the flywheels, serious injury may result if fingers are pinched between the
flywheel spokes and the stairarms.
•
The flywheel is very heavy. Be prepared for the weight of the flywheel when it comes off of
the pulley shaft.
Caution statements are intended to prevent damage to the EFX 544 as a result of the current
activity. Caution statements included in this manual are listed below:
•
Notice the orientation notch on the PROM (U3). These components must be positioned with
the same notch orientation.
Page 2
C544 Elliptical Fitness Crosstrainerl
•
When it is necessary to lift the EFX 544, ensure that the EFX 544 has adequate support. Do
not lift the EFX 544 by the front cross-member.
Safety guidelines you should know and follow include:
•
Read the owner’s manual and follow all operating instructions.
•
Operate the EFX 544 on a solid, level surface. Locate the rear of the EFX 544 at least four
feet from walls or furniture. Keep the area behind the EFX 544 clear.
•
Visually check the EFX 544 before beginning service or maintenance operations. If it is not
completely assembled or is damaged in any way, exercise extreme caution while operating
and checking the EFX 544.
•
When operating the EFX 544, do not wear loose clothing. Do not wear shoes with heels or
leather soles. Check the soles of your shoes and remove any embedded stones. Tie long
hair back.
•
Do not rock the unit. Do not stand or climb on the handlebars, display enclosure, or cover.
•
Do not set anything on the handlebars, display enclosure, or cover. Never place liquids on
any part of the EFX 544.
•
To prevent electrical shock, keep all electrical components, such as the power cord and
circuit breaker away from water and other liquids.
•
Do not use accessory attachments that are not recommended by the manufacturer-such
attachments might cause injuries.
General Information
For the latest exploded view, part number and part pricing information, visit the Precor dealer
website at “www.precor.com/Dealer”.
Page 3
C544 Elliptical Fitness Crosstrainer
Procedure 3.1 - Software Access Codes
Over the years the codes used to access the various software diagnostics features have
changed. Currently we are using a “standardized” set of access codes. These codes will be used
on all current and future software. In using the standardized access codes the keys are
numbered left to right with key #1 on the far left and key #7 on the far right. If the standard access
codes do not function on the unit being tested refer to the appropriate old access codes listed
below. The standard access codes use all sequential key presses, the old access codes use
simultaneous key presses.
Standard Access Codes
Diagnostics
Odometer
Club Settings
Keys RESET,5,1,7,6,5,7,6,1
Keys RESET,6,5
Keys RESET,5,6,5,1,5,6,5
Old Access Codes
Diagnostics
Odometer
Club Settings
Keys Ramp ▲, Resistance ▼, Resistance ▲
Keys Ramp ▲, Resistance ▲
Keys Resistance ▲, Quick Start/Change
Page 4
C544 Elliptical Fitness Crosstrainerl
Procedure 3.2 - Accessing the Diagnostic Software
The EFX 544 diagnostic software cycles through the following tests:
•
•
•
•
•
Performing LED Diagnostics
Checking the Lift Calibration Number
Determining Software Version
Heart Rate Diagnostic
Performing the Keypad Test
Procedure
1.
Plug the power cord into the wall outlet, then turn on the EFX 544 with the circuit breaker.
2.
Press the RAMP ▲, RESISTANCE ▼ and RESISTANCE ▲ keys, simultaneously or keys
RESET,5,1,7,6,5,7,6,1, sequentially.
3.
Watch the upper display as the LED test progresses. The test is programmed to display the
following LED illumination sequence:
a
Every LED on the left display window illuminates simultaneously.
b
Diagonal lines of illuminated LED’s sweep across the left display window.
c
The right display windows illuminate, then decrement from 8.8.8.8 to 0.0.0.0.
d
The function LED’s illuminate simultaneously and then extinguish.
e
Each function LED illuminates separately and then extinguishes.
4.
With LIFT displayed in the right display window, watch the right display window (shown in
Diagram 3-1). Press the RAMP ▲ and RAMP ▼ keys. Verify that the lift calibration number
increments and decrements as the RAMP keys are pressed.
5.
If you do not observe the LED illumination sequences described in Step 3...
THEN...
Replace the upper PCA as described
in Procedure 8.2.
OTHERWISE...
The LED passed successfully;
continue with the next step.
Page 5
C544 Elliptical Fitness Crosstrainer
Diagram 3.1 - C544 Display
6.
Press ENTER, then release.
7.
Note the software version number displayed in the right middle display window.
Note:
If you cannot determine the software version number in this manner, look at the PROM (U3)
mounted on the upper PCA. A label on U3 indicates the software version number. The part
number of the PROM indicates the version number.
8.
Press ENTER, then release.
9.
With HArt displayed in the right display window, a heart rate will be displayed when a chest
strap or test transmitter is used.
10. Press ENTER until seven dots illuminate in the left display window.
11. Press each key listed below. Verify that each single dot expands to four dots as the
appropriate key is pressed.
ENTER
RAMP DOWN
RAMP UP
STOP/RESET
RESISTANCE DOWN
RESISTANCE UP
QUICK START
Expands the far left dot.
Expands the second dot from the left.
Expands the third dot from the left.
Expands the center dot.
Expands the third dot from the right.
Expands the second dot from the right.
Expands the far right dot.
Page 6
C544 Elliptical Fitness Crosstrainerl
12. If the left display window column illuminates appropriately as each key is pressed...
THEN...
The keypad test passed successfully;
continue with the next step.
OTHERWISE...
Replace the upper PCA as described
in Procedure 8.2.
13. End the keypad test by pressing the RAMP ▼ and RESISTANCE ▲ keys, simultaneously.
Page 7
C544 Elliptical Fitness Crosstrainer
Procedure 3.3 - Displaying the Odometer
Procedure
1.
Plug the power cord into the wall outlet, then turn on the EFX 544 with the circuit breaker.
2.
With the PRECOR EFX 544 banner scrolling, press the RAMP ▲ and RESISTANCE ▲
keys, simultaneously or keys RESET,6,5, sequentially. The message EFX 544 ODOMETER
will scroll across the left display window.
3.
Press ENTER, then release.
Note:
The right display window displays the total strides on the EFX 544 (see Diagram 3.2). The
number displayed is 102,187. To convert strides to miles, divide the total number of strides by
2241. To convert strides to kilometers, divide the total number of strides by 1392.5.
Diagram 3-2. - Odometer Reading
2
1
1
0
8
7
Page 8
C544 Elliptical Fitness Crosstrainerl
Procedure 3.4 - Club Settings
Selecting United States standard units causes information to be displayed in miles. Information is
displayed in kilometers if metric units are selected. After you select a measurement standard, the
software accumulates and records workout information in the units of the measurement standard
selected.
Procedure
1.
Plug the power cord into the wall outlet, then turn on the EFX 544 with the circuit breaker.
2.
With the PRECOR EFX 544 banner scrolling, press the RESISTANCE ▲ and QUICK
START keys simultaneously or keys RESET,5,6,5,1,5,6,5, sequentially. Either U. S.
Standard or Metric will scroll across the display.
3.
If you wish to change the measurement standard...
THEN...
Use the ▲ or ▼ keys to toggle
to an alternate measurement standard;
then continue with the next step.
OTHERWISE...
Continue with the next step.
4.
Press ENTER, then release.
5.
Either 120 VOLTS or 240 VOLTS will scroll across the display. Press either of the ▲ or ▼
keys to toggle between the 120 0r 240 volt setting.
Note:
The 120 Volt/240 Volt setting does not change the input operating voltage of the EFX 544. It
changes the resistance levels to match the input operating voltage. Therefore, this setting must
match the input voltage of the EFX 544. If the setting does not match the input voltage, the
resistance levels will be incorrect.
6.
The maximum workout time is displayed on the left display window.
7.
If you wish to change the maximum workout time...
THEN...
Use the ▲ or ▼ keys to select
the new maximum workout time;
then continue with the next step.
8.
OTHERWISE...
Press ENTER to continue with the next step.
Either SMART RATE ACTIVATED or NO SMART RATE will scroll across the display. Use
the ▲ or ▼ keys to activate or deactivate smart rate, as required. Press ENTER to exit.
Page 9
C544 Elliptical Fitness Crosstrainer
Procedure 3.5 - Documenting Software Problems
When a problem is found with either the software or upper or lower PCA’s, record the information
listed below. If you isolated the problem to either the PROM, upper PCA, or lower PCA, include
the information you recorded with the malfunctioning PROM or PCA when you ship it to Precor.
When a problem occurs, record the following information:
•
Model and serial number
•
Software version number
Note:
Look at the PROM (U3) mounted on the upper PCA. A label on U3 indicates the software version
number. The part number of the PROM indicates the version number.
•
User and program number running when the problem occurred
•
A description of:
•
a
What happened or failed to happen.
b
The action taken by the user just before the problem occurred.
c
Problem-related information (such as how far into the program the problem occurred,
the work level being used when the problem occurred, etc.).
The frequency of occurrence.
Page 10
C544 Elliptical Fitness Crosstrainerl
Section Four - Checking EFX 544 Operation
This section provides you with a quick method of checking EFX 544 operation. Check the
operation of the EFX 544 at the end of most maintenance procedures.
Procedure
1.
Plug the power cord into the wall outlet, then turn on the EFX 544 with the circuit breaker.
2.
When the PRESS ENTER FOR PROGRAMS prompt appears, press QUICK START.
3.
If the ramp is not currently at the mid-point, the ramp will automatically move to the midpoint.
4.
Select Resistance Level 1 and press ENTER.
5.
Operate the EFX 544 for 4–5 minutes. As you operate the EFX 544, concentrate on the
operating sounds made by the unit. Be on the alert for unusual rubbing, hitting, grinding, or
squeaking noises.
6.
If the EFX 544 makes unusual noises or the electronic display does not change
appropriately, trouble shoot per section 6.
7.
Press the RESISTANCE ▲ key until you reach Resistance Level 5. Operate the EFX 544
for another 2–3 minutes.
8.
If the EFX 544 resistance does not change or the operation of the EFX 544 feels
inconsistent compared with Resistance Level 1, troubleshoot per section 6.
9.
Press the RESISTANCE ▲ key until you reach Resistance Level 10. Operate the EFX 544
for another 2–3 minutes.
10. If the resistance of the EFX 544 does not change or the EFX 544 operation feels
inconsistent with Resistance Levels 1 and 5, troubleshoot per section 6.
11. Check the LED’s mounted on the upper PCA and the function keys displayed on the
electronic console by performing Procedure 3.2.
12. Press the RAMP ▲ key while viewing the electronic console. Confirm that the foot pads
incline and the ramp display increments to ten as the RAMP ▲ key is pressed.
13. Press the RAMP ▼ key while viewing the electronic console. Confirm that the foot pads
return to a level position and the ramp display decrements to zero as the RAMP ▼ key is
pressed.
14. Turn off the EFX 544 with the circuit breaker, then unplug the power cord from the wall
outlet.
Page 11
C544 Elliptical Fitness Crosstrainer
Procedure 5.1 - Inspecting and Adjusting the Gap Between
the Disk and Magnet Assembly
Note:
This procedure is applicable only to units manufactured prior to March 20, 1997
Procedure
1.
Turn off the EFX 544 with the circuit breaker, then unplug the power cord from the wall
outlet.
WARNING
Before continuing with this procedure, review the Warning and Caution statements listed in
Section One, Things You Should Know.
2.
Remove the rear cover as described in Procedure 7.1.
3.
Place a. 062" (1/16”) feeler gauge between the disk and the magnets (see Diagram 5.1).
4.
If the feeler gauge does not fit snugly...
THEN...
Continue with the next step.
OTHERWISE...
Skip to Step 9.
Diagram 5.1 - The Magnets and Disk
Page 12
C544 Elliptical Fitness Crosstrainerl
5.
Loosen the two screws that secure the magnet assembly to the magnet pivot assembly.
IMPORTANT
Do not loosen the screws too much. Although you must be able to move the magnet assembly
along the adjustment slots, the assembly must stay in place after it is moved.
6.
Place a .062" (1/16”) feeler gauge between the disk and the magnets.
7.
Slide the magnet assembly along its adjustment slots until the feeler gauge fits snugly
between the disk and the magnets.
8.
Using the 6 mm allen wrench, tighten the screws that secure the magnet assembly to the
magnet pivot assembly.
9.
Re-install the rear cover as described in Procedure 7.1, then check the operation of the EFX
544 as described in Section Four.
Page 13
C544 Elliptical Fitness Crosstrainer
Procedure 5.2 - Measuring the Resistance of a Magnet
Caution
Remove power from the EFX 544 before you measure magnet resistance.
Procedure
1.
Turn off the EFX 544 with the circuit breaker, then unplug the power cord from the wall
outlet.
WARNING
Before continuing with this procedure, review the Warning and Caution statements listed in
Section One, Things You Should Know.
1.
Remove the rear cover as described in Procedure 7.1.
2.
Set the ohmmeter to a range that will conveniently read 125 Ω.
3.
Remove the wires from the terminals on the top magnet. Measure the resistance between
the two terminals.
Note:
The resistance of the magnets will be higher than optimum (90 - 110 Ω) when they are warm.
4.
If the resistance measures significantly less than 90 Ω or significantly more than 110 Ω...
THEN...
Replace the magnet as described
in Procedure 7.19.
OTHERWISE...
Connect the wires to the magnet, then
continue with the next step.
Note:
The EFX 544 magnet cable assembly is shown in Diagram 5-2.
5.
Repeat Steps 4 and 5 for the remaining magnets.
6.
Re-install the rear cover as described in Procedure 7.1, then check the operation of the EFX
544 as described in Section Four.
Page 14
C544 Elliptical Fitness Crosstrainerl
Diagram 5.2 - Magnet Wiring
Page 15
C544 Elliptical Fitness Crosstrainer
Procedure 5.3 - Calibrating the Lift Motor
Note:
The lift motor must be removed for calibration.
Removing the Lift Motor Assembly
1.
Set the ramp (lift) at level 1, turn off the EFX 544 with the circuit breaker, then unplug the
power cord from the wall outlet.
2.
Remove the front and rear covers as described in Procedure 7.1.
Note:
Refer to the wiring diagram shown in Diagram 8.1. Mark all wires before disconnecting, to insure
quick, accurate replacement!
3.
Lift the stair arms from the ramp assembly and rotate them towards the back of the EFX
544.
4.
Rotate the ramps to the back of the unit. Rest the ramps on the flywheels.
5.
Remove the outboard snap rings from each end of the lower lift shaft. Remove the plastic
wear tubes. Hold one end of the lower lift shaft with a wrench. Loosen the other end with a
second wrench. Using the wrenches, unthread both ends of the lower lift shaft from the
threaded stud. Set aside the lower lift shaft and the stud.
Note:
Units built before September 3, 1996, may have a one-piece lower lift shaft.
6.
Cut the cable ties that secure the ribbon cable to the lift motor and EFX 544 wiring cables.
7.
Disconnect the lift motor cable assembly from the lower PCA.
8.
Remove the wires from the lift motor capacitor.
9.
Remove the screw that secures the lift motor ground wire to the EFX 544 frame.
10. Remove the two screws securing the top of the electronics bracket to the EFX 544 frame.
11. While an assistant supports the lift motor, remove the nut from upper lift motor mounting
bolt. Remove the upper lift motor mounting bolt and the two plastic spacers (read the Note
below).
Note:
Units built after July 9, 1996, have two plastic spacers inserted onto the upper lift shaft.
12. Lift the lift motor assembly up and away from the EFX 544 (see Diagram 5.3).
Page 16
C544 Elliptical Fitness Crosstrainerl
Calibrating the Lift Motor Assembly
13. Position the lift motor assembly on the floor, close to the EFX 544 frame.
Diagram 5.3 - Lift Motor Assembly
Page 17
C544 Elliptical Fitness Crosstrainer
14. Refer to Diagram 8.1. Re-connect the lift motor cables to the lower PCA and lift capacitor.
Connect the lift motor ground wire.
15. Plug the power cord into the power entry module, then plug the power cord into the wall
outlet. Turn on the circuit breaker.
16. Access the EFX 544 diagnostic program by pressing Ramp ▲, Resistance ▼ and
Resistance ▲ simultaneously or keys 4,5,1,7,6,5,7,6,1.
17. When the LED test is complete and the EFX 544 is in lift calibration mode, operate the
Ramp ▲ or Ramp ▼ keys until 12 is shown on the display.
18. Exit the diagnostic program.
19. With the Precor banner scrolling, turn off the EFX 544 with the circuit breaker. Unplug the
power cord from the wall outlet.
20. Without allowing the lead screw to turn, thread the lift tube clockwise until it reaches the top
of the lead screw. Again without allowing the lead screw to turn, thread the lift tube
counterclockwise three and a half turns.
21. Disconnect the lift motor cable from the lower PCA, and lift capacitor.
22. Remove the screw that secures the lift motor ground wire to the EFX 544 frame.
Replacing the Lift Motor Assembly
23. Remount the upper end of the lift motor with the nut and bolt removed in step 11.
24. Position the lift motor assembly against the lift guide. Align the bore in the lift tube with the
bore in the lift bracket.
25. Remove the lower lift shaft from the threaded stud. Clean off the old loctite. Put a small
amount of blue loctite on the threaded stud. Thread one end of the lower lift shaft onto the
stud, then insert the shaft with the stud through the lift guide clamp.
26. Thread the remaining lower lift shaft onto the stud. Hand tighten the lower lift shaft and then
use the two wrenches to tighten it an additional 1/4 turn.
27.
Slide both wear tubes onto the lower lift shaft and replace the snap rings on each end of the
lower lift shaft (see Diagram 5.4).
Page 18
C544 Elliptical Fitness Crosstrainerl
Diagram 5.4 - Exploded View of the Lift System
28. Insert the upper lift shaft through the EFX 544 frame and upper lift motor assembly. Replace
the plastic spacers (if you have a unit built after June 19, 1996) and the snap ring on the end
of the upper lift shaft.
29. Position the lower electronics bracket against the EFX 544 frame. Replace the two screws
that secure the top of the bracket to the frame.
30. Refer to Diagram 7-3. Re-connect the lift motor cables to the lower PCA and lift capacitor.
Connect the lift motor ground wire.
31. Replace the screw that secures the lift motor and EFX 544 ground wires to the frame.
32. Using a large cable tie, secure the ribbon cable, lift motor cable and lift motor capacitor
wires to the lift motor. Loop the lift motor cable over the lift motor until the lift motor cable lies
flat against the motor casing.
33. Rotate the ramps and then the stair arms to the front of the EFX 544. Position the stair arms
on the ramp.
34. Re-install both covers.
Page 19
C544 Elliptical Fitness Crosstrainer
Procedure 6.1 - Troubleshooting the Ribbon Cable
1.
With the lift set at level 1, turn off the EFX 544 with the circuit breaker.
WARNING
Before continuing with this procedure, review the Warning and Caution statements listed in
Section One.
2.
Remove the front cover.
3.
Attach the wrist strap to your arm, then connect the ground lead of the wrist strap to the EFX
544 frame.
4.
Disconnect the ribbon cable from the lower PCA.
5.
Remove the screws that secure the upper display module assembly to the upper frame
member.
CAUTION
When you perform the next step, tape the ribbon cable to the EFX 544 to prevent it from falling
into the upper frame member.
6.
Disconnect the ribbon cable from the upper PCA. Set aside the upper display module.
7.
Connect the spare ribbon cable between the upper PCA and the lower PCA.
8.
Check the operation of the EFX 544 as described in Section Four.
9.
If the EFX 544 operates correctly with the spare ribbon cable...
THEN...
Install a new ribbon cable on the
EFX 544 as described in Procedure 7.5.
OTHERWISE...
Continue with the next step.
10. Turn off the EFX 544 with the circuit breaker.
11. Disconnect the spare ribbon cable from the upper and lower PCA’s.
12. Connect the original ribbon cable to the upper and lower PCA’s.
Page 20
C544 Elliptical Fitness Crosstrainerl
Diagram 6.1 - Upper Column Assembly
13. Position the upper display module on the upper frame member (see Diagram 6.1). Install the
screws that secure the display module to the frame member.
14. Remove the ground lead of the wrist strap from the EFX 544 frame, then remove the wrist
strap from your arm.
15. Re-install the front cover as described in Procedure 7.1, then check the operation of the
EFX 544 as described in Section Four.
Page 21
C544 Elliptical Fitness Crosstrainer
Procedure 6.2 - Troubleshooting the Keypad and Upper PCA
If the function keys on the electronic console are unresponsive, the problem may be either the
upper PCA or keypad. This troubleshooting procedure gives you the information you need to
determine which of these components is malfunctioning.
Procedure
1.
Set the circuit breaker in the “off” position.
WARNING
Before continuing with this procedure, review the Warning and Caution statements listed in
Section One of the Residential Treadmill Service Manual.
2.
Remove the screws that secure the upper display assembly to the upper handrail. Carefully,
pull some excess interconnect cable out from the targa upright. Rotate the display housing,
so that the rear of the upper PCA is facing upward, and set the display housing on the upper
handrail.
3.
Attach the wrist strap to your arm, then connect the ground lead of the wrist strap to the
treadmill frame.Set the voltmeter to a range that will conveniently read +6 Vdc.
U13
Diagram 6.2 - Upper PCA Component Layout
U3
26
RN4
2
J2
J1
25
RN5
1
J4
J5
4.
Set the voltmeter to a range that will conveniently read +6 Vdc.
5.
Set the circuit breaker in the “on” position.
6.
Use a DVM, set for DC volts, and read between pin 6 of J3 and the each of the pins in Table
6.1 (no keys pressed) and Table 6.2 (with the appropriate key pressed)...
Page 22
C544 Elliptical Fitness Crosstrainerl
Table 6.1 - Voltage Test Points (Function Keys Not Pressed)
Place the positive lead of the
voltmeter on...
Pin 3 of J3
Pin 4 of J3
Pin 5 of J3
Pin 7 of J3
Pin 8 of J3
Pin 9 of J3
Pin 10 of J3
The voltmeter should read...
5 Vdc ± 500 mVdc
5 Vdc ± 500 mVdc
5 Vdc ± 500 mVdc
5 Vdc ± 500 mVdc
5 Vdc ± 500 mVdc
5 Vdc ± 500 mVdc
5 Vdc ± 500 mVdc
Table 6.2 - Voltage Test Points (Function Keys Pressed)
Place the positive
voltmeter lead on...
Pin 3 of J3
Pin 4 of J3
Pin 5 of J3
Pin 7 of J3
Pin 8 of J3
Pin 9 of J3
Pin 10 of J3
At the display
enclosure, press...
ENTER
RAMP DOWN
RAMP UP
STOP
RESISTANCE DOWN
RESISTANCE UP
QUICK START
The voltmeter should
read between...
0 Vdc and 500 mVdc
0 Vdc and 500 mVdc
0 Vdc and 500 mVdc
0 Vdc and 500 mVdc
0 Vdc and 500 mVdc
0 Vdc and 500 mVdc
0 Vdc and 500 mVdc
7.
If the voltage readings match those listed in Tables 6.1 and 6.2 and one or more keys do not
function, replace the upper PCA.
8.
If the voltage readings in Table 6.1 are incorrect, disconnect the keypad cable from the key
pad connector and repeat the voltage measuremnts in 6.1. If the voltage readings are now
correct, replace the display housing (keypad). If the voltage readings are still incorrect,
replace the upper PCA.
9.
If the voltage readings in Table 6.1 are correct and one or more voltage readings in Table
6.2 are incorrect, replace the display housing (keypad).
10. Set the circuit breaker in the “off” position.
11. If necessary, carefully re-connect the keypad cable to the keypad connector.
12. Remove the ground lead of the wrist strap from the treadmill frame, then remove the wrist
strap from your arm.
13. Position the display enclosure on the display plate. Install the screws that secure the display
enclosure to the display plate.
14. Check the operation of the treadmill as described in Section Three of this appendix.
Page 23
C544 Elliptical Fitness Crosstrainer
Procedure 6.3 - Troubleshooting the Speed Sensor
Circuit Description
The speed sensor is an infrared photoeye that straddles a target. The target is either a plastic
disc with alternate clear and opaque sections or a plastic “fan” type device. The target rotates as
the unit is operated and the infrared beam is interrupted when an opaque section or “fan blade”
passes between the sensor legs. The output from the speed sensor is a 5 Vdc square wave, the
frequency of which indicates the operating speed. When a square wave output is not being
generated by the speed sensor the system assumes the unit is not in use and removes
resistance from the eddy current magnet system after 6 seconds of idle time.
Procedure
1.
Remove front and rear covers. Plug the unit into a wall outlet and set the circuit breaker in
the “on” position. Set the unit in the manual program and operate the unit. If a stride rate is
not displayed, the speed sensor is not operative. We shall use the presence of a stride rate
to determine when the speed sensor is functioning normally.
2.
Using a DC voltmeter, measure the voltage between terminal 1 (red wire) and terminal 2
(black wire) on the speed sensor connector. The measurement should be approximately 5
Vdc. If the voltage is correct skip to step 4. If the voltage is missing or significantly low,
disconnect the speed sensor connector from the speed sensor and repeat the measurement
on the connector. If the voltage is now correct, replace the speed sensor. If the voltage is
still missing or significantly low, continue with step 3.
3.
Repeat the measurement in step 2 at terminals 1 and 2 of P4 on the lower PCA. If the
voltage is missing or significantly low, replace the lower PCA. If the voltage is now correct,
replace the speed sensor cable assembly.
4.
Using a DC voltmeter, measure the voltage between terminal 1 (red wire) and terminal 5
(white wire) on the speed sensor connector. Slowly rotate the flywheel as you monitor the
voltage. The measurement should switch between approximately 0.5 Vdc and
approximately 4.25 Vdc. If the voltage is correct, skip to step 5. If the voltage does not
switch (the voltage is constantly low or high as the flywheel is slowly rotated), replace the
speed sensor. If the voltage does not exceed 3.8 Vdc, adjust potentiometer R24 on the
lower PCA and repeat the measurement. If the voltage is now correct, but the stride rate is
still not displayed when the unit is operated, skip to step 5. If the voltage is still significantly
low, replace the lower PCA.
5.
Repeat the measurement in step 4 at terminals 1 and 5 of P4 on the lower PCA. If the
voltage is missing or significantly low, replace the speed sensor cable assembly.
6.
If you have performed all of the above tests and the stride rate is not displayed when the unit
is operated, there are three parts that could cause the problem. There are not any good
tests to check these parts other than substituting a known good part. They are lower PCA,
ribbon cable and upper PCA. Replace only one part at a time. If the new part does not
correct the problem replace the original part.
Page 24
C544 Elliptical Fitness Crosstrainerl
Procedure 6.4 - Troubleshooting the Lift System (electrical)
1.
If the lift motor will not move skip to step 7. If the lift motor moves and an error occurs
continue with step 2.
2.
Access the diagnostics program per Procedure 3.2 and proceed to the lift calibration portion
of the diagnostics program. If the lift calibration number is 0 or 255 skip to step 3. Operate
the lift, if the lift calibration number does not increment as the lift moves, skip to step 3. If the
calibration number increments as the lift moves, recalibrate the lift per Procedure 5.3. If
recalibration does not correct the problem, continue with step 3.
3.
Set the C544 circuit breaker in the “off” position. Using an ohmmeter, measure between
terminal 4 (brown wire) and terminal 6 (orange wire) of the P2 connector on the lower PCA.
The measurement should be approximately 10 KΩ. If the measurement is open (∞) or
significantly high or low, replace the lift motor.
4.
Using an ohmmeter, measure between terminals 4 and 5 of P2 and measure between 5 and
6 of P2 on the lower PCA. The two measurements should total approximately 10 KΩ. If the
measurement is open (∞) or significantly high or low, replace the lift motor.
5.
If you have performed all of the above tests and an error still occurs when the lift motor
operates, there are three parts that could cause the problem. There are not any good tests
to check these parts other than substituting a known good part. They are lower PCA, ribbon
cable and upper PCA. Replace only one part at a time. If the new part does not correct the
problem replace the original part.
6.
If you have performed all of the above tests and the lift system is still not functioning, call
Precor Technical Support.
7.
Set the C544 circuit breaker in the “off” position. Remove the F2 (2 amp slow blow) fuse
from the lower PCA. Measure the fuse with an ohmmeter. The measurement should be 1Ω
or less. If the fuse is good, re-insert the fuse and skip to step 9. If the fuse is open (∞)or
significantly high, replace the fuse. Before operating the lift motor it is necessary to perform
a continuity test on the lift motor.
8.
Remove the P2 connector from the lower board. Using an ohmmeter, measure between
terminals 1 and 3 of P2, between terminals 1 and 2 of P2 and between terminals 2 and 3 of
P2. The measurements should be approximately 14.5Ω, 14.5Ω and 29Ω, respectively. If any
of the measurements are significantly low, replace the lift motor.
9.
Re-insert the P2 connector in the lower PCA. Set the C544 circuit breaker in the “on”
position. Using an AC voltmeter, monitor the voltage between terminals 1 and 2 (red and
white wires) of the P2 connector. Enter the manual program and press the RAMP ▲ key.
The measurement should be approximately 120 Vac (line voltage). If the voltage is present
and the lift motor moves normally, skip to step 10. The voltage will only be present until such
time as an error occurs. If line voltage is not present skip to step 11. If line voltage is
measured but the motor does not move, replace the lift motor.
Page 25
C544 Elliptical Fitness Crosstrainer
10. Monitor terminals 1 and 3 (white and black wires) of P2. Enter the manual program and
press the RAMP ▼ key. The measurement should be approximately 120 Vac (line voltage).
If the voltage is present and the lift motor moves normally skip to step 12. The voltage will
only be present until such time as an error occurs. If line voltage is measured but the motor
does not move, replace the lift motor.
11.
If line voltage is not present in both steps 9 and 10, there are three parts that could cause
the problem. There are not any good tests to check these parts other than substituting a
known good part. They are lower PCA, ribbon cable and upper PCA. Replace only one part
at a time. If the new part does not correct the problem replace the original part.
12.
If you have performed all of the above tests and the lift system is still not functioning, call
Precor Technical Support.
Page 26
C544 Elliptical Fitness Crosstrainerl
Procedure 6.5 - Troubleshooting the Lift System (mechanical)
Potential Symptoms
This procedure will cover two separate areas, a mechanically “frozen” lift system and a noisy lift
symptom. A mechanically “frozen” lift system is a lift system in which the lift motor is powered but
the lift does not move. Noise issues, will be segregated into two areas. Noises occurring as the
lift motor operates and noises from the front of the unit that occur as the stairarms are operated
1.
If the lift system is mechanically “frozen” continue with step 2. If lift system is noisy skip to
step 10.
2.
Set the circuit breaker in the “off” position and remove the front cover. Remove the lower lift
shaft. Set the circuit breaker in the “on’ position. If the lift motor operates normally with the
lower lift shaft removed continue with step 3. If the lift motor does not operate normally with
the lower lift removed, go to Procedure 6.4.
3.
Set the circuit breaker in the “off” position and unplug the unit from the wall outlet. Grasp the
lift bracket (aluminum bracket) and slide it up or down on the lift guide (plastic bar). If the lift
guide is very difficult to move, skip to step 4. Using a clean dry cloth, wipe the surface of the
lift guide clean. Slide the lift bracket out of your way so that you can wipe the entire surface
of the bracket. Apply a fresh coat of teflon anti-seize (paste) lubricant. Skip to step 8.
4.
Remove the bolts securing the lift guide to the frame. You may need to force the lift bracket
out of way to access some of the lift guide bolts. If, after the lift guide and lift bracket have
been removed, the lift bracket does not move freely on the lift guide, replace it with part
number 50548-101. This is a matched set and will provide optimum performance.
5.
If the steel bar that is between the lift guide and the frame is welded onto the frame skip to
step 7. If the steel bar that is between the lift guide and the frame is not welded onto the
frame, continue with step 6.
6.
Apply a fresh coat of teflon anti-seize lubricant to the lift guide. Apply a small amount of blue
loctite to the five lift guide mounting bolts. Set the lift bracket/lift guide on the steel bar and
remount all three onto the frame. Torque the mounting bolts to 100 in/lbs. Allow the loctite to
fully set (per label instructions) before the unit is used. If the lift tube has not been rotated
and the lift motor drive screw is well lubricated, remount the lift motor per Procedure 5.3
steps 23 to 33. Otherwise, this procedure is complete.
Page 27
C544 Elliptical Fitness Crosstrainer
7.
Apply a fresh coat of teflon anti-seize lubricant to the lift guide. Apply blue loctite to the lift
guide mounting bolts and mount the lift bracket/lift guide onto the frame. If the lift guide
mounting bolts were hypothetically numbered from 1 to 5, with bolt 1 on top and bolt 5 on
the bottom, tighten the bolts in the following order; 3,2,4,1,5. As the lift guide mounting bolts
are tightened the lift bracket may start to bind on the lift guide. Tighten the bolts as tight as
possible without causing the lift bracket to bind on the lift guide. It will be necessary to check
lift bracket movement after each bolt is tightened. If the lift bracket starts to bind, back out
the bolt just enough to allow the lift guide to move freely. Allow the loctite to fully set (per
label instructions) before the unit is used. If the lift tube has not been rotated and the lift
motor drive screw is well lubricated, remount the lift motor per Procedure 5.3 steps 23 to 33.
Otherwise, this procedure is complete.
8.
If the lift motor drive screw requires lubrication, thread the lift tube (T shaped tube) off of the
lift motor drive screw. Wipe the lift motor drive screw clean with a dry cloth. Apply a fresh
coat of bearing grease to the lift motor drive screw. Recalibrate the lift per Procedure 5.3.
9.
If the C544 is noisy when the stairarms are operated, skip to step 12. If the C544 is noisy
when the lift motor is operated continue with step 10.
10. If the noise is coming from the lift motor, lubricate the drive screw as in step 8. If the motor is
noisy after the drive screw has been lubricated, replace the lift motor per Procedure 5.3
steps 23 to 33.
11. If the noise is coming from the lift guide/lift bracket area the correct procedure will depend
on the type of lift guide, lift bracket and lower lift shaft that is on the unit.
12. If the unit contains a 3 piece lift bracket, replace the lift guide and lift bracket with part
number 50548-101. If the unit contains a one piece lower lift shaft, replace it with part
number 50533-104. Skip to step 5.
13. If the unit contains a aluminum lift bracket and the fit between the lift bracket and lift guide is
too loose, replace the lift guide and lift bracket with part number 50548-101. Skip to step 5.
Page 28
C544 Elliptical Fitness Crosstrainerl
Procedure 6.6 - Troubleshooting the Eddy Current System
(electrical)
Note:
If the control circuit does not see an output from the speed sensor for 6 second, it removes power
from the eddy current system. Therefore, when it is necessary to check the resistance or take
voltage measurements in the eddy current system it will be necessary to slowly turn the flywheels
to ensure that the power time out has not occurred.
1.
There are three typical symptoms concerning the eddy current system. No resistance
(pedaling resistance), no resistance after six seconds and incorrect resistance. If the
problem is no resistance, continue with step 2. If the problem is no resistance after six
seconds test the speed sensor per Procedure 6.3. If the problem is incorrect resistance skip
to step 7.
2.
Set the circuit breaker in the “on” position, enter the manual program and set the resistance
at level 5. Using a DC voltmeter, check the voltage across one of the magnets. The voltage
should measure approximately 24.5 Vdc (approximately 31 Vdc on software versions V2.03
or less). If the voltage is missing or significantly low, skip to step 4. If the voltage is correct,
continue with step 3.
3.
Set the circuit breaker in the “off“ position. Check the magnet wiring per Diagram 5.2. If any
of the magnet wiring is reversed or incorrect the resistance will be affected. If you have
performed all of the above tests and there is still no resistance, call Precor Technical
Support.
4.
Using an ohmmeter, measure between the M- and M+ terminals of the lower PCA. The
measurement should be approximately 45Ω. If the measurement is open (∞), check the
connections at both magnets, the filter capacitor, the inductor and the lower PCA.
5.
If all of the wiring connections are good and there is still no resistance, there are three parts
that could cause the problem. There are not any good tests to check these parts other than
substituting a known good part. They are lower PCA, ribbon cable and upper PCA. Replace
only one part at a time. If the new part does not correct the problem replace the original part.
6.
If you have performed all of the above tests and there is still no resistance, call Precor
Technical Support.
7.
If the resistance is greater than normal, the cause could be mechanical rather than
electrical. Set the circuit breaker in the “off“ position. Rotate the flywheels, they should turn
freely and easily. If the stairarms are removed from the flywheels and the flywheels are
rotated rapidly and then released, the flywheels should continue to spin for several seconds.
If the flywheels do no turn freely, continue with Procedure 6.7.
8.
If the C544 was manufactured prior to March 20, 1997, a magnet and eddy current disc with
an adjustable gap was used. If appropriate, check the magnet gap per Procedure 5.1.
Page 29
C544 Elliptical Fitness Crosstrainer
9.
Set the circuit breaker in the “on“ position, enter the manual program and set the resistance
at level 5. Using a DC voltmeter, check the voltage across one of the magnets. The voltage
should measure approximately 24.5 Vdc (approximately 31 Vdc on software versions V2.03
or less).
10. If the voltage is significantly high check the 120/240 volt setting in Procedure 3.4. If the 120/
240 volt setting is incorrect the voltages measured in step 9 will be incorrect.
11. If the voltage is still significantly high or low, there are three parts that could cause the
problem. There are not any good tests to check these parts other than substituting a known
good part. They are lower PCA, ribbon cable and upper PCA. Replace only one part at a
time. If the new part does not correct the problem replace the original part.
12. If you have performed all of the above tests and the resistances still incorrect, call Precor
Technical Support.
Page 30
C544 Elliptical Fitness Crosstrainerl
Procedure 6.7 - Troubleshooting the Eddy Current System
(mechanical)
Note:
Over a period of time and usage, the lubrication of the main flywheel oilite bushings and the
stairarm oliite bushings will loose effectiveness. This will cause the flywheels and/or stairarms to
turn harder, thus increasing the force required to operate the unit.
1.
Set the circuit breaker in the “off” position, unplug the line cord from the wall outlet and
remove the rear cover.
2.
Remove both stairarms per Procedure 7.21, steps 1 to 6. Remove the left hand flywheel per
Procedure 7.14 steps 1 to 8. Rotate the right hand flywheel and “walk” the drive belt off of
the pulley. Slide the right hand flywheel and pulley/axle assembly out of the frame as a unit.
3.
Using a clean dry cloth, wipe all residue off of the stairarm pins, mounted in the flywheel rim,
and the pulley axle. Using a clean dry cloth, wipe the inner surfaces of the oilite bushings in
both stairarms and the oilite bushings in the rear frame column. Use a Scotch Brite pad or
similar abrasive to lightly buff the inner surface of the stairarm and rear frame column oilite
bushings to remove any potential “glazing”.
4.
Coat the inner surface of the stairarm and rear frame column oilite bushings with Anderol
465 synthetic oil. If Anderol 465 is not available, mineral oil may be used. However, longer
lasting results will be achieved by using Anderol 465.
5.
Replace the flywheels per Procedure 7.14 steps 10 to 15. Replace the stairarms per
Procedure 7.21, steps 7 to 13.
6.
Replace the rear cover.
Page 31
C544 Elliptical Fitness Crosstrainer
Procedure 7.1 - Replacing the Covers
Replacing the Front Cover
1.
Turn on the EFX 544 with the circuit breaker, then press QUICKSTART on the display
panel.
2.
Press Ramp ▼ until the lift is set at level 1.
3.
Turn off the EFX 544 with the circuit breaker, then unplug the power cord from the wall
outlet.
4.
Remove the fasteners that secure the front cover to the EFX 544 frame.
5.
Lift the cover until it clears the lower electronics bracket, then set it aside.
6.
When maintenance operations are complete, slide the cover over the lower electronics
bracket. Position the cover at its mounting position, take care not to snag any wiring as you
slide the cover into place.
7.
Thread the fasteners through the front cover and EFX 544 frame, but do not tighten. Pull the
cover towards the front of the unit. Secure the fasteners.
Replacing the Rear Cover
1.
Turn off the EFX 544 with the circuit breaker, then unplug the power cord from the wall
outlet.
2.
Remove the fasteners that secure the rear cover to the EFX 544 frame.
3.
Raise the cover until it is clear of the flywheels, then set it aside.
4.
When maintenance operations are complete, place the cover over the flywheels. Position
the cover at its mounting position.
5.
Replace the fasteners that secure the rear cover to the EFX 544 frame.
Page 32
C544 Elliptical Fitness Crosstrainerl
Procedure 7.2 - Replacing the Display Enclosure or Upper PCA
Note:
Anti-static kits (part number 20024-101) can be ordered from Precor.
Removing the Display Enclosure
1.
Turn off the EFX 544 with the circuit breaker.
WARNING
Before continuing with this procedure, review the Warning and Caution statements listed in
Section One, Things You Should Know.
2.
Remove the screws that secure the upper display module assembly to the upper frame
member.
CAUTION
When you perform the next step, tape the ribbon cable to the EFX 544 to prevent it from falling
into the upper frame member.
3.
Attach the wrist strap to your arm, then connect the ground lead of the wrist strap to the EFX
544 frame.
4.
Disconnect the ribbon cable from the upper PCA.
5.
Remove the screws that secure the display enclosure to the display plate.
6.
If you are going to re-install the display enclosure without replacing the upper
PCA . . .
THEN . . .
Skip to Step 19.
OTHERWISE . . .
Continue with the next step.
Removing and Replacing the Upper PCA
7.
Carefully disconnect the keypad ribbon cable from the upper PCA.
8.
Remove the screws that secure the upper PCA to the display enclosure. Set aside the
defective upper PCA for eventual shipment to Precor Customer Service.
9.
Position the upper PCA at its mounting location on the display enclosure (see Diagram 7-1).
Install the screws that secure the upper PCA to the display enclosure.
Page 33
C544 Elliptical Fitness Crosstrainer
10. Line up the blank place on the end of the keypad ribbon cable with the blank pin position on
the keypad connector. Place a full twist in the end of the keypad ribbon cable, then carefully
connect it to the upper PCA.
11. Remove the ground lead of the wrist strap from the EFX 544 frame, then remove the wrist
strap from your arm.
12. Connect the ribbon cable to the upper PCA.
13. Position the upper display module on the upper frame member. Install the screws that
secure the display module to the upper frame member.
14. Position the display plate on the display enclosure. Install the screws that secure the display
enclosure to the display plate.
15. Check the operation of the EFX 544 as described in Section Four.
Diagram 7.1 - Upper Frame Assembly
Page 34
C544 Elliptical Fitness Crosstrainerl
Procedure 7.3 - Replacing the PROM
Anti-static kits (part number 20024-101) can be ordered from Precor.
1.
The PROM and the associated printed circuit assembly (PCA) are static sensitive. Antistatic devices must be used and all anti-static precautions must be followed during this
procedure.
2.
Remove the printed circuit assembly per its associated procedure.
3.
Currently we are using two styles of IC software packages. they are a 28 pin dual in line
package (DIP28) and a forty-four pin square package (PLCC44). Each of these packages
should be removed with a proper IC removal tool (see the illustrations below)
PLCC44 removal tool
DIP28 removal tool
4.
The IC’s may inserted into their socket by hand by carefully aligning the notch on the IC with
the notch on the IC socket and carefully pressing the IC into its socket. See the illustrations
below for the alignment notches. Care must be taken that the IC legs on a DIP28 are all
aligned in the socket to prevent the legs from bending when inserted. The PLCC44 IC must
be carefully aligned squarely in its socket or it will not insert. Do not force the IC into its,
socket. If it does not insert easily, remove the it and re-align it in its socket.
DIP28
Notch
Notch
Notch
PLCC44
Notch
Page 35
C544 Elliptical Fitness Crosstrainer
Procedure 7.4 - Replacing the Lower PCA
Removing the Lower PCA
1.
With the lift set at 1, turn off the EFX 544 with the circuit breaker.
WARNING
Before continuing with this procedure, review the Warning and Caution statements listed in
Section One, Things You Should Know.
2.
Remove the front cover as described in Procedure 7.1.
3.
Attach the wrist strap to your arm, then connect the ground lead of the wrist strap to the EFX
544 frame.
Note:
Refer to the wiring diagram shown in Diagram 7.3. Always mark all wires before disconnecting, to
insure quick accurate replacement!
4.
Disconnect the cables from the lower PCA.
CAUTION
While performing the next step, hold the lower PCA to prevent it from making contact with the
capacitor clamps.
5.
Remove the nuts that secure the lower PCA to the lower electronics bracket.
6.
Set aside the lower PCA for eventual shipment to Precor.
Replacing the Lower PCA
7.
Remove the P1 connector from the lower PCA that has been removed from the EFX 544
and install it on the replacement lower PCA.
8.
Insert the lower PCA screws into the T-shaped channel on the PCA heat sink.
9.
Hold the lower PCA against the lower electronics bracket. Install the nuts that secure the
lower PCA to the bracket.
10. Connect the cables you disconnected in Step 6.
11. Remove the ground lead of the wrist strap from the EFX 544 frame, then remove the wrist
strap from your arm.
12. Re-install the front cover as described in Procedure 7.1, then check the operation of the
EFX 544 as described in Section Four.
Page 36
C544 Elliptical Fitness Crosstrainerl
Procedure 7.5 - Replacing the Ribbon Cable
Removing the Ribbon Cable
1.
With the lift set at level 1, turn off the EFX 544 with the circuit breaker.
WARNING
Before continuing with this procedure, review the Warning and Caution statements listed in
Section One, Things You Should Know.
2.
Remove the front cover as described in Procedure 7.1.
3.
Cut the cable tie that secures the ribbon cable to the lift motor.
4.
Attach the wrist strap to your arm, then connect the ground lead of the wrist strap to the EFX
544 frame.
5.
Disconnect the ribbon cable from the lower PCA.
6.
Remove the screws that secure the upper display module assembly to the upper frame
member.
CAUTION
When you perform the next step, tape the ribbon cable to the EFX 544 to prevent it from falling
into the upper frame member.
7.
Disconnect the ribbon cable from the upper PCA. Set aside the upper display module until
you are ready to install the new ribbon cable.
Replacing the Ribbon Cable
8.
Tape the end of the new ribbon cable to the end of the old ribbon cable. Pull the old ribbon
cable through the slot in the lower end of the upper frame member until the ribbon cable is in
position. Tape the end of the new ribbon cable to the upper frame member.
9.
Connect the ribbon cable to the upper PCA.
10. Position the upper display module on the upper frame member. Install the screws that
secure the display module to the frame member.
11. Connect the new ribbon cable to the lower PCA.
12. Remove the ground lead of the wrist strap from the EFX 544 frame, then remove the wrist
strap from your arm.
13. With a large cable tie, secure the ribbon cable to the lift motor.
Page 37
C544 Elliptical Fitness Crosstrainer
14. Re-install the front cover as described in Procedure 7.1, then check the operation of the
EFX 544 as described in Section Four.
Page 38
C544 Elliptical Fitness Crosstrainerl
Procedure 7.6 - Replacing the Power Entry Module
Removing the Power Entry Module
1.
With the lift set at level 1, turn off the EFX 544 with the circuit breaker, then unplug the
power cord from the wall outlet.
WARNING
Before continuing with this procedure, review the Warning and Caution statements listed in
Section One, Things You Should Know.
2.
Remove the front cover as described in Procedure 7.1.
3.
Remove the wires from the back of the power entry module.
4.
Note the orientation of the power entry module. The new module must be positioned with
the same orientation. Remove the screws that secure the power entry module to the EFX
544 frame.
Replacing the Power Entry Module
5.
Position the new power entry module at its entry position. Make sure that the module is
oriented correctly. Install the screws that secure the power entry module to the EFX 544
frame.
6.
Replace the loose wire connected to the circuit breaker to the lower terminal of the power
entry module. Replace the loose wire connected to the lower PCA to the upper terminal of
the power entry module. Replace the loose ground wire on the ground stud to the middle
terminal.
7.
Re-install the front cover as described in Procedure 7.1, then check the operation of the
EFX 544 as described in Section Four.
Page 39
C544 Elliptical Fitness Crosstrainer
Procedure 7.7 - Replacing the Circuit Breaker
Removing the Circuit Breaker
1.
With the lift set at level 1, turn off the EFX 544 with the circuit breaker, then unplug the
power cord from the wall outlet.
WARNING
Before continuing with this procedure, review the Warning and Caution statements listed in
Section One, Things You Should Know.
2.
Remove the front cover as described in Procedure 7.1.
3.
Remove the wires from the circuit breaker.
4.
Remove the screws that secure the circuit breaker to the EFX 544.
Replacing the Circuit Breaker
5.
Make sure that the new circuit breaker is set to OFF. Position the breaker so that the label is
facing up, then install the screws that mount the circuit breaker to the EFX 544.
6.
Reconnect the loose wire connected to the power entry module to the line terminal of the
circuit breaker. Reconnect the loose wire connected to the lower PCA to the load terminal.
7.
Re-install the front cover as described in Procedure 7.1, then check the operation of the
EFX 544 as described in Section Four.
Page 40
C544 Elliptical Fitness Crosstrainerl
Procedure 7.8 - Replacing the Inductor
Removing the Inductor
1.
With the lift set at level 1, turn off the EFX 544 with the circuit breaker, then unplug the
power cord from the wall outlet.
WARNING
Before continuing with this procedure, review the Warning and Caution statements listed in
Section One, Things You Should Know.
2.
Remove the front cover as described in Procedure 7.1.
3.
Remove the inductor leads from the inductor.
4.
Remove the screws that secure the inductor to the lower electronics bracket.
Replacing the Inductor
5.
Hold the new inductor below its mounting position. Connect the inductor leads to the
inductor.
6.
Position the new inductor at its mounting position. Install the screws that secure the inductor
to the lower electronics bracket.
7.
Re-install the front cover as described in Procedure 7.1, then check the operation of the
EFX 544 as described in Section Four.
Page 41
C544 Elliptical Fitness Crosstrainer
Procedure 7.9 - Replacing the Filter Capacitor
Removing the Capacitor
1.
With the lift set at level 1, turn off the EFX 544 with the circuit breaker, then unplug the
power cord from the wall outlet.
WARNING
Before continuing with this procedure, review the Warning and Caution statements listed in
Section One, Things You Should Know.
2.
Remove the front cover as described in Procedure 7.1.
3.
Slide the plastic cap back from the capacitor terminals. Remove the screws that secure the
wires to the terminals of the capacitor. Remove the wires from the terminals.
4.
Loosen the screw and locknut on the capacitor clamp. Remove the capacitor from the
clamp.
5.
If you are removing and replacing the capacitor clamp . . .
THEN . . .
Continue with the next step.
OTHERWISE . . .
Skip to Step 8.
Removing the Capacitor Clamp
6.
Remove the screws that secure the capacitor clamp to the lower electronics bracket.
7.
Position the new capacitor clamp so that it is flush with the lower electronics bracket.
Replace the the screws that secure the clamp to the bracket.
Replacing the Capacitor
Take care not to nick the capacitor case. If the bare metal of the capacitor comes in contact with
the capacitor clamp, equipment failure could result.
8.
Position the new capacitor in its mounting position. Tighten the screw and locknut on the
capacitor clamp.
9.
Make sure the wires taken off the capacitor are routed through the capacitor cap. Connect
the loose black wires to the negative terminal of the capacitor. (see Diagram 7.5). Connect
the loose red wires to the positive terminal of the capacitor. Replace the screws that secure
the wires to the capacitor terminals. Slide the plastic cap over the capacitor terminals.
Page 42
C544 Elliptical Fitness Crosstrainerl
10. Re-install the front cover as described in Procedure 7.1, then check the operation of the
EFX 544 as described in Section Four.
Diagram 7.3 - Capacitor Wiring
Page 43
C544 Elliptical Fitness Crosstrainer
Procedure 7.10 - Replacing the Lift Motor Assembly
Removing the Lift Motor Assembly
1.
With the lift set at 1, turn off the EFX 544 with the circuit breaker, then unplug the power
cord from the wall outlet.
WARNING
Before continuing with this procedure, review the Warning and Caution statements listed in
Section One, Things You Should Know.
2.
Remove the front and rear covers as described in Procedure 7.1.
3.
Lift the stair arms from the ramp assembly and rotate them towards the back of the EFX
544.
4.
Rotate the ramps to the back of the unit. Rest the ramps on the flywheels.
5.
Remove the outboard snap rings from each end of the lower lift shaft. Remove the lower
axle wear tubes. Hold one end of the lower lift shaft with a wrench. Loosen the other end
with a second wrench. Using the wrenches, unthread both ends of the lower lift shaft from
the threaded stud. Set aside the lower lift shaft and the stud.
Note:
Units built before September 3, 1996, will have a one-piece lower lift shaft.
6.
Cut the cable ties that secure the ribbon cable to the lift motor and EFX 544 wiring cables.
7.
Disconnect the lift motor cable assembly from the lower PCA.
8.
Remove the wires from the lift motor capacitor.
9.
Remove the screw that secures the lift motor ground wire to the EFX 544 frame.
10. Remove the two screws that secure the top of the lower electronics bracket to the EFX 544
frame.
11. While an assistant supports the lift motor, remove the snap ring from one end of the upper
lift shaft. Remove the upper lift shaft and the two plastic spacers (read the Note below) from
the EFX 544 frame.
Note:
Units built after July 9, 1996, have two plastic spacers inserted into the upper lift shaft.
12. Lift the lift motor assembly up and away from the EFX 544 (see Diagram 7.6).
13. Calibrate the lift motor per Procedure 5.3, steps 13 to 22.
Page 44
C544 Elliptical Fitness Crosstrainerl
Replacing the Lift Motor Assembly
14. Inspect the upper and lower lift shafts. If they are worn, install new shafts on the EFX 544.
15. Position the lift motor assembly against the lift guide. Align the bore in the lift tube with the
bore in the lift bracket.
16. Remove the lower lift shaft from the threaded stud. Clean off the old loc-tite. Put a small
amount of blue loc-tite on the threaded stud. Thread one end of the lower lift shaft onto the
stud, then insert the shaft with the stud through the lift guide clamp.
17. Thread the remaining lower lift shaft onto the stud. Hand tighten and then use wrenches to
tighten the lift shaft an additional 1/4 turn.
CAUTION
If you do warp the lift guide clamp, the fit between the lift guide clamp and the lift guide will be
loose. This situation results in noise when the unit is used.
18.
Replace the snap rings on each end of the lower lift shaft (see Diagram 7-4).
Diagram 7.4 - EFX 544 Lift System
Page 45
C544 Elliptical Fitness Crosstrainer
19. Insert the upper lift shaft through the EFX 544 frame and upper lift motor assembly. Replace
the plastic spacers (if you have a unit built after June 19, 1996) and the snap ring on the end
of the upper lift shaft.
20. Position the lower electronics bracket against the EFX 544 frame. Replace the two screws
that secure the top of the bracket to the frame.
21. Refer back to Diagram 7.3. Re-connect the lift motor cables to the lower PCA and lift
capacitor. Connect the lift motor ground wire.
22. Replace the screw that secures the lift motor and EFX 544 ground wires to the frame.
23. Using a large cable tie, secure the ribbon cable, lift motor cable and lift motor capacitor
wires to the lift motor. Loop the lift motor cable over the lift motor until the lift motor cable lies
flat against the motor casing.
24. Rotate the ramps and then the stair arms to the front of the EFX 544. Position the stair arms
on the ramp.
25. Re-install both covers as described in Procedure 7.1, then check the operation of the EFX
544 as described in Section Four.
Page 46
C544 Elliptical Fitness Crosstrainerl
Procedure 7.11 - Replacing the Lift Guide
IMPORTANT
Units built before January 23, 1996, have a T-shaped lift guide. If you must replace an older style
lift guide, order a lift guide replacement kit from Precor (kit part number:50530-103).
Removing the Lift Guide
1.
With the lift set at level 1, turn off the EFX 544 with the circuit breaker, then unplug the
power cord from the wall outlet.
WARNING
Before continuing with this procedure, review the Warning and Caution statements listed in
Section One, Things You Should Know.
2.
Remove the front and rear covers.
3.
Lift the stair arms from the ramp assembly and rotate them towards the back of the EFX
544.
4.
Rotate the ramps to the back of the unit. Rest the ramps on the flywheels.
5.
Remove the lift motor assembly as described in Procedure 7.10, steps 5 to 12. After
removing the lift motor, do not rotate the lift tube. If the tube is rotated, you must recalibrate
the lift motor per Procedure 5.3, steps 13 to 22.
6.
Remove the screws that secure the lift guide to the EFX 544 frame.
7.
Replace the lift guide per Procedure 6.5 steps 5, 6 and 7.
8.
Replace the lift motor per Procedure 7.10, steps 15 to 23.
9.
Rotate the ramps and stairarms forward.
10. Replace both covers.
Page 47
C544 Elliptical Fitness Crosstrainer
Procedure 7.12 - Replacing the Lift Motor Capacitor
1.
With the lift set at level 1, turn off the EFX 544 with the circuit breaker, then unplug the
power cord from the wall outlet.
WARNING
Before continuing with this procedure, review the Warning and Caution statements listed in
Section One, Things You Should Know.
2.
Remove the front cover as described in Procedure 7.1.
Note:
Refer to the wiring diagram shown in Diagram 7.3. Mark all wires before disconnecting, to insure
quick, accurate replacement!
3.
Remove the wires from the terminals of the capacitor.
4.
Loosen the screw and locknut on the capacitor clamp. Remove the capacitor from the
clamp.
5.
If you are removing and replacing the capacitor clamp . . .
THEN . . .
Continue with the next step.
OTHERWISE . . .
Skip to Step 8.
Removing the Capacitor Clamp
6.
Remove the screws that secure the capacitor clamp to the lower electronics bracket.
7.
Position the capacitor clamp at its mounting location. Replace the screws that secure the
clamp to the lower electronics bracket.
Replacing the Capacitor
CAUTION
Take care not to nick the capacitor case. If the bare metal of the capacitor comes in contact with
the capacitor clamp, equipment failure could result.
8.
Position the new capacitor in its mounting position. Tighten the screw and locknut on the
capacitor clamp.
9.
Connect a loose lift motor wire to each terminal of the lift motor capacitor.
10. Re-install the front cover as described in Procedure 7.1, then check the operation of the
EFX 544 as described in Section Four.
Page 48
C544 Elliptical Fitness Crosstrainerl
Procedure 7.13 - Replacing the Lift Axle Wear Tube
Removing the Lift Axle Wear Tube
1.
Turn off the EFX 544 with the circuit breaker, then unplug the power cord from the wall
outlet.
WARNING
Before continuing with this procedure, review the Warning and Caution statements listed in
Section One, Things You Should Know.
2.
Remove the outboard snap ring from one end of the lower lift shaft. Remove the lower axle
wear tube (see Diagram 7.5).
Diagram 7.5 - EFX 544 Lift System
Page 49
C544 Elliptical Fitness Crosstrainer
3.
If you removed the lift axle wear tube because you are installing a new lower lift shaft (as
described in Procedure 7.10), visually inspect the lift axle wear tube. If the wear tube is worn
or defective . . .
THEN . . .
Replace a new lift axle wear tube on
the EFX 544 when you perform the
next step.
OTHERWISE . . .
Replace the original lift axle wear tube
on the EFX 544 when you perform the
next step.
Replacing the Lift Axle Wear Tube
4.
Place the lift axle wear tube on the end of the lower lift shaft. Replace the snap ring on the
lower lift shaft.
Page 50
C544 Elliptical Fitness Crosstrainerl
Procedure 7.14 - Replacing a Flywheel
Removing a Flywheel
1.
Turn off the EFX 544 with the circuit breaker, then unplug the power cord from the wall
outlet.
WARNING
Before continuing with this procedure, review the Warning and Caution statements listed in
Section One, Things You Should Know.
2.
Remove the rear cover as described in Procedure 7.1.
3.
Remove the stair arm assembly from the flywheel that is to be removed as described in
Procedure 7.21.
4.
Place a 2 x 4 piece of lumber or a long-handled tool through the flywheel spoke and against
the back of the rear frame upright.
Note:
When you perform the next step, use a long-handled wrench.
WARNING
Be careful not to catch your fingers in the flywheel when you perform the following steps.
5.
Remove the bolt and washer that secure the flywheel to the flywheel pulley shaft.
6.
Using a rubber mallet (or a block of wood and a hammer), tap the rim of the flywheel away
from the flywheel pulley. Rotate the flywheel 90 degrees, and tap the rim of the flywheel
again.
WARNING
The flywheel is very heavy. Be prepared for the weight of the flywheel when it comes off of the
pulley shaft.
7.
Keep tapping and rotating until the flywheel comes off of the pulley shaft (see Diagram 7.6).
8.
Set aside the flywheel and the square key.
9.
Check the flywheel belt for wear or damage. If the belt must be replaced, install a new belt
on the EFX 544 as described in Procedure 7.15.
Page 51
C544 Elliptical Fitness Crosstrainer
Diagram 7.6 - EFX 544 Flywheel
Replacing a Flywheel
10. Remove the tapered bushing from the flywheel hub. Inspect the bushing for wear or
damage. If the bushing must be replaced, put a new bushing in the flywheel hub.
Note:
The thin edge of the tapered bushing must go toward the inside of the hub. If the bushing is not
placed correctly in the flywheel hub, the flywheel will not fit onto the flywheel pulley shaft.
11. Position the square key on the pulley shaft. Line up the slot on the flywheel with the square
key. Push the flywheel onto the pulley shaft. Position two carpenter clamps, 180 degrees
apart, on the flywheels. Tighten the clamps evenly, drawing the flywheel fully onto the shaft.
Note
The outer edge of the bushing must be flush with the outer edge of the flywheel hub.
12. Place the edge of a deep-well socket against the edge of the bushing. Using a rubber
mallet, tap the bushing until it is is flush with the flywheel hub.
13. Clean the old loc-tite off of the bolt removed in Step 5. Place a few drops of blue loc-tite onto
the bolt shaft.
Page 52
C544 Elliptical Fitness Crosstrainerl
14. Place a 2 x 4 piece of lumber or a long-handled tool through the flywheel spoke and against
the front of the rear frame upright.
15. Install the bolt and washer that secure the flywheel onto the EFX 544. Torque the bolt to 100
foot-pounds. Remove the carpenter clamps.
CAUTION
If loc tite is not used and the bolts are not correctly torqued, the bolts may work loose during
normal operation.
16. Replace the stair arm assembly as described in Procedure 7.21.
17. Re-install the rear cover as described in Procedure 7.1, then check the operation of the EFX
544 as described in Section Four.
Page 53
C544 Elliptical Fitness Crosstrainer
Procedure 7.15 - Replacing the Flywheel Belt
Removing the Flywheel Belt
1.
Turn off the EFX 544 with the circuit breaker, then unplug the power cord from the wall
outlet.
WARNING
Before continuing with this procedure, review the Warning and Caution statements listed in
Section One, Things You Should Know.
2.
Remove the rear cover as described in Procedure 7.1.
3.
Remove the right stair arm assembly as described in Procedure 7.21.
4.
Remove the right flywheel as described in Procedure 7.14.
5.
Walk the belt off of the flywheel pulley.
Note:
The eddy current disk will fall to the frame when the belt is removed from the disk pulley.
Replacing the Flywheel Belt
6.
Position one end of the belt on the disk pulley. Place the other end of the belt inboard of the
flywheel pulley. Hold the belt against the disk pulley as you walk the belt onto the larger
flywheel pulley.
7.
Center the flywheel belt on the disk and flywheel pulley grooves.
8.
Replace the right flywheel as described in Procedure 7.14.
9.
Replace the right stair arm assembly as described in Procedure 7.21.
10. Re-install the rear cover as described in Procedure 7.1, then check the operation of the EFX
544 as described in Section Four.
Page 54
C544 Elliptical Fitness Crosstrainerl
Procedure 7.16 - Replacing the Tension Spring
Removing the Tension Spring
1.
Turn off the EFX 544 with the circuit breaker, then unplug the power cord from the wall
outlet.
WARNING
Before continuing with this procedure, review the Warning and Caution statements listed in
Section One, Things You Should Know.
2.
Remove the rear cover as described in Procedure 7.1.
3.
Walk the flywheel belt off of the eddy current disk.
4.
Remove the spring from the magnet pivot assembly and the EFX 544 frame.
Replacing the Tension Spring
Caution
Be careful not to pinch the speed sensor or magnet wiring when performing the next steps.
5.
Place the new spring onto the EFX 544 frame and the magnet pivot assembly.
6.
Replace the flywheel belt as described in Procedure 7.15.
7.
Re-install the rear cover as described in Procedure 7.1, then check the operation of the EFX
544 as described in Section Four.
Page 55
C544 Elliptical Fitness Crosstrainer
Procedure 7.17 - Replacing the Speed Sensor Assembly
IMPORTANT
On units built after August 21, 1996, the speed sensor cable is connected to the speed sensor
via a connector.
Removing the Speed Sensor Assembly
8.
With the lift set at level 1, turn off the EFX 544 with the circuit breaker, then unplug the
power cord from the wall outlet.
WARNING
Before continuing with this procedure, review the Warning and Caution statements listed in
Section One, Things You Should Know.
9.
Remove the front and rear covers as described in Procedure 7.1.
10. Remove the screw(s) that secures the speed sensor assembly to the rear frame upright.
11. If the unit you are servicing was built before August 22, 1996 . . .
THEN . . .
Continue with the next step.
OTHERWISE . . .
Disconnect the speed sensor cable
from the speed sensor. Skip to Step 7.
IMPORTANT
Do not remove the old speed sensor cable from when you perform the next step.
12. Cut the speed sensor cable off of the defective speed sensor. Remove the speed sensor
cable from the lower PCA.
13. Tape the connector on the new speed sensor assembly to the old speed sensor. Pull the old
speed sensor assembly through the slot in the horizontal frame member until the new
sensor assembly is in position. Separate the old and new speed sensor cables.
Replacing the Speed Sensor Assembly
14. Position the speed sensor so that the sensor "legs" evenly straddle the edge of the speed
label.
15. Replace the screw(s) that secures the speed sensor to the rear frame upright.
CAUTION
Rotate the eddy current disk assembly shaft. Check to be sure that the speed label does not rub
against the speed sensor.
Page 56
C544 Elliptical Fitness Crosstrainerl
16. If the unit you are servicing was built before August 22, 1996 . . .
THEN . . .
Connect the speed sensor cable to
the lower PCA. Continue with the
next step.
OTHERWISE . . .
Connect the speed sensor cable to
the speed sensor. Continue with the
next step.
17. Re-install the front and rear covers as described in Procedure 7.1, then check the operation
of the EFX 544 as described in Section Four.
Page 57
C544 Elliptical Fitness Crosstrainer
Procedure 7.18 - Replacing the Magnet Cable Assembly
Removing the Magnet Cable Assembly
1.
With the lift set at level 1, turn off the EFX 544 with the circuit breaker, then unplug the
power cord from the wall outlet.
WARNING
Before continuing with this procedure, review the Warning and Caution statements listed in
Section One, Things You Should Know.
2.
Remove the front and rear covers as described in Procedure 7.1.
3.
Remove the magnet cable assembly from the magnets.
4.
Slide the plastic cap back from the filter capacitor terminals. Remove the screws that secure
the wires to the terminals of the capacitor. Slide the magnet cables out of the plastic cap.
5.
Tape the connector on the new magnet cable assembly to the old magnet cable. Pull the old
magnet cable assembly through the slot in the horizontal frame member until the new
magnet cable is in position. Separate the old and new magnet cables.
Replacing the Magnet Cable Assembly
6.
Push the magnet cable assembly onto the magnet terminals (see Diagram 5.2).
7.
Push the magnet cables through the plastic capacitor cap.
8.
Connect the loose black wires to the negative terminal of the capacitor. Connect the loose
red wires to the positive terminal of the capacitor. Replace the screws that secure the wires
to the capacitor terminals. Slide the plastic cap over the capacitor terminals.
9.
Re-install the front and rear covers as described in Procedure 7.1, then check the operation
of the EFX 544 as described in Section Four.
Page 58
C544 Elliptical Fitness Crosstrainerl
Procedure 7.19 - Replacing the Magnet Pivot Assembly
IMPORTANT
Use this procedure when you must install a new magnet assembly, eddy current disk, target label
and magnet pivot assembly.
Removing the Magnet Pivot Assembly
1.
Turn off the EFX 544 with the circuit breaker, then unplug the power cord from the wall
outlet.
WARNING
Before continuing with this procedure, review the Warning and Caution statements listed in
Section One, Things You Should Know.
2.
Remove the rear cover as described in Procedure 7.1.
3.
Remove the flywheel belt as described in Procedure 7.15.
4.
Remove the screw(s) that secure(s) the speed sensor assembly to the magnet pivot
assembly.
5.
Disconnect the magnet cables from the magnet assembly.
6.
Remove the snap ring from one end of the magnet weldment pivot pin.
7.
Use the rubber mallet to tap the magnet weldment pivot pin out of the magnet weldment.
8.
Remove the tension spring from the magnet weldment (see Diagram 7.12).
Replacing the Magnet Pivot Assembly
9.
Place the tension spring onto the EFX 544 frame and the new magnet pivot assembly.
10. Position the magnet pivot assembly against the EFX 544 frame. Push the magnet weldment
pivot pin into the magnet weldment. If necessary, use a rubber mallet to push the pivot pin
into the magnet weldment.
11. Replace the snap ring into the end of the pivot pin.
Page 59
C544 Elliptical Fitness Crosstrainer
Diagram 7.7 - Magnet Pivot Assembly
12. Position the speed sensor so that the sensor "legs" evenly straddle the edge of the speed
label.
13. Replace the screw(s) that secure(s) the speed sensor to the magnet pivot assembly.
CAUTION
Rotate the eddy current disk assembly shaft. Check to be sure that the speed label does not rub
against the speed sensor.
14. Connect the magnet cables to the magnet assembly.
15. Replace the flywheel belt as described in Procedure 7.15.
16. Re-install the rear cover as described in Procedure 7.1, then check the operation of the EFX
544 as described in Section Four.
Page 60
C544 Elliptical Fitness Crosstrainerl
Procedure 7.20 - Replacing the Stair Arm Wheel
Removing the Old Wheel
1.
Turn off the EFX 544 with the circuit breaker, then unplug the power cord from the wall
outlet.
2.
Remove the rear cover as described in Procedure 7.1.
3.
Lift the stair arms from the ramp assembly and rotate them towards the back of the EFX
544.
4.
Use wrenches to remove the wheels from the stair arm assembly.
5.
Replace with the new wheel assembly (Precor part number: 50532-108). Install the tapered
aluminum spacer (shown in Diagram 7.8) to prevent noise during operation.
Diagram 7.8 - Stairarm Wheel
Page 61
C544 Elliptical Fitness Crosstrainer
6.
The wheel assembly consists of a wheel, axle, spacer, washer and locknut.
7.
Securely tighten the locknut.
8.
Rotate the stair arms towards the front of the EFX 544. Position the stair arms on the rail
assembly.
9.
Re-install the rear cover as described in Procedure 7.1, then check the operation of the EFX
544 as described in Section Four.
Page 62
C544 Elliptical Fitness Crosstrainerl
Procedure 7.21 - Replacing the Stair Arm Assembly
Removing the Stair Arm Assembly
1.
Turn off the EFX 544 with the circuit breaker, then unplug the power cord from the wall
outlet.
WARNING
Before continuing with this procedure, review the Warning and Caution statements listed in
Section One, Things You Should Know.
2.
Remove the rear cover as described in Procedure 7.1.
3.
Lift the stair arms from the ramp assembly and rotate them towards the back of the EFX
544.
4.
If the unit you are servicing was built before January 16, 1996. . .
THEN . . .
Continue with the next step.
5.
OTHERWISE . . .
Skip to Step 11.
Place a 2 x 4 piece of lumber or a long-handled tool through the flywheel spoke and against
the back of the rear frame upright.
Note:
When you perform the next step, use a long-handled wrench.
CAUTION
Be careful not to catch your fingers between the stair arm and the flywheel when you perform the
following step.
6.
Using a 1-1/2 inch wrench or ratchet, remove the bolt and washer that secure the stair arm
assembly to the flywheel (see Diagram 7.9).
Replacing the Stair Arm Assembly
7.
Place a 2 x 4 piece of lumber or a long-handled tool through the flywheel spoke and against
the front of the rear frame upright.
8.
Clean the old loc-tite off of the bolt removed in Step 6. Place a few drops of blue loc-tite onto
the bolt shaft.
Page 63
C544 Elliptical Fitness Crosstrainer
Diagram 7.9 - Stairarm Assembly
9.
Install the stair arm assembly on the flywheel and secure with the bolt and washer. Torque
the bolt to 100 foot-pounds.
10. Rotate the stair arms towards the front of the EFX 544. Position the stair arms on the ramp
assembly. Skip to Step 13.
11. Remove the snap ring, washers and wave washer. Slide the stair arm assembly away from
the 544 frame.
CAUTION
Be careful not to catch your fingers between the stair arm and the flywheel when you perform the
following step.
12. Slide the stair arm assembly onto the 544 frame. Replace the wave washer, washers and
snap ring.
13. Re-install the rear cover as described in Procedure 7.1, then check the operation of the EFX
544 as described in Section Four.
Page 64
C544 Elliptical Fitness Crosstrainerl
Procedure 7.22 - Replacing a Handlebar
Removing a Handlebar
1.
Loosen the four screws that hold the handlebars in the upper and lower handlebar clamps.
2.
Grasp and pull the ends of the handlebar away from the handlebar clamps.
Replacing a Handlebar
3.
Position the handlebar in the handlebar clamp. The edge of the foam grip must be flush with
the edge of the clamp.
4.
Tighten the screws that secure the handlebar in the handlebar clamps.
Page 65
C544 Elliptical Fitness Crosstrainer
Wiring Diagram 8.1 - C544 120 Vac
Page 66
C544 Elliptical Fitness Crosstrainerl
Block Diagram 8.2 - C544 120 Vac
Page 67
C544 Elliptical Fitness Crosstrainer
Wiring Diagram 8.3 - C544 240 Vac
Page 68
C544 Elliptical Fitness Crosstrainerl
Block Diagram 8.4 - C544 240 Vac
Page 69