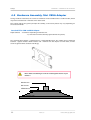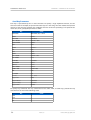
1
IntelliGaze™ Installation & Service Manual DocVersion: 3.0 © alea technologies gmbh, 2015 Copyright © 2007-2015, alea technologies gmbh. All rights reserved. The Information in this document is subject to change without notice. alea technologies. reserves the right to revise this document and its contents periodically without obligation to notify any person or persons of such revisions. This document contains proprietary information which is protected by copyright. All rights are reserved. No part of this document may be photocopied, reproduced or translated to another language without the prior written consent of alea technologies. The software described in this document is supplied under a license agreement and is protected by international copyright laws. It may be copied for the purpose of backup and used it only as described in the license agreement. Security Advice We would like to remind you that the contents of this operating manual do not constitute part of any previous or existing agreement, commitment or legal relationship, or an alteration thereof. All obligations of alea technolo gies gmbh result from the respective contract of sale, which also includes the complete and exclusively applica ble warranty regulations. These contractual warranty regulations are neither extended nor limited by the information contained in this operating manual. Should you require further information on this device, or encounter specific problems that are not discussed in sufficient detail in the operating manual, please contact your special ized dealer or system installer. The device may be connected, operated and maintained only by appropriately qualified personnel. The error-free and safe operation of this device can only be ensured if it is properly transported, stored, sited and assembled, and operated and maintained with due care. Operating Environment Please observe the proper use of this product. Failure to do so will render the warranty void. Do not subject this product to direct sunlight, moisture or shock. The following environmental conditions are required: Ambient temperature: Storage temperature: 0DC ... 45DC (32°F ... 113°F) -20°C ... 60DC (-4°F ... 140DF) THE INTELLIGAZE SYSTEM IS NOT INTENDED FOR USE IN THE OPERATION OF NUCLEAR FACILITIES, AIRCRAFT NAVIGATION OR COMMUNICATION SYSTEMS, AIR TRAFFIC CONTROL SYSTEMS, LIFE SUPPORT MACHINES OR OTHER EQUIP MENT IN WHICH THE FAILURE OF THE INTELLIGAZE SYSTEM COULD LEAD TO DEATH, PERSONAL INJURY, OR SEVERE PHYSICAL OR ENVIRONMENTAL DAMAGE. Installation and Maintenance The installation, testing, maintenance and extension of, and any necessary repairs to the system may be performed only by authorized personnel. Trademarks IntelliGaze™ and BlickFang™ are trademarks of alea technologies gmbh. Windows, Windows 95/98/2000/2003, Millennium (ME), XP. Windows NT, Windows Vista and Windows 7 are trademarks of Microsoft Corporation. Other products, trademarks or registered trademarks are the property of their respective owners. Printing History [2013-09-19] Latest Software Version Latest Hardware Version --- Doc.Version --- Print Date 1.1 CAM30 1.4 2010-04 1.2 CAM30 1.5 2010-07 1.2 CAM30 1.6 2010-10 1.5 CAM30 1.7 2011-10 2.0 CAM30 1.8 2012-03 2.1 CAM30 1.9 / 1.95 2013-02 2.5 CAM30 / CAM30NT 2.0 2013-05 3.0 CAM30 / CAM30NT 2.1 2013-09 3.0 CAM30 / CAM30NT 3.0 2015-03 4.0 CAM30 / CAM30NT Contact alea technologies gmbh Potsdamer Str. 18A - 14513 Teltow – Germany fon: +49 (0)3328 3380 290 www.alea-technologies.de fax: +49 (0)3328 3380 299 [email protected] IntelliGaze™ Installation & Service Manual Table of Contents 1 Introduction 5 2 Technical Specification 6 2.1 2.2 Tracking System - IG-30....................................................................6 Tracking System - IG-30NT..............................................................6 3 Safety & Compliance 3.1 3.2 3.3 3.4 3.5 8 Safety of the Infrared Illumination...............................................8 Magnetic Field Hazard......................................................................8 Epilepsia / Photosensitive Seizure Warning..............................8 CE Certificate.......................................................................................9 FCC....................................................................................................... 10 4 Setup 4.1 4.2 4.3 11 IntelliGaze™ CAM30 Camera Unit..............................................11 IntelliGaze™ CAM30NT Camera Unit.........................................12 HW-Requirements...........................................................................14 4.3.1 4.3.2 4.3.3 4.4 17 18 19 20 21 Hardware Integration Examples 25 Software.............................................................................................27 4.6.1 4.6.2 4.6.3 4.6.4 4.6.5 4.7 4.8 'Standard' VESA-Adapter - 'No.1' EZCom VESA-Adapter – 'No.2' Sliding VESA-Adapter – No.3 Mobi2 by jabbla - Adapter Tellus4 by jabbla - Adapter Hardware Assembly /Std. VESA Adapter..................................22 4.5.1 4.6 14 15 16 Camera Mounting Options...........................................................17 4.4.1 4.4.2 4.4.3 4.4.4 4.4.5 4.5 PC-Platform Monitor Tools Platform Prerequisites IntelliGaze™ Software Installation Camera Driver Licensing Service Mode Options 27 27 28 29 29 Monitor Calibration.........................................................................30 System Validation............................................................................30 5 Using IntelliGaze™ 5.1 5.2 5.3 Principle of operation....................................................................31 Environment......................................................................................31 Special Cases.....................................................................................32 5.3.1 5.3.2 5.3.3 5.3.4 5.4 5.5 © alea technologies gmbh, 2015 32 32 33 33 Hardware Error Codes (CAM30NT only) 36 Operation Modes.............................................................................36 5.6.1 5.6.2 5.6.3 5.7 Glasses Monocular Operation Calibration area Cerebral Palsy Monitor Calibration.........................................................................33 Tracking Status Indicator...............................................................35 5.5.1 5.6 31 Assisted Access Safe Access Full Access 36 37 38 General Use --> see Quickstart Guide.......................................39 Version: 3.0 3 Introduction IntelliGaze™ Installation & Service Manual 6 IntelliGaze™ Reference 6.1 6.2 6.3 Overview............................................................................................ 40 System Hotkeys................................................................................41 Desktop Control...............................................................................42 6.3.1 6.3.2 6.3.3 6.4 43 47 48 Calibration Options 50 52 IntelliGaze Preferences..................................................................59 6.5.1 6.5.2 6.5.3 6.5.4 6.5.5 6.5.6 6.6 Side Menus Integrated Keyboard Magnifier Operation Center.............................................................................49 6.4.1 6.4.2 6.5 40 General Options Calibration Input Integrated Keyboard Operation Center Application Center 59 61 63 65 65 66 Service Mode....................................................................................69 7 Adapting IntelliGaze to Different Applications 7.1 7.2 7.3 72 Blickfang™ Concept........................................................................72 Windows Desktop Settings..........................................................73 Application Center - General Considerations........................74 8 IntelliGaze Software Update 8.1 8.2 75 Update from CD...............................................................................75 Online-Update..................................................................................75 9 Gaze Assistant 9.1 9.2 76 General................................................................................................ 76 Usage................................................................................................... 76 9.2.1 9.2.2 9.2.3 9.2.4 9.2.5 9.2.6 9.2.7 User Profile Selection Target Selection Fixation Test Field of View Test Blink Test Calibration Report 76 76 78 79 80 80 81 10 Troubleshooting 10.1 General................................................................................................ 82 10.1.1 10.1.2 10.1.3 10.1.4 10.1.5 10.2 82 System is not tracking 82 Intelligaze cannot detect camera on start-up 'Measure the monitor before calibration error' Dwell click is never triggered 83 IntelliGaze crashed 83 Hardware............................................................................................ 84 10.2.1 10.2.2 10.2.3 10.2.4 Cleaning system components, CAM3084 Cleaning system components, CAM30NT Check and adjust lens focus (CAM30) 85 Software 86 11 Notes 4 82 83 84 87 Version: 3.0 © alea technologies gmbh, 2015 Introduction IntelliGaze™ Installation & Service Manual 1 Introduction This manual targets system integrators and support personnel who require in-depth knowledge regarding the IntelliGaze™ software and hardware. It is meant to accompany an on-site training session. It covers system specifications and general hardware setup aspects as well as software installation instructions. The software reference documents all settings of the IntelliGaze™ software and provides the default (installation) values for reference. 3rd-party software integration is explained and several cases are documented with their recommended parameters. Typical troubleshooting cases are mentioned in the last part of this manual. Please feel very welcome to contact alea technologies with any request or suggestion that has not been covered in this manual. For programming references regarding the IntelliGaze™ API, please refer to the 'IntelliGaze™ API Documentation' which is available for registered developers. © alea technologies gmbh, 2015 Version: 3.0 5 Technical Specification 2 IntelliGaze™ Installation & Service Manual Technical Specification 2.1 Tracking System - IG-30 Tracking technology Hybrid infrared video eye- & head-tracking. Binocular & monocular tracking Working Volume centered at 600 mm distance 300 x 200 x 200 mm³ [WxHxD] Accuracy, static 0.5° typically Accuracy, over full working volume 1° typically Sampling Rate 50 / 40 / 30 / 20 Hz Max. head-movement velocity 15 cm/s Recovery-time after tracking loss (head moved to quickly or was out of range) 40 ms (@50 Hz) System Dimensions ca. 300 x 45 x 80 mm3 [WxHxD] Mounting Options on monitor via VESA-adapter on Tablet-PC via customized interfaces System Weight ca. 850g Interface Full-Speed USB2 Power-Supply Desktop power supply provided with standard system: prim. 230 / 110 VAC - sec. 15..19V, 3A Power consumption (50 Hz full tracking mode) USB: Power-Supply: 2.2 Tracking System - IG-30NT Tracking technology Hybrid infrared video eye- & head-tracking. Binocular & monocular tracking Working Volume centered at 620 mm distance 320 x 200 x 250 mm³ [WxHxD] Accuracy, static 0.5° typ. Accuracy, over full working volume 1° typ. Sampling Rate 40 / 30 / 20 Hz Recovery-time after tracking loss (head moved to quickly or was out of range) 150 ms typ. System Dimensions 285 x 44 x 38 mm³ [WxHxD] Mounting Options on monitor via VESA-adapter ca. 200mA avg. 150mA @15V on Tablet-PC via customized interfaces System Weight ca. 280g Interface Full-Speed USB2 Power-Supply Single USB cable, up to 1m (optional aux. power supply for special setups) Power consumption (40 Hz full tracking mode) < 2,5W avg. 6 Version: 3.0 © alea technologies gmbh, 2015 Technical Specification IntelliGaze™ Installation & Service Manual Operating Environment Please observe the proper use of this product. Failure to do so will render the warranty void. Do not subject this product to direct sunlight, moisture or shock. The following environmental conditions are required: Ambient temperature: Storage temperature: 0°C ... 45°C (32°F ... 113°F) -20°C ... 60°C (-4°F ... 140°F) THE INTELLIGAZE SYSTEM IS NOT INTENDED FOR USE IN THE OPERATION OF NUCLEAR FACILITIES, AIRCRAFT NAVIGATION OR COMMUNICATION SYSTEMS, AIR TRAFFIC CONTROL SYSTEMS, LIFE SUPPORT MACHINES OR OTHER EQUIPMENT IN WHICH THE FAILURE OF THE INTELLIGAZE SYSTEM COULD LEAD TO DEATH, PERSONAL INJURY, OR SEVERE PHYSICAL OR ENVIRONMENTAL DAMAGE. © alea technologies gmbh, 2015 Version: 3.0 7 Safety & Compliance 3 IntelliGaze™ Installation & Service Manual Safety & Compliance The IntelliGaze™ IG-30 and IG30NT systems have been certified for general office use as in the class of information and telecommunication devices. The system will meet or exceed the required standard according to the CE certification below. 3.1 Safety of the Infrared Illumination The IG-30 and IG-30NT camera system contains LED sources that emit light in the near infrared (NIR) spectrum. The light emission levels have been measured and calculated to comply with the European laser safety standard EN60825-1. The standards contain test procedures to verify that the emitted light will cause no thermal injury to the eye of a person being exposed to the light. The product is classified as a Class 1 LED product and complies with the standards for long-time exposure. Exposure varies with the chosen frame-rate and working distance. For comparison reason: the user will be exposed to about 200W/cm² at 40Hz tracking rate in the suggested operating distance of 600mm. 3.2 Magnetic Field Hazard The CAM30 / CAM30NT units contain magnets. Magnetic fields may interfere with the function of cardiac pacemakers and implantable defibrillators. As a general rule, please maintain a minimum distance of 10 cm (4 inches) between the frontal part of the device and any implanted, electronic device. 3.3 Epilepsia / Photosensitive Seizure Warning A very small percentage of people may experience a seizure when exposed to certain visual images, including flashing lights or patterns that may appear in video games. Even people who have no history of seizures or epilepsy may have an undiagnosed condition that can cause these photosensitive epileptic seizures while using a gaze interaction device on a computer screen. These seizures may have a variety of symptoms, including lightheadedness, altered vision, eye or face twitching, jerking or shaking of arms or legs, disorientation, confusion, or momentary loss of awareness. Seizures may also cause loss of consciousness or convulsions that can lead to injury from falling down or striking nearby objects. Immediately stop while using a gaze interaction device on a computer screen and consult a doctor if you experience any of these symptoms. Parents should watch for or ask their children about the above symptoms - children and teenagers are more likely than adults to experience these seizures. The risk of photosensitive epileptic seizures may be reduced by taking the following precautions: • Using a gaze interaction device on a computer screen only in a well-lit room. • Do not use a gaze interaction device on a computer screen if you are drowsy or fatigued. If you or any of your relatives have a history of seizures or epilepsy, consult a doctor before playing. 8 Version: 3.0 © alea technologies gmbh, 2015 Safety & Compliance IntelliGaze™ Installation & Service Manual 3.4 CE Certificate Declaration of Conformity We, alea technologies gmbh Potsdamer Str. 18a, 14513 Teltow, Germany declare under our sole responsibility, that the product IntelliGaze™, IG-30, IG-30pro, IG-30NT using the CAM30 or CAM30NT camera units to which this declaration relates is in conformity with the following standards or other normative documents: EN55022:2008, class B EMC, emission EN55024:2003 EMC, Immunity EN60950 Electrical Safety EN60825-1 Laser Safety following the provisions of Directive 89/336/EWG (EMC) and 73/23/EWG (LVD). The IntelliGaze™ IG-30 system serves a gaze-controlled computer input device for physically handicapped persons. Teltow, October 30th 2012 _______________________________ Wolfgang Lehmann Managing Director, alea technologies gmbh © alea technologies gmbh, 2015 Version: 3.0 9 Safety & Compliance IntelliGaze™ Installation & Service Manual 3.5 FCC IntelliGaze™ CAM30, CAM30NT camera system Note: This equipment has been tested and found to comply with the limits for a Class B digital device, pursuant to part 15 of the FCC Rules. These limits are designed to provide reasonable protection against harmful interference in a residential installation. This equipment generates, uses and can radiate radio frequency energy and, if not installed and used in accordance with the instructions, may cause harmful interference to radio communications. However, there is no guarantee that interference will not occur in a particular installation. If this equipment does cause harmful interference to radio or television reception, which can be determined by turning the equipment off and on, the user is encouraged to try to correct the interference by one or more of the following measures: • Reorient or relocate the receiving antenna. • Increase the separation between the equipment and receiver. • • Connect the equipment into an outlet on a circuit different from that to which the receiver is connected. Consult the dealer or an experienced radio/TV technician for help. alea technologies is not responsible for any radio or television interference caused by cables and connectors other than those recommended by or by unauthorized changes or modifications to this equipment. Unauthorized changes or modifications could void the user’s authority to operate the equipment. This device complies with Part 15 of the FCC Rules. Operation is subject to the following two conditions: (1) this device may not cause harmful interference and (2) this device must accept any interference received, including interference that may cause undesired operation. alea technologies gmbh Potsdamer Str. 18A 14513 Teltow - Germany www.alea-technologies.de 10 Version: 3.0 © alea technologies gmbh, 2015 © alea technologies gmbh, 2015 Version: 3.0 USB2 cable Status-LED In pu t, 15 Pow 5, ..19 er5/ 2, VD Sup 5m C p ly m as Inte L e rn ns al -C Ma ap gn -H et old er IR -L ED Sp ot Ca (c m e ali ra br -Le at n ed s ) 4 Tr ipo d1/4 Mou nt “ Mounting-Lock Screw Allan/Hex Key 1,5mm St M and ou a nt rding (te Ch m as s p. is -c -F on a tro n, lle d) IntelliGaze™ Installation & Service Manual Setup Setup 4.1 IntelliGaze™ CAM30 Camera Unit The camera unit does not contain any adjustable or serviceable parts! Do not open the housing! 11 Setup IntelliGaze™ Installation & Service Manual 4.2 IntelliGaze™ CAM30NT Camera Unit The camera unit does not contain any adjustable or serviceable parts. Please do not open the housing! 8 7 7 3 4 2 1 9 5 6 4 1 USB2 connector (mini-USB) 2 Cable lock 3 Standard CAM30(NT) mount D:8mm → Max. depth: 35mm. 4 Std. Mount lock screws. → Please, only tighten hand-tight! 5 Optional auxiliary power-supply connector. (mini-USB) → Only required with very long main USB cable, adds to P.1 → Do only use manufacturer supplied power-supplies. 6 System status LED (see below) 7 Aux. camera mounting threads (M3, max. length 8mm) 8 Internal camera status LED (see below) 9 Camera label, warranty seal. 3 System Status LED [6] green IntelliGaze is running and camera functional. yellow IntelliGaze is running but camera functions are constricted*. red Camera stopped working because of a critical error* Device requires service, contact your distributor. /* IntelliGaze Tracking Status Indicator of IntelliGaze will give more details about the error 12 Version: 3.0 © alea technologies gmbh, 2015 Setup IntelliGaze™ Installation & Service Manual Internal Camera Status LED [8] orange Camera driver is properly installed. off Camera driver is not loaded, check the Windows device manager and reinstall driver or plug camera into a different USB port. 1 2 1 Front plate. IR-transmissive acrylic glass. → use only soft cloth, i.e. microfiber and avoid harsh cleaners. 2 IR-glass lens. → Please keep the lens clean. Dirt may be removed with glass cleaner or better isopropanol. The use of a cotton swab is recommended. © alea technologies gmbh, 2015 Version: 3.0 13 Setup IntelliGaze™ Installation & Service Manual 4.3 HW-Requirements 4.3.1 PC-Platform While every current notebook, tablet or desktop PC should be powerful enough to run IntelliGaze™ in the background, we specify the minimum requirements as follows: CPU: core i3 or AMD equivalent, Atom Z3XXX For media operations and gaming we recommend four logical CPU cores. RAM: Windows XP: Windows VISTA / 7 / 8 : Ports: 1 available full-speed USB2 port. OS: Windows 7 (32 and 64 bit) Windows 8 (32 and 64 bit) ( Windows VISTA SP2 – last supporting IntelliGaze version: v3.0) ( Windows XP SP3 – last supporting IntelliGaze version: v2.5) 14 512 MB (1GB recommended) 1 GB (2GB recommended) 3rd party software that sometimes uses excessive hardware resources while operating in the background, like some virus scanners or similar, can increase the minimum hardware requirements significantly. Other attached USB devices may negatively influence the gaze tracking performance. Please consider this carefully and whenever possible, test the compatibility in advance. We highly recommend connecting the camera system to a dedicated USB2 port on the computer rather then through a USB-Hub. CAM30: do not extend the USB cable length longer than 2m and use o ly USB2 certified, high quality cable. CAM30NT: do not extend the USB data cable length longer than 1m. When using the additional power-supply, do not extend the length of USB cable more than 2m. Prefer a custom, long cable over extensions, as the connectors will negatively influence the achievable maximum length. Version: 3.0 © alea technologies gmbh, 2015 Setup IntelliGaze™ Installation & Service Manual 4.3.2 Monitor Technical Requirements Screen size: TFT monitors 12” to 19”wide-screen. Mounting: VESA75 or VESA100 compatibility (for IG-30/30NT VESA adapters) In general most monitors that comply with the requirements above should work with the IG-30 or IG30NT system. small large One issue to consider when selecting a monitor is the width of the bottom screen-border (→ see sketch below). A large border, which forces the camera unit further away from the active screen region, might prevent accurate tracking on the upper parts of the screen. For the above reason screens with speakers integrated at the bottom should be avoided. Some VESA-mounts might require a custom spacer or special screws to integrate safely with the standard VESA adapter provided with the IG-30 or IG-30NT system. In most cases it is highly recommended to use a monitor arm, such as the Ergotron-LX (→ see image), to mount the monitor and camera units as flexibly as possible. Nevertheless, several, particularly height adjustable, desk-mounts allow integration without the use of a monitor arm. When in doubt, feel free to ask for our list of recommended monitors, or inquire about a particular model before making a purchase. alea technologies will also be pleased to provide monitor arms, desktop mounts or customized solutions on request. © alea technologies gmbh, 2015 Version: 3.0 15 Setup IntelliGaze™ Installation & Service Manual 4.3.3 Tools The assembly and service of the system may require several tools: CAM30 Tool Part of Demo-Unit Purpose Allan / Hex Key 0,9 mm Yes CAM-30, re-adjust lens calibration. Allan / Hex Key 1,5 mm Yes CAM-30, fixate housing. Allan / Hex Key, 2mm Yes VESA-Mount, fixate aluminum rods Metric Ruler or Measuring Tape, 50 cm No Monitor Calibration Screwdriver, div. No Depending on Monitor & Arm. 16 see: p.85 see:p.24 see: p.23 Version: 3.0 © alea technologies gmbh, 2015 Setup IntelliGaze™ Installation & Service Manual 4.4 Camera Mounting Options alea technologies can provide several custom mounting adapters to cover the majority of arising mounting challenges. While several adapters attach between VESA 75/100 mounts of the monitor and, i.e. a desktop arm, some integrate more closely with dedicated communication devices, i.e. the Tellus 4. More recently, some adapters have been adopted to carry the new CAM30NT model which maintains the general mounting scheme, but requires slight horizontal adjustments due to the reduced camera depth. Please find details below. 4.4.1 'Standard' VESA-Adapter - 'No.1' This was the first adapter, that alea technologies provided. This adapter attaches to small computers and TFT screens which provide a 75/100mm VESA mounting option. The mounting height can be adjusted in a very large range. Mount: VESA 75/100 Thickness (add to screw length): 12mm Camera Interface 2x 8mm Compatible Cameras Cam30, Cam30NT Maximum Mounting Height*: 156mm Minimum Mounting Height*: --- VESA75 / 144mm VESA100 * Mounting Height: distance between lower VESA-Screw and center of 8mm rod. Shorter aluminum rods, in particular for 12” Tablet computers can be provided on request. © alea technologies gmbh, 2015 Version: 3.0 17 Setup IntelliGaze™ Installation & Service Manual 4.4.2 EZCom VESA-Adapter – 'No.2' This is a fixed adapter specially designed for the ATS EZCom device. The adapter also fits alea technologies IG.Com 12” panel computer. Mount: VESA 75 Thickness (add to screw length): 4mm Camera Interface 2x 8mm Compatible Cameras Cam30, Cam30NT** Mounting Height*: 116mm VESA75 * Mounting Height: distance between lower VESA-Screw and center of 8mm rod. ** Extended dowel pins are available to mount the slimmer camera more forward. 18 Version: 3.0 © alea technologies gmbh, 2015 Setup IntelliGaze™ Installation & Service Manual 4.4.3 Sliding VESA-Adapter – No.3 With the release of the new camera model, targeting slimmer PC platforms, the Sliding VESA-Adapter, No.3 has been designed. It fits even small platforms, like the WeGo 10” SGD and provides a convenient, robust handle to move the system around easily. Mount: VESA 75/100 Thickness (add to screw length): 3mm Camera Interface 2x 8mm Compatible Cameras CAM30NT** Max.Mounting Height*: 107mm Min.Mounting Height*: 81mm VESA100 , 132mm VESA75 VESA75/100 * Mounting Height: distance between lower VESA-Screw and center of 8mm rod. ** Different dowel pins [32 / 50 mm] are available to mount the camera flush with the screen. - As of Feb.2013, this part is still under market evaluation. Color option is silver only Please ask for samples or adaptations. © alea technologies gmbh, 2015 Version: 3.0 19 Setup 4.4.4 Mobi2 IntelliGaze™ Installation & Service Manual by jabbla - Adapter This adapter has specifically been designed to fit jabbla's Mobi2 communication device. It replaces the original Daessy adapter plate while maintaining it's functionality. Mount: Mobi2 Thickness (add to screw length): n.a. Camera Interface 2x 8mm Compatible Cameras Cam30NT Max.Mounting Height*: n.a. Min.Mounting Height*: n.a. 20 Version: 3.0 © alea technologies gmbh, 2015 Setup IntelliGaze™ Installation & Service Manual 4.4.5 Tellus4 by jabbla - Adapter This adapter has specifically been designed to fit jabbla's Tellus4 communication device. It replaces the original Daessy adapter plate while maintaining it's functionality. Mount: Tellus4 Thickness (add to screw length): n.a. Camera Interface 2x 8mm Compatible Cameras CAM30, Cam30NT** Max.Mounting Height*: n.a. Min.Mounting Height*: n.a. ** Extended dowel pins are available to mount the slimmer camera more forward. © alea technologies gmbh, 2015 Version: 3.0 21 Setup IntelliGaze™ Installation & Service Manual 4.5 Hardware Assembly /Std. VESA Adapter During hardware installation, the camera and monitor will be combined into a stable module, which may then be mounted on a monitor-arm or desk-stand. This section explains the general principle of assembly, as the actual process may vary depending on the selected monitor. Standard TFT & CAM-30 VESA-Adapter Required Tools: - Screwdriver depending on monitor-arm. - 1,5 mm and 2 mm Allan/Hex keys (provide with the system). The standard VESA adapter is implemented as a VESA-75&100 spacer. The adapter will be mounted between a typical monitor's VESA-Interface and a monitor-arm. The adapter is 12mm thick, and the screw-length should be selected accordingly. Please make sure that longer screws do not damage the interior of your monitor ! Monitor-Arm M4 Screws VESA-Mount Monitor, top 22 Version: 3.0 © alea technologies gmbh, 2015 Setup IntelliGaze™ Installation & Service Manual Very slim monitors, in particular Tablet-PCs, may benefit from the use of a custom spacer that will allow more space between the VESA-adapter and the front of the device. Monitor-Arm M4 Screws VESA-Mount VESA-'Spacer' Monitor, top Once the adapter has been mounted on the back of the monitor and the monitor has been attached to a monitor-arm or desktop-mount, the aluminum rods can be inserted and roughly adjusted. Please make sure that the monitor is mounted stably and attach the CAM-30 unit underneath by inserting the rods into the appropriated mounting holes in the back of the device. The camera should be adjusted so that it is centered and parallel to the front of the monitor, as close to the bottom of the screen as possible. A A A A A: Thumb-Screw or Screws for 2mm Allan/Hex. Please use limited force when tightening! © alea technologies gmbh, 2015 Version: 3.0 23 Setup IntelliGaze™ Installation & Service Manual After adjusting the vertical distance, the horizontal position must be set. The camera can be firmly locked in place by tightening the hidden screws [B]. B B: Hidden Lock-Screws, use 1,5mm Allan/Hex key. The hardware installation is completed by connecting the USB cable to a USB2-port on the PC and connecting the provided power-supply. 24 When using USB2 extension cables, make sure to use USB2 certified cables, and be certain that the combined length does not exceed maximum length of 3m. Use USB2 hubs only when required and carefully examine the system performance. Version: 3.0 © alea technologies gmbh, 2015 Setup IntelliGaze™ Installation & Service Manual 4.5.1 Hardware Integration Examples Asus EEE Slate EP121 Mobi2 CAM30NT on Powerbox7 12” PaceBlade Tablet-PC on Wheelchair & Desk-Mount / DAESSY parts © alea technologies gmbh, 2015 Version: 3.0 25 Setup IntelliGaze™ Installation & Service Manual 15” Panel-PC on Desk-Mount 17” TFT-Monitor on Desktop-Mount with Quick-Release / DAESSY parts CAM30NT on 19” TFT 26 Version: 3.0 © alea technologies gmbh, 2015 Setup IntelliGaze™ Installation & Service Manual 4.6 Software 4.6.1 Platform Prerequisites IntelliGaze™ is designed to work on recent Microsoft Windows platforms. The following operating sys tem and software package requirements must be fulfilled. • • • • Windows 8, Windows 7 (SP1) Windows Vista (SP2) is no longer supported, IntelliGaze 3.0 is the last Windows Vista compatible version Windows XP is no longer supported, IntelliGaze 2.5 is the last Windows XP compatible version .Net Framework 4.5 (will be automatically installed by the IntelliGaze™ installer if the PC has inter net connection. If the framework is not installed and the PC has no internet connection the .Net Framework 4.5 can be installed from the IntelliGaze™ installation CD) Carefully consider that mobile computers tend to throttle the CPU in idle times and under battery power. Under these conditions, the hardware might no longer meet the above minimum requirements! It is highly recommended to turn most power-saving functions off. Power Options for Windows XP, Windows 7 / 8: 4.6.2 IntelliGaze™ Software Installation The latest version of IntelliGaze™ can be downloaded here. www.alea-technologies.de → Support → Login -Please use your customer login, which will be provided on request→ Download → Restricted Download Do not connect the camera to the PC before IntelliGaze™ is installed! You will need administrator rights to install IntelliGaze™ however the operation does not require them. © alea technologies gmbh, 2015 Version: 3.0 27 Setup IntelliGaze™ Installation & Service Manual 1. Launch the setup.exe from the installation package. There is just one installer for all supported languages. On the installation CD, the setup.exe is located in the IntelliGaze™ folder. If the CD-autostart is activated in your windows, installation will start automatically when the CD is inserted. 2. Accept the license agreement. 3. By default the camera driver is automatically installed. 4. After installation there is now a desktop icon and shortcuts in the program menu. You can launch setup.exe with the “/quiet” parameter to install it without user interaction. This can be used to integrate this installer into other setup packages. 4.6.3 Camera Driver The driver will be automatically installed with the IntelliGaze™ software. After the installation of IntelliGaze™ you may connect the camera to a USB 2.0 port of your PC. You will now be prompted to allow the installation of the driver after the windows hardware detection has found the new camera. Whenever you change the camera connection to a port that has never been used before by the camera, you will be prompted to permit the installation again. Confirm the security warning to finish the driver installation. 28 Version: 3.0 © alea technologies gmbh, 2015 Setup IntelliGaze™ Installation & Service Manual 4.6.4 Licensing IntelliGaze offers three different license packages. Depending on the license IntelliGaze offers different types of access. Assisted Access Starter Communication Full x x x x x API Access (i..e. Grid2) Safe Access x Full Access x The license is handled by the camera system hardware Please refer to the chapter ' Licensing' on page 59 for more information. 4.6.5 Service Mode Options After the software installation you need to set some parameters to make sure that IntelliGaze operates at it's best performance on your hardware platform. Open the service mode from the program start menu. In Windows 8 you access the apps list by swiping the start menu up. For a complete reference of the Service Mode Options refer to the chapter 'Service Mode'. On tablet pcs you should always choose the speed “Power Saving 1”. On computers where battery life time doesn't matter or where you need a higher tracking speed you should choose 40Hz. The seconds page of the Service Mode allows you to enable touch screen support on Windows 7 computers. Enable touch screen support and touch the display when prompted. If the touch display driver is not detected automatically you may choose the driver manually. Windows 8 computers don't need to enable touch support explicitly. In Windows 8 supports touch natively. © alea technologies gmbh, 2015 Version: 3.0 29 Setup IntelliGaze™ Installation & Service Manual 4.7 Monitor Calibration The last step of the setup process is the calibration of the monitor-camera configuration The monitor calibration requires a metric ruler of about 40 cm. For further details please refer to chapter 5.4. A badly calibrated monitor will result in inaccurate head-motion compensation and therefore provide inaccurate gaze position measurements. 4.8 System Validation This step will make sure that all components have been installed correctly and the system is working according to specification. It assumes all setup-steps above have been completed successfully. 1. Connect all cables. At the back of the CAM30 system there is a LED that turns green if the illumination has power. The LED of the CAM30NT shows the green LED when IntelliGaze is started. 2. Turn-on the PC and boot Windows. Login. 3. Start IntelliGaze™, if not included in 'Autostart' You should see the following: ▪ ▪ ▪ 4. 30 Dark red shining outer LEDs, the illumination will go to a standby mode if no head was detected for a while. In standby mode, the outer LEDs will flash only about once a second. The status windows showing a green or yellow head symbol when the head is within the working range Ctrl + F5 start a calibration (if the monitor is not calibrated you will get a message that the calibration can't be started) If the system is calibrated you should see the cursor following your gaze. Version: 3.0 © alea technologies gmbh, 2015 Using IntelliGaze™ IntelliGaze™ Installation & Service Manual 5 Using IntelliGaze™ 5.1 Principle of operation The IntelliGaze™ system allows the user to control specialized, e.g. AAC, applications as well as many standard Windows applications through eye-movements. A camera and illumination system mounted underneath the monitor receives images of the users face under invisible near-infrared illumination. A background PC program analyzes the images in real-time and extracts face and eye locations. High resolution image processing algorithms calculate the gaze angle of the user. By calculating the intersection point of these gaze-vectors with the monitor, the system can determine the gaze location on the screen. Heuristics and configurable filtering are applied to synchronize the mouse-cursor with the calculated gaze location. Mouse-clicks can be triggered by either dwelling on a certain region or blinking. The user may also use external switches or buttons to trigger the click. A new user needs to be calibrated to the system, before the gaze control can be used. The gaze tracking and 'click' control can be adopted to the user requirements and the target application. 5.2 Environment The IG-30 and IG-30NT has been designed for indoor use. The equipment should be used in an officelike environment. General Considerations Provide ● Well lit, comfortable seating or bed-site condition. ● The subject should be comfortable and stably positioned. ● ● Ideally both eyes should be clearly visible from the camera position. If one eye is covered, please refer to the monocular options in the calibration settings. The monitor-camera combination should have room and sufficient degrees of freedom to achieve a good position in-front of the user. We do highly recommend the use of monitor arms. Avoid ● Direct Sun-Light. ● Direct exposure to secondary IR sources like halogen bulbs, etc. ● Complex prescription glasses like bi-focals, etc. © alea technologies gmbh, 2015 Version: 3.0 31 Using IntelliGaze™ IntelliGaze™ Installation & Service Manual WARNING - If the IntelliGaze product is mounted in such a way to a monitor that it may fall and potentially harm the user, this is done solely at the user’s own risk. alea technologies or any of its representatives do not take any responsibility and will not be liable for any damages or injuries arising from the product falling onto someone or something, even if the mounting has been made according to instructions. As a general rule, the user should be centered in-front of the screen in a normal working position, whenever possible. If the system will be mounted above a bed, or the users head has been stabilized in a slightly tilted position, please adjust the monitor accordingly as pictured below. 5.3 Special Cases IntelliGaze™ is designed to work out of the box for the majority of users without adjusting any parameter. Some parameters allow users to adopt the system to special cases. The following overview explains which parameters should be used in which situation. 5.3.1 Glasses Most glasses do not interfere with the system, but bifocals and multifocals can be problematic. If calibrating a subject wearing glasses continuously gives you an inaccurate calibration, you should first try to change the camera position and repeat the calibration. Very often some disturbance reflec tion on the glasses will disappear if you change the system geometry. The eye video window will help you to find good positions for the camera. Ctrl + F10 toggles the head status window into an eye video if this option is activated in the IntelliGaze™ service mode. In rare cases, the accuracy will be decreased when using IntelliGaze™ with glasses. You should increase the cell size of your communication software in this case. Sometimes when working with glasses, a limited area of the screen cannot be calibrated and used. Try to change the calibration area (center, bottom, full) and avoid putting AAC input functions in the problematic area. 5.3.2 Monocular Operation When just one eye of the subject is visible you should select “left or right eye calibration” and check the option “ignore the other eye completely”. When just one properly moving eye is available because the other eye is a glass eye or is visually impaired, you should NOT check the option “ignore the other eye completely”. Both eyes are used for tracking but only the good one is used for calibration. In monocular operation mode the accuracy can be decreased. Make sure that the cells of your communication software are large enough to cover this inaccuracy. 32 Version: 3.0 © alea technologies gmbh, 2015 Using IntelliGaze™ IntelliGaze™ Installation & Service Manual 5.3.3 Calibration area Sometimes cognitive weak or visually impaired users can't look into all corners of the monitor. When you experience a systematic calibration error in one of the corners, you should shrink or move the calibration area. The accuracy outside the calibration will be decreased. Make sure that buttons and cells are larger when you want to use that region for gaze interaction. Some users can only look vertically or horizontally. Choose the calibration area vertical or horizontal in this case. Make sure the buttons and cells of a communication package are placed vertically or horizontally. 5.3.4 Cerebral Palsy Cerebral Palsy users often move the head very fast. Make sure that the center of movement is also the center of the working range at 60cm. It is recommended to use a one point calibration and large but tons and cells in the communication software. A simple and fast calibration with quick success reduces the stress for the user. The 16-point-calibration is designed for highest accuracy at the expense of a possibly lowered head movement range. Do not use this calibration method when the user moves his or her head a lot. 5.4 Monitor Calibration In order to ensure the highest gaze accuracy over the large working range, the physical setup of the system needs to be calibrated when the system is being integrated. Upon first start you have to select which camera is used. Integrated cameras don't have to be measured. Integrated cameras are using fixed pre-configured values. The monitor tool will quit when you select the integrated camera. Neos13 is such a device with integrated camera. CAM30 and CAM30NT must be measured with the tool. The measurements cover the physical proper ties of the monitor and the position of the camera unit relative to it. © alea technologies gmbh, 2015 Version: 3.0 33 Using IntelliGaze™ IntelliGaze™ Installation & Service Manual A failure to measure the monitor-camera parameters correctly will cause high gaze location errors under head-motion. 1. Use the tool Monitor Calibration which can be launched from the start menu. → Programs / alea technologies / Monitor Calibration 2. Choose the VESA mount option if your camera unit is attached using the standard IG30 VESA mount adapter, and choose the standalone option if your camera is mounted otherwise. 3. Finally, follow the instructions in the calibration tool and enter the following parameters: • The screen-resolution of the monitor. • The physical dimensions of the panel without the monitor frame. • Two or three measured distances between the camera and the monitor. Please check the monitor sketch for detailed reference.. In a dual monitor setup make sure the camera is attached to the primary monitor. The resolution of the primary monitor will be auto detected by the tool. The monitor resolution should be kept constant during the whole operation. The system will notify the user when the entered value does not match the actual monitor resolution when a calibration is started. IntelliGaze™ will try to adopt the gaze-cursor coordinates to possibly changing resolutions during the operation of the system e.g. in games. Nevertheless, the system should be validated carefully in such cases. You will have to repeat this measurement whenever the camera changes its position with respect to the monitor. The values are saved in a xml settings file which is located in the folder: \\Current User\Local Settings\Application Data\alea_technologies_gmbh\IntelliGaze\planes.settings 34 Version: 3.0 © alea technologies gmbh, 2015 Using IntelliGaze™ IntelliGaze™ Installation & Service Manual 5.5 Tracking Status Indicator The Tracking Status Indicator supports the proper positioning of the system and subject and provides feedback about the eye-tracking status during operation of the system. It displays the 3D location of the head in the tracking volume (position & size) as well as the status of the head-tracking operation (green, yellow, red). The status of the eye-tracking is displayed independently for each eye. The Tracking Status Indicator is always be shown at the top of the monitor. It will pop-up the display when problems occur and hide it again when the tracking continues successfully. For a continuous visualization of the Tracking Status Indicator the operator should open the Operation Center. Some non-critical and critical error conditions are shown at the bottom of the Tracking Status Indica tor: Clicking on the error or warning button will open an info dialog providing more details about the error or warning. The Troubleshooting Button will open an online help if the pc is connected to the internet. Errors will cause the eyetracker stop working while Warning will very often just degrade the performance of the eyettracking. © alea technologies gmbh, 2015 Version: 3.0 35 Using IntelliGaze™ IntelliGaze™ Installation & Service Manual 5.5.1 Hardware Error Codes (CAM30NT only) CAM30NT has an advanced system health monitor. The error codes indicate non-critical or critical errors that require attention. Hardware Error Code 1 Action Power off device, make sure it's not exposed to direct sun or a heating, restart device after it cooled down The USB cable is too long to provide enough power to the device Use a shorter USB cable or use the auxiliary USB connector to provide more power to the device 3 LED Voltage too low PC doesn't provide enough power over the USB, try using the auxiliary USB connector 4 LED open IR LEDs are broken, contact alea support 5 I2C error Internal electronics failure, contact alea support 2 (USB cable too long) Description Temperature too high It is acceptable if the performance indicators pop-up from time to time especially if you launch other applications or if you run applications that consume a lot of processing power. If the T indicator is constantly on, you should verify the system configuration. In energy saving mode, laptops usually power down the CPU which causes performance indicators to pop up. 5.6 Operation Modes IntelliGaze can be operated in three different modes. The modes determine the complexity of the tasks which can be performed with IntelliGaze. Additionally IntelliGaze adopts so that power users benefit from the availability of advanced options and a versatile user interface while inexperienced users and caretakers enjoy a simplified user interface and limited functionality. The possible operation modes are determined by the license. A license can be upgraded to switch an “Assisted Access" system into a “Save Access” or “Full Access” In energy saving mode, laptops usually power down the CPU which causes performance indicators to pop up. 5.6.1 Assisted Access The assisted access is designed to work optimal in an environment where a users needs permanent assistance by a caretaker or teacher. Typical applications used in the context of the assisted access mode are “Look To Learn” or “Life Tools” or other learning software. The IntelliGaze user interface is stripped down to the minimum set of functions to adjust user position, calibrate a user and chance basic parameters like cursor shape. When IntelliGaze is launched in Assisted Access gaze interaction is disabled until the caretaker un-pauses the device to give the caretaker time to start the learning software. A default calibration can be loaded with a single click to allow users gaze interaction even if they are not able to calibrate. 36 Version: 3.0 © alea technologies gmbh, 2015 Using IntelliGaze™ IntelliGaze™ Installation & Service Manual The Operation Center in Assisted Access offers just an option for calibration, close application, pause and basic cursor options. All functions can be accessed with keyboard shortcuts. Escape will return to the previous dialog or quit the operation center. 5.6.2 Safe Access The Safe Access allows caretakers to customize an environment where the users can autonomously switch between different applications without the need of Windows desktop access. The Safe Access offers more options to the user and the caretaker. The Windows desktop will be replaced with a configurable Home-Page (Application Center - AC). Applications which are launched from the Application Center may use off-screen accessible areas which control the mouse or touch behavior to interact with applications. The AC can be filled with standard desktop applications or Windows Store applications. In an application is terminated IntelliGaze will return to the AC. © alea technologies gmbh, 2015 Version: 3.0 37 Using IntelliGaze™ IntelliGaze™ Installation & Service Manual The operation center options offer access to more parameters than the Assisted Access operation center options. The user or caretaker can close an application, open a task manager, calibrate, call help, pause the system or access a wide variety number of options to configure profiles, cursor shape and behavior, volume and many more. 5.6.3 Full Access The Full Access offers the most flexibility for user which want to use any desktop application. The user interface offers control panels to interact with Windows 8 apps as well as standard desktop applications such as Word, Firefox, Skype, Adobe Reader and many games. Applications are launched directly from the Windows start menu or desktop. IntelliGaze profiles will automatically adopt eye tracker parameters to the active application. The operation center offers the same versatile options as the operation center in the safe mode. 38 Version: 3.0 © alea technologies gmbh, 2015 Using IntelliGaze™ IntelliGaze™ Installation & Service Manual 5.7 General Use --> see Quickstart Guide PDF version of the Quickstart Guide is included in the setup CD and it is installed with IntelliGaze. © alea technologies gmbh, 2015 Version: 3.0 39 IntelliGaze™ Reference 6 IntelliGaze™ Installation & Service Manual IntelliGaze™ Reference 6.1 Overview The IntelliGaze™ software package consists of several modules: 40 1) IntelliGaze™ Main Application . 2) IntelliGaze™ Service Mode Modification of in-depth parameters. 3) Monitor Calibration Tool to calibrate the physical setup. 4) Gaze Assistant Application to evaluate user and system performance. Version: 3.0 © alea technologies gmbh, 2015 IntelliGaze™ Reference IntelliGaze™ Installation & Service Manual All IntelliGaze settings can be reset to installation state using the tool Reset-IntelliGaze.exe which is located in the installation folder of IntelliGaze. 6.2 System Hotkeys The hotkey assignment can be redefined (see: Service-Mode), therefore only the standard set can be listed. Hotkey (default) Function Comment Ctrl- F5 Start Calibration ESC will cancel SPACE Accept point during calibration will trigger the overwrite mode during a binocular calibration PAUSE Dis-/Enable Cursor Control Toggles Gaze<>Mouse Ctrl- S Toggle Standard Mouse-Cursor on/off Ctrl- F1 Show Operation Center Ctrl- F11 Enter Preferences Ctrl- D Starts desktop screen video recording The status monitor shows a record icon in the upper right corner Video is encrypted. File location: /My Documents/alea_technologies_gmb h/IntelliGaze Ctrl- L Load calibration profiles Ctrl- K Save calibration profiles Ctrl- H Show help for keyboard shortcuts © alea technologies gmbh, 2015 Version: 3.0 41 IntelliGaze™ Reference IntelliGaze™ Installation & Service Manual Service and Administration Hotkeys (not for client use) Hotkey Ctrl- I Function Comment Snap Image to file no feedback. Image is encrypted. File location: /My Documents/alea_technologies_gmbh/IntelliGaze/ Ctrl- R Record Video The status monitor shows a record icon in the upper right corner. Video is encrypted. File location: /My Documents/alea_technologies_gmbh/IntelliGaze/ Ctrl-F10 Show eye image in status monitor Visual feedback for reflections on glasses. Needs to be enabled in Service-Mode. The mapping schema can be changed to a different mapping in the IntelliGaze Service-Mode. You can open a list with all available shortcuts from the IntelliGaze tray icon menu or press Ctrl+H 6.3 Desktop Control With a full IntelliGaze license the user can efficiently control the Windows desktop, applications or Window Store Apps. IntelliGaze will automatically detect the environment and will switch the user interface to an appropriate style. Additionally IntelliGaze application profiles will make sure that the gaze interaction will automatically adopt to the need of the active application. Gaze Interaction UI - Sidemenus for Desktop and Windows Store Apps 42 Version: 3.0 © alea technologies gmbh, 2015 IntelliGaze™ Reference IntelliGaze™ Installation & Service Manual 6.3.1 Side Menus Special functions, mouse functions and touch input functions can be activated from side menus. Side menus are activated with an off-screen fixation and can be made 'sticky' with another off-screen fixation if the menu is visible. Non-sticky side menus will disappear after a few seconds of idle time. The status of the menu is visualized by a small needle icon at the top of the menu bars. Desktop – Left Side Single Left Click Single Right Click, lockable* Double Left Click, lockable* Drag and Drop */ Locked Mouse actions will be used with every click until they are unlocked again. By default, Single Left-Click will be enabled after every other click action. Drag and Drop Options Three different drag and drop options are available to allow the user either fast and coarse or very precise drag&drop or selection operations. 1.Direct, single click select and drop operation. 2.The Position Helper will be used for very precise select and drop operation. 1. 2. The Position Helper tool does not place the mouse cursor directly at the gaze location, instead the position of the Windows cursor is moved according to the gaze position relative to a 'dead zone' (red circle). A fixation inside the dead zone initiates the mouse click. After the primary selection, the dead-zone shape changes to an octagon and the secondary selection can be completed as before. All menu functions are disabled while a drag&drop operation is in progress. © alea technologies gmbh, 2015 Version: 3.0 43 IntelliGaze™ Reference IntelliGaze™ Installation & Service Manual Desktop – Right Side Pause halts the gaze interaction, can be restarted with a second activation on the pause button. Enforce Magnifier will pop up the magnifier at the next activation on the screen. Scroll will open a scroll selection pop-up to choose between text scrolling and selection scrolling. Configuration allows to configure options When paused, the menu will disappear after 30s to allow undisturbed media-consumption or similar. Another off-screen fixation will bring the menu back. Scroll Selection Two different scroll modes are available to choose between text scrolling operation and selection scrolling operation. 1. Selection scrolling Used to select an item from a scrolling list of options. Exit with a 1 2 fixation inside the scroll area. 2. Text reading scrolling Used for reading long texts with automatic scrolling and minimal obstruction. Exit with fixation on upper right exit icon. WindowStore Apps – Left Side The off-screen App Gestures menu can be accessed on the left side of the screen. Tap and Select Gestures Drag and Drop Gestures Pan and Scroll Gestures Zoom and Rotate Gestures 44 Version: 3.0 © alea technologies gmbh, 2015 IntelliGaze™ Reference IntelliGaze™ Installation & Service Manual Tap and Select Gestures Options Four different Tap and Select Options are available. 1. 2. 3. 4. 1. 2. 3. 4. Single tap Double tap Right mouse click Select tap Drag and Drop Gestures Options Two different drag and drop options are available to allow the user either fast and coarse or very precise drag&drop selection operations. 1. 2. 1. Hold “finger” down and move it with the eyes 2. The Position Helper will be used for very precise select and drop operation. Pan and Scroll Gestures Options Two different Pan and Scroll Gestures are available to allow the user either use a reading scroll mode or a mode where you can pan in any direction. 1. Pan in any direction 2. Reading scrolling 1. 2. Zoom and Rotate Gestures Options Zoom and Rotate are multi-touch gestures. 1. Switch to the zoom mode 2. Switch to the rotate mode 1. 2. © alea technologies gmbh, 2015 Version: 3.0 45 IntelliGaze™ Reference IntelliGaze™ Installation & Service Manual WindowStore Apps – Right Side Pause halts the gaze interaction, can be restarted with a second activation on the pause button. Enforce Magnifier will pop up the magnifier at the next activation on the screen. System Gestures will open a system gesture menu that allows the user to perform a windows system gesture just like close, charms or switch app Configuration allows to configure options Windows System Gestures System Gestures are special Windows operations to switch between apps, close an app, show the charms menu or application options. Close Close the app Charms Menu will open the Windows charms menu Application Options opens the options menu of the application Task Manager shows the windows task manager to switch between apps 46 Version: 3.0 © alea technologies gmbh, 2015 IntelliGaze™ Reference IntelliGaze™ Installation & Service Manual Activate next app switches to the next app in the list 6.3.2 Integrated Keyboard A click inside an edit box or a text field will automatically pop up a keyboard. Depending on the preselection of the setup menu, one out of three keyboards will be activated. Use either the integrated alea keyboard for easy typing, the Windows OSK which supports several languages and provides word prediction or an optional third party keyboard which can be customized. Integrated keyboard (ABC-layout) with local text feedback. Shown above is the integrated alea keyboard. Buttons that are marked with a tiny triangle in the corner offer international variations of the letter when performing an immediate second fixation on the same button. The preview on top of the keyboard shows the content of the cursor even if the text field is hidden by the on screen keyboard. Its purpose is to provide quick feed-back. There are several layouts available. The layouts can be switched during run time if they are activated in the 'IntelliGaze Preferences '. At least one layout must be selected. Example layouts for the integrated keyboard. Italian © alea technologies gmbh, 2015 Version: 3.0 47 IntelliGaze™ Reference IntelliGaze™ Installation & Service Manual Hebrew 6.3.3 Magnifier A click in a region with small, crowded elements will automatically open the magnifier to allow for precise selections. Interactive Magnifier The magnifier will always be opened in the middle of the screen. It provides a live view of the desktop, rather then a simple, static snapshot and it can be shifted around by looking at or beyond the little arrows outside the central area. The operation can be canceled by looking at the top-right cross. The automation will always try to snap the cursor into elements. When there are overlapping elements and controls it can be advantageous to turn the automation off to prevent false selections. This can be done with the lower left button. 48 As constantly finding interactive GUI elements is a performance demanding task, slower PCs might fail to accomplish the calculations in real-time. The magnifier will then always pop up when the search for elements does not finish in time. A red frame on the magnifier indicates that the magnifier popped up because of lack of processing power on the PC. Version: 3.0 © alea technologies gmbh, 2015 IntelliGaze™ Reference IntelliGaze™ Installation & Service Manual 6.4 Operation Center The operation center is the central location where the user and the caretaker control the eye tracking options. The camera/monitor orientation is done with the status window of the first page being open. In cases, where tracking is hard to stabilize or environmental conditions are very challenging, the 'eye display' mode can be enabled by clicking in the status window. After the camera is alined the gaze is being calibrated. Calibration profiles can be loaded and saved on the calibration options page. The operation center can be opened in three different ways. Touch the display, look above the screen, use the right side menu to directly enter the application options sub-page of the operation center. The operation center offers just a subset of options in the Assisted Access. When opening the operation center with touch no gaze input is available in the operation center Operation Center Structure © alea technologies gmbh, 2015 Version: 3.0 49 IntelliGaze™ Reference Button IntelliGaze™ Installation & Service Manual Function Comment open windows start menu Will exit the operation center, only available in full access mode return to the application center Will exit the operation center, only available in safe access mode open task manager allows the user to quickly switch between active applications close active application closes the application in the foreground pause gaze interaction open options dwell time, profile options, sleep function, auditory feedback call help * will activate a sound to call for assistance open calibration menu The call help can be very loud if the preference “maximize volume” is selected! 6.4.1 Calibration The calibration page of the assisted access offers some calibration preferences which be changed directly from the operation center. Full Access, Safe Access Assisted Access 50 Version: 3.0 © alea technologies gmbh, 2015 IntelliGaze™ Reference IntelliGaze™ Installation & Service Manual Button Function Comment Start calibration Load default calibration If a user can't be calibrated you can load a default calibration which provides decent accuracy for most of the users Load calibration Save calibration Show last calibration result Show an image as calibration target Can be an animated gif to attract users attention Define the number of calibration points Clicking in status windows will toggle the view to a live video of the eyes. This video is especially useful to analyze problematic situations when working with glasses, contact lenses or other eye tracking relevant issues. Eyevideo view to analyze tracking problems You may want the make snapshots or a create 10-20secs video of the eyes and send the result to alea technologies to get assistance to understand possible problems and receive solutions. © alea technologies gmbh, 2015 Version: 3.0 51 IntelliGaze™ Reference IntelliGaze™ Installation & Service Manual 6.4.2 Options On this page users or caretakers may access options which are relevant at runtime. General Button Function Comment Dwell Modifier changes the speed of the dwell Volume adopt the system volume Audio Feedback Enable the generation of click noises Turn off monitor darkens the monitor when the user wants to rest The monitor is made bright by looking into the camera for a while Show IntelliGaze Preferences opens the 'IntelliGaze Preferences' will turn off gaze interaction. The preferences are for the caretaker. Quit IntelliGaze quits IntelliGaze will stop all gaze interaction 52 Version: 3.0 the basic speed is an application profile property, the modifier is a temporal personal preference of the user © alea technologies gmbh, 2015 IntelliGaze™ Reference IntelliGaze™ Installation & Service Manual Current Application Button Function Comment Application: displays the name of the currently active application This unique name is used to automatically find a profile for the application Profile: displays which profile is currently used for the application in the foreground If no specialized profile is found the default profile is used Add to Application adds the current active Center application to the application center with single click The application center is available in Safe Access only determines if the magnifier is opened automatically for this application chooses a keyboard for the current application The default keyboard is the alea keyboard with the preferences choosen in the Ctrl+F11 dialog Open Profile Man- edit the profiles or create new ager profiles Profile Overview © alea technologies gmbh, 2015 show an overview of the active profile Version: 3.0 53 IntelliGaze™ Reference IntelliGaze™ Installation & Service Manual Profile Overview This dialog gives you a complete overview of all customizable gaze interaction parameters of the current profile. A quick reminder for the most important profile options pops up evertime you switch an application in the upper right corner. Skype Profile providing the primary trigger, an OSK and the magnifier Profile Manager The profile manager lists all available profiles. Each profile except the default profile can be enabled individually. You may add a new profile or edit an existing one. 54 Version: 3.0 © alea technologies gmbh, 2015 IntelliGaze™ Reference IntelliGaze™ Installation & Service Manual Profile Editor IntelliGaze is installed with a wide selection of application profiles. In case you are going to deploy an application which benefits from an individual profile you can customize a newly created profile here. You may also adopt existing profiles to personalize the behavior and look & feel of the gaze interaction. You may share newly created profiles with alea technologies. Future releases of IntelliGaze will deploy new profiles to further enhance the user experience when working with arbitrary applications. The profile options are grouped in six categories. © alea technologies gmbh, 2015 Version: 3.0 55 IntelliGaze™ Reference IntelliGaze™ Installation & Service Manual Each parameter can be configured or set to default. If set to default. The setting of the default profile will be used instead. It's recommended to leave most parameters on default unless an application benefits from an individual parameter. If you change a parameter in the default profile all profiles using default parameters will use the changed parameter as well. Category Dwell-Blink Cursor Keyboard Parameter Comment Dwell Duration set the dwell time which is used in this profile Blink Duration set the blink duration which is used in this profile Cursor Shape determines the shape of the gaze cursor Cursor Color chooses the color of the gaze cursor, the color should have a high contrast to the application in which it is used Cursor Behavior Fast, used for gaming where the cursor needs to be moved in real time Simple Mouse, the cursor movement is smoothed Smart – Desktop 2, the cursor position can be displaced. It is not shown at the often inaccurate gaze position. The cursor will snap in to GUI elements using the Blickfang technology. Additionally an automatic magnifier and automatic keyboard is used Snap-In Distance determines the maximum size of GUI elements in which the “Smart -Desktop2” will snap in Use Keyboard enabled or disables the usage of an integrated OSK Keyboard Auto Activation if enabled the keyboard will pop up automatically when you look at editable elements on the screen Magnifier Appearance Trigger-Actions 56 Keyboard Type chooses the OSK which Auto Magnifier if enabled the magnifier will pop up automatically when you look in between several small GUI elements. Magnification Level chooses a magnification level Left Side Menu choose if the left side menu is available Right Side Menu choose if the right side menu is available Maximize App Window tries to maximize the window of the application Status Window determines the behavior of the status window list of all Trigger Actions which are available in this application see explanation below Version: 3.0 © alea technologies gmbh, 2015 IntelliGaze™ Reference IntelliGaze™ Installation & Service Manual Trigger-Actions A few applications react when you hover just the mouse cursor on elements. Most applications react on mouse clicks, touch or keyboard inputs. In the trigger actions associate a trigger with an action. A trigger in IntelliGaze is either the Dwell, Blink, Switch or Key entity. An application can use several trigger actions. In example a movieplayer can be configured to play forward, backward, change volume with 4 different trigger actions such as blinks in for corners of the screen. Parameter Function Comment Trigger chooses which type of trigger is used to raise the action Action determines which action is to be GUI Defined is only available for the raised when the trigger fires Primary Trigger and means that the action is determined by the left side menu Action Parameter set the parameter for an action You may send an entire text by choosing the Send Key action Region chooses a region on the screen in which the trigger is active restricts the trigger to a certain region (or entire screen) © alea technologies gmbh, 2015 Version: 3.0 The trigger itself is chosen in the 'IntelliGaze Preferences' Gaze Over will fire the trigger as soon as the user looks into the specified region. 57 IntelliGaze™ Reference IntelliGaze™ Installation & Service Manual Send Key Parameter Each key is represented by one or more characters. To specify a single keyboard character, use the character itself. For example, to represent the letter A, pass in the string "A" to the method. To represent more than one character, append each additional character to the one preceding it. To represent the letters A, B, and C, specify the parameter as "ABC". Key Code BACKSPACE {BACKSPACE}, {BS}, or {BKSP} BREAK {BREAK} CAPS LOCK {CAPSLOCK} DEL or DELETE {DELETE} or {DEL} DOWN ARROW {DOWN} END {END} ENTER {ENTER}or ~ ESC {ESC} HELP {HELP} HOME {HOME} INS or INSERT {INSERT} or {INS} LEFT ARROW {LEFT} NUM LOCK {NUMLOCK} PAGE DOWN {PGDN} PAGE UP {PGUP} RIGHT ARROW {RIGHT} SCROLL LOCK {SCROLLLOCK} TAB {TAB} UP ARROW {UP} F1 - F16 {F1} - {F16} Keypad add {ADD} Keypad subtract {SUBTRACT} Keypad multiply {MULTIPLY} Keypad divide {DIVIDE} To specify keys combined with any combination of the SHIFT, CTRL, and ALT keys, precede the key code with one or more of the following codes. Key Code SHIFT + CTRL ^ ALT % 58 Version: 3.0 © alea technologies gmbh, 2015 IntelliGaze™ Reference IntelliGaze™ Installation & Service Manual To specify that any combination of SHIFT, CTRL, and ALT should be held down while several other keys are pressed, enclose the code for those keys in parentheses. For example, to specify to hold down SHIFT while E and C are pressed, use "+(EC)". To specify to hold down SHIFT while E is pressed, followed by C without SHIFT, use "+EC". 6.5 IntelliGaze Preferences The preferences menu can be used with a keyboard, a mouse or with touch. It can be accessed via the IntelliGaze tray icon or by pressing Ctrl-F11. Alternatively it can be accessed from the operation center. The gaze control will be turned off while editing menu entries. ● General - General Options, Version and License Status ● Calibration - Calibration parameters ● Input - Trigger to do clicks and other actions ● Integrated Keyboard - alea integrated keyboard ● Operation Center - Appearance of the operation center ● Application Center - Options for the AC 'home-page' 6.5.1 General Options Language The user interface language of IntelliGaze can be adapted by choosing an entry from the list. A restart of IntelliGaze will finalize the change. Licensing The IntelliGaze licensing scheme is handled by the CAM30/CAM30NT camera module's hardware. The license key is stored in the camera module. This allows the user to install and run the software on sev eral computers. Wherever the camera will be connected, the licensed functionality will be available. The IntelliGaze™ software will only start properly if the camera has been connected. The actual licensing is done during the production process according to the customer order. Typically this will be a non time-limited 'AAC Standard' license. The license might also restrict the use to particular client software or only grant access to particular features. The status of the system license can be checked under: © alea technologies gmbh, 2015 Version: 3.0 → Options → General 59 IntelliGaze™ Reference IntelliGaze™ Installation & Service Manual Feature Full Api only Starter Professional Region A Description Allows desktop control using the Desktop 2 automation Only communication packages such as Grid2 or Mind Express can be used. Assisted operation center is available as well. Assisted operation center is available only Device is licensed for professional applications that access raw data just like head speed, binocular gaze and eyeball position Device supports only North American languages (English, French, Spanish) If you are running the system on a temporal license, a warning will be issued, a few days before it will terminate. The license can be programmed on-site without extra tools: • The Hardware Key will have to be transferred to alea technologies. • alea technologies will issue a new license key and re-transfer it. • • 60 This license key needs to be programmed into the device, an option that will be offered by IntelliGaze™, when the camera is connected and no license is found. Alternatively the current license can be overwritten with the Update License command link on this page The 'Device' parameter informs the user about which device is licensed. i.e. on a Neos13 computer with integrated camera the label will show CAM30NEOS Version: 3.0 © alea technologies gmbh, 2015 IntelliGaze™ Reference IntelliGaze™ Installation & Service Manual Software Version & Online Update This entry shows the currently installed software version and can optionally provide information about available online updates. Please refer to chapter 8 'IntelliGaze Software Update' for details. 6.5.2 Calibration During the calibration, the IntelliGaze™ system calibrates the internal calculations to the individual parameters of a subject’s eye. A calibration requires the subject to fixate a number of targets on the screen. Typically the system will automatically detect the correct fixation and interactively cycle through the point sequence. The parameters for this process can be configured as described below. After the calibration, the system will provide an intuitive feed-back about the quality of the calibration. Once a calibration has been completed successfully, it will be automatically saved and re-used, until another calibration has been completed. This works even over restarts of the system. In order to achieve and maintain the highest accuracy, we recommend calibrating the user after system changes or longer periods of time. Very large changes in ambient illumination might also be compensated by a new calibration run. The parameters of the calibration can be configured under: → Options → Calibration © alea technologies gmbh, 2015 Version: 3.0 61 IntelliGaze™ Reference IntelliGaze™ Installation & Service Manual Calibration Parameter Values, defaults Description # of points 1, 5, 9, 16 Number of points in calibration sequence. A higher number can increase the accuracy. The 16 points calibration is optimized for highest accuracy. Head movement range is limited with 16 point calibration. This method is designed for ALS users who want to control the Windows desktop. Target gaze accuracy 10, 20, 30, 40 mm The accuracy that a particular subject can/should achieve. The parameter does not influence the actual accuracy, but is only used for qualitative calibration feedback, e.g. even a user with impaired eye movement control can get 'good' results, when the target accuracy is lowered. Randomize points Y/N Changes the point sequence randomly to avoid prediction artifacts. Play audio Y/N Sound feedback with point acceptance. Slow mode Y/ N Slows down the automatic calibration process. Shake marker Y/ N Shakes the marker after it moved to a new position to help attract users attention at this position Automatic calibration Y/N Cycles through the point sequence automatically, checking proper fixation on each point. When turned off, the operator has to accept each point manually. ESC will cancel the calibration sequence at any time. Skip bad points Y/ N After a while a non-fixated point will be ignored and the sequence will continue. When turned off, the system will wait indefinitely for a proper fixation. Pick display colors n/a Colors for the calibration screen and targets. Please pick the calibration background colors close to the future operation scenario, in order to avoid gaze calculation artifacts through large pupil dilation changes, I.e. calibrate on dark background, when the operation environment will be dark. Use image marker Y/ N Position calibration area Bottom, Center, Full, Horizontal, Vertical Very large screens or visually impaired subjects might require on calibration only a part of the screen. Both, Right, Left Selects which eyes will be used for the calibration. Choose which eye to calibrate Ignore r/l eye completely 62 n/a Instead of the animated dot, a picture can be used as calibration target, which can be particularly useful when calibrating children. A dialog will allow the selection of a JPG, BMP or PNG image. The size shall not exceed 256x256 px., color of the pixel 1,1 will be treated as transparent image color. In most cases, the 1-point calibration on 'full-screen' will yield similar results to a reduced calibration are . Horizontal and Vertical options are only available with 5-point calibration. When only one eye is selected for calibration, the option to completely ignore the other eye comes up. The second eye should only be completely ignored, if it's permanently invisible, i.e. an eye-patch is being used. Version: 3.0 © alea technologies gmbh, 2015 IntelliGaze™ Reference IntelliGaze™ Installation & Service Manual Overwrite Calibration When calibrating both eyes the systems stalls at each point until data from both eyes is available. This ensures the maximum data quality sacrificing tolerance to unstable data. Some users can not be calibrated because there will be points where at least one eye is not visible or unstable. Pressing the space bar overwrites that calibration point. The system now relieves the strict data acceptance and calibrates the point with whatever data is available at this point. The calibration overwrite routine can also be used for user with problematic glasses. Pressing the space bar will force the system to accept data which would be rejected under normal calibration. Calibration Profiles A calibration can be saved for later usage. This is especially useful when working with several users on a system and the calibration is difficult to achieve. Using Load and Save Calibration you can very easily switch between calibrations. Beside the individual calibration data, the profile contains all settings of the calibration procedure. Use the IntelliGaze Operation Center to access this function: Button Function Load calibration profile Save Calibration profile The calibration profiles are shared with the Gaze Assistant tool, where several management functions are provided. 6.5.3 Input Clicks and other IntelliGaze actions can be triggered with dwell, blink, switches or keys. There are dif ferent channels for triggers which can be used simultaneously. The primary trigger can be dwell, blink, switch or key. The secondary trigger can be blink, switch or key. The action will be triggered is determined by an application profile. Some external switches generate physical key presses rather than Windows joystick button click events. Choose “key” as trigger input and define which key is to be used. To check if your hardware can be used as switch (Windows USB joystick) run the following windows program. “setup USB game controllers”. You device should appear in the list if it supports Windows USB joystick. Windows USB joysticks are access as “switches” in the IntelliGaze Input options. © alea technologies gmbh, 2015 Version: 3.0 63 IntelliGaze™ Reference 64 IntelliGaze™ Installation & Service Manual Make sure that a key trigger does not interfere with the application. It's recommended to use the function key F13-F24 if the hardware supports it. Primary switches always act as “direct click” devices. Holding down the button on the switch will generate a mouse down event at the gaze location, allowing the user to perform a drag and drop action. Version: 3.0 © alea technologies gmbh, 2015 IntelliGaze™ Reference IntelliGaze™ Installation & Service Manual The input triggers will only affect clicks generated by IntelliGaze. When using API applications such as Grid, the click method must be configured there independently. The actual dwell time is defined per application profile. 6.5.4 Integrated Keyboard The IntelliGaze desktop control comes with an integrated keyboard. The keyboard layout can be selected on this page. Multiple layouts can be unlocked at the same time. They are switched at run time by the user. 6.5.5 Operation Center The operation center can be configured to be support a specialized operation mode. Refer to chapter 5.6.Operation Modes. The IntelliGaze license determines which operation modes are available. The call help options define which actions are performed if the user clicks the help button in the operation center. © alea technologies gmbh, 2015 Version: 3.0 65 IntelliGaze™ Reference IntelliGaze™ Installation & Service Manual Button Effect Default Sound A standard sound is played at maximum system volume Custom Sound A sound file must be chosen which is played at maximum system volume Execute File A batch file must chosen which may trigger any additional actions such as sending a text message or trigger an environmental control command. 6.5.6 Application Center In the Application Center (AC) options you can configure the appearance of the AC. Each application will appear as button on the AC homepage which is available in the “Safe Access” of the Operation Center. You can also decide which background you want on the application center homepage. 66 Version: 3.0 © alea technologies gmbh, 2015 IntelliGaze™ Reference IntelliGaze™ Installation & Service Manual Application List The Application List gives you an overview of how many application are AC controlled. An application can be started by looking at the application button on the AC. The buttons are displayed from left to right in the order of the application list. Example application list: © alea technologies gmbh, 2015 Version: 3.0 67 IntelliGaze™ Reference IntelliGaze™ Installation & Service Manual Parameter/ Option Values, defaults Description Add n/a Opens a dialog to create a new AC controlled application Edit n/a Opens a dialog to edit the application that is selected in the application list Autostart n/a Defines the selected application as autostart. Once started, IntelliGaze will launch this application directly. Remove n/a Removes the highlighted application from the application list Add/Edit Application This dialog allows you to configure application arguments which are applied when the application is launched from the AC. App.Center Parameter / Option Values, defaults Description Name n/a When creating a new application, you can choose a name for the application. This name will also be shown on the button in the AC. This box is grayed when an existing application is edited. This name must be used as an Intelligaze.exe command line parameter when you want to autostart this application together with IntelliGaze™. Path n/a The full path to the program executable. Arguments n/a Program arguments for starting the application. Icon 68 n/a If you want to launch a browser application enter your favorite browser in the path edit box and the URL to the browser application in the arguments edit box. Pick an icon which will be displayed on the button in the application center. If left empty, IntelliGaze™ tries to extract an icon from the executable. Version: 3.0 © alea technologies gmbh, 2015 IntelliGaze™ Reference IntelliGaze™ Installation & Service Manual 6.6 Service Mode The Service Mode allows the adjustment of internal system parameters by the experienced system integrator.. It can be invoked by starting “IntelliGaze-Service” from the Program Menu. The Service-Mode is not meant to be used by the end-user! SERVICE-Mode - The program link should be deleted before delivery. It can easily be recreated: the Service Mode is internally linked to starting intelligaze.exe with a command-line parameter 'service' - i.e. RUN: “intelligaze.exe service” Eye Tracking Parameter Parameter Hardware Log Default Value Description Data Source Camera Speed 40Hz Recommendation: 50Hz for real time applications like games (CAM30 only) 30Hz for computers at the lower end of the hardware recommendation Power Saving 1 for the Tablet PCs to optimize battery lifetime. Standby-Time 15s The device will power down to an energy saving mode when there is no head in the working range for the given amount of time Eye-Display -on- When turned on, you can activate an eye display in IntelliGaze™. The eye display might help to solve problems that occur when dealing with glasses Log-Level Warning Chooses the debug level of the application. When set to verbose, the system will write all internals into the logger; when set to error, only error message will be logged. © alea technologies gmbh, 2015 Choose whether you want to operate the system in mouse simulation mode or in standard camera mode Version: 3.0 69 IntelliGaze™ Reference Eye Tracking Parameter Parameter Eye-Events 70 IntelliGaze™ Installation & Service Manual Default Value Description Log-Type Logfile Determines the output of the logger. UDP: logs text messages to 127.0.0.1:2351 LogFile location: /MyDocuments/alea_technologies_gmbh/IntelliGaze/logfiles Fixation Duration Min 100 ms The minimum fixation duration of the build in fixation detection algorithm. Fixation Dispersion 60 px Blink Duration Min 200 ms The minimum blink duration of the built-in blink detection algorithm 700 ms The maximum blink duration of the built-in blink detection algorithm. All blinks longer then this number are regarded as “no data available” The maximum dispersion of the fixation of the build in fixation detection algorithm The Speed Option “Power Saving 1” offers unique power optimization to maximize the battery lifetime on tablet pcs. It's recommended to use this mode when a tablet pc is operated in a mobile setup without mains power. Version: 3.0 © alea technologies gmbh, 2015 IntelliGaze™ Reference IntelliGaze™ Installation & Service Manual User Interface Parameter Parameter Default Value Cursor Delay 200 ms The mouse cursor is delayed with a rubber-band effect for the given amount of time. Key Shortcuts Disable Background false When true, IntelliGaze™ will disable all keyboard shortcuts when IntelliGaze™ is started with the “background” parameter Disable Application false When true IntelliGaze™ will disable all keyboard shortcuts when an application is launched from the application center IntelliGaze™, Rolltalk, Custom IntelliGaze Disable Application false When true IntelliGaze™ will disable all keyboard shortcuts when an application is launched from the application center Enable Touch Screen support false When activated IntelliGaze™ will bring up a menu for system function whenever the touch screen is touched Keyboard mapping Touch Screen Detect General Defines the set of key shortcuts which are used by IntelliGaze™ Activates the auto-detection function of the touch panel Touch duration 0.5sec Check for updates True © alea technologies gmbh, 2015 Description Delay before the menu pops up after a touch event Checks for online updates when you start IntelliGaze™ Version: 3.0 71 Adapting IntelliGaze to Different Applications 7 IntelliGaze™ Installation & Service Manual Adapting IntelliGaze to Different Applications 7.1 Blickfang™ Concept The measured gaze is never 100% accurate and stable because of measurement tolerances and the physiology of the eye. A gaze cursor that is directly coupled to the measured gaze will distract the user and create additional errors because the eye tends to follow moving and jittering target rather than staying focused on the real content of the screen. IntelliGaze uses a technology to snap the gaze cursor into elements. This works not just for controls in IntelliGaze but also in some selected Third party applications. Additionally, the Blickfang technology is employed by Desktop 2.0 to use the snap in function on any arbitrary Windows application that supports the so called UI-automation. The so called “decoupled cursor” is required to apply the snap in behaviour of the cursor. Blickfang greatly enhances the user experience and it is recommended to make use of it wherever possible. Gaze Cursor, floating between elements. Cursor with Blickfang, centered on elements using Desktop 2.0: Application IntelliGaze - always on Desktop 2 (decouple mouse cursor behavior) - always on Grid2 72 Blickfang Activation - integrated in Grid2, no Intelligaze Blickfang is used Version: 3.0 © alea technologies gmbh, 2015 IntelliGaze™ Installation & Service Manual Adapting IntelliGaze to Different Applications 7.2 Windows Desktop Settings The control of the Windows desktop poses a particular challenge to gaze interaction users. Enlarging the elements of the graphical user interface can help to substantially improve the user experience when relying on pure mouse cursor emulation. The desktop settings on Windows 8 can be adjusted, as follows: Control Panel\Appearance and Personalization\Display\Screen Resolution | Make text and other items larger or smaller Recommended Settings (based on 12”..15”, 1280x800 screen-size) : Parameter Value Title Bars 16 Menus 12 Message Boxes 12 Palette Titles 14 Icons 12 ToolTips 12 Grid2 supports only a DPI setting of 125%. If you intent to use Grid2 make sure to not make the DPI settings larger than 125%. © alea technologies gmbh, 2015 Version: 3.0 73 Adapting IntelliGaze to Different Applications IntelliGaze™ Installation & Service Manual 7.3 Application Center - General Considerations The purpose of the Application Center is to provide an easy, central home-page, where 3rd-party applications can be easily started and stopped. Some options include: • Switch between two applications without starting them from the Windows desktop • Start online resources directly by starting a web-browser with additional parameters. The applications grouped in the application center can be standard desktop applications, modern UI store apps or API applications such as Grid2. If there is a profiles for the application it will be automatically applied when the application is launched from the application center. 74 Version: 3.0 © alea technologies gmbh, 2015 IntelliGaze Software Update IntelliGaze™ Installation & Service Manual 8 IntelliGaze Software Update You can check the version of IntelliGaze™ under Options → General. 8.1 Update from CD If you intend to update to the newer version from a CD, just run the setup.exe of the newer version. The installer will replace the outdated files automatically. Please read the release notes of the new version to find out whether an update is advisable. 8.2 Online-Update IntelliGaze from v.1.2 onward additionally provides an online update function. Software version below 4 will not be updated to version 4 with the online update. Manually update versions below 4. IntelliGaze Options → General: “Show details” will open the update dialog and provide you with the Release Notes of the new version. This link is only available when a new update is available. Please read the Release Notes of the new version to find out whether an update is advisable. Clicking “Download and install” will then execute the update automatically. The execution of the online update does require Windows administrator rights! The check for online updates can be suppressed in the Intelligaze Service Mode © alea technologies gmbh, 2015 Version: 3.0 75 Gaze Assistant 9 IntelliGaze™ Installation & Service Manual Gaze Assistant 9.1 General The Gaze Assistant is wizard-like tool to measure and protocol the gaze interaction capabilities of a user. It also helps the caretaker to set up the system. It splits up the setup process into small well defined steps that help to identify problems early. The Gaze Assistant does not require an a user specific gaze calibration.. 9.2 Usage 9.2.1 User Profile Selection Create a user profile for a user. You can have several profiles per user if you want to switch between tests for different glasses in example. The user profiles are shared with the IntelliGaze calibration profiles. Each user calibration created with the gaze assistant is also available in IntelliGaze under “Calibration Profile/Load” Group Add Delete Run Tests Description Creates a new user profile. All settings and results are saved per user. Deletes the highlighted profile Performs the test for the highlighted user 9.2.2 Target Selection In this step of the wizard you can define a gaze target for the user. This target will be used later in the test as well as in the calibration. 76 Version: 3.0 © alea technologies gmbh, 2015 Gaze Assistant IntelliGaze™ Installation & Service Manual The target selection is a fundamental part of the set up process. A target / contrast / image that can only be poorly seen by the user will result in a poor performance. When working with children it's recommended to use a picture to draw their attention to the gaze target. Target Selection Default Value Colors Bgnd / Target Blue / Red Use image as marker off Use an image instead of a point as gaze target Shake off Shakes the target whenever it's moved to a new position to draw the users attention Slow Off Moves the target much slower to help users with a weak cognition to follow the target © alea technologies gmbh, 2015 Description Defines the color the background and the target during the following tests. The contrast should be high Version: 3.0 77 Gaze Assistant IntelliGaze™ Installation & Service Manual 9.2.3 Fixation Test The fixation test evaluates the previous target selection if the user is capable and or willing to look at the target. This tests confirms that there is some kind of reaction of the users to the target. It can reveal brain neglects as well as visual impairments. The test will switch the gaze target between two spots on the monitor and repeat this three times. It will measure if the eyes meaningfully respond to this stimulus change. Fixation Test Parameter Precision OUTPUT: Left / Right A low value < 100 px indicates that the user did react to the left or right stimulus. Average fixation OUTPUT: ms How long was the user able to fixate the targets. This value a also an early indicator how long the maximum dwell time should be Perform Fixation Test Good – clear reaction on both spots 78 Description Starts the test. Bad – arbitrary reaction on the left spot Gaze-Ass. Hotkey Function Enter Starts the test Escape Interrupts the test Version: 3.0 Comment © alea technologies gmbh, 2015 Gaze Assistant IntelliGaze™ Installation & Service Manual If the Fixation Test fails its recommended to go back to the target selection page, choose a different target and repeat the fixation test to check if this helps the user to react to the target better. 9.2.4 Field of View Test The Field of View Tests evaluates if the users is able to react to the gaze target on every critical position of the screen. The test confirms that the users reacts to the target on several screen positions and there are no eye tracking problems in that position. The test is binocular therefore it's possible to identify the problems per eye. The test will move the gaze target across several lines on the screen. The user is supposed to follow the dot while the system measures the eye movements during that process. As a result you will get a visual representation of the scan path per eye. FOV-Test Parameter Red line Left eye Green line Right eye Black line Combined eyes Description Scan path of the left eye Scan path of the right eye Scan path of the intelligent gaze combination of left and right eye. The lines don't have to be very accurate. The test is supposed to reveal a meaningful reaction to the moving gaze target. A meaningful reaction is a straight line, no matter where the line is. Good - binocular determined reaction at all pathes © alea technologies gmbh, 2015 Bad - tracking problems or no reaction on the upper and lower path Version: 3.0 79 Gaze Assistant IntelliGaze™ Installation & Service Manual Hotkey Function Enter Starts the test at the chosen position Escape Interrupts or ends the test 1-6 Select a position to start a scan Comment Very often it's enough to just test the outer lines ( 1,3,4,6) 9.2.5 Blink Test The blink test measures the user's blink behavior. During the test the user is supposed to look at the target and perform a couple of blinks he would use to trigger actions with the eyes. The system will measure the average blink duration. The blink test gives a recommendation for the minimum blink duration that should be used by IntelliGaze or a third party communication software to trigger clicks with eye blinks. Hotkey Function Comment Escape Interrupts or ends the test 9.2.6 Calibration The calibration test allows the user to perform a calibration with the settings that where found in pre vious tests. Decide for the number of points, the calibration area and the eye that needs to be cali brated according the field of view test. 80 Version: 3.0 © alea technologies gmbh, 2015 Gaze Assistant IntelliGaze™ Installation & Service Manual The calibration will create the first user specific calibration. Previous test will very often perform better after the first user specific calibration because the system now doesn't rely on a default calibration to measure the gaze anymore. 9.2.7 Report The report gives a short summary of the test. It's possible to export the result to an XPS document. The results itself are stored automatically. After quitting the Gaze Assistent and opening the same user again all results are in place. The XPS-viewer is pre-installed on every Windows Vista (and higher) system and will also be installed with the .net 4.5 framework which comes with later IntelliGaze versions. Group Save Report Description Export all test results to a XPS file. Transfer settings to Pushes all settings for calibration and target to IntelliGaze. IntelliGaze © alea technologies gmbh, 2015 Version: 3.0 81 Troubleshooting IntelliGaze™ Installation & Service Manual 10 Troubleshooting 10.1 General 10.1.1 System is not tracking Definition The tracking status Monitor constantly displays 'X' - It is not possible to achieve any positive tracking feed-back from the Tracking Status Monitor. Prerequisites ● IntelliGaze™ installed ● Camera unit connected via USB ● External power-supply connected (CAM30) If you still have problems with the tracking record a 10-20sec eyevideo using the keyboard shortcut Ctrl+R. Alternatively you can open the calibration page of the operation center and click the status windows to create and eye video or snapshots. The video is located in the folder [users documents]\alea_technologies_gmbh\IntelliGaze\eyevideos Send the video to alea technolgies using dropbox or a similar service. 10.1.2 Intelligaze cannot detect camera on start-up Check proper installation and connection of the camera Whenever the camera's USB cable is connected to a properly installed PC, the camera will show up among the USB devices in the control panel: 82 Version: 3.0 © alea technologies gmbh, 2015 Troubleshooting IntelliGaze™ Installation & Service Manual If the camera is not shown as above run the tool reinstall driver which is located in the IntelliGaze folder/driver. 10.1.3 'Measure the monitor before calibration error' Definition The system requires a proper monitor calibration before it can calibrate a subject. Changing the monitor resolution or the camera position with respect to the monitor invalidates the monitor calibration. Solution Launch the tool MonitorCalibration and make sure that the physical screen dimensions and the monitor resolution match your setup. 10.1.4 Dwell click is never triggered Problem Although the subject is properly fixating on a point, the dwell cursor never comes to an end and resets itself. Analysis 1 Some USB devices like memory sticks or external hard-disks allocate too many shared USB resources. The CAM30 data transfer might be interrupted by these devices resulting in an irregular video transfer which finally disturbs the eye event detection. Remove external memory sticks. Solution 1 In general, other USB devices like web cams, speakers, headsets are not a problem. Please select hardware combinations carefully and, if problems occur, consider moving other devices to a different USB port. Analysis 2 The data is too noisy for proper fixations to be detected, or the detection parameters are miss-configured. Solution 2 – Software setting The fixation dispersion is set to a value which prevents proper fixation detection. Increase this value. 10.1.5 IntelliGaze crashed Definition The IntelliGaze software crashes. Solution IntelliGaze has a build in crash recovery restarting the software after a crash to be able to control the pc. However to understand what the reasons of the crash are and to find a solution for that it's helpful to inspect the crash log files. They can be found in the folder [users documents]\alea_technologies_gmbh\IntelliGaze\crashreports © alea technologies gmbh, 2015 Version: 3.0 83 Troubleshooting IntelliGaze™ Installation & Service Manual 10.2 Hardware 10.2.1 Cleaning system components, CAM30 Housing Do not use any harsh solvent! We recommend that you use a cleaner specifically designed for electronic equipment to clean the case. This should be used in conjunction with a soft, lint-free cloth. Any cleaning solution should be applied to the cloth. Under no circumstances should you spray the cleaner directly onto the machine. Excess cleaner may find its way into sensitive areas of the machine and can cause severe damage. Lens Do not use water in any combination with soap or alcohol! Do not use any harsh solvent ! If the lens cover is being used for transport and storage, there should be no need to clean the lens. In the unfortunate case, of dirt reaching the frontal lens, the lens can be cleaned very carefully. Use lens cleaner and cleaning tissues that are certified for optical instruments or glasses. 10.2.2 Cleaning system components, CAM30NT Front plate. IR-transmissive acrylic glass: cleaners. Please use only soft cloth, i.e. microfiber and avoid harsh IR-Filter, 'Small Mirror': Dirt may be removed with glass cleaner or better isopropanol. The use of a cotton swab is recommended. 84 Version: 3.0 © alea technologies gmbh, 2015 Troubleshooting IntelliGaze™ Installation & Service Manual 10.2.3 Check and adjust lens focus (CAM30) Locking Screws Lens-marker with focus (above) and iris (below) calibration mark. How to identify and fix a possibly miss-adjusted camera lens ? The camera lens has been calibrated and screw-locked during production. Two small scratches mark the calibration position. If uncertain whether or not the lens has been miss-adjusted, check for the position of the scratch-marks. If the lens-rings have been moved, open the appropriated locking screw* slightly, move the ring so that the marks are properly aligned again and lock the screw carefully. (* - requires 0,9mm allen/hex key.) After the procedure, the system should be tracking again in the specified working range. If further problems occur, please contact alea technologies. © alea technologies gmbh, 2015 Version: 3.0 85 Troubleshooting IntelliGaze™ Installation & Service Manual 10.2.4 Software --- intentionally left blank --- 86 Version: 3.0 © alea technologies gmbh, 2015 Notes IntelliGaze™ Installation & Service Manual 11 Notes © alea technologies gmbh, 2015 Version: 3.0 87