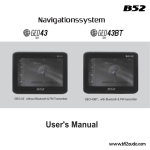
1
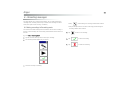
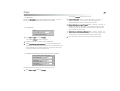
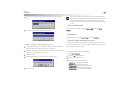
Zingui
manual
Zingui
Table of contents
1 - Introduction
5 - Batteries
2 - Safety and maintenance
5.1 Replacing the battery............................................................................ 13
5.2 Power management.............................................................................. 13
2.1 Safety precautions.................................................................................. 3
2.2 Cleaning instructions .............................................................................. 3
2.3 The carry case........................................................................................ 4
3 - Switch on/off the Zingui
3.1 Switch on the Zingui ...............................................................................
3.2 Standby ..................................................................................................
3.3 Switching the Zingui off ..........................................................................
3.4 Reset......................................................................................................
5
5
5
5
4 - Connectors and indicators
4.1 At the display side .................................................................................. 7
4.1.1 Light sensor (1) ............................................................................................. 7
4.1.2 Microphone (2) .............................................................................................. 7
4.1.3 The battery charging indicator (3) .................................................................. 7
4.1.4 The on/off indicator (4) .................................................................................. 7
4.1.5 The on/off switch (5)...................................................................................... 7
4.2 Left hand side......................................................................................... 8
4.2.1 DC power connector (1) ................................................................................. 8
4.2.2 Headphones (2) ............................................................................................. 8
4.2.3 USB port (slave) (3)........................................................................................ 8
4.3 At the back ............................................................................................. 9
4.3.1 USB port (master) (1) ................................................................................... 10
4.3.2 Switch input (2) ........................................................................................... 10
4.3.3 Desk stand (3) ............................................................................................. 10
4.3.4 ESC system switch (4) ................................................................................. 10
4.3.5 Reset button (5)........................................................................................... 11
4.3.6 The mounting holes (6) ................................................................................ 11
4.3.7 The IR remote control window (7) ................................................................ 11
4.3.8 Battery lid (8)............................................................................................... 11
6 - Recording messages
6.1 Making recordings in Recording mode ..................................................
6.2 Making recordings in Mouse mode ......................................................
6.3 Making recordings in Edit mode............................................................
6.4 Noise reduction and AGC ......................................................................
15
16
17
17
6.4.1 Noise reduction........................................................................................... 17
6.4.2 AGC ................................................................................................. 18
7 - Zingui
7.1 Settings ................................................................................................ 19
7.1.1 Sound .........................................................................................................
7.1.2 Microfoon ...................................................................................................
7.1.3 Brightness .................................................................................................
7.1.4 Standby and Shutdown Delay (requires restart to update) ...........................
7.1.5 Zingui Control Using button 1 ......................................................................
19
20
20
20
21
7.2 Clean Up Disk ....................................................................................... 21
7.3 Back up to USB memory stick............................................................... 21
7.3.1 Making a backup of the content of the Zingui on a memory stick ................ 21
7.3.2 Restore the Zingui with the USB memory stick ............................................ 22
7.4 Go to standby mode.............................................................................. 22
7.5 Shutdown ............................................................................................. 22
7.6 Use the Zingui commands from a cell ................................................... 22
7.6.1 How to use the Zingui commands? ............................................................. 22
8 - GEWA: sending Infrared codes
8.1 Programming infrared codes................................................................. 25
8.2 Transmitting IR codes ........................................................................... 26
8.3 Making a backup file of the GEWA commands ...................................... 26
Zingui
© Copyright Jabbla
All rights reserved. No part of this publication may be reproduced, stored in a retrieval system, translated to any language or transmitted in any form or by any means,
be it electronic, mechanical, magnetic, optical, chemical, manual, recording, or otherwise without prior permission by Jabbla
Jabbla
www.jabbla.com
Zingui
1
1 - Introduction
The Zingui is a portable dynamic display alternative communication aid that
allows recording and play-back messages easily. Symbols, pictures or other
visual objects represent recorded messages (or text-to-speech messages in the
Plus version) that the Zingui speaks out when selected via touch screen or
alternative access. The Zingui uses an adapted version of Mind Express to
achieve this. The Zingui Plus version also supports text-to-speech technology.
The Zingui has an integrated high performance microphone and high quality
audio channels to reproduce the recorded messages with high brightness,
minimal noise and sufficient volume.
The Zingui has a communication supporting function and is applicable for
people (from the age of 3 years) with a communication disability for general use
in their daily life. The user should have the mental and motor ability the use the
device. The Zingui should not be used for clinical, therapeutic or diagnostic
applications.
The Zingui can optionally be equipped with an infrared remote control module
that allows controlling for instance a television, a radio or any other device for
general use that can be controlled with infrared signals. The infrared remote
control unit of the Zingui should not be used for clinical, therapeutic or
diagnostic applications.
The Zingui is portable but it can also be mounted on a wheelchair. To ease the
portability and to additionally protect the device a carry case is provided with the
device.
Please read the user manual before starting to use the Zingui. The safety
precautions will help you to avoid misuse of the device.
Use the Mind Express 4 software to create files for the Zingui. The files can be
imported from the computer to the Zingui. For more information on how to use
the Mind Express 4 software see the Mind Express 4 manual.
General specifications
• Marvell® PXA320 processor
• Microsoft Windows® CE 6.0
•
•
•
•
•
•
•
•
128MB DDR RAM
1GB NAND Flash ROM
1 slave USB port for connection with PC
1 master USB port for keyboard, mouse
8,4“VGA (213 mm diagonal) TFT touch screen, LED backlight
Internal battery
Weight: 1,08 kg or 2lbs 6oz
8.46 x 6.5 x 1.5-1.6 inches
Zingui
3
2 - Safety and maintenance
2.1 Safety precautions
The Zingui is a light weight portable device. When using mobile, we recommend
to put the Zingui in its carry case and carry it in combination with the strap. This
will avoid that the device drops from your hands on the floor.
• When mounted on a wheelchair, make sure that the fixation is done
correctly and that the mounting of the Zingui is also locked on the
mounting system. This will avoid that the Zingui drops from its mounting
system due to shocks and bumps while driving.
• The Zingui has an internal Li-ion battery. Do not throw away the battery
after replacement. Follow the proper waste regulations of your state or
region. You can contact your local dealer or sent the used battery back to
your local dealer.
• In case the Zingui would be stored for a longer period, make sure that the
Zingui is completely powered off and that the battery is fully charged.
• Keep the Zingui away from high temperatures or do not leave the device in
spaces where it can be or become very hot (for instance in a car during the
summer). High temperatures can have a negative effect on the battery life.
• The Zingui is splash proof on top, but be aware that it has loudspeaker
holes at the back. Avoid dirt and moisture intruding the Zingui via the
loudspeaker holes, the microphone hole or the connectors. This can effect
the quality of the sound and the recording or it can cause bad operation of
the Zingui. Follow the cleaning instructions when cleaning the Zingui.
• The Zingui has a touch screen to make selections on the screen. You can
use your finger or a stylus. You do not need to press hard to make a
selection. Do not use a stylus with sharp edges because that could make
scratches on the screen.
• The Zingui has a desk stand to allow you to put and use the device upright
on a table. A little magnet in the housing of the Zingui keeps the desk
stand closed when not used. You should not use the desk stand as a
handle to carry the Zingui. It is not designed for that purpose and it could
come loose so that the Zingui would drop on the floor.
• The Zingui has an internal high performance microphone to make
recordings. Depending on the adjustable output volume and the original
volume of the recorded message, the reproduced message can have a
high volume. Be aware of this when making and playback recordings,
speak at a normal sound level.
2.2 Cleaning instructions
We advise to clean the Zingui regularly to give germs no change to spread.
Switch off the Zingui and unplug the power adapter before cleaning.
If possible use dry cleaning with a soft cloth. Local spots on the housing can be
cleaned with a slightly moistened cloth. Do not use aggressive cleaning agents.
Take care that no moisture soaks into the housing via the loudspeaker holes, the
microphone hole or the connectors. Use a little swab to clean the connectors.
Avoid cleaning the touch screen with paper towels, they can produce little
scratches. Use a dry and soft lint-free or micro fiber cloth with, if necessary,
some distilled water. Make sure the cloth is damp but not wet. Another option is
to use a screen cleaner kit that is specially designed for cleaning computer
screens. You can find these kits in computer stores. Do not press too hard on the
screen but wipe softly in circles.
Zingui
For cleaning the carry case you should again try dry cleaning with a cloth or
brush. If spots are persistent use a slightly moistened cloth. Avoid using
aggressive cleaning agents.
2.3 The carry case
The carry case allows you to carry and use the Zingui safely. The carry case will
also protect the Zingui from dirt, moisture, shocks and bumps.
Use the carry case in combination with the strap to avoid that the device can
drop from your hands on the floor. You can attach the strap to the opposite
corners of the carry case so that the Zingui can be positioned horizontally and
operated with one hand.
The carry case consists of two parts that are closed with a zipper. Make sure
that the zipper has been closed correctly to avoid that the Zingui drops out of its
carry case.
The carry case has a second zipper on the back. Opening that zipper allows to
use the desk stand while the Zingui is in its carry case. Keep that zipper closed
though, when you are not using the desk stand.
4
Zingui
5
3 - Switch on/off the Zingui
3.1 Switch on the Zingui
Shortly press the on/off switch (5) to switch on the Zingui. The on/off indicator
will start blinking during the start up procedure. The Zingui will be ready to use
as soon as the on/off indicator stops blinking and continuously lights up.
The Zingui will also automatically turn of the screen when it feels no activity
during a specific time. The Zingui is not in standby mode, the on/off indicator
stays on. The screen will immediately display the content as soon as you touch
the screen or activate an external switch.
3.2 Standby
You can bring the Zingui in a Standby mode by shortly pressing the on/off switch
again. The on/off indicator will now blink every 4 seconds. The power
consumption in standby mode is very low. Press the on/off switch to wake up
the Zingui from the Standby mode. Waking up will take no time so that you can
immediately restart to communicate.
3.3 Switching the Zingui off
Press and hold the on/off switch for 4 seconds to turn off the Zingui completely.
We recommend doing so when the Zingui is not going to be used for a longer
period (a few days). When you are using the Zingui every day, you can put the
Zingui in standby in the evening and charge it.
3.4 Reset
In the event that the Zingui should not react anymore you can execute a reset by
pressing the Reset button on the back of the device. The Zingui will be switched
off. Press the on/off switch shortly to restart.
Zingui
7
4 - Connectors and indicators
4.1 At the display side
4.1.3 The battery charging indicator (3)
The battery charging(3) indicator lights up as soon as you connect the Zingui
with the power adapter to the mains. The battery indicator turns from orange
into green during the charging process. A green battery indicator indicates that
the battery is fully charged.
Charging an empty standard battery should take about 90 minutes. Charging the
double size battery should take 3 hours.
Do not use another power adapter than the one that is delivered with the Zingui.
Using another adapter could damage the internal circuits or the battery.
4.1.4 The on/off indicator (4)
4.1.1 Light sensor (1)
The light sensor measures the environmental light and allows the Zingui to
automatically adapt the backlight of the display. This will optimize power
consumption and increase battery life.
The light sensor can be switched off if necessary. For more information
on switching off the Light sensor see“Brightness” on page 20.
4.1.2 Microphone (2)
The microphone allows to make high quality recordings. You do not need to talk
close to the microphone or raise your voice. Keep a distance of about 12 inches
while recording.
The on/off indicator (4) shows the power status of the Zingui.
When the Zingui is completely turned off, the on/off indicator will not blink nor
light up. In standby mode you can see the on/off indicator blinking shortly every
4 seconds.
During start up the on/off indicator blinks green for one second every other
second. Blinking turns into continuous lit when the Zingui has finished the start
up procedure and is ready to be used.
4.1.5 The on/off switch (5)
The on/off switch (5) controls the power state of the Zingui. When completely
switched off a short press on the on/off switch powers on the Zingui. Once the
Zingui is powered on, a short press on the on/off switch will put the Zingui in
standby. Power consumption in this mode is very low. If the user can use the on/
off switch easily, taking advantage of the standby mode can increase battery life
significantly. A short press on the on/off switch will immediately wake up the
Zingui.
Press the on/off switch for 4 seconds to completely shut down the Zingui.
Zingui
4.2 Left hand side
8
4.2.2 Headphones (2)
This is a 3.5 stereo mini-jack input connector for headphones.
4.2.3 USB port (slave) (3)
The Zingui has two USB ports: a master and a slave. This mini USB port is the
slave port. It is used to connect the Zingui to a computer to allow exchange of
data between the computer and the Zingui. Do not attempt to connect a
keyboard or a mouse on the mini USB slave port.
For more information on how to import and to export files see the Mind
Express 4 manual on chapter 1 ‘Getting started with Mind Express’.
4.2.1 DC power connector (1)
The DC power input is used to power and charge the Zingui. Do not use another
power adapter than the one that is delivered with the Zingui. Using another
adapter could damage the internal circuits or battery.
Zingui
4.3 At the back
9
Zingui
10
4.3.1 USB port (master) (1)
The Zingui has two USB ports: a master port and a slave port. This is the master
USB port. It can be used to connect a USB keyboard or USB mouse to the Zingui.
4.3.2 Switch input (2)
This is a 3.5 mini-jack input connector for connecting switches to the Zingui for
switch access in scanning mode. When used with only one switch, the switch
can directly be inserted in the switch input connector.
To connect two switches, an adapter cable is needed.
The cable has on one side a 3.5 mini-jack male connector that is inserted in the
switch input. The other side of the adapter cable has two 3.5 mini-jack female
connectors to connect both switches.
4.3.3 Desk stand (3)
The desk stand allows putting the Zingui on a table and using it standing up. A
little magnet will hold the desk stand in its closed position when carried.
4.3.4 ESC system switch (4)
The ESC system switch has different actions based on the user mode.
When the ‘fast recording’ mode is active, pressing the ESC switch will initiate a
recording procedure. If you now select a cell on the display of the Zingui the
recording window will pop and making recordings can be started.
When scanning is active press and hold the ESC switch to stop the scanning.
Zingui
When the menu is not visible press the ESC switch to make the menu appear on
the screen.
4.3.5 Reset button (5)
In the event that the Zingui should not react anymore you can execute a reset by
pressing the Reset button. The Zingui will be switched off. Press the on/off
switch shortly to restart the Zingui.
4.3.6 The mounting holes (6)
The mounting holes can be used to connect a mounting plate on the Zingui. A
DeaSSy mounting compatible plate is available as an option.
4.3.7 The IR remote control window (7)
The IR remote control window contains 2 IR LEDs when the Zingui is equipped
with the optional Gewa IR remote control unit. This module allows the Zingui to
learn and to transmit IR signals and to control for instance a television.
4.3.8 Battery lid (8)
The Zingui’s internal battery is located behind the battery lid. Two special
screws are holding the battery lid in position. Do not open the battery lid unless
it is necessary. You need specific tools to do this (Torx 6+).
The Zingui can be equipped with two types of batteries. Each of the batteries
uses their specific battery lid.
11
Zingui
13
5 - Batteries
The Zingui has an internal Li-ion battery. A new and fully charged battery offers
about 6 hours of continuous use. This is with a display continuously turned on, a
backlight intensity of 50% (indoor use) and continuously playing sound.
Depending on the user and the power management settings this can be
sufficient to use the Zingui a day without charging. Especially when the user is
able to access the on/off switch to make use of the standby mode.
In case the standard battery would not be sufficient the Zingui can be equipped
with a double capacity battery.
The power adapter of the Zingui can charge the internal battery. When the
Zingui is not active, charging the standard battery will take about 90 minutes (or
3 hours for the double capacity battery). You can use the Zingui while it is
charged. In that case it will take longer to fully charge the battery.
The power adapter can stay connected to the Zingui when the battery is fully
charged. It is better though for the environment to disconnect the power adapter
when the battery is fully charged.
Do not use another power adapter than the one that is delivered with the Zingui.
Using another adapter could damage the internal circuits or the battery.
5.1 Replacing the battery
The internal battery is located behind the battery lid. Two special screws are
holding the battery lid in position. Only open the battery lid unless it is
necessary. Do not use a common screwdriver; you need a specific tool to do this
(Torx 6+).
First make sure that the Zingui is switched off (press and hold the on/off switch
for 4 seconds) and that the Zingui is not powered by the power adapter.
Put the Zingui with its display side on a clean table (preferably with some soft
tissue in between) so that the display cannot be scratched.
Unscrew the two screws with a Torx 6+ tool and turn the battery lid from its
screw holes towards you. You should not have to use force to do this. The
battery is visible now.
Take the battery out of its compartment and replace it with the new battery.
Control the position of the battery and slide the battery in the battery
compartment towards the battery connector. You should feel a little resistance
when the battery slides into the battery connector. But you should not use much
force to make the connection. If that would be the case, double check to make
sure that the position of the battery is correct.
If you are replacing the standard battery with the double capacity battery (or vice
versa) make sure that you are using the corresponding battery lid. (The battery
lid for the double capacity battery does not have fixation parts in the middle of
the lid.)
Screw the battery lid back on the Zingui housing.
Do not throw away the battery that has been replaced but use the proper waste
regulations of your state or region. You can always send the used battery back
to your local Jabbla representative.
5.2 Power management
The Zingui uses different ways to minimize power consumption in favour of its
battery life.
The Zingui has a light sensor to automatically adjust the backlight intensity in
function of the environmental light. When used indoor for instance the backlight
can have a lower intensity without really changing the visibility. Less power is
consumed in that case and battery life will increase. You can switch off the
automatic backlight adjustment and set it on a constant value. For more
information about backlight adjustments see “Brightness” on page 20.
Be aware that more power is consumed when the backlight intensity is set
higher, resulting in a shorter battery life.
A second way to increase battery life is the use of the automatic turn off of the
display and backlight when the Zingui is not used for a specific period of time.
The display will turn on instantly when it is touched again or when an external
switch is activated.
Zingui
Finally the Zingui can be put in standby mode. In this mode the power
consumption is very low. To bring the Zingui in standby mode you have to press
the on/off switch shortly. When the Zingui is in standby, the power indicator will
blink shortly every 4 seconds.
To bring the Zingui out of standby mode just shortly press on the on/off switch
again. The Zingui will wake up instantly so that you can immediately continue to
use the device.
When you are using the Zingui every day you can put the Zingui in standby in the
evening, charge it and wake up the Zingui in the morning.
14
Zingui
15
6 - Recording messages
The Zingui allows you to make quick recordings. You can make recordings in
recording mode, in editing mode and you can also make recordings in mouse
mode (if the option “Quick recoring” is enabled.)
6.1 Making recordings in Recording mode
The first Voice recorded message will be overwritten with the new recording. If
there is no such message, the new recording will be added as the first action for
that cell.
• Keep
pressed during the recording. Release when finished
• Keep the Escape button on the back of the Zingui pressed during the
recording. Release when finished.
5. Tap
to listen to the recording.
1. Go to Edit > Recording mode.
2. Tap the cell under which you want to insert your recording.
3. The recording window appears on your screen:
4. There are two ways of recording:
6. Tap
to save the recording.
7. Tap
to delete the recording.
Zingui
16
6.2 Making recordings in Mouse mode
1. Go to Tools > Options. Select Quick recording.
5. Tap
to save the recording.
2. When you are working in Mouse mode and you want to make a recording,
press the ESC button on the back of the Zingui and then select a cell. The
recording window appears on the screen.
6. Tap
to delete the recording.
3. There are two ways of recording:
• Keep
pressed during the recording. Release when finished or
• Keep the Escape button pressed during the recording. Release when
finished.
4. Tap
to listen to the recording.
Zingui
17
6.3 Making recordings in Edit mode
6.4 Noise reduction and AGC
1. Open the content of a cell and select Sound in the action list.
6.4.1 Noise reduction
Noise reduction stands in for a reduction of surrounding noises while recording.
When this option is activated, Zingui will filter out the noise to improve the
quality of recording. When Noise reduction and/or AGC are activated, wait a
moment before speaking and do not speak too loud.
To activate Noise reduction:
2. Tap
to make a recording. The record button will turn green while
recording.
3. Tap
to stop recording. The Zingui automatically gives a new
recording a name zsnd _“serialnumber”_ x, where x is a number.
4. Tap
to listen to the recording.
5. To change the name of the recorded sound tap its filename and edit it.
6. To delete the sound tap and hold its filename and select Delete file.
7. Tap OK when you are ready.
1. Go to Tools > Options and select Settings.
The window Options appears on your screen:
Zingui
2. Select Noise reduction.
6.4.2 AGC
AGC will try to set every recording to the same volume level.
To activate AGC:
1. Go to Tools > Options and select Settings.
2. Select AGC.
3. Tap OK to confirm.
18
Zingui
19
7 - Zingui
The Zingui Tool allows you to control some general settings of your Zingui, such
as brightness, sound and standby mode.
7.1 Settings
In the Settings you can adjust the following parameters of the Zingui.
7.1.1 Sound
1. Go to Tools > Zingui and select Settings.
The window Settings appears on the screen:
To modify these settings of the Zingui go to Tools > Zingui.
2. Choose whether you want to send the sound to the Speakers of the Zingui
and/or to the phone (GSM)*.
3. Choose whether you want to send the sound to the Speakers and/or to the
Headphones.
4. The slider allows you to adjust the volume that goes to or comes from the
phone (GSM)* or Bluetooth device.
*Phone phunctions ares not available for the moment.
Zingui
7.1.2 Microfoon
Activate the Microphone if you want the Microphone to be active. If you don’t
activate the Microphone making recordings will not be possible.
7.1.3 Brightness
20
The window Settings appears on the screen.
2. Turn off display after: Never - 1 minute - 90 seconds - 2 minutes - 3
minutes - 5 minutes - 10 minutes if you want the display to be
automatically turned off after a specific time of inactivity.
3. Standby after (after turning off display): Never - 2 minutes - 5 minutes - 10
minutes - 15 minutes - 30 minutes - 1 hour. After the screen has been
turned off, you can ask the Zingui to go automatically in stand by mode
after a specific time of inactivity.
4. Shut down after (after going to Standby): Never - 5 hours - 10 hours - 20
hours - 25 hours. After the Zingui has been put in stand by mode, you can
ask the Zingui to be shut down automatically after a specific time.
1. Go to Tools > Zingui and select Settings.
The window Settings appears on the screen.
2. Displace the slider till you obtain the desired brightness.
3. Enable Automatically Adjust Brightness if you want the Zingui to adapt
automatically the brightness (with a maximum of the set brightness) of the
screen depending on the exterior brightness. This option is useful to use
the energy efficiently and to extend battery life.
7.1.4 Standby and Shutdown Delay (requires restart to update)
Changed settings will be operational after restarting the Zingui.
1. Go to Tools > Zingui and select Settings.
5. Select OK to confirm and restart the Zingui to activate this settings.
Zingui
7.1.5 Zingui Control Using button 1
1. Go to Tools > Zingui and select Settings.
The window Settings appears on the screen.
2. Turn on device when holding the switch: Never - 1 second - 2 seconds - 3
seconds - 4 seconds - 5 seconds - 6 seconds - 7 seconds - 8 seconds - 9
seconds.
3. Shut down device when holding the switch: Never - 1 second - 2 seconds 3 seconds - 4 seconds - 5 seconds - 6 seconds - 7 seconds - 8 seconds 9 seconds.
7.2 Clean Up Disk
When you overwrite the recording of a specific cell, the previous recording will
still be stored on the hard disk of the Zingui. When the free space on the hard
disk is no longer sufficient, you can remove these old unused recordings. The
option Clean up Disk will erase all recorded wave files that are not linked to a
cell of your documents. This should only be done if you are low on free hard disk
space.
21
7.3 Back up to USB memory stick
You can copy the content of the Zingui to an USB memory stick.
Insert an USB memory stick in the computer and go to Tools > Zingui and select
Back up to memory stick.
This option is meant as a backup function of the Zingui. If any problem occurs in
Mind Express, you can insert the USB memory stick in the Zingui and restore the
Zingui with the content of the USB stick.
7.3.1 Making a backup of the content of the Zingui on a memory stick
1. Insert an USB memory stick in the USB port. For more information about the
USB port see “USB port (master) (1)” on page 10.
2. Go to Tools > Zingui > Back up to USB memory stick. Following window,
asking to give the backup file a name, appears on the screen. Enter a name
for this backup file, for example backup_june:
1. Go to Tools > Zingui and select Clean Up Disk.
The window Clean Up Disk appears on the screen. In this window you
can see the percentage of free memory.
2. Select Clean Up to start cleaning the disk.
3. Select Manage Files to delete specific files.
3. Tap OK. Next message appears on the screen:
Zingui
22
Files that were made after copying the content of the disk to USB will
not be lost. All files that already existed before copying the disk to USB
will be overwritten by the files on the USB stick. So if you made any
changes to these files after copying the content to USB, all changes will
be lost.
4. Select Yes. A window showing the progress is displayed while copying the
files.
7.4 Go to standby mode
5. When copying is finished OK appears on the window.
To put the Zingui in standby mode go to Tools > Zingui and select Go to
Standby.
7.5 Shutdown
To shut down the Zingui go to Tools > Zingui and select Shutdown.
7.6 Use the Zingui commands from a cell
7.3.2 Restore the Zingui with the USB memory stick
1. Insert the USB memory stick in the USB port (master). For more information
In the content window of a cell you will find the Zingui commands. You can
insert them under cells, so the user will be able to change some settings of the
Zingui from his communication grid.
about the USB port see “USB port (master) (1)” on page 10.
2. Reset the Zingui with the Reset button.For more information on how to reset
the device see “Reset button (5)” on page 11.
3. Restart the device.
4. A window appears that asks you if you want to restore the files.
7.6.1 How to use the Zingui commands?
1. Go to Edit > Edit mode.
2. Open the Edit window of a cell.
3. Choose a symbol and/or label.
4. Choose one of the Zingui commands:
5. Select Yes or No.
•
•
•
•
•
Speaker on: sound goes to the speaker
Speaker off: stop sound to the speaker
Toggle speaker: sound goes to speaker on/off
Headphone on: sound goes to the headphone
Headphone off: stop sound to the headphone
Zingui
•
•
•
•
•
•
•
•
Toggle Headphone: sound to the headphone on/off
Increase Brightness: to increase the brightness of the screen
Decrease Brightness: to decrease the brightness of the screen
Turn Microphone On: to turn the Microphone on
Turn Microphone Off: to turn the Microphone off
Toggle Microphone: to turn the Microphone on or off
Go to Standby: to put the Zingui in standby mode
Shutdown: to shut down the Zingui
23
Zingui
25
8 - GEWA: sending Infrared codes
The Zingui can optionally be equipped with a programmable infrared remote
control unit. With this module the Zingui can learn to transmit infrared codes and
control for instance your television.
8.1 Programming infrared codes
Folliwing describes how to program IR codes on the Zingui:
1. Go to Tools > Gewa and select Record.
The window GEWA appears on your screen.
2. Choose one of the GEWA commands in the list and type a new name in the
Name box. For example Volume up. You can use the on screen keyboard to
fill in the name of the command.
3. Put your remote control (in this example it will be the remote control of your
television or cd player) in front of the IR window of the Zingui. The distance
between your remote control and the IR window should be about two
inches.
4. Select Record.
5. The status line in the Gewa window will display: Press key and hold. At the
same time a red light in the IR window will turn on. The IR module now
waits for the IR code that has to be learned.
Zingui
6. Press the button of your remote control of the code you want the IR module
to learn (in this case the IR code for television volume up).
7. Keep the button pressed until the red light in the Gewa window turns off or
the status line in the Gewa window displays Release.
8. This procedure will be repeated in order to learn the code for a second time:
The red light in the IR window will turn on again and the status line will ask
to press the (same) remote control button again. The unit is now waiting for
you to send the IR code for a second time. Press the same button on your
remote control again.
9. Keep the button pressed until the status line displays Release. The IR
module now has recorded the code a second time.
The red light will blink shortly to confirm that the record procedure has been
finished successfully. In the status line an OK will appear.
Repeat this procedure from (4) for all other command that you want to use.
26
8.3 Making a backup file of the GEWA commands
This option is meant as a backup function of the GEWA commands. If any
problem occurs, you can restore the GEWA commands with your backup file.
This can also be useful in case you want to use different GEWA command sets
for different locations. You can program the GEWA with the commands for
location A and make a backup file once it's programmed for location A. You can
do the same for location B. Using backup and restore, this allows you to switch
the GEWA command set based on your location.
How to make a backup of the GEWA commands?
1. Go to Tools > GEWA > Back up.
2. Following window, asking to give the backup file a name, appears on the
screen. Enter a name for this backup file, for example gewa_home.
3. Tap OK to confirm. Next message appears on the screen:
8.2 Transmitting IR codes
To send IR codes with the Zingui you have to link the command Send Gewa to a
cell.
1. Go to Edit > Edit Mode.
2. Choose a GEWA subcommand.
• Type command: if you want to type a specific GEWA command you can do
so by entering the GEWA command immediately in the field that is
foreseen beneath.
• Select Pause if you want to insert a pause between two GEWA commands.
This can be useful to make TV channel selections like for instance TV
channel 39. Pause allows you to add a pause after sending the
corresponding IR code. Insert the Duration of the Pause in milliseconds.
• Choose one of the commands you already have programmed.
3. Tap OK to confirm.
4. Select Yes. A sandglass appears while the files are being saved.
How to restore the GEWA backup?
1. Go to Tools > GEWA and select Restore Backup.
Zingui
2. The window restore appears on the screen. Select the backup you want to
restore and tap OK.
A sandglass will be displayed on the screen. When restoring is finished, the
window disappears.
27
Zingui
29
Index
B
G
Back up to USB memory disk 21
Backup 21
Backup file of the GEWA commands 26
Battery charging indicator 7
Brightness
Automatically Adjust Brightness 20
GEWA
C
Carry case 4
Clean Up Disk 21
Cleaning 3
Cleaning instructions 3
Connectors and indicators 7
Battery charging indicator 7
DC power connector 8
Headphones 8
Light sensor 7
Microphone 7
On/off indicators 7
On/off switch 7
Switch input 10
USB port (master) 10
USB port (slave) 8
D
DC power connector 8
Decrease Brightness 23
Backup of commands 26
Programming IR codes 25
Restoring the GEWA backup 26
Transmitting IR codes 26
Type command 26
Go to Standby 23
H
Headphone off 22
Headphone on 22
Headphones 8
I
Increase Brightness 23
Introduction 1
L
Light sensor 7
M
Menu
Make the menu appear on the screen 11
Microphone 7, 20
Mind Express 1
Zingui
N
Noise reduction 17, 18
O
On/off indicator 7
On/off switch 7
30
Stand-by 5
Standby 20
stop the scanning. 10
Switch input 10
Switch on 5
Switch on the Zingui 5
T
R
Record using noise reduction 17, 18
Recording
Noise reduction 17
Reset 5
Restore the GEWA backup 26
Restore the Zingui 22
S
Safety 3
Desk 3
Li-ion battery 3
Mounting 3
Recordings 3
Safety precautions 3
Storing the Zingui 3
Strap 3
Temperatures 3
Touch screen 3
Shutdown 20, 23
Sound 19
Speaker off 22
Speaker on 22
Speakers 19
Toggle Headphone 23
Toggle Microphone 23
Toggle speaker 22
Turn Microphone Off 23
Turn Microphone On 23
U
USB port (master) 10
USB port (slave) 8
Z
Zingui commands 22
Zingui Plus 1
Zingui settings 19