1
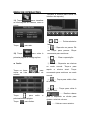
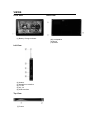
MANUAL DO PROPRIETARIO
Sistema de Posicionamento Global
BNAV-9580 MPTV
Informações de segurança ................................................................... 3
Instalação............................................................................................... 6
Layout do aparelho ............................................................................. 10
GPS (Sistema de posicionamento global)......................................... 11
Instalação de cartão de memória............................................................................................11
Menu de operações............................................................................. 14
Navegação ............................................................................................................................. 14
Configurações ........................................................................................................................ 14
Multimídia ............................................................................................................................... 16
E-Book.................................................................................................................................... 18
Jogos...................................................................................................................................... 19
Bluetooth ................................................................................................................................ 20
DUN ....................................................................................................................................... 23
IDSBT ................................................................................................................................... 24
SEGURANÇA
Instruções de Segurança
Leia todo este manual atentamente e
siga todas as instruções dadas. Isto
ajudará a garantir a melhor operação
do aparelho e aumentar sua vida útil.
Guarde a embalagem e o manual de
instruções para futuras referências.
Caso passe o aparelho a outra
pessoa, passe também estas
instruções.
● Nunca abra o aparelho ou o
adaptador de energia. Não há
peças que podem ser operadas
pelo usuário no interior do
aparelho. Se o aparelho for
aberto, há risco de choque
elétrico.
● Não coloque objetos sobre o
aparelho e não imponha fortes
impactos ao mesmo. Caso
contrário a tela poderá quebrar.
● Para evitar danificar o aparelho,
não toque a tela com objetos
pontiagudos. Utilize somente a
caneta fornecida.
● Há risco de ferimentos caso o
visor esteja quebrado. Caso isto
ocorra, utilize luvas protetoras
para
embalar
as
partes
quebradas e contate suporte
técnico para reparos. Lave as
mãos com água e sabão, pois
elementos químicos podem estar
presentes.
● Não deixe crianças brincar com
equipamentos eletrônicos. As
crianças
nem
sempre
reconhecem a existência de
perigo.
● Remova o adaptador de energia
da tomada, desligue o aparelho
imediatamente e contate serviço
●
●
●
●
técnico:
se o adaptador de energia
ou o plugue ficar danificado.
se a carcaça do aparelho
estiver danificada ou algum
fluído tiver caído dentro dela. Os
componentes
devem
ser
checados pelo suporte técnico!
Segurança dos dados
●Toda vez que você atualizar os
dados, faça cópias de backup
dos mesmos em uma mídia
de armazenamento externa.
O
fabricante
não
se
responsabiliza por perdas de
informações, e reclamações
concernentes a tal fato não
serão aceitas.
Ambiente de operação
Mantenha seu sistema de
navegação
e
todos
os
aparelhos conectados longe de
umidade,
poeira,
calor
excessivo e luz do sol,
especialmente no interior do
carro.
Certifique de proteger o aparelho
de água. (ex. chuva)
Note que a umidade pode
condensar-se
devido
a
mudanças
súbitas
de
temperatura.
Evite vibrações e tremores.
Evite que o aparelho solte-se
da carcaça, por exemplo,
quando
estiver
quebrado.
Instale o aparelho o mais
verticalmente possível. Caso
não siga estas instruções,
poderá danificar seu aparelho.
SEGURANÇA
Temperatura ambiente
● O aparelho opera em melhores
condições sob temperaturas
entre 5 ℃ e 40 ℃ e umidade
relativa de 10% a 90%.
● Quando desligado, o aparelho
pode ser armazenado em
ambiente de 0 ℃ a 60 ℃.
● Guarde o aparelho em local
seguro
para
evitar
altas
temperaturas (ex. estacionado
sob a luz do sol).
Compatibilidade eletromagnética
Ao conectar outros componentes,
a diretiva de compatiblidade
eletromagnética (EMC) deve ser
aderida. Note também que
somente cabos filtrados (máximo
de 10 pés) devem ser usados
com este aparelho.
Para
melhor
performance,
mantenha uma distância de ao
menos 10 pés de fontes de
alta-frequência e interferência
magnética
(televisores,
alto
falantes, telefones celulares, etc.)
Isto
ajudará
a
evitar
malfuncionamento e perdas de
informações.
Operação da bateria
Seu aparelho opera com uma bateria
removível. De modo a prolongar a
vida útil e eficiência da bateria, siga
as instruções abaixo:
● Cuidado: Risco de explosão se
as baterias recarregáveis não
forem carregadas corretamente.
Somente troque as baterias por
outras de mesmo tipo ou de
modelo similar recomendado
pelo fabricante. Nunca abra a
bateria. Não atire as baterias ao
fogo. Recicle as baterias velhas
seguindo as instruções do
fabricante.
● As baterias não têm resistência
ao calor. Evite que as mesmas
aqueçam. Não seguindo estas
instruções, poderá causar sérios
danos, inclusive a explosão da
bateria.
● Utilize somente o recarregador
original para recarregar a bateria.
As baterias pertencem a uma
categoria
diferenciada
de
reciclagem. Ao desfazer-se do
aparelho, certifique-se de fazê-lo
corretamente. Contate o serviço
técnico para mais detalhes.
Cuidados com o visor
● Evite riscar a superfície do visor.
Recomendamos o uso de um
protetor para evitar riscos.
Procure pelo revendedor para
saber onde obter tal produto. A
folha que cobre o visor serve
somente para proteção durante o
transporte!
● Certifique-se de que não há
vestígios de água na tela. A água
pode
causar
descoloração
irreversível.
SEGURANÇA
Utilize um pano macio para
limpar o visor.
● Não exponha o visor à luz do sol
ou radiação ultra-violeta.
Transporte
Para transportar o aparelho, siga as
instruções seguintes:
● Após transportar o aparelho,
espere algum tempo para
climatização antes de ligar.
No caso de alterações na
temperatura,
umidade
pode
condensar-se dentro do aparelho,
podendo
causar
um
curto-circuito.
● De modo a proteger o aparelho
de sujeira, batidas e riscos, utilize
a caixa protetora.
● Antes de viajar, certifique-se de
saber
das
condições
de
fornecimento de energia e
comunicações do local de destino.
Antes de viajar, tenha em mãos
quaisquer
adaptadores
de
comunicação (modem, LAN, etc.)
necessários.
● Ao transportar, utilize somente a
embalagem original do aparelho.
Ao passar pelo controle de
bagagem de aeroportos, é
recomendado que você passe o
aparelho e todos os dispositivos
magnéticos pelo sistema de
raio-x.
Evite
detectores
magnéticos,
que
podem
corromper os dados.
●
Conexão
Ao conectar o aparelho, certifique-se
de seguir as seguintes instruções:
● A tomada deve estar próxima do
aparelho e de fácil acesso.
● Use
somente o adaptador
principal em tomadas aterradas
de 100-240V~AC, 50/60Hz. Se
você não estiver certo sobre a
voltagem de sua casa, consulte o
prestador de serviços de energia.
Adaptador para carro
O adaptador para carro deve ser
conectado somente ao acendedor de
cigarros (bateria = DC12V). Se você
tiver dúvidas sobre a voltagem de
seu veículo, contate o fabricante.
Cabos
● Organize os cabos de modo que
ninguém tropece ou pise neles.
● Não coloque itens sobre os
cabos.
ATENÇÃO
Quando o aparelho não estiver em
uso por um longo período de
tempo, recarregue a bateria
quando for usá-lo, caso contrário,
a vida útil da bateria poderá ser
encurtada.
As seguintes instruções lhe mostram
passo a passo como fazer a
configuração inicial do aparelho.
Primeiro, remova o protetor que
cobre o visor.
INSTALAÇÃO
Como acessar o sistema de
navegação
Pressione o botão Sleep/Wake up
por dois segundos para ligar (Nota:
As vezes o aparelho não ligará por
motivo de bateria fraca, neste caso,
carregue
a
bateria.
Quando
carregando, o indicador ficará
vermelho). O logotipo irá aparecer e
o aparelho exibirá a tela do aplicativo
após alguns segundos.
Atenção: De acordo com a carga
inicial do aparelho, é necessário que
seja carregado antes de ser ligado
pela primeira vez.
Carregando a bateria do sistema
de navegação
Enquanto estiver carregando, o
indicador da bateria ficará vermelho.
Você pode carregar o aparelho de
diferentes maneiras:
● Com o adaptador de energia.
● Com o adaptador para carro.
O indicador de carga da bateria
ficará vermelho até que o sistema
esteja completamente carregado.
Não interrompa o processo de
carga antes da bateria estar
completamente
carregada.
Levará algumas horas até que o
aparelho
esteja
totalmente
carregado.
Quando a bateria estiver cheia, o
indicador ficará verde.
● Nota: Você pode usar o aparelho
normalmente durante a recarga,
porém, esta não deve ser
interrompida.
● Deixe
o adaptador principal
conectado ao sistema por
aproximadamente 24 horas para
que a bateria seja carregada
completamente.
● Você pode deixar o adaptador de
energia conectado e isto é
bastante útil para operação
contínua.
No
entanto,
o
adaptador puxa energia mesmo
quando não estiver carregando a
bateria do GPS.
Conecte o adaptador na parte direita
do adaptador de energia. Conecte o
adaptador de energia em uma
tomada de fácil acesso. Conecte o
cabo do adaptador de energia no
conector do GPS.
Utilizando cartões de memória
Seu aparelho suporta cartões de
memória do tipo MMC e SD ou TF.
Inserindo cartões de memória
1. Retire cuidadosamente o cartão
de memória de sua embalagem
(se inclusa). Tome cuidado para
não tocar ou sujar os contatos.
2. Coloque o cartão de memória
cuidadosamente
no
slot
correspondente. O lado do
cartão com a etiqueta deve
estar voltado para cima. O
cartão deverá encaixar e travar
no local.
INSTALAÇÃO
Removendo cartões de memória
● Não remova o cartão de memória
enquanto este estiver sendo
acessado.
1. Para
remover
o
cartão,
pressione-o levemente até ejetar.
2. Puxe o cartão para fora sem
tocar os contatos.
3. Guarde
o cartão em sua
embalagem ou em outro local
seguro.
● Cartões de memória são muito
frágeis. Tome cuidado para não
sujar os contatos e não forçar o
cartão.
Acessando cartões de memória
● O aparelho só suporta cartões de
memória no formato de arquivo
FAT16/32. Se você inserir um
cartão preparado com um
formato diferente, o GPS não irá
reconhecê-lo e pedirá para
formatá-lo novamente.
● Aviso: A formatação do cartão de
memória apagará todos os
dados.
● Da mesma forma, você não pode
simplesmente copiar arquivos
para o cartão de memória. Em
alguns casos, eles devem ser
convertidos
pelo
programa
Microsoft ActiveSync.
Intercâmbio de dados através de
leitor de cartão
Você pode transferir ou sincronizar
os dados através do ActiveSync.
Este é também o método correto, em
particular, se os arquivos que estão
para ser transferidos devem ser
convertidos em um formato que
possa ser lido pelo GPS.
No entando, caso deseje copiar
quantidades maiores de dados
(mapas de navegação) para o cartão
de memória, podem também ser
armazenados diretamente no cartão
de memória.
Muitos
computadores
já
tem
dispositivos leitores de cartões de
memória. Insira o cartão no
dispositivo e copie os dados
diretamente.
Resetando
o
Sistema
de
Navegação
Há duas opções para resetar o
sistema.
Soft Reset
Esta opção reseta o sistema sem
necessidade de reinstalação. Um
soft-reset é frequentemente utilizado
para
reorganizer
a
memória.
Fazendo-o, todos os programas
executados serão interrompidos e a
memória será reinicializada.
Selecione esta opção se o seu GPS
não
estiver
respondendo
ou
operando corretamente.
Siga as seguintes etapas:
Retire
a
tampa
superior
e
cuidadosamente pressione o ponto
na abertura para reset na parte
esquerda do aparelho.
Instruções de Segurança de
Navegação
Dicas de navegação
● Não manipule o GPS enquanto
estiver dirigindo, de modo a evitar
sérios acidentes!
● No caso de você não entender a
mensagem de voz ou se estiver
em dúvida sobre o que fazer na
próxima interseção, o mapa irá
fornecer a orientação. Somente
olhe para o visor quando estiver
numa situação de direção
segura!
INSTALAÇÃO
Atenção: O layout da estrada e
regras de trânsito têm preferência
sobre as instruções do GPS.
Somente siga as instruções
quando
as
circunstâncias
permitirem!
O
sistema
de
navegação lhe guiará a seu
destino mesmo quando você tiver
que desviar da rota planejada.
● As informações de direção do
GPS não isentam o motorista do
veículo de responsabilidade.
● Planeje a rota antes de viajar. Se
quiser planejar outra rota durante
a viagem, pare o carro.
Para receber sinais GPS
corretamente, objetos de metal
não devem impedir a recepção.
Coloque o GPS sob o para-brisa.
Tente outras posições de modo
a obter a melhor recepção.
Notas para uso no carro
● Tome cuidado para que o suporte
não apresente nenhum risco à
segurança, no caso de um
acidente.
● Cuide para que o cabo não
impeça quaisquer componentes
de segurança.
O visor de seu GPS pode
apresentar reflexos de luz. Cuide
para não ter a visão ofuscada
durante a operação.
● Não monte os componentes
dentro do campo de operação
dos airbags.
● Verifique a aderência do suporte
em intervalos regulares.
● O
plugue de energia irá
consumer energia mesmo se o
aparelho não estiver conectado.
Remova-o quando não estiver
em uso para evitar drenagem da
bateria..
● Verifique todos os equipamentos
de segurança do carro após a
instalação.
Montando o GPS no carro
Atenção! Somente fixe o suporte no
parabrisa se este não impedir a
visão do motorista. Não sendo
possível, monte o suporte em outro
local.
Instalação do suporte do GPS
● Dica: Se quiser fixar o suporte do
para-brisa, você pode pular as
etapas 1 e 2.
1. Remova o protetor do copo de
sucção do suporte.
Fixe em local adequado no
painel. A superfície do painel
deve estar limpa. Pressione o
copo de sucção firmemente
contra a superfície.
● Para obter um encaixe seguro e
firme, o suporte não deve ser
usado por 24 horas.
Suporte
Copo de sucção
Berço
Monte o suporte ao braço flexível.
Note as etiquetas no suporte. A seta
nomeada CLOSE deve apontar na
direção da fixação. A conexão é feita
com um som de click.
INSTALAÇÃO
Coloque o suporte no parabrisa e
pressione a alavanca de sucção.
Coloque o GPS no suporte e
pressione para baixo até
encaixar.
Conectando o GPS no carro
Quando a bateria estiver fraca,
você poderá recarregá-la no carro:
1. Conecte o plugue (1) do cabo
de conexão no receptor
correspondente na parte
inferior do GPS.
2. Insira o adaptador de energia
(2) no acendedor de cigarros
do carro. Encaixe bem para
que não solte enquanto
estiver dirigindo, causando
um mal funcionamento.
● Dica: Remova o adaptador de
energia do acendedor quando
terminar uma viagem ou quando
estacionar o carro por um longo
período de tempo.
LAYOUT DO APARELHO
Vista Frontal
Vista Traseira
(1) Indicador de carga da bateria
Vista Lateral
(2) Antena
(3) Interface para fones de ouvido
(4) Slot para cartão TF
(5) Entrada AV
(6) Interface USB
Vista Superior
(7) Power
(8) Alto-falante
(9) Stylus
(10) Reset
GPS (Sistema de posição global)
GPS é um sistema baseado em
satélites para determinar sua
posição. Com a ajuda de 24 satélites
ao redor do mundo, é possível
determinar sua posição no planeta
com a precisão de alguns metros. Os
sinais dos satélites são recebidos
pela antena do receptor GPS, que
deve “visualizar” ao menos 4 destes
satélites..
Nota:
Em locais com limitação de sinal
(ex: túneis, entre edificações,
florestas, etc) não será possível
determinar a posição. No entanto,
a recepção do satélite retornará
automaticamente assim que o
objeto tiver passado e houver
novamente sinal.
Note que o aparelho não é
configurado
para
desligar
automaticamente alguns minutos
sem atividade. Você pode alterar
isso nas configurações.
Se o receptor GPS não estiver
ativo por algumas horas, ele
deve ser reorientar novamente.
Este processo pode levar algum
tempo.
Instalação do cartão de memória
Esta opção é disponível somente se
o GPS for equipado com um cartão
de memória preparado. Neste caso,
você poderá usar a função
Navegação de seu aparelho após
um curto tempo, sem necessidade
de
pré-instalação
em
um
computador.
● A configuração inicial deve ser
feita como descrito na página 15
em qualquer caso.
A seguinte instalação limita a
navegação à área que foi
pré-instalado
o
cartão
de
memória.
Siga estas etapas para colocar a
navegação em operação no seu
carro:
1. Leia as instruções de segurança
na página 2 e siga instruções da
página 23.
2.Instale os componentes no GPS.
3.Pressione POWER para iniciar o
GPS. Se as instruções da etapa
1 não tiverem sido executadas,
faça-as agora. A bateria deve
estar carregada..
● Insira o cartão de memória
pré-instalado
no
GPS.
A
instalação do software iniciará
automaticamente.
Siga
as
instruções da tela.
●
NOTAS:
● O cartão de memória deve ser
inserido sempre durante o uso do
GPS. Um Soft Reset será
necessário para reinicializar o
sistema de navegação, caso o
cartão de memória seja removido
durante o uso, mesmo por pouco
tempo.
Configure a data e a hora nas
configurações. Ajuste a zona horária,
se disponível.
Iniciando a navegação
1. Pressione POWER por
segundos para ligar o GPS.
dois
GPS (Global Positioning System)
2. O software de navegação irá
iniciar automaticamente ou após
clicar no botão de controle, de
acordo com a versão.
3. Pressione o ícone menu para
entrar o destino e o endereço
desejados. Então inicie a navegação
clicando
em
Navigate.
Você
receberá a informação de rota na
tela, seguida das instruções de voz.
Tome informações sobre operações
adicionais
do
software
de
navegação.
Além disto, uma breve ajuda é
fornecida no próprio GPS. Você
pode
encontrá-la
em
Opções/Entrada de Destino e
selecionando a opção ajuda.
Nota: O receptor GPS irá requerer
alguns minutos alguns minutos para
inicialização quando ligado pela
primeira vez. Mesmo quando a
recepção do sinal GPS é indicada a
navegação pode ser imprecisa. Em
todas as ocasiões futuras, levará de
30-150 segundos até que um sinal
correto esteja disponível.
MENU DE OPERAÇÕES
Ao ligar o aparelho, ele entrará na
interface do menu automaticamente.
(veja a seguinte figura).
Toque
/
para ajustar o
brilho da tela
Toque
/
a mostrar na
última coluna. Esta exibição é
●
●
Navegação
Para operação de navegação,
veja o manual de instruções do
software.
Configurações
em círculo.
Toque
para sair da interface
de configuração de brilho.
2) Toque
Toque o ícone
para entrar
na interface de configurações, como
a seguir:
interface de ajuste de volume, como
a seguir:
Toque
o volume.
1) Toque
para entrar na
/
para ajustar
para entrar na
tela de luz de fundo, como a seguir:
Toque
/
para ativar
ou desativar o tom de clique.
Toque
para sair da interface.
MENU DE OPERAÇÕES
interface de configuração de hora:
3)Toque
para entrar na
configuração do Navipath:
Toque o item, ele ficará branco,
Toque
para sair da configuração
então toque
/
para ajustar
Navipath.
o ano, mês, data, hora e minutos.
4) FM
Toque
Toque
para entrar nas
configurações do transmissor FM
/
para ajustar o fuso
horário.
Toque
para sair da interface de
configuração de hora.
como a seguir:
6) Toque
para entrar no
modo de calibragem, você verá a
seguinte tela:
O transmissor FM enviará o áudio do
aparelho para aparelhos com rádio
FM. Pegue por exemplo a frequência
de 90.0MHZ. O GPS e o rádio
devem estar nessa frequencia para
que funcione.
Toque
para sair da interface de
configuração do transmissor FM.
Toque o ícone
tela como a seguir:
5) Toque
para entrar na
para calibrar a
MENU DE OPERAÇÕES
8) Toque
para entrar na
´segunda página de configurações:
9) Toque
para entrar na
configuração de restaurar padrões:
Clique na cruz central, ela moverá na
sequência centro, superior esquerda,
inferior esquerda, inferior direita e
superior direita até que a calibragem
seja terminada, então o sistema
sairá da interface automaticamente.
Toque o ícone
calibragem.
Toque
para sair da
Toque o ícone
para sair da interface de
configuração de calibragem.
7) Toque
para entrar nas
configurações de idioma como a
seguir:
Toque
para restaurar
as configurações de fábrica.
Toque
para sair.
10)Toque
para visualizar
as informações do GPS, na interface
como a seguir:
para sair da
configuração.
Toque
para sair da interface.
MENU DE OPERAÇÕES
Escolha a música para entrar na
interface de reproduç
11) Toque
para visualizar
as informações do sistema, como a
seguir:
①
Toque
—— Próxima/anterior
/
faixa.
para sair.
②
-- Reproduz ou pausa. Dê
um clique para pausar. Clique
12) Toque
para voltar à
primeira página de configurações.
●
Áudio
novamente para continuar.
③
—— Pára a reprodução.
④
—— Reproduz as músicas
no modo normal. Toque-o para
Toque no ícone
para
entrar na lista de arquivos de
música:
repetir
a
música
atual.
Toque
novamente para continuar no modo
normal.
⑤
--- Toque para exibir a lista
de músicas.
⑥
—— Toque para voltar à
página inicial.
—— Deslize a barra
Toque
para
próxima/anterior página.
Toque
para fechar.
exibir
a
para a esquerda ou direita para
ajustar o nível de volume.
——Volta ao menu anterior.
MENU DE OPERAÇÕES
●
Video
ajustar o nível de volume.
Toque no ícone
para
entrar na lista de arquivos de vídeo:
— — Arraste
ajustar o brilho
Toque no ícone
player de vídeo.
●
para
para fechar o
Visualizador de imagens
Toque no ícone
para entrar
na lista de arquivos de imagem:
Toque
para
exibir
a
próxima/anterior página.
Toque
para fechar. Escolha
uma arquivo e selecione-o para
entrar na interface de reprodução,
como a seguir:
Toque
para
exibir
a
Próxima/anterior página.
Toque
para fechar.
Escolha a imagem e clique nela para
exibi-la:
①
/
página.
①
— Toque para reproduzir
o próximo vídeo.
②Toque
— — Próxima/anterior
②
/
— — Toque para
aplicar um zoom na imagem.
para pausar e
continuar a reprodução.
③
--- Toque para exibir a lista
de arquivos.
—— Deslize a barra
para a esquerda ou direita para
③
— — Toque para girar a
imagem em 90°.
④
— — Toque para ver as
imagens no modo slide. No modo
slide, toque qualquer local da tela
MENU DE OPERAÇÕES
para retornar ao modo normal.
⑤
——Toque para ver o quadro
atual em tela cheia.
⑥
--- Toque para exibir a lista
de arquivos.
E-Book
Toque
para entrar na lista
de arquivos E-Book como a seguir:
①Toque
para fechar o leitor
e-book.
②
/
——Próxima/anterior
página.
③
—— Toque para entrar na
lista de arquivos E-book.
④
——Toque para editar a
fonte como a seguir:
Toque
para
mostrar
próxima/anterior página。
Toque
a
para fechar o arquivo
— —
atual.
Fonte
negrito.
——Fonte normal.
em
MENU DE OPERAÇÕES
/
——Diminui / aumenta
o tamanho da fonte.
— —
Indicador do
tamanho da fonte.
Toque
configurações atual.
⑥
——Adiciona um bookmark.
⑦
— — Abre os bookmarks,
como mostrado a seguir:
para fechar a página
de configurações atual.
⑤
——Toque para editar o
conjunto de cores, como a seguir:
—— Exclui um arquivo.
— — Retorna à página
inicial de e-book.
—
—
Mostra
a
proporção atual de leitura.
Toque
para retornar à
interface e-book.
Jogos
Toque
para entrar na
interface de jogos, como a seguir:
/
—— Seleciona a cor de
fundo, cord a fonte ou inverte a cor
de fundo
Toque
para fechar a página de
MENU DE OPERAÇÕES
1)Toque em
para entrar nas
configurações do Bluetooth:
Clique no ícone de busca
no canto inferior esquerdo para iniciar o
processo de busca.
●
BLUETOOTH (OPCIONAL)
Para utilizar o Phonelink, você deve
sincronizar seu celular com o aparelho
GPS. Siga as seguintes etapas para
realizar o processo de sincronia.
Toque no ícone
para entrar na
interface bluetooth como se segue:
Clique em
, então siga as
instruções de seu celular para completar a
sincronia.
MENU DE OPERAÇÕES
Clique em
para baixar a agenda
do telefone.
Clique em
para entrar na
interface de discagem:
Após completada a sincronia, a seguinte
imagem será exibida:
①
—— Toque para apagar
o último número.
2) Toque no ícone
para entrar
②
— — Toque para
selecionar o número da fotografia da
agenda.
na agenda:
③
—— Toque para
MENU DE OPERAÇÕES
selecionar o número a partir do
histórico de chamadas
④
—— Toque para fazer a
chamada:
③
/
—— Toque para
diminuir / aumentar o volume
gradualmente.
④
—— Toque para desligar
Se houver uma chamada, irá mostrar
o número:
—— Toque para segurar a
chamada e voltar à interface
principal.
①
—— Toque para mostrar a
interface de opções:
①
—— Atender a chamada.
②
——Toque para silenciar o
microfone enquanto mantém a
chamada.
——Toque para discar
um número de extensão.
— — Toque
enviar o som para o cellular
para
②
——Toque para silenciar o
microfone enquanto mantém a
chamada.
③
/
—— Toque para
diminuir / aumentar o volume
gradualmente.
④
—— Toque para rejeitar
a chamada.
Toque
chamada
principal
e
para manter a
voltar à interface
MENU DE OPERAÇÕES
DUN
1) Depois que o Bluetooth completar
o emparelhamento, aperte por favor
a configuração para DUN como
abaixo:
●
5) Toque
mensagens
sincronizado:
para baixar as
do
telefone
—— Toque para acessar a
seguinte interface:
6) Toque
para baixar
arquivos do celular sincronizado:
Aperte
para entrar no
estatus de conexão como abaixo:
2). Quando DUN for conectado,
será exibido como abaixo:
3 ) Aperte (image) para entrar no
Internet Explorer, o programa irá
rodar automaticamente como
abaixo ( versão teste para Internet
Explorer):
MENU DE OPERAÇÕES
——Volta para a última página
2) Pressione “Continuar” para ligar
web
——Entra na próxima página
web
a função TV, e pressione
para entrar no menu de seleção
de canais, como mostrado
abaixo:
——Atualiza a página web
——Vai para o topo da página
web
——Aperte o botão para ativar
o teclado
——Para mostrar o
endereço da página web
——Para fechar a página web
●
Funções da TV Digital ISDBT
1) Pressione o icone
para
ativar a função TV, como mostrado
abaixo:
3) Pressione “Buscar” para entrar
no menu de busca, como mostrado
abaixo:
Após a busca pelos canais ter sido
concluída, o menu abaixo será
exibido:
----De um toque duplo na tela para
entrar no modo de exibição em tela
cheia.
---- De apenas 1 toque durante a
exibição em tela cheia para voltar a
MENU DE OPERAÇÕES
exibição padrão, conforme mostrado
abaixo.
——Tirar fotos
⑼
Tira uma foto do que está em
reprodução no momento.
⑽
——Gravar
Para gravar o programa que está em
reprodução no momento.
⑴
——Abrir pastas
⑾
Pressione uma vez para pausar
Para exibir suas pastas, podendo
assim
escolher
seu
o
programa
para
—— Configurações
——Aumentar volume
⒀
——Diminuir Volume
——Mudo
⑻
sua
—— Parar
——Ir p/ primeiro canal
⒁
—— Ir p/ último canal
Vai para o último canal da lista
⒂
Desliga o som.
——Indicador de volume
a
Vai para o primeiro canal da lista
Reduz o nível do volume
⑺
em
de um programa.
Aumenta o nível do volume
⑹
está
Usado para parar a reprodução
——Exibir menu ESG.
Exibe o menu ESG.
⑸
continuar
⑿
ISDBT.
⑷
que
reprodução.
Para entrar nas configurações do
⑶
programa
reprodução, e mais uma vez
favorito.
⑵
—— Pausar
——Ir p/ próximo canal
Vai para o próximo canal da lista
⒃
—— Tela
Indica o nível do volume dentre os
Durante a exibição em tela
9 níveis disponíveis para seleção.
cheia,
——Fechar
Para fechar a função ISDBT.
toque
na
tela
para
retornar ao modo de exibição
padrão.
MENU DEOPERAÇÕES
⒄
——Indicador de recepção
Indica o nível da recepção
4) Pressione
para exibir
a lista de pastas disponíveis:
---- Pressione Configurações para
definir suas preferências conforme
mostrado abaixo: Existem 4 idiomas
disponíveis:
Inglês,
Japonês,
Português e Espanhol.
Escolha
seu
pressionando
Pressione
programa,
sobre
seu
e
abra
nome.
para esconder a
lista de pastas.
--- Pressione
para exibir o
menu ESG
As preferências de idioma e de
exibição são:
Exibição da lista de canais:
:
—Inglês, Japonês,
Português e Espanhol.
—Troca stream
de audio
—Áudio
principal, Áudio secundário e Áudio
Duplo são as três opções
Exibição da sua lista de canais
favoritos:
:
disponíveis.
OWNER’S MANUAL
Global Positioning System
BNAV-9580 MPTV
Safety Information................................................................................. 3
Installation ........................................................................................... 6
Views.................................................................................................... 10
GPS (Global Positioning System) ...................................................... 11
Memory Card Quick Installation ............................................................................................11
Menu Operation................................................................................... 14
Navigate ............................................................................................................................... 14
Settings................................................................................................................................... 14
Multimedia .............................................................................................................................. 16
E-Book.................................................................................................................................... 18
Game...................................................................................................................................... 19
Bluetooth. ............................................................................................................................... 20
DUN ....................................................................................................................................... 23
IDSBT ................................................................................................................................... 24
SAFETY INFORMATION
Safety Instructions
Please read this section carefully
and follow all the instructions given.
This will help ensure reliable
operation and extend the service life
for your appliance.
Keep the packaging and the user
instructions for future reference or
inquiries at a later date. If you pass
the article on to another person, you
must pass on these instructions.
● Never open up the housing of the
appliance or the power adapter.
These
contain
no
user-serviceable parts. If the
housing is opened there is a
danger to life from electric shock.
● Do not place any objects on the
appliance and do not exert any
pressure
on
the
display.
Otherwise there is a danger that
the screen will break.
● To avoid damage, do not touch
the screen with sharp objects.
Use only the stylus provided.
● There is a risk of injury if the
display breaks. If this should
occur, use protective gloves to
pack the broken parts and contact
customer support to arrange for
disposal. Then wash your hands
with soap, since there is a
possibility that chemicals may
have escaped.
● Never allow children to play with
electrical
equipment
unsupervised.
Children
not
always
correctly
recognize
possible danger.
● Remove the power adapter from
the outlet, switch the appliance off
immediately, or do not actually
●
●
●
●
switch it on, and contact
Customer Service …
if the power adapter or the
attached plug become scorched
or damaged.
if the housing of the
appliance or the power pack
becomes damaged or fluids leak
into it. Components must be
checked by Customer Service in
order to avoid damage!
Data Security
● Every time you update your
data make backup copies on
an external storage mediums.
The supplier does not assume
liability for data loss or
damage to data storage units,
and no claims can be
accepted
for
damages
resulting from the loss of data
or
for
consequential
damages.
Operating Environment
Keep your navigation system
and all connected devices away
from moisture and avoid dust,
heat and direct sunlight,
especially in the car.
Make sure you protect your
appliance from getting wet. (e.g.
from rain and hail, at all times.)
Please pay attention that
moisture can even build up in a
protective pouch because of
condensation.
Avoid heavy vibrations and
shaking.
Avoid the device from releasing
itself from its holder, for example
when braking. In stall the device
as vertically as
SAFETY INFORMATION
possible.
Failure to follow these instructions
may lead to damage to your
appliance.
Ambient Temperature
● The appliance if most reliably
operated
at
an
ambient
temperature of between 41°F to
104°F (5 ℃ to 40 ℃) and at a
relative humidity of between 10%
to 90%.
● In the powered down state the
appliance can be stored at
between 32°F to 140°F (0 ℃
to 60 ℃).
● Store the appliance in a safe
location
to
avoid
high
temperatures (e.g. when parking
or from direct sunlight).
Electromagnetic Compatibility
● When connecting additional or
other components the
“Electromagnetic
Compatibility
Directive”(EMC) must be adhered
to. Please also note that only
screened cable (maximum 10ft)
should be used with this
appliance.
For
optimal
performance,
maintain a distance of at least
10ft.
from
sources
of
high-frequency and magnetic
interference
(televisions,
loudspeaker systems, mobile
telephones and so on.) This will
help avoid malfunctions and loss
of data.
Battery Operation
Your appliance is operated with a
removable battery. In order to
prolong the life and efficiency of your
battery and to ensure safe operation,
follow the instructions below:
● Warning: Danger of explosion if
rechargeable batteries are not
charged properly. Only replace
with the same type of battery or a
similar type recommended by the
manufacturer. Never open the
rechargeable battery. Do not
throw the rechargeable battery
into fire. Dispose of the used
batteries
following
the
manufacturer’s instructions.
● Batteries cannot withstand heat.
Avoid the appliance and the
integrated
battery
becoming
overheated. Failure to comply
with this instruction may lead to
damage to and even explosion of
the battery.
● Use only the original power pack
to charge the battery or the car
adapter
from
the
optional
navigation kit.
● The
batteries
are
special
category waste. When disposing
of the appliance ensure that this
is
done
correctly.
Contact
Customer Service for more
details.
Care of the Display
● Avoid
scratching the display
surface as this is easily damaged.
It is strongly recommended to use
a display protection mylar to
avoid scratches. Please ask your
nearest
dealer
for
these
accessories. The foil on the
display at delivery is purely for
protection during transportation!
● Ensure that no traces of water
remain on the screen. Water can
cause irreversible discoloration.
SAFETY INFORMATION
Use only a soft , lint-free cloth to
clean the screen.
● Do not expose the screen to
either strong sunlight or ultraviolet
radiation.
Transport
If you wish to transport the appliance
follow the instructions below:
● Following
transport
of
the
appliance wait until the unit has
acclimatized before using it.
● In the case of wide fluctuations in
temperature
or
humidity
condensation or moisture may
form inside the appliance and this
can
cause
and
electrical
short-circuit.
● In order to protect the appliance
from dirt, knocks and scratching,
use either the protective case.
● Before traveling insure that you
are aware of the power and
communications provision at your
destination.
Before
traveling
obtain
any
power
or
communications
adapters(modem, LAN, etc.) That
may be needed.
● When shipping your appliance
use only the original packaging
and
advise
the
carrier
accordingly.
● When shipping your appliance
use only the original packaging
and
advise
the
carrier
accordingly.
● When passing through the hand
luggage control at airports, it is
recommended that you pass the
appliance and all magnetic
storage media (external hard
drives) through the X-ray system
(the machine on which you place
your bags). Avoid the magnetic
detector (the structure through
●
which you pass) or the magnetic
wand (the hand device that the
security staff use), since this may
corrupt your data.
Connection
When connection your appliance be
sure to correctly observe the
following instructions:
● The outlet must be in the vicinity
of the appliance and must be
easily accessible.
● Only use the mains adapter on
grounded
sockets
at
100-240V~AC, 50/60Hz. If you
are unsure about the power
supply to the place of use, ask
the relevant energy supplier.
● Use only the power adapter
provided with your appliance.
Power Through Car Adapter
The car adapter should only be
connected to the lighter socket of a
car (car battery =DV12V, no trucks!).
If you are in any doubt about the
power source in your car, contact
your car manufacturer.
Cabling
● Arrange cables so that no-one
can tread on them or trip over
them.
● Do not place any items on the
cable.
WARNING
When the unit is not in use for a
long time, please recharge the
battery every other time, otherwise
the battery’s lifetime would be
shortened.
The following guides you step by
step through the initial set up of the
navigation system.
Firstly, remove the foil for protecting
the device during transportation from
the display.
INSTALLATION
How to access to the navigation
system
Press Sleep/Wake up button on
the unit for about two seconds to
wake up the unit (Note: Sometimes
the unit will not be woken up by
reason of low battery, please charge
the battery. When in charging the
indicator is red). The brand logo will
appear and your device will display
the application screen after a few
seconds.
Attention: According to the charging
status of the accumulator installed.
It is necessary for the device to be
charged before the initial setting up
can run through.
Charging Battery of the Navigation
system
In causing of charging, the Battery
Charge Indicator is red.
You have different possibilities to
charge the battery of your navigation
system:
● With the help of the network
adapter.
● By means of the car adapter.
● The battery charge indicator
lights red until the navigation
system is charged. Do not
interrupt the charging process
before the battery is fully charged.
It will take a few hours for the
navigation system is fully
charged.
When the battery is fully charged
the battery indicator will turn to
green.
● Note: You can use the navigation
system during the charging
process, but the power supply
must not be interrupted during
initial set-up.
●
●
Leave
the
mains
adapter
connected to the navigation
system for around 24 hours, so
that the backup battery can be
fully charged.
You can leave the main adapter
connected, and this is very handy
for
continuous
operation.
However, the mains adapter also
requires power even when it is
not charging up the battery of the
navigation system.
Push the adapter connector into the
guide on the right of the network
adapter. Push the Network Adapter
(2) into a power point that is easily
accessible.
Push the cable of the Network
Adapter (1) into the network adapter
connection of the navigation system.
Working with memory cards
Your navigation system supports
MMC and SD or TF memory cards.
Inserting memory cards
1. Carefully take the memory card
out of its packing (if included).
Take care not to touch or dirty the
contacts.
2. Push the memory card carefully
into the card bay. The side of the
memory card wearing the label
must point upwards. The memory
card should slightly lock in place.
INSTALLATION
Removing memory cards
● Do not remove the memory card
while it is accessed. This could
result in loss of data.
1. To remove the card press lightly
onto the upper edge until it ejects.
2. Pull the card out without touching
the contacts.
3. Store the memory card in the
packing or in another safe
location.
● Memory cards are very fragile.
Take care not to dirty the contacts
and not to force the card.
Accessing Memory Cards
● The appliance only supports
memory cards in the FAT16/32
file format. If you insert a card
prepared
with
a
different
format,your navigation system
may not recognize it and will ask
you to format it again.
Warning: Formatting the memory
card irretrievably wipes out all
data.
● Likewise you cannot just copy
files onto the memory card. In
some cases they must be
converted by the Microsoft
ActiveSync program.
Data Exchange VIA Card Reader
You can transfer or synchronise data
via ActiveSync. This is also the
correct method, in particular, if files
are to be transferred that must be
converted into a navigation
system-readable format.
However, if you wish to copy large
quantities of data (navigation maps)
to the memory card, these can also
be stored directly to the memory
card.
Many computers already have
memory card devices. Insert the card
in this and copy the data directly to
the card.
Because of the direct access
significantly faster transfer will be
achieved.
Resetting The Navigation System
There are two options for resetting
the navigation system.
Soft Reset
This option restarts the navigation
system, without reinstallation being
necessary. A soft-reset is often used
in order to reorganize the memory. In
doing so all programs that are
running are interrupted and the
working memory is reinitialized.
Choose this option if your navigation
system is not responding or working
properly.
Perform the soft-reset as follows:
Screw off the end cap of the pointer
and carefully press the point of the
end cap into the reset opening on the
left side of your device.
Safety Instructions for Navigation
Tips for Navigation
● Do not manipulate the navigation
system while driving to protect
yourself
and
others
from
accidents!
● In the event that you do not
understand the voice instruction
or if you are in any doubt about
what to do at the next intersection,
then the map or arrow display will
provide you with a quick
orientation. Only look at the
display when you are in a safe
driving situation!
Attention: The road layout and
driving rules take precedence over
the
instructions
of
the
INSTALLATION
navigation system. Only follow
the instructions when
circumstances and driving rules
permit it! The navigation system
will guide you to your destination
even when you have to deviate
from your planned route.
● The direction statements of the
navigation system given do not
release the driver of the vehicle
from his or her duty of care or
personal responsibility.
● Plan routes before you leave. If
you want to play a new route
whilst on the road stop driving.
● In order to receive the GPS signal
correctly, metal objects may not
hinder reception. Attach the
navigation system onto the inside
of the windscreen or near the
windscreen with the sucker. Try
out different positions in your
vehicle in order to find the best
reception.
Notes for Use In Car
● Take care that the holder does
not present any risk to safety,
even in the case of an accident,
when installing it.
● Take care that the cable does not
impede any safety components.
● The display of your navigation
system may show “light
re-flexions”. Please take care of
not being “blinded” during
operation.
● Do not mount the components
within the operating range of any
airbags.
● Check the secure adherence of
●
the suction cup at regular
intervals.
● The power plug will consume
power, even if no device is
connected. Remove it when not
in use to avoid draining the
battery.
● Check all safety equipment in
your car after installation.
Mounting The Navigation Set In A
Car
Attention! Only fix the holder for the
navigation system to the windscreen,
if it does not impede the view. Should
this not be possible, then mount the
holder with the enclosed suction
plate in any way that will allow
peril-free and safe operation.
Installation Of The Holder Of The
Navigation System
● Hint: If you want to fix the holder
to the wind screen, then you can
skip steps 1 and 2.
1. Remove the protective foil from
the sticky side of the suction
plate.
2. Fix the suction plate to a suitable
location on the dashboard. Take
care, that the surface of the
dashboard is clean and press
the suction plate strongly onto
the surface.
● To obtain a strong and secure
hold the suction plate should not
be used for 24 hours.
Holder
Suction Cup
Cradle
Mount the car holder to the flexible
neck. Note the labels on the flexible
neck. The arrow labeled CLOSE
INSTALLATION
must point in
3. the direction of the fixture. The
connection closes with a
noticeable clicking sound.
4. Place the holder with the suction
head onto the suction plate (or
directly onto the wind screen)
and press the lever on the
suction head downwards. The
suction head will stick itself
firmly to the suction plate.
5. Place the navigation system into
the car holder by placing it
initially in the lower noses and
then pressing it down gently until
the holder clicks in.
Connecting the Navigation System In
The Car
When the battery is in a low voltage,
you can recharge it in the car:
1. Plug the jack (1) of the
connection cable into the
corresponding receptor at the
bottom of your navigation
system.
2. Insert the power adapter (2)
now into the cigarette lighter
socket and ensure, that it
will not lose contact while
driving. This could cause a
malfunction.
● Hint: Remove the power adapter
from the cigarette lighter socket
when ending a trip or when
parking the car for a extended
period of time.
VIEWS
Front View
(1) Battery Charge Indicator
Left View
(2) Antena
(3) Headphone Interface
(4) TF slot
(5) AV - IN
(6) USB Interface
Top View
(7) Power
Back View
(8) Loudspeaker
(9) Stylus
(10) Reset
GPS(Global Positioning System)
GPS is a satellite-backed system for
determining your position. With the
help of 24 satellites revolving around
the earth, it is possible to determine
your position on earth with the
accuracy of a few meters. The
satellite signals are received by the
antenna of the built-in GPS receiver,
which must have a “line of sight” to at
least 4 of these.
Note:
By limited line of sight (e.g. in
tunnels, between houses, in
woods or also in vehicles with
metal-coated windows) it is not
possible to determine the
position. The satellite reception
however automatically picks up
again as soon as the obstacle
has been passed and there line
of sight is reestablished again.
Please note that your appliance
is preset to not shut down
automatically after a few minutes
without activity. You can Change
this preset in the Settings mode.
If the GPS receiver has not been
active for some hours, it must
orientate itself again. This
process may take a while.
Memory Card Quick Installation
This option is only available to you if
your navigation system is equipped
with a prepared memory card. In this
case, you will ready be able to use
the Navigation function of your
device after a short time, without
carrying out the pre-installation on a
PC.
● The initial setting up must be
carried out as described on page
15 in any case.
The following installation limits
the Navigation to the area which
is pre-installed on your memory
card.
You must carry out these steps to put
the navigation into operation in your
car:
1. Read and adhere to the safety
instructions on p.2 and following
and p.23 and following.
2.Install the remaining components
of the navigation system.
3.Press the POWER button to start
your navigation system. If the
instructions of Step1 have not
yet been executed, then do it
now. The battery should be
charged. The accumulator will
be charged by means of the car
power supply if necessary.
● Insert the pre-installed memory
card in the navigation system.
The installation of the navigation
software will start automatically.
Follow the instructions on the
screen.
NOTES:
● The memory card must always be
inserted into the device during the
● use of the navigation system. A
Soft Reset will have to be carried
out to restart the navigation
system, if the memory card is
removed during its use, even for
a short time.
Set the date and time by means of
the Settings button and the date/time
control button, if this has not yet
taken place. Set the applicable time
zone, if available.
●
Staring Navigation
1. Press the POWER button for
about two seconds to wake up your
GPS (Global Positioning System)
navigation system.
2. The navigation software will start
automatically or after clicking on the
navigation control button, according
to the version.
3. Press the menu icon to enter the
destination and the address of your
navigation destination. Then start the
navigation by clicking on Navigate.
You will receive the route information
on the screen, augmented by
language statements, after a short
time, if the satellite reception is
adequate.
Please take information about the
further operation of the Navigation
software from the comprehensive
User Handbook on the Navigation
CD.
In addition, brief help is available to
you on your navigation system. You
will reach it by means of the
Options/Destination Entry icon and
by selecting the help function.
Note: The GPS-receiver will require
some minutes for initialization when
deployed for the first time. Even
when GPs signal reception is
indicated the navigation could be
imprecise. In all future instances it
will take about 30-150 seconds until
a correct GPS-signal is available,
sufficient “sight” of the satellite is a
prerequisite.
MENU OPERATION
When you turn on the unit, it will
enter
system
menu
interface
automatically. (refer to the following
picture).
Tap
/
to adjust the
screen backlight
Tap
/
to show last
column. This display is in circle.
●
●
Navigate
Navigation operation please refer
to the software instruction
Tap
to exit brightness
setting interface.
manual.
Settings
2) Tap
Tap
Icon will enter the
to enter volume
adjust interface like followed:
setting interface like followed:
Tap
/
to adjust the
volume level
1) Tap
to enter the screen
Tap
/
to turn on/ off
the screen click tone
backlight like followed:
Tap
interface.
to exit volume setting
MENU OPERATION
Tap
3) Tap
to enter the time
to exit FM Transmitter
setting interface.
setting like followed:
5) Tap
to enter the time
setting like followed:
Tap
to exit navipath setting
interface.
4) Tap
to enter the FM
transmitter setting like followed:
Tap the item,it will turn white, then
tap
/
to set year,
month, date, hour, minute.
Tap
Tap
/
to set time zone.
to exit time setting
interface.
FM Transmitter will send out the
audio signal to the radio devices.
Take
86.7MHZ
frequency
and
the
received
frequency of the radio should be
86.7MHZ, then all the sounds of the
GPS will be input through the
amplifier system of the radio.
to enter the
calibrate mode, you will see the
for
example, both the GPS transmitting
frequency
6) Tap
following picture:
MENU OPERATION
Tap
icon to calibrate screen
like followed:
8) Tap
to enter the second
page of settings
9)Tap
to enter the defoult
setting like followed:
Click the cross in the center, it will
move from in the sequence of the
center, left up, left down, right down
and right up till the calibration
succeed, then the system will exit to
the main interface automatically.
icon
Tap
calibrate setting.
Tap
to exit the
icon to restore the
Tap
factory default setting
Tap
icon
to exit the
to exit calibration setting
default setting.
interface.
10) Tap
7) Tap
to enter language
setting interface like followed:
to enter the GPS
information
interface
like
followed:
Tap
interfac
to exit language setting
Tap
interface.
to exit GPS information
MENU OPERATION
Tap
11) Tap
to enter the
defoult setting like followed:
to Close current file
Choose the song to enter the playing
interface as following:
1) PHOTO
Tap
to exit system information
①
——Previous/Next
/
track.
interface.
②
——To play and pause,
single click to pause, click again to
12) Tap
to turn back the
first page of settings,
play continuously;
③
④
●
Audio Player
—— Tap to stop playing
——Support sequencial
playing, loop playing, repeat playing
and random playing.
⑤
Tap
icon enter Music file
list as following:
—— Tap to display the play
list, and choose your favorite
⑥
—— Tap to back homepage
——Drag to adjust the
volume up/down
Tap
Tap
to show last/next page
to close the audio player.
MENU OPERATION
Video Player
●
——Drag to adjust the
Tap
icon enter Music
brightness
file list as following:
Tap
to close the video player.
Photo Viewer
●
Tap
icon enter Music
file list as following:
Tap
Tap
to show last/next page
to Close current file
Choose the video name to enter the
playing interface as following:
Tap
to show last/next page
to Close current file
Tap
Choose the picture to enter the
playing interface as following:
①
— — Tap to play next
——To play and pause,
single click to pause, click again to
play continuously;
③
——Tap to show the
/
previous/next picture
video
②
①
—— Tap to display the play
list, and choose your favorite
——Volume.
②
/
— — Tap to shrink
/enlarge current picture in proportion
③
——Tap to rotate the picture
90°.
④
— — Play all the pictures
MENU OPERATION
circularly on full screen from the
current picture
⑤
— — Tap to watch the
current picture in full screen
⑥
—— Tap to display the
play list, and choose your favorite
Tap
to close the photo viewer.
E-Book
Tap
to enter E-Book list
like followed:
①Tap
to close current ebook
reader.
②
/
— — Previous/Next
page.
③
—— Tap to enter Ebook
list to choose favorite book
④
——Tap to edit Font set
like followed:
Tap
Tap
to show last/next page。
to close current file.
——Set font as bold.
— — Set
normal.
font
as
MENU OPERATION
— — Decrease / Increase
/
font size.
——Font size indicator.
Tap
to close current font
setting.
⑥
——Tap to add bookmark.
⑦
——Tap to open bookmark
list like followed:
setting.
⑤
—— Tap to edit Color set
like followed:
——Delete file.
——Return e-book home
page.
— — Showing current
reading ratio.
Tap
to Return e-book
interface.
Tap
Game
to enter games for
choose like followed:
/
——Choose background
color,font color or set background
color with reverse or sequential order
Tap
to close current color
MENU OPERATION
1)Tap
bluetooth
following:
Tap
to enter the
settings
interface
as
to enter the
two picture as following,one for
searching ,another for searching
result:
●
BLUETOOTH
To start using Phonelink , you need to pair
your handset with the GPS device. Follow
the steps to complete the pairing process.
Tap
icon enter bluetooth
interface as following:
Top the device you want to connect
to pair as the
and click
following pictures:
MENU OPERATION
Top
and enter phone book as
following:
3)Tap
icon enter photo
book interface as following:
After
successful
pairing
and
connecting, it will show the following
picture:
4)Tap
icon enter dial pad
interface as following:
2)Tap
icon enter photo
book interface as following:
MENU OPERATION
①
—— Tap to delete the
last number
——Tap to shift the
voice to cell phone
②
—— Tap to select the
photo number from the photo book
③
—— Tap to select the
photo number from the call history
④
—— Tap to make call
and then it will be in dialing as
following:
②
— — Tap to mute the
microphone while keeping the call
③
/
——
decrease/increase
gradually.
④
the
Tap to
volume
—— Tap to hang up
If there is an incoming call, it will
show the caller ID and its number as
following:
—— Tap to keep call state
and return to main interface
①
—— Tap to show options
interface as following:
①
call
—— Tap to answer the
②
— — Tap to mute the
microphone while keeping the call
— — Tap
extension number
to
dial
③
/
decrease/increase
gradually.
④
——
the
Tap to
volume
—— Tap to reject the
MENU OPERATION
●
call
—— Tap to keep call state
and return to main interface
DUN
1)
After
Bluetooth
pairing
completed;please
press
into the DUN setting as below:
5) Tap
icon to download
SMS of paired phone as following:
.Press
to enter to
connecting status as below:
— — Tap to enter the
interface as following:
2). When DUN is connected; it
shows as below:
6) Tap
icon to download
files from paired cell phone as
following:
) Press
to
3)
enter into Internet Explorer, the
program will run automatically
as below (test version of
Internet Explorer):
MENU OPERATION
——Back to the last web page
2) Press “Continue” to enter into TV
——Enter into the next web
page
——To refresh the web page
function, press
to enter into
TV frequency selection menu as
below:
——To top the web page
——Press the button to active
the key board
——To show the
address of web page
——To close the web page
●
ISDBT Digital TV function
1) Press
icon to active the
TV function as below:
3) Press “Scan” to enter into scan
menu as below:
After received the TV channel, the
menu will show as below:
----Touch the screen twice to enter
into full screen.
---- Press once on the full screen to
return to the normal screen as below.
MENU OPERATION
⑾
——Pause
Press
once
to
Pause
the
program, press again to resume
the program playing
⑿
⑴
——Open folders
To open the folders, choice your
To stop the program playing
⒀
favorite program
⑵
—— Settings
——Display ESG menu.
⒁
——Volume Increase
To increase the volume level
⑸
——Volume reduce
To reduce the volume level
⑹
——Mute
To close the volume
⑺
——Volume level indication
Total 9 volume levels for selection
⑻
——Close
——Last Channel
To go to last channel
⒂
To enter into ESG menu
⑷
——Last Channel
To go to last channel
To enter into ISDBT settings
⑶
——Stop
——Next channel
To go to next channel
⒃
——Display
Full display model, touch the
reen twice to return to normal
display mode
⒄
——Signal level
To display the signal level
4) Press
list as below:
to enter to folder
To close the ISDBT function
⑼
——Take photo
To take photo on the present screen
⑽
——Recording
To record the present program while
playing
Choose the favorite program, and
MENU OPERATION
enter into the program by pressing
the program name. Press
—English,Japanese,
to
Portugese, Spanish.
exit the folder list
--- Press
display setting as below:
—Audio1Stream
to enter into ESG
menu
Display TV program list :
Display favorite channel list:
:
---- Press setting menu to set up for
yourfavorite setting as below: there
have 4 languages available: English,
Japanese, Portugese, Spanish
Language setting and monitor
Switch
—Main
Audio、Sub Audio and Dual three
choices