1
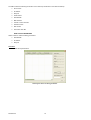
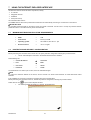
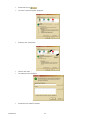
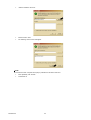
Mod.
1093
DS1093-070
MINIDOME IP H.264 COMPATTA
H.264 IP COMPACT MINIDOME
KOMPAKTE IP-MINIKAMERA H.264
Sch./Ref./Typ 1093/150
GUIDA RAPIDA
QUICK GUIDE
SCHNELLANLEITUNG
ITALIANO
INDICE
1
Impostazioni generali............................................................................................................................. 3
1.1
Avvertenze.............................................................................................................................. 3
1.1.1
1.1.2
1.1.3
1.1.4
1.1.5
1.2
1.3
Caratteristiche funzionali ........................................................................................................ 4
Apertura della confezione....................................................................................................... 4
1.3.1
2
3
Contenuto della confezione ...............................................................................................................................4
Installazione ............................................................................................................................................ 5
2.1
Descrizione delle parti ............................................................................................................ 5
2.2
Montaggio a soffitto ................................................................................................................ 6
Utilizzo del software IP Finder .............................................................................................................. 7
3.1
Istruzioni d’uso........................................................................................................................ 7
3.1.1
3.1.2
3.1.3
3.1.4
4
Alimentazione ....................................................................................................................................................3
Precauzioni per la sicurezza..............................................................................................................................3
Precauzioni per l’installazione ...........................................................................................................................3
Registrazioni immagini.......................................................................................................................................3
Privacy e Copyright............................................................................................................................................3
Installazione del software Urmet IP-finder.........................................................................................................7
Rilevamento dei dispositivi ................................................................................................................................7
Modifica dei parametri .......................................................................................................................................8
Ripristino della password di default ...................................................................................................................9
Utilizzo dell’interfaccia Internet Explorer............................................................................................. 9
4.1
Requisiti minimi per l’installazione del software ................................................................... 10
4.2
Configurazione di protezione e sicurezza ............................................................................ 10
DS1093-070
2
1
IMPOSTAZIONI GENERALI
Caro cliente,
La ringraziamo dell’acquisto di questo prodotto.
Il presente documento vuole essere una semplice guida rapida che Le permetterà una rapida messa in funzione del modello di
minidome IP URMET Domus S.p.A. Sch.1093/150..
ÚNOTA BENE
Per maggiori approfondimenti, fare riferimento al manuale istruzioni presente sul CD a corredo del prodotto.
1.1
AVVERTENZE
1.1.1
ALIMENTAZIONE
¾
¾
¾
1.1.2
PRECAUZIONI PER LA SICUREZZA
¾
¾
¾
¾
¾
1.1.3
Per prevenire il rischio di incendio e folgorazione evitare di esporre il dispositivo alla pioggia o all'umidità e di
introdurre al suo interno qualsiasi oggetto solido o liquido. Se ciò dovesse avvenire scollegare il dispositivo dalla rete
di alimentazione e farlo controllare da personale qualificato.
In nessun caso il dispositivo deve essere aperto. Per qualsiasi intervento di riparazione rivolgersi a personale
qualificato oppure contattare il centro assistenza tecnico autorizzato.
Conservare questa apparecchiatura lontano dalla portata dei bambini; in caso contrario questi potrebbero
danneggiarla, o danneggiarla accidentalmente.
Non toccare questa apparecchiatura con le mani bagnate per evitare scosse elettriche o danni meccanici.
Se l’apparecchiatura dovesse cadere o il contenitore esterno dovesse risultare danneggiato, cessarne l’utilizzo. Se si
continuasse ad utilizzarla in queste condizioni, potrebbe essere provocata una scossa elettrica. In questo caso
contattare il rivenditore, o l’installatore autorizzato.
PRECAUZIONI PER L’INSTALLAZIONE
¾
¾
¾
¾
¾
¾
¾
¾
¾
¾
1.1.4
Non installare la minidome in ambienti esposti alla pioggia o all'umidità. In questi casi utilizzare le apposite custodie.
Evitare di puntare direttamente l’obiettivo contro il sole o contro luci intense, anche se la minidome è spenta; il
soggetto da riprendere non deve essere in controluce.
Evitare di puntare la minidome verso oggetti riflettenti.
La presenza di alcuni tipi di luce (ad esempio fluorescente colorata) può falsare i colori.
Non posizionare questa apparecchiatura su alcuna superficie instabile come un tavolo traballante o inclinato. In caso
contrario l’apparecchiatura potrebbe cadere con conseguenti lesioni o guasti meccanici.
Se all’interno dell’apparecchiatura dovesse penetrare acqua o qualche altro materiale estraneo cessarne l’utilizzo al
fine di evitare la possibilità di incendio e scosse elettriche. In questo caso contattare il rivenditore, o l’installatore
autorizzato.
Non coprire l’apparecchiatura con un panno quando sta funzionando per evitare deformazioni del contenitore esterno
e surriscaldamento delle parti interne con conseguente possibilità di incendio, scosse elettriche o guasto meccanico.
Non avvicinare magneti od oggetti magnetizzati al dispositivo in quanto ciò potrebbe causare anomalie di
funzionamento.
Non usare questa apparecchiatura in ambienti con presenza di fumo, vapore, umidità, polvere, o vibrazioni intense.
Non mettere in funzione il dispositivo immediatamente dopo il trasporto da un luogo freddo ad un luogo caldo e
viceversa. Attendere mediamente tre ore: questo intervallo di tempo è necessario al dispositivo per adattarsi al nuovo
ambiente (temperatura, umidità, ecc... ).
REGISTRAZIONI IMMAGINI
¾
¾
¾
1.1.5
Prima di collegare l'apparecchio alla rete di alimentazione accertarsi che i dati di targa siano rispondenti a quelli della
rete di distribuzione.
E' opportuno prevedere a monte degli apparecchi un idoneo interruttore di sezionamento e di protezione.
In caso di guasto e/o cattivo funzionamento togliere l’alimentazione tramite l’interruttore generale.
Questa apparecchiatura non è progettata come antifurto ma per registrare immagini. Perciò, qualora l’utilizzatore
subisca un furto, la società URMET Domus S.p.A. non può essere considerata responsabile di alcuna perdita o danno
conseguente.
Effettuare una registrazione di prova prima di utilizzare l’apparecchiatura per verificare che l’operazione avvenga
correttamente. Tenere in considerazione che se l’utente subisce qualche perdita o danno a causa di errata
impostazione di osservazione, utilizzo, funzionamento improprio o malfunzionamento dell’apparecchiatura, la società
URMET Domus S.p.A. non può essere considerata responsabile per l’eventuale perdita di dati memorizzati.
Questa apparecchiatura contiene componenti elettronici di precisione. Per garantire la registrazione corretta delle
immagini, non sottoporla ad urti o colpi durante tale operazione.
PRIVACY E COPYRIGHT
¾ Il prodotto acquistato è un dispositivo per sistemi TVCC. La registrazione delle immagini è subordinata alle leggi
vigenti nel paese di utilizzo. È inoltre vietata la registrazione di immagini protette da Copyright.
¾ Gli utenti del prodotto sono responsabili per il controllo ed il rispetto di tutte le norme e gli statuti locali relativi al
monitoraggio e alla registrazione di segnali video. Il produttore NON potrà essere ritenuto responsabile per un utilizzo
di questo prodotto che non sia in conformità con le norme in vigore. Per maggiori informazioni consultare l’indirizzo
web http://www.garanteprivacy.it
DS1093-070
3
1.2
CARATTERISTICHE FUNZIONALI
¾
¾
¾
¾
¾
¾
¾
¾
¾
¾
¾
1.3
Compressione H.264
Supporta i protocolli TCP/IP (TCP/IP, HTTP, DHCP, DNS, DDNS, RTP, RTSP, PPPoE, SMTP, NTP) e permette
l’interfacciamento con il browser Internet Explorer.
Funzione “heartbeat”: tramite questa funzione, un server può verificare il funzionamento del dispositivo in tempo reale.
Funzioni di compressione: E’ disponibile sia in modalità bit rate variabile che in modalità bit rate fisso; inoltre possono
essere personalizzate dall’utente sia la qualità che il valore di bit rate delle immagini compresse.
Gestione Allarmi: Sono supportate le funzionalità di rivelazione movimento e di errore di memorizzazione.
Gestioni accessi utente a più livelli: l’amministratore può creare sino a 15 differenti utenti con differenti livelli di
accesso.
Il prodotto prevede un’interfaccia Ethernet 10M/100M auto-adattativa.
Visualizzazione e gestione completa da remoto mediante software dedicato e pagina Web Internet Explorer.
Controllo remoto: E’ possibile effettuare il set dei parametri, la visualizzazione in tempo reale dei video o la verifica
delle prestazioni della minicamera via software o tramite IE e memorizzare il flusso compresso attraverso la rete.
Funzione dual-stream: possibilità di generare due flussi video indipendenti: uno principale dedicato alla registrazione
in locale; uno dedicato secondario alla visualizzazione da remoto via network
Dimensioni compatte.
APERTURA DELLA CONFEZIONE
Verificare che l’imballo ed il contenuto non presentino danni visibili. Se alcune parti non sono presenti o risultano danneggiate,
contattare immediatamente il rivenditore. In questi casi non tentare di utilizzare il dispositivo. Se il prodotto dovesse essere
rimandato al fornitore, assicurarsi di spedirlo con il suo imballo originale.
1.3.1
CONTENUTO DELLA CONFEZIONE
¾
¾
¾
N°1 Minidome IP
N°1 Mini CD-ROM
N°1 Dima di foratura
¾
N°1 Chiave a brugola
ÚNOTA BENE
La composizione degli accessori a corredo può essere variata senza alcun preavviso.
DS1093-070
4
2
INSTALLAZIONE
2.1
DESCRIZIONE DELLE PARTI
RETE
ALIMENTAZIONE
VITI DI CHIUSURA
COPERTURA
VITI DI CHIUSURA
OTTICA
Vista generale
Descrizione delle parti
ID.
DESCRIZIONE
1
Involucro
2
Ottica
3
LED indicatore dell'alimentazione che si accende in rosso quando l'unità è alimentata
4
Piastra inferiore
5
Foro di fissaggio per piastra inferiore
6
Viti fissaggio ottica
7
S & L: LED indicatori stato della connessione di rete
Quando la rete è connessa il led “S” si accende in arancio ed il led “L” lampeggia in verde
8
RESET: riporta tutti i parametri al default di fabbrica
ÚNOTA BENE
ÚNOTA BENE
Quando si alimenta la minidome, premere il pulsante 'RESET' per circa 10 secondi affinché tutti i parametri, compresi nome
utente, password, indirizzo IP, numero della porta etc., siano riportati ai valori di fabbrica.
DS1093-070
5
2.2
MONTAGGIO A SOFFITTO
Il montaggio a soffitto è il metodo più raccomandato per questa telecamera. Si raccomanda di seguire i seguenti passi:
Passo 1: Allentare le viti di fissaggio con la chiave a brugola fornita a corredo per poter smontare la copertura esterna
come mostrato di seguito.
Rimozione della copertura esterna
Passo 2: Usare le viti per fissare la piastra inferiore al soffitto.
Fissaggio della piastra inferiore
ÚNOTA BENE
Se richiesto, l'utilizzatore può usare le pinze per rimuovere le clip di protezione (evidenziate dal riquadro tratteggiato) presenti
sui lati della copertura esterna per favorire il passaggio dei cavi e poi fissare il tutto al soffitto.
DS1093-070
6
3
UTILIZZO DEL SOFTWARE IP FINDER
Il software Urmet IP-finder è un “tool” che consente di rilevare i seguenti dispositivi Urmet Domus S.p.A con tipologia di
compressione video H.264:
¾
¾
¾
¾
DVS (video server);
IP-camere;
DVR;
Megapixel camere.
Tali dispositivi devono essere connessi alla propria rete LAN, indipendentemente dall’indirizzo IP, dalla maschera sub-net dei
dispositivi e del PC da cui il software Urmet IP-finder viene lanciato. Una volta reperiti i dispositivi, è possibile:
¾
¾
3.1
modificarne indirizzo IP e subnet mask;
ripristinarne la password di default dell’utente-amministratore.
ISTRUZIONI D’USO
3.1.1
INSTALLAZIONE DEL SOFTWARE URMET IP-FINDER
Procedura
1.
Selezionare il file “URMET IP-finder.zip” ed estrarre il contenuto in una nuova cartella.
WinPcap_3_1beta3.exe”
2.
Installare WinPcap_3_1beta3 selezionando “
3.
Completata l’installazione, entrare nella cartella in cui è stato estratto il programma e lanciarlo selezionando “
finder.exe”
IP-
ÚNOTA BENE
Assicurarsi che l’unica interfaccia di rete abilitata nel PC sul quale è stato lanciato il software Urmet IP-finder sia quella
connessa alla LAN dove sono presenti i dispositivi Urmet che l’IP-finder deve reperire.
Tutte le altre interfacce di rete disponibili sul PC (comprese le schede di rete Wi-Fi) vanno disabilitate.
3.1.2
1.
RILEVAMENTO DEI DISPOSITIVI
Lanciare il software Urmet IP-finder cliccando su “Avvia”:
Videata di avvio del software IP-finder
2.
Apparirà la schermata sottostante con l’elenco dei dispositivi rilevati sulla rete.
Informazioni sul
dispositivo
Area di visualizzazione /
modifica dei parametri
Area di ripristino
Barra di scorrimento
Dispositivi rilevati sulla rete
DS1093-070
7
La tabella contiene le seguenti informazioni relative ai dispositivi (le informazioni non visibili possono essere visualizzate
agendo sulla barra di scorrimento):
¾
Nome del dispositivo
¾
Indirizzo IP
¾
Porta Dati
¾
Numero Seriale
¾
Subnet Mask
¾
Indirizzo MAC
¾
Numero di canali video
¾
Versione Firmware
¾
Versione del DSP
¾
Data e ora relative al momento della ricerca
3.1.3
MODIFICA DEI PARAMETRI
Una volta selezionato uno dei suddetti dispositivi, è possibile modificarne i seguenti parametri:
¾
Subnet mask
¾
Indirizzo IP
¾
Porta dati
Procedura
1.
Selezionare il dispositivo desiderato.
Selezione del dispositivo del quale si desidera modificare i parametri
DS1093-070
8
2.
Premere il pulsante “Modifica” e procedere con le modifiche necessarie sui seguenti parametri: indirizzo IP, subnet
mask e porta dati.
Modifica dei parametri
ÚNOTA BENE
I parametri in che rimangono “offuscati” (Numero seriale, Versione FW, Porta e Indirizzo MAC) possono solo essere visualizzati
e non modificati.
3.
Una volta terminate le modifiche è possibile:
¾ cliccare su “Cancella” per annullare tutte le modifiche;
¾
inserire la password di amministratore del dispositivo e premere su “Salva” per salvare tutte le modifiche sul
dispositivo.
Se la password inserita è corretta, comparirà un messaggio di conferma, ed il dispositivo nella lista comparirà istantaneamente
aggiornato con i nuovi dati.
Messaggio di conferma
Se la password inserita è errata, comparirà un messaggio di salvataggio fallito.
Messaggio di errore
3.1.4
RIPRISTINO DELLA PASSWORD DI DEFAULT
Nel caso in cui si volesse ripristinare su un dispositivo la password di default dell’utente amministratore, si deve comunicare
all’Area Tecnica Servizio Clienti di Urmet Domus S.p.A il numero seriale del dispositivo e la data in cui desidera effettuare
l’operazione di ripristino della password.
Dopo aver ricevuto il codice di sblocco da parte dell’ Area Tecnica Servizio Clienti di Urmet Domus S.p.A, l’utente dovrà
utilizzare il software Urmet IP-finder per rilevare il dispositivo sulla rete, selezionarlo ed immettere il codice di sblocco
nell’apposito campo “Ripristina default password” e premere “OK” per confermare.
4
UTILIZZO DELL’INTERFACCIA INTERNET EXPLORER
Gli apparati Urmet Domus S.p.A. con tipologia di compressione video H.264 ovvero:
DS1093-070
9
¾
¾
¾
IP camere
Megapixel camere
DVR/DVS
¾
DVS (video server)
verranno di seguito identificati con il termine dispositivo.
I dispositivi URMET Domus sono dotati di Web Client per consentire la connessione automatica via internet mediante Pc
remoto.
ÚNOTA BENE
Qualunque operazione effettuata in locale sul dispositivo (tramite il pannello frontale del DVR – telecomando - mouse) potrebbe
causare un rallentamento delle prestazioni del software. A risentirne maggiormente potrebbe essere la fluidità dei flussi video in
LIVE.
4.1
4.2
REQUISITI MINIMI PER L’INSTALLAZIONE DEL SOFTWARE
¾
Processore
→
Pentium 4; 3GHz
¾
Ram
→
512 MB
¾
Scheda video
→
MMX 128 MB; 128 bit
¾
Sistema operativo
→
Win 2000 Pro; Win XP Pro - sp2; Vista; Seven
¾
Browser Internet
→
I.E 6.0 o successivi
CONFIGURAZIONE DI PROTEZIONE E SICUREZZA
Prima di effettuare la connessione con Pc remoto occorre procedere con la configurazione di protezione attenendosi alla
seguente procedura:
¾
Lanciare Internet Explorer e digitare nella barra degli indirizzi l’indirizzo IP del dispositivo.
Le impostazioni di default prevedono:
¾
Indirizzo IP della MINICAMERA →
¾
Porta
→
8000
¾
Nome utente
→
admin
¾
password
→
12345
192.0.0.64
L’amministratore può creare fino a 15 utenti separati con differenti diritti per ciascun utente.
ÚNOTA BENE
Per cambiare l’indirizzo IP di fabbrica del dispositivo consultare la guida del Software Urmet IP Finder o del Client Software
Urmet NVM PLUS.
Se venisse richiesta l’installazione di un componente ActiveX, verificare che ciò avvenga nelle seguenti modalità.
Prima di effettuare la connessione col PC occorre procedere con la configurazione di protezione di IE attenendosi alla seguente
procedura:
¾
Aprire il browser Internet Explorer facendo doppio click sull’icona
¾
Apparirà la seguente videata (o comunque la pagina iniziale predefinita).
.
¾
DS1093-070
Fare doppio click sull’icona
.
10
¾
Apparirà la schermata di “Proprietà – Protezione Internet”.
¾
Selezionare l’area “Siti attendibili”.
¾
Cliccare sulla voce “Siti…”.
¾
Apparirà la seguente videata.
¾
Aggiungere l’indirizzo IP del dispositivo nel campo
DS1093-070
11
¾
“Aggiungi il sito web all’area”.
¾
Cliccare sul pulsante “Aggiungi”.
¾
Apparirà la seguente videata di conferma.
ÚNOTA BENE
Non selezionare la voce “Richiedi verifica server (https:) per tutti i siti dell’area”.
¾
Cliccare ripetutamente su “OK” per concludere.
¾
Procedere con l’installazione dell’Active X.
DS1093-070
12
ENGLISH
TABLE OF CONTENTS
1
General settings ................................................................................................................................... 14
1.1
Warnings .............................................................................................................................. 14
1.1.1
1.1.2
1.1.3
1.1.4
1.1.5
1.2
1.3
General features................................................................................................................... 15
Opening the package ........................................................................................................... 15
1.3.1
2
3
Contents of the package..................................................................................................................................15
Installation............................................................................................................................................. 16
2.1
Description of the parts ........................................................................................................ 16
2.2
Ceiling installation................................................................................................................. 17
How to use ip finder ............................................................................................................................. 18
3.1
Introduction........................................................................................................................... 18
3.2
Instructions ........................................................................................................................... 18
3.2.1
3.2.2
3.2.3
3.2.4
4
Power ...............................................................................................................................................................14
Safety precautions ...........................................................................................................................................14
Installation precautions ....................................................................................................................................14
Image recording ...............................................................................................................................................14
Privacy and Copyright......................................................................................................................................14
How to install Urmet IP-Finder.........................................................................................................................18
How to detect the devices................................................................................................................................18
How to edit parameters....................................................................................................................................19
How to restore the default password ...............................................................................................................20
Using the internet explorer interface.................................................................................................. 21
4.1
Minimum software installation requirements ........................................................................ 21
4.2
Protection and security configuration ................................................................................... 21
DS1093-070
13
GENERAL SETTINGS
Dear Customer,
Thank you for having purchased this Urmet product.
This document is a simple, quick reference guide to help you start up the URMET S.p.A. IP minidome Ref. 1093/150.
ÚNOTE
For more detailed information about the devices, refer to the full instruction manual inside the CD provided with the product.
4.3
WARNINGS
4.3.1
¾
¾
¾
4.3.2
¾
¾
¾
¾
¾
POWER
Check mains rating before plugging the power unit in.
Do not pull the cable to unplug the device.
Switch the device off before unplugging power unit. This operation must not be performed when the NVR is recording,
playing or from the configuration menu. Stop recordings and playback in progress before disconnecting power from
the device to prevent damaging the hard disk beyond repair.
SAFETY PRECAUTIONS
Keep the device away from rain and humidity to prevent risk of fire and electrocution. Do not introduce material (solid
or liquid) inside. If this should accidentally occur, disconnect the device from the mains and have it inspected by
qualified personnel.
Never open the device. In all cases, contact a qualified personnel or authorised service centre for repairs.
Keep the device away from children, to prevent accidental damage.
Do not touch the device with wet hands to prevent electrical shock or mechanical damage.
Do not use the device if it should fall or the external casing is damaged. Risk of electrocution if the device is used in
such conditions. Contact the retailer or authorised installer.
INSTALLATION PRECAUTIONS
¾
¾
¾
¾
¾
¾
¾
¾
¾
¾
¾
¾
4.3.3
¾
¾
¾
4.3.4
¾
¾
Do not install the camera in environments exposed to rain or humidity. Use specific boxes if required.
Avoid pointing the lens directly towards the sun or intense sources of light also when the camera is off. The subject
must not be backlit.
Do not point the camera towards reflecting objects or mirrors.
Some lighting systems (e.g. coloured fluorescent lights) may false the colours.
Arrange the adapter provided between camera and lens if a “C” type lens is fitted.
Use an AUTO-IRIS lens if the camera is used in environments where the light conditions change.
Do not arrange this device on an unstable surface, such as a tottering or slanted table. The device could fall causing
injury or mechanical failures.
Stop using the device if water or other material should penetrate inside: risk of fire and electrocution. Contact the
retailer or authorised installer.
Do not cover the device with a cloth while it is running to prevent deforming the external casing and overheating the
internal parts: risk of fire, electrocution and mechanical failure.
Keep magnets and magnetised objects away from the device to prevent faults.
Do not use the device in presence of smoke, vapour, humidity, dust or intense vibrations.
Wait for a while before operating a device immediately after transporting it from a cold place to a warm place and vice
versa. Wait on average for three hours: this will allow the device to adapt to the new ambient (temperature, humidity,
etc.).
IMAGE RECORDING
This device was designed to record images, not as a burglar alarm. URMET Domus S.p.A. cannot be held liable for
loss or damage following theft sustained by the user.
Make a test recording before using the device to make sure that is working correctly. Please note that URMET Domus
S.p.A. is not liable for loss of stored data consequent to loss or damage caused by incorrect observation installation,
use, improper use or malfunctioning of the device.
This device contains precision electronic components. Protect the device from shocks to ensure correct recording of
images.
PRIVACY AND COPYRIGHT
The DVR DVS digital video recorder is a device for CCTV systems. Recording of imagines is subject to the laws in
force in your country. Recording of images protected by copyright is forbidden.
Product users shall be responsible for checking and respecting all local rules and regulations concerning monitoring
and recording video signals. The manufacturing SHALL NOT BE LIABLE for use of this product not in compliance with
the laws in force.
DS1093-070
14
4.4
GENERAL FEATURES
¾
¾
¾
H.264 compression.
It supports TCP/IP (TCP/IP,HTTP,DHCP,DNS,RTSP RTCP, PPPoE) protocols and can be managed with Internet
Explorer.
“Heartbeat” function: with this function, a server can check the proper operation of the device in real time.
Support 1 channel video signal and standard H.264 encoding compression, which supports both fixed bit rate and
variable frame rate; besides, you can self-define both the video quality and the value of compressed bit rate
Alarms management: the product is equipped with motion detection function and error on storing alarms.
Multilevel managements for user access: the administrator can create up to 15 different users with different access
levels.
The product is provided with a 10M/100M Ethernet self-adaptive interface.
Remote display and complete management with dedicated software and Internet Explorer Web page.
Dual-stream function: capability to generate two independent video streams: one main, for local recording; one
secondary for remote displaying via network.
RS-485 interface for connection of serial devices.
¾
Compact dimensions.
¾
¾
¾
¾
¾
¾
¾
4.5
OPENING THE PACKAGE
Check that the packing and the contents are not visibly damaged. Contact the retailer immediately if parts are either missing or
damaged. Do not attempt to use the device in this case. Send the product back in its original packing if it is damaged.
CONTENTS OF THE PACKAGE
¾
¾
¾
¾
¾
N°1 IP Minidome
N°1 Quick guide
Mini CD-ROM containing software and manuals
N°1 guide pattern (drilling template).
N°1 Allen wrench
ÚIMPORTANT NOTE
Accessories may be changed without prior notice.
DS1093-070
15
5
INSTALLATION
5.1
DESCRIPTION OF THE PARTS
Minidome view
Parts description
ID
DESCRIPTION
1
Back box
2
Lens
3
P: Power LED indicator, which turns red when power is applied to the unit.
4
Bottom board
5
Bottom board set screw hole
6
Lens set screw
7
S & L: Network status LED indicator.
When the network is connected, the “S” LED turns orange, while the “L” LED flickers in green.
8
RESET: Reset all paramaters to factory default settings.
ÚNOTE
When the camera is power up, press the “RESET” button for about 10 seconds, then all parameters, including user name,
password, IP address, port number, etc., will be reset to the factory default settings.
DS1093-070
16
CEILING INSTALLATION
The ceiling mount is a suitable installation method for this camera. Please stick to the following steps:
1.
Loosen the set screws with a hexagonal screw driver (attached with the camera), and take down the back box
shown as below:
Remove the back box
2.
Use the screws to fix the bottom board on the ceiling.
Fix the bottom board
ÚNOTE
If required, user can apply the pliers to remove the clip (refer to the part marked in dotted line) on the side of the back box and
then feed cables through the opening to secure on the ceiling
DS1093-070
17
6
HOW TO USE IP FINDER
6.1
INTRODUCTION
Urmet IP-finder is a software tool for detecting the following Urmet Domus S.p.A devices with H.264 video compression:
¾
¾
¾
¾
DVS (video server)
IP cameras
DVR R-Evolution.
Megapixel cameras
These devices must be connected to their LAN regardless of the IP address, the device subnet mask and the PC from where
Urmet IP-finder is started. After locating the devices, you can:
¾
¾
6.2
edit IP address and subnet mask
restore the default administration user password.
INSTRUCTIONS
HOW TO INSTALL URMET IP-FINDER
Procedure
1.
2.
Select the file named “URMET IP-finder.zip” and extract the contents to a new folder.
Install WinPcap_3_1beta3 by selecting “ WinPcap_3_1beta3.exe”.
3.
After installing, open the folder where the program has been extracted and select “
IP-finder.exe” to start.
ÚIMPORTANT NOTE
Make sure that the only network interface enabled on the PC where Urmet IP-finder is running is connected to the LAN where
the Urmet devices to be located by IP-Finder are present.
All other available network interfaces on the PC (including Wi-Fi network boards) must be deactivated.
HOW TO DETECT THE DEVICES
1.
Click on “Avvia” to start Urmet IP-finder:
IP-finder start dialog
2.
The following page will appear containing a list of the devices detected on the network.
Information about the
device
Parameter
display
editing area
and
Default password area
Scroll bar
Devices detected on the network
DS1093-070
18
The table contains the following information on the devices (scroll the bar to see other information):
¾
device name
¾
IP address
¾
data port
¾
serial number
¾
Subnet Mask
¾
MAC address
¾
number of video channels
¾
firmware version
¾
DSP version
¾
search time and date
HOW TO EDIT PARAMETERS
Select a device to edit the following parameters:
¾
Subnet Mask
¾
IP address
¾
data port
Procedure
1.
Select the required device.
Selecting the device for editing parameters
DS1093-070
19
2.
Press the “Modifica” button and edit the following parameters as required: IP address, subnet mask and data port.
How to edit parameters
ÚIMPORTANT NOTE
The shaded parameters (serial number, FW version, port and MAC address) are only displayed and cannot be edited.
3.
After ending the editing procedure, you can:
¾ click on “Cancella” to delete all changes;
¾ enter the administration password of the device and press “Salva” to save all changes on the device.
A confirmation message will appear if the entered password is correct and the new data will instantly appear in the list.
Confirmation message
A message indicating that the saving operation was not successful will appear if the password is wrong.
Error message
HOW TO RESTORE THE DEFAULT PASSWORD
To restore the administration user’s default password on a device, contact the Urmet Domus Customer Service Technical Area
and give them the device serial number.
After having received the release code from Urmet Domus Customer Service Technical Area, use Urmet IP-finder to locate the
device, select it and enter the release code in the specific “Ripristina default password” field. Press “OK” to confirm.
DS1093-070
20
7
USING THE INTERNET EXPLORER INTERFACE
Urmet Domus devices with H.264 video compression, namely:
¾ IP cameras
¾ Megapixel cameras
¾
¾
DVR/DVS
DVS (video server)
are hereinafter called ‘device’.
The URMET Domus devices are provided with a Web Client for automatically connecting to a remote PC on the internet.
ÚIMPORTANT NOTE
Any operation performed locally on the device (via the front panel of the DVR - remote control - mouse) may slow the software
performance down. LIVE video feed may be the most effective.
7.1
7.2
MINIMUM SOFTWARE INSTALLATION REQUIREMENTS
¾
Processor
→
Pentium 4; 3GHz
¾
RAM
→
1GB
¾
Video board
→
Memory 128 MB
¾
Operating system
→
Win 2000 Pro; Win XP Pro - sp2
¾
Browser Internet
→
I.E 6.0 or higher
PROTECTION AND SECURITY CONFIGURATION
Before performing the connection with a remote PC, set up the protection configuration following the procedure below:
¾
Launch Internet Explorer and enter in the address bar the device IP address.
Default settings are:
¾
Camera IP address
→
192.0.0.64
¾
Port
→
8000
¾
User name
→
admin
¾
Password
→
12345
The administrator can create up to 15 users, each one with different rights.
ÚNOTE
To change the default IP address of the device, see the manual of IP Finder Urmet Software or Urmet NVM PLUS Client
Software.
If the installation of an ActiveX component is required, follow the procedure below.
Before performing the connection to the PC, activate IE protection configuration, following the procedure below:
Double click the icon
¾
to open Internet Explorer browser.
The following display will appear (or, however, the default page).
DS1093-070
21
¾
Double click the icon
¾
The screen “Internet Properties” will appear.
.
¾
Select the area “Trusted sites”.
¾
Click the item “Sites…”.
¾
The following screen will appear:
¾
DS1093-070
Add the device IP address in the field.
22
¾
“Add this website to the zone”.
¾
Click the button “Add”.
¾
The following confirm screen will appear.
ÚNOTE
Do not select the item: “Require server (https:) verification for all sites in this zone”.
¾
Click repeatedly “OK” to finish.
¾
Install Active X.
DS1093-070
23
DEUTSCH
INHALTSVERZEICHNIS
1
Generelle Informationen ...................................................................................................................... 25
1.1
Warnungen ........................................................................................................................... 25
1.1.1
1.1.2
1.1.3
1.1.4
1.1.5
1.1.6
1.1.7
1.1.8
1.2
1.3
Allgemeine Merkmale ........................................................................................................... 27
Öffnen der Verpackung ........................................................................................................ 27
1.3.1
2
3
Verpackungsinhalt ..........................................................................................................................................27
Installation............................................................................................................................................. 28
2.1
Beschreibung der Teile ........................................................................................................ 28
Deckenmontage ..................................................................................................................................... 29
Verwendung des IP-Finders ................................................................................................................ 30
3.1
Einleitung.............................................................................................................................. 30
3.2
Anleitung............................................................................................................................... 30
3.2.1
3.2.2
3.2.3
3.2.4
4
Stromversorgung ............................................................................................................................................25
Sicherheitshinweise........................................................................................................................................25
Vorsichtsmaßnahmen bei der Aufstellung......................................................................................................25
Schutzmassnahmen .......................................................................................................................................25
Reinigung des Gerätes...................................................................................................................................25
Speicher Medium (SD Karte)..........................................................................................................................25
Bildaufzeichnungen ........................................................................................................................................26
Datenschutz und Copyright ............................................................................................................................26
Installation des Urmet IP-Finder .....................................................................................................................30
Suchen eines Gerätes ....................................................................................................................................30
Eingabe von Parametern................................................................................................................................31
Wiederherstellen des Standartpasswortes.....................................................................................................32
Verwenden der Internet Explorer Schnittstelle ................................................................................. 33
4.1
Minimum Software Installationsanforderungen .................................................................... 33
4.2
Konfiguration Schutz und Sicherheit .................................................................................... 33
DS1093-070
24
1
GENERELLE INFORMATIONEN
Lieber Kunde,
wir danken Ihnen für den Kauf dieses Produkts.
Dieses Dokument ist eine einfache und schelle Hilfe zum Gebrauch der URMET Domus S.p.A. IP Kamera Typ 1093/150.
ÚBEACHTEN
Detailliertere Informationen zu diesem Produkt, entnehmen Sie bitte der Bedienungsanleitung die sich auf der mitgelieferten CD
befindet.
1.1
WARNUNGEN
1.1.1
¾
¾
¾
1.1.2
¾
¾
¾
¾
¾
1.1.3
¾
¾
¾
¾
¾
¾
¾
¾
¾
¾
¾
¾
1.1.4
¾
¾
¾
¾
1.1.5
¾
¾
¾
¾
1.1.6
¾
STROMVERSORGUNG
Verwenden Sie nur das Netzteil, das für die Stromversorgung des Gerätes mitgeliefert wurde. Prüfen Sie die
Netzspannung, bevor Sie das Netzteil anschließen.
Installieren Sie einen passenden Schutzschalter und Sicherung vor den Geräten.
Im Falle einer Fehlfunktion schalten Sie den Strom am Schutzschalter aus.
SICHERHEITSHINWEISE
Halten Sie das Gerät von Regen und Feuchtigkeit fern um einen Brand oder einen elektrischen Schlag zu verhindern.
Lassen Sie kein Material (fest oder flüssig) in das Geräteinnere gelangen. Wenn dies versehentlich passiert, trennen
Sie das Gerät vom Netz und lassen Sie es durch einen Fachmann überprüfen.
Öffnen Sie niemals das Gerät. Nehmen Sie in jedem Fall Kontakt mit einer Fachfirma auf um das Gerät reparieren zu
lassen.
Halten Sie das Gerät von Kindern fern um eine versehentliche Beschädigung zu vermeiden.
Berühren Sie das Gerät nicht mit nassen Händen damit Sie keinen elektrischen Schlag bekommen oder mechanische
Schäden verursachen.
Benutzen Sie das Gerät nicht wenn es heruntergefallen oder das Gehäuse beschädigt ist. Es besteht die Gefahr
eines Stromschlags wenn Sie das Gerät in einem solchen Zustand benutzen. Nehmen Sie Kontakt mit dem
Händler oder einer Fachfirma auf.
VORSICHTSMAßNAHMEN BEI DER AUFSTELLUNG
Die Kamera sollte nicht ungeschützt wechselnden Wetterverhältnissen (z.B. Regen) ausgesetzt werden. Nutzen
Sie hierfür vorgesehene Außengehäuse.
Vermeiden Sie die Ausrichtung der Linse zu direkter Sonneneinstrahlung oder intensiven Lichtquellen, auch wenn
die Kamera ausgeschaltet ist. Der Gegenstand benötigt keine Hintergrundbeleuchtung.
Richten Sie die Kamera nicht auf reflektierende Objekte oder Spiegel.
Einige Lichtsysteme (z.B. farbige Leuchtstoffröhren) können die Farben verfälschen.
Setzten Sie den mitgelieferten Adapter zwischen die Kamera und die Linse wenn eine “C” Type Linse verwendet
wird.
Verwenden Sie eine AUTO-IRIS Linse wenn die Kamera in einer Umgebung mit wechselnden Lichtverhältnissen
verwendet wird.
Stellen Sie das Gerät nicht auf einer instabilen Unterlage auf, wie z.B. wackelnden oder schrägen Tischen. Das
Gerät könnte herabfallen und Verletzungen verursachen oder mechanisch beschädigt werden.
Benutzen Sie das Gerät nicht weiter wenn Wasser oder andere Substanzen in das Geräteinnere gelangt sind. Es
besteht Brandgefahr und die Gefahr eines elektrischen Schlags. Nehmen Sie Kontakt mit dem Händler oder einer
Fachfirma auf.
Decken Sie das Gerät im Betrieb nicht mit einem Tuch ab um ein Überhitzen und eine Deformation des Gehäuses
und des Geräts zu vermeiden: es besteht Brandgefahr, Gefahr eines elektrischen Schlags oder mechanischer
Fehlfunktion.
Halten Sie Magnete und magnetische Objekte vom Gerät fern um Fehlfunktionen zu vermeiden.
Benutzen Sie das Gerät nicht bei Rauch, Dampf, Feuchtigkeit, Staub oder intensiven Vibrationen.
Warten Sie mit dem Einschalten des Gerätes nach einem Transport von einem kalten an einen warmen Ort und
umgekehrt. Warten Sie ungefähr drei Stunden um das Gerät an die neue Umgebung (Temperatur, Feuchtigkeit
etc.) anzupassen.
SCHUTZMASSNAHMEN
Überprüfen Sie die Verpackung und den Verpackungsinhalt auf erkennbare Schäden.
Überprüfen Sie, dass die Umgebungstemperatur im angegebenen Bereich ist und dass die Umgebung nicht feucht
ist.
Berühren Sie nicht die Kamerasensoroberfläche. Reinigen Sie die Oberfläche mit einem trockenen, weichen Tuch
um Staub und Verschmutzungen zu entfernen.
Richten Sie die Kamera nicht in die Sonne um eine Beschädigung der CCD zu verhindern.
REINIGUNG DES GERÄTES
Reinigen Sie die Oberfläche mit einem trockenen, weichen Tuch um Staub und Verschmutzungen zu entfernen.
Befeuchten Sie das Tuch mit einem neutralen Reinigungsmittel wenn der Schmutz nicht mit einem trockenen
Tuch entfernt werden kann.
Benutzen Sie keine Flüssigkeiten (wie Benzin, Alkohol, Lösungsmittel, etc.) oder chemisch behandelte
Putzlappen um Verformungen, Zerstörung oder Kratzer im Lack zu verhindern.
Trennen Sie das Gerät vor der Reinigung oder Wartungsarbeiten von der Stromversorgung.
SPEICHER MEDIUM (SD KARTE)
Formatieren Sie die Karte vor der ersten Verwendung.
DS1093-070
25
¾
¾
¾
1.1.7
¾
¾
¾
1.1.8
¾
¾
Die Karte passt nur in einer Richtung. Versuchen Sie nicht, sie mit Gewalt einzustecken um eine Beschädigung
zu verhindern.
Das Speichermedium ist empfindlich gegen Stöße, Temperaturunterschiede und Vibrationen. Das
Nichtbeachten dieser Vorsichtsmaßnahmen kann zu Fehlfunktionen und den Verlust von gespeicherten Daten
führen.
Falls Reparaturen erforderlich sind ist es ratsam, alle wichtigen Daten zu sichern bevor das Gerät zum
Servicecenter gebracht wird. URMET Domus S.p.A. ist nicht haftbar für den Verlust von gespeicherten Daten.
BILDAUFZEICHNUNGEN
Dieses Gerät ist nicht als Diebstahlsicherung ausgelegt, sondern zum Aufzeichnen von Bildern. Daher können die
Unternehmen Grothe GmbH und URMET Domus S.p.A., sollte der Benutzer Opfer eines Diebstahls werden, für
daraus folgende Verluste oder Schäden nicht haftbar gemacht werden.
Führen Sie eine Probeaufzeichnung durch, bevor das Gerät eingesetzt wird um zu überprüfen, ob der Vorgang korrekt
erfolgt. Beachten Sie, dass, sollte der Benutzer aufgrund einer fehlerhaften Überwachungseinstellung, Verwendung,
unsachgemäßen Betriebs oder Funktionsstörungen des Geräts Verluste oder Schäden erleiden, die Unternehmen
Grothe GmbH und URMET Domus S.p.A. nicht für den eventuellen Verlust der gespeicherten Daten als haftbar
betrachtet werden können.
Dieses Gerät enthält elektronische Präzisionskomponenten. Um die korrekte Aufzeichnung der Bilder zu garantieren,
während dieses Vorgangs keinen Schlägen oder Stößen aussetzen.
DATENSCHUTZ UND COPYRIGHT
Die IP Kamera ist ein Gerät für CCTV-Systeme. Die Aufzeichnung der Bilder unterliegt den geltenden Bestimmungen
im Benutzungsland. Außerdem ist die Aufzeichnung von durch Copyright geschützten Bildern untersagt.
Die Benutzer des Produktes sind für die Kontrolle und die Einhaltung aller Normen und der örtlichen Vorschriften
bezüglich der Überwachung und Aufzeichnung von Videosignalen verantwortlich. Der Hersteller kann nicht für einen
Einsatz des Produktes haftbar gemacht werden, der nicht mit den geltenden Bestimmungen übereinstimmt.
DS1093-070
26
1.2
ALLGEMEINE MERKMALE
¾
¾
¾
¾
¾
¾
¾
¾
¾
¾
¾
1.3
H.264 Kompression.
Unterstützung der Protokolle TCP/IP (TCP/IP,HTTP,DHCP,DNS,RTSP/RTP, PPPoE) und Verwaltung über den
Internet Explorer.
“Heartbeat” Funktion: mit dieser Funktion kann ein Server unmittelbar die Kamera auf ordnungsgemäße Funktion
überprüfen.
Unterstützt 1 Kanal Videosignal und Standart H.264 Verschlüsselungskompression, die sowohl feste Bitrate und
variable Rahmenrate unterstützt; Sie können außerdem sowohl die Videoqualität als auch den Wert der
Kompressionsbitrate selbst definieren.
Alarm Verwaltung: Das Produkt ist mit Bewegungserkennungsfunktionen und Fehler bei Alarmspeicherung
ausgestattet.
Multilevel Verwaltung für Benutzerzugang: der Administrator kann bis zu 15 verschiedene Benutzer mit verschiedenen
Zugriffsebenen einrichten.
Das Produkt ist mit einer 10M/100M Ethernet Selbst-adaptiven Schnittstelle ausgestattet.
Remote Display und komplette Verwaltung mit entsprechender Software und Internet Explorer Web Seite.
Dual-Stream Funktion: zwei unabhängige Video Streams sind möglich: ein Hauptstream für lokales aufnehmen; ein
Zweitstream für Fernanzeige über das Netzwerk.
RS-485 Schnittstelle für den Anschluss von seriellen Geräten.
Kopmpakte Abemessungen.
ÖFFNEN DER VERPACKUNG
Überprüfen Sie die Verpackung und den Verpackungsinhalt auf erkennbare Schäden. Fehlen Teile, oder weisen diese
Beschädigungen auf, wenden Sie sich bitte umgehend an Ihren Fachhändler. Versuchen Sie in diesen Fällen nicht das
Gerät in Betrieb zu nehmen. Sollte das Gerät an den Lieferanten zurückgeschickt werden müssen, vergewissern Sie sich
bitte, dass dies in der Originalverpackung erfolgt.
1.3.1
VERPACKUNGSINHALT
¾
¾
¾
IP-Minidome-Kamera
Schnellanleitung
Mini CD-ROM mit Software und Bedienungsanleitungen
¾
Bohrschablone.
¾
Inbuss-Schlüssel
ÚWICHTIGER HINWEIS
Die Zusammensetzung der in der Lieferung enthaltenen Zubehörteile kann ohne Vorankündigung geändert werden.
DS1093-070
27
2
INSTALLATION
2.1
BESCHREIBUNG DER TEILE
Ansicht Minidome
Beschreibung
NR.
BESCHREIBUNG
1
Gehäuse
2
Objektiv
3
P: Anzeige Spannungsversorgung
Bei korrekter Spannungsversorgung leuchtet die LED rot.
4
Unterteil
5
Befestigungslöcher Unterteil
6
Einstellschrauben Objektiv
7
S & L: Status Anzeige Netzwerk.
Wenn mit dem Netzwerk verbunden, leuchtet die LED “S” orange, wogegen die LED “L” grün flackert.
8
RESET: Rücksetzen aller Parameter auf Werkseinstellungen.
ÚBEACHTEN
Wenn die Kamera eingespeist wurde, die Taste “RESET” für 10 Sekunden betätigen, danach werden alle Parameter inklusiv
Benutzername, Passwort, IP-Adresse usw. auf Werkseinstellungen zurück gesetzt.
DS1093-070
28
DECKENMONTAGE
Die Montage an der Decke wird bei dieser IP-Kamera empfohlen. Bitte befolgen Sie die untenstehenden Anweisungen zur
Montage:
3.
Lösen der Schrauben mit dem in der Verpackung enthaltenen Inbuss-Schlüssel. Das Gehäuse-Oberteil vom
Unterteil entfernen.
Entfernen des Gehäuse-Oberteils
4.
Das Unterteil an der Decke oder einer anderen ebenen Oberfläche befestigen.
Montieren des Unterteils auf der Oberfläche
ÚBEACHTEN
Es besteht die Möglichkeit das Verbindungskabel seitlich aus der Kamera herauszuführen. Dazu muss, wie im Bild unten rot
markiert, das Gehäuse-Oberteil seitlich ausgeklinkt werden.
DS1093-070
29
3
VERWENDUNG DES IP-FINDERS
3.1
EINLEITUNG
Urmet IP-finder ist eine Software zum Aufspüren von Urmet Domus S.p.A Geräten mit H.264 Video Kompression:
¾
¾
¾
¾
DVS (Video Server)
IP Kameras
DVR R-Evolution; Evolution; System
Megapixel Kameras.
Das Gerät muss unabhängig seiner IP-Adresse an derselben LAN-Verbindung angeschlossen sein, an der auch der PC mit
der Software IP-Finder ausgeführt wird. Nach Auffinden des Gerätes kann folgendes ausgeführt werden:
¾
¾
3.2
Ändern der IP Adresse and Subnet Maske
Wiederherstellen des voreingestellten Nutzerpasswortes.
ANLEITUNG
3.2.1
INSTALLATION DES URMET IP-FINDER
Ablauf
1.
Auswahl der Datei mit dem Namen “URMET IP-finder.zip” und entpacken der Datei in einem neuen Ordner.
2.
Folgen Sie den Installationshinweisen des Programms WinPcap und bestätigen Sie diese mit „Weiter“.
3.
Nach der Installation öffnen Sie den Ordner in dem das Programm entpackt wurde und wählen Sie “ IP-finder.exe”
zum Starten.
ÚWICHTIGER HINWEIS
Stellen Sie sicher das als einzige Netzwerkverbindung auf dem PC, der IP-Finder ausführt, die Verbindung zum LAN
hergestellt ist, an dem auch das zu suchende Urmet Gerät angeschlossen ist.
Alle anderen bestehenden Netzwerke am PC (einschließlich Wi-Fi Netzwerke) müssen desaktiviert sein.
3.2.2
1.
SUCHEN EINES GERÄTES
Klicken auf “Avvia” um Urmet IP-finder zu starten:
IP-Finder Start Dialog
2.
Die folgende Seite öffnet sich und zeigt die gefundenen Geräte an.
Geräte die
im Netzwerk gefunden wurden
Information
über das
Gerät
Anzeige
Parameter
und
Änderungsbereich
Standart
Passwortbereich
Scrolleiste
DS1093-070
30
Die Ansicht enthält folgende Gerätinformationen (durch Scrollen der Leiste können andere Parameter eingesehen werden):
¾
Gerätename
¾
IP Adresse
¾
Datenport
¾
Seriennummer
¾
Subnet Mask
¾
MAC Adresse
¾
Anzahl der Videokanäle
¾
Firmware Version
¾
DSP Version
¾
Zeit- und Datumssuche
3.2.3
EINGABE VON PARAMETERN
Wählen Sie ein Gerät aus, um die folgenden Parameter einzugeben:
¾
Subnet Maske
¾
IP Adresse
¾
Daten Port
Prozedur
1.
Wählen Sie das erforderliche Gerät aus.
Auswahl des Gerätes zur Eingaben von Parametern
DS1093-070
31
2.
Drücken Sie die Schaltfläche “Ändern” und geben Sie die folgenden erforderlichen Parameter ein: IP Adresse,
Subnet Maske und Daten Port.
Eingabe von Parametern
ÚWICHTIGER HINWEIS
Die schattierten Parameter (Seriennummer, FW Version, Port und MAC Adresse) werden nur angezeigt und können
nicht geändert werden.
3.
Nach Abschluss der Eingabeprozedur, können Sie:
¾ auf “Abbrechen” klicken um alle Änderungen zu löschen;
¾
das Administrationspasswort des Gerätes eingeben und “Speichern” drücken um alle Änderungen im
Gerät zu speichern.
Eine Bestätigungsmeldung erscheint wenn das eingegebene Passwort korrekt ist und die neuen Daten erscheinen
umgehend in der Liste.
Bestätigungsnachricht
Wenn das Passwort falsch ist, erscheint eine Nachricht, dass der Speichervorgang nicht erfolgreich war.
Fehlermeldung
3.2.4
WIEDERHERSTELLEN DES STANDARTPASSWORTES
Um das Administrator Standartpasswort in einem Gerät wieder herzustellen, kontaktieren Sie den Urmet Domus
Kundenservice, technischer Bereich und nennen Sie diesem die Geräteseriennummer.
Nachdem Sie von dem Urmet Domus Kundenservice, technischer Bereich den Freigabecode erhalten haben,
verwenden Sie den Urmet IP-Finder um das Gerät ausfindig zu machen, wählen Sie es aus und geben Sie den
Freigabecode in das spezielle Feld “Zurücksetzten Standardpasswort” ein. Drücken Sie “OK” zum Bestätigen.
DS1093-070
32
4
VERWENDEN DER INTERNET EXPLORER SCHNITTSTELLE
Urmet Domus Geräte mit H.264 Video Kompression, wie:
¾ IP Kameras
¾ Megapixel Kameras
¾
¾
DVR/DVS
DVS (Video Server)
werden nachstehenden mit ‘Gerät’ bezeichnet.
Die URMET Domus Geräte sind mit einem Web Client zum automatischen Verbinden mit einem Fern-PC über das Internet
ausgestattet.
ÚWICHTIGER HINWEIS
Jegliche Befehle, die Lokal am Gerät ausgeführt werden (über die Frontplatte des DVR - Fernbedienung - Maus), können die
Software Performance verlangsamen. LIVE Video Einspeisung kann die effektivste sein
4.1
4.2
MINIMUM SOFTWARE INSTALLATIONSANFORDERUNGEN
¾
Prozessor
→
Pentium 4; 3GHz
¾
RAM
→
1GB
¾
Grafikkarte
→
Memory 128 MB
¾
Betriebssystem
→
Win 2000 Pro; Win XP Pro - SP2, VISTA, WIN 7
¾
Internet-Browser
→
I.E 6.0 oder höher
KONFIGURATION SCHUTZ UND SICHERHEIT
Vor dem Ausführen einer Verbindung mit einem Fern-PC, richten Sie die Schutzkonfiguration ein:
¾
Starten Sie Internet Explorer und geben Sie in der Adresszeile die IP Adresse des Gerätes ein.
Standarteinstellungen sind:
¾
Kamera IP Adresse →
192.0.0.64
¾
Port
→
8000
¾
Benutzername
→
admin
¾
Passwort
→
12345
Der Administrator kann bis zu 15 Benutzer einrichten, jeden mit unterschiedlichen Rechten.
ÚWICHTIGER HINWEIS
Um die Standard IP Adresse des Gerätes zu ändern, sehen Sie in die Anleitung der IP Finder Urmet Software oder Urmet
NVM PLUS Client Software.
Wenn die Installation einer ActiveX Komponente erforderlich ist, folgen Sie der untenstehenden Prozedur.
Vor dem Ausführen der Verbindung zum PC aktivieren Sie IE Schutzkonfiguration, folgen Sie der untenstehenden Prozedur:
¾
Öffnen Sie Internet Explorer durch Doppelklick auf
¾
Die folgende Seite (oder die Homepage) erscheint.
¾
Doppelklick auf
DS1093-070
.
33
.
¾
Das “Internetoptionen - Sicherheit” Fenster erscheint.
¾
Wählen Sie “Vertrauenswürdige Seiten”; „Stufe anpassen…“ und wählen Sie die Stufe ‚Sehr Niedrig’.
DS1093-070
34
¾
Klicken Sie auf “Seiten (Sites)…”
¾
Das folgende Fenster erscheint.
¾
Fügen Sie die IP Adresse des Gerätes (um die Adresse anzuzeigen drücken Sie “F2” auf der Vorderseite des
Gerätes) in dem Feld “Diese Webseite zur Zone hinzufügen” hinzu.
¾
Klicken Sie auf “Hinzufügen”.
¾
Das folgende Bestätigungsfenster erscheint.
ÚWICHTIGER HINWEIS
Wählen Sie nicht “Für Seiten dieser Zone ist eine Serverüberprüfung (https:) erforderlich“.
¾
Klicken Sie mehrmals auf “OK” um diese Eingabe zu beenden.
¾
Fahren Sie mit der Installation von “Active X” fort.
Ú WICHTIGER HINWEIS
Sie können nach der Installation von “Active X “ die erforderliche Sicherheitszone wieder zurücksetzen.
DS1093-070
35
DS1093-070
36
DS1093-070
37
DS1093-070
38
Prodotto in Cina su specifica URMET Domus
Made in China to URMET Domus specifications
DS1093-070
Area Tecnica
Servizio Clienti 011.23.39.810
http://www.urmetdomus.com
e-mail: [email protected]
URMET DOMUS S.p.A.
10154 TORINO (ITALY)
VIA BOLOGNA 188/C
Telef.
011.24.00.000 (RIC.AUT.)
Fax
011.24.00.300 - 323
DS1093-070
39