1
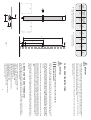
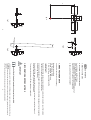
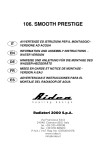
3d. PRODUCT DISPOSAL INFORMATION The symbol of a bin with a cross through it indicates that all electrical and electronic products in the European Union need to be disposed of at a special collection centre at the end of their working life. Do not dispose of these products with your normal household refuse. Dispose of the products at authorised refuse collection centres in order to avoid damaging the environment or human health due to incorrect refuse disposal, and in order to promote the sustainable reuse of renewable resources. Further information on disposal methods is available from the retailer, the local authorities or national manufacturer organisations. For further information, consult the information specific to your country. 4. DECLARATION OF CONFORMITY Radiatori 2000 SpA 04-05-2010 Hereby declares that the radiator model OTHELLO MONO is in conformity with the essential requirements of the Regulation (EU) No 305/2011. 12 IT INFORMATION AND INSTRUCTIONS FOR THE ASSEMBLY OF ELECTRIC RADIATOR AVVERTENZE ED ISTRUZIONI PER IL MONTAGGIO DEL RADIATORE ELETTRICO p.09 p.05 201. OTHELLO MONO EN Radiatori 2000 S.p.A. Via Francesca, 54/A 24040 Ciserano (BG) Italy tel. +39 035 4191198 fax +39 035 88 36 31 P.IVA / VAT Reg. No. 03554100176 www.ridea.it [email protected] Q potenza power (watt) peso a vuoto weight -empty (Kg) 90,5 (cm) a 20 (cm) c 12 (cm) d 83,5 (cm) e - (cm) f hxb (cm) 8,57 a Fig.1 3,5 areas for the electric socket x = aree per la presa elettrica 400 d optional height from the groung (min. 10 cm) c x h g = altezza da terra facoltativa (minimo 10 cm) x 3,8 b pavimento / floor 181x30 2 e 7 g 6 ! IMPORTANT 3.1 Wire the earth (yellow/green), live and neutral (red) cables to the corresponding clamps of the electrical resistance assembled into the radiator maintining the o-ring gasket in to the indicated position (Fig.2). 3.2 Insert cables and clamps into the plastic body of the temperature regulator "R" until this plastic boby will be close quarters with the lowest part of the radiator (Fig.3). 3.3 Tighten the screw "S" placed on the rear part of the regulator "R" (Fig.4) in order to fix definetively the regulator to the radiator. Read all the following instructions for the correct assembly of the radiator carefully IMPORTANT 3b. WALL MOUNTING INSTRUCTIONS ! i 3.4 Check that the distance between the level of the floor and the lowest part of the radiator is no less than 10 cm. Once installed, the radiator must be parallel to the wall, at a distance of 3.5 cm from the wall. 3.5 Following carefully the measurements shown in the drawing and the table of Fig. 1, secure the central prop "C" keeping it on the same axis of the center of the radiator (Fig.5).Use suitable plugs for the wall type, able to support the radiator on the wall (Fig.6). The radiator is supplied with D.8 mm plugs for reinforced concrete. 3.6 Hook the radiator leaning the rear part of the towel bar into the rectangular inlet of the support "C"(Fig.6). 3.7 Fix the cylinder with conical housing to the wall (fig. 7), using suitable plugs for the wall type, able to support the radiator on the wall. The radiator is supplied with D.8 mm plugs for reinforced concrete. Follow the table and drawing in Fig.1 and Fig.2 for the heights. We also recommend marking the point where the radiator is to be secured to the wall, by placing the radiator against the wall. Tighten up the screw "H" (Fig.8). 3.8 Placing himself in front of the radiator, put it in vertical position and tighten up the screw "G" on the rear part of the support (Fig.6). Placing himself laterally to the radiator, make sure that the radiator is parallel to the wall. 3c. INSTRUCTION FOR USE OF THERMOSTAT The appliance has a knob, as Fig.9 illustrates; with index on the BLUE area, thermostat is in Standby mode. The GREEN area regulates the ambient temperature from 7°C to 35°C, and with the index on the RED area the load is always on. 11 TECHNICAL CHARACTERISTICS OF REGULATOR: · Opearting voltage: 230V ±10% AC 50Hz; · Power of heating element: 400W; · Insulation class: Class I; · Water protection class: IPX4; · Mechanical protection for connection block: IK05; · Operating temperature: 0 - 50°C; · Storage temperature: -20 - 70°C; · Permitted humidity rating: 0 - 85% without condensation; · Temperature setting: analogical with knob; · Regulation scale: 7 - 35°C. · Do not turn on before attaching the heating element to the regulator and checking that the O-ring is intact and properly positioned (Fig.2). · Do not cut the power lead to stop regulation. · If the power cable is damaged, it must be replaced by the manufacturer or its customer services, or in any case by someone with similar qualifications, so as to prevent any risks. · Nominal voltage for the radiator must be the same as that on the mains (230 V AC ±10%). · The socket must be compatible with the regulator plug. · Check that the elecricity supply system is provided with a differential omni-pole safety cut-out connected directly to the socket or connection box involved. · This is an earthed class I appliance. Do not overlook this safety feature when doing wiring. · Class I devices must be connected exclusively to sockets or connector blocks with earthed contacts to current standards. · Avoid contact with any chemical product or alcohol, including the liquid in the radiator. · The appliance is not for use by people (including children) with reduced physical, sensorial or mental capacities, or with no experience or knowledge of the appliance, unless they are accompanied by a person or guardian responsible for their safety or have been able to read the instructions for its use. · Always be in attendance to make sure children do not play with the appliance. · Do not insert metal objects or fingers, even temporarily, into the area where the radiator or towel warmer is connected. · Before cleaning, make sure that the electric radiator is switched off and at room temperature, and that it has been disconnected. · Clean with damp cloths. Do not use aggressive or abrasive detergents that could damage the paintwork on the appliance. · In models with towel rails, do not overload with excessive weights. These structures are designed to carry a maximum of 2 Kg. · The protection system for this heating appliance has been designed to prevent direct access to the electric heating elements and must be kept in position during use. · Please contact the retailer in the case of any faults. Do not tamper with the product in any way. Radiatori 2000 SpA declines all responsibility for accidents deriving from any kind of tampering with the electrical appliance. · The electric radiator must be assembled and installed far from possible contact with water. The electric control and operating devices must not be left in reach of people who could touch them while in the bath, shower or similar situations in the presence of water. Read all the following instructions for the correct assembly of the radiator carefully. IMPORTANT 3a. ASSEMBLY INSTRUCTIONS ! i · Only carry out the securing mechanically the radiator to the wall after having wired the radiator. · Do not install the towel warmer with the regulator on the top. · Do not install the towel warmer under a power socket or connector box (Fig.1). · The regulator must not be in contact with the wall of floor. · The electronic regulator must be installed to 230 V AC ±10% systems only. · Wiring must only be carried out by qualified, expert personnel and must comply with current regulations, using certified material. · In keeping with current regulations, the installer must install a magneto-thermal circuit breaker upstream, dedicated exclusively to the electric radiator connection. · Do not attempt to open the body of the radiator or the electrical boxes. Contact the retailer in the case of any problems. The cable provided has been designed specifically for this application. Do not attempt to replace it with unsuitable cables. 10 R L N = messa a terra (giallo/verde) earth (yellow/green) L = fase (rosso) live (red) N = neutro (rosso) neutral (red) o-ring fig.2 3 fig.3 S fig.4 e = 5,0 = fig.5 fig.7 4 1,0 "C" "G" fig.6 "H" fig.8 EN CONTENTS 1. MANUFACTURER DATA 2. INFORMATION AND PRECAUTIONS 3a. ASSEMBLY INSTRUCTIONS 3b. WALL MOUNTING INSTRUCTIONS 3c. INSTRUCTION FOR USE OF THERMOSTAT 3d. PRODUCT DISPOSAL INFORMATION 4. DECLARATION OF CONFORMITY 1. MANUFACTURER DATA This radiator has been manufactured by: Radiatori 2000 SpA Via Francesca, 54/A 24040 Ciserano (BG) Italy P.IVA / VAT Reg. No. 03554100176 IMPORTANT! Radiatori 2000 SpA declines all responsibility for accidents deriving from use of the radiator that does not comply with these user instructions. All radiators produced by Radiatori 2000 SpA are strictly tested in keeping with current regulations before leaving the factory. Radiatori 2000 SpA reserves the right to make any technical and construction changes it believes to be necessary, without prior notification. The construction features of Ridea radiators are patented. Read all the following information and precautions carefully IMPORTANT 2. INFORMATION AND PRECAUTIONS ! i 9 · Electric towel warmers used for drying items of clothing washed in water, and room heating. Any other use is forbidden. · Always check that the master switch has been turned off before starting any installation or maintenance operations. · Do not use the device before it has been properly and completely installed. 3c. ISTRUZIONI D'USO DEL TERMOSTATO Il termostato è dotato di una manopola, come illustrato in Fig.9; quando l'indice della manopola è nell'area BLU il termostato è in modalità Standby. L'area VERDE regola la temperatura da 7°C a 35°C, mentre nell'area ROSSA lo scaldasalviette è sempre acceso. CARATTERISTICHE TECNICHE DEL REGOLATORE: · Tensione di funzionamento: 230V ±10% AC 50Hz; · Potenza dell'elemento riscaldante: 400W; · Classe di isolamento: Classe I; · Classe di protezione all'acqua: IPX4; · Protezione meccanica della scatola: IK05; · Temperatura di funzionamento: 0 - 50°C; · Temperatura di stoccaggio: -20 - 70°C; · Grado di umidità permesso: 0 - 85% senza condensa; · Impostazione della temperatura: analogica con manopola; · Scala di regolazione: 7 - 35°C. 3d. NOTE PER LO SMALTIMENTO DEL PRODOTTO La presenza di un contenitore mobile barrato sul prodotto segnala che all'interno della Unione Europea tutti i prodotti elettrici ed elettronici sono soggetti a raccolta speciale al fine del ciclo di vita. Non smaltire questi prodotti nei rifiuti urbani indifferenziati. Restituire i prodotti ai sistemi di raccolta per evitare eventuali danni all'ambiente o alla salute umana causati da smaltimento errato dei rifiuti e per promuovere il riutilizzo sostenibile delle risorse rinnovabili. Ulteriori informazioni sulle modalità di raccolta sono disponibili presso il rivenditore del prodotto, le locali autorità competenti o le organizzazioni nazionali dei produttori. Per ulteriori informazioni, vedere le informazioni specifiche del paese. 4. DICHIARAZIONE DI CONFORMITÀ La società Radiatori 2000 SpA 04-05-2010 Dichiara che il radiatore modello OTHELLO MONO è conforme ai requisiti essenziali del Regolamento (UE) N. 305/2011. 8 IT INDICE 1. DATI DEL PRODUTTORE 2. AVVERTENZE E PRECAUZIONI fig.9 3a. ISTRUZIONI DI MONTAGGIO 3b. ISTRUZIONI PER IL FISSAGGIO A MURO 3c. ISTRUZIONI D'USO DEL TERMOSTATO 3d. NOTE PER LO SMALTIMENTO DEL PRODOTTO 4. DICHIARAZIONE CE DI CONFORMITÀ 1. DATI DEL PRODUTTORE Questo radiatore è stato realizzato dalla società: Radiatori 2000 SpA Via Francesca, 54/A 24040 Ciserano (BG) Italy P.IVA / C.F. 03554100176 IMPORTANTE! Radiatori 2000 SpA declina tutte le responsabilità in caso di incidenti derivanti da un utilizzo del radiatore non conforme alle presenti istruzioni duso. Tutti i radiatori prodotti da Radiatori 2000 SpA vengono rigorosamente testati secondo le vigenti norme prima di lasciare la fabbrica. La Radiatori 2000 SpA si riserva di introdurre le modifiche tecniche e costruttive che riterrà necessarie senza obblighi di preavviso. 5 Particolari costruttivi dei radiatori Ridea sono brevettati. Leggere attentamente tutte le avvertenze e le precauzioni di seguito elencate. ATTENZIONE 2. AVVERTENZE E PRECAUZIONI ! i · Scaldasalviette elettrico per l'asciugatura di indumenti lavati in acqua ed il riscaldamento ambiente. Ogni altro utilizzo è vietato. · Prima di tutte le operazioni di installazione e manutenzione, verificare di aver spento l'interruttore generale dell'impianto elettrico. · Non utilizzare il prodotto prima che sia completamente e correttamente installato. · Non mettere in funzione prima di aver agganciato l'elemento riscaldante al termostato e di aver controllato che l'o-ring sia intatto e posizionato correttamente (Fig.2). · Non tagliare il cavo di alimentazione per interrompere la regolazione. · Se il cavo di alimentazione è danneggiato, esso deve essere sostituito dal costruttore o dal suo servizio assistenza o comunque da una persona con qualifica similare, in modo da prevenire ogni rischio. · La tensione nominale dell'apparecchio deve essere la stessa dell'impianto elettrico (230 V AC ±10%). · La presa di corrente e l'impianto elettrico devono essere dimensionati per sostenere la potenza richiesta. · La presa di corrente deve essere compatibile con la spina del regolatore. · Verificare la presenza nell'impianto elettrico di un dispositivo di sicurezza magnetotermico e differenziale ad interruzione omnipolare collegato direttamente alla presa o alla scatola di connessione utilizzata. · Lapparecchio appartiene alla classe I ed è quindi provvisto di messa a terra. · I dispositivi di classe I devono imperativamente essere collegati a prese o scatole di derivazione con contatto di messa a terra secondo le norme vigenti. · Evitare il contatto con qualsiasi prodotto chimico o alcool, ivi compreso il liquido contenuto nel radiatore. · L'apparecchio non è destinato a essere usato da persone (bambini compresi) le cui capacità fisiche, sensoriali o mentali siano ridotte, oppure con mancanza di esperienza o di conoscenza, a meno che esse abbiano potuto beneficiare, attraverso l'integrazione di una persona responsabile della loro sicurezza, di una sorveglianza o di istruzioni riguardanti l'uso dell'apparecchio. · I bambini devono essere sorvegliati per sincerarsi che non giochino con l'apparecchio. · Non inserire, neanche temporaneamente, oggetti metallicio le dita nella zona destinata alla connessione con il radiatore o scaldasalviette. · Prima di effettuare qualsiasi tipo di pulizia assicurarsi che il radiatore elettrico sia spento, a temperatura ambiente e che il circuito sia scollegato. · Pulire con panni umidi senza lutilizzo di detersivi aggressivi o abrasivi che potrebbero compromettere la verniciatura dellapparecchio. · Non caricare o appendere pesi eccessivi; la portata della maniglia porta salviette è calcolata per sostenere max. 2 Kg. · Il sistema di protezione di questo apparecchio di riscaldamento è stato concepito per evitare laccesso diretto agli elementi elettrici riscaldanti e deve essere mantenuto nella sua posizione durante lutilizzo. · In caso di guasto rivolgersi al rivenditore. Non manomettere in alcun modo il prodotto. Radiatori 2000 SpA declina ogni responsabilità per incidenti derivanti da qualsiasi tipo di manomissione fatta sullapparecchio elettrico. · Il radiatore elettrico deve essere montato ed installato lontano da possibili contatti con lacqua e i dispositivi elettrici di comando e di funzionamento non devono essere posti alla portata di persone che trovandosi in vasche da bagno, docce o simili situazioni di presenza di acqua potrebbero toccarli. Leggere attentamente tutte le istruzioni di seguito elencate per il corretto montaggio del radiatore ATTENZIONE 3a. ISTRUZIONI DI MONTAGGIO ! i 6 · Effettuare i collegamenti elettrici prima di fissare meccanicamente il radiatore al muro. · Non installare lo scaldasalviette con il regolatore in alto. ATTENZIONE · Non installare lo scaldasalviette sotto ad una presa di corrente o scatola di interconnessione (Fig.1). · Il regolatore non deve essere installato a contatto con il muro o con il pavimento. · Il regolatore elettronico può essere installato solamente su impianti a 230 V AC ±10%. · I collegamenti devono essere effettuati solo da personale qualificato ed esperto e devono essere eseguiti nel rispetto delle normative vigenti utilizzando materiale certificato. · È di obbligo per linstallatore, secondo le normative vigenti, mettere a monte un interruttore magnetotermico dedicato in modo esclusivo al collegamento del radiatore elettrico. · Non tentare di aprire il corpo del radiatore o le scatole elettriche. Se si dovessero presentare problemi contattare il rivenditore. Il cavo fornito in dotazione è studiato appositamente per lapplicazione. Non tentare di sostituirlo con altri cavi non idonei. ! 3.1 Collegare i cavi di messa a terra (giallo/verde), fase e neutro (rosso) ai rispettivi morsetti della resistenza elettrica inserita nel corpo del radiatore mantenendo la guarnizione o-ring nella posizione indicata (Fig.2). 3.2 Inserire i cavi ed i morsetti nella scocca in plastica del regolatore di temperatura "R" fino a portare quest'ultimo a stretto contatto con la parte inferiore del radiatore (Fig.3). 3.3 Serrare il grano "S" posto nella parte posteriore del regolatore "R" (Fig.4) in modo tale da fissare definitivamente il regolatore al radiatore. Leggere attentamente tutte le istruzioni di seguito elencate per il corretto montaggio del radiatore ATTENZIONE 3b. ISTRUZIONI PER IL FISSAGGIO A MURO ! i 3.4 Verificare che la distanza tra il livello del pavimento e la parte più bassa del radiatore non sia inferiore ai 10 cm. Una volta installato, il radiatore deve essere parallelo al muro, ad una distanza di 3,5 cm dal filo muro. 3.5 Seguendo attentamente le misure riportate nel disegno e nella tabella di Fig.1, fissare a muro il supporto centrale "C" mantenendolo in asse con il centro del radiatore, come indicato in Fig.5. Utilizzare per il fissaggio a muro tasselli idonei alla tipologia della muratura ed in grado di sostenere a parete il radiatore (Fig. 6). In dotazione vengono forniti tasselli D.8 mm per cemento armato. 3.6 Agganciare il radiatore appoggiando la parte posteriore della barra porta salviette allinterno della sede rettangolare del supporto C (Fig.6). 3.7 Fissare al muro il cilindro con sede conica (fig. 7) mediante tasselli idonei alla tipologia della muratura ed in grado di sostenere a parete lo scaldasalviette. In dotazione vengono forniti tasselli D.8 mm per cemento armato. Seguire la tabella ed il disegno in Fig. 1 e Fig. 2 per le quote; si consiglia, inoltre, di segnare il punto di fissaggio al muro appoggiando il radiatore contro la parete. Serrare il grano "H" (Fig.8). 3.8 Ponendosi frontalmente al radiatore, posizionarlo verticalmente e serrate la vite G posta nella parte inferiore del supporto (Fig. 6). Ponendosi lateralmente rispetto al radiatore, assicurarsi che lo stesso sia parallelo alla parete. 7