1
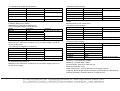
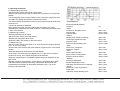
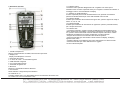
9/11200 5 in1 Digital Multimeter
Nimex NI-8002
Instruction manual
1.Introduction
2.Safety Instructions
3.Panel Description
4.Features
5.Specifications
5-1 Sound Level
5-2 Light
5-3 Temperature/Humidity
5-4 Multimeter
6.0perating Instruction
6-1 Measuring Sound Level
6-2 Measuring Humidity
6-3 Measuring Light
6-4 Measuring Temperature
6-5 Measuring DC Voltage
6-6 Measuring AC Voltage
6-7 Measuring DC Current
6-8 Measuring AC Current
6-9 Measuring Capacitance
6-10 Measuring Frequence
6-11 Measuring Resistance
6-12 Measuring Diode
6-13 Audible Continuity Test
6-14 Non-contact AC Voltage Test (NCV)
7.Maintenance
ELCART DISTRIBUTION SPA via Michelangelo Buonarroti, 46 - 20093 Cologno Monzese (Milano) ITALY
Tel. ++39(0)2/25.11.73.10 Fax ++39(0)2/25.11.76.10 sito internet: www.elcart.com e-mail: [email protected]
La divulgazione dei dati contenuti in questa scheda è da ritenersi un servizio puramente informativo e non costituisce alcun vincolo da parte della Elcart in merito a prestazioni ed utilizzo del prodotto.
1 Introduction
The 5 in 1 digital multi-tester has been designed to combine the functions of
Sound Level Meter, Light Meter, Humidity Meter, Temperature Meter Noncontact AC Voltage Test Meter and Digital Multimeter.
It is an ideal multi-function Instrument with scores of practical applications for
professional and home use.
The Sound Level function can be used to measure noise in factories, schools,
offices, airports, home, etc., checking acoustics of studios, auditoriums and hifi installations.
The Light function is used to measure illuminance in the field. It is fully cosine
corrected for the angular incidence of light. The light sensitive component
used in the meter is a very Stable, long life silicon diode.
The Temperature is for use a semiconductor sensor and K type thermocouple.
This operations manual contains general information and specification.
The digital multimeter performs AC/DC Voltage, AC/DC Current, Resistance
measurement and Audible Continuity, Diode, Temperature test.
2.Safety Instructions
This meter has been designed for safe use, but must be operated with
caution. The rules listed below must be carefully followed for safe operation.
NEVER apply voltage or current to the meter that exceeds the specified
maximum.
Indicates operators must refer to the explanation in this manual.
Indicates terminals at which dangerous voltage maybe present.
Input Protection Limits
Function
VDC or VAC
mA AC/DC
A AC/DC
Frequency, Resistance, Capacitance,
Duty Cycle, Diode Test, Continuity
Temperature
Maximum Input
250VDC/AC rms
400mA 250V fast acting fuse
(500mA/250V)
10A 250V fast acting fuse (10A for 30
seconds max every 15 minutes)
250VDC/AC rms
250VDC/AC rmsp
ELCART DISTRIBUTION SPA via Michelangelo Buonarroti, 46 - 20093 Cologno Monzese (Milano) ITALY
Tel. ++39(0)2/25.11.73.10 Fax ++39(0)2/25.11.76.10 sito internet: www.elcart.com e-mail: [email protected]
La divulgazione dei dati contenuti in questa scheda è da ritenersi un servizio puramente informativo e non costituisce alcun vincolo da parte della Elcart in merito a prestazioni ed utilizzo del prodotto.
3. Panel description
1. Humidity & Temperature
Humidity sensor ad semiconductor sensor inside for indoor.
2. LCD Display
3 4/5 digits LCD display
3. Function switch
4. V / Hz% / Ω / CAP / °C input jack
5. COM input jack
6. µA / mA input jack
7- 10A input jack
8. Microphone
Electric condenser microphone inside.
9. Photo Detector
Long life silicon photo diode inside.
10. Hz/% button
The button at AC/DC Voltage measurement and AC/DC Current measurement
and Hz% measurement. Function is availability.
11 . HOLD button
The HOLD function allows the meter to "freeze" a measurement for later
reference. Press the HOLD button to "freeze" the reading on the indicator. The
"HOLD" message will be appear in the display.
1 2. BACKLIGHT button
Press the backlight button for LCD light, again Press the backlight button to
exit light mode.
13. MODE button
The button to select AC or DC measurement when in A, mA, uA, and Ω, ,
ranges.
14. RANGE button
The button to select AC or DC measurement when in Voltage, Ω ranges.
15. REL button
•The relative measurement feature allows you to make measurements relative
to a stored reference value. A reference voltage, current, Capacitor, etc. can
be stored and measurements made in comparison to that value. The
displayed value is the difference between the reference value and the
measured value.
• Perform the measurement as described in the operating instructions.
• Press the REL button to store the reading in the display and the "REL"
indicator will appear on the display.
•The display will now indicate the difference between the stored value and the
measured value.
•Press the REL button to exit the relative mode.
16. NCV indicate lamp
ELCART DISTRIBUTION SPA via Michelangelo Buonarroti, 46 - 20093 Cologno Monzese (Milano) ITALY
Tel. ++39(0)2/25.11.73.10 Fax ++39(0)2/25.11.76.10 sito internet: www.elcart.com e-mail: [email protected]
La divulgazione dei dati contenuti in questa scheda è da ritenersi un servizio puramente informativo e non costituisce alcun vincolo da parte della Elcart in merito a prestazioni ed utilizzo del prodotto.
4. Features
• 14 functions measure Sound level, Light, Humidity, Temperature, DC
Voltage, AC Voltage, DC Current, AC Current, Resistance, Diode and
Continuity test.
• 3 4/5Digital large LCD display with units of Lux, °C, %RH and dB indication.
• Easy to use with single function switch operating, pocket size and light
weight.
• Sound level measures from 35dB to 100dB for C weighting checking with
0.1dB resolution.
• Light measuring levers ranging from 1 Lux to 40,000 Lux.
• Humidity measurement from 30%RH to 90%RH with 1%RH resolution and
fast time response.
5. Specifications
Display:
3 4/5Digital 4000 counts LCD display with function of
Lux, °C, % and dB indication.
Polarity:
Automatic, ( ) negative polarity indication.
Over-range:
"OL" mark indication.
Low battery indication: The "" is displayed when the battery voltage drops
below the operating level.
Measurement rate:
3 times per second, nominal.
Operating environment: 0°C to 40°C(32°F to 104°F) at <70%RH
Storage temperature: -10°C to 60°C (14°F to 140°F) at <80%RH
Power:
One standard 9V, NEDA1604 or 6F22 battery.
Dimensions:
170 (H)x78(W) x48(D) mm
Weight: Approx.:
335g including holster.
Accuracy is given at 18°C to 28°C (65°F to 83°F), less than 70%RH.
5-1 Sound Level
Measurement range:
35 to 100dB
Resolution:
0.1dB
Typical instrument frequency range:
30Hz to 10kHz
Frequency Weighting:
C — weighting
Time Weighting:
Fast
Accuracy:
±5dB at 94dB sound level, 1kHz sine
wave.
Microphone:
Electric condenser microphone.
5-2 Light
Measuring Range:
4000, 40,000Lux (40,000Lux range
reading xl 0)
Overrate Display:
Highest digit of "OL" is displayed .
Accuracy:
±5% rdg +10 dgts (calibrated to standard incandescent lamp
at color temperature 2856k).
Repeatability:
±2%
Temperature Characteristic:
±0.1% °C
Photo detector:
One silicon photo diode with filter.
5-3 Temperature/Humidity
K-type temperature Measurement
Range
Resolution
Accuracy
-20°C to 400°C
0.1°C
3% of rdg +3°C
-20°C to 1300°C
1°C
3% of rdg +3°C
Input Impedance: 10MQ
Overload Protection: 250VDC or AC rms. for 400mV range and 250VDC or
250VAC rms. for other ranges.
Indoor Temperature Range
Range
Resolution
Accuracy
0°C to 50°C
0.1°C
3% of rdg + 3°C
Indoor Humidity Range
Range
Resolution
Accuracy
33% RH to 99%RH
1%RH
3% of rdg + 5%RH
Input Impedance: 10MQ
Overload Protection: 250VDC or AC rms. for 400mV range and 250VDC or
250VAC rms. for other ranges.
5-4 Multimeter
DC Voltage (Auto-ranging)
Range
Resolution
Accuracy
±1.0% of rdg ±4dgts
400.0mV
0.1mV
4.000V
1.0mV
40.00V
10mV
100.0V
100mV
±1.0% of rdg ±4dgts
250V
1V
Input Impedance: 10MO.
Overload Protection: 250VDC or AC rms. for 400mV range and 250VDC or
250VAC rms. For other ranges.
ELCART DISTRIBUTION SPA via Michelangelo Buonarroti, 46 - 20093 Cologno Monzese (Milano) ITALY
Tel. ++39(0)2/25.11.73.10 Fax ++39(0)2/25.11.76.10 sito internet: www.elcart.com e-mail: [email protected]
La divulgazione dei dati contenuti in questa scheda è da ritenersi un servizio puramente informativo e non costituisce alcun vincolo da parte della Elcart in merito a prestazioni ed utilizzo del prodotto.
AC Voltage (Auto-ranging except 400mV)
Range
Resolution
400.0mV
0.1mV
4.000V
1.0mV
40.00V
10mV
Accuracy
±1.5%of rdg ±15dgts
± 1.0% of rdg ± 4dgts
100.0V
±1.5% of rdg ± 4dgts
100mV
250V
1V
±2% of rdg ± 4dgts
Input Impedance: 10MΩ
Frequency Range: 50 to 400Hz
Maximum Input: 250VDC or 250VAC rms.
• DC Current (Auto-ranging for uA and mA)
Range
Resolution
Accuracy
± 1.0% of rdg ± 2 dgts
400.0uA
0.1uA
4000uA
1uA
40.00mA
10uA
400.0mA
100uA
± 1.2% of rdg ± 2 dgts
10.00A
10mA
± 2.0% of rdg ± 5 dgts
Overload Protection: 500mA/250V and 10A/250V Fuse
Maximum Input: 400mA DC or 400mA AC rms on uA/mA ranges, 10A dc or
ac rms on 10A range.
AC Current (Auto-ranging for uA and mA)
Range
Resolution
Accuracy
± 1.2% of rdg ± 2 dgts
400.0uA
0.1uA
4000uA
1uA
40.00mA
10uA
400.0mA
100uA
± 1.5% of rdg ± 2 dgts
10.00A
10mA
± 2.0% of rdg ± 5 dgts
Overload Protection: 500mA/250V and 10A/250V Fuse
AC Response: 50Hz to 400 Hz
Maximum Input: 400mA DC or 400mA AC rms on uA/mA ranges, 10A DC or
AC rms on 10A range.
• Resistance (Auto-ranging)
Range
Resolution
Accuracy
± 1.2% of rdg ± 2 dgts
400.0Ω
0.1uA
4000 Ω
1uA
40.00 Ω
10uA
400.0 Ω
100uA
± 1.5% of rdg ± 2 dgts
10.00 Ω
10mA
± 2.0% of rdg ± 5 dgts
Overload Protection: 15 seconds maximum 250V DC or 250V AC rms, on all
ranges.
Maximum open circuit voltage: 2.8V
•Capacitance (Auto-ranging)
Range
Resolution
Accuracy
50.00nF
10pF
± 5.0% of rdg ± 20 dgts
± 3.0% of rdg ± 5 dgts
500.0nF
0.1nF
5.000uF
1nF
50.00uF
10nF
100.0uF
0.1uF
± 4.0% of rdg ± 5 dgts
Input Protection: 250V DC or 250V AC rms
•Frequency (Auto-ranging)
Range
Resolution
Accuracy
5.000Hz
0.001Hz
± 1.2% of rdg ± 3 dgts
50.00Hz
0.01Hz
500.0Hz
0.1Hz
5.000KHz
1Hz
50.00KHz
10Hz
500.0KHz
100Hz
10.00MHz
1KHz
± 1.5% of rdg ± 4 dgts
Sensitivity: >0.5V RMS while ≤1MHz;
Sensitivity: >3V RMS while >1MHz;
Input Protection: 250V DC or 250V AC rms.
Diode and Continuity check
Diode: Test current 1.4mA dc and open circuit voltage 2.8V DC.
Continuity: Built in Buzzer will be sound if the circuit resistance is less than 5Ω
Overload Protection: maximum 250V DC or 250V AC rms.
ELCART DISTRIBUTION SPA via Michelangelo Buonarroti, 46 - 20093 Cologno Monzese (Milano) ITALY
Tel. ++39(0)2/25.11.73.10 Fax ++39(0)2/25.11.76.10 sito internet: www.elcart.com e-mail: [email protected]
La divulgazione dei dati contenuti in questa scheda è da ritenersi un servizio puramente informativo e non costituisce alcun vincolo da parte della Elcart in merito a prestazioni ed utilizzo del prodotto.
6. Operating Instruction
6-1 Measuring Sound Level
•Set the function switch to the green "dB" position.
•Remove the meter and face the microphone to sound source in a horizontal
position.
•The C-weighting curve is nearly uniform over the frequency range from 30 to
10,000Hz, thus giving an indication of overall Sound level.
•The Fast response is suitable to measure shout bursts and peak values from
sound source.
•The sound level will be displayed.
Note: Strong wind (over 10m/sec.) striking the microphone can cause
misreading for measurement in windy locations, a windscreen should be used
in front of microphone.
6-2 Measuring Humidity
•Humidity Measurement for indoor.
•Set the function switch to the ON position.
•Remove the meter place to the room.
•Read the %RH in the display for about two hours.
6-3 Measuring Light
•Set the function switch to the green "Lux" scale and set the range to desired
("Lux" or "x10 Lux") range.
•Remove the meter and face the photo detector to light source in a horizontal
position.
•Read the illuminance nominal from the LCD display.
•Over-range: If the instrument only display one "1" in the M.S.D. the input
signal is too strong, and a higher range should be selected.
•When the measurement is completed. Replace the photo detector from the
light source.
•Spectral sensitivity characteristic: To the detector, the applied photo diode
with filters makes the spectral sensitivity characteristic almost meet CIE.
(International Commission on Illumination) photopia curve V ( λ) as the
following chart described.
Recommended Illumination:
Locations
*Office
Conference, Reception room.
Clerical work
Typing drafting
*Factory
Packing work, Entrance passage
Visual work at production line
Inspection work
Electronic parts assembly line
*Hotel
Public room, Cloakroom
Reception, Cashier
*Store
Indoors Stairs Corridor
Show window, Packing table
Forefront of show window
*Hospital
Sickroom, Warehouse
Medical Examination room
Operating room Emergency Treatment
*School
Auditorium, Indoor Gymnasium
Class room
Laboratory Library Drafting room
Lux
200 to 750
700 to 1,500
1000 to 2,000
150 to 300
300 to 750
750 to 1,500
1500 to 3,000
100 to 200
200 to 1,000
150 to 200
750 to 1,500
1500 to 3,000
100 to 200
300 to 750
750 to 1,500
100 to 300
200 to 750
500 to 1,500
ELCART DISTRIBUTION SPA via Michelangelo Buonarroti, 46 - 20093 Cologno Monzese (Milano) ITALY
Tel. ++39(0)2/25.11.73.10 Fax ++39(0)2/25.11.76.10 sito internet: www.elcart.com e-mail: [email protected]
La divulgazione dei dati contenuti in questa scheda è da ritenersi un servizio puramente informativo e non costituisce alcun vincolo da parte della Elcart in merito a prestazioni ed utilizzo del prodotto.
6-4 Measuring Temperature
Temperature Measurement for outdoor:
• Set the function switch to the green "0.1°C" position or "1°C" position.
•Then the display will show the environment temperature reading value °C
directly.
• Insert the black plug of temperature probe the COM jack and red plug to the
"V/Hz%/Ω/CAP/°C" jack.
•Touch the end of the temperature sensor to the area or surface of the object
to be measured. The display will show the temperature reading value °C
directly.
6-5 Measuring DC Voltage
•Insert the black test lead banana to the COM jack and red test lead banana to
the "V/Hz%/Ω/CAP/°C" jack.
•Set the function switch to the green at DCV ranges to be used and connect
test leads connect test leads across the source or load under measurement.
•Set the function switch at DCmV ranges to be used connect test leads
connect test leads across the source or load under measurement.
•Read LCD display. The polarity of red connection will be indicated when
making a DC measurement.
• Press the Hz% button to indicate "Hz".
• Read the frequency in the display. s Press the Hz% button again to indicate
"%".
• Read the % of duty cycle in the display.
6-6 Measuring AC Voltage
• Insert the black test lead banana to the COM jack and red test lead banana
to the "V/Hz%/0/Ω/CAP/°C" jack.
•Set the function switch to the green at AC ranges to be used and connect test
leads connect test leads across the source or load under measurement.
•Read LCD display. The polarity of red connection will be indicated when
making a AC measurement.
•Press the Hz% button to indicate "Hz".
•Read the frequency in the display. Press the Hz% button again to indicate
"%.
•Read the % of duty cycle in the display.
6-7 Measuring DC Current
• Insert the black test lead banana plug into the negative COM jack, and the
red test lead banana plug into the "uA/mA"or "10A" jack.
• For current measurements up to 4000uA DC, set the function switch to the
µA position and insert the red test lead banana plug into the uA/mA jack.
•For current measurements up to 400mA DC, set the function switch to the
mA position and insert the red test lead banana plug into the µA/mA jack.
•For current measurements up to 10A DC, set the function switch to the yellow
10A position and insert the red test lead banana plug into the 10A jack.
•Press the MODE button to indicate "DC" on the display.
•Remove power from the circuit under test, then open up the circuit at the
point where you wish to measure current.
•Touch the black test probe tip to the negative side of the circuit. Touch the
red test probe tip to the positive side of the circuit.
•Apply power to the circuit.
•Read the current in the display.
6-8 Measuring AC Current
•Insert the black test lead banana plug into the negative COM jack. and the
red test lead banana plug into the "uA/mA"or "10A" jack.
•For current measurements up to 4000uA AC, set the function switch to the uA
position and insert the red test lead banana plug into the uA/mA jack.
•For current measurements up to 400mA AC, set the function switch to the mA
position and insert the red test lead banana plug into the uA/mA jack
•For current measurements up to 10A AC, set the function switch to the yellow
OA position and insert the red test lead banana plug into the 10A jack
•Press the MODE button to indicate "AC" on the display.
•Remove power from the circuit under test, then open up the circuit at the
point where you wish to measure current.
•Touch the black test probe tip to the neutral side of the circuit.
•Touch the red test probe tip to the "hot" side of the circuit.
•Apply power to the circuit. -Read the current in the display.
•Press and hold the Hz% button to indicate "Hz".
•Read the frequency in the display.
•Momentarily press the Hz% button again to indicate "%".
•Read the % duty cycle in the display.
•Press and hold the Hz% button to return to current measurement.
6-9 Measuring Capacitance
•Set the function switch to the green CAP position.
•Insert the black test lead banana plug into the negative COM jack and the red
test lead banana plug into the "V/Hz%/Ω/CAP/°C" jack. (If value is no zero in
the display. Press the REL button to zero)
ELCART DISTRIBUTION SPA via Michelangelo Buonarroti, 46 - 20093 Cologno Monzese (Milano) ITALY
Tel. ++39(0)2/25.11.73.10 Fax ++39(0)2/25.11.76.10 sito internet: www.elcart.com e-mail: [email protected]
La divulgazione dei dati contenuti in questa scheda è da ritenersi un servizio puramente informativo e non costituisce alcun vincolo da parte della Elcart in merito a prestazioni ed utilizzo del prodotto.
•Touch the test probe tips across the part under test.
•Read the capacitance value in the display.
•The display will indicate the proper decimal point and value.
6-10 Measuring Frequency
•Set the function switch to the Hz position.
•Insert the black test lead banana plug into the negative (COM) jack
•Insert the red test lead banana plug into the "V/Hz%/Ω/CAP/°C" jack.
•Touch the test probe tips to the circuit under test.
•Read the frequency in the display.
•The digital reading will indicate the proper decimal point, symbols (Hz, kHz,
MHz) and value.
6-11 Measuring Resistance
•Set the function switch to the green Ω position.
•Insert the black test lead banana plug into the negative COM jack.
• Insert the red test lead banana plug into the V/Hz%/Ω/CAP/°C jack.
•Indicate "OL" "MΩ" on the display.
•Touch the test probe tips across the circuit or part under test. It is best to
disconnect one side of the part under test so the rest of the circuit will not
interfere with the resistance reading.
•Read the resistance in the display.
6-12 Measuring Diode.
•Set the function switch to the green position.
•Insert the black test lead banana plug into the negative COM jack and the red
test lead banana plug into the V/Hz%/Ω/CAP/°C jack.
•Press the MODE button to indicate and "V" on the display.
•Touch the test probes to the diode under test. Forward voltage will typically
indicate 0.400 to 0.700V. Reverse voltage will indicate "Or. Shorted devices
will indicate near OV and an open device will indicate "OL" in both polarities.
6-13 Audible Continuity Test
•Set the function switch to the green position.
•Insert the black lead banana plug into the negative COM jack. Insert the red
test lead banana plug into the V/Hz%/Ω/CAP/°C jack.
•Press the MODE button to indicate " " and "Ω" on the display
•Touch the test probe tips to the circuit or wire you wish to check.
•If the resistance is less than approximately 50Ω, the audible signal will sound.
If the circuit is open, the display will indicate "OL”
6-14 Non-contact AC Voltage Test (NCV)
•Set the function switch to the ON position.
• Remove the meter and face the NCV detector to ACV source.
•If source voltage in 200-1000V the NCV indicate lamp will light.
7.Maintenance
Battery and Fuse Replacement If the sign " " appears on the LCD display, it
indicates that the battery should be replaced. Remove screws on the back
cover and open the case. Replace the exhausted battery with new batteries.
(1 x 9V battery NEDA 1604, 6F22 or equivalent)
Fuse rarely need replacement and blow almost always as a result of the
operator's error. Open the case as and replace the blown fuse with ratings
specified.
Warning: Before attempting to open the case, be sure that test leads have
been disconnected from measurement circuit to avoid electric shock hazard.
Replace fuse only with specified ratings:
Fuse 1 : F1OA / 250V fast blow.
Fuse2: F500mA / 250V fast blow.
Information for users:
The symbol on the equipment indicates that the waste must be “separately
collected”.
Therefore, the user must carry (or have it carried) the waste to the separately
collected waste centers set up by local governments, or deliver it to the dealer
against purchase of a new equivalent-type equipment.
The separate waste collection and the subsequent processing, recovery and
disposal operations favour the production of equipment with recycled
materials and limit the negative effects on the environment and on health
which may be possibly caused by the waste improper management.
The improper product disposal by the user causes the application of administrative sanctions according to the Art. 50 et. seq. of the Law Decree No. 22/1997. IMPORTED AND DISTRIBUTED BY
ELCART DISTRIBUTION SPA
Via Michelangelo Buonarroti, 46
20093 COLOGNO MONZESE (MI)
ITALY
www.elcart.com - [email protected]
ELCART DISTRIBUTION SPA via Michelangelo Buonarroti, 46 - 20093 Cologno Monzese (Milano) ITALY
Tel. ++39(0)2/25.11.73.10 Fax ++39(0)2/25.11.76.10 sito internet: www.elcart.com e-mail: [email protected]
La divulgazione dei dati contenuti in questa scheda è da ritenersi un servizio puramente informativo e non costituisce alcun vincolo da parte della Elcart in merito a prestazioni ed utilizzo del prodotto.
9/11200 Multimetro Digitale 5 in1
Nimex NI-8002
Manuale d’istruzione
1.Introduzione
2.Istruzioni di sicurezza
3.Descrizione pannello
4.Caratteristiche
5.Specifiche tecniche
5-1 Livello sonoro
5-2 Luce
5-3 Temperatura/Umidità
5-4 Multimetro
6.Istruzioni Operative
6-1 Misurazione livello sonoro
6-2 Misurazione Umidità
6-3 Misurazione Luce
6-4 Misurazione Temperatura
6-5 Misurazione Tensione CC
6-6 Misurazione Tensione CA
6-7 Misurazione Corrente CC
6-8 Misurazione Corrente CA
6-9 Misurazione Capacità
6-10 Misurazione Frequenza
6-11 Misurazione Resistenza
6-12 Misurazione Diodi
6-13 Test Continuità
6-14 Non-contact AC Voltage (NCV)
7.Manutenzione
ELCART DISTRIBUTION SPA via Michelangelo Buonarroti, 46 - 20093 Cologno Monzese (Milano) ITALY
Tel. ++39(0)2/25.11.73.10 Fax ++39(0)2/25.11.76.10 sito internet: www.elcart.com e-mail: [email protected]
La divulgazione dei dati contenuti in questa scheda è da ritenersi un servizio puramente informativo e non costituisce alcun vincolo da parte della Elcart in merito a prestazioni ed utilizzo del prodotto.
1 Introduzione
Il Multitester digitale 5 in 1 è stato progettato per combinare le funzioni di fonometro,
luxmetro, tester di umidità, misuratore di temperatura, rilevatore di tensione AC a
distanza (non a contatto) e multimetro digitale.
È uno strumento multi-funzione con decine di applicazioni pratiche per l'uso
professionale e domestico.
La funzione del livello sonoro può essere usata per misurare il rumore all’interno di
fabbriche, scuole, uffici, aeroporti, case, ecc, la verifica acustica di studi, auditorium e
installazioni hi-fi.
La funzione luce è utilizzato per misurare la luminosità di un ambiente. E' adatto per
l'incidenza angolare della luce. Il componente sensibile alla luce usato nel misuratore è
molto stabile e il diodo al silicio assicura una lunga vita dell’apparecchio stesso.
Il misuratore di temperatura utilizza un sensore a semiconduttore e una termocoppia di
tipo K. Questo manuale operativo contiene informazioni generali e specifiche.
Il multimetro digitale esegue misurazioni di tensione CA / CC, corrente CA / CC,
misura di resistenza e continuità, diodo e prove di temperatura.
2 Informazioni di sicurezza:
Questo strumento è stato progettato per un utilizzo sicuro, ma deve essere gestito con
cautela. Le norme sotto indicate devono essere seguite attentamente per un
funzionamento sicuro.
NON applicare mai una tensione o corrente allo strumento che superi il valore
massimo specificato.
Gli utenti devono fare riferimento alle spiegazioni in questo manuale.
Vengono indicate i terminali nelle quali potrebbe presente tensione pericolosa.
Limiti di protezione ingressi
Funzione
Massimo ingresso VCC oppure VCA
250VCC/CA rms mA CA/CC
400mA 250V fusibile rapido (500mA/250V) A CA/CC
10A 250V fusibile rapido(10A per 30 secondi al massimo ogni 15 minuti) Frequenza, Resistenza, Capacità, Duty
250VDC/AC rms Cycle, diodi, Continuità
Temperatura
250VDC/AC rmsp ELCART DISTRIBUTION SPA via Michelangelo Buonarroti, 46 - 20093 Cologno Monzese (Milano) ITALY
Tel. ++39(0)2/25.11.73.10 Fax ++39(0)2/25.11.76.10 sito internet: www.elcart.com e-mail: [email protected]
La divulgazione dei dati contenuti in questa scheda è da ritenersi un servizio puramente informativo e non costituisce alcun vincolo da parte della Elcart in merito a prestazioni ed utilizzo del prodotto.
3. Descrizione pannello
11. Pulsante “HOLD”
La funzione HOLD permette all'apparecchio di "congelare" una misura per un
riferimento futuro. Premere il pulsante HOLD per "congelare " la lettura sul indicatore. Il
messaggio "HOLD" viene visualizzato sul display.
1 2. Pulsante di retroilluminazione
Premere il pulsante per la luce di retroilluminazione LCD, premere nuovamente il
pulsante di retroilluminazione per uscire dalla modalità di luce accesa.
13. Pulsante “MODE”
Pulsante per la selezione di misurazione AC oppure DC, quando si agisce nei campi di
azione A, mA, uA, e Ω.
14. Pulsante RANGE
Pulsante per la selezione di misurazione AC oppure DC quando e presente tensione,
per i campi di azione di Ω.
15. Pulsante “REL” • La funzione di misura in oggetto consente di effettuare misurazioni relative ad un
valore di riferimento memorizzato. Una tensione di riferimento, la corrente, capacità
ecc, possono essere memorizzati e misure effettuate rispetto a tale valore. Il valore
visualizzato è la differenza tra il valore di riferimento e il valore misurato.
• Eseguire la misurazione come descritto nelle istruzioni operative.
• Premere il tasto REL per memorizzare il valore indicato sul display, sul display
apparirà il testo "REL”.
• Il display indicherà ora la differenza tra il valore memorizzato e il valore misurato.
• Premere il tasto REL per uscire dalla funzione in oggetto.
16. NCV indica la lampada
1. Umidità e temperatura
Sensore a semiconduttore di umidità, sensore interno per interni.
2. Display LCD
Display a cristalli liquidi a 3 4/5 cifre
3. Interruttore di funzione
4. V / Hz% / Ω / CAP / ° C terminale di ingresso
5. COM terminale di ingresso
6. µA / mA terminale ingresso
7. Terminale di ingresso 10A
8. Microfono
Microfono a condensatore elettrico all'interno.
9. Foto sensore:
Diodo al silicone a lunga durata posto all'interno.
10. Pulsante Hz /%
Tramite il pulsante Hz%, sono disponibili le funzioni di misurazione di tensione CA /
CC, verifica CA / CC e la misurazione Hz%.
ELCART DISTRIBUTION SPA via Michelangelo Buonarroti, 46 - 20093 Cologno Monzese (Milano) ITALY
Tel. ++39(0)2/25.11.73.10 Fax ++39(0)2/25.11.76.10 sito internet: www.elcart.com e-mail: [email protected]
La divulgazione dei dati contenuti in questa scheda è da ritenersi un servizio puramente informativo e non costituisce alcun vincolo da parte della Elcart in merito a prestazioni ed utilizzo del prodotto.
4. Caratteristiche
• Le 14 funzioni permettono di misurare il livello sonoro, luce, umidità, temperatura,
voltaggio DC, voltaggio, corrente DC, corrente AC, resistenza, diodi e test di continuità.
• Grande display digitale a cristalli liquidi da 3/4/5 cifre con unità di Lux, °C, RH% e
indicazione dB.
• Facile da usare con unico interruttore per le varie funzioni, tascabile e leggero.
• Misura il livello sonoro da 35dB a 100dB per il controllo di ponderazione C con
risoluzione di 0,1 dB.
• leve di misurazione della luce che vanno da 1Lux a 40.000 Lux.
• Tempi di risposta veloci per misurazione di umidità, che vanno da 30% a 90% con
risoluzione 1% RH.
5. Specifiche
Display:
Display LCD digitale con 4000 punti a 3/4/5 cifre. Con funzione di
Lux, °C,% e l'indicazione dB.
Polarità:
Indicatore automatico ( - ) della polarità negativa.
Fuori portata (Overrange): Viene visualizzato il simbolo "OL"
Indicazione batteria scarica: il simbolo '"" viene visualizzato quando la tensione della
batteria scende al di sotto del livello di funzionamento.
Frequenza di misurazione: 3 volte al secondo, nominale.
Condizioni ambientali di funzionamento: 0 °C ÷ 40 °C (32 ° F a 104 ° F) a <70% RH
Temperatura di stoccaggio: da -10 °C a 60 °C (14 ° F a 140 ° F) a <80% RH
Alimentazione: Batteria 9V.
Dimensioni: 170 x78 x48 mm
Peso: circa. 335g.
La precisione è assicurata da 18 °C fino a 28 °C (65 °F a 83 °F), e umidità < 70%RH.
5-1 Livello sonoro
Campo di misurazione: da 35 a 100dB
Risoluzione: 0.1dB
Gamma di frequenza tipica dello strumento: 30Hz a 10kHz
Frequenza di attesa: C - Attesa
Tempo di attesa: Veloce
Precisione: ± 5dB a 94dB livello sonoro, 1 kHz onda sinusoidale.
Microfono: microfono a condensatore elettrico.
5-2 Luce
Gamma di misurazione: 4000, 40.000 Lux (40.000 Lux di gamma lettura x 10)
Indicatore Sovraccarico: Viene visualizzato il simbolo "OL".
Precisione: ± 5% rdg + 10 cifre (calibrato per lampada ad incandescenza standard, a
temperatura di colore 2856K).
Ripetibilità: ± 2%
Caratteristica di temperatura: ± 0,1% / °C
Foto sensore: Un foto diodo al silicone con filtro.
5-3 Temperatura / Umidità
Misurazione della temperatura con termocoppia Tipo-K
Gamma di misurazione ‐20°C to 400°C Risoluzione 0.1°C Precisione 3% of rdg +3°C ‐20°C to 1300°C 1°C 3% of rdg +3°C Impedenza d'ingresso: 10mΩ
Protezione di sovraccarico: 250Vcc oppure AC rms per un campo d’azione da 400mV
e da 250VDC, oppure 250VAC rms per altri campi d’azione.
Misurazione temperatura interna Gamma di misurazione Risoluzione Precisione 0°C to 50°C 0.1°C 3% of rdg + 3°C Misurazione umidità interna Gamma di misurazione Risoluzione Precisione 33% RH to 99%RH 1%RH 3% of rdg + 5%RH Impedenza d'ingresso: 10mΩ
Protezione da sovraccarico: 250VCC o CA rms per gamma di misurazione 400mV e
250VCC o 250VCA rms per le altre gamme.
5-4 Multimetro
Tensione CC (Autorange) Gamma di misurazione Risoluzione Precisione ±1.0% of rdg ±4dgts 400.0mV 0.1mV 4.000V 1.0mV 40.00V 10mV 100.0V 100mV ±1.0% of rdg ±4dgts 250V 1V Impedenza d'ingresso: 10MΩ.
Protezione da sovraccarico: 250VCC o CA rms per gamma di misurazione 400mV e
250VDC o 250VAC rms per tutte le gamme,
ELCART DISTRIBUTION SPA via Michelangelo Buonarroti, 46 - 20093 Cologno Monzese (Milano) ITALY
Tel. ++39(0)2/25.11.73.10 Fax ++39(0)2/25.11.76.10 sito internet: www.elcart.com e-mail: [email protected]
La divulgazione dei dati contenuti in questa scheda è da ritenersi un servizio puramente informativo e non costituisce alcun vincolo da parte della Elcart in merito a prestazioni ed utilizzo del prodotto.
Tensione CA (Autorange tranne per gamma 400mV)
Gamma di misurazione Risoluzione 400.0mV 0.1mV 4.000V 1.0mV 40.00V 10mV Precisione ±1.5%of rdg ±15dgts ± 1.0% of rdg ± 4dgts 100.0V ±1.5% of rdg ± 4dgts 100mV 250V 1V Impedenza d'ingresso: 10MΩ.
Gamma di frequenza: da 50 a 400Hz Massimo valore d’Ingresso: 250 VCC o 250VCA rms
±2% of rdg ± 4dgts Corrente CC (Autorange)
Gamma di misurazione Risoluzione Precisione ± 1.0% of rdg ± 2 dgts 400.0uA 0.1uA 4000uA 1uA 40.00mA 10uA 400.0mA 100uA ± 1.2% of rdg ± 2 dgts 10.00A 10mA ± 2.0% of rdg ± 5 dgts Protezione da sovraccarico: Fusibili 500mA/250V e 10A/250V
Ingresso massimo: 400mA DC o 400mA AC rms per gamme di misurazione uA /mA,
10ACC o CA rms nella gamma 10A.
Corrente AC (Ricerca automatica campo d’azione per uA/mA)
Gamma di misurazione Risoluzione Precisione 400.0uA 0.1uA ± 1.2% of rdg ± 2 dgts 4000uA 1uA 40.00mA 10uA 400.0mA 100uA ± 1.5% of rdg ± 2 dgts 10.00A 10mA ± 2.0% of rdg ± 5 dgts Protezione da sovraccarico: 2,8V Fusibili da 500mA/250V e 10A/250V
AC Risposta: 50 Hz a 400 Hz
Ingresso massimo: 400mA CC o 400mA CA rms per le gamme uA / mA, 10A CC o CA
rms per le gamme 10A.
• Resistenza: (Autorange)
Gamma di misurazione Risoluzione Precisione ± 1.2% of rdg ± 2 dgts 400.0Ω 0.1uA 4000 Ω 1uA 40.00 Ω 10uA 400.0 Ω 100uA ± 1.5% of rdg ± 2 dgts 10.00 Ω 10mA ± 2.0% of rdg ± 5 dgts Protezione da sovraccarico: 15 secondi massimo 250V CC o 250V CA rms, per tutte le
gamme.
Massima tensione a circuito aperto: 2,8 V • Capacità: (Autorange)
Gamma di misurazione Risoluzione Precisione 50.00nF 10pF ± 5.0% of rdg ± 20 dgts 500.0nF 0.1nF ± 3.0% of rdg ± 5 dgts 5.000uF 1nF 50.00uF 10nF 100.0uF 0.1uF ± 4.0% of rdg ± 5 dgts Protezione ingresso: 250V CC o 250V CA rms Frequenza: (Autorange) Gamma di misurazione Risoluzione Precisione 5.000Hz 0.001Hz ± 1.2% of rdg ± 3 dgts 50.00Hz 0.01Hz 500.0Hz 0.1Hz 5.000KHz 1Hz 50.00KHz 10Hz 500.0KHz 100Hz 10.00MHz 1KHz ± 1.5% of rdg ± 4 dgts Sensibilità: > 0.5V RMS mentre ≤ 1 MHz;
Sensibilità: > 3V RMS mentre > 1MHz;
Protezione di ingresso: 250V DC o 250V AC rms.
Controllo diodo e continuità
Diodo: Controllare che la corrente sia 1.4mA e la tensione del circuito aperto sia 2.8V.
Continuità: Il rilevatore acustico interno suonerà se c’è continuità. (R < 5Ω)
Protezione da sovraccarico: massimo 250 V cc oppure 250 V AC rms.
ELCART DISTRIBUTION SPA via Michelangelo Buonarroti, 46 - 20093 Cologno Monzese (Milano) ITALY
Tel. ++39(0)2/25.11.73.10 Fax ++39(0)2/25.11.76.10 sito internet: www.elcart.com e-mail: [email protected]
La divulgazione dei dati contenuti in questa scheda è da ritenersi un servizio puramente informativo e non costituisce alcun vincolo da parte della Elcart in merito a prestazioni ed utilizzo del prodotto.
6. Istruzioni per l'uso
6-1 Misurazione livello del suono
• Impostare il selettore di funzione sulla posizione verde "dB".
• Rimuovere il misuratore e porre il microfono di fronte alla sorgente sonora in
posizione orizzontale.
• La curva di ponderazione C è quasi uniforme su tutta la gamma di frequenza da 30 a
10.000 Hz, dando così un'indicazione del livello generale del suono.
• La risposta veloce è adatto a misurare suoni improvvisi e valori di picco dalla
sorgente sonora.
• Il livello sonoro verrà visualizzato.
Nota: fare attenzione forte vento ( sopra i 10m/sec), in questi luoghi il vento potrebbe
colpire il microfono causando cosi errori nella misurazione, vi consigliamo di munire il
microfono di para vento.
6-2 misurazione umidità
• Misurazione di umidità per interni.
• Impostare il selettore in posizione ON.
• Rimuovere il misuratore e posizionare nella stanza.
• Leggere il valore RH% sul display dopo circa due ore.
6-3 Misurazione della luce
• Impostare il selettore sulla scala verde del "Lux" e impostare l'intervallo sul campo
desiderato ("Lux" oppure "x10 Lux").
• Rimuovere il misuratore e posizionare il lettore ottico di fronte alla fascia di luce in
posizione orizzontale.
• Leggere il valore di l'illuminamento nominale sul display LCD.
• Sovraccarico: Se lo strumento visualizza "1" sul display significa che il segnale
d’ingresso è troppo forte e dovete selezionare una gamma di misurazione più alta.
• Quando la misurazione è stata completata. Togliere il lettore ottico dalla sorgente
luminosa.
• Caratteristica di sensibilità spettrale: Per il rivelatore, il fotodiodo applicato con filtri
rende la sua caratteristica sensibilità spettrale quasi conforme alla CIE. (International
Commission on Illumination). La Curva Photopica V (λ) viene descritta come segue.
illuminazioni consigliate:
Ambienti
* Ufficio
Sala riunioni, reception.
Uffici
Sala scrittura, ufficio grafico
* Azienda
Ufficio imballaggi,Ingresso
Controllo Linee Produttive
Ispezione
Linee produttive
* Hotel
Zona pubblica, Guardaroba
Reception, Cassa
* Negozio
Scale, Corridoi
Vetrina, tavolo confezionamento
Esterno Vetrina
* Ospedale
Infermeria, magazzino
Stanza per esami medici
Sala operatoria Trattamento di emergenza
* Scuola
Auditorium, Palestra coperta
Aula
Laboratorio, Biblioteca, sala disegno
ELCART DISTRIBUTION SPA via Michelangelo Buonarroti, 46 - 20093 Cologno Monzese (Milano) ITALY
Tel. ++39(0)2/25.11.73.10 Fax ++39(0)2/25.11.76.10 sito internet: www.elcart.com e-mail: [email protected]
La divulgazione dei dati contenuti in questa scheda è da ritenersi un servizio puramente informativo e non costituisce alcun vincolo da parte della Elcart in merito a prestazioni ed utilizzo del prodotto.
Lux
200-750
700 a 1.500
1.000 a 2.000
150-300
300-750
750 a 1.500
1500 a 3.000
100-200
200 a 1.000
150-200
750 a 1.500
1.500 a 3.000
100-200
300-750
750 a 1.500
100-300
200-750
500 a 1.500
6-4 Misurazione della temperatura Misurazione di temperatura esterne:
• Impostare il selettore sulla posizione "0.1 ° C" oppure in posizione "1 ° C".
• Il display visualizzerà la temperatura ambiente mostrando il valore in °C.
• Inserire il puntale nero della termocoppia nel terminale COM e quello rosso nel
terminale "V / Hz% / Ω / CAP / ° C".
• Appoggiate la termocoppia all'area e/o superficie dell'oggetto da misurare. Il display
visualizzerà il valore della temperatura rilevata direttamente in °C
6-5 Misurazione della tensione CC
• Inserire il puntale nero nel terminale COM e il rosso nel terminale "V/Hz%/Ω/CAP/°C".
• Impostare il selettore sulla funzione corretta da utilizzare e collegare i puntali al
circuito da misurare.
• Potete scegliere tra le funzioni VCC e mVCC, a seconda del valore da misurare.
• Leggete il valore misurato sul display LCD. La polarità verrà indicata in automatico.
• Premere il pulsante Hz% , verrà visualizzato il simbolo "Hz".
• Leggere la frequenza sul display. Premere ancora il tasto Hz%, verrà visualizzato il
simbolo "%".
• Leggere la % di duty cycle sul display.
6-6 Misurazione della tensione CA
• Inserire il puntale nero nel terminale COM e il rosso nel terminale "V/Hz%/Ω/CAP/°C".
• Impostare il selettore sulla funzione corretta da utilizzare AC e collegare i puntali al
circuito da misurare.
• Leggere il display LCD. La polarità del collegamento rosso è indicato quando si
effettua una misurazione AC.
• Premere il pulsante Hz% , verrà visualizzato il simbolo "Hz".
• Leggere la frequenza sul display. Premere ancora il tasto Hz%, verrà visualizzato il
simbolo "%".
• Leggere la % di duty cycle sul display..
6-7 Misurazione di corrente CC
• Inserire il puntale nero nella terminale COM e il puntale rosso nel terminale "µA/mA"
oppure nel terminale "10A".
• Per misurazioni di corrente fino a 4000uA DC, impostare il selettore sulla posizione
μA e inserire il puntale rosso nel terminale uA mA.
• Per misurazioni di corrente fino a 400mA DC, impostare il selettore sulla posizione
mA e inserire il puntale rosso nel terminale μA mA.
• Per misurazioni di corrente fino a 10A DC, impostare il selettore sulla posizione gialla
10A e inserire il puntale rosso nel terminale dei 10A.
• Premere il pulsante MODE per visualizzare "DC" sul display.
• Togliere l'alimentazione dal circuito in prova, quindi aprire il circuito nel punto in cui si
vuole misurare la corrente.
• Collegare i puntali in serie al circuito da misurare.
• Alimentare il circuito.
• Leggere il valore sul display.
6-8 Misurazione corrente CA
• Inserire il puntale nero nel terminale COM e il puntale rosso nel terminal "µA / mA"
oppure al terminale "10A".
• Per misurazioni di corrente fino a 4000uA AC, impostare il selettore di funzione sulla
posizione uA e inserire il puntale rosso nel terminale uA mA.
• Per misurazioni di corrente fino a 400mA AC, impostare il selettore di funzione sulla
posizione mA e inserire il puntale rosso nel terminale uA mA
• Per misurazioni di corrente fino a 10A AC, impostare il selettore di funzione sulla
posizione 10A e inserire il puntale rosso nel terminale dei10A
• Premere il pulsante MODE per indicare "AC" sul display.
• Togliere l'alimentazione dal circuito in prova, quindi aprire il circuito nel punto in cui si
vuole misurare la corrente.
• Collegare i puntali in serie al circuito da misurare.
• Alimentare il circuito.
• Leggere il valore sul display.
• Tenere premuto il tasto Hz%, verrà visualizzato il simbolo "Hz".
• Leggere la frequenza sul display.
• Premere brevemente il tasto Hz%, verrà visualizzato il simbolo "%".
• Leggere la % di duty cycle sul display.
• Premere e tenere premuto il tasto Hz% per tornare al valore attuale.
6-9 Misurazione di capacita
• Impostare l'interruttore di funzione sulla funzione CAP.
• Inserire il puntale nero nel terminale COM e quello rosso nel terminale
"V/Hz%/Ω/CAP/°C". (Se il valore sul display non è zero, premere REL per azzerare)
• Collegare i puntali al condensatore da misurare.
• Leggere il valore della capacità sul display.
6-10 Misurazione della frequenza
• Impostare il selettore sulla posizione Hz.
• Inserire il puntale nero nel terminale COM
• Inserire il puntale rosso nel terminale "V/Hz%/Ω/CAP/°C".
• Collegare i puntali al condensatore da misurare.
• Leggere il valore di frequenza sul display.
6-11 Misurazione della resistenza
• Impostare il selettore sulla posizione Ω.
• Inserire il puntale nero nel terminale COM.
• Inserire il puntale rosso nel terminale "V/Hz%/Ω/CAP/°C".
• Verrà visualizzato "OL" "MΩ" sul display.
• Collegare i puntali al circuito da misurare.
• Leggere la resistenza sul display.
ELCART DISTRIBUTION SPA via Michelangelo Buonarroti, 46 - 20093 Cologno Monzese (Milano) ITALY
Tel. ++39(0)2/25.11.73.10 Fax ++39(0)2/25.11.76.10 sito internet: www.elcart.com e-mail: [email protected]
La divulgazione dei dati contenuti in questa scheda è da ritenersi un servizio puramente informativo e non costituisce alcun vincolo da parte della Elcart in merito a prestazioni ed utilizzo del prodotto.
6-12 Misurazione del diodo.
• Impostare l'interruttore di funzione sulla posizione desiderata.
• Inserire il puntale nero nel terminale COM e il puntale rosso nel terminale
“V/Hz%/Ω/CAP/°C”.
• Premere il pulsante MODE per indicare "V" sul display.
• Toccare con i puntali il diodo in prova. Se collegate il diodo in maniera inversa verrà
indicato il simbolo “OL”.
6-13 Prova di continuità.
• Impostare l'interruttore di funzione sulla posizione desiderata.
• Inserire il puntale nero nel terminale COM. Inserire il puntale rosso nel terminale
“V/Hz%/Ω/CAP/°C”.
• Premere il pulsante MODE per indicare "" e "Ω" sul display
• Collegare i puntali al circuito da misurare.
• Se la resistenza è inferiore a circa 50Ω, il segnale acustico verrà azionato. Se il
circuito è aperto, il display indicherà "OL"
6-14 Rilevatore di tensione CA (NCV)
• Impostare il selettore in posizione ON.
• Posizionare lo strumento NCV di fronte alla fonte ACV.
• Se c’è presenza di tensione la luce si accenderà.
7.Manutenzione
Sostituzione batteria e fusibile.
Se il simbolo "" appare sul display LCD, la batteria dovrà essere sostituita. Rimuovere
le viti sul retro della copertura e aprire il vano. Sostituire la batteria scarica con una
nuova. (1 batteria da 9V NEDA 1604, 6F22 o equivalente)
Il fusibile raramente ha bisogno di sostituzione e si guasta quasi sempre a causa di
errori dell'operatore. Aprire il vano come per sostituire il la batteria e sostituire il fusibile
bruciato con uno delle stesse caratteristiche..
Attenzione: Prima di tentare di aprire il vano, assicurarsi che i puntali siano scollegati
dal circuito di misura per evitare scosse elettriche. Sostituire il fusibile solo con fusibili
con le stesse caratteristiche indicate:
Fusibile 1: F10A / rapido250V.
Fusibile 2: F500mA / rapido 250V
Informazioni agli utenti:
Il simbolo riportato sull’apparecchiatura indica che il rifiuto deve essere oggetto di
“raccolta separata”.
Pertanto, l’utente dovrà conferire (o far conferire) il rifiuto ai centri di raccolta
differenziata predisposti dalle amministrazioni comunali, oppure consegnarlo al
rivenditore contro acquisto di una nuova apparecchiatura di tipo equivalente.
La raccolta differenziata del rifiuto e le successive operazioni di trattamento, recupero
e smaltimento favoriscono la produzione di apparecchiature con materiali riciclati e
limitano gli effetti negativi sull’ambiente e sulla salute eventualmente causati da una
gestione impropria del rifiuto.
Lo smaltimento abusivo del prodotto da parte dell’utente comporta l’applicazione delle
sanzioni amministrative di cui l’articolo 50 e seguenti del D. Lgs. N° 22/1997.
IMPORTATO E DISTRIBUITO DA
ELCART DISTRIBUTION SPA
Via Michelangelo Buonarroti, 46
20093 COLOGNO MONZESE (MI)
ITALY
www.elcart.com - [email protected]
ELCART DISTRIBUTION SPA via Michelangelo Buonarroti, 46 - 20093 Cologno Monzese (Milano) ITALY
Tel. ++39(0)2/25.11.73.10 Fax ++39(0)2/25.11.76.10 sito internet: www.elcart.com e-mail: [email protected]
La divulgazione dei dati contenuti in questa scheda è da ritenersi un servizio puramente informativo e non costituisce alcun vincolo da parte della Elcart in merito a prestazioni ed utilizzo del prodotto.