1
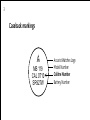
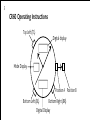
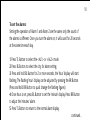
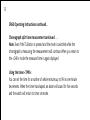
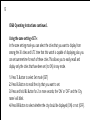
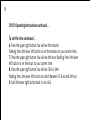
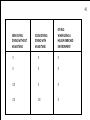
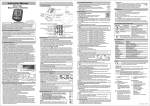
PURCHASED FROM
ADDRESS
Accurist Helpline
020 7447 3945
Further information or instructions can be obtained
from the Accurist Helpline during office hours Monday to Friday.
Folding
OWNERS NAME
MODEL NO
Perforation
DATE OF PURCHASE
M
E
A
N
T
I
M
E
Multi Function Chronograph with duo display
Setting Instructions
For: CR60 & CP00
2
Contents
How to use these instructions
CR60 Operating Instructions
CPOO Operating Instructions
Care of your watch
Bracelet Adjustment
International Service Agents
Resistance to water
Accurist Quartz Guarantee
After Sales Service
Payment & Postage Instructions
3
5
17
29
33
35
39
42
44
45
3
Caseback markings
w
MB 119
CAL 0T10
SR927W
Accurist Watches Logo
Model Number
Calibre Number
Battery Number
How to use these instructions
This booklet contains setting instructions for the Accurist Multi Function
Chronograph with duo display series of watches. Each section describes a
particular calibre (also called watch movement) which offers a unique set of
functions and features. As such, it is necessary to identify the correct calibre of
your watch before proceeding to the appropriate section (see diagram opposite).
Further information
The latest setting instructions, technical manuals and interactive instructions
are available from our web site at www.accurist.co.uk
When on the web site please refer to ‘After sales service/download manuals’
The Accurist technical helpline is also available during office hours:
+44 (0)20 7447 3941 or email [email protected]
4
5
CR60 Operating Instructions
Top Left (TL)
Digital display
Mode Display
Position A Position B
Bottom Left (BL)
Bottom Right (BR)
Digital Display
6
Displaying the time and calendar of cities worldwide:
1. Press TL Button to select the ‘TME’ or ‘CAL’ mode.
2. Press BL Button to select city’s names and its time and
calendar.
Analogue time setting:
1. When second hand moves to the 0 position, pull the crown to position B.
2. Turn crown either way to correct time.
3. Push in crown to position A.
7
CR60 Operating Instructions continued...
Digital time setting
1. Press TL Button to select Time (TME) mode.
2. Press BL Button to display the city whose time you want to adjust.
3. Press and hold BL Button for 2 or more seconds to select summertime (S.T)
either ‘ON’ or ‘OFF’.
4. Press BR Button to select summertime ‘ON’ or ‘OFF’
5. Press BL Button to select between summertime, seconds, minutes, hour and
12/24 hour sequence.
6. Press BR Button to adjust the flashing figures.
Press and hold BR Button to quick change the flashing figures.
7. Press TL Button to return to normal time display.
8
Note: When in the 12-hour mode, be sure to select morning (A) and afternoon (P)
The set flashing mode (step 6) will automatically revert to the normal display if left
for two minutes with no input.
To set the calendar/date:
Adjusting the calendar for one of the 30 cities and UTC time will automatically
adjust the calendar for the remaining cities.
1. Press TL Button to select Calendar (CAL) mode.
2. Press BL Button to display the city whose calendar you want to adjust.
3. Press and hold BL Button for 2 or more seconds, to set the ‘month’
4. Press the BR Button to adjust the month.
continued...
9
CR60 Operating Instructions continued...
To set the calendar/date continued . . .
5. Press the BL Button to select the ‘month’, ‘day’ and ‘year’ sequence.
6. Press the BR Button to adjust the flashing figures.
Press and hold BR Button to quick change the flashing figures.
7. Press TL Button to return to normal time display.
Press and hold BR Button for 2 or more second to switch between city display
(e.g. LON) and day display (e.g. SAT).
10
To set the alarms:
Setting the operation of Alarm 1 and Alarm 2 are the same, only the sound of
the alarms is different. Once you turn the alarm on, it will sound for 20 seconds
at the same time each day.
1. Press TL Button to select the <AL1> or <AL2> mode.
2. Press BL Button to select the city for alarm setting.
3. Press and hold BL Button for 2 or more seconds, the ‘hour’ display will start
flashing. The flashing ‘hour’ display can be adjusted by pressing the BR Button.
(Press and hold BR Button to quick change the flashing figures)
4. Once hour is set, press BL Button to set the ‘minute’ display. Press BR Button
to adjust the ‘minutes’ alarm.
5. Press TL Button to return to the normal alarm display.
continued...
11
CR60 Operating Instructions continued...
To set the alarms continued . . .
Notes: Press the BR Button while in the alarm mode (AL1 or AL2) to switch
alarm either ‘ON’ or ‘OFF’.
To test the alarm sound, while in the alarm mode (AL1 or AL2). Press and hold
BR Button. (Alarm sound monitor function)
When in the 12-hour mode, be sure to select morning (A) and afternoon (P).
To set the time and time zone:
When the time is set for one of the 30 cities and UTC (Universal time
coordinated) time, the remaining city’s and their ‘times’ are automatically set.
12
Chronograph measurement:
1. Press BL Button to select Chronograph mode (CHR).
2. Each time the BR Button is pressed, the chronograph is switched between ‘start’
and ‘stop’.
3. Press the BL Button to reset while the chronograph is stopped.
Chronograph split time measurement:
1. Press BL Button to select Chronograph mode (CHR).
2. Press BR Button to start chronograph.
3. Press BL Button to display the split time for approximately ten seconds.
(The ‘SPL’ indicator will flash while the split time is displayed)
Each time BL Button is pressed, the newest split time is displayed.
4. Press BL Button to reset while the chronograph is stopped.
continued...
13
CR60 Operating Instructions continued...
Chronograph split time measurement continued . . .
Note: Even if the TL Button is pressed and the mode is switched while the
chronograph is measuring, the measurement will continue. When you return to
the <CHR> mode the measured time is again displayed.
Using the timer <TMR>:
You can set the time for a number of whole minutes up to 99 in one minute
decrements. When the timer has elapsed, an alarm will sound for five seconds
and the watch will return to timer set mode.
14
Using the timer <TMR> continued . . .
1. Press TL Button to select Timer mode (TMR).
2. Press BL Button to adjust timer in one minute decrements.
(Press and hold BR Button to quick change the flashing figures)
3. Press BR Button to start and stop the timer.
4. Press BL Button to revert to set timer mode, when the timer has stopped.
Note: If the BL Button is pressed while the timer is running, the time will reset
to the set timer mode and commence timing automatically. Even if the TL
Button is pressed and the mode is changed while the timer is running, the timer
countdown will continue. When you return to the <TMR> mode, the countdown
time is again displayed.
15
CR60 Operating Instructions continued...
Using the zone setting <SET>:
In the zone setting mode you can select the cities that you want to display from
among the 30 cities and UTC time that this watch is capable of displaying, also you
can set summertime for each of these cities. This allows you to easily recall and
display only the cities that have been set (to ON) in any mode.
1. Press TL Button to select Set mode (SET)
2. Press BL Button to recall the city that you want to set.
3. Press and hold BL Button for 2 or more seconds, the ‘ON’ or ‘OFF’ and the ‘City
name’ will blink.
4. Press BR Button to select whether the city should be displayed (ON) or not (OFF).
16
Using the zone setting <SET> continued . . .
5. Press BL Button to display the Summertime (S.T) setting for selected city.
6. Press BR Button to select either summertime on (‘ON’ S.T) or summertime off
(‘OFF’ S.T).
7. Press BL Button to select and set modes for other cities.
Please follow procedures 3 to 6 for set up.
8. When all desired cites have been set, press TL Button to return to normal zone
setting display.
All Reset:
1. Gently pull out crown to Position B.
2. Press TL, BL and BR Buttons simultaneously. (While pressed, there will be no display)
3. Release the buttons. (Display segments will re-appear)
4. Push crown in to Position A.
KEY TO DIAGRAM
UTC dial - shows universal coordinated time (UTC)
in 24 hour format. UTC (or GMT) is the standard
from which all time zones are calculated.
24 hour dial - shows main hand time in 24 hour
UTC Dial
format. This can be used to determine the correct
Top Left (TL)
Top Right (TR)
a.m. and p.m settings.
Mode indicator dial - shows main hand time in
24 hour format. This can be used to determine
the correct a.m and p.m. settings.
Main
24 Hour
Mode indicator dial - shows the mode that the
Digital
Indicator
watch is in - TME (time), CAL (calendar),
AL-1, 2 or 3 (alarm 1, 2 or 3), CHR (chronograph),
Display
Dial
TMR (timer), SET (set)
Main digital display - shows the digital time,
calendar, alarms, chronograph or timer depending
on which mode chosen.
Bottom Left (BL)
Bottom Right (BR) Button function displays - indicates the function
Mode Indicator dial
of each button at any moment, as shown in the
diagram opposite. >
17
CPOO Operating Instructions
To set the time:
1. Push the bottom right hand button until the mode hand
indicator points to TME.
2. Press and hold the upper left button for three seconds. The hour and minute
hand will retract to the 12 O’clock position.
3. Select the time zone on the digital display by pressing the upper right button
or the lower left button.
4. Pull the bottom right button out one click. The bottom part of the digital
display will start flashing. Press the bottom left button to adjust for daylight
saving time.
5. Press the upper right button. You will see the seconds flashing on the lower
half of the digital display. Press the lower left button to reset the seconds to 00.
Top Left Button
Bottom Left Button
Top Right Button
Bottom Right Button
18
19
CPOO Operating Instructions continued . . .
To set the time continued . . .
6. Press the upper right button. You will see the minutes
flashing. Press the lower left button to set the minutes to your current time.
7. Press the upper right button. You will see the hours flashing. Press the lower
left button to set the hours to your current time.
8. Press the upper right button. You will see 12H or 24H
flashing. Press the lower left button to switch between 12 hour and 24 hour.
9. Push the lower right button back in one click.
20
To set the calendar:
1. Push the bottom right hand button until the mode hand
indicator points to CAL.
2. Press and hold the upper left button for three seconds. The hour and minute
hand will retract to the 12 O’clock position.
3. Select the time zone on the digital display by pressing the upper right button
or the lower left button.
4. Pull the bottom right button out one click. You will see the month flashing on
the digital display. Press the lower left button to change the month.
5. Press the upper right button and the date will begin flashing. Press the lower
left button to change the date.
6. Press the upper right button. You will see the year flashing. Press the lower left
button to change the year.
7. Push the lower right button back in one click.
21
CPOO Operating Instructions continued . . .
To set the alarms
1. Push the bottom right hand button until the mode hand
indicator points to AL1, AL2 or AL3.
2. Press and hold the upper left button for three seconds. The hour and minute
hand will retract to the 12 O’clock position.
3. Select the time zone on the digital display by pressing the upper right button
or the lower left button.
4. Pull the lower right button out one click. You will see ON or OF flashing on
the digital display. Press the lower left button to turn the alarm on or off.
5. Press the upper right button. You will see the hours flashing. Press the lower
left button to change the hour.
6. Press the upper right button. You will see the minutes flashing. Press the lower
left button to change the minutes.
7. Push the lower right button back in one click.
22
Using the timer
1. Press the lower right button to move the mode hand indicator to TMR mode on
the mode dial.
2. Press and hold the upper left button for three seconds. The hour and minute
hand will retract to the 12 O’clock position.
3. Pull the lower right button out one click. You will see the minutes flashing in
the digital display. Change the minutes by pressing the lower left button. Once you
have set the minutes on the timer, push the lower right button back in one click.
4. Pressing the upper right button starts and stops the timer.
5. Press the lower left button when the timer is stopped to reset the timer to its
initial preset time.
23
CPOO Operating Instructions continued . . .
To set the timezone
1. Setting the time zones allows you to add or remove cities on the digital
display or switch between daylight saving and standard time. Begin by pressing
the lower right button to move the mode hand indicator to SET mode on the
bottom dial.
2. If the hour or minute hands are obscuring the digital display, press and hold
the upper left button for three seconds. This will cause the hour and minute
hand to retract to the 12 O’clock position.
3. Now pull the lower right button out one click. You will see the digital display
flashing. Press the upper left button to select SET to display the city or OFF to
not display the city. Press the lower left button to turn summer time on or off.
Summer time is indicated on the lower part of the digital display. Daylight
savings time must be manually set for each city.
4. Pressing the upper right button will allow you to scroll through all the cities.
After setting, push the lower right button back in.
24
Troubleshooting
The analogue hands block the digital display.
1. Press and hold the upper left button for three seconds. The hour and minute hand
will retract to the 12 O’clock position allowing a clear view of the digital display.
2. Press the upper left button to return the analogue hands to the previous position.
The analogue time does not match the digital time for the selected zone.
1. Push the bottom right hand button until the mode indicator hand points to TME.
2. Select the time zone on the digital display by pressing the upper right button or the
lower left button.
3. Press the upper right and lower left buttons simultaneously and release. The hour
and minute hand will go to the time zone shown on the digital display. At this point
the digital display may go to UTC or another time zone. Press the upper right or lower
left button to scroll to the time zone you just set the analogue hands to.
25
CPOO Operating Instructions continued . . .
Troubleshooting continued . . .
The analogue hands are not precisely synchronised with the digital time.
1. Press the lower right button to move the mode indicator hand to CHR.
2. Pull the lower right button out one click. The hour, minute and UTC hands will
retract towards the straight up 12 O’clock position. You will see UTC on the top
half of the digital display.
3. Press the upper right button to advance the hands to the straight up 24-hour
position. Use the lower left button to go in reverse.
26
4. Press the upper left button. You will see HR on the top half of the digital
display. Press the upper right button to advance the hour and 24-hour hand
clockwise until they both point straight up at the 24-hour position. Use the
lower left button to move the hand anti-clockwise.anti-clockwise until it is
pointing straight up at the 12 O’clock position.
5. Press the upper left button. You will see MIN on the top half of the digital display. Press the upper right button to advance the minute hand clockwise or the
lower left button to move
anti-clockwise until it is pointing straight up at the 12 O’clock position.
6. Push the lower right button back in one click.
27
CPOO Operating Instructions continued . . .
Troubleshooting continued . . .
The watch malfunctions in some way and the above procedures do not work.
1. Press the lower right button until the mode indicator hand points to TME.
2. Pull the lower right button out one click. Press the other three buttons down
simultaneously for three seconds and release. You will see 8’s on the digital display.
3. Press the upper left button. You will see UTC on the top half of the digital display.
Press the upper right button to advance the hands of the top dial to the straight up
24-hour position. Use the lower left button to go in reverse.
4. Press the upper left button. You will see HR on the top half of the digital display.
Press the upper right button to advance the hour and 24-hour hand clockwise until
they both point straight up at the 24-hour position. Use the lower left button to move
the hand anti-clockwise.
28
5. Press the upper left button. You will see MIN on the top half of the digital display.
Press the upper right button to advance the minute hand clockwise or the lower left
button to move anti-clockwise until it is pointing straight up at the 12 O’clock
position.
6. Push the lower right button back in one click.
If you require technical assistance:
The following resources are available if you require technical assistance –
1. CDROM giving step-by-step interactive instructions is
supplied with the watch. Interactive instructions are also
available from our website www.accurist.co.uk.
2. Technical manual in A4 printable Adobe Reader format
available from our website www.accurist.co.uk.
3. Accurist technical help line +44 (0)20 74473941 – during office hours.
29
Care of your watch
Avoid temperature extremes
1. Avoid leaving your watch in direct sunlight or in extremely warm conditions
for long periods of time: this will cause malfunctioning and shorten the life of
the battery.
2. Do not leave your watch for long periods of time in extremely cold places;
this may cause your watch to gain or lose time. Should it begin to gain or lose
time, place your watch on your wrist to restore its original accuracy.
Avoid wet conditions
1. Do not operate the buttons when your watch is wet, even on models marked
'Water Resistant'
2. Check case back markings and refer to the Resistance to water section below.
30
Avoid strong shocks
1. This watch will withstand the bumps and jars normally incurred during sports
activities.
2. Avoid dropping your watch on the ground or otherwise imparting severe
shock to it.
Avoid strong magnetic fields
1. Keep your watch away from strong magnets
2. Generally, your watch is not affected by magnetic fields from household
appliances such as television sets and stereo equipment.
31
Avoid harmful chemicals, solvents & gases
1. Avoid wearing your watch in the presence of strong chemicals, solvents or
gases.
2. Avoid materials such as gasoline, benzene, paint thinner, alcohol, spray
cosmetics, nail polish, nail polish remover, adhesives or paint.
Periodic inspection
1. A regular 4 to 5 years service by an authorised Accurist technician will ensure
trouble free operation.
2. Refer to the After Sales Service section on page 44 for details.
32
IMPORTANT
1. Keep the batteries out of reach of infants and small children. Should
accidental ingestion occur consult a doctor immediately.
2. Do not attempt to replace the battery yourself as this invalidates your
guarantee.
Keep your watch clean
Wipe off any moisture that adheres to the case, glass or band with a soft,
clean cloth.
33
Bracelet Adjustment
The bracelet requires a small adjustment and the model has a Z-type clasp.
1. Depress the end of the spring bar on the centre clasp with a pin.
2. Relocate the spring bar in an alternative hole.
34
The bracelet requires a significant adjustment or the model does not have a
Z-type clasp.
1. Use the enclosed wrist gauge to measure and mark the size of your wrist.
2. Return the completed wrist gauge with your watch
3. Follow the instructions in the After Sales Service section to return your watch
for adjustment. Your watch will be adjusted free of charge.
35
International Service Agents
International Service Headquarters
Accurist Watches Limited, Asher House, Blackburn Road, West Hampstead,
London, NW6 1AW
Tel: +44 (0)20 7447 3945, Fax: +44 (0)20 7447 3946
United Arab Emirates
Al Abbas, P.O. Box 45999, Dubai, UAE
Tel: 00971 4 351 2440, Fax: 009714 351 2450
36
Netherlands
Sabre Nederland B.V., Ellermanstraat 23, 1099 BX Amsterdam, The Netherlands
Tel: 0031 20 692 8888, Fax: 0031 20 665 2184
Switzerland
Nimex AG, Raffelstr 11, CH - 8045, Zurich, Switzerland
Tel: 0041 44 462 91 91, Fax: 0041 44 462 91 81
Norway
Thune, Nils Hansensvei 2, N - 0667 Oslo, Norway
Tel: 0047 22 70 08 40, Fax: 0047 22 70 08 41
37
International Service Agents continued . . .
Kingdom of Saudi Arabia
Al Asasyah, Sitteen Street, P.O. Box 19248 - 19249, Jeddah 21435
Tel: 00966 672 6826, Fax: 00966 676 2262
N. Antilles
J Best Jeweler, 2 Front Street, Philipsburg, St. Maarten, N. Antilles
Tel: 47 22 17 09 00, Fax: 47 67 53 54 43
38
Cyprus
A Chrysanthou Ltd, 35 Kappadokias Street, Strovolos 2028
Tel: 00357 22 512 122, Fax: 00357 22 512 880
39
Resistance to water
INDICATIONS ON DIAL OR CASEBACK
DIAL
CASEBACK
LIGHT SPRAY,
PERSPIRATION,
LIGHT RAIN
BATHING, ETC...
SWIMMING
ETC...
-
WATER RESISTANT
OK
X
WATER RESISTANT
50M (5 ATM)
WATER RESISTANT
OK
OK
WATER RESISTANT
100M (10 ATM)
WATER RESISTANT
OK
OK
WATER RESISTANT
150M (15 ATM)
AND DEEPER
WATER RESISTANT
OK
OK
40
SKIN DIVING:
DIVING WITHOUT
AN AIR TANK
SCUBA DIVING:
DIVING WITH
AN AIR TANK
DIVING:
WHEN USING A
HELIUM ENRICHED
ENVIRONMENT
X
X
X
X
X
X
OK
X
X
OK
OK
X
41
Resistance to water continued . . .
IMPORTANT - NEVER PULL OUT THE CROWN WHEN THE WATCH IS WET.
• Tighten screwlock crown completely
• Water resistance is not a permenant property. We strongly
recommend you return your watch for resealing every 4 - 5
years and/or when changing batteries
• “Water resistant” may sometimes be abbreviated as “Water resist” or “WR”.
• Never pull out the crown when the watch is wet.
• Always set the crown in the normal position.
42
Accurist Quartz Guarantee
The terms of this guarantee provide rights that are in addition to your statutory
rights and do not in any way limit or otherwise affect those statutory rights.
Your Accurist watch is guaranteed for 3 years from the date of original retail
purchase against any malfunction of the watch movement due to defective
materials or workmanship. This guarantee is applicable only to watches
purchased in the United Kingdom. The guarantee is only valid if completed and
dated at the time of purchase by your Accurist stockist.
To make a claim under the guarantee please return your watch directly to the
International Service Headquarters at the address set out on page 35 or an
International Service Agent.
43
Accurist Quartz Guarantee continued . . .
When returning your watch, please indicate brief details of the nature of the
problem and the repair required.
We will, at our option, repair or replace your watch with a model of similar
appearance or value.
After the expiry of this guarantee the Accurist Service Centre and International
Service Agents are at your complete disposal.
We will be pleased to quote for routine maintenance, oiling or repair of your
watch by our factory trained staff of experts.
This guarantee is provided by Accurist Watches Limited of Asher House,
Blackburn Road, West Hampstead, London, NW6 1AW, England, United Kingdom
44
After Sales Service
Each Accurist watch comes with a lifetime commitment to quality after sales
service. Our award winning customer service team are dedicated to providing
expert servicing from bracelet adjustments to full overhaul. We pride ourselves in
identifying our customer's requirements and reacting to their individual needs.
An expert watchmaker personally services each watch and Accurist guarantees
quality at every step of the process.
45
For UK and Eire
1. Complete the payment details form attached opposite.
2. Return the watch and payment details form together with this guarantee to
the Accurist Service Centre address listed on page 35.
3. Enclose a cheque, postal order or MasterCard/Visa payment for £5.00 payable
to Accurist Service Centre. This covers return postage and insurance for loss or
damage whilst in transit or undergoing repairs. No liability for loss or damage
will be accepted without this remittance.
4. Please do not return your presentation box as we cannot guarantee its return.
46
1
I enclose:
Accurist Watches Limited
Asher House
Blackburn Road
West Hampstead
London, NW6 1AW
postal order
debit card (issue no.
1. Return the watch with payment to your nearest International service agent
(listed on page 35).
2. Enclose a cheque for €7.50. This covers return postage and insurance for loss
or damage whilst in transit or undergoing repairs. No liability for loss or damage
will be accepted without this remittance.
Card No:
Perforation
Folding
Telephone: +44 (0)20 7447 3900
Fax: +44 (0)20 7447 3949
cheque
credit card,
For all other countries
Expires:
Name:
Email: [email protected]
Address:
For latest information please check our web site: www.accurist.co.uk
Postcode:
Published June 2005
Signature:
/
/
) payment for £5.00