1
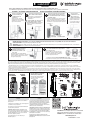
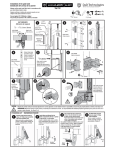
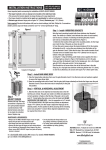
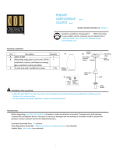
Instalación del cerrojo de la puerta
Vertical Pull
For pool gates 59” (1500mm) or higher
Para puertas para piscinas de 59” (1500mm) o más altas
GAP VARIANCE
Diferencia de espacio
/
1 ”
2 -
1
3
FENCE POST
Poste de cerca
1 1/2” (13mm-38mm)
GATE FRAME
Marco de la puerta
/
5
32”
(4mm)
2
5
D
59”
(1500mm)
FENCE POST
Poste de cerca
D
2
6
4”
(100mm)
3
1
D
D
4
4
GATE FRAME
Marco de la puerta
Position Striker Body
onto bottom of latch
Colocar en posición la
caja de la cerradura
hembra en la base del
cerrojo
6
5
GATE FRAME
Marco de la puerta
EE
1
/8” (3mm)
EE
Align marks for proper
vertical alignment
Alinear las marcas para la
alineación vertical correcta
2
1
5
D
6
DD
E
/32” (4mm)
3
4
5
8
7
Fix screw ‘B’
at bottom
Fijar el tornillo
‘B’ en la base
9
Align marks for
proper horizontal
alignment
Alinear las marcas
para la alineación
horizontal correcta
FF
1
B
F
2
CAUTION: MagnaLatch provides vertical & horizontal adjustment for correct alignment. It is the installer’s/owner’s responsibility to ensure the gate properly latches at all times. See Steps 5 & 9.
PRECAUCIÓN: MagnaLatch ofrece el ajuste vertical y horizontal para la alineación correcta. Es responsabilidad del instalador/propietario garantizar que la puerta se cierre con el
cerrojo en todo momento. Ver Pasos 5 y 9.
POWERING UP
11
ENCENDIDO/ACTIVACIÓN
Remove screw and front cover by
using a #1 Phillips-head screwdriver.
Extra screw included if lost.
Retirar el tornillo y cubierta frontal
usando un destornillador Phillips #1.
En caso de pérdida hay un tornillo
adicional.
22
Insert battery as indicated into the
battery compartment with the (+) symbol
on top and the (-) on the bottom.
Insertar la batería (pila) como se indica
en el compartimento de la batería con el
símbolo (+) en la parte superior y el (-)
en la base.
Open & close the gate a minimum of
5 times. This will calibrate the system
& battery so they operate properly. Repeat if low battery (ramp-down) sound
occurs. If low battery sound continues,
contact D&D Technologies.*
Para calibrar el sistema y la batería abrir y cerrar
la puerta mínimo 5 veces. Repita si la batería
produce un sonido bajo. Por favor contactar
a D&D Technologies si la batería continúa
produciendo un sonido bajo.*
3
4
Re-attach front cover and
screw by using #1 Phillips
head screwdriver.
Volver a sujetar la cubierta
frontal y atornillar usando un
destornillador Phillips #1.
OPEN
ABRIR
H
ER14250
1/2 AA (3.6V)
H
CLOSE
CERRAR
Vertical Pull
Refer to Owner’s Manual for more detailed instructions and important information about your ALERT alarm system.
Ver el Manual del propietario para las instrucciones de uso más detalladas e información importante sobre su sistema de alarma ALERT
OPTIONAL - ACTIVATING THE DISARM FEATURE
1
Remove screw and front cover
by using a #1 Phillips-head
screwdriver. Extra screw
included if lost.
Retirar el tornillo y cubierta
frontal usando un destornillador
#1 Phillips. En caso de pérdida
hay un tornillo adicional.
OPTATIVO- ACTIVACIÓN DE LA FUNCIÓN DE DESARMAD
Open the gate. Gate must be open in
order to activate the Disarm feature.**
Abrir la puerta. La puerta debe estar
abierta para activar la función de
Desarmado.**
2
3
NOTE: The ALERT comes from the factory
with the Disarm feature de-activated.
OBSERVACIÓN: ALERTA se presenta de
fábrica con la función de Desarmado
desactivada.
Insert a paper clip into the hole located between
the paper clip image and On/Off symbol. Press
once to activate the Disarm feature. A “ramp-up”
sound will be heard.**
Insertar un sujetapapeles en el agujero ubicado
entre la imagen del sujetapapeles y el símbolo
On/Off. Presionar una vez para activar la función
Desarmado. Se escuchará un sonido de puesta
en marcha. **
Close the gate and
re-attach the front cover
with screw using a #1
Phillips-head screwdriver.
Cerrar la puerta y volver a
sujetar la cubierta frontal
con un tornillo usando un
destornillador #1 Phillips.
Hole
Agujero
H
Paper clip
Clip de papel
OPTIONAL - TEMPORARILY DISARMING THE ALARM
4
On/Off icon
Icono de
encendido/apagado
H
OPTATIVO- DESARMADO PROVISORIO DE LA ALARMA
WARNING: DO NOT disarm the ALERT on a pool or spa gate. Activating the Disarm feature and using it is the sole responsibility of the user and not the manufacturer.
STOPPING THE ALARM - Closing and latching the gate will silence the alarm.
ADVERTENCIA: NO desarmar ALERT en una piscina o puerta de spa. La activación de la función de Desarmar y su uso es exclusiva responsabilidad del usuario y no del fabricante.
PARAR LA ALARMA- El cierre y trabado de la puerta silenciará la alarma.
1
To temporarily disarm the ALERT for a
maximum of 15 minutes, open the
gate and hold open until the second
beep sounds.
Para desarmar provisoriamente ALERT
durante un máximo de 15 minutos, abrir la
puerta y mantenerla abierta hasta el sonido
del segundo pitido (beep).
2
Place finger on top of the Disarm Sensor and hold
for 5 seconds. You will then hear 4 beeps followed
by a “ramp-up” sound.
Colocar el dedo por encima del sensor de
Desarmado y sostener durante 5 segundos.
Entonces escuchará 4 pitidos seguidos por
un sonido de puesta en marcha.
Disarm
Sensor
Disarm
Sensor
See page 12 of owner’s manual for DISARM MODE (Silence Cycle).
Ver la página 12 del manual del propietario para la MODALIDAD DESARMADO (ciclo de silencio).
t/05&"GBMTFTPVOEJOHPGBMPXCBUUFSZSBNQEPXO
NBZPDDVSEVSJOHUIFDBMJCSBUJPOQSPDFTT*GUIJTDPOUJOVFTSFQMBDFXJUIOFXCBUUFSZPSDPOUBDU%%5FDIOPMPHJFTt/05&&OTVSFCBUUFSZJTQSPQFSMZJOTFSUFEXJUI
TZNCPMPOUPQ
BOE
POCPUUPNt/05&5IFHBUFNVTUCFPQFOXIFOFWFSBDUJWBUJOHPSEFBDUJWBUJOHUIF%JTBSNGFBUVSFBOEXIFOVTJOHUIF%JTBSNGFBUVSFt/05&%POPUXFBSHMPWFTXIFOEJTBSNJOH5IF%JTBSN4FOTPSJTUPVDITFOTJUJWFUPTLJOPOMZ
/05&$MPTJOHBOEMBUDIJOHUIFHBUFBUBOZUJNFXJMMSFBSNUIF"-&35.PEVMFt/05&5IF"-&35JTOPXEFBDUJWBUFEGPSVQUPNJOVUFTBTMPOHBTUIFHBUFJTIFMEPQFO"GUFSNJOVUFTPSJGDMPTJOHUIFHBUFBUBOZUJNFUIF"-&35
.PEVMFXJMMSFBSNJUTFMGt/05&5IF%JTBSN4FOTPSJTUPVDITFOTJUJWFBOEEPFTOPUSFRVJSFUPCFQVTIFEJOXBSE*USFTQPOETUPDPOUBDUXJUIZPVSTLJOBOEXJMMOPUPQFSBUFXIFOXFBSJOHHMPWFT
t0#4&37"$*»/%VSBOUFFMQSPDFTPEFDBMJCSBEPQPESÓBQSPEVDJSTFVOTPOJEPGBMTPEFCBUFSÓBCBKBQJUJEPCBKP
4JFTUPDPOUJOVBSBSFFNQMB[BSDPOVOBCBUFSÓBOVFWBPDPNVOJDBSTFDPO%%5FDIOPMPHJFTt0#4&37"$*»/
"TFHVSBSTFEFRVFMBCBUFSÓBTFFODVFOUSFDPSSFDUBNFOUFJOTFSUBEBDPOFMTÓNCPMP
FOMBQBSUFTVQFSJPSZFM
FOMBCBTFt0#4&37"$*»/-BQVFSUBEFCFQFSNBOFDFSBCJFSUBDVBOEPTFBDUJWBPEFTBDUJWBMBGVODJØOEF%FTBSNBEP
y cuando se usa la función de Desarmado propiamente dicha.
t0#4&37"$*»//PVTBSHVBOUFTEVSBOUFFMEFTBSNBEP&MTFOTPSEF%FTBSNBEPFTTFOTJCMFBMUBDUPTJCJFOBMBQJFMÞOJDBNFOUFt0#4&37"$*»/&MDJFSSFZUSBCBEPEFMBQVFSUBFODVBMRVJFSNPNFOUPWPMWFSÈBBSNBSFM.ØEVMP
EF"-&35t0#4&37"$*»/"-&35BIPSBTFFODVFOUSBEFTBDUJWBEBIBTUBNJOVUPTTJFNQSFZDVBOEPMBQVFSUBTFNBOUFOHBBCJFSUB%FTQVÏTEFNJOVUPTPTJTFDFSSBSBMBQVFSUBFODVBMRVJFSNPNFOUPFM.ØEVMPEF"-&35TF
WPMWFSÈBBSNBSQPSTÓNJTNPt0#4&37"$*»/&MTFOTPSEF%FTBSNBEPFTTFOTJCMFBMUBDUPZOPSFRVJFSFTFSFNQVKBEPIBDJBBEFOUSP3FTQPOEFBMDPOUBDUPDPOTVQJFMZOPGVODJPOBSÈDPOFMVTPEFHVBOUFT
Unlocked
Destrabado
Key Tag supplied as reminder to
maintain proper alignment
Locked
Trabado
A (x1)
Placa para llave suministrada para
recordar el mantenimiento de la
alineación correcta
Red
Rojo
D (x12)
H (x2)
E (x1)
C (x2)
B (x1)
G (x2)
(x1)
(x1)
CONTENTS
1
INTRODUCTION
4
3.5 DISARMING THE ALERT TEMPORARILY Child Safety
Gate
Latch With Electronic Alarm System11
OPTIONAL
1.1 SCOPE
4
OWNER’S MANUAL13
3.6 OPERATIONAL SEQUENCE
1.2 PURPOSE
4
12
3.7 CHANGING THE BATTERY
F (x1)
2
SYSTEM DESCRIPTION
MANUAL DEL PROPIETARIO
4
3.8 DISPOSAL OF BATTERIES
2.1 SPECIFICATION
3.9 ENVIRONMENTAL PROTECTION
5
2.3 ENVIRONMENT
5
2.4 STANDARDS
4
STATEMENTS OF COMPLIANCE
5
FREQUENTLY ASKED QUESTIONS
6
3.2 INSTALLATION
7
3.3 POWERING UP
7
3.3 POWERING UP - CONTINUED
8
If using this latch on a swimming pool gate, consult all appropriate
local authorities for safety requirements.
The latch will operate properly only if installed and maintained in
accordance with these instructions.
MAINTENANCE: REMOVE KEY FROM LOCK AFTER USE. Do not
lubricate the latch with petroleum-based lubricants at any time;
use only powdered graphite. Ensure all screws are tightened firmly
and that the MagnaLatch® is kept free of sand, ice and other
debris which could impair performance.
For warranty information, see owner’s manual or go to
www.ddtechglobal.com
14
15
3.4 ACTIVATING THE DISARM FEATURE ON
ALERT - OPTIONAL
9
3.4 ACTIVATING THE DISARM FEATURE ON
ALERT - OPTIONAL (CONT)
10
6
TROUBLESHOOTING
16
7
POOL SAFETY INFORMATION
17
8
CLEANING & MAINTENANCE
9
POOL SAFETY RESOURCES
17
18
10 WARRANTY
19
CONTACT
22
For a French version of this manual, go to
www.ddtechglobal.com
www.ddtechglobal.com
ENGLISH
13
5
3.1 ATTACHING ALERT TO LATCH BODY
MagnaLatch® ALERT Gate Alarm System
Swimming pool fences, gates and latches cannot substitute for
adult supervision.
13
4
2.2 ELECTRICAL DATA
3
ESPANIOL
Las cercas, portones y pestillos de las piscinas no sirven como
substituto de la supervisión por parte de adultos. Si se usa este
pestillo en un portón de piscina, consulte a todas las autoridades
locales correspondientes con respecto a los requisitos de
seguridad. El pestillo funcionará debidamente sólo si se instala y
mantiene de acuerdo a estas instrucciones.
MANTENIMIENTO: RETIRAR LA LLAVE DE LA CERRADURA DESPUÉS
DE USAR. No lubricar el cerrojo con lubricantes a base de petróleo
en ningún momento; usar grafito en polvo únicamente. Asegurarse
de que todos los tornillos se encuentren firmemente ajustados y
que MagnaLatch® no contenga arena, hielo ni otros desechos que
podrían impedir su funcionamiento.
Para bajar una versión en Adobe Acrobat (PDF) de nuestar
GARANTÍA DE POR VIDA limitada dirigirse a nuestro sitio web www.
ddtechglobal.com
Scan for
installation animation
AUSTRALIA: Unit 6, 4-6 Aquatic Dr, Frenchs Forest NSW 2086
USA: 7731 Woodwind Drive, Huntington Beach, CA 92647
EUROPE: Niasstraat 1, 3531 WR Utrecht, The Netherlands.
www.ddtechglobal.com
.-*/4531"t