1
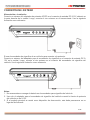
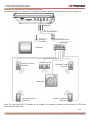
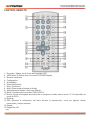
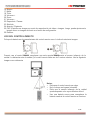
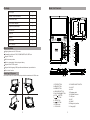
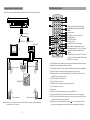
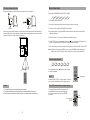
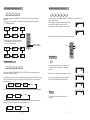
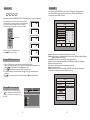
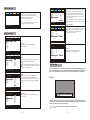
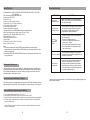
MANUAL DE INSTRUCCIONES
REP. DE DVD PORTÁTIL C/TV (9”)
SX-4737TVD
ESTIMADO CLIENTE
Con el fin de que obtenga el mayor desempeño de su producto, por favor lea este manual de
instrucciones cuidadosamente antes de comenzar a utilizarlo, y guárdelo para su futura referencia.
Si necesita soporte adicional, no dude en escribir a: [email protected]
ÍNDICE
ACCESORIOS ........................................................................................................................................... 3 CARACTERÍSTICAS PRINCIPALES ........................................................................................................ 3 PANTALLA LCD GIRATORIA .................................................................................................................. 3 DESCRIPCIÓN DE LA UNIDAD ................................................................................................................ 4 CONEXIÓN DEL SISTEMA ....................................................................................................................... 5 CONTROL REMOTO ................................................................................................................................. 8 USO DEL CONTROL REMOTO............................................................................................................. 9 FUNCIONES BÁSICAS ........................................................................................................................... 10 REPRODUCIR UN DISCO DE DVD, MPEG4, SVCD, VCD, CD, MP3 ................................................ 10 PAUSAR DURANTE EL FUNCIONAMIENTO ..................................................................................... 10 REPRODUCIR UN DISCO DVD CON MENÚ DE TITULO O CAPITULO ........................................... 10 ADELANTAR / RETROCEDER RÁPIDAMENTE ................................................................................. 10 REPETIR LA REPRODUCCIÓN .......................................................................................................... 11 REPETIR UNA ESCENA FAVORITA ................................................................................................... 11 SELECCIONAR ÁNGULO .................................................................................................................... 11 ZOOM ................................................................................................................................................... 12 REPRODUCIR UN DISCO DE ARCHIVOS JPEG ............................................................................... 12 REPRODUCIR UN DISCO DE ARCHIVOS MP3 ................................................................................. 12 EXTRACCIÓN DE CD ............................................................................................................................. 12 CONFIGURACIÓN DEL SISTEMA ......................................................................................................... 13 CONFIGURACIÓN GENERAL ............................................................................................................. 13 CONFIGURACIÓN DE AUDIO ............................................................................................................. 15 CONFIGURACIÓN DE VIDEO ............................................................................................................. 15 PREFERENCIAS .................................................................................................................................. 15 FUNCIÓN ATV ......................................................................................................................................... 16 USO DE LA BATERÍA RECARGABLE .................................................................................................. 17 MANTENIMIENTO DE LA BATERÍA RECARGABLE .......................................................................... 17 ESPECIFICACIONES .............................................................................................................................. 17 SOLUCIÓN DE PROBLEMAS ................................................................................................................ 18 P-1
PRECAUCIÓN
RIESGO DE CHOQUE
ELÉCTRICO , NO ABRA
Precaución: Para reducir el riesgo de choque eléctrico, no
retire la cubierta, no hay partes manipulables por el usuario al
interior de la unidad.
Refiera todo mantenimiento o
intervención técnica a personal técnico calificado.
Este símbolo indica la existencia de voltaje peligroso al
interior de esta unidad, que constituye un riesgo de choque
eléctrico.
Este símbolo indica que hay importantes instrucciones de
operación y mantenimiento en la literatura que acompaña a
esta unidad.
LÍNEAS DE SERVICIO AL CLIENTE PREMIER
Venezuela:
Panamá:
Sitio Web:
E-mail:
0800 – ELECTRIC (353-2874)
300-5185
www.premiermundo.com
[email protected]
NOTA
Nos reservamos el derecho de modificar las especificaciones, características y/u operación de esta
unidad sin previo aviso, con el fin de continuar las mejoras y desarrollo del mismo.
P-2
ACCESORIOS
•
•
•
•
•
•
•
•
•
•
Reproductor de DVD
Control remoto con baterías
Cable de Audio / Video
Adaptador de potencia AC/DC
Adaptador para Encendedor de cigarrillos
Manual de instrucciones
Audífonos
Antena
Bolsa para transporte
Enchufe tipo DIN F
1
1
1
1
1
1
1
1
1
1
CARACTERÍSTICAS PRINCIPALES
•
•
•
•
•
•
•
•
Pantalla LCD de 9” de alta luminosidad
Compatible con discos de DVD, VCD, MP3, MPEG4, CD, JPEG, etc.
Soporta TV/AV IN
Parlante estéreo incorporado
Batería de polímero de litio recargable incorporada
Soporta sistemas PAL ó NTSC
Soporta multi-Idiomas OSD, Adelantamiento y Retroceso rápido, Función de repetición.
Función Zoom
PANTALLA LCD GIRATORIA
La pantalla de esta unidad puede ser girada en el sentido de las agujas del reloj máximo 180º.
P-3
DESCRIPCIÓN DE LA UNIDAD
1. Configuración
2. Menú
3. Modo
4. USB/Tarjeta
5. Reproducir / Pausar
6. Detener
7. Anterior / Siguiente
8. OK
9. Adelantar / Retroceder
10. Abrir
11. Entrada DC 9-12V
P-4
12. Interruptor de Potencia de Encendido y
Apagado
13. Salida AV
14. Entrada AV
15. Conector de audífonos
16. Ranura para tarjetas SD/MMC
17. Puerto USB
18. Antena
19. Juegos
20. Posición de la etiqueta de clasificación
21. Carga / IR
CONEXIÓN DEL SISTEMA
Alimentación e instalación
Conecte un extremo del adaptador de potencia AC/DC en el conector de entrada DC 9-12V ubicado en
la parte derecha de la unidad. Luego, conecte el otro extremo en el tomacorriente. Use la siguiente
ilustración como referencia.
Si usa el encendedor de cigarrillos de su vehículo para conectar a la potencia:
Conecte un extremo del adaptador para el encendedor de cigarrillos en el conector de entrada DC 912V en la unidad. Luego, conecte el otro extremo en el conector del encendedor de cigarrillos del
vehículo. Use la siguiente ilustración como referencia.
Notas:
1. No recomendamos recargar la batería en el encendedor para cigarrillos del vehículo.
2. Use solo el adaptador para el encendedor de cigarrillos del vehículo cuando la fuente de potencia
del vehículo es de 9-12V.
3. Si el enchufe principal es usado como dispositivo de desconexión, este debe permanecer en un
lugar de fácil alcance.
P-5
Conectar al TV
Puede conectar la unidad a un televisor para disfrutar de imágenes de alta calidad y sonido estéreo.
Use la siguiente ilustración como referencia
Cable AV
(No suministrado)
Televisor
Nota: Use un cable AV para conectar la unidad
y el televisor. Asegúrese que las conexiones se
han realizado de manera correcta
P-6
Conectar La Unidad Con Un Parlante Externo
La unidad puede ser conectada a un parlante externo. Use la siguiente ilustración como referencia
Cable AV
(No suministrado)
Entrada
de Video
Entrada de Audio
Amplificador
Televisor
Parlante Central
Parlante Frontal
Izquierdo.
Parlante Frontal
Derecho.
Subwoofer
Parlante Posterior
Izquierdo.
Parlante Posterior
Derecho.
Nota: No hay salida de 5.1 Canales en la unidad. Sin embargo, después de conectarla al APM esta
salida estará disponible.
P-7
CONTROL REMOTO
1. Encender / Apagar luz de fondo de la pantalla LCD.
2. USB/Tarjeta (Cambiar entre los modos DVD/USB/Tarjeta).
3. Botones numéricos.
4. Configuración.
5. Arriba/Abajo.
6. Derecha/Izquierda.
7. Enter (Confirmar).
8. Audio (Seleccionar el idioma de Audio)
9. Adelantamiento Rápido / Retroceso Rápido.
10. Modo (Cambiar entre los modos DVD/AVIN/TV).
11. Buscar (Iniciar la búsqueda automática de un programa cuando esta en modo TV. No disponible en
modo de DVD).
12. Silenciar.
13. OSD (Muestra la información del disco durante la reproducción, como por ejemplo tiempo
transcurrido y tiempo restante).
14. Repetir.
15. Repetición A-B.
P-8
16. Ángulo.
17. Menú.
18. Titulo.
19. Volumen +
20. Zoom
21. Volumen –
22. Reproducir / Pausar.
23. Subtitulo.
24. Anterior / Siguiente.
25. CAP (Captura una imagen en modo de reproducción de video o imagen. Luego, puede ajustar esta
imagen como su imagen de fondo en el menú de configuración.
26. Detener.
USO DEL CONTROL REMOTO
Coloque la batería en el compartimiento del control remoto como lo indica la siguiente imagen:
Cuando use el control remoto, asegúrese que este apunta directamente al sensor infrarrojo de la
unidad. La distancia entre la unidad y el control remoto debe ser de 3 metros máximo. Use la siguiente
imagen como referencia
Notas:
• Evite que el control remoto se caiga.
• No lo coloque en lugares húmedos.
• Evite que el sensor infrarrojo de la unidad
quede expuesto a los rayos directos del sol.
• Use una batería nueva para reemplazar la
batería usada si el control remoto no funciona
P-9
FUNCIONES BÁSICAS
REPRODUCIR UN DISCO DE DVD, MPEG4, SVCD, VCD, CD, MP3
1. Conecte la unidad al tomacorriente (Asegúrese que el voltaje del área corresponda con el voltaje
marcado en la parte posterior de la unidad).
2. Abra la unidad y ajuste la pantalla en el ángulo deseado para una mejor visualización.
3. Encienda la unidad deslizando el interruptor de Encendido / Apagado.
4. Abra la bandeja de discos de la unidad presionando el botón Abrir. Luego, coloque el disco en el
compartimiento con la cara etiquetada mirando hacia arriba.
5. Cierre la bandeja de discos, la unidad cargara el disco e iniciara la reproducción.
6. Presione el botón Detener una vez si desea detener la reproducción. Luego, presione el botón
Reproducir/Pausar para reanudar la reproducción. Presione el botón Detener 2 veces si desea
detener completamente la reproducción.
7. Cuando la reproducción se ha finalizado, deslice el botón Encender / Apagar para apagar la unidad.
Nota: No desconecte el dispositivo USB ó la tarjeta SD/MMC mientras funcionan en la unidad. Pueden
ocurrir fallas en el funcionamiento en caso de presentarse operaciones incorrectas.
PAUSAR DURANTE LA REPRODUCCIÓN
Durante la reproducción, presione el botón reproducir / Pausar para Pausar. Presione el botón de nuevo
para reanudar la reproducción.
Nota: Si no oprime ningún botón en modo Pausar, Detener o No disco durante 3 minutos, la unidad
entrara en modo protegido. Presione cualquier botón para salir.
REPRODUCIR UN DISCO DVD CON MENÚ DE TITULO O CAPITULO
Para algunos discos de DVD con menú de titulo o capitulo, presione el botón Menú para ingresar a la
pagina de menú, y use los botones direccionales para seleccionar. Presione el botón Enter para
confirmar
ADELANTAR / RETROCEDER RÁPIDAMENTE
Cuando reproduzca un disco de DVD, MPEG4, SVCD, VCD, CD puede adelantar la reproducción hacia
delante o hacia atrás rápidamente.
1. Presione el botón adelantar rápidamente ó retroceder rápidamente para adelantar ó retroceder la
reproducción en las siguientes velocidades:
P-10
REPETIR LA REPRODUCCIÓN
Cuando reproduzca un disco de DVD, MPEG4, SVCD, VCD, CD, MP3 puede repetir la reproducción de
un capitulo, titulo o el disco completo.
Para discos de DVD, presione el botón Repetir para repetir un capitulo, presiónelo de nuevo para repetir
un titulo, y presiónelo por tercera vez para repetir el disco completo. Presione el botón de nuevo para
cancelar la repetición.
Para discos DC/VCD, presione el botón Repetir para repetir una pista ó el disco completo.
Para discos MP3, presione el botón Repetir para repetir el archivo actual, presiónelo de nuevo para
repetir la carpeta, y presiónelo nuevamente para cancelar la función.
REPETIR UNA ESCENA FAVORITA
Cuando reproduzca un disco de DVD, MPEG4, SVCD, VCD, CD, MP3, puede
repetir la reproducción de una sección especifica.
Durante la reproducción, presione el botón “A-B” en el punto A, luego presione
el botón de nuevo en el punto B. La unidad repetirá automáticamente la sección
marcada entre los puntos A y B.
Presione el botón una vez mas para reanudar la reproducción normal.
SELECCIONAR ÁNGULO
1. Durante la reproducción de un disco DVD con función mutli-Ángulo, presione el botón Ángulo.
2. Presione los botones numéricos para seleccionar el ángulo que desea.
3. Para regresar a la reproducción normal, presione el botón Ángulo de nuevo y la unidad reproducirá
el disco en el ángulo preestablecido.
Nota: Esta función solo esta disponible en discos con Multi-Angulo
P-11
ZOOM
Cuando reproduzca un disco de DVD, MPEG4, SVCD, VCD puede acercar o alejar la imagen durante la
reproducción. Presione el botón Zoom repetidamente para acercar o alejar la imagen en las siguientes
proporciones:
REPRODUCIR UN DISCO DE ARCHIVOS JPEG
1. Coloque un disco JPEG en la bandeja para discos, la unidad leerá el disco y lo reproducirá.
2. Cuando visualice los archivos JPEG, presione el botón Detener, las imágenes serán mostradas en
miniatura. Presione los botones de navegación o el botón OK para seleccionar una imagen.
3. Presione los botones de navegación de Arriba y Abajo y el botón OK para seleccionar un archivo
JPEG del menú.
4. Use los botones de navegación Derecho e Izquierdo para rotar la imagen.
5. Presione el botón de navegación Abajo para invertir la imagen horizontalmente y presione el botón
de navegación Arriba para invertir la imagen verticalmente.
REPRODUCIR UN DISCO DE ARCHIVOS MP3
Coloque el disco MP3 en la bandeja para discos. Presione los botones de
navegación de Arriba y Abajo o el botón OK para elegir un archivo MP3.
Presione el botón de navegación Derecho o el botón OK para reproducir el
archivo seleccionado.
EXTRACCIÓN DE CD
Durante la reproducción de discos de CD/HDCD, puede ingresar a la opción Extracción de CD
presionando el botón Subtitulo. La unidad cambiara el formato del CD a formato MP3, luego guardara
los archivos en el dispositivo USB o en la tarjeta de memoria SD.
P-12
Opciones:
Velocidad:
Tasa de Bits:
Crear ID3:
Dispositivo:
Salir:
Todo:
Ninguno:
Iniciar:
Ajuste la velocidad de extracción: Normal ó Rápida
Ajuste la tasa de bits, hay 6 opciones: 128Kbps, 192Kbps, 256Kbps, 320Kbps,
96Kbps y 112Kbps
Puede crear ID3 cuando reproduzca CD de texto
Indica si un dispositivo USB ó una Tarjeta SD están conectados en la unidad.
Regrese al menú anterior
Seleccione todos los archivos en el disco para conversión y almacenamiento
Cancela la selección
Mueva el cursor al ítem y presione el botón Enter, la conversión iniciara. Durante la
conversión, puede seleccionar Cancelar para detenerla.
CONFIGURACIÓN DEL SISTEMA
Presione el botón Configuración y el menú principal será
mostrado en la pantalla.
Use los botones de navegación para realizar los ajustes y el
botón OK para confirmar.
CONFIGURACIÓN GENERAL
Tipo de visualización de TV
Ingrese a esta opción para ajustar el formato de visualización
de pantalla (Normal/PS, Normal/LB, Ancho)
Nota:
• Esta función depende del radio de visualización con el que
fue grabado el disco DVD.
• Seleccione Ancho (16:9) cuando use un televisor de
pantalla ancha
P-13
Idioma OSD
Seleccione el idioma OSD de su preferencia: Ingles, Francés,
Alemán, Italiano.
Pre ajustado: Ingles
Protector de Pantalla
Seleccione “ON” para activar la función de protector de
pantalla.
Cuando activa esta función, un icono de DVD en movimiento
aparecerá en la pantalla cuando la unidad ha sido detenida o
cuando se muestra una imagen fija por algunos minutos. Esta
característica evita que la pantalla se dañe debido a una
imagen estática que queda en la pantalla LCD durante un largo
periodo de tiempo.
Seleccione “OFF” para desactivar la función.
Ultima Memoria
ON: Activar la función
OFF: Desactivar la función
Logotipo
Pre ajustado: Seleccione este ítem para ajusta el logo tipo pre
ajustado como logo de apertura
Capturado: Si ha capturado una imagen presionando el botón
CAP, seleccione este ítem para elegir la imagen como logo de
apertura.
Letras MP3
ON: Muestra las letras MP3 (Debe agregar el archivo de letras
MP3 al directorio de archivos MP3)
OFF: No muestra las letras MP3
P-14
CONFIGURACIÓN DE AUDIO
Downmix: Ajuste la salida del canal de audio como LT/RT ó
estéreo.
CONFIGURACIÓN DE VIDEO
Ajuste la calidad de imagen de la pantalla.
Opciones: Brillo, Contraste, Tono y Saturación
Para todos los ajustes el valor pre ajustado es 00.
En modo TV: En este modo, ingrese a esta opción para ajustar
el sistema de sonido e iniciar la búsqueda automática de
canales.
PREFERENCIAS
Tipo de TV
Ingrese a esta opción para seleccionar el tipo de TV (PAL,
NTSC)
El modo pre ajustado es PAL.
Audio
Ingrese a esta opción para seleccionar el idioma de audio
preferido para DVD. El idioma pre ajustado es Español.
Nota:
• El idioma de audio depende del material de cada disco.
• Puede cambiar el idioma de audio durante la reproducción
presionando el botón de Audio
Subtítulos
Elija el idioma de subtítulos preferido para mostrar en la
pantalla.
Nota:
• El idioma de subtítulos depende del material de cada
disco.
• Puede cambiar el idioma de subtítulos
durante la
reproducción presionando el botón Subtítulos.
P-15
Menú del Disco
Esta opción le permite elegir el idioma del menú guardado en
el disco
Control Parental
Los discos de DVD con la función de control parental son
clasificados de acuerdo a su contenido. El contenido
autorizado por el nivel de bloqueo parental y la manera en
que un disco puede ser controlado puede variar de disco a
disco. Si el disco lo permite, puede editar escenas violentes o
reemplazarlas o bloquear la reproducción del disco completo.
Presione los botones numéricos en el control remoto, ingrese
la contraseña y presione el botón OK para regresar al menú
anterior.
La opción pre ajustada es Adulto.
Contraseña
Ingrese a esta opción para ajustar la contraseña (Cuatro
números). Todas las características de control parental están
protegidas con una contraseña.
La contraseña pre ajustada es 0000.
Usted puede cambiar la contraseña.
Restablecer
Seleccione esta opción y presione el botón OK para
restablecer todos los ajustes a los valores iniciales de fabrica.
FUNCIÓN ATV
Presione el botón Modo para cambiar a modo ATV, asegúrese de conectar la antena correctamente. Si
no hay base de datos (Resultado de la búsqueda) en el dispositivo portátil, presione el botón Buscar
para explorar automáticamente. La siguiente operación le ayudara a recibir y ver los programas de TV.
Buscar
Presione el botón para que la unidad empiece a buscar
canales automáticamente. El proceso puede tardar algunos
minutos.
Use los botones de navegación de Derecha e Izquierda para
seleccionar los canales que desea ver.
P-16
USO DE LA BATERÍA RECARGABLE
La unidad utiliza una batería recargable de Li-polímero de larga vida. La batería no tiene efecto
memoria y por lo tanto se pueden recargar de forma segura independientemente de si la batería está
completamente o parcialmente descargada. Es suficiente recargarla no más de 3 horas cada vez. La
batería completamente cargada puede durar aproximadamente 2 horas.
Precauciones!
La batería solo debe ser recargada cuando la unidad este apagada. El indicador rojo se encenderá
indicando que la batería esta siendo cargada, cuando la luz indicadora cambie a amarillo la unidad ha
sido completamente cargada.
MANTENIMIENTO DE LA BATERÍA RECARGABLE
•
•
•
•
La temperatura de operación normal debe ser de: 0ºC-40ºC
Desconecte la unidad del tomacorriente cuando esta no este siendo usada.
La unidad puede calentarse un poco durante la reproducción, esto en normal. Evite reproducir por
largo tiempo y dejar la unidad desatendida.
Evite golpear la unidad con cualquier objeto. Así mismo, ubique la unidad en un lugar alejado de
fuentes de calor o zonas húmedas.
Precaución!
Hay peligro de explosión si la batería es puesta de manera incorrecta. Reemplácela solo con el mismo
tipo o equivalente.
ESPECIFICACIONES
Compatible con:
Formatos de archivos soportados:
Sistema de Señal:
Dimensiones de panel:
Respuesta de frecuencia:
Salida de Video:
Salida de Audio:
Audio S/N:
Rango Dinámico:
Capacidad de Memoria Máx.:
Laser:
Fuente de potencia:
Potencia de Salida RMS:
Temperatura de Operación:
Peso:
Dimensiones:
Tipo de Batería:
DVD, DVD-R ,DVD+R, DVD-RW, DVD+RW, VCD2.0, SVCD,
CD, CD-R, CD+RW
AVI / MPG / MP3 / JPG
PAL/NTSC
9”
20Hz a 20KHz
1Vp-p / 75Ohm, Desequilibrado
1.4Vrms / 10kOhm
Mejor que 80dB
Mejor que 85dB
USB/SD/MMC: 8G
Laser semiconductor, longitud de onda: 650nm / 795 nm
AC100-240V 60/50Hz, DC 9-12V
<9V
0-40ºC
0.89Kg
242 x 172 x 42mm (WxDxH)
Li-Polímero
P-17
SOLUCIÓN DE PROBLEMAS
Problema
Posible causa y solución
• Asegúrese que la unidad esta conectada correctamente
No suena o el sonido esta
• Asegúrese que todos los cables están conectados en los conectores
distorsionado
correspondientes
• No se puede avanzar a través de los créditos de apertura y la
No se puede avanzar a
información de alerta que aparece al principio de las películas,
través de una película
porque el disco está programado para prohibir esa acción.
La acción no puede ser completada debido a:
• El software del disco no lo permite
El icono “ ” aparece en la
• El software del disco no soporta la característica (Ejem: Angulos)
pantalla
• La característica no esta disponible en este momento.
• Ha ingresado un titulo o capitulo que esta fuera de rango.
• El disco puede estar dañado, intente con otro disco.
La imagen esta distorsionada • Es normal que alguna distorsión aparezca durante el proceso de
adelantamiento o retroceso
• Algunos discos tienen secciones que prohíben explorar rápidamente
o saltar un capítulo; Si intenta saltar a través de la información de
No se puede adelantar o
alerta y créditos al comienzo de una película, no le será permitido
retroceder
hacerlo. Esta parte de la película está programada a menudo para
prohibir saltar a través de ella.
Notas:
• La calidad y velocidad de lectura de imágenes JPEG depende de la resolución y el rango de
compresión de las imágenes.
• Algunas imágenes JPEG pueden no ser reproducidas debido a la calidad del disco y los formatos.
• Algunos discos de DVD+R/RW,DVD-R/RW,CD-R/RW pueden no ser reproducidos debido a la
calidad en el proceso de quemado.
P-18
INSTRUCTION MANUAL
PORTABLE DVD PLAYER WIH 9'SWIVEL LCD TV
SX-4737TVD
DEAR CUSTOMER
In order to achieve the best performance of your product, please
read this instruction manual carefully before using, and keep it for
future reference.
If you need extra support, please write to
[email protected]
Safety Precaution
Table Of Contents
Safety Precaution
1
Package
2
Main Features
2
Main Unit Controls
3
System Connection
4
The Remote Control
7
Basic operation
9
System Setup
14
Specification
18
Troubleshooting
19
Thank you for choosing our portable DVD player.The unit applies the latest state of art
electronics and is designed for use at home,in hotels and in offices etc for relaxation.
The compact size makes carrying easier as well as installation.Please read the manual
carefully prior to use and keep it well for future reference.
RISK OF ELECTRIC SHOCK,
DO NOT OPEN
Caution: To reduce the risk of electric shock do
not open this device, there are not serviceable
parts for customers. Please refer any
maintenance or repair to qualified personnel.
This sign means the existence of
dangerous voltage at the inside of the unit,
which states a risk of electric shock.
This sign means that there are important
instructions of operation and handling in the
manual that comes with this device.
PREMIER CUSTOMER SERVICE
Venezuela:
0800 ELECTRIC (353-2874)
Panama:
300-5185
Website
www.premiermundo.com
E-mail:
[email protected]
NOTE
This unit may be submitted to changes in specifications, characteristics and/or
operation without prior notice to the user, in order to continue improving and developing
its technology.
1
Safety Precaution
Table Of Contents
Safety Precaution
1
Package
2
Main Features
2
Main Unit Controls
3
System Connection
4
The Remote Control
7
Basic operation
9
System Setup
14
Specification
18
Troubleshooting
19
Thank you for choosing our portable DVD player.The unit applies the latest state of art
electronics and is designed for use at home,in hotels and in offices etc for relaxation.
The compact size makes carrying easier as well as installation.Please read the manual
carefully prior to use and keep it well for future reference.
RISK OF ELECTRIC SHOCK,
DO NOT OPEN
Caution: To reduce the risk of electric shock do
not open this device, there are not serviceable
parts for customers. Please refer any
maintenance or repair to qualified personnel.
This sign means the existence of
dangerous voltage at the inside of the unit,
which states a risk of electric shock.
This sign means that there are important
instructions of operation and handling in the
manual that comes with this device.
PREMIER CUSTOMER SERVICE
Venezuela:
0800 ELECTRIC (353-2874)
Panama:
300-5185
Website
www.premiermundo.com
E-mail:
[email protected]
NOTE
This unit may be submitted to changes in specifications, characteristics and/or
operation without prior notice to the user, in order to continue improving and developing
its technology.
1
Package
Main Unit Controls
Audio/Video Cable
1
AC/DC Power Adapter
1
Cigarette Lighter Adapter
1
User Manual
1
Earphone
1
Antenna
1
Carry pouch
1
DIN F Type pluy
1
20
1
SETUP
Compatible with disc of DVD,VCD,MP3,MPEG4,CD,JPEG,etc
2
3
4
56
7
8
11
12
13
14
15
Support TV/AV IN
9
16
MENU
MODE
Main Features
USB/CARD
High brightness color 9” LCD screen
Built-in stereo speaker
DC IN 9-12V
1
OFF/ON
Remote Control with battery
AV OUT
1
AV IN
DVD Player
17
Built-in rechargeable Lithium polymer battery
10
Support PAL or NTSC system
Support Multi-language OSD,speed forward/backward, repeat function
Zoom in/out function
Charging /IR
Swivelling LCD screen
You can swivel the LCD screen of this player clockwise a maximum of 180° for use.
21
19 18
1.SETUP BUTTON
2.MENU BUTTON
3.MODE BUTTON
4.USB/CARD BUTTON
5.PLAY/PAUSE BUTTON
6.STOP BUTTON
7.
BUTTON
8. OK BUTTON
9.
BUTTON
10. OPEN knob
11. DC IN 9-12V
2
12. POWER ON/OFF SWITCH
13. AV OUT
14 .AV IN
15. Earphone jack
16. SD/MMC Card slot
17. USB port
18. ANT
19. GAME
20.Rating label position
21.Charging/IR
3
System Connection
Connecting to TV
You can also connect the unit to a TV to enjoy high quality picture and stereo sound.
Please refer to the following illustration:
Powering and installation
Plug one end of the AC/DC power adaptor into the DC IN 9-12V jack on the right of the
main unit, then plug the other end into the AC power receptacle.Please refer to the
following illustration.
AV IN
AV OUT
OFF/ON
DC IN 9-12V
AV CABLE
AV IN
AV OUT
OFF/ON
DC IN 9-12V
(Not Supplied)
AUDIO IN
VIDEO IN
If using car cigarette lighter adaptor to connect to the power:
Plug one end of the cigarette lighter adaptor into the DC IN 9-12V jack on the unit, plug
the other end into the car cigarette lighter socket.See illustration below.
TV
AV IN
AV OUT
OFF/ON
DC IN 9-12V
Please use AV cable to connect the machine and the TV.Make sure it is connected
correctly.
Note:
1.Car cigarette lighter adaptor is not recommended to recharge the battery.
2.Car cigarette light adaptor can only be used when the car power supply is 9-12V.
3.The mains plug is used as the disconnect device, the disconnect device should remain
readily operable.
4
5
Connecting with external Speaker
The Remote Control
The unit can be connected with external speaker. Please see the following illustration.
1
2
OSD
LCD
MUTE
REPEAT
AV IN
AV OUT
OFF/ON
DC IN 9-12V
A-B
15
ANGLE
16
TITLE
MENU
ZOOM
VOL+
17
18
19
20
21
3
AV CABLE
Not supplied
VIDEO IN
AUDIO IN
AMPLIFIER
4
5
6
7
8
SETUP
VOL-
ENTER
22
23
24
SUBTITLE
AUDIO
9
TV
10
MODE
SEARCH
STOP
CAP
11
Center speaker
25
26
1. LCD(Ture on/off LCD panel back light)
2. USB/CARD(Switch between DVD/USB/
CARD)
3. Number button
4. SETUP(To go to or exit setup menu)
5. UP/DOWN button
6. LEFT/RIGHT button
7. Enter(To confirm)
8. AUDIO(To select audio language)
9. Fast forward/backward button (To scan
forward/backward at 2, 4, 8,16, or 32 times)
10. MODE(Switch between DVD/AVIN/TV
MODE)
11. SEARCH(To start auto search TV program
when in TV mode:Not available in DVD mode)
12. MUTE(To turn to mute)
13. OSD(To display disc information during playing such as elapsed and remaining time)
Right front speaker
Left front speaker
12
13
14
14. Repeat(To repeat playing title,chapter or track)
15. A-B (Rep eat a s peci fic p orti on fr om po int Ato B, press it again to cancel repeat playing)
16. Angle(To change viewing angle when playing disc with multi-angle)
17. Menu(To enter or exit menu root:When play disc with PBC,press this button to
enter PBC menu,press again to exit)
18. TITLE(To display title information)
19. VOL +(To adjust the volume)
SUBWOOFER
20. ZOOM(To zoom in/out the image during the playback)
21. VOL-(To adjust the volume)
22. Play/pause
23. Subtitle(To select subtitle language when playing DVD disc)
24. Previous/Next button(To go to previous/next chapter or scene during playing)
Right rear speaker
Left rear speaker
Notice:There is no 5.1 channel in the unit,however,after connecting to APM it is available
to output audio in 5.1 channel.
6
25. CAP(To capture a image when in playing video or pictrue,and then you can set this
image as your opening logo in setup menu)
26. Stop(press once to stop playback, then press
to resume playback from the
point where you stopped;press stop button twice to stop playback completely)
7
Basic Operation
The Use of Remote Control
Please put the battery into the remote control as per below illustration.
1
Playing disc of DVD,MPEG4,SVCD,VCD,CD,MP3,
DVD
MPEG4
VCD
SVCD
CD
MP3
1.Connect the unit to the power.
2
2.Open the unit and adjust the monitor to the best position for viewing.
CR2025
CR2025
When using remote control,make sure the infrared window is pointed to infrared receiving
window of the machine.The distance between machine and remote control must be within
3 metres.Please refer to the following illustration.
3.Turn on the unit by sliding the ON/OFF switch to ON.
4.Open the disc door by pressing OPEN button and insert a disc into the door with the
label side facing up.
5.Close the disc door. The unit will load the disc and start playing.
6.Press “STOP” once to stop playback; then press“ ”to resume playback from the point
where you stopped; press “STOP” twice to stop playback completely.
7.when the playing is finished, please turn off the power by sliding ON/OFF switch to OFF.
SETUP
MENU
MODE
Note:Please do not disconnect USB devices or plug out SD/MMC cards while they are
working with the unit.Functional failure may occur in case of wrong operations.
USB/CARD
Pause during playback
DVD
MPEG4
SVCD
VCD
CD
MP3
0
30
30 0
OSD
LCD
OSD
LCD
MUTE
REPEAT
During playback,press“
to resume playback.
” to pause;press it again
A-B
ANGLE
TITLE
MENU
ZOOM
VOL+
MUTE
SETUP
REPEAT
A-B
ANGLE
SETUP
TITLE
MENU
ZOOM
VOL+
MODE
SUBTITLE
SEARCH
Note
Play/pause
SUBTITLE
VOL-
ENTER
AUDIO
VOL-
ENTER
AUDIO
STOP
CAP
Notice
When at PAUSE,STOP,or no disc,in about 3 minutes
the unit will be protected; press any button to exit.
MODE
SEARCH
STOP
CAP
Play DVD disc with title or chapter menu
1. To avoid falling off or place near damp environment.
2. To avoid infrared receiving window of the unit being under direct sunlight.
3. Please use a new battery to replace old one if the remote control doesn't work.
For some DVD disc with Title or chapter menu,
press MENU button to enter menu page,and
use direction button to select,Press ENTER
to confirm.
Cursor button
ENTER
9
MUTE
REPEAT
A-B
ANGLE
SETUP
TITLE
MENU
ZOOM
VOL+
VOL-
ENTER
SUBTITLE
AUDIO
MODE
8
OSD
LCD
SEARCH
STOP
CAP
Title
Menu
Repeat playing of favorite scene
Fast forward and fast backward
MPEG4
DVD
SVCD
VCD
CD
DVD
When playing disc of DVD, MPEG4,SVCD, VCD, CD, the unit can search forward or
backward.
1. Press“ ”,the unit will search forward.Press it repeatedly,the unit will play at 2,4,
8,16,32 times of speed.
2X
4X
MPEG4
SVCD
VCD
CD
MP3
When playing disc of DVD,MPEG4,SVCD,VCD,CD,MP3,user can repeatedly
play a specific section.
During playback,press“ A-B ” button at a point A,then
A
press this button again in point B,the unit will
automatically repeat playing the part between A-B.
AB
OSD
LCD
32X
16X
8X
MUTE
REPEAT
Press it the third time,the unit will return to normal playback.
A-B
ANGLE
2. Press“ ”,the unit will search backward.
Press it repeatedly,the unit will play at
2,4,8,16,32 times of speed.
SETUP
MENU
ZOOM
VOL+
VOL-
ENTER
OSD
LCD
SUBTITLE
AUDIO
MODE
2X
TITLE
SEARCH
STOP
CAP
Search forward
Search backward
A-B
ANGLE
4X
SETUP
TITLE
MENU
ZOOM
VOL+
16X
8X
MODE
SUBTITLE
MPEG4
SEARCH
STOP
CAP
Select angle
DVD
Repeat playing
DVD
A-B
Angle
VOL-
ENTER
AUDIO
32X
MUTE
REPEAT
Number
SVCD
VCD
CD
During playing DVD disc with multi-angle,press
“Angle”button,the followings will be displayed
on screen.
MP3
When playing disc of DVD,MPEG4,SVCD,VCD,CD,MP3,user can repeat playing one
chapter,title or all the whole disc.
For DVD disc,press “ repeat ” button to repeat playing one Chapter,press it again to repeat
playing Title;press it third time to repeat playing the whole disc ;Press it again to cancel
repeat function.
Chapter
Title
All
1 /4
Press number buttons to select the angle you desire
To return to normal playing,please press “Angle”
the unit will play the disc in the default angle.
Repeat off
2 /4
3 /4
For CD/VCD disc,press “ repeat ” button repeatedly to repeat the track and the whole disc.
Note
Track
Repeat off
All
4 /4
The function is available only for discs with
multi-angle.
For Mp3 disc,press“ repeat ”button to repeat playing current file;press it again to repeat
playing the folder;press it third time to cancel repeat function.
Repeat off
Repeat one
Repeat folder
10
11
CD RIPPING
Zoom in/ out
MPEG4
DVD
SVCD
During playing the CD/HDCD disc,you can enter CD Ripping function.By pressing
subtitle button,DVD player will be able to change the CD format into MP3 format,
and then store it in the USB or SD card.
VCD
When playing disc of DVD,MPEG4,SVCD,VCD,user can zoom in or zoom out the image .
During playback,press“Zoom”button,the image will be
enlarged;press it again the image will be enlarged again;
press it fourth time,the image will zoom out,press it
repeatedly and the image will return to normal status.
OSD
LCD
2X
MUTE
3X
REPEAT
CD RIP
Options
Track
Speed
Normal
Track 01
03:36
Bitrate
128kbps
Track 02
03:36
Track 03
03:36
Track 04
03:36
Track 05
03:36
Track 06
03:36
Track 07
03:36
A-B
Create Id3
Yes
Device
USB 1
ANGLE
TITLE
SETUP
ZOOM
VOL+
Zoom in/out
4X
Selected Track
Selected Time
SUBTITLE
AUDIO
SEARCH
SUMMARY
VOL-
ENTER
MODE
MENU
STOP
1 /2X
CAP
When the image is enlarged,user can
press“
”to move the image.
Start
0
00:00
Exit
All
None
1 /3X
1 /4X
Playing JPEG file in data disc
1. Place a JPEG disc into the tray, the unit will start reading and play.
2. When viewing JPEG file,press “STOP”,pictures will be displayed in thumbnail mode,
press “
” or “ OK ” button to select one picture to view.
3. Press “
” and “ OK ” button to select a JPEG file from the menu.
4. To rotate the picture counter-clockwise,press“ ” ;Press “ ” to rotate the picture
clockwise.
5. Press“ ” to reverse the picture horizontally and press “ ” to reverse the picture
vertically.
Speed: In this item, you can set the rip speed: Normal or Fast.
Bitrate: In this item, you can set the bitrate. It has 6 choices,128Kbps,192Kbps,256Kbps,
320Kbps,96Kbps and 112Kbps.
Create ID3:In this item, you can create ID3 when playing CD text.
Device: This item indicates whether USB or SD CARD is connected with DVD player.
Exit: Exit to the previous menu.
All: Select all the files in the disc for convertion and storage.
None: Cancel the selection .
Start: Move the cursor to the item and press “ENTER” button, the convertion begins.
During the converting,you can select “CANCEL” to stop it.
CD RIP
Ripping
Selected track
Track Progress
Track 01
Playing MP3 files in data disc
Total Progress
00 36 03 43
Dir 001
Place MP3 disc into the disc door.Press
“
” or “OK”button to choose a MP3 file;
Press“ ”or“OK”button to play the file
selected.
Cancel
\Ctyy\
SUMMARY
......
Mp3
Mp3
Mp3
Mp3
Mp3
12
TRACK01
TRACK02
TRACK03
TRACK04
TRACK05
Now ripping
Track
01/01
13
9%
System Setup
General
Audio
General
Video
Prefer
- - General Setup Page - TV Display
OSD Lang
Screen Saver
Last Memory
Logo Type
Mp3 Lyric
Audio
Video
Prefer
- - General Setup Page - -
WIDE
ENG
On
Off
DEF
On
Press”Setup”button,the main menu will be displayed on the
screen
In the General Setup Page, Press
button to highlight this
item.
Press OK button to access.
Press
button to select the setting.
Press OK button to confirm your selection.
Press button to exit.
TV Display
OSD Lang
Screen Saver
Last Memory
Logo Type
Mp3 Lyric
WIDE
ENG
On
Off
DEF
On
On
Off
Set Screen Saver
General
Audio
Video
Screen Saver
Select On to activate the screen saver function,
when you activate this function,a moving DVD symbol
appears on the screen when the unit is stopped or
when it shows a still picture for several minutes.This
features saves the screen from the being damaged by
a static image remaining on the LCD screen for long
periods of time.
Select Off to cancel this function.
Prefer
- - General Setup Page - -
Go to General Setup Page
TV Display
OSD Lang
Screen Saver
Last Memory
Logo Type
Mp3 Lyric
General setup page
WIDE
ENG
On
Off
DEF
On
Last Memory
On:Turn on last memory function
Off:Turn off last memory function
On
Off
Set Last Memory State
Audio
General
Video
Prefer
- - General Setup Page - TV Display
OSD Lang
Screen Saver
Last Memory
Logo Type
Mp3 Lyric
WIDE
ENG
On
Off
DEF
On
Normal/PS
Normal/LB
Wide
Set TV Display Mode
TV display:
Enter this option,user can set screen display format
(Nomal/PS,Nomal/LB,Wide)
The default is “Wide”
Note
The function depends on the display ratio with which the
DVD disc is recorded.
Please choose “Wide(16:9)”when using a16:9 wide screen
TV set16:9.
General
Audio
Video
Prefer
- - General Setup Page - TV Display
OSD Lang
Screen Saver
Last Memory
Logo Type
Mp3 Lyric
Logo Type:
Default:Set that default logo as opening logo
Captured:If you have captured a image by press CAP key,
select this item to set that image as your opening logo.
WIDE
ENG
On
Off
DEF
On
Default
Captured
Set Logo Type
General
Audio
Video
TV Display
OSD Lang
Screen Saver
Last Memory
Logo Type
Mp3 Lyric
WIDE
ENG
On
Off
DEF
On
General
Prefer
- - General Setup Page - English
Spanish
Porturguese
OSD Language:
In the option user can set OSD menu language(English,
French,German,Italian).
The default:English
Set OSD Language
Audio
Video
Prefer
MP3 Lyric
On Show mp3 lyric(you must add the mp3 lyric file to the
mp3 file directory)
Off:Don't show mp3 lyric
- - General Setup Page - TV Display
OSD Lang
Screen Saver
Last Memory
Logo Type
Mp3 Lyric
WIDE
ENG
On
Off
DEF
On
On
Off
Set Mp3 Lyric Mode
Audio Setup Page
General
Audio
Video
Prefer
Downmix:Set audio CH output as LT/RT or stereo.
- - Audio Setup Page - Downmix STR
Go to Speaker setup Page
14
15
Video setup page
General
Audio
Video
Parental:
DVD discs equipped with the child lock function are rated
according to their content. The content authorized by a
parental lock level and the way a disc can be controlled
may vary from disc to disc. If the disc allows, you can edit
out violent scenes and replace them or lock out playback
of the disc altogether.
press the number button on the remote control to enter the
password and press the OK button to return to the previous
menu.
The default is ADULT.
Prefer
- - Preference Page - -
General
Audio
Video
PAL
FRE
TV Type
Audio
Subtitle
Disc Menu
Parental
Password
Default
Prefer
- - Video Setup Page - -
Enter this option,user can adjust picture quality of unit
screen.There are items available to be adjusted:
Brightness,contrast,Hue and Saturation.
For all these items the default is 00.
TV:
When in TV mode,enter this option to set the TV sound
system and start auto search TV program.
Panel Quality
TV
1
2
3
4
5
6
7
8
ENG
KID SAF
G
PG
PG 13
PGR
R
NC17
ADULT
Set Parental Control
Go to Video Setup Page
General
Audio
Video
Prefer
Enter this option, you can set a password(four numbers).
All parental Control features are password protected.
This function allow you to change the password.
The default password is 0000.
- - Preference Page - -
Preference page
General
Audio
Video
PAL
FRE
TV Type
Audio
Subtitle
Disc Menu
Parental
Password
Default
Prefer
ENG
Change
- - Preference Page - PAL
ENG
TV Type
Audio
Subtitle
Disc Menu
Parental
Password
Default
Change Password
PAL
NTSC
TV Type:
Enter this option to select TV type(PAL,NTSC)
The default is PAL.
ENG
General
TV Type
Audio
Subtitle
Disc Menu
Parental
Password
Default
Set TV Standard
General
Audio
Video
Prefer
- - Preference Page - TV Type
Audio
Subtitle
Disc Menu
Parental
Password
Default
PAL
ENG
Audio:
Enter this option,user can select your preferred audio
language for DVDs,The default is Spanish.
Note
The audio language depend on the material on each disc.
User can also change the audio language during playback
by pressing the Audio button.
English
French
Spanish
Chinese
Japanese
Korean
Russian
Thai
ENG
Preferred Audio La nguage
General
Audio
Video
Prefer
- - Preference Page - TV Type
Audio
Subtitle
Disc Menu
Parental
Password
Default
PAL
FRE
Spanish
Chinese
Japanese
Korean
Russian
Thai
Off
Others
CHI
Audio
Subtitle
Select your preferred language to show the subtitles
on the screen.The subtitle languages depend on the
information available on each disc,You can also change the
subtitle language during playback by press the SUBTITLE
button.
Video
Prefer
- - Preference Page - -
Default:
Select this item and press OK button to reset
all settings to the original factory settings.
PAL
FRE
ENG
Reset
Load Factory Setting
ATV Function
Press the MODE button to switch to ATV mode,ensure to connect antenna properly. If
there is no database(search result)in the portable device, please press SEARCH key
to auto scan.Operation as follow will help you receive and watch the TV programs.
SEARCH:
Preferred Subtitle Language
General
Audio
Video
- - Preference Page - TV Type
Audio
Subtitle
Disc Menu
Parental
Password
Default
PAL
FRE
ENG
English
French
Spanish
Chinese
Japanese
Korean
Russian
Thai
Prefer
Disc Menu
This function allows you to choose the menu language
stored on the disc.
255.25
0
VHF
SEARCH: Automatic Channel Scan,pressing the button,the player will automatically
start channel scan to find out available broadcasting channels in the area.It will cost
several minutes to finish the search process.
Preferred Menu Language
/
16
: use /
key to select the channel that you want to watch.
17
Troubleshooting
Specification
Compatatible Disc: DVD, DVD-R ,DVD+R, DVD-RW, DVD+RW, VCD2.0, SVCD, CD,
CD-R, CD+RW
File format to support: AVI/MPG/MP3/JPG
Signal system:PAL/NTSC
Panel size:9 inch
Frequency response:20 Hz to 20 kHz
Video output:1 Vp-p/ 75 Ohm, unbalanced
Audio output:1.4Vrms/10kOhm
Audio S/N:Better than 80 dB
Dynamic range:Better than 85 dB
The Max memory size of USB/SD/MMC card can be supported: 8 G
Laser:Semiconductor Laser, Wave Length: 650 nm /795 nm
Power source: AC 100-240V 60/50 HZ, DC 9-12V
RMS output power: < 9 W
Operating temperature:0~40°C
Weight:0.89kg
Dimensions (W x D x H):242 x 172 x42mm
Battery Type:Li Polymer
Note:
1.The quality and speed for reading JPEG photos depend on the resolution and
compression ratio of the photos.Some JPEG photo may not be played due to the disc
quality and the formats.
2.Some DVD+R/RW,DVD-R/RW,CD-R/RW disc may not be played due to the quality on
burning conditions.
Rechargeable battery use
The unit utilizes long-life Li polymer battery for portable power supply.The battery has
no Memory Effect and thus can be recharged safely regardless of whether the battery is
fully or partially discharged.It is enough to recharge no longer than 3H each time.fully
recharged battery can last about 2 hours.
Precautions related to Battery Recharge
The battery can be only recharged when turning power to OFF state,and keep continuous
power supply,the red light will be on,and the light will turn yellow when it is fully charged.
PROBLEM
SOLUTION
No sound or
distorted sound
Make sure the machine is connected properly.
Make sure all cables are securely inserted into
the appropriate jacks.
Can't advance
through a movie
You can't advance through the opening credits
and warning information that appears at the
beginning of movies because the disc is
programmed to prohibit that action.
The icon
appears on
screen
The feature or action cannot be completed at
this time because:
1.The disc's software restricts it.
2.The disc's software doesn't support the
feature (e.g., angles)
3.The feature is not available at the moment.
4.You've requested a title or chapter number
that is out of range.
Picture is distorted
The disc might be damaged.Try another disc;
it is normal for some distortion to appear during
forward or reverse scan.
No forward or
reverse scan
Some discs have sections that prohibit rapid
scanning or chapter skip;If you try to skip
through the warning information and credits
at the beginning of a movie,you won't be able
to.This part of the movie is often programmed
to prohibit skipping through it.
Owing to continuous improvement,no prior notice will be given regarding changes on
above feature and spec.
Using and Maintaining Rechargeable Battery
1.
2.
3.
4.
The normal working temperature is: 0 °C ~40 °C ;
Always unplug AC/DC power supply for the unit when not in use;
Heat will create during playing,it's normal,while avoid long time playing and unattended;
Avoid having the unit collide with any objects, and place away from all possible heat
sources or damp areas.
Caution:Danger of explosion if battery is incorrectly replaced. Replace only with the
same or equivalent type.
18
19