1
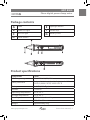
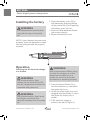
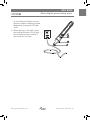
www.grupotemper.com
KDT 8900
Detector de tensión CA
AC Voltage detector
KDT 8900
Detector de tensión
Índice
Símbolos de seguridad
3
Precauciones
3
Garantía
3
Contenido del paquete
4
Especificaciones
4
Instalación de las baterías
5
Funcionamiento
5
Manual de instrucciones | 2
www.grupotemper.com
KDT 8900
Detector de tensión
Símbolos de seguridad
Indicación de información
de seguridad importante
Producto con doble
aislamiento (Protectción
Clase II)
Producto diseñado de
acuerdo con la normativa
ULSTD 61010-1,61010-031
Precauciones
Advertencia
Sea extremadamente cuidadoso a
la hora de utilizar este dispositivo.
Un uso indebido del aparato
podría causar daños graves
o incluso provocar la muerte.
Además de las normas de
seguridad usuales a la hora de
trabajar con circuitos eléctricos,
siga todas las contenidas en este
manual. No intente utilizar este
dispositivo si no se encuentra
cualificado para ello.
Precaución
Antes de utilizar este instrumento,
lea y asegúrese de entender
y seguir todas las normas de
seguridad y las instrucciones de
uso contenidas en este manual.
Si el aparato no es utilizado en
la forma correcta especificada
por el fabricante, puede que
la protección se vea dañada.
Antes de realizar mediciones
de tensiones peligrosas, mida
primero una tensión conocida
para determinar el correcto
funcionamiento del equipo.
Garantía
12 meses desde la fecha de compra;
este artículo está garantizado contra
cualquier defecto en el material o en
la fabricación. Si detecta algún fallo,
contacte por favor con el servicio
técnico.
Consejos para realizar auto
pruebas: antes de utilizar este
producto, pulse el botón de
encendido para realizar una auto
prueba. Si el detector funciona
correctamente, la luz LED emitirá
un flash, si no lo hiciera significaría
que el detector no funciona
adecuadamente.
www.grupotemper.com
Manual de instrucciones | 3
KDT 8900
Detector de tensión
Contenido del paquete
A
B
C
D
Sonda
LED verde
LED roja
E
F
G
Botón de luz de linterna
Enganche (clip) para bolsillo
Tapa de la batería
Botón de encendido
Especificaciones
Componente
Especificación
Escala de tensión CA
50V-1000V CA, 50/60Hz
Estándares de Seguridad
Diseñado según la normativa
internacional de seguridad UL 610101/600 CAT III, 1000 CAT II
Batería
2 x 1.5V (Tipo AAA)
Altitud
< 2000 m
Temperatura de funcionamiento
-10 a 50 ºC
Temperatura de almacenaje
-20 a 60 ºC
Humedad
< 85% de humedad relativa
Dimensiones
157 x 24 x 20 mm
Peso
42g aproximadamente
Manual de instrucciones | 4
www.grupotemper.com
KDT 8900
Detector de tensión
Instalación de las
baterías
ADVERTENCIA
Realice siempre las mediciones
con el capuchón o cubierta de la
punta de la sonda.
NOTA: si su detector no funciona
correctamente, compruebe que las
pilas están en buen estado y que se
han colocado correctamente.
1. Abra la tapa de las pilas (G)
presionando a la vez el borde del
clip para enganchar al bolsillo (F)
y empujando hacia a fuera la tapa
de las pilas (G).
2. Encaje las dos pilas AAA en su
hueco y asegúrese de colocarlas
con la polaridad correcta.
3. Ponga de nuevo la tapa. (G)
Funcionamiento
Comprobación de la tensión
eléctrica CA en un enchufe
ADVERTENCIA
Riesgo de descarga eléctrica. Los
circuitos de alta tensión, ya sean
de corriente CA o CC, son muy
peligrosos y deben ser medidos
cuidadosamente.
ADVERTENCIA
Riesgo de descarga eléctrica.
Mantenga siempre las manos y los
dedos en el cuerpo del detector y
no toque la punta de la sonda.
www.grupotemper.com
ADVERTENCIA
Riesgo de descarga eléctrica.
Pruebe siempre su detector
en un circuito vivo conocido
para verificar su correcto
funcionamiento antes de realizar
la prueba de tensión de un
enchufe.
1. Pulse el botón (D) para encender
el detector; mientras esté
encendido la luz LED verde
brillará.
2. Haga contacto con la punta de la
Manual de instrucciones | 5
KDT 8900
Detector de tensión
sonda(A) y un cable conectado a
un enchufe, o inserte la punta de
la sonda (A) directamente en el
enchufe.
3. Si existe tensión CA, la luz
LED roja(C) del detector
emitirá flashes y sonarán bips
intermitentes. Durante este
proceso, la luz LED verde estará
apagada.
4. Cuando realice pruebas en la
oscuridad, para una mayor
seguridad, pulse el botón de luz
de linterna (D) para iluminar el
lugar.
Manual de instrucciones | 6
www.grupotemper.com
KDT 8900
Phase digital power clamp meter
Contents
Safety symbols
9
Precautions
9
Warranty
9
Package contents
10
Product specifications
10
Installing the battery
11
Operation
11
www.grupotemper.com
Instructions manual | 7
KDT 8900
Phase digital power clamp meter
Safety symbols
Indicates important safety
information.
This product is insulated
at double insulation
(Protection Class II)
This product conforms to
ULSTD 61010-1, 61010-031
Precautions
WARNING
Self test tips: Before using this
product, press the power button to
perform a self test. If the detector is
working properly, the LED light will
flash. If the LED does not flash, the
detector is not working properly.
Warranty
12 months.
For one year form the date of
purchase, this product is warranted
against any defects in material or
workmanship. Contact the Customer
Service Team.
BE EXTREMELY CAREFUL IN THE
USE OF THIS DEVICE.
Improper use of this device can
result in injury or death. Follow
all safeguards suggested in
this manual in addition to the
normal safety precautions used in
working with electrical circuits. DO
NOT service this device if you are
not qualified to do so.
CAUTION
Read, understand, and follow
the safety rules and operating
instructions of this manual before
you use the product. Protection
provided by the instrument will
be impaired if used in a manner
not specified by the manufacturer.
Before measuring hazardous
voltages, first measure a voltage
which is known to determine if the
equipment operates correctly.
Instructions manual | 8
www.grupotemper.com
KDT 8900
Phase digital power clamp meter
Package contents
A
B
C
D
E
F
G
Probe
Green LED light
Red LED light
Spotlight button
Pocket clip
Battery cover
Power button
Product specifications
Component
Probe
AC Voltage range
50V-1000V AC, 50/60Hz
Safety standards
Designed to international safety standard UL
61010-1/600V CAT III, 1000V CAT II
Battery
2 x 1.5V (AAA Type)
Altitude
< 2000 m
Operating temperature
-10 to 50 ºC
Storage temperature
-20 to 60 ºC
Humidity
< 85% relative humidity
Dimensions
157 x 24 x 20 mm
Weight
Approximately 42g
www.grupotemper.com
Instructions manual | 9
KDT 8900
Phase digital power clamp meter
Installing the battery
WARNING
The measurement must be done
only with the cap on the probe
tip.
1. Open the battery cover (G) by
simultaneously pressing the top
of the pocket slip (F) and pushing
the battery cover (G) out.
2. Insert two AAA batteries (Ensure
the correct polarity).
3. Replace the battery cover.
NOTE: if your detector does not work
properly, check the batteries to make
sure are still good and are properly
inserted.
Operation
Checking the AC electrical voltage
in a shocket
WARNING
Risk of electrocution. Highvoltage circuits, both AC and DC,
are very dangerous and should be
measured with great care.
WARNING
Risk of electrocution. Keep hands
and fingers on body of the
detector and away from the probe
tip.
Instructions manual | 10
WARNING
Risk of electrocution. Before using
to check for voltage in a socket,
always test the detector on a
known live circuit to verify that
the detector is workeing properly.
1. Press the Power Button (D) to
turn the detector on, meanwhile
the green light is on.
2. Touch the probe tip(A) to a cord
plugged into the socket, or insert
the probe (A) directly into a
socket.
3. If AC electrical voltage is
present, the red LED light (C)
www.grupotemper.com
KDT 8900
Phase digital power clamp meter
on the detector flashes and the
detector makes a beeping sound.
Meanwhile, the green LED light
is off.
4. When testing in the dark, press
the spotlight button (D) to light
the test environment, which is
more safe for the user.
www.grupotemper.com
Instructions manual | 11
KDT 8900
Phase digital power clamp meter
Instructions manual | 12
www.grupotemper.com
KDT 8900
Phase digital power clamp meter
www.grupotemper.com
Instructions manual | 13
KDT 8900
Phase digital power clamp meter
Instructions manual | 14
www.grupotemper.com
GARANTÍA • WARRANTY
GARANTIE • GARANTIA
2
años
years
années
anos
TEMPER ENERGY INTERNATIONAL S.L.
garantiza este aparato por 2 años ante
todo defecto de fabricación. Para hacer
válida esta garantía, es imprescindible
presentar con este resguardo el ticket o
factura de compra.
TEMPER ENERGY INTERNATIONAL
S.L. garantit cet apareil pour le durée
de 2 annèes contre tout défault de
fabrication. Pour le service de garantie,
vous devez présenter ce reçu avec du
ticket de caisse ou la facture.
TEMPER ENERGY INTERNATIONAL S.L.
guarantees this device during 2 years
against any manufacturing defect. For
warranty service, you must present this
receipt with the purchase receipt or
invoice.
TEMPER ENERGY INTERNATIONAL S.L.
garantía este aparelho contra defeitos
de fábrica ate 2 anos. Para o serviço
de garantia, você deve apresentar este
recibo com o recibo de compra ou
fatura.
Ref. Art.
Nº serie / Serial number
Nombre / Name / Nom / Nombre
Fecha de venta / Date of purchase
Date de vente / Data de venda
Sello establecimiento vendedor / Dealer stamp
Cachet du commercant / Cambo da firma
TEMPER ENERGY INTERNATIONAL S.L.
Polígono industrial de Granda, nave 18
33199 • Granda - Siero • Asturias
Teléfono: 902 201 292
Fax:
902 201 303
Email:
[email protected]
Una empresa
del grupo