1
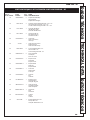
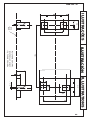
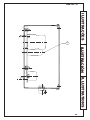
COD 22.01.0009-0
MANUAL DE INSTRUÇÕES
INSTRUCTION MANUAL
MANUAL DE INSTRUCCIONES
Torno Manual
Wood Lathe
Torno Manual
Mod.
TRI-40
MOD. TRI - 40
A2
A3
A3
A3
A3
A4
A4
A4
A4
A4
A4
A4
D
E
ENGLISH
PREZADO CLIENTE
CARGA E DESCARGA
LIGAÇÃO DA CORRENTE ELÉTRICA
LUBRIFICAÇÃO
ELEMENTOS DE COMANDO
REGULAGEM DO CABEÇOTE MÓVEL
REGULAGEM DA ESPERA
INSTRUÇÕES PARA OPERAR A PLACA TRASEIRA
INSTRUÇÕES PARA TROCAR AS PLACAS
INSTRUÇÕES PARA TROCA DE VELOCIDADE
EQUIPAMENTO ELÉTRICO COM PROTEÇÃO
IDENTIFICAÇÃO DA MÁQUINA E PEÇAS DE REPOSIÇÃO
ESPECIFICAÇÕES TÉCNICAS
ILUSTRAÇÕES
PORTUGUÊS
TABELA DE COMPONENTES
PREZADO CLIENTE
Aqui você encontrará as informações básicas referentes ao seu uso, manutenção e
conservação. Siga rigorosamente as instruções e obtenha da sua máquina INVICTA
VIGORELLI, um ótimo rendimento. Também recomendamos a leitura atenta de nosso
"Certificado de Garantia".
A2
ESPAÑOL
Queremos parabenizá-lo por ter escolhido um produto INVICTA VIGORELLI e agradecelo pela preferência. Podemos assegurar-lhe que temos máximo de interesse em mantêlo plenamente satisfeito. O objetivo deste manual é familiariza-lo com o funcionamento de
sua máquina e com os principais cuidados que devem ser tomados para que ela tenha
uma longa vida sem qualquer problema.
MOD. TRI - 40
CARGA E DESCARGA
No ato de carga e descarga a máquina não deve receber pressão em áreas que
possam afetar seu funcionamento. Na página E1 mostramos o procedimento
correto para essa operação.
B
A fundação deve ser preparada conforme esquema da página E3.
C
Remova o verniz de proteção das superfícies usinadas, usando querosene ou
outro solvente similar.
LIGAÇÃO DA CORRENTE ELÉTRICA
Quando motorizada, observar se a tensão da rede local corresponde exatamente à do
motor. Para controlar o sentido de rotação do eixo segue-se a seta indicativa conforme
demonstra o esquema da página E2. No caso do eixo apresentar rotação contrária à
indicada pela seta, deve-se inverter dois fios da rede elétrica sem, no entanto, alterar a
instalação interna da máquina. Na página E5 apresentamos o esquema elétrico para
motorização normal.
Sua máquina requer uma lubrificação periódica como segue: Os rolamentos do eixoárvore são blindados e não necessitam lubrificação. Os Pontos "A" devem ser lavados
com querosene e lubrificados com graxa comum, sempre que as condições de trabalho
exigirem.
ENGLISH
LUBRIFICAÇÃO - E2
PORTUGUÊS
A
ELEMENTOS DE COMANDO - E2
ESPAÑOL
1
2
3
4
6
7
12
Chave Elétrica
Manípulo do Freio
Alavanca da Trava da Espera Lateral
Alavanca de Trava do Suporte da Espera
Manípulo de Trava do Ponto Móvel
Volante do Cabeçote Móvel
Manípulo de Trava do Suporte da Espera
REGULAGEM DO CABEÇOTE MÓVEL - E2
A regulagem do cabeçote móvel pode ser efetuada de acordo com as seguintes
instruções:
Primeiramente , solte a porca nº 5 , e leve o cabeçote até o ponto desejado, tornando a
fixa-lo sobre o barramento, através da referida porca. A seguir, solte a trava nº 6 e gire o
volante nº 7 até obter a fixação da madeira entre os pontos. Feito isso, fixe o ponto
novamente
A3
MOD. TRI - 40
REGULAGEM DA ESPERA - E2
A regulagem do suporte da espera (ponto nº 8) sobre o barramento, é obtido atravéz da
porca nº 9. A regulagem vertical das esperas(nºs 10 e 11), pode ser executada por
intermédio do manípulo nº 12.
A placa lisa nº 13, tem como finalidade possibilitar o torneamento em peças de grandes
diâmetros. Para isso é necessário fixar a peça a ser torneada na placa. A espera nº 14,
possui regulagem vertical e horizontal, possibilitando a execução de diversos tipos de
trabalhos.
INSTRUÇÕES PARA TROCAR AS PLACAS - E2
PORTUGUÊS
INSTRUÇÕES PARA OPERAR A PLACA TRASEIRA - E2
Abra a tampa superior (ponto nº 15) e com auxílio do cabo de trava que acompanha a
máquina, introduza-o no orifício do eixo-árvore, travando o mesmo e efetuando a troca.
ENGLISH
INSTRUÇÕES PARA TROCA DE VELOCIDADES - E2
Quando for necessário trocar as velocidades tomo os seguintes procedimentos: Abra a
tampa nº15, levante o motor até afrouxar a correia e efetua a troca.
EQUIPAMENTO ELÉTRICO COM PROTEÇÃO - E4
IDENTIFICAÇÃO DA MÁQUINA E PEÇAS DE REPOSIÇÃO
Cada máquina INVICTA VIGORELLI possui um número de fabricação, o qual possibilita
ao fabricante identificar a série e a data de sua fabricação. No final deste manual existe
uma lista de peças que compõem sua máquina, com seus respectivos números e nomes.
Us somente peças originais INVICTA VIGORELLI e em seu pedido mencione sempre o
número de fabricação, número da peça e quantidade desejada.
A4
ESPAÑOL
Opcionalmente a máquina pode ser fornecida com equipamento elétrico contra sobrecargas. Este equipamento desliga automaticamente o motor quando houver sobre-carga
que possa danificá-lo. Quando houver o desligamento do motor, é necessário rearmar o
rele térmico pressionando o pino de rearme pelo ponto nº 16, antes de acionar o botão de
partida do motor. Na página 14 apresentamos os esquemas elétricos para motorização
especial.
MOD. TRI - 40
B2
B3
B3
B3
B3
B4
B4
B4
B4
B4
B4
B4
D
E
ENGLISH
DEAR CUSTOMER
LOADING AND UNLOADING
CONNECTING ELETRICITY
LUBRICATION
CONTROLS
TAILSTOCK ADJUSTMENT
ADJUSTING THE STEADY REST
USING THE REAR FACE-PLATE
CHANGING THE PLATES
CHANGING THE SPEEDS
ELETRICAL PROTECTION EQUIPAMENT
MACHINE IDENTIFICATION AND REPLACEMENT PARTS
TECHINICAL DATA
ILLUSTRATIONS
PORTUGUÊS
TABLE OF CONTENTS
DEAR CUSTOMER
B2
ESPAÑOL
We wish to thank you for choosing a INVICTA VIGORELLI product.
We can assure you that we have the maximum interest in keeping you satisfied. The
objective this manual is to familiarize you with the functioning of your machine and its care
for a long and trouble free life. Follow carefully the instructions and obtain the best
performance from your INVICTA VIGORELLI machine. We also recommended that you
carefully read our "Certificate of Warranty".
MOD. TRI - 40
LOADING AND UNLOADING
When loading and unloading the machine there should be no pressure on areas
which could affects its functioning. On page E1 We show correct procedure for this
operation.
B
A foundation should be prepared as on page E3.
C
Remove rust preventive from machine surfaces using kerosene or similar solvent..
CONNECTING ELECTRICITY
When motorized observe the local voltage corresponds exactly to that of the motor. To
check if the direction of rotation of the shaft is correct, observe the arrow shown on the
diagram on page E2. In case the shaft turns in the opposite direction to that of the arrow,
invert two wires coming into the machine. Do not change any of the internal wiring of the
machine. On page E5 is an electric diagram for normal motorization.
PORTUGUÊS
A
ENGLISH
LUBRIFICATION - E2
Your machine requires periodic lubrication as follows: Points "A" should be washed with
kerosene and lubricated with common grease as required. The shaft bearings are
CONTROLS - E2
ESPAÑOL
1
2
3
4
6
7
12
Electric Switch
Brake Lever
Lateral Rest Lock Lever
Rest Support Lock Lever
Tailstock Point Lock Lever
Tailstock Handle Whell
Rest Support Lock Knob
TAILSTOCK ADJUSTMENT - E2
The tailstock is adjusted follows: First, loosen nut nº 5, move the tailstock to the position
desired on the ways, and retighten the nut. Next, loosen lock nº 6 and turn whell nº 7 until
the wood is secured between the centers. Relock the center.
B3
MOD. TRI - 40
ADJUSTING THE STEADY REST - E2
The adjustment of steady rest (nº 8) on the ways is by nut nº 9. The vertical adjustment of
the rests (nºs 10 and 11) is carried out by knob nº 12.
Face-plate nº 13 enable large pieces to be turned by fixing them to the plate. Rest nº 1
can be adjusted vertically and horizontally enabling various types of work to be performad.
CHANGING THE PLATES - E2
PORTUGUÊS
USING THE REAR FACE-PLATE - E2
Open the upper cover (nº 15) and put the end of the rod that comes with the machine in
hole in the shaft, locking it, and make the change.
ENGLISH
CHANGING THE SPEEDS - E2
When necessary to change speeds, proceed as follows: Open cover nº 15, raise the
motor until the belts are loosened and make change.a.
ELETRICAL PROTECTION EQUIPMENT - E4
MACHINE IDENTIFICATION AND REPLACEMENT PARTS
Every INVICTA VIGORELLI machine has a serial number which enables the manufacture
to identify exactely the type and date of its manufacture. At the end of this manual you will
find a list of parts which compose your machine with their names and numbers. Use only
genuine INVICTA VIGORELLI parts and your order always mention the serial number,
part number and quantity desired.
B4
ESPAÑOL
The machine can Br opcionally supplied with electrical overload protection equipment.
This equipment disconnects the motor automatically when there is an electrical overload
that could harm it. When the motor is disconnect, it is necessary to reset the termal relay
by pressing the reset button (point nº 16) before pressing he star button. On page 14 are
electrical diagrams dor special motorization.
MOD. TRI - 40
C2
C3
C3
C3
C3
C3
C4
C4
C4
C4
C4
C4
D
E
ENGLISH
ESTIMADO CLIENTE
CARGA Y DESCARGA
CONEXIÓN DE LA CORRIENTE ELÉCTRICA
LUBRIFICACIÓN
ELEMENTOS DE COMANDO
REGULAJE DEL CABEZAL MÓVIL
REGULAJE DE LA ESPERA
INSTRUCCIONES PARA OPERAR LA PLACA TRASERA
INSTRUCCIONES PARA CAMBIAR LAS PLACAS
INSTRUCCIONES PARA CAMBIO DE VELOCIDADES
EQUIPAMENTO ELÉCTRICO CON PROTECCIÓN
IDENTIFICACIÓN DE LA MÁQUINA Y PIEZAS DE REPISOCIÓN
DATOS TÉCNICOS
ILUSTRACIÓN
PORTUGUÊS
TABLA DE COMPONENTES
ESTIMADO CLIENTE
C2
ESPAÑOL
Queremos felicitarlo por haber elegido un producto INVICTA VIGORELLI y agradecemos
su predilección. Podemos asegurarle que tenemos el máximo interés de mantenerlo
plenamente satisfecho. El objetivo de este manual es familiarizarlo con el funcionamiento
de su máquina y con los principales cuidados que tienen que ser tomados para que ella
tenga una larga vida sin cualquier problema.
Aquí Usted encontrará las informaciones básicas referente a su uso, mantención y
conservación. Acompañe rigurosamente las indicaciones y obtenga de su máquina
INVICTA VIGORELLI, un óptimo rendimiento. También le recomendamos la lectura atenta
de nuestro "Certificado de Garantía".
MOD. TRI - 40
CARGA Y DESCARGA
En el momento de carga y descarga, la máquina no debe recibir presión en áreas
donde puede afectar su funcionamiento. En la página E1 ilustramos el
procedimiento correcto para esa operación.
B
La fundación tiene que ser preparada de acuerdo al esquema da la página E3.
C
Remueva el barniz protector de las superficies usinadas, usando queroseno u otro
disolvente similar.
CONEXIÓN DE LA CORRIENTE ELÉCTRICA
Cuando motorizada, observar si la tensión local corresponde a la del motor. Para
controlar el sentido de rotación del eje, síguese el sentido de la flecha indicativa, de
acuerdo al esquema de la página E2. En el caso del eje presentar rotación contraria a la
indicada por la flecha, se tiene que invertir dos cables de la red eléctrica, sin alterar la
instalación interna de la maquina. En página E5 presentamos el esquema eléctrico para
motorización normal.
Su máquina necesita ser lubrificada periódicamente de la siguiente forma: Los
rodamientos del aje-árbol son blindados y no necesitan lubricación. Los puntos "A" deben
ser lavados con querosene y lubrificados con grasa común, siempre que as condiciones
de trabajo lo permitan.
ENGLISH
LUBRIFICACIÓN - E2
PORTUGUÊS
A
ELEMIENTOS DE COMANDO - E2
ESPAÑOL
1
2
3
4
6
7
12
Llave eléctrica
Manilla del Freno
Palanca de Traba de la Espera Lateral
Palanca de Traba del Soporte de la Espera
Manilla de Traba del Punto Móvil
Volante del Cabezal Móvil
Manilla de Traba del Soporte de la Espera
REGULAJE DEL CABEZAL MÓVIL - E2
La regulaje del cabezal móvil puede efectuarse de acuerdo a las siguientes instrucciones:
Primeramente suelta la tuerca nº 5 y lleve el cabezal hasta el punto deseado, volviendo a
fijarlo sobre el barramento a través de la tuerca. A seguir suelte la traba nº 6 y gire el
volante nº 7 hasta obtener la fijación de la madera entre los puntos. Completado esto fije
el punto nuevamente.
C3
MOD. TRI - 40
REGULAJE DE LA ESPERA - E2
La regulaje del suporte de la espera (punto nº 8) sobre el barramiento es obtenido a
través de la tuerca nº 9. La regulaje vertical de las esperas (nºs 10 o 11), puede ser
ejecutada por intermedio de la manilla nº 12.
La placa lisa nº 13 tiene como finalidad posibilitar el torneamiento en piezas de grandes
diámetros. Para eso es necesario fijar la pieza a ser torneada en la placa. La espera nº
14 posee regulaje vertical y horizontal posibilitando la ejecución de diversos tipos de
trabajos.
INSTRUCCIONES PARA CAMBIAR LAS PLACAS - E2
PORTUGUÊS
INSTRUCCIONES PARA OPERAR LA PLACA TRASERA - E2
Abra la Tapa superior (punto nª 15) y con auxilio del cado de traba que acompaña la
máquina introdúzcalo en el orificio del eje-árbol, trabando el mismo y efectuando el
Cuando se necesite cambiar las velocidades tome los siguientes cuidados: Abra la tapa
nº 15, levante el motor hasta aflojar la correa y efectúe el cambio.
EQUIPAMENTO ELÉCTRICO CON PROTECCIÓN - E4
IDENTIFICACIÓN DE LA MÁQUINA Y PIEZAS DE REPOSICIÓN
Every INVICTA VIGORELLI machine has a serial number which enables the manufacture
to identify exactely the type and date of its manufacture. At the end of this manual you will
find a list of parts which compose your machine with their names and numbers. Use only
genuine INVICTA VIGORELLI parts and your order always mention the serial number,
part number and quantity desired.
C4
ESPAÑOL
Opcionalmente la máquina puede ser provista con equipamiento eléctrico contra sobrecargas. Este equipamiento desliga automáticamente el motor cuando hay alguna sobrecarga que pueda dañarlo. Cuando hay un desligamiento del motor, es necesario rearmar
el rele térmico presionando el pino de rearme, por el punto nº 16, antes de accionar el
botón de arranque del motor. En la página nº 14 presentamos los esquemas eléctricos
para motorización especial.
ENGLISH
INSTRUCCIONES PARA CAMBIO DE VELOCIDADES - E2
MOD. TRI - 40
Distância entre pontos........................................................................................................... mm
Distance between centers.....................................................................................................
Distáncia entre puntos...........................................................................................................
1300
Altura dos pontos................................................................................................................... mm
Height of centers....................................................................................................................
Altura de los puntos...............................................................................................................
250
Diâmetro máximo admissível sobre o barramento................................................................ mm
Maximum permissable diameter over the ways.....................................................................
Diámetro máximo admisible sobre el barramiento................................................................
480
Cone Morse........................................................................................................................... nº
Morse cone............................................................................................................................
Cono morsa...........................................................................................................................
2
Largura do barramento.......................................................................................................... mm
Width of the ways..................................................................................................................
Anchura del barramiento.......................................................................................................
140
Diâmetro do plato traseiro..................................................................................................... mm
Diameter of rear face-plate....................................................................................................
Diámetro del plato trasero.....................................................................................................
350
Altura do centro do plato traseiro ao suporte......................................................................... mm
Height to center of rear face-plate from suport......................................................................
Diámetro máximo admissible en el plato trasero...................................................................
300
Comprimento máximo admissível no plato traseiro:
A
suporte para fora........................................................................................................... mm
A
suporte para dentro....................................................................................................... mm
Maximum permissable lenght on rear face-plate:
A
support to outside..........................................................................................................
A
support to inside............................................................................................................
Longitud máxima admisible em el plato trasero:
A
soporte para fora...........................................................................................................
A
soporte para dentro.......................................................................................................
Altura do barramento............................................................................................................. mm
Height of ways.......................................................................................................................
Altura del barramiento...........................................................................................................
Velocidade do eixo árvore..................................................................................................... RPM
Shaft speed...........................................................................................................................
Velocidades del eje-árbol.......................................................................................................
Potencia necessáia (4 polos)................................................................................................. CV
Power requeriment (4 pole motor).........................................................................................
Potencia necesaria (4 polos).................................................................................................
780
500 - 1000
1500 2000
2
A-64
Peso líquido aproximado....................................................................................................... Kg
Approximate net weight.........................................................................................................
Peso líquido aproximado.......................................................................................................
340
ACESSÓRIOS NORMAIS
NORMAL ACCESSORIES
ACCESSORIOS NORMALES
1 Placa lisa Ø 200 M
1 Bucha
1 Ponto fixo
1 Ponto móvel
1 Suporte da espera
1 Chave para bloqueio do eixo árvore
1 Chave especial
2 Esperas
1 Manual de instruções
1 Face-plate 200 mm dia.
1 Bushing
1 Dead center
1 Live center
1 Steady rest
1 Shaft lock wrench
1 Special wrench
2 Steady rests
1 Instructions manual
1 Placa lisa Ø 200 M
1 Casquillo
1 Punto fijo
1 Punto móvil
1 Suporte de la espera
1 Llave para bloqueo del eje-árbol
1 Llave especial
2 Esperas
1 Manual de instrucciones
ACESSÓRIOS EXTRAS
-Proteção elétrica contra
sobre-cargas
-Conjunto do plato traseiro
EXTRA ACCESSORIES
ACCESSORIOS EXTRAS
-Electrical overload protection
equipment
-Rear face-plate assembly
-Protección elétrica contra
sobre-cargas
-Conjunto del plato trasero
D1
DATOS TÉCNICOS
Correia "V" necessária (1 peça)............................................................................................
"V" belt (one)..........................................................................................................................
Correa "V" necesaria (1 pieza)..............................................................................................
340
100
DADOS TÉCNICOS TECHINICAL DATA
ESPECIFICAÇÕES TÉCNICAS/ TECHINICAL DATA/ CARACTERÍSTICAS TÉCNICAS
MOD. TRI - 40
DADOS TÉCNICOS TECHINICAL DATA
LISTA DE PEÇAS/ LIST OF PARTS/ LISTA DE PIEZAS - E7
Nº DE ORMDEM CÓDIGO
FIG. Nº
CODE
Nº DE ORDEN
CÓDIGO
QT.
DENOMINAÇÃO
QTY. NAME
CANT. DENOMINACIOÓN
82TM-KKK4-0
1
Espera lateral
Lateral rest
Espera lateral
2
11-27-0007
1
Painel p/ botoeira
Control button panel
Panel del botón de comando
3
10-01-0073
1
Botão de comando
Control button
Botón de coomando
4
BNCA-KK11-0
1
Cabo
Handle
Cable
5
81TM-KK23-0
1
Haste do freio
Brake rod
Asta del freno
6
81TM-KK21-0
1
Suporte da fibra
Fibre support
Suporte de la fibra
7
81TM-KK22-0
1
Fibra
Fibre
Fibra
8
06-05-0032
1
Parafuso cab. redonda UNC. 1/4” x1/2”
Round head screw UNC. 1/4” x 1/2”
Tornillo cab. redonda UNC 1/4” x 1/2”
9
06-02-0037
1
Parafuso Allen s/ cab. UNC. 1/4” x1/2”
Allen screw without head UNC. 1/4” x 1/2”
Tornillo Allen sin cabeza UNC 1/4” x 1/2”
10
82-TM-KKK6-0
1
Tampa
Cover
Tapa
11
06-05-0032
2
Parafuso cab. redonda UNC. 1/4” x1/2”
Round head screw UNC. 1/4” x 1/2”
Tornillo cab. redonda UNC 1/4” x 1/2”
12
BNAE-KKK5-0
1
Chave elétrica “PACCO” P-16 1/3hs/001
Electric switch “PACCO” P-16 1/3hs/001
Llave eléctrica “PACCO” P-16 1/3hs/001
13
06-09-0013
1
Porca sextavada UNC. 5/16”
Hex nut UNC. 5/16”
Tuerca hexagonal UNC. 5/16”
14
06-18-0028
2
Anel elástico RS-7
Snap ring RS-7
Anillo elástico RS-7
15
06-09-0020
6
Porca sextavada M.8 x 1,25
Hex nut M.8 x 1,25
Tuerca hexagonal M.8 x 1,25
16
85SF-KK52-0
4
Dobradiça
Hinge
Bisagra
17
85SF-KK77-0
2
Pino da dobradiça
Hinge pin
Pino de la bisagra
DATOS TÉCNICOS
1
D2
MOD. TRI - 40
DADOS TÉCNICOS TECHINICAL DATA
LISTA DE PEÇAS/ LIST OF PARTS/ LISTA DE PIEZAS - E7
zNº DE ORMDEM CÓDIGO
FIG. Nº
CODE
Nº DE ORDEN
CÓDIGO
QT.
DENOMINAÇÃO
QTY. NAME
CANT. DENOMINACIOÓN
82TM-KK26-0
2
Suporte da dobradiça
Hinge support
Soporte de la bisagra
19
06-04-0138
4
Parafuso cabeça sextavada UNC. 1/2” x 1/4”
Hex head cap screw UNC. 1/2” x 1/4”
Tornillo cabeza hexagonal UNC. 1/2” x 1/4”
20
10-01-0008
1
Placa de identifição
Identification plate
Placa de identificacion
21
06-13-0022
4
Arruela lisa Ø 1/2”
Flat washer Ø 1/2”
Arandela lisa Ø ½”
22
81TM-KK41-0
1
Chave fixa
Open end wrench
Llave fija
23
3 R-62
1
Cabo de trava do eixo
Shaft lock lever
Cabo de traba del eje
24
06-09-0003
2
Porca sextavada UNC. 1/4”
Hex nut UNC. 1/4”
Tuerca hexagonal UNC. 1/4”
25
8NAE-KK14-0
2
Pino rosqueado
Thread pin
Pino con rosca
26
81TM-KK15-0
1
Espera menor
Small rest
Espera menor
27
82TM-KKK4-0
1
Espera lateral
Side rest
Espera lateral
28
81TM-KKK7-0
1
Ponto fixo
Dead center
Punto fijo
29
81TM-KK26-0
1
Chaveta
Key
Chaveta
30
81TM-K050-0
1
Bucha de guia
Guide bushing
Casquillo de guía
31
8NCA-KK1A-0
1
Cabo de aperto
Tightening handle
Cabo de apriete
32
8NPW-KKK7-0
1
Prisioneiro
stud
Prisionero
33
8NVO-KKK5-0
1
Volante
Whell
Volante
34
26-01-008
1
Bucha elástica Ø 5 x 40
Roll pin Ø 5 x 40
Casquillo elástico Ø 5 x 40
DATOS TÉCNICOS
18
D3
MOD. TRI - 40
DADOS TÉCNICOS TECHINICAL DATA
LISTA DE PEÇAS/ LIST OF PARTS/ LISTA DE PIEZAS - E7
zNº DE ORMDEM CÓDIGO
CODE
FIG. Nº
CÓDIGO
Nº DE ORDEN
QT.
DENOMINAÇÃO
QTY. NAME
CANT. DENOMINACIOÓN
35
81-TM-KK12-0
1
Fuso
Screw
Huso
36
81TM-KK4-0
1
Cabeçote móvel
Tailstock
Cabezal móvil
37
06-13-0022
1
Arruela lisa Ø 1/2”
Flate washer Ø 1/2”
Arandela lisa Ø 1/2”
38
06-04-0138
1
Parafuso cab. sextavada UNC. 1/2” x 1 1/4”
Hex head screw UNC. 1/2” x 1 1/4”
Tornillo cab. hexagonal UNC. 1/2” x 1 1/4”
39
82TM-KK35-0
1
Pé traseiro
Rear leg
Pié trasero
40
8NMN-KK15-0
1
Manípulo
Knob
Manilla
41
06-09-0006
1
Porca sextavada 1/2”
Hex nut 1/2”
Tuerca hexagonal ½”
DATOS TÉCNICOS
D4
MOD. TRI - 40
DADOS TÉCNICOS TECHINICAL DATA
LISTA DE PEÇAS/ LIST OF PARTS/ LISTA DE PIEZAS - E8
Nº DE ORMDEM CÓDIGO
FIG. Nº
CODE
Nº DE ORDEN
CÓDIGO
QT.
DENOMINAÇÃO
QTY. NAME
CANT. DENOMINACIOÓN
06-13-0006
1
Arruela lisa Ø 5/8”
Flat washer Ø 5/8”
Arandela lisa Ø 5/8”
43
06-09-0016
1
Porca sextavada UNC. Ø 5/8”
Hex nut Ø 5/8”
Tuerca hexagonal UNC. Ø 5/8”
44
81TM-KK34-0
1
Parafuso prismátco
Prismatic screw
Tornillo prismático
45
06-13-0006
1
Arruela lisa Ø 5/8”
Flat washer Ø 5/8”
Arandela lisa Ø 5/8”
46
81TM-KK29-0
1
Sapata de fixação
Clamping shoe
Zapata de fijación
47
81TM-KK14-0
1
Suporte da espera
Steady rest
Soporte de la espera
48
82TM-KK1-0
1
Corpo do torno
Lathe frame
Cuerpo del torno
49
8NAE-KK13-0
1
Caixa dos bornes
Terminal box
Caja de los bornes
50
11-02-0001
4
Borne ET-32
Terminal ET-32
Borne ET-32
51
11-25-0001
1
Trilho BT-100 (100 mm)
Track BT-100 (100 mm)
Riel BT-100 (100 mm)
52
25-09-0001
1
Motor elétrico 2CV - 4 polos - 50/60 Hz
Electric motor 2HP - 4 pole - 50/60 Hz
Motor elétrico 2CV - 4 polos - 50/60 Hz
53
06-04-0072
4
Parafusocab. sextavada UNC. 3/8” x 1 1/2”
Hex head screw UNC. 3/8” x 1 1/2”
Tornillo cab. hexagonal UNC. 3/8” x 1 ½”
54
06-09-0014
4
Porca sextavada UNC. 3/8”
Hex nut UNC 5/8”
Tuerca hexagonal UNC. 3/8”
55
06-13-021
4
Arruela lisa Ø 3/8”
Flat washer Ø 3/8”
Arandela lisa Ø 3/8”
56
8NTR-KK6C-0
2
Trilho do motor
Motor track
Riel del motor
57
82TM-KKK8-0
1
Polia motora 60 Hz
Motor pulley 60 Hz
Polea motora 60 Hz
58
82TM-KKK9-0
1
Polia motora 50 Hz
Motor pulley 50 Hz
Polea motora 50 Hz
DATOS TÉCNICOS
42
D5
MOD. TRI - 40
DADOS TÉCNICOS TECHINICAL DATA
LISTA DE PEÇAS/ LIST OF PARTS/ LISTA DE PIEZAS - E8
Nº DE ORMDEM
FIG. Nº
Nº DE ORDEN
CÓDIGO
CODE
CÓDIGO
QT.
DENOMINAÇÃO
QTY.
NAME
CANT. DENOMINACIOÓN
8NVL-KKK1-0
1
Eixo do trilho
Track pin
Eje del riel
60
06-07-0021
1
Parafuso cab. quadrada UNC. Ø 3/8” x 3/4”
Square head screw UNC. Ø 3/8” x 3/4”
Tornillo cab. cuadrada UNC. Ø 3/8” x 3/4”
61
8NAN-KK31-0
2
Anel
Ring
Anillo
62
06-02-0037
2
Parafuso Allen s/ cab. UNC. 1/4” x 1/2”
Allen screw without head UNC. 1/4” x ½”
Tornillo allen sin cab. UNC. 1/4” x ½”
63
15-00-0011
1
Correia “V” A-64
“V” belt A-64
Correa “V” A-64
64
N-AR6
1
Arruela Ø 5/16”
Washer Ø 5/16”
Arandela Ø 5/16”
65
06-04-0071
1
Parafuso cab. Sextavada UNC. 5/16” X1 1/4”
Hex head cup screw UNC. 5/16” X1 1/4”
Tornillo cab. hexagonal UNC. 5/16” X1 1/4”
66
06-05-0037
2
Parafuso cab. redonda UNC. 3/16” x 3/8”
Round head screw UNC. 3/16” x 3/8”
Tornillo cab. redonda UNC. 3/16” x 3/8”
67
10-01-0027
1
Emblema
Emblem
Emblema
68
82TM-KK34-0
1
Pé dianteiro
Front leg
Pié diantero
69
26-02-0007
2
Bucha elástica Ø 6 x 40
Snap bushing Ø 6 x 40
Casquillo elástico Ø 6 x 40
70
06-04-0076
2
Parafuso cab. Sextavada UNC. 1/2” X 3/4”
Hex head cup screw UNC. 1/2” X 3/4”
Tornillo cab. hexagonal UNC. 1/2” X 3/4”
71
06-13-0022
2
Arruela
Washer
Arandela
72
82TM-KKK2-0
1
Suporte
Support
Soporte
73
82TM-KK14-0
1
Anel distanciador
Spacer ring
Anillo distanciador
74
82TM-KK16-0
1
Porca de trava
Lock nut
Tuerca de traba
75
16-25-0005
1
Esfera de baquelite
Bakelite ball
Esfera de bauqelita
DATOS TÉCNICOS
59
D6
MOD. TRI - 40
DADOS TÉCNICOS TECHINICAL DATA
LISTA DE PEÇAS/ LIST OF PARTS/ LISTA DE PIEZAS - E8
Nº DE ORMDEM
FIG. Nº
Nº DE ORDEN
CÓDIGO
CODE
CÓDIGO
QT.
DENOMINAÇÃO
QTY.
NAME
CANT. DENOMINACIOÓN
76
82TM-KKK3-0
1
Suporte da espera lateral
Lateral rest support
Soporte de la espera lateral
77
82TM-KK13-0
1
Parafuso de trava
Lock screw
Tornillo de traba
78
82TM-KK19-0
1
Haste de trava da espera
Steady rest lock stem
Asta de traba de espera
79
82TM-KK17-0
1
Sapata de trava
Lock shoe
Zapata de la traba
80
82TM-KK18-0
1
Parafuso de trava
Lock screw
Tornillo de traba
81
16-25-0004
2
Esfera de baquelite
Bakelite ball
Esfera de bauqelita
DATOS TÉCNICOS
D7
MOD. TRI - 40
DADOS TÉCNICOS TECHINICAL DATA
LISTA DE PEÇAS/ LIST OF PARTS/ LISTA DE PIEZAS - E9
Nº DE ORMDEM CÓDIGO
FIG. Nº
CODE
Nº DE ORDEN
CÓDIGO
QT.
DENOMINAÇÃO
QTY.
NAME
CANT. DENOMINACIOÓN
82TN-KKK5-0
1
Placa lateral
Lateral plate
Placa lateral
83
03-00-0077
1
Rolamento SKF 6208-2RS
Bearing SKF 6208-2RS
Rodamiento SKF 6208-2RS
84
8NCV-K240-0
1
Chaveta do eixo árvore
Shaft key
Chaveta del eje-árbol
85
82TM-KKK7-0
1
Polia do eixo árvore
Shaft pulley
Polea del eje-árbol
86
06-02-0040
2
Parafuso allen s/ cab. UNC. 3/8” x 3/4”
Allen screw without head UNC. 3/8” x 3/4”
Tornillo allen sin cabeza UNC. 3/8” x 3/4”
87
81TM-KK20-0
1
Tampa
Cover
Tapa
88
82TM-KK22-0
1
Bucha para o eixo
Shaft bushing
Casquillo para el eje
89
82TM-KK21-0
1
Placa lisa
Flat plate
Placa lisa
90
81TM-K052-0
1
Garra
Hook
Garra
91
06-05-0033
3
Parafuso cab. redonda UNC. 1/4” x 3/4”
Round head screw UNC. 1/4” x 3/4”
Tornillo cabeza redonda 1/4” x 3/4”
92
82TM-KK20-0
1
Anel ondulado
Wavy ring
Anillo ondulado
93
03-00-0077
1
Rolamento SKF 6208-2RS
Bearing SKF 6208-2RS
Rodamiento SKF 6208-2RS
94
82TM-KK10-0
1
Eixo árvore
Shaft
Eje-árbol
95
06-05-0033
3
Parafuso cab. redonda UNC. 1/4” x 3/4”
Round head screw UNC. 1/4” x 3/4”
Tornillo cabeza redonda 1/4” x 3/4”
96
81TM-KK20-0
1
Tampa
Cover
Tapa
DATOS TÉCNICOS
82
D8
MOD. TRI - 40
DADOS TÉCNICOS TECHINICAL DATA
LISTA DE PEÇAS/ LIST OF PARTS/ LISTA DE PIEZAS - E10
Nº DE ORMDEM CÓDIGO
FIG. Nº
CODE
Nº DE ORDEN
CÓDIGO
QT.
DENOMINAÇÃO
QTY. NAME
CANT. DENOMINACIOÓN
97
8NAE-KK64-0
1
Caixa elétrica
Electric junction box
Caja elétrica
98
11-07-0014
1
Contactor 3TA-11
Contact 3TA-11
Contactor 3TA-11
99
11-07-0007
1
Contactor 3TA-11 - Somente p/ 440 V
Contact 3TA-11 only 440 V
Contactor 3TA-11 - Solamiente p/ 440 V
100
11-02-0005
9
Borne terminal ET-32
Terminal ET-32
Borne terminal ET-32
101
11-02-0005
1
Tampa lateral L-32
Lateral cover L-32
Tapa lateral L-32
102
11-02-0006
1
Régua de identificação
Identification scale
Regla de identificación
103
11-03-0002
1
Box reto 1/2”
Junction box 1/2”
Box reto ½”
104
06-05-0053
2
Parafuso cab. redonda M.4 x 0,7 x 10
Round head screw M.4 x 0,7 x 10
Tornillo cab. redonda M.4 x 0,7 x 10
105
8NAE-KK16-0
1
Tampa
Cover
Tapa
106
11-05-0001
2
Chapa fixadora tipo “F”
Mounting plate type “F”
Chapa fijadora tipo “F”
107
11-25-0001
108
11-02-0005
1
Tampa lateral L-32
Lateral cover L-32
Tapa lateral L-32
109
11-20-0008
1
Rele bimetálico 3 UA-11
Bi-metal relay 3 UA-11
Relé bimetálico 3 UA-11
110
BNAE-KK66-0
1
Chapa de fixação dos componentes
Mounting plate
Chapa de fijación de los componentes
Trilho BT-100 (0,12 m)
Track BT-100 (0,12 m)
Riel BT-100 (0,12 m)
DATOS TÉCNICOS
D9
MOD. TRI - 40
ILUSTRAÇÕES
ILUSTRACIÓN
ILLUSTRATIONS
E1
4
3
A
11
12
A
6
5
7
ILUSTRAÇÃO COM OPCIONAIS - ILUSTRACIÓN CON OPCIONAL - ILLUSTRATION WITH OPTIONAL
10
ILLUSTRATIONS
14
9
ILUSTRACIÓN
E2
ILUSTRAÇÕES
13
15
1
8
2
MOD. TRI - 40
1705
458
358
508
E3
ILLUSTRATIONS
315
35
100
150
ILUSTRACIÓN
W. ½”
308
NÍVEL
LEVEL
NIVEL
150
ILUSTRAÇÕES
PLANTA DE FUNDAÇÃO
SKETCH OF FUNDATION
PLANTA DE FUNDACIÓN
MOD. TRI - 40
70
MOD. TRI - 40
ILUSTRAÇÕES
16
ILUSTRACIÓN
ILLUSTRATIONS
E4
MOD. TRI - 40
ESQUEMA ELÉTRICO
MOTORIZAÇÃO NORMAL P/2 CV - 220/380/440 V
ILUSTRAÇÕES
ELECTRICAL DIAGRAM
NORMAL MOTOR FOR 2 HP - 220/380/440 V
ESQUEMA ELÉTRICO
MOTORIZACIÓN NORMAL P/2 CV - 220/380/440 V
T
S
R
N
ILUSTRACIÓN
CH
FIO
WIRE
CABLE
14 AWG
F-16A
1
3
2
4
C
RST - FASES
RST - PHASES
RST - FASES
N - FASE NEUTRA
N - NEUTRAL PHASE
N - FASE NEUTRA
------ LIGAÇÃO A SER EXECÚTADA PELO CLIENTE
CONNECTION TO BE MADE BY CUSTOMER
CONEXIÓN A SER EJECUTADA POR EL CLIENTE
NOMENCLATURA
NAME
NOMENCLATURA
M
1
Motor 2 CV - 4 Polos
Motor 2 HP - 4 Ple
Motor 2 CV - 4 Polos
C
1
Chave e létrica
Electric switch
Llave eléctrica
4
Borne terminal
Terminal
Borne terminal
F
3
Fusível retardado
Delayed action fuse
Fusible retardado
CH
1
Chave geral
Master switch
Llave general
E5
ILLUSTRATIONS
M
CÓDIGO QT.
QTY.
CODE
CÓDIGO CANT.
MOD. TRI - 40
ESQUEMA ELÉTRICO
ELECTRIC DIAGRAM
ESQUEMA ELÉTRICO
MOTORIZACIÓN ESPECIAL PARA 2 CV - 220/380/440 V
CHAVE MAGNÉTICA
MAGNÉTIC SWITCH
LLAVE MAGNÉTICA
220 VOLTS
380 VOLTS
T
440 VOLTS
T
T
S
S
S
R
R
R
N
N
N
CH
FIO
WIRE
CABLE
CH
14 AWG
F-16A
3
1 2
FIO
WIRE
CABLE
F-16A
B2
4
1 2
3
B2
B2
4
8
B1 C
9
RT
7
9
6
7
1
Contactor
Contact
Contactor
RT
1
Rele bimetálico
Bi-metal relay
Rele bimetálico
B1
1
Botão liga - verde
“ON” button - green
Botón liga - verde
B2
1
Botão desliga - vermelho
“OFF” button - red
Botón desliga - rojo
9
Borne teminal
Terminal
Borne terminal
7
RT
M
CÓDIGO QT.
QTY.
CODE
CÓDIGO CANT.
NOMENCLATURA
NAME
NOMENCLATURA
M
1
Motor 2 CV - 4 Polos
Motor 2 HP - 4 Pole
Motor 2 CV - 4 Polos
F
3
Fusível retardado
Delayed action fuse
Fusible retardado
CH
1
Chave geral
Master switch
Llave general
RST - FASES
RST - PHASES
RST - FASES
N - FASE NEUTRA
N - NEUTRAL PHASE
N - FASE NEUTRA
------ LIGAÇÃO A SER EXECUTADA PELO CLIENTE
CONNECTION TO BE MADE BY CUSTOMER
CONEXIÓN A SER EJECUTADA POR EL CLIENTE
E6
ILLUSTRATIONS
C
6
RT
M
NOMENCLATURA
CÓDIGO QT.
QTY. NAME
CODE
CÓDIGO CANT. NOMENCLATURA
C
5
RT
M
RT
C
5
14 AWG
ILUSTRACIÓN
6
3
B1 C
9
5
1 2
8
B1 C
C
FIO
WIRE
CABLE
F-16A
4
8
RT
CH
14 AWG
ILUSTRAÇÕES
MOTORIZAÇÃO ESPECIAL P/2 CV - 220/380/440 V
SPECIAL MOTORIZATION FOR 2 CV - 220/380/440 V
3
4
5
6
7
8
ILLUSTRATIONS
9
10
11 12 13 14 15 16 17 18 19 20
21 22 23 24
ILUSTRAÇÃO COM OPCIONAIS - ILUSTRACIÓN CON OPCIONAL - ILLUSTRATION WITH OPTIONAL
2
ILUSTRACIÓN
E7
41
40
39
38
37
36
35
34
33
32
31
30
29
28
27
26
25
ILUSTRAÇÕES
1
MOD. TRI - 40
ILUSTRAÇÃO COM OPCIONAIS - ILUSTRACIÓN CON OPCIONAL - ILLUSTRATION WITH OPTIONAL
65 64 63 62 61 60 59 58 57 56 55 54 53 52 51 50 49 48 47 46 45 44 43 42
ILLUSTRATIONS
66
67
68
69
70
71
72
73
74
75
76
77
78
79
80
ILUSTRACIÓN
E8
ILUSTRAÇÕES
81
MOD. TRI - 40
90
88
91
87
92
86
93
85
94
84
95
83
96
89
ILLUSTRATIONS
E8
ILUSTRACIÓN
82
ILUSTRAÇÕES
ILUSTRAÇÃO COM OPCIONAIS - ILUSTRACIÓN CON OPCIONAL - ILLUSTRATION WITH OPTIONAL
MOD. TRI - 40
MOD. TRI - 40
110
99 98
109
108
101
ILUSTRACIÓN
100
ILUSTRAÇÕES
97
107
102
103
104
105
PRODUZIDO POR:
NETZHAUS
WWW.NETZHAUS.COM.BR
E10
ILLUSTRATIONS
106
INVICTA VIGORELLI Metalurgica Ltda.
GRUPO
VIGORELLI
Av. Major Levi Sobrinho, 2500 - C.P. 24
CEP. 13486-905 - Limeira / SP - Fone: (19) 3404-6800
CGC 53509626-0001/94
http://www.invicta.com.br
E-mail: [email protected]
Assistencia Técnica
Fone: (19) 3404-6823 - FAX (19) 3404-6803