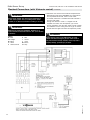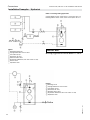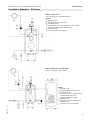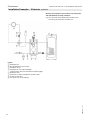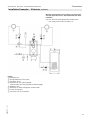
1
Installation and
Service Instructions
for use by heating contractor
Vitorond 100, VR1 Series
Oil-Fired Boiler
Heating input 91 to 140 MBH
27 to 41 kW
VITOROND 100
r
Product may not be exactly as shown
IMPORTANT
H
5583 571 - 01 01/2014
Read and save these instructions
for future reference.
Please file in Service Binder
Safety
Vitorond 100, VR1-22 to -33 Installation and Service
Important Safety, Installation, Regulatory and Warranty Requirements
Please ensure that these instructions are read and understood before commencing installation. Failure to comply with
the instructions listed below and details printed in this manual can cause product/property damage, severe personal
injury, and/or loss of life. Ensure all requirements below are understood and fulfilled (including detailed information
found in manual subsections).
Product documentation
Read all applicable documentation before commencing
installation. Store documentation near boiler in a
readily accessible location for reference in the future
by service personnel.
g
uFor a listing of applicable literature,
please see section entitled “Important
Regulatory and Safety Requirements”.
g
Licensed professional heating contractor
The installation, adjustment, service and maintenance
of this equipment must be performed by a licensed
professional heating contractor.
uFor information pertaining to the
proper installation, adjustment, service
and maintenance of this equipment to
avoid formation of carbon monoxide,
please see section entitled “Combustion
air supply” and “Venting information”
in this manual.
g
uPlease see section entitled
“Important Regulatory and Installation
Requirements”.
g
g
g
2
Advice to owner
Once the installation work is complete, the heating
contractor must familiarize the system operator/
ultimate owner with all equipment, as well as safety
precautions/requirements, shutdown procedure, and
the need for professional service annually before the
heating season begins.
Warranty
Information contained in this and
related product documentation must
be read and followed. Failure to do
so renders the warranty null and void.
Fresh air
This equipment requires fresh air for
safe operation and must be installed
ensuring provisions for adequate
combustion and ventilation air exist.
uFor information pertaining to the
fresh air requirements of this product,
please see subsection entitled
“Mechanical Room” in this manual.
Contaminated air
Air contaminated by chemicals can cause by-products
in the combustion process, which are poisonous to
inhabitants and destructive to
Viessmann equipment.
uFor a listing of chemicals which
cannot be stored in or near the
boiler room, please see section
entitled “Mechanical Room”.
in this manual.
Carbon monoxide
Improper installation, adjustment, service and/or
maintenance can cause flue products to flow into
living space. Flue products contain poisonous carbon
monoxide gas.
g
Equipment venting
Never operate boiler without an installed venting
system. An improper venting system can cause
carbon monoxide poisoning.
uFor information pertaining to
venting and chimney requirements,
please see section entitled “Venting
Information” in this manual. All
products of combustion must be
safely vented to the outdoors.
WARNING
Installers must follow local regulations with respect
to installation of carbon monoxide detectors.
Follow the Viessmann maintenance schedule of the
boiler in the “Service Instructions” manual.
5583 571 - 01
g
Safety
Vitorond 100, VR1-22 to -33 Installation and Service
Important Safety, Installation, Regulatory and Warranty Requirements (continued)
H Fiberglass wool and ceramic fiber materials
WARNING
Inhaling of fiberglass wool and/or ceramic fiber
materials is a possible cancer hazard. These materials
can also cause respiratory, skin and eye irritation.
The state of California has listed the airborne fibers of
these materials as a possible cancer hazard through
inhalation. When handling these materials, special care
must be applied.
Suppliers of ceramic fiber products recommend the
following first aid measures:
- Respiratory tract (nose and throat) irritation:
If respiratory tract irritation develops, move the
person to a dust free location.
- Eye irritation: If eyes become irritated, flush
immediately with large amounts of lukewarm water
for at least 15 minutes. Eyelids should be held away
from the eyeball to ensure thorough rinsing.
Do not rub eyes.
- Skin irritation: If skin becomes irritated, remove soiled
clothing. Do not rub or scratch exposed skin.
Wash area of contact thoroughly with soap and water.
Using a skin cream or lotion after washing may be
helpful.
5583 571 - 01
- Gastrointestinal irritation: If gastrointestinal tract
irritation develops, move the person to a dust free
environment.
Suppliers of fiberglass wool products recommend the
following precautions be taken when handling these
materials:
Precautionary measures
- Avoid breathing fiberglass dust and contact with
skin and eyes.
- Use NIOSH approved dust/mist respirator.
- Wear long-sleeved, loose fitting clothing, gloves
and eye protection.
- Wash work clothes separately from other clothing.
Rinse washer thoroughly.
- Operations such as sawing, blowing, tear-out and
spraying may generate airborne fiber concentration
requiring additional protection.
First aid measures
- If eye contact occurs, flush eyes with water to
remove dust. If symptoms persist, seek medical
attention.
- If skin contact occurs, wash affected areas gently
with soap and warm water after handling.
H Hazardous materials
WARNING
Appliance materials of construction, products of
combustion and the fuel contain alumina, silica, heavy
metals, carbon monoxide, nitrogen oxides, aldehydes
and/or other toxic or harmful substances which can
cause serious injury or loss of life and which are
known to the State of California to cause cancer,
birth defects and other reproductive harm. Always
use proper safety clothing, respirators and equipment
when servicing or working nearby the appliance.
3
Table of Contents
Vitorond 100, VR1-22 to -33 Installation and Service
4
Safety
Important Safety, Installation, Regulatory and
Warranty Requirements.................................................2
General Information
About these Instructions..............................................8
Product Information.....................................................9
Mechanical Room.....................................................10
Combustion Air Supply..............................................10
Set-up
Product Delivery........................................................12
Unpacking Instructions..............................................12
Minimum Clearances to Combustibles..........................13
Recommended Minimum Clearances for Service...........13
Boiler Set-up and Location ........................................14
Combustion Chamber Insert.......................................14
Connections
Venting Connection...................................................15
Water Side Connections
(with Hydrostat 3250-Plus Control).............................17
Safety Connections
(with Hydrostat 3250-Plus Control).............................18
Water Side Connections (with Vitotronic Control).........20
Safety Connections (with Vitotronic Control)...............21
Pressure Testing.......................................................23
Becket Burner Set-up
Burner Installation.....................................................24
Burner Information....................................................24
Burner Mounting.......................................................25
Oil Piping Connection.................................................26
Electrical Connections
(with Hydrostat 3250-Plus Control).............................27
Electrical Connections (with Vitotronic Control)............30
Installation of Vitotronic Control.................................32
Boiler Coding Card....................................................33
Electrical Connections
(with GeniSys Primary Control)...................................34
Riello Burner Set-up
Burner Installation.....................................................35
Burner Information....................................................35
Burner Mounting.......................................................36
Oil Piping Connection.................................................37
Electrical Connections
(with Hydrostat 3250-Plus Control).............................39
Electrical Connections (with Vitotronic Control)............40
Installation of Vitotronic Control.................................43
Boiler Coding Card....................................................44
5583 571 - 01
Page
Vitorond 100, VR1-22 to -33 Installation and Service
Table of Contents
Page
Start-up
Initial Start-up..........................................................45
Burner Calibration.....................................................46
Beckett Burner Calibration ........................................47
Riello Burner Calibration.............................................48
Barometric Draft Regulator.........................................49
Waterside Flow........................................................49
Connections
Installation Examples - Hydrostat 3250-Plus.................50
Installation Examples - Vitotronic................................51
Service
Necessary Tools.......................................................54
Service Procedure.....................................................54
Shut-down heating system....................................54
Open combustion chamber door............................54
Clean heat exchanger and flue pipe........................55
Check all gaskets and insulation.............................55
Close combustion chamber door............................55
Check heating system and
domestic hot water connections.............................56
Ensure proper operation of expansion tank,
low water cut-off (if applicable) and pumps.............56
Ensure that an adequate combustion air
supply exists in the boiler room.............................56
Ensure functionality of the barometric
draft regulator of the burner..................................56
Calibrate the Burner..............................................57
Additional Information
5583 571 - 01
Parts List.................................................................58
Maintenance Record..................................................61
5
Safety
Vitorond 100, VR1-22 to -33 Installation and Service
Important Safety, Installation, Regulatory and Warranty Requirements (continued)
For installations on the Commonwealth of Massachusetts, the following modifications to NFPA-54 chapter 10 apply:
Excerpt from 248 CMR 5-08:
2(a)
For all side-wall horizontally vented gas fueled equipment installed in every dwelling, building or structure
used in whole or in part for residential purposes, including those owned or operated by the Commonwealth
and where the side-wall exhaust vent termination is less than (7) feet above finished grade in the area of
the venting, including but not limited to decks and porches, the following requirements shall be satisfied:
1. INSTALLATION OF CARBON MONOXIDE DETECTORS. At the time of installation of the side-wall
horizontal vented gas fueled equipment, the installing plumber or gas fitter shall observe that a hard wired
carbon monoxide detector with an alarm and battery back-up is installed on the floor level where the gas
equipment is to be installed. In addition, the installing plumber or gas fitter shall observe that a battery
operated or hard wired carbon monoxide detector with an alarm is installed on each additional level of the
dwelling, building or structure served by the side-wall horizontal vented gas fueled equipment. It shall be
the responsibility of the property owner to secure the services of qualified licensed professional for the
installation of hard-wired carbon monoxide detectors.
a. In the event that the side-wall horizontally vented gas fueled equipment is installed in a crawl space or
an attic, the hard-wired carbon monoxide detector with alarm and battery back-up may be installed on
the next adjacent floor level.
b. In the event that the requirements of this subdivision can not be met at the time of completion of
installation, the owner shall have a period of thirty (30) days to comply with the above requirements;
provided, however, that during said thirty (30) day period, a battery operated carbon monoxide detector
with an alarm shall be installed.
2. APPROVED CARBON MONOXIDE DETECTORS. Each carbon monoxide detector as required in accordance
with the above provisions shall comply with NFPA 720 and be ANSI/UL 2034 listed and IAS certified.
3. SIGNAGE. A metal or plastic identification plate shall be permanently mounted to the exterior of the
building at a minimum height of eight (8) feet above grade directly in line with the exhaust vent terminal
for the horizontally vented gas fueled heating appliance or equipment. The sign shall read, in print size no
less than one-half (b) inch in size, "GAS VENT DIRECTLY BELOW. KEEP CLEAR OF ALL OBSTRUCTIONS".
4. INSPECTION. The state or local gas inspector of the side-wall horizontally vented gas fueled equipment
shall not approve the installation unless, upon inspection, the inspector observes carbon monoxide
detectors and signage installed in accordance with the provisions of 248 CMR 5.08(2)(a) 1 through 4.
(b)
EXEMPTIONS: The following equipment is exempt from 248 CMR 5.08(2)(a) 1 through 4:
1. The equipment listed in Chapter 10 entitled "Equipment Not Required To Be Vented" in the most current
edition of NFPA 54 as adopted by the Board; and
6
5583 571 - 01
2. Product Approved side-wall horizontally vented gas fueled equipment installed in a room or structure
separate from the dwelling, building or structure used in whole or in part for residential purposes.
Safety
Vitorond 100, VR1-22 to -33 Installation and Service
Important Safety, Installation, Regulatory and Warranty Requirements (continued)
Codes
Mechanical room
The installation of this unit shall be in accordance with
local codes. In the absence of local codes, use:
Ensure the mechanical room complies with the
requirements of the System Design Guidelines and/or
Technical Data Manual. In addition, see section entitled
“Mechanical Room” on page 10 in this manual.
H CAN/CSA-B139.00 for oil Installations in Canada
H NFPA 31 Standard for the Installation of Oil Burning
Equipment in the U.S.
Always use latest editions of codes.
Note: Please carefully read this manual prior to
attempting installation. Any warranty is null
and void if these instructions are not followed.
For information regarding other Viessmann System
Technology componentry, please reference
documentation of the respective product.
We offer frequent installation and service seminars
to familiarize our partners with our products. Please
inquire.
All electrical wiring is to be done in accordance with the
latest edition of CSA C22.1 Part 1 and/or local codes. In
the U.S. use the National Electrical Code ANSI/NFPA 70.
The heating contractor must also conform to the Standard
for Controls and Safety Devices for Automatically Fired
Boilers, ANSI/ASME CSD-1 where required by the
authority having jurisdiction.
Technical literature
Literature for the Vitorond 100 boiler:
- Technical Data Manual
- Installation Instructions
- Service Instructions
- Operating Instructions and User’s Information Manual
- Instructions of other Viessmann products utilized with
this installation
- Hydrostat 3250-Plus instructions
Note: Leave all literature at the installation site and advise
the system operator/ultimate owner where the
literature can be found. Contact Viessmann for
additional copies.
This product comes with several safety instruction
labels attached. Do not remove! Contact Viessmann
immediately if replacement labels are required.
Working on the equipment
The installation, adjustment, service, and maintenance
of this boiler must be performed by a licensed professional
heating contractor who is qualified and experienced in the
installation, service, and maintenance of hot water boilers.
There are no user serviceable parts on the boiler, burners,
or control.
Note: The completeness and functionality of field supplied
electrical controls and components must be verified
by the heating contractor. This includes low water
cut-offs, flow switches (if used), staging controls,
pumps, motorized valves, air vents, thermostats, etc.
5583 571 - 01
Ensure main power supply to equipment, the heating
system, and all external controls has been deactivated.
Close main gas supply valve. Take precautions in all
instances to avoid accidental activation of power during
service work.
7
General Information
Vitorond 100, VR1-22 to -33 Installation and Service
About these Instructions
Take note of all symbols and notations intended to draw attention to potential hazards or important product
information. These include “WARNING”, “CAUTION”, and “IMPORTANT”. See below.
WARNING
uWarnings draw your attention to the presence of
potential hazards or important product information.
Indicates an imminently hazardous situation which,
if not avoided, could result in loss of life, serious
injury or substantial product/property damage.
CAUTION
uCautions draw your attention to the presence of
potential hazards or important product information.
Indicates an imminently hazardous situation which,
if not avoided, may result in minor injury or product/
property damage.
IMPORTANT
u
uHelpful hints for installation, operation or maintenance
which pertain to the product.
uThis symbol indicates that additional, pertinent
information is to be found.
8
5583 571 - 01
uThis symbol indicates that other instructions must
be referenced.
General Information
Vitorond 100, VR1-22 to -33 Installation and Service
Product Information
Sectional gray cast-iron boiler with triple-pass design.
For operation in closed loop, forced circulation hot water
heating systems. This boiler does not require a flow
switch.
The boiler model size selected should be based on an
accurate heat loss calculation of the building. The boiler
selected must be compatible with the connected radiation.
Maximum adjustable high limit setting
(Hydrostat 3250-Plus):...........................190° F (88° C)
Fixed High limit Vitotronic 100 or 200
(factory set):........................................230° F (110° C)
Adjustable High limit Vitotronic 100 or 200
(factory set):..........................................167° F (75° C)
Maximum allowable working pressure*1: ...45 psig (3 bar)
Fuel:.............................................................#2 fuel oil
*1 Cast iron sections are ASME stamped for 58 psig
(4 bar) and maximum allowable temperature of 250° F
(121° C).
Supply/return bypass for large water content systems
For boilers connected to large water content systems
(typically systems with volume > 1 USG (3.8 L) for every
13000 Btu/h of boiler input), such as a previous gravity
system with large free-standing radiators, a bypass line
from the supply pipe to the return pipe must be used to
avoid flue gas condensation in the heat exchanger and the
vent system. A bypass can be installed on any system as
a preventative measure. Viessmann strongly recommends
installing a bypass pipe on all cast iron boilers.
Hydrostat thermal targeting
Thermal Targeting technology analyzes thermostat activity
and continually evaluates how much heat the house
requires. When it is very cold outside, the heat demand is
high and the Fuel Smart HydroStat will raise the boiler’s
Target temperature to provide needed heat to the home.
When the outside temperature is milder, the heat demand
is lower. During these periods, the Fuel Smart HydroStat
will lower the boiler’s Target temperature – saving fuel –
while continuing to provide comfort to the house.
5583 571 - 01
IMPORTANT
This boiler maybe equipped with an outdoor reset module
(field supplied) that saves energy by reducing the boiler
water temperature as the heating load decreases. This
feature is equipped with an override which is provided
primarily to permit the use of an external energy
management system that serves the same function.
THIS OVERRIDE MUST NOT BE USED UNLESS AT LEAST
ONE OF THE FOLLOWING CONDITIONS IS TRUE:
- an external energy management system is installed that
reduces the boiler water temperature as the heating load
decreases.
- This boiler is not used for any space heating.
- This boiler is part of a modular or multiple boiler system
having a total input of 300,000 BTU/hr or greater.
- This boiler is equipped with a tankless coil.
9
General Information
Vitorond 100, VR1-22 to -33 Installation and Service
Mechanical Room
During the early stages of new home design, we
recommend that proper consideration be given to
constructing a separate mechanical room dedicated to
gas or oil fired equipment including domestic hot water
storage tanks.
The boiler should be located in a heated indoor space,
near a floor drain, and as close as possible to the vertical
chimney or vent.
Install the boiler on a concrete foundation if:
- the floor may be flooded,
- the floor is not level,
- the boiler will be installed in a residential garage (in this
case ensure that the burner is raised at least 18 in.
(457 mm) above the floor to avoid contact with
flammable vapors and fumes).
Viessmann strongly recommends installing the boiler on
a concrete foundation.
Whenever possible install boiler near an outside wall so
that it is easy to duct fresh air directly to the boiler area.
In addition, do not use exhaust fans in the boiler room
and do not install the boiler in rooms with refrigeration
equipment. This equipment requires uncontaminated
outside air for safe operation - do not install where
chemicals are stored or in a room with negative pressure.
See section entitled “Combustion Air Supply” for further
details regarding the above.
Locate boiler on flooring capable of supporting the weight
of the boiler filled with water. Ensure that the boiler
location does not interfere with the proper circulation
of combustion and ventilation air within the mechanical
room.
Combustion Air Supply
Failure to provide an adequate supply of fresh
combustion air can cause poisonous flue gases
to enter living space. Flue gases entering living
space can cause carbon monoxide poisoning which
can result in severe personal injury or loss of life.
WARNING
Never cover the boiler or store debris or other
materials near the boiler, or in any way block the
flow of adequate fresh air to the boiler. Never
cover the combustion air opening.
Advise system operator/ultimate owner accordingly.
WARNING
The boiler must not be located in areas or rooms
where chemicals are stored, or aggressive
vapors (i.e. bleach, hair spray, methyl chloride,
carbon tetrachloride or perchloroethylene) or high
dust levels or humidity levels are present. Heat
exchanger corrosion might occur and reduce the
lifetime of the boiler significantly. If above criteria
are not properly observed and boiler damage
results, any warranty on the complete boiler and
related components will be null and void.
Whenever possible, install boiler near an outside wall so
that it is easy to duct fresh air directly to the boiler area.
The boiler location must never be under negative pressure.
Exhaust fans, attic fans, or dryer fans may cause air to be
exhausted at a rate higher than air can enter the structure
for safe combustion.
The heating contractor shall ensure all of the following
requirements are met:
H An adequate supply of combustion air must be available
to ensure proper combustion.
H Ambient air temperatures must be maintained within
safe operating limits.
H When a damper is provided in any opening intended to
admit combustion air into the room within which the
appliance is installed, the damper shall be interlocked to
prevent any burner from starting before the damper is
fully open.
H Each duct used to convey air from the outdoors shall
have:
1. A cross-sectional area throughout its length at least
equal to the free area of the inlet and outlet
openings which it connects,
2. A minimum dimension of 3 in. (76 mm) at any
cross-section,
3. When making provision for outside combustion air,
the intake shall not be less than 1 ft. (0.3 m) above
the anticipated snow level for the location.
H The heating contractor must check with local
authorities (municipal building department, gas utility)
for combustion air requirements particular
to the area.
10
5583 571 - 01
WARNING
General
This equipment requires fresh air for safe operation and
must be installed ensuring provisions for adequate
combustion and ventilation air exist.
General Information
Vitorond 100, VR1-22 to -33 Installation and Service
Combustion Air Supply
(continued)
Codes
Provisions for combustion and ventilation air must be
made in accordance with applicable local codes.
In the absence of local codes, use:
H CSA B-139.00 for oil installations in Canada, or
H NFPA 31, Standard for the Installation of Oil Burning
Equipment in the U.S. Always use latest editions of
codes.
Unconfined spaces
Where the boiler is located in an unconfined space in a
building having insufficient infiltration, additional air for
combustion and ventilation shall be obtained from
outdoors or from spaces freely communicating with the
outdoors. Under these conditions, permanent opening(s)
shall be provided so that the total air received through
these openings will be at least as much as would be
admitted by openings having a total free area of
1 in2/5000 Btu/h or 4.5 cm2/kWh of the total input
rating of all oil-fired appliances
Louvers and grilles
In calculating free area as specified, consideration shall be
given to the blocking effect of louvers, grilles, or screens
that protect openings. Screens used shall be no smaller
than ¼ in. (6 mm) mesh and shall be readily accessible
for cleaning. If the free area through a design of louver or
grille is known, it shall be used in calculating the size of
opening required to provide the free area specified. If the
design and free area are not known, it shall be assumed
that wood louvres have 20-25% free area and metal
louvres and grills have 60-75% free area.
Installation
Install a combustion air opening. Round duct diameters
are as follows:
Boiler Model No.
Round duct
for combustion
air supply *1
VR1 -22
Ø”
5
VR1 -27 VR1 -33
5
6
Confined spaces
If the boiler is located in a confined space and obtains all
of its air for combustion and ventilation from within the
conditioned space, the building shall be provided with
two permanent openings, one near the top of the
enclosure and another near the bottom. Each opening
shall have a free area of not less than 1 in2/1000 Btu/h
or 19.5 cm2/kWh of the total input rating of all appliances
in the enclosure, freely communicating with interior areas
that have in turn adequate infiltration from the outside.
If the boiler is located in a confined space and that obtains
all of its air for combustion and ventilation from outside,
the building shall be provided with two permanent
openings, one near the top of the enclosure and another
near the bottom. Each opening shall communicate directly
or by means of ducts with the outdoors or to such
spaces (such as a crawl space) that freely communicate
with the outdoors, and shall be sized in accordance with
the following methods:
H Vertical duct(s) with a free area of not less than
1 in2/4000 Btu/h or 5.5 cm2/kWh of the total input
rating of all appliances in the enclosure,
H Horizontal duct(s) with an equivalent length of less
than 50 ft (15 m), having a free area of not less than
1 in2/2000 Btu/h or 11 cm2/kWh of the total input of
all appliances in the enclosure,
5583 571 - 01
H Air openings that communicate directly with the
outdoors, having a free area of not less than 1 in2/4000
Btu/h or 5.5 cm2/kWh of the total input rating of all
appliances in the enclosure.
11
Set-up
Vitorond 100, VR1-22 to -33 Installation and Service
Product Delivery
Vitorond boilers size VR1-22 to VR1-33 are shipped in
a crate with separate boiler jacketry.
Product delivery
Ensure each of the following has been
delivered:
H Crate with boiler A
H Carton with burner (shipped separately)
H Carton with standard installation equipment
Unpacking Instructions
CAUTION
WARNING
To avoid injury and to facilitate boiler maneuvering,
it is strongly recommended that Viessmann carrying
handles (Part No. 7189 602) be used. The carrying
handles allow easy removal of boiler from skid and
enables easy transportation to permanent location,
while reducing the risk of boiler panel damage due to
improper lifting or maneuvering techniques. The
carrying handles are designed to prevent boiler
slippage onto hand when carrying up/down inclines.
Do
Do
Do
Do
not
not
not
not
lift or position boiler alone.
lift by or push against panels.
bump boiler panels against floor.
drop boiler.
CAUTION
To avoid injury to hands, place wooden block under
pipes in front of skid.
If carrying handles are not available, follow the steps
below.
1. Remove top and sides of crate.
To avoid damage during lifting, carefully remove
front panel by lifting panel up and out.
2. Place wooden block 12” from rear of skid.
3. Insert 1” Ø Schedule 40 pipes through openings in
casting legs. Ends of pipes should be centered on
wooden block behind skid.
4. Lift boiler using pipes until clear from skid. Remove
skid from beneath boiler.
5. Lower boiler until pipes rest on front block.
Legend
A Casting
B 1” pipe, x2
C Rear wooden block
D Front wooden block
12
7. Remove pipes. Reinstall front boiler panel once boiler
is in final position.
5583 571 - 01
6. To remove rear block, lift (by casting - not jacket)
to tilt unit forward.
To remove front block, lift (by casting - not jacket)
to tilt unit backward.
Set-up
Vitorond 100, VR1-22 to -33 Installation and Service
Minimum Clearances to Combustibles
For typical installations, Viessmann recommends installing
the boiler with clearances as shown in Recommended
Minimum Clearances for Service.
The following are clearances to combustibles:
Standard installation
Boiler model VR1
Rear
Sides
Flue
in.
(mm)
in.
(mm)
in.
(mm)
Floor
-22
-27
-33
6
(150)
0
0
9
(230)
6
(150)
0
0
9
(230)
6
(150)
0
0
9
(230)
Combustibles
Alcove installation
Boiler model VR1
Rear
Sides
Flue
Top
Floor
in.
(mm)
in.
(mm)
in.
(mm)
in.
(mm)
-22
-27
-33
6
(150)
0
0
9
(230)
6
(150)
6
(150)
0
0
9
(230)
6
(150)
6
(150)
0
0
9
(230)
6
(150)
Combustibles
*1 Clearance of 24” (610 mm) required . for burner service.
Legend
A Boiler
B Burner
Recommended Minimum Clearances for Service
5583 571 - 01
*1 Minimum access for cleaning and service.
Legend
A Boiler
13
Set-up
Vitorond 100, VR1-22 to -33 Installation and Service
Boiler Set-up and Location
IMPORTANT
For important information concerning boiler placement
and set-up, refer to the section entitled “Mechanical
Room” on page 10.
The boiler should be located as close to the chimney as
possible. Set-up/locate boiler with slight incline towards
the rear of the boiler using levelling bolts A.
CAUTION
Boiler must be installed in such a way that oil ignition
system components are protected from water (spraying,
splashing, etc) during boiler system operation and service.
Combustion Chamber Insert
For optimum, environmentally sound operation, Vitorond
boilers are equipped with a high-grade, corrosion resistant,
stainless steel combustion chamber insert.
Ensure the bolts of the combustion chamber door are
tightened before installing the burner.
Boiler model No.
a
b
14
in.
(mm)
in.
(mm)
VR1-22
VR1-27
VR1-33
9f
(244)
9
(231)
9f
(244)
9
(231)
9f
(244)
9
(231)
5583 571 - 01
Combustion chamber insert sizes
Connections
Vitorond 100, VR1-22 to -33 Installation and Service
Venting Connection
Vitorond 100
The vent system must comply with all applicable local
and/or national codes.
If installing boiler with a side wall vent system, ensure
all manufacturer’s requirements are met.
Venting codes
For oil-fired boilers install venting system in accordance
with all applicable local codes:. In the absence of local
codes, follow national codes
g Local codes or CSA B139-00 in Canada,
or
g NFPA-31 in the U.S.
Building codes
Masonry or concrete or metal chimneys (smokestacks)
shall be constructed according to the requirements of
the province/state building code or, in the absence of
such regulations, in accordance with:
g CSA Standard CAN/CSA-A405
(National Building Code of Canada) in Canada, or
g NFPA 211 (Standard for Chimneys, Fireplaces, Vents,
and Solid Fuel-Burning Appliances) in the US. Metal
chimneys also shall meet the requirements of Chapter
4 of NFPA 211.
In Canada, factory built chimneys shall:
g Conform to ULC Standards
CAN/ULC-S629 for 1202° F (650° C),
CAN/ULC-S604 for Type A, or
CAN/ULC-S609 for Type L chimneys,
g Be certified and installed in accordance with the
manufacturer’s certified instructions, and
g Be provided with a clean-out opening that is equipped
with a tight-fitting removable cap, and constructed so
that no air can enter the clean-out facility when the cap
is in place.
In the U.S., factory built chimneys shall:
g Meet the requirements of NFPA, and
g Be listed, installed and used in accordance with their
listings and manufacturer’s instructions.
WARNING
Improper sizing, maintenance, termination of vent or
chimney can cause flue gases to enter living space.
Any blockage of vent or chimney by birds’ nests, ice,
snow, debris, or other materials can cause flue gases
to enter living space. Flue gases entering living space
can cause carbon monoxide poisoning which can
result in severe personal injury or loss of life.
General
The heating contractor shall ensure all of the following
requirements are met:
g The vent system shall ensure that no hazard is created
by the products of combustion.
g Provision shall be made to vent the products of
combustion safely to outside the building, and
such venting shall not pass through or be installed
in return air, supply air, ventilating, or combustion air
ducts or shafts.
g Sufficient air for combustion of the oil and ventilation
of the appliance shall be supplied to the space wherein
the appliance is located (see section entitled
Combustion Air Supply).
g The house and its mechanical systems shall be
inspected to determine if operation of exhaust devices
could lead to levels of depressurization of the house
that would adversely affect the operation of the oilburning appliance and its venting system. If such is the
case, the building owner shall be informed of the
situation in writing.
g The chimney shall be inspected to ensure that the
material construction, condition, and size are suitable
for the application.
g This boiler/burner combination shall not be connected
to an unlined chimney. Such chimneys shall be lined
in accordance with the applicable codes and standards.
g The chimney shall be capable of exhausting the
products of combustion and of producing a draft
not less than that recommended by the manufacturer
of the appliance connected thereto, during the mildest
weather conditions under which the appliance is
expected to operate.
During cold weather testing, excess flow performance
shall be demonstrated to ensure that flow is adequate
in warmer weather.
g An oil burning appliance that depends on natural
chimney draft shall be connected to an individual
chimney vent used for no other appliance, except
as permitted by the applicable codes and standards.
g The vent connector of this boiler must not be
connected into any portion of mechanical draft
systems operating under positive pressure.
g A chimney flue shall extend at least 3 ft (1 m) above
the highest point at which the chimney comes in
contact with the roof, and not less than 2 ft (0.6 m)
above the highest roof surface or structure within
10 ft. (3 m) of the chimney on a horizontal plane
perpendicular to the chimney. Not more than 8”
(200 mm) of chimney flue above the top of the
chimney cap shall be considered in computing height.
g Down draft and condensation problems must be
corrected.
5583 571 - 01
WARNING
Never operate the boiler/burner without an installed
venting system which safely vents all products of
combustion to the outdoors. The vent system must
comply with all applicable local and/or national codes.
15
Connections
Vitorond 100, VR1-22 to -33 Installation and Service
Venting Connection (continued)
When installing piping or venting, or while insulating
overhead pipes, do not stand on top panel of boiler.
Advise other trades accordingly!
Installation
Use approved vent material only.
1. Install the venting so as to achieve the shortest
possible way with minimum elbows. If necessary,
rearrange existing water piping to achieve closest
chimney connection.
2. Horizontal runs must be supported by appropriate
means to prevent sagging. Avoid long horizontal
runs of vent pipe. Horizontal runs should have not
less than ¼” rise per ft. from the boiler to the vent
terminal. Metal strapping must be used to support
horizontal runs every 4 ft. (1.2 m)
3. Connect factory supplied vent pipe adaptor E
to flue gas collar. Fasten using either three equally
spaced,corrosion resistant, self-tapping screws and
high temperature silicone, or equivalent means.
4. Connect chimney via a 18” (457 mm) long field
supplied, slightly inclined intermediate section of
venting. Flue pipe outside ∅: 5”.
5. Drill a ½” opening on the side of the vent pipe
approximately three times the vent pipe diameter
away from the flue gas collar of the boiler for flue
gas analysis equipment.
6. Seal all flue pipe joints.
7. Viessmann recommends that any non-insulated vent
pipe is insulated to reduce cooling of flue gas and
velocity noises.
For direct vent application, refer to the Direct
Vent System Installation Instructions
Installation Instructions
Blocked Vent Safety Switch
*1 Install in accordance with the draft control
manufacturer’s instructions.
16
5583 571 - 01
Legend
A Vitorond boiler with burner
B Outside rain cap
C Vent, use approved vent material
D M-Barometric damper (field supplied) for oil *1
E Vent pipe adaptor (factory supplied)
F For Canada: Blocked vent safety switch
Connections
Vitorond 100, VR1-22 to -33 Installation and Service
Water Side Connections (with Hydrostat 3250-Plus Control)
IMPORTANT
This boiler is designed for closed loop, forced circulation
heating systems only.
1. Flush heating system thoroughly (particularly with
existing systems which have been in operation for years).
WARNING
Failure to flush the heating system could cause system
sludge to settle in the boiler, causing overheating and
failure. This type of failure is not covered under
warranty.
IMPORTANT
Legend
A Boiler water supply connection,
pressure relief valve:.................................1½” NPT
B High limit control location:........................1a” NPTF
C Boiler water return, drain and automatic feed:.1½” NPT
We recommend the installation of a spring-loaded flowcheck valve in heating circuits without mixing valves.
This serves to avoid uncontrolled gravity circulation of
heat into the heating system during summer months.
2. Remove screw Q. Remove top back panel before
starting to connect pipe fittings to boiler water supply
connection.
3. Connect system supply A to using NPT fittings,
as shown in the illustration. Connect the system
return C to using NPT fittings, as shown.
See installation examples in the following section
starting on page 50.
4. Install temperature and pressure gage O with brass
extension coupling in ½” opening as shown in
the illustration. Use thread sealing compound such
as Loctite or Teflon tape.
5583 571 - 01
Hydrostat control is equipped with a remote mounting
kit (c/w a 48” sensor cable) for easy installation of the
control in a convenient location.
Legend
D Hydrostat control 3250 Plus
E Electro-well
F Hex bushing, 1½” x ¾”
G Nipple, 1½” x 5”
H Pressure relief valve
I Tee, 1½” x 1½” x ¾”
J Drain valve (sediment faucet), ¾”
K
L
M
N
O
P
Reducing tee/elbow, 1½” x ¾” x 1½”
Street elbow, ¾”
Nipple, ¾” x 3½”
Reducing tee, 1½” x 1½” x ½”
Temperature and pressure gage
Flue gas adaptor, Ø 5”
17
Connections
Vitorond 100, VR1-22 to -33 Installation and Service
Safety Connections (with Hydrostat 3250-Plus Control)
Pressure relief valve
1. Install pressure relief valve. Pipe pressure relief valve
as illustrated and connect to boiler water supply
connection.
Refer to instructions supplied with
the pressure relief valve.
2. Install discharge pipe on pressure relief valve.
The discharge pipe should terminate approximately
6” (150 mm) above a floor drain.
The end of the pipe must not be threaded.
Minimum connection diameters:
”
Pressure relief valve..............................................¾
”
Discharge pipe......................................................¾
Piping to precharged expansion tank
”
VR1-22 to VR1-33................................................¾
This boiler does not require a flow switch.
Legend
A Pressure relief valve
B Nipple, ¾” x 3½”
C Tee, 1½” x ¾” x 1½”
IMPORTANT
Install the (approved) factory supplied pressure relief valve.
Removal of air from the system must occur via use of air
vent(s) in the system supply. To ensure the boiler can be
purged of all air, ensure supply/return water lines do not
contain restrictive piping where air could be trapped.
WARNING
Do not install an isolation valve between boiler and
pressure relief valve.
The discharge pipe for the pressure relief valve must be
oriented to prevent scalding of attendants. Pipe pressure
relief valve discharge pipe close to floor drain. Never pipe
discharge pipe to the outdoors.
Boiler control
1.
Install supplied high limit control as shown.
Maximum allowable temperature setting is 240°F (110°C).
Legend
A Hydrostat 3250-Plus high limit control
B Electro-well
C Hex bushing
18
5583 571 - 01
Refer to instructions supplied with
the Hydrostat 3250-Plus control.
Connections
Vitorond 100, VR1-22 to -33 Installation and Service
Safety Connections (with Hydrostat 3250-Plus Control) (continued)
5583 571 - 01
1.
To avoid problems with removing the top panel,
we recommend moving the top panel screw
approximately 3” to the left or right. To do so,
pre-drill the panel with an d” drill bit.
To reinstall the top panel, drill a new d” pilot hole
through the top back panel and into the back panel.
Reinstall the screw P into this new mounting hole.
19
Connections
Vitorond 100, VR1-22 to -33 Installation and Service
Water Side Connections (Vitotronic Control)
IMPORTANT
This boiler is designed for closed loop, forced circulation
heating systems only.
1. Flush heating system thoroughly (particularly with
existing systems which have been in operation for
years).
CAUTION
Failure to flush the heating system could cause system
sludge to settle in the boiler, causing overheating and
failure. This type of failure is not covered under warranty.
IMPORTANT
Legend
A Boiler water supply connection,
pressure relief valve......................................1½” NPT
B Boiler water return with return
injector nozzle .........................................1½” NPT
C Safety return; connect precharged expansion
tank, boiler drain, and automatic feed .........1½” NPT
We recommend the installation of a spring-loaded flowcheck valve in heating circuits without mixing valves.
This serves to avoid uncontrolled gravity circulation of
heat into the heating system during summer months.
2. Remove screw P. Remove top back panel before
starting to connect pipe fittings to boiler water supply
connection.
3. Connect system supply to A using NPT fittings.
Connect the system return to B using NPT fittings
pictured below. See installation examples.
Legend
E Nipple, 1½” x 5”
F Pressure relief valve
G Tee, 1½” x 1½” x ¾”
H Drain valve (sediment faucet), ¾”
I Reducing tee/elbow, 1½” x ¾” x 1½”
J Street elbow, ¾”
20
K
L
M
N
O
Nipple, ¾” x 3½”
Reducing tee, 1½” x 1½” x ½”
Temperature and pressure gage
Flue gas adaptor, Ø 5”
Return injector
5583 571 - 01
4. Install temperature and pressure gage with brass
extension coupling M in ½” opening as shown in
the illustration. Use thread sealing compound such
as Loctite or Teflon tape.
Connections
Vitorond 100, VR1-22 to -33 Installation and Service
Safety Connections (Vitotronic Control)
Pressure relief valve
1. Install pressure relief valve. Pipe pressure relief valve
as illustrated and connect to boiler water supply
connection.
Refer to instructions supplied with
the pressure relief valve.
2. Install discharge pipe on pressure relief valve.
The discharge pipe should terminate approximately
6 in. (150 mm) above a floor drain. The end of the
pipe must not be threaded.
Minimum connection diameters:
”
Pressure relief valve ..............................................¾
”
Discharge pipe ......................................................¾
This boiler does not require a flow switch.
IMPORTANT
Legend
A Pressure relief valve
B Nipple, ¾” x 3½”
C Tee, 1½” x ¾” x 1½”
Install the (approved) factory supplied pressure relief
valve. Removal of air from the system must occur via
use of air vent(s) in the system supply. To ensure the
boiler can be purged of all air, ensure supply/return water
lines do not contain restrictive piping where air could be
trapped.
WARNING
Do not install an isolation valve between boiler and
pressure relief valve.
The discharge pipe for the pressure relief valve must be
oriented to prevent scalding of attendants. Pipe pressure
relief valve discharge pipe close to floor drain. Never pipe
discharge pipe to the outdoors.
Boiler return injector
5583 571 - 01
1. Install bushing/return water injector combination D.
21
Connections
Vitorond 100, VR1-22 to -33 Installation and Service
Safety Connections (Vitotronic Control) (continued)
22
To avoid problems with removing the top panel,
we recommend moving the top panel screw
approximately 3” to the left or right. To do so,
pre-drill the panel with an d” drill bit.
To reinstall the top panel, drill a new d” pilot hole
through the top back panel and into the back panel.
Reinstall the screw P into this new mounting hole.
5583 571 - 01
1.
Connections
Vitorond 100, VR1-22 to -33 Installation and Service
Pressure Testing
Perform pressure test on boiler
The boiler must be leak tested before being placed in
operation. Before boiler is connected to piping or electrical
power supply, it must be hydrostatically pressure tested
with a maximum of 1½ times the maximum operating
pressure of the boiler.
1. After installing safety devices (above), install
temporary cap on ¾” nipple extension (nipple for
pressure relief valve mounting).
2. Cap supply and return connections.
3. Connect ½” garden hose to boiler drain valve and
fill boiler slowly until pressure gage indicates max.
68 psi (4.65 bar).
WARNING
Exposing the boiler to pressures and temperatures
in excess of those listed will result in damage and
will render warranty null and void.
4. Maintain pressure for 15 minutes. During time of
pressure testing, do not leave boiler unattended.
5. Inspect all pipe joint connections, the safety devices
(Safety Header, if applicable), and boiler base with
flashlight for leaks.
6. After 15 minutes, release water pressure from boiler
by opening boiler drain valve slowly, remove caps
from supply and return connections as well as ¾”
cap from safety nipple, and install pressure relief
valve immediately instead of ¾” cap. After boiler
has passed pressure test, proceed with installation.
5583 571 - 01
Max. allowable operating pressure..............45 psig (3bar)
Max. allowable testing pressure...........68 psig (4.65 bar)
Max. allowable boiler temperature..........248° F (120° C)
23
Burner - Beckett
Vitorond 100, VR1-22 to -33 Installation and Service
Burner Installation
Refer to instructions supplied with
the Beckett burner.
Observe all instructions supplied with the burner.
Burner Information
Fuel
This boiler is for use with the Beckett #2 fuel oil burner
supplied by Viessmann only. Use only the fuel stated on
the rating plate of the burner.
WARNING
DO NOT USE GASOLINE
CRANKCASE DRAININGS OR ANY
OIL CONTAINING GASOLINE.
Oil nozzle
The Beckett burner for the VR1-63 boiler is shipped with
factory setting and oil nozzle installed. For VR1-50
boiler, replace installed nozzle with nozzle packaged with
burner. For Beckett burner specifications see table on
page 47.
Burner calibration
Ensure that the combustion results of the oil-fired burner
mounted on this boiler are verified after start-up.
If adjustments are necessary, always verify results with
a calibrated flue gas analyzer.
For Beckett burner specifications see table on page 47.
IMPORTANT
24
5583 571 - 01
This burner is shipped with the oil pump set to operate
on a single line system. To operate on a two-line system,
the bypass plug must be installed. The burner is shipped
configured for use in single line applications. No changes
to the oil pump are required for use in single line
applications.
Beckett Burner Set-up
Vitorond 100, VR1-22 to -33 Installation and Service
Burner Mounting
Refer to instructions supplied with
the Beckett burner.
1.
Remove burner from carton. The mounting flange
has been installed at the factory.
2.
Mount four M8 spacer bolts A in threaded holes of
combustion chamber door.
3.
Slide burner gasket B over spacer bolts.
4.
Mount burner as shown. (For proper insertion
lengths see table on page 47).
5.
Secure burner with M8 nuts C and washers D
provided.
5583 571 - 01
Burner air tube insertion
25
Beckett Burner Set-up
Vitorond 100, VR1-22 to -33 Installation and Service
Oil Piping Connection
General Oil piping requirements
Location and installation of oil tanks, oil piping and
burners must follow:
- Local codes and regulations.
- Information provided with burner and fuel pump.
- In Canada, CSA B139.00, Installation of Oil-Burning
Equipment.
- In USA, NFPA 31, Standard for the Installation of
Oil-Burning Equipment.
WARNING
Do not use Teflon tape as an oil pipe sealant. It can
cause valves to fail, creating hazards. Do not use
compression fittings.
Underground oil line piping must be encased to prevent
oil leaking into ground. Check local codes for information.
If any part of fuel oil tank is above burner level, an antisiphon device must be used to prevent flow of oil in case
of oil line break.
Legend
A Oil line (see local codes for appropriate arrangement
and piping of filter control valves, etc., back to oil tank)
B Flare fitting
Make tank connections with swing joints or copper tubing
to prevent breaking in case the tank settles. Make swing
joints so they will tighten as tank settles. Non-hardening
pipe joint compounds should be used on all threads.
Support oil lines as required by codes.
IMPORTANT
This burner is shipped with the oil pump set to operate
on a single line system. To operate on a two-line system,
the bypass plug must be installed. The burner is shipped
configured for use in single line applications. No changes
to the oil pump are required for use in single line
applications.
Oil piping connection at burner
See illustration above for recommended connection at
burner, allowing burner mounting door to swing open
completely for servicing.
WARNING
26
5583 571 - 01
The oil supply inlet pressure to the fuel unit cannot
exceed 3 psig. Install a pressure-limiting device in
accordance with the above mentioned codes.
Beckett Burner Set-up
Vitorond 100, VR1-22 to -33 Installation and Service
Electrical Connections (with Hydrostat 3250-Plus control)
WARNING
Electric shock hazard. Can cause severe personal injury
or loss of life if power source, including service switch
on boiler, is not disconnected before installing or servicing.
Installations must follow these codes and requirements:
- National Electrical Code, ANSI/NFPA 70, latest edition
and any additional national, state or local codes.
- In Canada, CSA C22.1 Canadian Electrical Code Part 1
and any local codes.
- Wiring must be N.E.C. Class 1. If original wire as
supplied with boiler must be replaced, type 105°C wire
or equivalent must be used. Supply wiring to boiler and
additional control wiring must be 14 ga. or heavier.
- Provide electrical ground at boiler as required by codes.
g
g
g
All field supplied nominal 120 VAC voltage wiring must
be sheathed in a flexible metal conduit.
Disconnect means, overload protection and low water
cut-off must be provided as required by local codes.
Connect incoming line voltage HOT (L1) wire to
terminal L1, and N to terminal L2 of the Hydrostat
3250-Plus control (see wiring diagram on page 29).
Burner wiring (Beckett)
IMPORTANT
The R7184 or GeniSys 7505P primary control with
valve-on delay (pre-purge) and burner motor-off delay
(post-purge - factory default settings can be field
adjusted), requires a constant 120 VAC power source
supplied to the BLACK wire on the control (see wiring
diagram on pages 29).
1.
The cover mounting plate is not a conduit connection
point. Pass conduit and attached connector through
the front opening in the mounting plate or through
one of the knockouts on either side of the cover and
attach it directly to the burner-mounted 4x4 electrical
junction box.
Room thermostat wiring
Legend
A Cable strap (supplied)
B Hydrostat 3250-Plus
C Burner wiring harness (supplied)
1.
Install thermostat on inside wall away from influences
of drafts, hot or cold water pipes, lighting fixtures,
television, sun rays or fireplaces.
2.
Follow instructions supplied with room thermostat.
If it has a heat anticipator, set heat anticipator in
thermostat to match power requirements of
equipment connected to it. Boiler wiring diagrams
give setting for standard equipment.
WARNING
5583 571 - 01
Ensure that burner wiring harness is properly attached
and secured to the boiler side panel using the supplied
cable straps as depicted above. The cable strap must
be coiled on the boiler side panel so that no slack is left,
allowing the burner/boiler door to be swung open without
disconnecting the burner wiring harness from the burner.
Failure to heed this warning may result in personal injury.
27
Beckett Burner Set-up
Vitorond 100, VR1-22 to -33 Installation and Service
Electrical Connections (with Hydrostat 3250-Plus control) (continued)
WARNING
Electric shock hazard. Can cause severe personal injury
or loss of life if power source, including service switch
on boiler, is not disconnected before installing or servicing.
Installations must follow these codes and requirements:
- National Electrical Code, ANSI/NFPA 70, latest edition
and any addtional national, state or local codes.
- In Canada, CSA C22.1 Canadian Electrical Code Part 1
and any local codes.
- Wiring must be N.E.C. Class 1. If original wire as
supplied with boiler must be replaced, type 105°C wire
or equivalent must be used. Supply wiring to boiler and
additional control wiring must be 14 ga. or heavier.
- Provide electrical ground at boiler as required by codes.
Burner wiring harness (supplied)
28
If Beckett burner is being installed, cut this length to
6” for connection to burner junction box (located
under the burner primary control).
5583 571 - 01
*
Beckett Burner Set-up
Vitorond 100, VR1-22 to -33 Installation and Service
Electrical Connections (with Hydrostat 3250-Plus control) (continued)
Legend
A Power supply, provide disconnect means and
overload protection as required.
B Control case must be connected to earth ground.
Use grounding provided.
C B1 is a in. tab terminal.
D Circulator
E Temperature limit control (when required by local
jurisdiction)
Note: Used with standard venting and direct vent systems.
WARNING
Ensure that the burner cycles ON and OFF on proper
call for heat before leaving the job site. Failure to do so
may lead to boiler runaway situation, which may lead to
property damage, personal injury or death.
CAUTION
5583 571 - 01
A field supplied manual reset high limit control must
be installed at the outlet pipe of the boiler to interrupt
burner operation should the factory supplied high limit
control fail. This field supplied high limit control must
be set 20°F (7°C) above the setting of the factory
supplied high limit control. The setting of this field
supplied high limit control must never be greater than
220°F (104°C).
Installations must follow these codes and requirements:
- National Electrical Code, ANSI/NFPA 70, latest edition
and any additional national, state or local codes.
- In Canada, CSA C22.1 Canadian Electrical Code
Part 1 and any local codes.
- Wiring must be N.E.C. Class 1. If original wire as
supplied with boiler must be replaced, type 105°C
wire or equivalent must be used. Supply wiring to
boiler and additional control wiring must be 14 ga.
or heavier.
- Provide electrical ground at boiler as required by codes.
WARNING
Electric shock hazard. Can cause severe personal injury
or loss of life if power source, including service switch on
boiler, is not disconnected before installing or servicing.
H
All field supplied nominal 120 VAC voltage wiring
must be sheathed in a flexible metal conduit.
H
Disconnect means, overload protection and low water
cut-off must be provided as required by local codes.
H
Connect incoming line voltage HOT (L1) wire to
terminal L1, and N to terminal L2 of the Hydrostat
3250-Plus control (see wiring diagram).
29
Beckett Burner Set-up
Vitorond 100, VR1-22 to -33 Installation and Service
Electrical Connections (with Vitotronic control)
WARNING
Electric shock hazard. Can cause severe personal injury
or loss of life if power source, including service switch
on boiler, is not disconnected before installing or servicing.
Installations must follow these codes
and requirements:
- National Electrical Code, ANSI/NFPA 70, latest edition
and any addtional national, state or local codes.
- In Canada, CSA C22.1 Canadian Electrical Code Part 1
and any local codes.
- Wiring must be N.E.C. Class 1. If original wire as
supplied with boiler must be replaced, type 105°C
wire or equivalent must be used. Supply wiring to boiler
and additional control wiring must be 14 ga. or heavier.
- Provide electrical ground at boiler as required by codes.
Burner wiring
IMPORTANT
The R7184 or GeniSys 7505P primary control with
valve-on delay (pre-purge) and burner motor-off delay
(post-purge - factory default settings can be field
adjusted), requires a constant 120 VAC power source
supplied to the BLACK wire on the control (see wiring
diagram on page 34).
1. The cover mounting plate is not a conduit connection
point. Pass conduit and attached connector through
the front opening in the mounting plate or through
one of the knockouts on either side of the cover
and attach it directly to the burner-mounted 4x4
electrical junction box.
Electrical connections
1. Run the fA plug-in connector cable of the Vitotronic
control down behind the front panel of the boiler
and out through the bottom.
2. Connect the female fA plug of the burner to the male
fA plug of the Vitotronic control.
2.
30
Follow instructions supplied with room thermostat.
If it has a heat anticipator, set heat anticipator in
thermostat to match power requirements of
equipment connected to it. Boiler wiring diagrams
give setting for standard equipment.
5583 571 - 01
Room thermostat wiring
1. Install thermostat on inside wall away from influences
of drafts, hot or cold water pipes, lighting fixtures,
television, sun rays or fireplaces.
Beckett Burner Set-up
Vitorond 100, VR1-22 to -33 Installation and Service
Electrical Connections (with Vitotronic control)
(continued)
WARNING
Electric shock hazard. Can cause severe personal injury
or loss of life if power source, including service switch
on boiler, is not disconnected before installing or servicing.
Installations must follow these codes and requirements:
- National Electrical Code, ANSI/NFPA 70, latest edition
and any addtional national, state or local codes.
- In Canada, CSA C22.1 Canadian Electrical Code Part 1
and any local codes.
- Wiring must be N.E.C. Class 1. If original wire as
supplied with boiler must be replaced, type 105°C
wire or equivalent must be used. Supply wiring to boiler
and additional control wiring must be 14 ga. or heavier.
- Provide electrical ground at boiler as required by codes.
Closed end connectors are factory installed on RED, ORANGE and BLUE
wires. These RED,ORANGE and BLUE wires may or may not be used in
your burner application. See wiring diagram in this manual which is specific
to your burner application. Do not remove or cut any of the closed end
connectors of the RED, ORANGE or BLUE wires, unless it is necessary to do
so. RED wire is live (120VAC) at all times. Do not remove or cut its closed
end connector unless it is necessary to do so. Failure to heed the above
instructions may cause severe personal injury or loss of life.
Burner wiring harness (supplied)
Legend
BL Blue
O Orange
BK Black
W White
G Green
R Red
5583 571 - 01
* If Beckett burner is being installed, cut this length
to 6” for connection to burner junction box (located
under the burner primary control).
31
Beckett Burner Set-up
Vitorond 100, VR1-22 to -33 Installation and Service
Installation of Vitotronic Control
Refer to Installation Instructions Boiler Control
(for all connections to control base)
IMPORTANT
The power supply cable is shipped with the boiler control.
1.
Loosen two screws, remove cover plate and discard.
2.
Remove top back panel.
3.
Remove front panel.
4.
Place control console on boiler and fasten with two
screws removed in step 1.
WARNING
Do not kink capillaries. Proper operation of sensors is not
possible if capillaries are kinked.
IMPORTANT
Boiler temperature sensor 3 is shipped with the boiler
control (not applicable to Vitotronic 100, KK10).
5.
Carefully push high limit and boiler temperature
sensor 3 behind front panel and into sensor wells
as far as possible. Lay excess sensor cabling and
capillary tubing on insulation.
6. Channel power supply cable (for Vitotronic 200 KW2
or Vitotronic 100 KW10B) and all other 120 VAC
cabling through back opening toward boiler control.
7. Channel low voltage cables (i.e. sensor cables)
through cable opening toward boiler control.
8. Coil excess cabling and tuck between side panel and
insulation.
WARNING
Always route all cables and capillaries between nylon
backed insulation and metal enclosure panels, never
directly on cast iron heat exchanger.
32
5583 571 - 01
9. Tighten strain reliefs.
Beckett Burner Set-up
Vitorond 100, VR1-22 to -33 Installation and Service
Installation of Vitotronic Control (continued)
1.
To avoid problems with removing the top panel,
we recommend moving the top panel screw
approximately 3” to the left or right. To do so,
pre-drill the panel with an 1/8” drill bit.
To reinstall the top panel, drill a new 1/8” pilot hole
through the top back panel and into the back panel.
Reinstall the screw P into this new mounting hole.
Boiler Coding Card
IMPORTANT
Only the boiler coding card supplied with the standard
equipment of the boiler may be used. The coding card
is enclosed in the accessory pack of the boiler.
1. Push boiler coding card through recess in the cover
and insert it into plug-in location ”X7”.
IMPORTANT
5583 571 - 01
If the boiler coding card is not installed the following fault
code will be displayed on the boiler control: “b7“.
Applies to Vitotronic 200 KW2.
33
Beckett Burner Set-up
Vitorond 100, VR1-22 to -33 Installation and Service
Electrical Connections (with GeniSys primary control)
Electric shock hazard. Can cause severe personal injury
or loss of life if power source, including service switch
on boiler, is not disconnected before installing or servicing.
Installations must follow these codes and requirements:
- National Electrical Code, ANSI/NFPA 70, latest edition
and any additional national, state or local codes.
- In Canada, CSA C22.1 Canadian Electrical Code Part 1
and any local codes.
- Wiring must be N.E.C. Class 1. If original wire as
supplied with boiler must be replaced, type 105°C
wire or equivalent must be used. Supply wiring to
boiler and additional control wiring must be 14 ga.
or heavier.
- Provide electrical ground at boiler as required by codes.
34
WARNING
Ensure that the burner cycles ON and OFF on proper call
for heat before leaving the job site. Failure to do so may
lead to boiler runaway situation, property damage, and
personal injury or death.
IMPORTANT
If burner lock-out occurs, verify a blocked vent safety
switch operation first.
5583 571 - 01
WARNING
Riello Burner Set-up
Vitorond 100, VR1-22 to -33 Installation and Service
Burner Installation
Refer to the Instructions supplied
with Riello burner
Observe all instructions supplied with the burner.
Burner Information
Fuel
This boiler is for use with the Riello #2 fuel oil burner
supplied by Viessmann only. Use only the fuel stated
on the rating plate of the burner.
Oil nozzle
The Riello burner for the VR1-33 boiler is shipped with
factory setting and oil nozzle installed, and should require
only minor adjustments. For VR1-40, and -50 boilers,
replace installed nozzle with nozzle packaged with burner.
For Riello burner specifications see table on page 48.
Burner calibration
Ensure that the combustion results of the oil-fired burner
mounted on this boiler are verified after start-up.
If adjustments are necessary, always verify results with
a calibrated flue gas analyzer.
For Riello burner specifications see table on page 48.
WARNING
Do not use gasoline crankcase drainings or any oil
containing gasoline.
IMPORTANT
5583 571 - 01
This burner is shipped with the oil pump set to operate
on a single line system. To operate on a two-line system,
the bypass plug must be installed. The burner is shipped
configured for use in single line applications. No changes
to the oil pump are required for use in single line
applications.
35
Riello Burner Set-up
Vitorond 100, VR1-22 to -33 Installation and Service
Burner Mounting
Refer to the Instructions supplied
with Riello burner
1. Remove burner from carton. The mounting flange
has been installed at the factory.
2. Mount four M8 spacer bolts A in threaded holes
of combustion chamber door.
3. Slide burner gasket B over spacer bolts.
4. Mount burner as shown. (For proper insertion lengths
see table on page 48).
Burner air tube insertion
36
5583 571 - 01
5. Secure burner with M8 nuts C and washers D
provided.
Riello Burner Set-up
Vitorond 100, VR1-22 to -33 Installation and Service
Oil Piping Connection
Refer to the Instructions supplied
with Riello burner
General oil piping requirements
Location and installation of oil tanks, oil piping and
burners must follow:
- Local codes and regulations.
- Information provided with burner and fuel pump.
- In Canada, CSA B139.00, Installation of Oil-Burning
Equipment.
- In USA, NFPA 31, Standard for the Installation of
Oil-Burning Equipment.
WARNING
Do not use Teflon tape as an oil pipe sealant. It can cause
valves to fail, creating hazards. Do not use compression
fittings.
Legend
A Oil line (see local codes for appropriate arrangement
and piping of filter control valves, etc., back to oil
tank)
IMPORTANT
5583 571 - 01
This burner is shipped with the oil pump set to operate
on a single line system. To operate on a two-line system,
the bypass plug must be installed. The burner is shipped
configured for use in single line applications. No changes
to the oil pump are required for use in single line
applications.
Underground oil line piping must be encased to prevent
oil leaking into ground. Check local codes for information.
If any part of fuel oil tank is above burner level, an antisiphon device must be used to prevent flow of oil in case
of oil line break.
Make tank connections with swing joints or copper tubing
to prevent breaking in case the tank settles. Make swing
joints so they will tighten as tank settles. Non-hardening
pipe joint compounds should be used on all threads.
Do not use Loctite or Teflon tape. Support oil lines as
required by codes.
Oil piping connection at burner
See illustration for recommended connection at burner,
allowing burner mounting door to swing open completely
for servicing.
WARNING
The oil supply inlet pressure to the fuel unit cannot exceed
3 psig. Install a pressure-limiting device in accordance with
the above mentioned codes.
37
Riello Burner Set-up
Vitorond 100, VR1-22 to -33 Installation and Service
Electrical Connections (with Hydrostat 3250-Plus control)
H
All field supplied nominal 120 VAC voltage wiring
must be sheathed in a flexible metal conduit.
H
Disconnect means, overload protection and low water
cut-off must be provided as required by local codes.
H
Connect incoming line voltage HOT (L1) wire to
terminal L1, and N to terminal L2 of the Hydrostat
3250-Plus control (see wiring diagram).
WARNING
Electric shock hazard. Can cause severe personal injury
or loss of life if power source, including service switch
on boiler, is not disconnected before installing or servicing.
Installations must follow these codes and requirements:
- National Electrical Code, ANSI/NFPA 70, latest edition
and any additional national, state or local codes.
- In Canada, CSA C22.1 Canadian Electrical Code Part 1
and any local codes.
- Wiring must be N.E.C. Class 1. If original wire as
supplied with boiler must be replaced, type 105°C
wire or equivalent must be used. Supply wiring to
boiler and additional control wiring must be 14 ga.
or heavier.
- Provide electrical ground at boiler as required by codes.
Burner wiring
1. Secure control harness A using 2 supplied cable
straps B.
WARNING
Ensure that burner wiring harness is properly attached
and secured to the boiler side panel using the supplied
cable straps as depicted above. The cable strap must
be coiled on the boiler side panel so that no slack is left,
allowing the burner/boiler door to be swung open without
disconnecting the burner wiring harness from the burner.
Failure to heed this warning may result in personal injury.
38
2. Follow instructions supplied with room thermostat.
If it has a heat anticipator, set heat anticipator in
thermostat to match power requirements of
equipment connected to it. Boiler wiring diagrams
give setting for standard equipment.
5583 571 - 01
Legend
A Burner and control harness,
(see wiring diagram on page 39)
B Cable strap (supplied)
C Hydrostat 325-Plus control
Room thermostat wiring
1. Install thermostat on inside wall away from influences
of drafts, hot or cold water pipes, lighting fixtures,
television, sun rays or fireplaces.
Riello Burner Set-up
Vitorond 100, VR1-22 to -33 Installation and Service
Electrical Connections (with Hydrostat 3250-Plus control)
Legend
A Power supply, provide disconnect means and
overload protection as required.
B Control case must be connected to earth ground.
Use grounding provided.
C B1 is a in. tab terminal.
D Circulator
WARNING
Ensure that the burner cycles ON and OFF on proper
call for heat before leaving the job site. Failure to do so
may lead to boiler runaway situation, which may lead to
property damage, personal injury or death.
IMPORTANT
Red wire not used in this application. Use wire nuts to
cap both ends (inside high limit control and Riello burner
sub- base).
CAUTION
5583 571 - 01
A field supplied manual reset high limit control must
be installed at the outlet pipe of the boiler to interrupt
burner operation should the factory supplied high limit
control fail. This field supplied high limit control must
be set 20°F (7°C) above the setting of the factory
supplied high limit control. The setting of this field
supplied high limit control must never be greater than
220°F (104°C).
Note: Used with standard venting.
Installations must follow these codes and requirements:
- National Electrical Code, ANSI/NFPA 70, latest edition
and any additional national, state or local codes.
- In Canada, CSA C22.1 Canadian Electrical Code
Part 1 and any local codes.
- Wiring must be N.E.C. Class 1. If original wire as
supplied with boiler must be replaced, type 105°C
wire or equivalent must be used. Supply wiring to
boiler and additional control wiring must be 14 ga.
or heavier.
- Provide electrical ground at boiler as required by codes.
WARNING
Electric shock hazard. Can cause severe personal injury
or loss of life if power source, including service switch on
boiler, is not disconnected before installing or servicing.
H
All field supplied nominal 120 VAC voltage wiring
must be sheathed in a flexible metal conduit.
H
Disconnect means, overload protection and low water
cut-off must be provided as required by local codes.
H
Connect incoming line voltage HOT (L1) wire to
terminal L1, and N to terminal L2 of the Hydrostat
3250-Plus control (see wiring diagram).
39
Riello Burner Set-up
Vitorond 100, VR1-22 to -33 Installation and Service
Electrical Connections (with Vitotronic control)
WARNING
Electric shock hazard. Can cause severe personal injury
or loss of life if power source, including service switch
on boiler, is not disconnected before installing or servicing.
Installations must follow these codes
and requirements:
- National Electrical Code, ANSI/NFPA 70, latest edition
and any addtional national, state or local codes.
- In Canada, CSA C22.1 Canadian Electrical Code Part 1
and any local codes.
- Wiring must be N.E.C. Class 1. If original wire as
supplied with boiler must be replaced, type 105°C
wire or equivalent must be used. Supply wiring to boiler
and additional control wiring must be 14 ga. or heavier.
- Provide electrical ground at boiler as required by codes.
Electrical connections
1. Run the fA plug-in connector cable of the Vitotronic
control down behind the front panel of the boiler
and out through the bottom.
2. Connect the female fA plug of the burner to the male
fA plug of the Vitotronic control.
Room thermostat wiring
1. Install thermostat on inside wall away from influences
of drafts, hot or cold water pipes, lighting fixtures,
television, sun rays or fireplaces.
40
Follow instructions supplied with room thermostat.
If it has a heat anticipator, set heat anticipator in
thermostat to match power requirements of
equipment connected to it. Boiler wiring diagrams
give setting for standard equipment.
5583 571 - 01
2.
Riello Burner Set-up
Vitorond 100, VR1-22 to -33 Installation and Service
Electrical Connections (with Vitotronic control) (continued)
WARNING
Electric shock hazard. Can cause severe personal injury
or loss of life if power source, including service switch
on boiler, is not disconnected before installing or servicing.
Installations must follow these codes and requirements:
- National Electrical Code, ANSI/NFPA 70, latest edition
and any addtional national, state or local codes.
- In Canada, CSA C22.1 Canadian Electrical Code Part 1
and any local codes.
- Wiring must be N.E.C. Class 1. If original wire as
supplied with boiler must be replaced, type 105°C
wire or equivalent must be used. Supply wiring to boiler
and additional control wiring must be 14 ga. or heavier.
- Provide electrical ground at boiler as required by codes.
Closed end connectors are factory installed on RED, ORANGE and BLUE
wires. These RED,ORANGE and BLUE wires may or may not be used in
your burner application. See wiring diagram in this manual which is specific
to your burner application. Do not remove or cut any of the closed end
connectors of the RED, ORANGE or BLUE wires, unless it is necessary to do
so. RED wire is live (120VAC) at all times. Do not remove or cut its closed
end connector unless it is necessary to do so. Failure to heed the above
instructions may cause severe personal injury or loss of life.
Burner wiring harness (supplied)
5583 571 - 01
Legend
BL Blue
O Orange
BK Black
W White
G Green
R Red
41
Riello Burner Set-up
Vitorond 100, VR1-22 to -33 Installation and Service
Electrical Connections (with Vitotronic control) (continued)
Electric shock hazard. Can cause severe personal injury
or loss of life if power source, including service switch
on boiler, is not disconnected before installing or servicing.
WARNING
RED wire not used in this application. DO NOT cut or
remove closed end connector from the wire. (Live 120VAC
at all times).
Legend
BL Blue
OG Orange
BK Black
W White
G Green/Ground
42
R
Y
V
BR
GY
Red
Yellow
Violet
Brown
Gray
Installations must follow these codes and requirements:
- National Electrical Code, ANSI/NFPA 70, latest edition
and any addtional national, state or local codes.
- In Canada, CSA C22.1 Canadian Electrical Code Part 1
and any local codes.
- Wiring must be N.E.C. Class 1. If original wire as
supplied with boiler must be replaced, type 105°C
wire or equivalent must be used. Supply wiring to boiler
and additional control wiring must be 14 ga. or heavier.
- Provide electrical ground at boiler as required by codes.
WARNING
Ensure that the burner cycles ON and OFF on proper
call for heat before leaving the job site. Failure to do so
may lead to boiler runaway situation, which may lead to
property damage, personal injury or death.
5583 571 - 01
WARNING
Riello Burner Set-up
Vitorond 100, VR1-22 to -33 Installation and Service
Installation of Vitotronic Control
Refer to Installation Instructions Boiler Control
(for all connections to control base)
IMPORTANT
The power supply cable is shipped with the boiler control.
1.
Loosen two screws and remove cover plate.
2.
Remove top back panel.
3.
Remove front panel.
4.
Place control console on boiler and fasten with two
screws removed in step 1.
WARNING
Do not kink capillaries. Proper operation of sensors is not
possible if capillaries are kinked.
IMPORTANT
Boiler temperature sensor 3 is shipped with the boiler
control (not applicable to Vitotronic 100, KK10).
5.
Carefully push high limit and boiler temperature
sensor 3 behind front panel and into sensor wells
as far as possible. Lay excess sensor cabling and
capillary tubing on insulation.
6. Channel power supply cable or Power/Pump Module
cable (for Vitotronic 200 or Vitotronic 100 KW10B)
and all other 120 VAC cabling through back opening
toward boiler control.
7. Channel low voltage cables (i.e. sensor cables)
through cable opening toward boiler control.
8. Coil excess cabling and tuck between side panel and
insulation.
WARNING
Always route all cables and capillaries between nylon
backed insulation and metal enclosure panels, never
directly on cast iron heat exchanger.
5583 571 - 01
9. Tighten strain reliefs.
43
Riello Burner Set-up
Vitorond 100, VR1-22 to -33 Installation and Service
Installation of Vitotronic Control (continued)
1.
To avoid problems with removing the top panel,
we recommend moving the top panel screw
approximately 3” to the left or right. To do so,
pre-drill the panel with an 1/8” drill bit.
To reinstall the top panel, drill a new 1/8” pilot hole
through the top back panel and into the back panel.
Reinstall the screw P into this new mounting hole.
Boiler Coding Card
IMPORTANT
Only the boiler coding card supplied with the standard
equipment of the boiler may be used. The coding card
is enclosed in the accessory pack of the boiler.
1. Push boiler coding card through recess in the cover
and insert it into plug-in location ”X7”.
IMPORTANT
44
5583 571 - 01
If the boiler coding card is not installed the following fault
code will be displayed on the boiler control: “b7“.
Applies to Vitotronic 200 KW2.
Start-up
Vitorond 100, VR1-22 to -33 Installation and Service
Initial Start-up
WARNING
Verify completeness of all discussion points on the
following pages before starting-up the system.
Refer to the Burner Instructions
1. Ensure fresh air intake of boiler room is open and that
chimney and all flue pipes are connected, sealed and
unobstructed inside.
2. Ensure proper size and operation of expansion tank.
Undersized expansion tanks cause fresh water to be
added to the system through fill valve. This will cause
premature section failure, which is not covered by
warranties.
Note: If the nitrogen pressure of the precharged
expansion tank is less than the static pressure
of the system, inflate membrane pressure to
slightly exceed pressure of system.
The static pressure required at the tank is
based upon the static height of the system.
Normal fill pressure for most residential
applications is 12 to 15 psig when the system
is cold. A lower pressure gage reading usually
indicates loss of water due to leakage. All leaks
must be corrected.
Refer to instructions packaged with automatic
fill valve. Follow local regulations with respect
to backflow preventers.
3. Fill heating system with water and bleed out air
completely. Ensure complete system is properly
vented of air.
Note: Water treatment should be considered in areas
where it is known that boiler feed water
contains a high mineral content and hardness.
Contact local water treatment company.
In areas where freezing might occur, an
antifreeze may be added to the system water
to protect the system. Please adhere to the
specifications given by the antifreeze
manufacturer. Do not use automotive silicatebased antifreeze. Ensure a copy of the Material
Safety Data Sheet is left on site.
Please observe that an antifreeze/water
mixture may require a backflow preventer
within the automatic water feed and influence
components such as diaphragm expansion
tanks, radiation, etc. A 40% antifreeze content
will provide freeze-up protection to -10°F
(-23°C).
Do not use antifreeze other than specifically
made for hot water heating systems. System
also may contain components which might be
negatively affected by antifreeze. Check total
system frequently when filled with antifreeze.
Follow anti-freeze manufacturer’s instructions.
4. Perform a pressure test of the boiler and the water
piping. Pressure test must not exceed 1½ times the
maximum operating pressure (45 psi) of the boiler.
Pressure relief valve must be removed during pressure
test. Any leaks must be corrected.
5583 571 - 01
g
g
the max. operating pressure is 45 psig (310 kPa)
the max. testing pressure is 68 psig (465 kPa)
5. Ensure proper and adequate fuel supply exists;
open oil shut-off valve.
45
Start-up
Vitorond 100, VR1-22 to -33 Installation and Service
Burner Calibration
WARNING
DO NOT USE GASOLINE, CRANKCASE DRAININGS OR
ANY OIL CONTAINING GASOLINE.
WARNING
Always keep the manual fuel supply valve shut off if the
burner is shut down for an extended period of time.
WARNING
Do not tamper with the unit or controls.
WARNING
DO NOT START THE BURNER UNLESS THE
COMBUSTION CHAMBER DOOR IS SECURED
IN PLACE.
WARNING
DO NOT ATTEMPT TO START THE BURNER WHEN
EXCESS OIL HAS ACCUMULATED, WHEN THE UNIT
IS FULL OF VAPOR, OR WHEN THE COMBUSTION
CHAMBER IS VERY HOT.
WARNING
Refer to the Instructions supplied with the
Beckett or Riello burner.
Combustion analysis
This oil burner requires combustion measurements
performed at the final installation site, using calibrated
combustion equipment, to verify factory settings, or to
be used as a guide in changing burner settings to suite
local conditions.
Examples of local conditions which influence combustion
results include: weather conditions, length of horizontal
vent pipe, diameter and height of the chimney, side wall
venting (power vent), altitude above sea level, quality
and heating value of oil used, maximum number of other
fuel burning appliances running at the same time.
These conditions affect the burner set-up. The burner
must be adjusted for acceptable combustion results under
local conditions of the installation.
Combustion measurements (CO2, stack temperature,
draft and CO) are taken in the flue pipe between boiler
and barometric draft regulator before dilution air (see the
installation manual).
Overfire draft is measured at the combustion chamber
observation port opening. Over-fire draft ranges from 0
to +0.01 “w.c.. Breeching draft is approximately -0.02
“w.c.
Note: This boiler is approved for operation with a
breeching draft of up to -0.08 “w.c. (when used
without a barometric draft regulator). The expected
CO2 average range for #2-oil is from 11.0% to
13.0%.
For burner technical data see table on following pages.
Do not fire boiler without water.
WARNING
46
5583 571 - 01
Do not leave any tools inside combustion chamber.
Start-up
Vitorond 100, VR1-22 to -33 Installation and Service
Beckett Burner Calibration
Boiler Model No.
Burner model
Beckett
Fuel type
oil
Pump pressure
psig
Oil nozzle
VR1-27
VR1-33
NX-VI 701
NX-VI 702
NX-VI 703
No. 2 fuel oil
No. 2 fuel oil
No. 2 fuel oil
175
175
175
Danfoss
n.a.
0.60x60°AS
n.a.
Delavan
0.50x60°B
n.a.
0.75x60°A/W
Hago
0.50x60°B
0.60x60°B
n.a.
Oil nozzle flow rate
GPH@psig
0.65@190
0.75@175
1.00@175
Air tube length
inches
mm
7
178
7
178
7
178
Air tube insertion
inches
mm
3¼
83
3¼
83
3f
92
NX70LP
NX70LP
NX70LJ
Head type
6-slot
6-slot
9-slot
Head setting
2.00
2.50
3.25
Air setting
see head setting
see head setting
see head setting
Static plate
n.a.
n.a.
n.a.
Baffle
n.a.
n.a.
n.a.
Fuel pump c/w solenoid valve
21844
21844
21844
Flange
32073
32073
32073
Air tube combination
5583 571 - 01
VR1-22
47
Start-up
Vitorond 100, VR1-22 to -33 Installation and Service
Riello Burner Calibration
Boiler Model No.
VR1-22
VR1-27
VR1-33
Burner model
Riello 40 Series
Fuel type
oil
Pump pressure
psig
175
175
175
Oil nozzle
Danfoss
0.50x60°xAS
0.60x60°xAS*3
0.75x60°xAS
Delavan
0.50x60°xSS
0.60x60°xW
0.75x60°xA
0.75x60°xW*2
0.50x60°xSS*2
0.60x60°xES
n.a.
Hago
F3
F3*1
F5
No. 2 fuel oil
No. 2 fuel oil
No. 2 fuel oil
Oil nozzle flow rate
GPH@psig
0.65@175
0.75@175
1.00@175
Air tube length
inches
mm
7
178
7
178
65/16
160
Air tube insertion
inches
mm
4f
118
4f
118
4¼
108
Air tube combination
0.0
2.0
0.8
Head type
3.1
3.4
2.9
IMPORTANT
*1 For VR1-27 boiler, replace installed nozzle with nozzle
packaged with Riello burner.
*2 Factory-installed nozzle.
*3 Nozzles must be installed by installer.
48
5583 571 - 01
Note: Riello oil burners are factory set for Vitorond 100,
VR1-22, and -33 boilers and should only require
minor adjustments. Install appropriate nozzle and
set the burner for model VR1-27.
Start-up
Vitorond 100, VR1-22 to -33 Installation and Service
Barometric Draft Regulator
When a barometric draft regulator is used, adjust the
barometric draft regulator such that the over-fire draft
is 0.00 to +0.01 “w.c., while the breech draft is
approximately -0.02 “w.c.
During operation of the burner, the barometric draft
regulator installed in the vent system must move freely.
Waterside Flow
General
The schematics on the following pages are to be seen
as guidelines only. They further do not display all system
varieties, safety devices, or concepts possible. Specific
system layouts may be further discussed with the local
Viessmann sales representative office.
Clearances
A minimum of 2” circumferential clearance from noninsulated hot water pipes to combustible construction
must be maintained. In cases where the pipes are
insulated with pipe insulation of appropriate and
sufficient thickness and insulation values, the above
clearance may be reduced to 0”.
Flow rates
The relationship between boiler flow rate and temperature
rise is according to the formula:
Boiler output (Btu/h) = 500 x flow (USGPM) x Rise (°F)
The following chart lists typical flow rates for the
Vitorond boiler:
Boiler model No.
20° F rise
30° F rise
USGPM
(m3/h)
USGPM
(m3/h)
VR1-22
VR1-27
VR1-33
8
(1.8)
5.3
(1.2)
9.2
(2.1)
6.1
(1.4)
12.2
(2.8)
8.1
(1.8)
5583 571 - 01
A VR1-22 to -33
49
Connections
Vitorond 100, VR1-22 to -33 Installation and Service
Installation Examples - Hydrostat
Boiler in a heating/cooling application
Cooling season starts: close valve v1 and open valve v2
Heating season starts: close valve v2 and open valve v1
Legend
A Heating/Cooling unit
B Spring-loaded flow check valve
C Circulation pump
D Automatic air vent,
E Pressure relief valve
F Hydrostat 3250-Plus (with low water cut-off)
G Water chiller
H Expansion tank
IMPORTANT
We strongly suggest that the valves be labelled “v1” and v2.”
50
5583 571 - 01
Legend
A Heating circuit
B Spring-loaded flow check valve
C Circulation pump
D Automatic air vent,
E Pressure relief valve
F Hydrostat 3250-Plus (with low water cut-off)
G Expansion tank
Connections
Vitorond 100, VR1-22 to -33 Installation and Service
Installation Examples - Vitotronic
Without mixing valve
e.g. with Vitotronic 100, Model KW10B
Legend
A Heating circuit
B Spring-loaded flow check valve
C Circulation pump
D Automatic air vent, (field supplied), pressure relief
valve, and temperature pressure gage
E Expansion tank
F Low water cut-off (if required)
Without mixing valve and with DHW
e.g. with Vitotronic 100, KW10B
5583 571 - 01
Legend
A Heating circuit
B Spring-loaded flow check valve
C Circulation pump
D Automatic air vent, (field supplied),
pressure relief valve, and
temperature pressure gage
E Expansion tank
E Domestic hot water storage tank
(indirect-fired)
F Low water cut-off (if required
51
Connections
Installation Examples - Vitotronic
Vitorond 100, VR1-22 to -33 Installation and Service
(continued)
With one low-temperature circuit with 4-way mixing valve,
and with domestic hot water production
e.g. with Vitotronic 200, Model KW2 combined with
one mixing valve actuator accessory kit
52
5583 571 - 01
Legend
A Heating circuit
B Spring-loaded flow check valve
C Circulation pump
D Automatic air vent, (field supplied),
pressure relief valve, and temperature pressure gage
E Expansion tank
F Domestic hot water storage tank (indirect-fired)
G 4-Way mixing valve
H Low water cut-off (if required)
Connections
Vitorond 100, VR1-22 to -33 Installation and Service
Installation Examples - Vitotronic
(continued)
With one low-temperature circuit with 4-way mixing valve,
one high temperature circuit, and with domestic hot water
production
e.g. with Vitotronic 200, Model KW2 combined with
one mixing valve actuator accessory kit
5583 571 - 01
Legend
A Heating circuit
B Spring-loaded flow check valve
C Circulation pump
D Automatic air vent, (field supplied),
pressure relief valve, and temperature pressure gage
E Expansion tank
F Domestic hot water storage tank (indirect-fired)
G 4-Way mixing valve
H Low water cut-off (if required)
53
Service
Vitorond 100, VR1-22 to -33 Installation and Service
Necessary Tools
WARNING
Ensure that warning concerning fiberglass wool and
ceramic fiber materials on page 3 has been read and
understood before handling insulation.
IMPORTANT
Use only calibrated equipment.
Testing/analysis equipment
H Calibrated flue gas analyzer
WARNING
NEVER ADJUST BURNER BY EYE.
Cleaning supplies
H Hand brush
H Rags
H Vacuum cleaning
Possible replacement parts
H Rope sealant for combustion chamber door
H Refractory for combustion chamber door
Service Procedure
Shut-down heating system
1. Ensure main power supply to equipment, the heating
system, and all external controls has been
deactivated. Take precautions in both instances
to avoid accidental activation.
2.
Close main oil supply valve near burner and near tank.
WARNING
Always keep the manual fuel supply valve shut off if the
burner is shut down for an extended period of time.
Open combustion chamber door
1. Disconnect power supply.
2. Remove front panel A by lifting panel up and out.
3. Remove two bolts B of combustion chamber door C
and open. Continued on following page.
4. Remove turbulators, if applicable. See page 59 for
details.
5. Remove combustion chamber insert (if applicable).
WARNING
54
5583 571 - 01
Never burn garbage or paper in the unit, and never leave
combustible material around it.
Service
Vitorond 100, VR1-22 to -33 Installation and Service
Service Procedure
(continued)
Clean heat exchanger and flue pipe
1.
Clean heat exchanger with field supplied cleaning
brush and use vacuum cleaner to remove all
sediment.
2.
Remove all sediment from flue pipe and flue gas
collector using vacuum cleaner.
Check all gaskets and insulation
WARNING
Ensure that warning concerning fiberglass wool and
ceramic fiber materials on page 3 has been read and
understood before handling insulation.
1.
Check all gaskets and the sealant rope of the
combustion chamber door for wear or damage.
2.
Check the combustion chamber door refractory for
wear or damage.
3. Replace worn or damaged parts.
Close combustion chamber door
1. Reinsert flue gas turbulators D.
2.
Reinstall combustion chamber insert (if applicable).
3.
Close combustion chamber door C and tighten two
bolts B in an even fashion.
WARNING
Reconnect oil burner and follow instructions found in
burner installation/start-up manual.
4.
Install front panel A.
5.
Fasten burner hood (if applicable) and lock in place.
WARNING
5583 571 - 01
Do not leave any tools inside combustion chamber.
55
Service
Service Procedure
Vitorond 100, VR1-22 to -33 Installation and Service
(continued)
Check heating system and domestic hot water connections
Ensure all connections are pressure tight.
Ensure proper operation of all safety devices
Check pressure gage, air vent and pressure relief valve.
Ensure pressure relief valve does not leak. Also ensure
pressure relief valve operates in accordance with
information provided by the manufacturer.
Ensure proper operation of expansion tank, low water
cut-off (if applicable) and pumps
Refer to maintenance instructions supplied with
diaphragm expansion tanks, low water cut-offs, pumps,
etc. Flush float water type low water cut-offs (if used).
The usual water fill pressure is between 10 and 15 psi
with the system cold. A lower pressure gage reading
usually indicates loss of water due to leakage.
All leaks must be corrected. Refer to instructions
packaged with automatic fill valve. Follow local
regulations with respect to backflow preventers.
If oil-lubricated pumps are used, ensure proper lubrication.
If motorized zone valves are used, refer to maintenance
instructions provided with zone valves. If an older
non-diaphragm expansion tank is used, ensure the correct
water level is present.
Ensure that an adequate combustion air supply exists
in the boiler room
Ensure fresh air intake of boiler room is open. This
opening must never be blocked or partially covered.
56
5583 571 - 01
Ensure functionality of the barometric draft regulator
of the burner
During operation of the burner, the barometric draft
regulator installed in the vent system must move freely.
Service
Vitorond 100, VR1-22 to -33 Installation and Service
Service Procedure
(continued)
Calibrate the burner
WARNING
DO NOT USE GASOLINE, CRANKCASE DRAININGS OR
ANY OIL CONTAINING GASOLINE.
Refer to the Instructions supplied with the
Beckett or Riello burner.
Note: For burner technical information refer to table on
page 47 or page 48.
WARNING
Always keep the manual fuel supply valve shut off if the
burner is shut down for an extended period of time.
WARNING
Do not tamper with the unit or controls.
WARNING
DO NOT START THE BURNER UNLESS THE
COMBUSTION CHAMBER DOOR IS SECURED
IN PLACE.
WARNING
DO NOT ATTEMPT TO START THE BURNER WHEN
EXCESS OIL HAS ACCUMULATED, WHEN THE UNIT
IS FULL OF VAPOR, OR WHEN THE COMBUSTION
CHAMBER IS VERY HOT.
WARNING
Do not fire boiler without water.
WARNING
Combustion analysis
This oil burner requires combustion measurements
performed at the final installation site, using calibrated
combustion equipment, to verify factory settings, or to
be used as a guide in changing burner settings to suite
local conditions.
Examples of local conditions which influence combustion
results include: weather conditions, length of horizontal
vent pipe, diameter and height of the chimney, side wall
venting (power vent), altitude above sea level, quality
and heating value of oil used, maximum number of other
fuel burning appliances running at the same time.
These conditions affect the burner set-up. The burner
must be adjusted for acceptable combustion results under
local conditions of the installation.
Combustion measurements (CO2, stack temperature,
draft and CO) are taken in the flue pipe between boiler
and barometric draft regulator before dilution air (see the
installation manual).
Overfire draft is measured at the combustion chamber
observation port opening. Over-fire draft ranges from 0
to +0.01 “w.c.. Breeching draft is approximately -0.02
“w.c.
Note: This boiler is approved for operation with a
breeching draft of up to -0.08 “w.c. (when used
without a barometric draft regulator). The expected
CO2 average range for #2-oil is from 11.0% to
13.0%.
For direct vent application, refer to the Direct
Vent System Installation Instructions.
5583 571 - 01
Do not leave any tools inside combustion chamber.
57
Additional Information
Vitorond 100, VR1-22 to -33 Installation and Service
Parts List
Model No.
VR1-22 Boiler
VR1-27 Boiler
VR1-33 Boiler
Serial No.
7249048
7249049
7249050
Ordering Replacement Parts:
Please provide boiler Model and Serial
Number from rating plate when ordering
replacement parts. Order replacement
components from your Viessmann
distributor.
Parts
202 Top panel, front
203 Side panel, left
204 Insulation blanket
205 Back panel
206 Insulation blanket, rear
207 Front panel
208 Support bracket
209 Top panel, rear
210 Side panel, right
211 Nameplate ”Vitorond 100”
212 Cover, edge molding
215 Cover plate
509 Vitotronic retrofit housing
Other Parts (not illustrated)
300 Touch-up spray paint, Vitotec, silver
301 Touch-up paint stick, Vitotec silver
304 Accessory pack,
small parts for insulation jacket
400 Installation fittings for Hydrostat
applications
500 Installation fittings for Vitotronic
applications
600 Installation, Service and Operating
Instructions
602 Warranty Sheet, Cast iron/Residential
58
5583 571 - 01
A Rating plate (location of serial no.)
Vitorond 100, VR1-22 to -33 Installation and Service
Parts List
Additional Information
(continued)
Parts
001 5-Point sensor well
002 Combustion chamber door refractory
003 Combustion chamber door
004 Hinge bracket
005 Glass-fiber gasket,16 x 12 L=2000 mm
006 Glass-fiber gasket, 3x116 mm*1
008 Observation port cover
011 Turbulator insert, x2 2nd pass, VR1-22 *2
012 Turbulator insert, x2, VR1-33 *3
014 Turbulator insert, x1, VR1-33 *3
023 Combustion chamber insert
500
501
502
503
504
505
506
507
508
509
510
Installation fittings for Vitotronic
Sediment faucet, ¾” NPT
Pressure relief valve, 30 psig
Vent pipe adaptor, 5”
Junction box *4
Accessory Pack,
burner installation hardware
Temperature and pressure gage
Control cable with #41 plug *4
Burner cable (#41) *4
Vitotronic retrofit housing *4
Return injector nozzle
5583 571 - 01
Wear Parts
016 Cleaning brush handle 800 mm, M10 *5
017 Cleaning brush (no handle) *5
*1 Sold with adhesive
*2 for VR1-22 only
*3 for VR1-33 only
*4 not shown on diagram
*5 optional - not standard equipment of boiler
59
Additional Information
Parts List
Vitorond 100, VR1-22 to -33 Installation and Service
(continued)
Parts List
0701 Hydrostat control, 3250-Plus
0702 Electro well, extended ¾” NPT
0703 Hex bushing, 1¼” x ¾”
0704 Temperature and pressure gage
0705 Reduction tee, 1½” x 1½” x ½”
0706 Nipple, 1½” x 5”
0707 Reduction tee, 1½” x ¾” x 1½”
0708 90º Street elbow, ¾”
0709 Nipple, ¾” x 3½”
0710 Pressure relief valve, 30 psig
0711 Reduction tee, 1½” x 1½” x ¾”
0712 Sediment faucet
0713 Vent pipe adaptor, 5”
0715 Burner cable 85” (4-wire)
0721 Cable clamp
Other Parts (not illustrated)
0717 Accessory pack (burner installation hardware)
0722 Remote mounting kit (with 48” sensor cable)
0730 Installation, Operation and Service Instructions
0732 Installation, Operating Instructions,
Hydrostat, 3250-Plus
0733 Installation Instructions, Direct Vent
0734 Warranty Sheet Cast-Iron, Residential
0735 Parts List, Installation Set
60
5583 571 - 01
A Vitorond boiler see separate parts list
Additional Information
Vitorond 100, VR1-22 to -33 Installation and Service
Maintenance Record
WARNING
Neglecting to perform necessary maintenance can cause
unsafe operation.
Before each heating season begins, have the following
service and maintenance done by a licensed, professional
heating contractor:
1. Boiler heat exchanger inspected and cleaned.
2. Vent system inspected for deterioration, leaks,
corrosion, proper draft, and proper operation.
Check vent system for compliance with local
and national code requirements. Repair or replace
as required.
5583 571 - 01
3. Burner checked, and if necessary, adjusted for proper
combustion and operation. Check for adequate supply
of fresh outside combustion and ventilation air.
61
62
5583 571 - 01
Vitorond 100, VR1-22 to -33 Installation and Service
5583 571 - 01
Vitorond 100, VR1-22 to -33 Installation and Service
63
Vitorond 100, VR1-22 to -33 Installation and Service
5583 571 - 01
Technical information subject to change without notice.
Printed on environmentally friendly
(recycled and recyclable) paper.