1
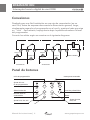
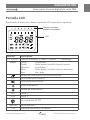
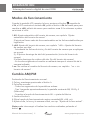
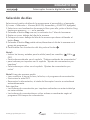
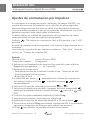
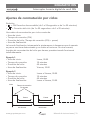
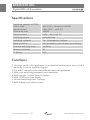
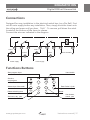
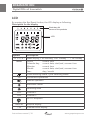
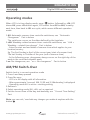
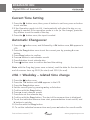
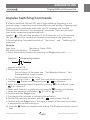
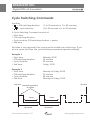
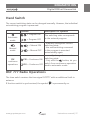
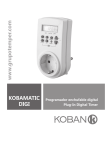
www.grupotemper.com
KOBAMATIC
DIN
Interruptor horario digital de carril DIN
Digital DIN rail timeswitch
KOBAMATIC DIN
Interruptor horario digital de carril DIN
Índice
Especificaciones
3
Funciones
3
Conexiones
4
Panel de botones
4
Pantalla LCD
5
Modos de funcionamiento
6
Cambio AM/PM
6
Ajuste de la hora actual
7
Ajuste automático del horario de verano
7
cHA = Ajuste del horario de verano por días
7
no = sin horario de verano
8
Ordenes estándar de conmutación
8
Selección de días
9
Ajustes de conmutacíon por impulsos
10
Ajustes de conmutación por ciclos
11
Lectura – modificación – borrado – reseteo
13
Ajuste manual
14
Manual de instrucciones | 2
www.grupotemper.com
KOBAMATIC DIN
Interruptor horario digital de carril DIN
Especificaciones
Potencia de ruptura a 230V~ :
Carga ohmica
Carga inductiva, cosΦ 0,6
Lámpara fluorescente
16A, 250V~, Maximo 3680W
2.5A, 250V~,
1000W
Carga inductiva
230V~, 4A /cosΦ 0.4
Salida
libre de potencial
Contacto
1 ó 2 contactos conmutados
Reserva de marcha
3 años desde salida de fábrica, pila de litio
Maniobra mínima
1 minuto
Posiciones de memoria
40
Grado de protección
IP20
Funciones
1.Este programador ha sido diseñado para su instalación en una caja de
conmutación con el fin de encender o apagar un circuito en particular
mediante un programa preseleccionado.
2.Dispone de dos canales para conectar las diferentes aplicaciones.
3.Permite la programación por ciclos y por impulsos.
4.Ajuste automático del horario verano.
5.Formato de hora 12h/24h.
6.Maniobra mínima: 1 minuto.
7.Anulación manual de funciones.
www.grupotemper.com
Manual de instrucciones | 3
KOBAMATIC DIN
Interruptor horario digital de carril DIN
Conexiones
Diseñado para una fácil instalación en una caja de conmutación (en un
carril Din). Antes de empezar desconecte la alimentación general, luego,
simplemente enganche el programador en el carril y presione hasta que oiga
un “click”. Para retirarlo, empuje hacia abajo la pestaña situada en la base
del programador.
Conecte los cables según se muestra en el siguiente diagrama:
3
4
5
6
Carga 1
7
8
Carga 2
N
1
2
Carga 3
Carga 4
L
N
Alimentación
230V CA/50Hz
L
Alimentación
Panel de botones
Inicio de programación
Interruptores manuales
Ajuste de hora,
fin de programación
Seleccíon de día
Borrado hora de
conmutación
Ajuste hora, día, año
Prog
1
Day
h
m
Clear
+1h
Res.
2
Introd. de pulsos/ciclos
Reset
Ajuste minutos,
mes, año
Ajuste horario
de verano/invierno
Manual de instrucciones | 4
www.grupotemper.com
KOBAMATIC DIN
Interruptor horario digital de carril DIN
Pantalla LCD
Presionando el botón Res (Reset) la pantalla LCD mostrará lo siguiente:
Días de la semana
grabados en pantalla
LCD
Símbolo
Descripción
1234567
Días de la semana, 1: Lunes, 2: martes ....... 7: domingo
08:00
Horas: Fecha: Minutos: Mes:
Año: hora actual
fecha actual, inicio/fin horario verano
hora actual
fecha actual, inicio/fin horario de verano
día / mes
estado de conmutación por impulsos/ciclos
FIX
Funcionamiento continuo
Funcionamiento manual
Modo automático
Estado de conmutación
CH1:
Canal 1
CH2:
Canal 2
Sincronización DCF77
AM/PM
+1h
Horas AM/PM
Indicación de horario de verano
www.grupotemper.com
Manual de instrucciones | 5
KOBAMATIC DIN
Interruptor horario digital de carril DIN
Modos de funcionamiento
Cuando la pantalla LCD muestre la hora, presione el botón
seguido de
±1h, el LCD mostrará el símbolo AU, pulse el botón ±1h de nuevo para para
cambiar a cHA, púlselo de nuevo para cambiar a no. Si lo volvemos a pulsar
se iniciará el ciclo.
1.AU: Ajuste automático del horario de verano, ver capítulo“Ajuste
automático del horario de verano”.
El ajuste se lleva a cabo de forma automática en las fechas establecidas por
legislación.
2.cHA: Ajuste del horario de verano, ver capítulo“cHA = Ajuste del horario
de verano por días”.
- Introduzca las fechas de inicio y fin del horario de verano que se apliquen
en su país.
Ej.: El primer domingo de abril del presente año (inicio del horario de
verano)
El ultimo domingo de octubre del año (fin del horario de verano)
- En los años siguientes el cambio se realizará siempre el mismo día de la
semana indicada.
3.no: No realizar el cambio del horario de verano, ver capítulo “no = sin
horario de verano”.
Cambio AM/PM
Partiendo del funcionamiento normal:
1.Pulse y mantenga presionado el botón h.
2.Pulse Res una vez.
- Todos los segmentos de la pantalla se activan.
- Tras 1 segundo aproximadamente, la pantalla mostrará AM, 12:00 y 3
(Miércoles).
- Se activa el modo de funcionamiento AU = ajuste de fábrica.
3.Suelte el botón h.
4.Elija el modo de funcionamiento según necesidad(AU, cHA, no).
5.Ajuste el día, la hora y la semana actual, ver cap.“Ajuste de la hora actual”.
Note:puede interrumpir o finalizar los cambios realizados pulsando el
botón
.
Manual de instrucciones | 6
www.grupotemper.com
KOBAMATIC DIN
Interruptor horario digital de carril DIN
Ajuste de la hora actual
1.Pulse el botón
una vez, después pulse el botón “h” para ajustar la
hora y el botón “m” para los minutos.
2.Si el modo de funcionamiento está en AU, el día se seleccionará
automáticamente y no será necesario realizar ningún ajuste. Si el modo
de funcionamiento está en no (Sin cambios), debe pulsar el botón día
(“day”)para ajustar el día de la semana.
3.Por último, pulse el botón
una vez para finalizar el ajuste.
Ajuste automático
1.Pulse el botón
una vez, seguido del botón ±1h, la pantalla mostrará el
símbolo AU.
2.Pulse el botón Prog una vez para ajustar el año actual y utilice los botones
h o m.
3.Confirme el ajuste pulsando de nuevo el botón Prog.
4.Para ajustar el mes pulse el botón m.
5.Para ajustar el día pulse el botón h.
6.Pulse el botón
una vez para confirmar y finalizar con los ajustes.
Nota: Con el botón Prog puede visualizar las fechas de inicio p.ej. 29.03.
(pulsar una vez) y fin p.ej. 25.10. (pulsar dos veces) del horario de verano.
cHA = Ajuste del horario de verano por días
predeterminados
1.Pulse el botón
una vez.
2.Pulse el botón ±1h hasta que aparezca cHA en el LCD.
3.Pulse el botón Prog una vez.
4.Seleccione el año actual con la tecla m o el botón h.
5.Confirme los ajustes con el botón Prog.
6.Pulse la tecla m para seleccionar el mes del calendario.
7.Pulse h para seleccionar el día del calendario.
8.Confirme los ajustes con el botón Prog. Se indicará el inicio del horario de
verano.
9.Para ajustar el inicio personalizado del horario de verano, pulse el botón m
www.grupotemper.com
Manual de instrucciones | 7
KOBAMATIC DIN
Interruptor horario digital de carril DIN
para ajustar el mes, y h para el día.
10.Confirme los ajustes con el botón Prog.
11.Para ajustar el fin personalizado del horario de verano, pulse el botón m
para ajustar el mes, y h para el día.
12.Presiones el botón
para confirmar y finalizar el ajuste.
no = sin horario de verano
1.Pulse el botón
una vez.
2.Pulse el botón ±1h hasta que aparezca no en el LCD. Sólo interruptor
horario semanal.
3. Pulse el botón
una vez para confirmar el modo seleccionado.
Órdenes estándar de conmutación
Las horas y estados de conmutación para cada salida (canal) se ajustan
individualmente:
CH1: (ON) = Canal 1 encendido
CH2:
(OFF) = Canal 2 apgado
1.Pulse el botón Prog hasta que en el LCD aparezca - -:- -.
2.Pulse las teclas m y h para ajustar los minutos y las horas respectivamente.
3.Presiones el botón
para seleccionar el estado de apagado o encendido.
4.Pulse una vez el botón Prog para finalizar la programación. A continuación
aparecerá otra posición de memoria para realizar más ajustes o...
5.Pulse
para finalizar.
Nota 1:
• Se puede desactivar el estado de conmutación para CH1 ó CH2, cuando no
hay símbolo - no habrá conmutación.
Nota 2: podemos ajustar los siguientes programas:
• Ordenes de conmutación solo para el canal 1 (o para el canal 2)
• Las mismas órdenes de conmutación para el canal 1 y el 2. (El tiempo de
conmutación y el estado de conmutación son idénticos)
• El mismo tiempo de conmutación en el canal 1 y en el 2 pero diferente
estado de conmutación.
Manual de instrucciones | 8
www.grupotemper.com
KOBAMATIC DIN
Interruptor horario digital de carril DIN
Selección de días
Seleccione el patrón de días de la semana para el encendido y el apagado.
Ej. Lunes + Miércoles + Viernes (8:00 ON, encendido, y 20:00 OFF, apagado)
1.Seleccione una localización de memoria libre: para ello, pulse el botón Prog
hasta que aparezca - -:- - en la pantalla.
2.Pulsando el botón Day una vez, se activarán los 7 días de la semana.
3.Existe un cursor debajo del día de la semana.
4.Coloque el cursor debajo del día de la semana que desee utilizando el
botón Prog.
5.Pulsando el botón Day podrá activar/desactivar el día de la semana en el
grupo de programas.
6.Para finalizar con la selección del día, pulse el botón
Nota 1:
• Indicar las horas y estados para la salida (canal) en cuestión, ( ON o
OFF)
• Para órdenes estándar ver el capítulo“Ordenes estándar de conmutación”
• para órdenes por impulsos ver el capítulo“Ajustes de conmutacíon por
impulsos”
• Para órdenes por ciclos ver el capítulo“Ajustes de conmutación por
ciclos”
Nota 2: tras este proceso podrá:
• Leer, modificar o borrar la hora, la fecha, o el programa de conmutación.
• Sincronizar la señal DCF.
• Reconectar la alimentación, el stado del iterruptor horario se actualizará
automáticamente.
Esto significa:
• Las órdenes de conmutación por impulsos realizadas con anterioridad ya
no serán válidas.
• Las órdenes de conmutaciónpor ciclos activas se reactivarán según el
programa ON-tiempo de conmutación.
www.grupotemper.com
Manual de instrucciones | 9
KOBAMATIC DIN
Interruptor horario digital de carril DIN
Ajustes de conmutacíon por impulsos
Si conectamos una carga para que se encienda y se apague ON/OFF, con
una alta frecuencia de conmutación en un intervalo de pocos segundos,
debemos asegurarnos de que esto no afecta a los dispositivos luminosos
(a veces pueden parpadear) y que no se produzcan interferencias con otros
aparatos receptores tales como radios o televisores.
Se deben definir las órdenes de conmutación de los impulsos, las cuales
serán ejecutadas una vez por cada hora programada.
Símbolo:
= ON tiempo de conmutación (de1 a 99 segundos, o de 1 a 99
minutos)
El modo de preseleccionar los segundos y los minutos lo explicaremos en su
momento.
Una orden de conmutación por impulsos consiste en“Start time” (hora de
inicio) y en“Tiempo de conexión ON”
Ejemplo:
Hora de inicio: Lunes a Viernes, 09:00
Tiempo de conexión: 10 segundos
1.Seleccione una localización de memoria libre: para ello, pulse el botón
Prog hasta que aparezca - -:- - en la pantalla.
2.Ajuste de la hora de inicio:
- Para ajustar los días de la semana consulte el cap.“Selección de días”
- Presione m para fijar los minutos
- h para fijar la hora
3.Preselección por pulsos =
, para realizar las órdenes de conmutación
por pulsos, presione el botón
, la pantalla mostrará
,
secuencialmente.
4.Seleccione el canal de conmutación pulsando
1o
2.
5.Seleccione el estado de encendido o apagado del canal presionando
hasta que la pantalla muestre el estado deseado (
para ON o
para
OFF)
6.Confirme los ajustes realizados mediante el botón Prog.
7.Seleccione los minutos o segundos con el botón m.
8.Establezca la duración de encendido desde 01 a 99 con el botón
.
9.Pulse una vez el botón Prog para finalizar la programación. A continuación
aparecerá otra posición de memoria para realizar más ajustes o...
10.Pulse
para finalizar. La pantalla mostrará la hora actual.
Manual de instrucciones | 10
www.grupotemper.com
KOBAMATIC DIN
Interruptor horario digital de carril DIN
Ajustes de conmutación por ciclos
Símbolos
•
= ON Duración de encendido (de 1 a 99 segundos o de 1 a 99 minutos)
•
= Duración del ciclo (de 1 a 99 segundos o de 1 a 99 minutos)
Una orden de conmutación por ciclos consta de:
• Hora de inicio
• Tiempo de conexión (ON)
• Duración del ciclo (Tiempo de conexión (ON) + pausa)
• Hora de finalización
La hora de finalización únicamente la ajustaremos si deseamos que el aparato
se pare a una hora determinada y no vuelva a funcionar. De otra manera,
la orden de conmutación del ciclo que hemos preseleccionado funcionará
indefinidamente.
Ejemplo 1
• Hora de inicio:
• Tiempo de conexión:
• Duración del ciclo: • Hora de finalización:
Lunes, 09:00
10 minutos
60 minutos
Viernes, 19:00
Ejemplo 2
• Hora de inicio:
• Tiempo de conexión: • Duración del ciclo: • Hora de finalización:
Lunes a Viernes, 09:00
10 minutos
60 minutos
Lunes a Viernes, 19:00
Inicio
Fin
Tiempo de conexión
10 minutos
Pausa
Duración del ciclo
60 minutos
www.grupotemper.com
Pausa
Duración del ciclo
60 minutos
Manual de instrucciones | 11
KOBAMATIC DIN
Interruptor horario digital de carril DIN
1.Seleccione una localización de memoria libre: para ello, pulse el botón
Prog hasta que aparezca - -:- - en la pantalla.
2.Establezca la hora de inicio de la semana. Ver cap. “Selección de días”
3.Para ajustar los minutos y las horas, pulse los botones m y h
respectivamente.
4.Preselección por ciclos =
, para realizar las órdenes de conmutación por
ciclos, presione el botón
dos veces.
5.Seleccione el estado de encendido o apagado del canal presionando
hasta que la pantalla muestre el estado deseado (
para ON o
para
OFF)
6.Confirme los ajustes realizados mediante el botón Prog.
7.Seleccione los minutos o segundos con el botón m.
8.Establezca la duración de encendido desde 01 a 99 con el botón
.
9.Confirm with the Prog button
Podremos visualizar la hora de apagado con el formato 00:00 durante los 7
días de la semana. Podrá realizar los cambios que considere convenientes de
forma individual o borrarlo todo utilizando el botón “Clear”.
Una vez finalizados estos pasos, puede buscar espacio libre en la memoria y
realizar una nueva preselección o pulsar el botón
una vez para finalizar. La
pantalla mostrará la hora actual.
Nota:
• La siguiente orden de conmutación en la secuencia de programas finalizará
el ciclo. La orden de conmutación puede ser
(ON) o
(OFF).
Tras este proceso podrá:
• Leer, modificar o borrar la fecha, la hora o el programa de conmutación.
• Sincronizar la señal DCF.
• Reconectar la alimentación, el stado del iterruptor horario se actualizará
automáticamente.
Esto significa:
• Las órdenes de conmutación por impulsos realizadas con anterioridad ya
no serán válidas.
• Las órdenes de conmutaciónpor ciclos activas se reactivarán según el
programa ON-tiempo de conmutación.
Manual de instrucciones | 12
www.grupotemper.com
KOBAMATIC DIN
Interruptor horario digital de carril DIN
Lectura – modificación – borrado – reseteo
• Podrá leer uno a uno los ajustes programados.
• Podrá borrar, anular y realizar cambios en cualquiera de los programas.
• Así mismo, la fecha y la hora también pueden ser cambiadas o anuladas.
Lectura
1.Para acceder a la lectura de los contenidos, pulse el botón Prog paso a
paso; con cada pulsación la pantalla le mostrará los detalles de cada uno
hasta finalizar el programa.
2.La pantalla mostrará - -:- - en las posiciones de memoria libres.
3.Al final se mostrará numéricamente el número de posiciones de memoria
libres.
Modificación
1.Para realizar cambios, pulse el botón Prog hasta llegar a la orden de
conmutación que desea cambiar e introduzca los nuevos datos.
2.Cambie lor programas/ contenidos como se muestra en los capítulos:
• Ordenes estándar de conmutación
• Ajustes de conmutacíon por impulsos
• Ajustes de conmutación por ciclos
Borrado
1.Borrado de programas/contenidos individualmente
• Pulse el botón Prog hasta llegar la orden/contenido que se quiere borrar,
pulse el botón Clear para borrar los datos.
• Las órdenes por ciclos y por impulsos se eliminarán al borrar la hora de
inicio.
2.Borrado de todo el contenido
• Pulse el botón Prog hasta que la pantalla muestre FR XXX.
• Pulse Clear una vez. La pantalla mostrará CL.
• mantenga presionado Clear para borrar todo el contenido.
• La pantalla mostrará el máximo de posiciones de memoria disponibles.
Reseteo
1.Presiones el botón Res una vez para resetear la fecha y la hora.
2.Durante unos dos segundos se verán todos los segmentos de la pantalla,
después aparecerá 12:00.
3.Se restablecerán los valores de fábrica:
www.grupotemper.com
Manual de instrucciones | 13
KOBAMATIC DIN
Interruptor horario digital de carril DIN
• AU – Ajuste automático del horario de verano
• Cambio de horario activado
Ajuste manual
El ajuste del estado de conmutación puede ajustarse manualmente. Sin
embargo, se mantendrán los programas de conmutación individuales.
Símbolos
= Programa ON
Modo
automático
= Programa OFF
= Manual ON
Modo
manual
= Manual OFF
FIX
FIX = Continuos ON
Funcionamiento
continuo
FIX = Continuos OFF
Descripción
El estado de conmutación se
corresponde con el programa
introducido
- Cambio manual del estado de
conmutación
- La siguiente orden del programa
se ejecuta de manera automática
- Cambio manual del estado de
conmutación
- Únicamente se puede cambiar
de operación continua a operación
automática con el botón
Operaciones de radio DCF 777
El interruptor recibe su señal horaria DCF777 gracias a su antena integrada.
Si interruptor está sincronizado se mostrará permanentemente el símbolo
en la pantalla.
Manual de instrucciones | 14
www.grupotemper.com
KOBAMATIC DIN
Digital DIN rail timeswitch
Contents
Specifications
16
Functions
16
Connections
17
Function buttons
17
LCD
18
Operating modes
19
AM/PM Switch-Over
19
Current Time Setting
20
Automatic Changeover
20
cHA = Weekday – related time change
20
no = No changeover
21
Standard Switching Commands
21
Set Weekday Patterns
22
Impulse Switching Commands
23
Cycle Switching Commands
24
Read – Change – delete – reset
26
Hand Switch
27
www.grupotemper.com
Instructions manual | 15
KOBAMATIC DIN
Digital DIN rail timeswitch
Specifications
Switching capacity at 230V~ :
Ohmic load
Inductive load
Glow lamp load
16A, 250V~, Maximum 3680W
2.5A, 250V~, cosΦ 0.6
1000W
Inductive load
230V~, 4A /cosΦ 0.4
Switching output
potential-free
Switching contacts
1 or 2 changeover contacts
Battery back up
Lithium battery, up to 3 years from factory
Shortest switching time
1 minute
Memory locations
40
IP Rating
IP20
Functions
1.This time switch is for application in an electrical switch box to turn on/off a
particular circuit in a preset program.
2.It is with 2 channels to connect different electrical appliances.
3.With cycle switching command, pulse switching .
4.With summer / winter time conversion
5.With 12/24hours time display
6.Shortest switching time: 1 minute
7.With manual override functions
Instructions manual | 16
www.grupotemper.com
KOBAMATIC DIN
Digital DIN rail timeswitch
Connections
Designed for easy installation in the electrical switch box (on a Din Rail). First
cut off main supply before any installation. Then, simply hook the timer onto
the railing and press until you hear “click”. To remove, pull down the catch
located at the bottom of the timer to release.
Connect the wires as indicated in the diagram.
3
4
5
6
Load 1
7
8
Load 2
N
1
2
Load 3
Load 4
L
N
Power supply
230V AC/50Hz
L
Power supply
Functions Buttons
Start program input
Hand switch
Set time,
end program
Select days of the week
Delete switching time
Set hours, day, year
Prog
1
Day
h
m
Clear
+1h
Res.
2
Enter Pulse / Cycle
Reset
Set minutes,
month, year
Summer/winter
time switchover
www.grupotemper.com
Instructions manual | 17
KOBAMATIC DIN
Digital DIN rail timeswitch
LCD
By pressing the Res (Reset) button, the LCD display as following:
Description for the display
Week day silk
screen on the products
LCD
Symbol
Description
1234567
Week display, 1 for Monday, 2 for Tuesday …… 7 for Sunday
08:00
Hours: Calendar day: Minutes: Month:
Year: current time
current date, start/end, summer time
current time
current date, start/end, summer time
day / month
Pulse switching status, Cycle switching status
FIX
Continuous operations
Manual operation
Automatic mode
Switching state
CH1:
Channel 1
CH2:
Channel 2
DCF77 reception
AM/PM
+1h
AM/PM display
Summer timer display
Instructions manual | 18
www.grupotemper.com
KOBAMATIC DIN
Digital DIN rail timeswitch
Operating modes
When LCD is in time display mode, press
button, followed by ±1h, LCD
shows AU, press ±1h button again, LCD switch from AU to cHA, to no by
each time, then back to AU as a cycle, which means different operation
mode.
1.AU: Automatic summer time controller switchover, see “Automatic
Changeover” Part in below.
The switchover occurs on the dates defined by the legislator
2.cHA: Weekday-related summer timer controller switchover, see “cHA =
Weekday – related time change” Part in below.
- Enter the start and end dates of summer time which applies to your
location/country
Eg. The first Sunday in April of the current year (start of summer time)
The last Sunday in October of the year (end of summer time)
- In the following years, changeover always occurs on the right day of the
week in the corrected calendar week.
3.no: No changeover, see “no = No changeover” Part in below.
AM/PM Switch-Over
Switch clock is in current operation mode
1.Press h and keep pressed
2.Press Res once
- LCD is in full display with all information
- After approximate 1 second, AM, 12:00 and 3 (Wednesday) is displayed
- Operating mode AU is active = working setting
3.Release h
4.Select operating mode (AU, cHA, no) as required.
5.Set the current time of the day and weekday, see “Current Time Setting”
Part.
Note: you can exit / conclude any changes you make at anytime with the
button .
www.grupotemper.com
Instructions manual | 19
KOBAMATIC DIN
Digital DIN rail timeswitch
Current Time Setting
1.Press the
button once, then, press h button to set hour, press m button
to set minutes
2.If the Operation mode is in AU, it automatically will select the day, so, no
setting is needed. If the operation mode is in no (ie. No change), press the
Day button to set the week of the day.
3.Press the
button once, the input is ended.
Automatic Changeover
1.Press the
button once, and followed by ±1h button once, AU appears in
LCD
2.Press the Prog button once to set the current year by pressing h or m
button
3.Press Prog button to confirm
4.Press m button to set calendar month
5.Press h button to set calendar day
6.Press
button once to confirm and end the setting.
Note: with the Prog key (press once or twice), read the date for the start and
end of summer time. eg 29.03 (for start) and 25.10 (for end).
cHA = Weekday – related time change
1.Press the
button once
2.Press the ±h button until cHA appears in the LCD
3.Press the Prog button once
4.Set the current year by pressing m key or h button
5.Confirm with the Prog button
6.Press m to set calendar month
7.Press h to set the calendar day
8.Confirm with the Prog button. The start of the summer time is displayed
9.To set the individual summer time start, press m button to set month, and
h button to set day
10.Confirm with the Prog button
11.To set the individual summer time end, press m button for month and h
Instructions manual | 20
www.grupotemper.com
KOBAMATIC DIN
Digital DIN rail timeswitch
button for day.
12.Press the
button to confirm and end the setting
no = No changeover
1.Press the
button once
2.Press the ±1h button until no appears in the LCD. No time or days to be
set in the “no” operation mode
3. Press the
button to confirm the operation mode selected.
Standard Switching Commands
Determines the switching time and the switching state for the relevant
switching output (channel), eg.
CH1: (ON) = Channel 1 on
CH2:
(OFF) = Channel 2 off
1.Press Prog button until the LCD shows - -:- - appears in the LCD.
2.Press the switching times by pressing m for minutes and h for hours
3.Press the
button to set the switching state, ie. ON or OFF
4.Press the Prog button to end the setting. A free memory location is
displayed. – for other setting OR
5.Press the
button, the input is ended
Note 1:
• The switching state for CH1 or CH2 can be deactivated. No symbol – no
switching
Note 2: It´s possible to set the following programs:
• Switching commands only for channel 1 (or channel 2)
• The same switching commands for channel 1 and channel 2 (the switching
time and the switching states are identical)
• The same switching time for channel 1 and 2 but with a different switching
state.
www.grupotemper.com
Instructions manual | 21
KOBAMATIC DIN
Digital DIN rail timeswitch
Set Weekday Patterns
Select the weekday pattern for the on/off.
Eg. Monday + Wednesday + Friday (8:00 ON, and 20:00 OFF)
1.Select free memory location: Press Prog until - -:- - appears in the LCD
2.Press the Day button once all 7 days of the week are active
3.There is a cursor under the number (under the day of the week)
4.Move the cursor by pressing Prog button until it moves to the desired day
of the week
5.Press Day button to activate/ deactivate the day of the week in the
program group
6.Press the
button, the weekday selection is ended
Note 1:
• Enter the switching times and the switching status for the relevant
switching channels ( ON or
OFF)
• For Standard Switching Commands, see “Standard Switching Commands”
Part
• For Impulse Switching Commands, see “Impulse Switching Commands”
Part
• For Cycle Switching Commands, see “Cycle Switching Commands”Part
Note 2: After the procedures:
• Read, modify or delete the time, date, switching program
• DCF snychornisation
• Restotration of mains power, the switching state of the time switch is
updated automatically
That means:
• Impulse Switching Commands from earlier times are ignored
• Active Cycle Switching Commands are re-started with the programme ONswitching time
Instructions manual | 22
www.grupotemper.com
KOBAMATIC DIN
Digital DIN rail timeswitch
Impulse Switching Commands
If a load is switched ON and OFF with a high switching frequency in the
seconds range, it must be ensured that effects on the quality of lighting units
(flickering) and interference with radio and TV reception are avoided.
Determine the times for Pulse Switching Commands. These are executed
once at the respective programmed time.
Symbol:
= ON switching duration (1 to 99 seconds, or 1 to 99 minutes)
The pre-selection for seconds or minutes is explained at the given time.
A Pulse Switching Command consists of “Start time” and “Switching ON
operation”
Example:
Start time: Monday to Friday, 09:00
ON Switching duration: 10 seconds
1.Select free memory location by pressing the Prog button until - -:- Start time
ON switching duration
appears in the LCD
2.Setting the start time:
- Set the day(s) of the week, see “Set Weekday Patterns”Part
- Press m button to set minutes
- Press h button to set hours
3.Pre-selection for Pulse =
, mark the pulse switching command by
pressing
button once, display shows
,
in sequence.
4.Select the switching output channel by pressing
1 for channel 1 and
2 for channel 2
5.Select each channel´s on/off status by pressing
button until display
shows the desired on/off status (
for ON or
for OFF)
6.Confirm with the Prog button
7.Pre-selection for seconds or minutes with m button
8.Set the ON switching duration, with the
button from 01 to 99
9.Confirm with the Prog button. The input is ended. A free memory location
is displayed for further settings or
10.Press the
button to complete the setting. The display shows the current
time.
www.grupotemper.com
Instructions manual | 23
KOBAMATIC DIN
Digital DIN rail timeswitch
Cycle Switching Commands
Symbols
•
= ON switching duration •
= cycle duration ( 1 to 99 seconds or 1 to 99 minutes)
(1 to 99 seconds or 1 to 99 minutes)
A Cycle Switching Command consists of
• Start time
• ON switching duration
• Cycle duration (ON switching duration + pause)
• End time
End time is only required if the cycle must be ended at a certain time. If you
do not set an end time, the cycle switching commands operate endlessly.
Example 1
• Start time:
• ON switching duration:
• Cycle duration: • End time:
Monday, 09:00
10 minutes
60 minutes
Friday, 19:00
Example 2
• Start time:
• ON switching duration: • Cycle duration: • End time:
Monday to Friday, 09:00
10 minutes
60 minutes
Monday to Friday, 19:00
Start time
End time
ON switching duration
10 minutes
Pause
Cycle duration
60 minutes
Instructions manual | 24
Pause
Cycle duration
60 minutes
www.grupotemper.com
KOBAMATIC DIN
Digital DIN rail timeswitch
1. Select free memory locations by pressing the Prog button until - -:- appears in the LCD
2. Set the start time of the week as per “Set Weekdays Patterns”Part.
3. Press m button for setting minutes and h button for setting hours
4. Pre-selection for cycle =
, mark the cycle switching command with
the
button, by pressing two times.
5. Select the switching output channel by pressing the
button until
display shows the desired on/off status (
for ON or
for OFF)
6. Confirm with the Prog button
7. Pre-selection for seconds or minutes with m button
8. Set the ON switching duration with the
button, (01 to 99)
9. Confirm with the Prog button
10. Pre-selection for seconds or minutes with the m button
11.Set the ON switching duration with the
button, (01 to 99)
12.Confirm with the Prog button
A switching OFF time is displayed here with 00:00 for all 7 days of the week.
You can change these individually or delete them with Clear button.
A free memory location is displayed for further settings or Press
button
once to complete the setting. The display show the current time.
Note:
• The next switching command in the program sequence ends the cycle. The
switching command can be
(ON) or
(OFF).
After the procedures:
• Read, modify or delete the time, date, switching program
• DCF synchronization
• Restoration of mains power the switching state of the time switch is
updated automatically
That means:
• Impulse switching commands from earlier times are ignored
• Active Cycle Switching Commands are re-started with the program ONswitching time.
www.grupotemper.com
Instructions manual | 25
KOBAMATIC DIN
Digital DIN rail timeswitch
Read – Change – delete – reset
• You can read the program contents stepwise
• You can change, override or delete the program contents]
• You can change or delete the date and time
Read
1.Press the Prog button step by step, each individual content is displayed
until the end of the program.
2.Then, one free memory location where LCD shows - -:- 3.One digit (free memory locations) (ex. Fr 10)
Change
1.Press the Prog button step by step, re-enter the new data when LCD shows
the switching command that you need to change.
2.Change the switching commands / contents as per previous paragraph in
• Setting Weekdays Patterns
• Impulse Switching Commands
• Cycle Switching Commands
Delete
1.Delete individual Switching Commands
• Press the Prog button step by step, press the Clear button when LCD
shows the switching command that you need to delete.
• The Cycle Switching Command and Pulse Switching Command will be
removed when you delete the start time.
2.Delete ALL Switching Commands
• Press the Prog button until FR XXX appears in the LCD
• Press the Clear button once. CL is in the display.
• Press the Clear button and hold it down, all memory locations are
deleted.
• The display shows the number of the maximum memory locations
Reset
1.Press the Res. button once.
2.The set date and time are reset
3.LCD is in full displays for about 2 seconds, then 12:00 appears.
4.Factory setting as following:
• AU – Automatic switching commands
• Time changeover is activated
Instructions manual | 26
www.grupotemper.com
KOBAMATIC DIN
Digital DIN rail timeswitch
Hand Switch
The current switching state can be changed manually. However, the individual
set switching program is preserved.
Symbols
= Program ON
Automatic
mode
= Program OFF
= Manual ON
Manual
mode
FIX
continuos
operations
= Manual OFF
Description for Symbols
The switching state corresponds
to the entered program
- manually change the current
switching state
- the next switching command
in the program is executed
automatically again
-manually change the current
switching state
FIX = Continuos ON
- Only with the
button, do you
switch from continuous operation
FIX = Continuos OFF
back to automatic mode
DCF 777 Radio Operations
The time switch receives the time signal DCF777 with an additional built-in
antenna.
If the time switch is synchronized, the symbol
www.grupotemper.com
is permanently on.
Instructions manual | 27
TEMPER ENERGY INTERNATIONAL S.L.
Polígono industrial de Granda, nave 18
33199 • Granda - Siero • Asturias
Teléfono: (+34) 902 201 292
Fax:
(+34) 902 201 303
Email:
[email protected]
Una empresa
del grupo
GARANTÍA • WARRANTY
GARANTIE • GARANTIA
2
años
years
années
anos
TEMPER ENERGY INTERNATIONAL S.L.
garantiza este aparato por 2 años ante
todo defecto de fabricación. Para hacer
válida esta garantía, es imprescindible
presentar con este resguardo el ticket o
factura de compra.
TEMPER ENERGY INTERNATIONAL
S.L. garantit cet apareil pour le durée
de 2 annèes contre tout défault de
fabrication. Pour le service de garantie,
vous devez présenter ce reçu avec du
ticket de caisse ou la facture.
TEMPER ENERGY INTERNATIONAL S.L.
guarantees this device during 2 years
against any manufacturing defect. For
warranty service, you must present this
receipt with the purchase receipt or
invoice.
TEMPER ENERGY INTERNATIONAL S.L.
garantía este aparelho contra defeitos
de fábrica ate 2 anos. Para o serviço
de garantia, você deve apresentar este
recibo com o recibo de compra ou
fatura.
Ref. Art.
Nº serie / Serial number
Nombre / Name / Nom / Nombre
Fecha de venta / Date of purchase
Date de vente / Data de venda
Sello establecimiento vendedor / Dealer stamp
Cachet du commercant / Cambo da firma