1
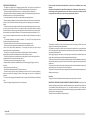
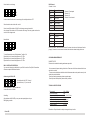
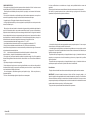
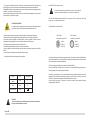
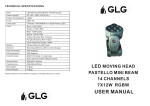
factorLED
Ff
Ff
Fle
FactorLED
MANUAL DE USUARIO
USER MANUAL
Par 56 Plata 151 led (FL-LED56P)
Par 56 Polish 151 led (FL-LED56P)
FactorLED
Par 56 Negro 151 led (FL-LED56N)
Par 56 Black 151 led (FL-LED56N)
Lea atentamente este manual antes de utilizar el aparato
Read kindly this user manual before using the machine
PAR 56 LED
CAUTION
Keep this device away from rain and moisture.
Unplug main lead before opening the housing!
For your own safety , please read this user manual carefully before you initially start-up.
Every person involved with the installation, operation and maintenance of this device has to
• be qualified
• Follow the instruction of this manual
• Consider this manual to be part of the total product
• Keep this manual for the entire service life of the product
• Pass this manual on to every further owner or user of the product
• Download the latest version of the user manual from the internet
INSTRUCTION
Thank you for having chosen a Par 56 LED-D . If you follow the instruction given in this manual,
we are sure that you will enjoy this device for long period of time
Unpack your Par 56LED-D
Before you initially start up, please make sure that there is no damage cause by transportation.
Should there is any, consult your dealer and do not use the device.
SAFETY INSTRUCTION
Be careful with your operation. With a dangerous voltage you
can suffer a dangerous electric shock when touching the wires!
This device has left our premises in absolutely perfect condition. In order to maintain this condition
and to ensure a safe operation, it is absolutely necessary for the user to follow the safety instruction
and warning notes written in this manual.
Important:
Damages cause by the disregard of this user manuals are not subject to warranty. The dealer will not
accept liability for any resulting defect or problem.
FactorLED
If the device has expose has been exposed to drastic temperature fluctuation (e.g after
transportation), do not switch it on immediately. The arising condensation water might damage your
device . Leave the device switch off until it reach room temperature.
Please make sure that there are no obvious transport damage. Should you notice any damage on the
A/C connection cable or on the casing. Do not take the device into operation and immediately consult
your local dealer.
This device falls under protection class 1. The power plug must only be plugged into a protection
class 1outlet. The voltage and frequency must exactly be the same as stated on the device. Wrong
voltage or power outlets can lead to the destruction of the device and to mortal electric shock.
Always plug in power plug last. The power plug must always be inserted without force. Make sure that
the plug is tightly connected with the outlet.
Never let the power cord come into contact with other cables! Handle the power cord and all
connection with the mains with particular caution! Never touch them with wet hands, as this could lead
to mortal electric shock.
Never modify, bend, strain mechanically, put pressure on ,pull or heat up the power cord. Never
operate next to source of heat or cold. Disregard can lead to power cord damages, fire or mortal
electric shock.
The cable insert or female part in the device must never be strained. There must be sufficient cable to
the device otherwise, the cable may be damages which may lead to mortal damage.
Make sure that the power cord is never crimped or damage by sharp edges. Check the device and the
power cord from time to time.
If extension cord are use, make sure that the core diameter is sufficient for the required power
consumption of the device. All warning concerning the power cords are also valid for possible
extension cords.
Always disconnect from the mains, when the device is not in use or before cleaning it. Only handle
the power cord by the plug. Never pull out the plug by tugging the power cord. Otherwise, the cable or
plug can be damaged leading to mortal electrical shock. If power plug or power switch is not
accessible, the device must be disconnected via mains.
If the power plug or the device is dusty, the device must be taken out of operation, disconnect nd
then be cleaned with a dry cloth. Dust can reduce the insulation witch may lead to mortal electrical
shock. More severe dirt in and at the device should be removed by a specialist.
There must never enter any liquid into outlets, extension cords or any holes in the housing of the
device. If you suppose that also a minimal amount of liquid may enter the device, it must immediately
be disconnected. This is also valid, if the device was expose to high humidity. Also if the device is still
running, the device must be checked by a specialist if liquid has reduce any insulation. Reduce
insulation san cause mortal electrical shock.
There must never be any object entering into the device. This is especially metal parts. If any metal
parts like staple or coarse metal chips enter into the device must be taken out of operation and
disconnected immediately. Malfunction or short circuit cause by metal parts may cause mortal
injuries.
During initial start up some smoke or smell may arise. This is normal process and does necessarily
means that the device is defective.
!
HEALTH HAZARD!
Never look directly into the light source, as sensitive person may suffer an
epileptic shock (especially meant for epileptics).
Keep away Children and armature!
Never leave this device running un attended.
OPERATING DETERMINATIONS
This device is a lighting effect for creating decorative effects. This product is only allowed to be
operated with an alternating voltage of 230V,50/60Hz and was designed for indoor use only.
This device is designed for professional use e.g. on stage in discotheques, theatres etc.
Lighting effects are not designed for permanent operation. Consistent operation breaks will ensure
that the device will serve you for long time without defects.
Do not shake the device. Avoid brute force when installing or operating the device.
When choosing the installation-spot please make sure that the device is not expose to extreme heat,
moisture or dust. There should not be any cable lying around. You endanger your own and safety of
others!
This device must never be operated or stockpiled in surrounding where splash water ,rain, moisture
or fog may harm the device. Moisture or very high humidity can reduce the insulation and lead to
mortal electrical shock. When using smoke machine make sure that the device is never expose to the
direct smoke jet and is installed in a distance of 0.5 meter between smoke machine and device. The
room must only be saturated with an amount of smoke that the visibility will always be more than 10
meter.
The ambient temperature must always be between –5ºC and +45ºC Keep away from direct
insulation ( particularly in cars) and heater.
The relative humidity must not exceed 50% with an ambient temperature of 45ºC.
This device must only be operated in an altitude between -20 and 2000 m over NN.
Never use the device during thunderstorm . Over voltage could destroy the device. Always
disconnect the device during thunderstorms.
The symbol d e t e rmines the minimum distance from lighted object. The minimum distance
between light-output and the illuminated surface must be more than 0.1 meters.
This device is only allowed for an installation via mounting bracket. In order to safe guard sufficient
ventilation leave 50 cm of free space around the device.
The housing must not touch surrounding surface or object.
Make sure that the are bellow the installation place is block when rigging, de rigging or servicing
the fixture.
Always fix the fixture with safety rope.
The maximum ambient temperature 45ºC must never exceed.
Operate the device only after having familiarized with its functions. Do not permit operation by
persons not qualified for operating the device. Most damage are the result of unprofessional
operation.
Do not use solvent or aggressive detergents in order to clean the device! Rather use soft and damp
cloth.
Please use original packaging if the device is to be transported.
FactorLED
Please consider that unauthorized modification on the device are forbidden due to safety
reasons!
If this device will operated in any way different to the describe in this manual, the product may
suffer damage and the guarantee becomes void. Further more, any other operation may lead
to danger like short circuit, burns, electric shock, lamp explosion, crash etc.
The installation of the projector has to be build and constructed in a way that can hold 10 times the
weight for 1 hour without any harming deformation.
The installation must always be secure with a secondary safety attachment, e.g. appropriate catch
net. This secondary safety attachment must be constructed in a way that no part of installation can fall
down if the main attachment fails.
When rigging, dragging or servicing the fixture staying in the area below the installation place, on
bridges under high working places and other endangered areas is forbidden.
The operator has to make sure that safety relating and machine technical installation are approve by
an expert before taking into operation for the first time and after changes before taking into operation
another time.
The operator has to make sure that safety relating and machine technical installation are approve by
an expert after every four years in the course of an acceptance.
The operator has to make sure that safety relating and machine technical installation are approve by a
skilled person once a year.
Procedure:
The projector should be installed outside areas where persons may walk by or be seated.
IMPORTANT! OVERHEAD RIGGING REQUIRES EXTENSIVE EXPERIENCE, including (but not
limited to) calculating working load limit, installation material being use, and periodic safety inspection
of all installation material and the projector. If you lack these qualification, do not attempt the
installation yourself but instead use a professional structural rigger. Improper installation can result in
bodily injury and or damage to property.
The projector has to be installed out of reach of people
If the projector shall be lowered from the ceiling or high joints, Professional trussing system have to
be used. the projector must never be fixed swinging freely in the room.
Caution: Projector may cause sever injuries when crashing down! If you have doubts concerning the
safety of a possible installation, do NOT install the projector.
Before rigging make sure that the installation area can hold a minimum point load of ten times the
projector’s.
DANGER OF FIRE!
When installing the device, make sure there is no highly inflammable material
( decoration articles , etc.) within a distance of min. 0.5m.
Mount the projector with the mounting bracket to your trussing system using an appropriate clamps.
For over head use, always install a safety rope that can hold at least 12 times the weight of the fixture.
You must only use safety ropes with quick links with screw cap. Pull the safety rope through
the hole in the mounting bracket and over the trussing system ar safe fixation spot. Insert the end in
the quick link and lighten the safety screw.
DMX-512 connection / connection between fixture
!
The wires must not come into contact with each other, otherwise the
Fixture will not work at all, or will not work properly
Only use a stereo shielded cable and 3-pin XLR– plugs and connector in order to connect the
controller with the fixture or one fixture with another.
Only use a stereo shielded cable and 3-pin XLR– plugs and connector in order to connect the
controller with the fixture or one fixture with another.
Occupation of the XLR– connector
DMX -Output
XLR mounting-socket
DMX - Input
XLR mounting-socket
2
2
3
1
1 Ground
2 Signal (-)
3 Signal (+)
3
1
1 Ground
2 Signal (-)
3 Signal (+)
The maximum drop distance must never exceed 20 cm.
A safety rope which already hold the strain of a crash or is defective must not be used again.
Adjust the desired inclination angle via mounting bracket and tighten the fixation screws.
Connect the fixture to the main with the power plug.
Building a serial DMX chain:
Connect the DMX– output of the first fixture in the DMX chain with the DMX– input of the next
fixture. Always connect one output with the input of the next fixture until all fixture are connected.
The occupation of the connection cable is as follows:
!
FactorLED
If you are using controllers with this occupation. You can connect the DMX– output of the controller
directly with the DMX—input of the first fixture in the DMX chain. If you wish to connect DMX–
controller with other XLR– outputs, you need to use adapter cable.
Cable
Pin
Brown
Live
L
Blue
Neutral
N
Yellow/Green
Earth
International
DANGER TO LIFE!
Before taking into operation for the first time, the installation
has to be approved by an expert!
Caution: At the last fixture, the DMX– cable has to be terminated with the terminator. Solder a
120Ω resistor between Signal(-)Signal (+) into a 3 pin XLR plug and plug it in the DMX output
of the last fixture.
Sound control or auto change
1
2
3
4
5
6
7
8
DMX Protocol
Channel 1– Mode
Mode 1
ON
0-63
OFF
Mode 2
In order to select Sound control or auto change, first set all dipswitches to OFF
Select the desire mode via the slide– switch.
Sound control: Slide switch on SOUND, color changes are sound controlled.
Auto changes: Slide switch on AUTO, automatic color change. The rotary speed control can be
use in the Auto change mode.
2
3
R
4
G
5
6
7
8
B
DMX– CONTROLLED OPERATION
You can control the projector individually via your DMX– controller. Every DMX– Channel has
different occupation with different features.
Addressing the PAR-56 LED
2
3
4
5
6
7
8
Set the dipswitch 8 to OFF, At least 1
dipswitches form (1-7) must turn ON
Set the dipswitches 1-7 set DMX addresses
Set the slide switch to SOUND
Controlling:
After addresses all Par 56LED you may now start operating these via your
DMX lighting controller.
FactorLED
7 color fade
7 color change
196-255
7 color change
Mode 4
Channel 2- R and speed
Channel 3- G
Channel 4- B
Channel 5- Sound control
DMX Value Characteristic
0-10
No function
101-150
151-255
No function
Sound control
Automatic
Note: If No function “ DMX value under channel 5 is chosen, then the rest of the channel function
properly; if Automatic or sound control is selected, then the other channel settings will not run.
To set to Manual mode set to ON dipswitches 7 and 8 to ON.
Dipswitches 1 and 2 control the brightness or “R” LEDs.
Dipswitches 3 and 4 control the brightness or “G” LEDs.
Dipswitches 5 and 6 control the brightness or “B” LEDs.
1
RGB
128-191
11-100
Manual Mode
1
64-127
Mode 3
Characteristic
CLEANING AND MAINTENANCE
DANGER TO LIFE!
Disconnect from mains before starting maintenance operation!
We recommend a frequent cleaning of the device. Please use soft lint-free moistened cloth. Never
use alcohol or solvent!
There are not serviceable parts inside the device. Maintenance and service operation are only to be
carried out by authorize dealer.
Should you need any spare parts, please use genuine parts.
Should you have further question, please contact your dealer.
TECHNICAL SPECIFICATIONS
Power supply
Power consumption
Dimmension (LxWxH)
Weight
Maximum ambient temperature
Maximum housting temperature
Minimum distance
230v, 50/60Hz
20w
220 x 210 x 220 mm
1.6 kg
45 grados C
60 grados C
0,10 mts
Please Note: Every information is subjet to change whitout proir noticie.
PAR 56 LED
PRECAUCION
Mantenga este dispositivo alejado de la lluvia y la humedad.
Desconectar antes de abrir el aparato.
Por su propia seguridad, por favor lea este manual cuidadosamente antes de su puesta en
marcha.
Cada persona que participe con la instalación, operación y mantenimiento de este dispositivo
tiene que:
• tener cualificación para su instalación.
• Seguir las instrucciones de este manual.
• Considerar este manual como parte del equipo.
• Conservar el manual durante toda la vida útil del equipo.
• Entregar este manual a todos los posibles usuarios del equipo.
• Descargar posibles nuevas versiones de este manual en internet.
INSTRUCCIONES
Gracias por haber elegido un Par 56 LED-D. Si usted sigue las instrucciones dadas en este
manual, estamos seguros de que podrá disfrutar de este equipo durante un largo periodo de
tiempo.
Desempaquetar el Par 56LED-D.
Antes de su puesta en marcha por primera vez, por favor, asegúrese de que no haya daños
causados por el transporte.
Si tiene alguna duda consulte a su distribuidor y no utilice el equipo.
INSTRUCCIONES DE SEGURIDAD
Tenga cuidado con la tensión. El voltaje puede ser peligroso.
Tocar los cables puede provocarle una descarga eléctrica.
Este equipo a salido de nuestras instalaciones en perfecto estado. A fin de mantener estas
condiciónes
y para garantizar un funcionamiento seguro, es absolutamente necesario que el usuario siga las
instrucciones de seguridad y tome nota de todos los datos de este manual.
Importante:
Daños producidos por no tener en cuenta este manual, estarán fuera de la garantía. El distribuidor
no aceptará ninguna responsabilidad por cualquier defecto resultante o problema debido a esta
causa.
FactorLED
Si el equipo ha sido expuesto a variaciones de temperatura drásticas (por ejemplo, después del
transporte), no encenderlo de inmediato. El agua de la condensación podria dañar el equipo. Deje el
equipo apagado hasta que alcance la temperatura ambiente.
Asegúrese de que no haya daños evidentes del transporte.
Si usted nota cualquier daño en el cable de alimentación , o en la conexión de la carcasa, no conecte
el equipo y póngase rapidamente en contacto con su distribuidor.
Este equipo está en una clase de protección 1. El enchufe de acometida debe de ser colocado con
una protección similar. La tensión y la frecuencia deben ser exactamente las mismas que figuran en
el equipo. Voltaje incorrecto o tensiones de alimentación diferentes pueden provocar la destrucción
del equipo y una descarga eléctrica mortal. El cable de alimentación siempre tiene que ser instalado
sin tensión. Asegúrese de que el enchufe está correctamente conectado con la toma de tierra.
Nunca deje que el cable de alimentación esté en contacto con otros cables. Maneje el cable de
alimentación y toda conexión con la red con especial precaución. Nunca toque los cables con las
manos mojadas, ya que ésto podría conducir a una descarga eléctrica mortal. Nunca debe modificar,
la tensión mecánica, presionar, estirar o calentar el cable de alimentación. Nunca trabaje junto a
fuentes de calor o frío. No hacer caso de estas observaciones sobre el cable de alimentación puede
dar lugar a daños y perjuicios como un incendio o una descarga eléctrica mortal. El prensaestopas
por donde sale el cable nunca debe de ser forzado. Asegúrese de que el cable de alimentación no es
ondulado o tiene daños en su recorrido. Compruebe el equipo y el cable de alimentación de vez en
cuando. Si se utiliza un cable para extender la alimentación, asegúrese de que el diámetro del
conductor es suficiente para el consumo de energía requerido para el equipo. Todas las
advertencias sobre los cables de alimentación también son válidos para los cables de extensión. El
cable de alimentación solamente debe de ser usado con clavija. Nunca desconecte la clavija tirando
del cable de alimentación, de lo contrario, el cable o el enchufe puede ser dañado y producir una
descarga eléctrica mortal. Si el enchufe o interruptor de alimentación no es accesible, el dispositivo
debe ser desconectado de la red a traves de un interruptor. Si el enchufe o el equipo está sucio, el
equipo debe de apagarse y desconectarse para ser limpiado con un paño seco. El polvo puede
reducir el grado de aislamiento pudiendo conducir a una descarga eléctrica mortal. Si el equipo tiene
mucha suciedad éste debe de ser revisado por un especialista. Nunca se debe introducir ningún
líquido en los conectores, cables de extensión o en los agujeros de la carcasa del equipo. Si supone
que una mínima cantidad de líquido puede entrar en el dispositivo, éste debe ser inmediatamente
desconectado. Esto también es válido, si el dispositivo se expone a humedad alta. Reducir el
aislamiento puede provocar una descarga eléctrica. Nunca debe de haber ningún objeto dentro del
equipo, especialmente piezas metálicas. Si alguna pieza metálica entra dentro del equipo como
grapas, o virutas metálicas, éste debe de ser apagado inmediatamente. Estas pueden provocar un
cortocircuito.
Cuando el equipo nuevo durante el primer encendido, emita algún olor o humo, se tratará de un
proceso normal y no necesariamente significaria que el equipo este defectuoso.
!
RIESGOS PARA LA SALUD
Nunca mire directamente a la fuente de luz, algunas personas sensibles
pueden sufrir una crisis epiléptica (especialmente destinado a los
epilépticos).
Mantener alejado el equipo de los niños.
Nunca deje el equipo encendido sin un asistente.
CONDICIONES DE USO
Este equipo es un efecto de iluminación para crear efectos decorativos. Puede funcionar con una
tensión alterna de 230 V, 50/60 Hz y ha sido creado para uso en interiores.
Este dispositivo está diseñado para uso profesional, por ejemplo, en el escenario de discotecas,
teatros, etc
Este equipo de iluminación no está diseñado para el funcionamiento permanente, no cumplir con
esta norma no garantiza que el equipo funcione sin defectos durante mucho tiempo.
No agitar el equipo. Evite golpes al instalar o al hacer funcionar el equipo.
Al elegir el lugar de instalación, por favor, asegúrese de que el dispositivo no esté expuesto a calor
extremo, humedad o polvo.
Este equipo no debe ser instalado o almacenado en lugares donde pueda haber salpicaduras de
agua, lluvia, humedad o niebla; estos pueden causar daño al equipo. Un exceso de humedad muy
alta puede reducir el aislamiento y llevar a una descarga eléctrica mortal. Si el lugar de la instalación
tiene una máquina de humo hay que asegurarse de que el equipo no esté expuesto al chorro directo
de salida del humo e instalalo a una distancia de 0,5 metros entre la máquina de humo y el equipo. La
habitación donde se encuentre el equipo debe de tener una visión mínima de 10 mts.
La temperatura ambiente debe estar siempre entre los -5 º C y +45 º C.
La humedad relativa no debe exceder del 50% con una temperatura ambiente de 45 º C.
El equipo debe ser instalado en una altitud de entre -20 y 2000 m sobre el nivel del mar.
Nunca utilizar el equipo durante una tormenta, más tensión podría destruir el equipo. Desconecte el
equipo durante las tormentas eléctricas.
Este
símbolo determina la distancia mínima del objeto iluminado. La distancia mínima
entre salida de luz y la superficie iluminada debe ser menor de 0,1 metros.
Este equipo sólo permite una instalación mediante el soporte de montaje. Con el fin de guardar la
distancia de seguridad suficiente de ventilación, debe de haber unos 50 cmts libres alrededor del
equipo.
Fijar siempre el equipo con un cable de seguridad.
Puede trabajar con el equipo una vez que se haya familiarizado con sus funciones. No permitirá el
funcionamiento del equipo por personas no cualificadas para el uso de éste. La mayoría de daños
son el resultado de un trabajo no profesional.
No use detergentes o disolventes agresivos para limpiar el equipo. Utilizar un paño suave y
ligeramente húmedo.
Por favor, utilice el embalaje original si el dispositivo se va a transportar.
FactorLED
No hacer modificaciones no autorizadas en el equipo, están prohibidas debido a razones de
seguridad.
Si este equipo funciona de una manera diferente a la descrita en este manual, el equipo puede
sufrir daños y la garantía queda sin efecto, pudiendo dar lugar a peligros como cortocircuitos,
quemaduras, choque eléctrico, explosión, accidente, etc
La instalación del equipo debe estar preparada de manera que pueda soportar 10 veces su peso
durante 1 hora sin sufrir ningún tipo de daño o deformación.
La instalación debe ser asegurada con un sistema de seguridad anexo como por ejemplo un cable
de seguridad. Este cable de seguridad debe de estar colocado de tal manera en la instalación que
impida que el equipo caiga al suelo.
El operador tiene que asegurarse de que la seguridad sobre el equipo y la instalación técnica se
apruebe por un experto antes de su funcionamiento por primera vez y después de los posibles
cambios posteriores.
El operador tiene que asegurarse de que la seguridad sobre el equipo y la instalación técnica se
apruebe por un experto una vez al año y todos los años de su funcionamiento..
Procedimiento:
El equipo debe ser instalado fuera de las zonas donde las personas pueden caminar o sentarse.
IMPORTANTE: el área de instalación requiere el cálculo del lÌmite de carga de trabajo y la
inspección periódica de la seguridad de todo el material de instalación y del equipo. Si usted carece
de estas cualificaciones de cálculo, no trate de hacer la instalación usted mismo, sino que recurra a
una persona profesional y cualificada para hacer los cálculos e instalación. Una instalación incorrecta
puede resultar en lesiones corporales y / o daÒos a la propiedad.
El proyector tiene que estar instalado fuera del alcance de las personas.
Si el proyector fuera bajado del techo o de sitios muy altos debe ser instalado un sistema de truss
profesional. El proyector nunca debe ser colocado balanceandose libremente en la instalación.
PrecauciÛn: El equipo puede causar lesiones al caer. Si tiene dudas sobre la de seguridad de una
instalación es mejor que no instale el proyector.
Antes de manipular asegurarse de que el área de la instalación puede albergar una carga puntual
mínima de diez veces el peso del equipo.
PELIGRO DE INCENDIO
Al instalar el equipo, asegúrese de que no hay material altamente inflamable
(Artículos de decoración, etc) dentro de una distancia de min. 0.5m.
Instalar el equipo mediante el soporte de montaje suministrado y utilizar garras apropiadas.
Utilizar siempre un cable de seguridad que pueda soportar hasta 12 veces el peso del equipo.
Utilizar sólo cables de seguridad con enlaces rápidos y rosca de seguridad. Coloque el cable de
seguridad a través del agujero del soporte de montaje e instalelo en un sitio seguro.
La distancia máxima de caída nunca debe superar los 20 cm.
Una cable de seguridad dañado o defectuoso, no debe ser utilizado.
Ajustar el ángulo de inclinación deseado a través del soporte de montaje y apretar los tornillos de
fijación.
Conectar el equipo a la alimentación principal mediante el enchufe.
La configuración del cable de alimentación es la siguiente:
Conexión DMX-512 entre proyectores
!
Los cables no deben entrar en contacto unos con otros, de lo contrario el
Aparato no funcionará en absoluto, o no funcionara correctamente.
Sólo use cable blindado especial para DMX y conectores XLR de 3 pines para unión entre
proyectores y con el dispositivo de control.
Configuración de los conectores XLR:
DMX -Salida
Montaje de conector XLR
DMX - Entrada
Montaje de conector XLR
2
2
3
1
1 Masa
2 Señal (-)
3 Señal (+)
3
1
1 Masa
2 Señall (-)
3 Señall (+)
Si usted está utilizando controladores para esta función. Usted puede conectar la salida DMX del
controlador directamente con el conector DMX de entrada del primer aparato. Pero si usted no hace
este tipo de conexión, necesitará un adaptador.
Para hacer una sucesión de equipos conectados mediante señal DMX:
Conecte la salida DMX del primer proyector en serie con la entrada DMX del siguiente proyector.
Hacer esta operación con todos los aparatos a instalar.
Cable
Pin
Marrón
Fase
L
Azul
Neutro
N
Amarillo/Verde
!
FactorLED
Internacional
Tierra
PELIGRO
Antes de su puesta en funcionamiento por primera vez, la instalación
tiene que ser aprobada por un experto.
Precaución: en el último proyector, la conexión DMX debe de ser terminada mediante un conector
terminador. Para ello soldar una resistencia de 120 Omh , entre la Señal(+) y Señal -) en el conector
XLR de 3 pin y éste debe ser instalado en la salida DMX del último proyector.
No hacer series mayores de 15 aparatos, si esto fuera necesario, puede hacerlo utilizando
amplificadores de señal DMX.
Control por sonido o Auto cambio.
1
2
3
4
5
6
7
8
Protocolo DMX
Canal 1– Modo
Modo 1
ON
0-63
OFF
Modo 2
Selección de Control por sonido o auto camio, seleccionar todos los interruptores en posición OFF
Seleccione el modo deseado a través del interruptor.
Control sonido: Interruptor en sonido, los cambios de color seran controlados.
Auto cambios: Interruptor en AUTO, cambio color automatico. La rotación de velocidad de control
Automatica puede tambien ser seleccionada.
Modo Manual
1
2
3
R
4
G
5
6
7
8
B
Direccionamiento PAR-56 LED
3
4
7 fader color
7 cambio color
196-255
7 cambio color
Modo 4
Valor DMX
Caracteristicas
11-100
Automatico
0-10
Canal 2- R y velocidad
Canal 3- G
Canal 4- B
Canal 5- control sonido
Sin funcion
Sin funcion
Control Sonido
Nota: Si se elige Sin función DMX en el canal 5, entonces el resto de funciónes , el control sera
automatico o si el sonido es seleccionado, entonces la configuración de otro canal no se ejecutará.
CONTROL OPERACION DMX
Usted puede controlar el proyector de forma individual a través de un controlador. Cada canal DMX
puede controlar diferentes parametros.
2
RGB
128-191
101-150
151-255
Para establecer el modo Manual interruptores 7 y 8 en ON.
Interruptores 1 y 2 para controlar el brillo "R".
Interruptores 3 y 4 para controlar el brillo "G".
Interruptores 5 y 6 para controlar el brillo "B".
1
64-127
Modo 3
Caracteristicas
5
6
7
8
Seleccionar el interruptor 8 en OFF, Al menos 1
Interruptor (1-7) debe de estar en ON
Seleccione los interruptores 1-7 para direccionamiento DMX.
Seleccione el interruptor para Sonido.
Control:
Después de las direccionar todos los Par 56LED ya pueden empezar a
funcionar a través del controlador de iluminación DMX.
LIMPIEZA Y MANTENIMIENTO
PELIGRO DE ACCIDENTE
Desconectar de la red antes de iniciar la operación de mantenimiento.
Le recomendamos una limpieza frecuente del equipo. Por favor, use un paño sin pelusa
ligeramente humedecido. No use alcohol ni disolventes.
En el interior del equipo no hay repuestos para hacer reparaciones. El servicio técnico y
mantenimiento debe ser hecho solamente por un distribuidor autorizado.
Si Usted necesita piezas de repuesto, utilice solamante repuestos originales.
Si Usted necesita mas aclaraciones, debe de ponerse en contacto con su distribuidor.
ESPECIFICACIONES TECNICAS
Alimentación
Consumo
Dimensión (LxWxH)
Peso
Maxima temperatura ambiente
Maxima temperatura
Distancia minima
230v, 50/60Hz
20w
220 x 210 x 220 mm
1.6 kg
45 grados C
60 grados C
0,10 mts
La información de este manual puede variar sin previo aviso.
FactorLED