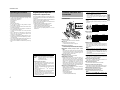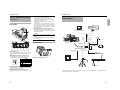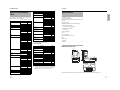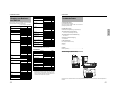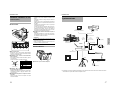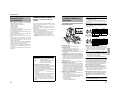
1
English Français Español INSTRUCTIONS BEDIENUNGSANLEITUNG INSTRUCTIONS INSTRUCCIONES ISTRUZIONI Italiano KA-HD250 Deutsch STUDIO ADAPTER STUDIOADAPTER APTATEUR DE STUDIO ADAPTADOR DE ESTUDIO ADATTATORE STUDIO For Customer Use: Enter below the Serial No. which is located on the body. Retain this information for future reference. Model No. KA-HD250 Serial No. © 2006 Victor Company of Japan, Limited LST0445-001B LST0445-001B These are general important Safeguards and certain items may not apply to all appliances. 11. 12. Important Safeguards 13. 14. 1. 2. 3. 4. 5. 6. 7. 8. 9. 10. 2 Read all of these instructions. Save these instructions for later use. All warnings on the product and in the operating instructions should be adhered to. Unplug this appliance system from the wall outlet before cleaning. Do not use liquid cleaners or aerosol cleaners. Use a damp cloth for cleaning. Do not use attachments not recommended by the appliance manufacturer as they may cause hazards. Do not use this appliance near water – for example, near a bathtub, washbowl, kitchen sink, or laundry tub, in a wet basement, or near a swimming pool, etc. Do not place this appliance on an unstable cart, stand, or table. The appliance may fall, causing serious injury to a child or adult, and serious damage to the appliance. Use only with a cart or stand recommended by the manufacturer, or sold with the appliance. Wall or shelf mounting should follow the manufacturer’s instructions, and should use a mounting kit approved by the manufacturer. An appliance and cart combination should be moved with care. Quick stops, excessive force, and uneven surfaces may cause the appliance and cart combination to overturn. Slots and openings in the cabinet and the back or bottom are provided for ventilation, and to insure reliable operation of the appliance and to protect it from overheating, these openings must not be blocked or covered. The openings should never be blocked by placing the appliance on a bed, sofa, rug, or other similar surface. This appliance should never be placed near or over a radiator or heat register. This appliance should not be placed in a built-in installation such as a bookcase unless proper ventilation is provided. This appliance should be operated only from the type of power source indicated on the marking label. If you are not sure of the type of power supplied to your home, consult your dealer or local power company. For appliance designed to operate from battery power, refer to the operating instructions. For added protection for this product during a lightning storm, or when it is left unattended and unused for long periods of time, unplug it from the wall outlet and disconnect the antenna or cable system. This will prevent damage to the product due to lightning and power-line surges. 15. 16. Do not allow anything to rest on the power cord. Do not place this appliance where the cord will be abused by persons walking on it. Follow all warnings and instructions marked on the appliance. Do not overload wall outlets and extension cords as this can result in fire or electric shock. Never push objects of any kind into this appliance through cabinet slots as they may touch dangerous voltage points or short parts that could result in a fire or electric shock. Never spill liquid of any kind on the appliance. Do not attempt to service this appliance yourself as opening or removing covers may expose you to dangerous voltage or other hazards. Refer all servicing to qualified service personnel. Unplug this appliance from the wall outlet and refer servicing to qualified service personnel under the following conditions: a. b. c. d. The power cord or plug is damaged or frayed. Liquid has been spilled into the appliance. The appliance has been exposed to rain or water. The appliance does not operate normally by following the operating instructions. Adjust only those controls that are covered by the operating instructions as improper adjustment of other controls may result in damage and will often require extensive work by a qualified technician to restore the appliance to normal operation. e. The appliance has been dropped or the cabinet has been damaged. f. The appliance exhibits a distinct change in performance – this indicates a need for service. 17. 18. When replacement parts are required, be sure the service technician has used replacement parts specified by the manufacturer that have the same characteristics as the original part. Unauthorized substitutions may result in fire, electric shock, or other hazards. Upon completion of any service or repairs to this appliance, ask the service technician to perform routine safety checks to determine that the appliance is in safe operating condition. Safety Precautions (For USA and Canada) CAUTION RISK OF ELECTRIC SHOCK DO NOT OPEN CAUTION: TO REDUCE THE RISK OF ELECTRIC SHOCK, DO NOT REMOVE COVER (OR BACK). NO USER SERVICEABLE PARTS INSIDE. REFER SERVICING TO QUALIFIED SERVICE PERSONNEL. The lightning flash with arrowhead symbol, within an equilateral triangle is intended to alert the user to the presence of uninsulated “dangerous voltage” within the product’s enclosure that may be of sufficient magnitude to constitute a risk of electric shock to persons. THIS DEVICE COMPLIES WITH PART 15 OF THE FCC RULES. OPERATION IS SUBJECT TO THE FOLLOWING TWO CONDITIONS: (1) THIS DEVICE MAY NOT CAUSE HARMFUL INTERFERENCE, AND (2) THIS DEVICE MUST ACCEPT ANY INTERFERENCE RECEIVED, INCLUDING INTERFERENCE THAT MAY CAUSE UNDESIRED OPERATION. This unit should be used with 12 V DC only. CAUTION: To prevent electric shocks and fire hazards, DO NOT use any other power source. INFORMATION (FOR CANADA) This Class A digital apparatus complies with Canadian ICES-003. Cet appareil numérique de la Classe A est conforme à la norme NMB-003 du Canada. The exclamation point within an equilateral triangle is intended to alert the user to the presence of important operating and maintenance (servicing) instructions in the literature accompanying the appliance. INFORMATION: This equipment has been tested and found to comply with the limits for a Class A digital device, pursuant to Part 15 of the FCC Rules. These limits are designed to provide reasonable protection against harmful interference when the equipment is operated in a commercial environment. This equipment generates, uses, and can radiate radio frequency energy and, if not installed and used in accordance with the instruction manual, may cause harmful interference to radio communications. Operation of this equipment in a residential area is likely to cause harmful interference in which case the user will be required to correct the interference at his own expense. CAUTION: CHANGES OR MODIFICATIONS NOT APPROVED BY JVC COULD VOID USER’S AUTHORITY TO OPERATE THE EQUIPMENT. NOTE: The rating plate (serial number plate) is on this unit. WARNING: TO REDUCE THE RISK OF FIRE OR ELECTRIC SHOCK, DO NOT EXPOSE THIS APPLIANCE TO RAIN OR MOISTURE. 3 English INTRODUCTION INTRODUCTION Information for Users on Disposal of Old Equipment WARNING: TO REDUCE THE RISK OF FIRE OR ELECTRIC SHOCK, DO NOT EXPOSE THIS APPLIANCE TO RAIN OR MOISTURE. This unit should be used with 12 V DC only. CAUTION: To prevent electric shocks and fire hazards, do NOT use any other power source. CAUTION: To prevent electric shock, do not open the cabinet. No user serviceable parts inside. Refer servicing to qualified service personnel. Note: The rating plate (serial number plate) is on this unit. This equipment is in conformity with the provisions and protection requirements of the corresponding European Directives. This equipment is designed for professional video appliances and can be used in the following environments: z Controlled EMC environment (for example, purpose-built broadcasting or recording studio), and rural outdoors environments. In order to keep the best performance and furthermore for electromagnetic compatibility we recommend to use cables not exceeding the following lengths: Port Cable Length RM Exclusive Cable 10 meters PROMPTER OUTPUT Coaxial Cable 5 meters DC INPUT Exclusive Cable 5 meters TALLY OUTPUT Exclusive Cable 5 meters TALLY INPUT Exclusive Cable 5 meters INTERCOM Shielded Cable 1.5 meters VF OUTPUT (BNC) Coaxial Cable 5 meters VF OUTPUT (20-pin) Shielded Cable 0.4 meters Caution: Where there are strong electromagnetic waves or magnetism, for example near a radio or TV transmitter, transformer, motor, etc., the picture and sound may be disturbed. In such a case, please keep the apparatus away from the sources of the disturbance. Dear Customer, This apparatus is in conformance with the valid European directives and standards regarding electromagnetic compatibility and electrical safety. European representative of Victor Company of Japan Limited is: JVC Technology Centre Europe GmbH P.O. Box 10 05 52 61145 Friedberg Germany 4 Thank you for purchasing this product. (These instructions are for: KA-HD250U.) Before operating this device, read the instruction manual carefully in order to make sure that the best possible performance is obtained. Main Features Attention: This symbol is only valid in the European Union. [European Union] This symbol indicates that the electrical and electronic equipment should not be disposed as general household waste at its end-of-life. Instead, the product should be handed over to the applicable collection point for the recycling of electrical and electronic equipment for proper treatment, recovery and recycling in accordance with your national legislation. By disposing of this product correctly, you will help to conserve natural resources and will help prevent potential negative effects on the environment and human health which could otherwise be caused by inappropriate waste handling of this product. For more information about collection point and recycling of this product, please contact your local municipal office, your household waste disposal service or the shop where you purchased the product. Penalties may be applicable for incorrect disposal of this waste, in accordance with national legislation. (Business users) If you wish to dispose of this product, please visit our web page www.jvc-europe.com to obtain information about the take-back of the product. [Other Countries outside the European Union] If you wish to dispose of this product, please do so in accordance with applicable national legislation or other rules in your country for the treatment of old electrical and electronic equipment. CAUTION • Moving this device with the supporting tripod attached may cause it to detach and fall if there is a sudden external impact or vibration. This may cause injuries. Remove this device from the tripod before moving it. • The front base mount may lock even when the pin on this device and the rear base mount attachment hole on the camera is not attached. After attaching, confirm that the camera has been firmly attached. The camera may fall and cause injury or accident if it is not attached properly. • When transporting with the camera attached to this device, hold the bottom of this device. If transported with the camera handle, the attachment may come off and this device may fall and cause injury or accident. Equipped with Analog 26P Camera Connector Connect the Remote Control Unit RM-P210 (sold separately) to control this device from up to a distance of 100 m away. In this case, the remote control unit provides power for the camera and thus there is no requirement for a separate power supply for the camera. Multi-system Output Output composite signals and RGB component, Y/PB/PR component, or YC separate signals from the 26P camera connector. (Selectable with the menu switch.) Equipped with Intercom Terminal Use a headset to communicate with the remote control unit operator. (Dynamic only) Equipped with Prompter Output Terminal Contents English Safety Precautions (For Europe) INTRODUCTION Main Features . . . . . . . . . . . . . . . . . . . . . . . . . . . . . . . . . . .5 Operating Precautions . . . . . . . . . . . . . . . . . . . . . . . . . . . . .6 Regarding Genlock Signal and Adjustment of System Phase . . . . . . . . . . . . . . . . . . . . . . . . . . . . . . . . . . . .6 Controls, Indicators and Connectors . . . . . . . . . . . . . . . . . .7 Front Section. . . . . . . . . . . . . . . . . . . . . . . . . . . . . . . . . .7 Rear Section . . . . . . . . . . . . . . . . . . . . . . . . . . . . . . . . . .8 Bottom Section . . . . . . . . . . . . . . . . . . . . . . . . . . . . . . . .8 PREPARATIONS Basic System . . . . . . . . . . . . . . . . . . . . . . . . . . . . . . . . . . . .9 Installation . . . . . . . . . . . . . . . . . . . . . . . . . . . . . . . . . . . . .10 Mounting on a Tripod . . . . . . . . . . . . . . . . . . . . . . . . . .10 Mounting the Camera . . . . . . . . . . . . . . . . . . . . . . . . . .10 Connecting Cables . . . . . . . . . . . . . . . . . . . . . . . . . . . .11 Connecting the Viewfinder (VF-P400) . . . . . . . . . . . . .11 Output signals when the viewfinder is connected . . . . .12 Connecting to Remote Control Unit RM-P210 . . . . . . . . . .12 Connection . . . . . . . . . . . . . . . . . . . . . . . . . . . . . . . . . .12 Menu Screen Setting . . . . . . . . . . . . . . . . . . . . . . . . . .13 Switch Setting . . . . . . . . . . . . . . . . . . . . . . . . . . . . . . . .13 Operation . . . . . . . . . . . . . . . . . . . . . . . . . . . . . . . . . . .13 Notes on Operating RM-P210 . . . . . . . . . . . . . . . . . . . . . .14 OTHERS Specifications . . . . . . . . . . . . . . . . . . . . . . . . . . . . . . . . . . .15 Dimensions . . . . . . . . . . . . . . . . . . . . . . . . . . . . . . . . . .15 Output prompter video from the remote control unit as composite signals. VF-P400 4-inch Viewfinder Compatible with a Conversion Plug Equipped with External Monitor Component Terminals (BNC × 3) 5 INTRODUCTION • In order to ensure that this device serves you longer, avoid storing or using in the following. Extremely hot or cold places Strong vibrations Dusty places High humidity Near loud noise sources • Do not subject this device to strong vibration or impact when installing or moving it. • Do not plug in or unplug the camera cable connector when this device is powered on. • Use only the designated power supplies. Use either RMP210 or IDX IA-60a, VL-2PLUS. • To reduce power consumption, turn off the power when not in-use. • When a transceiver or mobile phone is used near this device, noise may occur in the intercom speaker or the screen. This is not a malfunction. • Grounding the INTERCOM G (GND) terminal is recommended as noise may be induced depending on the intercom headset used. • Use only the specified standard length camera cable. Otherwise, cable compensation may be insufficient. • Return video is available in the viewfinder only for SD signals. Regarding Genlock Signal and Adjustment of System Phase When using the RM-P210 Remote Control Unit with this system, input Genlock signal into either the GY-HD250 Camera or RM-P210. However, if Genlock signal is applied to both GY-HD250 and RM-P210, screen images will appear choppy. Perform System Phase adjustment on the machine where Genlock signal has been input. In addition, RM-LP55 is prioritized when connected. • When Genlock signal is input into RM-P210 Adjust the phase by adjusting RM-P210’s H and SC. • When Genlock signal is input into GY-HD250 Adust the phase by adjusting RM-P210’s H and GYHD250’s SC. • When the viewfinder is connected to this terminal, the signal is not output correctly even if the viewfinder is connected to the 3 [VF OUTPUT] terminal. • When connected to the Y/PB/PR terminal of the monitor, the return video signal from the RM-P210 appears in monochrome. Front Section 8[TALLY OUTPUT] Tally Signal Output Terminal (D-sub 9 pin) Output tally signals. Use when connecting a VF other than VF-P400. 1 7 6 VF OUTPUT G/Y B/PB 2 Signal 9 R/PR 1 5 (Surface profile) 3 Signal 1 NC 6 NC 2 RM_PREVIEW 7 RM_TALLY 3 NC 8 NC 4 NC 9 NC 5 GND 1 NC 6 NC 2 9[TALLY INPUT] Input tally signals. f e d 4 c 9 a Characters and symbols used in this manual CAUTION : Points to pay attention to during operation. MEMO : Details for reference, such as functions or constraints during use. X : Pages or items to refer to. Notation used in this manual • The copyright for this manual is property of JVC. Unauthorized reproduction or publication of this manual in part or in whole is strictly forbidden. • All product names that appear in this document are the trademarks or registered trademarks of their respective companies. Marks and symbols such as ™, ® and © do not appear in this document. • The design, specifications, etc. found in this manual are subject to change without notice for improvement. • This manual refers to the connecting camera as GYHD250. However, the same operations are used when connecting the GY-HD251. 9 8 7 6 Signal TALLY_IN 7 NC 3 NC 8 NC 1 4 NC 9 NC (Surface profile) 5 GND 5 1Viewfinder Holder Use for mounting the VF-P400 4-inch Viewfinder. 2Lock Lever Fastens the camera to this device. X See “Mounting the Camera” on page 10. 3[VF OUTPUT] round 20-pin Connect the VF-P400 4-inch Viewfinder (sold separately). X See “Connecting the Viewfinder (VF-P400)” on page 11. 4[PROMPTER OUTPUT] Prompter Output Terminal (BNC) The prompter video signal input to the [AUX] input terminal of the remote control unit is output from this terminal via the RM multi-pin connector. Composite signal is output. Video monitor is connected here. 5[VF] Viewfinder Cable Connect to the VF terminal of GY-HD250. 6[BREAKER] Breaker Switch Breaker switch trips and cuts off power if the power consumed is higher than the rated capacity. If the breaker switch trips, confirm that there are no abnormalities and that the power consumption does not exceed the rated wattage. If no abnormalities are detected, press the breaker switch before turning the power on again to put this device in the operating status. If this device still does not function properly, consult your JVC-authorized dealer. 7[VF OUTPUT] (Y/PB/PR/RGB) BNC×3 Output terminal for viewfinder. Use when connecting a Viewfinder other than VF-P400. The HD/SD (from the GY-HD250) and composite video signal (from the RM-P210) can be switched. Use the GYHD250 menu to set. Recommended viewfinder: • DM-3106 (Astrodesign) • V-R70P-HAD (Marshall Electronics) Signal 6 0 b How to Use This Manual 6 MEMO Controls, Indicators and Connectors 5 0[RM] RM Multi-pin Connector (26 Pin) Connect to Remote Control Unit RM-P210 by using the 26-pin camera cable. In addition, power is supplied to this device and the camera from the remote control unit via this connector. MEMO • Output Composite video signal and RGB component, Y/ PB/PR component and YC separate signals from the output terminal of RM-P210. Select the output signal using the “OUTPUT” item on the “SYSTEM” menu screen on the GY-HD250. • SDI and HD signal cannot be output to the RM-P210. aGenlock Output Cable (BNC) Output cable for synchronization signals. Connect to the GENLOCK output terminal of GY-HD250. bComposite Video Input Cable (RCA) Input cable for composite video signals. Connect to the VIDEO output terminal of GY-HD250. cDC Output Cable (XLR 4pin) Connect to the DC INPUT terminal of GY-HD250. dComponent Y/PB/PR Input Cable (BNC×3) Input cable for component video Y/PB/PR signals. Connect to the each of the Y/PB/PR output terminals of GY-HD250. e[STUDIO] Studio Cable (Round 10 pin) Connect to the STUDIO terminal of GY-HD250. f[REMOTE] Remote Cable (Round 6 pin) Connect to the REMOTE terminal of GY-HD250. MEMO Do not pull the cables (5, a to f) or otherwise apply excessive force. Doing so may cause malfunction or injury. 7 English Operating Precautions PREPARATIONS Controls, Indicators and Connectors (Cont’d) Rear Section g k[CALL] CALL button/Power indicator Lights green when the studio adapter is turned on. However, lights up amber when the camera is off. Press to send call signal to the remote control unit operator if intercom headset is not in-use. Button indicator changes from green to red when the button is pressed. When this button is pressed and held down, call signal is sent to the remote control unit and the [TALLY] indicator blinks. Once the [CALL] button is released, call signal is no longer sent and the [TALLY] indicator of the remote control unit turns off. Basic System English INTRODUCTION l[DC INPUT] DC Power Input Terminal (XLR 4 Pin) Connect DC power to this terminal if Remote Control Unit RM-P210 is not connected. For DC power supply, use the IDX IA-60a or VL-2PLUS. View Finder DM-3106 (Astrodesign) V-R70P-HAD (Marshall Electronics) View Finder VF-P400 CAUTION When cable is connected to the DC INPUT terminal while supplying power from the RM-P210, power will be interrupted. Turn off connected devices when connecting a cable to the DC INPUT terminal. Conversion plug VF BRIGHT MACRO USER 1 USER 2 ND FILTER 2 1 MENU STATUS WHT.BAL AUTO CH-1 ON DC INPUT PUSH INTERCOM MIC INTERCOM LEVEL AUTO AUDIO LEVEL CH-2 HD CAMERA RECORDER GY-HD250/GY-HD251 Bottom Section h MIN i VF OUTPUT terminal (Round 20-Pin) INTERCOM terminal STUDIO KIT KA-HD250 CALL MAX j Headset DT109 (Beyerdynamic) REC ON OFF VF OUTPUT terminal (BNC × 3) OFF POWER INTERCOM USER 3 DC cable k AC Power Adapter IA-60a, VL-2PLUS (IDX) l DC INPUT terminal PROMPTER OUTPUT terminal g[TALLY] TALLY Lamp Lights up green when in stand-by (preview). Lights up red when the camera image is selected with the remote controller. h[INTERCOM] Intercom Input Terminal (XLR 5 Pin) Input terminal for intercom headset. (Dynamic only) Recommended headset: DT109 (Beyerdynamic) 1 4 3 (Surface profile) 1 MIC (H) 2 MIC (C) 3 EAR (C) 4 EAR (H) – LEFT 5 EAR (H) – RIGHT i[INTERCOM MIC] Intercom Mic [ON/OFF] Switch [ON/OFF] switch for intercom headset microphone. Set to [ON] to use the headset microphone. j[INTERCOM LEVEL] Intercom Receiver Volume Use for adjusting the intercom headset receiver volume level. 8 REMOTE cable m Tripod mScrew Holes for Mounting Tripod Signal 5 2 RM terminal REMOTE CONTROL UNIT RM-P210 TALLY CALL FULL AUTO F1 BARS F2 SHUTTER F3 MENU/SHUTTER GAIN PAINT WHITE PUSH-ON VARIABLE PUSH-ON POWER B MID LOW IRIS W.BAL HIGH MENU MASTER BLACK AUTO STEP SHUTTER F4 I A R B PRESET AUTO MANU GAIN INTERCOM LEVEL Monitor O DOWN UP DOWN UP CLOSE OPEN Remote Control Unit RM-P210 Headset DT109 (Beyerdynamic) Dolly z Power is supplied by the Remote Control Unit RM-P210 via the 26 pin camera cable when in-use. If the Remote Control Unit RM-P210 is not in-use, use AC power adapter. 9 PREPARATIONS 2. While pushing the safety lever, pull the lock lever toward Installation the front until the front mount clip clicks into place. Connecting Cables Connecting the Viewfinder (VF-P400) English Connect the cables for this device to the camera. Pin Mounting on a Tripod Lock lever Use the screw holes on the bottom to mount on a tripod. There are multiple screw holes. Use well-balanced holes to mount to a tripod. Safety lever 1. 9 3. Place the camera on this device and align the rear base Screw holes 4 mount of the camera with the pin on this device. GENLOCK/AUX IN P TC IN P TC OUT IEEE 1394 REMOTE CH2-AUDIO OUT-CH1 VIDEO HD/SD SDI 2 Mounting the Camera 1. Loosen the lock lever. Y 1 5 Turn the viewfinder lock lever counterclockwise and loosen the lock lever. 6 7 2. Attach the viewfinder. Slide the viewfinder forward along the viewfinder holder guides on the top of this device. DC INPUT 3 Prepare the camera as follows before mounting. • Attach the lens. • Attach the microphone. • Remove the viewfinder. For details, refer to GY-HD250’s INSTRUCTION MANUAL. Rear base mount STUDIO base mount of the camera is locked by the front mount clip of this device as it clicks into place. 1. Open the side cover. 3. Tighten with the lock lever. 8 Front base mount 4. Hold the camera on the top and slide forward so that the 2. 3. Front mount clip Connect the cable for this device to the camera terminal. Cable (type) Camera terminal GENLOCK (BNC) 1 GENLOCK REMOTE (Round 6-pin) 2 REMOTE DC OUTPUT (XLR 4-pin) 3 DC INPUT VIDEO (RCA) 4 VIDEO Y (BNC) 5 Y PB (BNC) 6 PB PR (BNC) 7 PR STUDIO (Round 10-pin) 8 STUDIO VF (Round 20-pin) 9 VF Turn the viewfinder lock lever clockwise and tighten the lock lever. 4. Connect the cables. Connect the viewfinder cable and conversion plug (KAV400) and connect the conversion plug to the viewfinder output terminal (20 pin) of this device. 4. Plug 4. MEMO CAUTION • The front base mount may lock even when the pin on this device and the rear base mount attachment hole on the camera is not attached. After attaching, confirm that the camera has been firmly attached. The camera may fall and cause injury or accident if it is not attached properly. • When transporting with the camera attached to this device, hold the bottom of this device. If transported with the camera handle, the attachment may come off and this device may fall and cause injury or accident. 10 • Turn off the device before connecting cables. • Do not touch the plug terminals when connecting. • Insert the DC cable plug all the way in until it locks. MEMO • Do not connect a monitor to the VF OUTPUT (Y/PB/PR/ RGB) terminal on the side of this device. When monitors are simultaneously connected to two VF OUTPUT terminals, signals are not properly output. • Do not connect anything other than the specified viewfinder to the viewfinder output terminal (20 pins). 11 PREPARATIONS Connecting to Remote Control Unit RM-P210 VF OUTPUT signals and displays are as shown below. Signal Display Connection Y Termi- RGB (Round nal (BNC×3) 20p) Y Y/PB/PR Y/PB/PR VBS (BNC×3) (BNC×3) (BNC×3) (BNC×1) Signal H/SD Component Composite Y Y RGB Y GYHD250 RGB VF SIGNAL item Y COMPONENT COMPONENT COMPOSITE Prompter video (RM-P210 [AUX VIDEO INPUT] terminal input signal) from RM-P210 can be verified by connecting this device’s [PROMPTER OUTPUT] terminal located in the front to a monitor using a BNC cable. MEMO VF-P400 p HD Component 3. Connecting a Monitor Switch off RM-P210 power supply before attempting the connection. 1. Connecting the RM-P210 Connect this device’s RM multi-pin connector and RMP210 using the 26 pin camera cable. Length of the camera cable should not be longer than 100 m. • Power for this device and the camera are supplied by RM-P210 via the 26 pin camera cable. • 26 pin camera cable VC-P110 (5 m) VC-P112 (20 m) VC-P113 (50 m) VC-P114 (100 m) G G G*1 G*1 G G*2 DV G G × G G G*2 REVERSE PICTURE*3 G G G G G G *4 G 1. Output Signal Setting Composite video signal is always output from the RM multi-pin connector. In addition, RGB component, Y/PB/ PR component or YC separate signal can also be output. Select the output signal using the OUTPUT item on the SYSTEM menu screen. MEMO × × × × × (G: Available, ×: Not available) Characters from the GY-HD250 are displayed for Y/PB/ PR terminal output signals. Therefore, use the HD/SDSDI terminal output signal for this line. *2 Signal is only output to the Y terminal of the Y/PB/PR terminal. *3 SKIN TONE display is not available. *4 The following displays are not available. • ZEBRA • Skin Detail range • Safety Zone • Focus Assist 1. Turn the RM-P210 on. Turn the [POWER] switch of the camera remote control unit to [ON]. CALL button lights up green when the power is turned on. After the [POWER] switch is turned on, camera remote control unit can be operated after about 30 seconds. MEMO After the power is turned on, the camera remote control unit takes about 30 seconds to be ready to communicate with this device. 2. Press the [CALL] button. Menu Screen Setting HD (HDV) Operation Press and hold down the [CALL] to send call signals to the remote control unit operator. The [TALLY] button indicator of the remote control unit blinks. [CALL] button indicator changes from green to red while the button is pressed. The [TALLY] lamp on the viewfinder also blinks when call signals are received from the remote control unit. 3. Adjust the volume. Adjust the headset reception volume with [INCOM LEVEL]. Sync signals are superimposed onto RGB component signals. *1 Switch Setting 1. Enabling/disabling INCOM MIC 2. Connecting the DT109 Connect the Headset DT109 plug to the [INTERCOM] terminal to use an intercom headset. Set the [INCOM MIC ON/OFF] switch depending on whether headset microphone will be used. Set the switch to [ON] use the headset microphone. MEMO This device supports only DYNAMIC-type headset. CARBON-type headphones cannot be connected. INCOM LEVEL volume CALL button MEMO INCOM MIC ON/OFF switch 12 • If both this device (including the camera) and the remote control unit have the same functional switches, the remote control unit switches are prioritized. • If external synchronization signal is present when the power is turned on, pictures may appear choppy for a few seconds. This is not a malfunction. • When using the remote control unit, refer to its instruction manual for details. 13 English Output signals when the viewfinder is connected OTHERS Function GAMMA DNR DNR LEVEL (G: Action available ×: No action) Function Action OFF G ON G OFF G (CONTOUR) ON G IRIS MANU G AUTO G MANU G PRE G AUTO1 G AUTO2 G FAW G BAR DETAIL WHITE BAL AUTO GAIN TALLY SET × WHITE G 0dB G +3dB G +6dB G +9dB G +12dB G +18dB G +24dB × –3dB × ALC+EEl G VARIABLE GAIN2 × VARIABLE GAIN × OFF G ON G PREVIEW G G VOLTAGE CHK. (RM r CAM) G VOLTAGE CHK. (CAM r RM) HIGH G LOW G SHUTTER OFF G 1/100 G*1 1/120 G*2 1/250 G 1/500 G 1/1000 G 1/2000 G V.SCAN × NORMAL G STRETCH G COMPRESS G BLACK NORMAL (OFF) × (HI-RESO) V.MAX (ON) × AUTO KNEE OFF G ON G 14 DTL FRQ SKIN DTL COLOR MATRIX ASPECT RATIO × ON × OFF G ON G LOW × MIDDLE × HIGH × AUTO × LOW G MIDDLE G HIGH G AUTO × OFF G ON G OFF × ON × 4:3 × 16:9 × LETTER × FULL AUTO SHOOTING OFF G ON G LOLUX OFF × ON × SMOOTH TRANS OFF G ON G *1 *2 When frame rate is 60p, 60i, 30p, or 24p When frame rate is 50p, 50i, or 25p Specifications RM Multi-pin connector: Composite video signal output (Either Y/PB/PR, RGB or YC separate output signal can be selected) PROMPTER output: PROMPTER video signal output (composite signal) Operating temperature range: • –5°C to 40°C (Humidity below 80%) Allowable storage temperature: • –20°C to 60°C Power supply voltage: DC12 V Power consumption: Max. 38W (GY-HD250, VF-P400) Mass: Approx. 5.2 d Accessories: Instructions ........................................................................× 1 Level command Function Action G IRIS MANUAL WHITE BALANCE R G B G BLACK PAINT R × B × Dimensions (Unit: mm) 80 G MASTER BLACK G*3 H.PHASE DETAIL MASTER G DETAIL BAL H/V G WHITE PAINT R G B G KNEE MASTER G GAMMA MASTER × INTERCOM DC INPUT VF OUTPUT PUSH INTERCOM MIC INTERCOM LEVEL CALL G/Y ON TALLY INPUT IRIS LEVEL (AL) G VARIABLE SHUTTER × VARIABLE GAIN2 × *3 OFF MIN B/PB R/PR TALLY OUTPUT 60 Some actions are not compatible when setting the GYHD250 with RM-P210 menu operations. Action OFF 256 243 Notes on Operating RMP210 English PREPARATIONS MAX 176 204 325 337.5 The range in which the RM-P210 H.PHASE item can actually be adjusted is 96 to 215. The value is adjusted to 96 if you set a value from 0 to 95 and the value is adjusted to 215 if you set a value from 216 to 255. 67 96(=6×P16) 22 48(=3×P16) Specifications and appearance of this device are subject to change for further improvement without prior notice. 15 Deutsch STUDIOADAPTER KA-HD250 16 BEDIENUNGSANLEITUNG EINFÜHRUNG Benutzerinformationen zur Entsorgung alter Geräte WARNUNG: UM DAS RISIKO VON BRÄNDEN UND ELEKTRISCHEN SCHLÄGEN ZU VERRINGERN, SETZEN SIE DIESES GERÄT KEINEM REGEN UND KEINER FEUCHTIGKEIT AUS. Dieses Gerät darf nur mit 12 V Gleichstrom betrieben werden. ACHTUNG: Um elektrische Schläge und Brände zu verhindern, verwenden Sie KEINE andere Stromquelle. ACHTUNG: Um elektrische Schläge zu vermeiden, öffnen Sie nicht das Gehäuse. Im Inneren befinden sich keine Teile, die vom Benutzer gewartet werden können. Überlassen Sie sämtliche Wartungsarbeiten qualifiziertem Wartungspersonal. Hinweis: Das Leistungsschild (Seriennummernschild) befindet sich an diesem Gerät. Dieses Gerät erfüllt die Normen und Schutzbestimmungen der zutreffenden europäischen Richtlinien. Das vorliegende Gerät wurde für professionelle Videoanwendungen entwickelt und kann in den folgenden Umgebungen eingesetzt werden: z Umgebung mit kontrollierter elektromagnetischer Verträglichkeit (EMV) (z. B. speziell gebautes Sende- oder Aufnahmestudio) und im Freien ländlicher Umgebungen. Um eine optimale Leistung sowie eine elektromagnetische Kompatibilität sicherzustellen, empfehlen wir die Verwendung von Kabeln, die die folgende Länge nicht übersteigen: Anschluss Kabel Länge RM Spezialkabel 10 Meter PROMPTER OUTPUT Koaxialkabel 5 Meter DC INPUT Spezialkabel 5 Meter TALLY OUTPUT Spezialkabel 5 Meter TALLY INPUT Spezialkabel 5 Meter INTERCOM Abgeschirmtes Kabel 1,5 Meter VF OUTPUT (BNC) Koaxialkabel 5 Meter VF OUTPUT (20-polig) Abgeschirmtes Kabel 0,4 Meter Achtung: In der Nähe von starken elektromagnetischen Wellen oder magnetischen Gegenständen, wie beispielsweise Radio- oder Fernsehsendeanlagen, Transformatoren, Motoren usw., können Bild und Ton gestört sein. Stellen Sie in diesen Fällen das Gerät weiter entfernt von den Störquellen auf. Sehr geehrter Kunde, dieses Gerät erfüllt die geltenden europäischen Richtlinien und Normen in Bezug auf elektromagnetische Kompatibilität und Stromschutzvorschriften. Victor Company of Japan, Limited wird in Europa vertreten durch: JVC Technology Centre Europe GmbH Postfach 10 05 52 61145 Friedberg Deutschland 18 Hinweis: Dieses Symbol ist nur in der Europäischen Union gültig. [Europäische Union] Dieses Symbol zeigt an, dass das elektrische bzw. elektronische Gerät nicht als normaler Haushaltsabfall entsorgt werden soll. Stattdessen sollte das Produkt zur fachgerechten Entsorgung, Weiterverwendung und Wiederverwertung in Übereinstimmung mit der Landesgesetzgebung einer entsprechenden Sammelstelle für das Recycling elektrischer und elektronischer Geräte zugeführt werden. Die korrekte Entsorgung dieses Produkts dient dem Umweltschutz und verhindert mögliche Schäden für die Umwelt und die menschliche Gesundheit, welche durch unsachgemäße Behandlung des Produkts auftreten können. Weitere Informationen zu Sammelstellen und dem Recycling dieses Produkts erhalten Sie bei Ihrer Gemeindeverwaltung, Ihrem örtlichen Entsorgungsunternehmen oder in dem Geschäft, in dem Sie das Produkt gekauft haben. Für die nicht fachgerechte Entsorgung dieses Abfalls können gemäß der Landesgesetzgebung Strafen ausgesprochen werden. (Geschäftskunden) Wenn Sie dieses Produkt entsorgen möchten, besuchen Sie bitte unsere Webseite www.jvc-europe.com, um Informationen zur Rücknahme des Produkts zu erhalten. [Andere Länder außerhalb der Europäischen Union] Wenn Sie dieses Produkt entsorgen möchten, halten Sie sich dabei bitte an die entsprechenden Landesgesetze und andere Regelungen in Ihrem Land zur Behandlung elektrischer und elektronischer Geräte. ACHTUNG • Wenn Sie das Gerät umsetzen, während das Stativ angebracht ist, kann es sich u. U. loslösen und herunterfallen, sollte es plötzlich einem Stoß oder einer Erschütterung ausgesetzt werden. Dabei kann es zu Verletzungen kommen. Trennen Sie das Gerät vom Stativ, bevor Sie es an einen anderen Ort bringen. • Die vordere Sockelhalterung kann einrasten, auch wenn der Stift an diesem Gerät und die Befestigungslöcher an der hinteren Sockelhalterung der Kamera nicht miteinander verbunden sind. Überzeugen Sie sich nach der Montage, dass die Kamera ordnungsgemäß angebracht wurde. Sollte die Kamera nicht ordnungsgemäß angebracht sein, kann sie herunterfallen und Verletzungen oder Unfälle verursachen. • Wenn Sie das Gerät mit angebrachter Kamera transportieren, halten Sie die Unterseite dieses Geräts fest. Falls beim Transport der Kameragriff angefasst wird, kann sich der Aufsatz lösen, und dieses Gerät fällt möglicherweise herunter und verursacht Verletzungen oder Unfälle. Wir bedanken uns für den Kauf dieses Produkts. (Diese Bedienungsanleitung gilt für folgendes Modell: KAHD250U.) Bevor Sie dieses Gerät verwenden, lesen Sie sorgfältig die Bedienungsanleitung durch, um eine optimale Leistung sicherzustellen. Besondere Merkmale Ausstattung mit einem analogen 26P-Kameraanschluss Schließen Sie die Fernsteuereinheit RM-P210 (gesondert erhältlich) an, um dieses Gerät aus einer Entfernung von bis zu 100 m zu steuern. In diesem Fall liefert die Fernsteuereinheit den Strom für die Kamera, weswegen keine gesonderte Stromversorgung an die Kamera angeschlossen werden muss. Ausstattung mit Multi-SystemAusgabe Gibt Composite-Signale sowie RGB-Component-, Y/PB/PRComponent- oder Y/C-Trennsignale vom 26P-Kameraanschluss aus. (Wählbar über den Menüschalter.) Ausstattung mit einem IntercomAnschluss INHALTSVERZEICHNIS EINFÜHRUNG Besondere Merkmale . . . . . . . . . . . . . . . . . . . . . . . . . . . . .19 Vorsichtsmaßnahmen für die Bedienung . . . . . . . . . . . . . .20 Hinweise zu Genlock-Signal und Anpassung der Systemphase. . . . . . . . . . . . . . . . . . . . . . . . . . . . . .20 Bedienungselemente, Anzeigen und Anschlüsse . . . . . . .21 Vorderseite . . . . . . . . . . . . . . . . . . . . . . . . . . . . . . . . . .21 Rückseite . . . . . . . . . . . . . . . . . . . . . . . . . . . . . . . . . . .22 Unterseite . . . . . . . . . . . . . . . . . . . . . . . . . . . . . . . . . . .22 VORBEREITUNGEN Grundsystem . . . . . . . . . . . . . . . . . . . . . . . . . . . . . . . . . . .23 Installation . . . . . . . . . . . . . . . . . . . . . . . . . . . . . . . . . . . . .24 Anbringen an einem Stativ . . . . . . . . . . . . . . . . . . . . . .24 Anbringen der Kamera . . . . . . . . . . . . . . . . . . . . . . . . .24 Anschließen von Kabeln . . . . . . . . . . . . . . . . . . . . . . . .25 Anschließen des Suchers (VF-P400) . . . . . . . . . . . . . .25 Ausgegebene Signale bei Anschluss des Suchers. . . .26 Anschließen an die Fernsteuereinheit RM-P210 . . . . . . . .26 Anschlussverbindung . . . . . . . . . . . . . . . . . . . . . . . . . .26 Einstellung des Menübildschirms . . . . . . . . . . . . . . . . .27 Schaltereinstellung . . . . . . . . . . . . . . . . . . . . . . . . . . . .27 Ablauf . . . . . . . . . . . . . . . . . . . . . . . . . . . . . . . . . . . . . .27 Hinweise zum Bedienen des RM-P210 . . . . . . . . . . . . . . .28 SONSTIGES Technische Daten . . . . . . . . . . . . . . . . . . . . . . . . . . . . . . .29 Abmessungen . . . . . . . . . . . . . . . . . . . . . . . . . . . . . . . .29 Verwenden Sie ein Headset, um mit dem Bediener der Fernsteuereinheit zu kommunizieren. (nur dynamisch) Ausstattung mit einem PrompterAusgangsanschluss Gibt Prompter-Videosignale von der Fernsteuereinheit als Composite-Signale aus. 4-Zoll-Sucher VF-P400 mit einem Umwandlungsstecker kompatibel Ausstattung mit ComponentAnschlüssen für einen externen Monitor (3 × BNC) 19 Deutsch Sicherheitshinweise (Für Europa) EINFÜHRUNG • Damit Sie noch lange Freude an Ihrem Gerät haben, vermeiden Sie es, das Gerät unter folgenden Bedingungen bzw. an folgenden Orten zu betreiben oder aufzubewahren: Extrem heiße oder kalte Orte Starke Erschütterungen Staubige Orte Hohe Luftfeuchtigkeit In der Nähe von lauten Geräuschquellen • Setzen Sie dieses Gerät keinen starken Erschütterungen oder Stößen aus, wenn Sie es aufstellen oder transportieren. • Wenn das Gerät eingeschaltet ist, dürfen Sie das Kamerakabel weder anschließen noch vom Gerät trennen. • Verwenden Sie nur die für das Gerät vorgesehenen Stromversorgungen. Benutzen Sie entweder RM-P210, IDX IA-60a oder VL-2PLUS. • Um den Stromverbrauch zu verringern, schalten Sie die Stromversorgung aus, wenn das Gerät nicht verwendet wird. • Wenn in der Nähe dieses Geräts ein Sende-EmpfangsGerät oder ein Handy verwendet wird, kann es im Intercom-Lautsprecher oder auf dem Bildschirm zu Störungen kommen. Dies ist keine Fehlfunktion. • Es wird empfohlen, den INTERCOM G (GND)-Anschluss zu erden, da bei einigen Intercom-Headsets Störungen hervorgerufen werden können. • Verwenden Sie nur Kamerakabel mit der angegebenen Standardlänge. Anderenfalls reicht eventuell die Leitungskompensation nicht aus. • Das Rückführungsvideosignal ist im Sucher nur für SDSignale verfügbar. Hinweise zu Genlock-Signal und Anpassung der Systemphase Wenn Sie die Fernsteuereinheit RM-P210 zusammen mit diesem System verwenden, legen Sie ein Genlock-Signal entweder an der Kamera GY-HD250 oder dem RM-P210 an. Wenn jedoch ein Genlock-Signal sowohl am GY-HD250 als auch am RM-P210 angelegt wird, werden abgehackte Bildschirmbilder angezeigt. Führen Sie an dem Gerät, an dem das Genlock-Signal angelegt wurde, eine Anpassung der Systemphase durch. Darüber hinaus erhält das Gerät RM-LP55 Vorrang, wenn es angeschlossen ist. • Wenn ein Genlock-Signal am RM-P210 angelegt wird, passen Sie die Phase an, indem Sie H- und SC-Wert des RM-P210 regeln. • Wenn ein Genlock-Signal am GY-HD250 angelegt wird, passen Sie die Phase an, indem Sie den H-Wert des RMP210 und den SC-Wert des GY-HD250 regeln. 1 G/Y B/PB R/PR 1 5 (Oberflächenprofil) 2 3 Signal 9 VF OUTPUT Signal 1 NC 6 NC 2 RM_PREVIEW 7 RM_TALLY 3 NC 8 NC 4 NC 9 NC 5 GND 9[TALLY INPUT] Gibt Tally-Signale ein. f 9 0 b 9 a 8 7 6 5 1Sucherhalter Dient zum Anbringen des VF-P400 4-Zoll-Suchers. 2Sicherungshebel Dient zum Befestigen der Kamera an dieses Gerät. X Siehe „Anbringen der Kamera“ auf Seite 24. 3[VF OUTPUT] runder 20-poliger Anschluss Dient zum Anschließen des VF-P400 4-Zoll-Suchers (gesondert erhältlich). X Siehe „Anschließen des Suchers (VF-P400)“ auf Seite 25. 4[PROMPTER OUTPUT] Prompter-Ausgangsanschluss (BNC) Die Prompter-Videosignaleingabe für den Eingangsanschluss [AUX] der Fernsteuereinheit wird an diesem Anschluss über den vielpoligen RM-Stecker ausgegeben. Ein Composite-Signal wird ausgegeben. Der Videomonitor wird hier angeschlossen. 5[VF] Sucherkabel Dient zum Anschließen an den VF-Eingang des GY-HD250. 6[BREAKER] Trennschalter Der Trennschalter wird ausgelöst und schaltet den Strom ab, wenn der Stromverbrauch höher als die Nennleistung ist. Wenn der Trennschalter ausgelöst wird, überzeugen Sie sich, dass keine Störungen vorliegen und dass der Stromverbrauch die Nennleistung nicht übersteigt. Wenn keine Störungen festgestellt werden, drücken Sie zuerst den Trennschalter, bevor Sie erneut den Strom einschalten, um dieses Gerät wieder in Betrieb zu nehmen. Sollte das Gerät immer noch nicht funktionieren, wenden Sie sich an Ihren autorisierten JVC-Händler. 7[VF OUTPUT] (Y/PB/PR/RGB) 3× BNC Ausgangsbuchse für den Sucher. Wird verwendet, wenn Sie einen anderen Sucher als den VF-P400 anschließen. Das HD/SD- (vom GY-HD250) und das Composite-Videosignal (vom RM-P210) können umgeschaltet werden. Verwenden Sie zur Einstellung das Menü des GY-HD250. Empfohlener Sucher: • DM-3106 (Astrodesign) • V-R70P-HAD (Marshall Electronics) 5 Signal 6 4 c In diesem Handbuch aufgeführte Zeichen und Symbole ACHTUNG: Weist darauf hin, dass hier besonders aufmerksam vorgegangen werden muss. MEMO : Wichtige Einzelheiten, wie z. B. Funktionen oder Beschränkungen während der Verwendung. X : Seiten oder Punkte, die als Querverweis dienen. • Ist der Sucher mit diesem Anschluss verbunden, wird das Signal nicht korrekt ausgegeben, selbst wenn der Sucher an der Buchse 3 [VF OUTPUT] angeschlossen ist. • Erfolgt der Anschluss an der Buchse Y/PB/PR des Monitors, wird das Rückführungsvideosignal vom RM-P210 nur schwarz-weiß angezeigt. 6 7 d Verwendung dieses Handbuchs MEMO 8[TALLY OUTPUT] Tally-Signal-Ausgangsanschluss (9poliger D-sub-Anschluss) Gibt Tally-Signale aus. Wird verwendet, wenn Sie einen anderen Sucher als den VF-P400 anschließen. Vorderseite e In diesem Handbuch verwendete Schreibweise • JVC besitzt das Urheberrecht für dieses Handbuch. Eine unbefugte Vervielfältigung oder Veröffentlichung dieses Handbuchs, auch auszugsweise, ist strengstens untersagt. • Alle in diesem Dokument aufgeführten Produktnamen sind Marken oder eingetragene Marken der jeweiligen Unternehmen. Zeichen und Symbole, wie z. B. ™, ® und © werden in diesem Dokument nicht verwendet. • Änderungen an den in diesem Handbuch aufgeführten technischen Daten sowie am Design usw. bleiben im Sinne des technischen Fortschritts jederzeit vorbehalten. • In diesem Handbuch wird die anzuschließende Kamera als „GY-HD250“ bezeichnet. Zum Anschließen der GYHD251 sind jedoch dieselben Bedienschritte erforderlich. 20 Bedienungselemente, Anzeigen und Anschlüsse 1 (Oberflächenprofil) Signal 1 NC 6 NC 2 TALLY_IN 7 NC 3 NC 8 NC 4 NC 9 NC 5 GND 0[RM] vielpoliger RM-Stecker (26-polig) Dient zum Anschluss an die Fernsteuereinheit RM-P210 mittels 26-poligem Kamerakabel. Darüber hinaus wird diesem Gerät und der Kamera über diesen Anschluss Strom von der Fernsteuereinheit zugeführt. MEMO • Composite-Videosignale sowie RGB-Component-, Y/PB/ PR-Component- und Y/C-Trennsignale werden über die Ausgangsbuchse des RM-P210 ausgegeben. Wählen Sie das Ausgangssignal im Menübildschirm „SYSTEM“ des GY-HD250 über den Punkt „OUTPUT“. • SDI- und HD-Signal können nicht an den RM-P210 ausgegeben werden. aGenlock-Ausgangskabel (BNC) Ausgangskabel für Synchronisationssignale. Dient zum Anschließen an die GENLOCK-Ausgangsbuchse des GYHD250. bComposite-Videoeingangskabel (RCA) Eingangskabel für Composite-Videosignale. Dient zum Anschließen an die VIDEO-Ausgangsbuchse des GY-HD250. cGleichstrom-Ausgangskabel (XLR, 4-polig) Dient zum Anschließen an die Buchse DC INPUT des GYHD250. dComponent Y/PB/PR-Eingangskabel (3× BNC) Eingangskabel für Y/PB/PR-Component-Videosignale. Wird an die einzelnen Y/PB/PR-Ausgangsanschlüsse des GY-HD250 angeschlossen. eStudiokabel [STUDIO] (10-polig, rund) Dient zum Anschließen an die STUDIO-Buchse des GYHD250. f[REMOTE] Fernsteuerkabel (rund, 6-polig) Dient zum Anschließen an die REMOTE-Buchse des GYHD250. MEMO Ziehen Sie nicht an den Kabeln (5, a bis f), und wenden Sie auch keine anderweitigen übermäßigen Kräfte an. Anderenfalls kann es zu Fehlfunktionen oder Verletzungen kommen. 21 Deutsch Vorsichtsmaßnahmen für die Bedienung VORBEREITUNGEN Bedienungselemente, Anzeigen und Anschlüsse (Fortsetzung) Rückseite g k[CALL] Ruftaste/Power-Anzeige Leuchtet grün, wenn der Studioadapter eingeschaltet ist. Leuchtet jedoch gelb auf, wenn die Kamera ausgeschaltet ist. Muss gedrückt werden, um ein Rufsignal an den Bediener der Fernsteuereinheit zu senden, wenn das IntercomHeadset nicht verwendet wird. Die Tastenanzeige wechselt von grün zu rot, wenn die Taste gedrückt wird. Wird diese Taste gedrückt gehalten, wird ein Rufsignal an die Fernsteuereinheit gesendet, und die Anzeige [TALLY] blinkt. Nachdem die Ruftaste [CALL] losgelassen wurde, wird kein Rufsignal mehr gesendet, und die Anzeige [TALLY] der Fernsteuereinheit wird ausgeschaltet. Grundsystem Sucher DM-3106 (Astrodesign) V-R70P-HAD (Marshall Electronics) l[DC INPUT] Gleichstrom-Eingangsbuchse (XLR, 4polig) Schließen Sie eine Gleichstromquelle an diese Buchse an, wenn die Fernsteuereinheit RM-P210 nicht angeschlossen ist. Verwenden Sie zur Gleichstromversorgung den IDX IA-60a oder VL-2PLUS. VF BRIGHT USER 1 MACRO DC INPUT PUSH INTERCOM MIC INTERCOM LEVEL Wenn das Kabel am Gleichstromeingang DC INPUT angeschlossen wird, während Strom vom RM-P210 eingespeist wird, wird die Stromzufuhr unterbrochen. Schalten Sie alle angeschlossenen Geräte ab, bevor Sie ein Kabel an den Gleichstromeingang anschließen. USER 2 USER 3 ND FILTER 2 1 MENU STATUS WHT.BAL AUTO CH-1 ON AUTO AUDIO LEVEL CH-2 MIN VF OUTPUT Anschlussbuchse (3× BNC) VF OUTPUT Anschlussbuchse (rund, 20-polig) POWER REC HD-CAMCORDER GY-HD250/GY-HD251 INTERCOM-Anschluss STUDIO KIT KA-HD250 CALL MAX Gleichstromkabel Unterseite h i j k Headset DT109 (Beyerdynamic) OFF ON OFF Sucher VF-P400 Umwandlungsstecker ACHTUNG INTERCOM Deutsch EINFÜHRUNG Netzadapter IA-60a, VL-2PLUS (IDX) l Gleichstromeingang DC INPUT PROMPTER OUTPUT Anschlussbuchse g[TALLY] Tally-Lampe Leuchtet im Bereitschaftsmodus (Vorschau) grün. Leuchtet rot auf, wenn das Kamerabild mit der Fernbedienung ausgewählt wird. RM-Anschluss h[INTERCOM] Intercom-Eingangsanschluss (XLR, 5polig) Eingangsanschluss für Intercom-Headset. (nur dynamisch) Empfohlenes Headset: DT109 (Beyerdynamic) Fernsteuerkabel Stativ REMOTE CONTROL UNIT RM-P210 TALLY CALL FULL AUTO F1 BARS F2 SHUTTER F3 MENU/SHUTTER GAIN PAINT WHITE PUSH-ON VARIABLE PUSH-ON POWER B MID LOW IRIS W.BAL HIGH MENU MASTER BLACK AUTO STEP SHUTTER F4 I A R B PRESET AUTO MANU GAIN 1 Signal 5 2 4 3 (Oberflächenprofil) 1 MIC (H) 2 MIC (C) 3 EAR (C) 4 EAR (H) – LEFT 5 EAR (H) – RIGHT i[INTERCOM MIC] Intercom-Mikrofon [ON/OFF]-Schalter [ON/OFF]-Schalter für das Mikrofon des Intercom-Headsets. Auf [ON] stellen, um das Mikrofon des Headsets zu verwenden. m INTERCOM LEVEL Monitor O DOWN UP DOWN UP CLOSE OPEN Fernsteuereinheit RM-P210 mBefestigungslöcher zum Anbringen des Stativs Headset DT109 (Beyerdynamic) Kamerawagen z Die Stromversorgung erfolgt über die Fernsteuereinheit RM-P210 mithilfe des 26-poligen Kamerakabels, wenn eingesetzt. Wenn die Fernsteuereinheit RM-P210 nicht verwendet wird, benutzen Sie einen Netzadapter. j[INTERCOM LEVEL] Lautstärke des Intercom-Empfängers Dient zum Anpassen der Lautstärke des Intercom-Headset-Empfängers. 22 23 VORBEREITUNGEN 2. Halten Sie den Sicherheitshebel gedrückt, und ziehen Sie den Verriegelungshebel nach vorn, bis die vordere Befestigungsklemme einrastet. Installation Anschließen von Kabeln Anschließen des Suchers (VF-P400) Schließen Sie die Kabel für dieses Gerät an der Kamera an. Stift Anbringen an einem Stativ Verriegelungshebel Zum Anbringen an einem Stativ verwenden Sie die Befestigungslöcher an der Unterseite. Es sind mehrere Befestigungslöcher vorhanden. Für die Montage auf einem Stativ verwenden Sie die Löcher, die die Kamera am besten ausbalancieren. 1. Deutsch Vordere Befestigungsklemme 9 3. Setzen Sie die Kamera auf dieses Gerät, und richten Sie die hintere Sockelhalterung der Kamera am Stift dieses Geräts aus. 4 Befestigungslöcher GENLOCK/AUX IN 1. Lösen Sie den Sicherungshebel. Y P TC IN 6 P TC OUT 7 IEEE 1394 REMOTE 5 CH2-AUDIO OUT-CH1 VIDEO 1 HD/SD SDI 2 Bereiten Sie die Kamera wie folgt vor, bevor Sie sie anbringen. • Bringen Sie das Objektiv an. • Bringen Sie das Mikrofon an. • Entfernen Sie den Sucher. Einzelheiten finden Sie in der BEDIENUNGSANLEITUNG für den GY-HD250. 3 Hintere Sockelhalterung STUDIO Vordere Sockelhalterung 4. Halten Sie die Kamera an der Oberseite, und schieben Sie sie nach vorn, so dass die Sockelhalterung der Kamera mit der vorderen Befestigungsklemme dieses Geräts einrastet. 1. Öffnen Sie die seitliche Abdeckung. Schließen Sie das Kabel für dieses Gerät an der Kamerabuchse an. (Typ) Kamerabuchse GENLOCK (BNC) 1 REMOTE (rund, 6-polig) 2 REMOTE DC OUTPUT (XLR, 4-polig) 3 DC INPUT (Gleichstromeingang) VIDEO (RCA) 4 VIDEO OUT Y (BNC) 5 Y OUT PB (BNC) 2. Bringen Sie den Sucher an. Schieben Sie den Sucher entlang der Sucher-Haltungsschienen auf der Oberseite dieses Geräts nach vorn. Drehen Sie den Sucher-Sicherungshebel im Uhrzeigersinn, und ziehen Sie den Sicherungshebel fest. 8 Kabel Drehen Sie den Sucher-Sicherungshebel im entgegengesetzten Uhrzeigersinn, und lösen Sie den Sicherungshebel. 3. Ziehen Sie ihn mit dem Sicherungshebel fest. DC INPUT Anbringen der Kamera 2. 3. Sicherheitshebel 6 GENLOCK IN 4. Schließen Sie die Kabel an. Schließen Sie das Sucherkabel und den Umwandlungsstecker (KA-V400) an, und schließen Sie den Umwandlungsstecker an die Sucher-Ausgangsbuchse (20-polig) dieses Geräts an. 4. PB OUT PR (BNC) 7 PR OUT STUDIO (rund, 10-polig) 8 STUDIO VF (rund, 20-polig) 9 VF Steckverbindung 4. MEMO ACHTUNG • Die vordere Sockelhalterung kann einrasten, auch wenn der Stift an diesem Gerät und die Befestigungslöcher an der hinteren Sockelhalterung der Kamera nicht miteinander verbunden sind. Überzeugen Sie sich nach der Montage, dass die Kamera ordnungsgemäß angebracht wurde. Sollte die Kamera nicht ordnungsgemäß angebracht sein, kann sie herunterfallen und Verletzungen oder Unfälle verursachen. • Wenn Sie das Gerät mit angebrachter Kamera transportieren, halten Sie die Unterseite dieses Geräts fest. Falls beim Transport der Kameragriff angefasst wird, kann sich der Aufsatz lösen, und dieses Gerät fällt möglicherweise herunter und verursacht Verletzungen oder Unfälle. 24 • Schalten Sie das Gerät aus, bevor Sie Kabel anschließen. • Berühren Sie beim Anschließen nicht die Anschlussstecker. • Führen Sie den Stecker des Gleichstromkabels so weit ein, bis er einrastet. MEMO • Schließen Sie keinen Monitor an den an der Seite dieses Geräts befindlichen Anschluss VF OUTPUT (Y/PB/PR/ RGB) an. Werden Monitore gleichzeitig mit zwei VF OUTPUT-Anschlüssen verbunden, werden die Signale nicht ordnungsgemäß ausgegeben. • Schließen Sie lediglich den angegebenen Sucher an die Sucher-Ausgangsbuchse (20-polig) an. 25 VORBEREITUNGEN Die Signale und Anzeigen von VF OUTPUT können Sie der untenstehenden Tabelle entnehmen. Anschlussverbindung VF-P400 p Signal Display AnY RGB schluss(Round (BNC×3) buchse 20p) Y Y/PB/PR Y/PB/PR VBS (BNC×3) (BNC×3) (BNC×3) (BNC×1) Signal Y Y RGB Y HDH/SDComKompo- Kompoposite nente nente GYHD250 RGB VF SIGNAL Y COMPONENT COMPONENT COMPOSITE Schalten Sie zuerst die Stromversorgung des RM-P210 aus, bevor Sie den Anschluss vornehmen. 1. Anschließen des RM-P210 Schließen Sie den vielpoligen RM-Stecker dieses Geräts über ein 26-poliges Kamerakabel an den RM-P210 an. Das Kamerakabel darf nicht länger als 100 m sein. HD (HDV) G G G*1 G*1 G G*2 DV G G × G G G*2 REVERSE PICTURE*3 G G G G G G *4 G × × × × × (G: verfügbar, ×: nicht verfügbar) *1 Zeichen vom GY-HD250 werden für ausgegebene Signale des Y/PB/PR-Anschlusses angezeigt. Verwenden Sie daher für diese Zeile das Ausgangssignal des HD/ SD-SDI-Anschlusses. *2 Signal wird nur an die Y-Buchse des Y/PB/PR-Anschlusses ausgegeben. *3 Die Anzeige SKIN TONE ist nicht verfügbar. *4 Die folgenden Anzeigen sind nicht verfügbar. • ZEBRA • Hauttoneinzelheit-Bereich • Sicherheitszone • Focus Assist (Funktion zur Unterstützung der Schärfeeinstellung) 3. Anschließen eines Monitors Prompter-Videosignale (Eingangssignale des RM-P210Anschlusses [AUX VIDEO INPUT]) vom RM-P210 können verifiziert werden, indem der an der Vorderseite dieses Geräts befindliche Anschluss [PROMPTER OUTPUT] über ein BNC-Kabel an einen Monitor angeschlossen wird. MEMO • Der Strom für dieses Gerät und die Kamera werden vom RM-P210 über das 26-polige Kamerakabel zur Verfügung gestellt. • 26-poliges Kamerakabel VC-P110 (5 m) VC-P112 (20 m) VC-P113 (50 m) VC-P114 (100 m) Einstellung des Menübildschirms 1. Einstellung des Ausgabesignals Über den vielpoligen RM-Stecker wird immer ein Composite-Videosignal ausgegeben. Darüber hinaus können auch RGB-Component-, Y/PB/PR-Component- oder Y/CTrennsignale ausgegeben werden. Wählen Sie das Ausgangssignal im Menübildschirm SYSTEM über den Punkt OUTPUT. Ablauf 1. Schalten Sie den RM-P210 an. Drehen Sie den [POWER]-Schalter der Kamera-Fernsteuereinheit auf [ON]. Die CALL-Taste leuchtet grün, wenn der Strom eingeschaltet wird. Nachdem der [POWER]-Schalter auf „ON“ gestellt wurde, kann die Kamera-Fernsteuereinheit nach ca. 30 Sekunden betrieben werden. MEMO Nach Einschalten des Stroms braucht die Kamera-Fernsteuereinheit ca. 30 Sekunden, um für die Kommunikation mit diesem Gerät bereit zu sein. 2. Drücken Sie die Ruftaste [CALL]. Halten Sie die Ruftaste [CALL] gedrückt, um Rufsignale an den Bediener der Fernsteuereinheit zu senden. Die Anzeige der Taste [TALLY] an der Fernsteuereinheit blinkt. Die Tastenanzeige [CALL] wechselt von grün zu rot, solange die Taste gedrückt wird. Die [TALLY]-Lampe am Sucher blinkt auch, wenn Rufsignale von der Fernsteuereinheit empfangen werden. 3. Regeln Sie die Lautstärke. Passen Sie die Empfangslautstärke des Headsets über den Punkt [INCOM LEVEL] an. MEMO Synchronisationssignale werden mit RGB-Component-Signalen überlagert. 2. Anschließen des DT109 Stecken Sie den Stecker des Headsets DT109 in die [INTERCOM]-Buchse, um ein Intercom-Headset zu verwenden. MEMO Dieses Gerät unterstützt lediglich dynamische Headsets. Kopfhörer mit Kohleausführung können nicht angeschlossen werden. Schaltereinstellung 1. Aktivieren/Deaktivieren des INCOM MIC-Anschlusses Stellen Sie den Schalter [INCOM MIC ON/OFF] auf die gewünschte Position; je nachdem, ob das HeadsetMikrofon verwendet werden soll. Stellen Sie den Schalter auf [ON], um das Mikrofon des Headsets zu verwenden. INCOM LEVEL Lautstärke Taste CALL MEMO • Wenn die Schalterfunktionen dieses Geräts (einschließlich der Kamera) und der Fernsteuereinheit gleich sind, erhalten die Tasten der Fernsteuereinheit Priorität. • Wenn beim Einschalten des Stroms ein externes Synchronisationssignal anliegt, können die Bilder eventuell einige Sekunden lang abgehackt erscheinen. Dies ist keine Fehlfunktion. • Wenn Sie die Fernsteuereinheit verwenden, nehmen Sie deren Bedienungsanleitung zur Hand, um weitere Einzelheiten zu erfahren. Schalter INCOM MIC ON/OFF 26 27 Deutsch Anschließen an die Fernsteuereinheit RM-P210 Ausgegebene Signale bei Anschluss des Suchers SONSTIGES Funktion OFF DNR Einige Aktionen sind nicht kompatibel, wenn der GY-HD250 über Menübefehle des RM-P210 bedient wird. DNR LEVEL (G: Aktion verfügbar ×: Keine Aktion) Funktion Aktion OFF G ON G DETAIL OFF G (CONTOUR) ON G IRIS MANU G AUTO G MANU G PRE G AUTO1 G AUTO2 G FAW G SET × WHITE G 0dB G +3dB G +6dB G +9dB G BAR WHITE BAL AUTO GAIN TALLY +12dB G +18dB G +24dB × –3dB × ALC+EEl G VARIABLE GAIN2 × VARIABLE GAIN × OFF G ON G PREVIEW G G VOLTAGE CHK. (RM r CAM) VOLTAGE CHK. (CAM r RM) SHUTTER BLACK G HIGH G LOW G OFF G 1/100 G*1 1/120 G*2 1/250 G 1/500 G 1/1000 G 1/2000 G V.SCAN × NORMAL G STRETCH G COMPRESS G NORMAL (OFF) × (HI-RESO) V.MAX (ON) × AUTO KNEE OFF G ON G 28 Aktion × ON × OFF G ON G LOW × MIDDLE × HIGH × AUTO × Technische Daten Vielpoliger RM-Stecker: Composite-Videosignalausgang (Es können entweder Y/PB/PR-, RGB- oder Y/C-Trenn-Ausgabesignale gewählt werden) LOW G MIDDLE G PROMPTER-Ausgang: HIGH G PROMPTER-Videosignalausgang (Composite-Signal) AUTO × OFF G ON G COLOR MATRIX OFF × ON × ASPECT RATIO 4:3 × 16:9 × DTL FRQ SKIN DTL Temperaturbereich für den Betrieb: • -5 °C bis 40 °C (Luftfeuchtigkeit unter 80%) Temperaturbereich für die Aufbewahrung: • -20 °C bis 60 °C Spannung der Stromversorgung: LETTER × OFF G ON G Leistungsaufnahme: LOLUX OFF × Max. 38 W (GY-HD250, VF-P400) ON × SMOOTH TRANS OFF G Gewicht: ON G ca. 5,2 d FULL AUTO SHOOTING *1 Wenn die Bildrate 60p, 60i, 30p oder 24p lautet *2 Wenn die Bildrate 50p, 50i oder 25p lautet Zubehör: Bedienungsanleitung .......................................................... 1× Stufenbefehl Funktion MANUAL WHITE BALANCE BLACK PAINT Aktion G IRIS 12 V Gleichstrom R G B G R × B × Abmessungen (Gerät: mm) 80 G MASTER BLACK G*3 H.PHASE DETAIL MASTER G DETAIL BAL H/V G WHITE PAINT R G B G KNEE MASTER G GAMMA MASTER × INTERCOM DC INPUT INTERCOM MIC IRIS LEVEL (AL) G VARIABLE SHUTTER × VARIABLE GAIN2 × *3 VF OUTPUT PUSH INTERCOM LEVEL CALL G/Y ON TALLY INPUT OFF MIN B/PB R/PR TALLY OUTPUT 60 GAMMA 256 243 Hinweise zum Bedienen des RM-P210 Deutsch VORBEREITUNGEN MAX 176 204 325 337.5 Der einstellbare Wertebereich des Punkts H.PHASE des RM-P210 liegt zwischen 96 und 215. Wenn Sie einen Wert zwischen 0 und 95 eingeben, wird der Wert automatisch auf 96 gesetzt. Geben Sie einen Wert zwischen 216 und 255 ein, wird der Wert auf 215 gesetzt. 67 96(=6×P16) 22 48(=3×P16) Änderungen an den technischen Daten und am Design dieses Geräts bleiben im Sinne des technischen Fortschritts jederzeit vorbehalten. 29 KA-HD250 30 INSTRUCTIONS Français ADAPTATEUR DE STUDIO INTRODUCTION Informations relatives à l’élimination des appareils usagés, à l’intention des utilisateurs Fonctions principales AVERTISSEMENT : POUR RÉDUIRE LE RISQUE D’INCENDIE OU DE CHOC ÉLECTRIQUE, N’EXPOSEZ PAS CET APPAREIL À LA PLUIE OU À L’HUMIDITÉ Cet appareil ne peut être utilisé qu’avec 12 V CA. ATTENTION : pour éviter tout choc électrique ou risque d’incendie, n’utilisez PAS d’autre source électrique. Attention : Ce symbole n’est reconnu que dans l’Union européenne. Remarque : La plaque signalétique (plaque du numéro de série) se trouve sur cette unité. [Union européenne] Lorsque ce symbole figure sur un appareil électrique et électronique, cela signifie qu’il ne doit pas être éliminé en tant que déchet ménager à la fin de son cycle de vie. Le produit doit être porté au point de pré-collecte approprié au recyclage des appareils électriques et électroniques pour y subir un traitement, une récupération et un recyclage, conformément à la législation nationale. Cet équipement est conforme aux clauses et exigences de protection des directives européennes correspondantes. Il est conçu pour les appareils vidéo professionnels et peut être utilisé dans les environnements suivants : z Environnement EMC contrôlé (par exemple, studio de diffusion ou d’enregistrement intégré) et environnements extérieurs en campagne. Afin de maintenir une performance optimale et une compatibilité électromagnétique, nous vous recommandons d’utiliser des câbles de longueur inférieure à : En éliminant correctement ce produit, vous contribuerez à la conservation des ressources naturelles et à la prévention des éventuels effets négatifs sur l’environnement et la santé humaine, pouvant être dus à la manipulation inappropriée des déchets de ce produit. Pour plus d’informations sur le point de pré-collecte et le recyclage de ce produit, contactez votre mairie, le service d’évacuation des ordures ménagères ou le magasin dans lequel vous avez acheté le produit. Des amendes peuvent être infligées en cas d’élimination incorrecte de ce produit, conformément à la législation nationale. ATTENTION : Pour éviter un choc électrique, n’ouvrez pas le boîtier. Ne touchez pas aux pièces situées à l’intérieur. Confiez toute réparation à du personnel qualifié. Port Câble Longueur RM Câble exclusif 10 mètres PROMPTER OUTPUT Câble coaxial 5 mètres DC INPUT Câble exclusif 5 mètres TALLY OUTPUT Câble exclusif 5 mètres TALLY INPUT Câble exclusif 5 mètres INTERCOM Câble torsadé 1,5 mètre VF OUTPUT (BNC) Câble coaxial 5 mètres VF OUTPUT (20 broches) Câble torsadé 0,4 mètres Attention : en cas de fortes ondes électromagnétiques ou de magnétisme, à proximité d’une radio ou d’un émetteur TV, d’un transformateur ou d’un moteur par exemple, l’image et le son peuvent être perturbés. Dans ce cas, éloignez l’appareil des sources d’interférences. Cher client, Cet appareil est conforme aux directives et normes européennes en vigueur relatives à la compatibilité électromagnétique et à la protection électrique. Représentant européen de Victor Company of Japan Limited : JVC Technology Centre Europe GmbH P.O. Box 10 05 52 61145 Friedberg Allemagne 32 Nous vous remercions d’avoir acheté ce produit. (Ces instructions s’appliquent au modèle : KA-HD250U.) Avant d’utiliser l’unité, lisez attentivement le manuel d’instructions afin d’obtenir la meilleure performance possible. (Utilisateurs professionnels) Si vous souhaitez éliminer ce produit, visitez notre page Web www.jvc-europe.com afin d’obtenir des informations sur sa récupération. [Pays ne faisant pas partie de l’Union européenne] Si vous souhaitez éliminer ce produit, faites-le conformément à la législation nationale ou autres règles en vigueur dans votre pays pour le traitement des appareils électriques et électroniques usagés. Équipé du connecteur de caméra analogique 26P Connectez la télécommande RM-P210 (vendue séparément) pour contrôler cette unité à une distance pouvant atteindre 100 m. Dans ce cas, la télécommande fournit l’alimentation à la caméra et aucune autre source n’est nécessaire pour la caméra. Sorties multiples Émettent des signaux composites et la composante RGB, la composante Y/PB/PR ou des signaux YC à partir du connecteur de caméra 26P. (Peut être sélectionnée à l’aide du commutateur de menu.) Équipé de la prise Intercom Utilisez un casque pour communiquer avec l’opérateur de la télécommande. (Dynamique uniquement) Équipé de la prise Prompter Output Contenu INTRODUCTION Fonctions principales . . . . . . . . . . . . . . . . . . . . . . . . . . . . .33 Précautions de fonctionnement . . . . . . . . . . . . . . . . . . . . .34 Signal Genlock et réglage de la phase système. . . . . .34 Commande, indicateurs et connecteurs . . . . . . . . . . . . . .35 Section avant . . . . . . . . . . . . . . . . . . . . . . . . . . . . . . . .35 Section arrière. . . . . . . . . . . . . . . . . . . . . . . . . . . . . . . .36 Section inférieure . . . . . . . . . . . . . . . . . . . . . . . . . . . . .36 PRÉPARATIFS Système de base . . . . . . . . . . . . . . . . . . . . . . . . . . . . . . . .37 Installation . . . . . . . . . . . . . . . . . . . . . . . . . . . . . . . . . . . . .38 Fixation sur un trépied . . . . . . . . . . . . . . . . . . . . . . . . .38 Montage de la caméra . . . . . . . . . . . . . . . . . . . . . . . . .38 Connexion des câbles. . . . . . . . . . . . . . . . . . . . . . . . . .39 Connexion du viseur (VF-P400) . . . . . . . . . . . . . . . . . .39 Signaux de sortie lors de la connexion au viseur . . . . .40 Connexion à la télécommande RM-P210 . . . . . . . . . . . . .40 Connexion. . . . . . . . . . . . . . . . . . . . . . . . . . . . . . . . . . .40 Écran de réglage des menus . . . . . . . . . . . . . . . . . . . .41 Réglage de la commutation . . . . . . . . . . . . . . . . . . . . .41 Fonctionnement . . . . . . . . . . . . . . . . . . . . . . . . . . . . . .41 Remarques relatives au fonctionnement de la télécommande RM-P210 . . . . . . . . . . . . . . . . . . . . .42 DIVERS Spécifications . . . . . . . . . . . . . . . . . . . . . . . . . . . . . . . . . . .43 Dimensions . . . . . . . . . . . . . . . . . . . . . . . . . . . . . . . . . .43 Émet de la vidéo à partir de la télécommande sous forme de signaux composites. ATTENTION • Le déplacement de cette unité avec le trépied fixé peut entraîner son détachement et sa chute en cas de choc ou de vibration externe soudain. Ceci peut entraîner des blessures. Retirez cette unité du trépied avant de la déplacer. • La fixation de base avant peut se bloquer même si la tige de cet appareil et l’orifice de la fixation de base arrière de la caméra ne sont pas fixés. Après fixation, vérifiez que l’appareil est fermement rattaché. La caméra peut tomber et provoquer des blessures ou un accident si elle n’est pas fixée correctement. • Lors du transport avec la caméra fixée à cet appareil, veillez à tenir l’appareil par la partie inférieure. Si vous le transportez par la poignée de la caméra, la fixation peut se relâcher et entraîner des blessures ou un accident. Viseur VF-P400 4 pouces compatible avec fiche de conversion Équipé des prises de composante de moniteur externe (BNC × 3) 33 Français Consignes de sécurité (Pour l’europe) INTRODUCTION • Pour garantir une durée de service optimale de cette unité, ne la stockez ni ne l’utilisez dans les endroits suivants. Extrêmement chauds ou froids À fortes vibrations Poussiéreux À forte humidité À proximité de parasites importants. • Ne soumettez pas cette unité à de fortes vibrations ou chocs pendant l’installation ou le déplacement. • Ne branchez ni ne débranchez le connecteur du câble de la caméra lorsque cette unité est sous tension. • N’utilisez que les accessoires électriques indiqués. Utilisez RM-P210 ou IDX IA-60a, VL-2PLUS. • Pour réduire la consommation électrique, mettez-la hors tension lorsque vous ne l’utilisez pas. • Lorsqu’un émetteur-récepteur ou un téléphone portable est utilisé à proximité de cette unité, des parasites peuvent se produire dans le haut-parleur ou sur l’écran. Ceci est normal. • La mise à la terre de la prise INTERCOM G (GND) est recommandée car des parasites peuvent se produire en fonction du casque utilisé. • N’utilisez que le câble de caméra de longueur standard indiqué. Une compensation de câble peut sinon être insuffisante. • La vidéo de retour n’est disponible que pour les signaux SD sur le viseur. Signal Genlock et réglage de la phase système Lorsque vous utilisez la télécommande RM-P210 avec ce système, vous émettez un signal Genlock dans la caméra GY-HD250 ou la télécommande RM-P210. Si un signal Genlock est appliqué à la caméra GY-HD250 et à la télécommande RM-P210, les images à l’écran sembleront irrégulières. Procédez à un réglage de la phase système sur la machine ayant reçu le signal Genlock. De plus, la télécommande RM-LP55 est prioritaire si elle est connectée. • Lorsqu’un signal Genlock est entré dans la télécommande RM-P210 Réglez la phase en ajustant les options H et SC de la télécommande RM-P210. • Lorsqu’un signal Genlock est entré dans la caméra GYHD250 Réglez la phase en ajustant les options H de la télécommande RM-P210 et SC du GY-HD250. 1 7 G/Y B/PB 1 Signal 9 R/PR 2 5 (Profil de surface) 3 Signal 1 NC 6 NC 2 RM_PREVIEW 7 RM_TALLY 3 NC 8 NC 4 NC 9 NC 5 GND 9[TALLY INPUT] Entre des signaux de contrôle. f e 9 d 8 7 6 2Levier de verrouillage Fixe la caméra sur cette unité. X Voir « Montage de la caméra » page 38. 3[VF OUTPUT] ronde à 20 broches Connectez le viseur VF-P400 4 pouces (vendu séparément). X Voir « Connexion du viseur (VF-P400) » page 39. 4[PROMPTER OUTPUT] Prise de sortie de programme guide-opérateur (BNC) L’entrée de signal vidéo de programme guide-opérateur dans la prise d’entrée [AUX] de la télécommande est délivrée par cette prise via le connecteur RM à plusieurs broches. Un signal composite est émis. Le moniteur vidéo est connecté ici. 5[VF] Câble de viseur Connectez la prise VF à la caméra GY-HD250. 6[BREAKER] Disjoncteur Le disjoncteur dirige et coupe l’alimentation si l’énergie consommée est supérieure à la puissance nomimale. Si le disjoncteur se déclenche, vérifiez l’absence d’anomalies et que la consommation électrique ne dépasse pas la tension nominale. Si aucune anomalie n’est détectée, appuyez sur le disjoncteur avant de remettre cette unité en fonctionnement. Si cette unité ne fonctionne toujours pas correctement, contactez votre agent agréé JVC. 7[VF OUTPUT] (Y/PB/PR/RGB) BNC×3 Prise de sortie du viseur. Utilisée pour connecter un viseur autre que le VF-P400. Les options HD/SD (de la caméra GY-HD250) et un signal vidéo composite (de la télécommande RM-P210) peuvent être commutés. Utilisez le menu de la caméra GY-HD250 pour procéder au réglage. Viseur recommandé : • DM-3106 (Astrodesign) • V-R70P-HAD (Marshall Electronics) NC 6 NC 2 TALLY_IN 7 NC 3 NC 8 NC 4 NC 9 NC (Profil de surface) 5 GND 5 1Support de viseur Utilisé pour la fixation du viseur VF-P400 4 pouces. Signal 1 1 0 9 Signal 6 4 a Notation utilisée dans ce manuel • Le copyright de ce manuel est la propriété de JVC. Toute reproduction ou publication non autorisée de ce manuel en tout ou en partie est strictement interdite. • Les noms des produits indiqués dans le présent document sont des marques de commerce ou des marques déposées de leurs sociétés respectives. Les marques et symboles tels que ™, ® et © n’apparaissent pas dans le présent document. • La conception, les spécifications, etc. indiquées dans le présent manuel sont susceptibles d’être modifiées sans préavis en vue de leur amélioration. • Le présent manuel concerne la connexion de la caméra GY-HD250. Les mêmes opérations sont cependant utilisées lors de la connexion de la caméra GY-HD251. • Lorsque le viseur est connecté à cette prise, le signal n’est pas émis correctement même si le viseur est connecté à la prise 3 [VF OUTPUT]. • En cas de connexion à la prise Y/PB/PR du moniteur, le signal de vidéo de retour du RM-P210 s’affiche en monochrome. 6 VF OUTPUT b Caractères et symboles utilisés dans ce manuel ATTENTION : Points auxquels prêter attention pendant le fonctionnement. RAPPEL : Informations pour référence, comme des fonctions ou des contraintes pendant l’utilisation. : Pages ou rubriques auxquelles se reporter. X RAPPEL 8[TALLY OUTPUT] Prise de sortie de signal de contrôle (D-sub à 9 broches) Émet des signaux de contrôle. Utilisé en cas de connexion d’un viseur VF autre que VF-P400. Section avant c Utilisation de ce manuel 34 Commande, indicateurs et connecteurs 5 Français Précautions de fonctionnement 0[RM] Connecteur RM à plusieurs broches (26 broches) Connectez à la télécommande RM-P210 à l’aide du câble de caméra 26 broches. De plus, l’alimentation est fournie à cette unité et à la caméra par la télécommande via ce connecteur. RAPPEL • Émet un signal vidéo composite et la composante RGB, la composante Y/PB/PR et des signaux YC à partir de la prise de sortie de la télécommande RM-P210. Sélectionnez le signal de sortie à l’aide de l’option «OUTPUT» dans le menu «SYSTEM» de la caméra GY-HD250. • Les signaux SDI et HD ne peuvent pas être délivrés à la télécommande RM-P210. aCâble de sortie Genlock (BNC) Câble de sortie des signaux de synchronisation. Connectez à la prise de sortie GENLOCK de la caméra GY-HD250. bCâble d’entrée vidéo composite (RCA) Câble d’entrée des signaux vidéo composites. Connectez à la prise de sortie VIDEO de la caméra GY-HD250. cCâble de sortie DC (XLR 4 broches) Connectez à la prise DC INPUT de la caméra GY-HD250. dComposante Y/PB/PR Câble d’entrée (BNC×3) Câble d’entrée des signaux vidéo de la composante Y/PB/ PR. Connectez à chacune des prises de sortie Y/PB/PR de la caméra GY-HD250. e[STUDIO] Câble de studio (rond à 10 broches) Connectez à la prise STUDIO de la caméra GY-HD250. f[REMOTE] Câble distant (rond à 6 broches) Connectez à la prise REMOTE de la caméra GY-HD250. RAPPEL Ne tirez pas sur les câbles (5, a à f) sinon vous exercerez une force trop puissante. Vous risquez de provoquer un dysfonctionnement ou des blessures si vous agissez de cette manière. 35 INTRODUCTION PRÉPARATIFS Section arrière g k[CALL] Touche CALL/indicateur d’alimentation S’allume en vert lorsque l’adaptateur de studio est sous tension. Cependant, il s’allume en orange lorsque la caméra est hors tension. Appuyez pour envoyer un signal d’appel à l’opérateur de la télécommande si un casque d’intercommunication n’est pas utilisé. L’indicateur de la touche passe du vert au rouge lorsque vous appuyez sur la touche. Lorsque vous appuyez et maintenez cette touche enfoncée, un signal d’appel est envoyé à la télécommande et l’indicateur [TALLY] clignote. Lorsque vous relâchez la touche [CALL], le signal d’appel n’est plus envoyé et l’indicateur [TALLY] de la télécommande s’éteint. Système de base Viseur DM-3106 (Astrodesign) V-R70P-HAD (Marshall Electronics) Fiche de conversion ATTENTION VF BRIGHT USER 1 MACRO INTERCOM DC INPUT PUSH INTERCOM MIC INTERCOM LEVEL Lorsqu’un câble est connecté à la prise DC INPUT et que de l’alimentation provient de la télécommande RM-P210, l’alimentation s’interrompra. Mettez les appareils connectés hors tension lorsque vous connectez un câble à la prise DC INPUT. USER 2 USER 3 ND FILTER 2 1 MENU STATUS WHT.BAL AUTO CH-1 ON AUTO AUDIO LEVEL CH-2 MIN Prise VF OUTPUT (BNC × 3) Prise VF OUTPUT (ronde à 20 broches) POWER REC CAMÉSCOPE HD GY-HD250/GY-HD251 Prise INTERCOM STUDIO KIT KA-HD250 CALL MAX Câble CC Section inférieure h i j k Casque DT109 (Beyerdynamic) OFF ON OFF Viseur VF-P400 l[DC INPUT] Prise d’entrée d’alimentation CC (XLR à 4 broches) Connectez l’alimentation CC à cette prise si la télécommande RM-P210 n’est pas connectée. Pour l’alimentation CC, utilisez IDX IA-60a ou VL-2PLUS. Français Commande, indicateurs et connecteurs (suite) Adaptateur secteur IA-60a, VL-2PLUS (IDX) l Prise DC INPUT Prise PROMPTER OUTPUT g[TALLY] Voyant TALLY S’allume en vert en mode d’attente (prévisualisation). S’allume en rouge lorsque l’image de la caméra est sélectionnée avec la télécommande. Prise RM h[INTERCOM] Prise d’entrée d’intercommunication (XLR à 5 broches) Prise d’entrée du casque d’intercommunication. (Dynamique uniquement) Casque recommandé : DT109 (Beyerdynamic) 1 Signal 5 2 4 3 (Profil de surface) 1 MIC (H) 2 MIC (C) 3 EAR (C) 4 EAR (H) – LEFT 5 EAR (H) – RIGHT i[INTERCOM MIC] Commutateur de microphone d’intercommunication [ON/OFF] [ON/OFF] Commutateur du microphone du casque d’intercommunication. Réglez sur [ON] pour utiliser le microphone du casque. Câble REMOTE Trépied REMOTE CONTROL UNIT RM-P210 TALLY CALL FULL AUTO F1 BARS F2 SHUTTER F3 MENU/SHUTTER GAIN PAINT WHITE PUSH-ON VARIABLE PUSH-ON POWER B MID LOW IRIS W.BAL HIGH MENU MASTER BLACK AUTO STEP SHUTTER F4 I A R B PRESET AUTO MANU GAIN m INTERCOM LEVEL Moniteur O DOWN UP DOWN UP CLOSE OPEN Télécommande RM-P210 mOrifices de vis pour la fixation du trépied Casque DT109 (Beyerdynamic) Chariot z L’alimentation est fournie par la télécommande RM-P210 via le câble de caméra à 26 broches si elle est utilisée. Si la télécommande RM-P210 n’est pas utilisée, utilisez un adaptateur secteur. j[INTERCOM LEVEL] Volume de réception d’intercommunication Utilisé pour régler le volume de réception du casque d’intercommunication. 36 37 PRÉPARATIFS 2. Tout en poussant sur le levier de sécurité, tirez le levier Installation de verrouillage vers l’avant jusqu’à ce que la fixation avant se bloque en position. Connexion des câbles Connexion du viseur (VF-P400) Connectez les câbles de cet appareil à la caméra. Fixation sur un trépied Cheville Utilisez les orifices de vis situés au bas pour fixer sur un trépied. Il en existe plusieurs. Utilisez des orifices bien répartis pour la fixation sur un trépied. Levier de verrouillage 2. 3. Levier de sécurité 1. Fixation avant 9 3. Placez la caméra sur cet appareil et alignez la fixation de base arrière de la caméra avec la cheville de l’appareil. GENLOCK/AUX IN P TC OUT IEEE 1394 REMOTE CH2-AUDIO OUT-CH1 VIDEO P TC IN HD/SD SDI 2 Montage de la caméra Préparez la caméra comme suit avant le montage. • Fixez l’objectif. • Fixez le microphone. • Retirez le viseur. Pour plus d’informations, consultez le MANUEL D’INSTRUCTIONS de la caméra GY-HD250. 1. Relâchez le levier de verrouillage. Y 1 5 Tournez le levier de verrouillage du viseur dans le sens anti-horaire et relâchez le levier de verrouillage. 6 2. Fixez le viseur. 7 Faites glisser le viseur vers l’avant le long des guides du support du viseur situés en haut de l’appareil. DC INPUT 3 3. Serrez à l’aide du levier de verrouillage. STUDIO 8 Fixation de base arrière Fixation de base avant 4. Tenez la caméra par le haut et faites glisser vers l’avant afin que la fixation de base de la caméra soit bloquée en position par la fixation avant de l’appareil. 1. Ouvrez le couvercle latéral. Connectez le câble de cet appareil à la prise de la caméra. Câble (type) GENLOCK (BNC) 1 Prise de la caméra GENLOCK REMOTE (ronde à 6 broches) 2 REMOTE DC OUTPUT (XLR à 4 broches) 3 DC INPUT VIDEO (RCA) 4 VIDEO Y (BNC) 5 Y PB (BNC) 6 PB PR (BNC) 7 PR STUDIO (ronde à 10 broches) 8 STUDIO VF (ronde à 20 broches) 9 VF Tournez le levier de verrouillage du viseur dans le sens horaire et serrez le levier de verrouillage. 4. Raccordez les câbles. Raccordez le câble du viseur et la fiche de conversion (KA-V400), puis raccordez la fiche de conversion à la prise de sortie du viseur (20 broches) de l’appareil. 4. Fiche 4. RAPPEL ATTENTION • La fixation de base avant peut se bloquer même si la tige de cet appareil et l’orifice de la fixation de base arrière de la caméra ne sont pas fixées. Après fixation, vérifiez que l’appareil est fermement fixé. La caméra peut tomber et provoquer des blessures ou un accident si elle n’est pas fixée correctement. • Lors du transport avec la caméra fixée à cet appareil, veillez à tenir l’appareil par la partie inférieure. Si vous le transportez par la poignée de la caméra, la fixation peut se relâcher et entraîner des blessures ou un accident. 38 • Mettez l’appareil hors tension avant de connecter les câbles. • Ne touchez pas les prises pendant la connexion. • Insérez totalement la fiche du câble CC jusqu’à ce qu’elle se bloque en position. RAPPEL • Ne connectez pas de moniteur à la prise VF OUTPUT (Y/ PB/PR/RGB) sur le côté de l’appareil. Lorsque des moniteurs sont connectés simultanément aux deux prises VF OUTPUT, les signaux ne sont pas émis correctement. • Ne connectez aucun autre viseur que celui indiqué à la prise de sortie du viseur (20 broches). 39 Français Orifices de vis 4 PRÉPARATIFS Les signaux VF OUTPUT et les écrans d’affichage sont indiqués ci-dessous. Connexion VF-P400 p Prise RGB Y HD composante Option GYHD250 RGB VF SIGNAL Y COMPONENT COMPONENT COMPOSITE Signal Signal Affichage Y Y/PB/ Y/PB/ RGB (ronde à VBS Y PR PR (BNC×3) 20 (BNC×3) (BNC×1) (BNC×3) (BNC×3) broches) H/SD composante Composite Y Y 1. Connexion de la télécommande RM-P210 Connectez le connecteur RM à plusieurs broches de cette unité et la télécommande à l’aide du câble de caméra à 26 broches. La longueur du câble de caméra ne doit pas supérieure à 100 m. La vidéo de programme guide-opérateur (signal d’entrée de la prise [AUX VIDEO INPUT] RM-P210) de la télécommande RM-P210 peut être vérifiée en connectant la prise [PROMPTER OUTPUT] de cette unité située à l’avant au moniteur à l’aide d’un câble BNC. RAPPEL • L’alimentation de cette unité et de la caméra est fournie par la télécommande RM-P210 via le câble de caméra à 26 broches. • Câble de caméra à 26 broches VC-P110 (5 m) VC-P112 (20 m) VC-P113 (50 m) VC-P114 (100 m) Écran de réglage des menus HD (HDV) G G G*1 G*1 G G*2 DV G G × G G G*2 REVERSE PICTURE*3 G G G G G G G × × × × × *4 Coupez l’alimentation de la télécommande RM-P210 avant de tenter la connexion. 3. Connexion d’un moniteur (G: Disponible, ×: Non disponible) Les caractères du GY-HD250 s’affichent pour les signaux de sortie de la prise Y/PB/PR. Par conséquent, utilisez le signal de sortie de la prise HD/SD-SDI pour cette ligne. *2 Le signal n’est émis que vers la prise Y de la prise Y/PB/ PR. *3 L’affichage SKIN TONE n’est pas disponible. *4 Les affichages suivants ne sont pas disponibles. • ZEBRA • Plage de détail des tons peau • Zone de sécurité • Assistance de la mise au point 1. Réglage du signal de sortie Un signal vidéo composite est toujours émis via le connecteur RM à plusieurs broches. De plus, la composante RGB, la composante Y/PB/PR ou le signal YC peut également être émis. Sélectionnez le signal de sortie à l’aide de l’option OUTPUT dans le menu SYSTEM. Fonctionnement 1. Mettez la télécommande RM-P210 sous tension. Réglez le commutateur [POWER] de la télécommande de la caméra sur [ON]. La touche CALL s’allume en vert à la mise sous tension. Une fois le commutateur [POWER] activé, la télécommande de la caméra peut être utilisée après 30 secondes environ. RAPPEL Après la mise sous tension, la télécommande de la caméra prend environ 30 secondes avant de pouvoir communiquer avec cette unité. 2. Appuyez sur la touche [CALL]. Appuyez sur et maintenez la touche [CALL] enfoncée pour envoyer des signaux d’appel à l’opérateur de la télécommande. L’indicateur de la touche [TALLY] de la télécommande clignote. L’indicateur de la touche [CALL] passe du vert au rouge lorsque vous appuyez sur la touche. Le voyant [TALLY] sur le viseur clignote également lorsque les signaux d’appel sont reçus de la télécommande. 3. Réglez le volume. Réglez le volume de réception du casque avec [INCOM LEVEL]. RAPPEL Des signaux de synchronisation sont superposés aux signaux de la composante RGB. *1 Réglage de la commutation 2. Connexion de la fiche DT109 Connectez la fiche DT109 du casque à la prise [INTERCOM] pour utiliser un casque d’intercommunication. RAPPEL 1. Activation/désactivation de INCOM MIC Réglez le commutateur [INCOM MIC ON/OFF] en fonction de l’utilisation ou non d’un microphone de casque. Réglez le commutateur sur [ON] pour utiliser le microphone du casque. Cet appareil ne prend en charge que les casques du type DYNAMIC. Des écouteurs du type CARBON ne peuvent pas être connectés. Volume INCOM LEVEL Touche CALL RAPPEL • Si cette unité (y compris la caméra) et la télécommande sont équipés des mêmes commutateurs fonctionnels, ceux de la télécommande sont prioritaires. • Si un signal de synchronisation externe est présent à la mise sous tension, des images peuvent sembler irrégulières pendant quelques secondes. Ceci est normal. • Si vous utilisez la télécommande, reportez-vous au manuel d’instructions pour plus d’informations. Commutateur INCOM MIC ON/OFF 40 41 Français Connexion à la télécommande RM-P210 Signaux de sortie lors de la connexion au viseur DIVERS DNR DNR LEVEL (G : Action disponible × : Aucune action) Fonction Action OFF G ON G DETAIL OFF G (CONTOUR) ON G IRIS MANU G AUTO G BAR WHITE BAL AUTO GAIN TALLY MANU G PRE G AUTO1 G AUTO2 G FAW G SET × WHITE G DTL FRQ SKIN DTL COLOR MATRIX ASPECT RATIO Action OFF × ON × OFF G ON G LOW × MIDDLE × HIGH × AUTO × LOW G MIDDLE G HIGH G AUTO × OFF G ON G OFF × ON × 4:3 × 16:9 × LETTER × FULL AUTO SHOOTING OFF G ON G LOLUX OFF × ON × SMOOTH TRANS OFF G ON G 0dB G +3dB G +6dB G +9dB G +12dB G +18dB G +24dB × –3dB × ALC+EEl G IRIS VARIABLE GAIN2 × MANUAL WHITE BALANCE R G B G BLACK PAINT R × B × *1 *2 Lorsque la cadence d’images est 60p, 60i, 30p ou 24p Lorsque la cadence d’images est 50p, 50i ou 25p Fonction × OFF G ON G PREVIEW G MASTER BLACK G H.PHASE G Action G DETAIL MASTER G G DETAIL BAL H/V G G LOW WHITE PAINT SHUTTER OFF G 1/100 G*1 1/120 G*2 1/250 G IRIS LEVEL (AL) G G 1/500 VARIABLE SHUTTER × 1/1000 G VARIABLE GAIN2 × 1/2000 G V.SCAN × NORMAL G STRETCH G COMPRESS G (OFF) × (HI-RESO) V.MAX (ON) × AUTO KNEE OFF G ON G 42 Plage de températures de fonctionnement : • –5°C à 40°C (humidité inférieure à 80 %) Température de stockage autorisée : • –20°C à 60°C Tension d’alimentation électrique : 12 V CC Consommation : 38 W max. (GY-HD250, VF-P400) Poids : Environ 5,2 d Accessoires : Instructions ........................................................................× 1 Dimensions (unité : mm) 80 G HIGH NORMAL Sortie PROMPTER : Sortie de signal vidéo PROMPTER (signal composite) G*3 VOLTAGE CHK. (CAM r RM) BLACK Connecteur RM à plusieurs broches : Sortie de signal vidéo composite (Un signal de sortie Y/PB/PR, RGB ou YC peut être sélectionné.) Commande de niveau VARIABLE GAIN VOLTAGE CHK. (RM r CAM) Spécifications R G B G KNEE MASTER G GAMMA MASTER × INTERCOM DC INPUT VF OUTPUT PUSH INTERCOM MIC INTERCOM LEVEL CALL G/Y ON TALLY INPUT *3 OFF MIN B/PB R/PR TALLY OUTPUT 60 Certaines actions sont incompatibles lorsque vous réglez la caméra GY-HD250 avec des opérations de menu de la télécommande RM-P210. Fonction GAMMA 256 243 Remarques relatives au fonctionnement de la télécommande RM-P210 Français PRÉPARATIFS MAX 176 204 325 337,5 La plage dans laquelle l’option H.PHASE de la télécommande RM-P210 peut effectivement être réglée est 96 à 215. La valeur est ajustée à 96 si vous réglez une valeur comprise entre 0 et 95 et elle est ajustée à 215 si vous réglez une valeur comprise entre 216 et 255. 67 96(=6×P16) 22 48(=3×P16) Les spécifications et l’apparence de cette unité sont susceptibles d’être modifiées sans préavis en vue de leur amélioration. 43 ADAPTADOR DE ESTUDIO INSTRUCCIONES Español KA-HD250 44 INTRODUCCIÓN AVISO: PARA REDUCIR EL RIESGO DE INCENDIO O DESCARGAS ELÉCTRICAS, NO EXPONGA ESTE APARATO A LA LLUVIA O A LA HUMEDAD. Esta unidad debe utilizarse sólo con 12 V CC. ADVERTENCIA: Para impedir descargas eléctricas o incendios, NO utilice una fuente de alimentación distinta. ADVERTENCIA: Para evitar descargas eléctricas, no abra la carcasa. No existen piezas en el interior que pueda reparar el usuario. Solicite asistencia técnica únicamente a personal de reparación calificado. Nota: La placa de valores nominales (placa con el número de serie) se encuentra en esta unidad. Este equipo se ajusta a las estipulaciones y normas de protección establecidas por las correspondientes Directivas Europeas. El equipo está diseñado para aparatos de vídeo profesional y se puede utilizar en los siguientes ámbitos: z Entornos controlados de compatibilidad electromagnética (CEM) (por ejemplo, estudios de TV o de grabación) y entornos exteriores rurales. Para lograr un mejor rendimiento y, además, conseguir compatibilidad electromagnética, se recomienda utilizar cables que no excedan las siguientes longitudes: Puerto Cable Longitud RM Cable exclusivo 10 metros PROMPTER OUTPUT Cable coaxial 5 metros DC INPUT Cable exclusivo 5 metros TALLY OUTPUT Cable exclusivo 5 metros TALLY INPUT Cable exclusivo 5 metros INTERCOM Cable blindado 1,5 metros VF OUTPUT (BNC) Cable coaxial 5 metros VF OUTPUT (20 patillas) Cable blindado 0,4 metros Advertencia: en aquellos lugares en los que haya ondas electromagnéticas o magnetismo fuerte, como por ejemplo, cerca de una radio o un transmisor de TV, un transformador, motor, etc., la imagen y el sonido pueden sufrir interferencias. Si esto sucediera, mantenga el aparato alejado de estas fuentes de interferencia. Estimado cliente, Este aparato cumple con las directivas y normas europeas respecto a la compatibilidad electromagnética y seguridad eléctrica. El representante europeo de Victor Company of Japan Limited es: JVC Technology Centre Europe GmbH P.O. Box 10 05 52 61145 Friedberg Alemania 46 Información para los usuarios sobre la eliminación de equipos usados Gracias por adquirir este producto. (Estas instrucciones son para: KA-HD250U.) Antes de utilizar esta unidad, lea atentamente el manual de instrucciones para obtener el mejor rendimiento posible. Características principales Atención: Este símbolo sólo es válido en la Unión Europea. [Unión Europea] Este símbolo indica que los aparatos eléctricos y electrónicos no deben desecharse junto con la basura doméstica al final de su vida útil. El producto deberá llevarse al punto de recogida correspondiente para el reciclaje y el tratamiento adecuado de equipos eléctricos y electrónicos de conformidad con la legislación nacional. Si desecha el producto correctamente, estará contribuyendo a conservar los recursos naturales y a prevenir los posibles efectos negativos en el medio ambiente y en la salud de las personas que podría causar el tratamiento inadecuado del producto desechado. Para obtener más información sobre el punto de recogida y el reciclaje de este producto, póngase en contacto con su oficina municipal, su servicio de recogida de basura doméstica o la tienda en la que haya adquirido el producto. De acuerdo con la legislación nacional, podrían aplicarse multas por la eliminación incorrecta de estos desechos. (Empresas) Si desea desechar este producto, visite nuestra página Web www.jvc-europe.com para obtener información acerca de la retirada del producto. [Otros países no pertenecientes a la Unión Europea] Si desea desechar este producto, hágalo de conformidad con la legislación nacional vigente u otras normativas de su país para el tratamiento de equipos eléctricos y electrónicos usados. ADVERTENCIA • Al transportar la unidad con el trípode instalado, ésta puede soltarse y caer si se produce un impacto externo brusco o vibración. Esto puede causar lesiones. Retire la unidad del trípode antes de transportarla. • El montaje de la base delantera puede bloquearse incluso si la patilla de este dispositivo y el orificio del montaje de la base trasera de la cámara no están acoplados. Una vez realizado el acoplamiento, compruebe que la cámara se encuentra asegurada firmemente. Si no se fija apropiadamente, la cámara puede caerse y ocasionar lesiones o un accidente. • Cuando transporte la cámara acoplada a este dispositivo, sujételo por la parte inferior. Si lo transporta por el asa de la cámara, el dispositivo puede soltarse y caer provocando lesiones o un accidente. Equipado con conector analógico de 26P para cámaras Conecte el mando a distancia RM-P210 (se vende por separado) para controlar esta unidad desde una distancia máxima de 100 m. En este caso, el mando a distancia suministra alimentación a la cámara y, por ello, no es necesario un dispositivo de alimentación adicional para la cámara. Salida multisistema Emite señales compuestas y señales componente RGB, componente Y/PB/PR o separadas Y/C desde el conector de cámara 26P. (Se selecciona mediante el interruptor de menú) Equipado con terminal de intercomunicador Utilice unos auriculares para comunicarse con el operador del mando a distancia. (Sólo dinámicos) Contenido INTRODUCCIÓN Características principales . . . . . . . . . . . . . . . . . . . . . . . . .47 Precauciones de funcionamiento . . . . . . . . . . . . . . . . . . . .48 Información relativa a la señal Genlock y al ajuste de la fase de sistema . . . . . . . . . . . . . . . . . . . . . . . . . . . .48 Controles, indicadores y conectores . . . . . . . . . . . . . . . . .49 Sección delantera . . . . . . . . . . . . . . . . . . . . . . . . . . . . .49 Sección trasera . . . . . . . . . . . . . . . . . . . . . . . . . . . . . . .50 Sección inferior . . . . . . . . . . . . . . . . . . . . . . . . . . . . . . .50 PREPARATIVOS Sistema básico . . . . . . . . . . . . . . . . . . . . . . . . . . . . . . . . .51 Instalación . . . . . . . . . . . . . . . . . . . . . . . . . . . . . . . . . . . . .52 Instalación en un trípode. . . . . . . . . . . . . . . . . . . . . . . .52 Instalación de la cámara . . . . . . . . . . . . . . . . . . . . . . . .52 Conexión de los cables. . . . . . . . . . . . . . . . . . . . . . . . .53 Conexión del visor (VF-P400). . . . . . . . . . . . . . . . . . . .53 Señales de salida cuando el visor está conectado . . . .54 Conexión al mando a distancia RM-P210 . . . . . . . . . . . . .54 Conexión. . . . . . . . . . . . . . . . . . . . . . . . . . . . . . . . . . . .54 Ajuste de la pantalla de menús. . . . . . . . . . . . . . . . . . .55 Ajuste del interruptor. . . . . . . . . . . . . . . . . . . . . . . . . . .55 Funcionamiento . . . . . . . . . . . . . . . . . . . . . . . . . . . . . .55 Notas sobre el funcionamiento del RM-P210 . . . . . . . . . .56 OTROS Especificaciones . . . . . . . . . . . . . . . . . . . . . . . . . . . . . . . .57 Dimensiones . . . . . . . . . . . . . . . . . . . . . . . . . . . . . . . . .57 Equipado con terminal de salida del apuntador Emite vídeo de apuntador desde el mando a distancia como señales compuestas. Visor VF-P400 de 4 pulgadas compatible con un enchufe de conversión Equipado con terminales de componente de monitor externo (BNC × 3) 47 Español Medidas de seguridad (Para Europa) INTRODUCCIÓN • Para garantizar una larga vida útil, evite utilizar o almacenar la unidad a lo siguiente: Lugares extremadamente cálidos o fríos Vibraciones intensas Lugares polvorientos Humedad elevada Cerca de fuentes con mucho ruido • No someta esta unidad a fuertes vibraciones o impactos cuando la instale o la transporte. • No conecte o desconecte el cable de la cámara cuando la unidad esté encendida. • Utilice sólo las fuentes de alimentación indicadas. Utilice RM-P210 o IDX IA-60a, VL-2PLUS. • Para reducir el consumo, desconéctela cuando no la utilice. • Cuando se utilice un transmisor-receptor o un teléfono móvil cerca de la unidad, puede producirse ruido en el altavoz del intercomunicador o en la pantalla. Esto no implica ninguna anomalía. • Se recomienda conectar a tierra el terminal INTERCOM G (GND), ya que puede generarse ruido según los auriculares del intercomunicador que se utilicen. • Utilice sólo cables de longitud estándar para la cámara. De lo contrario, la compensación del cable puede ser insuficiente. • El vídeo de retorno está disponible en el visor sólo para señales SD. Información relativa a la señal Genlock y al ajuste de la fase de sistema Cuando utilice el mando a distancia RM-P210 con este sistema, introduzca la señal Genlock en la cámara GYHD250 o en el RM-P210. Sin embargo, si la señal Genlock se aplica tanto a la GYHD250 como al RM-P210, las imágenes pueden aparecer distorsionadas. Realice el ajuste de la fase de sistema en el aparato en el que haya introducido la señal Genlock. Además, se da prioridad al RM-LP55 cuando se conecta. • Cuando la señal Genlock se introduce en el RM-P210 Configure la fase ajustando H y SC en RM-P210. • Cuando la señal Genlock se introduce en la GY-HD250 Configure la fase ajustando H en RM-P210 y SC en GYHD250. NOTA Controles, indicadores y conectores • Cuando el visor se conecta a este terminal, la señal no se emitirá correctamente aunque el visor se conecte al terminal 3 [VF OUTPUT]. • Cuando se conecta al terminal Y/PB/PR del monitor, la señal de vídeo de retorno del RM-P210 aparece en monocromo. Sección delantera 8[TALLY OUTPUT] Terminal de salida de señal tally (9 patillas sub D) Emite señales tally. Utilícelo cuando conecte un visor distinto del VF-P400. 1 7 6 G/Y B/PB R/PR 1 2 NC 6 NC 2 RM_PREVIEW 7 RM_TALLY 3 NC 8 NC 4 NC 9 NC 5 GND 9[TALLY INPUT] Introduce señales tally. 9 e d 0 b 9 a 8 7 6 5 1Soporte para el visor Se utiliza para instalar el visor VF-P400 de 4”. 2Palanca de bloqueo Se utiliza para fijar la cámara a esta unidad. X Véase “Instalación de la cámara” en la página 52. Cómo usar este manual Caracteres y símbolos utilizados en este manual ADVERTENCIA : indica que se debe prestar atención durante el funcionamiento. NOTA : detalles de referencia, como funciones o limitaciones en la utilización. X : páginas u opciónes de consulta. Anotaciones utilizadas en este manual • El copyright de este manual es propiedad de JVC. La reproducción o publicación total o parcial no autorizada de este manual está estrictamente prohibida. • Todos los nombres de productos que aparecen en este documento son marcas comerciales o registradas de sus respectivas empresas. Símbolos como ™, ® y © no aparecen en este documento. • El diseño, especificaciones, etc. que aparecen en este documento están sujetos a cambios sin previo aviso como consecuencia de mejoras en el producto. • En este manual se emplea el término GY-HD250 para referirse a la cámara de conexión. Sin embargo, se realizan las mismas operaciones al conectar la GYHD251. 4[PROMPTER OUTPUT] Terminal de salida del apuntador (BNC) La entrada de señal de vídeo del apuntador al terminal de entrada [AUX] del mando a distancia se emite desde este terminal a través del conector multiclavijas RM. Se emite una señal compuesta. El monitor de vídeo se conecta aquí. 5[VF] Cable del visor Se utiliza para conectar al terminal VF de la GY-HD250. 6[BREAKER] Interruptor diferencial El interruptor diferencial desconecta la alimentación si el consumo es mayor que la potencia nominal. Si salta el interruptor diferencial, compruebe que no existen anomalías y que el consumo de energía no supera el vataje indicado. Si no detecta ninguna anomalía, pulse el interruptor diferencial antes de volver a conectar la alimentación para poner en funcionamiento esta unidad. Si la unidad sigue sin funcionar correctamente, consulte a su distribuidor de JVC autorizado. 7[VF OUTPUT] (Y/PB/PR/RGB) BNC×3 Terminal de salida para el visor. Utilícelo cuando conecte un visor distinto del VF-P400. La señal HD/SD (del GY-HD250) y la señal de vídeo compuesta (del RM-P210) pueden intercambiarse. Utilice el menú de la GY-HD250 para realizar los ajustes. Visor recomendado: • DM-3106 (Astrodesign) • V-R70P-HAD (Marshall Electronics) 5 Señal 6 4 c Señal 1 f 3[VF OUTPUT] de alrededor de 20 patillas Se utiliza para conectar el visor VF-P400 de 4” (se vende por separado). X Véase “Conexión del visor (VF-P400)” en la página 53. 48 5 (Perfil de superficie) 3 Señal 9 VF OUTPUT 1 (Perfil de superficie) Señal 1 NC 6 NC 2 TALLY_IN 7 NC 3 NC 8 NC 4 NC 9 NC 5 GND 0[RM] Conector multiclavijas RM (26 patillas) Se utiliza para conectar el mando a distancia RM-P210 mediante el cable de 26 patillas de la cámara. Además, mediante este conector se suministra la alimentación a esta unidad y a la cámara desde el mando a distancia. NOTA • Emite señal de vídeo compuesta y señales RGB componente, componente Y/PB/PR e YC separadas desde el terminal de salida del RM-P210. Seleccione la señal de salida con la opción “OUTPUT” en la pantalla del menú “SYSTEM” de la GY-HD250. • Las señales SDI y HD no pueden emitirse desde el RM-P210. aCable de salida Genlock (BCN) Cable de salida para las señales de sincronización. Se utiliza para conectar al terminal de salida GENLOCK de la GY-HD250. bCable de entrada de señal compuesta de vídeo (RCA) Cable de entrada para señales de vídeo compuestas. Se utiliza para conectar al terminal de salida VIDEO de la GY-HD250. cCable de salida CC (XLR de 4 patillas) Se utiliza para conectar al terminal DC INPUT de la GY-HD250. dCable de entrada de componente Y/PB/PR (BNC×3) Cable de entrada para señales Y/PB/PR de vídeo componente. Se utiliza para conectar a cada uno de los terminales de salida Y/PB/PR de la GY-HD250. e[STUDIO] Cable de estudio (alrededor de 10 patillas) Se utiliza para conectar al terminal STUDIO de la GY-HD250. f[REMOTE] Cable remoto (alrededor de 6 patillas) Se utiliza para conectar al terminal REMOTE de la GY-HD250. NOTA No tire de los cables (5, a a f) ni aplique de ningún otro modo fuerza excesiva. De lo contrario, pueden producirse anomalías u ocasionarse lesiones. 49 Español Precauciones de funcionamiento INTRODUCCIÓN PREPARATIVOS Controles, indicadores y conectores (continuación) Sección trasera g k[CALL] Botón CALL /Indicador de alimentación Se ilumina en verde cuando se enciende el adaptador de estudio. Sin embargo, se ilumina en ámbar cuando la cámara está apagada. Pulse para enviar una señal de llamada al operador del mando a distancia si no se están utilizando los auriculares del intercomunicador. El indicador del botón cambia de verde a rojo cuando se pulsa el botón. Cuando este botón se mantiene pulsado, se envía una señal de llamada al mando a distancia y el indicador [TALLY] parpadea. Cuando suelta el botón [CALL], se deja de enviar la señal de llamada y se apaga el indicador [TALLY] del mando a distancia. Sistema básico Visor DM-3106 (Astrodesign) V-R70P-HAD (Marshall Electronics) l[DC INPUT] Terminal de entrada de alimentación CC (XLR de 4 patillas) Conecte la alimentación CC a este terminal si el mando a distancia RM-P210 no está conectado. Para la alimentación CC, utilice IDX IA-60a o VL-2PLUS. Enchufe de conversión ADVERTENCIA VF BRIGHT USER 1 MACRO Si el cable se conecta al terminal DC INPUT mientras se suministra alimentación desde el RM-P210, la alimentación se interrumpirá. Apague los dispositivos conectados cuando conecte un cable al terminal DC INPUT. DC INPUT PUSH INTERCOM MIC INTERCOM LEVEL USER 2 USER 3 ND FILTER 2 1 MENU STATUS WHT.BAL AUTO CH-1 ON AUTO AUDIO LEVEL CH-2 POWER MIN Terminal VF OUTPUT (Alrededor de 20 patillas) CÁMARA DE VÍDEO DIGITAL HD GY-HD250/GY-HD251 Terminal INTERCOM KIT DE ESTUDIO KA-HD250U CALL MAX Cable de CC Sección inferior h i j k Auriculares DT109 (Beyerdynamic) REC ON OFF Terminal VF OUTPUT (BNC × 3) OFF Adaptador de CA IA-60a, VL-2PLUS (IDX) l Español INTERCOM Visor VF-P400 Terminal DC INPUT Terminal PROMPTER OUTPUT g[TALLY] Piloto TALLY Se ilumina en verde cuando está en el modo de espera (vista previa). Se ilumina en rojo cuando la imagen de la cámara se selecciona con el mando a distancia. h[INTERCOM] Terminal de entrada intercomunicador (XLR de 5 patillas) Terminal de entrada para los auriculares intercomunicador. (Sólo dinámicos) Auriculares recomendados: DT109 (Beyerdynamic) 1 2 4 3 (Perfil de superficie) 1 MIC (H) 2 MIC (C) 3 EAR (C) 4 EAR (H) – LEFT 5 EAR (H) – RIGHT Cable REMOTE del Trípode del Señal 5 Terminal RM i[INTERCOM MIC] Interruptor [ON/OFF] del micrófono del intercomunicador Interruptor [ON/OFF] para auriculares con micrófono del intercomunicador. Ajuste a [ON] para utilizar los auriculares con micrófono. REMOTE CONTROL UNIT RM-P210 TALLY CALL FULL AUTO F1 BARS F2 SHUTTER F3 MENU/SHUTTER GAIN PAINT WHITE PUSH-ON VARIABLE PUSH-ON POWER B MID LOW IRIS W.BAL HIGH MENU MASTER BLACK AUTO STEP SHUTTER F4 I A R B PRESET AUTO MANU GAIN m INTERCOM LEVEL Monitor O DOWN UP DOWN UP CLOSE OPEN Mando a distancia RM-P210 mOrificios de rosca para el montaje del trípode Auriculares DT109 (Beyerdynamic) Plataforma rodante z La alimentación es suministrada por el mando a distancia RM-P120 a través del cable de la cámara de 26 patillas cuando se utiliza el mismo. Si no se utiliza el mando a distancia RM-P210, utilice el adaptador CA. j[INTERCOM LEVEL] Volumen del receptor del intercomunicador Utilícelo para ajustar el nivel de volumen del receptor de los auriculares del intercomunicador. 50 51 PREPARATIVOS 2. Mientras empuja la palanca de seguridad, tire de la palanca de bloqueo hacia adelante hasta que la brida del montaje delantero quede encajada. Instalación Conexión de los cables Conexión del visor (VF-P400) Conecte los cables de este dispositivo a la cámara. Instalación en un trípode Pasador Utilice los orificios de rosca de la parte inferior para montar un trípode. Existen varios orificios roscados. Utilice orificios bien equilibrados para instalar sobre un trípode. Palanca de bloqueo 2. 3. Palanca de seguridad 1. Brida del montaje delantero 9 3. Coloque la cámara en este dispositivo y alinee el montaje de base trasero con el pasador. 4 GENLOCK/AUX IN P TC IN P TC OUT IEEE 1394 REMOTE CH2-AUDIO OUT-CH1 VIDEO HD/SD SDI 2 Instalación de la cámara Prepare la cámara de la siguiente manera antes de instalarla. • Instale el objetivo. • Instale el micrófono. • Retire el visor. Para más información, consulte el MANUAL DE INSTRUCCIONES de la GY-HD250. 1. Afloje la palanca de bloqueo. Y 1 5 Gire la palanca de bloqueo del visor en sentido antihorario y afloje la palanca de bloqueo. 6 2. Instale el visor. 7 Deslice el visor hacia adelante por las guías del soporte del visor en la parte superior de este dispositivo. DC INPUT 3 Montaje de la base trasera 8 Montaje de la base delantera 4. Mantenga la cámara en la parte superior y deslícela hacia adelante para que el montaje de la base de la cámara se bloquee con la brida del montaje delantero una vez quede encajado. 1. Abra la tapa lateral. 3. Apriete la palanca de bloqueo. STUDIO Conecte el cable de este dispositivo al terminal de la cámara. Cable (tipo) Terminal de la cámara GENLOCK (BNC) 1 GENLOCK REMOTE (Alrededor de 6 patillas) 2 REMOTE DC OUTPUT (XLR de 4 patillas) 3 DC INPUT VIDEO (RCA) 4 VIDEO Y (BNC) 5 Y PB (BNC) 6 PB PR (BNC) 7 PR STUDIO (Alrededor de 10 patillas) 8 STUDIO VF (Alrededor de 20 patillas) 9 VF Gire la palanca de bloqueo del visor en el sentido de las agujas del reloj y apriete la palanca de bloqueo. 4. Conecte los cables. Conecte el cable del visor y el enchufe de conversión (KA-V400) y conecte este último al terminal de salida del visor (20 patillas) de este dispositivo. 4. Enchufe 4. NOTA ADVERTENCIA • El montaje de base delantero puede bloquearse incluso si la patilla de este dispositivo y el orificio de montaje de base trasero de la cámara no están acoplados. Una vez realizado el acoplamiento, compruebe que la cámara se encuentra asegurada firmemente. Si no se fija apropiadamente, la cámara puede caerse y ocasionar lesiones o un accidente. • Cuando transporte la cámara acoplada a este dispositivo, sujételo por la parte inferior. Si lo transporta por el asa de la cámara, el dispositivo puede soltarse y caer provocando lesiones o un accidente. 52 • Apague el dispositivo antes de conectar los cables. • No toque los terminales del enchufe cuando lo conecte. • Inserte el enchufe del cable CC hasta que quede fijo. NOTA • No conecte un monitor al terminal VF OUTPUT (Y/PB/PR/ RGB) situado en el lateral de este dispositivo. Si se conectan monitores simultáneamente a los dos terminales VF OUTPUT, las señales no se emiten correctamente. • Conecte únicamente el visor especificado al terminal de salida del visor (20 patillas). 53 Español Orificios de rosca PREPARATIVOS Conexión al mando a distancia RM-P210 Las visualizaciones y señales VF OUTPUT son las que se muestran a continuación. Conexión VF-P400 p Y Y Termi- RGB (Alrede- Y/PB/PR Y/PB/PR VBS nal (BNC×3) dor de (BNC×3) (BNC×3) (BNC×3) (BNC×1) 20 p.) RGB Y Compo- CompoComY nente nente puesto HD H/SD GYHD250 Opción RGB VF SIGNAL Y COMPONENT COMPONENT COMPOSITE Señal Señal 1. Conexión del RM-P210 Conecte el conector multiclavijas RM de esta unidad y el RM-P210 utilizando el cable de 26 patillas de la cámara. La longitud del cable de la cámara no debería ser superior a 100 m. El vídeo del apuntador (señal de entrada del terminal RM-P210 [AUX VIDEO INPUT]) procedente del RMP210 puede verificarse conectando el terminal [PROMPTER OUTPUT] de esta unidad situado en la parte delantera a un monitor mediante un cable BNC. NOTA • El RM-P210 suministra la alimentación a esta unidad a través del cable de 26 patillas de la cámara. • Cable de 26 patillas de la cámara VC-P110 (5 m) VC-P112 (20 m) VC-P113 (50 m) VC-P114 (100 m) G G G*1 G*1 G G*2 DV G G × G G G*2 G G G G G G G × × × × × (G: disponible, ×: no disponible) Se muestran los caracteres de la GY-HD250 para las señales de salida del terminal Y/PB/PR. Por lo tanto, deberá utilizarse la señal de salida del terminal HD/SDSDI para esta línea. *2 La señal sólo se emite al terminal Y del terminal Y/PB/PR. *3 La visualización de SKIN TONE no está disponible. *4 Las siguientes visualizaciones no están disponibles. • ZEBRA • Escala de detalle del tono de piel • Zona de seguridad • Ayuda de enfoque Funcionamiento 1. Encienda el RM-P210. Ajuste el interruptor [POWER] del mando a distancia de la cámara a [ON]. El botón CALL se ilumina en verde cuando se conecta la alimentación. Una vez se ha encendido el interruptor [POWER], el mando a distancia de la cámara podrá utilizarse al cabo de unos 30 segundos. NOTA Una vez se conecta la alimentación, el mando a distancia de la cámara tarda unos 30 segundos en estar listo para comunicarse con esta unidad. 2. Pulse el botón [CALL]. Ajuste de la pantalla de menús Y HD (HDV) REVisua- VERSE PICTUlizaRE*3 ción *4 Apague la alimentación del RM-P210 antes de intentar la conexión. 3. Conexión de un monitor 1. Ajuste de la señal de salida La señal de vídeo compuesta se emite siempre desde el conector multiclavijas RM. Además, pueden emitirse también las señales componente RGB, componente Y/ PB/PR o YC separadas. Seleccione la señal de salida utilizando la opción OUTPUT en la pantalla de menús SYSTEM. Mantenga pulsado [CALL] para enviar señales de llamada al operador del mando a distancia. El indicador del botón [TALLY] del mando a distancia parpadea. El indicador del botón [CALL] cambia de verde a rojo cuando se pulsa el botón. El piloto [TALLY] del visor también parpadea cuando se reciben señales de llamada desde el mando a distancia. 3. Ajuste el volumen. Ajuste el volumen de recepción de los auriculares con [INCOM LEVEL]. NOTA Las señales de sincronización se superponen a las señales componente RGB. *1 Español Señales de salida cuando el visor está conectado Ajuste del interruptor 2. Conexión de los DT109 Conecte el enchufe de los auriculares DT109 al terminal [INTERCOM] para poder utilizar unos auriculares de intercomunicador. 1. Activar/desactivar INCOM MIC Ajuste el interruptor [INCOM MIC ON/OFF] conforme a los auriculares con micrófono que vaya a utilizar. Ajuste el interruptor a [ON] para utilizar los auriculares con micrófono. NOTA Este dispositivo sólo es compatible con auriculares de tipo DINÁMICO. Los auriculares de tipo CARBONO no pueden conectarse. Volumen INCOM LEVEL Botón CALL NOTA • Si ambos, la unidad (incluyendo la cámara) y el mando a distancia poseen los mismos interruptores funcionales, se priorizarán los interruptores del mando a distancia. • Si existe una señal de sincronización externa cuando se conecta la alimentación, las imágenes pueden aparecer distorsionadas unos segundos. Esto no implica ninguna anomalía. • Si desea más información sobre el uso del mando a distancia, consulte el manual de instrucciones. Interruptor INCOM MIC ON/OFF 54 55 OTROS OFF DNR DNR LEVEL (G: acción disponible ×: acción no disponible) Función Acción OFF G ON G OFF G (CONTOUR) ON G IRIS MANU G AUTO G BAR DETAIL WHITE BAL AUTO GAIN MANU G PRE G AUTO1 G AUTO2 G FAW G SET × WHITE G 0dB G +3dB G +6dB G +9dB G +12dB G +18dB G +24dB TALLY × ALC+EEl G VARIABLE GAIN2 × VARIABLE GAIN × OFF G ON G PREVIEW G G VOLTAGE CHK. (RM r CAM) VOLTAGE CHK. (CAM r RM) SHUTTER BLACK × –3dB G HIGH G LOW G OFF G 1/100 G*1 1/120 *2 G 1/250 G 1/500 G 1/1000 G 1/2000 G V.SCAN × NORMAL G STRETCH G COMPRESS G NORMAL (OFF) × (HI-RESO) V.MAX (ON) × AUTO KNEE OFF G ON G 56 DTL FRQ Acción × ON × OFF G ON G LOW × MIDDLE × HIGH × AUTO × LOW G MIDDLE G HIGH G AUTO × OFF G ON G COLOR MATRIX OFF × ON × ASPECT RATIO 4:3 × 16:9 × LETTER × SKIN DTL OFF G ON G LOLUX OFF × ON × SMOOTH TRANS OFF G ON G FULL AUTO SHOOTING *1 *2 Cuando la velocidad de cuadro sea 60p, 60i, 30p, o 24p Cuando la velocidad de cuadro sea 50p, 50i, o 25p Especificaciones Conector multiclavijas RM: Salida de señal de vídeo compuesta (Se puede seleccionar la señal de salida Y/PB/PR, RGB o YC separada) Salida PROMPTER: Salida de señal de vídeo PROMPTER (señal compuesta) Rango de temperatura de funcionamiento: • de –5 °C a 40 °C (Humedad inferior al 80%) Temperatura de almacenamiento permitida: • de –20 °C a 60 °C Tensión de alimentación: 12 V CC Consumo de energía: Max. 38 W (GY-HD250, VF-P400) Peso: Approx. 5,2 d Accesorios: Instrucciones .....................................................................× 1 Comando de nivel Función Acción G IRIS MANUAL WHITE BALANCE R G B G BLACK PAINT R × B × Dimensiones (Unidad: mm) 80 G MASTER BLACK G*3 H.PHASE DETAIL MASTER G DETAIL BAL H/V G WHITE PAINT R G B G KNEE MASTER G GAMMA MASTER × INTERCOM DC INPUT VF OUTPUT PUSH INTERCOM MIC INTERCOM LEVEL CALL G/Y ON IRIS LEVEL (AL) G VARIABLE SHUTTER × VARIABLE GAIN2 × *3 TALLY INPUT OFF MIN B/PB R/PR TALLY OUTPUT 60 Algunas acciones no son compatibles cuando se ajusta la GY-HD250 con las funciones de menú del RM-P210 Función GAMMA 256 243 Notas sobre el funcionamiento del RM-P210 Español PREPARATIVOS MAX 176 204 325 337,5 El margen en que realmente se puede ajustar la opción RM-P210 H.PHASE es de 96 a 215. El valor se ajusta a 96 si se especifica un valor de 0 a 95, o se ajusta a 215 si se especifica un valor de 216 a 255. 67 96(=6×P16) 22 48(=3×P16) Las especificaciones y apariencia de esta unidad están sujetas a cambios sin previo aviso como consecuencia de mejoras en la misma. 57 ADATTATORE STUDIO ISTRUZIONI Italiano KA-HD250 58 INTRODUZIONE Informazioni per gli utenti sullo smaltimento delle apparecchiature obsolete Caratteristiche principali AVVERTENZA: PER RIDURRE I RISCHI DI INCENDIO O SCOSSE ELETTRICHE, NON ESPORRE QUESTO APPARECCHIO A PIOGGIA O UMIDITÀ. Utilizzare solo una tensione CC di 12V con questo apparecchio. AVVERTENZA: Per evitare rischi di scosse elettriche o incendi, NON utilizzare nessun altro tipo di alimentazione. AVVERTENZA: Per evitare scosse elettriche, non aprire lo chassis dell’apparecchio, in quanto la manutenzione delle parti al suo interno deve essere eseguita da personale qualificato. Nota: La piastra del numero di serie si trova su questa unità. Questo apparecchio è conforme alle regolamentazioni sulla sicurezza delineate nelle direttive europee. Questo apparecchio è stato progettato per essere utilizzato con dispositivi video professionali e può essere utilizzato nei seguenti ambienti: z Ambienti con controllo delle emissioni elettromagnetiche (ad esempio, studi di trasmissione o di registrazione video) e ambienti esterni. Per ottenere le migliori prestazioni e garantire la compatibilità elettromagnetica, si consiglia di utilizzare cavi che non superino le seguenti lunghezze: Porta Cavo Lunghezza RM Cavo esclusivo 10 metri PROMPTER OUTPUT Cavo coassiale 5 metri Attenzione: Questo simbolo è valido solo nell’Unione Europea. [Unione Europea] Questo simbolo indica che l’apparecchiatura elettrica ed elettronica a cui è relativo non deve essere smaltita tra i rifiuti domestici generici alla fine della sua vita utile. Il prodotto, invece, va consegnato a un punto di raccolta appropriato per il riciclaggio di apparecchiature elettriche ed elettroniche, per il trattamento, il recupero e il riciclaggio corretti, in conformità alle proprie normative nazionali. Mediante lo smaltimento corretto di questo prodotto, si contribuirà a preservare le risorse naturali e a prevenire potenziali effetti negativi sull’ambiente e sulla salute umana che potrebbero essere provocati, altrimenti, da uno smaltimento inappropriato del prodotto. Per ulteriori informazioni sul punto di raccolta e il riciclaggio di questo prodotto, contattare la sede comunale locale, il servizio di smaltimento rifiuti domestici o il negozio in cui si è acquistato il prodotto. L’utente è responsabile del conferimento dell’apparecchio a fine vita alle appropriate strutture di raccolta, pena le sanzioni previste dalla vigente legislazione sui rifiuti. 5 metri 5 metri TALLY INPUT Cavo esclusivo 5 metri INTERCOM Cavo schermato 1,5 metri VF OUTPUT (BNC) Cavo coassiale 5 metri AVVERTENZA VF OUTPUT (20 pin) Cavo schermato 0,4 metri • Se si sposta l’unità mentre è attaccato il treppiede, questo potrebbe staccarsi in caso di impatti o vibrazioni improvvise. Ciò potrebbe causare danni fisici. Staccare il treppiede dall’unità prima di spostarla. • Il supporto della base anteriore potrebbe bloccarsi anche se il perno di questa unità non viene attaccato al foro di blocco del supporto della base posteriore. Dopo aver attaccato i dispositivi, verificare che la videocamera sia collegata saldamente, in quanto potrebbe cadere e causare danni fisici se non collegata correttamente. • Quando questa unità e la telecamera sono attaccate, trasportarle tenendo la parte inferiore dell’unità. Se le si trasporta tenendo l’impugnatura della videocamera, i dispositivi potrebbero staccarsi causando possibili danni fisici. Il rappresentante europeo di Victor Company of Japan Limited è: JVC Technology Centre Europe GmbH P.O. Box 10 05 52 61145 Friburgo Germania 60 Uscita multi-sistema È possibile trasmettere segnali compositi e i segnali separati dei componenti RGB, Y/PB/PR e YC dal connettore 26P per videocamera. (La selezione viene effettuata dal menu.) Terminale Intercom Terminale di uscita del suggeritore elettronico Cavo esclusivo questo apparecchio è conforme alle direttive e agli standard europei vigenti per quel che riguarda compatibilità elettromagnetica e sicurezza elettrica. È possibile collegare il telecomando RM-P210 (venduto a parte) per controllare questa unità da una distanza massima di 100 metri. In questo caso, il telecomando alimenta la videocamera, pertanto non sarà necessario utilizzare un alimentatore a parte. [Per altre nazioni al di fuori dell’Unione Europea] Qualora si desideri smaltire questo prodotto, effettuare lo smaltimento in conformità alla normativa nazionale applicabile o alle altre leggi della propria nazione relative al trattamento delle apparecchiature elettriche ed elettroniche obsolete. Cavo esclusivo Gentile acquirente, Connettore analogico 26P per videocamera Possibilità di utilizzare una cuffia per comunicare con l’operatore del telecomando (solo Dynamic). TALLY OUTPUT Sommario INTRODUZIONE (Per gli utenti aziendali) Qualora si desideri smaltire questo prodotto, visitare la nostra pagina web www.jvc-europe.com per ottenere informazioni sul ritiro del prodotto. DC INPUT Avvertenza: nei luoghi con forte presenza di onde elettromagnetiche, ad esempio accanto a radio, TV, trasformatori, motori e così via, l’immagine e l’audio potrebbero essere disturbati. In questo caso, tenere l’apparecchio lontano dalle fonti di disturbo. Grazie per aver acquistato questo prodotto. (Queste istruzioni si riferiscono al KA-HD250U.) Prima di usare l’apparecchio, leggere attentamente il manuale di istruzioni per ottenere i migliori risultati possibili. Caratteristiche principali . . . . . . . . . . . . . . . . . . . . . . . . . .61 Precauzioni operative . . . . . . . . . . . . . . . . . . . . . . . . . . . .62 Informazioni sul segnale Genlock e la regolazione della fase di sistema . . . . . . . . . . . . . . . . . . . . . . . .62 Comandi, indicatori e connettori . . . . . . . . . . . . . . . . . . . .63 Sezione anteriore . . . . . . . . . . . . . . . . . . . . . . . . . . . . .63 Sezione posteriore . . . . . . . . . . . . . . . . . . . . . . . . . . . .64 Sezione inferiore . . . . . . . . . . . . . . . . . . . . . . . . . . . . . .64 FASI DI PREPARAZIONE Sistema di base . . . . . . . . . . . . . . . . . . . . . . . . . . . . . . . . .65 Installazione . . . . . . . . . . . . . . . . . . . . . . . . . . . . . . . . . . . .66 Montaggio su un treppiede . . . . . . . . . . . . . . . . . . . . . .66 Montaggio della videocamera . . . . . . . . . . . . . . . . . . . .66 Cavi di connessione . . . . . . . . . . . . . . . . . . . . . . . . . . .67 Collegamento del mirino (VF-P400) . . . . . . . . . . . . . . .67 Segnali in uscita quando viene collegato il mirino . . . .68 Collegamento al telecomando RM-P210 . . . . . . . . . . . . . .68 Collegamento . . . . . . . . . . . . . . . . . . . . . . . . . . . . . . . .68 Impostazione della schermata del menu . . . . . . . . . . .69 Impostazione degli interruttori. . . . . . . . . . . . . . . . . . . .69 Funzionamento . . . . . . . . . . . . . . . . . . . . . . . . . . . . . . .69 Note sul funzionamento dell’RM-P210. . . . . . . . . . . . . . . .70 ALTRE INFORMAZIONI Trasmette il video del suggeritore elettronico telecomando sotto forma di segnali compositi. Specifiche . . . . . . . . . . . . . . . . . . . . . . . . . . . . . . . . . . . . .71 Dimensioni . . . . . . . . . . . . . . . . . . . . . . . . . . . . . . . . . .71 Italiano Precauzioni sulla sicurezza (Per l’Europa) dal Mirino VF-P400 da 4 pollici, compatibile con convertitore Terminali component per monitor esterno (BNC × 3) 61 INTRODUZIONE • Per garantire il corretto funzionamento di questa unità nel tempo, evitare di conservarla o di utilizzarla nelle seguenti condizioni. Luoghi molto caldi o molto freddi Luoghi con forti vibrazioni Luoghi polverosi Luoghi molto umidi Vicino a fonti di rumore molto forte • Non sottoporre l’unità a forti vibrazioni o urti quando la si installa o rimuove. • Non collegare o scollegare il connettore dei cavi della videocamera quando questa unità è accesa. • Utilizzare solo gli alimentatori previsti (RM-P210 o IDX IA60a, VL-2PLUS). • Per ridurre il consumo elettrico, spegnere l’unità quando non è in uso. • Se nei pressi dell’unità viene utilizzato un trasmettitore o un telefono cellulare, si potrebbero riscontrare dei disturbi nelle cuffie o sullo schermo. Ciò non indica un malfunzionamento. • Si consiglia di mettere a terra il terminale INTERCOM G (GND) poiché potrebbero verificarsi dei disturbi in base alle cuffie utilizzate. • Utilizzare solo il cavo per videocamera della lunghezza specificata standard. In caso contrario, la compensazione del cavo potrebbe non essere sufficiente. • Il video di ritorno è disponibile nel mirino esclusivamente per i segnali SD. Informazioni sul segnale Genlock e la regolazione della fase di sistema Quando si utilizza il telecomando RM-P210 con questo sistema, trasmettere il segnale Genlock nella videocamera GY-HD250 o nell’RM-P210. Se, tuttavia, il segnale Genlock viene applicato sia alla GYHD250 che all’RM-P210, le immagini sullo schermo appariranno disturbate. Eseguire la regolazione della fase di sistema sul dispositivo in cui viene trasmesso il segnale Genlock. L’unità RM-LP55, se collegata, avrà la priorità. • Se il segnale Genlock viene trasmesso nell’RM-P210 Regolare la fase H e SC dell’RM-P210. • Se il segnale Genlock viene trasmesso nella GY-HD250 Regolare la fase utilizzando l’opzione H del telecomando RM-P210 e SC della videocamera GY-HD250. PROMEMORIA Comandi, indicatori e connettori • Quando il mirino è collegato a questo terminale, il segnale non viene trasmesso correttamente anche se si è collegato il mirino al terminale 3 [VF OUTPUT]. • Quando lo si collega al terminale Y/PB/PR del monitor, il segnale video di ritorno restituito dall’unità RM-P210 compare in bianco e nero. Sezione anteriore 8[TALLY OUTPUT] Terminale di uscita del segnale Tally (D-sub a 9 pin) Trasmette i segnali Tally. Da utilizzare quando si collega un mirino diverso dal VF-P400. 1 7 6 VF OUTPUT G/Y B/PB R/PR 1 2 e 9 d 0 b 9 a 8 7 6 5 1Supporto per mirino Da utilizzare per montare il mirino VF-P400 da 4 pollici. 2Leva di blocco Blocca la videocamera a questa unità. X Vedere “Montaggio della videocamera” a pagina 66. Convenzioni utilizzate nel manuale • Il copyright di questo manuale è proprietà di JVC. È vietata qualsiasi riproduzione o pubblicazione non autorizzata del manuale. • Tutti i nomi di prodotti in questo documento sono marchi o marchi registrati di proprietà delle rispettive società. Marchi e simboli come ™, ® e © non compaiono in questo documento. • Design, specifiche, ecc. riportati in questo manuale sono soggetti a modifiche senza preavviso. • In questo manuale, la videocamera a cui si fa riferimento è la GY-HD250. Tuttavia, le stesse operazioni sono valide per collegare la videocamera GY-HD251. NC 6 NC 2 RM_PREVIEW 7 RM_TALLY 3 NC 8 NC 4 NC 9 NC 5 TERRA 4[PROMPTER OUTPUT] Terminale di uscita del suggeritore elettronico (BNC) Il segnale video del suggeritore elettronico inviato al terminale di ingresso [AUX] del telecomando viene trasmesso da questo terminale attraverso il connettore multi-pin RM. Viene trasmesso il segnale composito. Qui va collegato il monitor. 5[VF] Cavo del mirino Collegarlo al terminale VF della videocamera GY-HD250. 6[BREAKER] Interruttore differenziale Si attiva per interrompere l’alimentazione qualora il consumo sia superiore alla capacità prevista. Se l’interruttore differenziale si attiva, verificare che non vi siano anomalie e che il consumo elettrico non superi la tensione prevista. Qualora non si riscontri alcuna anomalia, premere l’interruttore differenziale prima di riaccendere l’unità per farla funzionare correttamente. Se permangono dei problemi di funzionamento, consultare un distributore autorizzato JVC. 7[VF OUTPUT] (Y/PB/PR/RGB) BNC×3 Terminale di uscita per il mirino. Da utilizzare quando si collega un mirino diverso dal VF-P400. Il segnale video HD/SD (dalla GY-HD250) e composito (dalla RM-P210) può essere alternato. Utilizzare il menu della videocamera GY-HD250 per eseguire l’impostazione. Mirino consigliato: • DM-3106 (Astrodesign) • V-R70P-HAD (Marshall Electronics) 5 Segnale 6 4 c Caratteri e simboli utilizzati nel manuale AVVERTENZA : segnala procedure importanti durante l’utilizzo. PROMEMORIA: segnala informazioni di riferimento come funzionalità o limiti durante l’utilizzo. X : pagine o argomenti a cui fare riferimento. Segnale 1 9[TALLY INPUT] Riceve i segnali Tally. f 3[VF OUTPUT] Terminale rotondo a 20 pin Collega il mirino VF-P400 da 4 pollici (venduto a parte). X Vedere “Collegamento del mirino (VF-P400)” a pagina 67. 62 5 (profilo della superficie) 3 Uso del manuale Segnale 9 1 (profilo della superficie) Segnale 1 NC 6 NC 2 TALLY_IN 7 NC 3 NC 8 NC 4 NC 9 NC 5 TERRA 0[RM] Connettore multi-pin RM (a 26 pin) Collega il telecomando RM-P210 mediante un cavo a 26 pin per videocamera. Inoltre, questa unità e la videocamera vengono alimentate dal telecomando attraverso questo connettore. PROMEMORIA • Trasmettere il segnale video composito e i segnali separati dei componenti RGB, Y/PB/PR e YC dal terminale di uscita dell’RM-P210. Selezionare il segnale di uscita con la voce “OUTPUT” nella schermata del menu “SYSTEM” sulla videocamera GY-HD250. • I segnali SDI e HD non possono essere trasmessi sull’RM-P210. aCavo di uscita GENLOCK (BNC) Cavo di uscita per i segnali di sincronizzazione. Collegarlo al terminale di uscita GENLOCK della videocamera GY-HD250. bCavo di ingresso video composito (RCA) Cavo di trasmissione per i segnali video compositi. Collegarlo al terminale di uscita VIDEO della videocamera GY-HD250. cCavo di uscita CC (XLR a 4 pin) Collegarlo al terminale DC INPUT della videocamera GY-HD250. dCavo di ingresso del componente Y/PB/PR (BNC×3) Cavo di trasmissione dei segnali video Y/PB/PR. Collegarlo a ognuno dei terminali di uscita Y/PB/PR della videocamera GY-HD250. e[STUDIO] Cavo studio (rotondo, a 10 pin) Collegarlo al terminale STUDIO della videocamera GY-HD250. f[REMOTE] Cavo del telecomando (rotondo a 6 pin) Collegarlo al terminale REMOTE della videocamera GY-HD250. PROMEMORIA Non tirare i cavi (5, da a a f) o applicare in ogni caso forza eccessiva.In caso contrario si possono provocare malfunzionamenti o lesioni. 63 Italiano Precauzioni operative INTRODUZIONE FASI DI PREPARAZIONE Comandi, indicatori e connettori (segue) Sezione posteriore g k[CALL] Pulsante CALL/indicatore dell’alimentazione Di colore verde quando l’adattatore Studio è acceso. Tuttavia, si accende in giallo se la videocamera è spenta. Premere il pulsante per inviare un segnale di chiamata all’operatore del telecomando qualora non si utilizzi la cuffia. Quando si preme il pulsante, l’indicatore del pulsante cambia da verde a rosso. Tenendo premuto questo pulsante, il segnale di chiamata viene inviato al telecomando e l’indicatore [TALLY] lampeggia. Quando si rilascia il pulsante [CALL], il segnale di chiamata non viene più trasmesso e l’indicatore [TALLY] del telecomando si spegne. Sistema di base Mirino DM-3106 (Astrodesign) V-R70P-HAD (Marshall Electronics) l[DC INPUT] Terminale di ingresso CC (XLR a 4 pin) Collegare l’alimentazione CC a questo terminale se l’unità RM-P210 non è collegata. Per l’alimentazione CC utilizzare IDX IA-60a o VL-2PLUS. Mirino VF-P400 AVVERTENZA Se si collega il cavo al terminale DC INPUT mentre l’alimentazione proviene dall’RM-P210, l’alimentazione verrà interrotta. Quando si collega un cavo al terminale DC INPUT, spegnere i dispositivi collegati. Convertitore VF BRIGHT MACRO USER 1 USER 2 ND FILTER 2 1 MENU STATUS WHT.BAL AUTO CH-1 ON INTERCOM LEVEL ON OFF h MIN i Terminale VF OUTPUT (rotondo a 20 pin) Terminale INTERCOM STUDIO KIT KA-HD250 MAX j Cuffie DT109 (Beyerdynamic) REC Sezione inferiore CALL Terminale VF OUTPUT (BNC × 3) VIDEOCAMERA HD GY-HD250/GY-HD251 DC INPUT PUSH INTERCOM MIC AUTO AUDIO LEVEL CH-2 OFF POWER INTERCOM USER 3 Cavo CC k Adattatore CA IA-60a, VL-2PLUS (IDX) l Terminale DC INPUT Terminale PROMPTER OUTPUT g[TALLY] Spia TALLY Si accende in verde in stand-by (anteprima). Si accende in rosso se le immagini della videocamera vengono selezionate col telecomando. 1 5 2 4 3 (profilo della superficie) Segnale 1 MIC (H) 2 MIC (C) 3 EAR (C) 4 EAR (H) – SINISTRO 5 EAR (H) – DESTRO i[INTERCOM MIC] Interruttore [ON/OFF] del microfono delle cuffie Interruttore [ON/OFF] per il microfono delle cuffie. Impostare su [ON] per utilizzare il microfono. j[INTERCOM LEVEL] Volume del ricevitore delle cuffie Da utilizzare per regolare il livello del volume delle cuffie. 64 Terminale RM Cavo REMOTE Treppiede m mFori delle viti per montare il treppiede Italiano h[INTERCOM] Terminale di ingresso per le cuffie (XLR a 5 pin) Terminale di ingresso per le cuffie (solo Dynamic). Cuffie consigliate: DT109 (Beyerdynamic) REMOTE CONTROL UNIT RM-P210 TALLY CALL FULL AUTO F1 BARS F2 SHUTTER F3 MENU/SHUTTER GAIN PAINT WHITE PUSH-ON VARIABLE PUSH-ON POWER B MID LOW IRIS W.BAL HIGH MENU MASTER BLACK AUTO STEP SHUTTER F4 I A R B PRESET AUTO MANU GAIN INTERCOM LEVEL Monitor O DOWN UP DOWN UP CLOSE OPEN Telecomando RM-P210 Cuffie DT109 (Beyerdynamic) Carrello z L’alimentazione proviene dal telecomando RM-P210, se in uso, mediante un cavo a 26 pin per videocamera. Se non si usa l’unità RM-P210, utilizzare un alimentatore CA. 65 FASI DI PREPARAZIONE 2. Premere la leva di sicurezza e spingere la leva di blocco Installazione in avanti finché il perno di montaggio frontale non scatta in posizione. Cavi di connessione Collegamento del mirino (VF-P400) Collegare i cavi di questa unità alla videocamera. Montaggio su un treppiede Perno Utilizzare i fori per le viti nella parte inferiore dell’unità per montarla su un treppiede. Ci sono vari fori per le viti. Utilizzare quelli più adatti per montare il treppiede. Leva di blocco 2. 3. Leva di sicurezza 1. Perno del supporto anteriore 9 3. Posizionare la videocamera su questa unità e allineare il 4 supporto della base posteriore della videocamera con il perno sull’unità. GENLOCK/AUX IN P TC IN P TC OUT IEEE 1394 REMOTE CH2-AUDIO OUT-CH1 VIDEO HD/SD SDI 2 Montaggio della videocamera Prima di montare la videocamera, prepararla come descritto di seguito. • Collegare l’obiettivo. • Collegare il microfono. • Rimuovere il mirino. Per i dettagli, consultare il manuale di istruzioni della GYHD250. 1. Allentare la leva di blocco. Y 1 5 Ruotare in senso antiorario la leva di blocco del mirino e allentarla. 6 2. Collegare il mirino. 7 Far scorrere il mirino in avanti lungo le guide del supporto per il mirino, sulla parte superiore di questa unità. DC INPUT 3 3. Stringere la leva di blocco. STUDIO 8 Supporto della base posteriore 4. Tenere Supporto della base anteriore la videocamera dalla parte superiore e farla scorrere in avanti in modo che il supporto della base venga bloccato dal perno del supporto anteriore di questa unità, finché non scatta in posizione. 1. Aprire lo sportello laterale. Collegare il cavo di questa unità al terminale della videocamera. Cavo GENLOCK Terminale della videocamera (tipo) (BNC) 1 GENLOCK REMOTE (rotondo a 6 pin) 2 REMOTE DC OUTPUT (XLR a 4 pin) 3 DC INPUT VIDEO (RCA) 4 VIDEO Y (BNC) 5 Y PB (BNC) 6 PB PR (BNC) 7 PR STUDIO (rotondo a 10 pin) 8 STUDIO VF (rotondo a 20 pin) 9 VF Ruotare in senso orario la leva di blocco del mirino e stringerla. 4. Collegare i cavi. Collegare il cavo del mirino e il convertitore (KA-V400), quindi collegare il convertitore al terminale di uscita del mirino (a 20 pin) di questa unità. 4. Connettore 4. PROMEMORIA AVVERTENZA • Il supporto della base anteriore potrebbe bloccarsi anche se il perno di questa unità non viene attaccato al foro di blocco del supporto della base posteriore. Dopo aver attaccato i dispositivi, verificare che la videocamera sia collegata saldamente. La videocamera potrebbe cadere e causare danni fisici se non collegata correttamente. • Quando questa unità e la telecamera sono attaccate, trasportarle tenendo la parte inferiore dell’unità. Se si trasportano tenendo l’impugnatura della videocamera, i dispositivi potrebbero staccarsi causando possibili danni fisici. 66 • Spegnere l’unità prima di collegare i cavi. • Non toccare i terminali delle prese durante il collegamento. • Inserire la presa del cavo CC finché non si blocca in posizione. PROMEMORIA • Non collegare un monitor al terminale VF OUTPUT (Y/PB/ PR/RGB) sul lato di questo dispositivo. Se ai due terminali VF OUTPUT vengono contemporaneamente collegati due monitor, i segnali non vengono trasmessi correttamente. • Collegare esclusivamente il mirino specificato al terminale di uscita del mirino (a 20 pin). 67 Italiano Fori delle viti FASI DI PREPARAZIONE Collegamento al telecomando RM-P210 Di seguito vengono indicati i segnali VF OUTPUT e le indicazioni. Collegamento VF-P400 p Y Termi- RGB (Round nale (BNC×3) 20p) RGB Y Component HD Component H/SD Composito Y GYHD250 RGB voce VF SIGNAL Y COMPONENT COMPONENT COMPOSITE Y Segnale Segnale Y Y/PB/PR Y/PB/PR VBS (BNC×3) (BNC×3) (BNC×3) (BNC×1) G G G*1 G*1 G G*2 DV G G × G G G*2 G G G G G G G × × × × × *4 1. Collegamento dell’RM-P210 Collegare il connettore multi-pin RM di questa unità all’RM-P210 mediante il cavo a 26 pin per videocamera. Il cavo della videocamera deve essere lungo 100 metri al massimo. HD (HDV) REVERSE Indica- PICzione TURE*3 Spegnere l’RM-P210 prima di eseguire il collegamento. (G: disponibile, ×: non disponibile) I caratteri trasmessi dalla videocamera GY-HD250 vengono visualizzati per i segnali in uscita dal terminale Y/PB/PR. Pertanto, per questa linea utilizzare il segnale in uscita dal terminale HD/SD-SDI. *2 Il segnale viene trasmesso esclusivamente al terminale Y dal terminale Y/PB/PR. *3 L’indicazione SKIN TONE non è disponibile. *4 Le seguenti indicazioni non sono disponibili. • ZEBRA • Intervallo del dettaglio incarnato • Zona di sicurezza • Assistenza per la messa a fuoco 3. Collegamento a un monitor Per controllare il video del suggeritore elettronico (segnale di ingresso del terminale [AUX VIDEO INPUT] dell’RM-P210) proveniente dall’RM-P210, collegare il terminale [PROMPTER OUTPUT] di questa unità a un monitor mediante un cavo BNC. PROMEMORIA • L’alimentazione per questa unità e la videocamera proviene dall’RM-P210 mediante un cavo a 26 pin per videocamera. • Cavo a 26 pin per videocamera VC-P110 (5 m) VC-P112 (20 m) VC-P113 (50 m) VC-P114 (100 m) Impostazione della schermata del menu 1. Impostazione del segnale di uscita Il segnale video composito viene sempre trasmesso dal connettore multi-pin RM. Inoltre, è possibile trasmettere i segnali separati dei componenti RGB, Y/PB/PR o YC. Selezionare il segnale di uscita con la voce OUTPUT nella schermata del menu SYSTEM. *1 Funzionamento 1. Accendere l’RM-P210. Portare su [ON] l’interruttore [POWER] del telecomando della videocamera. Il pulsante CALL diventa di colore verde quando l’unità viene accesa. Dopo aver portato su [ON] l’interruttore [POWER], il telecomando della videocamera entra in funzione dopo circa 30 secondi. PROMEMORIA Dopo l’accensione dell’apparecchio, il telecomando della videocamera impiega circa 30 secondi per comunicare con questa unità. 2. Premere il pulsante [CALL]. Tenere premuto il pulsante [CALL] per inviare un segnale di chiamata all’operatore del telecomando. L’indicatore del pulsante [TALLY] del telecomando lampeggia. Quando si preme il pulsante, l’indicatore del pulsante [CALL] cambia da verde a rosso. Anche la spia [TALLY] sul mirino lampeggia quando si ricevono segnali dal telecomando. 3. Regolare il volume. Regolare il volume di ascolto delle cuffie con [INCOM LEVEL]. PROMEMORIA I segnali di sincronizzazione vengono sovraimposti sui segnali RGB. 2. Collegamento delle cuffie DT109 Per utilizzare le cuffie, collegare la presa delle cuffie DT109 al terminale [INTERCOM]. PROMEMORIA Questa unità supporta solo cuffie di tipo DYNAMIC. Non è possibile collegare cuffie di tipo CARBON. Impostazione degli interruttori 1. Abilitazione/disabilitazione di INCOM MIC Impostare l’interruttore [INCOM MIC ON/OFF] a seconda che si usi o meno il microfono delle cuffie. Impostare l’interruttore su [ON] per utilizzare il microfono. Volume INCOM LEVEL Italiano Segnali in uscita quando viene collegato il mirino Pulsante CALL PROMEMORIA • Se sia l’unità (compresa la videocamera) e il telecomando hanno gli stessi interruttori delle funzioni, il telecomando ha la priorità. • Se si accende la videocamera mentre si riceve un segnale di sincronizzazione esterno, le immagini potrebbero apparire disturbate per alcuni secondi. Ciò non indica un malfunzionamento. • Se si utilizza il telecomando, consultare il rispettivo manuale di istruzioni per maggiori dettagli. Interruttore INCOM MIC ON/OFF 68 69 FASI DI PREPARAZIONE ALTRE INFORMAZIONI Funzione BAR OFF G ON G GAMMA OFF DNR DNR LEVEL Operazione OFF G × ON × OFF G ON G LOW × MIDDLE × HIGH × AUTO × ON G LOW G DETAIL OFF G MIDDLE G (CONTOUR) ON G HIGH G IRIS MANU G AUTO × AUTO G OFF G MANU G ON G PRE G COLOR MATRIX OFF × AUTO1 G ON × ASPECT RATIO 4:3 × × WHITE BAL AUTO GAIN TALLY AUTO2 G DTL FRQ SKIN DTL FAW G 16:9 SET × LETTER × WHITE G FULL AUTO SHOOTING OFF G 0dB G ON G +3dB G LOLUX OFF × ON × OFF G ON G +6dB G +9dB G +12dB G +18dB G +24dB × –3dB × ALC+EEl G VARIABLE GAIN2 × SMOOTH TRANS *1 *2 Comando di livello Funzione Operazione IRIS G MANUAL WHITE BALANCE R G ON G B G PREVIEW G BLACK PAINT R × G B G MASTER BLACK H.PHASE G DETAIL MASTER G SHUTTER OFF G DETAIL BAL H/V G BLACK G*2 1/250 R G B G G KNEE MASTER G 1/500 G GAMMA MASTER 1/1000 G IRIS LEVEL (AL) G 1/2000 G VARIABLE SHUTTER × V.SCAN × VARIABLE GAIN2 × NORMAL G STRETCH G COMPRESS G (OFF) × (HI-RESO) V.MAX (ON) × 70 Consumo elettrico: Max. 38W (GY-HD250, VF-P400) Peso: Circa 5,2 d Accessori: Istruzioni ............................................................................× 1 Dimensioni (unità di misura: mm) 80 INTERCOM DC INPUT *3 VF OUTPUT PUSH INTERCOM MIC INTERCOM LEVEL CALL G/Y ON TALLY INPUT OFF WHITE PAINT NORMAL Tensione di alimentazione: CC 12 V G*3 G LOW 1/120 Temperatura di conservazione consentita: • Da -20°C a 60°C × HIGH G Temperatura operativa: • Da -5°C a 40°C (umidità sotto l’80%) G VOLTAGE CHK. (CAM r RM) 1/100 Uscita PROMPTER: Uscita del segnale video del suggeritore elettronico (segnale composito) G × OFF *1 Connettore Multi-pin RM: Uscita del segnale video composito (È possibile selezionare i segnali di uscita separati dei componenti Y/PB/PR, RGB o YC.) Con frequenza dei fotogrammi pari a 60p, 60i, 30p o 24p Con frequenza dei fotogrammi pari a 50p, 50i o 25p VARIABLE GAIN VOLTAGE CHK. (RM r CAM) Specifiche Italiano (G: Azione disponibile ×: Nessuna azione) Funzione AUTO KNEE MIN B/PB R/PR TALLY OUTPUT 60 Alcune azioni non sono compatibili se si imposta la videocamera GY-HD250 con le operazioni di menu dell’RMP210. Operazione 256 243 Note sul funzionamento dell’RM-P210. MAX 176 204 325 337,5 × L’intervallo all’interno del quale è effettivamente possibile regolare l’opzione H.PHASE sul telecomando RM-P210 è compreso tra 96 e 215. Se si imposta un valore compreso tra 0 e 95, il valore viene regolato su 96, mentre se si imposta un valore compreso tra 216 e 255, il valore viene impostato su 255. 67 96(=6×P16) 22 48(=3×P16) Le specifiche e l’aspetto di questa unità sono soggetti a modifiche e perfezionamenti senza preavviso. 71