1
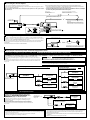
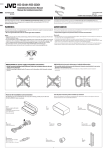
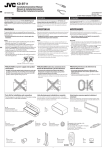
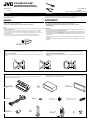
KD-G632/KD-G631
Installation/Connection Manual
Manuald’installation/raccordement
de instalare/conectare
Manuel
GET0424-010A
1106DTSMDTJEIN
EN/RO
EN, FR
[EX/EU]
© 2006 Victor Company of Japan, Limited
ROMÂNĂ
FRANÇAIS
ENGLISH
This unit is designed to operate on 12 V DC, NEGATIVE ground electrical systems. If your vehicle
does not have this system, a voltage inverter is required, which can be purchased at JVC IN-CAR
ENTERTAINMENT dealers.
Acest
aparatest
este
destinat
în cadrul
sistem
electriccontinu
cu împământare
NEGATIVĂ
CC
Cet
appareil
conçu
pour utilizării
fonctionner
sur desunui
sources
de courant
de 12 V à masse
NEGATIVE.
12votre
V. Dacă
autovehiculul
este dotat
cu un astfel
de sistem,
necesară montarea
de
Si
véhicule
n’offre pasnu
ce type
d’alimentation,
il vous
faut uneste
convertisseur
de tension,unui
que invertor
vous pouvez
acheter
un revendeur
d’autoradios
tensiunechez
pe care
îl puteţi achiziţiona
deJVC.
la dealerii JVC IN-CAR ENTERTAINMENT.
WARNINGS
AVERTISMENTE
AVERTISSEMENTS
To prevent short circuits, we recommend that you disconnect the battery’s negative terminal and make all
electrical connections before installing the unit.
• Be sure to ground this unit to the car’s chassis again after installation.
Pentru
a preveni
producerea de
scurt
circuite,
vă recomandăm
să deconectaţi
borna negativă
a bateriei
Pour éviter
tout court-circuit,
nous
vous
recommandons
de débrancher
la borne négative
de la batterie
et
şi
să conectaţi
cablurile electrice
înainte
de instalarea
d’effectuer
toustoate
les raccordements
électriques
avant
d’installer echipamentului.
l’appareil.
•
Asiguraţi-vă că
instalare
aţi împământat
nou aparatul
la caroseria
• Assurez-vous
de după
raccorder
de nouveau
la mise à din
la masse
de cet appareil
au châssis de la
autovehiculului.
voiture
après l’installation.
Notes:
• Replace the fuse with one of the specified rating. If the fuse blows frequently, consult your JVC IN-CAR
ENTERTAINMENT dealer.
• It is recommended to connect to the speakers with maximum power of more than 50 W (both at
the rear and at the front, with an impedance of 4 Ω to 8 Ω). If the maximum power is less than
50 W, change “AMP GAIN” setting to prevent the speakers from being damaged (see page 17 of the
INSTRUCTIONS).
• To prevent short-circuit, cover the terminals of the UNUSED leads with insulating tape.
• The heat sink becomes very hot after use. Be careful not to touch it when removing this unit.
Observaţii
Remarques:
• Remplacer
le fusible cu
paruna
un care
de la prezintă
valeur précisée.
le fusible saute
consulter
revendeur
•
Înlocuiţi siguranţa
valorileSispecificate.
Dacăsouvent,
siguranţa
se ardevotre
în mod
frecvent,
d’autoradios
JVC. dealer JVC IN-CAR ENTERTAINMENT.
adresaţi-vă unui
• IlSeestrecomandă
recommandé
de connecter
des enceintes
avec une
de plus dede50peste
W (les
arrière
•
conectarea
aparatului
la difuzoare
cupuissance
o putere maximă
50enceintes
W (atât în
spate
etcât
lesşienceintes
avant,
avec une de
impédance
comprise
entreputerea
4 Ω et 8maximă
Ω). Si laapuissance
maximum
estmică
în faţă, cu
o impedanţă
4 până la
8 Ω). Dacă
difuzoarelor
este mai
inférieure
à 50 W, changez
éviter
d’endommager
vos enceintes(vezi
(voirpagina
page 1717
dudin
de 50 W, schimbaţi
setarea“AMP
“AMPGAIN”
GAIN” pour
pentru
a evita
defectarea difuzoarelor
MANUEL
D’INSTRUCTIONS).
INSTRUCŢIUNI).
• Pour
éviter
les court-circuits,
couvrir
lescircuit,
bornesînfăşuraţi
des fils quicapetele
ne sont cablurilor
PAS UTILISÉS
avec de lacubande
•
Pentru
a evita
producerea unui
scurt
NEUTILIZATE
bandă
isolante.
izolatoare.
• Le
dissipateur
deradiatorul
chaleur devient
très chaud
après
usage.
Faire attention
ne pas leatunci
toucher
en retirant
•
După
utilizare,
de căldură
devine
foarte
fierbinte.
Evitaţi să-ldeatingeţi
când
scoateţi
cet
appareil.
aparatul.
Heat sink
Radiator de de
căldură
Dissipateur
chaleur
PRECAUTIONS on power supply and speaker connections:
PRECAUTIONS
sursursa
l’alimentation
et la şi
connexion
des enceintes:
PRECAUŢII
privind
de alimentare
cablurile difuzoarelor:
• DO NOT connect the speaker leads of the power cord to the car battery; otherwise, the unit
will be seriously damaged.
• BEFORE connecting the speaker leads of the power cord to the speakers, check the speaker wiring in
your car.
•
NUCONNECTEZ
conectaţi cablurile
de alimentare
difuzoarelor
la bateria autovehiculului.
În caz
• NE
PAS les fils
d’enceintesadu
cordon d’alimentation
à la batterie; sinon,
l’appareil
serait sérieusement
endommagé.
contrar aparatul
va suferi defecţiuni
grave.
• AVANT
les firelor
fils d’enceintes
du cordon
d’alimentation
auxcablurile
enceintes,
vérifiezinstalate
le câblageîndes
•
ÎNAINTEde
deconnecter
conectarea
de alimentare
la difuzoare,
verificaţi
acestora
enceintes
de votre voiture.
autovehicul.
Parts list for installation and connection
Lista
necesare
pentru instalare
şi conectare
Liste de
despiese
pièces
pour l’installation
et raccordement
Pentru
acest
echipament
sunt furnizate
piese. Dacă
dintre
ele lipseşte,
Les pièces
suivantes
sont fournies
avec ceturmătoarele
appareil. Si quelque
choseoricare
manquait,
consultez
votreadresaţi-vă
revendeur
imediat
dealer-ului
JVC IN-CAR ENTERTAINMENT.
autoradio
JVC immédiatement.
The following parts are provided for this unit. If any item is missing, consult your JVC IN-CAR
ENTERTAINMENT dealer immediately.
A/B
Hard case/Control panel
Cutie
transport/Panou
de
Etui de
transport/Panneau
comandă
de commande
C
Sleeve
Cutie
de
Manchon
montare
E
Power cord
Cablu
alimentare
Cordonded’alimentation
I
Rubber cushion
Tampon
de cauciuc
Amortisseur
en caoutchouc
D
Trim plate
Placă
asamblare
Plaqueded’assemblage
F
Washer (ø5)
Şaibă
(ø5)(ø5)
Rondelle
G
Lock nut (M5)
Piuliţă
de blocare
Ecrou d’arrêt
(M5)(M5)
J
Handles
Mânere
Poignées
K
Remote controller
Telecomandă
Télécommande
1
H
Mounting bolt (M5 × 20 mm)
Şurub de
(M5 (M5
× 20×mm)
Boulon
defixare
montage
20 mm)
L
Battery
Baterie
Pile
INSTALLATION (IN-DASH MOUNTING)
INSTALARE (MONTARE
BORD)
INSTALLATION
(MONTAGEÎNDANS
LE TABLEAU DE BORD)
The following illustration shows a typical installation. If you have any questions or require information
regarding installation kits, consult your JVC IN-CAR ENTERTAINMENT dealer or a company supplying
kits.
• If you are not sure how to install this unit correctly, have it installed by a qualified technician.
L’illustration
suivante ilustrează
est un exemple
d’installation
Si vousDacă
avez aveţi
des questions
avez
besoin
Următoarea imagine
o modalitate
tipicătypique.
de instalare.
întrebăriou
sau
aveţi
nevoie
d’information
sur des kitslad’installation,
consulteradresaţi-vă
votre revendeur
JVC ouENTERTAINMENT
une compagnie
de informaţii referitoare
kit-urile de instalare,
unuid’autoradios
dealer JVC IN-CAR
d’approvisionnement.
sau firmei care furnizează kit-urile.
• Dacă
Si l’onnun’est
pas sûr
decă
pouvoir
correctement
cetmod
appareil,
le apelaţi
faire installer
par un technicien
sunteţi
sigur
puteţiinstaller
instala acest
aparat în
corect,
la un tehnician
autorizat.
qualifié.
Do the required electrical connections.
Realizaţiles
conexiunile
necesare.
Réalisez
connexionselectrice
électriques.
Bend the appropriate tabs to hold the
sleeve firmly in place.
Pentru ales
fixalanguettes
ferm cutia appropriées
de montare îndoiţi
Tordez
clemele
corespunzătoare.
pour
maintenir
le manchon en place.
Removing the unit
Scoaterea
Retrait deaparatului
l’appareil
Before removing the unit, release the rear section.
Înainte
deretirer
a îndepărta
echipamentul,
eliberaţi
secţiunea posterioară.
Avant de
l’appareil,
libérer la section
arrière.
Insert the two handles, then pull them as
illustrated so that the unit can be removed.
Introduceţi
cele poignées,
două mânere,
apoide
tregeţi-le
Insérez les deux
puis tirez
la façondupă
cum
se poate
observa
în imagine,
illustrée
de façon
à retirer
l’appareil.astfel încât aparatul
să poată fi îndepărtat.
Utilizarea
bridei
When using the optional stay / Lors
de l’utilisation
du
de
fixare
opţională
hauban en option
Fire wall
PereteCloison
ignifug
Stay (option)
Brida
de fixare
Hauban
(en option)
(opţional)
instalarea
aparatului
When installing the unit without using the sleeve / La
Lors
de l’installation
de l’appareil
fără
cutia
de
montare
scans utiliser de manchon
In a Toyota car for example, first remove the car radio and install the unit in its place.
În cazul
autovehicul
Toyota,
de exemplu,
mai întâi
scoateţi et
aparatul
al maşinii
şi instalaţi-l pe acesta în locul său.
Dans
uneunui
voiture
Toyota, par
exemple,
retirez d’abord
l’autoradio
installezradio
l’appareil
à sa place.
Flat type screws (M5 × 8 mm)*2
Şuruburi
cap(M5
plat×(M5x
8 mm)*
Vis à têtecu
plate
8 mm)
*2 2
Dashboard
Tablou
Tableaudedebord
bord
Bracket*2
Suport
Support*2*2
Screw (option)
Vis (en(opţional)
option)
Şurub
Flat type screws (M5 × 8 mm)*2
Şuruburi
cap(M5
plat×(M5x
8 mm)
*2 *2
Vis à têtecu
plate
8 mm)
Pocket
Fantă
Poche
Bracket*2
Suport
Support*2*2
Install the unit at an angle of less than
30˚.
Instalaţi
astfel
încât
formeze
Installezaparatul
l’appareil
avec
unsă
angle
de un
unghi
mic de 30˚ faţă de orizontală.
moinsmai
de 30˚.
: When installing the unit on the mounting bracket, make sure to use the 8 mm-long screws. If longer screws
are used, they could damage the unit.
Observaţie
instalaţi
aparatul
suportul
şuruburi
cu od’utiliser
lungimedes
devis
8 mm.
utilizaţi
Remarque : când
Lors de
l’installation
de pe
l’appareil
surdelemontare,
support deutilizaţi
montage,
s’assurer
d’uneDacă
longueur
de
şuruburi
lungi,
aparatul.
8 mm. Si mai
des vis
plusacestea
longuespot
sontdefecta
utilisées,
elles peuvent endommager l’appareil.
Note
ţineţivous
aparatul
vertical,
asiguraţi-vă
că nufaire
deterioraţi
siguranţa
partea posterioară.
* Când
Lorsque
mettez
l’appareil
à la verticale,
attention
de ne pasdin
endommager
le fusible situé sur l’arrière.
suntfourni
incluse.
*2NuNon
avec cet autoradio.
*1 1
*1 When you stand the unit, be careful not to damage the fuse on the rear.
*2 Not supplied for this unit.
*2
TROUBLESHOOTING
ÎNDRUMAR
DE DEPANARE
EN CAS DE DIFFICULTES
•• Le
fusible saute.
Siguranţa
se arde.
** Les
filsconectate
rouge et noir
sont-ils
correctement?
Sunt
corect
fireleracordés
roşii şi negre?
• The fuse blows.
* Are the red and black leads connected correctly?
• Nu se realizează alimentarea.
• L’appareil ne peut pas être mise sous tension.
* Este conectat firul galben?
* Le fil jaune est-elle raccordée?
• Difuzoarele nu funcţionează.
•* Pas
son des enceintes.
Suntdescurtcircuitate
firele de ieşire ale difuzoarelor?
* Le fil de sortie d’enceinte est-il court-circuité?
• Sunetul este distorsionat.
Este
legat
masă firul de ieşire al difuzorului?
•* Le
son
est la
déformé.
Aufilmasă
comună
bornele
„ –à“ale
difuzoarelor L şi R?
** Le
de sortie
d’enceinte
est-il
la masse?
• Power cannot be turned on.
* Is the yellow lead connected?
• No sound from the speakers.
* Is the speaker output lead short-circuited?
• Sound is distorted.
* Is the speaker output lead grounded?
* Are the “–” terminals of L and R speakers grounded in common?
Apar
interferenţe.
*• Les
bornes
“–” des enceintes gauche et droit sont-elles mises ensemble à la masse?
* Borna de masă din spate este conectată la caroseria autovehiculului cu ajutorul unor cabluri mai
• Interférence
avec les sons.
scurte şi mai groase?
* La prise arrière de mise à la terre est-elle connectée au châssis de la voiture avec un cordon court et épais?
• Aparatul se încălzeşte.
Este legat la
masă firul
de ieşire al difuzorului?
•* L’appareil
devient
chaud.
Aufilmasă
comună
bornele
„ –à“ la
alemasse?
difuzoarelor L şi R?
** Le
de sortie
d’enceinte
est-il
• Noise interfere with sounds.
* Is the rear ground terminal connected to the car’s chassis using shorter and thicker cords?
• This unit becomes hot.
* Is the speaker output lead grounded?
* Are the “–” terminals of L and R speakers grounded in common?
• This unit does not work at all.
* Have you reset your unit?
2
*• Les
bornes “–”
enceintes gauche
et droit sont-elles mises ensemble à la masse?
Aparatul
nu des
funcţionează
deloc.
* Aţi resetat aparatul?
• Cet appareil ne fonctionne pas du tout.
* Avez-vous réinitialisé votre appareil?
ROMÂNĂ
FRANÇAIS
FRANÇAIS
FRANÇAIS
FRANÇAIS
FRANÇAIS
FRANÇAIS
ENGLISH
ENGLISH
ENGLISH
ENGLISH
ENGLISH
ENGLISH
CONEXIUNI
ELECTRICE
ELECTRICAL
CONNECTIONS
RACCORDEMENTS
ELECTRIQUES
ELECTRICAL
ELECTRICAL
CONNECTIONS
CONNECTIONS
RACCORDEMENTS
RACCORDEMENTS
ELECTRIQUES
ELECTRIQUES
ELECTRICAL
CONNECTIONS
RACCORDEMENTS
ELECTRIQUES
ELECTRICAL
CONNECTIONS
RACCORDEMENTS
ELECTRIQUES
ENGLISH
FRANÇAIS
your
car is
iswith
equipped
with
the ISO
ISO For
For
some
VW/Audi
or Opel
Opelautomobile
(Vauxhall)
automobile
/ Pour
Pour
certaine
voiture
VW/Audi
ou Opel
Opel
Pentru
autovehicule
VW/Audi
sau ou
IfIfequipped
your
car
equipped
with
For
some
or
(Vauxhall)
automobile
/unele
certaine
voiture
VW/Audi
IfIfyour
your
car
is
isequipped
equipped
with
with
the
the
ISO
ISO the
For
For
some
some
VW/Audi
VW/Audi
or
orOpel
Opel
(Vauxhall)
(Vauxhall)
automobile
automobile
/ /Pour
Pour
certaine
certaine
voiture
voiture
VW/Audi
VW/Audi
ou
ou
Opel
Opel
carcar
is
the
ISO
some
VW/Audi
orVW/Audi
Opel
(Vauxhall)
/ Pour
certaine
voiture
VW/Audi
ou
Opel
A
A
A AAIfAyour
If your car
is equipped with
the ISO
For some VW/Audi or Opel (Vauxhall)
automobile / Pour certaine
voiture VW/Audi ou Opel
CONNECTIONS
RACCORDEMENTS
ELECTRIQUES
Opel
(Vauxhall)
connector
Si votre
votre
voiture
est équippée
équippée
(Vauxhall)
//voiture
Si
voiture
est
(Vauxhall)
connector
connector
/ /Si
Sivotre
votre
voiture
est
est
équippée
équippée
(Vauxhall)
(Vauxhall)
Dacă
autovehiculul
este
connector
/connector
SiELECTRICAL
votre
voiture
est
équippée
(Vauxhall)
connector / Si votre voiture est équippée
(Vauxhall)
dotat
cud’un
un conector
You
may
need
to
modify
wiring
ofpower
the
supplied
power
cordas
asillustrated.
illustrated.
may
need
to
modify
of
the
supplied
cord
You
may
need
need
totomodify
modify
the
the
wiring
wiring
ofofthe
the
thewiring
supplied
supplied
power
cord
cord
aspower
as
illustrated.
illustrated.
YouYou
maymay
need
toYou
modify
the
wiring
of the
supplied
power
cord
as illustrated.
d’un
connecteur
ISO
connecteur
d’un
d’un
connecteur
connecteur
ISO
ISOISO ISO
d’un
connecteur
ISO
Youyour
may
to modify
the
wiring
of
the
supplied
power
cord
as
illustrated.
d’un connecteur
ISO car is equipped with the
Ifillustrated.
your
ISO
For
some
VW/Audi
orthis
Opel
(Vauxhall)
• Contact
Contact
your
authorized
car
dealer
before
installing
this
unit. automobile / Pour certaine voiture VW/Audi ou
•need
your
authorized
car
dealer
before
installing
this
unit.
• •Contact
Contact
your
your
authorized
authorized
car
dealer
dealer
before
before
installing
installing
this
unit.
unit.
• Contact
authorized
carcar
dealer
before
installing
this
unit.
Connect
theISO
ISO
connectors
asillustrated.
illustrated.
•• ISO
Connect
the
as
• •Connect
Connect
the
ISO
connectors
connectors
asconnectors
as
illustrated.
illustrated.
• Connect
thethe
ISO
connectors
as
• Contact
youraurrez
authorized
car
dealer
installing
this
unit.
Poate
fi necesară
modificarea
instalaţiei
cablului
de
alimentare
conform
imaginii.
Vous
aurrez
peut-être
besoin
de
modifier
lecordon
câblage
dufurnizat,
cordonfourni
d’alimentation
fourni
comme
montrésur
surl’illustration.
l’illustration.
Vous
peut-être
besoin
de
modifier
câblage
du
cordon
d’alimentation
fourni
comme
montré
Vous
Vous
aurrez
aurrez
peut-être
peut-être
besoin
besoin
dede
modifier
modifier
lebefore
le
câblage
câblage
du
dule
cordon
d’alimentation
d’alimentation
fourni
fourni
comme
comme
montré
montré
sur
surl’illustration.
l’illustration.
aurrez
peut-être
besoin
de
modifier
le câblage
du
cordon
d’alimentation
comme
montré
sur
l’illustration.
• Connect
the
ISO
as montré
illustrated.
connector
/comme
Si
votre
voiture
estVous
équippée
(Vauxhall)
Legaţi
conectorii
ISOconnectors
ca
imagine.
Connectez
lesîn
connecteurs
ISOsur
comme
montré
surl’illustration.
l’illustration.
••les
Connectez
les
connecteurs
ISO
montré
sur
• •Connectez
Connectez
les
connecteurs
connecteurs
ISO
ISO
comme
comme
montré
montré
sur
sur
l’illustration.
l’illustration.
• Connectez
les
connecteurs
ISO
comme
l’illustration.
Vous aurrez
peut-être
besoin
de modifier
leavant
câblage
du
cordon
d’alimentation
fourni comme montré sur l’illustration.
devotre
instala
acest
aparat
contactaţi
unavant
dealer
autorizat
ald’installer
autovehiculului.
Contactez
votre
revendeur
automobile
autorisé
avant
d’installer
l’appareil.
••avotre
Contactez
votre
revendeur
automobile
autorisé
avant
l’appareil.
• •Înainte
•Contactez
Contactez
revendeur
revendeur
automobile
automobile
autorisé
autorisé
avant
d’installer
d’installer
l’appareil.
l’appareil.
• Contactez
votre
revendeur
automobile
autorisé
d’installer
l’appareil.
• Connectez les connecteurs ISO comme montré sur l’illustration.
You
may
need
to
modify
the
wiring
of
the
supplied
power
cord
as
illustrated.
d’un connecteur ISO
• Contactez votre revendeur automobile autorisé avant d’installer l’appareil.
• original
Contact
your
authorized car dealer before
installing
this
unit.
Original
wiring
Câblage
original
Original
wiring
//Câblage
original
Original
Original
wiring
wiring
/ Câblage
/ Instalaţie
Câblage
original
electrică
originală
Modified
wiring
1
Câblage
modifié1
1
Original
wiring
/ Câblage
original
Modified
wiring
1
//Câblage
modifié
Modified
Modified
wiring
wiring
1/ Câblage
/ Instalaţie
Câblage
modifié
modifié
11modificată
electrică
Modified
wiring
1
/1
Câblage
modifié
1
• Connect the ISO connectors
as illustrated.
Fromthe
thecar
carbody
body Original wiring / Câblage
From
From
From
thecar
carbody
body
From
the the
car
body
original
Modified
wiringd’alimentation
1 / Câblage modifié
1 comme montré sur l’illustration.
Vous
aurrez
peut-être
besoin
de
modifier
le
câblage
du
cordon
fourni
• Connectez les connecteurs
ISO
comme
montré
sur
l’illustration.
From
the
car
body
De
la
caroserie
De
la
carrosserie
de
la
De
la
carrosserie
de
la
De
De
la
la
carrosserie
carrosserie
de
de
la
la
De la carrosserie de la
• Contactez votre revendeur automobile autorisé avant d’installer l’appareil.
De la carrosserie de la
A
A
C
E
G
A
BA BB
A
C
DC D D
C
E
FE F F
E
G
HG H H
G
B
D
F
AA
BB
CC
DD
EE
FF
GG
HH
H
voiture
voiture
voiture
voiture
A
B
C
D
E
F
voiture
voiture
Original wiring / Câblage original
From the car body
ISO
connector
ISO
ISO
connector
connector
ISO
connector
DeISO
la
carrosserie
de
laconnector
ISO ISO
connector
Conector
ISO
ConnecteurISO
ISO
Connecteur
Connecteur
Connecteur
ISO
ISO
Connecteur
voiture
Connecteur ISO
ISO connector
Connecteur ISO
G
Hconnector
ISO
connector
of
the
supplied
powercord
cord
ISO
connector
of
the
supplied
ISOconnector
ofofthe
the
supplied
supplied
power
power
cord
cord power
ISOISO
connector
of the
supplied
power
cord
ISO ISO
connector
ofcordon
the
supplied
power
cordd’alimentation
Conectorul
ISO
alpour
de
alimentare
Connecteur
ISO
pour
cordon
d’alimentation
Connecteur
ISO
pour
lelecordon
Connecteur
Connecteur
ISO
ISO
pour
le
lecordon
cordon
d’alimentation
d’alimentation
Connecteur
pour
lecablului
d’alimentation
Connecteurfourni
ISO pour le cordon d’alimentation
furnizat
fourni
fourni
fourni
fourni
L
MM NN
M
fourni
N
OO PP
O
ISO connector of the supplied power cord
J
I
P
Y: R:
Yellow
R: Red
Red
Yellow
R:
Y:Yellow
Yellow Y:
R:
R:Red
Red
Connecteur ISO pour le cordon d’alimentation
Y: Y:
Yellow
Red
L
K
Y:
Yellow Jaune
R:Rouge
Red
G: Jaune
Galben
R: Rouge
Roşu
Jaune
Rouge
Rouge
Jaune
fourni
Jaune
Rouge
View
from
thelead
lead
side
View
from
View
View
from
from
the
lead
leadside
side the
M side
N
View
from
the the
lead
side
Jaune
Rouge
View
from
the
Vedere
dinspre
conector
Vue
àdes
partir
ducôté
côté
des
fils
Vue
àlead
partir
à àpartir
partir
dudu
côté
côté
desside
fils
filsdu
VueVue
àVue
partir
du
côté
des
fils
O des
P fils
Vue à partir du côté des fils
Y: Yellow
R: Red
Jaune
Rouge
View from the lead side
Vue à partir du côté des fils
I
K
JI I J J
I
K
LK LL
K
M
M
N
N
N
M
O
PO P P
O
J
II
JJ
KK
LL
Modified wiring 1 / Câblage modifié 1
Use
modified
wiring
2ififnot
theturn
unit
does
notturn
turnon.
on.
Use
wiring
2
the
unit
does
Usemodified
modified
wiring
wiring
2ififthe
the
unit
unitdoes
does
not
turnon.
on. not
UseUse
modified
wiring
2modified
if2the
unit
does
not
turn
on.
Use
wiring
2
ifmodificată
unitnedoes
not
turn
on.
Utilizaţi
electrică
dacă
aparatul
nu
începe
să
Utilisez
lecâblage
câblage
modifié
2ne
sise
l’appareil
nese
se
met
passous
soustension.
tension.
Utilisez
le
modifié
2
si
l’appareil
ne
met
pas
Utilisez
Utilisez
lemodified
leinstalaţia
câblage
câblage
modifié
modifié
sithe
sil’appareil
l’appareil
ne
se
met
met
pas
pas
sous
sous
tension.
tension.
Utilisez
le câblage
modifié
2
si22
l’appareil
se
met
pas
sous
tension.
Utilisez le câblage modifié 2 si l’appareil ne se met pas sous tension.
funcţioneze.
Use modified wiring 2 if the unit does not turn on.
Modified
wiring
2
Câblage
modifié2
2 si l’appareil ne se met pas sous tension
Modified
wiring
2
/le/Câblage
modifié
Modified
Modified
wiring
wiring
2/ Câblage
/ Instalaţia
Câblage
modifié
modifié
22modificată
electrică
Utilisez
câblage
modifié
2
Modified
wiring
2
/2
Câblage
modifié
2
Modified wiring 2 / Câblage modifié 2
Modified wiring 2 / Câblage modifié 2
Connections
without
using
the ISO
ISO connectors
connectors
Connexions
sans
l’utilisation
des connecteurs
connecteurs
ISO
without
using
the
// Connexions
sans
l’utilisation
des
ISO
Connections
Connections
without
without
using
using
the
the
ISO
ISO
connectors
connectors
/ /Connexions
Connexions
sans
sans
l’utilisation
l’utilisation
des
des
connecteurs
connecteurs
ISO
ISO
Conexiuni
realizate
fără
utilizarea
conectorilor
ISO
BB Connections
without
using
the
ISO
connectors
/ Connexions
sans
l’utilisation
des
connecteurs
ISO
B BBConnections
without using the ISO connectors / Connexions sans l’utilisation des connecteurs ISO
B Connections
Before
connecting:
Check
the
wiring
in
thevehicle
vehicle
carefully.
Incorrect
connection
maycause
cause
serious
Avantde
de
commencer
la
connexion:
Vérifiez
attentivement
levéhicule.
câblage
du
véhicule.
Uneconnexion
connexion
Before
connecting:
Check
in
the
carefully.
Incorrect
connection
may
serious
Avant
la
connexion:
Vérifiez
câblage
du
véhicule.
Une
Before
Before
connecting:
connecting:
Check
Check
thewiring
wiring
ininthe
thewiring
vehicle
vehicle
carefully.
carefully.
Incorrect
Incorrect
connection
connection
may
cause
cause
serious
serious
Avant
Avant
de
commencer
commencer
lala
connexion:
connexion:
Vérifiez
Vérifiez
attentivement
attentivement
lelecâblage
câblage
dule
véhicule.
Une
Une
connexion
connexion
Înainte
de
conectare:
verificaţi
cuVérifiez
atenţie
instalaţia
electrică
din
autovehicul.
Realizarea
incorectă
a
Before
connecting:
Check
thethe
wiring
in the
vehicle
carefully.
Incorrect
connection
maymay
cause
serious
Avant
de de
commencer
la commencer
connexion:
attentivement
le attentivement
câblage
du du
véhicule.
Une
connexion
Before
connecting:
Check
Avant
de
commencer
la
connexion:
Vérifiez
attentivement
damage
tothis
this
unit.the wiring in the vehicle carefully. Incorrect connection may cause serious
incorrecte
peut
endommager
sérieusement
l’appareil.
damage
unit.
incorrecte
endommager
sérieusement
l’appareil.
damage
damage
totothis
this
unit.
unit.to
incorrecte
incorrecte
peut
endommager
endommager
sérieusement
sérieusement
l’appareil.
l’appareil.
conexiunii
poate
ducepeut
lasérieusement
deteriorarea
gravă
a acestui
aparat. le câblage du véhicule. Une connexion
damage
to this
unit.
incorrecte
peutpeut
endommager
l’appareil.
damage
to
this
unit.
incorrecte
peut
endommager
Connections
without
using
the
ISO
connectors
/ Connexions
sans
l’utilisation
des
connecteurs
ISO
The
leads
ofcord
theand
power
cord
and
those
of
the
connector
from
the
car
body
may
becolor.
different
incolor.
color.
Le
fild’alimentation
ducordon
cordonetd’alimentation
d’alimentation
etl’appareil.
ceuxdu
desde
connecteurs
du
châssis
de
laêtre
voiture
peuvent
être
différentsen
en
The
leads
of
the
power
cord
and
those
of
the
connector
body
may
be
different
in
Le
fil
du
et
ceux
des
connecteurs
du
châssis
de
la
voiture
peuvent
The
leads
leads
ofof
the
the
power
power
cord
and
those
those
ofofthe
theconnector
connector
from
from
the
thecar
carfrom
body
body
may
may
bebe
different
different
in
in
color.
Le
Le
fil
fildu
du
cordon
cordon
d’alimentation
et
ceux
ceux
des
des
connecteurs
connecteurs
du
du
châssis
dede
la
lavoiture
voiture
peuvent
peuvent
être
êtredifférents
différents
enendifférents
Firele
cablului
de
alimentare
şietsérieusement
cele
ale
conectorului
lachâssis
maşină
pot
avea
culori
diferite.
TheThe
leads
of the
power
cord
and
those
of
the
connector
from
the
car
body
maythe
becar
different
in color.
Le
fil
du
cordon
d’alimentation
ceux
des
connecteurs
châssis
de la
voiture
peuvent
différents
enêtre
The leads of the power cord and those of the connector from the car body may be different in color. couleur.
Le fil du cordon
d’alimentation et ceux des connecteurs du châssis de la voiture peuvent être différents en
couleur.
couleur.
couleur.
couleur.
connecting: Check the wiring in the vehicle carefully. Incorrect connection may
cause serious
de commencer
la connexion: Vérifiez attentivement le câblage du véhicule. Une conne
Cut
theBefore
ISOconnector.
connector.
11 connector.
Cut
the
ISO
1 Cut
Cutthe
theISO
ISO
connector.
1 couleur.
Întrerupeţi
legăturaAvant
conectorului
ISO.
ISO
connector.
1 1Cut
the ISO connector.
1theCut
damage to this unit.
incorrecte
peutISO.
endommager sérieusement l’appareil.
1
Coupez
connecteur
ISO.
Coupez
lele
connecteur
1
1
Coupez
Coupez
lele1
connecteur
connecteur
ISO.
ISO.
1
Coupez
le connecteur
ISO.
Connect
the
colored
leads
ofcord
the
power
cord
in
the
order
specified
inbelow.
thebelow.
illustration
below.
Connect
the
colored
leads
of
the
cord
in
order
specified
in
the
illustration
below.
22thecolored
Connect
colored
leads
leads
ofofthe
the
power
power
cord
inpower
in
the
the
order
order
specified
specified
ininthe
the
illustration
illustration
below.
2 Connect
2 1Conectaţi
firele
colorate
ale
de alimentareetînceux
ordinea
indicată în imaginea
jos. peuvent être diffé
2 2Connect
thethe
colored
leads
ofleads
the
power
cord
in
the
order
specified
in
the
illustration
Coupez
le connecteur
The
of the
the
power
cord
and
ofthe
the
connector
the
car
body may
be different
in color.
Le filISO.
du cablului
cordon d’alimentation
des connecteurs
du châssis de
de mai
la voiture
the colored
leads of
power
cord
in
thethose
order
specified
in thefrom
illustration
below.
2 Connect
2
Connectez
les
fils
colorés
ducordon
cordon
d’alimentation
dans
l’ordre
spécifiéci-dessous.
surci-dessous.
l’illustrationci-dessous.
ci-dessous.
2
Connectez
les
fils
colorés
du
d’alimentation
dans
spécifié
sur
l’illustration
2
2
Connectez
Connectez
les
lescolorés
fils
filscolorés
colorés
du
ducordon
cordon
d’alimentation
d’alimentation
dans
dans
l’ordre
l’ordre
spécifié
spécifié
sur
surl’illustration
l’illustration
ci-dessous.
2
Connectez
les fils
du
cordon
d’alimentation
dans
l’ordre
spécifié
surl’ordre
l’illustration
couleur.
Connect
the
aerial
cord.
3
3
Connect
the
aerial
cord.
3
Conectaţi
cablul
antenei.
3
3
Connect
Connect
the
the
aerial
aerial
cord.
cord.
the aerial cord.1 Cut the ISO connector.
3 Connect
2 Connectez les fils colorés du cordon d’alimentation dans l’ordre spécifié sur l’illustration ci-dessous.
the aerial cord.
3 Connect
3leleConnectez
Connectez
cordon
d’antenne. ISO.
lelecordon
Connectez
cordon
cordon
d’antenne.
3 Connectez
3 3Connectez
le 3
cordon
d’antenne.
1d’antenne.
Coupez
le d’antenne.
connecteur
Finally
theto
wiring
harness
tothe
theunit.
unit.
4
final,
conectaţi
cablurile
la aparat.
44 the
Finally
connect
the
wiring
harness
4 Finally
Finally
connect
connect
the
thewiring
wiring
harness
harness
toto
the
the
unit.
unit. to
4 4Finally
connect
wiring
harness
the
unit.
Connectez
le cordon
d’antenne.
3La
2connect
Connect
the
colored
below.
4 Finally
connect the
wiring
harness
to the leads
unit. of the power cord in the order specified in the illustration
Finalement,
connectez
faisceau
decordon
filsààl’appareil.
l’appareil.
4
Finalement,
connectez
lele
faisceau
de
fils
4
Finalement,
Finalement,
connectez
connectez
le
le
faisceau
faisceau
de
fils
ààl’appareil.
l’appareil.
4
4
connectez le2faisceau
de fils
àfils
l’appareil.
4 Finalement,
Connectez
lesde
fils
du
d’alimentation dans l’ordre spécifié sur l’illustration ci-dessous.
4 Finalement,
connectez
le faisceau
de colorés
fils à l’appareil.
3 Connect the aerial cord.
Tosteering
steering
wheel
remote
controller
(see
diagramle cordon
))
To
wheel
remote
controller
) ) diagram
To
Tosteering
steering
wheel
wheel
remote
remote
controller
controller
(see
(see
diagram
diagram
3) (see
Connectez
d’antenne.
To steering
wheel
remote
controller
(see
diagram
4 components
Finally
the
wiring
to the unit.
steering
wheel
remote
controller
(see
diagram
Toconnect
external
components
(see
diagram
To
external
components
(see
))
To
Toexternal
external
components
components
(see
diagram
diagram
) ) diagram
Pour
lapentru
télécommande
deleschema
volant
(voir
diagramme
Către
telecomanda
volan
)) lele)diagramme
))
Pour
la
télécommande
de
volant
(voir
))
Pour
Pour
lala
télécommande
télécommande
de
devolant
volant
(voir
(voir
le
diagramme
diagramme
To external
(see(see
diagram
) harness
Pour
la To
télécommande
de
volant
(voir
le(vezi
diagramme
To
external
components
(see
diagram
)
Finalement,
connectez
le faisceau de fils à l’appareil.
4
Pour la télécommande de volant (voir le diagramme )
Către
componentele
externe
schema
Aux
appareils
extérieurs
(voir
diagramme
))
Aux
appareils
extérieurs
(voir
)
Auxappareils
appareils
extérieurs
extérieurs
(voir
(voir
le(vezi
lediagramme
diagramme
AuxAux
appareils
extérieurs
(voir
le diagramme
) lele)diagramme
B
Aux appareils extérieurs (voir le diagramme
)
To steering wheel remote controller (see diagram )
Rearground
groundterminal
terminal
Rear
Rear
Rearground
ground
terminal
terminal
terminal
To external components (see diagram ) Rear ground
Pour la télécommande de volant (voir le diagramme )
Rear
ground
terminal
Borne
arrièrede
demasse
masse
Borna
de
masă
spate
Borne
arrière
Borne
Borne
arrière
arrière
de
demasse
masse
Borne
arrière
de
masse
Aux appareils extérieurs (voir le diagramme )
Borne arrière de masse
15AAfuse
fuse Rear ground terminal
15
AAfuse
fuse
15 A1515
fuse
15 A
A1515
fuse
15AABorne arrière de masse
Fusible
Fusible
A15
A Fusible
Siguranţa
AFusible15
Fusible
15
Fusible 15 A
Aerialterminal
terminal
Aerial
Aerial
Aerial
terminal
terminal
Aerial
terminal
Lineout
out
(see
diagram ))
Line
Line
out(see
(seediagram
diagram
) ) diagram
LineLine
out out
(see
diagram
) (see
terminal
(see
diagram
Bornede
del’antenne
l’antenne
Mufă
ieşire
(vezi
schema
Borna
antenei
Borne
Borne
Borne
dede
l’antenne
l’antenne
Borne
deAerial
l’antenne
Sortie
deligne
ligne))
Sortie
de
Sortie
Sortie
de
deout
ligne
ligne
Sortie
deLine
ligne
Borne de l’antenne
Sortie
de ligne
(voir
diagramme
(voir
))
(voir
lelediagramme
diagramme
)
(voir(voir
le diagramme
) lele)diagramme
(voir le diagramme )
Aerial terminal
Line out (see diagram )
Black
Black
Black
Borne de l’antenne
Sortie de ligne
Negru
Black
Noir
(voir le diagramme )NoirNoir
Noir
15 A fuse
Fusible 15 A
Ignitionswitch
switch
Ignition
Ignition
Ignition
switch
switch
Ignition
switch
Ignition switch
Interrupteur
Comutatorul
Interrupteur
Interrupteur
Interrupteur
Interrupteur
Tochassis
metallic
body
orcar
chassis
ofthe
thecar
car
Interrupteur
To
metallic
or
chassis
To
Tometallic
metallic
body
body
or
orchassis
chassis
ofofthe
the
car of
To metallic
body
or
of body
the
car
de
contact d’allumage
d’allumage
d’allumage
d’allumage
d’allumage
To
metallic
body
or
chassis
of
the
car
Vers
corps
métallique
ou
châssisde
dela
lavoiture
voiture
Către
caroseria
metalică
sau
autovehiculului
d’allumage
Vers
métallique
châssis
Vers
corps
corps
métallique
métallique
ouou
châssis
châssis
dede
laou
la
voiture
voiture
VersVers
corps
métallique
oucorps
châssis
deşasiul
la
voiture
Vers corps métallique ou châssis de la voiture
Ignition switch
Black
Interrupteur
Noir
To metallic body or chassis of the car
d’allumage
Yellow**22To aTo
Yellow
Yellow
*2 *2*2 Yellow
Yellow
To
a
live
terminal
in
the
fuse
block
connecting
to
the
car
battery
(bypassing
To
a
live
terminal
in
the
fuse
block
connecting
to
the
car
battery
(bypassing
To
a
a
live
live
terminal
terminal
in
in
the
the
fuse
fuse
block
block
connecting
connecting
to
to
the
the
car
car
battery
battery
(bypassing
(bypassing
live terminal in the fuse block
connecting
to theoucar
battery
2
Vers corps
métallique
châssis
de (bypassing
la voiture
To
a switch)
liveswitch)
terminal
in the
fuse
block
connecting
Galben
Jaune**22 the the
Jaune
Jaune
*2*2*2 * Jaune
the
ignition
switch)
(constant
12V)
V) to the car battery (bypassing
Jaune
*2Yellow
the
ignition
switch)
(constant
12
theignition
ignition
switch)
(constant
(constant
1212V)
V)
ignition
(constant
12
V)
Jaune *2
theborne
ignition
12 V)
borna
sub
tensiune
asous
panoului
dedu
siguranţe
bateria
une
borne
sous
tension
du
porte-fusible
connectée
batteriede
dela
lavoiture
voiture
ÀÀswitch)
une
borne
tension
porte-fusible
connectée
ààlala
batterie
ÀCătre
Àune
une
borne
sous
tension
tension
dudu
porte-fusible
porte-fusible
connectée
connectée
àbatterie
àlalabatterie
batterie
de
lavoiture
voiture
À une
borne
soussous
tension
du(constant
porte-fusible
connectée
à laconectată
delalade
voiture
Àdérivant
unel’interrupteur
borne
sous
tension
du porte-fusible
connectée
àconstant)
la
batterie
de la voiture
autovehiculului
(ocolind
comutatorul
de
contact)
(12V
(en
dérivant
l’interrupteur
d’allumage)
(12
Vconstant)
constant)
(en
dérivant
l’interrupteur
d’allumage)
(12
V
(endérivant
l’interrupteur
l’interrupteur
d’allumage)
d’allumage)
(12
VVconstant)
constant)
(en (en
dérivant
d’allumage)
(12 (12
V
constant)
2
*
Yellow
To ad’allumage)
live terminal
inVthe
fuse block connecting to the car battery (bypassing
(en dérivant l’interrupteur
(12
constant)
Jaune *2
the ignition switch) (constant 12 V)
Red
Red
Red
RedRed
Fuseblock
block
block
block Fuse
block
À une borne sous tension du porte-fusible connectée à la batterieFuse
deFuse
laFuse
voiture
Red
Rouge To an
Roşu
Rouge
Rouge
Rouge
To
anaccessory
accessory
terminal
inthe
thefuse
fuseblock
block
Rouge
To
an
terminal
in
To
To
ananaccessory
accessory
terminal
terminal
ininthe
the
fuse
fuseblock
block
accessory
terminal
in the
block
Fusede
block
Porte-fusible
Tablou
siguranţe
Porte-fusible
Porte-fusible
Porte-fusible
Porte-fusible
(enfuse
dérivant
l’interrupteur
d’allumage) (12 V constant)
Rouge
To
an
accessory
terminal
in
the du
fuse
block de siguranţe
Către
o
bornă
suplimentară
situată
peporte-fusible
tabloul
Vers
borne
accessoire
du
porte-fusible
Vers
accessoire
Vers
borne
borne
accessoire
accessoire
duduporte-fusible
porte-fusible
VersVers
borne
accessoire
duborne
porte-fusible
Porte-fusible
Vers borne accessoire du porte-fusible
Red
Fuse block
Rouge
To an accessory terminal in the fuse block
Porte-fusible
Blue
withwhite
whitestripe
stripe
Blue
with
Blue
with
white
white
stripe
stripe
BlueBlue
withwith
white
stripe
Vers
borne
accessoire
du
porte-fusible
To
the
remote
leadof
ofor
other
equipment
or
power
aerial
any(200
(200mA
mAmax.)
max.)
the
remote
lead
other
equipment
or
aerial
ififmax.)
any
To
Tothe
theremote
remote
lead
lead
ofof
other
other
equipment
equipment
ororpower
power
aerial
aerial
ififpower
any
any(200
(200
mA
mA
max.)
Blue
with
white
stripe
remote
leadTo
of
other
equipment
power
aerial
if any
(200
mA
max.)
Albastru
cu
dungă
albăbande
Bleu
avec
bandeblanche
blanche To the
Bleu
avec
Bleu
avec
avec
bande
bande
blanche
blanche
BleuBleu
avec
bande
blanche
To
the
remote
lead
of
other
equipment
or
power
aerial
if
any
(200
mA
max.)
Către
telecomenzii
uni
aparat
extern
sau
antenei
automate,
înys’il
cazul
în
Aufil
filde
del’autre
télécommande
del’autre
l’autre
appareil
ou
l’antenne
automatique
s’ilyyen
enaaune
une
Au
de
télécommande
de
appareil
ou
ààl’antenne
automatique
filfil
defirul
detélécommande
télécommande
de
del’autre
l’autre
appareil
appareil
ouà àal’antenne
l’antenne
automatique
automatique
s’il
yayen
enacare
aune
unes’il
Bleu avec bande blanche
Au Au
filAu
de
télécommande
appareil
ou
àou
l’antenne
automatique
s’il
en
une
Au
filmax.)
de
télécommande
de l’autre appareil ou à l’antenne automatique s’il y en a une
acestea
există
(maxim
200mA)
(200
mAmax.)
max.)
(200
mA
(200
mA
mA
max.)
(200(200
mA
max.)
Blue with white stripe(200 mA max.)
To the remote lead of other equipment or power aerial if any (200 mA max.)
Bleu avec bande blanche
Orange
with
whitestripe
stripe
Orange
with
white
Orange
Orange
with
with
white
white
stripe
stripe
Orange with white stripe
Au fil de télécommande de l’autre appareil ou à l’antenne automatique s’il y en a une
Orange
with
white
stripe
Portocaliu
cu
dungă
albă
To
car
lightcontrol
controlswitch
switch
To
car
light
Orange
avec
bande
blanche
To
To
car
car
light
light
control
control
switch
switch
Orange
avec bande blanche
Orange
Orange
avecbande
bande
blanche
blanche
To car light(200
control
switch
Orange
avecavec
bande
blanche
mA
max.)
To
car light
control
switch
Orange avec bande blanche
l’interrupteur
d’éclairage
dela
lavoiture
voiture
comutatorul
de lumini
al
ÀÀd’éclairage
l’interrupteur
d’éclairage
ÀCătre
Àl’interrupteur
l’interrupteur
d’éclairage
la
lamaşinii
voiture
voiture de
À l’interrupteur
d’éclairage
de
ladede
voiture
À l’interrupteur d’éclairage de la voiture
Orange with white stripe
To car light control switch
Orange avec bande blanche
Brown
Brown
Brown
Brown
Brown
À l’interrupteur d’éclairage de la voiture
Brown Marron
Maro
Marron
Tocellular
cellular
phonesystem
system
Marron
Marron
To
To
Tocellular
cellular
phone
phone
system
systemphone
Marron
To cellular
phone
system
Marron
To
cellular
phone
system
Către
sistemul
telefonului
celular
À
un
système
detéléphone
téléphonecellulaire
cellulaire
À
un
système
de
À
À
un
un
système
système
de
de
téléphone
téléphone
cellulaire
cellulaire
À un système de téléphone cellulaire
À un système de téléphone cellulaire
Brown
Marron
To cellular phone system
À un système de téléphone cellulaire
White
withblack
blackstripe
stripe
White
with
White
White
with
black
black
stripe
stripe
White
White
White
withwith
black
stripe
White
White
with
black
stripe
Alb
cu
dungă
neagră
AlbWhite
Blanc
avec
bandenoire
noire
Blanc
avec
bande
Blanc
Blanc
avec
avec
bande
bande
noire
noire
Blanc
Blanc
Blanc
avec
bande
noire
Blanc
Blanc avec bande noire
Blanc
Black
Black
Noir
Noir
White
Gray
withblack
blackstripe
stripe
White
Gray
with
Gray
Gray
with
black
black
stripe
stripe
Gray
Gray
Gray
withwith
black
stripe
Gray
with
black
stripe
GriGray
cu
dungă
neagră
GriGray
Blanc
Gris
avec
bandenoire
noire
Blanc
Gris
avec
bande
Gris
Gris
avec
avec
bande
bande
noire
noire
Gris
Gris
avec
bande
noire
GrisGris
Gris avec bande noire
Gris
White with black stripe
White
Blanc avec bande noire
Blanc
Left
speaker
(front)
Left
speaker
(front)
Left
Left
speaker
speaker
(front)
(front)
Left speaker (front)
Left
speaker
(front)
Difuzor
stânga
(faţă)
Enceinte
gauche(avant)
(avant)
Enceinte
gauche
Enceinte
Enceinte
gauche
gauche
(avant)
(avant)
Enceinte
gauche
(avant)
Enceinte gauche (avant)
Gray
Green
withblack
blackstripe
stripe
Gray
Green
with
Green
Green
with
black
black
stripe
stripe
Green
Green
Green
withwith
black
stripe
Green
Green
with
black
stripe
Green
Verde
cubande
dungă
neagră
Verde
GrisVert
Vert
avec
bandenoire
noire
Gris
Vert
avec
bande
Vert
avec
avec
bande
noire
noire
Vert
Vert
avec
bande
noire
VertVert
Vert avec bande noire
Vert
Gray with black stripe
Gray
Gris avec bande noire
Gris
Right
speaker
(front)
Right
speaker
(front)
Right
Right
speaker
speaker
(front)
(front)
Right speaker (front)
Right
speaker
(front)
Enceinte
droit(avant)
(avant)
Enceinte
Enceinte
Enceinte
droit
droit
(avant)
(avant)
Difuzor
dreapta
(faţă)droit
Enceinte
droit
(avant)
Enceinte droit (avant)
Left speaker (front)
Enceinte gauche (avant)
Green
Purple
withblack
blackstripe
stripe
Green
Purple
with
Purple
Purple
with
black
black
stripe
stripe
Purple
Purple
Purple
withwith
black
stripe
Purple
Purple
with
black
stripe
Purple
Mov
cubande
dungă
neagră
Mov
Vert
Violet
avec
bandenoire
noire
Vert
Violet
avec
bande
Violet
Violet
avec
avec
bande
bande
noire
noire
Violet
Violet
Violet
avec
noire
Violet
Violet avec bande noire
Violet
Green with black stripe
Green
Vert avec bande noire
Vert
Left
speaker
(rear)
Left
speaker
(rear)
Left
Left
speaker
speaker
(rear)
(rear)
Left speaker (rear)
Left
speaker
(rear)
Difuzor
stânga
(spate)
Enceinte
gauche(arrière)
(arrière)
Enceinte
gauche
Enceinte
Enceinte
gauche
gauche
(arrière)
(arrière)
Enceinte
gauche
(arrière)
Enceinte gauche (arrière)
Right speaker (front)
Enceinte droit (avant)
Purple
Purple
Violet
Violet
Purple with black stripe
Purple
Violet avec bande noire
Violet
Right
speaker
(rear)
Right
speaker
(rear)
Right
Right
speaker
speaker
(rear)
(rear)
Right speaker (rear)
Right
speaker
(rear)
Difuzor
dreapta
(spate)
Enceinte
droit(arrière)
(arrière)
Enceinte
Enceinte
Enceinte
droit
droit
(arrière)
(arrière)droit
Enceinte
droit
(arrière)
Enceinte droit (arrière)
Left speaker (rear)
Enceinte gauche (arrière)
Right speaker (rear
Enceinte droit (arri
1*1Not
1*1Non
Not
supplied
forthis
thisunit.
unit.
*11cet
Non
fourni
aveccet
cetautoradio.
autoradio.
**11this
*avec
Not
supplied
Non
avec
Notsupplied
supplied
for
for
this
this
unit.
unit. for
Nonfourni
fourni
avec
cet
cetfourni
autoradio.
autoradio.
*1 *Not
supplied
for
unit.
*1 *Non
fourni
avec
autoradio.
*1
Nu
inclus.
1 Not supplied for this unit.
1 este
*Before
*Pour
Non
fourni
avec
cet autoradio.
22lele
2*2Before
2*2Pour
Before
checking
the
operation
ofinstallation,
this
unitprior
prior
to
installation,
this
leadmust
must
be
connected,
otherwise
power
*fonctionnement
Pour
vérifier
lefonctionnement
fonctionnement
deavant
cetappareil
appareil
avant
installation,
ce
fildoit
doitsinon
être
raccordé,
sinon
l’appareilne
nepeut
peut
**22the
*
Before
checking
the
operation
this
unit
installation,
this
lead
be
connected,
otherwise
Pour
vérifier
le
de
cet
avant
installation,
ce
fil
être
raccordé,
l’appareil
*Pour
checking
checking
the
theoperation
operation
of
ofthis
this
unit
unitprior
prior
to
toinstallation,
installation,
this
this
lead
leadmust
must
be
beconnected,
connected,
otherwise
otherwise
power
power
vérifier
vérifier
fonctionnement
fonctionnement
dedeappareil
cet
cetappareil
appareil
avant
installation,
installation,
fil
fildoit
doitêtre
êtreraccordé,
raccordé,
sinon
l’appareil
l’appareil
nenepeut
peut
*2 *Before
checking
operation
of this
unit
prior
toof
thisto
lead
must
be connected,
otherwise
power
*2power
vérifier
le
de
cet
avant
installation,
ce filcece
doit
être
raccordé,
sinon
l’appareil
nesinon
peut
*2
2
2
Acest
fir
trebuie
conectat
înainte
de
verificarea
funcţionării
aparatului.ceÎnfilcaz
aparatulsinon
nu poate
fi pornit.
*cannot
Before
checking
the
of this unit prior to installation, this lead must be connected, otherwise power
*pasêtre
Pour
vérifier
leêtre
fonctionnement
de
cet appareil
avant installation,
doitcontrar
être raccordé,
l’appareil
ne peut
cannot
beoperation
turnedon.
on.
pas
être
missous
soustension.
tension.
cannot
be
turned
pas
mis
cannot
bebeturned
turned
on.
on.
êtremis
missous
sous
tension.
tension.
cannot
be
turned
on.
pas pas
être
mis
sous
tension.
cannot be turned on.
pas être mis sous tension.
*1 Non fourni avec cet autoradio.
*2 Pour vérifier le fonctionnement de cet appareil avant installation, ce fil doit être raccordé, sinon l’appar
33
*1 Not supplied for this unit.
3 33
3
*2 Before checking the operation of this unit prior to installation, this lead must be connected, otherwise
power
C Connecting
C Connecting
the external
amplifier
/ Connexion
d’und’un
amplificateur
extérieur
Conectarea
unui
amplificator
extern
the external
amplifier
/ Connexion
amplificateur
extérieur
You can
connect
an amplifier
to upgrade
your car
stereo
system.
Vous pouvez
connecter
un amplificateur
pour
améliorer
votre système
autoradio.
You
can connect
an amplifier
to upgrade
your
car stereo
system.
Vous pouvez
connecter
un amplificateur
pour améliorer
votre
autoradio.
Pentru
a îmbunătăţi
sistemul
stereo
al autovehiculului
puteţisystème
instala
un amplificator extern.
• Connect
the remote
lead (blue
to the to
remote
lead oflead
the of
other
so thatsoit that it
• Connectez
le fil dele
commande
à distance
(bleucu
avec
bande
blanche)
autelecomenzii
fil de
à distance
deextern
• Connect
the remote
lead with
(bluewhite
with stripe)
white stripe)
the remote
the equipment
other equipment
• Connectez
fil de
commande
à distance
(bleu
avecalbă)
bande
blanche)
aucommande
fil de commande
à distance
de
•
Conectaţi
firul
telecomenzii
(albastru
dungă
la firul
echipamentului
can becan
controlled
through
this unit.
l’autrel’autre
appareil
de façon
être prin
commandé
via cet
appareil.
be controlled
through
this unit.
appareil
de qu’il
façon
qu’il puisse
être
commandé
via
cet aparat.
appareil.
astfel
încât
să poată
fi puisse
controlat
intermediul
acestui
• Disconnect
les enceintes
de cet
appareil
etşiconnectez-les
à l’amplificateur.
Laissez
lesutilizaţi
filsles fils
the speakers
from this
them to
theto
amplifier.
LeaveLeave
the speaker
leads of
• Disconnect
• Déconnectez
les
enceintes
de
appareil
et connectez-les
à l’amplificateur.
Laissez
the speakers
fromunit,
thisconnect
unit, connect
them
the amplifier.
the speaker
leads• ofDéconnectez
•
Deconectaţi
difuzoarele
de
lacet
aparat
conectaţi-le
la
amplificator.
Ulterior,
nu
în
d’enceintes
appareil
inutilisés.
this unit
d’enceintes
de
cet
appareil
inutilisés.
thisunused.
unit unused.
nici unde
altcet
scop
firele
pentru
difuzoare ale acestui aparat.
RemoteRemote
lead lead
Fil d’alimentation
à distance
Firul
telecomenzii
Fil d’alimentation
à distance
Y-connector
(not supplied
for thisfor
unit)
Y-connector
(not supplied
this unit)
Connecteur
Y (nonYYfourni
avec
cetavec
autoradio)
Conectorul
(nu
este
inclus)
Connecteur
(non
fourni
cet autoradio)
RemoteRemote
lead (blue
white
leadwith
(blue
withstripe)
white stripe)
Firuld’alimentation
telecomenzii
(albastru
cu
dungă
Fil d’alimentation
à distance
(bleu avec
bande
blanche)
Fil
à distance
(bleu
avecalbă)
bande blanche)
Rear speakers
Rear speakers
Enceintes
arrière arrière
Difuzoare
spate
Enceintes
To the To
remote
lead of lead
otherofequipment
or power
the remote
other equipment
or power
aerial ifaerial
any if any
Către
telecomenzii
unui
aparat
extern
sauà a
Au fil de
de l’autre
appareil
ou
à ou
Autélécommande
fil firul
de télécommande
de l’autre
appareil
antenei
automate,
cazul
acestea există
l’antenne
automatique
s’il în
y en
a une
l’antenne
automatique
s’il
yîn
encare
a une
JVC Amplifier
JVC Amplifier
JVC
JVCAmplificatorul
Amplificateur
JVC Amplificateur
Rear speakers
Rear speakers
Difuzoare
spate
Enceintes
arrière arrière
Enceintes
Front speakers
(see diagram
)
Front speakers
(see diagram
)
Difuzoare
faţăle(vezi
schema
Enceintes
avant (voir
diagramme
)
Enceintes
avant
(voir
le diagramme
)
to the
wheel
remote
controller
/ Connexion
de latelecomenzii
télécommande
de volant
to steering
the steering
wheel
remote
controller
/ Conectarea
Connexion
de
la télécommande
de volant
volanului
D Connecting
D Connecting
If yourIfcar
is equipped
with the
steering
wheel wheel
remoteremote
controller,
you can
operate
this unit
your
car is equipped
with
the steering
controller,
you
can operate
thisusing
unit the
using the
controller.
To do To
it, ado
JVC’s
OE remote
adapter
(not supplied)
whichwhich
matches
with your
is required.
controller.
it, a JVC’s
OE remote
adapter
(not supplied)
matches
withcar
your
car is required.
Consult
your JVC
ENTERTAINMENT
dealerdealer
for details.
Consult
yourIN-CAR
JVC IN-CAR
ENTERTAINMENT
for details.
În
care
autovehiculul
este dotat
cu telecomandă
pe
volan,
o puteţi
utiliza
şi pentru
a cet
comanda
aparat.
Si votre
voiture
est munie
d’une télécommande
de volant,
vous
pouvez
commander
cet autoradio
enacesten
Sicazul
votreînvoiture
est munie
d’une
télécommande
de volant,
vous
pouvez
commander
autoradio
În
acest
scop
este nevoiePour
de unlePour
adaptor
pentru
telecomanda
JVC (nuau
este
inclus)
care(non
să
fiefourni)
adecvat
utilisant
la télécommande.
faire,leun
adaptateur
pour volanului
télécommande
volant
JVC
utilisant
la télécommande.
faire,
un
adaptateur
pour télécommande
au volant
JVC
(non fourni)
autovehiculului.
correspondant
à votreàvoiture
est nécessaire.
Consultez
votre revendeur
d’autoradio
JVC pour
détails.
correspondant
votre voiture
est nécessaire.
Consultez
votre revendeur
d’autoradio
JVCles
pour
les détails.
Steering
wheel remote
input input
Steering
wheel remote
Entrée Intrare
de la télécommande
de
volant
telecomandă
volan
Entrée
de
la télécommande
de volant
OE remote
adapteradapter
(not supplied)
OE remote
(not supplied)
Adaptor
volan
(nuau
este
inclus)
Adaptateur
pourtelecomandă
télécommande
au volant
(non
fourni)
Adaptateur
pour télécommande
volant
(non fourni)
Pentru detalii adresaţi-vă unui dealer JVC IN-CAR ENTERTAINMENT.
Steering
wheel remote
controller
(equipped
in the car)
Steering
wheel remote
controller
(equipped
in the car)
Telecomandă
pe
dotarea
autovehiculului)
Télécommande
de volant
(installée
dans ladans
voiture)
Télécommande
devolan
volant(în(installée
la voiture)
E Connecting
the external
components
/ Connexion
des appareils
extérieurs
E Connecting
the external
components
/ Connexion
des
appareils
extérieurs
Conectarea
componentelor
externe
JVC CD
JVC DAB
tuner,
Apple
iPod,iPod,
or JVC
player
/ Changeur
de CD
tuner
DAB
JVC,
iPod
Apple
ousau
lecteur
D. JVC
CD changer
JVC,
tuner
DABDAB
JVC,
Apple
iPod
player
JVCchanger,
CD changer,
JVC DAB
tuner,
Apple
orD.
JVC
D. player
/ Changeur
deJVC,
CD JVC,
tuner
JVC,
iPod
Apple
ouD.lecteur
D.JVC
JVC
/ Choisissez
• Set “CHANGER”
for thefor
external
input input
settingsetting
(See page
of the
INSTRUCTIONS.)
“CHANGER”
pour lepour
réglage
dede
l’entrée
extérieure
(Voir
page
17
du pagina
MANUEL
D’INSTRUCTIONS.)
/ Choisissez
• Set “CHANGER”
the external
(See 17
page
17 of
the INSTRUCTIONS.)
“CHANGER”
le réglage
de
l’entrée
extérieure
(Voir(vezi
page
17
du MANUEL
D’INSTRUCTIONS.)
Setaţi
“CHANGER”
în
modul
intrare
semnal
extern
17 a INSTRUCŢIUNILOR.)
You can
connect
these components
as illustrated
below.below.
The iPod
D. player
can becan be
You
can connect
these components
as illustrated
Theor
iPod
or D. player
/ PRECAUTION:
ATENŢIE
CAUTION
/ PRECAUTION:
connected
using an
interface
adapter
(not supplied)—KS-PD100
(for iPod)
KS-PD500
(for (forCAUTION
connected
using
an interface
adapter
(not supplied)—KS-PD100
(for or
iPod)
or KS-PD500
BeforeBefore
connecting
the external
components,
make sure
unit
turned
off. off.
connecting
the external
components,
makethat
surethe
that
theisunit
is turned
D. player).
D. player).
Înainte
de aconnecter
conecta
componentele
externe,
asiguraţi-vă
ca aparatul
nuest
estehors
înest
funcţiune.
AvantAvant
de connecter
les appareils
extérieurs,
assurez-vous
que
l’appareil
tension.
de
les appareils
extérieurs,
assurez-vous
que l’appareil
hors tension.
Puteţi pouvez
conecta
aceste
în
imaginea
demontrée
mai
iPod-ul
sau D.Leplayer-ul
pot
conectate
Vous pouvez
connecter
cescomponente
appareils
enprecum
sérieencomme
montrée
surjos.
l’illustration.
iPod
le fiou
Vous
connecter
ces appareils
série
comme
sur l’illustration.
Leou
iPod
le
prin
intermediul
unui
adaptor
deeninterfaţă
(nuun
este
inclus)
- KS-PD100
(pentru
iPod)
sau KS-PD500 (în cazul
lecteurlecteur
D. peut
connecté
en utilisant
un adaptateur
d’interface
(non
fourni)—KS-PD100
D.être
peut
être connecté
utilisant
adaptateur
d’interface
(non
fourni)—KS-PD100
D. player-ului).
iPod isiPod
a trademark
of Apple
Computer,
Inc., registered
in the in
U.S.
is a trademark
of Apple
Computer,
Inc., registered
theand
U.S.other
and countries.
other countries.
(pour iPod)
ou
KS-PD500
(pour le
lecteur
D.). D.).
(pour
iPod)
ou KS-PD500
(pour
le lecteur
iPod
este
marcă
înregistrată
a Apple
Computer,
Inc. înInc.,
S.U.A.
şi în alte
ţări.
iPod est
une
marque
de
commerce
d’Apple
Computer,
enregistrée
aux États-Unis
et dansetles
autres
pays. pays.
iPod
est
une
marque
de commerce
d’Apple
Computer,
Inc.,
enregistrée
aux États-Unis
dans
les autres
Connection
2 (alternative
connection)
/ Connexion
2
Connection
2 (alternative
connection)
/ Connexion
2
(connexion
alternative)
(connexion
alternative)
Conexiunea
2 (conexiune alternativă)
Connection
1 (integrated
connection)
/ Connexion
1 (connexion
intégrée)
Connection
1 (integrated
connection)
/ Connexion
1 (connexion
intégrée)
Conexiunea
1 (conexiune
integrată)
JVC DAB
JVC tuner
DAB tuner
TunerTuner
DAB
DAB
JVC
TunerJVC
DAB JVC
JVC DAB
JVC tuner
DAB tuner
TunerTuner
DAB
TunerJVC
DAB JVC
DAB
JVC
or / ouor
or// sau
ou
JVC CD
changer
JVC
CD changer
Changeur
JVC
Changeur
CDJVC
JVC
CD CD
changer
JVC CD
changer
JVC
CD changer
Changeur
JVC
Changeur
CDJVC
JVC
CD CD
changer
or / ou
ou
oror/ /sau
CD changer
jack jack
CD changer
Prise duMufa
changeur
de CD de CD
CDchangeur
changer-ului
Prise
du
or / ouor
or// sau
ou
AppleApple
iPod iPod
iPod Apple
iPod Apple
Apple
iPod
AppleApple
iPod iPod
iPod Apple
iPod
AppleApple
iPod
or / ou
ou
oror/ /sau
or / ouor
or// sau
ou
JVC D.
player
JVC
D. player
Lecteur
JVCD.JVC
D.D.player
Lecteur
JVC
JVC D.
player
JVC
D. player
Lecteur
JVCD.JVC
Lecteur
JVC
D.D.player
Other
external
component
/ Autre
appareil
extérieur
Other
external
component
/ Alte
Autre
appareil
extérieur
componente
externe
• Set “EXT
forIN”
thefor
external
input input
settingsetting
(See page
of the
• SetIN”
“EXT
the external
(See 17
page
17 of the
“EXT
IN”
înlepour
modul
dede
intrare
/ Choisissez
“EXT
IN”
pour
réglage
l’entrée
INSTRUCTIONS.)
/ Setaţi
Choisissez
“EXT
IN”
le réglage
de l’entrée
INSTRUCTIONS.)
semnalextern
(vezi
pagina
aD’INSTRUCTIONS.)
INSTRUCŢIUNILOR.)
extérieure
(Voir page
17
du 17
MANUEL
extérieure
(Voir
page
du17
MANUEL
D’INSTRUCTIONS.)
External
component
External
component
Appareil
extérieur
Componentă
Appareil
extérieur
externă
CD changer
jack jack
CD changer
Conectorul
CD
Prise du
changeur
de CD de CD
Prise
du changeur
changer-ului
You can
also
an external
component
through
this unit
You
canconnect
also connect
an external
component
through
thisusing
unit using
Line Input
Adapter,
KS-U57
(not supplied)
or AUX
Adapter,
Line Input
Adapter,
KS-U57
(not supplied)
or Input
AUX Input
Adapter,
KS-U58
(not supplied).
KS-U58
(not supplied).
Puteţi
asemenea
componentă
externă
prin àintermediul
Vous pouvez
aussi
connecter
un oappareil
extérieur
à travers
cet appareil
Vous de
pouvez
aussiconecta
connecter
un appareil
extérieur
travers
cetAdaptorului
appareil
liniei
del’adaptateur
intrare
KS-U57
(nu este
al Adaptorului
de intrare
KS-U58
en utilisant
d’entrée
deinclus)
ligne
KS-U57
(non fourni)
ou auxiliară
en utilisant
l’adaptateur
d’entrée
desau
ligne
KS-U57
(non
fourni)
ou
(nu
ested’entrée
inclus).d’entrée
l’adaptateur
auxiliaire
KS-U58
(non fourni).
l’adaptateur
auxiliaire
KS-U58
(non fourni).
3.5 mm3.5
stereo
mm mini
stereoplug
mini plug
Mini
conector
stereo
de 3,5
Mini fiche
3,5
mm
Ministéréo
fichede
stéréo
de 3,5
mmmm
or / ouor
or//sau
ou
External
component
External
component
Componentă
Appareil
extérieur
Appareil
extérieur
externă
3 Attachez
*3 Firmly
attach the
ground
wire towire
the metallic
body orbody
to the
of the car—to
the place
with paint
solidement
le fil de
delemise
àlala
masse
châssis
métallique
de laautovehiculului
voiture—à
un endroit
quinevopsită
n’est
pas
*3 Firmly
attach
the ground
to the metallic
orchassis
to the chassis
of the car—to
theuncoated
place uncoated
with paint *3 Attachez
solidement
fil de
mise
à la au
masse
au châssis
de la voiture—à
endroit
qui
n’est
pas este
**3 Montaţi
ferm
firul
masă
caroseria
metalică
sau lamétallique
şasiul
- laun
zona
(dacă
(if coated
with paint,
the paint
the wire).
to do sotomay
cause
to the unit.
(if coated
withremove
paint, remove
thebefore
paint attaching
before attaching
theFailure
wire). Failure
do so
maydamage
cause damage
to the unit.
*4 Signal
supplied
for thisfor
unit)
*4 cord
Signal(not
cord
(not supplied
this unit)
5 Cut
*5 Cut*the
rearthe
speaker
leads ofleads
the car’s
connector
and connect
them tothem
the amplifier.
rear speaker
of theISO
car’s
ISO connector
and connect
to the amplifier.
*6 Connecting
cord supplied
for your
changer
or DABortuner
*6 Connecting
cord supplied
forCD
your
CD changer
DAB tuner
4
recouvert
de peinture
(s’il estvopseaua
recouvert
de peinture,
enlevezenlevez
d’abord
la peinture
avant
d’attacher
le fil).
L’appareil
recouvert
de peinture
(s’il
est recouvert
de
la peinture
avant
le fil).grav.
L’appareil
vopsită,
îndepărtaţi
înainte
depeinture,
a monta
firul).
Înd’abord
caz
contrar,
aparatul
se d’attacher
poate
defecta
peut
endommagé
si cela
pas
faitpas
correctement.
peut
être
si
cela
n’est
fait correctement.
*4être
Cablul
de endommagé
semnal
(nun’est
este
inclus).
*4 Cordon
de signal
fourni
avec
cet
autoradio)
Cordon
de(non
signal
(non
fourni
avec
cet autoradio)
**54 Întrerupeţi
legătura
dintre
firele
difuzoarelor
din spate şi conectorul ISO al autovehiculului şi conectaţi-le la
*5 Coupez
les fils des
enceintes
arrière arrière
du connecteur
ISO de ISO
la voiture
et connectez-les
à l’amplificateur.
*5 amplificator.
Coupez
les fils
des enceintes
du connecteur
de la voiture
et connectez-les
à l’amplificateur.
**66 Cablu
dede
conectare
CD
sau
DAB.
*6 Cordon
de connexion
fournipentru
avec
votre
changeur
CDtuner
ou CD
tuner
Cordon
connexion
fourni
avecchanger
votre changeur
ouDAB
tuner DAB
4