1
3/8” spine allowed - adjust according to binding
xxl
The information in this guide is subject to change without notice.
COMPAQ COMPUTER CORPORATION SHALL NOT BE LIABLE FOR TECHNICAL OR
EDITORIAL ERRORS OR OMISSIONS CONTAINED HEREIN; NOR FOR INCIDENTAL OR
CONSEQUENTIAL DAMAGES RESULTING FROM THE FURNISHING, PERFORMANCE, OR
USE OF THIS MATERIAL.
This guide contains information protected by copyright. No part of this guide may be photocopied or reproduced in any form without prior written consent from Compaq Computer Corporation.
© 1999 Compaq Computer Corporation. All rights reserved. Printed in the U.S.A., Brazil,
Canada, Japan, Korea, Singapore, Taiwan, and the U.K. Compaq and Presario are registered in the
U.S. Patent and Trademark Office.
Microsoft, MS-DOS, and Windows are registered trademarks of Microsoft Corporation.
The software described in this guide is furnished under a license agreement or nondisclosure
agreement. The software may be used or copied only in accordance with the terms of
the agreement.
Product names mentioned herein may be trademarks and/or registered trademarks of their respective companies.
Including:
• Model-Specific Features
• Upgrade Information
1800 Series
Purchase Date ___________________
Store Name _____________________
Computer Model No. ______________
Computer Serial No. _______________
120223-001
Port1800.pm6
Mobile Internet PC Features Guide
1
3/25/99, 4:34 PM
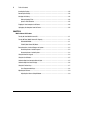
Table of Contents
i
Contents
CHAPTER 1
Using This Guide
Text Conventions...................................................................................................................1-1
Special Messages .................................................................................................................1-2
Locating Help ........................................................................................................................1-2
Glossary ........................................................................................................................1-2
Index .............................................................................................................................1-2
Troubleshooting.............................................................................................................1-2
Understanding Your Service and Support Options ..........................................................1-3
Comments about this Guide ..................................................................................................1-3
CHAPTER 2
Introducing Your Mobile Internet PC
Checking Your Connections...................................................................................................2-1
Front of Your Mobile Internet PC............................................................................................2-2
Using Your Keyboard to Access the Internet...........................................................................2-5
Internet Zone Buttons ....................................................................................................2-5
Reprogramming Your Internet Zone Buttons ..........................................................................2-7
Disabling and Enabling the Internet Zone Buttons ..........................................................2-7
Left Panel of Your Mobile Internet PC ....................................................................................2-8
Right Panel of Your Mobile Internet PC ..................................................................................2-9
Back Panel of Your Mobile Internet PC.................................................................................2-10
Bottom of Your Mobile Internet PC.......................................................................................2-11
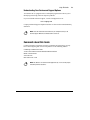
ii
Table of Contents
Inserting the Battery ........................................................................................................... 2-12
Removing the Battery ......................................................................................................... 2-13
Charging the Battery........................................................................................................... 2-13
Battery Charging Time................................................................................................. 2-13
Spare or Extra Batteries .............................................................................................. 2-13
Plugging In Your Computer to AC Power.............................................................................. 2-14
Unplugging the Computer from AC Power ........................................................................... 2-14
CHAPTER 3
Mobile Internet PC Features
Turning On Your Mobile Internet PC ...................................................................................... 3-1
Turning Off Your Mobile Internet PC Properly ........................................................................ 3-1
Standard Off Mode ........................................................................................................ 3-1
Full Off (Main Power Off) Mode...................................................................................... 3-2
Recovering from a Locked Program or System...................................................................... 3-2
Recovering from a Locked Program............................................................................... 3-2
Recovering from a Locked System ................................................................................ 3-3
Using the Numeric Keypad.................................................................................................... 3-4
Using the Scroll Button ......................................................................................................... 3-5
Understanding Your Computer Status Lights ......................................................................... 3-5
Understanding Your Status Display ....................................................................................... 3-6
Using the Function Keys ....................................................................................................... 3-7
User-Programmable Keys.............................................................................................. 3-8
Adjusting the Volume............................................................................................................ 3-9
Adjusting the Volume Using Windows............................................................................ 3-9
Table of Contents
iii
2
Using Disqplay .....................................................................................................................3-9
2
Playing Audio CDs Using Disqplay ...............................................................................3-11
Using Repeat Track......................................................................................................3-12
Using Repeat All ..........................................................................................................3-12
Setting Up Your TV-Out Connection .....................................................................................3-13
Connecting and Enabling TV-Out..................................................................................3-13
Setting Up Your Television Format ...............................................................................3-14
Adjusting the Television Screen ...................................................................................3-14
Switching Between Displays ........................................................................................3-15
Introducing Your SuperDisk Drive (available on select models) ............................................3-15
Features of Your SuperDisk Drive ........................................................................................3-15
Using Your SuperDisk Drive.................................................................................................3-16
Inserting a Diskette......................................................................................................3-16
Ejecting a Diskette.......................................................................................................3-16
Manually Ejecting a Diskette ........................................................................................3-17
Creating a Startup SuperDisk Diskette .........................................................................3-18
Write-Protecting a Diskette ..........................................................................................3-18
Formatting a SuperDisk Diskette..................................................................................3-19
SuperDisk Copy Disk ...................................................................................................3-20
SuperDisk Accelerator (available on select models)......................................................3-20
Handling and Storing Diskettes ....................................................................................3-21
iv
Table of Contents
CHAPTER 4
Learning About Your Modem
Performance Features .......................................................................................................... 4-1
Identifying Your Modem ........................................................................................................ 4-1
56K ITU V.90 Standard.......................................................................................................... 4-2
Understanding Point-to-Point Connections ............................................................................ 4-2
CHAPTER 5
Connecting Your Mobile Internet PC to a Network
Setting Up a Network............................................................................................................ 5-1
Hardware Requirements................................................................................................ 5-1
Hardware Installation .................................................................................................... 5-1
Installing the Network Protocols .................................................................................... 5-2
Sharing Folders .................................................................................................................... 5-4
File Security .................................................................................................................. 5-4
Creating a Shared Folder............................................................................................... 5-4
Sharing a Folder............................................................................................................ 5-5
Sharing Printers.................................................................................................................... 5-5
Setting Up Printer Sharing ............................................................................................. 5-5
Connecting to a Shared Printer...................................................................................... 5-6
Disabling Printer Sharing............................................................................................... 5-6
Mapping a Network Drive ..................................................................................................... 5-7
CHAPTER 6
Upgrading Your Mobile Internet PC
Adding More Memory ........................................................................................................... 6-1
Installing Memory Expansion Modules........................................................................... 6-1
What Are PC Cards?.............................................................................................................. 6-3
PC Card Types ...................................................................................................................... 6-3
Inserting a PC Card............................................................................................................... 6-4
Table of Contents
v
Removing a PC Card .............................................................................................................6-5
Compaq-Compatible PC Cards ..............................................................................................6-6
Using Network PC Cards .......................................................................................................6-6
PC Card Software..................................................................................................................6-7
Configuring PC Cards.....................................................................................................6-7
Vendor-Provided PC Card Software................................................................................6-8
Index
vi
Table of Contents
Using This Guide
1-1
Chapter 1
Using This Guide
Thank you for buying a Compaq Mobile Internet PC. This Features Guide will help
you to familiarize yourself with the features of your Internet PC, as well as
information on how to upgrade your computer.
Please take a moment to familiarize yourself with the special text and messages
used throughout this guide.
Text Conventions
The examples below explain the specially formatted text used in this guide.
•
Keyboard key names appear in bold type: Home, End, Backspace, Tab
•
Keyboard keys that must be pressed at the same time to perform a task appear
in bold type with a plus (+) between the key names: Ctrl+Home
•
Drives appear as capital letters: drive C
•
Folder names appear with initial capital letters: Favorites
•
File names appear in italics with an initial capital letter: Setup.exe
•
Command line statements appear in lower case bold type: a:\install
•
Names of icons appear in bold type followed by a picture of the icon:
My Computer G icon
•
Menu items appear in bold type: Programs, Accessories
1-2
Using This Guide
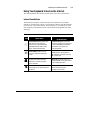
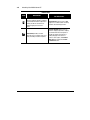
Special Messages
The following words and symbols have special meaning in this guide.
*
HINT: Helpful hints that will make using your computer easier and faster.
+
NOTE: Important information concerning the operation of your Internet PC.
`
CAUTION: Failure to follow directions may result in equipment damage or loss of
data.
a
WARNING: Failure to follow directions may result in bodily harm or loss of life.
Locating Help
Compaq provides you with several resources to help you learn about your Internet
PC. These resources include the following:
Glossary
Computer terms that may be unfamiliar to you are identified in the glossary.
Index
The index is a comprehensive list of the topics covered in this guide.
Troubleshooting
The Troubleshooting section shows how to fix many common computer-related
issues.
Using This Guide
1-3
Understanding Your Service and Support Options
Your Internet PC is equipped with several helpful programs that will aid you in
identifying and solving common computer problems.
If you need further technical support, visit the Compaq Web site at:
www.compaq.com
Compaq Technical Support telephone numbers are listed in the Limited Warranty
Statement.
+
NOTE: Locate the model and serial numbers for your computer before you call
technical support. Write these numbers down for future use.
Comments about this Guide
Compaq Computer Corporation welcomes comments and suggestions you may
have concerning this guide. Send correspondence to the following address:
COMPAQ COMPUTER CORP
ATTN: DOCUMENTATION PROGRAM MANAGER
MAIL CODE 060504
20555 SH 249
HOUSTON TX 77070
+
NOTE: This address is for comments and suggestions only. It is not for the purpose
of obtaining technical assistance.
1-4
Using This Guide
Introducing Your Mobile Internet PC
Chapter 2
Introducing Your Mobile Internet PC
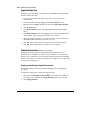
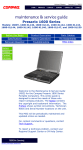
Checking Your Connections
Your Computer Connections
Connections
1
AC Adapter
2
Battery
3
Modem Cable
2-1
2-2
Introducing Your Mobile Internet PC
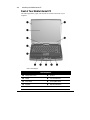
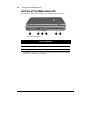
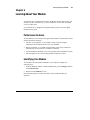
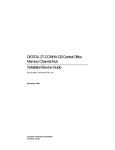
Front of Your Mobile Internet PC
The following buttons, lights, and controls are located on the front of your
computer:
Front of Your Computer
Front Components
1
Display Release Latch
6
Speakers
2
Display
7
Left TouchPad Button
3
Power Button
8
Scroll Up/Down Button
4
Keyboard
9
Right TouchPad Button
5
TouchPad
-
Model Number
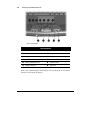
Introducing Your Mobile Internet PC
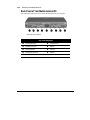
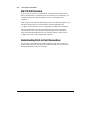
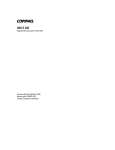
Internet Zone Buttons and Lights
Internet Zone Buttons and Lights
1
AC Adapter Light
7
Instant Search Button
2
Caps Lock Light
8
Online MarketPlace Button
3
Instant Internet Access Button
9
Retail Central Button
4
Instant E-Mail Button
-
Num Lock Light
5
My Presario Instant Access Button
q
Scroll Lock Light
6
Power Button
2-3
2-4
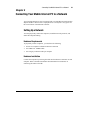
Introducing Your Mobile Internet PC
Front of Your Computer
Front Components
1
Previous Track Button
7
Battery Gauge
2
Next Track Button
8
Disqplay On/Off Button
3
Sleep Status Icon
9
Volume Down Button
4
Power Status Icon
-
Volume Up Button
5
Battery Charging Status Icon
q
Play/Pause Button
6
Disqplay Status Icon
w
Stop Button
2
2
Refer to the Understanding the Status Display section in this guide for more details
about the icons found on the display.
Introducing Your Mobile Internet PC
2-5
Using Your Keyboard to Access the Internet
The Compaq Internet Zone buttons provide quick, easy access to the Internet.
Internet Zone Buttons
The Internet Zone buttons, located at the top of the keyboard of your Mobile
Internet PC, automatically connect you to the Internet. Before using these buttons,
you must have access to the Internet. These buttons give you quick access to the
most frequently used Internet activities. These buttons are programmed to do the
following:
Internet Zone
Button
United States
All Other Countries Outside
the United States
Instant Internet Access provides your
daily start point to the Internet. It
connects you to a personalized Web
page filled with local weather, news,
sports, and financial information.
Instant Internet Access is your daily
start point to the Internet. It connects you
to a personalized Web page filled with
local weather, news, sports, and
financial information.
Instant E-Mail provides one-touch
access for sending and reading your
e-mail.
Instant E-Mail opens the Microsoft
Outlook Express e-mail program. For
AOL subscribers, this button opens your
AOL e-mail account.
$
My Presario is your instant connection
to Compaq for product information,
helpful hints, performance updates,
service, and more.
My Presario is your direct link to the
Compaq Help Web site for quick answers
to your computing questions.
©
Instant Search accesses a default Web
site that helps you locate information on
the Internet.
Instant Search opens a search engine
Web site that helps you locate
information on the Internet.
3
2
2-6
Introducing Your Mobile Internet PC
Internet Zone
Button
*
°
United States
All Other Countries Outside
the United States
Online MarketPlace takes you to an
electronic shopping experience. Compaq
has partnered with several companies to
provide you with the convenience of
catalog shopping at the touch of a
button.
Instant Answer connects you to a Web
page that is a central location for solving
problems and answering questions.
Retail Central provides an instant
connection to your computer store and a
variety of leading consumer companies.
Instant E-Commerce takes you to an
electronic shopping experience. Compaq
has worked with several companies to
provide you with the convenience of
catalog shopping at the touch of a
button. In some regions, the Featured
Web site button replaces the Instant
E-Commerce button.
Introducing Your Mobile Internet PC
2-7
Reprogramming Your Internet Zone Buttons
You can reprogram the Internet Zone buttons to reflect your personal preferences.
The Easy Access Internet Zone ¸ icon is located on the Windows Taskbar. It
can also be reached by clicking the Start button, then Programs and choosing
Reprogram Easy Access Buttons.
To reprogram your Internet Zone buttons, complete the following steps:
1. From the Status bar, right-click the Easy Access Internet Zone ¸ icon and
choose Reprogram Easy Access Buttons.
2. From the Compaq Easy Access Button Settings window, click the button you
wish to change.
3. Follow the instructions provided.
Disabling and Enabling the Internet Zone Buttons
You may turn off all Internet Zone buttons from the Easy Access Button program.
When turned off, no Internet Zone buttons will operate. The Easy Access Internet
Zone ¸ icon located on the Taskbar will appear with a red X on top. You can
still access the button functions if you click the Easy Access Internet Zone ¸
icon.
To disable the Internet Zone buttons, complete the following steps:
1. From the Windows Taskbar, right-click the Easy Access Internet Zone ¸
icon.
2. Click Disable Easy Access Buttons.
To enable the Internet Zone buttons, complete the following steps:
1. From the Windows Taskbar, right-click the Easy Access Internet Zone ¸
icon.
2. Click Enable Easy Access Buttons.
2-8
Introducing Your Mobile Internet PC
Left Panel of Your Mobile Internet PC
The following components are located on the left panel of your computer:
Left Panel of Your Computer
Left Panel Components
1
Security Slot
4
CD or DVD Manual Eject Hole
2
CD or DVD Drive
5
Diskette Drive*
3
CD or DVD Eject Button
6
Diskette Eject Button*
* A SuperDisk drive is available on some models. Refer to the Mobile Internet PC Features section of this guide
for more information about the optional SuperDisk drive.
Introducing Your Mobile Internet PC
Right Panel of Your Mobile Internet PC
The following components are located on the right panel of your computer:
Right Panel of Your Computer
Right Panel Components
1
Battery Compartment
5
Microphone Jack
2
PC Card Eject Button
6
Modem Port*
3
PC Card Slot
7
Ethernet Port*
4
Headphone Jack
* Available on select models.
2-9
2-10
Introducing Your Mobile Internet PC
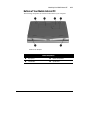
Back Panel of Your Mobile Internet PC
The following components are located on the back panel of your computer:
Back Panel of Your Computer
Back Panel Components
1
Mouse/Keyboard Port
6
TV Out Connector
2
AC Adapter Connector
7
VGA Port
3
Printer/Parallel Port
8
Serial Port
4
Port Replicator Connector
9
USB Port
5
Fan Vent
Introducing Your Mobile Internet PC
Bottom of Your Mobile Internet PC
The following components are located on the bottom of your computer:
Bottom of Your Computer
Bottom Components
1
Pop-Up Feet
3
Memory Compartment
2
Serial Number
4
Speaker Ports
2-11
2-12
Introducing Your Mobile Internet PC
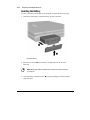
Inserting the Battery
To insert your battery into the battery compartment, complete the following steps:
1. Push down on the battery compartment door to remove the door.
Inserting the Battery
2. Insert the new battery 1 into the battery compartment with the label side
turned up.
+
NOTE: Only Compaq 1800 Series Mobile Internet PC batteries should be installed in
your computer.
3. Close the battery compartment door 2 by gently pushing up on the door until it
snaps into place.
Introducing Your Mobile Internet PC
2-13
Removing the Battery
To remove the battery, complete the following steps:
1. Save your files.
2. If the AC adapter is not connected, turn off your computer.
3. Remove the battery compartment door by sliding it down.
4. Use the tab on the battery to pull the battery out.
a
WARNING: To reduce the risk of damage to the battery or personal injury, do not
crush, puncture, or incinerate the battery or short the metal contacts. Do not attempt
to open or service the battery.
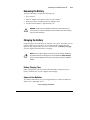
Charging the Battery
Charge the battery by connecting your computer to AC power. The battery receives
a charge whether your computer is on or off and continues charging until the
battery is fully charged or the AC power is disconnected. The Battery Charging
ç icon is displayed when the battery is charging.
+
NOTE: When you charge the battery the first time, leave your computer plugged into
the electrical outlet until the battery pack is fully charged and the Battery Charging
ç icon is no longer displayed. This measure ensures that your battery is completely
charged.
Battery Charging Time
Battery charging time will vary based on the initial battery charge, the type of
battery, and the activity of your computer while charging.
Spare or Extra Batteries
To purchase extra batteries for your Compaq Internet PC, contact an authorized
dealer or the Compaq Web site at:
www.compaq.com/athome
2-14
Introducing Your Mobile Internet PC
Plugging In Your Computer to AC Power
To connect your computer to AC power, follow the instructions on the Compaq
Hardware Setup poster. Refer to the Government Approvals section of the Mobile
Internet PC Reference Manual for worldwide power cord information.
Unplugging the Computer from AC Power
When your computer does not have a charged battery, you should save your work
and turn off the computer before unplugging it from AC power.
When a charged battery is in the computer, you can simply unplug it from AC
power. The computer automatically switches to battery power.
WARNING: Make sure you can easily reach the electrical outlet. Unplug the AC
adapter from the electrical outlet when you want to disconnect power from your
computer. Do not leave the AC adapter plugged into the electrical outlet.
a
WARNING: Do not place anything on power cords or cables. Arrange them so that no
one will accidentally step on or trip over them. Do not pull on a cord or cable. When
unplugging from the electrical outlet, grasp the cord by the plug.
WARNING: To reduce the risk of electrical shock, fire, or damage to the equipment,
do not use converter kits sold for appliances to power your computer.
Mobile Internet PC Features
3-1
Chapter 3
Mobile Internet PC Features
Turning On Your Mobile Internet PC
To turn on your computer, press the Power › button, which is located at the top of
the keyboard.
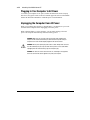
Turning Off Your Mobile Internet PC Properly
Standard Off Mode
To turn off your computer properly, complete the following steps:
1. Save any work you want to keep by clicking the File menu, then clicking Save.
If the Save As window is displayed, type in a file name and specify where you
want to save the file, then click the Save button.
2. Exit the program you are using by clicking the Close button in the top right-
hand corner of the window.
3. Maximize and close any windows shown on the Taskbar at the bottom of the
screen.
4. Repeat steps 1, 2, and 3 for each window you have open until only the
Windows desktop remains active.
5. Click the Start button, then click Shut Down.
6. Select the Shut down option.
7. Click the OK button. After a few seconds, your computer will turn off.
+
NOTE: Your computer cannot receive faxes when it is turned off or in Hibernation
mode.
3-2
Mobile Internet PC Features
Full Off (Main Power Off) Mode
If you need to install or replace components in your computer, you must turn your
computer off completely. To do this, complete the previous steps for putting your
computer into Standard Off mode. Unplug the computer electrical cord from the
outlet and remove the battery if installed.
Recovering from a Locked Program or System
Recovering from a Locked Program
To recover from a frozen software program, complete the following steps:
1. Press Ctrl+Alt+Delete. The Close Program window displays.
2. Select the program that is not responding.
3. Click the End Task button. A message displays prompting you to close the
program that is not responding.
4. Click End Task.
+
NOTE: Learn to save your work often. Work that has not been saved may be lost
when a program or the computer stops responding.
Mobile Internet PC Features
3-3
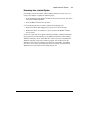
Recovering from a Locked System
Occasionally you may encounter a nonworking keyboard or a frozen screen. To
restart your computer, complete the following steps:
1. Press and hold down the Power › button for at least four seconds. This action
will cause a manual shutdown.
2. Press the Power › button once to restart.
If your computer still does not restart, complete the following steps:
1. Remove the battery and unplug the AC power for at least 30 seconds.
2. Reinsert the battery or reconnect AC power and press the Power › button
once to restart.
If files were open when the computer locked up, ScanDisk, a Microsoft Windows
utility program, will automatically run. ScanDisk will determine if the improper
shutdown caused any errors on the hard drive. Errors may occur if the Microsoft
Windows operating system was not able to properly close all files before the
shutdown. If no errors are found, the restart process will continue. If ScanDisk
does detect errors, follow the instructions shown to continue the restart process.
Work that was not saved prior to the lockup may be lost.
3-4
Mobile Internet PC Features
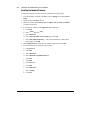
Using the Numeric Keypad
To use the embedded numeric keypad, press Fn+NumLk. This key combination
switches the keys to numbers until you press Fn+NumLk again. When NumLock is
activated, the NumLock h light is turned on.
You may also use the numeric keypad by pressing and holding the Fn key while
using the embedded number keys.
+
NOTE: If an external keyboard or numeric keypad is connected, pressing Fn+NumLk
on the notebook keyboard will not activate NumLock. You must press the NumLock
key on the external keyboard or numeric keypad to activate NumLock.
Numeric Keypad
Mobile Internet PC Features
3-5
Using the Scroll Button
If you are using a program that has a vertical scroll bar, the scroll button beneath
your touchpad will allow you to scroll up and down a page.
To change the function of the scroll button, complete the following steps:
1. Click the Start button from the Windows Taskbar.
2. Point to Settings, then Control Panel.
3. Double-click the Mouse Z icon.
4. Click the Button Actions tab. Change the selection in the Rocker Switch
column of the Buttons panel.
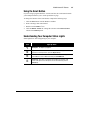
Understanding Your Computer Status Lights
Status lights show what is happening in your computer.
Icon
ä
e
h
g
Lights up when...
AC Adapter – AC adapter is plugged in.
Caps Lock – This feature is activated. When used, letters are typed in
uppercase. To turn Cap Lock on, press the Caps Lock key.
Num Lock – This feature is activated. You can use the embedded keypad to
enter numbers. To turn on Num Lock mode, press Fn+NumLock.
Scroll Lock – This feature is activated. Text that takes up more than a full
screen scrolls up the screen line-by-line. To turn on Scroll Lock, press the
ScrLock key.
3-6
Mobile Internet PC Features
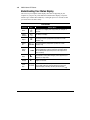
Understanding Your Status Display
The icons on your computer status display show what is happening in your
computer. If you press any of the buttons around the status display (except the
Volume Up or Volume Down buttons), it will light up for a few seconds so that
you can see the icons more clearly.
Icon Functions
Function
Power
Battery
Charging
Repeat
Repeat
All
Battery
Gauge
Sleep
Disqplay
Track/
Time
2
Icon
›
ç
œ
Displays when...
2
Main power is on. Disqplay will not play when your computer is
turned on.
Your battery is charging.
The current track that is playing will be repeated once it ends.
2
(Disqplay only)
•
The current CD that is playing will be repeated once it ends.
2
(Disqplay only)
å
The battery is inserted. The amount of power remaining in the
battery is displayed in 25 percent increments. The battery gauge
will start blinking when your battery has less than 10 percent of
power remaining.
n
R
2
The computer is in Sleep mode. Disqplay will not play when your
computer is in Sleep mode.
2
Disqplay is turned on.
A CD is inserted. The first two digits indicate the track number, the
b next four digits indicate the time left playing in the track. If2the
Track/Time display is blinking, the CD is paused. (Disqplay only)
Mobile Internet PC Features
3-7
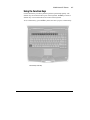
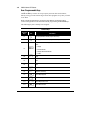
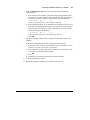
Using the Function Keys
Use the function keys on the keyboard to perform repeated tasks quickly. The
function keys are located on the top row of the keyboard. The Fn key activates a
function key. It is located in the lower-left area of the keyboard.
To use a function key, press the Fn key at the same time you press a function key.
Function Keys and Fn Key
3-8
Mobile Internet PC Features
User-Programmable Keys
The F1 and F2 keys can also be set up to open your most often-used software,
thereby saving you time from having to locate these programs every time you want
to use them.
Refer to the Reprogramming Your Internet Zone Buttons and Function Keys
section in this guide for more information about programming the F1 and F2 keys.
The following keys have already been assigned:
Function Keys
Function
Keys
F1
F2
Icon
k
k
Description
User-programmable favorite program launch key
User-programmable favorite program launch key
Switches between the display and external monitor in the following
order:
F3
F4
c
o
•
•
•
•
Display
External Monitor
Display and External Monitor
TV Out
Sleep
F5
None
F6
None
F7
F8
F9
F10
F11
F12
y
x
•
–
“
”
Brightness control down
Brightness control up
CD or DVD play/pause
CD or DVD stop
CD or DVD previous track
CD or DVD next track
Mobile Internet PC Features
3-9
Adjusting the Volume
You can change the speaker volume on your Internet PC. Press the µ button to
increase the volume. Press the ´ button to decrease the volume. Pressing the ´
and µ buttons at the same time will turn on and turn off the mute feature.
a
WARNING: To reduce the risk of personal injury or equipment damage, reduce the
speaker volume before putting on headphones.
Adjusting the Volume Using Windows
To adjust the volume using Windows, single-click the Volume ¶ icon on the
Windows Taskbar. Use the slider bar to adjust the volume. Click the Mute All box
to mute the volume.
Using Disqplay
2
2
2
Your Compaq Internet PC features Disqplay technology. Disqplay allows you to
play CDs on your Internet PC while main power is turned off, a convenient way to
play CDs while greatly reducing the amount of power used by your computer.
2
With Disqplay you can:
•
Insert an audio CD and it will automatically start playing.
•
View the total playing time and number of tracks on an audio CD when it is
stopped.
•
View the track number and time remaining within the track.
•
Fast forward or rewind within a CD track.
•
Continuously repeat a track or repeat an entire disc once it has reached the end
of the last track.
•
Press a button (except for Volume Up or Volume Down) and your status
display will light up for a few seconds so you can see the icons more clearly.
2
Disqplay will also turn itself off if your CD has stopped playing and no activity
has occurred for a certain amount of time.
3-10
Mobile Internet PC Features
2
For a list of the buttons used to operate Disqplay , please see the table below.
Button Functions
Function
Disqplay
On/Off
2
Icon
R
Description
2
Turns Disqplay on and off. You must hold down the button for 1
2
second to turn on or turn off Disqplay .
‹
Skips the CD to the previous track. If you hold the button down for 1
second, it will rewind through the song. When the CD is paused,
pressing this button will start Repeat Track mode.
Next
Track
Œ
Skips the CD to the next track. If you hold the button down for 1
second, it will fast forward through the song that is playing. When
the CD is paused, pressing this button will start Repeat All mode.
Play/
Pause
ˆ
‘
Previous
Track
Stop
Starts or ends Play or Pause mode. In combination with other
buttons, this button will start Repeat Track or Repeat All mode.
Stops the CD playing.
Volume
Down*
-
Turns down the volume of the CD.
Volume
Up*
µ
Turns up the volume of the CD.
* Pressing the Volume Down and Volume Up buttons at the same time will turn on and turn off the mute
feature.
Mobile Internet PC Features
3-11
2
Playing Audio CDs Using Disqplay
To play an audio CD using Disqplay , press the Disqplay On/Off R button for 1
2
second to turn on Disqplay , then insert the CD into the CD drive. The CD will
automatically start playing. Use the CD control buttons to navigate the CD.
2
2
If there is no CD in the CD drive, a No Disc message will appear on the status
display.
No Disc Message
3-12
Mobile Internet PC Features
If there is a data (non-audio) CD in the CD drive, a Data CD message will appear
2
on the status display. Disqplay will not run data CDs.
Data CD Message
Using Repeat Track
To continuously repeat a track, complete the following steps:
1. While the track is playing, press the Play/Pause ˆ button.
2. Press the Previous Track Š button. The Repeat œ icon will appear on the
status display and the track will start playing.
3. Press any button to stop the track from repeating.
Using Repeat All
To continuously repeat a CD, complete the following steps:
1. While the track is playing, press the Play/Pause ˆ button.
2. Press the Next Track • button. The Repeat All • icon will appear on the
status display and the track will start playing.
3. Press any button to stop the CD from repeating.
Mobile Internet PC Features
3-13
Setting Up Your TV-Out Connection
Your Mobile Internet PC comes with a composite TV-Out connector on the back
panel. An S-Video connector can be found on your optional port replicator.
With a TV-Out connection, you can do the following:
•
Play games on a bigger screen, such as your television.
•
Watch DVD movies on TV rather than a computer monitor.
•
Play a video clip for recording on a VCR.
Connecting and Enabling TV-Out
To connect your computer and your television, you will need a composite video
cable (RCA cable) to plug into your TV, VCR, or other device. These cables can
be purchased in a retail TV store or a computer store.
To connect and enable TV-Out, complete the following steps:
1. Before connecting your computer to your television, turn on your computer.
2. When you reach the Windows desktop, connect your computer and your
television with a composite video cable.
3. Right-click the Windows desktop.
4. Click Properties.
5. Click the Settings tab, then click the Advanced button.
6. Click the Displays tab.
7. Click the green corner of the TV field box to enable TV-Out. TV-Out is
enabled if the button next to Primary is blue.
8. Click the OK button to exit the Advanced menu and the Display Properties
menu.
+
NOTE: At this time, the display on your television may be rolling. To correct this
problem, you must set your TV format.
3-14
Mobile Internet PC Features
Setting Up Your Television Format
To properly view images, you must set your computer to your country’s standard
for television transmission. To do this, complete the following steps:
1. Right-click the Windows desktop.
2. Click Properties.
3. Click the Settings tab, then click the Advanced button.
4. Click the Displays tab.
5. Click the top right corner of the TV field box.
6. Click the Format tab.
7. Make sure Select by country is selected.
8. Scroll to find your country, then select it.
9. Click the OK button to exit the Advanced menu and the Display Properties
menu.
10. If your computer asks you to restart Windows, click OK for the new settings to
take effect.
Your television format is now set and the television image should be stable.
Adjusting the Television Screen
After you have enabled your television, you may need to adjust the size or location
of your screen.
To make adjustments to your screen, complete the following steps:
1. Right-click the Windows desktop.
2. Click Properties.
3. Click the Settings tab, then click the Advanced button.
4. Click the Displays tab.
5. Click the top right corner of the TV field box.
a. To change the brightness, contrast, or color saturation, click the Attributes
tab.
b. To change the position and screen size, click the Adjustments tab.
6. Click the OK button to exit out of the Advanced menu and the Display
Properties menu.
Mobile Internet PC Features
3-15
Switching Between Displays
You can switch between your television and your display or external monitor by
pressing Fn+F3. The order in which they change is:
•
Display
•
External Monitor
•
Display and External Monitor
•
TV-Out
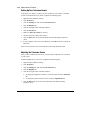
Introducing Your SuperDisk Drive (available on select models)
Your SuperDisk (formerly known as LS-120) drive is a 3.5-inch diskette drive
capable of storing up to 120 megabytes (MB) of information. It delivers highly
effective file transfer, backup, and storage capacity, while maintaining
compatibility with current 1.44-MB diskette.
SuperDisk is the perfect technology to use for large graphic files, project and file
management, Internet downloads, digital photo libraries, large presentations, video
and audio files, and much more. It is the perfect device to store large amounts of
data without using all the storage capacity on your hard drive.
Features of Your SuperDisk Drive
The SuperDisk drive is designed to read, write, and format the following sizes of
diskettes:
•
720 kilobytes (KB)
•
1.44 MB
•
120 MB
Key features of the SuperDisk drive include the following:
•
Storage capacity of 120 MB of data on a single, 3.5-inch diskette (a capacity
increase of more than 83 times the capacity of the standard 3.5-inch diskette)
•
Motorized diskette ejection providing easy operation
•
Faster transfer rate and access time than the 1.44-MB diskette drive, delivering
up to 5 times the performance when using a SuperDisk diskette
3-16
Mobile Internet PC Features
Using Your SuperDisk Drive
For optimum performance, use Imation SuperDisk diskettes with your SuperDisk
drive.
Inserting a Diskette
To insert a 1.44-MB or SuperDisk diskette into the drive, complete the following
steps:
1. Turn on your computer, if it is not already turned on.
2. Hold the diskette, label side up, and gently insert the diskette into the drive.
After you insert a diskette, it will take a few seconds for the drive to read the
diskette before you can use it.
+
NOTE: The SuperDisk Drive Diskette Eject button is motorized and does not pop out
after inserting a diskette.
Ejecting a Diskette
Because the SuperDisk drive has a motorized Diskette Eject button, your
computer must be turned on to eject a diskette. Do not turn off your computer until
the diskette has been ejected.
The diskette will not eject if the computer is still writing to the diskette.
To eject a diskette, complete the following steps:
1. Push the Diskette Eject button. The diskette will eject from the drive.
2. Remove the diskette from the drive.
OR
From the Windows desktop, double-click the My Computer G icon.
3. Right-click the 3½ Floppy (A:) H icon, then select Eject. The diskette will
eject from the drive.
Mobile Internet PC Features
3-17
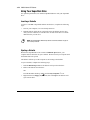
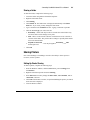
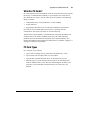
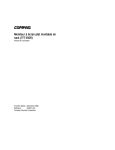
Manually Ejecting a Diskette
If you need to eject a diskette when the power is off, complete the following steps
to manually eject the diskette:
1. Make sure the power is off and any external power sources are disconnected.
2. Insert a metal rod, such as a paper clip (approximately 1/16 inch in diameter
and at least 3/8 inch in length) into the Manual Eject hole and push firmly as
shown in the figure below. The diskette should pop out of the SuperDisk drive.
Manually Ejecting a Diskette
3. Remove the diskette from the drive.
If the diskette does not eject, contact your local Compaq-authorized dealer,
reseller, or service provider.
3-18
Mobile Internet PC Features
Creating a Startup SuperDisk Diskette
You can start your computer from the SuperDisk drive, which is your A:\ drive, if
you have a diskette containing the necessary system files. To create a Startup
SuperDisk diskette, you must copy the Windows system files to the diskette.
Copying system files does not erase files already saved to the diskette.
To create a Startup SuperDisk diskette, complete the following steps:
1. Turn on your computer, if it is not already turned on.
2. Insert a SuperDisk diskette.
3. From the Windows desktop, double-click the My Computer G icon.
4. Right-click the 3½ Floppy (A:) H icon, then select Format.
5. Select 120.3 MB for the Capacity.
6. Select Copy system files only for the Format type.
7. Click the Start button. The computer will begin to copy its system files to the
diskette.
Once the files are copied to the diskette, you will have a Startup SuperDisk
diskette.
Write-Protecting a Diskette
The write-protect tab on a standard 3.5-inch diskette or a SuperDisk diskette serves
the purpose of not allowing you to save data to or delete data from the diskette.
The write-protect tab functions the same way as on a standard 3.5-inch diskette. If
the hole is covered, you can read and write to the diskette. If the hole is open, you
can only read from the diskette.
Mobile Internet PC Features
3-19
Formatting a SuperDisk Diskette
SuperDisk diskettes are preformatted so you can use them immediately.
If you need to reformat a SuperDisk diskette, complete the following steps:
1. From the Windows desktop, double-click the My Computer G icon.
2. Right-click the 3½ Floppy (A:) H icon, then select Format.
3. Select 120.3 MB for the Capacity.
4. Select Quick, Full, or Copy system files only for the Format type.
•
Quick – Deletes all the files from the disk but does not scan the disk for
bad sectors. The Quick format option only works on disks that have been
previously formatted. You should choose Quick format if you are sure that
your diskette is not damaged.
•
Full – Prepares a diskette so that you can store information on it. If the
diskette has any files on it, formatting will remove the files. If you are
formatting a 1.44-MB diskette, it will be scanned for bad sectors after it is
formatted.
•
Copy system files only – Copies system files to a diskette that is already
formatted, without erasing the files on the diskette. A diskette containing
system files can be used to start your computer.
5. Click the Start button. Your computer will begin formatting the SuperDisk
diskette. A progress bar will indicate its completion status in percentage.
3-20
Mobile Internet PC Features
SuperDisk Copy Disk
SuperDisk Copy Disk allows you to duplicate 1.44-MB diskettes and SuperDisk
diskettes quickly and easily.
1. Insert the source diskette (the diskette you wish to copy from) into the
SuperDisk drive.
2. From the Windows desktop, double-click the My Computer G icon.
3. Right-click the 3½ Floppy (A:) H icon, then select SuperDisk Copy Disk.
4. Click the Start button.
5. Click Removable Drive (A:) in the Copy from: field and click the Start
button.
6. Click Removable Drive (A:) in the Copy to: field and click the Start button.
Your computer begins copying files from the source diskette.
7. When your computer prompts you, remove the source diskette and insert the
destination diskette (the diskette you wish to copy to).
8. Click OK. Your computer begins writing files to the destination diskette.
9. Click OK when the SuperDisk Copy Disk process is complete.
SuperDisk Accelerator (available on select models)
SuperDisk Accelerator improves SuperDisk diskette performance for your
SuperDisk drive. SuperDisk uses a portion of your hard drive, referred to as the
Staging Area, to temporarily store files before transferring them to the SuperDisk
diskette. This allows you to continue working on your computer as soon as the files
are copied to the Staging Area.
Enabling and Disabling the SuperDisk Accelerator
You have the ability to enable and disable the Staging Area of the SuperDisk
Accelerator.
To enable the Staging Area, complete the following steps:
1. Right-click the SuperDisk Accelerator P icon on the Windows Taskbar. If
the Staging Area is disabled, the Staging Disabled option will be checked.
2. Click Staging Enabled.
Mobile Internet PC Features
3-21
To disable the Staging Area, complete the following steps:
1. Right-click the SuperDisk Accelerator P icon on the Windows Taskbar. If
the Staging Area is enabled, the Staging Enabled option will be checked.
2. Click Staging Disabled.
SuperDisk Accelerator Icon
The SuperDisk Accelerator P icon is located in you Windows Taskbar.
SuperDisk Accelerator P icon changes color during different SuperDisk activity
states. The following table describes what each color represents.
SuperDisk Accelerator Icon Colors
Color
Description
Light gray disk/
yellow shutter
The Staging Area is enabled. No SuperDisk write activity is taking
place.
Brown disk
Files/folders are being transferred to the SuperDisk diskette with the
Staging Area enabled. The color progressively turns to gray as the
data is written to the diskette. You can place your cursor over the icon
to display the amount of data transfer remaining.
Yellow disk
A file was successfully saved to a SuperDisk diskette and the file
remains open.
Light gray disk/
black shutter
The Staging Area is disabled.
Handling and Storing Diskettes
`
CAUTION: Do not ship or move your computer with a SuperDisk diskette in the drive.
The diskette mechanism locks in place when a diskette is ejected to ensure the drive
will sustain no damage during shipping or moving. The mechanism remains
unlocked and subject to damage when a diskette is loaded. Use the cases provided
with your SuperDisk diskettes for storing and transporting the diskettes.
3-22
Mobile Internet PC Features
Learning About Your Modem
4-1
Chapter 4
Learning About Your Modem
Your Internet PC is equipped with a 56K V.90 data/fax modem. Before using your
modem to connect to the Internet, you must establish an account with an Internet
service provider (ISP).
If your Internet PC is equipped with a digital modem, please refer to the digital
modem features guide.
Performance Features
Your modem has several features that significantly enhance its performance. These
features include the following:
•
56K ITU V.90 compliant – Your modem is ready to operate using the
International Telecommunications Union V.90 standard.
•
K56flex compliant – If your ISP uses the K56flex protocol, the modem will
automatically use this protocol to establish a connection.
•
Intel VideoPhone compatible (refer to the Using the Intel VideoPhone section).
•
data/fax capable (refer to the Sending and Receiving Faxes section).
Identifying Your Modem
To learn more about the modem installed on your computer, complete the
following steps:
1. From the Windows Taskbar, click the Start button, point to Settings, and then
click Control Panel.
2. Double-click the Modems I icon.
In the Modem Properties window, the names of the installed modems are
displayed.
4-2
Learning About Your Modem
56K ITU V.90 Standard
If you are able to connect to an ISP using the V.90 standard, the modem will be
able to download files at a maximum speed of 56 kilobits per second (Kbps), over
standard telephone lines. Download speeds will vary with telephone line
conditions.
When using the V.90 standard, download speeds are faster than upload speeds. The
maximum download speed is 56 Kbps and the maximum upload speed is
33.6 Kbps. Transmission rates will vary depending on telephone line conditions.
The V.90 and K56flex protocols are designed only to increase the download
transmission rate from V.90 or K56flex compliant digital sources. Maximum
achievable download transmission rates are currently unknown, may not reach
56 Kbps, and will vary with telephone line conditions.
Understanding Point-to-Point Connections
You can set up your modem to call another modem directly. This is known as a
point-to-point connection. During a direct modem-to-modem call, the download
and upload speeds are limited to 33.6 Kbps.
Connecting Your Mobile Internet PC to a Network
5-1
Chapter 5
Connecting Your Mobile Internet PC to a Network
Your Compaq Internet PC may be equipped with a 10/100 Mbps network interface
adapter and driver. Refer to the Compaq Hardware and Software Setup poster for
the exact location of the Ethernet connector.
Setting Up a Network
You must physically connect the computers, install the network protocols, and
enable file and print sharing.
Hardware Requirements
To physically connect computers, you must have the following:
•
at least two computers with RJ-45 Ethernet connectors
•
one 10BaseT or 100BaseT hub
•
one Category 5 Ethernet cable per computer
Hardware Installation
Connect the computers by inserting the cable into the Ethernet connectors on each
computer. Refer to the hub manufacturer documentation for instructions on
connecting the cables to the hub.
5-2
Connecting Your Mobile Internet PC to a Network
Installing the Network Protocols
To install the necessary network protocols, complete the following steps:
1. From the Windows Taskbar, click Start, point to Settings, then click Control
Panel.
2. Double-click the Network L icon.
3. When the message Your network is not complete. Do you want to continue?
is displayed, click Yes.
4. In the Network window, the Configuration tab is displayed:
a. Click Add.
b. Select Client and click Add.
c. Select Microsoft.
d. Select Client for Microsoft Networks, then click OK.
e. Select File and Print Sharing…, then click in both boxes to make check
marks appear. Click OK.
5. The Configuration tab in the Network window is displayed. Click Add.
6. In the Select Network Component Type window:
a. Click Protocol.
b. Click Add.
c. Select Microsoft.
d. Select IPX/SPX compatible Protocol.
e. Click OK.
f.
Click Add.
g. Click Protocol.
h. Click Add.
i.
Select Microsoft.
j.
Select TCP/IP.
k. Click OK.
Connecting Your Mobile Internet PC to a Network
5-3
7. Select the Identification Tab in the Network window and complete the
following steps:
a. Enter a name for the computer. This name must be unique, different from
the name of every other computer in the network. The name may contain a
maximum of 15 letters, numbers, and the following special characters:
! @ # $ % ^ & ( ) - _ ' { } ~
Do not use any blank spaces in the Computer name box.
b. Enter a Workgroup name. If you would like all computers to have access to
each other, the Workgroup name must be the same for all of the computers
on the network. The name may contain a maximum of 15 letters, numbers,
and the following special characters:
! @ # $ % ^ & ( ) - _ ' { } ~
Do not use any blank spaces in the Workgroup name box.
c. Click OK.
8. The System Settings Change window is displayed. Click Yes to restart your
computer.
9. In the Microsoft Networking window, complete the following steps:
a. Enter a User name. Your user name should be easy to remember since you
will use it every time you log onto your network.
b. Enter a Password. Typing a password is optional. If you choose not to type
a password, leave the password box blank.
c. Click OK.
d. Document your user name and password for future reference.
10. Close the Control Panel window.
11. Repeat this procedure to add the next computer to the network.
5-4
Connecting Your Mobile Internet PC to a Network
Sharing Folders
To prevent others on the network from accessing sensitive files on your computer,
you can set the access level on a folder by adjusting the shared files properties. The
shared properties can be changed to meet your file security needs.
`
CAUTION: You should never share your Windows folder or any of its subfolders or
files. The accidental deletion of any Windows file can prevent your computer from
operating properly. If you choose to share your entire hard drive carefully consider
the type of access you will allow.
File Security
Microsoft Networking enables file sharing at the folder level; that is, all the files in
a folder must be either shared or not shared. You cannot share some files in a
folder and keep others private at the same time.
If you want to share files on the network, it is recommended that you create a
special folder for these files and share only that folder. This feature provides the
flexibility of allowing file sharing while keeping secure all other programs and
sensitive files on your hard drive.
Creating a Shared Folder
To create a shared folder on the hard drive, complete the following steps:
1. Double-click the My Computer G icon.
2. Double-click (C:) (or the letter that corresponds to your hard drive).
3. On the window menu bar, click File, point to New, and then click Folder. A
New Folder is displayed in the window.
4. Give the folder a name that indicates it is shared, such as Shared Files.
5. Move the files you wish to share into this folder.
Connecting Your Mobile Internet PC to a Network
5-5
Sharing a Folder
To share the folder, complete the following steps:
1. Locate the folder using Microsoft Windows Explorer.
2. Right-click the folder name.
3. Click Sharing.
4. Click Shared As. The folder name is displayed automatically in the Share
Name box. If you wish, you may change the share name.
5. Type a comment in the Comment text box. Typing a comment is optional.
6. Click the Access Type you wish to activate:
•
Read-Only – Others will only be able to read the files in the folder. They
will not be able to make changes to any files.
•
Full – Others on the network will have read and write access to the file or
contents of the folder. They will be able to change or possibly delete all the
files in the shared folder.
•
Depends on Password – You may designate a Read-Only or a Full
Access password.
7. Click OK.
Sharing Printers
One of the advantages of installing a network is the ability to share expensive
resources, such as a printer.
Setting Up Printer Sharing
To share a printer, complete the following steps:
1. From the Windows Taskbar, click the Start button, point to Settings, then
click Printers.
2. Right-click the desired printer and select Sharing.
3. Select Shared As. You may change the Share name, add Comments, and set
a Password, if desired.
4. Click OK. In the Printers window, an open hand holding the printer you shared
on the network is displayed.
5. Close the Printers window.
5-6
Connecting Your Mobile Internet PC to a Network
Connecting to a Shared Printer
To connect to a shared network printer, complete the following steps:
1. From the Windows Taskbar, click the Start button, point to Settings, and then
click Printers.
2. Double-click the Add Printer ü icon. The Add Printer window is displayed.
Select Network Printer, then click Next.
3. To find the network printer, click Browse. The Browse for Printer window is
displayed. Select the printer you want to use, then click OK. The network
printer path statement is displayed in the Add Printer window.
4. If you would like to print from MS-DOS-based programs, select Yes, then
click Next. If you will not be printing from MS-DOS based programs, select
No, then click Next.
5. A message appears reminding you to put it online before you try printing. Click
Next.
6. Select the printer manufacturer and model and click Next.
+
NOTE: If your printer manufacturer or model is not listed, click Have Disk and follow
the instructions shown.
7. You may either accept the default printer name or change it. If you want this to
be the default printer, select Yes then click Finish. If you do not wish this to be
the default printer, select No then click Finish.
Disabling Printer Sharing
You may occasionally find it necessary to restrict access to a shared network
printer. You can only disable printer sharing at the computer to which the printer is
directly connected.
To disable printer sharing, complete the following steps:
1. From the Windows Taskbar, click the Start button, point to Settings, and then
click Printers.
2. Right-click the icon of the printer for which you wish to disable sharing. Select
Sharing.
3. Select the Not Shared option, then click OK.
Connecting Your Mobile Internet PC to a Network
5-7
Mapping a Network Drive
*
HINT: The Network Neighborhood K icon will not appear on the Windows desktop
until the network protocols are installed.
If you wish to automatically access a shared folder on another computer each time
you turn on your computer and log onto the network, complete the following steps:
1. Right-click the My Computer G icon.
2. Click Map Network Drive. The Drive text box automatically contains the next
available drive letter.
3. Click the down arrow located on the right side of the Path text box. Select the
path statement of the drive you wish to map. Add the exact folder location to
complete the path statement. Your path statement should look similar to the
following:
C:\My Documents\Shared Files
4. Click the Reconnect at logon box. If the folder is password protected, you will
be prompted for the password when you log onto the network.
5-8
Connecting Your Mobile Internet PC to a Network
Upgrading Your Mobile Internet PC
6-1
Chapter 6
Upgrading Your Mobile Internet PC
Adding More Memory
Memory upgrades of 32, 64, or 128 megabytes (MB) of random access memory
(RAM) are available for your computer. Contact your Compaq retailer, seller, or
authorized dealer for information on memory or refer to your accessories catalog.
The memory specifications for your Mobile Internet PC are as follows:
•
144-pin SODIMMs (small outline dual inline memory modules)
•
SyncDRAM (synchronous dynamic random access memory)
•
3.3 volt
•
PC100 compliant (only)
`
CAUTION: Electrostatic discharge can damage electronic components. Before
beginning this procedure, make sure you are properly grounded (discharged of static
electricity) by briefly touching a grounded, unpainted metal object or surface.
Installing Memory Expansion Modules
`
CAUTION: It is recommended that you use Compaq memory modules when
expanding memory. The use of non-Compaq memory modules may cause potential
warranty issues.
To properly install memory modules, complete the following steps:
1. Turn off your computer using the Windows shutdown process.
`
CAUTION: If you enter Hibernation mode instead of turning off your computer when
adding memory, you will lose data.
2. Disconnect all power sources and external hardware from your computer.
6-2
Upgrading Your Mobile Internet PC
3. Remove the battery from its compartment.
4. Turn your computer over and locate the memory compartment door.
5. Use a Phillips screwdriver to remove the screw from the memory compartment
door.
6. Remove the memory compartment door.
7. Slide 1 and lock 2 the memory expansion module in place.
`
CAUTION: When installing memory expansion modules, apply gentle, even pressure
when inserting the memory module. Excessive pressure can damage the memory
module.
+
NOTE: Make sure the memory module is properly seated and snapped into place. If it
is not seated, you may see memory error messages or your computer may not
recognize the memory module.
Installing the Memory Expansion Module
8. Replace the memory compartment door.
9. Reinsert the screw.
Upgrading Your Mobile Internet PC
6-3
What Are PC Cards?
PC Cards (formerly known as PCMCIA Cards) are removable devices that increase
the storage or communications capability of your computer. PC Cards come in
three different sizes: Type I, Type II, and Type III. PC Cards have the following
things in common:
•
2 standard bus sizes, 16-bit (PCMCIA) or 32-bit (CardBus)
•
68-pin connectors
•
approximately the same size as a credit card, but differences in thickness
PC Cards are easy to install. Other issues, however, especially software
considerations, can impact your ability to use them effectively.
The Personal Computer Memory Card International Association (PCMCIA) was
formed in 1989 to set industry standards for the use of PC Card technology.
PCMCIA represents more than 500 companies in the computer industry. As a
member of PCMCIA’s Board of Directors and Executive Committee, Compaq is a
driving force in the PC Card industry.
PC Card Types
PC Card types vary as follows:
•
Type I cards are usually memory cards and are the thinnest at 3.3 mm.
•
Type II cards, such as modem cards, are 5.0 mm thick.
•
Type III cards, typically hard disk drives, are the thickest at 10.5 mm.
•
Extended Type I, Type II, and Type III PC Cards are the same height and
width as standard size PC Cards. They have added length or thickness at one
end so they can accommodate external connectors or wireless PC Card
antennas.
6-4
Upgrading Your Mobile Internet PC
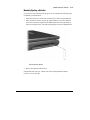
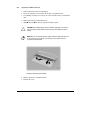
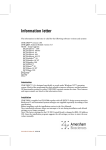
Inserting a PC Card
To insert a PC Card into your computer, complete the following steps:
1. Guide the PC Card, label side up, through the lower door of the PC Card slot.
2. Gently push the card into the slot. If the computer is turned on, the computer
automatically configures the PC Card and beeps when the card is ready to use.
+
NOTE: Your 1800 Series notebook will only accept one PC Card of any type at one
time.
`
CAUTION: Do not force the card into the slot, as this may damage the connector
pins.
Inserting a PC Card
Upgrading Your Mobile Internet PC
6-5
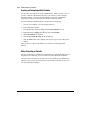
Removing a PC Card
If your computer is turned on, click on the PC Card O icon on the Windows
Taskbar to stop card activity before you remove the card. A popup window
prompts you to remove the card. Then, follow these steps to remove the PC Card:
1. Push in on the recessed PC Card Eject button 1 to extend it.
2. Push the extended button back into the unit. The PC Card pops out, and if the
computer is turned on, the computer will beep.
3. Gently grasp the card and pull it out completely.
Ejecting a PC Card
6-6
Upgrading Your Mobile Internet PC
Compaq-Compatible PC Cards
Internet PCs are compatible with many PC Cards and CardBus PC Cards on the
market today. Refer to the documentation that came with your PC Card or contact
your PC Card manufacturer for information. The Compaq Web site lists many
compatible PC Cards:
www.compaq.com/athome/support/serv_note
+
NOTE: Before buying a non-Compaq PC Card, check the documentation that comes
with it to be sure it conforms to standards set by the PCMCIA.
Using Network PC Cards
Your Internet PC can support many types of Ethernet-based and Token Ring-based
network cards. This support allows you to connect to other computers, printers,
modems, and the Internet.
The Microsoft Windows 98 Getting Started guide and the documentation that came
with your network card will have more information about setting up to use a
network or compatible network card.
Compaq Netelligent PC Card is one of the compatible network PC Cards you can
use with your computer. The Compaq Web site lists many compatible network
cards:
www.compaq.com/athome/support/serv_note
If your computer came with an integrated Ethernet controller, you will not need a
PC Card to connect to a network. To determine whether you have an integrated
Ethernet controller, check the right panel of your computer to see if you have an
Ethernet port.
Upgrading Your Mobile Internet PC
6-7
PC Card Software
Some types of PC Cards require card-specific device drivers. Contact your PC
Card manufacturer for additional information.
Configuring PC Cards
The PC Card software needed to easily install and configure PC Cards in Windows
is provided on your Internet PC.
You do not need to turn off your computer or initiate Sleep mode before inserting a
PC Card.
When you insert a PC Card for the first time, Windows identifies the new hardware
and automatically determines the correct settings for the card to install the needed
PC Card drivers. You may be prompted to make simple setup choices. Once you
have completed setup for a PC Card, each time you insert that card, Windows
remembers the correct settings and configures it automatically.
Depending on the card and the version of PC Card software you are using, you
may have to turn on PC Card drivers or install device drivers. Your computer
features easy-to-follow popup windows to guide you through the process.
6-8
Upgrading Your Mobile Internet PC
Vendor-Provided PC Card Software
PC Card vendors provide the following types of PC Card software:
Card-specific device driver – If needed, install a card-specific device driver in
Windows. It is important to be certain you are installing only a card-specific device
driver. Installing the wrong software can limit the card’s ability to work properly.
If diskettes are not clearly labeled or the instructions are unclear, call your PC Card
vendor for more specific information.
Direct or point enabler – An enabler is proprietary software, which means it is
designed to support only the card it comes with. An enabler can prevent your
computer from working with other PC Cards. When an enabler is used, you lose
the benefits of your existing PC Card software. You lose features such as Power
Management, Sleep, Hibernation, support for other PC Cards, and the ability to hot
plug (to insert cards without restarting your computer).
Enabler software should only be installed by an experienced user. In fact, an
enabler is rarely needed.
+
NOTE: An enabler can disable your computer’s ability to function with another PC
Card. As a precaution, copy your important files to a diskette before installing an
enabler.
NOTE: All Compaq computers with PC Card slots already have PC Card software
loaded. Do not install vendor-provided Card and Socket Services.
Index-1
right touchpad 2-2
scroll button 3-5
scroll lock 2-3
scroll up/down 2-2
stop 2-4, 3-10
volume down 2-4, 3-9, 3-10
volume up 2-4, 3-9, 3-10
Index
A
AC adapter 2-1
AC power
connecting 2-14
unplugging 2-14
access
depends on password 5-5
file 5-4
full 5-5
read-only 5-5
Add Printer Wizard 5-6
B
battery 2-1
charging 2-13
charging time 2-13
compartment 2-9
extra batteries 2-13
guage 2-4
buttons
CD/DVD eject 2-8
diskette eject 2-8
Disqplay on/off 2-4, 3-10
Instant E-Mail 2-3
Instant Internet Access 2-3
Instant Search 2-3
Internet zone 2-5
left touchpad 2-2
mute 3-10
My Presario 2-3
next track 2-4, 3-10
num lock 2-3
PC card eject 2-9
play/pause 2-4, 3-10
power 2-2, 2-3
previous track 2-4, 3-10
C
category 5 Ethernet 5-1
CD/DVD
drive 2-8
manual eject hole 2-8
computer
adjusting volume 3-9
back panel 2-10
bottom 2-11
connections 2-1
front 2-2
full off 3-2
left panel 2-8
main power off 3-2
name 5-3
password 5-3
right panel 2-9
scroll button 3-5
standard off 3-1
turning off 3-1
turning on 3-1
TV out 3-13
connecting to a network Printer 5-6
connection speeds 4-2
connectors
AC adapter 2-10
port replicator 2-10
TV out 2-10
D
disabling printer sharing 5-6
diskette 3-15, 3-16
1.44 MB 3-15
120 MB 3-15. See SuperDisk
3.5-inch See 1.44 MB
Index-2
720 KB 3-15
drive 2-8
eject button 2-8, 3-16
ejecting 3-16
formatting 3-19
handling 3-21
manually ejecting 3-17
storing 3-21
write protecting 3-18
diskette drive 3-15
display 2-2
display release latch 2-2
Disqplay
buttons 3-10
data CDs 3-12
next track button 3-10
no disc message 3-11
on/off button 3-10
play/pause button 3-10
playing CDs 3-11
previous track button 3-10
repeat all 3-12
repeat track 3-12
stop button 3-10
turning off 3-9
using 3-9
download speeds 4-2
drives
CD/DVD 2-8
diskette 2-8
F
fan vent 2-10
feet
pop-up 2-11
file sharing
enabling 5-2
folders
sharing 5-4
formatting a diskette 3-19
function keys
using 3-7
H
hard drive
sharing 5-4
help 1-2
hibernation 3-1
hub 5-1
I
icons
battery charging 3-6
battery charging status 2-4
battery gauge 3-6
Disqplay 2-4, 3-6
network 5-2
PC card 6-5
power 3-6
power status 2-4
repeat 3-6
repeat all 3-6
sleep 3-6
sleep status 2-4
status display 3-6
track/time 3-6
inserting the battery 2-12
Instant Answer 2-6
Instant E-Commerce
button 2-6
Instant E-mail 2-5
Instant Internet Access 2-5
Instant Search 2-5
Intel VideoPhone
compatibility with modem 4-1
International Telecommunications
Union 4-1
Internet PC 2-2
Internet zone 2-5
ITU See International
Telecommunications Union
Index-3
J
jack
headphone 2-9
microphone 2-9
K
K56flex 4-1
keyboard 2-2
Instant Answer 2-6
Instant E-Commerce 2-6
Instant E-Mail 2-5
Instant Internet 2-5
Instant Search 2-5
My Presario 2-5
numeric keypad 3-4
Online MarketPlace 2-6
Retail Central 2-6
modem 4-1
56K 4-1
cable 2-1
data/fax 4-1
identifying 4-1
properties 4-1
My Presario 2-5
N
lights
AC adapter 2-3
caps lock 2-3
status 3-5
name
computer 5-3
user 5-3
workgroup 5-3
network
configuring 5-1
hardware installation 5-1
hardware requirements 5-1
icon 5-2
installing protocols 5-2
setting up 5-1
network interface adapter 5-1
Network Neighborhood 5-7
network printer
connecting to 5-6
numeric keypad 3-4
M
P
mapping
a network drive 5-7
memory
adding 6-1
compartment 2-11
illustration 6-2
installing 6-2
specifications 6-1
messages
printer offline 5-6
Mobile Internet PC 2-2
model number 2-2
password 5-3
PC cards 6-3
CardBus 6-3
card-specific device driver 6-8
Compaq Netelligent PC Card 6-6
compatible 6-6
compatible network cards 6-6
configuring 6-7
definition 6-3
eject button 2-9
enablers 6-8
inserting 6-4
network cards 6-6
removing 6-5
slot 2-9
software 6-7, 6-8
L
Index-4
type I 6-3
type II 6-3
type III 6-3
types 6-3
PCMCIA See PC Cards
point-to-point connection 4-2
ports
Ethernet 2-9
modem 2-9
mouse/keyboard 2-10
printer/parallel 2-10
serial 2-10
speaker 2-11
USB 2-10
VGA 2-10
power
button 2-2
full off 3-2
main power off 3-2
turning off 3-1
turning on 3-1
print sharing
enabling 5-2
printer
connecting to a network 5-6
offline 5-6
printer sharing
disabling 5-6
protocol
IPX/SPX 5-2
TCP/IP 5-2
R
restarting the computer 3-3
S
Scandisk 3-3
securing your computer
security slot 2-8
serial number 2-11
serial numbers 1-3
share properties
file 5-4
shared folder
creating 5-4
sharing
folders 5-4
hard drive 5-4
slots
PC card 2-9
security 2-8
speakers 2-2
startup diskette
creating 3-18
status display 3-6
status lights 3-5
storage capacity 3-15
SuperDisk 2-8, 3-15, 3-16
copy disk 3-20
drive 2-8
features 3-15
SuperDisk Accelerator 3-20
disabling 3-20
enabling 3-20
icon 3-21
SuperDisk diskette
creating a startup 3-18
T
text conventions 1-1
touchpad 2-2
left button 2-2
right button 2-2
turning on and off your computer 3-1
TV out 3-13
adjusting television screen 3-14
connecting 3-13
displays 3-15
enabling 3-13
format 3-14
U
upload speed 4-2
user name 5-3
Index-5
V
V.90 standard 4-1, 4-2
volume
adjusting 3-9
control 3-9
W
workgroup 5-3
write protecting 3-18
Index-6