1
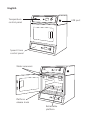
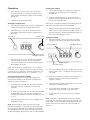
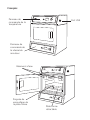
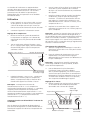
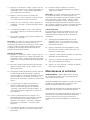
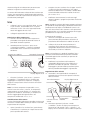
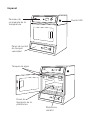
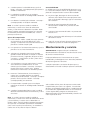
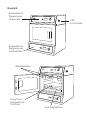
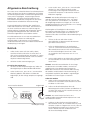
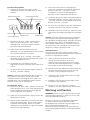
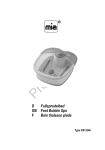
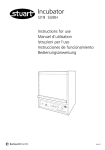
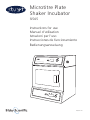
Microtitre Plate
Shaker Incubator
SI505
Instructions for use
Manuel d’utilisation
Istruzioni per l’uso
Instrucciones de funcionamiento
Bedienungsanweisung
on/off
temperature ºC
microtitre plate skaker incubator
press to set
S1505
rpm
time
on/off
start/sto
p mod
e
Version 1.0
English
on/off
temperature ºC
Temperature
control panel
microtitre plate skaker incubator
USB port
press to set
S1505
rpm
time
on/off
start/stop
mode
Speed / time
control panel
Water reservoirs
on/off
temperature ºC
microtitre plate skaker incubator
press to set
S1505
rpm
time
on/off
Platform
release knob
start/stop
mode
Retractable
platform
Microtitre Plate
Shaker Incubator
SI505
NOTE: Refer to the equipment’s rating plate to ensure
that the plug and fusing are suitable for the voltage and
wattage stated
The wires in the mains cable are coloured as follows:
BROWN BLUE GREEN/YELLOW Instructions for use
-
-
-
LIVE
NEUTRAL
EARTH
Introduction
The instrument is fitted with an IEC socket at the rear
of the instrument for connection of the mains lead. The
Thank you for purchasing this piece of Stuart equipment. appropriate mains lead should be connected BEFORE
To get the best performance from the equipment and for connection to the mains supply.
your own safety, please read these instructions carefully
Should the mains lead need replacement, a cable of
before use. Before discarding the packaging check that
1mm2 of harmonised code H05W-F connected to an
all parts are present and correct.
IEC320 plug should be used.
This equipment is designed to operate under the
IF IN DOUBT CONSULT A QUALIFIED ELECTRICIAN
following conditions:
•
•
•
•
•
•
•
•
For indoor use only
Use in a well ventilated area
Ambient temperature range +10ºC to +40ºC
Altitude to 2000m
Relative humidity not exceeding 80%
Mains supply fluctuation not exceeding 10%
Over-voltage category II IEC60364-4-443
Pollution degree 2
If the equipment is not used in the manner described
in this manual and with accessories other than those
recommended by Stuart, the protection provided may
be impaired.
Electrical Installation
THIS EQUIPMENT MUST BE EARTHED
Before connection please ensure that the line
supply corresponds to that shown on the rating
plate.
Model
SI505
Supply requirements
230V, 50 Hz,
Power
250W
The model is supplied with two mains leads fitted with
IEC plugs for connection to the instrument. One has
a U.K. 3 pin plug and the other has a 2 pin “Shuko”
plug for connection to the mains. Choose the lead
appropriate for your electrical installation and discard
the other. Should neither lead be suitable, take the lead
with the U.K. plug and replace the plug with a suitable
alternative. This involves cutting off the moulded plug,
preparing the cable and connecting to the re-wireable
plug in accordance with its instructions.
THIS OPERATION SHOULD ONLY BE UNDERTAKEN
BY A QUALIFIED ELECTRICIAN
Safety Advice Before Use
•
•
•
•
•
•
•
Do not attempt to lift or carry the unit alone.
Never move or carry the unit while it is in use or connected to the mains supply.
Do not use in a hazardous atmosphere or with hazardous materials.
Ensure that the load is balanced.
Do not attempt to stop movement by hand.
In the case of mains interruption, the unit will not restart on restoration of the electricity supply.
In the case of mechanical interruption (e.g. motor stall), the unit will continue operating on removal of interruption.
Some parts of the incubator may become hot
during use. These are clearly marked with
warning labels and include the heated base and
steel parts of the water reservoirs. Avoid touching
these parts when the incubator is running.
General Description
The Stuart SI505 microtitre plate shaker incubator is
ideal for mixing and aerating samples in microtitre
plates or micro centrifuge tubes under accurate
temperature controlled conditions. High speed
combined with a tiny orbit creates the vibrational
shaking action required for very small sample volumes.
The retractable platform allows for easy access when
loading or unloading samples. This has a non-slip mat
to hold microtitre plates in place and micro centrifuge
tubes of various sizes can be held in purpose built
accessory racks.
The incubator chamber is fitted with two water
reservoirs which allow the humidity of the chamber to
be increased, thus reducing the possibility of sample
loss due to evaporation over longer incubation
periods.
Operation
1.
Place the unit on a firm, level, non-slip surface ensuring that there is sufficient free space on all sides without coming into contact with anything during use.
2.
Connect to the electricity supply.
Loading the samples
9. Lift the release knob on the front of the platform and draw the platform out of the incubator towards you.
10. Place the microtitre plates or tube racks on the platform and push down gently onto the non-slip mat to help with adhesion.
Setting the temperature
Note: Up to 4 standard or deep-well microtitre plates or
3. Using the top control panel, switch the temperature two micro tube racks can be accommodated.
control unit ON by pressing the control knob.
11. Gently push the platform back into the incubator 4. Hold down the “press to set” button and turn until it locks in place and close the door. Failure to the control knob until the correct temperature is lock the platform in place before operating the unit displayed.
can result in damage to the unit.
Press to set
Control knob
Setting the speed
12. Using the keypad at the base of the instrument, switch the unit ON by pressing the control knob.
Time/speed LED
Red digital display
Red digital display
5.
Release the “press to set” button. The incubator will then begin to heat to the set temperature. The actual temperature inside the chamber will be displayed on the screen.
Note: The minimum set temperature is 10ºC and the
maximum is 60ºC, however the unit will only control to
a minimum of 7ºC above the ambient temperature e.g.
the minimum temperature at 10 ºC ambient is 17 ºC.
Increasing the chamber humidity
For longer incubations, it may be advantageous to
increase the humidity in the chamber to reduce the
amount of sample evaporation.
6.
7.
Open the door and slide out, or partially slide out the water reservoirs situated in the top of the chamber.
Mode button
Start/stop button
13. Press the mode button until a red dot shows in the display below “rpm”. The display will show the last set speed.
14. Adjust the speed by turning the control knob. The minimum speed is 250rpm and the maximum speed is 1250rpm.
15. Once the correct speed is displayed, press the start/
stop button to begin motion.
16. The speed can be adjusted at any time without halting the unit by turning the control knob.
Fill each reservoir to the ‘max fill’ mark with distilled or deionised water. This should be sufficient to 17. To stop the unit at any time, press the start/stop humidify the chamber to 80-90% humidity for 72h button.
at 37ºC.
Note: If the door is opened while the unit is in motion
8. Carefully replace the reservoirs in the holders and a warning alert will sound and the motion will stop. The
push back to stop.
word “door” will also be momentarily displayed on the
screen. The heater will remain ON. Close the door to
Note: When using the water reservoirs for a long
continue.
period of incubation, it is possible that small quantities
of water may be found on the bottom of the chamber.
This should not affect the safety or performance of the
product but regular drying with a cloth is recommended.
Setting the timer
18. Press the mode button until a red dot shows in the display below “time”. The display will show three horizontal lines or the last set time.
19. For continuous operation, set the display to the three horizontal lines.
Maintenance & Servicing
WARNING: Ensure the unit is disconnected from the
mains electricity supply before attempting maintenance
or servicing.
Periodically clean the instrument using a damp cloth and
mild detergent solution. Do not use harsh or abrasive
cleaning agents.
20.
Select the required countdown time by turning
the control knob. The time will be displayed first in Any repairs or replacement of parts MUST be
minutes and seconds, next in hours and minutes, then in days and hours up to a maximum of 9 days. undertaken by suitably qualified personnel.
21.
If the platform is already in motion, countdown will start immediately. Otherwise, press the start/stop button to begin countdown; motion will also start at the set speed.
22.
During operation, motion and countdown can be paused at any time by pressing the start/
stop button. Press the start/stop button again to continue.
23. The timer can be adjusted at any time without halting the unit by turning the control knob.
24. When the timer reaches zero, the unit will automatically stop motion and an alert will sound.
For a comprehensive list of parts required by service
engineers conducting internal repairs, please contact the
Service Department, quoting both the model number
and serial number:
E-mail: [email protected]
Tel: +44 (0)1785 810475
Fax: +44 (0)1785 810471
Only spare parts supplied or specified by Stuart or its
agents should be used. Fitting of non-approved parts
may affect the performance of the safety features
designed into the instrument. If in any doubt, please
contact the Service Department of Bibby Scientific Ltd.
or the point of sale.
For any other technical enquiries, please contact the
Technical Support Department:
Note: If the door is opened while the unit is in motion a
E-mail: [email protected],
warning alert will sound and the motion and countdown
Tel: +44 (0)1785 810433.
will stop. The word “door” will also be momentarily
displayed on the screen. The heater will remain ON.
Close the door to continue and the countdown will
resume from the point at which it was stopped.
Description
Catalogue Number
Tube holder for 1.5ml tubes
SSM5/1
USB connectivity
Tube holder for 0.5ml tubes
SSM5/2
The SI505 has capability to connect to a PC via USB
Tube holder for 0.2ml tubes
SSM5/3
for long term tracking of the incubator chamber
temperature.
Warranty
Stuart warrants this equipment to be free from defects
25. First, download the latest version of the SI505 in material and workmanship, when used under normal
software from www.stuart-equipment.com. Once laboratory conditions, for a period of three (3) years.
downloaded, follow the installation instructions.
In the event of a justified claim, Stuart will replace any
defective component or replace the unit free of charge.
26. Remove the waterproof cap from the USB port on This warranty does NOT apply if damage is caused by
the side of the SI505 and connect the included fire, accident, misuse, neglect, incorrect adjustment
cable.
or repair, damage caused by installation, adaptation,
modification, fitting of non-approved parts or repair by
27. Connect the other end of the cable to a free USB unauthorised personnel.
port on a PC.
Spares and Accessories
28. Follow the software instructions for new hardware installation.
29. Click ‘Run Software’ to complete the program start-
up.
Technical Specification
Temperature range
Temperature display resolution
Temperature fluctuation
Speed range
Orbit diameter
Maximum load
Speed control
Timer
Electrical supply
Fuses
Dimensions (w x d x h)
Net weight
SI505
Ambient +7ºC to 60ºC
0.1ºC
±0.5ºC at 37ºC
250 to 1250rpm
1.5mm
1kg
Digital set in 10rpm increments
min/s, h/min, day/h
230V, 50Hz, 250W
2 x Anti-surge T3.15A
361 x 405 x 430mm
22.5kg
Français
on/off
temperature ºC
Panneau de
commande de la
température
Panneau de
commande de
la vitesse/du
minuteur
microtitre plate skaker incubator
Port USB
press to set
S1505
rpm
time
on/off
start/stop
mode
Réservoirs d’eau
on/off
temperature ºC
microtitre plate skaker incubator
press to set
S1505
rpm
time
on/off
Poignée de
verrouillage de
la plate-forme
start/stop
mode
Plate-forme
rétractable
Incubateur agitateur
pour plaques de
microtitrage
SI505
Manuel d’utilisation
Introduction
Nous vous remercions d’avoir fait l’acquisition de
cet équipement Stuart. Pour profiter au mieux des
performances de cet équipement et pour votre sécurité,
lisez attentivement ces instructions avant toute
utilisation. Avant de jeter l’emballage, vérifiez que tous
les éléments sont présents et en bon état.
Cet appareil est conçu pour fonctionner dans les
conditions suivantes :
•
•
•
•
•
•
•
•
Utilisation à l’intérieur uniquement
Utilisation dans un lieu correctement ventilé
Température ambiante de +10 ºC à +40 ºC
Altitude maximale de 2 000 m
Taux d’humidité relative n’excédant pas 80 %
Fluctuations de l’alimentation secteur n’excédant
pas 10 %
Surtension de catégorie II IEC60364-4-443
Degré de pollution 2
Si l’appareil n’est pas utilisé conformément aux directives
détaillées dans ce manuel ou avec des accessoires
différents de ceux recommandés par Stuart, la protection
fournie risque d’être inefficace
Installation électrique
CET APPAREIL DOIT ÊTRE MIS À LA
Avant toute connexion, vérifiez que l’alimentation
secteur correspond aux caractéristiques indiquées
sur la plaque signalétique.
Modèle Spécifications d’alimentation
SI505
230 V, 50 Hz,
Puissance
250 W
Cet instrument est fourni avec deux cordons
d’alimentation équipés de fiches IEC. L’un de ces
cordons est équipé d’une fiche britannique à 3 broches
et l’autre d’une fiche « Shuko » à deux broches.
Choisissez le cordon d’alimentation adapté à votre
installation électrique et mettez l’autre de côté. Si aucun
des cordons ne convient, utilisez le cordon équipé d’une
fiche britannique après avoir remplacé celle-ci par une
fiche appropriée. Cette opération consiste à couper le
cordon du côté de la fiche moulée, à préparer les fils et
à les connecter à une fiche démontable, conformément
aux instructions fournies avec cette dernière.
CETTE OPÉRATION DOIT ÊTRE RÉALISÉE PAR UN
ÉLECTRICIEN QUALIFIÉ.
REMARQUE : Reportez-vous à la plaque signalétique
de l’appareil afin de vous assurer que la fiche et les
fusibles sont adaptés à la tension et à la puissance
mentionnées. Les couleurs des fils du cordon
d’alimentation sont les suivantes :
MARRON BLEU VERT/JAUNE -
-
-
PHASE
NEUTRE
TERRE
L’appareil est équipé d’une prise IEC sur sa face arrière,
pour la connexion du cordon d’alimentation. Le cordon
d’alimentation approprié doit être connecté à l’appareil
AVANT de le brancher sur une prise secteur. Si le cordon
d’alimentation doit être remplacé, utilisez un câble d’1
mm2 de type H05W-F (code harmonisé), connecté à
une fiche IEC320.
EN CAS DE DOUTE, CONSULTEZ UN ÉLECTRICIEN
QUALIFIÉ.
Consignes de sécurité
• Ne pas tenter de soulever ou de porter l’appareil seul.
• Ne jamais déplacer ou porter l’appareil lorsqu’il est en fonctionnement ou connecté à l’alimentation secteur.
• Ne pas utiliser dans une atmosphère dangereuse ou en présence de substances dangereuses.
• S’assurer de l’équilibre de la charge.
• Ne pas tenter de stopper le mouvement de l’appareil manuellement.
• En cas de coupure de l’alimentation secteur, l’appareil
ne redémarrera pas au rétablissement de l’alimentation.
• En cas d’interruption mécanique (par exemple, en cas de calage du moteur), l’appareil reprendra son fonctionnement une fois la cause de l’interruption corrigée.
Certaines parties de l’incubateur peuvent
chauffer durant son fonctionnement. Celles-ci
sont clairement identifiées à l’aide d’étiquettes
d’avertissement. Il s’agit notamment de la base
chauffée et des parties en acier des réservoirs
d’eau. Évitez de toucher ces éléments durant le
fonctionnement de l’incubateur.
Description générale
L’incubateur agitateur pour plaques de microtitrage
Stuart SI505 est idéal pour le mélange ou l’aération
d’échantillons placés sur des plaques de microtitrage
ou dans des micro-éprouvettes à centrifuger, dans des
conditions de contrôle précis de la température. La
vitesse élevée de l’appareil, combinée à une orbite de
diamètre réduit, génère l’effet d’agitation vibratoire
requis pour les échantillons de très faible volume.
La plate-forme rétractable permet un accès aisé pour
le chargement ou le déchargement des échantillons.
Elle est équipée d’un tapis antidérapant permettant de
maintenir les plaques de microtitrage en place. Il est
possible de placer des micro-éprouvettes à centrifuger
de différentes tailles dans des casiers optionnels conçus
spécialement.
La chambre de l’incubateur est équipée de deux
réservoirs d’eau qui permettent d’augmenter le taux
d’humidité à l’intérieur de celle-ci. Ces réservoirs
permettent ainsi de réduire le risque de perte
d’échantillons due à l’évaporation en cas de délais
d’incubation élevés.
Utilisation
1.
Placez l’appareil sur une surface stable, à niveau et non glissante, en veillant à laisser un espace suffisant de chaque côté afin qu’il n’entre en contact avec aucun élément lors de son utilisation.
2.
Connectez l’appareil à l’alimentation secteur.
Réglage de la température
3. Mettez en marche le système de contrôle de la température en appuyant sur le bouton de commande situé sur le panneau de commande supérieur.
4.
Tout en maintenant enfoncé le bouton « press to set » (appuyer pour régler), tournez le bouton de commande jusqu’à ce que la température souhaitée s’affiche.
Bouton « Press to set »
Bouton de commande
6.
Ouvrez la porte et faites glisser les réservoirs d’eau situés dans la partie supérieure de la chambre de façon à les extraire totalement ou partiellement de l’appareil.
7.
Remplissez chaque réservoir avec de l’eau distillée ou déionisée, jusqu’au repère de remplissage maximum. Ce volume est normalement suffisant pour obtenir à l’intérieur de la chambre un taux d’humidité de 80 à 90 % durant 72 heures, à une température de 37 ºC.
8.
Replacez les réservoirs dans leurs supports avec précaution, puis poussez-les vers l’arrière jusqu’à ce qu’ils se bloquent.
Remarque : Lorsque les réservoirs d’eau sont utilisés au
cours d’un processus d’incubation de longue durée, il
est possible de constater la présence de petites quantités
d’eau sur le fond de la chambre. Ce phénomène n’a
aucun impact négatif sur la sécurité ou les performances
de l’appareil, mais il est conseillé d’essuyer régulièrement
cette eau à l’aide d’un chiffon.
Chargement des échantillons
9. Soulevez la poignée de verrouillage à l’avant de la plate-forme et tirez celle-ci vers vous pour l’extraire de l’incubateur.
10.
Placez les plaques de microtitrage ou les casiers d’éprouvettes sur la plate-forme et appuyez doucement dessus pour favoriser son adhérence sur le tapis antidérapant.
Remarque : L’appareil peut accueillir 4 plaques de
microtitrage standard ou à puits profonds, ou deux
casiers de micro-éprouvettes.
11. Poussez doucement la plate-forme dans l’incubateur jusqu’à ce qu’elle se bloque Écran d’affichage dans la position appropriée, puis fermez la porte. numérique rouge Assurez-vous que la plate-forme est correctement bloquée dans la position appropriée avant la mise 5. Relâchez le bouton « press to set ». L’incubateur en marche de l’incubateur. Dans le cas contraire, commence à chauffer jusqu’à la température vous risqueriez d’endommager l’appareil.
définie. La température réelle à l’intérieur de la chambre de l’appareil est affichée à l’écran.
Réglage de la vitesse
12. Mettez l’appareil sous tension (ON) en appuyant sur le bouton de commande du panneau de Remarque : La température minimum de
commande situé à la base de l’appareil.
fonctionnement est de 10 ºC et la température
maximum de fonctionnement est de 60 ºC. Cependant,
Affichage
l’appareil permet uniquement une température
digital rouge
Voyant de minuterie/vitesse
minimum de fonctionnement supérieure de 7 ºC à la
température ambiante (par exemple, à une température
ambiante de 10 ºC, la température minimum de
fonctionnement est de 17 ºC).
Augmentation du taux d’humidité à l’intérieur de
la chambre
Pour les processus d’incubation de longue durée, il
peut être utile d’augmenter le taux d’humidité dans la
chambre de l’appareil afin de limiter l’évaporation des
échantillons.
Bouton Mode
Bouton Start/stop
Bouton de
commande
13.
Appuyez sur le bouton « mode » jusqu’à ce qu’un 24. Lorsque le compte à rebours est terminé, point rouge apparaisse sur l’écran d’affichage, sous l’appareil s’arrête automatiquement et émet un l’indication « rpm ». L’écran d’affichage indique avertissement sonore.
alors la dernière vitesse définie.
Remarque : Si la porte est ouverte alors que l’appareil
14. Réglez la vitesse en tournant le bouton de est en fonctionnement, une alarme retentit et le
commande. La vitesse minimum est de 250 tr/min. mouvement de l’appareil ainsi que le compte à rebours
et la vitesse maximum est de 1250 tr/min.
sont interrompus. Le mot « door » (porte) s’affiche
à l’écran durant quelques instants. Le dispositif de
15. Lorsque la vitesse souhaitée s’affiche, appuyez sur chauffage continue de fonctionner. Refermez la porte
le bouton « start/stop » (marche/arrêt) pour lancer pour remettre l’appareil en marche. Le compte à rebours
la rotation.
du minuteur reprend au stade où il avait été arrêté.
16. Il est possible de régler la vitesse à tout moment, sans arrêter l’appareil, en tournant le bouton de commande.
17. Pour arrêter l’appareil à tout moment, appuyez sur le bouton « start/stop ».
Remarque : Si la porte est ouverte alors que l’appareil
est en fonctionnement, une alarme retentit et le
mouvement de l’appareil est interrompu. Le mot « door
» (porte) s’affiche à l’écran durant quelques instants.
Le dispositif de chauffage continue de fonctionner.
Refermez la porte pour continuer.
Réglage du minuteur
18. Appuyez sur le bouton « mode » jusqu’à ce qu’un point rouge apparaisse sur l’écran d’affichage, sous l’indication « time ». L’écran affiche alors trois lignes horizontales ou le dernier délai de fonctionnement défini.
19. Pour que l’appareil fonctionne de façon continue, réglez l’écran de façon à ce qu’il affiche les trois lignes horizontales.
Connectivité USB
Il est possible de connecter l’incubateur SI505 à un
ordinateur, grâce au port USB, pour assurer le suivi
à long terme de la température de la chambre de
l’incubateur.
25.
Téléchargez tout débord la dernière version
du logiciel SI505 sur le site Web www.stuart-
equipment.com. Suivez ensuite les instructions d’installation fournies.
26. Retirez le capuchon étanche protégeant le port USB situé sur le côté de l’incubateur SI505, puis connectez le câble fourni.
27. Connectez l’autre extrémité du câble à un port USB disponible de votre ordinateur.
28. Suivez les instructions du logiciel pour l’installation d’un nouvel équipement matériel.
29. Cliquez sur « Run Software » (Exécuter le logiciel) pour lancer le programme.
Maintenance et entretien
20.
Sélectionnez le délai de compte à rebours souhaité à l’aide du bouton de commande. Le délai de compte à rebours s’affiche tout d’abord en minutes AVERTISSEMENT : Veillez à déconnecter l’appareil
de l’alimentation secteur avant toute opération de
et en secondes, puis en heures et en minutes et enfin en jours et en heures, jusqu’à un maximum de maintenance ou d’entretien.
9 jours.
Nettoyez périodiquement l’appareil à l’aide d’un chiffon
humide et d’un détergent doux. N’utilisez pas de
21. Si la plate-forme est déjà en mouvement, le produits nettoyants abrasifs ou corrosifs.
compte à rebours démarre immédiatement. Dans le cas contraire, appuyez sur le bouton Toute opération de réparation ou de remplacement de
start/stop » pour lancer le compte à rebours. La pièces DOIT être réalisée par un technicien qualifié.
plate-forme commence également à tourner à la vitesse définie.
Pour obtenir la liste complète des pièces nécessaires aux
techniciens de maintenance réalisant des réparations
22. Durant le fonctionnement de l’appareil, il est internes, contactez notre service d’assistance en
possible d’interrompre à tout moment la rotation mentionnant le numéro de modèle et le numéro de
de la plate-forme et le compte à rebours en série :
appuyant sur le bouton « start/stop ». Appuyez de nouveau sur le bouton « start/stop » pour continuer.
23. Il est possible de régler le minuteur à tout moment, sans arrêter l’appareil, en tournant le bouton de commande.
Seules des pièces détachées fournies ou spécifiées par
Stuart ou l’un de ses représentants doivent être utilisées.
L’installation de pièces non approuvées peut affecter
l’efficacité des dispositifs de sécurité intégrés à l’appareil.
En cas de doute, contactez le service d’assistance de
Bibby Scientific Ltd. ou votre revendeur.
Pièces détachées et accessoires
Description
Porte-éprouvettes pour éprouvettes de 1,5 ml
Porte-éprouvettes pour éprouvettes de 0,5 ml
Porte-éprouvettes pour éprouvettes de 0,2 ml
Référence
SSM5/1
SSM5/2
SSM5/3
Garantie
Stuart garantit cet appareil contre tout défaut de pièces
ou de main-d’œuvre, dans des conditions d’utilisation
normale en laboratoire, pour une période de trois (3)
ans. En cas de réclamation justifiée, Stuart remplacera
gratuitement l’appareil ou tout composant défectueux.
Cette garantie NE s’applique PAS en cas de dommages
provoqués par un incendie, un accident, une utilisation
inappropriée, une négligence, un réglage incorrect, une
réparation inadéquate, une installation, une adaptation
ou une modification inappropriée, l’installation de pièces
non approuvées ou la réalisation de réparations par un
personnel non autorisé.
Caractéristiques techniques
Plage de températures
Résolution d’affichage de la température
Fluctuation de la température
Plage de vitesse
Diamètre d’orbite
Charge maximum
Réglage de la vitesse
Minuteur
Alimentation électrique
Fusibles
Dimensions (l x p x h)
Poids net
SI505
De la température ambiante +7 ºC jusqu’à 60 ºC
0,1 ºC
±0,5 ºC à 37 ºC
250 à 1250 tr/min.
1,5 mm
1 kg
Réglage numérique par incréments de 10 tr/min.
min/s, h/min, jour/h
230 V, 50 Hz, 250 W
2 fusibles anti-surtensions T 3,15 A
361 x 405 x 430 mm
22,5 kg
Italiano
on/off
temperature ºC
Pannello di
controllo della
temperatura
Pannello di
controllo della
velocità/del
tempo
Vaschette per
l’acqua
microtitre plate skaker incubator
Porta USB
press to set
S1505
rpm
time
on/off
start/stop
mode
on/off
temperature ºC
microtitre plate skaker incubator
press to set
S1505
rpm
time
on/off
Manopola di
rilascio della
piattaforma
start/stop
mode
Piattaforma
estraibile
Incubatore agitatore
per piastre di
microtitolazione
SI505
NOTA: controllare che la spina e i fusibili siano adatti
alla tensione e alla potenza indicate consultando la
targhetta dei dati nominali dell’apparecchio
Colori dei conduttori nel cavo di alimentazione:
MARRONE BLU VERDE/GIALLO Istruzioni per l’uso
Introduzione
Grazie per aver acquistato questo apparecchio Stuart.
Per ottenere le migliori prestazioni dall’apparecchio e
per operare in completa sicurezza, leggere attentamente
le istruzioni prima dell’uso. Prima di gettare via la
confezione, controllare che tutti i componenti siano
presenti e integri.
Condizioni di esercizio previste:
-
-
-
FASE
NEUTRO
TERRA
Nella parte posteriore dello strumento è presente una
presa IEC per il collegamento del cavo di alimentazione.
Collegare il cavo di alimentazione PRIMA allo strumento
e poi alla presa di rete.
Se il cavo di alimentazione deve essere sostituito,
utilizzare un cavo da 1 mm2, codice armonizzato
H05W-F, collegato a una spina IEC320.
IN CASO DI DUBBIO CONTATTARE UN ELETTRICISTA
• Solo per uso in ambienti al chiuso
• Utilizzare in ambienti ben ventilati
• Intervallo di temperatura ambiente da +10ºC a +40ºC
• Altitudine fino a 2.000 m
• Umidità relativa non superiore all’80%
• Fluttuazioni dell’alimentazione di rete non superiori al 10%
• Categoria di sovratensione II IEC60364-4-443
• Grado di inquinamento 2
L’uso per scopi diversi da quelli indicati sul manuale e
l’impiego di accessori differenti da quelli raccomandati
da Stuart possono compromettere la sicurezza
dell’apparecchio.
Impianto elettrico
L’APPARECCHIO DEVE ESSERE DOTATO DI COLLEGAMENTO A TERRA
Prima di collegare l’apparecchio, controllare
che l’alimentazione di rete corrisponda a quella
indicata sulla targhetta dei dati nominali.
Modello Alimentazione
SI505
230 V, 50 Hz
QUESTA OPERAZIONE DEVE ESSERE ESEGUITA
UNICAMENTE DA UN ELETTRICISTA QUALIFICATO
Potenza
250 W
Il modello viene fornito con due cavi di alimentazione
provvisti di spina IEC per il collegamento allo strumento.
Per il collegamento alla rete elettrica, un cavo presenta
una spina tripolare del tipo in uso nel Regno Unito,
mentre l’altro è dotato di una spina bipolare di tipo
Schuko. Utilizzare il cavo adatto all’impianto elettrico in
uso. Se nessuno dei due risulta appropriato, sostituire
la spina del tipo in uso nel Regno Unito con una di tipo
idoneo. Per eseguire questa operazione, occorre tagliare
via la spina esistente, preparare il cavo e collegarlo alla
spina sostitutiva seguendo le relative istruzioni.
Indicazioni di sicurezza da leggere
prima dell’uso
•
•
•
•
•
•
•
Non sollevare o trasportare l’unità da soli.
Non spostare o trasportare l’unità mentre è in funzione o collegata alla rete elettrica.
Non usare in atmosfere pericolose o con sostanze pericolose.
Controllare che il carico sia bilanciato.
Non arrestare il movimento manualmente.
In caso di interruzione della corrente di rete, al ripristino dell’alimentazione l’unità non riprende a funzionare.
In caso di arresto dovuto a motivi meccanici (ad esempio stallo del motore), una volta eliminata la causa del blocco l’unità riprende a funzionare.
Durante l’uso, alcuni componenti dell’incubatore,
tra cui la base riscaldata e le parti in acciaio delle
vaschette per l’acqua, potrebbero diventare caldi.
Tali componenti sono chiaramente contrassegnati
con etichette di avvertenza e non vanno toccati
quando l’incubatore è in funzione.
Descrizione generale
L’incubatore agitatore per piastre di microtitolazione
Stuart SI505 rappresenta la soluzione ideale per
miscelare ed aerare campioni contenuti in piastre di
microtitolazione o in provette da microcentrifuga in
accurate condizioni di temperatura controllata. L’elevata
velocità, abbinata a un leggero movimento orbitale,
crea l’effetto di agitazione vibrazionale necessario per
volumi di campione molto ridotti.
La piattaforma estraibile consente un facile accesso per
l’inserimento e la rimozione dei campioni ed è fornita
di un tappetino antiscivolo che trattiene le piastre di
microtitolazione in posizione, mentre provette da
microcentrifuga di varie dimensioni possono essere
collocate in apposite rastrelliere accessorie.
La camera dell’incubatore è dotata di due vaschette per
l’acqua, che permettono l’umidificazione dell’ambiente,
riducendo il rischio di evaporazione dei campioni in caso
di incubazioni prolungate.
Uso
1.
Collocare l’unità su una superficie solida, in piano e non scivolosa, controllando che vi sia spazio sufficiente su tutti i lati e che l’apparecchio non tocchi altri oggetti durante l’uso.
2. Collegare l’apparecchio alla rete elettrica.
Regolazione della temperatura
3. Attivare l’unità di controllo della temperatura premendo la manopola di comando situata sul pannello di controllo superiore.
4.
Tenendo premuto il pulsante “press to set” (“premere per regolare”), ruotare la manopola di comando fino a visualizzare la temperatura desiderata.
Premere per regolare
7.
Riempire ciascuna vaschetta fino al segno “max fill”
(“livello massimo di riempimento”) con acqua distillata o deionizzata. In tal modo, l’umidità della camera dovrebbe mantenersi intorno all’80-90% per 72 ore a 37ºC.
8. Ricollocare accuratamente le vaschette negli appositi supporti e spingerle in posizione finché non si arrestano.
Nota: quando le vaschette dell’acqua vengono utilizzate
per periodi di tempo prolungati, potrebbero accumularsi
piccole quantità di acqua sul fondo della camera. Ciò
non avrà alcun effetto sulla sicurezza o sulle prestazioni
dell’apparecchio, ma si consiglia comunque di asciugare
periodicamente l’acqua con un panno.
Inserimento dei campioni
9. Sollevare la manopola di rilascio situata sulla parte anteriore della piattaforma ed estrarre la piattaforma dall’incubatore tirandola verso di sé.
10.
Collocare le piastre di microtitolazione o le rastrelliere con le provette sulla piattaforma, spingendole delicatamente contro il materassino antiscivolo per favorirne l’adesione.
Nota: la piattaforma è in grado di accogliere fino a
Manopola di comando 4 piastre di microtitolazione con pozzetti standard
o profondi oppure due rastrelliere per provette da
microcentrifuga.
11.
Ricollocare la piattaforma nell’incubatore spingendola delicatamente fino a bloccarla in posizione e chiudere lo sportello. Il mancato bloccaggio in posizione della piattaforma prima dell’uso potrebbe danneggiare l’apparecchio.
Regolazione della velocità
Display digitale rosso 12. Accendere l’unità premendo la manopola di comando situata sulla tastiera presente alla base dello strumento.
5. Rilasciare il pulsante “press to set” (“premere
per regolare”). L’incubatore inizia a riscaldarsi per
LED velocità/tempo
Display digitale rosso
raggiungere la temperatura impostata. Sul display
compare la temperatura effettiva misurata all’interno
della camera.
Nota: la minima temperatura impostabile è 10ºC,
mentre la massima è 60ºC; tuttavia, la temperatura
impostata deve essere di almeno 7ºC superiore alla
temperatura ambiente. Ad esempio, la temperatura
minima raggiungibile dall’apparecchio a una
temperatura ambiente di 10ºC è 17ºC.
Umidificazione della camera
In caso di incubazioni prolungate, potrebbe risultare utile
aumentare l’umidità della camera per ridurre il rischio di
evaporazione del campione.
6. Aprire il portello e far scivolare fuori, parzialmente o totalmente, le vaschette per l’acqua situate nella parte superiore della camera.
Pulsante di avvio/
arresto
13.
Pulsante della
modalità
Manopola di
comando
Mantenere premuto il pulsante “mode” (“modalità”) finché sul display non compare un punto rosso al di sotto di “rpm” (“giri/min”). Sul display verrà visualizzata l’ultima velocità impostata.
14. Regolare la velocità ruotando la manopola di comando. La velocità minima è di 250 giri/min, la massima di 1250 giri/min.
“door” (“sportello”). Il riscaldatore rimarrà acceso. Per
continuare, chiudere lo sportello: il conto alla rovescia
riprenderà dal punto in cui si era interrotto.
15. Quando sul display compare la velocità desiderata, premere il pulsante “start/stop” per dare inizio al movimento.
Connettività USB
L’incubatore agitatore SI505 può essere collegato a un
PC via USB per registrare nel tempo la temperatura della
camera dell’incubatore.
16. La velocità può essere modificata in qualsiasi momento senza arrestare l’unità ruotando la manopola di comando.
17. Per arrestare l’apparecchio in qualsiasi momento, premere il pulsante “start/stop”.
Nota: se lo sportello viene aperto mentre la piattaforma
è in movimento, l’apparecchio emette un segnale
acustico e il movimento si arresta. Inoltre, sul display
viene visualizzata temporaneamente la parola “door”
(“sportello”). Il riscaldatore rimarrà acceso. Chiudere lo
sportello per continuare.
Regolazione del timer
18. Mantenere premuto il pulsante “mode” (“modalità”) finché sul display non compare un punto rosso al di sotto di “time” (“tempo”). Sul display vengono visualizzate tre linee orizzontali oppure l’ultimo intervallo di tempo impostato.
19. Per un funzionamento continuato, impostare il display sulle tre linee orizzontali.
20. Selezionare l’intervallo di tempo desiderato per il
conto alla rovescia ruotando la manopola di comando. Il tempo viene visualizzato dapprima in minuti e secondi, quindi in ore e minuti e infine in giorni e ore, fino a un massimo di 9 giorni.
21. Se la piattaforma è già in movimento, il conto alla rovescia partirà immediatamente. Altrimenti, premere il pulsante “start/stop” per dare inizio al conto alla rovescia e avviare il movimento della piattaforma alla velocità impostata.
22. Il movimento della piattaforma e il conto alla rovescia possono essere interrotti in qualsiasi momento premendo il pulsante “start/stop”. Premere nuovamente il pulsante “start/stop” per continuare.
23. Il timer può essere regolato in qualsiasi momento senza arrestare l’unità ruotando la manopola di comando.
24. Quando il timer arriva a zero, il movimento della piattaforma si arresta automaticamente e l’apparecchio emette un segnale acustico.
Nota: se lo sportello viene aperto mentre la piattaforma
è in movimento, l’apparecchio emette un segnale
acustico e il conto alla rovescia si arresta. Inoltre, sul
display viene visualizzata temporaneamente la parola
25. Innanzitutto, occorre scaricare l’ultima versione del
software SI505 dal sito www.stuart-equipment.com.
Una volta scaricato il software, seguire le istruzioni di
installazione.
26. Rimuovere il cappuccio impermeabile della porta
USB situata sul lato dell’apparecchio e collegare
l’apposito cavo fornito in dotazione.
27. Collegare l’altra estremità del cavo a una porta USB
libera su un PC.
28. Seguire le istruzioni del software per l’installazione
del nuovo hardware.
29. Fare clic su “Run Software” (“Esegui software”) per
completare l’avvio del programma.
Manutenzione e assistenza
AVVERTENZA: prima di procedere a interventi di
manutenzione o riparazione, assicurarsi che l’unità sia
scollegata dalla rete elettrica.
Pulire lo strumento periodicamente con un panno
umido e un detergente blando. Non utilizzare detergenti
abrasivi o aggressivi.
Eventuali interventi di riparazione o sostituzione devono
essere eseguiti UNICAMENTE da personale qualificato.
Usare solo ricambi forniti o autorizzati da Stuart o dai
suoi agenti. L’impiego di componenti non autorizzati
può compromettere le prestazioni o le caratteristiche
di sicurezza dello strumento. Per qualsiasi dubbio
contattare il centro assistenza di Bibby Scientific Ltd. o il
punto vendita.
Ricambi e accessori
Descrizione
Supporto per provette da 1,5ml
Supporto per provette da 0,5ml
Supporto per provette da 0,2 ml
Codice catalogo
SSM5/1
SSM5/2
SSM5/3
Garanzia
Stuart garantisce questo apparecchio da difetti di
materiale e fabbricazione per un periodo di tre (3)
anni, se utilizzato in normali condizioni di laboratorio.
In caso di reclamo giustificato, Stuart provvederà alla
sostituzione dei componenti difettosi o dell’unità senza
addebitare costi al cliente. Questa garanzia NON copre i
danni provocati da incendi, incidenti, uso non conforme,
negligenza, errori di regolazione o di riparazione,
danni dovuti a installazioni, adattamenti, modifiche,
montaggio di componenti non approvati o riparazioni
condotte da personale non autorizzato.
Dati tecnici
Intervallo di temperatura
Risoluzione di visualizzazione temperatura
Fluttuazioni termiche
Intervallo di velocità
Diametro orbitale
Carico massimo
Regolatore velocità
Timer
Alimentazione elettrica
Fusibili
Dimensioni (l x p x a)
Peso netto
SI505
Da 7ºC al di sopra della temperatura ambiente fino a 60ºC
0,1ºC
±0,5ºC a 37ºC
Da 250 a 1250 giri/min
1,5mm
1kg
Impostato digitalmente con incrementi di 10 giri/min
min/s, ore/min, giorni/ore
230 V, 50 Hz, 250 W
2 fusibili T3 da 15 A con protezione contro le sovracorrenti
361 x 405 x 430 mm
22,5 kg
Espanol
on/off
temperature ºC
Panneau de
commande de la
température
Panel de control
de tiempo/
velocidad
microtitre plate skaker incubator
Puerto USB
press to set
S1505
rpm
time
on/off
start/stop
mode
Tanques de agua
on/off
temperature ºC
microtitre plate skaker incubator
press to set
S1505
rpm
time
on/off
Pomo de
liberación de la
plataforma
start/stop
mode
Plataforma
retráctil
Incubador/agitador
de placas de
microtitulación
ESTA OPERACIÓN SÓLO DEBE LLEVARLA A CABO
UN ELECTRICISTA CUALIFICADO
Instrucciones de funcionamiento
MARRÓN AZUL VERDE/AMARILLO SI505
Introducción
Gracias por adquirir este equipo de Stuart. Para obtener
el máximo rendimiento del equipo y para su propia
seguridad, lea detenidamente estas instrucciones antes
de utilizarlo. Antes de desechar el embalaje, compruebe
que todas las piezas estén presentes y en buen estado.
Este equipo se ha diseñado para funcionar en las
condiciones siguientes:
• Sólo para uso en interior
• Se debe utilizar en un área bien ventilada
• Rango de temperatura ambiente: de +10 ºC a +40 ºC
• Altitud: hasta 2000 m
• Humedad relativa: inferior al 80%
• Fluctuación de la alimentación eléctrica: inferior al 10%
• Categoría de sobretensión II según la norma IEC60364-4-443
• Grado de contaminación: 2
Si el equipo no se utiliza tal como se describe en
este manual y se emplean accesorios distintos a los
recomendados por Stuart, la protección ofrecida puede
verse afectada.
Instalación eléctrica
ESTE EQUIPO DEBE CONECTARSE A
TIERRA
Antes de la conexión asegúrese de que la
alimentación de línea corresponde a la que se
muestra en la placa de características
Modelo Requisitos de alimentación SI505
230 V, 50 Hz
Potencia
250 W
El modelo se suministra con dos cables de alimentación
provistos de enchufes IEC que se conectan al
instrumento. Uno de los cables tiene un enchufe de tres
pines (Reino Unido) y el otro dispone de un enchufe
“Shuko” de dos pines para la conexión a la red eléctrica.
Elija el cable adecuado para su instalación eléctrica y
deseche el otro. Si ninguno de los dos es adecuado,
seleccione el cable que tiene el enchufe para el Reino
Unido y sustituya el enchufe por otro que sea apropiado.
Esto implica cortar el enchufe moldeado, preparar el
cable y conectarlo a un enchufe desmontable según las
instrucciones pertinentes.
NOTA: Consulte la placa de características del equipo
para asegurarse de que utiliza el enchufe y el fusible
adecuados para la tensión y potencia indicadas.
Los hilos del cable de alimentación tienen los colores
siguientes:
-
-
-
FASE
NEUTRO
TIERRA
El instrumento está provisto de un zócalo IEC situado
en la parte posterior en el que se conecta el cable de
alimentación. ANTES de la conexión a la red eléctrica,
debe conectarse el cable de alimentación adecuado.
Si fuera preciso sustituir el cable de alimentación, se
utilizará un cable de 1 mm2 de código armonizado
H05VV-F conectado a un enchufe IEC320.
SI TIENE DUDAS AL RESPECTO, CONSULTE A UN
ELECTRICISTA CUALIFICADO.
Aviso de seguridad antes del uso
•
•
•
•
•
•
•
No intente levantar o transportar la unidad por su cuenta.
No mueva ni transporte nunca la unidad cuando esté
en funcionamiento o esté conectada a la alimentación de red eléctrica.
No debe utilizarse en atmósferas peligrosas ni junto con materiales peligrosos.
Asegúrese de que la carga esté equilibrada.
No intente detener el movimiento de la unidad de forma manual.
En caso de que se interrumpa la alimentación eléctrica, la unidad no volverá a arrancar tras restaurarse el suministro eléctrico.
En caso de interrupción mecánica (por ejemplo, el calado del motor), la unidad continuará funcionando una vez que finalice dicha interrupción.
Algunas piezas del incubador podrían calentarse
durante el uso. Estas piezas, que están claramente
señaladas con etiquetas de advertencia, incluyen
la base calefactada y las piezas de acero de los
tanques de agua. Evite tocar estas piezas mientras
el incubador esté en funcionamiento.
Descripción general
El incubador/agitador de placas de microtitulación
Stuart SI505 resulta idóneo para mezclar y airear
muestras en placas de microtitulación o tubos de
microcentrífuga en condiciones controladas de
temperatura precisa. La combinación de la velocidad
alta y de la minúscula órbita crea la acción de agitación
por vibración necesaria para volúmenes de muestra muy
pequeños.
La plataforma retráctil facilita el acceso para la carga y
descarga de muestras. Dispone de una almohadilla no
deslizante que mantiene las placas de microtitulación
en su sitio y se pueden almacenar los tubos de
microcentrífuga de distintos tamaños en bastidores
específicamente diseñados para ello.
La cámara del incubador cuenta con dos tanques de
agua que permiten aumentar la humedad de la cámara,
con lo que se reduce la posibilidad de que se pierda
muestra por efecto de la evaporación durante períodos
de incubación largos.
Funcionamiento
1. Coloque la unidad en una superficie firme, nivelada y no deslizante, y asegúrese de que haya suficiente espacio libre en todos los lados para evitar que pueda entrar en contacto con otros objetos durante su funcionamiento.
7.
Llene cada tanque hasta la marca de llenado máximo con agua destilada o desionizada. Esto debería bastar para darle a la cámara una humedad del 80-90% durante 72 h a 37 ºC.
8. Vuelva a colocar con cuidado los tanques en los soportes y empújelos hasta que se detengan.
Nota: Cuando los tanques de agua se utilizan durante
períodos de incubación largos, se pueden quedar
pequeñas cantidades de agua en la parte inferior de
la cámara. Esto no debería influir en la seguridad o el
rendimiento del producto, pero se recomienda secar esta
agua periódicamente con un paño.
Carga de las muestras
9. Levante el pomo de liberación de la parte frontal de la plataforma y tire de la plataforma hacia usted haciéndola salir del incubador.
2. Conéctela a la alimentación eléctrica.
10. Coloque las placas de microtitulación o los bastidores de tubos en la plataforma y ejerza una
Ajuste de la temperatura
suave presión sobre la almohadilla no deslizante 3. Utilice el panel de control superior para encender para facilitar la adhesión.
(ON) la unidad de control de temperatura pulsando el botón de control.
Nota: Se pueden acomodar hasta cuatro placas de
microtitulación Deepwell o estándar, o dos bastidores de
4. Mantenga pulsado el botón “press to set” (pulsar microtubos.
para establecer) y gire el botón hasta que se muestre la temperatura correcta.
11. Empuje suavemente la plataforma para devolverla Pulsar para establecer
Botón de control
al incubador hasta que quede bloqueada en su sitio y cierre la puerta. Si no se coloca la plataforma en su lugar antes de utilizar la unidad, se pueden producir daños en la unidad.
Ajuste de la velocidad
12. Utilice el teclado situado en la base del instrumento para encender (ON) la unidad pulsando el botón de control.
LED de tiempo/velocidad
Pantalla digital roja
Pantalla digital roja
5. Suelte el botón “press to set” (pulsar para establecer).
A continuación, el incubador empezará a calentarse hasta la temperatura establecida. La temperatura real dentro de la cámara se mostrará en la pantalla.
Nota: La temperatura mínima establecida es de 10
ºC y la máxima es de 60 ºC. No obstante, la unidad
controlará únicamente hasta un mínimo de 7 ºC por
encima de la temperatura ambiente, por ejemplo, si la
temperatura ambientemínima es de 10 ºC, controlará
hasta 17 ºC.
Aumento de la humedad de la cámara
Para incubaciones más largas, podría resultar beneficioso
aumentar la humedad de la cámara para reducir la
cantidad de evaporación de muestra.
6. Abra la puerta y saque completa o parcialmente los tanques de agua situados en la parte superior de la cámara.
Botón de arranque/parada
Botón de
modo
Botón de
control
13. Pulse el botón “mode” (modo) hasta que aparezca un punto rojo en la pantalla debajo de “rpm”. La pantalla mostrará la velocidad que se fijó por última vez.
14. Ajuste la velocidad girando el botón de control. La velocidad mínima es de 250 rpm y la máxima de 1250 rpm.
15. Cuando aparezca la velocidad correcta, pulse el Conectividad USB
botón “start/stop” (arranque/parada) para poner la La unidad SI505 tiene la posibilidad de conectarse a un
unidad en movimiento.
PC a través de USB para realizar un seguimiento a largo
plazo de la temperatura de la cámara del incubador.
16. La velocidad se puede ajustar en cualquier momento sin detener la unidad girando el botón de 25. En primer lugar, descargue la última versión del control.
software SI505 desde www.stuart-equipment.com. Una vez finalizada la descarga, siga las instrucciones 17. Para detener la unidad, pulse el botón “start/stop” de instalación.
(arranque/parada) en cualquier momento.
26. Extraiga el tapón hermético del puerto USB Nota: Si se abre la puerta estando la unidad en
del lateral de la unidad SI505 y conecte el cable movimiento, se emitirá una alerta de advertencia
suministrado.
sonora y el movimiento se detendrá. La palabra “door”
(puerta) también aparecerá brevemente en la pantalla.
27. Conecte el otro extremo del cable a un puerto USB El calentador permanecerá encendido (ON). Cierre la
libre de un PC.
puerta para continuar.
28. Siga las instrucciones del software para la instalación Ajuste del temporizador
de hardware nuevo.
18. Pulse el botón “mode” (modo) hasta que aparezca un punto rojo en la pantalla debajo de “time” 29. Haga clic en Run Software (Ejecutar software) para (tiempo). Se mostrarán tres líneas horizontales en la completar la puesta en marcha del programa.
pantalla o el último tiempo fijado.
19. Para permitir un funcionamiento continuo, ajuste la pantalla a las tres líneas horizontales.
20.
Seleccione el tiempo de cuenta atrás deseado girando el botón de control. El tiempo se mostrará primero en minutos y segundos, después en horas y minutos y, a continuación, en días y horas hasta un máximo de 9 días.
21.
Si la plataforma ya está en movimiento, la cuenta atrás comenzará inmediatamente. En caso contrario, pulse el botón “start/stop” (arranque/
parada) para iniciar la cuenta atrás. También comenzará el movimiento a la velocidad ajustada.
22.
Durante el funcionamiento, el movimiento y la cuenta atrás se pueden detener en cualquier momento pulsando el botón “start/stop” (arranque/
parada). Vuelva a pulsar el botón “start/stop” (arranque/parada) para continuar.
Mantenimiento y servicio
ADVERTENCIA: Asegúrese de que la unidad esté
desconectada de la red eléctrica antes de efectuar tareas
de servicio o mantenimiento.
Limpie periódicamente el instrumento con un paño
humedecido y un detergente suave. No utilice productos
de limpieza agresivos o abrasivos.
Cualquier reparación o sustitución de piezas que se
efectúe DEBE ser llevada a cabo por personal cualificado.
23. El temporizador se puede ajustar en cualquier momento sin detener la unidad girando el botón de Sólo se deben utilizar piezas de repuesto suministradas
o especificadas por Stuart o sus agentes. La instalación
control.
de piezas no aprobadas puede afectar al rendimiento de
las funciones de seguridad diseñadas en el instrumento.
24. Cuando el temporizador llegue a cero, la unidad detendrá automáticamente el movimiento y se oirá Si tiene alguna duda, póngase en contacto con el
departamento de servicio técnico de Bibby Scientific Ltd.
una alerta.
o con el punto de venta.
Nota: Si se abre la puerta estando la unidad en
movimiento, se emitirá una alerta de advertencia sonora
y el movimiento y la cuenta atrás se detendrán. La
palabra “door” (puerta) también aparecerá brevemente
en la pantalla. El calentador permanecerá encendido
(ON). Cierre la puerta para continuar y se reanudará la
cuenta atrás en el punto en el que se detuvo.
Repuestos y accesorios
Descripción
Gradilla para tubos de 1,5 ml
Gradilla para tubos de 0,5 ml
Gradilla para tubos de 0,2 ml
Número de catálogo
SSM5/1
SSM5/2
SSM5/3
Garantía
Stuart garantiza que este equipo estará libre de defectos
de material o fabricación, siempre que se utilice en
condiciones normales de laboratorio, por un período
de tres (3) años. En el caso de que se presente una
reclamación justificada, Stuart sustituirá gratuitamente
el componente defectuoso o toda la unidad. Esta
garantía NO se aplicará a ningún daño causado por
incendio, accidente, uso inadecuado, negligencia, ajuste
incorrecto o reparación, ni ningún daño causado por
una instalación, adaptación, modificación, instalación de
piezas no aprobadas o reparación llevadas a cabo por
personal no autorizado.
Especificaciones técnicas
Rango de temperaturas
Resolución de visualización de temperatura
Fluctuación de temperatura
Rango de velocidad
Diámetro orbital
Carga máxima
Control de velocidad
Temporizador
Alimentación eléctrica
Fusibles
Dimensiones (An. x Pr. x Al.)
Peso neto
SI505
Ambiente de +7 ºC a 60 ºC
0,1 ºC
±0.5 ºC a 37 ºC
de 250 a 1250 rpm
1.5mm
1kg
Ajuste digital en incrementos de 10 rpm
min/s, h/min, día/h
230 V, 50 Hz, 250 W
2 x contra transitorios de T3.15 A
361 x 405 x 430 mm
22,5 kg
Deutsch
Bedienfeld zur
Regelung der
Temperatur
Bedienfeld zur
Regelung von
Zeit/Drehzahl
on/off
temperature ºC
microtitre plate skaker incubator
USBSchnittstelle
press to set
S1505
rpm
time
on/off
start/stop
mode
Wasserbehälter
on/off
temperature ºC
microtitre plate skaker incubator
press to set
S1505
rpm
time
on/off
Knopf zum
Entriegeln der
Plattform
start/stop
mode
Einschubplattform
Schüttelinkubator für
Mikrotiterplatten
DIESER VORGANG DARF NUR VON EINEM
QUALIFIZIERTEN ELEKTRIKER DURCHGEFÜHRT
WERDEN.
SI505
HINWEIS: Prüfen Sie anhand des Geräteschilds,
dass Stecker und Sicherungen für die angegebene
Spannungs- und Stromstärke geeignet sind.
Bedienungsanweisung
Die Leiter des Netzkabels sind wie folgt farbcodiert:
Einführung
BRAUN
-
BLAU -
GRÜN/GELB - Vielen Dank, dass Sie sich für dieses Stuart-Gerät
entschieden haben. Lesen Sie bitte vor Verwendung
des Geräts gründlich diese Gebrauchsanweisung, um
das Potenzial des Geräts optimal nutzen zu können und
Ihre eigene Sicherheit zu gewährleisten. Überprüfen Sie
bitte vor dem Entsorgen der Verpackung, dass alle Teile
vorhanden und in Ordnung sind.
Dieses Gerät ist für den Betrieb unter folgenden
Bedingungen ausgelegt:
• Nur für den Betrieb in Innenräumen
• Betrieb in gut belüfteten Räumen
• Umgebungstemperatur +10ºC bis +40ºC
• Höhenlagen bis 2000 m
• Relative Luftfeuchtigkeit maximal 80 %
• Schwankungen in der Stromversorgung maximal
10 %
• Überspannungskategorie II IEC60364-4-443
• Verschmutzungsgrad 2
Das Gerät darf nur in der hier beschriebenen Weise
und mit Zubehör betrieben werden, das von Stuart
empfohlen wurde; andernfalls kann der gewährte
Schutz beeinträchtigt werden.
Elektrische Installation
DIESES GERÄT MUSS GEERDET WERDEN.
Vergewissern Sie sich vor dem Anschluss, dass die
Netzspannung den Angaben auf dem Geräteschild
entspricht.
Modell Erforderliche
Spannungs-
Spannungsversorgung versorgung
SI505
230 V, 50 Hz,
250 W
Das Modell ist mit zwei Netzkabeln mit IEC-Steckern
für den Anschluss an das Gerät ausgestattet. Zum
Anschluss an die Stromversorgung ist ein Kabel mit
einem 3-poligen GB-Stecker, das andere mit einem
2-poligen Schukostecker versehen. Wählen Sie das für
Ihre Elektroinstallation geeignete Kabel und entfernen
Sie das andere. Sollten beide Kabel ungeeignet sein,
entfernen Sie den GB-Stecker und ersetzen Sie ihn
durch eine geeignete Alternative. Dazu müssen Sie den
Formstecker abschneiden, das Kabel vorbereiten und
den verdrahtbaren Stecker gemäß den Anweisungen
anschließen.
SPANNUNGSFÜHREND
NEUTRAL
MASSE
Auf der Rückseite des Instruments befindet sich
eine IEC-Buchse für den Anschluss des Netzkabels.
Der entsprechende Netzstromleiter muss verbunden
werden, BEVOR der Anschluss an die Stromversorgung
erfolgt.
Sollte ein Austausch des Netzkabels erforderlich sein,
muss ein Kabel mit einem Querschnitt von 1 mm2 mit
dem harmonisierten Code H05VV-F und einem IEC320Stecker verwendet werden.
BEI ZWEIFELN WENDEN SIE SICH AN EINEN
QUALIFIZIERTEN ELEKTRIKER
Vor dem Einsatz zu beachtende
Sicherheitshinweise
•
•
•
•
•
•
•
Versuchen Sie nicht, das Gerät allein anzuheben oder zu tragen.
Transportieren Sie das Gerät nicht, wenn es in Betrieb oder an die Netzstromversorgung angeschlossen ist.
Betreiben Sie das Gerät nicht in einer gefährlichen Umgebung oder einer Umgebung mit gefährlichen Werkstoffen.
Stellen Sie eine ausgeglichene Last sicher.
Versuchen Sie nicht, die Bewegung des Geräts mit der Hand zu stoppen.
Bei Stromausfällen startet das Gerät nicht automatisch, wenn die Stromversorgung wieder hergestellt ist.
Bei mechanischen Unterbrechungen (z. B. Stoppen des Motors) setzt das Gerät den Betrieb fort, sobald die Ursache für die Unterbrechung beseitigt ist.
Einige Komponenten des Inkubators können
sich während des Betriebs erhitzen. Diese
Komponenten, zu denen u.a. der erwärmte
Sockel und aus Stahl gefertigte Teile der
Wasserbehälter zählen, sind deutlich mit
Warnhinweisen gekennzeichnet. Vermeiden Sie
während des Betriebs des Inkubators jeglichen
Kontakt mit diesen Komponenten.
Allgemeine Beschreibung
Der Stuart SI505 Schüttelinkubator für Mikrotiterplatten
eignet sich ideal zum Mischen und Belüften von Proben
auf Mikrotiterplatten oder in Mikrozentrifugenröhrchen
unter präzise festgelegten, temperaturgesteuerten
Bedingungen. Eine hohe Drehzahl kombiniert mit
einer kleinen Umlaufbahn erzeugt die für sehr kleine
Probenvolumen erforderliche Vibrationswirkung.
Die Einschubplattform erleichtert den Zugriff beim
Laden oder Entnehmen von Proben. Die Plattform ist
mit einer rutschfesten Matte zur Stabilisierung der
Mikrotiterplatten ausgelegt und verfügt über speziell
gefertigte Zubehörgestelle für die Aufnahme von
Mikrozentrifugenröhren verschiedener Größen.
Die Inkubatorkammer ist mit zwei Wasserbehältern
ausgestattet. Sie dienen zur Erhöhung der
Luftfeuchtigkeit in der Kammer, um bei längeren
Inkubationszeiten das Risiko von Probenverlusten durch
Verdampfung zu verringern.
5.
Hinweis: Die Mindestsolltemperatur beträgt 10ºC
und die maximale Solltemperatur 60ºC. Das Gerät
lässt sich jedoch nur auf mindestens 7ºC oberhalb
der Umgebungstemperatur einregeln, d. h. bei einer
Umgebungstemperatur von beispielsweise 10°C beträgt
die Mindestsolltemperatur 17ºC.
Erhöhung der Luftfeuchtigkeit in der Kammer
Bei längeren Inkubationszeiten ist es möglicherweise
von Vorteil, die Luftfeuchtigkeit in der Kammer zu
erhöhen und so das Ausmaß der Probenverdamfpung zu
reduzieren.
6. Öffnen Sie die Tür und ziehen Sie die Wasserbehälter im oberen Bereich der Kammer ganz oder teilweise heraus.
7.
1. Stellen Sie das Gerät auf eine stabile, ebene, rutschfeste Fläche und stellen Sie sicher, dass an allen Seiten ausreichend Platz vorhanden ist, sodass das Gerät während des Betriebs nicht mit anderen 8.
Objekten in Berührung kommt.
2. Schließen Sie die Stromversorgung an.
Betrieb
Einstellen der Temperatur
3. Schalten Sie den Temperaturregler EIN, indem Sie den Reglerknopf im oberen Bedienfeld drücken.
4.
Halten Sie die Taste „press to set“ (zum Einstellen drücken) gedrückt und drehen Sie dabei den Reglerknopf, bis die richtige Temperatur angezeigt wird.
Zum Einstellen drücken
Reglerknopf
Lassen Sie die Taste „press to set“ (zum Einstellen drücken) los. Der Inkubator beginnt mit der Erwärmung auf die eingestellte Temperatur. Die tatsächliche Temperatur in der Kammer wird am Bildschirm angezeigt.
Füllen Sie beide Behälter bis zur Markierung „max fill“ (maximaler Füllstand) mit destilliertem oder entionisiertem Wasser. Dies müsste ausreichen, um eine Luftfeuchtigkeit von 80-90% über 72 Stunden bei einer Temperatur von 37ºC zu erzeugen.
Setzen Sie die Behälter vorsichtig in die Halterungen ein und schieben Sie sie bis zum Anschlag in das Gerät hinein.
Hinweis: Wenn die Wasserbehälter für eine lange
Inkubationszeit verwendet werden, sammelt sich
möglicherweise eine geringe Wassermenge am
Boden der Kammer an. Die Sicherheit oder Leistung
des Produkts wird hierdurch nicht beeinträchtigt, es
wird jedoch empfohlen, den Boden in regelmäßigen
Abständen mit einem Lappen zu trocknen.
Laden der Proben
9. Heben Sie den Entriegelungsknopf vorne an der Plattform an und ziehen Sie die Plattform aus dem Inkubator zu sich heraus.
10.
Stellen Sie die Mikrotiterplatten bzw. die Röhrchengestelle auf die Plattform und drücken Sie sie leicht nach unten auf die rutschfeste Matte, um die Haftung zu erhöhen.
Hinweis: Das Gerät bietet Platz für bis zu 4
Standard- oder Deep-Well-Mikrotiterplatten bzw. zwei
Mikroröhrchen-Gestelle.
11.
Rote Digitalanzeige
Schieben Sie die Plattform vorsichtig wieder in den Inkubator zurück, bis sie hörbar einrastet, und schließen Sie die Tür. Vergewissern Sie sich, dass die Einschubplattform eingerastet ist, bevor Sie das Gerät in Betrieb nehmen. Andernfalls kann das Gerät beschädigt werden.
Einstellen der Drehzahl
12. Schalten Sie das Gerät EIN, indem Sie den Reglerknopf auf dem Tastenfeld unten am Gerät drücken.
Drehzahl-/Zeit-LED
Rote Digitalanzeige
21. Wenn die Plattform bereits in Bewegung ist, startet der Countdown unverzüglich. Andernfalls drücken Sie die Taste „start/stop“, um den Countdown zu starten; die Bewegung setzt daraufhin mit der eingestellten Drehzahl ein.
22. Sie können das Gerät und den Countdown jederzeit während des Betriebs anhalten, indem Sie die Taste „start/stop“ drücken. Um den Betrieb fortzusetzen, drücken Sie erneut „start/stop“.
23. Der Timer lässt sich jederzeit über den Reglerknopf einstellen, ohne das Gerät anhalten zu müssen.
Start/Stopp-Taste
Modus-Taste
Reglerknopf
13. Drücken Sie die Taste „mode“ (Modus), bis ein roter Punkt am Display unter „rpm“ (U/Min) angezeigt wird. Am Display erscheint danach die zuletzt eingestellte Drehzahl.
14. Stellen Sie die Drehzahl durch Drehen des Regelknopfs ein. Die Mindestdrehzahl lautet 250 U/
Min, die Höchstdrehzahl 1250 U/Min.
24. Sobald der Timer Null erreicht hat, stoppt das Gerät automatisch die Bewegung und gibt ein Warnsignal aus.
Hinweis: Wenn bei laufendem Gerät die Tür geöffnet
wird, ertönt ein Warnsignal und die Bewegung und
der Countdown werden gestoppt. Außerdem erscheint
kurzzeitig das Wort „door“ auf dem Bildschirm. Die
Heizung bleibt EINGESCHALTET. Schließen Sie die Tür,
um fortzufahren. Der Countdown wird an dem Punkt
fortgesetzt, an dem er gestoppt wurde.
USB-Schnittstelle
Der SI505 kann über eine USB-Schnittstelle zwecks
Langzeitüberwachung der Inkubatorkammer-Temperatur
an einen PC angeschlossen werden.
15. Drücken Sie die Taste „start/stop“ (Start/Stopp), sobald die richtige Drehzahl angezeigt wird, um das 25. Laden Sie hierzu bitte zunächst die neuste Gerät in Bewegung zu setzen.
Version der SI505 Software von unserer Webseite www.stuart-equipment.com herunter. 16. Die Drehzahl lässt sich jederzeit über den Wenn der Download abgeschlossen ist, befolgen Reglerknopf einstellen, ohne das Gerät anhalten zu Sie bitte die Installationsanweisungen.
müssen.
26. Nehmen Sie die wasserdichte Verschlusskappe von 17. Sie können das Gerät jederzeit stoppen, indem Sie der USB-Schnittstelle seitlich am SI505 ab und die Taste „start/stop“ drücken.
schließen Sie das mitgelieferte Kabel an.
Hinweis: Wenn bei laufendem Gerät die Tür geöffnet
wird, ertönt ein Warnsignal und das Gerät stoppt.
Außerdem erscheint kurzzeitig das Wort „door“ auf
dem Bildschirm. Die Heizung bleibt EINGESCHALTET.
Schließen Sie die Tür, um fortzufahren.
27. Schließen Sie das andere Ende an eine freie USB-
Schnittstelle Ihres PC an.
28. Befolgen Sie die Software-Anweisungen für die Installation neuer Hardware.
Einstellen des Timers
29. Klicken Sie auf „Run Software“ (Software ausführen), um den Programmstart abzuschließen.
18. Drücken Sie die Taste „mode“ (Modus), bis ein roter Punkt am Display unter „time“ (Zeit) angezeigt wird. Danach werden drei horizontale Linien oder die zuletzt eingestellte Zeit angezeigt.
WARNUNG: Stellen Sie sicher, dass das Gerät von der
19. Stellen Sie für Dauerbetrieb das Display auf die drei Stromversorgung getrennt ist, bevor Sie Service- oder
Wartungsarbeiten durchführen.
horizontalen Linien ein.
Wartung und Service
20. Wählen Sie die erforderliche Countdown-Zeit durch
Drehen des Reglerknopfes. Die Zeit wird zunächst in Minuten und Sekunden, danach in Stunden und Minuten und schließlich in Tagen und Stunden bis maximal 9 Tage angezeigt.
Reinigen Sie das Gerät in regelmäßigen Abständen
mit einem feuchten Lappen und einer milden
Reinigungslösung. Verwenden Sie keine aggressiven
oder scheuernden Reinigungsmittel.
Reparaturen und ein Austausch von Teilen MÜSSEN
von entsprechend qualifiziertem Personal durchgeführt
werden.
Es dürfen nur Ersatzteile verwendet werden, die von
Stuart oder seinen Vertretern geliefert oder angegeben
werden. Die Verwendung nicht genehmigter Teile
kann die Leistung der in das Gerät integrierten
Sicherheitseinrichtungen beeinträchtigen. Bei
Fragen oder Zweifeln wenden Sie sich bitte an die
Serviceabteilung von Bibby Scientific Ltd. oder an die
Verkaufsstelle.
Ersatzteile und Zubehör
Beschreibung
Röhrchenhalter für 1,5 ml-Röhrchen
Röhrchenhalter für 0,5 ml-Röhrchen
Röhrchenhalter für 0,2 ml-Röhrchen
Katalog-Nummer
SSM5/1
SSM5/2
SSM5/3
Garantie
Stuart garantiert, dass dieses Gerät frei von Materialund Herstellungsfehlern ist. Bei Einsatz unter normalen
Laborbedingungen wird eine Garantie von drei (3) Jahren
gewährt. Bei einem berechtigten Garantieanspruch
ersetzt Stuart defekte Bauteile oder das gesamte Gerät
kostenlos. Diese Garantie gilt NICHT, wenn Schäden
durch Feuer, Unfall, Missbrauch, Nachlässigkeit, falsche
Einstellung oder Reparatur, durch Installation, Adaption,
Modifikation, Montage nicht genehmigter Teile oder
Reparatur durch nicht autorisierte Personen entstanden
sind.
Technische Daten
Temperaturbereich
Auflösung der Temperaturanzeige
Temperaturschwankung
Drehzahlbereich
Bahndurchmesser
Maximale Last
Drehzahlregelung
Timer
Stromversorgung
Sicherungen
Abmessungen (B x T x H)
Nettogewicht
SI505
Umgebungstemperatur +7ºC bis 60ºC
0,1ºC
±0,5ºC bei 37ºC
250 bis 1250 U/Min
1,5 mm
1 kg
Digital in Schritten von 10 U/Min
min/s, h/min, Tag/h
230 V, 50 Hz, 250 W
2 x Überspannungsschutz T 3,15 A
361 x 405 x 430 mm
22,5 kg
Notes
This product meets the applicable
EC harmonized standards for radio
frequency interference and may be
expected not to interfere with, or be affected
by, other equipment with similar qualifications.
We cannot be sure that other equipment
used in its vicinity will meet these standards
and so we cannot guarantee that interference
will not occur in practice. Where there is a
possibility that injury, damage or loss might occur
if equipment malfunctions due to radio frequency
interference, or for general advice before use,
contact the Technical Department of Bibby
Scientific Ltd.
INSPECTION REPORT
MODEL SI505
ELECTRICAL SAFETY
1. Earth continuity
2. Insulation
3. Flash test
FUNCTIONAL
1. Indicators
2. Speed/temperature
3. Visual acceptance
QUALITY CONTROL INSPECTOR
Bibby Scientific France SAS
Bibby Scientific Italia Srl
ZI du Rocher Vert - BP 79
77793 Nemours Cedex
France
Tel: +33 1 64 45 13 13
Fax: +33 1 64 45 13 00
e-mail: [email protected]
www.bibby-scientific.com
Via Alcide de Gasperi 56
20077 Riozzo di Cerro al Lambro
Milano Italia
Tel: +39 (0)2 98230679
Fax: +39 (0)2 98230211
e-mail: [email protected]
www.bibby-scientific.it
Bibby Scientific Ltd
Bibby Scientific US Ltd
Bibby Scientific (Asia) Ltd
Beacon Road Stone
Staffordshire ST15 0SA
United Kingdom
Tel: +44 (0)1785 812121
Fax: +44 (0)1785 810471
e-mail: [email protected]
www.bibby-scientific.com
3 Terri Lane Suite 10
Burlington NJ 08016
USA
Tel: 800-225-9243
Fax: 609-589-2571
www.bibby-scientific.com
Room 607 Yen Sheng Centre
64 Hoi Yuen Road Kwun Tong
Kowloon Hong Kong
Tel: +852 3583 1581
Fax: +852 3583 1580
e-mail [email protected]
www.bibby-scientificasia.com
Thank you for reading this data sheet.
For pricing or for further information, please contact us at our UK Office, using the details
below.
UK Office
Keison Products,
P.O. Box 2124, Chelmsford, Essex, CM1 3UP, England.
Tel: +44 (0)1245 600560
Fax: +44 (0)1245 808399
Email: [email protected]
Please note - Product designs and specifications are subject to change without notice. The user is responsible for determining the
suitability of this product.