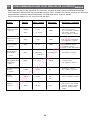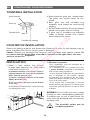
1
FR MANUEL D’UTILISATION EN INSTRUCTION MANUAL Four à micro-ondes Microwave oven CE3282 Chère Cliente, Cher Client, Vous venez d’acquérir un four micro-ondes BRANDT et nous vous en remercions. Nous avons mis dans cet appareil toute notre passion, notre savoir-faire pour qu’il réponde au mieux à vos besoins. Innovant, performant, nous l’avons conçu pour qu’il soit aussi toujours facile à utiliser. Vous trouverez également dans la gamme des produits BRANDT, un vaste choix de fours, de tables de cuisson, de hottes aspirantes, de cuisinières, de lave-vaisselle, de lave-linge, de sèche-linge, de réfrigérateurs et congélateurs que vous pourrez coordonner à votre nouveau four à micro-ondes BRANDT. Bien entendu, dans un souci permanent de satisfaire le mieux possible vos exigences vis à vis de nos produits, notre service consommateurs est à votre disposition et à votre écoute pour répondre à toutes vos questions ou suggestions (coordonnées à la fin de ce livret). Et connectez-vous aussi sur notre site www.brandt.com où vous trouverez tous nos produits, ainsi que des informations utiles et complémentaires. BRANDT Dans le souci d’une amélioration constante de nos produits, nous nous réservons le droit d’apporter à leurs caractéristiques techniques, fonctionnelles ou esthétiques toutes modifications liées à leur évolution. Important : Avant de mettre votre appareil en marche, veuillez lire attentivement ce guide d’installation et d’utilisation afin de vous familiariser plus rapidement avec son fonctionnement. FR SOMMAIRE 1/A L’ATTENTION DE L’UTILISATEUR • Consignes de sécurité ....................................................................... 4 • Principe de fonctionnement ............................................................. 6 • Protection de l’environnement......................................................... 6 2/INSTALLATION DE VOTRE APPAREIL • Avant le branchement ....................................................................... • Le raccordement électrique .............................................................. • Ustensiles. .......................................................................................... • Description de votre appareil ........................................................... • Descriptif du bandeau de commande ......................................................................................... 7 7 8 9 10 3/UTILISATION DE VOTRE APPAREIL • Instructions de fonctionnement ....................................................... 12 • Tableau des menus pour les programmes automatiques ............. 19 4/ENTRETIEN ET NETTOYAGE DE VOTRE APPAREIL............................. 25 5/EN CAS D’ANOMALIES DE FONCTIONNEMENT................................. 26 6/SERVICE APRES-VENTE ET RELATIONS CONSOMMATEURS • Interventions ...................................................................................... 27 • Relations consommateurs................................................................ 27 7/RECOMMANDATIONS POUR MESURE DE LA PERFORMANCE ....... 28 EN INSTRUCTION MANUAL.................................................. 2 9 3 FR 1/A L’ATTENTION DE L’UTILISATEUR et la température doit être vérifiée avant consommation, afin d’éviter les brûlures. Important : Conservez cette notice d’utilisation avec votre appareil. Si l’appareil devait être vendu ou cédé à une autre personne, assurez-vous que la notice d’utilisation l’accompagne. Merci de prendre connaissance de ces conseils avant d’installer et d’utiliser votre appareil. Ils ont été rédigés pour votre sécurité et celle d’autrui. • CONSIGNES Ne chauffez jamais un biberon avec sa tétine (risque d’explosion). Ne laissez pas les enfants utiliser le four sans surveillance sauf si des instructions appropriées ont été données afin que l’enfant puisse utiliser le four de façon sûre et comprenne les dangers d’un usage incorrect. Utilisez toujours des gants isolants pour retirer les plats du four. Certains plats absorbent la chaleur des aliments, et sont donc très chauds. DE SECURITE Votre appareil est exclusivement destiné à un usage domestique pour la cuisson, le réchauffage ou la décongélation des aliments. Le fabricant se dégage de toute responsabilité en cas d’utilisations non conformes. Les liquides ou autres aliments ne doivent pas être chauffés dans des récipients hermétiques car ils risquent d’exploser. Vérifiez que les ustensiles sont appropriés à l’usage dans un four à micro-ondes. Il est recommandé de ne pas chauffer les œufs dans leur coquille et les œufs durs entiers dans un four micro-ondes car ils risquent d’exploser, même après la fin de la cuisson. Pour ne pas détériorer votre appareil, ne jamais le faire fonctionner à vide ou sans plateau. Le chauffage de boissons par micro-ondes peut provoquer un jaillissement brusque et différé de liquide en ébullition, aussi des précautions doivent être prises lorsqu’on manipule le récipient. N’intervenez pas dans les orifices de la serrure en face avant vous pourriez créer des dommages sur votre appareil qui nécessiteraient une intervention. Le joint et l’encadrement de la porte doivent être inspectés régulièrement pour s’assurer qu’ils ne sont pas détériorés. Si ces zones étaient endommagées, n’utilisez plus l’appareil et faites-le contrôler par un technicien spécialisé. Dans le cas de petites quantités (une saucisse, un croissant, etc...) posez un verre d’eau à côté de l’aliment. Des temps trop longs peuvent dessécher l’aliment et le carboniser. Pour éviter de tels incidents, n’utilisez jamais les mêmes temps préconisés pour une cuisson au four traditionnel. Pendant le chauffage de denrées alimentaires dans des contenants en plastique ou en papier, gardez un œil sur le four en raison de la possibilité d’inflammation. Si de la fumée apparaît, arrêtez ou débranchez le four et gardez la porte fermée pour étouffer les flammes éventuelles. En fonction micro-ondes et micro-ondes + chaleur tournante, il est déconseillé d’utiliser des récipients métalliques, des fourchettes, des cuillères, des couteaux ainsi que des liens et agrafes en métal pour sachets de congélation. Il est dangereux pour toute personne non qualifiée d’ôter un capot de protection contre l’exposition à l’énergie à microondes. Le contenu des biberons et des pots d’aliments pour bébés doit être remué ou agité Compte tenu des températures atteintes lorsque l’appareil fonctionne en mode 4 FR 1/A L’ATTENTION DE L’UTILISATEUR associé, les enfants ne doivent utiliser le four que sous la surveillance d’un adulte (uniquement pour les appareils avec grill) sur cet appareil. Ce four est spécifiquement conçu pour réchauffer. Il n’est pas destiné à un usage industriel ou en laboratoire. Lisez et respectez les consignes spécifiques « PRECAUTIONS A PRENDRE POUR EVITER UNE EVENTUELLE EXPOSITION A UNE TROP FORTE QUANTITE D’ENERGIE A MICRO-ONDES ». Si le cordon d’alimentation est endommagé, il doit être remplacé par le fabricant, son représentant ou toute autre personne qualifiée afin d’éviter tous dangers. Ne surcuisez pas les aliments. Ne rangez pas et n’utilisez pas cet appareil à l’extérieur. N’utilisez pas le compartiment du four à des fins de rangement. Ne placez pas d’aliments tels que le pain, les gâteaux secs, etc. à l’intérieur du four. N’utilisez pas ce four près d’une source d’eau, sur un sol humide ou près d’une piscine. Otez les liens de fermeture et les poignées métalliques des récipients/sacs en papier ou en plastique avant de les introduire dans le four. La température des surfaces accessibles peut être élevée lorsque l’appareil est en marche. Eloignez le cordon des surfaces chaudes et ne couvrez surtout pas le four. Installez ou posez ce four en respectant strictement les instructions d’installation fournies. Ne laissez pas le cordon pendre au bord d’une table ou d’un plan de travail. L’absence d’entretien du four peut entraîner la détérioration de la surface et peut altérer irréversiblement la durée de vie de l’appareil et provoquer des situations dangereuses. Utilisez uniquement cet appareil pour les usages décrits dans ce manuel. N’utilisez pas de produits chimiques sur cet appareil et ne l’exposez pas à des vapeurs corrosives. Spécifications Modèle : CE3282 Tension nominale : 230 V ~ 50 Hz Puissance d’entrée nominale (micro-ondes) : 1 550 W Puissance de sortie nominale (micro-ondes) : 900 W Puissance d’entrée nominale (Gril) : 1 100 W Puissance d’entrée nominale (Convection) : 2 500 W Contenance du four : 32 L Diamètre du plateau tournant : 31.5 cm Dimensions extérieures (Lxlxh) : 520 x 506.7 x 335.2 mm Poids net : 22.4 kilos 5 FR 1/A L’ATTENTION DE L’UTILISATEUR • PRINCIPE DE FONCTIONNNEMENT • PROTECTION DE L’ENVIRONNEMENT Les micro-ondes utilisées pour la cuisson sont des ondes électro-magnétiques. Elles existent couramment dans notre environnement comme les ondes radio-électriques, la lumière, ou bien les rayonnements infrarouges. Leur fréquence se situe dans la bande des 2450 MHz. Leur comportement : • Elles sont réfléchies par les métaux. • Elles traversent tous les autres matériaux. • Elles sont absorbées par les molécules d’eau, de graisse et de sucre. Il est bon de savoir que les micro-ondes provoquent à l’intérieur de l’aliment un simple phénomène thermique et qu’elles ne sont pas nocives pour la santé. Les matériaux d'emballage de cet appareil sont recyclables. Participez à leur recyclage et contribuez ainsi à la protection de l'environnement en les déposant dans les conteneurs municipaux prévus à cet effet. Votre appareil contient également de nombreux matériaux recyclables. Il est donc marqué de ce logo afin de vous indiquer que les appareils usagés ne doivent pas être mélangés avec d'autres déchets. Le recyclage des appareils qu'organise votre fabricant sera ainsi réalisé dans les meilleures conditions, conformément à la directive européenne 2002/96/CE sur les déchets d'équipements électriques et électroniques. Adressez vous à votre mairie ou à votre revendeur pour connaître les points de collecte des appareils usagés les plus proches de votre domicile. Nous vous remercions pour votre collaboration à la protection de l'environnement. Lorsqu’un aliment est exposé aux microondes il s’ensuit une agitation rapide des molécules, ce qui provoque un échauffement. La profondeur de pénétration des ondes dans l’aliment est d’environ 2,5 cm, si l’aliment est plus épais, la cuisson à cœur se fera par conduction comme en cuisson traditionnelle. Fig.01 6 2/INSTALLATION DE VOTRE APPAREIL • AVANT FR Dans le cas d’un branchement avec fiche de courant, celle-ci doit rester accessible après l’installation de l’appareil. Le neutre du four (fil bleu) doit être raccordé au neutre du réseau. LE BRANCHEMENT Attention : Vérifier que votre appareil n’ait subi aucune avarie lors du transport (porte ou joint déformé, etc...). Si vous constatez un dommage quelconque, avant toute utilisation, contactez votre revendeur. Prévoyez dans votre installation électrique un dispositif accessible par l’utilisateur qui doit être en mesure de séparer l’appareil du secteur et dont l’ouverture de contact est au moins 3 mm au niveau de tous les pôles. Afin de retrouver aisément à l’avenir les références de votre appareil, nous vous conseillons de les noter en page « Service après vente et relations consommateur ». Si le câble d’alimentation est endommagé, il doit être remplacé par le fabricant, son service après vente, ou une personne de qualification similaire afin d’éviter tout danger. • LE RACCORDEMENT ELECTRIQUE Attention : Vérifier que : - la puissance de l’installation est suffisante. - les lignes d’alimentation sont en état. - le diamètre des fils est conforme aux règles d’installation. - votre installation est équipée d’une protection thermique de 16 ampères. En cas de doute, veuillez consulter votre installateur électricien. Notre responsabilité ne saurait être engagée en cas d’accident ou d’incident consécutif à une mise à la terre inexistante, défectueuse ou incorrecte. Si le four présente une quelconque anomalie, débranchez l’appareil ou enlevez le fusible correspondant à la ligne de branchement du four. Le raccordement électrique est à réaliser avant la mise en place de l’appareil dans le meuble. La sécurité électrique doit être assurée par un encastrement correct. Lors de l’encastrement et des opérations d’entretien, l’appareil doit être débranché du réseau électrique, les fusibles doivent être coupés ou retirés. L’appareil doit être branché avec un câble d’alimentation (normalisé) à 3 conducteurs de 1,5 mm2 (1 ph + 1N + terre) qui doivent être raccordés sur le réseau 220-240 V ~ monophasé par l’intermédiaire d’une prise de courant 1 ph + 1N + terre normalisée CEI 60083 ou conformément aux règles d’installation. Le fil de protection (vert-jaune) est relié à la borne de l’appareil et doit être relié à la terre de l’installation. 7 FR 2/INSTALLATION DE VOTRE APPAREIL • USTENSILES Veuillez consulter les instructions « Matériels utilisables dans votre four à micro-ondes et matériels à éviter ». Certains ustensiles non métalliques peuvent également ne pas être utilisables au micro-ondes. En cas de doute, testez l’ustensile en question en suivant la procédure suivante. Test avec ustensile : 1. Remplissez un récipient allant au micro-ondes d’une tasse d’eau froide (250 ml) et placez-y l’ustensile en question. 2. Faites réchauffer à puissance maximale pendant 1 minute. 3. Touchez prudemment l’ustensile. Si l’ustensile est très chaud, ne l’utilisez pas pour cuire au micro-ondes. 4. Ne dépassez pas un temps de cuisson de 1 minute. AVERTISSEMENT Risque de blessure Il est dangereux pour une personne non qualifiée d’effectuer une opération d’entretien ou de réparation impliquant le démontage d’un capot de protection contre l’exposition à l’énergie à micro-ondes. Matériels utilisables dans votre four à micro-ondes Ustensiles Observations Feuille d’aluminium Pour couvrir uniquement. On peut utiliser de petits morceaux d’aluminium pour couvrir les parties fines de la viande ou de la volaille et éviter une surcuisson. Un arc électrique peut se former si la feuille est trop près des parois du four. La feuille doit être éloignée d’au moins 2,5 cm des parois du four. Plat brunisseur Respectez les consignes du fabricant. Le fond du plat brunisseur doit être surélevé d’au moins 5 cm du plateau tournant. Une utilisation incorrecte pourrait provoquer la rupture du plateau tournant. Vaisselle Compatible micro-ondes seulement. Respectez les consignes du fabricant. N’utilisez pas de plats fêlés ou ébréchés. Bocaux Otez toujours le couvercle. Utilisez-les uniquement pour réchauffer à peine les aliments. La plupart des bocaux ne résistent pas à la chaleur et peuvent se briser. Verrerie Verres spéciaux allant au four uniquement. Vérifiez l’absence de métal. N’utilisez pas de plats fêlés ou ébréchés. Sacs de cuisson au four Respectez les consignes du fabricant. Ne fermez pas le sac avec un lien métallique. Percez pour permettre à la vapeur de s’échapper. Assiettes et verres en papier A n’utiliser que pour une cuisson/un réchauffement très court. Ne vous éloignez pas du four pendant la cuisson. Serviettes en papier Utilisez-les pour couvrir vos aliments lors du réchauffage et pour absorber les graisses. Utilisez-les sous surveillance pour une cuisson très courte uniquement. Papier sulfurisé Utilisez-le en couverture pour éviter les éclaboussures ou en papillotte pour la cuisson vapeur. Plastique Uniquement le plastique allant au micro-ondes. Respectez les consignes du fabricant. Le plastique doit comporter la mention « Utilisable au Micro-ondes ». Certains récipients en plastique fondent lorsque les aliments qu’ils contiennent sont chauds. Les « sachets cuisson » et les sacs en plastique hermétiquement fermés doivent être fendus, percés ou ouverts, comme indiqué sur l’emballage. Film plastique Uniquement le plastique allant au micro-ondes. Utilisez-le pour couvrir vos aliments lors de la cuisson pour conserver l’humidité. Ne laissez pas le film plastique entrer en contact avec les aliments. Papier parafiné Utilisez-le en couverture pour éviter les éclaboussures et conserver l’humidité. 8 2/INSTALLATION DE VOTRE APPAREIL FR Matériels à éviter avec un four à micro-ondes Ustensiles Observations Plateau en aluminium Peut provoquer la création d’arcs électriques. Transférez vos aliments dans un plat allant au micro-ondes. Cartons alimentaires Peut provoquer la création d’arcs électriques. Transférez vos aliments dans un plat avec poignée métallique allant au micro-ondes. Ustensiles en métal ou comportant du métal Le métal empêche l’énergie à micro-ondes d’atteindre les aliments. Les armatures métalliques peuvent provoquer la création d’arcs électriques. Liens métalliques Peuvent provoquer la création d’arcs électriques et entraîner un incendie dans le four. Sacs en papier Peuvent provoquer un incendie dans le four. Mousse plastique La mousse plastique peut fondre ou contaminer le liquide à l’intérieur lorsqu’elle subit de fortes températures. Bois Le bois sèche s’il est placé dans un four à micro-ondes et peut se fendre ou se craqueler. • DESCRIPTION DE VOTRE APPAREIL Noms des pièces et accessoires de votre four Sortez le four et tous les accessoires de leur carton et de l’intérieur du four. Votre four s’accompagne des accessoires suivants : A F H I E D C B J G A) Bandeau de commandes B) Entraîneur C) Support à roulettes D) Plateau en verre E) Vitre de surveillance F) Porte G) Système de verrouillage de sécurité H) Bol à pétrin I ) Tasse et cuillère doseuse J) Pale du pétrin et crochet Clayette (Uniquement pour les fours avec gril) 9 FR 2/INSTALLATION DE VOTRE APPAREIL Descriptif du bandeau de commande A Les afficheurs : vous facilitent la programmation en affichant les fonctions, le temps ou le poids programmé, l’heure et les catégories d’aliments. A B La touche Autoprogramme : vous permet de sélectionner le type de plat à cuire ainsi que son poids: l’appareil règle automatiquement la puissance et le temps de cuisson. C La touche Machine à pain : permet de sélectionner la fonction machine à pain et les programmes associés B C D La touche décongélation : permet de programmer la décongélation selon le poids des aliments D E E La touche Mémoires 1 2 3 : permet d’accéder rapidement aux 3 opérations pré-programmées F G H I F La touche chaleur tournante : permet de sélectionner la fonction chaleur tournante G La touche micro-ondes/ gril : permet de choisir la puissance micro-ondes ou gril appropriée. H Le sélecteur TURN & PRESS : permet de choisir le temps, le poids et de lancer la cuisson. I La touche STOP Annulation : permet d’interrompre ou d’effacer un programme en cours 10 2/INSTALLATION DE VOTRE APPAREIL FR INSTALLATION DU PLATEAU TOURNANT a. Ne placez jamais le plateau en verre à l’envers. La rotation du plateau en verre ne doit jamais être entravée. b. Le plateau en verre et le support à roulettes doivent toujours être utilisés pendant la cuisson. c. Tous les aliments ou récipients alimentaires sont toujours placés sur le plateau en verre pour leur cuisson. d. Si le plateau en verre ou le plateau tournant se fissurent ou se cassent, prenez contact avec votre service après-vente agréé le plus proche. Moyeu central (dessous) Plateau en verre Entraîneur du plateau tournant Support à roulettes INSTALLATION SUR UN PLAN DE TRAVAIL Enlevez les emballages et mettez les accessoires de côté. Vérifiez que le four n’est pas abîmé, par exemple en présentant des traces de chocs ou une porte cassée. N’installez pas le four s’il est abîmé. Carrosserie : Otez le film de protection de la surface de la carrosserie du four à micro-ondes. N’enlevez pas le revêtement en Mica marron clair qui se trouve côté droit dans la cavité du four et qui protège le magnétron. INSTALLATION 2. Raccordement électrique • Votre installation doit être équipée d'une protection thermique de 16 Ampères. • Utilisez impérativement une prise de courant comportant une borne de mise à la terre et raccordée conformément aux normes de sécurité en vigueur. • Prévoyez dans votre installation électrique un dispositif accessible par l'utilisateur qui doit être en mesure de séparer l'appareil du secteur et dont l'ouverture de contact est d'au moins 3 mm au niveau de tous les pôles. • Si le câble d'alimentation est endommagé, il doit être remplacé par le fabricant, son service après-vente, ou une personne de qualification similaire afin d'éviter un danger. 1. Choisissez une surface plane laissant suffisamment d’espace libre pour permettre l’arrivée d’air et/ou la ventilation des grilles de sortie (pas d'encastrement). Un espace dégagé d’au moins 7,5 cm est nécessaire entre le four et les murs adjacents. Un côté doit rester libre. (1) Laissez au moins 12 cm d’espace au-dessus du four. (2) N’enlevez pas les pieds du four. (3) Si vous obstruez l’arrivée d’air et/ou les grilles de sortie, vous risquez d’endommager le four. AVERTISSEMENT : N’installez pas le four au-dessus d’une plaque de cuisson ou de tout appareil produisant de la chaleur. S’il est installé près ou au-dessus d’une source de chaleur, le four pourra être endommagé et la garantie sera annulée. La surface accessible peut être chaude pendant le fonctionnement du four. 30 cm 7,5 cm OUVERT 7,5 cm 11 FR 3/UTILISATION DE VOTRE APPAREIL • INSTRUCTIONS DE FONCTIONNEMENT Lorsque le four à micro-ondes est sous tension, le four affichera « 0:00 » et la sonnerie retentira une fois. Réglage de l’horloge Affichage Appuyez simultanément sur les touches Chaleur tournante et Micro/Gril, les chiffres des heures clignotent. 0 :0 0 Tournez le sélecteur pour régler les heures, l’heure réglée devra être comprise entre 0 et 23 (24 heures). Appuyez sur le sélecteur Turn &Press , les 12 :0 0 chiffres des minutes clignotent. Tournez le sélecteur pour régler les minutes, les minutes réglées devront être comprises entre 0 et 59. Appuyez sur le sélecteur Turn &Press pour achever le réglage de l’heure, « : » clignote et 12 :35 l’heure s’allume. Cuisson au micro-ondes Tableau de puissance du micro-ondes Appuyer 1 fois 2 fois 3 fois 4 fois 5 fois Puissance 900 W 700 W 500 W 350 W 150 W Affichage 900 700 500 350 150 Affichage Appuyez sur la touche Micro/gril plusieurs fois pour sélectionner la fonction souhaitée. Tournez le sélecteur pour régler la durée de cuisson. 900 1:30 Appuyez sur le sélecteur Turn& Press pour lancer la cuisson. Par exemple : Si vous souhaitez cuire pendant 20 minutes à 700 W, réglez le four comme suit. Appuyez sur la touche Micro/gril une fois, le four affichera « 900 ». 12 900 FR 3/UTILISATION DE VOTRE APPAREIL Appuyez sur la touche Micro/gril une fois de plus pour sélectionner 700 W, le four affichera « 700 ». 70 0 Tournez le sélecteur pour régler la durée de cuisson jusqu’à ce que le four indique « 20:00 ». (La durée de cuisson maximum est de 95 minutes.) 2 0 :0 0 Appuyez sur le sélecteur Turn& Press pour lancer la cuisson . Remarque : les intervalles de réglage de la durée sont les suivants : 0---1 min : 5 secondes 1---5 min : 10 secondes 5---10 min : 30 secondes 10---30 min : 1 minute 30---95 min : 5 minutes Cuisson au gril + cuisson combinée gril + micro-ondes Tableau de puissance Gril/Micro-ondes + Gril Fonction G-1 G-2 G-3 Puissance du micro-ondes 0% 20 % 40 % Puissance du gril 100 % 80 % 60 % Affichage Appuyez sur la touche Micro/gril plusieurs fois jusqu’à ce que « G-1 », « G-2 » ou « G-3 » s’affiche. Tournez le sélecteur pour régler la durée de cuisson. (La durée de cuisson maximum est de 95 minutes.) Exemple : 8 minutes 30 secondes. G- 1 8 :30 Appuyez surle sélecteur Turn& Press pour lancer la cuisson. Remarque : A mi-cuisson le four émet deux bips pour vous indiquer qu'il faut retourner l'aliment si besoin. 13 FR 3/UTILISATION DE VOTRE APPAREIL Cuisson à chaleur tournante Fonction C-1 C-2 C-3 Puissance du micro-ondes 0% 20 % 40 % Puissance de chaleur tournante 100 % 80 % 60 % Cuisson à chaleur tournante (avec préchauffage) La cuisson à chaleur tournante vous permet de cuire vos aliments comme dans un four traditionnel. La fonction micro-ondes n’est pas utilisée. Il est conseillé de préchauffer le four à bonne température avant d’introduire les aliments dans le four. Lorsque la température requise est atteinte, le four la conserve pendant 5 minutes. Programmation de la fonction chaleur tournante (avec préchauffage) Affichage Appuyez sur la touche Chaleur tournante une fois, le four affichera « C-1 ». C-1 Tournez le sélecteur pour sélectionner la température de chaleur tournante. 200 Appuyez sur le sélecteur Turn & Press pour confirmer la température. Appuyez sur la touche sur le sélecteur Turn & Press pour lancer le pré- chauffage. Lorsque la température de préchauffage est atteinte, la sonnerie se déclenchera deux fois pour vous rappeler de placer les aliments au four. Et la température de préchauffage s’affichera en clignotant. Placez les aliments au four et fermez la porte. Tournez le sélecteur pour régler la durée de cuisson. (La durée de cuisson maximum est de 95 minutes.) 200 9 5 :0 0 Appuyez sur le sélecteur Turn & Press pour lancer la cuisson. Remarque : La température peut être réglée entre 140 et 230 degrés. tournez le sélecteur pour sélectionner la température de chaleur tournante Ne préchauffez jamais votre four en position cuisson par chaleur tournante + microondes car cela pourrait endommager l’appareil. En cas d’utilisation du four en position de cuisson combinée par chaleur tournante + micro-ondes, n’utilisez pas de récipient en métal. 14 FR 3/UTILISATION DE VOTRE APPAREIL Programmation de la fonction chaleur tournante/ chaleur tournante+ Affichage micro-ondes (sans préchauffage ) Appuyez sur la touche Chaleur tournante autant de fois que nécessaire pour que le four affiche « C-1 », « C-2 » ou « C-3 » dans l’ordre. C-2 Tournez le sélecteur pour sélectionner la température souhaitée. La température peut être réglée entre 140 et 230 degrés. 200 Appuyez sur le sélecteur Turn &Press pour confirmer votre choix. L'écran affichera la température. Tournez le sélecteur pour régler la durée de cuisson. (La durée de cuisson maximum est de 95 minutes.) Exemple : 45 minutes. Appuyez sur le sélecteur Turn &Press pour lancer la cuisson. Attention : en cas d’utilisation du four en position de cuisson combinée par chaleur tournante + micro-ondes, n’utilisez pas de récipient en métal . 15 4 5 :0 0 FR 3/UTILISATION DE VOTRE APPAREIL Programmation de la fonction mémorisation Appuyez sur la touche le programme de cuisson 1, 2 ou 3. Affichage pour sélectionner Programmez la cuisson de votre choix. Validez la programmation en appuyant sur la touche . Bip de confirmation et affichage de l'heure. 1 900 8 :5 9 Remarque : La cuisson en mode Menu Auto ne peut être sélectionnée comme procédure de mémorisation. Par exemple : pour inscrire le programme en mémoire 2 : cuire les aliments à 700 W pendant 3 minutes et 20 secondes. Affichage A l’arrêt, appuyez sur la touche deux fois, l’écran affiche « 2 ». 2 Appuyez une fois sur la touche Micro/gril , « 900 » s’affiche. 900 Continuez à appuyer sur la touche Micro/gril jusqu’à ce que « 700 » s’affiche. 70 0 Tournez le sélecteur pour sélectionner 3 minutes et 20 secondes. « 3:20 » s’affiche. 3:2 0 Appuyez sur la touche pour sauvegarder le réglage. Ou appuyez sur le sélecteur Turn & Press pour lancer la cuisson et sauvegarder le réglage en même temps. La fois prochaine, à l’arrêt , sélectionnez puis appuyez sur le sélecteur Turn & Press pour lancer la cuisson . 16 FR 3/UTILISATION DE VOTRE APPAREIL Programmation de la cuisson rapide Affichage A l’arrêt , appuyez sur le sélecteur Turn & Press pour lancer la cuisson avec 100 % de puissance micro-ondes pendant 30secondes. Chaque pression supplémentaire augmentera le temps de cuisson de 30 secondes jusqu’à 95 minutes au maximum. 0:30 En modes micro-ondes, gril et chaleur tournante, chaque pression sur le sélecteur Turn & Press augmente la durée de 30 secondes. 1:30 Pendant la cuisson en mode Menu Auto et Décongélation au poids, la durée ne peut pas être augmentée en appuyant sur le sélecteur Turn & Press Programmation de la décongélation rapide Appuyez sur la touche « 100 », « g » s’allumera. Affichage une fois, le four affichera Tournez le sélecteur pour sélectionner le poids des aliments. Simultanément, les témoins « micro-ondes » et « décongélation » s’allumeront. Le poids des aliments doit être compris entre 100 et 1500 g. 100 400 r. r. Appuyez sur le sélecteur Turn & Press pour lancer la décongélation. Programmation du Menu Auto Affichage Appuyez sur la touche tionner un menu de « A1 » à « A9 ». pour sélec- Tournez le sélecteur pour choisir le poids par défaut, comme indiqué dans le tableau des menus. sauf pour « tartes » A8 qui vous indique une température fixe. Appuyez sur le sélecteur Turn & Press pour lancer la cuisson. A la fin de la cuisson, la sonnerie retentira cinq fois. Recommandation : Les programmes A7,A8, A9 intègrent une phase de préchauffage. 17 A1 400 r. FR 3/UTILISATION DE VOTRE APPAREIL Procédez de la manière suivante : Affichage A8 Appuyez sur la touche jusqu'à faire apparaître le programme choisi (par exemple A8). Tourner le sélecteur pour choisir le poids (saur pour A8). Appuyez sur le sélecteur Turn & Press pour démarrer le pré- chauffage. Lorsque la température est atteinte un bip est émis. Mettez l'aliment dans la cavité et appuyez sur le sélecteur Turn & Press pour démarrer la cuisson. Le temps de cuisson commence alors à décompter. Par exemple : Si vous voulez utiliser le menu auto pour cuire 150 grammes de poisson : Affichage trois fois Appuyez sur la touche pour sélectionner « A3 ». Le témoin « poisson » s’allume. Tourner le sélecteur pour sélectionner 150 g. 15 0 Appuyez sur le sélecteur Turn & Press pour lancer la cuisson. Veuillez vous reporter en page suivante pour consulter le tableau des menus. 18 r. 3/UTILISATION DE VOTRE APPAREIL FR • TABLEAU DES MENUS POUR LES PROGRAMMES AUTOMATIQUES MENUS POIDS TEMP S A1 VIANDES ROUGES ( micr o- on des + c h aleu r tou rnante) Utilisez un plat adapté micro-ondes et aux te mpératures élevées. Sort ez la viande du réfrigérateur 1 h avant cuisson. Plat sur plat eau Tournant . Après cuisson, hors du four, laissez reposer la viande 10 min emba llée dans une feuille d’aluminium. 400g 600g 800 g 1000 g 1200 g 15 m in 20 min 25 min 30 min 35 m in A 2 V IANDES BLAN CHES ( m icro- ondes + ch ale ur tournante ) ( por c, veau di ndon ne au) Utilisez un plat adapté micro- ondes et températures élevées. Voir conseils « viandes rouges » 400 g 600 g 800 g 1000 g 1200 g 25 30 35 40 45 150g 250 g 300 g 400 g 600 g 2 min 30 4 min 4 min 35 5 min 48 7 min 48 500 g 750 g 1000 g 1200 g 1500 g 25 30 35 45 55 min min min min min 300 g 450 g 600 g 750 g 1000 g 20 25 30 35 45 min min min min min 200 g 300 g 400 g 500 g 600 g 6 min 7 min 35 8 min 50 10 min 12 min 25 200 g 300 g 400 g 500 g 600 g 14 16 18 20 22 A3 P OIS SONS ( mi cr o - ondes) Utilisez un plat adapté micro-onde s, ajoutez 2 à 3 cuillérées d’eau, de jus de citron ou de vin blanc. Couvrez avec un couverc le adapté ou un film alimentaire et posez sur le plateau tournant. A 4 VOLAILLES (m icro- ondes + chaleur tournante) (pou let entie r ou morceaux ) Piquez la peau pour éviter les projections En fin de cuisson, laissez reposer la volaille 5 min dans le four. A 5 PLATS PREP AR ES ( m icro – on des + gr il ) Pour réchauffer et gratiner des plats préparés surgelés ; Utilisez un plat adapté micro- ondes et températures élevées, Ne pas couvri r . A6 LEGUMES (mic ro- on des) Pour cuire des légume s frais , ajoutez dans le récipient adapté : - 2 cuillérées à soupe d’eau pour 200g, - ½ dl au-delà. A7 P I ZZA (chaleur tournante) Fonction avec préchauffage. Mettre la tarte, moule posé sur la grille position basse, après le bip. 19 min min min min min min min min min min FR 3/UTILISATION DE VOTRE APPAREIL A8 TARTES (chaleu r tournante) Fonction avec préchauffage. Mettre la tarte, moule posé sur la grille position basse, après le bip. A9 GATEAUX (chaleur tournante ) Fonction avec préchauffage . Mettre le moule sur la grille position basse, après le bip. Surveillez la colorat ion. fixe 40 min 400 g 500 g 600 g 700 g 800 g 30 40 50 60 70 Programmation de la fonction verrouillage de protection (enfants) Verrouillage : En mode pause, appuyez sur la touche pendant 3 secondes, vous entendrez / un signal sonore indiquant l’état de verrouillage enfant. Le témoin de verrouillage s'affichera. min min min min min Affichage SEC U Déverrouillage : En mode verrouillage, appuyez sur touche pendant 3 secondes, vous entendrez / un long « bip » indiquant que le four est déverrouillé. Le témoin de verrouillage s'éteindra. Remarques : A la fin de la cuisson, la sonnerie retentira cinq fois. Si vous ouvrez la porte pendant la cuisson, il vous faudra la refermer et appuyer sur la touche Turn & Press pour poursuivre la cuisson. Une fois le programme de cuisson sélectionné, si vous n’appuyez pas sur la touche Turn & Press dans les cinq minutes, la sélection sera annulée. 20 FR 3/UTILISATION DE VOTRE APPAREIL &RPPHQWLQVWDOOHUOHEROjSDLQjO·LQWpULHXUGHYRWUHIRXU Moyeu central (dessous) Plateau en verre Entraîneur du plateau tournant Support à roulettes Ne pas utiliser ces accessoires lors du programme machine à pain. Une fois que vous avez versé les ingré dients ( farine, eau,. . .) à linté rieur du bol, retirez le plateau tournant, son support et l entraineur. Placez le bol dans la cavité en respectant la procé dure suivante: 1.Placez le bol à l’intérieur par-dessus les 4 ergots de sorte que la flèche inscrite sur celui-ci corresponde avec la flèche placée sur la sole du four. (dessin n°1) 2.Plaquez le bol de façon à ce qu’il soit bien en contact avec la sole du four (dessin n°2) 3.Tournez le bol dans le sens inverse des aiguilles d’une montre afin de bien le fixer dans les ergots. (dessin n°3) Assurez-vous que le bol ne bouge plus et est bien à plat. Votre appareil est maintenant prêt pour la réalisation du pain. (1&2&+( (5*27 '(),;$7,21 'HVVLQ 'HVVLQ 21 'HVVLQ FR 3/UTILISATION DE VOTRE APPAREIL /DIRQFWLRQSDLQ $SSX\H]VXUODWRXFKH´ µ©Eª SURJUDPPH SDLQQ DSSDUDvWGDQVO·DIILFKHXU &RQWLQXH]G·DSSX\HUVXUODWRXFKH© ªMXVTX·j REWHQLUOHSURJUDPPHGpVLUp&KDTXHDSSXLIDLW GpILOHUOHSURJUDPPHVXLYDQW©EE«Eª $SSX\H] sur le sélecteur Turn & Press SRXUchoisir OHSRLGVFKRL[SRVVLEOHVJJJ $SSX\H] sur le sélecteur Turn & Press SRXU FRQILUPHUOHSRLGVFKRLVL $SSX\H]sur le sélecteur jQRXYHDX SRXU Turn & Press choisir OD FRORUDWLRQGXSDLQ OpJqUHPHQWGRUp PHGLXP ELHQGRUp $SSX\H] sur le sélecteur Turn & Press SRXU FRQILUPHUODFRORUDWLRQFKRLVLH Pour un départ immédiat, appuyez de nouveau sur le sélecteur Turn & Press. L’app areil se met en route. Dans le cas d’une fin d ifférée , tournez d’a bord le sélecteur Turn & Press pour choisir dans combien de temps vous voulez que votre pai n soit prêt . Appuyez ensuite sur le sélecteur Turn & Press pour lancer le pro gramme. L’appareil se mettra automatiquement en route à l’heure désirée. Ex : S’il est 20h et que vo us voulez votre pain prêt à 9h le lendemain, choisissez 13h puis appuyez pour lancer le programme. /DGXUpHPD[LPXPGHGpSDUWGLIIpUpHVWGHKHXUHV $SSX\H] sur le sélecteur Turn & Press SRXUFRQILUPHUOD GXUpH OHIRXUFRPPHQFHDORUV j IRQFWLRQQHU Programme Type de pain Temps de cuisson selon le poids b-1 Pain blanc (standard) de 3h35 min à 3h45 min b-2 Pain blanc (rapide) de 1h 25 à 1h35 b-3 Pain complet de 3h55 à 4h05 b-4 Brioche de 3h45 à 3h55 b-5 Pain français de 3h55 à 4h05 b-6 Pâte levée 1h40 NB :en b-6, pas de cuisson, pas de possibilité de régler la coloration et pas de maintien au chaud en fin de programme 3DVGH GpSDUWGLIIpUpSRXUOHVSURJUDPPHVEHWE 22 3/UTILISATION DE VOTRE APPAREIL FR Arrêt pendant la cuisson 6LYRXVRXYUH]ODSRUWHHQFRXUVGHSUpSDUDWLRQGXSDLQRXGH FXLVVRQO·DSSDUHLOV·DUUrWHHWUHGpPDUUHXQHIRLVODSRUWHIHUPpH 3RXUDUUrWHUOHSURJUDPPHHQFRXUVLOIDXWDSSX\HUVHFRQGHV DSSXLORQJ VXUODWRXFKH©6WRSDQQXODWLRQª 6LXQHFRXSXUHG·pOHFWULFLWpDOLHXSHQGDQWODUpDOLVDWLRQGX SURJUDPPHFHOXLFLHVWJDUGpHQPpPRLUHSHQGDQWPLQXWHV 5HFHWWHVSRXUOHVGLIIpUHQWVSURJUDPPHV 3DLQ%ODQF VWDQGDUG $3RXUXQSDLQGHJPHWWH]GDQVO·RUGUHGDQVODFXYHPOG·HDX JUDQGHFXLOOqUHG·KXLOHGHWRXUQHVROSHWLWHFXLOOqUHôGHVHOSHWLWHFXLOOqUH GHVXFUHHQSRXGUHSHWLWHFXLOOqUHGHSRXGUHGHODLW80 JGHIDULQHSHWLWH FXLOOqUHGHOHYXUHERXODQJqUH %3RXUXQSDLQGHJPHWWH]GDQVO·RUGUHGDQVODFXYHPOG·HDX JUDQGHVFXLOOqUHVG·KXLOHGHWRXUQHVROSHWLWHFXLOOqUHGHVHOSHWLWHFXLOOqUH GHVXFUHHQSRXGUHSHWLWHVFXLOOqUHVGHSRXGUHGHODLW JGHIDULQHSHWLWH FXLOOqUHGHOHYXUHERXODQJqUH &3RXUXQSDLQGHJPHWWH]GDQVO·RUGUHGDQVODFXYH POG·HDX JUDQGHVFXLOOqUHVG·KXLOHGHWRXUQHVROSHWLWHVFXLOOqUHVGHVHOSHWLWHFXLOOqUH GHVXFUHHQSRXGUHSHWLWHVFXLOOqUHVGHSRXGUHGHODLW JGHIDULQH SHWLWHVFXLOOqUHVGHOHYXUHERXODQJqUH 3DLQ%ODQF UDSLGH $3RXUXQSDLQGHJPHWWH]GDQVO·RUGUHGDQVODFXYH POG·HDXWLqGH JUDQGHFXLOOqUHG·KXLOHGHWRXUQHVROSHWLWHFXLOOqUHGHVHOSHWLWHFXLOOqUH GHVXFUHHQSRXGUHSHWLWHFXLOOqUHGHSRXGUHGHODLWJGHIDULQH SHWLWHVFXLOOqUHVGH OHYXUHERXODQJqUH %3RXUXQSDLQGHJPHWWH]GDQVO·RUGUHGDQVODFXYHPOG·HDXWLqGH JUDQGHFXLOOqUHG·KXLOHGHWRXUQHVROSHWLWHFXLOOqUHGHVHOSHWLWH FXLOOqUHGHVXFUHHQSRXGUHSHWLWHVFXLOOqUHVGHSRXGUHGHODLW J GHIDULQHSHWLWHVFXLOOqUHV GHOHYXUHERXODQJqUH &3RXUXQSDLQGHJPHWWH]GDQVO·RUGUHGDQVODFXYHPOG·HDXWLqGH JUDQGHVFXLOOqUHVG·KXLOHGHWRXUQHVROSHWLWHVFXLOOqUHVGHVHOSHWLWHFXLOOqUH GHVXFUHHQSRXGUHSHWLWHVFXLOOqUHVGHSRXGUHGHODLWJGHIDULQH SHWLWHVFXLOOqUHVGHOHYXUHERXODQJqUH 23 FR 3/UTILISATION DE VOTRE APPAREIL 3DLQFRPSOHW $3RXUXQSDLQGHJPHWWH]GDQVO·RUGUHGDQVODFXYH POG·HDXWLqGH JUDQGHVFXLOOqUHVG·KXLOHGH WRXUQHVRO SHWLWHVFXLOOqUHVGHVHO SHWLWHFXLOOqUH GHVXFUHHQSRXGUHJGHIDULQH JGHIDULQHFRPSOqWHSHWLWH FXLOOqUHGHOHYXUHERXODQJqUH %3RXUXQSDLQGHJPHWWH]GDQVO·RUGUHGDQVODFXYHPOG·HDXWLqGH JUDQGHVFXLOOqUHVG·KXLOHGHWRXUQHVROSHWLWHVFXLOOqUHVGHVHOSHWLWHFXLOOqUH GHVXFUHHQSRXGUHJ GHIDULQH JGHIDULQHFRPSOqWHSHWLWH FXLOOqUHGHOHYXUHERXODQJqUH &3RXUXQSDLQGHJPHWWH]GDQVO·RUGUHGDQVODFXYHPOG·HDXWLqGH JUDQGHVFXLOOqUHVG·KXLOHGHWRXUQHVROSHWLWHVFXLOOqUHVGHVHOSHWLWHV FXLOOqUHVGHVXFUHHQSRXGUHJ GHIDULQHJGHIDULQHFRPSOqWH SHWLWHFXLOOqUHGHOHYXUHERXODQJqUH %ULRFKH $3RXUXQHEULRFKHGHJPHWWH]GDQVO·RUGUHGDQVODFXYH±XIVJGH EHXUUHUDPROOLSHWLWHFXLOOqUHGHVHOSHWLWHVFXLOOqUHVGHVXFUHHQSRXGUH POGHODLW JGHIDULQHSHWLWHVFXLOOqUHVGHOHYXUHERXODQJqUH %3RXUXQHEULRFKHGHJPHWWH]GDQVO·RUGUHGDQVODFXYH±XIV JGH EHXUUHUDPROOLSHWLWHFXLOOqUHGHVHOSHWLWHVFXLOOqUHV GH VXFUH HQ SRXGUH POGHODLWJGHIDULQHSHWLWHVFXLOOqUHVGHOHYXUHERXODQJqUH &3RXUXQHEULRFKHGHJPHWWH]GDQVO·RUGUHGDQVODFXYH±XIVJGH EHXUUHUDPROOLSHWLWHVFXLOOqUHVGHVHOSHWLWHVFXLOOqUHVGHVXFUHHQSRXGUH POGHODLWJGHIDULQHSHWLWHVFXLOOqUHVGHOHYXUHERXODQJqUH 3DLQIUDQoDLV $3RXUXQSDLQGHJPHWWH]GDQVO·RUGUHGDQVODFXYH POG·HDXSHWLWHVFXLOOqUHVGHVHO JGHIDULQHSHWLWHVFXLOOqUHVGHOHYXUH ERXODQJqUH %3RXUXQSDLQGHJPHWWH]GDQVO·RUGUHGDQVODFXYH POG·HDXSHWLWHVFXLOOqUHVGHVHOJGHIDULQHSHWLWHVFXLOOqUHVGHOHYXUH ERXODQJqUH &3RXUXQSDLQGHJPHWWH]GDQVO·RUGUHGDQVODFXYH POG·HDXSHWLWHVFXLOOqUHVGHVHOJGHIDULQHSHWLWHVFXLOOqUHV GHOHYXUHERXODQJqUH 3kWHOHYpH $3RXUXQSkWHGHJPHWWH]GDQVO·RUGUHGDQVODFXYH POG·HDXSHWLWHFXLOOqUHG·KXLOHG·ROLYHSHWLWHVFXLOOqUHVGHVHOJGH IDULQHSHWLWHFXLOOqUHGHOHYXUHERXODQJqUH %3RXUXQHSkWHGHJPHWWH]GDQVO·RUGUHGDQVODFXYHPOG·HDXSHWLWH FXLOOqUHG·KXLOHG·ROLYHSHWLWHVFXLOOqUHVGHVHOJGHIDULQHSHWLWHFXLOOqUH GHOHYXUHERXODQJqUH &3RXUXQHSkWHGHJPHWWH]GDQVO·RUGUHGDQVODFXYHPOG·HDX SHWLWHVFXLOOqUHVG·KXLOHG·ROLYHSHWLWHVFXLOOqUHVôGHVHOJGHIDULQH SHWLWHVFXLOOqUHVGHOHYXUHERXODQJqUH 24 4/ENTRETIEN ET NETTOY AGE DE VOTRE APPAREIL FR Le plateau peut être retiré pour faciliter le nettoyage. Pour ce faire, prenez-le par les zones d’accès prévues à cet effet. Si vous enlevez l’entraîneur, évitez de faire pénétrer de l’eau dans le trou de l’axe moteur. N’oubliez pas de remettre l’entraîneur, le support à roulettes et le plateau tournant. Il est recommandé de nettoyer le four régulièrement et d’enlever tout dépôt alimentaire à l’intérieur et à l’extérieur de l’appareil. Utilisez une éponge humide et savonneuse. Si l’appareil n’est pas maintenu dans un état de propreté, sa surface pourrait se dégrader et affecter de façon inexorable sa durée de vie et conduire à une situation dangereuse. Si la porte ou le joint de porte sont endommagés, le four ne doit pas être utilisé avant d’avoir été remis en état par une personne compétente. Pour préserver votre appareil, nous vous recommandons d'utiliser les produits d'entretien Clearit. L’expertise des professionnels au service des particuliers. Ne pas nettoyer l’appareil avec un nettoyeur vapeur. Clearit vous propose des produits professionnels et des solutions adaptées pour l'entretien quotidien de vos appareils électroménagers et de vos cuisines. Vous les trouverez en vente chez votre revendeur habituel, ainsi que toute une ligne de produits accessoires et consommables. L’emploi de produits abrasifs, d’alcool ou de diluant est déconseillé; ils sont susceptibles de détériorer l’appareil. En cas d’odeur ou de four encrassé, faites bouillir de l’eau additionnée de jus de citron ou de vinaigre dans une tasse pendant 2 minutes et nettoyez les parois avec un peu de liquide vaisselle. 25 FR 5/EN CAS D’ANOMALIES DE FONCTIONNEMENT Si vous avez des doutes sur le bon fonctionnement de votre appareil, ceci ne signifie pas forcément qu’il est en panne. Dans tous les cas, vérifiez les points suivants : Vous constatez que ... Que faut-il faire ? Vérifiez le branchement de votre appareil. Vérifiez que la porte de votre four soit bien fermée. L’appareil ne démarre pas. Vérifiez que la sécurité enfant ne soit pas programmée. L’appareil est bruyant. Le plateau ne tourne pas correctement. Nettoyez les roulettes et la zone de roulement sous le plateau tournant. Vérifier si les roulettes sont bien positionnées. Vous constatez de la buée sur la vitre. Essuyez l’eau de condensation à l’aide d’un chiffon. L’aliment n’est pas chauffé en programme micro-ondes. Vérifiez que les ustensiles conviennent aux fours à micro-ondes et que le niveau de puissance soit bien adapté. L’appareil produit des étincelles. Bien nettoyer l’appareil : retirez graisses, particules de cuisson ... Eloignez tout élément métallique des parois du four. Ne jamais utiliser d’éléments métalliques avec la grille. L'ampoule est grillée. Faire appel à un professionnel qualifié dépositiaire de la marque pour changer l'ampoule. Attention : Cet appareil est équipé d'un circuit haute tension. Dans tous les cas, ne jamais intervenir vous-même à l'intérieur de l'appareil. 26 6/SERVICE APRES-VENTE ET RELATIONS CONSOMMATEURS FR • INTERVENTIONS • RELATIONS Les éventuelles interventions sur votre appareil doivent être effectuées par un professionnel qualifié dépositaire de la marque. Lors de votre appel, mentionnez la référence “Service” de votre appareil ainsi que le numéro de série “Nr”. Ces renseignements figurent sur la plaque signalétique collée à l'arrière de l'appareil. • Pour en savoir plus sur tous les produits de la marque : informations, conseils, les points de vente, les spécialistes après-vente. CE3282 FAGORBRANDT SAS 7 rue Henri Becquerel CE3282 Type: TC930AHQ CONSOMMATEURS • Pour communiquer : nous sommes à l'écoute de toutes vos remarques, suggestions, propositions auxquelles nous vous répondrons personnellement. 92500 RUEIL-MALMAISON > Vous pouvez nous écrire : No. FagorBrandt SAS, Locataire Gérant 230-240V ~ 50Hz Max 2500W / 20A Etablissement de Cergy Service Consommateurs PIÈCES D’ORIGINE Lors d’une intervention d’entretien, demandez l'utilisation exclusive de pièces détachées certifiées d’origine. 5 Avenue des béthunes BP 69526 – Saint Ouen l’Aumone 9506 0 CERGY PONTOISE CEDEX > nous envoyer un mail à : [email protected] > ou nous téléphoner, du lundi au vendredi de 8h30 à 18h, au : 0892 02 88 01 * 0,337 TTC / min à partir d'un poste fixe Tarif en vigueur au 1er avril 2004 27 FR 7/RECOMMANDATIONS POUR MESURE DE LA PERFORMANCE Méthodes de mesure de l’aptitude à la fonction conformes aux normes CEI/EN/NF EN 60705. La commission Electrotechnique Internationale SC 59 K, a établi une norme relative aux mesures comparatives de performance effectuées sur différents fours à micro- ondes. Nous recommandons ce qui suit pour cet appareil : Essais Crème aux oeufs (12.3.1.) Charge 1000g Temps approx. Puissance 21 min 500W 750 g 13- 15 min 475g 7 min 700W 900g 14 min 700 W 500 g 10 min 50 + 5 min repos 250 g 6 -7 min 200 W 1100 g 35 min G2 Poulet (12.3.6.) 1200 g 45 min A4 C2 Gâteau (12.3.5.) 700 g 30 min A9 Gâteau de Savoie (12.3.2.) Pain de viande (12.3.3.) Décongélation de la viande speed defrost Récipients / conseils plat Pyrex réf. 227 sur le plateau tournant plat Pyrex réf. 220 Sur le plateau tournant plat pyrex rond réf. 828 sur le plateau tournant plat cake Pyrex réf. 838 sur plateau tournant Couvrir d’un film alimentaire sur plateau tournant (13.3.) Décongélationdes Framboises (B.2.1.) Gratin de pommes De terre (12.3.4.) 28 assiette plate sur plateau tournant plat Pyrex réf. 827 sur plateau tournant plat sur plateau tournant plat pyrex rond réf. 828 clayette position basse Faire un préchauffage à 160° EN INSTRUCTION MANUAL Microwave oven CE3282 Dear Customer, You have just purchased a Brandt microwave oven and we would like to thank you. We have placed in this appliance all our passion and know-how so that it best meets your needs. Innovation and performance: we designed it so that it is always easy to use. In the line of Brandt products, you will also find a wide range of ovens, hobs, ventilation hoods, electronic cookers, dishwashers, refrigerators and freezers that can be coordinated with your new Brandt microwave oven. Of course, in an ongoing effort to satisfy your demands with regard to our products as best as possible, our after-sales service department is at your disposal and ready to listen in order to respond to all of your questions and suggestions (contact information at the end of this booklet). You can also log on to our web site at www.brandt.com where you will find all our products, as well as additional, useful information. BRANDT As part of our commitment to constantly improving our products, we reserve the right to make changes to their technical, functional and/or esthetic properties in line with their technological development. Attention: Before installing and using your appliance, please carefully read this Guide to Installation and Use, which will allow you to quickly familiarise yourself with its operation. EN TABLE OF CONTENTS 1/NOTICES TO THE USER • Safety recommendations ................................................................. • Operating principle ........................................................................... • Protecting the environment.............................................................. 32 34 34 2/INSTALLING YOUR APPLIANCE • Before hook-up .................................................................................. • Electrical connection ......................................................................... • Utensils............................................................................................... • Description of your appliance ......................................................... • The control panel ............................................................................ 35 35 36 37 38 3/USING YOUR APPLIANCE • Operation instruction ........................................................................ • Menu chart for automatic programs ............................................... 40 47 4/CARING FOR AND CLEANING YOUR APPLIANCE............................... 53 5/TROUBLESHOOTING .............................................................................. 54 6/AFTER-SALES SERVICE AND CUSTOMER RELATIONS • Service calls ....................................................................................... • Customer relations............................................................................ 55 55 7/OPERATING PROFICIENCY TESTING ............................................ 56 31 1/NOTICES TO THE USER EN The contents of baby bottles and baby food jars should be shaken or stirred and their temperature checked before consumption to avoid burns. Important : Keep this user guide with your appliance. If the appliance is ever sold or transferred to another person, ensure that the new owner receives the user guide. Please become familiar with these recommendations before installing and using your appliance. They were written for your safety and the safety of others. • SAFETY Never heat a baby bottle with the nipple on (risk of explosion). Do not allow children to use the microwave oven without supervision, unless appropriate instructions have been given so that the child can use the oven safely and understands the dangers of incorrect operation. RECOMMENDATIONS Your appliance is designed for standard household use for cooking, reheating and defrosting foods. The manufacturer declines any responsibility in the case of inappropriate use. Always use oven mitts to remove dishes from the oven. Some dishes absorb the heat of foods and, therefore, are very hot. Liquids and other foods should not be heated in sealed containers because they may explode. Ensure that the cookware is suitable for use in a microwave oven. It is recommended that you avoid heating eggs in their shells and whole hard-boiled eggs in the microwave oven because they run the risk of explosion, even after cooking is complete. To avoid damaging your appliance, never operate it while empty or without the turntable. Do not interfere with the openings on the lock on the front of the appliance; this could cause damage to your appliance that would require a service call. Heating beverages in the microwave oven can cause sudden and/or delayed splattering of boiling liquid, so precautions must be taken when handling their containers. The seal and frame of the door must be regularly examined to ensure that they have not been deteriorated. If these areas In the case of small quantities (a sausage, a croissant, etc.) place a glass of water next are damaged, discontinue use of the to the food. appliance and have a specialised technician check it. Excessive cooking times may dry out foods While heating food items in plastic or and carbonise them. To avoid such incipaper containers, monitor the microwave’s dents, never use the same times recomcontents for there is a risk of spontaneous mended for cooking in a traditional oven. combustion. If smoke appears, stop or unplug the oven For the microwave and microwave + cirand leave the door closed to smother any cular heating functions, the use of metallic flames that may appear. cookware, forks, spoons, knives or metal staples or fasteners for frozen foods is not It is hazardous for anyone other than a competent person to remove a cover recommended. 32 EN 1/NOTICES TO THE USER chemicals or vapors in this appliance. This oven is especially designed to heat. It is not designed for industrial or laboratory use. which gives protection against exposure to microwave energy. When the appliance is operated in the combination mode, children should only use the oven under adult supervision due to the temperatures generated. (only for grill series) If the supply cord is damaged, it must be replaced by the manufacturer, its service agent or similarly qualified persons in order to avoid a hazard. Read and follow the specific:”PRECAUTIONS TO AVOID POSSIBLE EXPOSURE TO EXCESSIVE MICROWAVE ENERGY”. Do not store or use this appliance outdoors. Do not use this oven near water, in a wet basement or near a swimming pool. Do not overcook food. Do not use the oven cavity for storage purposes. Do not store items,such as bread, cookies, etc. inside the oven. The temperature of accessible surfaces may be high when the appliance is operating. Keep cord away from heated surface, and do not cover any events on the oven. Remove wire twist-ties and metal handles from paper or plastic containers/bags before placing them in the oven. Do not let cord hang over edge of table or counter. Install or locate this oven only in accordance with the installation instructions provided. Use this appliance only for its intended uses as described in manual. Do not use corrosive Failure to maintain the oven in a clean condition could lead to deterioration of the surface that could adversely affect the life of the appliance and possibly result in a hazardous situation. Specifications Model: CE3282 Rated Voltage: 230V~50Hz Rated Input Power(Microwave): 1550W Rated Output Power(Microwave): 900W Rated Input Power(Grill): 1100W Rated Input Power(Convection): 2500W Oven Capacity: 32L Turntable Diameter: 31.5cm External Dimensions(LxWxH): 520 x 506.7 x 335.2 mm Net Weight: 22.4 kg 33 1/NOTICES TO THE USER • OPERATING EN PRINCIPLE • PROTECTING THE ENVIRONMENT The micro-waves used for cooking are electro-magnetic waves. They are commonly found in our environment in the form of radio-electric waves, light or infrared rays. Their frequency is in the 2450 MHz range. Their behaviour: • They are reflected by metals. • They travel through all other materials. • They are absorbed by water, fat and sugar molecules. It is valuable to note that the micro-waves trigger within the food cause a simple thermal phenomenon and that they are not harmful to one’s health. This appliance’s packing materials are recyclable. Recycle them and play a role in protecting the environment by disposing of them in municipal containers provided for this purpose. When food is exposed to micro-waves, its molecules begin moving rapidly, which causes heating. Your appliance also contains various recyclable materials. Thus it is stamped with this logo to indicate to you that used appliances should be mixed with other waste. The recycling of appliances organised by your manufacturer will take place under the best conditions, in compliance with European directive 2002/96/CE concerning electrical and electronic equipment waste. Consult your city hall or your retailer to find the drop-off points for used appliances that is nearest to your home. We thank you for your help in protecting the environment. The penetration depth of waves into the food is approximately 2.5 cm; if the food is thicker, the core of the food will be cooked by conduction, as in traditional cooking. Fig.01 34 EN 2/INSTALLING YOUR APPLIANCE • BEFORE In the case of connections with an electric receptacle, it must remain accessible after installation of the appliance. HOOK-UP Warning: Ensure that your appliance has not suffered any damage during transport (deformed seal or door, etc...). If you see any kind of damage, before doing anything else, contact your retailer. The oven’s neutral conductor (blue wire) must be connected to the network’s neutral conductor. In your electrical installation, allow for a user-accessible device that must be able to separate the appliance from the main power supply and whose contact opening is at least 3 mm above all the terminals. In order to easily locate the reference information for your appliance, we recommend that you note these data on the “AfterSales Service Department and Customer Relations” page. • ELECTRICAL If the power cable is damaged, it should be replaced by the manufacturer, its after-sales service department or by a qualified person to avoid danger. CONNECTION Ensure that: - The electrical installation has sufficient voltage. - The electrical wires are in good condition. - The diameter of the wires complies with the installation requirements. - Your electrical installation is equipped with 16-ampere thermal-sensitive protection. In case of doubt, consult your electricianinstaller. Warning: We cannot be held responsible for any accident resulting from an inexistent, defective or incorrect ground lead. If the oven malfunctions in any way, unplug the appliance or remove the fuse corresponding to the sector there the oven is hooked up. The electrical connections are made before the appliance is installed in its housing. Electrical safety must be provided by a correct build-in. During installation and maintenance operations, the appliance must be unplugged from the electrical grid; fuses must be cut off or removed. The oven must be connected with a power cable (standardized) with three 1.5 mm2 conductors (1 ph + 1 N + ground) that must be connected to a monophase 220-240 V network via a CEI 60083 standardised receptacle (1 ph + 1 N + ground lead) or in accordance with installation rules. The safety wire (green-yellow) is connected to the appliance’s terminal and must be connected to the ground lead of the electrical set-up. 35 2/INSTALLING YOUR APPLIANCE • UTENSILS EN See the instructions on “Materials you can use in microwave oven or to be avoided in microwave oven.” There may be certain non-metallic utensils that are not safe to use for microwaving. If in doubt, you can test the utensil in question following the procedure below. Utensil Test: 1. Fill a microwave-safe container with 1 cup of cold water (250ml) along with the utensil in question. 2. Cook on maximum power for 1 minute. 3. Carefully feel the utensil. If the empty utensil is warm, do not use it for microwave cooking. 4. Do not exceed 1 minute cooking time. CAUTION Personal Injury Hazard It is hazardous for anyone other than a compentent person to carry out any service or repair operation that involves the removal of a cover which gives protection against exposure to microwave energy. Materials you can use in microwave oven Utensils Remarks Aluminum foil Shielding only. Small smooth pieces can be used to cover thin parts of meat or poultry to prevent overcooking. Arcing can occur if foil is too close to oven walls. The foil should be at least 1 inch (2.5cm) away from oven walls. Browning dish Follow manufacturer’s instructions. The bottom of browning dish must be at least 3/16 inch (5mm) above the turntable. Incorrect usage may cause the turntable to break. Dinnerware Microwave-safe only. Follow manufacturer’s instructions. Do not use cracked or chipped dishes. Glass jars Always remove lid. Use only to heat food until just warm. Most glass jars are not heat resistant and may break. Glassware Heat-resistant oven glassware only. Make sure there is no metallic trim. Do not use cracked or chipped dishes. Oven cooking bags Follow manufacturer’s instructions. Do not close with metal tie. Make slits to allow steam to escape. Paper plates and cups Use for short–term cooking/warming only. Do not leave oven unattended while cooking. Paper towels Use to cover food for reheating and absorbing fat. Use with supervision for a short-term cooking only. Parchment paper Use as a cover to prevent splattering or a wrap for steaming. Plastic Microwave-safe only. Follow the manufacturer’s instructions. Should be labeled “Microwave Safe”. Some plastic containers soften, as the food inside gets hot. “Boiling bags” and tightly closed plastic bags should be slit, pierced or vented as directed by package. Plastic wrap Microwave-safe only. Use to cover food during cooking to retain moisture. Do not allow plastic wrap to touch food. Wax paper Use as a cover to prevent splattering and retain moisture. 36 EN 2/INSTALLING YOUR APPLIANCE Materials to be avoided in microwave oven Utensils Remarks Aluminum tray May cause arcing. Transfer food into microwave-safe dish. Food carton with metal handle May cause arcing. Transfer food into microwave-safe dish. Metal or metaltrimmed utensils Metal shields the food from microwave energy. Metal trim may cause arcing. Metal twist ties May cause arcing and could cause a fire in the oven. Paper bags May cause a fire in the oven. Plastic foam Plastic foam may melt or contaminate the liquid inside when exposed to high temperature. Wood Wood will dry out when used in the microwave oven and may split or crack. • DESCRIPTION OF YOUR APPLIANCE Names of Oven Parts and Accessories Remove the oven and all materials from the carton and oven cavity. Your oven comes with the following accessories: A H F I E D C J B G A) Control panel B) Turntable shaft C) Turntable ring assembly D) Glass tray E) Observation window F) Door assembly G) Safety interlock system H) Bread barrel I ) Measuring spoon and cup J) Kneading paddle and hook Grill rack (Only for Grill series) 37 2/INSTALLING YOUR APPLIANCE EN The control panel A Displays : to simplify programming, the display indicates : the time of day, the types of food and functions, the minutes /seconds or weight programmed. A B « Autoprogramme » key automatically sets the correct programme time according to a specified food type and weight. C Bread Maker key : to select bread maker function and associated programs D Defrost key: to defrost according to the weight of food B C D E E Memory 1 2 3 key: to reach quickly 3 preset operations F Convection key : to select convection function G Microwave/grill key : to set the microwaves or grill’s power level. F G H H TURN & PRESS knob: To choose the time or the weight and to launch cooking. I STOP Annulation key: To interrupt or to erase a current program I 38 EN 2/INSTALLING YOUR APPLIANCE TURNTABLE INSTALLATION a. Never place the glass tray upside down. The glass tray should never be restricted. b. Both glass tray and turntable ring assembly must always be used during cooking. c. All food and containers of food are always placed on the glass tray for cooking. d. If glass tray or turntable ring assembly cracks or breaks, contact your nearest authorized service center. Hub (underside) Glass tray Turntable shaft Turntable ring assembly COUNTERTOP INSTALLATION Remove all packing material and accessories. Examine the oven for any damage such as dents or broken door. Do not install if oven is damaged. Cabinet: Remove any protective film found on the microwave oven cabinet surface. Do not remove the light brown Mica cover that is attached on the right side to the oven cavity to protect the magnetron. INSTALLATION 2. Electrical connection 1. Select a level surface that provide enough open space for the intake and/or outlet vents (no built in). A minimum clearance of 3.0 inches (7.5cm) is required between the oven and any adjacent walls. One side must be open. (1) Leave a minimum clearance of 12 inches (30cm) above the oven. (2) Do not remove the legs from the bottom of the oven. (3) Blocking the intake and/or outlet openings can damage the oven. WARNING: Do not install oven over a range cooktop or other heat-producing appliance. If installed near or over a heat source, the oven could be damaged and the warranty would be void. 30 cm 7.5 cm • Your installation must be protected by a 16 Amp thermal fuse. • It is mandatory to use a power point with a ground terminal, connected in accordance with current safety regulations. • In your electrical installation, provide a device that is accessible to the installer, capable of separating the appliance from the main power and whose contact opening is at least 3 mm at all of the poles. • If the supply cord is damaged, it must be replaced by the manufacturer, its service agent or similarly qualified persons in order to avoid a hazard. OPEN 7.5 cm The accessible surface may be hot during operation. 39 EN 3/USING YOUR APPLIANCE • OPERATION INSTRUCTION When the microwave oven is electrified,the oven will display “0:00”, buzzer will ring once. Clock Setting Display Press the Micro/gril and Chaleur keys simultaneously, the hour figures will flash. 0 :0 0 Turn the function selector to adjust the hour figures, the input time should be within 0--23. Press Turn and press knob, the minute figures will flash. 12 :0 0 Turn the function selector to adjust the minute figures, the input time should be within 0--59. Press the Turn and press knob to finish clock 12 :35 set ting. “:” will flash, and the time will light. Microwave Cooking Microwave Power Chart Press Once Twice 3 times 4 times 5 times Power 900W 700W 500W 350W 150W Display 900 500 350 700 150 Display Press the Micro/gril key several times to select the function you want. Turn the function selector to adjust the cooking time. 900 1:30 Press the Turn and press knob to start cooking. Example: If you want to use 700W power to cook for 20 minutes, you can operate the oven as the following steps. Press the Micro/gril key once, the oven will display “900”. 900 Press the Micro/gril key once again to choose 700W, the oven will display “700”. 70 0 40 EN 3/USING YOUR APPLIANCE Turn the function selector to adjust the cooking time until the oven display”20:00” (The maximum cooking time is 95 minutes.) 2 0 :0 0 Press the Turn and press knob to start cooking. Note: the step quantities for the adjustment time are as follow: 0---1 min : 5 seconds 1---5 min : 10 seconds 5---10 min : 30 seconds 10---30 min : 1 minute 30---95 min : 5 minutes Grill & Grill+ Microwave Cooking Grill/Microwave+Grill Power Chart Function Microwave Power Grill Power G-1 0% 100% G-2 20% 80% G-3 40% 60% Display Press the Micro/gril key several times until “G-1”, ”G-2” or “G-3” displays. Turn the function selector to adjust the cooking time. (The maximum cooking time is 95 minutes.) Example : 8 minutes 30 seconds. Press the Turn and press knob G- 1 8 :30 to start cooking. Note: Halfway through the grilling time the oven will beep twice. This indicates that the food should be turned over. 41 EN 3/USING YOUR APPLIANCE Convection Cooking Function Microwave Power Convection Power C-1 0% 100 % C-2 20 % 80 % C-3 40 % 60 % Convection Cooking (With preheating funtion) The convection cooking can let you to cook the food as a traditional oven. Microwave is not used. It is recommended that you should preheat the oven to the appropriate temperature before placing the food in the oven. When the oven reaches the required temperature, it will maintain at the requested temperature 5 minutes. Programming the FAN HEAT function (With pre-heating function) Display Press the Chaleur tournante key once, the oven will display “C-1”. C-1 Turn the function selector to select the convection temperature. Choose the convection temperature by keeping turning it. 200 Press the Turn and press knob to confirm the temperature. Press the Turn and press knob to start preheating. When the pre heating temperature arrives, the buzzer will sound twice to remind you to put the food into the oven. And the preheated temperature is displayed and flash. 200 Put the food into the oven and close the door. Turn the function selector to adjust the cooking time. (The maximum setting time is 95 minutes.) 9 5 :0 0 Press the Turn and press knob to start cooking. Note: The temperature can be chosen from 140 degrees to 230 degrees. Turn the selector in order to select the convection temperature. Never preheat your oven in the Circulating Heat + Microwave mode because this could damage the appliance. When using the oven in the combined circulating heat + microwave mode, do not use metal cookware. 42 EN 3/USING YOUR APPLIANCE Convection/Convection+ microwave cooking (without pre-heating function) Display Press the Chaleur tournante key once, twice or three times,the oven will display "C-1","C-2" or "C-3". C-1 Turn the function selector to select the convection temperature. Choose the convection temperature by keeping turning it. The temperature can be chosen from 140 degrees to 230 degrees. 200 Press the Turn and press knob to confirm. Turn the function selector to adjust the cooking time. (The maximum setting time is 95 minutes.) Press the Turn and press knob to start cooking. Warning : when using t he oven in the combined circulating . heat + microwave mode, do not use metal cookware. 43 15 :0 0 EN 3/USING YOUR APPLIANCE Display Programming a memory function Press the gramme 1, 2 ou 3. key to select the cooking pro- 1 900 Make the cooking programme of your choice. Confirm the programme by pressing the button. A bip will confirm the setting and the time is set. 8 :5 9 Note : Auto menu cooking cannot be set as memory procedure. For example: to set the program as memory 2: cook the food with 700W power for 3 minutes and 20 seconds. Display In waiting states, press the LED displays “2”. key twice, 2 Press the Micro/gril key once, “900” displays. 900 Keep pressing the Micro/gril key until “700” displays. 70 0 Micro/gril Micro/gril Turn the function selector to select 3 minutes and 20 seconds. “3:20” displays. Press the key to save the setting. Or you can press the Turn and press knob to start cooking and save the setting at the same time. For the next time, in waiting states, select Memory 2 and then push the Turn & press knob to launch cooking. 44 3:2 0 EN 3/USING YOUR APPLIANCE Speedy Cooking Affichage In waiting state, press the Turn and press knob to start cooking with 100% microwave power for 30 seconds, each added press will increase 30 seconds cooking time up to 95 minutes. 0 :30 In microwave, grill and convection cooking states, each press of the Turn and press knob can increase 30 seconds. 1:30 During auto menu and weight defrost cooking, time cannot be increased by pressing the Turn and press knob. Speed Defrost Affichage Press the key pad once, the oven will display “100”, ”g” will lights. Turn the function selector to select the weight of food. At the same time,”microwave” and “defrost” indicators will light.The weight should be 100-1500g. 10 0 r. 400 r. Press the Turn and press knob to start defrosting. Auto Menu Affichage Keep pressing the the menu from “A1”,”A2”...”A9”. key to choose Turn the function selector to choose the default weight as indicated in the menu chart. Excepted for pies A8 which indicates to you a fixed temperature . Press the Turn and press knob to start cooking. After cooking finished, buzzer will sound five times. Recommendation : The Auto programmes A7, A8 and A9 need a preheat phase. 45 A1 400 r. EN 3/USING YOUR APPLIANCE Affichage Press the chosen programme (i.e A8). key until you reach the A8 Turn the function selector to adjust the weight (except for A8). Press the Turn and press knob to start the pre heating. A double beep will sound to confirm when the right temperature is reached. Insert the food inside the cavity an press on Turn and press knob to start the cooking.The cooking time starts to deduct. Example: If you want to use auto menu to cook 150g of fish. Affichage Press the key three times to choose “A3”. The fish indicator lights up. Turn the function selector to choose 150g. Press the Turn and press knob to start cooking. Please kindly refers to the next page for menu chart. 46 15 0 r. EN 3/USING YOUR APPLIANCE • MENU CHART FOR AUTOMATIC PROGRAMS MENU WEIGHT A1 RED MEAT ( microwave + convection) Use a dish adapted to microwaves and to hi gh temperatures. Take out the meat from refrigerator 1 hour be fore cooking. Dish on rotating tray. After cooking, out of the oven, let rest the meat 10 min packed in an aluminium foil. A 2 WHITE MEAT (microwave + convection) (pork, veal turkey poultry) Use an adapted dish to the micro waves and high temperatures. See advices «re d meats . TIME 400g 600g 800 g 1000 g 1200 g 15 20 25 30 35 min min min min min 400g 600g 800g 1000g 1200g 25 30 35 40 45 min min min min min « 150g 250g 300g 400g 600g A3 F I SH ES (mic rowave ) Use a d ish adapted to microwave, add from 2 to 3 spoon of water, of lemon juice or of white wine. Cover it with an adequate lid or a plastic wrap and lay it on the rotating tray . A 4 POULTRY (microwave + convection) (Whole chicken or pieces) Prick the skin to a void the projections. At the end of cooking, let rest the poultry 5 min in t he oven. A 5 Pre pared dishes (microwave+ grill) To warm and brown deep-frozen prepared dishes; use a dish adapted to microwaves and high temperatures. Do not cover A 6 VEGETABLES (microwave) To cook fresh vegetables, add in the adequate dish : - 2 tablespoonful of water for 200 grams - ½ dl beyond. A 7 PIZZA (Convection) To warm, cook or gild deep-frozen pizzas. Program with a preheating function, put the pizza after the beep 500g 750g 1000g 1200g 1500g 25 min 30 min 35 min 45 min 55 min 300g 450g 600g 750g 1000g 20 25 30 35 45 A 9 CAKES (C onvection) Function with preheating. Lay the mould on t he grill in low position, after t he beep. Have an eye on the burning colour. 6 min 7 min 35 8 min 50 10 min 12 min 25 200g 300g 400g 500g 600g 14 16 18 20 22 400g 500g 600g 700g 800g 47 min min min min min 200g 300g 400g 500g 600g Fix A 8 PIE S ( Convection) Function with preheating. Put the pie, cake pan laid on a fixed grill , low position, after the be ep. 2 min 30 4 min 4 min 35 5 min 48 7 min 48 min min min min min 40min 30 40 50 60 70 min min min min min EN 3/USING YOUR APPLIANCE +RZWRLQVWDOOWKHEUHDGERZOLQWKHFDYLW\ Hub (underside) Glass tray Turntable shaft Turntable ring assembly 'RQRWXVHWKHVHDFFHVVRULHVGXULQJEUHDGFRRNLQJ $VVRRQDV\RXKDYHSXWDOOWKHLQJUHGLHQWV IORXUZDWHU« LQVLGHWKHERZOWDNH RXWRIWKHFDYLW\WKHJODVVWXUQWDEOHWKHULQJEHDULQJDQGWKHGULYHU)L[WKHERZO LQVLGHWKHFDYLW\IROORZLQJWKHSURFHGXUHEHORZ 3ODFHWKHERZOLQVLGHWKHRYHQVRWKDWWKHDUURZRQWKHERZOLVDOLJQHGZLWKWKH RQHRQWKHVROH GUDZLQJ 3XVKWKHERZOGRZQZDUGVVRWKDWWKHQRWFKHVRQLWVEDVHIDVWHQRQWRWKH DWWDFKPHQWFOLSVLQVLGHWKHPLFURZDYH GUDZLQJ 7XUQWKHERZOLQDQDQWLFORFNZLVHGLUHFWLRQXQWLOWKHDWWDFKPHQWFOLSUHDFKHVWKH VWRSRIWKHQRWFKRQWKHEDVH GUDZLQJ 7KHERZOLVWKHQFRUUHFWO\ORFNHGLQWR SRVLWLRQ 7KHERZOKDVWREHFRUUHFWO\IL[HGDQGVWD\IODWRQWKHERWWRPRIWKHRYHQ<RX FDQQRZVWDUWWKHEUHDGFRRNLQJ 127&+ ),;,1* /8* 'UDZLQJ 'UDZLQJ 48 'UDZLQJ EN 3/USING YOUR APPLIANCE Bread Cooking In waiting state, press once,"b-1" displays. Keep pressing times to choose the function wanted, and "b-1","b-2", "b-3"... "b-6" will be displayed in order. Turn the function selector to choose the weight of of menu. 1000g,1200g and 800g can be chosen. Press Turn and press knob to confirm the weight. Turn the function selector to choose the bread, " ", " ", or " " will display. " " indicates for light color," " indicates for medium color and " " indicates for dark color Press Turn and press knob to confirm the color. At this time, the cooking time displays. To start cooking immediately, press the Turn & Press knob again. Cooking starts. To choose the moment you want your bread being ready, turn the Turn & Press selector to choose preset end of cooking time. Then press the Turn & Press knob to start the program. The oven will start automatically when it is right time. Ex: If it is 8 p.m and you want your bread cooked at 9a.m on next mornin g, turn the selector until 13h. Preset time should be within 1 5 hours . Press Turn and press knob to start cooking. Note: Menu Kind of bread Time of cooking according to the weight b-1 Basic bread from 3h35 min to 3h45 min b-2 Turbo bread from 1h 25 to 1h35 b-3 Whole wheat bread from 3h55 to 4h05 b-4 Sweet bread from 3h45 to 3h55 b-5 French bread from 3h55 to 4h05 b-6 Dough bread 1h40 a. For menu b-6: no color can be chosen. b. For menu b-6: no keep warm function c. F or menu b-6,b-2: no preset function. 49 EN 3/USING YOUR APPLIANCE Stop while processing During cooking, the oven will pause when the oven door open. The oven will continue working after the door close. You can press " " for three seconds to cancel the cooking. / During bread cooking process,if the electricity is cut off for no more than 10 minutes, the oven will resume cooking after it is electrified. Cooking Guide Basic Bread A. Ingredients and seasoning for 800g white bread: 270 ml water, 1.5 tbsp sunflower oil, 1.5 tsp salt, 1.0 tsp sugar, 1.5 tbsp powder milk,480g flour,1.5 tsp yeast. B.Ingredients and seasoning for 1000g white bread: 350 ml water, 2.0 tbsp sunflower oil, 1.5 tsp salt, 1.0 tsp sugar, 2.0 tbsp powder milk, 615g flour,1.5 tsp yeast. C.Ingredients and seasoning for 1200g white bread: 395 ml water, 2.5 tbsp sunflower oil, 2.0 tsp salt, 1.5 tsp sugar, 2.5 tbsp powder milk,740g flour,2.0 tsp yeast. Turbo Bread A.Ingredients and seasoning for 800g turbo bread: 300 ml lukewarm water, 1.0 tbsp sunflower oil, 1.0 tsp salt, 1.5 tsp sugar, 1.5 tbsp powder milk, 450g flour, 4.0 tsp yeast. B.Ingredients and seasoning for 1000g turbo bread: 380 ml lukewarm water, 1.5 tbsp sunflower oil, 1.5 tsp salt, 1.5 tsp sugar, 2.5 tbsp powder milk, 580g flour, 4.5 tsp yeast. C.Ingredients and seasoning for 1200g turbo bread: 450 ml water, 2.0 tbsp sunflower oil, 2.0 tsp salt, 1.5 tsp sugar, 3.0 tbsp powder milk, 700g flour, 5.0 tsp yeast. Whole Wheat Bread A. Ingredients and seasoning for 800g whole wheat bread: 300 ml lukewarm water, 2.0 tsp sunflower oil, 2.0 tsp salt, 1.5 tsp sugar, 195g flour, 285g wholewheat flour, 1.5 tsp yeast. 50 EN TITRE DU CHAPITRE 3/USING YOUR APPLIANCE B.Ingredients and seasoning for 1000g whole wheat bread: 380 ml lukewarm water, 2.0 tsp sunflower oil, 2.0 tsp salt, 1.5 tsp sugar, 250g flour, 370g wholewheat flour, 1.5 tsp yeast. C.Ingredients and seasoning for 1200g whole wheat bread: 450 ml lukewarm water, 2.0 tsp sunflower oil, 2.5 tsp salt, 2.0 tsp sugar, 300g flour, 450g wholewheat flour, 1.5 tsp yeast. Sweet Bread A. Ingredients and seasoning for 800g sweet bread: 2 eggs, 140 butter soften, 1.5 tsp salt, 3.5 tbsp sugar, 65g liqiud milk, 360 flour, 2.0 tsp yeast. B. Ingredients and seasoning for 1000g sweet bread: 3 eggs, 185 butter soften, 1.5 tsp salt, 4.5 tbsp sugar, 80g liqiud milk, 460 flour, 3.0 tsp yeast. C. Ingredients and seasoning for 1200g sweet bread: 4 eggs, 240 butter soften, 2.0 tsp salt, 5.0 tbsp sugar, 90g liqiud milk, 600 flour, 3.5 tsp yeast. French Bread A. Ingredients and seasoning for 800g french bread: 300 ml water, 2.0 tsp salt, 500 flour, 2.0 tsp yeast. B. Ingredients and seasoning for 1000g french bread: 400 ml water, 2.0 tsp salt, 640 flour, 2.0 tsp yeast. C. Ingredients and seasoning for 1200g french bread: 450 ml water, 2.5 tsp salt, 750 flour, 2.5 tsp yeast. Dough Bread A. Ingredients and seasoning for 800g dough bread: 250 ml water, 1.5 tbsp olive oil, 2.0 tsp salt, 490 flour, 1.5 tsp yeast. B. Ingredients and seasoning for 1000g dough bread: 320 ml water, 1.5 tbsp olive oil, 2.0 tsp salt, 640 flour, 1.5 tsp yeast. C. Ingredients and seasoning for 1200g dough bread: 390 ml water, 2.0 tbsp olive oil, 2.5 tsp salt, 790 flour, 2.0 tsp yeast. 51 TITRE DU CHAPITRE 3/USING YOUR APPLIANCE EN Lock-out Function for Children Affichage / Lock: In waiting state, press the key for 3 seconds, there will be a beep denoting entering the children-lock state , the oven will display “SECU“. SECU / Lock quitting: In locked state, press the key for 3 seconds, there will be a long “beep“ denoting that the lock is released. Notes : Buzzer will sound five times when cooking finished. During cooking, if the door is opened and after closing the door, the Turn and press knob must be pressed to continue cooking. Once the cooking program has been set, if the Turn and press knob is not pressed in five minutes, the setting will be cancelled. 52 EN TITRE 4/CARING DU CHAPITRE FOR AND CLEANING YOUR APPLIANCE It is recommended that you regularly clean your oven and remove any food build-up on the inside and outside of the appliance. Use a damp, soapy sponge. If the appliance is not cleaned regularly, its surface could become damaged, permanently affecting the appliance’s lifespan and possibly causing a safety hazard. If the door or door hinge are damaged, the oven should not be used until it has been repaired by an authorised person. The table can be removed to facilitate cleaning. To do this, handle it by the access zones provided for this purpose. If you remove the turning gear, do not let water penetrate into the the motor axle hole. Don’t forget to return the turning gear, wheel guide and turntable. To preserve your appliance, we recommend that you use Clearit cleaning products. Professional expertise serving individuals. Do not clean the appliance with a steam cleaner. The use of abrasive products, alcohol or thinner is not recommended; they may damage the appliance. In the event of odour or caked-on dirt, boil water with lemon juice and vinegar in a cup for two minutes and clean the insides with a bit of dishwashing liquid. Clearit offers you professional products and solutions designed for the daily care of your household appliances and kitchens. They are on sale at your regular retailer, along with a complete line of accessories and consumable products. 53 EN 5/TROUBLESHOOTING If you have doubts about the proper functioning of your appliance, this does not necessarily mean it is broken. In any event, check the following items: You observe that ... The appliance does not start. What should you do? Check the electrical connection of your appliance. Ensure that your oven’s door is fully closed. Ensure that the child safety feature is not activated. The appliance is noisy. The turntable does not rotate properly. Clean the wheels and the rolling area under the turntable. Ensure that the wheels are properly positioned. You see steam on the window. Wipe the condensation away with a cloth. Food is not heated during a microwave programme. Ensure that the cookware is suitable for microwave ovens and that the power level is appropriate. The appliance is creating sparks. Thoroughly clean the appliance: remove grease, cooking particles, etc. Remove any metal items from the walls of the oven. Never use metal items with the grid. The bulb doesn't work. Call the brand's authorized technician to replace the bulb. Warning: Be careful, this appliance is equipped with a high tension circuit. Do not make yourself any repairing inside the oven. 54 EN 6/AFTER-SALES SERVICE AND CUSTOMER RELATIONS • SERVICE CALLS • CUSTOMER Any repairs that are made to your appliance must be handled by a qualified professional authorised to work on the brand. When you call, mention your appliance’s “Service” reference, as well as its serial number “Nr”. This information appears on the manufacturer’s nameplate which can be found stuck behind the oven. CE3282 Type: TC930AHQ 92500 RUEIL-MALMAISON • To communicate: we will personally respond to all your comments, suggestions, and proposals. > You may write us: FagorBrandt SAS, Locataire Gérant o N. 230-240V ~ 50Hz • To find out more about all the brand’s products: information, tips, sales outlets, after-sales specialists. FAGORBRANDT SAS 7 rue Henri Becquerel CE3282 RELATIONS Max 2500W / 20A Etablissement de Cergy Service Consommateurs 5 Avenue des béthunes ORIGINAL PARTS. During maintenance work, request the exclusive use of certified original replacement parts. BP 69526 – Saint Ouen l’Aumone 95060 CERGY PONTOISE CEDEX > e-mail us : [email protected] > or phone us at: 0892 02 88 01 * 0,337 TTC / min à partir d'un poste fixe Rate valid as of 1 April 2004 55 EN 7/OPERATING PROFICIENCY TESTING Operating proficiency testing according to CE/EN/NF EN 60705 standards. The international Electrotechnical Commission, SC.59K, has established a standard relative tocomparative performance tests conducted on various microwaves. We recommend the following for this appliance: TEST Load Egg custard (12.3.1.) 1000g Approx time Power 21 min 500 W Containers/ recommendations pyrex 227 on the turnta ble pyrex 220 On the turntable 750g 13-15 min Sponge cake (12.3.2.) 475g 7 min 700W pyrex 828 on the turntable Meatloaf (12.3.3.) 900g 14 min 700W pyrex 838 cover with cling film On the turntable Defrosting Meat (13.3.) 500g Defrosting Raspberries (B.2.1.) 250g 6-7 min 200W on a flat plate on the turntable Potato gratin (12.3.4.) 1100g 35 min G2 pyrex 827 on the turntable Chicken (12.3.6.) 1200g 45 min Cake (12.3.5.) 700 g 30 min 10 min 50 +standing 5 min speed defrost A4 C 2 (200°C) A9 56 on the turntable on the turntable pyrex 828 place on the grill in low position Preheating 160°C CE3282 FR / EN