1
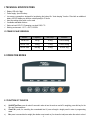
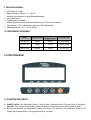
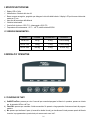
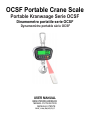
OCSF Portable Crane Scale
Portable Kranwaage Serie OCSF
Dinamometro portatile serie OCSF
Dynamomètre portable série OCSF
USER MANUAL
BENUTZERHANDBUCH
MANUEL D’UTILISATION
MANUALE UTENTE
OCSF_11.04_EN_DE_FR_IT
INDEX
I. TECHNICAL SPECIFICATIONS .............................................................................................................................. page
II. OPERATION MODES ............................................................................................................................................. page
II.1 FUNCTION OF THE KEYS .............................................................................................................................page
II.2 ZERO AND TARE OPERATIONS ...................................................................................................................page
III. CALIBRATION ....................................................................................................................................................... page
IV. BACKLIGHT FUNCTION....................................................................................................................................... page
V. SELECT UNIT OF MEASURE................................................................................................................................ page
VI. AUTO SWITCH-OFF FUNCTION .......................................................................................................................... page
VII. PRECAUTIONARY MEASURES.......................................................................................................................... page
DECLARATION OF CONFORMITY............................................................................................................................ page
WARRANTY ............................................................................................................................................................... page
3
3
3
4
4
4
5
5
5
6
6
INHALT
I. TECHNISCHE DATEN ............................................................................................................................................ Seite 7
II. FUNKTIONS MODI ................................................................................................................................................ Seite 7
II.1 FUNKTION DER TASTEN .............................................................................................................................Seite 7
II.2 NULLSTELL-UND TARAFUNKTION .............................................................................................................Seite 8
III. KALIBRIERUNG ................................................................................................................................................... Seite 8
IV. HINTERGRUNDBELEUCHTUNG......................................................................................................................... Seite 8
V. WAHL DER MAßEINHEIT..................................................................................................................................... Seite 9
VI. AUTOMATISCHE ABSCHALTUNG...................................................................................................................... Seite 9
VII. WARNHINWEISE .................................................................................................................................................Seite 10
KONFORMITÄTSERKLÄRUNG................................................................................................................................ Seite 11
GARANTIE................................................................................................................................................................. Seite 11
INDEX
I. CARACTÉRISTIQUES TECHNIQUES ...................................................................................................................page
II. MODE OPÉRATOIRE ............................................................................................................................................page
II.1 FONCTION DU CLAVIER .............................................................................................................................page
II.2 OPERATIONS DE ZÉRO ET TARE ..............................................................................................................page
III. CALIBRATION ......................................................................................................................................................page
IV. FONCTION DU RETRO ÉCLAIRAGE ..................................................................................................................page
V. SÉLECTION DE L’UNITÉ DE MESURE................................................................................................................page
VI. FONCTION DE MISE EN VEILLE AUTOMATIQUE .............................................................................................page
VII. PRÉCAUTIONS D’UTILISATION ........................................................................................................................page
DÉCLARATION DE CONFORMITÉ...........................................................................................................................page
GARANTIE……………………………………………………………………………………………………………………....page
12
12
12
13
13
13
14
14
14
15
15
INDICE
I. SPECIFICHE TECNICHE.........................................................................................................................................pag.
II. MODALITA’ OPERATIVE........................................................................................................................................pag.
II.1 FUNZIONI DEI TASTI ....................................................................................................................................pag.
II.2 OPERAZIONI DI ZERO E TARA ....................................................................................................................pag.
III. CALIBRAZIONE ....................................................................................................................................................pag.
IV. FUNZIONE DI RETRO-ILLUMINAZIONE..............................................................................................................pag.
V. SELEZIONE DELL’UNITÀ DI MISURA..................................................................................................................pag.
VI. FUNZIONE DI AUTO-SPEGNIMENTO..................................................................................................................pag.
VII. MISURE PRECAUZIONALI..................................................................................................................................pag.
DICHIARAZIONE DI CONFORMITA’ .........................................................................................................................pag.
GARANZIA .................................................................................................................................................................pag.
2
16
16
16
17
17
17
17
18
18
19
19
I. TECHNICAL SPECIFICATIONS:
Display LCD with 6 digit
Power supply: 3pcs AA battery
Low energy consumption, designed for lengthening the battery life. “Auto-sleeping” function. Fitted with an additional
battery, the LED display can function uninterruptedly for 70 hours.
Auto zero-setting when switch on the scale
2 available selectable divisions
Safe over-load:125% F.S, Damaging over-load: 200% F.S
Working environment: -10°C ~ +40°C, 85%RH.
I.1 CRANE SCALE VERSIONS:
Model:
Capacity
Min Cap.
Division
OCSF-50
50 kg
0.4kg
0.01/0.02kg
OCSF-150
150kg
1.0kg
0.02/0.05kg
OCSF-300
300 kg
2.0kg
0.05/0.1kg
II. OPERATION MODES
II.1 FUNCTION OF THE KEYS
a)
b)
c)
On&Off/Tare/Zero: press for about 3 seconds in order to turn the scale on and off. In weighing, press this key for the
Zero and Tare operations.
Clear/CAL: press, for cancelling the accumulated total. If press at length a length permit to enter in programming
menu.
M+: press to accumulate the weight (the relative arrow turned on); for shows the total press when the scale is unload.
3
d)
e)
In programming, this key can be used as “exit”.
Set/Div.: press for change the division of the scale (selectable divisions depending on the version, Ref. Par.I.1).
NOTE:The division set is saved even though the instrument has been switched off. In programming, this key be used
for modify a parameter.
Menu/Hold: In weighing, press to freeze the weight shown on the display (the relative arrow turned on). By pressing
again this key, the display unlocks. When the display shows the accumulated data, the Menu/Hold key does not
work. Press this key for enter in the menu for set unit of measure and the backlight and switch-off function (see par.
IV, V, VI).
II.2 ZERO AND TARE OPERATIONS
a) Instantaneous tare
When the suspended weight is stable, press the [On&Off/Tare/Zero] key: if the weight reenters the zero range (4% F.S.)
configured by the user, the crane scale clears the weight and turned on the arrow on the display which indicate ZERO
(zero function); if, on the other hand, the weight is greater than the zero range, the crane scale executes a tare and the
arrow on the display which indicate TARE (tare function).
b) Tare cancellation: to eliminate the stored tare, press the [Tare/Zero] key. The tare weight is cancelled and the gross
weight is displayed. The tare light turns off.
III. CALIBRATION
(1) Enter in the calibration menu: press the [Clear/CAL] key for about 3 seconds: the instrument shows the A/D
converter points relative to the weight.
(2) press the [Clear/CAL] key, the display shows “F= xxx”: select the maximum capacity, with [Set/Div] key;
(3) press the [Clear/CAL] key, the display shows “d=0.xx” : select the divisions of the scale, with [Set/Div] key;
(4) press the [Clear/CAL] key, the display shows “CAL-0” (zero calibration): clear the loading and wait for stable (the
arrow on “Stable” turned on).
(5) press the [Clear/CAL] key, the display shows “L-xx” (calibration with sample weight): press the [Set/Div] key for select
the weight calibration;
(6) Load the scale and wait the stable.
(7) Press the [Clear/CAL] key for save and exit.
Note: during the calibration, press the [Tare/Zero] key to return to the previous step or exit the calibration; if one
exits before the last step, the modifications will not be saved; only when one ends with step (7), the parameters are
updated and the modifications are saved.
IV. BACKLIGHT FUNCTION
1) Press the [Menu/Hold] key for about 3 seconds
2) Press the [Set/Div] key for set:
- “b-AUto” enable backlight when the weigh is instable;
- “b-off” disable backlight
3) Press the [Menu/Hold] key for save and exit.
4
V. SELECT UNIT OF MEASURE
1) Press the [Menu/Hold] key for about 3 seconds:
2) Press the [M+] key until of the display show “U - xx”;
3) Press the [Set/Div] key for set:
- kg (“U - kg”);
- Lb (“U - Lb”).
4) Press the [Menu/Hold] key for save and exit.
NOTE: It will possible see the selection unit of measure on the right of the LCD display.
VI. AUTO SWITCH-OFF FUNCTION
1) Press the [Menu/Hold] key for about 3 seconds:
2) Press the [M+] key until of the display show “Off xx”
3) Press the [Set/Div] key for set:
- “Off- 0” for disable the function
- “Off- x”: x can be 1,5,10,30 minutes of unused time of the instrument.
4) Press the [Menu/Hold] key for save and exit.
VII. PRECAUTIONARY MEASURES
Do not allow the scale body to receive knocks. If not in use, keep the scale in a dry and ventilated place, away from heat
sources.
If the scale is in the open and there is lightning, turn off the scale temporarily.
In order to ensure the safety of the scale structure, do not rotate the crane scale with the suspended loads.
Do not overload the scale, so that the load cell is not damaged.
It is forbidden to halt or transit under the suspended load.
5
DECLARATION OF CONFORMITY
This device conforms to the essential standards and norms relative to the applicable
European regulations. The Declaration of conformity is available in the web site
www.scalehouse.it.
WARRANTY
The TWO-YEAR warranty period begins on the day the instrument is delivered. It includes
spare parts and labour for repairs at no charge if the INSTRUMENTS ARE RETURNED
prepaid to the DEALER’S PLACE OF BUSINESS. Warranty covers all defects NOT
attributable to the Customer (such as improper use) and NOT caused during transport.
If on site service is requested (or necessary), for any reason, where the instrument is used,
the Customer will pay for all of the service technician’s costs: travel time and expenses plus
room and board (if any).
The customer pays for shipping costs (both ways), if the instrument is shipped to the DEALER
or manufacturer for repair.
The WARRANTY is VOIDED if faults occur due to work done by unauthorised personnel or
due to connections to equipment installed by others or incorrect connection to the power
supply.
This warranty DOES NOT provide for any compensation for losses or damages, direct or
indirect, incurred by the Customer due to complete or partial failure of instruments or systems
sold, even during the warranty period.
6
I. Technische Daten:
LCD Display mit 6 Digit
Batterie Betrieb mit 3 Stück 1,5 V / Typ AA
Minimaler Stromverbrauch für lange Batterielebensdauer.
Auto-Schlaf-Funktion.
2 Ablesbarkeit zu auswählen
Mit einer Zusätzlichen Batterie kann eine Betriebszeit von 70 Std. erreicht werden.
Überlastsicher = 125% Wägebereich, Bruchlast = 200% Wägebereich.
Arbeitsbedingungen: -10°C ~ +40°C, 85%RH.
I.1 VERFÜGBARE VERSIONEN:
Model:
Wägebereich
Min
Wägebereich.
Ziffernschritt
OCSF-50
50 kg
0.4kg
0.01/0.02kg
OCSF-150
150kg
1.0kg
0.02/0.05kg
OCSF-300
300 kg
2.0kg
0.05/0.1kg
II. FUNKTIONS MODI
II.1 FUNKTION DER TASTEN
a) On&Off/Tare/Zero: Zum Einschalten Taste für 3 Sek. Drücken. Im Betrieb dient die Taste der Null-und Tarafunktion.
Clear/CAL: Zum Löschen der akkumulierten Werte. Bei langem Drücken kommt man in das Programmier-Menü.
b) M+: Zum akkumulieren der Gewichtswerte drücken; (der entspr. Pfeil erscheint). Bei unbelasteter Waage für die
Anzeige des Gesamtgewichtes. Im Programmier-Menü als “verlassen”.
7
c) Set/Div.: Zum Ändern der Teilung der Anzeige (Ablesbarkeit nach dem Modell zu auswaehlen ,Sehen Sie bitte Par.
l.1). ANMERKUNG:Die angelegt Ablesbarkeit gespeichert bleibt, obwohl das Geraet abgästellt wird. Im ProgrammierMenü dient die Taste zum Ändern der Parameter.
d) Menu/Hold: Beim Wägen dient die Taste zum “einfrieren” der Anzeige. (der entspr. Pfeil erscheint) Durch erneutes
Drücken wird die Funktion wieder abgeschaltet. Die Taste funktioniert nicht wenn der akkumulierte Wert gezeigt wird.
Im Programmier-Menü kann mit dieser Taste die Maßeinheit, die Hintergrundbeleuchtung und die Abschaltfunktion
gesetzt werden. (siehe auch Abs. IV, V, VI).
II.2 NULLSTELL UND TARAFUNKTION
a) TARAFUNKTION: Wenn das angezeigte Gewicht stabil ist und kleiner als der Nullstellbereich von 4% (ist
einstellbar) des Skalenbereiches wird beim Drücken der Taste [On&Off/Tare/Zero] die Waage Nullgestellt. Der
ZERO Pfeil erscheint in der Anzeige (Nullstellung). Wenn das Gewicht größer ist wird die Waage tariert. Der
TARE Pfeil erscheint in der Anzeige (Tarierung)
b) LÖSCHEN DER TARA: Zum Löschen der Tara die Taste [Tare/Zero] drücken. Die Tara wird gelöscht, die
Tara Anzeige geht aus und das Bruttogewicht wird angezeigt.
III. KALIBRIERUNG
(1) Einstieg in das Kalibriermenü: Taste [Clear/CAL] für ca. 3 Sek. Drücken: Das Display zeigt die Konverterpunkte
des Gewichts.
(2) Taste [Clear/CAL] drücken, das Display zeigt “F= xxx”: mit Taste [Set/Div] den Wägebereich wählen;
(3) Taste [Clear/CAL] drücken, Display zeigt “d=0.xx” : mit Taste [Set/Div] die Teilung der Waage wählen;
(4) Taste [Clear/CAL] drücken, Display zeigt “CAL-0” (Null-Kalibrierung): bei unbelasteter Waage warten auf den
Pfeil „Stable“.
(5) Taste [Clear/CAL] drücken, Display zeigt “L-xx” (Kalibrierung mit Mustergewicht): mit Taste [Set/Div] das
Gewicht für die Kalibrierung wählen;
(6) Waage beladen und Stillstand abwarten.
(7) Taste [Clear/CAL] drücken zum Speichern und Menü verlassen.
An: während der Kalibrierung kann mit der Taste [Tare/Zero] zurück gesprungen oder das Menü ohne speichern
verlassen werden; die neuen Daten werden erst abgespeichert wenn die Prozedur bis zum Enden (7)
durchgeführt wurde.
IV. HINTERGRUNDBELEUCHTUNG
1)
2)
Taste [Menu/Hold] ca. 3 Sek.drücken
Mit Taste [Set/Div] wählen:
- “b-AUto” Hintergrundbeleuchtung bei instabiler Anzeige;
- “b-off” keine Hintergrundbeleuchtung
3) Taste [Menu/Hold] drücken zum Speichern und Menü verlassen.
8
V. WAHL DER MAßEINHEIT
1)
2)
3)
Taste [Menu/Hold] ca. 3 Sek.drücken:
Taste [M+] sooft drücken bis das Display “U - xx” zeigt;
Mit Taste [Set/Div] wählen:
- kg (“U - kg”);
- Lb (“U - Lb”).
4) Taste [Menu/Hold] drücken zum Speichern und Menü verlassen.
Anm.: Die Anzeige ist auf der rechten Seite des LCD Displays.
VI. AUTOMATISCHE ABSCHALTUNG
Taste [Menu/Hold] ca. 3 Sek.drücken:
Taste [M+] sooft drücken bis das Display “Off xx” zeigt;
Mit Taste [Set/Div] wählen:
“Off- 0” Funktion gesperrt
“Off- x”: für x kann eingestellt werden ob nach 1,5,10,30 Minuten ungebrauchter Waage die Waage
abgeschaltet werden soll.
4) Taste [Menu/Hold] drücken zum Speichern und Menü verlassen.
1)
2)
3)
9
VII. Warnhinweise
Keine Schläge auf den Waagenkörper zulassen. Wenn die Waage nicht in Gebrauch ist, an einem trockenen gelüfteten
Ort abseits von Hitzequellen lagern.
Bei Gewitter im Freien Waage sofort abschalten.
Um die Sicherheit der Waage zu gewähren, die Last nicht verdrehen.
Die Waage nicht überlasten damit die Wägezelle nicht beschädigt wird.
Der Aufenthalt unter hängender Last ist verboten.
10
Konformitätserklärung
Dieses Gerät ist konform mit den zuständigen, gültigen europäischen Normen. Die
Konformitätserklärung ist im Internet unter www.scalehouse.it verfügbar.
Garantie
Die Zwei-Jahres-Garantie beginnt mit dem Lieferdatum und beinhaltet die kostenlose
Reparatur mit Ersatzteilnen, wenn das Gerät auf kosten des Kunden zum Händler kommt. Die
Garantie gilt nicht für Transportschäden oder unsachgemäßen Gebrauch.
Verlangt der Kunde eine Reparatur vor Ort gehen alle Kosten für Arbeitszeit, Spesen und Anund Abreise zu Lasten des Kunden.
Der Kunde übernimmt die Transportkosten (hin und rück) wenn das Gerät zum Händler oder
Hersteller geschickt werden muss.
Die Garantie ist erloschen wenn durch nicht autorisierte Personen Reparaturversuche
vorgenommen wurden, das Gerät, geöffnet oder unsachgemäß an das Stromnetz
angeschlossen war.
Die Garantie gilt nicht für direkte oder indirekte Folgeschäden oder Verluste des Kunden bei
teilweisem oder ganzem Ausfall des Gerätes auch in der Garantiezeit.
11
I. CARACTÉRISTIQUES TECHNIQUES :
Affichage LCD avec 6 chiffres.
Alimentation : 3 piles AA.
La consommation à faible énergie, permettant l’allongement de la vie de la batterie. La fonction “Arrêt automatique”
avec l’affichage LED peut fonctionner pendant 70 heures.
Auto zéro à l’allumage.
2 Divisions disponibles sélectionnables.
Sécurité de surcharge : 125 % F.S., Sécurité de dommage : 200% F.S.
Environnement de travail : -10°C ~ +40°C, 85 % RH.
I.1 VERSIONS DISPONIBLES :
Modèle:
Capacité
Min. Cap.
Division
OCSF-50
50 kg
0.4kg
0.01/0.02kg
OCSF-150
150kg
1.0kg
0.02/0.05kg
OCSF-300
300 kg
2.0kg
0.05/0.1kg
II. MODE OPÉRATOIRE :
II.1 FONCTION DU CLAVIER
a)
b)
c)
On&Off/Tare/Zéro : Appuyer sur la touche pendant 3 secondes pour mettre le crochet peseur ‘’en ou hors’’ tension. En mode pesage appuyer sur cette touche pour les opérations de tarage et de zéro.
Clear/CAL: Appuyer sur la touche pour annuler la totalisation. Appuyer longuement pour entrer dans le menu de
programmation de l’instrument.
M+: En charge, appuyer pour accumuler le poids. Déchargé, appuyer pour voir le total. En mode programmation
cette touche permet de sortir. .
12
d)
e)
Set/Div. : Appuyer pour changer la division d’affichage (sélectionnable selon le modèle, Réf. Par.I.1). NOTE : La
division est enregistré même si l’instrument est hors tension. En mode programmation cette touche permet de
modifier un paramètre.
Menu/Hold : En charge, appuyer pour verrouiller le poids sur l’afficheur, Appuyer à nouveau sur cette touché
pour déverrouiller le poids. (the relative arrow turned on). En mode totalisation cette touche est inhibée. Appuyer
sur la touche pendant 3 secondes pour entrer dans le menu de sélection de l’unité de mesure et de la fonction arrêt automatique (voir paragraphe IV, V, VI).
II.2 OPÉRATIONS DE ZÉRO ET DE TARE
Tare semi automatique
a) Lorsque le poids est stable appuyer ur la touche [On&Off/Tare/Zéro] si le poids reste inférieur à (4% F.S.) de la
capacité, configuré par l’utilisateur, l’instrument autorise un retour à zéro et la signalétique de l’écran indique ZERO, si
le poids est supérieur l’instrument exécute une tare et revient à zéro et la signalétique indique une TARE.
b) Effacement de la tare : Pour éliminer la tare mémorisée, appuyer sur la touche [Tare/Zéro]. La tare est effacée et
l’instrument retourne en poids brut et la signalétique indique BRUT et la signalétique tare s’efface.
III. CALIBRATION :
1. Entrer dans le menu de la calibration : Appuyer sur la touche [Clear/CAL] pendant 3 secondes: L’instrument affiche
le nb de points du convertisseur A/D par rapport au poids.
2. Appuyer sur la touche [Clear/CAL] l’instrument affiche “F= xxx” : sélectionner la capacité maximale avec la touche
[Set/Div].
3. Appuyer sur la touche [Clear/CAL] l’instrument affiche “d=0.xx” : sélectionner la division avec la touche [Set/Div].
4. Appuyer sur la touche [Clear/CAL] l’instrument affiche “CAL-0” (zéro calibration) : l’instrument doit-être sans charge et
attendre que la signalétique indique “Stable”.
5. Appuyer sur la touche [Clear/CAL] l’instrument affiche “L-xx” (calibration avec le poids étalon), appuyer sur la touche
[Set/Div] pour sélectionner le poids de la masse.
6. Charger le poids étalon et attendre que la signalétique indique ‘’Stable’’.
7. Appuyer sur la touche [Clear/CAL] pour sauvegarder et sortir.
Note : Durant la calibration, appuyer sur la touche [Tare/Zéro] pour revenir à l’étape précédant ou pour sortir de
l’étalonnage, si l’on sort avant la dernière étape les modifications ne sont pas enregistrées, pour enregistrer les
modification il faut terminer la dernière étape.
IV. FONCTION DU RÉTRO ÉCLAIRAGE :
1) Appuyer sur la touche [Menu/Hold] pendant 3 secondes.
2) Appuyer sur la touche [Set/Div] pour sélectionner :
- “b-AUto” Activer le retro éclairage pendant la pesée.
- “b-off” Désactiver le rétro éclairage.
3) Appuyer sur la touche [Menu/Hold] pour sauvegarder et sortir.
13
V. SÉLECTION DE L’UNITÉ DE MESURE :
1) Appuyer sur la touche [Menu/Hold] pendant 3 secondes.
2) Appuyer sur la touche [M+] jusqu’à l’affichage de “U - xx”;
3) Appuyer sur la touche [Set/Div] pour sélectionner :
- kg (“U - kg”);
- Lb (“U - Lb”).
4) Appuyer sur la touche [Menu/Hold] pour sauvegarder et sortir..
NOTE: Il est possible de vérifier l’unité de mesure à droite de l’écran.
VI. FONCTION DE VEILLE AUTOMATIQUE
1. Appuyer sur la touché [Menu/Hold] pendant 3 secondes.
2. Appuyer sur la touche [M+] jusqu’à l’affichage de “Off xx”.
3. Appuyer sur la touche [Set/Div] pour sélectionner :
a. “Off- 0” : Désactiver la fonction.
b. “Off- x” : Activer le temps de 1,5,10,30 minutes avant l’état de veille de l’instrument.
4. Appuyer sur la touche [Menu/Hold] pour sauvegarder et sortir.
VII. PRÉCAUTION D’UTILISATION :
Ne pas autoriser que l’instrument reçoive des chocs. Lorsque l’instrument n’est pas utilisé le stocker dans un endroit sec
et aéré loin des sources de chaleur.
Si l’instrument est à l’extérieur en cas d’orage le mettre hors service temporairement.
Afin d’assurer la sécurité de l’ensemble ne tourner pas le crochet peseur avec une charge suspendue.
Ne surcharger pas l’instrument, la cellule risquerait d’être endommagée.
Il est interdit de s’arrêter ou de transiter sous la charge suspendue.
14
DÉCLARATION DE CONFORMITÉ
Ce dispositif est conforme aux normes et à la réglementation européenne. La déclaration de conformité est disponible sur
le site Web.
www.scalehouse.it.
GARANTIE
La garantie est d’un an pour les pièces. La garantie commence le jour où l'instrument est livré. Elle comprend les pièces de
rechange et la main d'oeuvre pour les réparations, sans déplacement, si les instruments sont retournés c’est en port payé
au concessionnaire. La garantie couvre tous les défauts qui ne sont pas imputables au client (par exemple un mauvais
usage) et les problèmes causés lors du transport.
Si le service sur site est demandé (ou nécessaire), pour une raison quelconque, le client doit payer pour l'ensemble des
services du technicien frais de voyage et d’hébergement (le cas échéant).
Le client a sa charge les frais d'expédition et de retour, si l'instrument est livré chez le distributeur ou le fabricant pour
réparation.
La garantie est annulée si les défauts se produisent en raison de travaux effectués par un personnel non autorisé ou en
raison de connexions sur d’autres équipements ou une mauvaise alimentation électrique.
Cette garantie ne prévoit pas d'indemnisation pour les pertes ou dommages, directs ou indirects, supportés par le client en
raison de la défaillance complète ou partielle de l’instrument ou de systèmes de pesage, même au cours de la période de
garantie.
15
I. SPECIFICHE TECNICHE:
Display LCD a 6 cifre
Alimentazione: 3 batterie stilo size AA
Basso consumo energetico, progettato per allungare la vita utile delle batterie. Il display LCD può lavorare ininterrottamente per 70 ore.
Auto zero all’accensione della bilancia
2 divisioni selezionabili
Il carico finito è sicuro a 125% F.S., si danneggia a 200% F.S.
Temperatura di funzionamento: -10°C ~ +40°C, umidità relativa 85%RH.
I.1 VERSIONI DINAMOMETRO:
Model:
Portata
Portata Min..
Divisione
OCSF-50
50 kg
0.4kg
0.01/0.02kg
OCSF-150
150kg
1.0kg
0.02/0.05kg
OCSF-300
300 kg
2.0kg
0.05/0.1kg
II. MODALITA’ OPERATIVE
II.1 FUNZIONE DEI TASTI
a) On&Off/Tare/Zero: premere per circa 3 secondi per accendere/spegnere la bilancia. In pesatura, premere un istante
per le operazioni di Zero e di Tara.
b) Clear/CAL: premere per cancellare il totale accumulato. Se premuto a lungo permette di entrare nel menù di programmazione.
c) M+: premere per totalizzare il peso (si accende la relativa freccia); per visualizzare il totale premere quando la bilancia
è scarica. In programmazione, questo tasto può essere usato come “exit”.
16
d) Set/Div.: premere per cambiare la divisione della bilancia (divisioni selezionabili a seconda del modello, Rif. par. I.1).
NOTA: La divisione impostata rimane in memoria anche dopo lo spegnimento dello strumento.
In programmazione, questo tasto è usato per modificare un parametro.
e) Menu/Hold: In pesatura, premere per congelare il peso sul display (si accende la relativa freccia). Premendo nuovamente questo tasto, il display si sblocca. Quando il display visualizza i dati totalizzati, il tasto Menu/Hold non funziona.
Premere questo tasto per entrare nel menù per settare l’unità di misura e le funzioni di Retro-illuminazione e Autospegnimento (vedi par. IV, V, VI).
II.2 OPERAZIONI DI ZERO E TARA
a) Tara istantanea
Quando il peso sospeso è stabile, premere il tasto [On&Off/Tare/Zero]: se il peso rientra nel range di zero (4% F.S.), il
dinamometro azzera il peso presente e si accende una freccia sul display LCD che indica ZERO (funzione di zero); se al
contrario il peso è maggiore del range di zero, il dinamometro esegue una tara, la freccia sul display LCD indica TARE
(funzione di tara).
b) Cancellazione della tara: per eliminare la tara in memoria, premere il tasto [Tare/Zero]. Il peso tara viene cancellato e
viene visualizzato il peso lordo. La freccia che indica la TARA si spegne.
III. CALIBRAZIONE
(1) Entrare nel menù di calibrazione: premere il tasto [Clear/CAL] per circa 3 secondi: il display visualizzerà i punti del
convertitore A/D relativi al peso presente.
(2) Premere il tasto [Clear/CAL], il display visualizza “F= xxx”: selezionare la portata dello strumento con il tasto [Set/Div]
(3) Premere il tasto [Clear/CAL], il display visualizza “d=0.xx” : selezionare la divisione della bilancia con il tasto [Set/Div]
(4) Premere il tasto [Clear/CAL], il display visualizza “CAL-0” (calibrazione di Zero): scaricare la bilancia e attendere la
stabilità (si accende la freccia sopra “Stable”).
(5) Premere il tasto [Clear/CAL], il display visualizza “L-xx” (calibrazione con peso campione): premere il tasto [Set/Div]
per selezionare il peso di calibrazione;
(6) Caricare la bilancia e attendere la stabilità.
(7) Premere il tasto [Clear/CAL] per salvare ed uscire.
NOTA: durante la calibrazione, premere il tasto [M+] per tornare allo step precedente o per uscire dalla calibrazione; se si esce prima dell’ultimo step, allora le modifiche non sono salvate, solo quando si termina lo step (7) i parametri vengono aggiornati e le modifiche vengono salvate.
IV. FUNZIONE DI RETRO-ILLUMINAZIONE
1) Premere il tasto [Menu/Hold] per circa 3 secondi
2) Premere [Set/Div] per selezionare:
- “b-AUto” retro-illuminazione attiva ad ogni movimento del peso;
- “b-off” retro-illuminazione disabilitata
3) Premere [Menu/Hold] per salvare ed uscire.
V. SELEZIONE UNITÀ DI MISURA
a) Premere il tasto [Menu/Hold] per circa 3 secondi;
17
b) Premere il tasto [M+] fino a quando il display visualizza “U - xx”;
c) Premere [Set/Div] per selezionare:
- kg (“U - kg”);
- Lb (“U - Lb”).
d) Premere il tasto [Menu/Hold] salvare ed uscire.
NOTA: Sarà possibile vedere l’unità di misura scelta a destra sul display LCD.
VI. FUNZIONE DI AUTO-SPEGNIMENTO
1) Premere il tasto [Menu/Hold] per circa 3 secondi, il display visualizza l’opzione impostata per l’auto-spegnimento,
2) Premere il tasto [M+] fino a quando il display visualizza “Off xx”
3) Premere [Set/Div] per selezionare:
- “Off- 0” per disabilitare la funzione
- “Off- x”: x può essere 1,5,10,30 minuti di inutilizzo dello strumento dopo i quali lo strumento si spegne.
4) Premere [Menu/Hold] per salvare ed uscire.
VII. MISURE PRECAUZIONALI
Non permettere che il corpo della bilancia riceva colpi. Se non in uso, conservare la bilancia in luogo asciutto, ventilato e
lontano da fonti di calore.
Se la bilancia si trova all’aperto e ci sono dei lampi, spegnere temporaneamente la bilancia.
Al fine di assicurarsi l’incolumità della struttura della bilancia, non ruotarla con carichi sospesi.
Non sovraccaricare la bilancia, per non causare danneggiamenti alla cella di carico.
È vietato sostare o transitare sotto il carico sospeso.
18
DICHIARAZIONE DI CONFORMITA’
Il presente dispositivo è conforme agli standard essenziali e alle altre normative pertinenti dei
regolamenti europei applicabili. La Dichiarazione di Conformità è disponibile all'indirizzo
Internet www.scalehouse.it.
GARANZIA
La garanzia è di DUE ANNI dalla consegna dello strumento e consiste nella copertura gratuita
della manodopera e dei ricambi per STRUMENTI RESI FRANCO SEDE della VENDITRICE.
La garanzia è valida in caso di guasti NON imputabili al Committente (ad es. uso improprio) e
NON imputabili al trasporto.
Se, per qualsiasi ragione, l'intervento è richiesto (o é necessario) presso il luogo di utilizzo,
saranno a carico del Committente le spese per la trasferta del tecnico: tempi e spese di
viaggio ed eventualmente vitto e alloggio.
Se lo strumento è spedito a mezzo corriere, le spese di trasporto (a/r) sono a carico del
Committente.
La GARANZIA DECADE nel caso di guasti dovuti ad interventi di personale non autorizzato o
di collegamenti ad apparecchiature applicate da altri o per errato inserimento alla rete di
alimentazione.
E' ESCLUSO qualsiasi indennizzo per danni, diretti o indiretti, provocati al Committente dal
mancato o parziale funzionamento degli strumenti od impianti venduti, anche se durante il
periodo di garanzia.
19