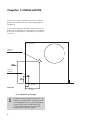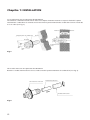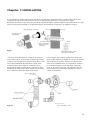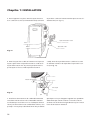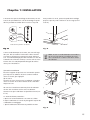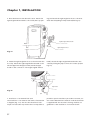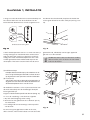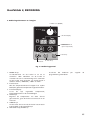
1
Laser FF 95
3
MANUEL D’UTILISATION
3
4
OPERATING INSTRUCTIONS
26
1
GEBRUIKSAANWIJZING
49
Chapitre 1: INSTALLATION
Chère Madame, Cher Monsieur,
Nous vous remercions de la confiance que vous avez bien voulu témoigner à
notre marque en choisissant un appareil de chauffage à combustible liquide
Zibro. Vous venez d'acquérir un produit de qualité, qui vous donnera entière
satisfaction durant de très nombreuses années. A condition, bien sûr, de
respecter les consignes d'utilisation. C'est pourquoi nous vous invitons vivement
à consulter ce manuel afin d'assurer à votre appareil Zibro Laser une durée de
vie optimale.
Les produits Zibro sont garantis contre tout vice de fabrication ou de conception (hors consommables) pendant une durée de 4 ans à compter de leur date
d'achat.
Nous vous souhaitons beaucoup de chaleur et de confort avec votre Zibro.
Bien cordialement,
PVG Holding B.V.
1 LISEZ PRÉALABLEMENT LE MANUEL D'UTILISATION
2 EN CAS DE DOUTE, CONTACTEZ VOTRE REVENDEUR ZIBRO
3
CE QUE VOUS DEVEZ SAVOIR AU PRÉALABLE:
LE BON COMBUSTIBLE
Votre poêle Zibro est conçu pour être utilisé avec un pétrole non aqueux de haute qualité, comme Zibro
Extra ou Zibro Kristal. Seuls les combustibles de ce type garantissent une combustion efficace et propre. Les
combustibles de qualité inférieure peuvent générer les problèmes suivants:
왘
왘
왘
왘
왘
Pannes plus nombreuses
Combustion incomplète
Durée de vie du poêle plus courte
Fumée et/ou odeur
Dépôts de combustion sur la grille ou le manchon
L’utilisation du bon combustible est cruciale pour une utilisation sûre, efficace et confortable de votre poêle.
Pour connaître le combustible le mieux adapté à votre poêle, informez-vous auprès de votre distributeur
Zibro local.
☞
• Les premières fois que votre poêle sera utilisé, il sentira une odeur de ‘neuf’.
• Conservez le combustible dans un endroit frais et sec.
• Le combustible a une durée d’utilisation limitée. Utilisez un nouveau combustible à chaque
nouvelle saison.
• L’utilisation des combustibles de qualité Zibro Extra ou Zibro Kristal vous garantit un chauffage optimal.
• Si vous voulez utiliser un pétrole d’une autre marque ou d’un autre type, faites d’abord brûler
le reste de combustible contenu dans le poêle.
CONSEILS POUR UNE UTILISATION EN SÉCURITÉ
1 Prévenez les enfants des dangers que représente un poêle en fonctionnement.
2 L’avant du poêle doit se trouver à une distance minimum d’1,5 m de murs, rideaux et meubles.
3 Le chauffage n’est pas optimal dans les pièces poussiéreuses. N’utilisez pas votre poêle près d’une
baignoire, d’une douche ou d’une piscine.
4 Éteignez votre poêle lorsque vous quittez l’habitation ou lorsque vous allez dormir. Si vous partez pour
une longue période (vacances, par exemple) débranchez le poêle.
5 Transportez le combustible uniquement dans des bidons et des jerrycans adéquats.
6 N’exposez pas le combustible à la chaleur ou à des variations extrêmes de températures. Stockez toujours
le combustible dans un endroit sec et frais (la lumière directe du soleil influence la qualité du
combustible).
7 N’utilisez jamais le poêle dans des pièces où se trouvent des substances ou des gaz nocifs (gaz
d’échappement ou odeurs de peinture, par exemple).
8 Soyez prudent lorsque la grille du poêle est brûlante; couvrir le poêle risque de provoquer un incendie.
9 Utilisez uniquement le poêle en conformité avec les prescriptions, normes et règlements nationaux ou
locaux.
10 Lorsque vous utilisez le poêle, il doit être posé sur une surface plane.
11 Attendez toujours que le poêle soit complètement froid avant de le remplir de combustible ou de le nettoyer.
12 Ne pas utiliser le poêle dans des pièces où des vapeurs inflammables et autres facteurs, peuvent
provoquer un incendie ou une explosion.
13 Cet appareil n’est pas conçu pour des utilisateurs (y compris les enfants) qui présentent un handicap
moteur, mental ou sensoriel, ou qui manquent d’expérience et de connaissances, sauf s’ils sont surveillés
par une personne responsable de leur sécurité.
4
Chapitre 1: INSTALLATION
1. Introduction
Outils conseillés:
Ce chapitre contient des informations concernant:
1.
2.
3.
4.
5.
• Spécifications pour l’installation
• Liste des outils nécessaires à l’installation
• Exigences minimums pour l’installation du réservoir
de combustible
• Instructions pour l’installation du Laser System
Le poêle peut être installé à l’endroit de votre choix,
l’emplacement doit cependant être conforme aux
normes en matière d’électricité, de combustible et
d’émission de gaz.
Avant de commencer l’installation du système de
chauffage (et du câblage électrique) consultez d’abord
les prescriptions locales en matière de construction, d’incendie et de sécurité. Ces normes doivent être respectées
pour obtenir une installation juridiquement conforme et
pour garantir un bon fonctionnement.
☞
Le poêle est conçu pour être utilisé à une
altitude maximum de 1.000 mètres. Pour
l’utilisation de votre poêle à une altitude
supérieure, consultez votre distributeur.
6.
7.
8.
9.
10.
11.
12.
13.
14.
15.
16.
17.
18.
19.
Tournevis cruciforme
Mètre métallique
Feutre ou crayon
Ciment pour extérieur
Perceuse électrique (rotation gauche et droite
conseillée)
Scie cloche, scie sauteuse ou autre outil permettant
de découper un trou de 70~80 mm pour le tuyau
d’évacuation.
Mèche de perceuse suffisamment longue
Tournevis standard
Clés ajustables (diverses tailles)
Scie pour tuyaux en cuivre
Alésoir
Multimètre (voltmètre/ohmmètre)
Niveau à bulle d’air
Adhésif de plombier pour filetages de tuyaux
Vis autotaraudeuses de diverses dimensions
Série de pinces (pince coulissante, pince à câble,
pince coupante, pince de serrage)
Tournevis isolé
Matériel de protection pour le sol
Bac de récupération pour la vidange du
combustible
3. Installation électrique
Le poêle doit être installé dans un endroit suffisamment grand où l’air peut circuler librement. Nous vous
recommandons de stocker le combustible dans une
autre pièce. Le Laser System peut être installé sur tous
les types de surface (même sur une moquette ou autre
revêtement de sol inflammable) et fonctionner en sécurité, sauf si les règlements en matière de combustible et
d’incendie mentionnent le contraire. Vérifiez les différences entre le mode d’emploi et les normes locales
en vigueur.
Le système électrique doit être protégé de la surcharge
grâce à un fusible (5 Ampères minimum) ou un coupecircuit.
☞
2. Déplacer le poêle
Certaines installations (dans les mobile
homes, par example) doivent avoir une
liaison permanente avec un réseau
électrique. Cette liaison doit être installée
par un electrician agree.
4. Réservoir de combustible
Combustible de chauffage (exclusivement de l’huile de
paraffine exempte d’eau) en cuves de 200/1 000 litres
situées à l’extérieur. Dans le cas d’une utilisation de
grandes, un régulateur de pression, avec un maximum
de 2,5 PSI (± 0,17 bar), doit être adapté sur l’appareil, à
l’arrivée. Ce montage doit être effectué en stricte conformité avec les normes locales et/ou règlements de la
construction.
5
Chapitre 1: INSTALLATION
5. Fils du capteur de température ambiante
6. Sortir l’appareil de l’emballage
Le capteur de température peut être fixé sur un mur. Il
mesure la température ambiante pour réguler automatiquement le chauffage. Le câble standard du capteur a
une longueur de 2,5 m.
Conservez l’emballage de votre appareil pour une utilisation ultérieure éventuelle.
☞
Le capteur ne doit pas être installé dans un
endroit trop sec, en plein soleil, ou dans le
flux d’air chaud émis par le poêle. Ceci peut
perturber la mesure de la température
ambiante.
A) Retirez de l’emballage le gabarit de perçage
(carton) et le mode d’emploi.
B) Retirez de l’emballage la boîte du kit d’installation.
C) Retirez le poêle de l’emballage.
D) Retirez le sac en plastique
E) Retirez les pièces du sac en plastique.
F) Retirez le tuyau d’évacuation placé au fond de
l’emballage.
G) Vérifiez que vous avez bien toutes les pièces
(détachées).
☞
Le poêle est livré avec tous les équipements
standard nécessaires à l’évacuation et à
l’installation électrique.
Plus de 60 cm
Plus de 10 cm
Plus de 30 cm
Plus de 30 cm
Plus de 1,5 m
Laser 95
ill. 1-1: Espace entre poêle et tuyau d’évacuation
6
Chapitre 1: INSTALLATION
Objet inflammable
Objet inflammable
Pas moins de 60 cm
Pas moins
de 45 cm
Pas moins
de 45 cm
Objet noninflammable
Pas moins de 60 cm
45°C
Pas moins de 30 cm
Tuyau d’évacuation
Pas moins de 20 cm*
* Ce dispositif doit également être présent en cas de chutes de neige, etc.
ill. 1-1 Espace entre poêle et tuyau d’évacuation (suite)
Obstruction à l’avant
45 cm ou plus
20 cm ou plus
Surface enneigée
Important: Dans les zones à fort enneigement, l’installation doit
prévoir un espace suffisant au dessus du sol.
Important: Dans les endroits exposés à des vents forts, l’installation d’un pare vent est recommandée.
Vent fort
Tuyau de rallongement 3,0 mètres maximum (maximum de
trois coudes)
Hauteur insuffisante
Espace entre tuyau
d’évacuation et
pare vent: 45 cm
minimum.
Pas
moins
de 45 cm
Pare vent
Neige
ill. 1-2 Espace entre poêle et tuyau d’évacuation
7
Chapitre 1: INSTALLATION
Percez le trou pour le tuyau d’évacuation à l’aide du
gabarit, puis installez le Laser comme indiqué par les
illustrations.
Si vous ne possédez plus le gabarit de perçage ou si le
poêle doit être déplacé, voici les dimensions à respecter
pour les trous du tuyau de combustible et le tuyau d’évacuation.
Arrière du poêle
Milieu de la
conduite
12 3/8”
(310 mm)
Entrée de
carburant
3 5/8”
(92 mm)
1 7/8” (92 mm)
Laser 95
12 1/2”
(317 mm)
ill. 1-3 Gabarit de perçage
☞
8
Ne démontez pas les pièces du poêle. Si une
réparation est nécessaire, contactez toujours
votre distributeur. Si le cordon électrique est
endommagé, faites-le remplacer par un
cordon de type H05 VV-F. Ceci doit être
réalisé par un installateur agréé.
Sol
Chapitre 1: INSTALLATION
Pièces standard nécessaires à l’installation
Les pièces standard indiquées ci-dessous sont fournies
avec le poêle. Si vous installez votre poêle selon une
autre procédure, vous devrez peut-être commander
d’autres pièces.
Plaque de fond (1)
Crochets muraux (2 jeux)
Porte tuyau (1)
Fixation de tuyauterie (1)
(3)
(3)
Tuyau d’évacuation (1)
Tuyau d’évacuation coudé (1)
9
Chapitre 1: INSTALLATION
Goulotte de trop-plein (1)
Tuyau d’air coudé (2)
Tuyau d’air souple (1)
Pince à tuyau souple (2)
10
Chapitre 1: INSTALLATION
1. Pour une installation standard, utilisez le gabarit
fourni pour placer le trou destiné au tuyau d’évacua-
tion au bon endroit. Fixez le gabarit sur le mur à l’aide
de ruban adhésif ou de petits clous (voir fig. 4).
Ruban adhésif
Fig. 4
Remarque: L’appareil doit être installé sur un sol robuste, plat et à niveau. Si ce n’est pas le cas, l’appareil
peut être remis à niveau grâce à ses pieds réglables. Le
petit niveau vous permet de vérifier si l’appareil est
bien à l’horizontal.
2. Percez le trou pour le tuyau d’évacuation. Pour cela
utilisez un foret cloche de 70~80 mm monté sur une
perceuse (voir fig. 5). Le trou du côté intérieur du mur
doit être légèrement plus haut que le trou à l’extérieur
afin que le tuyau de passage et le tuyau
d’évacuation soient légèrement inclinées vers le bas
(environ 2°) (voir fig. 6). Ceci permet d’évacuer la
condensation du tuyau d’évacuation et évite l’entrée
de pluie ou de neige vers l’intérieur de l’installation.
2°
Fig. 5
Fig. 6
11
Chapitre 1: INSTALLATION
3a. Pour des murs avec une épaisseur de 230-320 mm:
Introduisez le conduit d’évacuation d’air dans le trou depuis l’intérieur. Assurez-vous que la flèche de la partie
intérieure du conduit d’air est orientée vers le haut. Fixez la partie intérieure du conduit d’air au mur à l’aide des
trois vis à bois (voir fig. 7).
Extérieur
Intérieur
230~320mm
Partie intérieure du conduit d’air
Flèche
Vis à bois:
2° minimum vers
le bas
Fig. 7
3b. Pour des murs avec une épaisseur de 130-230 mm
Retirez le conduit d’arrivée d’air et le raccord de sortie de la partie extérieure du conduit d’air (voir fig. 8).
Conduit d’évacuation d’air
Partie extérieure du conduit d’air:
Conduit d’arrivée d’air
Fig. 8
12
Chapitre 1: INSTALLATION
3c. Introduisez le conduit d’évacuation d’air dans le trou depuis l’extérieur. Fixez le conduit d’évacuation d’air
extérieure au mur en la tournant vers la droite. Les deux parties seront ainsi connectées (voir fig. 9).
Remarque: Assurez-vous que la flèche sur le bord surélevé (bride) de la partie extérieure du conduit d’air est orientée vers le haut. Bien attacher le conduit d’évacuation d’air extérieur (composant –A, indiqué à la fig. 9).
Partie extérieure du conduit d’air:
Intérieur:
Extérieur:
A
Partie intérieure du
conduit d’air:
2° minimal vers le bas
Flèche
Bord surélevé (bride) de
la partie extérieure du
conduit d’air:
Fig. 9
Bord surélevé (bride) de la partie
extérieure du conduit d’air:
4. Fixez le tuyau d’évacuation coudé sur la sortie du
tuyau d’évacuation. Si nécessaire coupez le tuyau d’air
souple à la bonne dimension. Fixez le tuyau d’air coudé
sur les deux extrémités du tuyau d’air souple: fixez
ensuite le tuyau d’air coudé sur l’entrée du tuyau
d’évacuation. Placez le tuyau d’air coudé sur les deux
extrémités du tuyau d’air souple: fixez ensuite le tuyau
d’air coudé sur l’entrée du tuyau d’évacuation.
Fixez le tuyau d’air coudé à l’entrée avec une pince à
tuyau souple. Fermez les entrées et sorties non utilisées
avec les bouchons fournis. Assurez-vous que les bouchons sont solidement fixés. Si le tuyau d’air coudé se
raccorde difficilement sur le tuyau d’air, utilisez de
l’eau ou de l’eau savonneuse. La longueur totale du
tuyau d’évacuation ne doit pas dépasser 3 m (avec 3
coudes au maximum).
Pince à tuyau souple
Bouchon
Tuyau d’air souple
Sortie
Tuyau d’air coudé
Fig. 10
Tuyau d’évacuation coudé
13
Chapitre 1: INSTALLATION
5. Posez l’appareil à sa place. Fixez le tuyau d’évacuation coudé sur la sortie (l’ouverture du haut) et fixez le
tuyau d’air coudé sur l’entrée. Vérifiez que tout est solidement fixé (voir fig. 11).
Tuyau d’évacuation coudé
Sortie
Entrée
Tuyau d’air coudé
Fig. 11
6. Fixez le tuyau d’air coudé sur l’entrée avec la pince à
tuyau souple. Fixez le tuyau d’évacuation coudé sur le
tuyau d’évacuation avec le porte tuyau (fixez aussi le
porte tuyau sur le raccord du tuyau d’évacuation
coudé). Fixez le tuyau d’évacuation coudé sur la sortie
en enfilant la fixation du tuyau dans la pince de la sortie (voir fig. 12).
Fixation de tuyauterie
Porte tuyau
Fig. 12
7. Installation d’un réservoir de combustible extérieur
L’installation d’un réservoir de combustible extérieur
est illustrée par le schéma 1-11. Les techniques d’installation pour des réservoirs de combustibles varient, c’est
pourquoi il n’est pas possible de donner une procédure
14
spécifique. La façon d’équiper l’appareil est cependant
déterminée par certains critères. La liste de contrôle
suivante vous donnera une ligne directrice pour l’installation d’un réservoir extérieur.
Chapitre 1: INSTALLATION
8. Assurez-vous que le chauffage est de niveau, en utilisant le fil à plomb du bon côté du chauffage Le poids
du fil à plomb doit tomber dans le cercle. Si le poids
n’est pas dans le cercle, ajustez les pieds du chauffage
jusqu’à ce que le poids soit dans le cercle rouge (voir ill.
13 & 14).
Bon
Poids
Cercle
Mauvais
Poids du fil à plomb vu du dessus
Fig. 13
☞
Fig. 14
Choose a location for the sensor that is not in the path of direct sunlight, drafts or the flow of
w
9. Une sonde thermique est fournie, avec une rallonge
NOTE : Posez la sonde thermique à un endroit
de 2,5 m. Elle est située à l’arrière du coffret. Assurezqui ne soit pas exposé à la lumière du soleil,
vous que la rallonge ne touche pas le tuyau d’évacuaaux courants d’air ou dans le flux d’air chaud
tion. La sonde thermique peut être installée soit avec de
du radiateur.
la bande autocollante à l’arrière, soit avec une vis à bois
fournie avec la sonde, dépendant du type de surface
choisi pour l’installation.
(a) Bande autoadhésive
Décollez le papier de protection à l’arrière du capteur
pour exposer les adhésifs. Posez la sonde à l’endroit
choisi sur le mur, puis appuyez.
(b) Vis à bois
Vissez la vis à bois fournie avec le radiateur à l’endroit
choisi sur le mur. Accrochez l’arrière de la sonde thermique sur la vis.
(a)
10. Une fois l’installation terminée, fixez le radiateur
au mur avec les étriers fournis avec le radiateur.
Assurez-vous que le radiateur est parallèle au mur (voir
ill. 15).
).
(b)
11. Avant d’allumer, revérifiez :
a. Que tous les branchements sont serrés et solides.
b. Que le radiateur et la zone de passage des tuyaux de
combustible sont dégagés.
c. Que le radiateur et de niveau et parallèle au mur.
Fig. 15
15
Chapitre 1: INSTALLATION
LISTE DE CONTROLE
Possibilités d’alimentation en combustible
• Vérifiez si l’appareil est branché à une prise
électrique adéquate.
• Vérifiez qu’une quantité suffisante de combustible
se trouve dans le réservoir de combustible.
• Assurez-vous que le combustible ne contient ni eau
ni autres produits de contamination.
• Vérifiez si le réservoir de combustible est en bon
état de fonctionnement, il ne doit présenter aucune
fuite ni trace de rouille ou de corrosion.
• Inspectez les tuyaux de combustible et assurez-vous
qu’ils ne présentent pas de fuite, de fêlures, de
bulles d’air ou d’obstruction.
• Vérifiez si les robinets du réservoir de combustible
et le robinet anti-feu sont bien ouverts permettant
au combustible de circuler librement.
• Vérifiez la proximité du tuyau d’évacuation à
l‘extérieur du bâtiment, aucun combustible ou autre
obstacle ne doit gêner la circulation de l’air.
• Assurez-vous que les tuyaux d’entrée d’air ne sont
pas fendus, mal fixés ou bouchés.
• Assurez-vous que les tuyaux de sortie d’air ne sont
pas fendus, mal fixés ou bouchés.
• Vérifiez à l’arrière de l’appareil si le flux d’air en
direction du ventilateur n’est pas bloqué.
• Vérifiez la proximité de l’appareil à l‘intérieur du
bâtiment, aucun combustible ou autre obstacle ne
doit gêner la circulation de l’air.
• Vérifiez si le capteur de température dans la pièce
n’est pas exposé aux courants d’air, à la lumière
directe du soleil ou à la chaleur directe de l’appareil.
• Vérifiez à l’aide d’un niveau, si l’appareil est bien à
l’horizontale.
L’alimentation en combustible du Laser 95 peut se faire
de la façon suivante:
Si cette inspection permet de déceler un dysfonctionnement, veillez d’abord à régler le problème avant d’utiliser l’appareil.
☞
Utilisez exclusivement du combustible
dépourvu d’eau et de bonne qualité.
N’utilisez jamais d’essence, de LPG, de gaz
de camping ou d’autres liquides
inflammables. De tels combustibles peuvent
provoquer des explosions et des feux.
Réservoir extérieur de grande capacité à pression atmosphérique:
Pour installer un gros réservoir extérieur à pression
atmosphérique, suivez les instructions suivantes. Il est
recommandé d’être assisté par un installateur agréé. La
pression d’arrivée dans l’appareil ne doit pas dépasser
2,5 psi. Utilisez un robinet réducteur de pression avec
une force de propulsion maximum de 2,5 psi (environ
0,17 bars).
Le fond du réservoir de combustible doit être installé à
une hauteur de 40 cm au-dessus du sol ou se trouve
l’appareil. Ceci permet au combustible d’avoir une pression suffisante à l’arrivée dans l’appareil. La distance
entre le sol où est posé l’appareil et le haut du réservoir
de combustible ne doit pas dépasser 2,5 m. Sinon la
pression du combustible à l’arrivée dans l’appareil
serait trop importante.
La tuyauterie ne doit pas non plus comporter de raccords en U (pour éviter la formation de bulles d’air qui
peuvent bloquer l’alimentation en combustible).
Il est conseillé d’utiliser un filtre à eau dans le tuyau de
combustible au niveau du réservoir. Un robinet de fermeture doit être monté sur le réservoir.
Il est recommandé d’installer un robinet anti-feu et un
filtre à combustible sur le tuyau de combustible.
L’utilisation d’une valve de coupure, placée juste avant
que le tuyau entre dans le bâtiment, limitera la quantité de combustible à pomper au minimum si le radiateur exige de l’entretien.
Si un tuyau de combustible a une longueur de plus de
90 cm à l’intérieur du bâtiment, un robinet de fermeture supplémentaire devra être installé.
Le réservoir de combustible extérieur doit être installé
à au moins 2 mètres d’une éventuelle source de
chaleur.
Le réservoir de combustible extérieur doit avoir une
bouche de remplissage placée sur le dessus et une
ouverture pour purger l’air avec bouchon antiintempéries placée sur le côté. Sur certains réservoirs la
16
Chapitre 1: INSTALLATION
purge d’air et le remplissage s’effectue par la même
ouverture.
Important: Veillez à ce que les tuyaux de combustible
soient propres. Des éventuelles saletés peuvent causer
des problèmes dans le bac de récupération de combustible.
La tuyauterie de combustible doit être en cuivre avec
un diamètre extérieur de 3/8”.
L’installation du réservoir externe doit être conforme
aux normes anti incendie NFPA31 et/ou aux réglementations locales. Renseignez-vous auprès des instances
locales responsables.
Réservoir de combustible
extérieur
Laser 95
Bac de récupération pour combustible avec bouton
de déverrouillage
Filtre à combustible: type
capteur d’eau de préférence
2.5 m (max.)
Robinet anti-feu
(conseillé)
Robinet de fermeture
(conseillé)
40 cm (min.)
Robinet de fermeture
Spirale
Tuyau en cuivre
avec diamètre
extérieur 3/8
Fig. 1-11 Branchement des tuyaux de combustible
17
Chapitre 2, UTILISATION
1. Introduction
Le Laser FF 95 est un appareil ventilé à combustible
facile à utiliser. Il a une importante puissance de
chauffage et présente une régulation automatique de
la température ambiante, une faible consommation de
combustible et d’électricité et peut être utilisé en mode
automatique ou manuel.
Ce chapitre vous donne toutes les informations nécessaires à l’utilisation de l’appareil Laser. Toutes les procédures d’utilisation doivent être suivies dans l’ordre
indiqué.
2. Spécifications de l’appareil Laser 95
Low
Puissance de chauffage (W)
3.100
Consommation de combustible (l/h) 0.38
Consommation de combustible (g/h) 304
Medium
6.300
0.73
584
High
9.500
1.080
864
• Rendement nominal (appliqué aux appareil de
chauffage à combustible liquide): 92%
• Consommation électrique:
Allumage
280 W
Eteint
80 W
Capacité du ventilateur: 2,9/1,9/0,8 mètres cubes/min.
• Source combustible: réservoir extérieur
• Volume de chauffage comme chauffage principal:
130 – 440 m³
18
Chapitre 2, UTILISATION
3. Touches de commandes et voyants lumineux
1. Bouton ON/OFF
3. Écran
2. Boutons
Adjustment
de réglage
buttons
(time and temperature)
4. Bouton
Save button
de sécurité (SAVE):
5. Bouton
Timer button
minuterie
6. Bouton sécurité enfant
(childproof lock):
Fig. 2-1 Panneau de commande
1. Bouton ON/OFF:
Interrupteur principal pour allumer et éteindre le
poêle. Appuyez sur “ON” pour mettre le poêle en
route. Le poêle s’allume après un préchauffage de 3
à 9 minutes. Le poêle a 4 positions “HIGH”,
“MEDIUM”, “LOW” et “OFF”.
2. Boutons de réglage:
Les boutons de réglage permettent de régler la
température souhaitée lorsque le poêle fonctionne.
3. Écran
Affiche l’heure, la température programmée, la
température ambiante et les indications de pannes
4. Bouton de sécurité (SAVE):
Limite la température. Si cette fonction est activée,
le poêle s’éteint automatiquement lorsque la
température programmée est atteinte.
5. Bouton minuterie
Il se rallume automatiquement si la température
baisse. La fonction minuterie permet d’allumer le
poêle automatiquement à une heure programmée.
6. Bouton SÉCURITÉ ENFANT (CHILDPROOF LOCK):
Fonction de verrouillage pour que les enfants ne
puissent pas modifier les réglages du poêle.
19
Chapitre 2, UTILISATION
4. Avant la première utilisation
Étape 1: Ouvrez le(s) couvercle(s)
Ouvrez le couvercle pour le réservoir de combustible
extérieur et le robinet anti-feu (s’il est présent).
Étape 2: Activez le flux de combustible
Appuyez doucement pendant une seconde sur le bouton de déverrouillage rouge pour libérer le flotteur du
bac de récupération du combustible.
Le bac de récupération du combustible ne doit être
déverrouillé que lorsque l’appareil est utilisé pour la
première fois, après une consommation de toute la
réserve de combustible ou après une longue période de
non-fonctionnement. Le déverrouillage peut aussi être
exigé si la pression de l’arrivée du combustible dépasse
2,5 psi (environ 0,17 bars). Dans ce cas, un robinet
réducteur de pression doit être installé.
Étape 3: Réglez l’heure
Important: L’heure de l’appareil doit toujours être
réglée correctement.
A. Mettez l’interrupteur de choix horaire en position
“CLOCK SET” (réglage heure)
B. Appuyez sur les touches “HOUR” (heure) et
“MINUTE” (minutes) pour régler respectivement les
heures et les minutes. Si vous appuyez une seule fois
sur la touche “HOUR” ou “MINUTE” l’heure se
règlera en heure/minute. Si vous maintenez les
touches enfoncées les heures/minutes défileront
rapidement.
En cas de coupure de courant de plus de dix secondes,
tous les enregistrements horaires s’effacent. L’écran
affiche “PM 12:00” et clignote lorsque l’appareil est
éteint. L’heure et la minuterie doivent alors être reprogrammées.
C. Une fois le réglage de l’heure terminé, mettez
l’interrupteur de choix horaire en position
“NORMAL”. L’heure du moment s’affiche alors sur
l’écran numérique.
5. Fonctionnement en mode manuel
Le fonctionnement de l’appareil est régulé directement
par l’utilisateur. La puissance de chaleur est cependant
réglée automatiquement en fonction de la tempéra-
20
ture ambiante enregistrée par le capteur dans la pièce.
Étape 1: Allumez l’appareil
Mettez le bouton ON/OFF en position “ON” (marche).
La température ambiante et la température programmée s’affichent sur l’écran. Le témoin lumineux ON/OFF
commence à clignoter puis l’appareil se met en route.
L’appareil ne se met pas en route si la température
ambiante est supérieure à la température souhaitée qui
a été programmée.
Note: (*) La période de démarrage dépend de la température ambiante.
Après 9-15 minutes l’appareil choisira automatiquement la bonne position et le bouton ON/OFF s’allumera
continuellement.
Température ambiante:
inférieure à 0°C
15 minutes
0°C - 15°C
12 minutes
15°C
9 minutes
Si aucune flamme n’est visible après la période de
démarrage, l’appareil s’arrêtera et se remettra automatiquement en route. Si à nouveau aucune flamme n’est
détectée, l’appareil s’éteindra encore; il devra alors être
remis en route manuellement. (code d’erreur EE-2 sur
l’écran).왔왖
Étape 2: Programmer la température
La température peut uniquement être modifiée si le
poêle brûle. Pour modifier la température, utilisez les
boutons de réglage comme suit: activez d’abord la fonction en appuyant sur l’un des deux boutons (l’indicateur
lumineux TEMP à côté de l’écran se met à clignoter).
Réglez la température avec le bouton de droite (왔 min)
pour augmenter et avec le bouton de gauche (왖 hour)
pour diminuer. Appuyez une fois pour augmenter la température d’1 degré. L’indicateur lumineux s’arrête de clignoter au bout d’environ 10 secondes et la température
est mémorisée. La température peut être réglée de 10°C
minimum à 32°C maximum. Si le poêle n’est pas branché
(ou a subi une panne de courant), la température revient
automatiquement sur le réglage d’usine, c’est-à-dire
20°C.
Le mode de fonctionnement est sélectionné automatiquement selon la température ambiante enregistrée
par le capteur de température. Le poêle fonctionne en
Chapitre 2, UTILISATION
mode de fonctionnement “HIGH” jusqu’à ce que la température ambiante ait atteint le niveau souhaité.
Lorsque la température ambiante est identique à la température programmée, le poêle passe automatiquement
en mode “MED” ou “LOW”, pour maintenir la température dans la pièce.
☞
Sans la fonction ‘SAVE’, le poêle maintient
aussi la température de la pièce en régulant
son volume de chauffage. ‘SAVE’ est un
réglage économique, à utiliser par exemple
dans une pièce inhabitée pour ne pas qu’elle
gèle.
Étape 4: L’indicateur lumineux FUEL
L’indicateur lumineux FUEL s’allume pour indiquer que
le poêle a assez de combustible pour une durée de 10
minutes. Le temps de chauffage restant s’affiche alors
sur l’écran. Retirez alors le réservoir à combustible du
poêle et remplissez-le hors de la pièce. Si vous ne remplissez pas le réservoir, le poêle émet un signal sonore
toutes les deux minutes. Au bout de 10 minutes, le
poêle s’éteint automatiquement.
6. Minuterie
Avec la fonction minuterie, vous pouvez programmer
l’heure de mise en route automatique du poêle.
Pour activer la minuterie, l’heure du poêle doit être
réglée et le poêle doit être éteint. Suivez la procédure
suivante:
[1] Appuyez sur le bouton de la minuterie. L’indicateur
lumineux TIMER et l’écran se mettent à clignoter.
[2] Utilisez les boutons de réglage pour programmer
l’heure de mise en route automatique du poêle.
Utilisez le bouton de gauche pour saisir les heures (▲
[3] Appuyez sur le bouton ON/OFF alors que l’écran clignote.
[4] Au bout d’environ 10 secondes le symbole CLOCK
réapparaît sur l’écran et le signal TIMER s’allume. Ceci
indique que la fonction TIMER est activée.
Pour annuler la programmation de la minuterie,
appuyez une fois sur le bouton ON/OFF.
☞
Étape 3: Bien utiliser le bouton ‘SAVE’
Avec la fonction ‘SAVE’, vous pouvez limiter la température. Si cette fonction est activée, le poêle s’arrêtera
automatiquement lorsque la température ambiante sera
supérieure de 2°C à la température programmée. Si la
température ambiante baisse trop, le poêle se remet
automatiquement en route. Pour activer la fonction
‘SAVE’, appuyez sur le bouton correspondant et l’indicateur lumineux s’allume. Pour éteindre la fonction, il suffit
de rappuyer sur le bouton.
hour) et le bouton de droite pour les minutes
(▼ min.) (intervalle de 10 minutes).
Remarque: lorsque la température ambiante
est inférieure à 15 °C, l’heure programmée
change automatiquement – selon la température – pour chauffer la pièce à temps.
Température ambiante
Plus de 15 °C
0°C ~ 15°C
Moins de 0 °C
Heure d’allumage
Heure programmée
10 minutes avant l’heure programmée
20 minutes avant l’heure programmée
7. Capteur de température ambiante
Le capteur de température ambiante est muni d’un
câble de 2,5 mètres à l’arrière du poêle. Veillez à ce que
le câble du capteur ne se trouve pas contre le tuyau d’évacuation. Pour fixer le capteur de température
ambiante, utilisez de l’adhésif double face ou un vis à
bois. Fixez le capteur dans un endroit non exposé aux
courants d’air, hors du rayonnement direct du soleil et
du poêle.
8. Sécurité enfant
La sécurité enfant permet d’éviter que les enfants
changent par inadvertance, les réglages du poêle.
Lorsque le poêle fonctionne et que la sécurité enfant
est activée, toutes les fonctions sont bloquées, sauf
celle d’extinction du poêle. Si le poêle est déjà éteint, la
sécurité enfant rend l’allumage du poêle impossible.
Pour activer la sécurité enfant, appuyez plus de 3 secondes sur le bouton correspondant. L’indicateur lumineux
KEY-LOCK s’allume, la sécurité est alors activée. Pour
éteindre la fonction, rappuyer plus de 3 secondes sur le
même bouton.
9. Éteindre le poêle
Le poêle peut s’éteindre de deux façons.
21
Chapitre 2, UTILISATION
10. Remise en route après surchauffe
Le poêle est muni d’un dispositif anti surchauffe.
Lorsque la température de la carrosserie du poêle
dépasse les 90 °C, un capteur s’enclenche
automatiquement.
Étape 1: Éteignez le poêle (OFF).
Étape 2: Laissez le poêle refroidir.
☞
Ne touchez pas les parties métalliques du
poêle avant d’être sûr qu’elles ont refroidi.
Dans des conditions normales, le refroidissement
prend de 30 à 45 minutes.
☞
Avant de nettoyer l’intérieur du poêle, soyez sûr
qu’il a suffisamment refroidi. Dépoussiérez
l’extérieur du caisson avec un chiffon humide et
doux, qui ne peluche pas, ou avec un produit de
nettoyage. N’oubliez pas de nettoyer l’extérieur
de la chambre de combustion et de l’échangeur
de chaleur.
Étape 7: Remettez en place le panneau frontal.
Étape 8: Rebranchez le poêle.
Étape 9: Allumez le poêle.
Étape 10: Reprogrammez le poêle (heure et minuterie).
22
Attention: Si le poêle surchauffe à nouveau
malgré les mesures prises, contactez votre
distributeur. Ne rallumez le poêle que lorsque le
problème est résolu.
11. Nettoyage mensuel du filtre
Éteignez le poêle et laissez-le refroidir avant de commencer le nettoyage. Débranchez également le poêle.
Votre Zibro nécessite un entretien vraiment minimum.
Cependant, nettoyez le filtre à air chaque semaine à l’aspirateur et la grille avec un chiffon humide. Vérifiez périodiquement les raccords du tuyau à combustible pour
détecter toute fuite ou décrochement.
Vérifiez aussi régulièrement le filtre à combustible:
[1] Sortez le réservoir à combustible du poêle et retirez le
filtre à combustible. Prévoyez un chiffon car des gouttes de
combustible peuvent couler du filtre.
[2] Faites tomber les impuretés du filtre à combustible en le
retournant et en le tapotant sur une surface dure. (Ne le
nettoyez jamais avec de l’eau!)
[3] Remettez le filtre à combustible en place dans le poêle.
Nettoyez les saletés et les taches de combustible immédiatement, une fois sèches les taches peuvent être très difficiles à faire disparaître.
☞
Étape 3: Débranchez le poêle.
Étape 4: Essayez de trouver la cause de la surchauffe.
La surchauffe est généralement provoquée par des
objets qui bloquent la circulation de l’air. Vérifiez
donc que le ventilateur et le tuyau d’évacuation ne
sont pas bloqués. Vérifiez également qu’aucun objet
ne gêne le système d’évacuation.
Étape 5: Retirez le panneau frontal du poêle.
Étape 6: Nettoyez l’intérieur du poêle.
☞
[1] Appuyez sur le bouton ON/OFF. L’écran affiche le signal CLOCK. Le ventilateur et son moteur continuent
à fonctionner pendant environ 3 minutes, pour
refroidir le poêle.
[2] Appuyez sur le bouton de la minuterie, si vous
souhaitez éteindre le poêle et le rallumer automatiquement à l’aide de la minuterie. De cette façon,
vous éteignez le poêle mais vous activez aussi la
minuterie. Vous pouvez modifier l’heure de remise
en route avec les boutons de réglage.
Ne démontez et ne réparez jamais une pièce du
poêle. Pour cela, contactez toujours votre distributeur Zibro. Si le cordon électrique est
abîmé, un réparateur qualifié devra le remplacer
par un cordon de type H05 VV-F.
12. Avant de consulter un expert
Les situations suivantes ne sont pas des pannes:
Pendant l’allumage ou l’extinction du poêle
Lorsque le poêle est allumé pour la première fois, une
fumée blanche peut se dégager.
De l’huile lubrifiante ou de la poussière déposée sur la
chambre de combustion ou l’échangeur de chaleur brûlent.
Après l’allumage du poêle, les flammes vacillent quelques
Chapitre 2, UTILISATION
minutes.
La tige d’allumage continue de fonctionner quelques minutes après l’allumage lorsque le poêle a refroidi. Ceci peut
provoquer des flammes plus grandes.
Le poêle émet des craquements lorsqu’il chauffe ou
refroidit.
Les craquements sont provoqués par la dilatation des
pièces métalliques.
Une fois le poêle allumé, son ventilateur ne se met pas en
route immédiatement.
Le ventilateur commence seulement à tourner lorsque le
poêle est chaud, pour éviter de diffuser de l’air froid.
Lorsque le poêle est utilisé pour la première fois ou
lorsque le combustible circule dans le poêle, un fort bruit
de cliquetis se fait entendre.
Le bruit est provoqué par la pompe à combustible qui
chasse l’air qu’elle contient. Au bout d’une minute, l’air
s’est échappé.
Remarque: Lorsqu’elle fonctionne, la pompe à combustible peut émettre un léger bruit de cliquetis. Ceci est
normal et n’est pas une panne.
Lorsque le poêle fonctionne
Une partie du brûleur et / ou de l’échangeur de chaleur
rougit lorsque le poêle est en marche.
Ceci est normal et n’est pas un problème.
23
Chapitre 3 INDICATIONS DES PANNES
CODE PANNE
E-0
E-2
E-6
E-8
E-12
E-13
E-22
-- : -Hi
Lo
24
INFORMATION
Coupure de courant
Sécurité de l’allumage activée
Les flammes s’éteignent
Panne de moteur du ventilateur
Sécurité anti surchauffe activée
Panne du thermistor du brûleur
Trop de combustible dans le brûleur
Pas d’allumage après 3 tentatives
Plus de combustible
Minuterie non réglée
Température ambiante > 35°C.
Capteur de température mal positionné
Température ambiante < -10°C. Vérifiez
l’emplacement du capteur de température
SOLUTION
Rallumer le poêle
Contactez votre distributeur
Contactez votre distributeur
Contactez votre distributeur
Nettoyez et dépoussiérez le filtre à air
Contactez votre distributeur
Contactez votre distributeur
Contactez votre distributeur
Remplissez le réservoir
Réglez la minuterie
Vérifiez l’emplacement du capteur de
température
Panne du thermistor ou capteur de
température non branché
Chapitre 4 CONDITIONS DE GARANTIE
Votre appareil Zibro Laser est couvert par une garantie de 4
ans à compter de la date d’achat. Durant cette période,
tous les vices de fabrication ou de conception seront réparés
gratuitement. De plus, les règles suivantes s’appliquent :
1
Nous rejetons expressément toute autre demande
d’indemnisation, y compris en cas de préjudice indirect.
2
La réparation ou le changement de pièces effectués
dans la période de garantie n’entraîne pas la reconduction de la garantie.
3
La garantie ne s’applique pas dans les cas suivants:
modifications apportées au appareil, usage de pièces
non d’origine, réparations de l’appareil effectuées par
des tiers.
4
Les pièces sujettes à l’usure normale ne sont pas couvertes par la garantie.
5
La garantie s’applique uniquement si vous présentez
le bon d’achat d’origine, daté et ne portant pas de
modifications.
6
La garantie ne s’applique pas en cas de dommage
occasionné par des manipulations non-conformes au
manuel d’utilisation, par une négligence ou par
l’usage de combustible non approprié ou usagé. Un
combustible non approprié peut même être dangereux*.
7
Les frais d’expédition et les risques liés à l’envoi de
l’appareil ou de ses pièces sont toujours à la charge de
l’acheteur.
Ne pas jeter vos appareils électriques avec vos
ordures ménagères. Prière de les déposer dans
les lieux de dépôt prévus à cet effet. Pour tout
information concernant le recyclage, merci de
vous informer auprès de votre distributeur ou
des autorités locales.
En cas de problème, consultez le manuel d’utilisation. Si le problème persiste, consultez votre revendeur.
* Les matières hautement inflammables, par exemple, peuvent produire une combustion incontrôlable avec, pour conséquence, un jaillissement
des flammes. Dans ce cas, ne déplacez pas l’appareil mais éteignez-le i mmédiatement. En cas
d’urgence, vous pouvez utiliser un extincteur mais
uniquement du type B: extincteur à acide carbonique ou à poudre.
25
Chapter 1, INSTALLATION
Dear Sir, Madam,
Congratulations with your purchase of a portable domestic heater. You have
purchased a quality product, which will serve you for many years to come. This,
of course, provided you use the heater correctly. Please read these Directions
for Use first, to ensure maximum lifetime for your heater.
Your heater comes with a 48-month manufacturer’s warranty on all defects in
materials or workmanship.
We wish you a warm and comfortable time with your heater.
Yours sincerely,
PVG Holding b.v.
Customer Service Department
1 READ THE DIRECTIONS FOR USE FIRST.
2 IN CASE OF ANY DOUBT, CONTACT YOUR ZIBRO DEALER.
26
WHAT YOU NEED TO KNOW IN ADVANCE
THE RIGHT FUEL
Only use Class C1 paraffin fuel in accordance with BS2869: Part 2, or equivalent. Your Zibro heater has been
designed for use with high-quality water-free pure paraffin oil, such as Zibro Extra, Zibro Kristal or Zibro Bio.
Only fuels of this kind will ensure clean and proper burning. Lower quality fuel may result in:
왘
왘
왘
왘
왘
increased possibility of malfunctioning
incomplete burning
reduced heater lifetime
smoke and/or smells
deposits on the grid or mantle
Using the right fuel is therefore essential for safe, efficient, and comfortable use of your heater.
Always refer to your local Zibro dealer for the right fuel for your heater.
☞
• The first time you ignite your heater it will smell like ’new’ for a short time.
• Store your fuel in a cool and dark place.
• Fuel has a limited shelf life. Start every heating season with renewed fuel.
• The right quality of fuel will be assured, when you use Zibro Extra or Zibro Kristal for your
heater.
• If you change to another brand and/or type of paraffin oil, you must first finish up all the
remaining fuel in the heater.
TIPS FOR SAFE USE
1 Make sure that children are always aware of the presence of a burning heater.
2 Position the front of the heater at a distance of minimum 1.5 metres from walls, curtains, and furniture.
3 Do not use the heater in dusty rooms. You will not have optimum burning in such rooms. Do not use the
heater in the immediate surrounding of a bath, a shower or a swimming pool.
4 Switch off the heater, before you leave or go sleeping. Unplug the heater as well, when you go away for
a longer period of time (e.g. holidays).
5 Store and move fuel only in suitable tanks and jerrycans.
6 Make sure that the fuel is not exposed to heat or extreme temperature changes. Always store the fuel in
a cool, dry and dark place (sunlight will affect the quality).
7 Never use the heater in places where harmful gasses or fumes may be present (e.g. exhaust gasses or
paint fumes).
8 Beware that the grid of the heater becomes hot. If the appliance is covered there is a risk of fire.
9 Use only in accordance with state and/or local regulations, ordinances and codes.
10 Make sure the heater is on a level surface during operation
11 Do not service or refuel heater while in operation or still hot.
12 Do not operate in areas exposed to flammable vapors or high duel level to avoid fire or explosion.
13 This appliance is not intended for use by persons (including children) with reduced physical, sensory or
mental capabilities, or lack of experience and knowledge, unless they have been given supervision or
instruction concerning use of the appliance by a person responsible for their safety.
27
Chapter 1, INSTALLATION
1. Introduction
Recommended tool kit
This chapter contains all the relevant information,
specifically:
1.
2.
3.
4.
5.
• Installation specifications
• List of installation tools
• Basic requirements for the installation of the fuel
tank
• Instructions for the installation of the Laser System
The heater can be installed at any location, on condition that there is full compliance with electrical, fuel
and emission regulations.
Before you start installing the heating system (including electrical wiring and fuel supply equipment),
check the local building and fire safety regulations. The
requirements stipulated in these regulations must be
respected in order to guarantee a legally approved
installation and correct operation.
☞
The heater was designed to be used to a
maximum altitude of 1000m above sea level.
Contact your dealer for the necessary
adjustments if you wish to use it at a higher
altitude.
Crosshead screwdriver
Steel tape measure
Felt-tip pen or pencil
Cement for exterior use
Electric drill (clockwise and anti-clockwise
recommended)
6. Hole cutting saw, jig saw or other tools suitable for
sawing a hole of 70~80 mm for the exhaust pipe
7. Long drill
8. Standard screwdrivers
9. Adjustable spanners (various sizes)
10. Copper tube cutter
11. Reamer
12. Volt, Ohmmeter
13. Spirit level
14. Plumber’s tape for tube screw thread
15. Small range of self-tapping screws
16. Range of pliers (pin tongs, needle nose pliers,
cutting pliers, locking pliers)
17. Insulated screwdriver
18. Protective material for your floor
19. Container for fuel exhaust pipe
3. The electrical supply system
The electrical system must be protected from overloads
by an at least 5-Ampere fuse or contact breaker.
2. Moving the heater
☞
In addition to the space required for the heater, extra
room must be kept free for air circulation. The Laser
System can be placed on any type of flooring and operate safely, unless fuel or fire safety regulations specify
otherwise. Check the gaps in the manner stipulated in
the instructions in the manual.
Some installations (such as for use in mobile
homes) must be fitted with a permanent
connection to the household power circuits.
This must be done by a recognised
electrician.
4. Fuel tank
Heater fuel (exclusively water-free, pure paraffin oil) in
200/1000 litre storage tanks located outside. If large
tanks are used, a pressure regulator with a max. of 2.5
PSI (± 0.17 bar) must be fitted at the inlet on the
heater. This must be carried out in strict adherence to
all local standards and/or building regulations.
28
Chapter 1, INSTALLATION
5. Wiring for the room temperature sensor
6. Unpacking
A temperature sensor that can be fitted to a wall measures the room temperature in order to automatically
regulate the heating. The standard sensor wire is
approximately 2.5 m long.
Save all packaging materials for possible future transportation.
☞
The sensor may not be placed in a draught,
direct sunlight or the warm air flowing out
of the heater. This may cause incorrect
temperature indications.
A) Remove the cardboard (drilling) template and the
user’s manual from the packaging.
B) Remove the base plate and the box with the
installation kit from the packaging.
C) Remove the heater from the packaging.
D) Remove the plastic bag covering the heater.
E) Remove the plastic bag containing the parts.
F) Remove the exhaust pipe from the bottom of the
box.
G) Check that all parts are present.
☞
Only the standard feed and exhaust system
is supplied with the heater.
More than 60 cm
More than 10 cm
More than 30 cm
More than 30 cm
More than 1,5 m
Laser 95
Fig. 1-1: Gaps heater/exhaust pipe
29
Chapter 1, INSTALLATION
Flammable object
Flammable object
Not less than 60 cm
Not less
than 45 cm
Not less
than 45 cm
Non-flammable object
Not less than 60 cm
45°C
Not less than 30 cm
Exhaust pipe
Not less than 20 cm*
* This clearance has to be present also in case of snowfall, etc.
Fig. 1-1 (continued) gaps heater/exhaust pipe
Frontal obstruction
45 cm or more
20 cm or more
Snow-covered surface or ground
Important: The gap with the ground must be enlarged in areas
subject to heavy snowfall.
Important: A windbreaker may be necessary in open areas that
are subjected to strong winds.
Strong wind
Extension tube of
max. 3.0 metres
(with max. 3 bends)
Must be higher
Distance from
exhaust pipe to
windbreaker minimum 45 cm
Not less
than
45 cm
Windbreaker
Snow
Fig. 1-2 Gaps heater/exhaust pipe
30
Chapter 1, INSTALLATION
After using the installation template as a guide for the
drilling of the hole for the exhaust pipe, the Laser can
be installed normally, according to the procedure in the
illustration.
If the template is lost or the heater has to be moved,
these are the dimensions and locations of the holes for
the fuel pipe and exhaust pipe.
Back of the heater
The center of
the flue pipe
12 3/8”
(310 mm)
Fuel inlet
3 5/8”
(92 mm)
1 7/8” (92 mm)
Laser 95
12 1/2”
(317 mm)
Fig. 1-3 Template
☞
31
Do not remove any components from the
heater. Always contact your dealer if repairs
are required.
If the electricity cable is damaged, this may
only be replaced with type H05 VV-F and by
a recognised installer.
Floor
Chapter 1, INSTALLATION
Standard installation parts
The following list of standard installation parts is supplied with your heater. It may be necessary to order
extra parts from your Zibro dealer if other installation
methods are required.
Base plate (1)
Wall brackets (2 set)
Pipe holder (1)
Pipe lock (1)
(3)
(3)
Exhaust pipe (1)
Right-angled exhaust pipe bend (1)
32
Chapter 1, INSTALLATION
Discharge chute (1)
Right-angled air hose (2)
Flexible air hose (1)
Hose clip (2)
33
Chapter 1, INSTALLATION
1. For the standard installation, use the template supplied to position the hole for the exhaust pipe correct-
ly. Use cellotape or small nails to attach the template to
the desired position on the wall (see Fig. 4).
Tape
Fig. 4
Comment: The heater must be installed on a strong
and stable floor. The floor must be flat and level. If this
is not the case, the heater can be levelled by means of
adjustable legs. This can be checked with the plumb
line.
2. Drill the hole for the exhaust pipe. Use a hole saw
with a diameter of 70~80 mm (see Fig. 5). The opening
on the interior side of the wall must be a little higher
than the opening on the outside in order to create a
slight gradient in the feed-through and exhaust pipe
after installation (approximately 2º) (see Fig. 6). This
ensures that condensed water in the exhaust pipe flows
to the outside and prevents the penetration of rainwater and snow after installation.
2°
Fig. 5
Fig. 6
34
Chapter 1, INSTALLATION
3. Install the inner flue pipe.
a. For wall thickness 230~320mm.
From inside the room, insert the inner flue pipe through the hole. Make sure the arrow on the inner flue
pipe is pointing up. Secure the inner flue pipe to the wall with the three wood screws. (See Fig. 7)
Inside
inside
Outside
Outsida
230~320mm
Inner fiue pipe
Arrow
Wood screws
2˚ downward Min.
Fig. 7
b. For wall thickness 130~230mm.
Remove Intake joint and Exhaust joint from Outer flue pipe (See Fig. 8).
Exhaust joint
Outer flue pipe
Intake joint
Fig. 8
35
Chapter 1, INSTALLATION
c. From outside, insert the outer flue pipe through the hole. Secure the outer flue pipe to the wall by turning
it clockwise. This locks the two halves together (See Fig. 9).
IMPORTANT: Make sure the arrow on the outer flue pipe frange is pointing up.
Make sure to secure the outer flue pipe well. (A-part shown in Fig. 9)
Inside
Outer flue pipe frange
Outside
A
Inner flue pipe
2˚ downward Min.
Arrow
Outer flue pipe
Fig. 9
Outer flue pipe frange
4. Attach the right-angled exhaust pipe bend to the
outlet of the exhaust pipe. Cut, if necessary, the flexible
air hose to size. Fasten the right-angled air hose to
both ends of the flexible air hose – now attach the
right-angled air hose to the inlet of the exhaust pipe.
Attach the right-angled air hose to both ends of the
flexible air hose. Now fasten the right-angled air hose
to the inlet of the exhaust pipe.
Fasten the right-angled air hose onto the inlet with a
hose clip. Seal the inlets and outlets that are not being
used with the caps supplied. Check that the caps are
firmly in position (See Fig.10). Use water or soap suds
to provide lubrication when fitting the right-angled air
hose onto the flexible air hose. The total length of the
exhaust pipe may be a maximum of 3 m (max. 3 bends).
Hose clip
Cap
Flexible air hose
Outlet
Right-angled air hose
Fig. 10
Right-angled exhaust bend
36
Chapter 1, INSTALLATION
5. Place the heater in the desired location. Attach the
right-angled exhaust bend to the outlet (the top open-
ing) and attach the right-angled air hose to the inlet.
Check that everything is firmly attached (See Fig. 11).
Right-angled exhaust bend
Outlet
Inlet
Right-angled air hose
Fig. 11
6. Fasten the right-angled air hose to the inlet with the
hose clip. Attach the right-angled exhaust bend to the
exhaust pipe with the pipe holder (attach the pipe
holder to the connection of the right-angled exhaust
bend). Attach the right-angled exhaust bend to the
outlet by sliding the pipe lock into the outlet clip (See
Fig. 12).
Pipe lock
Pipe holder
Fig. 12
7. Installation of an external fuel tank
The installation of an external fuel tank is illustrated in
a diagram (Fig. 1-11). The fact that installation techniques for fuel tanks vary means that it is impossible to
37
provide a specific installation procedure. However, certain criteria determine the manner in which the heater
is supplied with fuel. Use the following checklist as a
guideline for the installation of an external tank.
Chapter 1, INSTALLATION
8. Make sure the position of the heater is level by using
the plumb bob located at the right side of the heater.
The plumb bob weight should be within the circle. If
the plumb bob weight is not within the circle, adjust
the heater legs until the plumb bob weight is within
the red circle (See Fig. 13 & 14).
Good
Weight
Circle
Bad
Plumb bob as viewed from above
Fig. 13
☞
Fig. 14
Choose a location for the sensor that is not in the path of direct sunlight, drafts or the flow of
w
ing on the type of surface chosen for installation.
9. A room temperature sensor is provided with a 2.5 m
long extension wire. It is located on the rear of the cabiNOTE: Choose a location for the sensor that is
net. Make sure that the extension wire is not touching
not in the path of direct sunlight, drafts or the
the exhaust pipe. The room temperature sensor can be
flow of warm air from the heater.
installed either with the self adhesive tape on the back
or with a wood screw provided with the sensor depend-
(a) Self Adhesive Tape
Peel off the protective tape on the back of the sensor and expose the adhesives. Place the sensor on
the desired location on the wall and press down.
(b) Wood Screw
Screw down the wood screw provided with the
heater into the desired location on the wall. Hook
the back of the room temperature sensor.
(a)
(b)
10. After installation is completed, secure heater to the
wall with the wall brackets provided with the heater.
Make sure the heater is parallel to the wall (See Fig.
15).
11. Before ignition, recheck the following:
a. All connections are tight and firm.
b. The heater and the flue pipe areas are free of any
materials.
c. The heater is level and parallel to the wall.
Fig. 15
38
Chapter 1, INSTALLATION
CHECKLIST
Available fuel supply options
• Check whether the heater has been connected to a
suitable socket.
• Check that a suitable quantity of petroleum is in the
fuel tank.
• Ensure that the fuel is free of water or other
contaminants.
• Check that the fuel tank is in good working order –
it must be free of rust, corrosion and/or leaks.
• Inspect the fuel pipe for signs of leaks, loose
connections, cracks, air bubbles or blockages.
• Check that the fuel valves on the fuel tank and the
fire safety valve are open in order to allow the free
flow of fuel.
• Check outside the building in order to ascertain that
there is no fuel or obstructions to the free
circulation of air in the area immediately adjacent
to the exhaust pipe.
• Inspect the inlet air hose for cracks, loose
connections or blockages.
• Check the outlet air hose for cracks, loose
connections or blockages.
• Check the back of the heater to ensure that the
airflow to the air circulation ventilator is not
obstructed.
• Inspect the interior of the building to ensure that
the area immediately adjacent to the heater is free
of fuel and objects that may obstruct the free flow
of air.
• Check that the room sensor is not exposed to
draughts, direct sunlight or heat radiated directly
from the heater.
• Use a spirit level to check that the heater is level.
The fuel supply of the Laser 95 can be set up as follows:
If this inspection brings any faults to light, resolve these
problems before using the heater.
☞
39
Use only water-free high quality pure
paraffin oil. Never use gasoline, LPG,
camping gas or other flammable liquids.
The use of these substances may cause
explosions or fire.
Large gravity-operated exterior tank
To install a large gravity-operated exterior tank, follow
the instructions below. We recommend that you call in
a recognised installer.
The inlet pressure to the heater may not exceed 2.5 psi.
Use a pressure reduction valve with a maximum thrust
of 2.5 psi ( ± 0.17 bar).
The installation height of the bottom of the fuel tank
must be 40 cm or more above the level of the floor on
which the heater is standing. This will ensure that there
is sufficient fuel inlet pressure. The distance between
the floor surface on which the heater is standing and
the top of the fuel tank may not exceed 2.5 metres.
This will prevent excessive fuel inlet pressures.
The pipe may not have any inverted U-bends (to prevent air pockets that may block the fuel supply).
We recommend using a water-blocking filter in the fuel
pipe leading into the tank. A cut-off valve must be fitted to the tank.
We recommend installing a fire safety valve and a fuel
filter in the fuel pipe.
The use of a cut-off valve, placed just before the pipe
enters the building, will limit the quantity of fuel to be
tapped off to a minimum if the heater requires maintenance.
Chapter 1, INSTALLATION
If a fuel pipe inside the building is more than 90 cm
long, you must use an extra cut-off valve.
Copper tubing with an exterior diameter of 3/8” must
be used for the fuel pipe.
The external fuel tank must be placed at least 2 metres
away from any heat source.
The external tank and the installation of the external
tank must meet fire applicable (local) regulations. Refer
to the local authorities for these regulations.
Installation may be done by a qualified person only.
The external fuel tank must have a filling opening on
the top and a ventilation opening with a weatherresistant cap on the side. Some tanks use the same
opening for ventilation and filling.
Important: Ensure that the fuel pipe is free of dust and
waste particles. These particles may cause problems in
the fuel receptacle.
Fuel tank placed
outside
Laser 95
Fuel drainage
container with
unlocking button
Fuel filter: Preferred type
– water intake cut-off
valve
2.5 m (max.)
Fire safety valve
(recommended)
Valve (recommended)
Valve
40 cm (min.)
Loop
Copper tube with
3/8 exterior
diameter
Fig.1-11 Connection to the fuel pipe
40
Chapter 2, OPERATION
1. Introduction
The Laser 95 is an easy to use vented petroleum heater.
It provides considerable quantities of heat, automatically regulates the room temperature, uses very little
fuel and electricity and has options for automatic or
manual operation.
This chapter provides all the information required for
the operation of the Laser heater system. All specified
operating procedures must be carried out in the order
in which they are described.
2. Laser FF 95 heater specifications
Heat yield (W)
Fuel consumption (l/h)
Fuel consumption (g/h)
Low
3.100
0.38
304
Medium
6.300
0.73
584
High
9.500
1.080
864
• Nominal yield
(as applied to petroleum heaters): ~92%
• Power consumption:
Ignition
280 W
Burning
80 W
Ventilator capacity: 2.9/1.9/0.8 cubic metre/min.
• Fuel source: external tank
• Room volume indication when used as main heating
source: 130 - 440m3
41
Chapter 2, OPERATION
3. Operating elements and lights
1. ON/OFF button
3. Information display
2. Adjustment buttons
(time and temperature)
4. Save button
5. Timer button
6. Childproof lock button
Fig. 2-1 Operation panel
1. ON/OFF button:
The main switch to turn the heater on and off.
Switch it “ON” to activate the heater. Combustion
will start after a 3-9 minutes pre-heating period.
The heater has 4 settings “HIGH”, “MEDIUM”,
“LOW” and “OFF”.
2. Adjustment buttons:
Temperature selection switches offer the user the
option to select the desired temperature during
operation.
3. Information display
Displays the clock, set temperature, room
temperature and error codes.
4. SAVE button:
Allows you to limit the temperature.
When this function is activated, the heater will
automatically switch off and on again.
5. TIMER button:
Allows you to switch on the heater automatically at
a preset time.
6. CHILDPROOF LOCK button:
Can be used to prevent children accidentally
changing the heater settings.
42
Chapter 2, OPERATION
4. Prior to use
Step 1: Open the valve(s)
Screw the valve on the top of the removable tank open
or open the valve for the external fuel tank and the
fire safety valve of the heater (if present).
Step 2: Start the fuel supply
Carefully press the red unlocking button for one second to release the float in the fuel receptacle.
The fuel receptacle only has to be unlocked when the
heater is activated for the first time or after it has run
out of fuel, or if the heater has not been used for an
extended period of time. Unlocking may also be
required if the fuel inlet pressure exceeds 2.5 psi
(± 0.17 bar). In this case, a pressure reduction valve
must be installed.
Step 3: Adjust the clock
Important: The clock on the heater must always be set
to the correct time.
A. Switch the time selector switch to “CLOCK SET”
B. Press the “HOUR” and the “MINUTE” buttons to
adjust the hours and minutes. Pressing the “HOUR”
or “MINUTE” button once will adjust the time by
one unit (hours or minutes respectively). Holding
the button down accelerates the adjustment of the
time display.
All clock and timer settings are deleted if the power is
cut off for a period longer than 10 seconds. The information display flashes “PM 12:00” when the heater is
switched off. The clock and timer now have to be
reprogrammed.
C. Set the timer switch to the “NORMAL” setting after
completing the clock adjustment. The current time
is then displayed on the digital indicator.
5. Igniting the heater
The heater is operated directly by the user. However,
the heat yield is controlled automatically in accordance
with the room temperature registered by the temperature sensor.
Step 1: Switch the heater ON
43
Press the ON/OFF button. The current room temperature and the set temperature are displayed on the
information display.
The ON/OFF light starts to flash, after which the heater
will switch on.
Note: (*) The start-up time depends on the room temperature.
After 9-15 minutes, the heater will automatically select
the correct operating mode and the ON/OFF button will
now be illuminated continuously.
Room temperature:
under 0°C
11 minutes
0°C - 15°C
9 minutes
15°C
8.5 minutes
If no flames are visible after the start-up period, the
heater will deactivate and then restart automatically. If
flames are still not detected, the heater will deactivate
and will have to be restarted manually (error code E-2
on the information display).
Step 2: Setting the room temperature
The temperature setting can only be adjusted, when the
heater is burning. Use the adjustment buttons to adjust
the temperature. First press either of the two buttons to
switch on the function (the TEMP light next to the information display will start blinking). Next, adjust the temperature using the button on the right (왔min.) to set the
temperature to a higher setting and the button on the
left (왖hour) to lower the temperature. Press once to
increase the value one step. After approximately 10 seconds the light will stop blinking and setting will be
locked. The available temperature settings range from
10°C minimum to 32°C maximum. When the heater has
been unplugged (or after a power failure), the temperature will reset to the factory setting of 20°C.
The operating mode is automatically controlled in accordance with the room temperature detected by the room
temperature sensor. The heater works in the “HIGH”
operating mode until the room temperature has reached
the desired level.
When the room temperature reaches the chosen setting.
the heater automatically switches to the “MED” or
“LOW” operating mode in order to maintain the desired
temperature.
Chapter 2, OPERATION
☞
Without the ‘SAVE’ setting your heater will
maintain the set temperature by approximation as well, by adjusting its heating capacity.
‘SAVE’ is an economy setting, which you can
use when, for instance, you are not present in
the room or to keep it frost-free.
play will show CLOCK again and the TIMER indicator
light will light up, indicating that the timer function
has been activated.
To clear the timer setting, press the ON/OFF button once.
☞
Step 3: The correct use of ‘SAVE’
The ‘SAVE’ function allows you to limit the temperature.
When this function is activated, the heater will automatically switch off, when the room temperature exceeds the
set temperature by 2°C. Subsequently, when the room
temperature has dropped again to the set temperature,
the heater will automatically switch on again. Activate
the ‘SAVE’ setting by pressing the appropriate button.
The SAVE indicator light will light up. Switch off the
function by pressing the SAVE button once again.
Note: When the room temperature is less than
15°C, the preset time is changed automatically
depending on the room temperature in order
to heat the room by the desired time.
Room temperature
More than 15°C
0°C ~ 15°C
Less than 0°C
Ignition time
Set time
10 minutes before set time
20 minutes before set time
7. Room temperature sensor
Step 4: The ‘FUEL’ indicator light
When the FUEL indicator light lights up, it means that
there is only fuel left for 10 more minutes. The countdown of the remaining heating time can be seen in the
information display. You remove the fuel tank and
refill it outside the living room. If you don’t refill it,
you will hear an alarm signal every two minutes, warning you to refill the removable tank and after 10 minutes the heater will switch off automatically.
The room temperature sensor is fitted with a 2.5 meter
cable. This is located on the back of the heater. Ensure
that the cable does not touch the outlet tube. The
room temperature sensor can be installed with cello
tape or with a wood screw.
Select the location where the sensor is to be installed in
such a way that it will not be exposed to direct sunlight, draughts or the warm air flowing out of the
heater.
6. Timer operation
8. Childproof lock
The timer allows you to switch on the heater automatically at a preset time.
In order to switch on the timer, the correct time must
have been set and the heater should be off. Follow the
procedure below:
The childproof lock can be used to prevent children
accidentally changing the heater settings. When the
heater is burning and the childproof lock is on, the
heater can only be switched off. Other functions are
blocked then. If the heater has already been switched
off, the childproof lock also prevents accidental ignition
of the heater. Activate the childproof lock by pressing
the appropriate button and holding it down for more
than 3 seconds. The KEY-LOCK indicator light will light
up, indicating that the childproof lock has been activated. Switch off the childproof lock by pressing the button and holding it down for more than 3 seconds once
again.
[1] Press the TIMER button. The TIMER light and the
information display will start blinking.
[2] Use the adjustment buttons to set the time at which
the heater must ignite. Use the button on the left
(왖hour) to set the hours and the button on the right
(왔min.) to set the minutes (interval of 10 minutes).
[3] Press the ON/OFF button while the information display is blinking.
9. Switching off the heater
[4] After approximately 10 seconds the information dis-
[1] Press the ON/OFF button. The information display
There are two ways to switch off the heater.
44
Chapter 2, OPERATION
[2] Press the TIMER button, when you want to switch
off the heater and ignite it again with the timer the
next time. This not only switches off the heater, but
it also activates the timer function. You can change
the required time with the adjustment buttons.
☞
will show the CLOCK signal. The air circulation ventilator and the ventilator motor continue to operate
for approximately 3 minutes in order to cool the
heater down.
If the heater overheats after the completion of a
recovery procedure, contact your dealer and do
not switch the heater on until the problem has
been resolved.
11. Cleaning the filter (monthly)
The heater is protected against damage caused by
overheating.
Switch off the heater and let it cool down, before you start
any maintenance work. Also disconnect the plug from the
mains.
Your Zibro needs hardly any maintenance. It is, however,
important that you clean the louvers, grilles and circulation
fan cover on the back of the heater weekly. Periodically
check the flue pipe connection for leakage or separation.
A sensor will activate if the temperature in the housing
exceeds 90°C.
Step 1: Switch the heater OFF.
Step 2: Allow the heater to cool down.
Regularly inspect the fuel filter as well:
[1] Remove the removable tank from the heater and
remove the fuel filter. Some drops may leak from the
filter; keep a cloth at hand.
10. Recovery after overheating
☞
Ensure that the metal housing has cooled
sufficiently before touching it.
Under normal conditions, a period of 30 to 45 minutes
is sufficient to allow the heater to cool down
completely.
☞
Before starting to clean the heater, ensure that
the interior is cool enough to touch. Wipe all
dust off the outside of the housing with a clean,
non-fluffy, damp cloth or another suitable
cleaning aid. Do not forget to clean the outside
of the heat chamber and the heat exchanger.
Step 7: Re-attach the front panel.
Step 8: Insert the heater plug into the socket.
Step 9: Switch the heater ON.
Step 10: Re-program the heater (clock and timer).
45
[3] Reinstall the fuel filter into the heater.
We recommend that you remove dust and stains in time
with a damp cloth, because otherwise these may cause
stains that are hard to remove.
☞
Step 3: Pull the heater plug out of the socket.
Step 4: Look for the source of the overheating.
Overheating is usually caused by objects that obstruct the
free flow of air. Check that the circulation ventilator or
exhaust pipes are not blocked. Check that there are no
objects blocking the outlet system.
Step 5: Remove the front panel.
Step 6: Clean the inside of the heater.
[2] Remove the dirt by tapping the fuel filter upside-down
against a hard surface. (Never clean it with water!)
Do not remove any heater components yourself.
Always contact your Zibro dealer for repairs.
When the power cord is damaged, it may only
be replaced by an authorized fitter. Use a new
cord of the type H05 VV-F.
12. Before consulting an expert
The following situations do not indicate defects.
While switching the heater on or off.
White smoke can be seen when the heater is switched on
for the first time.
Machine oil or dust on the burner chamber or heat
exchanger is burning.
The flames flicker for several minutes after the heater has
Chapter 2, OPERATION
been ignited.
The ignition rod continues to function when the heater is
cold, even several minutes after ignition. This may cause
the flames to be a little larger.
The heater makes intermittent creaking sounds when
warming up or cooling down.
Expansion and shrinkage of metal parts may cause a slight
creaking sound.
Circulation of air in the room does not start immediately
when the heater is lit.
To prevent unpleasant cold draughts, the ventilator only
switches on when the heater has become warm.
A loud clicking sound can be heard during the first use or
when the fuel runs out.
There is air in the fuel pump. This should be gone within
approximately 1 minute.
Note: The fuel pump may make a slight ticking sound during normal operation. This does not indicate a problem.
While the heater is in operation
A part of the burner pot and/or heat exchanger becomes
red in color during operation.
This is normal and does not indicate a problem.
46
Chapter 3, ERROR MESSAGES
ERROR CODE
E-0
E-2
E-6
E-8
E-12
INFORMATION
Power interrupted.
Ignition safety feature is activated.
Extinguished during operation.
Blower motor malfunction.
Overheating safety feature is activated.
E-13
Burner thermistor malfunction
Excess fuel in the burner
Ignition failure three times
No fuel.
Timer is not setting.
Room temperature is higher than 35°C.
Position of room temperature sensor is
not correct.
Room temperature is lower than -10°C.
Room thermistor malfunction or
disconnected.
E-22
-- : -Hi
Lo
47
WHAT TO DO
Re-ignite the heater
Contact your dealer
Contact your dealer
Contact your dealer
Clean the air filter and
remove dust.
Contact your dealer
Contact your dealer
Contact your dealer
Refill removable tank.
Set the timer.
Check the position of room
temperature sensor.
Check the position of room
temperature sensor.
Chapter 4, WARRANTY PROVISIONS
Your heater comes with a 48-months warranty starting on
the date of purchase. Within this period all defects in
material or workmanship will be repaired without any
charge. The following provisions shall apply regarding this
warranty:
1
We expressly dismiss all other claims for damages,
including consequential damages.
2
Any repairs or replacements of components within
the term of warranty will not result in an extension of
the term of warranty.
3
The warranty shall no longer apply, when the heater
has been modified, non-original parts have been
used, or when it is repaired by third parties.
4
The warranty shall not apply to parts that are subject
to normal wear, such as the burner mat and the manual fuel pump.
5
The warranty shall only apply, when you present the
original, dated proof of purchase, provided no
changes have been made to it.
6
The warranty shall not apply to damages caused by
actions not in compliance with the Directions for Use,
neglect, and the use of an incorrect type of fuel, or
fuel past its use-by date. The use of incorret fuel can
even be dangerous*.
7
Transportation costs and the risks involved during the
transportation of the heater or heater components
shall always be for the account of the purchaser.
Waste electrical products should not be disposed with household waste. Please recycle
where facilities exist. Check with your local
authority or retailer for recycling advice.
In order to avoid unnecessary costs, we recom
mend that you always read the ’Directions for
Use’ carefully first. In case they offer no solution,
please take the heater to your dealer for repair.
* Highly inflammable substances may induce
uncontrollable burning, causing flames to
break out. Should this happen, never try to
move the heater, but always switch off the
heater immediately. In case of emergency you
may use a fire extinguisher, but only a type B
extinguisher: a carbon dioxide or powder
extinguisher.
48
Hoofdstuk 1, INSTALLATIE
Geachte mevrouw, mijnheer,
Van harte gefeliciteerd met de aankoop van uw Zibro, het nummer één merk
onder de verrijdbare kachels. U hebt een eersteklas kwaliteitsproduct
aangeschaft waar u jarenlang plezier van kunt hebben, mits u de kachel verantwoord gebruikt.
Lees daarom eerst de gebruiksaanwijzing voor een maximale levensduur van
uw Zibro.
De fabrikant geeft 48 maanden garantie op materiaal- en fabricagefouten.
Wij wensen u veel warmte en comfort met uw Zibro.
Met vriendelijke groeten,
PVG Holding B.V.
Afdeling klantenservice
1 LEES VOOR INGEBRUIKNAME EERST DE GEBRUIKSAANWIJZINGEN.
2 IN GEVAL VAN TWIJFEL CONTACT OPNEMEN MET UW ZIBRO DEALER.
49
WAT U VOORAF MOET WETEN
DE JUISTE BRANDSTOF
Uw Zibro kachel is afgestemd op het gebruik van kwalitatief hoogwaardige watervrije petroleum, zoals
Zibro Extra of Zibro Kristal. Alleen soortgelijke brandstof garandeert een schone en goede verbranding.
Brandstof van mindere kwaliteit kan leiden tot:
왘
왘
왘
왘
왘
Meer kans op storingen
Incomplete verbranding
Beperkte levensduur van de kachel
Rook en / of geur
Slakken / verbrandingsresten op de rooster of aanslag op het gloeikousje
Voor een veilige, efficiënte en comfortabele werking van uw kachel is het gebruik van de juiste brandstof
van cruciaal belang.
Informeer naar de juiste brandstof voor uw kachel bij uw lokale Zibro dealer.
☞
• De eerste keren dat u uw kachel gebruikt, zal hij ’nieuw’ ruiken.
• Bewaar de brandstof op een koele, droge plek.
• Brandstof heeft een beperkte levensduur. Begin ieder stookseizoen met nieuwe brandstof.
• Als u de Zibro Extra of Zibro Kristal kwaliteitsbrandstof voor uw kachel gebruikt, is optimale
verwarming verzekerd.
• Als u een ander merk of ander type petroleum wilt gebruiken, dient u eerst de resterende
brandstof in de kachel op te stoken.
TIPS VOOR VEILIG GEBRUIK
1 Maak kinderen attent op de gevaren van een brandende kachel.
2 Plaats de voorkant van de kachel minimaal op een afstand van 1,5 meter van muren, gordijnen en
meubels.
3 In stoffige ruimtes is de verwarming niet optimaal. Gebruik de kachel niet in de directe omgeving van een
bad, douche of zwembad.
4 Schakel de kachel uit als u weggaat of gaat slapen. Haal de stekker uit het stopcontact als u voor een
langere periode afwezig bent (bijv. op vakantie).
5 Brandstof alleen transporteren en opslaan in geschikte tanks en jerrycans.
6 De brandstof niet blootstellen aan hitte of extreme temperatuurverschillen. De brandstof altijd opslaan in
een droge koele plaats (direct zonlicht beïnvloedt de kwaliteit).
7 Gebruik de kachel nooit in ruimtes waar schadelijke stoffen of gassen kunnen hangen (bijvoorbeeld
uitlaatgassen of verfluchten).
8 Let op als de rooster van de kachel roodgloeiend wordt. Als de kachel afgedekt is, kan er brand ontstaan.
9 De kachel alleen gebruiken in overeenstemming met nationale en of lokale voorschriften, verordeningen
en reglementen.
10 Let op dat de kachel tijdens gebruik op een vlakke ondergrond staat.
11 Als de kachel brandt of nog warm is, niet schoonmaken of van brandstof voorzien.
12 De kachel niet gebruiken in ruimtes waarin brandbare dampen of een ongewenste combinatie van
factoren een brand of explosie kunnen veroorzaken.
13 Dit apparaat is niet bedoeld voor gebruik door personen (inclusief kinderen) met verminderde
lichamelijke, geestelijke of zintuiglijke vermogens, of gebrek aan ervaring en kennis, tenzij er toezicht
wordt gehouden op en instructies worden gegeven voor het gebruik van het apparaat door iemand die
verantwoordelijk is voor hun veiligheid.
50
Hoofdstuk 1, INSTALLATIE
1. Inleiding
Aanbevolen gereedschapskit
•
•
•
•
1.
2.
3.
4.
5.
Installatiespecificaties
Lijst van installatiegereedschap
Basisvereisten voor installatie van brandstoftank
Instructies voor installatie van het Laser System
De kachel kan overal worden geïnstalleerd, op
voorwaarde dat aan de elektrische, brandstof- en
uitlaatvoorschriften wordt voldaan. Voor u het
verwarmingssysteem (inclusief eventuele elektrische
bedrading en brandstoftoevoeruitrusting) begint te
installeren, moet u de plaatselijke bouw-, en
brandveiligheidregelementen nagaan. De vereisten
hiervan moeten worden gerespecteerd om een
wettelijk goedgekeurde installatie en een correct
gebruik te waarborgen.
☞
De kachel is ontworpen voor gebruik
maximum 1000 m boven zeeniveau. Bij
gebruik op grotere hoogte dient u contact
op te nemen met uw dealer voor de nodige
aanpassingen.
Kruiskopschroevendraaier
Stalen meetlint
Viltpen of potlood
Kit voor buitengebruik
Elektrische boor (aanbevolen links- en
rechtsdraaiend)
6. Gatenzaag, figuurzaag of ander gepast
gereedschap voor het uitsnijden van een gat van
70~80 mm voor afvoerpijp
7. Lange boor
8. Standaard schroevendraaiers
9. Verstelbare sleutels (verschillende maten)
10. Koperbuissnijder
11. Ruimer
12. Volt-, Ohmmeter
13. Waterpas
14. Loodgieterstape voor buisschroefdraad
15. Klein assortiment zelftappende schroeven
16. Reeks tangen (schuiftang, kabeltang, snijtang,
opsluittang)
17. Geïsoleerde schroevendraaier
18. Beschermingsmateriaal voor uw vloer
19. Opvangbak voor aftappen van brandstof
2. Verplaatsen van de kachel
3. Het voedingssysteem
Het elektrisch systeem moet beschermd worden tegen
overbelasting door ten minste een 5 ampère zekering
of onderbreker.
☞
Naast de door de kachel ingenomen ruimte moet ook
enige extra ruimte worden vrijgehouden voor luchtcirculatie. Tenzij brandstof- of brandveiligheidreglementen dit anders bepalen, kan het Laser System op
elk vloeroppervlak (inclusief vast tapijt of ander brandbaar materiaal) worden geplaatst en aldus een veilige
werking bieden. Controleer de tussenruimtes volgens
de instructies in de gebruikershandleiding.
Bij sommige installaties (zoals voor gebruik
in mobilhomes) moet een vaste verbinding
met de huisstroomkringen voorzien worden.
Laat dit door een erkende elektricien
uitvoeren.
4. Brandstoftank
Kachelbrandstof (uitsluitend watervrije, zuivere petroleum) kan worden opgeslagen in buiten opgestelde
brandstoftanks van 200/1000-liter. Bij gebruik van grote
tanks moet een drukregelaar met een max. van 2,5 PSI
(is ± 0,17 bar) bij de inlaat van de kachel worden geïnstalleerd. Hierbij moet worden voldaan aan alle
plaatselijke normen en/of bouwreglementen.
51
Hoofdstuk 1, INSTALLATIE
5. Bedrading voor kamertemperatuursensor
6. Uitpakken
Een temperatuursensor meet de kamertemperatuur om
de verwarming automatisch te regelen en kan tegen
een wand worden gemonteerd. De standaard sensordraad is ca. 2,5 m lang.
Bewaar alle verpakkingsmaterialen voor eventueel
transport.
☞
De sensor mag niet geplaatst worden in de
tocht, direct zonlicht of de warme
luchtstroom van de kachel. Dit kan een
onjuiste temperatuuraanduiding
veroorzaken.
A) Haal de kartonnen (boor)mal en de
gebruikershandleiding uit de verpakking.
B) Haal de onderplaat en de doos met de installatiekit
uit de verpakking.
C) Haal het toestel uit de verpakking.
D) Verwijder de plastic zak van de kachel.
E) Verwijder de plastic zak met de onderdelen.
F) Neem de afvoerpijp van de bodem van de doos.
G) Controleer of alle onderdelen aanwezig zijn.
☞
Enkel het standaard toe- en afvoersysteem
wordt samen met de kachel verzonden.
Meer dan 60 cm
Meer dan 10 cm
Meer dan 30 cm
Meer dan 30 cm
Meer dan 1,5 m
Laser 95
Afbeelding 1-1: Tussenruimtes kachel / afvoerpijp
52
Hoofdstuk 1, INSTALLATIE
Brandbaar object
Brandbaar object
Niet minder dan 60 cm
Niet minder
dan 45 cm
Niet minder
dan 45 cm
Onbrandbaar
object
Niet minder dan 60 cm
45°C
Niet minder dan 30 cm
Afvoerpijp
Niet minder dan 20 cm*
* Er moet tussenruimte zijn ook in geval van sneeuwval, etc.
Afbeelding 1-1 (vervolg) Tussenruimtes kachel/afvoerpijp
Frontale hindernis
45 cm of meer
20 cm of meer
Sneeuwoppervlak of grond
Belangrijk: In gebieden met zware sneeuwval,
moet de tussenruimte met de grond worden vergroot.
Belangrijk: In open gebieden met sterke wind kan een
windbreker noodzakelijk zijn.
Sterke wind
Verlengbuis van
max 3 meter
Moet hoger zijn
Afstand afvoerpijp
tot windbreker
minimaal 45 cm.
Niet
minder
dan
45 cm
Windbreker
Sneeuw
Afbeelding 1-2 Tussenruimtes kachel/afvoerpijp
53
Hoofdstuk 1, INSTALLATIE
Na de installatiemal als richtlijn te hebben gebruikt
voor het boren van het gat voor de afvoerpijp kan de
Laser normaal worden geïnstalleerd volgens de afgebeelde procedure. Voor het geval dat de mal verloren
raakt of het toestel moet worden verplaatst, geven we
hier de maten en locatie van de gaten voor de brandstofleiding en afvoerpijp.
Achterkant kachel
Middelpunt van
doorvoerstuk
12 3/8”
(310 mm)
Brandstofinlaat
3 5/8”
(92 mm)
1 7/8” (92 mm)
Laser 95
12 1/2”
(317 mm)
Afbeelding 1-3 Mal
☞
54
Verwijder zelf geen onderdelen van de
kachel. Neem voor een eventuele reparatie
altijd contact op met uw dealer. Indien het
elektriciteitssnoer beschadigd is, mag alleen
een erkend installateur dit vervangen door
het type H05 VV-F.
Vloer
Hoofdstuk 1, INSTALLATIE
Standaard installatieonderdelen
De volgende lijst met standaard installatieonderdelen
wordt met uw kachel meegeleverd. Voor afwijkende
installatiemethoden kan het nodig zijn om bij uw Zibro
dealer extra onderdelen te bestellen.
Onderplaat (1)
Muurhaken (2 stel)
Pijphouder (2)
Pijpvergrendeling (1)
(3)
(3)
Afvoerpijp (1)
Haakse afvoerbocht (1)
55
Hoofdstuk 1, INSTALLATIE
Uitlooptrechter (1)
Haakse luchtslang (2)
Flexi-luchtslang (1)
Slangklem (2)
56
Hoofdstuk 1, INSTALLATIE
1. Voor een standaardinstallatie gebruikt u de
bijgeleverde mal om het gat voor de afvoerpijp op de
juiste plaats te krijgen. Gebruik plakband of spijkertjes
om de mal op de gewenste plaats op de muur te
bevestigen (zie fig. 4).
Plakband
Fig. 4
Opmerking: De kachel moet op een stevige vloer worden geïnstalleerd. De vloer dient vlak en waterpas te
zijn. Zoniet dan kan de kachel middels verstelbare
pootjes waterpas worden gesteld. Dit is te controleren
met het schietloodje.
2. Boor het gat voor de afvoerpijp. Gebruik een op een
boormachine bevestigde gatenzaag met een diameter
van 70~80 mm (zie fig. 5). De opening aan de binnenzijde van de muur moet iets hoger zijn dan de opening
aan de buitenzijde, zodat de muurdoorvoer en de
afvoerpijp na installatie iets naar beneden hellen
(ongeveer 2°) (zie fig. 6). Dit zorgt ervoor dat condenswater van de afvoerpijp naar buiten kan worden afgevoerd en voorkomt het binnendringen van regenwater
en sneeuw na installatie.
2°
Fig. 5
Fig. 6
57
Hoofdstuk 1, INSTALLATIE
3.
Installeer de binnen afvoerleiding
a. Voor muurdiktes van 230-320 mm
Steek de afvoerleiding van binnenuit door het gat. Zorg dat de pijl op het binnendeel van de luchtdoor
voer naar boven wijst. Bevestig het binnendeel van de luchtdoorvoer aan de muur met de drie hout
schroeven (zie fig. 7).
Binnen
Buiten
230~320mm
Binnendeel luchtdoorvoer
Pijl
Houtschroeven
2° naar beneden
minimaal
Fig. 7
b.
Voor muurdiktes van 130–230 mm
Neem de luchttoevoerbuis en de uitlaatverbinding uit het buitendeel luchtdoorvoer (zie fig. 8)
Luchtafvoerbuis
Buitendeel luchtdoorvoer
Luchttoevoerbuis
Fig. 8
58
Hoofdstuk 1, INSTALLATIE
c.
Steek de buiten afvoerleiding van buitenaf door het gat. Bevestig de buiten afvoerleiding aan de wand
door het naar rechts te draaien. Dit sluit de twee helften op elkaar aan (zie fig. 9).
Opmerking:Zorg dat de pijl op de opstaande rand (flens) van het buitendeel luchtdoorvoer naar
boven wijst. Zorg dat de buiten afvoerleiding stevig vast zit (onderdeel –A,
aangegeven in fig. 9).
Buitendeel luchtdoorvoer
Binnen
Buiten
Binnendeel
luchtdoorvoer
A
2° naar
beneden minimaal
Buitendeel
luchtdoorvoer
Pijl
Fig. 9
Opstaande rand (flens)
buitendeel luchtdoorvoer
4. Bevestig de haakse afvoerbocht aan het uitlaatstuk
van de afvoerpijp. Snij, indien nodig, de flexi-luchtslang
op maat. Bevestig de haakse luchtslang aan beide uiteinden van de flexi-luchtslang: bevestig vervolgens de
haakse luchtslang aan het inlaatstuk van de afvoerpijp.
Zet de haakse luchtslang aan beide uiteinden van de
flexi-luchtslang: bevestig vervolgens de haakse luchtslang aan het inlaatstuk van de afvoerpijp.
Zet de haakse luchtslang met een slangklem op het
inlaatstuk vast. Dicht de in- en uitlaatstukken die niet
worden gebruikt af met de bijgeleverde doppen.
Controleer of de doppen stevig vastzitten (zie fig. 10).
Gebruik water of zeepsop wanneer de haakse luchtslang niet soepel op de flexi-luchtslang past. De totale
lengte van de afvoerpijp mag max. 3 m bedragen (max.
3 bochten).
Slangklem
Dop
Flexi-luchtslang
Uitlaatstuk
Haakse luchtslang
Fig. 10
Haakse afvoerbocht
59
Hoofdstuk 1, INSTALLATIE
5. Zet de kachel op zijn plaats. Bevestig de haakse
afvoerbocht aan het uitlaatstuk (de bovenste opening)
en bevestig de haakse luchtslang aan het inlaatstuk.
Controleer of alles goed vastzit (zie fig. 11).
Haakse afvoerbocht
Uitlaatstuk
Haakse luchtslang
Inlaatstuk
Fig. 11
6. Bevestig de haakse luchtslang aan het inlaatstuk met
de slangklem. Bevestig de haakse afvoerbocht aan de
afvoerpijp met de pijphouder (bevestig ook de pijphouder aan de verbinding van de haakse afvoerbocht).
Bevestig de haakse afvoerbocht aan het uitlaatstuk
door pijpvergrendeling in de klem van het uitlaatstuk
te schuiven (zie fig. 12).
Pijpvergrendeling
Pijphouder
Fig. 12
7. Installatie van een externe brandstoftank
De installatie van een externe brandstoftank is weergegeven op een tekening (afbeelding 1-11). Omdat de
installatietechnieken voor brandstoftanks variëren, kan
geen specifieke installatieprocedure worden opgege-
60
ven. Bepaalde criteria bepalen echter de brandstofvoorzieningswijze voor de kachel. Gebruik de volgende
controlelijst als richtlijn voor de installatie van een
externe tank.
Hoofdstuk 1, INSTALLATIE
8. Zorg ervoor dat de kachel recht staat met behulp van
het schietlood dat zich aan de rechterkant van de
kachel bevindt. Wanneer het schietlood gewicht zich
niet binnen de cirket bevindt, herplaats de kachel dan
tot het gewicht binnen de rode cirkel past (zie Fig. 13 &
14).
Goed
Gewicht
Cirkel
Slecht
Schietlood als van boven gezien
Fig. 13
☞
Fig. 14
Choose a location for the sensor that is not in the path of direct sunlight, drafts or the flow of
w
geleverd wordt, afhankelijk van het type oppervlak
9. Een kamertemperatuur sensor is voorzien van een 2,5
gekozen voor de installatie.
m lang verlengsnoer. Het bevindt zicht aan de achterzijde van de kachel. Zorg ervoor dat het snoer de uitLET OP: Kies een locatie voor de sensor zonder
laatpijp niet raakt. De kamertemperatuur sensor kan
direct zonlicht, tocht of de stroom van warme
worden geïnstalleerd met zelfklevende tape aan de
lucht van de kachel.
achterzijde of met een houtschroef die met de sensor
(a) Zelfklevend tape
Verwijder de beschermende tape op de achterkant van de
sensor en leg het kleverige materiaal bloot. Plaats de sensor
op de gewenste locatie op de muur en druk naar beneden.
(b) Houtschroef
Schroef de houten schroef die bij de kachel geleverd is op
de gewenste locatie in de muur. Plaats de achterkant van
de ruimtetemperatuur sensor over de schroef.
(a)
(b)
10. Nadat de installatie is voltooid, monteer kachel aan
de muur met behulp van de muurbeugels die bij de
kachel geleverd zijn.
Zorg ervoor dat de kachel is parallel aan de muur (zie Fig. 15).
11. Voor de ontsteking, controleer het volgende:
a. Zijn alle aansluitingen goed en stevig.
b. De kachel en het gebied van de rookkanaal zijn vrij
van materialen.
c. De ondergrond van verwarming is vlak en parallel
aan de muur.
Fig. 15
De sensor mag niet geplaatst worden in de tocht,
direct zonlicht of de warme luchtstroom van de kachel.
61
Hoofdstuk 1, INSTALLATIE
CONTROLELIJST
Beschikbare brandstoftoevoermogelijkheden
• Controleer of de kachel op een gepast stopcontact
is aangesloten.
• Controleer dat een gepaste hoeveelheid kerosine in
de brandstoftank beschikbaar is.
• Verzeker u er van dat de brandstof vrij van water of
andere verontreinigingen is.
• Controleer of de brandstoftank in goede
bedrijfsstaat is; ze moet vrij van roest, corrosie en
lekken zijn.
• Inspecteer de brandstofleiding op tekenen van
lekken, losse aansluitingen, scheurtjes, luchtzakken
of blokkeringen.
• Controleer of de brandstofkleppen op de
brandstoftank en de brandbeveiligingsklep open
zijn, zodat de brandstof vrij kan stromen.
• Controleer buiten het gebouw of het gebied
onmiddellijk rond de afvoerpijp geen brandstof of
belemmeringen voor een vrije luchtcirculatie bevat.
• Inspecteer de inlaatluchtleiding op scheuren, losse
aansluitingen of blokkering.
• Controleer de uitlaatluchtleiding op scheuren, losse
aansluitingen of blokkering.
• Controleer aan de achterkant van de kachel of de
luchtstroom naar de luchtcirculatieventilator niet
geblokkeerd is.
• Inspecteer binnen in het gebouw of het gebied
onmiddellijk rond de kachel wel vrij is van
brandstoffen en objecten die de vrije luchtstroom
kunnen belemmeren.
• Controleer of de kamersensor niet is blootgesteld
aan tocht, direct zonlicht of directe warmte van de
kachel.
• Controleer met behulp van de waterpas of de
kachel waterpas staat.
De brandstoftoevoer van de Laser 95 kan als volgt worden verwezenlijkt:
Als deze inspectie enige systeemgebreken aan het licht
brengt, moet u de problemen verhelpen voor u de
kachel in gebruik neemt.
☞
62
Gebruik uitsluitend watervrije kerosine van
hoogwaardige kwaliteit. Gebruik nooit
benzine, LPG, campinggas of andere
ontvlambare vloeistoffen. Het gebruik van
dergelijke brandstoffen kan ontploffing en
brand veroorzaken.
Door zwaartekracht gevoede externe tank met grote
capaciteit:
Om een grote, door zwaartekracht gevoede externe
tank te installeren moet u onderstaande instructies
uitvoeren. Het is aan te raden hiervoor de hulp van een
erkende installateur in te roepen.
De inlaatdruk naar de kachel mag niet meer dan 2,5 psi
bedragen. Gebruik een drukreduceerklep met een
max. stuwkracht van 2,5 psi (is ± 0,17 bar).
De installatiehoogte van de bodem van de brandstoftank moet 40 cm of meer zijn boven het vloeroppervlak
waarop de kachel staat. Dit staat borg voor voldoende
brandstofinlaatdruk. De afstand tussen het vloeroppervlak waarop de kachel staat en de bovenkant van de
brandstoftank mag niet meer dan 2,5 m bedragen. Dit
zorgt ervoor dat de brandstofinlaatdruk niet te hoog
kan zijn.
De leiding mag geen omgekeerde U-bochten bevatten
(om luchtzakken te vermijden die brandstoftoevoer
kunnen blokkeren).
Een waterblokkeerfilter is aanbevolen voor gebruik op
de brandstofleiding bij de tank. Er moet een afsluitklep
op de tank worden geïnstalleerd.
Het is aan te bevelen om in de brandstofleiding een
brandbeveiligingsklep en een brandstoffilter te
installeren.
Het gebruik van een afsluitklep, geplaatst net voordat
de leiding het gebouw binnenkomt, zal de af te tappen
hoeveelheid brandstof bij eventueel aan de kachel
vereiste werkzaamheden tot een minimum beperken.
Hoofdstuk 1, INSTALLATIE
Als een brandstofleiding binnen het gebouw meer dan
90 cm lang is, moet u een bijkomende afsluitklep
gebruiken.
De externe brandstoftank moet minstens op 2 meter
van een eventuele warmtebron worden geplaatst.
De externe brandstoftank moet een vulopening aan de
bovenkant hebben en een ontluchtingsopening met
een weersbestendige kap aan de zijkant. Bij sommige
tanks wordt voor ontluchting en vulling dezelfde opening gebruikt.
veroorzaken in de brandstofopvangbak.
Koperbuis met een buitendiameter van 3/8” moet worden gebruikt voor de brandstofleiding.
De installatie van de externe tank moet voldoen aan
brandveiligheidsreglement NFPA31 en/of plaatselijk
toepasselijke reglementen. Raadpleeg hiervoor de
plaatselijke verantwoordelijken.
Belangrijk: Zorg dat brandstofleiding vrij is van stof en
afvaldeeltjes. Deze deeltjes kunnen problemen
Brandstoftank
buitenshuis
Laser 95
Brandstofopvang
bak met ontgrendelknop
Brandstoffilter (voorkeurtype WATERVANG)
2.5 m (max.)
Brandbeveiligingsklep (aan te bevelen)
Afsluiter (aan te bevelen)
40 cm (min.)
Afsluitklep
Lus
Koperbuis met 3/8
buiten diameter
Fig.1-11 Aansluiting brandstofleiding
63
Hoofdstuk 2, BEDIENING
1. Inleiding
De Laser FF 95 is een makkelijk te bedienen geventileerde petroleumkachel. Deze biedt een grote warmteopbrengst, automatische regeling van de kamertemperatuur, laag brandstof- en stroomverbruik en keuze
tussen automatische of manuele kachelbediening.
Dit hoofdstuk verstrekt alle vereiste informatie voor
het gebruik van het Laser kachel systeem. Alle gespecificeerde bedieningsprocedures moeten worden uitgevoerd in de volgorde waarin ze beschreven worden.
2. Kachelspecificaties Laser FF 95
Warmte opbrengst (W)
Brandstofverbruik (l/u)
Brandstofverbruik (g/h)
laag
3.100
0.38
304
midden
6.300
0.73
584
hoog
9.500
1.080
864
• Nominaal rendement
(zoals toegepast op petroleumkachels): 93%
• Stroomverbruik:
Ontsteking Verbranding
280 W
80 W
Ventilatorcapaciteit: 5,7/4,2/2,8 kubieke meter/min.)
• Brandstofbron: externe tank
• Verwarmingsgebied als hoofdverwarming:
130 – 440 m³
64
Hoofdstuk 2, BEDIENING
3. Bedieningselementen en -lampjes
1. AAN/UIT toets (ON/OFF)
3. Informatiedisplay
2. Insteltoetsen
Adjustment buttons
(time
(tijd en
and
temperatuur)
temperature)
4. Save knop
button
5. Timer knop
button
6. Kinderslot
Fig. 2-1 Bedieningspaneel
1. ON/OFF knop:
Hoofdschakelaar om de kachel in en uit te
schakelen. “ON” indrukken om de kachel te
activeren. Na een voorverwarming van 3-9 minuten
zal de kachel gaan branden. De kachel heeft 4
standen “HIGH”, “MEDIUM”, “LOW” en “OFF”.
2. Insteltoetsen:
Met de temperatuurkeuze knoppen kan tijdens
bedrijf de gewenste temperatuur ingesteld worden.
3. Informatiedisplay
Toont
de
tijd,
ingestelde
temperatuur,
kamertemperatuur en de foutmeldingen
4. SAVE knop:
Begrenst de temperatuur. Als deze functie
geactiveerd is, gaat de kachel automatisch uit en
weer aan.
5. TIMER knop:
Via de timer functie wordt de kachel automatisch
ingeschakeld op de ingestelde tijd.
6. KEY LOCK knop (kinderslot):
Voorkomt dat kinderen
programmering veranderen.
per
ongeluk
de
65
Hoofdstuk 2, BEDIENING
4. Voor ingebruikname
Stap 1: Open de klep(pen)
Open de klep voor de externe brandstoftank en de
brandbeveiligingsklep (indien aanwezig) van de kachel.
Stap 2: Start de brandstofstroom
Druk eenmaal gedurende een seconde voorzichtig op
de rode ontgrendelknop om de vlotter van de brandstofopvangbak vrij te maken.
De brandstofopvangbak hoeft slechts te worden ontgrendeld als de kachel voor het eerst wordt aangezet
of nadat hij zonder brandstof was gevallen, of als de
kachel gedurende langere periode niet werd gebruikt.
Het ontgrendelen kan ook vereist zijn als de brandstofinlaatdruk boven 2,5 psi (is ± 0,17 bar) stijgt. In dit
geval moet een drukreduceerklep worden geïnstalleerd.
Stap 3: Klok instellen
Belangrijk: De klok op de kachel moet altijd op de
actuele tijd ingesteld worden.
A. Zet de tijdkeuzeschakelaar op “CLOCK SET” (klok
instellen).
B. Druk op de “HOUR” (uur)- en de “MINUTE”
(minuten)-toets om respectievelijk de uren en de
minuten aan te passen.Bij eenmaal drukken op de
“HOUR”- of “MINUTE” (minuten)-toets zal de tijd
aanpassen per eenheid (resp. per uur, per minuut).
Als u de toets continu ingedrukt houdt, dan kan de
tijdsaanduiding versneld veranderd worden.
Bij een stroomuitval van meer dan tien seconden worden alle klok- en timerinstellingen gewist. Het informatiedisplay laat een knipperende “PM 12:00” zien
wanneer de kachel uit staat. Men moet dan de klok en
de timer herprogrammeren.
C. Zet de timerkeuzeschakelaar op “(NORMAL-stand)”
na het voltooien van de klokinstelling. De huidige tijd
wordt dan weergegeven op de digitale indicator.
5. De kachel ontsteken
De kachel wordt direct door de gebruiker bediend. De
warmteafgifte wordt automatisch bepaald door de
kamertemperatuur die de temperatuursensor registreert.
66
Stap 1: zet de kachel aan
De ON/OFF knop indrukken. De kamertemperatuur en
de ingestelde temperatuur verschijnen op de display.
Het ON/OFF lampje flitst en de kachel slaat aan.
Opmerking: (*) De opstarttijd is afhankelijk van de
kamertemperatuur.
Na 9-15 minuten zal de kachel automatisch de geschikte bedrijfsmodus selecteren, de ON/OFF knop blijft verlicht.
Kamertemperatuur:
onder 0°C
11 minuten
0°C - 15°C
9 minuten
15°C
8,5 minuten
Als er na de opstarttijd geen vlammen zichtbaar zijn,
schakelt de kachel uit en start automatisch weer op.
Zijn er dan nog geen vlammen dan schakelt de kachel
weer uit en moet handmatig opgestart worden (foutcode E-2 op de display).
Stap 2: Aanpassen van de kamertemperatuur
De temperatuur kan alleen maar aangepast worden als
de kachel brandt. Gebruik de instelknoppen voor het
aanpassen van de temperatuur. Eerst een van de twee
knoppen indrukken om de functie te activeren (het TEMP
lampje naast de display gaat knipperen). Dan met de
rechterknop (▼ min.) de temperatuur verhogen of met
de linkerknop (▲ hour) verlagen. Druk een keer om de
temperatuur met 1 graad te verhogen. Na ca. 10 seconden stopt het lampje met knipperen en is de temperatuur
opgeslagen. Beschikbare temperatuurinstellingen variëren van 10°C minimaal tot 32°C maximaal. Als de kachel
niet aangesloten is op het stopcontact (of na een stroomstoring), wordt de temperatuur gereset op de fabrieksinstelling van 20°C.
De bedrijfsmodus wordt automatisch geregeld, afhankelijk van de kamertemperatuur die de temperatuursensor
registreert. De kachel werkt in “HIGH” bedrijfsmodus tot
de kamertemperatuur het gewenste niveau heeft
bereikt.
Als de kamertemperatuur overeenkomt met de gekozen
instelling switcht de kachel automatisch naar de “MED”
of “LOW” bedrijfsmodus om de kamer op de ingestelde
temperatuur te houden.
Hoofdstuk 2, BEDIENING
☞
Zonder de ‘SAVE’ instelling houdt de kachel
de kamer ook op temperatuur door de verwarmingscapaciteit aan te passen. ‘SAVE’ is
een energiezuinige instelling die u bijvoorbeeld kunt gebruiken om de kamer, als die
niet gebruikt wordt, vorstvrij te houden.
play en het TIMER lampje gaat branden, dit betekent
dat de timer functie is geactiveerd.
Om de timer instelling te wissen de ON/OFF knop een
keer indrukken.
☞
Stap 3: Het juiste gebruik van ‘SAVE’
Met de ‘SAVE’ functie kunt u de temperatuur begrenzen.
Als deze functie is geactiveerd, zal de kachel automatisch
afslaan als de kamertemperatuur 2°C boven de
ingestelde temperatuur komt. Als de kamertemperatuur
te laag wordt, slaat de kachel weer automatisch aan.
Activeer de ‘SAVE’ functie door op de daarvoor bestemde
knop te drukken. Het SAVE lampje licht op. Schakel de
functie uit door nogmaals op de SAVE knop te drukken.
Opmerking: wanneer de kamertemperatuur
lager is dan 15 °C, dan verandert de ingestelde
tijd automatisch - afhankelijk van de temperatuur - om de kamer toch op tijd warm te krijgen.
Kamertemperatuur
Hoger dan 15 °C
0°C ~ 15°C
Lager dan 0 °C
Ontbrandingstijd
Ingestelde tijd
10 minuten voor de ingestelde tijd
20 minuten voor de ingestelde tijd
7. Kamertemperatuur sensor
Stap 4: Het ‘FUEL’ lampje
Als het FUEL lampje gaat branden is er nog brandstof
voor 10 minuten. Het aftellen van de resterende
brandtijd wordt op de display weergegeven. De brandstoftank uit de kachel halen en buiten de woonkamer
opnieuw vullen. Als u de tank niet vult, hoort u iedere
twee minuten een alarmsignaal en na 10 minuten
schakelt de kachel automatisch uit.
De kamertemperatuur sensor is voorzien van een kabel
van 2,5 meter aan de achterkant van de kachel. Let op
dat de kabel niet tegen de afvoerpijp aankomt. De
kamertemperatuur sensor kan met tweezijdig plakband
of met een houtschroef bevestigd worden. De sensor
bevestigen op een tochtvrije plaats, zonder direct zonlicht en buiten de invloed van de warme luchtstroom
van de kachel.
6. Timer functie
8. Kinderbeveiliging
Met de timer functie kunt u een tijd instellen waarop
de kachel automatisch inschakelt.
Om de timer in te schakelen, moet de gewenste tijd
ingesteld zijn en de kachel uitgeschakeld zijn. Volg de
onderstaande procedure:
Om te voorkomen dat kinderen, per ongeluk, de
instellingen van de kachel veranderen, kan de kinderbeveiliging gebruikt worden. Als de kachel brandt en
de kinderbeveiliging is ingeschakeld, kan de kachel
alleen maar uitgeschakeld worden. De andere functies
zijn dan geblokkeerd. Als de kachel al uitgeschakeld is,
voorkomt de kinderbeveiliging dat de kachel per
ongeluk wordt aangezet. Activeer de kinderbeveiliging
door de hiervoor bestemde knop ruim 3 seconden in te
drukken. Het KEY-LOCK lampje gaat branden, dit
betekent dat de beveiliging is geactiveerd. Om de
beveiliging uit te schakelen, dezelfde knop weer ruim 3
seconden indrukken.
[1] De TIMER knop indrukken. Het TIMER lampje en de
display gaan knipperen.
[2] Gebruik de instelknoppen om de tijd in te stellen
waarop de kachel moet ontbranden. Gebruik de
linkerknop (▲ hour) om de uren in te stellen en de
rechterknop (▼ min.) voor de minuten (interval van
10 minuten).
9. Kachel uitschakelen
[3] De ON/OFF knop indrukken terwijl de display knippert.
[4] Na ca. 10 seconden verschijnt CLOCK weer in de dis-
De kachel kan op twee manieren uitgeschakeld worden.
[1] De ON/OFF knop indrukken. De display toont
CLOCK. De luchtcirculatie ventilator en de ventila-
67
Hoofdstuk 2, BEDIENING
tormotor blijven nog ca. 3 minuten in bedrijf om de
kachel af te koelen.
☞
[2] De TIMER knop indrukken als u de kachel uit wilt
schakelen en de volgende keer met de timer in wilt
schakelen. Op deze manier wordt niet alleen de
kachel uitgeschakeld, maar ook de timerfunctie
geactiveerd. De gewenste tijd is te wijzigen met
behulp van de instelknoppen.
Stap 9: De kachel inschakelen.
Stap 10: De kachel opnieuw programmeren (klok en timer).
Let op: Als de kachel na het doorlopen van het
herstelprogramma voor oververhitting weer
oververhit raakt, moet u contact opnemen met
uw dealer. De kachel pas weer inschakelen als
het probleem verholpen is.
11. Maandelijks schoonmaken van filter
10. Herstel na oververhitting
De kachel is
oververhitting.
beschermd
tegen
schade
door
Als de temperatuur van de kachelombouw boven de
90 °C komt, wordt er een sensor geactiveerd.
Stap 1: Schakel de kachel (uit) OFF.
Stap 2: Laat de kachel afkoelen.
☞
Raak de metalen ombouw niet aan voor u
zeker weet dat die voldoende is afgekoeld.
Onder normale omstandigheden is een afkoelperiode
van 30 tot 45 minuten voldoende voor volledige
afkoeling.
☞
Voordat u de binnenkant van de kachel schoon
gaat maken moet u zeker weten dat u die aan
kunt raken. Verwijder al het stof aan de
buitenkant van de behuizing met een schone,
pluisvrije en vochtige doek of met een ander
geschikt schoonmaakmiddel. Vergeet niet om de
buitenkant van de verwarmingskamer en de
warmtewisselaar schoon te maken.
Stap 7: Frontpaneel opnieuw vastzetten.
Stap 8: De stekker in het stopcontact steken.
68
Ook de brandstoffilter regelmatig controleren:
[1] Haal de uitneembare brandstoftank uit de kachel en
verwijder de brandstoffilter. Er kunnen wat druppels
van de filter lekken, dus houdt een doekje bij de hand.
[2] Verwijder het vuil door de brandstoffilter om te draaien
en op het verharde oppervlak te kloppen. (Nooit
schoonmaken met water!)
[3] De brandstoffilter weer in de kachel plaatsen.
Het tijdig verwijderen van stof en vlekken met een
vochtige doek wordt aanbevolen omdat er anders moeilijk
te verwijderen vlekken ontstaan.
☞
Stap 3: Haal de stekker uit het stopcontact.
Stap 4: Probeer de oorzaak van de overhitting te
achterhalen.
Oververhitting
wordt
meestal
veroorzaakt door objecten die de luchtcirculatie
blokkeren. Controleer of de circulatie ventilator of
afvoerpijpen geblokkeerd zijn. Controleer of er
objecten zijn die het afvoersysteem blokkeren.
Stap 5: Verwijder het frontpaneel.
Stap 6: Maak de binnenkant van de kachel schoon.
Kachel uitschakelen en af laten koelen voor u met schoonmaken begint. Haal ook de stekker uit het stopcontact.
Uw Zibro heeft amper onderhoud nodig. Het is echter wel
belangrijk dat u de luchtfilter met een stofzuiger en het
rooster met een vochtige doek iedere week schoonmaakt.
Zelf geen kachelonderdelen verwijderen of
repareren, neem daarvoor altijd contact op met
uw Zibro dealer. Wanneer de elektriciteitskabel
beschadigd is, moet die vervangen worden door
een erkende installateur. Gebruik een nieuwe
kabel van het type H05 VV-F.
12. Voor u een expert raadpleegt
In de volgende situaties is er geen sprake van storingen.
Tijdens in- of uitschakelen van de kachel.
Als de kachel voor de eerste keer wordt aangezet kan er
witte rook af komen.
Smeerolie of stof op de verbrandingskamer of de
warmtewisselaar verbrandt.
Hoofdstuk 2, BEDIENING
De vlammen flakkeren enkele minuten nadat de kachel is
ontstoken.
De ontstekingsstaaf werkt ook als de kachel koud is een
aantal minuten na ontsteking. Hierdoor kunnen de vlammen wat hoger zijn.
De kachel kraakt regelmatig bij het opwarmen of afkoelen.
Uitzetten of krimpen van de metalen onderdelen
veroorzaken het gekraak.
Als de kachel is ontstoken, duurt het even voor de luchtcirculatie in de kamer op gang komt.
De ventilator start pas op als de kachel warm is, om te
voorkomen dat er koude lucht circuleert.
Als de kachel voor de eerste keer gebruikt wordt of als de
brandstof gaat stromen kan er een hard klikkend geluid
hoorbaar zijn.
Er zit lucht in de brandstofpomp. Na ca. 1 minuut is de
lucht eruit.
Opmerking: De brandstofpomp kan een zacht tikkend
geluid maken tijdens normaal bedrijf. Dit duidt niet op
storing.
Terwijl de kachel in bedrijf is
Een deel van de branderpot en / of de warmtewisselaar
kleurt rood tijdens bedrijf.
Dit is normaal en duidt niet op problemen
69
Hoofdstuk 3 FOUTMELDINGEN
FOUT CODE
E-0
E-2
E-6
E-8
E-12
INFORMATIE
Stroomonderbreking
Ontbrandingsveiligheidsvoorziening is geactiveerd.
Vlammen doven tijdens bedrijf.
Storing ventilatormotor.
Oververhittingbeveiliging is geactiveerd.
E-13
Storing branderthermistor
Teveel brandstof in de brander
Drie keer geen ontsteking
Geen brandstof.
Timer is niet ingesteld.
Kamertemperatuur hoger dan 35°C.
E-22
-- : -Hi
Temperatuursensor op de verkeerde plek.
Lo
70
Kamertemperatuur onder -10°C.
Storing kamerthermistor of van de
temperatuursensor. niet aangesloten.
OPLOSSING
Kachel opnieuw ontsteken
Neem contact op met uw dealer
Neem contact op met uw dealer
Neem contact op met uw dealer
Maak de luchtfilter schoon
en verwijder stof.
Neem contact op met uw dealer
Neem contact op met uw dealer
Neem contact op met uw dealer
Vul de tank
Stel de timer in.
Controleer de plaats van de
temperatuursensor
Controleer de plaats van de
temperatuursensor
Controleer de plaats
Controleer de plaats
Hoofdstuk 4: GARANTIEBEPALINGEN
U krijgt op de kachel 48 maanden garantie vanaf de
aankoopdatum. Binnen deze periode worden alle materiaal- en fabricagefouten kosteloos verholpen. Hierbij
gelden de volgende regels:
1
Alle verdere aanspraken op schadevergoeding,
inclusief gevolgschade wijzen wij uitdrukkelijk af.
2
Reparaties of vervanging van onderdelen binnen de
garantietermijn leiden niet tot verlenging van de
garantie.
3
De garantie geldt niet wanneer aan de kachel veranderingen zijn aangebracht, niet originele onderdelen
zijn gemonteerd of reparaties zijn verricht door derden.
4
Onderdelen die aan normale slijtage onderhevig zijn
vallen buiten de garantie.
5
De garantie geldt uitsluitend als u de originele,
aankoopbon voorzien van datum overlegt en als
daarop geen veranderingen zijn aangebracht.
6
De garantie geldt niet bij schade ontstaan door: handelingen die afwijken van die in de gebruiksaanwijzing, verwaarlozing en het gebruik van een verkeerd
type brandstof of brandstof die over datum is. Het
gebruik van verkeerde brandstof kan gevaarlijk zijn*.
7
Verzendkosten en het risico tijdens het transport van
de kachel en de onderdelen daarvan zijn altijd voor
rekening van de koper.
Defecte elektrische apparaten horen niet bij
het huisafval. Zorg voor een goede recycling
waar mogelijk. Vraag eventueel uw gemeente
of uw lokale handelaar voor een deskundig
recycling advies.
Om onnodige kosten te voorkomen, raden wij u aan
eerst altijd zorgvuldig de gebruiksaanwijzing te raadplegen. Wanneer deze geen uitkomst biedt, kunt u
de kachel voor reparatie aanbieden bij uw dealer.
* Hoogontvlambare stoffen kunnen een oncontroleerbare verbranding induceren met uitslaande vlammen. Mocht dit gebeuren: de
kachel niet verplaatsen maar onmiddellijk
uitschakelen. In geval van nood kunt u een
brandblusser gebruiken, uitsluitend een B type
brandblusser: een kooldioxide blusser of
poederblusser.
71
--- --- -- ----- -- --- ------ -- --- ------ ---- -- ----
-- -- --- ------ -- --- ------- --- -- ----- ---- -- ----
www.zibro.com
Distributed in Europe by PVG Holding B.V.
D Benötigen Sie weitere Informationen oder treten Probleme auf, besuchen Sie bitte unsere Website www.zibro.com, oder setzen Sie sich mit
unserem Kundendienst in Verbindung (Telefonnummer auf www.zibro.com).
For alle yderligere oplysninger eller ved eventuelle problemer med apparatet henvises til www.zibro.com eller det lokale Kundecenter (telefonnumre findes i www.zibro.com).
Si necesita información o si tiene algún problema, visite nuestra página Web www.zibro.com, o póngase en contacto con el servicio cliente
(hallará el número de teléfono en www.zibro.com).
F Si vous souhaitez obtenir des informations supplémentaires ou si vous rencontrez un problème, rendez-vous sur notre site Web (www.zibro.
com) ou contactez le notre service client (vous trouverez l’adresse et numéro de téléphone sur www.zibro.com).
Jos haluat huoltoapua, lisätietoja tai laitteen kanssa tulee ongelmia, tutustu verkkosivustoon osoitteessa www.zibro.com tai kysy neuvoa PVG
kuluttajapalvelukeskuksesta (www.zibro.com).
If you need information or if you have a problem, please visit the our website (www.zibro.com) or contact our sales support (you find its phone
number on www.zibro.com)
I Per informazioni e in caso di problemi, visitate il sito Web www.zibro.com oppure contattate il Centro Assistenza Clienti (per conoscere il numero
di telefono, consultate www.zibro.com).
N Hvis du trenger informasjon, eller hvis du har et problem med produktet, kan du gå til nettsidene www.zibro.com. Alternativt kan du kontakte
med PVG’ forbrukertjeneste (telefonnummeret i www.zibro.com).
Als u informatie nodig hebt of als u een probleem hebt, bezoek dan de onze website (www.zibro.com) of neem contact op met de afdeling
sales support (adres en telefoon op www.zibro.com).
P Se necessitar de informações ou se tiver problemas, visite o Web site www.zibro.com ou contacte o Centro de Assistência (número de telefone
o www.zibro.com)
W przypadku problemów i w celu uzyskania szczegółowych informacji odwiedź stronę internetową Zibro dostępną pod adresem www.zibro.
com lub skontaktuj się z Centrum kontaktów Zibro (www.zibro.com)
S Om du behöver service eller information eller har problem med apparaten kan du besöka www.zibro.com eller kontakta Zibro kundtjänst (du
hittar telefonnumret på www.zibro.com).
Če želite dodatne informacije, obiščite spletno mesto podjetja na naslovu www.zibro.com ali pokličite na telefonsko (www.zibro.com).
PVG Traffic
Zibro® is registered trademark of TOYOTOMI Co., Ltd. for paraffin heaters.
ZIBRO brand paraffin heaters are made in Japan and imported by PVG Holding B.V.
avg©110921
man_Laser FF95
Daha fazla bilgiye ihtiyaç duyarsanız veya bir sorunla karşılaşırsanız, www.zibro.com adresindeki Zibro Internet sitesini ziyaret edin veya ülkenizde
bulunan Zibro müşteri merkeziyle iletişim kurun (telefon numarasını: www.zibro.com).
Rev. 05/11