1
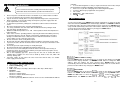
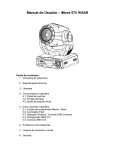
SPARK LED
TABLE DES MATIERES
1. Consignes générales
Nouvelle technologie LED
2. Spécifications Techniques
3. Fonctions principales
4. Comment contrôler votre unité
5. Configuration DMX 512
6. Connexion DMX 512
7. En cas de panne
8. Nettoyage de votre unité
Manuel d’utilisation
Merci de lire ce manuel avant toute utilisation
1-
1. Consignes Générales
Lire attentivement les consignes ci-après. Elles contiennent des informations importantes
sur la sécurité de l'installation ainsi que sur l'utilisation et la maintenance de l'équipement.
Conserver le présent manuel avec l'équipement pour référence ultérieure. En cas de
vente de l'équipement à un autre utilisateur, il est important que le présent manuel soit
joint à l'équipement afin que le nouvel utilisateur dispose des informations nécessaires
à son utilisation et puisse prendre connaissance des mises en gardes relatives à la
sécurité.
•
Avant le démarrage initial, déballer et vérifier soigneusement tous les éléments pour
s'assurer qu'ils n'ont subi aucune détérioration pendant le transport.
•
Choisir un emplacement bien ventilé pour l'installation du dispositif. Vérifier également
que les ventilateurs ou fentes de ventilation sont bien dégagées.
•
Vérifier que la zone alentour ne contient ni liquides inflammables, ni eau, ni objets
métalliques susceptibles de pénétrer dans l'appareil. En cas de pénétration de corps
étrangers, débrancher immédiatement l'alimentation secteur. Placer l'appareil dans
une pièce bien ventilée à environ 15 cm des murs.
•
Respecter l'environnement. Jeter les cartons d'emballage dans un endroit approprié.
•
Les travaux d'électricité nécessaires à l'installation doivent impérativement être
effectués par du personnel qualifié.
•
En cas de graves problèmes de fonctionnement, cesser d'utiliser l'appareil
immédiatement. Ne jamais tenter de le réparer soi-même. Les réparations effectuées
par du personnel non qualifié peuvent entraîner de graves détériorations ou défauts de
fonctionnement. Contacter le service après-vente le plus proche. Toujours utiliser des
pièces de rechange d'origine.
•
Il est indispensable de relier le conducteur jaune/vert à la terre pour être en conformité
avec les règles de sécurité.
•
Mettre l'appareil hors tension à intervalles réguliers afin de lui assurer une durée de vie
maximale
•
Ne jamais connecter l'appareil à un bloc d'atténuation (dimmer).
•
Toujours débrancher l'appareil du secteur avant de procéder à son entretien.
•
Ne jamais ouvrir l'appareil. Il ne contient aucune pièce nécessitant un entretien.
•
La haute tension présente des risques d'électrocution. Ne jamais toucher les fils
pendant l'utilisation.
•
Après environ 700 heures de fonctionnement du projecteur, faire vérifier les pièces
internes par un technicien qualifié.
•
De par sa lentille grossissante, veillez à ne pas exposer la lentille en contact direct
avec les rayons du soleil. Les rayons du soleil par « effet loupe » pourraient
sérieusement endommager l’électronique interne de l’appareil.
Remarque : Il est fortement déconseillé de brancher plus de 64 appareils sur la
même alimentation.
•
Poids : 4.2KG
•
Maître / esclave audio 2000 pas de programmes
•
DMX 512 – 4 canaux
Canal 1 MODE
Canal 2 programmes / chaser
Canal 3 vitesse strobe / vitesse chaser
Canal 4 Dimmer
•
Ces appareils peuvent être reliés ensemble en combinaison maître/esclave et
commandés par des programmes intégrés
•
Compatible avec contrôleur simple ou contrôleur DMX universel
3. Fonctions principales
Pour choisir des fonctions données, appuyez sur le bouton de MENU jusqu'à ce que la
fonction exigée s’affiche. Choisissez la fonction appuyé sur ENTER l’affichage clignotera.
Utilisation VERS LE BAS et vers le HAUT pour changer de mode. Une fois que le mode
exigé a été choisi,
appuyez sur le bouton de ENTER pour installer, il reviendra automatiquement aux
fonctions principales après 8 s de non affectation. Pour aller de nouveau aux fonctions
pressez le Bouton de MENU.
Les fonctions principales s’affichent comme ci dessous :
Accès au mode DMX 512
2. Specifications Techniques
Alimentation : AC 100V-240V 50-60Hz
Consommation : 18 W
Fusible : 6.3A
LED : Rouge: 48pcs, Vert: 36pcs, Bleu: 36pcs, Blanc: 36pcs
Dimensions : 280×240×213mm
2-
Appuyez sur le bouton de MENU jusqu'à se que s’affiche le mode
. Appuyé sur
ENTER le bouton et l'affichage clignoteront. APPUYER SUR UP ou DOWN pour afficher le
bon canal DMX.
Une fois l'adresse choisie, appuyer sur le bouton ENTER, si vous n’avez pas validé au bout
de 8 secondes la machine revient au mode automatique.
3-
1) Par la fonction Maître / Esclave
Mode esclave
Appuyez sur le bouton de MENU jusqu'à ce que
apparaisse sur l'affichage.
Appuyez sur ENTER l'affichage clignote. Naviguez avec les boutons UP et DOWN pour
choisir
(normal) ou
(2 light show). Une fois que le mode a été choisi,
appuyez sur ENTER pour VALIDER ou le retour à l’état précédent se fera
automatiquement après 8 secondes. Pour un retour appuyez sur MENU.
En reliant les unités en mode maître / esclave, la première unité va contrôler les autres afin
de les synchroniser. Cette fonction est adaptée lorsque vous voulez un show instantané.
Vous devez définir la première unité en mode maître
(Show 1) ou
(Show 2) ou
(Show 3) ou
(Show 4).
Il n'y a aucun branchement dans la prise d'entrée DMX , le voyant Maître est allumé en
continu, et le voyant Son clignote sur la musique.
Les autres unités sont programmées en mode esclave
Afficheur à LED
et sélectionnez le mode
. Sélectionnez le mode
Appuyez sur le bouton de MENU jusqu'à ce que
s’affiche. Appuyez sur ENTER le
bouton et l'affichage clignoteront. Naviguez avec les boutons UP et DOWN pour choisir
(normal) ou
(2 lumières).Leurs câbles DMX sont branchés sur l'entrée DMX
(guirlande) et le voyant Esclave est allumé en continu.
Light Show
(Led on) ou
(Led off). Une fois que le mode a été choisi, appuyez sur
ENTER pour VALIDER ou le retour à l’état précédent se fera automatiquement après 8
secondes. Pou un retour appuyez sur MENU.
Pour faire un light show, vous pouvez configurer
sur la deuxième unité pour
obtenir des mouvements de contraste sur chacune des autres, même si vous avez deux
unités seulement.
2) Par contrôleur simple : CA 8
Inversion Display
Appuyez sur le bouton de MENU jusqu'à ce que
s’affiche. Appuyez sur ENTER
le bouton et l'affichage clignoteront. Naviguez avec les boutons UP et DOWN pour choisir
(inversion du display affichage vers le sol) ou
(normal affichage vers le
plafond). Une fois que le mode a été choisi, appuyez sur le bouton ENTER.
compteur d’utilisation.
Appuyez sur le bouton de MENU jusqu'à ce que
s’affiche. Appuyez sur ENTER
l'affichage clignoteront. Une fois que le mode a été choisi, appuyez sur le bouton ENTER, le
temps s’affichera.
Version du logiciel
Pressez la touche MENU jusqu’à ce que
s’affiche, puis appuyez sur ENTER
pour afficher la version du logiciel. Pour revenir au menu principal, appuyez sur MENU.
4. Comment contrôler votre unité
Le CA 8 est utilisé seulement pour le câblage maître/esclave. Il est
connecté par le Jack 6/35 sur la machine Maître, et pilote
l’ensemble des machines pour les fonctions ; Stand by, Shutter,
Show lent ou rapide.
La fonction Shutter Strob est activée en restant pressé sur le
bouton selon 3 modes :
1. Une impulsion ; Strob Synchronisé
2. Deux impulsions ; Strob Désynchronisé
Strob sur les gobos et couleurs en programmations:
3) Contrôleur DMX
Un contrôleur universel DMX contrôle les unités, vous devez configurer l'adresse DMX des
canaux 1 à 512 de sorte que les unités puissent recevoir le signal DMX.
Appuyez sur le bouton MENU jusqu'à ce que
apparaisse à l'écran. Appuyer sur le
bouton ENTER ; l'écran clignote. Utilisez le bouton UP et DOWN pour changer l'adresse
512.
Une fois que l'adresse a été sélectionnée, appuyez sur le bouton ENTER, l'afficheur cesse
de clignoter, sinon retour au menu précédent 8 secondes plus tard. Pour revenir aux
Vous pouvez utiliser l'unité de trois façons:
1. Par maître / esclave en fonction pré-programmée
2. Par contrôleur simple
3. Par contrôleur universel DMX
Pas besoin d'éteindre l'appareil lorsque vous modifiez l'adresse DMX, le paramétrage de la
nouvelle adresse DMX sera effectué à chaque fois. Chaque fois que vous allumez l'unité, il
s'affichera 200S sur l'écran mettra tous les moteurs sur leur position d'origine, et vous
pouvez entendre les signaux sonores après environ 20 secondes. Après cela, l'unité sera
prête à recevoir le signal DMX ou prête à exécutez le programme.
fonctions sans modification appuyez sur le bouton MENU. Veuillez vous référer au
schéma suivant pour adresser votre canal DMX512 pour les 4 premières unités.
4-
5-
5. Configuration DMX512
DMX sur un connecteur XLR 3 broches, placer une résistance 120 OHMS ¼ watt entre la
broche 2 (DMX -) et la broche 3 (DMX +).
− Un système de contrôle DMX 512 nécessite une régie DMX 512 et un câblage
en série de toutes les machines avec un connecteur de terminaison. Les
câbles DMX ne doivent pas être branchés en parallèle ou avec des
connecteurs « Y ».
− Placer une résistance 90-120 OHM ¼ watt sur le connecteur de terminaison
entre les pôles + et – DMX.
− Le DMX 512 utilise un signal de transmission très rapide. Des câbles de
mauvaise qualité, des connecteurs oxydés dégraderont la transmission du signal.
− Chaque machine doit être correctement adressée pour recevoir le signal DMX.
Adresse entre 0 et 511.
− Le connecteur XLR 3 broches est le plus souvent utilisé, certaines machines
peuvent utilisées des connecteurs 5 broches.
XLR 3 broches : N° 1 masse . N°2 pôle - . N°3 pôle +
XLR 5 broches : N° 1 masse . N°2 pôle - . N°3 pôle +
7. En cas de panne
6. Connection DMX512
Le signal DMX 512 est généralement utilisé pour le contrôle des projecteurs asservis, avec
un maximum de 512 canaux.
Définissez le problème et vérifiez la solution:
A. L’unité ne s’allume pas, il n’y a pas de flux lumineux, le ventilateur ne tourne pas
1. Vérifiez que l’appareil soit bien branché, vérifiez le fusible.
2. Vérifiez le voltage.
3. Vérifiez que la LED power soit allumée.
B. Votre unité ne répond pas au DMX
1. La LED DMX n’est pas allumée, vérifiez vos connections DMX si vos connections sont
bonnes changez de câble.
2. Si la LED DMX est allumée, vérifiez la polarité de vos câbles ou celle en sortie de table
DMX.
3. Si le signal DMX arrive par intermittence vérifiez vos connecteurs et vos câbles si le
problème persiste faites vérifiez la carte DMX de l’unité.
4. Essayez avec un autre contrôleur DMX.
5. Vérifiez que vos câbles ne passent pas à proximité d’une alimentation électrique haute
tension risquant de faire une interférence.
C. Vos unités ne réagissent pas au CA 8
1. Vérifiez vos câbles DMX, vos connecteurs.
2. Vérifiez votre adressage.
D. Pas de réponse au mode audio
1. Vérifiez que votre appareil ne reçoit pas un signal DMX.
2. Vérifiez que le micro de l’unité fonctionne en tapotant dessus.
8. Nettoyage
Un connecteur de terminaison est nécessaire sur la dernière machine de la chaîne DMX. Il
réduit considérablement les risques d’erreurs, d’interférences, et de parasites sur le signal
6-
Le nettoyage des optiques internes et externes et/ou des miroirs doit impérativement être
effectué à intervalles réguliers pour optimiser la qualité de la lumière. La fréquence du
nettoyage dépend de l'environnement dans lequel l'appareil est utilisé : un environnement
7-
humide, enfumé ou particulièrement sale peut entraîner une accumulation plus importante
de salissures sur l'optique de l'appareil.
•
•
•
Nettoyer avec un chiffon doux et un produit de nettoyage pour glaces.
Toujours sécher soigneusement les pièces.
Nettoyer les optiques extérieures au moins tous les 20 jours. Nettoyer les optiques
intérieures au moins tous les 30 à 60 jours.
TABLE OF CONTENTS
1. Safety Instructions
2. Technical Specifications
3. Main Function
4. How to control the fixture
5. DMX 512 Configuration
6. DMX 512 Connections
7. Troubleshooting
8. Fixture Cleaning
8-
9-
1. Safety Introductions
Please read the instructions carefully which includes important
WARNING
information about the installation, operation and maintenance.
Please keep this User Manual for future consultation. If you sell the fixture to another
user, be sure that they also receive this instruction booklet.
Unpack and check carefully there is no transportation damage before using the fixture.
Before operating, ensure that the voltage and frequency of power supply match the
power requirements of the fixture.
It’s important to ground the yellow/green conductor to earth in order to avoid electric
shock.
Disconnect main power before servicing and maintenance.
Use safety chain when fixes this fixture. Don’t handle the fixture by taking its head
only, but always by taking its base.
Maximum ambient temperature is Ta : 40 . Don’t operate it where the temperature is
higher than this.
In the event of serious operating problem, stop using the fixture immediately. Never try
to repair the fixture by yourself. Repairs carried out by unskilled people can lead to
damage or malfunction. Please contact the nearest authorized technical assistance
center. Always use the same type spare parts.
Do not connect the device to any dimmer pack.
Do not touch any wire during operation and there might be a hazard of electric shock.
To prevent or reduce the risk of electrical shock or fire, do not expose the fixture to rain
or moisture.
The housing must be replaced if they are visibly damaged.
Do not look directly at the LED light beam while the fixture is on.
There are no user serviceable parts inside the fixture. Do not open the housing or
attempt any repairs by yourself. In the unlikely event your fixture may require service,
please contact your nearest dealer.
Due to the magnifying type lens, please keep the lens out of contact with direct
sunlight. Direct sunlight can cause heat to build up inside of the unit, which will
seriously damage unit.
For power supply, do not connect in series much more than 64 units, use another
mains supply for next 64 units.
℃
2. Technical Specifications
:
Input Voltage AC 100V-240V 50-60Hz
Power consumption 18W
Fuse : 6.3A
LED : Total 156pcs, Red 48pcs, Green 36pcs, Blue 36pcs, White 36pcs
Channels
Channel 1 = Mode
Channel 2 = Pattern/Chase
Channel 3 = Pattern Strobe/Chase Speed
Channel 4 = Dimmer
It can be operated by DMX512 control or can be used as an individual unit without
:
10-
controller.
It can be linked together as many as required in master/slave mode, and perform
the great built-in programmed lighting shows triggered by music.
Please use a 3 pin XLR cable/plug when connecting them together.
It features different pre-programmed chase patterns.
Fan cooled.
Dimension 280 x 240 x213mm
Weight 4.2KG
:
:
3. Main Function
To select any functions, press MENU button until the required one is shown on the display.
Select the function by ENTER button and the display will blink. Use DOWN and UP button
to change the mode. Once the required mode has been selected, press ENTER button to
setup or it will automatically return to the main functions without any change after idling 8
seconds. Back to the functions without any change press MENU button.
The main functions are shown below:
DMX 512 Address Setting
Press the MENU button up to when the
is shown on the display. Pressing ENTER
button and the display will blink. Use DOWN and UP button to change the DMX 512
address. Once the address has been selected, press ENTER button to setup or
automatically return to the main functions without any change after 10 seconds. Back to the
previous functions without any change press MENU button.
Master Mode
Press the MENU button up to when the
is shown on the display. Pressing ENTER
button, Use DOWN and UP button to select the
, Pressing ENTER button, Use
DOWN and UP button to select the
or
. Select the
ENTER button, Use DOWN and UP button to select the
or
11-
Pressing
. Select the
Pressing ENTER button. Use DOWN and UP button to select the Yes or No
Blackout, Back to the main functions, press the MENU button twice.
By linking the units in master/slave connection, the first unit will control the other units to
give an automatic, sound activated, synchronized light show. This function is good when
you want an instant show. You have to set the first unit in master mode
Slave Mode
Press the MENU button up to when the
is shown on the display. Pressing ENTER
button, Use DOWN and UP button to select the
or
(Slave Mode 1and 2).
Back to the previous functions without any change press MENU button.
LED
Press the MENU button up to when the
is shown on the display. Pressing ENTER
button and the display will blink. Use DOWN and UP button to select the (ON) or (OFF)
mode. Once the mode has been selected, press ENTER button to setup or automatically
return to the main functions without any change after 10 seconds. Back to the functions
without any change press MENU button again.
Display Inverse
Press MENU button until
is blinking on the display. Pressing ENTER button. Once
the mode has been selected, press ENTER button to setup or automatically return to the
main functions without any change after 10 seconds. Back to the functions without any
change press MENU button again.
and select
(show 1) or
(show 2) or
(show 3) or
(show 4) mode. Its DMX
input jack will have nothing plugged into it, and Its master LED will be constantly on and
sound LED will flash to the music. The other units will have to set in slave mode
and select
(normal) or
(2 light show) mode, Their DMX cables plugged into
the DMX input jacks (daisy chain) and the slave led lights will constantly on.
2-light show
In
(slave mode),
means the unit works normally and
means 2-light
show. In order to create a great light show, you can set
on the second unit to get
contrast movement to each other, even if you have two units only.
4.2. Easy Controller (by CA-8)
The easy remote control is used only in master/slave mode. There is a
terminator for connect the easy controller inside the fixture. By connecting the
cable into DMX IN waterproof cable entry gland to the CA-8 terminator of the
first fixture, you will find that the remote control on the first fixture will control all
the other fixtures for Stand by, Function and Mode functions.
Fixture Hours
Press the MENU button up to when the
is blinking on the display. Pressing ENTER
button and the display will show the number of working hours of the unit. To go back to the
functions press the MENU button again.
Software version
Press the MENU button up to when the
is blinking on the display. Pressing ENTER
button and the display will show the version of software of the unit. To go back to the
functions press the MENU button again.
Blackout
Blackout the unit
Function
1. Synchronous Strobe
2. Sound Strobe
3. Two light Strobe
Chase Select
(Chase 1-10)
Mode
Sound/Strobe
(LED OFF)
Chase
(LED ON)
4. How To Control The Unit
You can operate the unit in three ways:
1. By master/slave built-in preprogram function
2. By easy controller
3. By iLead controller (Please refer to the user guide of iLead) or universal DMX controller
No need to turn the unit off when you change the DMX address, as new DMX address
setting will be effected at once. Every time you turn the unit on, it will show 200S on the
display and move all the motors to their ‘home’ position and you may hear some noises for
about 20 seconds. After that the unit will be ready to receive DMX signal or run the built in
programs.
4.1 Master/Slave Built In Preprogrammed Function
12-
4.3 iSolution Operation
Consistent DMX configuration enable iMove to be linked together with iRock and
iShow and controlled at the same time.
♦ DMX address can be set remotely by iLead controller (Please refer to the user manual
of iLead controller). No need to calculate the DMX channels of each fixture in the chain.
♦ Automatic switching between DMX function and built-in stand alone programs.
♦
4.4 DMX Controller
13-
An universal DMX controller to control the units, you have to set DMX address from 1 to
512 channel so that the units can receive DMX signal.
is showing on the display. Pressing ENTER
Press the MENU button up to when the
button and the display will blink. Use DOWN and UP button to change the DMX512
address. Once the address has been selected, press and keep ENTER button pressed up
to when the display stops blinking or storing automatically 8 seconds later. To go back to
the functions without any change press the MENU button again. If you use please refer to
the following diagram to address your DMX512 channel for the first 4 units.
DMX address can be setting remotely by IL-0824 controller. No need to calculate the DMX
channels of each fixture in the chain.
6. DMX512 Connections
The DMX512 is widely used in intelligent lighting control, with a maximum of 512 channels.
5. DMX512 Configuration
1.
2.
3.
4.
5.
Connect the fixture together in a “daisy chain” by XLR plug cable from the output of
the fixture to the input of the next fixture. The cable cannot be branched or split to a
“Y” cable. Inadequate or damaged cables, soldered joints or corroded connectors can
easily distort the signal and shut down the system
The DMX output and input connectors are pass-through to maintain the DMX circuit
when no power is connected to the fixture.
At last fixture, the DMX cable has to be terminated with a terminator to reduce signal
errors. Solder a 120-ohm 1/4W resistor between pin 2(DMX-) and pin 3(DMX+) into a 3pin XLR-plug and plug it in the DMX-output of the last fixture.
Each lighting fixture needs to have an address set to receive the data sent by the
controller. The address number is between 0-511 (usually 0 & 1 are equal to 1).
3 pin XLR connectors are more popular than 5 pins XLR.
3 pin XLR: Pin 1: GND, Pin 2: Negative signal (-), Pin 3: Positive signal (+)
5 pin XLR: Pin 1: GND, Pin 2: Negative signal (-), Pin 3: Positive signal (+)
7. Troubleshooting
Following are a few common problems that may occur during operation. Here are some
suggestions for easy troubleshooting:
A. The fixture does not work, no light and the fan does not work
1. Check the connection of power and main fuse.
2. Measure the mains voltage on the main connector.
B. Not responding to DMX controller
1. DMX LED should be on. If not, check DMX connectors, cables to see if link properly.
14-
15-
2. If the DMX LED is on and no response to the channel, check the address settings and
DMX polarity.
3. If you have intermittent DMX signal problems, check the pins on connectors or on
PCB of the fixture or the previous one.
4. Try to use another DMX controller.
5. Check if the DMX cables run near or run alongside to high voltage cables that may
cause damage or interference to DMX interface circuit.
C. Some fixtures don’t respond to the easy controller
1. You may have a break in the DMX cabling. Check the LED for the response of the
master/ slave mode signal.
2. Wrong DMX address in the fixture. Set the proper address.
D. No response to the sound
1. Make sure the fixture does not receive DMX signal.
2. Check microphone to see if it is good by tapping the microphone.
E. One of the channels is not working well
1. The stepper motor might be damaged or the cable connected to the PCB is broken.
2. The motor’s drive IC on the PCB might be out of condition.
8. Fixture Cleaning
The cleaning of internal must be carried out periodically to optimize light output. Cleaning
frequency depends on the environment in which the fixture operates: damp, smoky or
particularly dirty surrounding can cause greater accumulation of dirt on the fixture’s optics.
Clean with soft cloth using normal glass cleaning fluid.
Always dry the parts carefully.
Clean the external optics at least every 20 days. Clean the internal optics at least
every 30/60 days.
16-