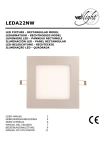
1
310-0280X
Lees de volledige handleiding vóór installatie en ingebruikname.
1. BESCHRIJVING
Deze inbouwdrukknopdimmer met faseafsnijding heeft een maximale belasting van 100W en is geschikt voor het
dimmen van Philips© ledarmaturen (zie 3.4) en dimbare spaarlampen. Bediening op afstand via N.O.-contacten.
Maximum 30 niet-verlichte drukknoppen in parallel.
2. MONTAGE EN AANSLUITINGEN
Voor de aansluiting van de belasting en de nodige voedingsspanning, zie aansluitschema’s achteraan ➥➊.
Om bij niet-correcte lichtoutput het minimumniveau te regelen, zie stap ➥➋. Voor montage zie ➥➌.
3. WERKING EN GEBRUIK
3.1. Normale werking
Afstandsbediening door N.O.-contacten (niet verlicht). Druk kort om in- of uit te schakelen. Druk lang om op- of
neer te dimmen. Bij lang drukken wordt de dimrichting na elke onderbreking omgekeerd (opdimmen -> stop ->
neerdimmen-> stop -> opdimmen -> enz.). Als de maximumintensiteit bereikt is, blijft het dimniveau onveranderd.
Het laatst bereikte niveau vóór de dimmer uitgeschakeld wordt, wordt al dan niet in een geheugen opgeslagen
(3.3). Tot 30 N.O.-contacten (170‑00000) kunnen parallel aangesloten worden (max. afstand 100m). De drukknoppen zijn niet galvanisch gescheiden.
3.2 De dimmer werkt volgens het faseafsnijdingsprincipe.
3.3 Geheugenfunctie
De dimmer kan zowel met als zonder geheugen gebruikt worden. De dimmer is standaard ingesteld zonder geheugenfunctie. Om deze functie te wijzigen, dim tot de maximum lichtstand en hou vervolgens de bedieningstoets
gedurende 10s. ingedrukt. Na 10s. dimt het licht van 100% tot een lagere lichtstand om aan te duiden dat deze
functie ingeschakeld is. Laat de druktoets na deze wijziging van de lichtintensiteit onmiddellijk los. Herhaal de
procedure om de geheugenfunctie weer uit te schakelen. Deze functie en de laatst ingestelde lichtstand worden
in een permanent geheugen bewaard; zij gaan niet verloren bij een spanningsonderbreking. Met geheugenfunctie
schakelt de dimmer de eerste keer in op een door de fabrikant gekozen lichtstand. Daarna schakelt de dimmer
in op de laatst ingestelde waarde.
TIP! Voor het dimmen van dimbare spaarlampen wordt aangeraden de geheugenfunctie uit te schakelen.
Met geheugen
-Kort drukken = aan op vorig niveau / uit
-Lang drukken bij ‘uit’-toestand = de dimmer dimt op vanaf minimum lichtstand
-Bij stijgen: de dimmer stopt op maximum
-Bij dalen: de dimmer stopt 2s. op min. en dimt daarna op
-Een hernieuwde (lange) druk keert de dimrichting om.
5. WAARSCHUWINGEN BIJ GEBRUIK
-Stuursignalen die over het net verstuurd worden kunnen de werking van de dimmer storen (dit is geen defect).
-Deze dimmer zal bij normaal gebruik een beperkte hoeveelheid warmte produceren. Zorg voor voldoende
warmteafvoer, dek de dimmer niet af met isolerend materiaal.
-Gedrag van het toestel na een stroomonderbreking: terug naar vorige toestand met geheugen/zonder geheugen.
-De dimmer wordt door de bediening van de sturing nooit elektrisch van het net gescheiden. Alle delen blijven
dus onder spanning ook al is de belasting (bv. het licht) “uit”.
-Dit toestel is niet geschikt voor het regelen van motoren en draadgewikkelde nettransformatoren.
6. TECHNISCHE GEGEVENS
-Voedingsspanning: 230V~ ±10%, frequentie 50Hz
-Montage: deze dimmer past in een standaard inbouwdoos met min. 40mm diepte
-Gewicht: ±75g
-Omgevingstemperatuur (ta): 35°C
-Voor gebruik in omgeving met een niet-condenserende luchtvochtigheid
-Eigen verbruik: ±0,6W (onbelast)
-Maximumdraaddiameter per aansluitklem: 2,5mm2
-Voeding en belasting: 2 x 1,5mm2 of 1 x 2,5mm2
-Drukknopingang: 2 x 1,5mm2 of 1 x 2,5mm2
-Minimumbelasting: 2W
-Maximumbelasting: 100W
-Geen spanningsval over dimmer
-Beveiligingen: thermische overbelastingsbeveiliging; kortsluitingsbeveiliging
-Drukknoppen voor bediening: 230V~; 5mA (niet galvanisch gescheiden)
-Max. afstand tot laatste drukknop: 100m
-Overeenkomstig de normen EN60669-2-1
7. WETTELIJKE WAARSCHUWINGEN
Zonder geheugen
-Kort drukken = aan op maximum/uit. Verder is de bediening analoog aan de bediening met geheugen.
-Druktoetsbediening:
kort drukken < 400ms.
= aan/uit
De dimmer is voorzien van een thermische beveiliging: als de temperatuur door overbelasting te hoog oploopt,
schakelt de dimmer uit. Indien dit gebeurt
-controleer of de belasting niet te hoog is.
-controleer of er gemengde belastingen gebruikt zijn
-controleer of het minimum dimniveau te laag ingesteld is (bij werking met geheugen)
-controleer de omgevingstemperatuur en plaatsingsomstandigheden - afhankelijk hiervan moet het max.
aansluitvermogen verminderd worden:
-10% per 5°C overschrijding van de omgevingstemperatuur 35°C
-25% voor inbouw in een isolerende wand (gips, hout) of bij plaatsing van 2 dimmers naast elkaar
lang drukken > 400ms.
= opdimmen/neerdimmen
3.4 Lampen
-Philips© ledarmaturen
- Ledino
- Roomstylers
- Arcitone
- Smartspot
- Lirio by Philips
-Topselection van Massive
-Dimbare spaarlampen CFLi
-Elektronische transformatoren
-Halogeen 230V
Zie tabel onderaan (fig. 1)
-De installatie dient te worden uitgevoerd door een bevoegd persoon en met inachtname van de geldende
voorschriften.
-Deze handleiding dient aan de gebruiker te worden overhandigd. Zij moet bij het dossier van de elektrische
installatie worden gevoegd en dient te worden overgedragen aan eventuele nieuwe eigenaars. Bijkomende
exemplaren zijn verkrijgbaar via de Niko-website of -supportdienst.
-Bij de installatie dient rekening gehouden te worden met (lijst is niet limitatief):
-de geldende wetten, normen en reglementen;
-de stand van de techniek op het ogenblik van de installatie;
-het feit dat een handleiding alleen algemene bepalingen vermeldt en dient gelezen te worden binnen het
kader van elke specifieke installatie;
-de regels van goed vakmanschap.
-Bij twijfel kan u de supportdienst van Niko raadplegen of contact opnemen met een erkend controleorganisme.
Support België: Support Nederland:
tel. + 32 3 778 90 80
tel. + 31 183 64 06 60
website: http://www.niko.be
website: http://www.niko.nl
e-mail: [email protected] e-mail: [email protected]
In geval van defect kan u uw product terugbezorgen aan een erkende Niko-groothandel samen met een duidelijke
omschrijving van uw klacht (manier van gebruik, vastgestelde afwijking…).
8. GARANTIEBEPALINGEN
-Garantietermijn: twee jaar vanaf leveringsdatum. Als leveringsdatum geldt de factuurdatum van aankoop van
het goed door de consument. Indien geen factuur voorhanden is, geldt de productiedatum.
-De consument is verplicht Niko schriftelijk over het gebrek aan overeenstemming te informeren, uiterlijk binnen
de twee maanden na vaststelling.
-In geval van een gebrek aan overeenstemming van het goed heeft de consument recht op een kosteloze
herstelling of vervanging, wat door Niko bepaald wordt.
-Niko is niet verantwoordelijk voor een gebrek of schade als gevolg van een foutieve installatie, oneigenlijk of
onachtzaam gebruik of verkeerde bediening of transformatie van het goed.
-De dwingende bepalingen van de nationale wetgevingen betreffende de verkoop van consumptiegoederen en de
bescherming van de consumenten van de landen waarin Niko rechtstreeks of via zuster/dochtervennootschappen, filialen, distributeurs, agenten of vaste vertegenwoordigers verkoopt, hebben voorrang op bovenstaande
bepalingen.
4. TROUBLESHOOTING
Mogelijke oorzaken indien de dimmer niet werkt:
-de dimmer is uitgeschakeld, de belasting is niet dimbaar in faseafsnijding
-de netspanning is niet aangesloten
-de belasting is niet aangesloten of is te hoog
-de lamp of de gebruikte kabel is defect
-een niet geschikte belasting is aangesloten (bv.een draadgewikkelde transformator)
-de thermische beveiliging is in werking getreden
-combinatie van bovenvermelde oorzaken
Fig.1
Philips ©
ledarmatuur
type 30W
Philips ©
ledarmatuur
type 7,5W
Lamp
HAL.230V
HAL.230V
HAL.12V
dimbaar
Verklaring symbolen
Metaaldraadlampen
Max.
3 ex.
10 ex.
100W
100W
100W
100W
Min.
1 ex.
1 ex.
2W
2W
2W
2W
nv Niko sa
Elektronische transformatoren
Industriepark West 40, BE-9100 Sint-Niklaas, Belgium — tel. +32 3 778 90 00 — fax +32 3 777 71 20 — e-mail: [email protected] — www.niko.be
PM310-0280XR10263
310-0280X
Lisez entièrement le mode d’emploi avant toute installation et mise en service.
Pour le raccordement de la charge et de la tension d’alimentation nécessaire, voir le schéma de raccordement
à l’arrière ➥➊. Pour régler le niveau minimum en cas de puissance de sortie incorrecte, voir ➥➋. Pour le
montage, voir ➥➌.
Le variateur est équipé d’une protection thermique : lorsque la température augmente trop en raison d’une
surcharge, le variateur s’éteint. Si cela arrive :
-vérifiez que la charge n’est pas trop élevée
-vérifiez que des charges mixtes ne sont pas utilisées
-vérifiez que le niveau minimum de variation réglé n’est pas trop faible (en cas de fonctionnement avec la
mémoire)
-vérifiez la température ambiante et les conditions d’installation – en fonction des constatations, la charge
maximale doit être diminuée :
-10% par 5°C de dépassement de la température ambiante de 35°C
-25% pour intégration dans une cloison isolante (plâtre, bois) ou dans le cas d’installation de 2 variateurs
juxtaposés
3. FONCTIONNEMENT ET UTILISATION
5. AVERTISSEMENTS LORS DE L’UTILISATION
1. DESCRIPTION
Ce variateur à bouton-poussoir encastrable à contrôle de phase possède une charge maximale de 100W et convient
pour la variation lumineuse des armatures LED Philips© (voir 3.4) et les ampoules variables basse consommation.
Commande à distance via contacts N.O. 30 boutons-poussoirs non-éclairés en parallèle.
2. MONTAGE ET RACCORDEMENTS
3.1. Fonctionnement normal
Télécommande par contacts N.O. (non-éclairé). Appuyez brièvement pour allumer ou éteindre. Appuyez longtemps pour faire varier (augmenter ou diminuer) la luminosité. En appuyant de façon prolongée, le sens de la
variation est inversé après chaque interruption (augmenter - > arrêt - > diminuer - > arrêt- > augmenter - >
etc.). Lorsque l’intensité maximale est atteinte, le niveau de variation n’augmente plus. Le dernier niveau atteint
avant que le variateur ne soit éteint, peut être stocké en mémoire (3.3). Il est possible de raccorder jusqu’à
30 contacts N.O. (170 00000) en parallèle (distance max. 100m). Les boutons-poussoirs ne possèdent pas
d’isolation galvanique.
3.2 Le variateur fonctionne selon le principe de contrôle de phase.
3.3 Fonction de mémorisation
Le variateur peut être utilisé aussi bien avec que sans fonction de mémorisation. Le variateur est livré d’origine
avec la fonction de mémorisation. Pour modifier cette fonction, il suffit d’enfoncer la touche de commande
pendant 10s. au niveau d’éclairage max. Après ces 10s., la lumière diminuera de 100% à un niveau plus faible
pour indiquer que la fonction standard est désactivée. Relâchez immédiatement le bouton-poussoir après ce
changement d’intensité d’éclairage. Répétez la procédure pour désactiver la fonction de mémorisation. Cette
fonction et la dernière position de luminosité réglées sont conservées dans une mémoire permanente ; elles ne
seront pas perdues en cas de coupure de courant. Avec la fonction de mémorisation, le variateur s’enclenche la
première fois à l’état d’éclairage minimum. Ensuite, le variateur s’enclenche à la dernière valeur réglée.
CONSEIL ! Pour la variation d’ampoules variables basse consommation, il est conseillé de désactiver la fonction
de mémorisation.
Avec mémorisation
-Pression courte = allumage au niveau précédent / extinction
-Pression longue en position « éteinte » = le variateur augmente à partir de la position de luminosité
minimum
-Variation à la hausse: le variateur s’arrête sur maximum
-Variation à la baisse: le variateur arrête 2s. sur minimum avant d’augmenter
-Une nouvelle pression (long) inverse le sens de variation.
Sans mémorisation
-Pression courte = allumage au niveau maximum / extinction. Pour le reste, la commande est identique à la
commande avec mémoire.
-Commande par touche:
P ression courte < 400ms.
= allumage/extinction
Pression longue > 400ms.
= variation à la hausse/à la baisse
3.4 Lampes
-Armatures LED Philips©
- Ledino
- Roomstylers
- Arcitone
- Smartspot
- Lirio by Philips
-Topselection de Massive
-Ampoules variables basse consommation
-Transformateurs électroniques
-Halogène 230V
Voir tableau ci-dessous (fig. 1)
-Les signaux de commande envoyés sur le réseau, peuvent perturber le fonctionnement du variateur (il ne s’agit
pas d’une panne).
-Ce variateur produira lors de l’utilisation normale une quantité de chaleur restreinte. Veillez à ce qu’il y ait une
évacuation de chaleur suffisante, ne couvrez pas le variateur avec un matériau isolant.
-Comportement de l’appareil après une coupure de courant : retour à la situation précédente avec mémoire/sans
mémoire.
-Le variateur n’est jamais séparé électriquement du réseau par la commande. Toutes les parties restent donc sous
tension même si la charge (p.ex. la lumière) est « éteinte ».
-Cet appareil ne convient pas pour le réglage de moteurs et de transformateurs réseau ferromagnétiques.
6. DONNÉES TECHNIQUES
-Tension d’alimentation: 230V~ ±10%, fréquence 50Hz
-Montage: ce variateur convient pour un boîtier standard avec 40mm min. de profondeur
-Poids: ±75g
-Température ambiante (Ta): 20°C
-Pour utilisation dans un environnement dont le degré hygroscopique de l’air ne prête pas à la condensation
-Consommation propre: ±0,6W (sans charge)
-Diamètre de câble maximum par borne de raccordement: 2,5mm²
-Alimentation et charge: 2 x 1,5mm2 ou 1 x 2,5mm2
-Entrée bouton-poussoir: 2 x 1,5mm2 ou 1 x 2,5mm2
-Charge minimum: 2W
-Charge maximum: 100W
-Aucune chute de tension sur le variateur
-Protections: en cas de surcharge thermique; en cas de court-circuit
-Boutons-poussoirs pour la commande: 230V, 5mA (pas d’isolation galvanique)
-Distance max. jusqu’au dernier bouton-poussoir: 100m
-Conforme aux normes: EN60669-2-1
7. PRESCRIPTIONS LEGALES
-L’installation doit être effectuée par une personne compétente et dans le respect des prescriptions en
vigueur.
-Ce mode d’emploi doit être remis à l’utilisateur. Il doit être joint au dossier de l’installation électrique et
être remis à d’éventuels autres propriétaires. Des exemplaires supplémentaires peuvent être obtenus sur
le site web ou auprès du service ‘support Niko’.
-Il y a lieu de tenir compte des points suivants avant l’installation (liste non limitative):
-les lois, normes et réglementations en vigueur;
-l’état de la technique au moment de l’installation;
-ce mode d’emploi qui doit être lu dans le cadre de toute installation spécifique;
-les règles de l’art.
-En cas de doute, vous pouvez appeler le service ‘support Niko’ ou vous adresser à un organisme de contrôle
reconnu.
Support Belgique: Support France:
+ 32 3 778 90 80
+ 33 820 20 66 25
site web: http://www.niko.be
site web: http://www.niko.fr
e-mail: [email protected]
e-mail: [email protected]
En cas de défaut de votre appareil, vous pouvez le retourner à un grossiste Niko agréé, accompagné d’une
description détaillée de votre plainte (manière d’utilisation, divergence constatée…).
8. DISPOSITIONS DE GARANTIE
-Délai de garantie: 2 ans à partir de la date de livraison. La date de la facture d’achat par le consommateur
fait office de date de livraison. Sans facture disponible, la date de fabrication est seule valable.
-Le consommateur est tenu de prévenir Niko par écrit de tout manquement à la concordance des produits
dans un délai max. de 2 mois après constatation.
-Au cas ou pareil manquement serait constaté, le consommateur a droit à une réparation gratuite ou à un
remplacement gratuit selon l’avis de Niko.
-Niko ne peut être tenu pour responsable pour un défaut ou des dégâts suite à une installation fautive, à
une utilisation contraire ou inadaptée ou à une transformation du produit.
-Les dispositions contraignantes des législations nationales ayant trait à la vente de biens de consommation et la protection des consommateurs des différents pays où Niko procède à la vente directe ou par
entreprises interposées, filiales, distributeurs, agents ou représentants fixes, prévalent sur les dispositions
susmentionnées.
4. DEFAUTS DE FONCTIONNEMENT
Si le variateur ne fonctionne, plusieurs causes sont possibles:
-le variateur est désactivé, la charge n’est pas variable en contrôle de phase
-la tension réseau n’est pas raccordée
-la charge n’est pas raccordée ou est trop élevée
-La lampe ou le câble utilisé est défectueux
-la protection thermique est enclenchée -combinaison des causes susmentionnées
Fig.1
Armature LED Armature LED
Philips ©
Philips ©
type 30W
type 7,5W
Ampoule
HAL.230V
HAL.230V
HAL.12V
variable
Symboles explicatifs
Des ampoules à fil métallique
Max.
3 ex.
10 ex.
100W
100W
100W
100W
Min.
1 ex.
1 ex.
2W
2W
2W
2W
nv Niko sa
Transformateurs électroniques
Industriepark West 40, BE-9100 Sint-Niklaas, Belgium — tel. +32 3 778 90 00 — fax +32 3 777 71 20 — e-mail: [email protected] — www.niko.be
PM310-0280XR10263
310-0280X
Lesen Sie vor der Montage und Inbetriebnahme die vollständige Gebrauchsanleitung.
1. BESCHREIBUNG
Dieser Tastdimmer für Unterputzeinbau mit Phasenanschnittsteuerung kann max. eine Leistung von bis zu
100W ansteuern und eignet sich für das Dimmen von dimmbaren Energiesparlampen und Led-Leuchtmitteln
von Philips© (Siehe 3.4). Fernbedienbar über Schließerkontakte. Parallelschaltung von max. 30 unbeleuchteten
Tastdimmern möglich.
2. MONTAGE UND ANSCHLÜSSE
Weitere Informationen zu Belastungswerten und Versorgungsspannung siehe untenstehenden Anschlussplan
➥➊. Um bei einer unkorrekten Lichtabgabe den Mindestlichtabgabewert einzustellen, siehe ➥➋. Anleitungen
zur Montage siehe ➥➌.
3. FUNKTIONSWEISE UND BETRIEB
3.1. Normalbetrieb
Fernbedienung mit Schließerkontakten (unbeleuchtet). Zum Ein- oder Ausschalten Dimmtaster kurz drücken.
Zum Auf- oder Abdimmen Dimmtaster länger drücken. Bei längerem Drücken wird die Dimmrichtung nach jeder
Unterbrechung umgekehrt (aufdimmen -> Stopp -> abdimmen -> Stopp -> aufdimmen -> usw.). Bei Erreichen
der maximalen Lichtintensität bleibt das Dimmniveau unverändert stehen. Das vor Abschalten des Dimmers
zuletzt eingestellte Dimmniveau kann abgespeichert werden (3.3). Es können bis zu 30 Schließerkontakte
(170‑00000) parallel zueinander angeschlossen werden (max. Abstand 100 m). Die Drucktaster sind nicht
galvanisch getrennt ausgeführt.
3.2 Der Dimmer arbeitet nach dem Prinzip einer Phasenanschneidung.
3.3 Speicherfunktion
Der Dimmer kann sowohl mit als auch ohne Speicher verwendet werden. Standardmäßig ist die Speicherfunktion des Dimmers deaktiviert. Um die Speicherfunktion ein- und auch wieder auszuschalten, müssen Sie den
Dimmer bis zu seinem Maximum aufdimmen und danach die Bedientaste noch 10 Sek. lang betätigen. Nach
Ablauf der 10 Sekunden dimmt das Licht auf eine niedrigere Lichtleistung herunter und zeigt dadurch an, dass
die Speicherfunktion nun aktiv ist. Lassen Sie sofort nach dieser Änderung der Lichtleistung den Drucktaster
wieder los. Wiederholen Sie diese Schritte, um die Speicherfunktion wieder auszuschalten. Diese Funktion und
die zuletzt eingestellte Lichteinstellung werden in einem permanenten Speicher gespeichert. Sie gehen bei einer
Spannungsunterbrechung nicht verloren. Mit aktivierter Speicherfunktion schaltet der Dimmer beim ersten Mal
immer mit einer werkseitig voreingestellten Lichtintensität ein. Anschließend schaltet der Dimmer auf den zuletzt
eingestellten Wert um.
TIPP! Wenn Sie dimmbare Energiesparlampen dimmen möchten, empfehlen wir Ihnen die Deaktivierung der
Speicherfunktion.
Mit Speicher
-Kurz drücken = einschalten auf vorher eingestellter Lichtintensität / ausschalten
-Langer Druck im „Aus“-Zustand = der Dimmer dimmt hoch ab Lichteinstellung 0 %.
-Aufdimmen: der Dimmer stoppt bei max. Helligkeit
-Abdimmen: Der Dimmer stoppt 2 Sek. auf Mind. und dimmt anschließend hoch.
-Ein erneuter (langer) Druck kehrt die Dimmrichtung um.
Ohne Speicher
-Kurz drücken = einschalten auf vorher eingestellte Lichtintensität / ausschalten. Die weitere Bedienung entspricht
ansonsten der Bedienung eines Dimmers ohne Speicherfunktion.
-Drucktastenbedienung:
Kurz drücken <400ms.
= AN/AUS
Lang drücken >400ms.
= Hoch-/runterdimmen
3.4 Lampen
-Philips©-Led-Leuchtmittel
- Ledino
- Roomstylers
- Arcitone
- Smartspot
- Lirio by Philips
-Topselection von Massive
-Dimmbare Energiesparlampen
-Elektronische Trafos
-Halogenlampen 230 V
Siehe untenstehende Tabelle (Abb. 1)
Mögliche Fehlerursachen, falls der Dimmer nicht arbeitet:
-der Dimmer ist ausgeschaltet bzw. die Last lässt sich nicht mit Phasenanschnitt dimmen
-Netzspannung ist nicht angeschlossen
-die Last ist nicht angeschlossen oder zu hoch
-die Lampe bzw. das verwendete Kabel ist defekt
-die angeschlossene Last ist ungeeignet (z.B. Transformator mit Drahtwicklung)
-Thermoschutz hat ausgelöst
-Kombination der o.a. Punkte
Lampe
5. WARNHINWEISE ZUR BEDIENUNG
-Über das Leitungsnetz ausgesandte Steuersignale können die Funktionsweise der Dimmer beeinträchtigen. Hierbei
handelt es sich nicht um einen Defekt des Dimmers.
-Dieser Dimmer erzeugt im normalen Betrieb eine bestimmte Menge Abwärme. Daher muss für eine ausreichende
Wärmeabfuhr gesorgt werden. Der Dimmer darf nicht mit isolierenden Materialien abgedeckt werden.
-Geräteverhalten nach einem Spannungsausfall: zurück zum vorherigen Status mit Speicher / ohne Speicher
-Dimmer wird durch Betätigung der Bedienelemente nie elektrisch von der Netzspannung getrennt. Alle Teile bleiben
somit unter Spannung, selbst wenn die Last (z.B. das Licht) „ausgeschaltet“ ist.
-Dieses Gerät ist nicht zur Regelung von Motoren und gewickelten Transformatoren geeignet.
6. TECHNISCHE DATEN
-Versorgungsspannung: 230 V, ± 10 %, Frequenz 50 Hz
-Montage: Dieser Dimmer kann in eine Standardunterputzdose mit mind. 40 mm Tiefe eingebaut werden
-Gewicht: ± 75 g
-Umgebungstemperatur (Ta): 20 °C
-Geeignet für Einsatz in Umgebung mit nicht-kondensierender Luftfeuchte
-Eigenverbrauch: ± 0,6 W (unbelastet)
-Max. Leiterquerschnitt pro Anschlussklemme: 2,5 mm²
-Netz- und Lastanschluss: 2 x 1,5 mm2 bzw. 1 x 2,5 mm2
-Drucktasteranschluss: 2 x 1,5 mm2 bzw. 1 x 2,5 mm2
-Minimallast: 2 W
-Maximallast: 100 W
-Keine Spannungsfall über Dimmer
-Schutzschaltungen: thermische Übertemperatursicherung; kurzschlusssicher
-Drucktasten für Bedienung: 230 V, 5 mA (nicht galvanisch getrennt)
-Max. Abstand bis zum letzten Drucktaster: 100 m
-Ausführung gemäß EN60669-2-1
7. GESETZLICHE BESTIMMUNGEN
-Die Installation darf ausschließlich von einem Fachmann des Elektrohandwerks unter Berücksichtigung der
geltenden Vorschriften vorgenommen werden.
-Übergeben Sie dem Benutzer diese Gebrauchsanleitung. Sie ist den Unterlagen der elektrischen Anlage
beizufügen und muss auch eventuellen neuen Besitzern übergeben werden. Zusätzliche Exemplare erhalten
Sie über unsere Website oder unseren Servicedienst.
-Bei der Installation müssen Sie u.a. Folgendes berücksichtigen:
-die geltenden Gesetze, Normen und Vorschriften;
-den Stand der Technik zum Zeitpunkt der Installation;
-diese Gebrauchsanleitung die im Zusammenhang mit jeder spezifischen Anlage gesehen werden muss;
-die Regeln fachmännischen Könnens.
-Sollten Sie Fragen haben, können Sie sich an die Niko-Hotline oder an eine anerkannte Kontrollstelle
wenden:
Web-site: http://www.niko.be; E-Mail: [email protected];
Hotline Belgien: +32 3 778 90 80
Hotline Moeller Deutschland:
Berlin: +49 30 701902-46
Hamburg: +49 40 75019-281
Düsseldorf: +49 2131 317-37 Frankfurt a.M.: +49 69 50089-263
Stuttgart: +49 711 68789-51 München: +49 89 460 95-218
Mail: [email protected]
Österreich:
Moeller Gebäudeautomation UG Schrems 0043‑2853‑702‑0
Hotline Slowakei: +421 263 825 155 – E-mail: [email protected]
Im Falle eines Defektes an Ihrem Niko-Produkt, können Sie dieses mit einer genauen Fehlerbeschreibung
(Anwendungsproblem, festgestellter Fehler, usw.) an Ihren Moeller- oder Niko-EGH zurückbringen.
8. GARANTIEBESTIMMUNGEN
4. FEHLERSUCHE
Fig.1
Der Dimmer enthält eine Übertemperatursicherung: Wenn die Temperatur infolge Überlast zu hoch ansteigt, dann
schaltet der Dimmer ab. Ist dies der Fall:
-Überprüfen Sie, ob die Last nicht zu hoch ausgelegt ist.
-Überprüfen Sie, ob unterschiedliche Lasttypen verwendet werden
-Überprüfen Sie, ob das Mindest-Dimmniveau zu niedrig eingestellt wurde (bei Dimmer mit Speicherfunktion)
-Überprüfen Sie die Umgebungstemperatur und Montagegegebenheiten, da hiervon abhängig die max. Anschlussleistung verringert werden muss:
-10 % pro 5 °C überschrittener Temperaturbetrag bei anberaumter Umgebungstemperatur von 35 °C
-25 % bei Einbau in eine isolierende Wand (Gips, Holz) bzw. bei Montage von 2 Dimmern nebeneinander
Philips ©
LedLeuchtmittel
typ 30W
-Garantiezeitraum: Zwei Jahre ab Lieferdatum. Als Lieferdatum gilt das Rechnungsdatum zu dem der Endkunde
das Produkt gekauft hat. Falls keine Rechnung mehr vorhanden ist, gilt das Produktionsdatum.
-Der Endkunde ist verpflichtet, Niko über den festgestellten Mangel innerhalb von zwei Monaten zu informieren.
-Im Falle eines Mangels an dem Produkt hat der Endkunde das Recht auf eine kostenlose Reparatur oder Ersatz.
Dies wird von Niko entschieden.
-Niko ist nicht für einen Mangel oder Schaden verantwortlich, der durch unsachgemäße Installation, nicht
bestimmungsgemäßen oder unvorsichtigen Gebrauch oder falsche Bedienung oder Anpassen/Ändern des
Produktes entsteht.
-Die zwingenden Vorschriften der nationalen Gesetzgebung bezüglich des Verkaufs von Konsumgütern und
der Schutz des Kunden in den Ländern in denen Niko direkt oder über seine Tochtergesellschaften, Filialen,
Distributoren, Handelsvertretungen oder Vertretern verkauft, haben Vorrang vor den obigen Bestimmungen.
Philips ©
LedLeuchtmittel
typ7,5W
HAL.230V
HAL.230V
HAL.12V
Dimmbar
Symbolerläuterung
Lampen mit Glühfaden aus Metall
Max.
3 Stück
10 Stück
100W
100W
100W
100W
Min.
1 Stück
1 Stück
2W
2W
2W
2W
nv Niko sa
Elektronische Trafos
Industriepark West 40, BE-9100 Sint-Niklaas, Belgium — tel. +32 3 778 90 00 — fax +32 3 777 71 20 — e-mail: [email protected] — www.niko.be
PM310-0280XR10263
310-0280X
Read the complete manual before attempting installation and activating the system.
To connect the load and the necessary power supply voltage, see the wiring diagrams below ➥➊.
To regulate the minimum level in cases of incorrect light output, see ➥➋. For installation, see ➥➌.
The dimmer is equipped with thermal protection. If the temperature climbs too high as a result of overloading,
the dimmer switches off. If this happens:
-check whether the load is too high
-check whether mixed loads are being used
-check whether the minimum dimming level is set too low (for operation with memory)
-check the ambient temperature and positioning conditions. Depending on these factors, the maximum connection
output must be reduced as follows:
-10% per 5°C in excess of the ambient temperature of 35°C
-25% for flush-mounting in an insulated wall (gypsum, wood) or when 2 dimmers are positioned next to one
another
3. OPERATION AND USE
5. USAGE WARNINGS
1. DESCRIPTION
This flush-mounting push button dimmer with reverse phase control has a maximum load of 100W and is suitable
for dimming Philips© LED fixtures (see 3.4) and dimmable economy lamps. Remote control via N.O. contacts.
Maximum of 30 non-illuminated push buttons in parallel.
2. INSTALLATION AND CONNECTIONS
3.1. Normal operation
Remote control unit via N.O. contacts (not illuminated). Press briefly to switch on and off. Hold down to dim up
and down. When holding down, the dimming direction is switched after each interruption (dimming up -> stop
-> dimming down-> stop -> dimming up -> etc.). Once the maximum intensity has been reached, the dimming level remains unchanged. The last dimming level reached before the dimmer is switched off is saved in
a memory (3.3). Up to 30 N.O. contacts (170 00000) can be connected in parallel (max. distance 100 m). The
push buttons are not galvanically isolated.
3.2 The dimmer works according to the reverse phase control principle.
3.3 Memory function
The dimmer can be used with or without memory. The standard setting of the dimmer is without memory function.
To change this setting, dim up to the maximum light level and then hold the control button in for 10 sec. After 10
sec., the light dims from 100% to a lower light level to indicate that this function has been switched on. After this
change in light intensity, immediately release the push button. Repeat the procedure to deactivate the memory
function. This function, and the last set light level, is stored in a non-volatile memory; i.e. they will not be lost in
the event of a power failure. With the memory function, the dimmer switches on for the first time at a light level
chosen by the manufacturer. Thereafter the dimmer switches on at the last set value.
TIP! When using dimmable economy lamps, we recommend switching off the memory function.
With memory
-Press briefly = on at previous level / off
-Hold down when off = the dimmer dims up from the minimum light level
-When dimming up, the dimmer stops at the maximum.
-When dimming down, the dimmer stops for 2 sec. at the minimum and then dims back up.
-A renewed (long) press reverses the dimming direction.
Without memory
-Press briefly = on at maximum / off . Apart from that, the control is analogous to the control with memory.
-Push button control:
brief press < 400 ms;
= on / off
holding down > 400 ms
= dimming up / dimming down
3.4 Lamps
-Philips© LED fixtures
- Ledino
- Roomstylers
- Arcitone
- Smartspot
- Lirio by Philips
-Topselection of Massive
-Dimmable economy lamps CFLi
-Electronic transformers
-Halogen 230 V
See table below (Fig. 1)
-Control signals that are sent via the mains can interfere with the operation of the dimmer. (This is not a defect.)
-This dimmer produces a limited amount of heat under normal operating conditions. Allow for sufficient heat
dissipation; do not cover the dimmer with insulating material.
-Reaction of the device after a power failure: return to the previous setting with memory/without memory.
-The dimmer is never electrically separated from the mains due to the operation of the control. In other words, all
parts remain connected to the power even if the load (e.g., the light) is “off”.
-This appliance is not suitable for controlling motors and ferromagnetic mains transformers.
6. TECHNICAL DATA
-Power supply voltage: 230V~ ± 10%, frequency 50Hz
-Mounting: This dimmer fits in a standard flush-mounting box with a min. depth of 40mm
-Weight: ± 75g
-Ambient temperature (Ta): 35°C
-Designed for use in an environment with non-condensing humidity
-No-load power consumption: ± 0.6W (unloaded)
-Maximum wire diameter per connection terminal: 2.5 mm²
-Power supply and load: 2 x 1.5 mm2 or 1 x 2.5 mm2
-Push button input: 2 x 1.5 mm2 or 1 x 2.5 mm2
-Minimum load: 2W
-Maximum load: 100W
-No voltage drop over the dimmer
-Protections: thermal overload protection; short circuit protection
-Push button controls: 230 V, 5 mA (not galvanically isolated)
-Max. distance to the last push button: 100m
-Complies with the EN60669-2-1 standards
7. LEGAL WARNINGS
-The installation has to be carried out by a qualified person and in compliance with the statutory regulations.
-This user manual has to be handed over to the user. It has to be included in the electrical installation file
and has to be passed on to any new owners. Additional copies are available on the Niko website or via the
support service.
-During installation, the following has to be taken into account (not limited to list below):
-The statutory laws, standards and regulations;
-The state of the art technique at the moment of installation;
-This user manual, which must be read within the scope of each specific installation, only states general
regulations;
-The rules of proper workmanship
-In case of questions, you can consult Niko’s support service or contact a registered control organisation.
Support Belgium:
Support UK:
+32 3 778 90 80
+44 1525877707
website : http://www.niko.be
http://www.nikouk.com
e-mail: [email protected]
[email protected]
In case of a defect, you can return your product to a registered Niko wholesaler, together with a clear description of your complaint (Conditions of use, stated defect…).
8. GUARANTEE PROVISIONS
-Period of guarantee: 2 years from date of delivery. The delivery date is the invoice date of purchase of the
product by the consumer. If there is no invoice, the date of production applies.
-The consumer is obliged to inform Niko in writing about the defect, within two months after stating the
defect.
-In case of a failure to conform, the consumer has the right to a repair or replacement (decided by Niko) free of
charge.
-Niko cannot be held liable for a defect or damage as a result of an incorrect installation, improper or careless
use or wrong usage or transformation of the goods.
-The compulsory regulations of the national legislation concerning the sales of consumer goods and the protection
of the consumers in the countries where Niko sells, directly or via sister or daughter companies, chain stores,
distributors, agents or permanent sales representatives, take priority over the rules and regulations mentioned
above.
4. TROUBLESHOOTING
Possible causes of dimmer malfunction:
-the dimmer is switched off; the load is not dimmable in reverse phase control
-the mains voltage is not connected
-the load is not connected or is too high
-the lamp or the cable used is defective
-the connected load is not suitable (e.g., a ferromagnetic transformer)
-the thermal protection has been activated
-a combination of the above causes
Fig.1
Philips©
LED fixture
type 30W
Philips©
LED fixture
type 7,5W
Lamp
HAL.230V
HAL.230V
HAL.12V
dimmable
Key to symbols
Metal filament lamps
Max.
3 units
10 units
100W
100W
100W
100W
Min.
1 unit
1 unit
2W
2W
2W
2W
nv Niko sa
Electronic transformers
Industriepark West 40, BE-9100 Sint-Niklaas, Belgium — tel. +32 3 778 90 00 — fax +32 3 777 71 20 — e-mail: [email protected] — www.niko.be
PM310-0280XR10263
310-0280X
➥ ➊ Dimmer aansluiten/ Raccordement variateur / Dimmer anschlieSSen / Connect dimmer
1 bedieningspunt
1 point de commande
1 Bedienungspunkt
1 control point
2...100W
Meerdere bedieningspunten
Plusieurs points de commande
Mehrere Bedienungspunkte
Several control points
230V~50Hz
N N L L
2...100W
230V~50Hz
N N L L
ε
N N L L
ε
0
230V~50Hz
2...100W
2...100W
N N L L
ε
0
230V~50Hz
ε
170-0000X
170-0000X
max. 30
x 170-00000
max. 30
x 170-00000
12V
12V
N
L 230V~
N
L 230V~
N
L 230V~
N
L 230V~
➥ ➋ Minimumniveau instellen / Réglage du niveau minimum / Mindestdimmniveau einstellen / Setting the minimum level
ACTION
CHECK
CONCLUSION
Dim to MINIMUM
Min level
310-0280X
MIN
MAX
OR
ACTION
√
Minimum dimniveau OK
Niveau de variation minimum OK
Mindestdimmniveau ist OK
Minimum dimming level OK
X
Minimum dimniveau te hoog
Niveau de variation minimum trop élevé
Mindestdimmniveau ist zu hoch
Minimum dimming level too high
X
Minimum dimniveau te laag
Niveau de variation minimum trop bas
Mindestdimmniveau ist zu niedrig
Minimum dimming level too low
CHECK
/
➥ ➌ Montage / Mounting
310-02800
310-02801
Min
l
leve
-02
310
80X
nv Niko sa
Min
leve
l
80X
-02
310
Industriepark West 40, BE-9100 Sint-Niklaas, Belgium — tel. +32 3 778 90 00 — fax +32 3 777 71 20 — e-mail: [email protected] — www.niko.be
PM310-0280XR10263