1
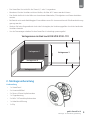
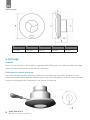
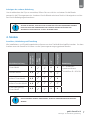
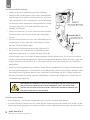
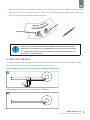
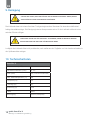
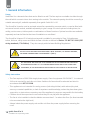
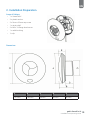
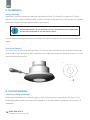
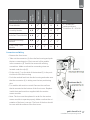
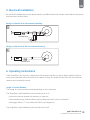
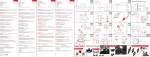
SmartFan X
Montage- und Bedienungsanleitung
Installation and Operating Guide
getAir GmbH & Co. KG
Krefelder Straße 670
41066 Mönchengladbach
Deutschland
Tel: +49 2161 82 10 330
Fax: +49 2161 82 10 331
E-Mail: [email protected]
Website: www.getair.eu
V 1.0
Inhaltsverzeichnis
Table of Content
Deutsch
English
1. Allgemeine Hinweise..................4
1. General Information................ 14
2. Montagevorbereitung.................5
2. Installation Preparation.......... 15
3. Montage........................................6
3. Installation................................. 16
4. Module..........................................7
4. Control Modules....................... 16
5. Elektroinstallation.......................9
5. Electrical Installation............... 19
6. Bedienungshinweise............... 10
6. Operating Instructions............ 19
7. Fehlersuche............................... 10
7. Trouble Shooting...................... 20
8. Instandhaltung......................... 11
8. Maintenance............................. 21
9. Reinigung................................... 12
9. Cleaning..................................... 21
10. Technische Daten.................. 12
10. Technical Data........................ 22
11. Gewährleistung...................... 13
11. Warranty.................................. 22
DE
1. Allgemeine Hinweise
Verwendung
Der SmartFan X ist ein Abluftventilator für die Wandmontage. Es ist eine Bohrung in der Wand erforderlich, durch die eine Verbindung zu einem, nach außen führendem Entlüftungskanal hergestellt wird.
Die äußere Öffnung muss durch ein passendes Wetterschutzgitter abgedeckt werden. Dieses bietet
ebenfalls die getAir GmbH & Co. KG an.
Der SmartFan X kann entweder mit einer Fernschaltung oder mit einem internen Steuerungsmodul verbunden werden, wodurch zahlreiche Steuerungsoptionen möglich sind. Zeitschaltuhr, Feuchtigkeitssensor, Bewegungssensor oder eine Kombination dieser Funktionen sind möglich. Die Zusatzmodule sind
getrennt erhältlich, sie können bei der Installation eingebaut oder später nachgerüstet werden.
Der SmartFan X verfügt über ein Gehäuse, das als IP X4 eingestuft ist. Es ist der Schutzklasse II, schutzisoliert entsprechend VDE 0100, zugeordnet und kann entsprechend in den Zonen 2 und 3 von Bädern,
Toiletten, Küchen und Werkräumen installiert werden.
DER VENTILATOR DARF NICHT DIREKT NEBEN EINER WÄRMEQUELLE PLATZIERT
WERDEN, WIE Z.B. IN DER NÄHE VON HEIZSTRAHLERN ODER AN STELLEN, AN DENEN DIE
TEMPERATUR 40°C ÜBERSTEIGEN KANN.
ALLE INSTALLATIONEN UND EINSTELLUNGEN MÜSSEN VON EINER ELEKTROFACHKRAFT
AUSGEFÜHRT WERDEN. DIE GETAIR GMBH & CO. KG HAFTET NICHT FÜR SCHÄDEN, DIE
DURCH UNSACHGEMÄSSEN GEBRAUCH ODER INSTALLATION VERURSACHT WERDEN.
ALLE SMARTFAN X-PRODUKTE SIND NACH VDE 0100 ZU INSTALLIEREN.
Sicherheitshinweise
• Bitte achten Sie darauf, dass Sie einen geeigneten Kondensatablauf installiert haben.
• Bitte beachten Sie die Sicherheitsvorschriften bei Inbetriebnahme des Ventilators.
• Bitte überprüfen Sie vor dem Bohren der Befestigungslöcher die Beschaffenheit des Wanduntergrundes.
• Bitte achten Sie darauf, dass keine Elektrokabel oder andere Leitungen beschädigt werden.
• Wichtig: Lesen Sie bitte vor Beginn der Installation alle in den Montage- und Bedienungsanleitung
angegebenen Hinweise.
• Alle Anweisungen sind sorgfältig zu beachten, um die Funktion des SmartFan X zu gewährleisten
Bei der Elektroinstallation und Gerätemontage sind die einschlägigen Vorschriften nach DIN VDE
0100 zu beachten.
4
getAir SmartFan X
Montage- und Bedienungsanleitung
DE
• Der SmartFan X ist nicht für die Zonen 0, 1 oder 2 vorgesehen.
• Montieren Sie den Ventilator nicht an Stellen, die über 40°C warm werden können.
• Das Gerät darf nicht in der Nähe von brennbaren Materialien, Flüssigkeiten und Gasen betrieben
werden.
• Bei Betrieb mit raumluftabhängigen Feuerstätten muss für eine ausreichende Zuluftnachströmung
gesorgt werden.
• Stecken Sie keine Gegenstände durch das Schutzgitter, da Verletzungsgefahr durch den laufenden
Ventilator besteht.
• Vor der Demontage schalten Sie den SmartFan X unbedingt spannungsfrei.
Verlegezonen im Bad nach DIN VDE 0100-701
Verlegezone 1
Verlegezone 3
60
Verlegezone 0
Verlegezone 2
2. Montagevorbereitung
Lieferumfang
• 1 x SmartFan X
• 2 x Kunststoffdübel
• 2 x 5mm x 32mm Kopfschrauben
• 1 x Zugentlastung
• 2 x M3 x 10 Flanschkopfschrauben
• 1 x Kabeldurchführung
• 1x Clip
getAir SmartFan X
Montage- und Bedienungsanleitung
5
DE
Abmessungen
A
B
C
D
E
197 mm
108 mm
68 mm
99 mm
40 mm
3. Montage
Unterputz
Bauen Sie den SmartFan X an die dafür vorgesehene Wandöffnung ein. Der Lüfter ist mittels der mitgelieferten Dübel und Schrauben an der Wand zu befestigen.
Entfernung der vorderen Abdeckung
Die vordere Abdeckung des SmartFan X verfügt über einen Bajonett-Verschluss. Entfernen Sie die
Halteschraube am unteren Ende der Abdeckung mit einem Schraubendreher. Drehen Sie dann die Abdeckung ein wenig gegen den Uhrzeigersinn und nehmen Sie diese ab.
6
getAir SmartFan X
Montage- und Bedienungsanleitung
DE
Anbringen der vorderen Abdeckung
Um ein abbrechen des Clips zu vermeiden, öffnen Sie zuvor die Iris und setzen Sie die Blende
passend in die Führungsnasen ein. Arretieren Sie die Blende mit einem Dreh im Uhrzeigersinn und ziehen Sie die Befestigungsschraube an.
ACHTEN SIE DARAUF, DASS SICH DAS LAUFRAD DES LÜFTERS UNGEHINDERT DREHEN
KANN UND DASS BEI VERWENDUNG VON FLEXIBLEN KANALSCHLÄUCHEN DER
ABGANGSSTUTZEN HIN NICHT ZU FEST GESPANNT WIRD.
4. Module
Anschluss, Verkabelung und Einstellung
Alle Installations- und Einstellungsarbeiten müssen von einer Fachkraft durchgeführt werden. Vor dem
Anschluss
Diagramm
Trigger
Eingang
Timer 1)
PIR 2)
Feuchtigkeit 3)
Ausbau muss der SmartFan X immer von der Spannungsversorgung getrennt werden.
A
P
P
X
X
Feuchte-Modul
A, B
P
P
X
P
Infrarot Timer-Modul
A, B
P
P
P
X
Infrarot Feuchte-Modul
A, B
P
P
P
P
2 Min.Verzögerung
Timer-Modul
A, B
P
P
X
X
Modulbeschreibung
Timer-Modul
Bemerkung
2 - 45 Minuten
passives Infrarot
3)
einstellbar 40 - 90% RH
1)
2)
DIE STEUERUNGS-MODULE SIND SEPARAT VERPACKT UND MÜSSEN NOCH MONTIERT
WERDEN.
getAir SmartFan X
Montage- und Bedienungsanleitung
7
DE
Anschluss und Verkabelung
• Entfernen Sie die Frontabdeckung (siehe Montage).
• Heben Sie die Lüsterklemme (4) aus dem Lüftergehäuse
und drücken Sie die beiden Anschlussstifte (3) an einem
Ende des Moduls in die Lüsterklemme (4) und befestigen
Sie diese mit einem passenden Schraubendreher. Stellen
Sie sicher, dass sich die Anschlussdrähte unter dem
Halteclip (5) befinden.
• Passen Sie die Kerbe (1) an der Anschlussklemmenseite
(2) des Moduls in den Positionsblock des Lüftergehäuses ein.
• Drücken Sie das Modul zurück in das Lüftergehäuse und
vergewissern Sie sich, dass die Lüsterklemme (4) über
den zwei Positionsstiften liegen.
• Bei Modulen mit Bewegungssteuerung; Entfernen Sie
die ovale Linse, die unten an der Frontabdeckung des
Ventilators angebracht ist. Ersetzen Sie diese durch die
durchsichtige Linse, die mit dem Bewegungssensor-Modul geliefert wird. Die Linse muss ersetzt
werden, damit das Bewegungssensor-Modul ordnungsgemäß arbeitet. Stellen Sie sicher, dass die
Ausrichtung der Linse korrekt ist, d. h. die Vorderseite der Linse sollte bündig mit der Oberfläche
abschließen
• Anschluss des Hauptkabels im Ventilator; Setzen Sie die mitgelieferte Dichtungs-Schutzmanschette in den Kabeleingang ein. Durchstechen Sie die Manschette ohne die Dichtung zu verletzen, damit
das Kabel hindurch gezogen werden kann. Verbinden Sie das Kabel mit der 3-poligen Anschlussklemme und stellen Sie sicher, dass die mitgelieferte Lüsterklemme eingebaut ist. Setzen Sie die
Frontabdeckung wieder ein.
BEIM SMARTFAN X HANDELT ES SICH UM SCHUTZISOLIERTE GERÄTE (SCHUTZKLASSE II).
DER SCHUTZLEITER WIRD HIER ALSO NICHT VERWENDET. DER T-ANSCHLUSS DARF
NUR MIT DEM GLEICHEN POTENTIAL WIE AM L-ANSCHLUSS GESCHALTET WERDEN. FÜR
FEHLANSCHLÜSSE HAFTET DER MONTEUR.
Einstellung der Module
• Alle Installations- und Einstellungsarbeiten sind von einer Fachkraft auszuführen.
• Vor dem Öffnen der Geräte oder der Justierung der Steuerung muss der SmartFan X immer von der
Spannungsversorgung getrennt werden. Module mit einer Nachlaufzeitsteuerung oder einem Feuch-
8
getAir SmartFan X
Montage- und Bedienungsanleitung
DE
tigkeitsregler werden voreingestellt geliefert, müssen aber eventuell vom Installateur justiert werden.
• Beachten Sie, dass bei Verwendung eines Tasters der Trigger des Moduls träge reagieren kann und
sich das auf die eingestellte Nachlaufzeit auswirkt.
JE NIEDRIGER DIE FEUCHTIGKEIT EINGESTELLT IST, DESTO LÄNGER LÄUFT DER
SMARTFAN X. IN EINIGEN FÄLLEN, BEISPIELSWEISE IN NEUEN HÄUSERN, WIRD DER
SMARTFAN X FÜR LÄNGERE ZEIT UNUNTERBROCHEN LAUFEN, WEIL ES SEHR FEUCHT
IST. VERWENDEN SIE, UM SCHÄDEN ZU VERMEIDEN, FÜR DIE JUSTIERUNG NUR DAS
BEIGELEGTE JUSTIER-WERKZEUG.
5. Elektroinstallation
Alle Elektroinstallationen müssen von einer zugelassenen Elektrofachkraft ausgeführt werden. Stellen
Sie sicher, dass alle Klemmen vorschriftsmäßig angebracht sind.
Verdrahtung eines SmartFan X mit extern geschaltetem Steuermodul
Verdrahtung eines SmartFan X ohne externe Schaltung
getAir SmartFan X
Montage- und Bedienungsanleitung
9
DE
6. Bedienungshinweise
Wenn der SmartFan X eingeschaltet ist, dauert es ca. 45 Sekunden, ehe sich die Iris-Blende öffnet.
Bei Abschaltung des Hauptschalters, wird der Motor angehalten und nach ca. weiteren 25 Sekunden
schließt sich die Iris-Blende. Die Reaktionszeit der Iris-Blende ist technisch bedingt und völlig normal.
Verwendung von Steuerungsmodulen
Der Gebrauch mit Steuerungsmodulen hängt vom jeweiligen Anschluss ab:
Der SmartFan X mit angeschlossenem Steuerungsmodul schaltet sich ein, wenn:
• der Bewegungssensor erfasst, dass sich jemand im Raum befindet.
• der Feuchtigkeitssensor feststellt, dass die eingestellte Feuchtigkeit im Raum überschritten ist.
• am Triggeranschluss „T“ 230 Volt anliegen (siehe Schaltbild A).
Der SmartFan X mit angeschlossenem Steuerungsmodul schaltet sich ab, wenn:
• der Bewegungssensor erfasst, dass sich niemand im Raum befindet.
• der Feuchtigkeitssensor feststellt, dass die eingestellte Feuchtigkeit im Raum unterschritten ist.
• dass die Zeitvorgabe verstrichen ist.
• dass am Triggeranschluss „T“ keine 230 Volt anliegen (siehe Schaltbild A).
Einheiten mit dieser Funktionskombination schalten ab, bis die letzte Funktionsmöglichkeit abgeschaltet wurde und die Nachlaufzeit verstrichen ist.
7. Fehlersuche
Falls, nach Ausführung der folgenden Maßnahmen, der SmartFan X nicht korrekt arbeiten sollte, wenden Sie sich an Ihren Handwerker.
Fehler
Maßnahme
Das Gerät zeigt keine
Prüfen Sie, ob der Anschluss korrekt ist und überprüfen Sie die Siche-
Funktion.
rung. Prüfen Sie die Funktion des Moduls.
Der Lüftermotor läuft
Prüfen Sie, ob das Flügelrad sich frei bewegen kann. Meist reicht es
nicht an.
den Laufradkanal zu reinigen.
Der Ventilator schaltet
nicht aus.
Prüfen Sie ob am „T“-Anschluss des Moduls keine Spannung mehr
anliegt und warten Sie die Nachlaufzeit ab. Vergewissern Sie sich,
dass keine Sensoren angesprochen werden.
Der Lüftermotor läuft mit
Prüfen Sie, ob das Flügelrad sich frei bewegen kann. Meist reicht es
halber Drehzahl.
den Laufradkanal zu reinigen. Prüfen Sie die Funktion des Moduls.
SmartFan X
10 getAir
Montage- und Bedienungsanleitung
DE
Vermeiden Sie die Montage in Trockenbauwänden, da diese wie
Der Lüfter macht laute
Geräusche bzw. vibriert.
Membrane wirken können und kleinste Vibrationen verstärkt werden.
Überprüfen Sie das Flügelrad auf Beschädigungen oder auf Unwucht.
In manchen Fällen lässt sich eine Unwucht oder ein Schleifen am
Gehäuse durch leichten Daumendruck beheben.
Die Ventilator-Blende
öffnet bzw. schließt nicht
sofort.
Die Blenden des SmartFan X brauchen ca. 45 Sek. zum Öffnen und ca.
25 Sek. zum Schließen.
Achten Sie auf eine korrekte Montage der Irisblende. Hierfür ist die
Die Ventilatorblende öffnet
nicht.
Position der Arretierschraube zu beachten. Ersetzen Sie gegebenenfalls den Clip, der im Zubehörpaket beigepackt ist. Prüfen Sie, ob die
Mechanik durch einen Fremdkörper blockiert wird. Wichtig ist, dass
die Mechanik der Irisblende sauber ist.
Die Ventilatorblende
schließt nicht.
Prüfen Sie ob die Mechanik durch einen Fremdkörper blockiert wird.
Vergewissern Sie sich, dass die Zugfeder richtig montiert ist. Wichtig
ist, dass die Mechanik der Irisblende sauber ist.
8. Instandhaltung
TRENNEN SIE DIE BELÜFTUNGSEINHEIT IMMER ZUERST VOM STROMNETZ, BEVOR SIE DIE
ABDECKUNG ÖFFNEN.
Um einen langjährigen Betrieb und den Erhalt der Garantie zu gewährleisten, empfehlen wir den Lüfter
jährlich zu reinigen. Starke Verschmutzungen des Flügelrades und des Lüfterinnenraumes führen zur
Überhitzung des Motors.
getAir SmartFan X
Montage- und Bedienungsanleitung
11
DE
9. Reinigung
Stellen Sie sicher, dass der Lüfter vom Stromnetz getrennt wurde, bevor
Sie die Bürste in den Laufradkanal einführen.
Die Irisblende kann mit einem feuchten Tuch gereinigt werden. Benutzen Sie niemals schleifmittelhaltige Haushaltsreiniger. Die Reinigung interner Komponenten wie z. B. des Laufrads sollte mit einer
weichen Bürste erfolgen.
Versuchen Sie nie den Lüfter selbst zu reinigen, indem Sie diesen in Wasser
eintauchen oder Sie ihn in die Spülmaschine geben.
Lediglich die Irisblende lässt sich problemlos, nach entfernen der Zugfeder und der Arretierschraube, in
der Spülmaschine reinigen.
10. Technische Daten
SmartFan X
Volumenstrom (m³/h)
68
Gerätedurchmesser (mm)
Ø 197
Tiefe (mm)
40 (+ 68 mm Einschub)
max. Raumtemperatur (°C)
40
Frequenz (Hz)
50
Leistung (W)
9,2
Spannung (V)
230
Farbe
weiß
Anbringung
Wand (Unterputz)
SmartFan X
12 getAir
Montage- und Bedienungsanleitung
DE
11. Gewährleistung
Geltend für alle in Deutschland installierten und benutzten Einheiten. Die getAir GmbH & Co. KG gewährt
auf den SmartFan X 2 Jahre Garantie ab Kaufdatum gegen Material- und Verarbeitungsfehler. Die Garantie bezieht sich nur auf das Material, nicht auf eine eventuell erforderliche Neuinstallation der Geräte.
Sollten Teile defekt sein, behält sich die getAir GmbH & Co. KG das Recht vor, diese nach eigenem Ermessen zu reparieren oder kostenfrei auszutauschen, sofern die Einheit:
•
gemäß den mitgelieferten Anweisungen zum Einbau und zur Verdrahtung installiert wurde.
•
nicht zweckentfremdet, nachlässig behandelt oder beschädigt wurde.
•
nicht von einer Person verändert oder repariert wurde, die nicht durch die getAir GmbH & Co. KG dazu autorisiert
wurde
•
•
nach den jeweils geltenden Bau- und Installationsvorschriften installiert wurde.
Die getAir GmbH & Co. KG haftet nicht für Verlust, Verletzungen oder andere Folgeschäden, die aus einer Fehlfunktion der Geräte resultieren oder in irgendeiner Weise mit den Geräten in Zusammenhang stehen, mit der Ausnahme,
dass nichts in dieser Klausel dahingehend ausgelegt werden soll, dass die Haftung für Fahrlässigkeit ausgeschlossen oder begrenzt wird.
Diese Garantie berührt in keiner Weise gesetzliche oder andere Rechte der Verbraucher. Außerhalb Deutschlands gelten
die nationalen Gewährleistungsbestimmungen des Landes indem das Gerät vertrieben wird. Wenden Sie sich bitte an den
Händler Ihres Heimatlandes.
Bei genauer Befolgung der Anweisungen und deren Anwendungsmöglichkeiten, die in dieser Anleitung ausführlich beschrieben sind, ist die getAir GmbH & Co. KG bei dennoch möglich auftretenden Fehlfunktionen nicht verantwortlich. Sollten Sie
Teile dieser Anleitung nicht verstanden haben, wenden Sie sich bitte an Ihren den getAir-Kundenservice. Im Hinblick auf unsere ständigen Verbesserungsbemühungen an unserem Produktprogramm behalten wir uns vor, die Einbaubeschreibungen
bzw. Anleitungen in dieser vorliegenden Installations-Anweisung zu verändern (Technische Änderungen vorbehalten).
Alle Rechte vorbehalten. Der Nachdruck bzw. die Kopie, auch von Teilen dieser Dokumentation, sowohl auf elektronischem
wie mechanischem Weg, bedürfen der schriftlichen Genehmigung.
getAir SmartFan X
Montage- und Bedienungsanleitung
13
EN
1. General Information
Usage
SmartFan X is a domestic fans that can be fitted to a wall. The fan requires a suitable size hole through
the wall which connects into a duct venting to the outside. The external opening should be covered by a
suitable external grill, available separately from getAir GmbH & Co. KG.
The SmartFan X can be used as a simple extract fan operated by a remote switch, or can be fitted with
an internal control module, available separately to give a range of control options including timer, humidity, motion sensor, trickle speed or combinations of these functions. Optional modules are available
separately and can be fitted at the time of installation or retrofitted.
The SmartFan X has an IP X4 rating housing and is suitable for mounting in Zone 3 in bathrooms,
toilets, kitchens, utility rooms and inside shower cubicles as defined in Section 701 BS7161:2008 (IEEE
wiring standards, 17th Edition). They also comply with the latest Building Regulations.
Do not place the ventilator near direct heat sources, e.g. radiant heaters,
or where temperatures can exceed 40°C (104°F).
All electrical installation to be carried out by an approved electrician in
accordance with Part “P” U.K. Building Regulations and to the latest IEEE
standards, or the appropriate regulations in the country of installation.
Safety Instructions
• The Fan requires a 230V 50Hz single phase supply. Class II equipment. BS EN 60417. An external
3A fuse is required for each fan unit. Note: Switches for fans should be selected and sited in
accordance with BS7161:2008.
• This appliance is not intended for use by persons (including children) with reduced physical,
sensory or mental capabilities, or lack of experience and knowledge, unless they have been given
supervision or instruction concerning use of the appliance by a person responsible for their safety.
• Children should be supervised to ensure that they do not play with the appliance.
• The fan is to be installed so that the blades are more than 2.1 m above the floor (for fans intended
to be mounted at the high level).
• Always isolate the power supply unit and fan unit from the power supply before removing the
cover.
SmartFan X
14 getAir
Installation and Operating Guide
EN
2. Installation Preparation
Scope of Delivery
• 1 x SmartFan X
• 2 x plastic anchor
• 2 x 5mm x 32mm cap screw
• 1 x strain relief
• 2 x M3 x 10 flange head screw
• 1 x cable bushing
• 1x clip
Dimensions
A
B
C
D
E
197 mm
108 mm
68 mm
99 mm
40 mm
getAir SmartFan X
Installation and Operating Guide
15
EN
3. Installation
Surface Mounting
SmartFan X can be recessed in a wall with a suitable size hole. The SmartFan X requires a 110mm
diameter hole through the wall lined with a 100mm id (internal diameter) duct. The fan has to be fixated
to the wall using the provided plastic anchors and screws.
Ensure free running of the fan impeller and that flexible duct connections
are not over tightened to the fan outlet spigot.
It’s recommend that rigid ducting is used instead of flexible ducting, this will ensure maximum performance.
Front Cover Removal
The front cover fan has a bayonet type fitting. To remove, undo the retaining screw at the bottom edge
of the cover using a screwdriver, then rotate the cover a few degrees anticlockwise and remove. To refit,
reverse the above procedure.
4. Control Modules
Connection, Wiring and Settings
All electrical installation to be carried out by an approved electrician in accordance with Part “P” U.K.
Building Regulations and to the latest IEEE standards, or the appropriate regulations in the country of
installation.
SmartFan X
16 getAir
Installation and Operating Guide
Wiring
Diagram
Trigger Input
Timer 1)
PIR 2)
Humidity 3)
EN
A
P
P
X
X
Humidity Module
A, B
P
P
X
P
Infra Red Timer Module
A, B
P
P
P
X
Infra Red Humidity
Module
A, B
P
P
P
P
2 Min. Delay Timer
Module
A, B
P
P
X
X
Description of module
Timer Module
Notes
2 - 45 Minuten
passives Infrarot
3)
einstellbar 40 - 90% RH
1)
2)
Connection and Wiring
• Remove the front cover.
• Take out the connector (4) from the fan housing and push
the two connecting pins (3) at one end of the module
in the connector (4). Secure the screw with a fitting
screwdriver. Make sure that the connecting wires are
located under the clip (5).
• Fit the notch (1) on the side of the terminal (2) in the position block of the fan housing.
• Push the module back into the fan housing and make sure
that the connector (4) is sitting over the two positioning
pins.
• For module with motion control: Remove the oval lens
that is mounted at the bottom of the front cover. Replace
it with the translucent lens supplied with the motion
sensor module.
• Note: The lens must be replaced in order for the motion
sensor module to operate properly. Make sure that the orientation of the lens is correct. The front of the lens should
be even with the surface of the front cover.
getAir SmartFan X
Installation and Operating Guide
17
EN
• Connection of the main power cable: Insert the supplied cable bushing. Pierce the bushing without
damaging the seal, so that the cable can be pulled through. Connect the cable to the 3-pin connector. Mount the front cover.
SmartFan X requires a 230V 50Hz supply. It is double insulated so therefore
does not require an earth. The electrician is liable for an incorrect
installation.
Adjusting the Modules
• The installation and adjustment must be performed by a qualified electrician. Always isolate the
SmartFan X from the power supply before removing the cover or adjusting the control modules.
• Timer modules and Humidity modules are supplied preset, but may have to be adjusted by the
installer.
• Please note that if using a switch the trigger of the module can respond slower which affects the
set overrun time.
The lower the humidity level is set, the longer the SmartFan X will run.
In some cases, for example in new constructions, the SmartFan X will
run continuously for a long time, because of the high humidity. To avoid
damaging only use the supplied adjustment tool for adjusting the modules.
SmartFan X
18 getAir
Installation and Operating Guide
EN
5. Electrical Installation
All electrical installations must be performed by a qualified electrician. Please check that all connectors
and wires are correctly fitted.
Wiring of a SmartFan X with external switching
3 AMP
SWITCHED FUSE
Wiring of a SmartFan X with no external switching
3 AMP
SWITCHED FUSE
6. Operating Instructions
If the SmartFan X is turned on, it takes about 45 seconds until the iris opens. When switched off, the
motor stops and after about 25 seconds iris starts closing. The reaction time of the iris has technical
reasons and is perfectly normal.
Usage of Control Modules
The usage of control modules varies depending on the connection:
The SmartFan X with installed control module turns on, if:
• the motion sensor detects the presence of a person.
• the humidity sensor detects that the set humidity level in the room is exceeded.
• the trigger switch „T“ is provided with 230 V (see diagram A).
The SmartFan X with installed control module turns off, if:
getAir SmartFan X
Installation and Operating Guide
19
EN
• the motion sensor doesn’t detect the presence of a person.
• the humidity sensor detects that the set humidity level in the room isn’t exceeded.
• the set overrun time has elapsed.
• the trigger switch „T“ isn’t provided with 230 V (see diagram A).
SmartFan X with control modules that feature a combination of functions turn off until the last possible
function has turned off and the overrun time has elapsed.
7. Trouble Shooting
Take care not to over tighten the duct connection to the fan spigot. This can result in restricting the free
rotation of the impeller and a thermal overload of the motor could occur causing short term fan failure.
In the event of this occurring loosen the duct connection so that the impeller rotates freely within the
spigot.
The motor is fitted with an automatic reset after approximately 15 minutes and will restart the fan when
reconnected to the module controller and mains supply.
If after performing the following instructions the SmartFan X won’t work properly, please contact your
installer.
Fehler
Maßnahme
The SmartFan X is not
Check whether the connection is correct and check the fuse. Check
functioning.
the function of the control module.
The fan motor does not
Check whether the fan impeller can move freely. Usually it is sufficient
start.
to clean the fan impeller channel.
The fan does not stop.
The fan motor runs at half
speed.
Check if the trigger switch “T” isn’t provided with voltage and wait for
the overrun time to elapse. Make sure that no sensors are triggered.
Check whether the fan impeller can move freely. Usually it is sufficient
to clean the fan impeller channel. Check the function of the control
module.
Avoid mounting in drywall construction, as theses can act as mem-
The fan is noisy or
branes and amplify even the smallest vibrations. Check the fan im-
vibrates.
peller for damage or unbalance. In some cases an imbalance can be
fixed by light thumb pressure on the housing.
SmartFan X
20 getAir
Installation and Operating Guide
EN
The iris does not open or
The iris of SmartFan X needs 45 seconds to open and 25 seconds to
close immediately.
close.
Pay attention to the correct mounting of the front cover. Notice the
The iris does not open.
correct position of the locking screw. Replace the provided clip if
necessary. Check whether the mechanism is blocked by a foreign
object. It is important that the mechanism of the iris is clean.
Check whether the mechanism is blocked by a foreign object. Make
The iris does not close.
sure that the spring is correctly fitted. It is important that the mechanism of the iris is clean.
8. Maintenance
SAFETY FIRST: ALWAYS ISOLATE THE FAN UNIT FROM THE POWER SUPPLY BEFORE
REMOVING THE COVER.
Warranty only covers the fan, not the reinstallation of this if required. When installed according to these
instructions the SmartFan X is completely safe. The materials used do not constitute a hazard. The
module covers are made of a flame retardant material.
9. Cleaning
The external housing of the fan can be wiped with a damp cloth. Do not use household cleaners containing abrasives.
Always ensure that the fan unit is isolated from the power supply before
inserting the brush into the impeller duct.
Cleaning of the internal parts such as the impeller should be carried out using a soft brush. Never clean
any parts of the fan assembly by immersing in water or using a dishwasher.
getAir SmartFan X
Installation and Operating Guide
21
EN
10. Technical Data
SmartFan X
Air flow rate (m³/h)
68
Device diameter (mm)
Ø 197
Depth (mm)
40 (+ 68 mm insertion)
Max room temperature (°C)
40
Frequency (Hz)
50
Power (W)
9,2
Voltage (V)
230
Colour
white
Mounting
Wall
11. Warranty
Applicable to units installed and used in Germany. getAir GmbH & Co. KG guarantees the SmartFan X
for 2 years from date of purchase against faulty material or workmanship. Warranty only covers the fan,
not the reinstallation of this if required.
In the event of any defective parts being found, getAir GmbH & Co. KG reserve the right to repair or at
our discretion replace without charge provided that the unit:
• has been installed and used in accordance with the fitting and wiring instructions supplied with each unit.
• has not been connected to an unsuitable electrical supply.
• has not been subjected to misuse, neglect or damage.
• has not been modified or repaired by any person not authorised by getAir GmbH & Co. KG
• has been installed in accordance with latest Building Regulations and IEEE wiring regulations.
• getAir GmbH & Co. KG shall not be liable for any loss, injury or other consequential damage, in the event of a failure of
the equipment or arising from, or in connection with, the equipment excepting only that nothing in this condition shall be
construed as to exclude or restrict liability for negligence.
This warranty does not in any way affect any statutory or other consumer rights. For any location outside of Germany, the
national warranty regulations of that respective country apply. Please contact the distributor of your home country.
In strict accordance with the instructions described in detail in this manual, getAir GmbH & Co. KG is not responsible for any
occurring malfunctions. If you do not understand parts of this manual, please contact the customer service. getAir GmbH &
Co. KG reserve the right in the interest of continuous development to alter any or all specifications without prior notice.
All rights reserved. This documentation and any parts of the documentation may not be reprinted or copied, either via electronic or mechanical means, without our express permission.
SmartFan X
22 getAir
Installation and Operating Guide
getAir GmbH & Co. KG
Krefelder Straße 670
41066 Mönchengladbach
Deutschland
E-Mail: [email protected]
Website: www.getair.eu