1
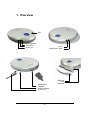
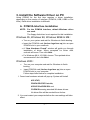
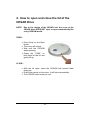
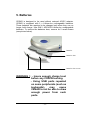
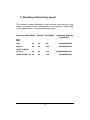
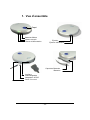
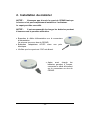
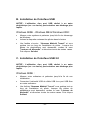
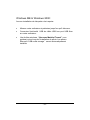
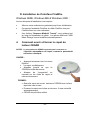
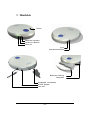
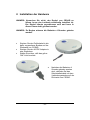
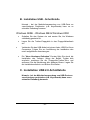
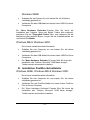
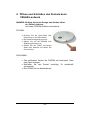
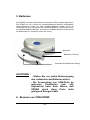
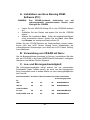
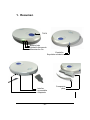
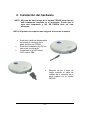
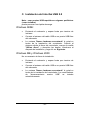
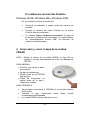
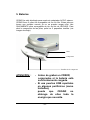
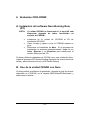
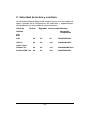
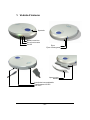
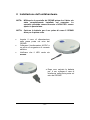
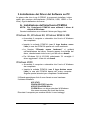
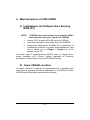
CESAR MPM
USER GUIDE
VER 1.0
100 831
Install Guide – English ......................................p. 2
Guide d'installation – Français ....................... p. 15
Betriebsanleitung – Deutsch .......................... p. 28
Manual del usuario – Español ........................ p. 42
Manual dell’ utilizzatore – Italiano .................. p. 56
-1-
Quick Start Guide
Contents
1.
Overview ....................................................... 5
2.
Install the Hardware ...................................... 6
3.
Install the Software Driver on PC :
A. PCMCIA Interface Installation ................... 7
B. USB Interface Installation ......................... 8
C. USB 2.0 Interface Installation ................... 8
D. FireWire Interface Installation ................... 9
4.
How to open and close the lid of the
CESAR Drive .............................................. 10
5.
Batteries ...................................................... 11
6.
CDR-CRDRW burning :
A. Install the Nero Burning ROM Software (PC) .. 12
B. Using CESAR with Nero ................................. 12
C. Reading and burning speed............................ 13
7.
Customer Support ....................................... 14
CLASS 1 LASER PRODUCT
DANGER INVISIBLE LASER RADIATION WHEN OPEN.
AVOID DIRECT EXPOSURE TO BEAM.
-2-
Warranty and Limited Liability
This product is sold with a limited warranty and specific remedies are available
to the original purchaser in the event the product fails to conform to the limited
warranty. Manufacturer’s liability may be further limited in accordance with its
sales contact.
In general, the manufacturer shall not be responsible for product damages
caused by natural disasters, fire, static discharge, misuse, abuse, neglect,
improper handling or installation, unauthorised repair, alteration or accident.
In no event shall the manufacturer be liable for loss of data stored on disk
media.
MANUFACTURER SHALL NOT BE LIABLE FOR ANY SPECIAL,
INCIDENTAL OR CONSEQUENTIAL DAMAGES. EVEN IF INFORMED OF
THE POSSIBILITY THEREOF IN ADVANCE.
Please see your sales contract for a complete statement of warranty rights,
remedies and limitation of liability.
Further, the warranty does not apply to:
•
Damages or problems resulting from misuse, abuse, accident, alteration
or incorrect electrical current or voltage.
•
Any product with a tampered-with or damaged warranty seal or serial
number label.
•
•
Any product without a warranty or serial number label.
Any batteries and all consumable items delivered with or in the
equipment..
Warnings and Safety Instructions
CAUTION
To prevent risks of electric shock, this unit must only be opened by qualified
service personnel.
Power off and disconnect the power supply cable before opening the unit.
WARNING
§
To prevent fire or shock hazard, do not expose the unit to rain or
moisture.
§
Use of this product is for personal use only. Copying CDs or downloading
music files for sale or other business purposes is or may be a violation of
copyright law.
-3-
FCC Warning Statement
FCC Compliance
This equipment has been tested and found to comply with the requirements
for a class B digital device pursuant to Part 15 of the FCC regulations. These
requirements are designed to provide reasonable protection against harmful
interference in a residential area. This equipment generates, uses and can
radiate radio frequency energy. If not installed and used in accordance with
the manufacturer’s instructions, it may cause harmful interference to radio
communications. However, there is no guarantee that interference will not
occur in a particular environment. If this equipment does cause harmful
interference, to radio or television reception which can be determined by
turning the equipment on and off. The user is advised to try to correct the
interference by one or more of the following methods :
•
•
•
•
Reorient or relocate the receiving unit's antenna;
Increase the distance between the equipment and the receiver;
Connect the equipment to a different power outlet other than the one
where the receiver is connected;
Consult a certified television or radio technician for assistance.
CAUTION :
Any changes or modifications not expressly approved by the
manufacturer of this device will void the user's authority to
operate the equipment.
FCC Part 15 - Operation is subject to the following two conditions:
1. This device may not cause harmful interference;
2. This device must accept any interference received including interference
that may cause undesired operation.
Copyright Notice
Copyright ARCHOS © 2001 - All rights reserved.
This document may not, in whole or part, be copied, photocopied, reproduced,
translated or reduced to any electronic medium or machine-readable form
without prior consent, in writing, from ARCHOS. Windows 95, Windows 98,
Windows 98 SE, Windows Me, Windows 2000, Windows XP, Mac OS are
trademarks of Microsoft Corporation and Apple Inc. All rights reserved. All
brands and products names are registered trademarks and the property of
their respective owners. Specifications are subject to change without
notification. Errors and omissions excepted. Images and illustrations may not
always match contents.
-4-
1. Overview
LID
Low Batteries
Drive Busy
Power On
Eject
Mechanical eject
Swappable
Interface
AC/DC adapter
LINE OUT
-5-
Batteries
door
Batteries
2. Install the Hardware
NOTE: DO NOT try to open the lid of the CESAR until the drive is
fully installed into a computer. The lid may be locked and
CANNOT be opened at this stage.
NOTE : First use require 4 hours of Batteries charging.
•
•
•
Plug in the power cable into the
Power Socket at the back of your
CESAR.
Plug the AC/DC adpter into
anelectrical outlet.
Verify that the green “ON” LED is turn
ON.
• After 4 hours of batteries charging,
connect the interface cable to the
connector at the back of the
CESAR drive.
-6-
3..Install the Software Driver on PC
Using CESAR for the first time requires a driver installation,
depending on the version of interface (PCMCIA, USB, USB2 or Fire
Wire). Each driver installation is different.
A. PCMCIA Interface Installation
NOTE : For the PCMCIA interface, default Windows driver
are used.
The floppy disk driver is not required for this installation.
Windows 95, Windows 98, Windows 98SE & ME :
• Turn on your system and wait for Windows to finish booting.
• Insert the PCMCIA card (Archos logo face up) into an open
PCMCIA slot in your notebook.
• A “New Hardware Found” window will guide you through
installation of driver. When prompted for driver disk,
uncheck all boxes. Then click Next.
• For Windows 98 (4.10.1998) choose “The updated driver
recommended” and click Next:
Windows 2000 :
•
Turn on your computer and wait for Windows to finish
booting.
•
Insert PCMCIA card (Archos logo face up) into an open
PCMCIA slot in your computer.
Follow steps listed below to complete installation:
1. Found new hardware wizard will pop up. System will install
ARC ATAPI,
PCMCIA IDE/ATAPI Controller,
ARCHOS SlimCDRW 8824 and
CD-ROM Drive using standard Windows drivers.
No driver files will be needed from Archos.
2. You must restart your computer before the new settings will take
effect.
-7-
B. USB Interface Installation
NOTE : using USB ports repeated on some peripherals
(such as keyboards).
May cause quick discharge.
Windows 98SE - Windows ME & Windows 2000 :
•
Turn on your system and wait for Windows to finish booting.
•
Insert the driver floppy disk into the floppy disk Drive
•
Insert USB cable to an open USB port on your computer.
Follow steps listed below to complete installation:
•
A “New Hardware Found” window will guide you through
installation of driver. When prompted for driver disk, Check
"Floppy disk drives” box, and uncheck all other boxes. Insert
Install Disk in floppy drive then click Next.
C. USB 2.0 Interface Installation
NOTE : using USB ports repeated on some peripherals
(such as keyboards).
May cause quick discharge.
Windows 98SE :
•
Turn on your computer and wait until it has finished booting.
•
Connect USB end of USB cable to a free USB port on your
computer
•
A “New Hardware Found” window will guide you through
installation of driver. When prompted for driver disk, Check
"Floppy disk drives” box, and uncheck all ot
-8-
Windows ME & Windows 2000 :
No install disk is needed.
•
Turn on your computer and wait until it has finished booting.
•
Connect USB end of USB cable to a free USB port on your
computer
•
A “New Hardware Found” window will guide you through
installation of driver. Microsoft “USB Mass storage” drivers will
be automatically installed.
D. FireWire Interface Installation
Windows 98SE, Windows ME & Windows 2000 :
No install disk is needed.
•
Turn on your computer and wait until it has finished booting.
•
Connect FireWire end of FireWire cable to a free FireWire port
on your computer
•
A “New Hardware Found” window will guide you through
installation of driver. Microsoft “USB Mass storage” drivers will
be automatically installed.
-9-
4. How to open and close the lid of the
CESAR Drive
NOTE: Due to the design of the CESAR unit, the cover of the
CESAR drive DOES NOT eject or open automatically like
a tray CDROM would.
OPEN :
• Press firmly on the Eject
button.
• The cover will unlock.
• Wait until the CDROM
stops spinning.
• Grasp the “TABS” on
both sides of the lid and
gently lift up.
CLOSE :
• With the lid open, insert the CDROM with printed label
facing up.
• Push down gently on the cover. It will lock automatically.
• The CESAR is now ready for use.
- 10 -
5. Batteries
CESAR is designed to be used without external AC/DC adapter.
CESAR is equipped with 2 x Lithium-Ion rechargeable batteries.
These batteries are required to be changed only when they can no
longer hold charge. Use ONLY ARCHOS Lithium-Ion rechargeable
batteries. To remove the batteries door, remove its 2 small screws
(see picture below).
Batteries
Batteries door
Batteries door screws
WARNING ! : - Insure enough charge level
before any CDR/W burning.
- Using USB ports repeated
on some peripherals (such as
keyboards),
may
cause
CESAR to not be able to draw
enough power from such
ports.
- 11 -
6. CDR-CDRW burning
A. Install the Nero Burning ROM Software
(PC)
NOTE:
•
•
•
The CESAR drive will not operate if the cover is
NOT in the locked position after inserting a
CDROM media.
Insert the ARCHOS setup CD into the CDROM drive.
Close the cover and wait for the CDROM to spin up.
Choose Nero installation. If the software installation
program does not start automatically, click Start, click
Run, and Browse to the asetup.exe file on the CD.
If you wish to use the CD-RW writer as a floppy drive, you can install
InCD Packet Writing by repeating the instructions above and by
choosing the InCD Packet Writing icon.
B. Using CESAR with Nero
In order to use the burning software, please refer to the user’s guide
available on CD-ROM in the folder \NERO\Nero55\Quickstart and
choose your language.
- 12 -
C. Reading and burning speed
The maximum speed depends on the interface used (see the chart
below), as well as on the configuration of your computer, and notably
on the performance of the communication ports.
Interface Cable Write
Rewrite Read Max
Operating Systems
Supported
PC
USB
4X
4X
6X
W98SE/ME/2000
USB 2.0
8X
8X
24X
W98SE/ME/2000
16-BIT PCMCIA/
PC Card
8X
8X
12X
W98/98SE/ME/2000
FireWire/IEEE 1394 8X
8X
24X
W98SE/ME/2000
- 13 -
7. Customer Support
If you need help with your CESAR drive, contact the place of
purchase.
If you need additional help you may contact Archos directly via
the Web or by phone.
USA-Canada-Asia
Europe
Archos, Inc.
15375 Barranca Parkway
Suite J 101
Irvine, CA 92618
Archos S.A.
12, rue Ampère
91430 Igny - France
Phone: (949) 453-1121
Fax : (949) 453-1139
Phone : 00 800 123400
[email protected] [email protected]
http://www.archos.com
- 14 -
Guide d’installation rapide
Table des matières
1.
Vue d’ensemble.............................................18
2.
Installation du matériel ..................................19
3. Installation des pilotes du périphérique
dans le PC :
A. Installation de l’Interface PCMCIA.............20
B. Installation de l’Interface USB ...................22
C. Installation de l’Interface USB 2.0 .............22
D. Installation de l’Interface FireWire.............24
4.
Comment ouvrir et fermer le capot du lecteur
CESAR .........................................................24
5.
Batteries ........................................................25
6.
Gravure de CDR-CRDRW :
A. Installation du logiciel ...............................26
B. Nero Burning ROM(PC)
Utiliser CESAR avec Nero .......................26
C. Vitesse de lecture et de gravure ...............26
7.
Support client ………….………… .................27
APPAREIL A LASER DE CLASSE 1
ATTENTION RADIATION DU FAISCEAU LASER INVISIBLE EN CAS
D’OUVERTURE. EVITER TOUTE EXPOSITION AUX RAYONS.
- 15 -
Conformité FCC
Cet équipement a été testé et prouvé conforme aux exigences d’un appareil
numérique de classe B selon l’Article 15 du règlement FCC. Ces exigences
sont conçues pour fournir une protection suffisante contre toute interférence
nuisible dans une zone résidentielle. Cet équipement génère, utilise et peut
émettre de l’énergie à radiofréquence. S’il n’est pas installé et utilisé selon les
instructions du fabricant, il peut provoquer des interférences nuisibles avec les
communications radio. Cependant, il n’existe aucune garantie que ces
interférences ne puissent survenir dans un environnement particulier. Si cet
équipement occasionne des interférences nuisibles à la réception de radio ou
de télévision (déterminé par la mise sous et hors tension de l’appareil), il est
conseillé à l’utilisateur d’essayer de corriger l’interférence à l’aide de l’une des
méthodes suivantes :
•
Réorienter ou replacer l’antenne de l’unité de réception ;
•
Augmenter la distance entre l’équipement et le récepteur ;
•
Connecter l’équipement à une prise électrique différente de celle du
récepteur ;
•
Consulter un technicien certifié de radio ou télévision pour obtenir de
l’aide.
ATTENTION :
tout changement ou modification non autorisée
expressément par le fabricant de cet appareil annulera
l’autorité de l’utilisateur à manipuler l’équipement.
Les articles de loi L44.5 et 44.6 du code de la Santé publique,
modifiés par l’article 2 de la loi du 28 mai 1996 imposent une
puissance acoustique maximale de 100 décibels. Le casque livré
(référence ARCHOS 100200) et l’appareil respectent la législation en
vigueur.(NF/EN 50332-1).
ATTENTION, à pleine puissance, l’écoute prolongée du baladeur
peut endommager l’oreille de l’utilisateur.
Article 15 de la FCC – L’exploitation est sujette aux deux conditions
suivantes :
1. Cet appareil ne doit pas causer d’interférence nuisible ;
2. Cet appareil doit accepter toute interférence de réception, y compris
celles pouvant causer une opération non souhaitée.
- 16 -
Avis de droits d’auteur
Copyright ARCHOS © 2001 – Tous droits réservés.
Tout ou partie de ce document ne peut en aucun cas être copié, photocopié,
reproduit, traduit ou réduit pour tout appareil électronique sans autorisation
écrite préalable de la société ARCHOS. Toutes les marques citées sont des
marques déposées par leurs propriétaires respectifs. Informations données
sous réserve d’erreurs typographiques et susceptibles de modifications sans
préavis. Photos et illustrations non contractuelles.
- 17 -
1. Vue d’ensemble
Capot
Batteries faibles
Lecteur occupé
Témoin d’alimentation
Ejection
Ejection mécanique
Capot des Batteries
Batteries
Interface
interchangeable
Adaptateur AC/DC
Sortie “Line out”
- 18 -
2. Installation du matériel
NOTEZ :
N’essayez pas d’ouvrir le capot du CESAR tant que
le lecteur n'est pas complètement installé sur l’ordinateur.
Le capot peut-être verrouillé.
NOTEZ :
Il est recommandé de charger les batteries pendant
4 heures avant la première utilisation.
• Branchez le câble d’alimentation sur le connecteur
d’alimentation.
La prise se trouve au dos du CESAR.
• Branchez l’adaptateur AC/DC dans une prise
électrique.
• Vérifiez que le voyant vert “ON” est allumé.
• Après avoir chargé les
batteries pendant 4 heures,
connectez le câble d’interface
sur le connecteur au dos du
CESAR.
- 19 -
3. Installation des pilotes du périphérique
sur le PC
Lorsqu’on utilise CESAR pour la première fois, il faut installer les
pilotes, selon la version de l’interface (PCMCIA, USB, USB2 ou Fire
Wire). Chaque installation de pilote est différente.
A. Installation de l’Interface PCMCIA
NOTEZ : Pour l’interface PCMCIA, les pilotes Windows sont utilisés
par défaut.
La disquette de pilotes n’est pas requise pour cette installation.
Windows 95, Windows 98, Windows 98SE & ME :
•
Allumez votre système et patientez jusqu’à la fin du Démarrage
de Windows.
•
Insérez la carte PCMCIA (Logo d’Archos vers le haut) dans
un logement ouvert PCMCIA de votre ordinateur portable.
•
Une fenêtre s’ouvrira “Nouveau Matériel Trouvé” et vous
guidera tout au long de l’installation. Lorsque les pilotes du
périphérique sont demandés, décochez toutes les cases. Puis
cliquez Suivant.
•
Pour Windows 98 (4.10.1998) choisissez “Le pilote mis à jour
recommandé ” puis cliquez Suivant:
- 20 -
Windows 2000 :
•
Allumez votre ordinateur et patientez jusqu’à la fin du
démarrage de Windows.
•
Insérez la carte PCMCIA (Logo d’Archos vers le haut) dans
un
logement
ouvert
PCMCIA
de
votre
ordinateur.
Suivez les démarches telles qu’énumérées ci-dessous pour
compléter l’installation:
Le nouveau périphérique trouvé va apparaître. Le système va
installer :
ARC ATAPI,
Contrôleur PCMCIA IDE/ATAPI,
ARCHOS SlimCDRW 8824 et
Lecteur CD-ROM utilisant des pilotes Windows standard.
Aucun fichier pilote de périphérique ne sera requis.
Vous devez redémarrer votre ordinateur avant que les nouveaux
paramètres ne se mettent en place.
- 21 -
B. Installation de l’Interface USB
NOTEZ : L’utilisation d’un port USB chaîné à un autre
périphérique (ex : un clavier) peut entraîner une décharge plus
rapide.
Windows 98SE - Windows ME & Windows 2000 :
•
Allumez votre système et patientez jusqu’à la fin du démarrage
de Windows.
•
Insérez la disquette contenant les pilotes dans le lecteur
•
Une fenêtre s’ouvrira “Nouveau Matériel Trouvé” et vous
guidera tout au long de l’installation du pilote. Lorsque les
pilotes du périphérique sont demandés, cochez la case
"Lecteurs de disquette” et décochez toutes les autres cases.
Puis cliquez Suivant.
C. Installation de l’Interface USB 2.0
NOTEZ : L’utilisation d’un port USB chaîné à un autre
périphérique (ex : un clavier) peut entraîner une décharge plus
rapide.
Windows 98SE :
•
Allumez votre ordinateur et patientez jusqu’à la fin de son
initialisation.
•
Connectez l’extrémité USB du câble USB à un port USB libre
sur votre ordinateur.
•
Une fenêtre “Nouveau Matériel Trouvé” vous guidera tout au
long de l’installation du pilote. Lorsque les pilotes du
périphérique sont demandés, cochez la case "Lecteurs de
disquette” et décochez toutes les autres cases. Puis cliquez
Suivant.
- 22 -
Windows ME & Windows 2000 :
Aucune installation de disquette n’est requise.
•
Allumez votre ordinateur et patientez jusqu’à ce qu’il démarre.
•
Connectez l’extrémité USB du câble USB à un port USB libre
sur votre ordinateur.
•
Une fenêtre windows “Nouveau Matériel Trouvé” vous
guidera tout au long de l’installation du pilote. Les pilotes
Microsoft “USB mass storage ” seront automatiquement
installés.
- 23 -
D. Installation de l’Interface FireWire
Windows 98SE, Windows ME & Windows 2000 :
Aucune disquette d’installation n’est requise.
•
Allumez votre ordinateur et patientez jusqu’à son initialisation.
•
Connectez l’extrémité FireWire du câble FireWire à un port
FireWire libre sur votre ordinateur.
•
Une fenêtre “Nouveau Matériel Trouvé” vous guidera tout
au long de l’installation du pilote. Les pilotes Microsoft “USB
Mass Storage” seront installés automatiquement.
4.
Comment ouvrir et fermer le capot du
lecteur CESAR
NOTEZ: La conception du CESAR ne permet pas l’ouverture ou
l’éjection automatique du capot, comme le permettrait
un lecteur classique.
OUVRIR :
•
Appuyez fermement sur le bouton
Ejection.
•
Le capot se débloquera.
•
Attendez jusqu'à ce que le
CDROM s’arrête de tourner.
•
Attrapez les “Languettes” se
trouvant sur les côtés du capot et
relevez doucement.
FERMER :
• Quand le capot est ouvert, insérez le CDROM avec la face
imprimée vers le haut.
• Poussez le capot vers le bas en douceur. Il sera verrouillé
automatiquement.
• CESAR est prêt à être utilisé.
- 24 -
5. Batteries
CESAR est conçu pour fonctionner sans adaptateur externe AC/DC.
CESAR est équipé de 2 batteries 2 x Lithium-Ion rechargeables.
Ces batteries doivent être uniquement changées lorsqu’elles ne
peuvent plus être chargées. Utiliser UNIQUEMENT les batteries
rechargeables d’ARCHOS en Lithium-Ion. Pour enlever le capot des
batteries, il faut enlever ses 2 petites vis (voir photo ci-dessous).
Batteries
Capot pour
Batteries
Vis du capot pour
Batteries
ATTENTION ! :
- Assurez-vous que le niveau de
charge est suffisant avant chaque
gravure CDR/W.
- L’utilisation d’un port USB chaîné à un
autre périphérique (ex : un clavier) peut
entraîner une décharge plus rapide.
- 25 -
6. Gravure de CDR-CDRW
A. Installation du logiciel Nero Burning ROM
(PC) :
NOTEZ:
•
•
•
Le lecteur CESAR ne pourra pas fonctionner tant
que le capot n’est PAS en position verrouillée après
l’insertion d’un CDROM.
Insérez le CD d’installation d’ARCHOS dans le lecteur de
CDROM.
Fermer le capot et attendez que le CDROM se mette en route.
Choisissez l’installation de Nero. Si le programme d’installation
ne démarre pas automatiquement, cliquez
Démarrez, cliquez Exécuter, et Naviguer vers le fichier
A setup.exe se trouvant sur le CD.
Si vous souhaitez utiliser le graveur CD-RW comme un lecteur de
disquettes, vous pouvez installer InCD Packet Writing en répétant
les instructions ci-dessus et en choisissant l’icône InCD Packet
Writing.
B. Utiliser CESAR avec Nero :
Pour utiliser le logiciel de gravure, veuillez vous référer svp au guide
d’installation
disponible
sur
CD-ROM
dans
le
fichier
NERO\Nero55\Quickstart\ et choisissez votre langue.
C. Vitesse de lecture et de gravure :
La vitesse maximum dépend de l’interface utilisée (voir tableau cidessous), ainsi que de la configuration de votre ordinateur, et
notamment de la performance des ports de communication.
Câble
d’Interface
Graver
Réinscrire
Lire Max
Systèmes
d’exploitation
Supportés
PC
USB
4X
4X
6X
W98SE/ME/2000
USB 2.0
8X
8X
24X
W98SE/ME/2000
Carte PCMCIA /
PC 16-BIT
8X
8X
12X
FireWire/IEEE 1394 8X
8X
24X
- 26 -
W98/98SE/ME/2000
W98SE/ME/2000
7. Support client
Si vous avez besoin d’aide pour votre unité CESAR, veuillez
contacter votre revendeur.
Si vous souhaitez une aide supplémentaire, veuillez vérifier d’abord
sur le site web d’Archos la rubrique FAQ (Frequently Asked
Questions) et préparer le numéro de série avant de contacter
ARCHOS directement par téléphone.
USA-Canada-Asia
Europe
Archos, Inc.
15375 Barranca Parkway
Suite J 101
Irvine, CA 92618
Archos S.A.
12, rue Ampère
91430 Igny - France
Phone: (949) 453-1121
Fax : (949) 453-1139
Phone : 00 800 123400
[email protected] [email protected]
http://www.archos.com
- 27 -
Quick Start Anleitung
Inhalt
1. Überblick .........................................................32
2. Installation der Hardware ................................33
3. Installation des Software-Treibers auf den PC:
A. Installation PCMCIA-Schnittstelle ...............34
B. Installation USB-Schnittstelle ......................36
C. Installation USB 2.0 -Schnittstelle................36
D. Installation FireWire -Schnittstelle ...............37
4. Öffnen und Schließen des Deckels vom
CESAR-Laufwerk ............................................38
5. Batterieen ........................................................39
6. Brennen von CDR-CRDRW
A. Installation von Nero Burning ROM-Software
(PC) .................................................................. 40
B. Verwendung von CESAR mit Nero .............. 40
C. Les- und Brenngeschwindigkeit................... 40
7. Kundendienst………….………….................... ...41
LASER KLASSE 1
VORSICHT: INSICHTBARE LASERSTRAHLUNG WENN ABDECKUNG.
GEÖFFNET NICHT DEM STRAHL AUSSETSEN
- 28 -
Garantie und beschränkte Haftung
Diese Erzeugnis wird mit einer beschränkten Garantie verkauft, und für den
Erstkäufer sind für den Fall, dass das Erzeugnis der beschränkten Garantie
nicht entspricht, spezifische Abhilfsmaßnahmen erhältlich. Die Haftung des
Herstellers kann außerdem dem Kaufvertrag entsprechend eingeschränkt
werden.
Ganz allgemein ist der Hersteller nicht verantwortlich für Schäden, die durch
Naturkatastrophen, Brand, statische Entladungen, falsche Benutzung,
Missbrauch, Nachlässigkeit, ungeeignete Handhabung oder Installation, nicht
genehmigte Reparaturen, Abänderung oder Unfall entstehen.
Auf keinen Fall kann der Hersteller für den Verlust von Daten haftbar gemacht
werden, die auf Plattenmedien gespeichert worden sind.
DER HERSTELLER IST NICHT HAFTBAR FÜR IRGENDWELCHE
BESONDEREN, ZUFÄLLIGEN ODER FOLGESCHÄDEN, AUCH WENN ER
ÜBER DEREN MÖGLICHKEIT VORAB INFORMIERT WORDEN IST.
Bitte entnehmen Sie Ihrem Kaufvertrag die vollständige Ausführung der
Garantieansprüche, Abhilfen und Beschränkung der Haftung.
Darüber hinaus ist die Garantie nicht anwendbar auf :
•
•
•
•
Schäden oder Probleme, die durch falsche Benutzung, Missbrauch,
ungeeignete Handhabung, Abänderung oder falschen elektrischen Strom
oder Spannung entstehen.
Jedes Erzeugnis mit einem gefälschten oder beschädigten
Garantiesiegel oder Seriennummer-Zeichen.
Jedes Erzeugnis ohne Garantiesiegel oder Seriennummer-Zeichen.
Der Batterien und aller mitgelieferten Verbrauchsmaterialien
Warn- und Sicherheitshinweise
ACHTUNG
Zur Vermeidung von Elektroschocks darf diese Einheit nur von qualifiziertem
Dienstpersonal geöffnet werden.
Die Einheit vor dem Öffnen ausschalten und das Stromversorgungskabel
herausziehen.
- 29 -
WARNUNG
§
Zur Vermeidung von Brand oder Berührungsgefahr darf die Einheit
nicht Regen oder Feuchtigkeit ausgesetzt werden.
§
Der Gebrauch dieses Erzeugnisses ist dem persönlichen Bedarf
vorbehalten. Das Kopieren von CDs oder Herunterladen von
Musikdateien für den Verkauf oder andere Geschäftszwecke stellt eine
Verletzung der Urhebergesetze dar oder kann sie darstellen.
FCC-Warnerklärung
FCC-Genehmigung
Diese Einrichtung ist getestet und für übereinstimmend mit den
Anforderungen für die B-Klasse von digitalen Geräten erklärt worden, die eine
Weiterführung von Teil 15 der FCC-Verordnungen ist. Diese Anforderungen
sind dazu bestimmt, um einen vernünftigen Schutz gegen schädliche
Interferenzen und einem Wohngebiet zu vermeiden. Diese Einrichtung
erzeugt, nutzt Radiofrequenzenergie und kann sie ausstrahlen. Sollte sie nicht
in Übereinstimmung mit den Herstellervorschriften installiert und benutzt
werden, kann sie schädliche Interferenzen auf Funkverbindungen hervorrufen.
Es wird jedoch nicht garantiert, dass es in einer besonderen Umgebung nicht
zu Interferenzen kommen kann. Sollte diese Einrichtung schädliche
Interferenzen auf den Radio- oder Fernsehempfang hervorrufen, die durch
das Ein- und Ausschalten des Gerätes festgestellt werden können, wird der
Benutzer darauf hingewiesen, dass er versuchen kann, der Interferenz durch
die eine oder andere der folgenden Methoden Abhilfe zu schaffen :
• Die Antenne der Empfangseinheit neu ausrichten oder versetzen;
• Den Abstand zwischen dem Gerät und dem Empfänger vergrößern;
• Das Gerät an einen anderen Stromanschluss als den des Empfängers
anschließen;
• Einen Fachmann für Fernsehen oder Rundfunk zu Rate ziehen.
ACHTUNG: Jede Umwandlung oder Veränderung, die nicht ausdrücklich vom
Hersteller des Gerätes genehmigt worden sind, hebt die
Benutzungsgenehmigung für die Bedienung dieser Einrichtung
auf.
- 30 -
FCC Teil 15 – Der Betrieb ist den folgenden beiden Bedingungen
unterworfen:
Dieses Gerät darf keine schädlichen Interferenzen erzeugen;
Dieses Gerät muß jede empfangene Interferenz ertragen können,
einschließlich der Interferenzen, die ungewünschten Betrieb verursachen.
Copyright-Anmerkung
Copyright ARCHOS © 2001 - Alle Rechte vorbehalten.
Dieses Dokument darf ohne vorherige schriftliche Genehmigung durch
ARCHOS weder ganz noch teilweise kopiert, fotokopiert, nachgedruckt,
übersetzt oder für irgendein elektronisches Medium oder eine
maschinenlesbare Form
gekürzt werden. Alle Warenzeichen und
Produktnamen sind die eingetragenen Warenzeichen ihrer jeweiligen
Besitzer. Technische Änderungen vorbehalten. Die hier verwendeten
Fotos und Abbildungen können vom tatsächlichen Inhalt abweichen.
- 31 -
1. Überblick
Deckel
Batterieen schwach
Laufwerk in Betrieb
Strom an
Eject
Mechanisches Eject
Batterieen Öffnung
Batterieen
Swappable Schnittstelle
AC/DC Adapter
Line OUT
- 32 -
2. Installation der Hardware
HINWEIS: Versuchen Sie nicht, den Deckel von CESAR zu
öffnen, bevor das Laufwerk vollständig installiert ist.
Der Deckel könnte verschlossen sein und kann in
dieser Phase nicht geöffnet werden.
HINWEIS: Zu Beginn müssen die Batterien 4 Stunden geladen
werden.
•
•
•
Stecken Sie das Zufuhrkabel in die
dafür vorgesehene Buchse auf der
Rückseite von CESAR.
Stecken Sie den AC/DC-Adapter in
eine Steckdose.
Stellen Sie sicher, daß das grüne
"AN"-Licht leuchtet.
•
- 33 -
Nachdem die Batterien 4
Stunden geladen worden
sind, vebinden Sei das
Schnitstellenkabel mit dem
Verbindungsstecker auf der
Rückseite von CESAR.
3. Installieren des Softwaretreibers auf dem PC
Die erste Verwendung von CESAR erfordert je nach
Schnittstelle(PCMCIA, USB, USB2 or Fire Wire) die Installierung
eines Treibers. Jede Treiberinstallation ist anders.
A. Installation PCMCIA-Schnittstelle
HINWEIS: Bei der Installation von PCMCIA ist ein Default
Windows-Laufwerk erforderlich.
Das Floppydisklaufwerk wird bei der Installation nicht gebraucht.
Windows 95, Windows 98, Windows 98SE & ME:
• Stellen Sie Ihren Computer ein und warten Sie, bis er
vollständig gestartet ist.
• Legen Sie die PCMCIA-Karte (Archos-Logo nach oben) in
einen freien PCMCIA-Schlitz Ihres Notebooks.
• Ein "Neue Hardware Gefunden"-Fenster erscheint und
führt Sie durch die Installation des Treibers.
Wenn der Befehl Treiberdisk erscheint, entfernen
Sie die Markierung von allen Boxen und klicken Sie Weiter.
• Bei Windows 98 (4.10.1998) wählen Sie "Neuester Treiber
empfohlen" und klicken Sie Weiter:
- 34 -
Windows 2000:
•
Stellen Sie Ihren Computer an und warten Sie, bis Windows
vollständig heraufgefahren ist.
•
Legen Sie die PCMCIA-Karte (Archos-Logo nach oben)
in einen freien PCMCIA-Schlitz ihres Computers ein.
Zur kompletten Installation befolgen Sie die folgenden Schritte:
Der Neue-Hardware-Gefunden-Wizard
installiert:
erscheint.
Das
System
ARC ATAPI,
PCMCIA IDE/ATAPI Controller,
ARCHOS SlimCDRW 8824 und
CD-ROM Drive bei normalen Windowstreibern.
Es ist keine Treiberdatei von Archos erforderlich.
Bevor die Neuenstellungen aktiviert werden, müssen Sie den
Computer neu starten.
- 35 -
B. Installation USB - Schnittstelle
Hinweis - bei der Mehrfachverwendung von USB-Ports an
verschiedenen Peripherien (z.B. Keyxboards) kann es zu
schneller Entladung kommen.
Windows 98SE - Windows ME & Windows 2000
•
Schalten Sie das System ein und warten Sie, bis Windows
vollständig gestartet ist.
•
Legen Sie die Treiber-Floppydisk in das Floppydisklaufwerk
ein
•
Verbinden Sie das USB-Kabel mit einem freien USB-Port Ihres
Computers. Folgen Sie zur Ausführung der Installation den
unten aufgeführten Anweisungen:
•
Ein "Neue Hardware Gefunden"-Fenster führt Sie durch die
Installation des Treibers. Wenn der Befehl Treiber disk
erscheint, markieren Sie die "Floppydisk-Treiber"-Box, und
entfernen Sie die Markierung aller anderen Boxen. Legen Sie
die Installationsdisk ein und klicken Sie Weiter.
C. Installation USB 2.0-Schnittstelle
Hinweis : bei der Mehrfachverwendung von USB-Ports an
verschiedenen peripherien (z.B. Keyxboards) kann es zu
schneller Entladung kommen.
- 36 -
Windows 98SE:
•
Schalten Sie das System ein und warten Sie, bis Windows
vollständig gestartet ist.
•
Verbinden Sie das USB-Kabel mit einem freien USB-Port Ihres
Computers.
Ein "Neue Hardware Gefunden"-Fenster führt Sie durch die
Installation des Treibers. Wenn der Befehl Treiber disk erscheint,
markieren Sie die "Floppydisk-Treiber"-Box, und entfernen Sie die
Markierung aller anderen Boxen. Legen Sie die Installationsdisk ein
und klicken Sie Weiter.
Windows ME & Windows 2000:
Es ist keine Installationsdisk erforderlich.
•
Schalten Sie den Computer ein und warten Sie, bis dieser
vollständig gestartet ist.
•
Verbinden Sie das USB-Kabel mit einem freien USB-Port Ihres
Computers.
•
Ein "Neue Hardware Gefunden"-Fenster führt Sie durch die
Installation des Treibers. Microsoft "USB Mass storage"Treiber werden automatisch installiert.
D. Installation FireWire-Schnittstelle
Windows 98SE, Windows ME & Windows 2000:
Es ist keine Installationsdisk erforderlich.
•
Schalten Sie den Computer ein und warten Sie, bis dieser
vollständig gestartet ist.
•
Verbinden Sie das FireWire-Kabel mit einem freien FireWirePort an Ihrem Computer.
•
Ein "Neue Hardware Gefunden"-Fenster führt Sie durch die
Installation des Treibers. Microsoft "USB Mass storage"Treiber werden automatisch installiert.
- 37 -
4. Öffnen und Schließen des Deckels beim
CESAR-Laufwerk
HINWEIS: Bedingt durch das Design des Gerätes öffnet
der Deckel nicht wie
bei einem CDROM-Schlitten automatisch.
ÖFFNEN:
• Drücken Sie die Eject-Taste fest.
Press firmly on the Eject button.
• Die Deckelverriegelung löst sich.
• Warten Sie, bis die CDROM zum
Stillstand gekommen ist.
• Greifen Sie die "TABS" auf beiden
Seiten des Deckels und öffnen Sie
ihn vorsichtig.
SCHLIEßEN:
• Bei geöffnetem Deckel die CDROM mit bedruckter Seite
nach oben einlegen.
• Schließen Sie den Deckel vorsichtig. Er verschließt
automatisch.
• Der CESAR ist nun betriebsbereit.
- 38 -
5. Batterieen
Der CESAR ist auf die Verwendung mit externem AC/DC-Adapter abgestimmt.
Der CESAR ist mit 2 Lithium-Ion wiederaufladbaren Batterien ausgestattet.
Diese Batterieen sollten nur dann wiederaufgeladen werden, wenn sie
vollständig leer sind. Verwenden Sie AUSSCHLIESSLICH ARCHOS-LithiumIon wiederaufladbare Batterien. Zum öffnen des Batterienfaches entfernen Sie
die beiden kleinen Schrauben (siehe Ab. unten).
Batterieen
Batterieen Öffnung
Sch Schrauben der Batterieen Öffnung
ACHTUNG! :
- Stellen Sie vor jedem Brennvorgang
den Ladestatus der Batterien sicher.
- Die Verwendung von USB-Ports an
mehreren
Peripherien
(wie
z.B.
Keyboards) kann dazu führen, daß
CESAR durch diese Ports nicht
genügend Energie erhält.
6. Brennen von CDR-CDRW
- 39 -
A. Installation von Nero Burning ROMSoftware (PC):
HINWEIS:
•
•
•
Das CESAR-Laufwerk funktioniert nur mit
ordnungsgemäß geschlossenem Deckel nach
Einlegen der CDROM.
Legen Sie die ARCHOS-Setup-CD in das CDROM-Laufwerk
ein.
Schließen Sie den Deckel und warten Sie, bis die CDROM
startet.
Wählen Sie Installation Nero. Sollte die Installationssoftware
nicht automatisch starten, klicken Sie auf Start, dann Run,
und Browse zur asetup.exe-Datei auf der CD.
Sollten Sie den CD-RW-Brenner als Floppylaufwerk nutzen wollen,
könne nSie das InCD Packet Writing durch Wiederholen der
vorhergehenden Anweisungen und Wahl des InCD Packet WritingIcon installieren.
B. Verwendung von CESAR mit Nero:
Um die Brennersoftware benutzen zu können, konsultieren Sie bitte
das auf CD-ROM in der Datei NERO\Nero55\Quickstart\ verfügbare
Handbuch und wählen Sie Ihre Sprache.
C. Les- und Brenngeschwindigkeit:
Die Höchstgeschwindigkeit hängt sowohl von der verwendeten
Schnittstelle (siehe Tabelle unten), als auch von der Konfiguration
Ihres Computers sowie in hohem Maße von der Leistungsfähigkeiten
der Ports ab.
Schnittstellekabel/ Schreiben/ Überschreieben/Lesen/ Max unterstützte
Anwendungssysteme
PC
USB
4X
4X
6X
W98SE/ME/2000
USB 2.0
8X
8X
24X
W98SE/ME/2000
16-BIT PCMCIA/
PC Card
8X
8X
12X
W98/98SE/ME/2000
FireWire/IEEE 1394 8X
8X
24X
W98SE/ME/2000
- 40 -
7. Kundendienst
Wenn Sie Hilfe für Ihre CESAR-Einheit brauchen, wenden Sie sich
bitte an Ihren Händler.
Wenn Sie zusätzliche Hilfe benötigen, Bei Fragen empfehlen wir
unsere Archos-FAQ-Webseite.
Wenn Sie sich telefonisch an ARCHOS wenden möchten, halten Sie
bitte Ihre Seriennummer bereit.
USA-Canada-Asia
Europe
Archos, Inc.
15375 Barranca Parkway
Suite J 101
Irvine, CA 92618
Archos S.A.
12, rue Ampère
91430 Igny - France
Phone: (949) 453-1121
Fax : (949) 453-1139
Phone : 00 800 123400
[email protected] [email protected]
http://www.archos.com
- 41 -
GUåA DE INSTALACIÓN RÁPIDA
Índice
1.
Resumen ................................................... 46
2.
Instalación del hardware............................ 47
3.
Instalación del software del controlador en
el PC:
A. Instalación del interfaz PCMCIA............ 48
B. Instalación del interfaz USB .................. 49
C. Instalación del interfaz USB 2.0 ............ 50
D. Instalación del interfaz FireWire ............ 51
4.
Cómo abrir y cerrar la tapa de la unidad
CESAR ...................................................... 51
5.
Baterías ..................................................... 52
6.
Grabación CDR-CRDRW :
A. Instalación del software Nero Burning
Rom (PC) .................................................... 53
B. Uso de la unidad CESAR con Nero......... 53
C. Velocidad de lectura y escritura .............. 54
7.
Servicio de atención al cliente .....................55
- 42 -
Garantía y limitación de responsabilidad
Este producto se vende con una garantía limitada, en caso de que el producto
no cumpla con las limitaciones de la garantía el comprador original cuenta
con recursos específicos. La responsabilidad del fabricante puede limitarse
adicionalmente en el contrato de venta.
De manera general, el fabricante no será responsable por los daños
producidos en el producto como consecuencia de desastres naturales, fuego,
descargas estáticas, utilización inadecuada, abuso, negligencia, manejo o
instalación inadecuado, reparación no autorizada, modificaciones o
accidentes.
El fabricante no será responsable, en ningún caso, por la pérdida de datos
almacenados en discos.
EL FABRICANTE NO SERÁ RESPONSABLE POR DAÑOS Y PERJUICIOS
ESPECIALES O INCIDENTALES. NI SIQUIERA EN EL CASO DE QUE SEA
INFORMADO CON ANTERIORIDAD DE LA POSIBILIDAD DE QUE
OCURRAN.
Le rogamos lea su contrato de venta para conocer con mayor detalle los
derechos de la garantía, recursos y limitaciones de responsabilidad.
La garantía tampoco cubre :
•
•
•
•
Daños o problemas consecuencia de utilización inadecuada, abuso,
accidente, modificaciones, o corriente o voltaje incorrecto.
Productos que hayan sido manipulados, o cuyo sello de garantía o
etiqueta de número de serie esté dañado.
Productos que no presenten etiqueta de garantía o número de serie.
Las baterías y todos los consumibles incluidos con el dispositivo.
Advertencias y recomendaciones de seguridad
PRECAUCIÓN
Para evitar el riesgo de descarga eléctrica, la unidad debe ser abierta
únicamente por personal de servicio cualificado.
Apague y desconecte el cable de suministro eléctrico antes de abrir la
unidad.
- 43 -
ADVERTENCIA
•
•
Para evitar la posibilidad de incendio o descarga eléctrica, no maneje la
unidad bajo la lluvia ni en lugares húmedos.
Este producto es para uso personal. Copiar CD o descargar archivos de
música para su venta posterior u otras actividades comerciales es o
puede ser una violación de las leyes de derechos de reproducción.
Advertencias de la FCC
Conformidad con las normativas de FCC
Este equipo ha sido probado y cumple con las normas para aparatos
digitales de Clase B, según lo establecido en la disposición 15 de la
normativa de la FCC. Estos límites han sido fijados para proporcionar una
protección razonable contra interferencias perjudiciales en instalaciones
residenciales. Este equipo genera, utiliza y puede irradiar energía
radioeléctrica, y si no es instalado y utilizado según las instrucciones, puede
causar interferencias perjudiciales en las comunicaciones de radio. De
cualquier manera, no existe garantía de que no ocurran interferencias en
una instalación particular. En caso de que este equipo causara
interferencias perjudiciales en la recepción de la señal de radio o televisión,
lo que puede comprobarse encendiéndolo y apagándolo, se sugiere al
usuario que intente corregir la interferencia siguiendo una de las siguientes
medidas:
•
Cambiar la orientación o la ubicación de la antena receptora de la
unidad.
•
Aumentar la distancia de separación entre el equipo y el receptor.
•
•
Conectar el equipo a un enchufe diferente del utilizado por el receptor.
Solicitar ayuda a un técnico de radio o televisión certificado.
ADVERTENCIA :
Los cambios o modificaciones realizados en este aparato
sin aprobación expresa del fabricante pueden
desautorizar al usuario a operar el equipo
Disposición 15 de la normativa de FCC – La operación está sujeta a
las dos siguientes condiciones :
Este dispositivo no producirá interferencias perjudiciales.
Este dispositivo debe aceptar cualquier interferencia recibida, incluso las que
puedan ocasionar problemas en su operación.
- 44 -
Derechos de autor
Copyright Archos © 2001 – Reservados todos los derechos.
Esta publicación no puede reproducirse, salvaguardarse o transmitirse de
ninguna forma ni por ningún método, ya sea electrónico, mecánico, por
fotocopias, grabación o similares sin el consentimiento previo por escrito de
Archos.
Todas las marcas citadas son marcas registradas por sus propietarios
respectivos. La información suministrada está sujeta a errores de impresión y
puede ser modificada sin previo aviso. Fotos e ilustraciones no contractuales.
PRODUCTO LÁSER CLASE 1
PELIGRO: RADIACIÓN LÁSER NO VISIBLE CUANDO ESTÁSER ABIERTO.
EVITE LA EXPOSICIÓN DIRECTA AL LÁSER.
- 45 -
1. Resumen
TAPA
Batería baja
Unidad funcionando
Alimentación On
Expulsión
Expulsión mecánica
Interfaz
conmutable
Adaptador
- 46 -
Compuerta
pilas
2. Instalación del hardware
NOTA: NO trate de abrir la tapa de la unidad CESAR hasta que no
esté totalmente instalada en el ordenador. Puede que la
tapa esté bloqueada y NO SE PUEDA abrir en este
momento.
NOTA: El primer uso requiere una carga de 4 horas de la batería.
•
•
•
Enchufe el cable de alimentación
en latoma de corriente de la
parte de atrás de CESAR.
Enchufe el adaptador AC/DC en
una to ma de corriente.
Compruebe si el LED verde
"ON" está en ON.
•
- 47 -
Después de las 4 horas de
carga, enchufe el cable de
interfaz en el conector de la
parte trasera de la unidad
CESAR.
3.
Instalación del software del
controlador en el PC
Para usar CESAR por primera vez hay que instalar un controlador
que dependerá de la versión del interfaz (PCMCIA, USB, USB2 o
Fire Wire). La instalación de cada controlador es diferente.
A. Instalación del interfaz PCMCIA
NOTA: Para el interfaz PCMCIA se utilizan los
controladores predeterminados de Windows.
El controlador del disquete no es necesario para la
instalación.
Windows 95, Windows 98, Windows 98SE y ME:
•
Encienda el ordenador y espere hasta que se haya
iniciado el sistema.
•
Inserte la tarjeta PCMCIA (logotipo de Archos hacia
arriba) en una ranura abierta PCMCIA del portátil.
•
La ventana "Nuevo hardware encontrado" le guiará a
través de la instalación del controlador. Cuando el
sistema le pida el disco del controlador, desactive todas
las casillas. Haga clic en Siguiente.
•
Para Windows 98 (4.10.1998) elija “Recomendado
controlador actualizado” y haga clic en Siguiente:
- 48 -
Windows 2000:
•
Encienda el ordenador y espere hasta que se haya
iniciado el sistema.
•
Inserte la tarjeta PCMCIA (logotipo de Archos hacia
arriba) en una ranura abierta PCMCIA del ordenador.
Siga las instrucciones que se detallan a continuación para
hacer la instalación:
Aparecerá el asistente Nuevo hardware encontrado. El sistema
instalará
ARC ATAPI,
Controlador PCMCIA IDE/ATAPI,
ARCHOS SlimCDRW 8824 y
unidad de CD-ROM utilizando los controladores estándar de Windows.
No se necesita ningún archivo de controlador de Archos.
Para que se active la nueva configuración deberá reiniciar el sistema.
B. Instalación del interfaz USB
NOTA : usar puertos USB repetidos en algunos periféricos
(como teclados)
puede provocar una rápida descarga.
Windows 98 SE, Windows ME y Windows 2000:
•
Encienda el ordenador y espere hasta que se haya
iniciado el sistema.
•
Introduzca el disquete en su unidad
•
Conecte el cable USB en un puerto USB libre del
ordenador. Siga las instrucciones que se detallan a
continuación para hacer la instalación:
•
La ventana "Nuevo hardware encontrado" le guiará a
través de la instalación del controlador. Cuando el
sistema solicite el disco del controlador, marque la casilla
"Utilizar disco” y desactive las demás. Introduzca el
disquete de instalación y haga clic en Siguiente.
- 49 -
C. Instalación del interfaz USB 2.0
Nota - usar puertos USB repetidos en algunos periféricos
(como teclados)
puede provocar una rápida descarga.
Windows 98SE:
•
Encienda el ordenador y espere hasta que termine de
iniciarse.
•
Conecte el extremo del cable USB en un puerto USB libre
del ordenador
•
La ventana "Nuevo hardware encontrado" le guiará a
través de la instalación del controlador. Cuando el
sistema solicite el disco del controlador, marque la casilla
"Utilizar disco” y desactive las demás. Introduzca el
disquete de instalación y haga clic en Siguiente.
Windows ME y Windows 2000:
No es necesario el disco de instalación.
•
Encienda el ordenador y espere hasta que termine de
iniciarse.
•
Conecte el extremo del cable USB en un puerto USB libre
del ordenador
•
La ventana "Nuevo hardware encontrado" le guiará a
través de la instalación del controlador. Los controladores
de "almacenamiento masivo USB" se instalan
automáticamente.
- 50 -
D. Instalación del interfaz FireWire
Windows 98 SE, Windows ME y Windows 2000:
No es necesario el disco de instalación.
•
Encienda el ordenador y espere hasta que termine de
iniciarse.
•
Conecte el extremo del cable FireWire en un puerto
FireWire libre del ordenador
•
La ventana "Nuevo hardware encontrado" le guiará a
través de la instalación del controlador. Los controladores
de “almacenamiento masivo USB“ de Microsoft se
instalan automáticamente.
4. Cómo abrir y cerrar la tapa de la unidad
CESAR
NOTA: Debido al diseño de la unidad CESAR, la tapa NO se
expulsa ni se abre automáticamente como una bandeja de
CDROM.
PARA ABRIRLA:
• Presione con fuerza el botón
de expulsión.
• La tapa se desbloquea
• Espere hasta que el CDROM
deje de girar
• Sujete las “Lengüetas” de
ambos lados de la tapa y
súbala con cuidado.
PARA CERRARLA:
•
•
•
Abra la tapa e introduzca el CDROM con la etiqueta mirando
hacia arriba.
Presione la tapa suavemente hacia abajo. Queda
automáticamente bloqueada.
La unidad CESAR está ya lista para su uso.
- 51 -
5. Baterías
CESAR ha sido diseñada para usarla sin adaptador AC/DC externo.
CESAR lleva 2 pilas AA recargables de ión de litio. Estas pilas se
tienen que cambiar cuando ya no se pueden cargar más. Use
ÚNICAMENTE pilas recargables de ión de litio de ARCHOS. Para
abrir la compuerta de las pilas, quite los 2 pequeños tornillos (ver
imagen de abajo).
Pilas
Compuerta
Tornillos de la compuerta
ATENCIÓN: :
- Antes de grabar un CDR/W,
compruebe si la batería está
suficientemente cargada.
- Si usa puertos USB repetidos
en algunos periféricos (como
teclados),
puede
que
CESAR
no
obtenga de ellos toda la
energía que necesita.
- 52 -
6. Grabación CDR-CDRW
A. Instalación del software Nero Burning Rom
(PC)
NOTA:
•
•
•
La unidad CESAR no funcionará si la tapa NO está
bloqueada después de haber introducido un
soporte de CDROM.
Introduzca en la unidad de CD-ROM el CD de
instalación ARCHOS.
Cierre la tapa y espere a que el CDROM empiece a
girar.
Seleccione la instalación de Nero. Si el programa de
instalación no empieza automáticamente, haga clic en
Inicio, Ejecutar y en Examinar para seleccionar el
archivo Setup.exe del CD.
Si desea utilizar la grabadora de CD-RW como una unidad de disco,
instale el paquete InCD Packet Writing siguiendo las instrucciones de
arriba y seleccionando el icono InCD Packet Writing.
B. Uso de la unidad CESAR con Nero
Si desea utilizar el software de grabación, consulte la guía de usuario
disponible en CD-ROM, en la carpeta NERO\Nero55\Quickstart\ y
seleccione su idioma.
- 53 -
C. Velocidad de lectura y escritura
La velocidad máxima depende del interfaz que se use (ver cuadro de
abajo), además de la configuración del ordenador y, especialmente,
del rendimiento de los puertos de comunicaciones.
Cable de
Interfaz
Grabar
Regrabar Lectura máx.Sistemas
operativos
compatibles
PC
USB
4X
4X
6X
W98SE/ME/2000
USB 2.0
8X
8X
24X
W98SE/ME/2000
16-BIT tarjeta
PCMCIA / PC
8X
8X
12X
W98/98SE/ME/2000
FireWire/IEEE 1394
8X
8X
24X
W98SE/ME/2000
- 54 -
7. Servicio de atención al cliente
Si necesita ayuda con su unidad CESAR, póngase en contacto con
su proveedor habitual.
Si necesita ayuda adicional puede consulte primero el sitio web en el
que aparecen las preguntas más frecuentes (FAQ) de Archos.
Tenga listo el número de serie antes de ponerse en contacto
telefónico con ARCHOS.
USA-Canada-Asia
Europe
Archos, Inc.
15375 Barranca Parkway
Suite J 101
Irvine, CA 92618
Archos S.A.
12, rue Ampère
91430 Igny - France
Phone: (949) 453-1121
Fax : (949) 453-1139
Phone : 00 800 123400
[email protected] [email protected]
http://www.archos.com
- 55 -
Guida installazione
rapida
Indice
1.
Veduta d’insieme............................................. 60
2.
Installazione dell’unità hardware ..................... 61
3.
Installazione dei Driver del Software su PC :
A. Installazione dell’interfaccia PCMCIA.......... 62
B. Installazione dell’interfaccia USB ................ 63
C. Installazione dell’interfaccia USB 2.0 .......... 63
D. Installazione dell’interfaccia FireWire.......... 64
5. Chiusura e apertura del CESAR Drive ............... 65
5.
Batterie............................................................ 66
6.
Masterizzazione di CDR-CRDRW :
A. Installazione del Software Nero Burning
ROM (PC) ................................................... 67
B. Usare CESAR con Nero.............................. 67
C. Velocità di lettura e masterizzazione........... 68
7.
Assistenza clienti ....................................................... 1069
PRODOTTO LASER CLASSE 1
PERICOLO : RADIAZIONI LASER INVISIBILI ALL’APERTURA.
EVITARE L’ESPOSIZIONE DIRETTA AL RAGGIO.
- 56 -
Garanzia e responsabilità limitata
Questo prodotto è venduto con una garanzia limitata e le risoluzioni dei
problemi sono disponibili presso il commissionario, nel caso in cui il prodotto
non sarebbe conforme alla garanzia limitata. La responsabilità del fabbricante
potrebbe essere limitata secondo il suo contratto di vendita.
Di regole, il fabbricante non sarà responsabile dei prodotti danneggiati da
disastri naturali, fuoco, scarica statica, uso errato, uso illicito, disuso,
manutenzione o installazione errata, riparazione non autorizzata, alterazione o
accidente.
In nessun caso, il fabbricante potrebbe essere responsabile della perdita dei
dati registrati sul disco fisso.
IL FABBRICANTE NON POTREBBE ESSERE RESPONSABILE DI
QUALSIASI DANNI SPECIALI, INCIDENTALI O INDIRETTI. ANCHE SE
FOSSE INFORMATO IN ANTICIPO DELLE POSSIBILITA.
Vogliate rivolgervi al vostro contratto di vendita per conoscere i diritti della
garanzia, le risoluzioni e il limite della responsabilità.
Pero, la garanzia non è valida per :
•
•
•
•
Danni o problemi risultando da uso errato, uso illicito, accidente, disuso o
collegamento elettrico o voltaggio errato.
Qualsiasi prodotto con un sigillo di garanzia, o un numero di serie
danneggiato o truccato.
Qualsiasi prodotto senza garanzia o numero di serie.
Alle batterie e materiale di consumo consegnati con l’apparecchio
Avvertimenti e istruzioni di sicurezza
ATTENZIONE
Per evitare i rischi di shock elettrico, questo lettore deve essere aperto solo
da personale autorizzato.
Spegnere e scollegare il cavo di alimentazione prima di aprire il lettore.
- 57 -
AVVERTIMENTI
§
§
Per evitare il fuoco o rischi di folgorazione, tenere il lettore al riparo dalla
pioggia e dall’umidità.
Questo prodotto è stato progettato solamente per uso personale. La
riproduzione del CD o lo scaricare file musicali a scopo di rivendita o per
altre attività commerciali è o puo essere una violazione alle leggi sui diritti
d’autore.
Avvertimenti FCC
Conformità FCC
Quest’attrezzatura è stata accertata e risponde ai requisiti dalla classe B dei
dispositivi digitali in conformità alla Parte 15 delle regole FCC. Questi requisiti
sono stati progettati per fornire una protezione efficace contro un’interferenza
dannosa in una zona residenziale. Quest’attrezzatura produce, utilizza e puo
diffondersi nelle frequenze radio. Se non è installata e usata secondo le
istruzioni dal costruttore , potrebbe provocare interferenza dannosa nelle
communicazioni radio. Comunque, non si puo garantire che quest’interferenza
non occorre in un’ambiente particolare. Se quest’attrezzatura provoca
dannosa interferenza alla radio o alla televisione, provate di spegnere
l’attrezzatura. L’utente deve provare di corregere l’interferenza usando uno o
più dei metodi seguenti:
•
•
•
Reorientare o spostare l’antenna del ricevitore;
Aumentare la distanza tra l’attrezzatura e il ricevitore;
Connettere l’attrezzatura a un attacco diverso dall’attacco del ricevitore;
•
Rivolgetevi a un servizio assistenza autorizzato.
ATTENZIONE :
Qualsiasi cambiamento o modifica non autorizzati dal
fabbricante del dispositivo annulla il diritto dell’utente a
lavorare sull’attrezzatura.
FCC Parte 15 – L’operazione è sottoposta alle due condizioni seguenti:
Quest’attrezzatura non deve provocare dannosa interferenza;
Quest’attrezzatura deve ammettere qualsiasi interferenza, incluso interferenza
che potrebbe provocare indesiderata operazione.
- 58 -
Diritti d’autore
Diritti d’autore ARCHOS © 2001 – Tutti i diritti riservati.
E vietato copiare, fotocopiare, riprodurre, tradurre, o ridure totalmente o
parzialmente questo documento usando qualsiasi mezzo elettronico prima di
ottenere l’accordo scritto da ARCHOS. Tutti i marchi citati sono marchi
depositati dai rispettivi proprietari. Le informazioni sono comunicate salvo
errori di tipografia e possono essere modificate senza preavviso. Le fotografie
e le illustrazioni non sono contrattuali.
Tutti i marchi citati sono marchi depositati dai rispettivi proprietari. Le
informazioni sono comunicate salvo errori di tipografia e possono essere
modificate senza preavviso. Le fotografie e le illustrazioni non sono
contrattuali.
La Società ARCHOS dichiara che ha ottemperato alle vigenti disposizioni di
legge sul territorio francese in materia di diritti d'autore, in quanto diretta
proprietaria di tali titoli o in uso a norma di legge.
Pertanto i Compact Disk e i Floppy disk contenuti nella confezione sono
originali ed autentici e possono circolare sul territorio italiano senza ulteriori
adempimenti da parte dell'importatore/distributore.
- 59 -
1. Veduta d’insieme
Sportello
Batterie scariche
Drive funzionante
On/Off
Eject
Eject d'emergenza
Apertura per
batterie
Interfaccia intercambiabile
Trasformatore AC/DC
Line OUT
- 60 -
2. Installazione dell’unità hardware
NOTA: NON aprire lo sportello del CESAR prima che il drive sia
stato completamente installato nel computer. Lo
sportello potrebbe essere bloccato e NON PUO’ essere
aperto in questa fase.
NOTA: Caricare le batterie per 4 ore prima di usare il CESAR
drive per la prima volta.
•
•
•
Inserire il cavo di alimentazione
nella presa posta nel retro del
CESAR.
Collegare il trasformatore AC/DC a
un punto di erogazione di corrente
elettrica.
Verificare che il LED verde sia
acceso.
• Dopo aver caricato le batterie
per 4 ore, collegare il cavo di
interfaccia nella porta posta sul
retro del CESAR.
- 61 -
3. Installazione dei Driver del Software su PC
La prima volta che si usa il CESAR, è necessario installare i driver
adatti alla versione dell’interfaccia (PCMCIA, USB, USB2 o Fire
Wire). Ogni installazione è diversa.
A. Installazione dell’interfaccia PCMCIA
NOTA : Per l’interfaccia PCMCIA sono utilizzati i driver di
default di Windows.
Questa installazione non richiede il driver per floppy disk.
Windows 95, Windows 98, Windows 98SE & ME:
• Accendete il computer e attendete che l’avvio di Windows
sia completato.
• Inserite la scheda PCMCIA (con il logo Archos verso
l’alto) in una slot PCMCIA aperta nel vostro notebook.
• La finestra “Rilevato nuovo hardware” vi guiderà
nell’installazione dei driver. Quando appare la richiesta del
disco, deselezionate tutte le voci, poi fate clic su Avanti.
• Per Windows 98 (4.10.1998) selezionate “Si consiglia il
driver aggiornato” e fate clic su Avanti.
Windows 2000:
• Accendete il computer e attendete che l’avvio di Windows
sia completato.
• Inserite la scheda PCMCIA (con il logo Archos verso
l’alto) in una slot PCMCIA aperta del vostro computer.
Seguite queste istruzioni per completare l’installazione:
Il Wizard apparirà per dirvi di aver rilevato nuovo hardware.
Il sistema installerà:
ARC ATAPI,
PCMCIA IDE/ATAPI Controller,
ARCHOS SlimCDRW 8824 e
CD-ROM Drive con driver standard di Windows.
Non sono necessari file forniti da Archos.
Riavviate il computer per rendere effettivi i nuovi settaggi.
- 62 -
B. Installazione dell’interfaccia USB
NOTA : L'uso di porte USB per diverse periferiche (ad
esempio, la tastiera) può scaricare le batterie con maggiore
velocità.
Windows 98SE - Windows ME & Windows 2000
•
Accendete il computer e attendete che l’avvio di Windows sia
completato.
•
Inserite il floppy disk dei driver nell’apposito drive
•
Inserire il cavo USB in una porta USB aperta nel computer.
Seguite queste istruzioni per completare l’installazione:
•
La finestra “Rilevato nuovo hardware” vi guiderà
nell’installazione dei driver. Quando appare la richiesta del
floppy disk dei driver, selezionate "Floppy disk drives”, e
deselezionate tutto il resto. Inserite il floppy di installazione nel
floppy drive e fate clic su Avanti.
C. Installazione dell’interfaccia USB 2.0
NOTA : L'uso di porte USB per diverse periferiche (ad esempio,
la tastiera) può scaricare le batterie con maggiore velocità.
Windows 98SE:
•
Accendete il computer e attendete che l’avvio di Windows sia
completato.
•
Collegare l’estremità USB del cavo USB a una porta USB del
computer.
•
La finestra “Rilevato nuovo hardware” vi guiderà
nell’installazione dei driver. Quando appare la richiesta del
floppy disk dei driver, selezionate "Floppy disk drives”, e
deselezionate tutto il resto. Inserite il floppy di installazione nel
floppy drive e fate clic su Avanti.
- 63 -
Windows ME & Windows 2000:
Non occorre alcun floppy di installazione.
•
Accendete il computer e attendete che l’avvio di Windows sia
completato.
•
Collegare l’estremità USB del cavo USB a una porta USB del
computer.
•
La finestra “Rilevato nuovo hardware” vi guiderà
nell’installazione dei driver. I driver Microsoft “USB Mass
storage” verranno installati automaticamente.
D. Installazione dell’interfaccia FireWire
Windows 98SE, Windows ME & Windows 2000:
Non occorre alcun floppy di installazione.
•
Accendete il computer e attendete che l’avvio di Windows sia
completato.
•
Collegate l’estremità FireWire del cavo FireWire a una porta
FireWire libera del computer.
•
La finestra “Rilevato nuovo hardware” vi guiderà
nell’installazione dei driver. I driver Microsoft “USB Mass
storage” verranno installati automaticamente.
- 64 -
4. Apertura e chiusura del CESAR Drive
NOTA: Il CESAR Driver è stato progettato senza la funzione di
Eject per lo sportello, che non si apre
automaticamente come nel caso dei lettori per
CDROM.
APERTURA:
• Premere con decisione il
pulsante Eject.
• Lo sportello si sblocca.
• Attendere che il CDROM si
fermi.
• Afferrare
le
linguette
su
entrambi i lati del coperchio e
alzare con cautela.
CHIUSURA:
• Con lo sportello aperto, inserire il CDROM con l’etichetta
stampata rivolta verso l’alto.
• Premere leggermente lo sportello verso il basso. Il blocco
avverrà automaticamente.
• Il CESAR Drive è pronto per l’uso.
- 65 -
5. Batterie
CESAR è progettato per essere utilizzato senza trasformatore AC/DC
esterno. CESAR è dotato di 2 batterie ricaricabili al litio. Queste
batterie devono essere sostituite solo quando non mantengono più la
carica. Utilizzare SOLO BATTERIE ARCHOS al litio ricaricabili. Per
rimuovere l’apertura del vano batterie, svitare le due piccole viti (vedi
disegno).
Batterie
Apertura del
vano batterie
Viti
ATTENZIONE !:
- Assicurarsi che il livello di
carica sia abbastanza alto
prima
di
masterizzare
CDR/W.
- L'uso di porte USB per
diverse periferiche (ad
esempio la tastiera), può
ridurre la quantità di
alimentazione del CESAR
drive dalle porte stesse.
- 66 -
6. Masterizzazione di CDR-CDRW
A Installazione del Software Nero Burning
ROM (PC)
NOTA:
•
•
•
Il CESAR drive non funziona se lo sportello NON è
stato bloccato dopo aver inserito un CDROM.
Inserite il CD di setup ARCHOS nel drive CDROM.
Chiudete lo sportello e attendete l'avvio del CDROM.
Selezionate installazione di Nero. Se il programma di
installazione software non parte automaticamente, fate
clic su Avvio, poi su Esegui, e Sfoglia fino al file
asetup.exe sul CD.
Se volete usare il masterizzatore CD-RW come un floppy drive,
potete installare InCD Packet Writing ripetendo le istruzioni
precedenti e selezionando l’icona InCD Packet Writing.
B. Usare CESAR con Nero
Per poter utilizzare il software di masterizzazione, è possibile fare
riferimento al manuale dell’utente disponibile su CD-ROM nel folder
NERO\Nero55\Quickstart\ selezionando la lingua.
- 67 -
C. Velocità di lettura e masterizzazione:
La velocità massima dipende dall’interfaccia usata (vedi la tabella
sottostante), dalle configurazione del computer, e in particolare dalle
prestazioni delle porte di comunicazione.
PC
USB
4X
4X
6X
W98SE/ME/2000
USB 2.0
8X
8X
24X
W98SE/ME/2000
16-BIT PCMCIA/
PC Card
8X
W98/98SE/ME/2000
FireWire/IEEE 1394 8X
8X
8X
- 68 -
12X
24X
W98SE/ME/2000
7. Servizio Assistenza
Ne necessitate un’aiuto per il vostro cesar, rivolgetevi dal negozio
dove avete comprato il lettore.
Ne necessitate aiuto supplementare, Verificate prima la scheda FAQ
sul sito web.
Prima di telefonare ad ARCHOS, verificate di avere a portata di mano
il numero di serie.
USA-Canada-Asia
Europe
Archos, Inc.
15375 Barranca Parkway
Suite J 101
Irvine, CA 92618
Archos S.A.
12, rue Ampère
91430 Igny - France
Phone: (949) 453-1121
Fax : (949) 453-1139
Phone : 00 800 123400
[email protected] [email protected]
http://www.archos.com
- 69 -