1
DEUTSCH
Siehe Seiten i
bis vi und D-1
bis D-56.
FRANÇAIS
Se reporter aux
pages i à vi et
F-1 à F-56.
ESPAÑOL
1-BIT DIGITAL HEIMKINO
ENSEMBLE HOME CINEMA 1-BIT
SISTEMA 1-BIT PARA HOME CINEMA
1-BIT DIGITAL HEMBIOGRAF
SISTEMA DIGITALE HOME CINEMA A 1 BIT
1-BIT DIGITALE HUISBIOSCOOP
CINEMA FAMILIAR DIGITAL DE 1-BIT
1-BIT DIGITAL HOME CINEMA
MODELL
MODÈLE
MODELO
MODELL
MODELLO
MODEL
MODELO
MODEL
SD-AT50H
BEDIENUNGSANLEITUNG
MODE D’EMPLOI
MANUAL DE MANEJO
BRUKSANVISNING
SDAT50H(H)_FRONT
1
DVD-SPIELER
LECTEUR DVD
REPRODUCTOR DE DVD
DVD SPELARE
LETTORE DVD
DVD-SPELER
APARELHO DE DVD
DVD PLAYER
MODELL
MODÈLE
MODELO
MODELL
MODELLO
MODEL
MODELO
MODEL
DX-AT50H
MANUALE DI ISTRUZIONI
GEBRUIKSAANWIJZING
MANUAL DE OPERAÇÃO
OPERATION MANUAL
02.8.28, 5:36 PM
Consulte las
páginas i a vi
y S-1 a S-56.
SVENSKA
Hänvisa till
sidorna i till vi
och V-1 till V-56.
ITALIANO
Leggere le
pagine i a vi e
I-1 a I-56.
NEDERLANDS
Raadpleeg de
bladzijden i t/m
vi en N-1 t/m N-56.
PORTUGUÊS
Favor consultar
as páginas i a vi e
P-1 a P-56.
ENGLISH
Please refer to
pages i to vi and
E-1 to E-56.
BESONDERE ANMERKUNGEN
REMARQUES SPÉCIALES
NOTAS ESPECIALES
SÄRSKILDA ANMÄRKNINGAR
NOTE PARTICOLARI
BIJZONDERE OPMERKINGEN
NOTAS ESPECIAIS
SPECIAL NOTES
● Dieses Gerät entspricht den Anforderungen der EG-Richtlinien 89/336/
EWG und 73/23/EWG mit Änderung 93/68/EWG.
● Ce matériel répond aux exigences contenues dans les directives 89/336/
CEE et 73/23/CEE modifiées par la directive 93/68/CEE.
● Este aparato satisface las exigencias de las Directivas 89/336/CEE y
73/23/CEE, modificadas por medio de la 93/68/CEE.
● Denna utrustning uppfyller kraven enligt riktlinjerna 89/336/EEC och 73/23/
EEC så som kompletteras av 93/68/EEC.
● Quest’apparecchio è conforme ai requisiti delle direttive 89/336/EEC e 73/
23/EEC, come emendata dalla direttiva 93/68/EEC.
● Dichiarazione di conformità
La società SHARP ELECTRONICS EUROPE GmbH dichiara che il prodotto
SHARP SISTEMA DIGITALE
DIGITALE HOME
HOME CINEMA
CINEMAAA1BIT
1BITSD-AT50H
CON DVD è costruito
in conformità alle prescrizioni del D.M.n˚548 del 28/8/95, pubblicato sulla
G.U.n˚301 del 28/12/95 ed in particolare è conforme a quanto indicato
nell’art. 2, comma 1 dello stesso decreto.
● Dit apparaat voldoet aan de eisen van de richtlijnen 89/336/EEG en 73/23/
EEG, gewijzigd door 93/68/EEG.
● Este equipamento obedece às exigências das directivas 89/336/CEE e
73/23/CEE, na sua versão corrigida pela directiva 93/68/CEE.
● This equipment complies with the requirements of Directives 89/336/
EEC and 73/23/EEC as amended by 93/68/EEC.
● Dette udstyr overholder kravene i direktiv nr. 89/336/EEC og 73/23/EEC
med tillaeg nr. 93/68/EEC.
● Este equipamento obedece às exigências das directivas 89/336/CEE e 73/
23/CEE, na sua versão corrigida pela directiva 93/68/CEE.
● Dette produktet oppfyller betingelsene i direktivene 89/336/EEC og 73/23/
EEC i endringen 93/68/EEC.
● Tämä laite täyttää direktiivien 89/336/EEC ja 73/23/EEC vaatimukset, joita
on muutettu direktiivillä 93/68/EEC.
● Bei Einstellung der ON/STAND-BY-Taste auf STAND-BY ist die
Netzspannung immer noch im Gerät vorhanden.
Wenn die ON/STAND-BY-Taste auf STAND-BY eingestellt wird, kann das
Gerät unter Verwendung der Timer-Betriebsart oder Fernbedienung in
Betrieb gesetzt werden.
Warnung:
In diesem Gerät sind keine vom Benutzer wartbaren Teile vorhanden.
Niemals Abdeckungen entfernen, außer wenn Sie dafür qualifiziert sind. In
diesem Gerät sind gefährliche Spannungen vorhanden. Vor Ausführung
von irgendwelchen Kundendienstarbei ten oder bei längerer Nichtverwendung des Gerätes stets den Netzstecker aus der Netzsteckdose
ziehen.
● Lorsque la touche ON/STAND-BY est mise en STAND-BY, l’appareil est
toujours sous tension.
Lorsque la touche ON/STAND-BY se trouve sur la position STAND-BY,
l’appareil est prêt à fonctionner par la minuterie ou la télécommande.
Avertissement:
Cet appareil contient des pièces non réparables par l’utilisateur. Personne
non qualifiée n’enlèvera jamais les couvercles. L’appareil contenant des
organes portés à haute tension, débrancher l’appareil avant toute réparation
ou en période de non-utilisation.
● Cuando el botón ON/STAND-BY está puesto en la posición STAND-BY,
todavía hay tensión dentro del aparato.
Cuando el botón ON/STAND-BY está puesto en la posición STAND-BY, el
aparato puede ponerse en funcionamiento utilizando el modo del
temporizador o el controlador remoto.
Advertencia:
Tenga en cuenta que dentro de este aparato no hay piezas que pueda
reparar. No quite nunca las tapas a menos que se esté cualificado para
hacerlo. Este aparato tiene en su interior tensiones peligrosas.
Desenchufe siempre la clavija de la red del tomacorriente antes de realizar
cualquier servicio de mantenimiento y cuando no se use el aparato
durante un largo período de tiempo.
● När ON/STAND-BY knappen är i läge STAND-BY, finns nätspänning i
apparaten.
Med ON/STAND-BY knappen i läge STAND-BY kan apparaten startas med
timerfunktion eller fjärrkontrollen.
Varning:
Apparaten innehåller inga delar som kan åtgärdas av kunden. Höljet får
endast öppnas av kvalificerad personal. Apparaten innehåller farliga
spänningar.
Stickkontakten ska därför dras ut från nätuttaget före reparationsarbeten
och bör dras ut om apparaten inte ska användas på mycket länge.
0110
●
i
02/8/8
SD-AT50H(H)_common.fm
● Quando il tasto ON/STAND-BY si trova in posizione STAND-BY, all’interno
dell’apparecchio c’è ancora la corrente.
Se il tasto ON/STAND-BY si trova nella posizione STAND-BY, l’unità può
essere accesa con il modo timer o con il telecomando.
● Når ON/STAND-BY-knappen er sat i STAND-BY positionen, er der stadig
netspaending til stede i apparatet.
Når ON/STAND-BY-knappen er sat i STAND-BY position, kan apparatet
startes v.hj.a. timer-funksionen eller fjernbetjeningen.
Avvertenza:
L’apparecchio non contiene parti riparabili dall’utente.
Non togliere mai i coperchi, a meno di non essere qualificati per farlo.
All’interno dell’apparecchio ci sono tensioni pericolose, per cui si deve
sempre staccare la spina del cavo d’alimentazione dalla presa di corrente
prima di qualsiasi intervento di manutenzione e quando non si usa
l’apparecchio per un lungo periodo di tempo.
Advarsel:
Apparatet indeholder ingen dele, der kan repareres af brugeren selv. Fjern
aldrig kabinettet med mindre De er kvalificeret hertil. Apparatet indeholder
farlig strømspaending. Traek altid stikket ud af stikkontakten før der
foretages reparationer, eller hvis apparatet ikke er i brug i laengere tid.
● Wanneer de ON/STAND-BY toets in de STAND-BY stand staat, loopt er
nog steeds stroom (netspanning) in het toestel.
Wanneer de ON/STAND-BY toets in de STAND-BY stand staat, kan het
toestel ingeschakeld worden via de timerfunctie of de afstandsbediening.
Waarschuwing:
Dit toestel bevat geen door de gebruiker te repareren onderdelen. Verwijder
de behuizing nooit tenzij u deskundig bent op dit gebied. In het toestel
loopt een gevaarlijke spanning; haal de stekker altijd uit het stopcontact
alvorens onderhoud uit te voeren of wanneer het toestel voor langere tijd
niet gebruikt wordt.
● Quando o botão ON/STAND-BY estiver ajustado na posição STAND-BY, a
voltagem de alimentação ainda se encontra presente dentro do aparelho.
Quando o botão ON/STAND-BY estiver ajustado na posição STAND-BY, o
aparelho pode ser colocado em operação através do modo de programação
horária ou pelo controle remoto.
DENNA APPARAT ÄR ANSLUTEN TILL 230 V VÄXELSTRÖM NÄR
STICKPROPPEN ÄR INSKJUTEN I VÄGGUTTAGET. FÖR ATT
FULLSTÄNDIGT KOPPLA IFRÅN APPARATEN, V.G. DRAG UT
STICKPROPPEN.
0111
Advertência:
Neste aparelho não há partes que podem ser consertadas pelo usuário. Nunca
retire a tampa, a menos que você tenha qualificação para tal. Este aparelho
contém voltagens perigosas. Remova sempre o cabo de alimentação da
tomada antes de efetuar qualquer conserto ou quando deixar o aparelho muito
tempo fora de uso.
● When the ON/STAND-BY button is set at STAND-BY position, mains voltage is still present inside the unit.
When the ON/STAND-BY button is set at STAND-BY position, the unit may
be brought into operation by the timer mode or remote control.
Warning:
This unit contains no user serviceable parts. Never remove covers unless
qualified to do so. This unit contains dangerous voltages, always remove
mains plug from the socket before any service operation and when not
in use for a long period.
ii
02/8/8
SD-AT50H(H)_common.fm
● Vorsicht:
Das Gerät weder Tropf- noch Spritzwasser aussetzen. Ansonsten besteht
die Gefahr eines Brandes oder elektrischen Schlages. Es sollten keine mit
Flüssigkeiten gefüllten Gegenstände wie Vasen auf dem Gerät abgestellt
werden.
● Attention:
Pour éviter un incendie ou une secousse électrique, mettre l’appareil à l’abri
d’eau (éclaboussure, goutte). Ne pas poser sur l’appareil un récipient contenant
du liquide.
● Advertencia:
Para evitar incendios y descargas eléctricas, no exponga el aparato a goteo
o salpicadura de líquidos. No deberán ponerse encima del aparato objetos
que estén llenos de líquido, como por ejemplo un florero.
● Advarsel:
Til at forbygge ild og stød risiko, lad vaere med at undsaette denne indretning
for drypning eller overstaenkning. Der må ikke anbringes nogen genstande
fyldt med vand, som for eksempel vaser, på dette apparat.
● Advarsel:
For å unngå brann eller kortslutning, utsett ikke produktet for vann eller
fuktighet. Gjenstander som inneholder vaeske, feks. en blomstervase, må
ikke plasseres oppå apparatet.
● Varoitus:
Älä vie laitetta sateeseen tai kosteisiin tiloihin. Jos laite on kostunut,
anna sen kuivua ennen kuin käytät sitä verkkovirralla. Nestettä sisältäviä
astioita kuten esim. kukkamaljakoita ei saa asettaa laitteen päälle.
● Varning:
Utsätt inte enheten för dropp eller stänk för att förhindra brand eller
elektriska stötar. Inga vätskefyllda föremål såsom vaser bör placeras
på enheten.
● Attenzione:
Per prevenire incendi o scosse elettriche, non fare gocciolare nessun liquido
sull’apparecchio e non bagnarlo. Non collocarvi sopra nessun oggetto
riempito d’acqua, come per esempio vasi.
0110
● Waarschuwing:
Stel het toestel niet bloot aan druipend of spattend water om brand en
elektrische schokken te voorkomen. Met vloeistoffen gevulde voorwerpen,
zoals vazen, mogen niet op het toestel geplaatst worden.
● Cuidado:
Para evitar incêndio ou choque eléctrico, não exponha este aparelho a
gotejamento ou salpicamento de água. Não coloque objetos com água como,
por exemplo, um vaso de flores, em cima do aparelho.
● Warning:
To prevent fire or shock hazard, do not expose this appliance to dripping or
splashing. No objects filled with liquids, such as vases, should be placed
on the apparatus.
iii
02/8/8
SD-AT50H(H)_common.fm
● VORSICHT
Verwendung von Regelungen oder Einstellungen bzw. Durchführung von
anderen Verfahren als die hierin angegebenen kann zum Aussetzen
gefährlicher Strahlung führen.
Da der in diesem DVD-Spieler verwendete Laserstrahl für die Augen schädlich
ist, ist das Gehäuse unter keinen Umständen zu zerlegen.
Wenden Sie sich für Wartungsarbeiten nur an berechtigten Fachhändler.
● ATTENTION
Respecter les indications données relatives à la manipulation, au réglage et
au fonctionnement. En cas de non-respect, on s’exposera à une radiation
dangereuse.
Éviter absolument de démonter le lecteur DVD, qui utilise un rayon laser
nuisible aux yeux. Pour toute réparation, s’adresser à une personne qualifiée.
● PRECAUCIÓN
El uso de los controles, ajustes o ejecución de procedimientos distintos de los
especificados podría causar la exposición a radiación peligrosa.
No intente desmontar la caja ya que el haz de láser usado en este reproductor
de DVD es perjudicial para los ojos. Para el servicio de reparación, consulte a
una persona cualificada.
● OBSERVERA
Användning av reglage eller justeringar eller handhavande på annat sätt än
som anges kan leda till farlig bestrålning.
Försök inte ta isär höljet eftersom DVD spelarens laserstråle är skadlig för
ögonen. Överlåt service endast till kvalificerad personal.
● CAUTION
Use of controls, adjustments or performance of procedures other than those
specified herein may result in hazardous radiation exposure.
As the laser beam used in this DVD player is harmful to the eyes, do not
attempt to disassemble the cabinet. Refer servicing to qualified personnel
only.
Dieses Produkt ist ein Laserprodukt der Klasse 1.
Ce produit est classifié comme étant un LASER DE CLASSE 1.
Este producto está clasificado como un PRODUCTO LÁSER DE CLASE 1.
Denna produkt klassificeras som KLASS 1 LASERPRODUKT.
Questo prodotto è classificato come CLASS 1 LASER PRODUCT.
Dit product is geclassificeerd als een KLASSE 1 LASER PRODUCT.
Este produto é classificado como PRODUTO LASER DE CLASSE 1.
This product is classified as a CLASS 1 LASER PRODUCT.
Dette produktet er klassifisert som et KLASSE 1 LASERPRODUKT.
Dette produkt er klassificeret som et KLASSE 1 LASERPRODUKT.
Tämä laite on luokiteltu LUOKAN 1 LASERLAITTEEKSI.
Denna produkt klassificeras som KLASS 1 LASERAPPARAT.
● ATTENZIONE
L’uso dei comandi e l’effettuazione di regolazioni e procedimenti diversi da
quelli specificati nel manuale possono provocare una pericolosa esposizione
alle radiazioni.
Poiché il raggio laser usato in questo giradischi può danneggiare gli occhi,
non smontare il lettore DVD. Per le riparazioni rivolgersi a personale
specializzato.
● LET OP
Gebruik van regelaars, het maken van instellingen, gebruik of handelingen
anders dan in deze gebruiksaanwijzing vermeld, kan gevaarlijke straling
blootleggen.
De laserstraal in deze DVD-speler kan de ogen beschadigen, Probeer derhalve
de ombouw niet te verwijderen. Laat reparaties alleen over aan erkend
onderhoudspersoneel.
● CUIDADO
O uso de controles, ajustes ou a execução de procedimentos além daqueles
especificados aqui pode resultar em perigosa exposição à radiação.
Como os raios laser usados neste aparelho de DVD são perigosos para os
olhos, não tente desmontar o aparelho. Solicite o conserto somente para
pessoas especializadas.
0110
iv
02/8/8
SD-AT50H(H)_common.fm
Eigenschaften der Laserdiode
Material: AIGaAs/InGaAIP
Wellenlänge: 780 nm/650 nm
Emissionsdauer: kontinuierlich
Laser-Ausgang: max. 0,69 mW
Caractéristiques de la diode laser
Matière: AIGaAs/InGaAIP
Longueur d’onde: 780 nm/650 nm
Durée d’émission: ininterrompue
Puissance de sortie
laser maximale: 0,69 mW
Características del diodo láser
Material: AIGaAs/InGaAIP
Longitud de onda: 780 nm/650 nm
Duración de emisión : continua
Salida de láser: máx. 0,69 mW
Laserdiodens egenskaper
Material: AIGaAs/InGaAIP
Våglängd: 780 nm/650 nm
Utstrålningsvaraktighet: kontinuerlig
Lasereffekt: max. 0,69 mW
Proprietà del diodo laser
Materiale: AIGaAs/InGaAIP
Lunghezza d’onda: 780 nm/650 nm
Durata di emissione: continua
Uscita massima del laser: 0,69 mW
ADVERSEL-SYNLIG OG USYNLIG LASERSTRÅLING VED ÅBNING. SE IKKE IND I
STRÅLEN-HELLER IKKE MED OPTISKE INSTRUMENTER.
VARO! AVATTAESSA OLET ALTTIINA NÄKYVÄLLE JA NÄKYMÄTTÖMÄLLE
LASERSÄTEILYLLE ÄLÄ TUIJOTA SÄTEESEEN ÄLÄKÄ KATSO SITÄ OPTISEN
LAITTEEN LÄPI.
Laser diode specificaties
Materiaal: AIGaAs/InGaAIP
Golflengte: 780 nm/650 nm
Stralingsduur: doorlopend
Laseruitgang: max. 0,69 mW
VARNING-SYNLIG OCH OSYNLIG LASERSTRÅLNING NÄR DENNA DEL ÄR
ÖPPNAD. STIRRA EJ IN I STRÅLEN OCH BETRAKTA EJ STRÅLEN GENOM
OPTISKT INSTRUMENT.
VAROITUS! LAITTEEN KÄYTTÄMINEN MUULLA KUIN TÄSSÄ
KÄYTTÖOHJEESSA MAINITULLA TAVALLA SAATTAA ALTISTAA
KÄYTTÄJÄN TURVALLISUUSLUOKAN 1 YLITTÄVÄLLE NÄKYVÄLLE JA
NÄKYMÄTTÖMÄLLE LASERSÄTEILYLLE.
Propriedades do diodo de laser
Material: AlGaAs/InGaAIP
Comprimento de onda: 780 nm/650 nm
Duração da emissão: contínua
Saída de laser: máx. 0,69 mW
Laser Diode Properties
Material: AIGaAs/InGaAIP
Wavelength: 780 nm/650 nm
Emission Duration: continuous
Laser Output: max. 0.69 mW
VARNING - OM APPARATEN ANVÄNDS PÅ ANNAT SÄTT ÄN I DENNA
BRUKSANVISNING SPECIFICERAS. KAN ANVÄNDAREN UTSÄTTAS FÖR
SYNLIG OCH OSYNLIG LASERSTRÅLNING, SOM ÖVERSKRIDER GRÄNSEN
FÖR LASERKLASS 1.
0110
0110
v
02/8/8
SD-AT50H(H)_common.fm
● In Lizenz von Digital Theater Systems, Inc. hergestellt. US Pat. Nr. 5,451,942,
5,956,674, 5,974,380, 5,978,762 und andere, ausgegebene und
schwebende, weltweite Patente. “DTS” und “DTS Digital Surround” sind
eingetragene Warenzeichen der Digital Theater Systems, Inc. Copyright
1996, 2000 Digital Theater Systems, Inc. Alle Rechte vorbehalten.
● Fabriqué, sous licence de Digital Theater Systems, Inc. Les brevets US
Pat. No. 5,451,942, 5,956,674, 5,974,380, 5,978,762 et autres internationaux
délivrés et demandés. “DTS” et “DTS Digital Surround” sont des marques
déposées de Digital Theater Systems, Inc. Copyright 1996, 2000 Digital
Theater Systems. Tous droits réservés.
● Fabricado con licencia de Digital Theater Systems, Inc. Patentes de
EE.UU.N.o 5,451,942, 5,956,674, 5,974,380, 5,978,762 y otras patentes
mundiales emitidas y pendientes. “DTS” y “DTS Digital Surround” son
marcas registradas de Digital Theater Systems, Inc. Copyright 1996, 2000
Digital Theater Systems, Inc. Todos los derechos reservados.
● Tillverkad under licens från Digital Theater Systems, Inc. US Pat. No.
5,451,942, 5,956,674, 5,974,380, 5,978,762 och andra världspatent utgivna
och oavgjorda. “DTS” och “DTS Digtal Surround” är registrerade varumärken
för Digital Theater Systems, Inc. Copyright 1996, 2000 Digital Theater Systems, Inc. Alla rättigheter förbehållna.
● Costruito su licenza della Digital Theater Systems, lnc. US Pat. No.
5,451,942, 5,956,674, 5,974,380, 5,978,762 e brevetti già concessi o in
attesa di esserlo di altri Paesi. “DTS” e “DTS Digital Surround” sono marchi
di fabbrica registrati della Digital Theater Systems, Inc. Copyright 1996,
2000 Digital Theater Systems, Inc. Tutti i diritti riservati.
● Gefabriceerd onder licentie van Digital Theater Systems, lnc. US
patentnummer 5,451,942, 5,956,674, 5,974,380, 5,978,762 en andere
wereldwijde patenten verstrekt en aangevraagd. “DTS” en ”DTS Digital
Surround” zijn geregistreerde handelsmerken van Digital Theater Systems,
lnc. Copyright 1996, 2000 Digital Theater Systems, lnc. Alle rechten
voorbehouden.
● ln Lizenz von Dolby Laboratories hergestellt. “Dolby”, “Pro Logic” und
das Doppel-D-Symbol sind Warenzeichen der Dolby Laboratories.
Vertrauliche, unveröffentlichte Schriften. © 1992-1999 Dolby Laboratories. Alle Rechte vorbehalten.
● Fabriqué sous licence de Dolby Laboratories. «Dolby», «Pro Logic» et le symbole
double D sont des marques de commerce de Dolby Laboratories. Œuvres
confidentielles non publiées. © 1992-1999 Dolby Laboratories. Tous droits
réservés.
● Fabricado bajo licencia de Dolby Laboratories. “Dolby”, “Pro Logic” y el
símbolo con una doble D son marcas registradas de Dolby Laboratories.
Trabajos confidenciales no publicados. © 1992-1999 por Dolby Laboratories. Todos los derechos queden reservados.
● Tillverkad på Dolby Laboratories licens. “Dolby”, “Pro Logic” och dubbelD-symbol är varumärken som tillhör Dolby Laboratories. Konfidentiella
opublicerade arbeten. © 1992-1999 Dolby Laboratories. Alla rättigheter
förbehålls.
● Prodotto sotto licenza dalla Dolby Laboratories. “Dolby”, “Pro Logic” ed il
simbolo doppia D sono marchi registrati della Dolby Laboratories. Lavori
non pubblicati riservati. © 1992-1999 Dolby Laboratories. Tutti i diritti sono
riservati.
● Vervaardigd in licentie van Dolby Laboratories. “Dolby”, “Pro Logic” en het
dubbel D-symbool zijn handelsmerken van Dolby Laboratories. Vertrouwelijk
ongepubliceerd materiaal. © 1992-1999 Dolby Laboratories. Alle rechten
voorbehouden.
● Fabricado sob licença da Dolby Laboratories. “Dolby,” “Pro Logic” e o
símbolo do “D” duplo são marcas registradas da Dolby Laboratories.
Trabalhos inéditos confidenciais. © 1992-1999 Dolby Laboratories. Todos
os direitos reservados.
● Manufactured under license from Dolby Laboratories. “Dolby”, “Pro Logic”
and the double-D symbol are trademarks of Dolby Laboratories. Confidential unpublished works. © 1992-1999 Dolby Laboratories. All rights reserved.
● Produzido sob licença da Digital Theater Systems, Inc. Patente nos Estados
Unidos Nº 5,451,942, 5,956,674, 5,974,380, 5,978,762 e outras patentes
ao redor do mundo emitidas e pendentes. “DTS” e “DTS” Digital Surround”
são marcas comerciais registradas da Digital Theater Systems, Inc. Direitos
autorais 1996, 2000 Digital Theater Systems, Inc. Todos os direitos
reservados.
0208
● Manufactured under license from Digital Theater Systems, Inc. US Pat. No.
5,451,942, 5,956,674, 5,974,380, 5,978,762 and other world-wide patents
issued and pending. “DTS” and “DTS Digital Surround” are registered trademarks of Digital Theater Systems, Inc. Copyright 1996, 2000 Digital Theater Systems, Inc. All Rights Reserved.
vi
02/8/8
SD-AT50H(H)_common.fm
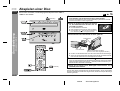
DEUTSCH
SD-AT50H
DX-AT50H
DEUTSCH
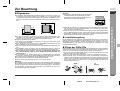
Einführung
" Das 1-Bit Digital Heimkino SD-AT50H und der DVD-Spieler DX-AT50H sollen zum
Gebrauch kombiniert werden.
" Das System SD-AT50H enthält eine AV-Steuereinheit, eine Subwoofer/VerstärkerEinheit, zwei Front-Lautsprecher, zwei Surround-Lautsprecher und einen CenterLautsprecher.
" DX-AT50H soll nur mit SD-AT50H benutzt werden. Sämtliche Zubehörteile sind in
SD-AT50H zusammengepackt.
Für die beiden Produkte arbeitet die Fernbedienung.
Für die Bedienung des DX-AT50H beziehen Sie sich auf diese Bedienungsanleitung.
Inhalt
- Einführung / Inhalt -
Allgemeine Informationen
Vielen Dank für den Kauf dieses SHARP-Produktes. Lesen Sie dieses Handbuch
sorgfältig durch, um eine bestmögliche Leistung zu erreichen. Es führt Sie in den Betrieb dieses Produkts von SHARP ein.
! Allgemeine Informationen
Seite
Zubehör . . . . . . . . . . . . . . . . . . . . . . . . . . . . . . . . . . . . . . . . . . . . . . . . . . . . . . . . . . 3
Zur Beachtung . . . . . . . . . . . . . . . . . . . . . . . . . . . . . . . . . . . . . . . . . . . . . . . . . . . . . 4
Beschreibung von Discs . . . . . . . . . . . . . . . . . . . . . . . . . . . . . . . . . . . . . . . . . . 5, 6
Bedienungselemente und Anzeigen . . . . . . . . . . . . . . . . . . . . . . . . . . . . . . . 7 - 10
! Vorbereitung für die Inbetriebnahme
Anschluß des Systems . . . . . . . . . . . . . . . . . . . . . . . . . . . . . . . . . . . . . . . . . . 11, 12
Anschluß der Antennen . . . . . . . . . . . . . . . . . . . . . . . . . . . . . . . . . . . . . . . . . . . . 13
Anschluß des Fernsehers . . . . . . . . . . . . . . . . . . . . . . . . . . . . . . . . . . . . . . 13 - 15
Installation des Systems . . . . . . . . . . . . . . . . . . . . . . . . . . . . . . . . . . . . . . . . 15, 16
Fernbedienung . . . . . . . . . . . . . . . . . . . . . . . . . . . . . . . . . . . . . . . . . . . . . . . . . . . 17
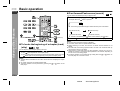
Allgemeine Regelung . . . . . . . . . . . . . . . . . . . . . . . . . . . . . . . . . . . . . . . . . . . . . . 18
Ändern der DVD-Anfangseinstellung . . . . . . . . . . . . . . . . . . . . . . . . . . . . . 19 - 22
Sprachcodeliste für Disc-Sprache . . . . . . . . . . . . . . . . . . . . . . . . . . . . . . . . . . . . 23
Einstellen der Uhr . . . . . . . . . . . . . . . . . . . . . . . . . . . . . . . . . . . . . . . . . . . . . . . . . 24
! Fortgeschrittene Disc-Funktionen
Seite
Grundbedienung
Auffinden des Kapitel- oder Spuranfangs (Übersprung) . . . . . . . . . . . . . . . . . 29
Schneller Vor-/Rücklauf (Suchlauf) . . . . . . . . . . . . . . . . . . . . . . . . . . . . . . . . . . . 29
Starten der Wiedergabe ab gewünschter Stelle (Direktwiedergabe) . . . . . . . . 30
Standbild/Bildfortschaltung . . . . . . . . . . . . . . . . . . . . . . . . . . . . . . . . . . . . . . . . . 30
Zeitlupenwiedergabe . . . . . . . . . . . . . . . . . . . . . . . . . . . . . . . . . . . . . . . . . . . . . . 30
Nützliche Funktionen
Wiedergabe in zufälliger Reihenfolge (Zufallswiedergabe) . . . . . . . . . . . . . . . 31
Wiedergabe in der gewünschten Reihenfolge
(programmierte Wiedergabe) . . . . . . . . . . . . . . . . . . . . . . . . . . . . . . . . . . . . . . . . 31
Wiederholte Wiedergabe . . . . . . . . . . . . . . . . . . . . . . . . . . . . . . . . . . . . . . . . . . . 32
Wiederholte Wiedergabe des Inhalts zwischen den bestimmten Punkten
(A-B Wiederholung) . . . . . . . . . . . . . . . . . . . . . . . . . . . . . . . . . . . . . . . . . . . . . . . 32
Auswählen eines Titels vom Topmenü der Disc . . . . . . . . . . . . . . . . . . . . . . . . 32
! Grundbedienung
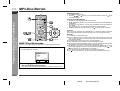
MP3-Disc-Betrieb
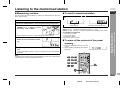
Rundfunkempfang . . . . . . . . . . . . . . . . . . . . . . . . . . . . . . . . . . . . . . . . . . . . . . . . 25
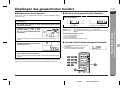
Empfangen des gespeicherten Senders . . . . . . . . . . . . . . . . . . . . . . . . . . . . . . . 26
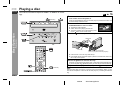
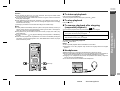
Abspielen einer Disc . . . . . . . . . . . . . . . . . . . . . . . . . . . . . . . . . . . . . . . . . . . . 27, 28
Verschiedene Einstellungen
MP3-Disc-Wiedergabe . . . . . . . . . . . . . . . . . . . . . . . . . . . . . . . . . . . . . . . . . . . . . 33
Ändern der Untertitelsprache . . . . . . . . . . . . . . . . . . . . . . . . . . . . . . . . . . . . . . . 34
Ändern der Audio-Sprache (Audio-Ausgang) . . . . . . . . . . . . . . . . . . . . . . . . . . 34
Wählen einer Untertitel- oder Audio-Sprache vom Discmenü . . . . . . . . . . . . . 34
Aufhellen eines Bildes (Schwarzpegel-Einstellung) . . . . . . . . . . . . . . . . . . . . . 35
Ändern des Blickwinkels . . . . . . . . . . . . . . . . . . . . . . . . . . . . . . . . . . . . . . . . . . . 35
Heranholen eines Bildes (Zoomen) . . . . . . . . . . . . . . . . . . . . . . . . . . . . . . . . . . . 35
Schalten der Anzeige auf dem Fernsehschirm . . . . . . . . . . . . . . . . . . . . . . . . . 36
DVD-Modus-Operationsanzeige . . . . . . . . . . . . . . . . . . . . . . . . . . . . . . . . . . . . . 36
D-1
02/8/28
SD-AT50H(H)D1.fm
SD-AT50H
DX-AT50H
DEUTSCH
! Referenzen
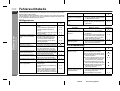
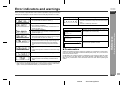
Fehleranzeigen und Warnungen . . . . . . . . . . . . . . . . . . . . . . . . . . . . . . . . . . . . .52
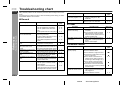
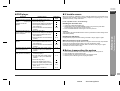
Fehlersuchtabelle . . . . . . . . . . . . . . . . . . . . . . . . . . . . . . . . . . . . . . . . . . . . . .53, 54
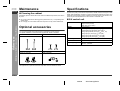
Wartung . . . . . . . . . . . . . . . . . . . . . . . . . . . . . . . . . . . . . . . . . . . . . . . . . . . . . . . . .55
Optionales Zubehör . . . . . . . . . . . . . . . . . . . . . . . . . . . . . . . . . . . . . . . . . . . . . . . .55
Technische Daten . . . . . . . . . . . . . . . . . . . . . . . . . . . . . . . . . . . . . . . . . . . . . .55, 56
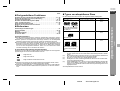
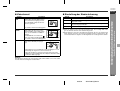
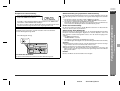
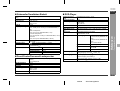
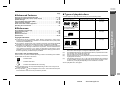
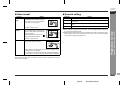
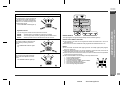
Der DVD-Player kann Discs mit einer der folgenden Marken wiedergeben:
Disctyp
DVD-Video (*1)
Disc-Inhalt
Audio und Video (Filme)
Discgröße
12 cm
8 cm
Oder in der Video-Betriebsart aufgezeichnete DVD-R/
DVD-RW (*2)
Audio-CD
Audio
12 cm
8 cm
Oder CDV (*3)
Audio-CD-R/CD-RW (*4)
Audio
12 cm
8 cm
Copyright-Information:
" Es sind unberechtigte Kopierung, Sendung, Öffentlichkeit, Übertragung, öffentliche Aufführung und Miete (egal ob für Profit) des Disc-Inhalts gesetzlich verboten.
" Dieses System ist mit Kopierschutz-Technologie versehen, die die Bildqualität
beträchtlich verschlechtert, wenn der Disc-Inhalt auf Videoband kopiert wird.
" Durch US-Patente und anderes geistiges Eigentum, d.h. Copyright dafür, was zu
Macrovision Corporation gehört, ist dieses System geschützt. Die Benutzung der
Macrovision Kopierschutz-Technologie im System ist von Macrovision autorisiert
und nur für den Hausgebrauch bestimmt, sofern nicht von Macrovision anders
schriftlich berechtigt. Nach- oder Abbau ist verboten.
In dieser Bedienungsanleitung benutzte Symbole
Abhängend von Discs können einige Funktionen nicht verfügbar sein. Die folgenden
Symbole zeigen die im Abschnitt benutzbaren Discs an.
Oder in MP3-Format aufgezeichnete CD-R/CD-RW
(*5)
(*1):
... Zeigt DVDs an.
(*2):
... Zeigt Audio-CDs an.
... Zeigt CD-R/RW mit MP3-Aufnahme an.
" Abhängend von Discs können einige Operationen durchgeführt werden, selbst
wenn sie in dieser Bedienungsanleitung beschrieben werden.
" Während der Operation kann " " auf dem Bildschirm erscheinen. Dies bedeutet,
daß die in diesem Handbuch beschriebenen Operationen von der Disc verboten
sind.
(*3):
(*4):
(*5):
Dieser DVD-Spieler ist mit dem PAL-System versehen. Dank dem modifizierten PAL-System kann er auch NTSC-Discs als DVD Regionalcode 2 wiedergeben.
Durch Eigenschaften und Kratzer der Disc, schmutzige optische Abtasterlinse
usw. kann die DVD-R/DVD-RW nicht abgespielt werden.
Nur der Ton auf der CDV kann wiedergegeben werden.
Abhängend von dem Aufnahmegerät oder der Disc kann die CD-R/CD-RW
nicht richtig abgespielt werden.
Ist die Abtastfrequenz 44,1 oder 48,1 kHz und die feste Bitrate 128 kbps oder
höher, können MPEG 1 Audio Layer 3 (MP3)-Dateien abgespielt werden. Abhängig von ihren Zuständen oder Formaten können jedoch einige davon nicht
abgespielt werden.
- Inhalt -
Genießen des Surround-Sounds (Sound-Betriebsart) . . . . . . . . . . . . . . . . 37 - 39
Ändern der Registrierung in der Fernbedienung . . . . . . . . . . . . . . . . . . . . . . . .40
Lautsprechereinstellungen . . . . . . . . . . . . . . . . . . . . . . . . . . . . . . . . . . . . . . .41, 42
Benutzen des Radio-Daten-Systems (RDS) . . . . . . . . . . . . . . . . . . . . . . . . 43 - 46
Timer- und Sleep-Funktion . . . . . . . . . . . . . . . . . . . . . . . . . . . . . . . . . . . . . . 47 - 49
Audio-Anschluß anderer Geräte . . . . . . . . . . . . . . . . . . . . . . . . . . . . . . . . . . . . .50
Bedienen des angeschlossenen Fernsehers . . . . . . . . . . . . . . . . . . . . . . . . . . .51
! Typen von abspielbaren Discs
Allgemeine Informationen
! Fortgeschrittene Funktionen
Seite
" Unabspielbare Discs siehe Seite 5.
D-2
02/8/28
SD-AT50H(H)D1.fm
1
SD-AT50H
DX-AT50H
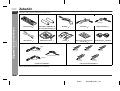
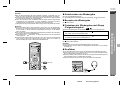
Zubehör
DEUTSCH
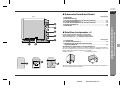
Prüfen Sie, ob die folgenden Zubehörteile vorhanden sind.
Orange
Fernbedienung 1
"AA"-Batterie (UM/SUM-3, R6,
HP-7 oder gleichwertiges) 2
Netzkabel 1
Videokabel 1
Digital-Audiokabel 1
- Zubehör -
IN
Allgemeine Informationen
Gelb
UKW-Antenne 1
MW-Rahmenantenne 1
Ständer 2
Gleitsichere Lautsprecherkissen (20 St.) 1
Rot
ca. 5 m
Grün
ca. 5 m
Weiß
ca. 5 m
(Für DVD-Player)
Schwarz
(Für Sound)
System-Anschlußkabel 3
Blau
ca. 15 m
Grau
ca. 15 m
Lautsprecher-Anschlußkabel 5
Hinweis:
Nur die obigen Zubehörteile gehören zum Lieferumfang.
D-3
02/9/9
T
SCART-Adapter 2 (IN/OUT)
Blau
(Für Signal/Leistung)
OU
SD-AT50H(H)D1_2.fm
Zur Beachtung
SD-AT50H
DX-AT50H
DEUTSCH
! Allgemeines
Vorsicht:
" Sicherstellen, daß die Subwoofer/Verstärker-Einheit in einem Raum mit guter Lüftung gestellt ist und daß ein Abstand von mindestens 10 cm entlang den Seiten
und dem Rückseite der Subwoofer/Verstärker-Einheit bleibt. Ein Abstand von mindestens 15 cm muß auch auf dem Oberteil der Subwoofer/Verstärker-Einheit bleiben.
" Zur besseren Wärmestrahlung ist diese Subwoofer/
Verstärker-Einheit auf ihrer Rückseite mit einem
Kühlgebläse versehen. Niemals die Öffnungen an
diesem Teil mit Hindernissen bedecken.
15 cm
10 cm
" Das System auf eine feste, ebene und erschütterungsfreie Unterlage stellen.
" Das System fernhalten von direktem Sonnenlicht, starken Magnetfeldern, sehr
staubigen Orten, Feuchtigkeit und elektronischen/elektrischen Geräten (Heimcomputer, Fernkopierer usw.), die elektrisches Rauschen erzeugen.
" Nichts auf die Komponenten stellen.
" Das System nicht Feuchtigkeit, Temperaturen von über 60°C oder extrem niedrigen Temperaturen aussetzen.
" Wenn das System nicht richtig funktioniert, die Netzkabel herausziehen und wieder anschließen. Danach das System einschalten.
" Bei einem Gewitter ist es am sichersten, wenn die Netzkabel herausgezogen werden.
" Das Netzkabel immer am Stecker aus der Netzsteckdose ziehen, niemals am
Kabel ziehen, da das Ziehen des Kabels innere Kabellitzen beschädigen kann.
" Die Abdeckung nicht entfernen, weil dies zu elektrischem Schlag führen
kann. Interne Wartung sollte von Ihrem SHARP-Kundendienstzentrum ausgeführt werden.
" Durch Bedecken der Belüftungsöffnungen mit Gegenständen wie Zeitungen,
Tischtüchern, Vorhängen usw. wird die Belüftung blockiert. Daher dies vermeiden.
" Sie sollten auf die Umweltaspekte bei der Batterieentsorgung achten.
" Das System ist für Verwendung in mildem Klima konstruiert.
" Dieses System sollte im Bereich von 5°C - 35°C benutzt werden.
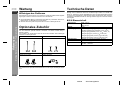
Warnung:
Die auf diesem System angegebene Spannung muß verwendet werden. Der Betrieb
des Produktes mit einer Spannung, die höher ist als die angegebene, ist gefährlich
und kann zu Brand oder anderem Unfall durch Beschädigung führen. SHARP kann
nicht für Schäden verantwortlich gemacht werden, die aus Betrieb mit einer unvorschriftsmäßigen Spannung resultieren.
" Beim Betrieb erwärmen sich der DVD-Player und die Subwoofer/Verstärker-Einheit wegen der im Inneren entwickelten Wärme, und Sie können sich verbrennen,
indem Sie sie längere Zeit berühren.
" Dieses System ist mit einer besonderen Funktion versehen, die Verstärkerschaltung vor Beschädigungen schützt. Wenn sie aktiviert wird, wird der Soundschalter
abgeschaltet. In diesem Fall den DVD-Player und die AV-Steuereinheit auf die
Bereitschafts-Betriebsart stellen und wieder einschalten.
! Lautstärkeregelung
Der Schallpegel bei einer gegebenen Lautstärkeeinstellung hängt von Lautsprecherleistung, Stelle und verschiedenen anderen Faktoren ab. Es ist ratsam, hohen Lautstärkepegeln nicht auszusetzen, die beim Einschalten des Systems mit zu hoher
Lautstärkeeinstellung oder während der kontinuierlichen Wiedergabe bei hohen
Lautstärkepegeln auftreten.
! Pflege der DVDs/CDs
DVDs/CDs sind ziemlich widerstandsfähig gegen Beschädigungen, aber Falschabtastungen können infolge einer Ansammlung des Staubs auf der Discoberfläche auftreten. Für optimale DVD/CD-Wiedergabe die folgenden Punkte beachten.
" Auf die Disc darf nichts geschrieben werden, insbesondere auf die Seite ohne Etikett; hier werden Tonsignale abgetastet.
" Die Discs nicht direkter Sonnenbestrahlung, Hitze oder Feuchtigkeit aussetzen.
" Die DVDs/CDs immer am Rand halten. Durch Fingerabdrücke, Schmutz oder
Wasser auf den DVDs/CDs kann Störgeräusch oder falsche Abtastung verursacht
werden. Wenn eine DVD/CD schmutzig ist oder nicht einwandfrei abgespielt wird,
sie mit einem weichen, trockenen Tuch von der Mitte gerade nach außen dem
Radius entlang abwischen.
NEIN
- Zur Beachtung -
10 cm
Allgemeine Informationen
Kühlgebläse
10 cm
JA
Richtig
D-4
02/8/28
SD-AT50H(H)D1.fm
1
SD-AT50H
DX-AT50H
DEUTSCH
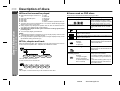
Beschreibung von Discs
! Discs, die nicht abgespielt werden können
! Auf DVDs verwendete Symbole
" DVDs ohne Regionalcode "2" oder
"ALL".
" DVDs mit SECAM-System
" DVD-ROM
" DVD-RAM
" DVD-Audio
Vor Disc-Wiedergabe die Symbole der DVD-Hülle überprüfen.
"
"
"
CDG
Video-CD
Foto-CD
CD-ROM
SACD
In speziellen Formaten aufgezeichnete Discs usw.
Die obigen Discs können keinesfalls abgespielt werden, oder kein Ton wird
gehört, obwohl Bilder auf dem Bildschirm erscheinen, und umgekehrt.
Falsche Wiedergabe kann die Lautsprecher beschädigen oder beim Verwenden
des Kopfhörers mit hoher Lautstärke Ihr Hörvermögen beeinträchtigen.
Dieser DVD-Player führt das PAL-System ein. Vor dem Einkaufen von Discs
überprüfen Sie das Aufnahmesystem.
Illegal produzierte Discs können nicht abgespielt werden.
Anzeige
" Eine Disc, auf der Kratzer oder Fingerabdrücke vorhanden sind, kann nicht richtig
abgespielt werden. Zum Reinigen der Disc beziehen Sie sich auf den Abschnitt
"Pflege der DVDs/CDs" (Seite 4).
" Niemals Discs von speziellen Formen (herzförmig oder achteckig) abspielen, da sie
bei der Drehung ausgeworfen werden können; dies kann Verletzung verursachen.
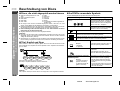
! Titel, Kapitel und Spur
DVDs werden in "Titel" und "Kapitel" geteilt. Wenn ein oder mehrere Filme auf der
Disc vorhanden sind, ist jedes Film einen separaten "Titel". "Kapitel" sind Unterteilungen von Titeln.
Beschreibung
Regionalcode (abspielbare Bereichsnummer)
2
1
2
6
ALL
Auf DVD aufgezeichnetes Format
Anwenden des Videoformates auf die
angeschlossenen Fernseher ("BreitbildFernseher" oder "4:3-Fernseher")
Sie können Breitbilder auf einem Breitbild-Fernseher und Bilder von
Letterbox-Format auf dem 4:3-Fernseher genießen.
Sie können Breitbilder auf einem Breitbild-Fernseher und seitenausgeschnittene 4:3-Bilder auf dem 4:3-Fernseher genießen.
Typ von aufgezeichneten Unterti- Aufgezeichnete Untertitel-Sprachen.
teln
2
Beispiel:
1: Englisch
2: Japanisch
Mit der SUB TITLE-Taste kann eine gewünschte Sprache gewählt werden.
Anzahl von Kamera-Positionen
Titel 1
Kapitel 1
Titel 2
Kapitel 2
Kapitel 3
Kapitel 1
2
Kapitel 2
Die Audio-CDs bestehen aus "Tonspuren".
Eine "Spur" ist jedes Musikstück auf einer Audio-CD.
Spur 1
Spur 2
Spur 3
Spur 4
DVDs sind mit Regionalcodes programmiert, die für Länder stehen, in denen sie
abgespielt werden können. Auf diesem
System lassen sich Discs mit Regionalcode "2" oder "ALL" abspielen.
Aufgezeichnet in 4:3.
Hinweise:
- Beschreibung von Discs -
Allgemeine Informationen
"
"
"
"
"
"
"
Anzahl von auf DVD aufgezeichneten
Blickwinkeln.
Mit der ANGLE-Taste kann ein gewünschter Blickwinkel gewählt werden.
Anzahl von Tonspuren und Ton- Die Anzahl von Tonspuren und das Tonaufnahmesystem werden angezeigt.
aufnahmesystem
Beispiel:
1: Original <Englisch>
(DTS 5.1 Surround)
2: Japanisch (Dolby Digital 5.1 Surround)
" Mit der AUDIO-Taste kann der auf
DVD aufgezeichnete Ton geschaltet
werden.
" Je nach der DVD weicht Ton und Aufnahmesystem ab. Sie im Handbuch
der DVD nachsehen.
Spur 5
Hinweis:
Titel-, Kapitel- oder Spurnummern können auf einige Discs nicht aufgezeichnet werden.
D-5
02/8/28
SD-AT50H(H)D1.fm
SD-AT50H
DX-AT50H
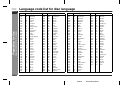
Namen von Ländern und Bereichen
Republik Albanien
Fürstentum Andorra
Republik Österreich
Staat Bahrain
Königreich Belgien
Republik Bosnien-Herzegowina
Republik Bulgarien
*Kanalinseln
Republik Kroatien
Republik Zypern
Tschechische Republik
Königreich Dänemark
Arabische Republik Ägypten
*Färöer
Republik Finnland
Französische Republik
Bundesrepublik Deutschland
*Gibraltar
Greichische Republik
*Grönland
Republik Ungarn
Republik Island
Islamische Republik Iran
Irakische Republik
Republik Irland
*Insel Man
Staat Israel
Italienische Republik
Japan
Haschemitisches Königreich Jordanien
Staat Kuwait
Libanon
Lesotho
Liechtenstein
Luxemburg
Makedonien
Malta
Monaco
Niederlande
Norwegen
Oman
Polen
Portugal
Katar
Rumänien
San Marino
Saudi-Arabien
Slowakei
Slowenien
Südafrika
Spanien
Svalbard und Jan Mayen
Swasiland
Schweden
Schweiz
Arabische Republik Syrien
Türkei
Vereinigte Arabische Emirate
Großbritannien
Vatikanstadt
Jemen
Jugoslawien
Namen von Ländern und Bereichen
Republik Libanon
Königreich Lesotho
Fürstentum Liechtenstein
Großherzogtum Luxemburg
Republik Makedonien
Republik Malta
Fürstentum Monaco
Königreich der Niederlande
Königreich Norwegen
Sultanat Oman
Republik Polen
Portugiesische Republik
Staat Katar
Rumänien
Republik San Marino
Königreich Saudi-Arabien
Slowakische Republik
Republik Slowenien
Republik Südafrika
Spanien
*Svalbard und Jan Mayen
Königreich Swasiland
Königreich Schweden
Schweizerische Eidgenossenschaft
Arabische Republik Syrien
Republik Türkei
Vereinigte Arabische Emirate
Vereinigtes Königreich von Großbritannien
und Nordirland
Staat Vatikanstadt
Republik Jemen
Bundesrepublik Jugoslawien
- Beschreibung von Discs -
Gemeinsame Namen
Albanien
Andorra
Österreich
Bahrain
Belgien
Bosnien-Herzegowina
Bulgarien
Kanalinseln
Kroatien
Zypern
Tschechien
Dänemark
Ägypten
Färöer
Finnland
Frankreich
Deutschland
Gibraltar
Griechenland
Grönland
Ungarn
Island
Iran
Irak
Irland
Insel Man
Israel
Italien
Japan
Jordanien
Kuwait
Gemeinsame Namen
Allgemeine Informationen
DEUTSCH
Die untenstehende Liste zeigt die Länder, die dem Regionalcode 2 entsprechen.
* steht für den Bereichsnamen.
D-6
02/8/28
SD-AT50H(H)D1.fm
1
SD-AT50H
DX-AT50H
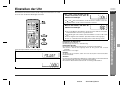
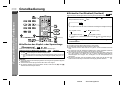
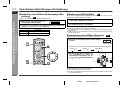
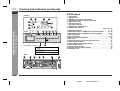
Bedienungselemente und Anzeigen
DEUTSCH
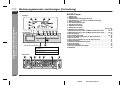
! AV-Steuereinheit
Anzeige
4
5
6
(1) (2) (3) (4) (5) (6)
8
9
10
- Bedienungselemente und Anzeigen -
Allgemeine Informationen
1 2 3
7
(8)
(7)
(11) (12) (13)
(9) (10)
11
Vorderseite
12 13 14
1. RDS-Anzeige
2. Radiotext-Anzeige
3. Verkehrsfunk-Anzeige
4. Verkehrsdurchsage-Anzeige
5. Dynamic-PTY-Anzeige
6. Audiosignal/Lautsprecher-Anzeigen
(1) Anzeige für linken FrontLautsprecher
(2) Anzeige für linkes Front-Signal
(3) Center-Lautsprecher-Anzeige
(4) Center-Signal-Anzeige
(5) Anzeige für rechtes Front-Signal
15
(6) Anzeige für rechten FrontLautsprecher
(7) Tieftoneffekt-Anzeige
(8) Subwoofer-Anzeige
(9) Anzeige für linken SurroundLautsprecher
(10) Anzeige für linkes Surround-Signal
(11) Surround-Monosignal-Anzeige
(12) Anzeige für rechtes SurroundSignal
(13) Anzeige für rechten SurroundLautsprecher
7. Timer-Wiedergabeanzeige
8. Sleep-Anzeige
9. UKW-Stereo-Betriebsartenanzeige
10.UKW-Stereo-Empfangsanzeige
Bezugsseite
<Der Boden des Gerätes>
16
17
18
19
MODEL NO. SD-AT50H
(AV CONTROL UNIT)
1-BIT DIGITAL HOME CINEMA
SHARP CORPORATION
MADE IN MALAYSIA
Rückseite
20
21
22
23
24
25
26
27
11.Netz-/Bereitschaftstaste . . . . . . . . . . . . . . . . . . . . . . . . . . . . . . .18, 54
12.Timereinstellanzeige . . . . . . . . . . . . . . . . . . . . . . . . . . . . . . . . . . . . .47
13.Funktionstaste . . . . . . . . . . . . . . . . . . . . . . . . . . . . . . . . . . . .25, 27, 51
14.Digital/Analog-Eingangswahl- oder
Tuner-Wellenbereichswahltaste . . . . . . . . . . . . . . . . . . . . . . . . .25, 51
15.Lautstärke-Aufwärts- und Abwärts-Tasten . . . . . . . . . . . . . . . . . . .18
16.Fernbedienungssensor . . . . . . . . . . . . . . . . . . . . . . . . . . . . . . . . . . .17
17.Netzanzeige . . . . . . . . . . . . . . . . . . . . . . . . . . . . . . . . . . . . . . . . . . . .18
18.Sound-Betriebsartenanzeigen . . . . . . . . . . . . . . . . . . . . . . . . . .38, 39
19.Kopfhörerbuchse . . . . . . . . . . . . . . . . . . . . . . . . . . . . . . . . . . . . . . . .28
20.System-Anschlußbuchse (zum DVD-Player) . . . . . . . . . . . . . . . . . .11
21.Audio-Digital-Eingang . . . . . . . . . . . . . . . . . . . . . . . . . . . . . . . . . . . .50
22.Koaxialer Digital-Audio-Eingang . . . . . . . . . . . . . . . . . . . . . . . . . . .11
23.Audio-Eingänge . . . . . . . . . . . . . . . . . . . . . . . . . . . . . . . . . . .11, 15, 50
24.System-Anschlußbuchsen
(zur Subwoofer/Verstärker-Einheit) . . . . . . . . . . . . . . . . . . . . . . . . .11
25.MW-Rahmenantennenklemme . . . . . . . . . . . . . . . . . . . . . . . . . . . . .13
26.Antennenerdklemme . . . . . . . . . . . . . . . . . . . . . . . . . . . . . . . . . . . . .13
27.UKW-Antennenbuchse (75 Ohm) . . . . . . . . . . . . . . . . . . . . . . . . . . .13
D-7
02/8/28
SD-AT50H(H)D1.fm
SD-AT50H
DX-AT50H
DEUTSCH
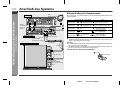
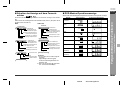
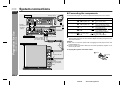
! Subwoofer/Verstärker-Einheit
Bezugsseite
Seite
4
5
! Satelliten-Lautsprecher 5
Front-Lautsprecher 2: magnetisch abgeschirmt
Center-Lautsprecher 1: magnetisch abgeschirmt
Surround-Lautsprecher 2: magnetisch abgeschirmt
6
Bezugsseite
7
1
1. Lautsprecher
2. Lautsprecheranschlüsse . . . . . . . . . . . . . . . . . . . . . . . . . . . . . . . . . 12
3. Montagelöcher für Ständer oder Halterung
(optional erhältlich) . . . . . . . . . . . . . . . . . . . . . . . . . . . . . . . . . . . . . . 16
2
Verwenden der gleitsicheren Lautsprecherkissen:
Sie können die Satelliten-Lautsprecher entweder vertikal oder horizontal installieren.
Die Kissen (mitgeliefert) an der Unterseite der Lautsprecher anbringen, um sie am
Gleiten oder Fallen durch Erschütterungen zu hindern.
(Vertikale Position)
(Horizontale Position)
Vorderseite
Rückseite
1
Unterseite
- Bedienungselemente und Anzeigen -
3
Allgemeine Informationen
1. Subwoofer
2. Baßreflex-Öffnung
3. System-Anschlußbuchse (zur AV-Steuereinheit) . . . . . . . . . . . . . 11
4. Lautsprecheranschlüsse . . . . . . . . . . . . . . . . . . . . . . . . . . . . . . . . . 12
5. System-Anschlußbuchse (zur AV-Steuereinheit) . . . . . . . . . . . . . 11
6. Netzanschlußbuchse . . . . . . . . . . . . . . . . . . . . . . . . . . . . . . . . . . . . 18
7. Kabelhalter . . . . . . . . . . . . . . . . . . . . . . . . . . . . . . . . . . . . . . . . . . . . . 12
2
3
Ein Blatt Lautsprecherkissen (20 St.) gehört zum Lieferumfang dieses Produktes. 4
Kissen pro Lautsprecher verwenden.
D-8
02/8/28
SD-AT50H(H)D1.fm
1
SD-AT50H
DX-AT50H
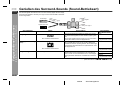
Bedienungselemente und Anzeigen (Fortsetzung)
DEUTSCH
! DVD-Player
Anzeige
1
2
3
5
9
7
- Bedienungselemente und Anzeigen -
4
8
6
Allgemeine Informationen
1. CD-Anzeige
2. DVD-Anzeige
3. CD/MP3-Zufallswiedergabe-Anzeige
4. Disc-Wiederhol- oder Disc A - B Wiederholanzeige
5. DVD-Titel-Anzeige
6. Disc-Wiedergabeanzeige
7. Disc-Pausenanzeige
8. CD/MP3-Titel-Anzeige
9. DVD-Kapitel-Anzeige
Bezugsseite
10
Vorderseite
10.Netz-/Bereitschaftstaste . . . . . . . . . . . . . . . . . . . . . . . . . . . . . . . . . .18
11.DVD-Kapitelsprung- oder CD/MP3-Titel-Abwärts-Taste . . . . . .29, 33
12.DVD-Kapitelsprung- oder CD/MP3-Titel-Aufwärts-Taste . . . . .29, 33
13.Disc-Stopptaste . . . . . . . . . . . . . . . . . . . . . . . . . . . . . . . . . . . . . . . . .28
14.Disc-Wiedergabetaste . . . . . . . . . . . . . . . . . . . . . . . . . . . . . . . . .27, 28
15.Taste zum Öffnen/Schließen der Disc-Schublade . . . . . . . . . . . . .27
16.Disc-Schublade . . . . . . . . . . . . . . . . . . . . . . . . . . . . . . . . . . . . . . . . .27
17.System-Anschlußbuchse (zur AV-Steuereinheit) . . . . . . . . . . . . . .11
18.Audio-Ausgänge . . . . . . . . . . . . . . . . . . . . . . . . . . . . . . . . . . . . . . . .11
19.Koaxialer Digital-Audio-Ausgang . . . . . . . . . . . . . . . . . . . . . . . . . . .11
20.Video-Ausgang . . . . . . . . . . . . . . . . . . . . . . . . . . . . . . . . . . . . . . . . .13
21.S-Video-Ausgang . . . . . . . . . . . . . . . . . . . . . . . . . . . . . . . . . . . . . . . .14
22.Komponentenvideo-Ausgänge . . . . . . . . . . . . . . . . . . . . . . . . . . . . .14
23.Netzkabel . . . . . . . . . . . . . . . . . . . . . . . . . . . . . . . . . . . . . . . . . . . . . .18
11 12 13 14 15
16
<Der Boden des Gerätes>
MODEL NO. DX-AT50H
DVD PLAYER
230 V ~ 50 Hz 15 W
SERIAL NO.
SHARP CORPORATION
MADE IN CHINA
Rückseite
17
18
19
20
21
22
23
D-9
02/8/28
SD-AT50H(H)D1.fm
SD-AT50H
DX-AT50H
DEUTSCH
4
5
6
7
8
9
10
11
12
13
14
15
16
17
18
19
1
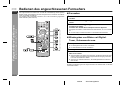
Bezugsseite
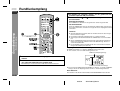
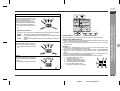
1. Fernbedienungssender . . . . . . . . . . . . . . . . . . . . . . . . . . . . . . . . . . . . . . . . . .17
2. Display-Helligkeitswahl- oder Uhr-Anzeigetaste . . . . . . . . . . . . . . . . . . 18, 24
3. TV-Anzeigewahltaste . . . . . . . . . . . . . . . . . . . . . . . . . . . . . . . . . . . . . . . . . . . . 36
4. Direkt-Taste . . . . . . . . . . . . . . . . . . . . . . . . . . . . . . . . . . . . . . . . . . . . . . . . . . .30
5. Direkt-Zifferntaste . . . . . . . . . . . . . . . . . . . . . . . . . . . . . . . . . . . . . . . . 26, 30, 40
6. Disc-Wiederholtaste . . . . . . . . . . . . . . . . . . . . . . . . . . . . . . . . . . . . . . . . . . . . 32
7. Disc A - B Wiederholtaste . . . . . . . . . . . . . . . . . . . . . . . . . . . . . . . . . . . . . . . .32
8. DVD-Menütaste . . . . . . . . . . . . . . . . . . . . . . . . . . . . . . . . . . . . . . . . . . . . . . . . 34
9. Cursortaste . . . . . . . . . . . . . . . . . . . . . . . . . . . . . . . . . . . . . . . . . . . . . . 24, 33, 47
10. Taste für Disc-Schnellrücklauf, Tuner-Voreinstellung abwärts . . . . . .26, 29
11. Disc-Stopptaste . . . . . . . . . . . . . . . . . . . . . . . . . . . . . . . . . . . . . . . . . . . . . . . . .28
12. DVD-Kapitelsprung-, CD/MP3-Titel-Abwärtsoder Abstimm-Abwärts-Taste . . . . . . . . . . . . . . . . . . . . . . . . . . . . . . . 25, 29, 33
13. DVD-Topmenü-Taste . . . . . . . . . . . . . . . . . . . . . . . . . . . . . . . . . . . . . . . . . . . . 32
14. Digital/Analog-Eingangswahl- oder Tuner-Wellenbereichswahltaste . . . . .25, 51
15. Timertaste . . . . . . . . . . . . . . . . . . . . . . . . . . . . . . . . . . . . . . . . . . . . . . . . . . . . .47
16. Klang-Betriebsartenwahltasten . . . . . . . . . . . . . . . . . . . . . . . . . . . . . . . . . . . 39
17. Wahltaste für dynamischen Sound . . . . . . . . . . . . . . . . . . . . . . . . . . . . . . . .39
18. TV-Eingangswahltaste . . . . . . . . . . . . . . . . . . . . . . . . . . . . . . . . . . . . . . . . . . .51
19. Lautstärke-Aufwärts- und Abwärts-Tasten . . . . . . . . . . . . . . . . . . . . . . . . . . . . . 18
20. Netz-/Bereitschaftstaste . . . . . . . . . . . . . . . . . . . . . . . . . . . . . . . . . . . . . . . . . . .17
21. RDS-Anzeigeartenwahl- oder DVD-Audio-Sprachwahloder CD-Audio-Ausgangswahltaste . . . . . . . . . . . . . . . . . . . . . . . . . . . . . 34, 43
22. Taste für RDS-Programmart/Verkehrsinformations-Suchlauf
oder DVD-Blickwinkel . . . . . . . . . . . . . . . . . . . . . . . . . . . . . . . . . . . . . . . . 35, 46
23. RDS ASPM (Automatischer Senderspeicher)oder DVD-Untertitel-Taste . . . . . . . . . . . . . . . . . . . . . . . . . . . . . . . . . . . . .34, 45
24. Löschtaste . . . . . . . . . . . . . . . . . . . . . . . . . . . . . . . . . . . . . . . . . . . . . . . . .26, 30
25. DVD-Anfangseinstelltaste . . . . . . . . . . . . . . . . . . . . . . . . . . . . . . . . . . . . . . . .19
26. Verstärker-Anfangseinstelltaste . . . . . . . . . . . . . . . . . . . . . . . . . . . . . . . . . . . 41
27. CD/MP3-Wiedergabe-Betriebsartenwahltaste . . . . . . . . . . . . . . . . . . . . . . . . 31
28. Return-Taste . . . . . . . . . . . . . . . . . . . . . . . . . . . . . . . . . . . . . . . . . . . . . 19, 31, 42
29. Eingabetaste . . . . . . . . . . . . . . . . . . . . . . . . . . . . . . . . . . . . . . . . . . . . . 24, 33, 47
30. Taste für Disc-Schnellvorlauf, Tuner-Voreinstellung aufwärts . . . . . . . 26, 29
31. DVD-Kapitelsprung-, CD/MP3-Titel-Aufwärtsoder Abstimm-Aufwärts-Taste . . . . . . . . . . . . . . . . . . . . . . . . . . . . . . 25, 29, 33
32. Disc-Wiedergabetaste . . . . . . . . . . . . . . . . . . . . . . . . . . . . . . . . . . . . . . . . . 27, 28
33. Funktionstaste . . . . . . . . . . . . . . . . . . . . . . . . . . . . . . . . . . . . . . . . . . . .25, 27, 51
34. DVD-Einzelbild-Fortschalt-, Disc-Pausentaste . . . . . . . . . . . . . . . . . . . . 28, 30
35. TV-Net/Bereitschaftstaste . . . . . . . . . . . . . . . . . . . . . . . . . . . . . . . . . . . . . . . .51
36. DVD-Zoomtaste . . . . . . . . . . . . . . . . . . . . . . . . . . . . . . . . . . . . . . . . . . . . . . . . 35
37. Schwarzpegel-Wahltaste . . . . . . . . . . . . . . . . . . . . . . . . . . . . . . . . . . . . . . . . .35
38. TV-Lautstärke-Aufwärts- und Abwärtstaste . . . . . . . . . . . . . . . . . . . . . . . . . 51
39. TV-Kanalwahltasten . . . . . . . . . . . . . . . . . . . . . . . . . . . . . . . . . . . . . . . . . . . . . 51
- Bedienungselemente und Anzeigen -
2
3
20
21
22
23
24
25
26
27
28
29
30
31
32
33
34
35
36
37
38
39
Allgemeine Informationen
! Fernbedienung
Tasten mit " "-Markierung in der Abbildung können nur mit Hilfe der Fernbedienung
betätigt werden.
D-10
02/8/28
SD-AT50H(H)D1.fm
1
SD-AT50H
DX-AT50H
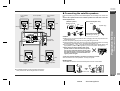
Anschluß des Systems
DEUTSCH
MWRahmenantenne
SystemAnschlußkabel
(Für DVDPlayer)
Digital-Audiokabel
UKW-Antenne
- Anschluß des Systems -
Vorbereitung für die Inbetriebnahme
DVD-Player
AV-Steuereinheit
SystemAnschlußkabel
(Für Sound, schwarz)
Subwoofer/Verstärker-Einheit
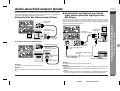
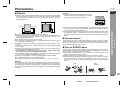
! Anschließen der Komponenten
Den DVD-Player, die AV-Steuereinheit und die Subwoofer/Verstärker-Einheit wie
folgt anschließen.
Anschließen der Komponenten
AVSubwoofer/
Steuereinheit
Verstärker-Einheit
Subwoofer/
AVVerstärker-Einheit
Steuereinheit
AVDVD-Player
Steuereinheit
AVDVD-Player
Steuereinheit
System-Anschlußkabel
(Für Signal/Leistung, blau)
System-Anschlußkabel
(Für DVD-Player)
Digital-Audiokabel
(Für Digitalsignal)
AVSteuereinheit
Im Handel erhältliches
Cinch-Kabel
(Für Analogsignal)
Kabel
System-Anschlußkabel
(Für Sound, schwarz)
DVD-Player
Pfeil nach oben
Ein Digital-Audiokabel oder ein im Handel erhältliches Cinch-Kabel anschließen.
Die DIGITAL/ANALOG-Taste drücken, um entsprechend dem Anschluß zwischen
Digital- und Analogsignal umzuschalten.
Schließer
Vorsicht:
Schließer
" Die Netzkabel des DVD-Players und der Subwoofer/Verstärker-Einheit herausziehen, dann das System anschließen.
" Die beiden System-Anschlußkabel (für Sound und Signal/Leistung) zusammen
verlegen. Wenn nicht, kann Rauschen erzeugt werden.
Herausziehen des System-Anschlußkabels:
1 Drücken
2 Herausziehen
Pfeil nach links
SystemAnschlußkabel
(Für Signal/Leistung,
blau)
D-11
02/8/28
SD-AT50H(H)D2.fm
SD-AT50H
DX-AT50H
! Anschließen der Satelliten-Lautsprecher
Rot
Rot
Schwarz
Rot
Die Lautsprecherstecker entsprechend der Farbcodierung an die Subwoofer/Verstärker-Einheit anschließen.
Die Lautsprecherkabel zuerst an die Satelliten-Lautsprecher und dann an die
Subwoofer/Verstärker-Einheit anschließen.
(Satelliten-Lautsprecher)
Lautsprecheranschlüsse
Rot
Rohr
(Subwoofer/Verstärker-Einheit)
Etikett
Lautsprecherstecker
Schwarz
Schwarz
Schwarz
Rot
Grün
Weiß
Mit der ansteigenden
Seite nach links weisend
einstecken.
Weiß
Vorsicht:
Rot
Grau
Grün
Subwoofer/
Verstärker-Einheit
Blau
Schwarz
Schwarz
Rot
Grau
Surround-Lautsprecher
(Rechts)
Rot
Blau
Surround-Lautsprecher
(Links)
" Die Netzkabel des DVD-Players und der Subwoofer/Verstärker-Einheit herausziehen, dann die Lautsprecher anschließen.
" Den Lautsprecherstecker mit der ansteigenden Seite nach links weisend ganz einstecken.
" Das Lautsprecherkabel immer am Stecker aus der Subwoofer/Verstärker-Einheit ziehen. Ziehen des Kabels kann Störung der Subwoofer/Verstärker-Einheit verursachen.
" Niemals und sowie die rechten und linken Klemmen der Lautsprecherkabel
verwechseln. (Der rechte Lautsprecher befindet sich auf der rechten Seite, wenn
Sie vor dem System stehen. Siehe Seite 16.)
" Niemals die Lautsprecherkabel kurzschließen.
Beim Kurzschluß der Lautsprecherkabel wird
die Schutzschaltung aktiviert, und das System
schaltet in die Bereitschafts-Betriebsart. In
diesem Fall prüfen, ob die Kabel richtig angeschlossen sind, bevor die Stromversorgung
erneut eingeschaltet wird.
" Nur die mitgelieferten Lautsprecher sollten mit diesem Produkt verwendet
werden.
" Sie sollten nicht auf den Lautsprechern stehen oder sitzen. Sie können sich verletzen.
Binden der Kabel:
Die an die Subwoofer/Verstärker-Einheit angeschlossenen Kabel mit einem Kabelhalter binden.
" Sämtliche Satelliten-Lautsprecher bieten die gleiche Leistung.
Ihre Positionen können sich gewechselt werden.
- Anschluß des Systems -
Front-Lautsprecher
(Links)
CenterLautsprecher
Vorbereitung für die Inbetriebnahme
Front-Lautsprecher
(Rechts)
DEUTSCH
Kabelhalter
D-12
02/8/28
SD-AT50H(H)D2.fm
1
SD-AT50H
DX-AT50H
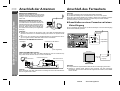
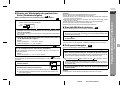
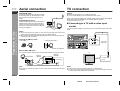
Anschluß der Antennen
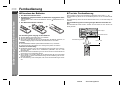
Anschluß des Fernsehers
Mitgelieferte UKW-Antenne:
Vorsicht:
DEUTSCH
" Vor dem Anschließen des Fernsehers alle Geräte ausschalten.
" Die Bildschirmanzeige kann verwürfelt werden, wenn nicht PAL-System.
Drei Typen von Buchsen [VIDEO OUT (VIDEO), VIDEO OUT (S-VIDEO) und COMPONENT VIDEO OUT] sind für Fernseh- und DVD-Player-Anschluß erhältlich.
Entsprechend Ihrem Fernseher anschließen.
Mitgelieferte MW-Rahmenantenne:
- Anschluß der Antennen / Anschluß des Fernsehers -
Vorbereitung für die Inbetriebnahme
Den UKW-Antennendraht an die Buchse FM 75
OHMS anschließen und danach in die Richtung
verlegen, wo das stärkste Empfangssignal erhalten wird.
Den MW-Rahmenantennendraht an die AMund GND-Klemmen anschließen. Danach die
MW-Rahmenantenne für optimalen Empfang
ausrichten. Die MW-Rahmenantenne auf ein
Bord usw. stellen oder an einen Ständer bzw.
eine Wand mit Schrauben (nicht mitgeliefert)
anbringen.
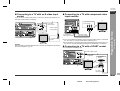
! Anschließen an einen Fernseher mit einen
Video-Eingang
Weiß
Schwarz
Durch Anschließen des Fernsehers und des DVD-Players mit einem Video-Eingang
können Sie DVD-Bilder genießen.
Hinweise:
Zum VideoAusgang
" Abstellen der Antenne auf das System oder in der Nähe des Netzkabels kann
Rauschen verursachen. Für besseren Empfang die Antenne vom System fernhalten.
" Wenn auch nach Einstellung der MW-Rahmenantenne atmosphärische Störungen noch gehört werden, die Drähte verkehrt herum anschließen.
Installieren der MW-Rahmenantenne:
< Montage >
Video-Kabel
(mitgeliefert)
< Montieren an der Wand >
Wand
Schrauben
(nicht mitgeliefert)
Fernseher
UKW- oder MW-Außenantenne:
Durch Verwendung einer UKW- oder MW-Außenantenne kann ein besserer Empfang erzielt werden. Wenden Sie sich an Ihren Fachhändler.
MWRahmenantenne
Zum VideoEingang
UKW-Außenantenne
15 m
MW-Außenantenne
7,5 m
Erdleitung
Erdstab
Hinweis:
Beim Verwenden einer MW-Außenantenne unbedingt den Draht der MW-Rahmenantenne angeschlossen halten.
Hinweise:
" Entsprechend der angeschlossenen Buchse den Fernseheingang umschalten.
" Niemals ein anderes Gerät zwischen dem Fernseher und dem DVD-Player
anschließen. Wenn sie über Videorecorder angeschlossen werden, können Bilder
verzerrt werden.
D-13
02/8/28
SD-AT50H(H)D2.fm
SD-AT50H
DX-AT50H
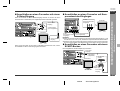
DEUTSCH
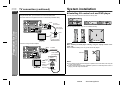
! Anschließen an einen Fernseher mit Komponentenvideo-Eingängen
Zu den
KomponentenvideoEingängen
Zum S-VideoAusgang
Fernseher
S-Video-Kabel
(nicht mitgeliefert)
Fernseher
Zu den
KomponentenvideoAusgängen
Komponentenvideokabel
(nicht mitgeliefert)
Hinweise:
Zum S-VideoEingang
Vorsicht:
Wenn sowohl das Video- als auch das S-Videokabel angeschlossen sind, erscheinen die Bilder aus dem S-Video-Eingang des Fernsehers.
" Wenn Ihr Fernseher andere Anzeigen für die Komponentenvideo-Eingänge (Y, CB
und CR oder Y, B-Y und P-Y) hat, sind Buchsen mit passender Farbe anzuschließen.
" Niemals an einen Komponentenvideo-Eingang für das High-Vision-System anschließen,
der nicht DVD-kompatibel ist (die Bilder können verzerrt werden oder nicht erscheinen).
! Anschließen an einen Fernseher mit einem
SCART-Buchse
Einen mitgelieferten SCART-Adapter (IN) verwenden.
Zum VideoAusgang
Video-Kabel
(mitgeliefert)
Fernseher
Zur Buchse
SCART
IN
R AUDIO
L
VIDEO
- Anschluß des Fernsehers -
Wenn Ihr Fernseher mit einem S-Video-Eingang versehen ist, können Sie durch
Anschluß eines S-Videokabels (nicht mitgeliefert) klarere DVD-Bilder genießen.
Vorbereitung für die Inbetriebnahme
! Anschließen an einen Fernseher mit einem
S-Video-Eingang
SCARTAdapter (IN)
Zum VideoEingang
D-14
02/8/28
SD-AT50H(H)D2.fm
1
SD-AT50H
DX-AT50H
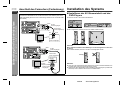
Anschluß des Fernsehers (Fortsetzung)
DEUTSCH
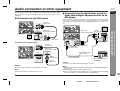
Hören des Fernsehtons über Lautsprecher dieses Systems:
Weiß
- Anschluß des Fernsehers / Installation des Systems -
Vorbereitung für die Inbetriebnahme
Mit Hilfe des Audiokabels können Sie den Fernsehton über dieses System hören.
(Das Audio-Kabel gehört nicht zum Lieferumfang. Kaufen Sie ein im Handel erhältliches Kabel.)
Installation des Systems
! Installieren der AV-Steuereinheit und des
DVD-Players
Sie können sie über- oder nebeneinanderstellen.
Zu den
Audio-Eingängen
Audio-Kabel
(nicht mitgeliefert)
Rot
Mit den mitgelieferten Ständern können sie vertikal installiert werden.
Weiß
Rot
Zu den
Audio-Ausgängen
Fernseher
Anschluß mit Hilfe eines SCART-Adapters:
Vorsicht:
Weiß
Rot
Zu den
Audio-Eingängen
Beim vertikalen Installieren des DVD-Players ist das Anzeigefenster nach oben
zu weisen.
Wenn vertikal installiert, können 8 cm-Discs nicht abgespielt werden.
Audio-Kabel
(nicht mitgeliefert)
Richtig
Zur Buchse
SCART
SCARTAdapter (OUT)
Fernseher
Zu den AudioAusgängen
Rot
OUT
R AUDIO
L
VIDEO
Weiß
Hinweise:
" Wenn sich das Anzeigefenster des DVD-Players auf der Unterseite befindet, kann
eine Disc fallen oder nicht herausgenommen werden.
" Während der Disc-Wiedergabe ist die Aufstellung des DVD-Players (vertikal oder
horizontal) nicht zu ändern. Die Disc kann verkratzt werden.
D-15
02/8/28
SD-AT50H(H)D2.fm
SD-AT50H
DX-AT50H
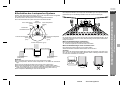
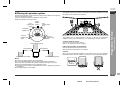
! Aufstellen des Lautsprecher-Systems
DEUTSCH
Die Lautsprecherständer und Lautsprecher-Wandhalterungen sind optional erhältlich
(siehe Seite 55). Für die Montage beziehen Sie sich auf ihre Anweisungen.
Front-Lautsprecher
(rechts)
(rot)
Subwoofer/
Verstärker-Einheit
Surround-Lautsprecher
(rechts)
(grau)
Surround-Lautsprecher
(links)
(blau)
Die Lautsprecher können neben oder nah dem Fernseher aufgestellt werden, da sie
magnetisch abgeschirmt sind. Je nach dem Fernsehtyp können jedoch Farbschwankungen vorkommen.
Wenn Farbschwankungen vorkommen...
Center-Lautsprecher (grün)
Den Fernseher (seinen Netzschalter) ausschalten.
15 - 30 Minuten später den Fernseher wieder einschalten.
Wenn Farbschwankungen noch vorhanden sind...
Gleicher Abstand
Gleicher Abstand
Die Lautsprecher weiter entfernt vom Fernseher stellen.
Weitere Einzelheiten siehe Benutzerhandbuch des Fernsehers.
Vorsicht:
Beim Tragen der Subwoofer/Verstärker-Einheit darf der Subwoofer nicht berührt werden, der sich in der Nähe des Bodens befindet. Diese unbedingt am Boden halten,
um Bruch des Subwoofers zu vermeiden.
Front-Lautsprecher
(links)(weiß)
Front-Lautsprecher
(rechts)(rot)
Hinweise:
" Den Fernseher genau zwischen den Front-Lautsprechern stellen.
" Es wird empfohlen, daß der Center-Lautsprecher in der Nähe des Fernsehers
liegt.
" Die Surround-Lautsprecher etwas höher als Ihre Ohren positionieren.
" Die Subwoofer/Verstärker-Einheit auf einen stabilen, robusten Boden stellen.
" Wenn die Lautsprecher nicht in gleichen Abständen aufgestellt werden können,
siehe Abschnitt "Einstellung der Lautsprecherverzögerung" (siehe Seite 41).
" Die Lautsprecher-Bekleidungen sind nicht abnehmbar.
Subwoofer
- Installation des Systems -
CenterFront-Lautsprecher Lautsprecher
(links)
(grün)
(weiß)
Vorbereitung für die Inbetriebnahme
Dadurch, daß jeder Lautsprecher gleich weit von der Hörposition entfernt aufgestellt
wird, wird der bestmögliche Surroundeffekt erzielt.
Es wird empfohlen, die Lautsprecher wie unten dargestellt aufzustellen.
Durch die Rohrenfarbe kann jeder Lautsprecher identifiziert werden.
Richtig
D-16
02/8/28
SD-AT50H(H)D2.fm
1
SD-AT50H
DX-AT50H
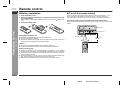
! Einsetzen der Batterien
! Test der Fernbedienung
1 Den Batteriefachdeckel öffnen.
2 Die Batterien entsprechend der im Batteriefach angegebenen Polarität einsetzen.
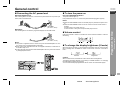
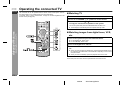
Alle Anschlüsse und dann die Fernbedienung überprüfen (siehe Seiten 11 - 18).
Die Fernbedienung direkt auf den Fernbedienungssensor an der AV-Steuereinheit
richten.
Die Fernbedienung ebenso auf die AV-Steuereinheit richten, um den DVD-Player zu
bedienen.
Beim Einsetzen oder Entnehmen der Batterien nach den
drücken.
Batterieklemmen hin
3 Den Batteriefachdeckel schließen.
Die Fernbedienung kann im unten gezeigten Bereich verwendet werden:
Die ON/STAND-BY-Taste drücken. Schaltet sich das Gerät ein? Nun können Sie
Musik genießen.
DVD-Player
AV-Steuereinheit
Zur Beachtung beim Umgang mit den Batterien:
- Fernbedienung -
Vorbereitung für die Inbetriebnahme
DEUTSCH
Fernbedienung
" Alle alten Batterien gleichzeitig durch neue ersetzen.
" Alte und neue Batterien nicht mischen.
" Wenn das System längere Zeit nicht verwendet wird, die Batterien entfernen, um
eine Beschädigung wegen Auslaufens der Batteriesäure zu verhindern.
Fernbedienungssensor
0,2 m - 6 m
Vorsicht:
" Keine aufladbaren Batterien (Nickel-Kadmium-Batterie usw.) verwenden.
" Falsches Einsetzen der Batterien kann Störung des Systems verursachen.
Hinweise zur Verwendung:
" Die Batterien ersetzen, wenn der Wirkungsbereich abnimmt oder wenn Funktionsstörungen auftreten. Kaufen Sie 2 "AA"-Batterien (UM/SUM-3, R6, HP-7 oder
gleichwertiges).
" Den Sender auf der Fernbedienung und den Sensor auf der AV-Steuereinheit mit
einem weichen Tuch regelmäßig reinigen.
" Wenn starkes Licht auf den Sensor der AV-Steuereinheit fällt, kann der Betrieb
gestört werden. In diesem Fall die Beleuchtung oder die Aufstellung der AV-Steuereinheit verändern.
" Die Fernbedienung nicht Feuchtigkeit, Hitze, Stoß oder Erschütterungen aussetzen.
D-17
02/8/28
SD-AT50H(H)D2.fm
Allgemeine Regelung
SD-AT50H
DX-AT50H
Subwoofer/Verstärker-Einheit
Die ON/STAND-BY-Taste drücken.
Überprüfen, daß alle Anschlüsse richtig gemacht worden sind. Danach das Netzkabel an die Netzanschlußbuchse und dann an die Wandsteckdose anschließen.
Die Netzanzeige leuchtet auf.
Wenn sich die Stromversorgung nicht einschaltet, prüfen Sie, ob die Netzkabel richtig angeschlossen sind.
Hinweise:
(AC INPUT)
Wandsteckdose
(Wechselspannung 230 V, 50 Hz)
DVD-Player:
Überprüfen, daß alle Anschlüsse richtig gemacht worden sind. Danach das Netzkabel des DVD-Players an die Wandsteckdose anschließen.
" Wenn die ON/STAND-BY-Taste auf dem DVD-Player gedrückt wird, schaltet sich
das System ein.
" Wenn die ON/STAND-BY-Taste auf der AV-Steuereinheit oder auf der Fernbedienung gedrückt wird:
In der DVD-Funktion: Das System schaltet sich ein.
In anderen Funktionen: Das System außer dem DVD-Player schaltet sich ein.
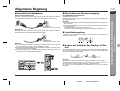
! Lautstärkeregelung
Zum Erhöhen der Lautstärke die VOLUME +-Taste drücken; zum Vermindern die
VOLUME --Taste drücken.
Wandsteckdose
(Wechselspannung 230 V, 50 Hz)
Hinweise:
" Der AV-Steuereinheit wird aus der Subwoofer/Verstärker-Einheit Strom zugeführt.
Die AV-Steuereinheit ist nicht mit einem Netzkabel versehen.
" Niemals ein anderes Netzkabel als das mitgelieferte verwenden. Ansonsten kann
eine Störung oder ein Unfall auftreten.
" Wenn der DVD-Player und die Subwoofer/Verstärker-Einheit längere Zeit nicht
verwendet werden, die Netzkabel herausziehen.
0
1
2 .....
39
40
! Ändern der Helligkeit des Displays (2 Stufen)
Wenn der Eingang auf DVD nicht gestellt ist, können Sie die Display-Helligkeit der
AV-Steuereinheit ändern, indem Sie die DISPLAY-Taste auf der Fernbedienung 2
Sekunden oder länger gedrückt halten.
Verdunkelt
Erhellt
Vorsicht:
Bei der DVD-Funktion kann die DISPLAY-Taste die Helligkeit nicht umschalten.
Die Helligkeit des Displays hängt von der Einstellung von "PANEL DISPLAY" im
Abschnitt "Ändern der DVD-Anfangseinstellung " ab (siehe Seite 20).
Sie können die Display-Helligkeit der AV-Steuereinheit und des DVD-Players
umschalten.
DEUTSCH
- Allgemeine Regelung -
! Einschalten der Stromversorgung
Vorbereitung für die Inbetriebnahme
! Anschluß des Netzkabels
Netzanzeige
D-18
02/8/28
SD-AT50H(H)D2.fm
1
SD-AT50H
DX-AT50H
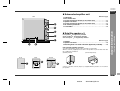
Ändern der DVD-Anfangseinstellung
DEUTSCH
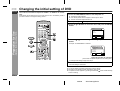
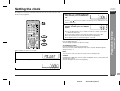
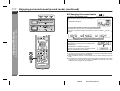
1
Zum Einschalten der Stromversorgung die ON/STAND-BY-Taste
drücken.
" Der Start-Bildschirm erscheint.
" Wenn der Start-Bildschirm nicht erscheint, den Eingang auf "DVD" stellen.
" Zu dieser Zeit ist die Disc zu stoppen.
2
3
Die - und dann SETUP DVD-Taste drücken.
Die - oder -Taste drücken, um das Menü auszuwählen, und die
ENTER-Taste betätigen.
SET-UP
- Ändern der DVD-Anfangseinstellung -
Vorbereitung für die Inbetriebnahme
Den Fernseher einschalten, und den Eingang dementsprechend auf "VIDEO 1",
"VIDEO 2" usw. schalten.
Eine neue Einstellung wird gespeichert, selbst wenn der DVD-Player auf die Bereitschafts-Betriebsart gestellt wird. Wenn Sie die Einstellung umspeichern oder ändern
wollen, sie zurücksetzen.
1.LANGUAGE
2.DISPLAY
3.AUDIO
4.PARENTAL
SELECT:
SET:
ENTER
SETUP CANCEL: RETURN
EXIT:
4
Die Taste oder drücken, um die Einstellung zu ändern, und die
ENTER-Taste betätigen.
Beispiel: "PLAYER MENU" wird gewählt
SET-UP
LANGUAGE CONTROLS
PLAYER MENU
1.ENGLISH
2.FRANÇAIS
3.ESPAÑOL
4.DEUTSCH
5.ITALIANO
SELECT:
SET:
ENTER
SETUP CANCEL: RETURN
EXIT:
Die Operation wie angewiesen wiederholen.
(Die Wiederholungszahl hängt vom Einstellgegenstand ab.)
Zum Ändern anderer Einstellungen ab Schritt 3 beginnen.
5
Die SETUP DVD-Taste drücken.
Die neue Einstellung wird abgespeichert.
Hinweise:
" Während der Disc-Wiedergabe können Sie den Setup-Bildschirm nicht öffnen.
" Siehe Seite 21 zur Wahl einer anderen Sprache für Discmenüs.
" Dadurch, daß die RETURN
-Taste beim Wählen eines Gegenstandes oder
einer Einstellung gedrückt wird, erscheint der vorherige Bildschirm.
D-19
02/8/28
SD-AT50H(H)D2.fm
SD-AT50H
DX-AT50H
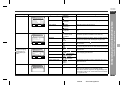
DEUTSCH
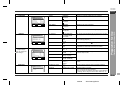
Einstellung
SPRACHE
Wählbare Parameter (* zeigt die Anfangseinstellungen an.)
ORIGINAL *
AUDIO
SET-UP
ENGLISCH
Beschreibung
Wählt die über Lautsprecher hörbare Sprache.
SELECT:
SET:
ENTER
SETUP CANCEL: RETURN
EXIT:
ANZEIGE
UNTERTITEL
AUS *
ENGLISCH
Wählt den auf dem Fernsehschirm angezeigten Untertitel.
DISC. MENÜ
ORIGINAL
ENGLISCH *
Wählt die Sprache des Discmenüs.
PLAYER MENÜ
ENGLISH *
FRANÇAIS
Wählt die Sprache der Anfangs- oder Wiedergabeeinstellung.
BILDFORMAT
4:3 LETTER BOX *
4:3 PAN & SCAN
16:9 BREIT
AN *
AUS
AUTO
AN *
AUS
AN *
AUS
AUS *
AN
BITSTREAM*
DPCM
AN * (BITSTREAM)
AUS (Kein Signal)
AUS * (PCM)
AN (BITSTREAM)
AUTO *
48 kHz
96 kHz
ALLE *
8-1
Passwort eingeben.
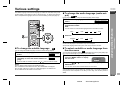
Entsprechend dem Fernsehtyp ist der Bildschirmmodus
einzustellen (weitere Einzelheiten siehe Seite 22).
SET-UP
DISPLAY CONTROLS
1.TV ASPECT
2.PANEL DISPLAY
3.ANGLE ICON
4.AUTO POWER OFF
4:3 LETTER BOX
ON
ON
ON
SELECT:
SET:
ENTER
SETUP CANCEL: RETURN
EXIT:
ANZEIGE
KAMERAWINKEL
ABSCHALTUNG
AUDIO
(Digital-Ausgang)
Niemals die Anfangseinstellungen
ändern.
DRC
SET-UP
AUDIO CONTROLS
1.DRC
2.DOLBY DIGITAL
3.DTS
4.MPEG
5.DOWN SAMPLING
OFF
BITSTREAM
ON
OFF
AUTO
SELECT:
SET:
ENTER
SETUP CANCEL: RETURN
EXIT:
DOLBY DIGITAL
DTS
MPEG
DOWN SAMPLING
SICHERUNG
ZUGRIFFSEBENE
SET-UP
PARENTAL CONTROLS
1.PARENTAL LEVEL
2.CHANGE
ALL
ÄNDERN
Helligkeitseinstellung für Display. (Wenn auf "auto" gestellt,
wird das Licht während der Wiedergabe abgeschaltet.
Stellt der Kamerawinkel ( ) auf dem Fernsehschirm ein
oder annulliert.
Das System schaltet automatisch in die Bereitschafts-Betriebsart, wenn es länger als 35 Minuten außer Betrieb gesetzt wird.
Macht oder annulliert die Regelung außerhalb des Lautstärkebereichs
Wählt den Typ eines Tonsignal, das vom koaxialen DigitalAudio-Ausgang gesendet wird.
Wandelt das mit PCM von 96 kHz aufgezeichnete Tonsignal in 48 kHz um.
Stellt die Zugriffsebene beim Betrachten der DVD-Software
ein.
Paßworteinstellung oder -änderung
"4737" kann als Paßwort nicht eingestellt werden.
Wenn Sie Ihr Paßwort vergessen, das gegenwärtige Paßwort löschen, indem "4737" mit den Direkt-Nummerntasten
(0 - 9) gedrückt wird.
- Ändern der DVD-Anfangseinstellung -
ORIGINAL
OFF
ORIGINAL
ENGLISH
Vorbereitung für die Inbetriebnahme
LANGUAGE CONTROLS
1.AUDIO
2.SUBTITLE
3.DISC MENU
4.PLAYER MENU
D-20
02/8/28
SD-AT50H(H)D2.fm
1
SD-AT50H
DX-AT50H
Ändern der DVD-Anfangseinstellung (Fortsetzung)
DEUTSCH
! Disc-Sprache
Einstellung
Eine Sprache für Audio kann eingestellt werden.
Sie können eine Sprache für Gespräch und Erzählung bestimmen.
Englisch
ou
nk y
Thank you
Deutsch
LOADING
LADEN
ke
Dan
UNTERTITEL Eine Sprache für Untertitel kann eingestellt werden.
Der Untertitel wird in einer bestimmten Sprache angezeigt.
Englisch
Einstellung
Eine Sprache für die Bildschirmanzeige kann eingestellt werden
(z.B. für Anfangseinstellungen oder Meldungen).
Englisch
Deutsch
Tha
- Ändern der DVD-Anfangseinstellung -
Vorbereitung für die Inbetriebnahme
Anzeige
AUDIO
Anzeige
PLAYER
MENÜ
Deutsch
Danke
! Andere Spracheinstellungen
Sie können die "OTHER" Sprache für Audio, Untertitel und Discmenü einstellen.
(Siehe "Sprachcodeliste für Disc-Sprache" auf Seite 23.)
Beispiel: Wählen von 5464 (Kroatisch) als Audio-Sprache
1
"LANGUAGE" auf dem Anfangseinstellungs-Bildschirm anwählen
(siehe Schritte 1 - 3 auf Seite 19).
2
Nach dem Wählen von "AUDIO" im Schritt 4 auf Seite 19 ist
"OTHER" anzuwählen. Danach die ENTER-Taste drücken.
3
Mit Hilfe der Direkt-Nummerntasten "5464" anwählen.
"5464 (HR)" wird auf dem Fernsehschirm angezeigt.
DISC. MENÜ
Eine Sprache für Discmenüs kann eingestellt werden.
Menü-Bildschirme werden in einer bestimmten Sprache angezeigt.
4
Die SETUP DVD-Taste drücken.
Hinweis:
Englisch
Deutsch
CAST
BESETZUNG
STAFF
BELEGSCHAFT
Wenn die gewählte Sprache nicht aufgezeichnet wird, wird die durch die Disc eingestellte Sprache angewendet.
D-21
02/8/28
SD-AT50H(H)D3.fm
SD-AT50H
DX-AT50H
DEUTSCH
Einstellung
4:3 LETTER Beim Abspielen einer Breitbild-Disc
(16:9) werden schwarze Balken in den
BOX
Ober- und Unterteil eingefügt, und Sie
können Breitbilder (16:9) auf dem 4:3Fernseher genießen.
Anzeige
Ebene 1
Ebenen 2 bis
7
Ebene 8
ALLE
Eine 4:3-Disc wird in 4:3 wiedergegeben.
4:3 PAN & Beim Abspielen einer Breitbild-Disc
(16:9) werden die linken und rechten
SCAN
Seiten des Bildes ausgeschnitten (Pan
Scan), um ein natürliches 4:3-Bild anzuzeigen.
Eine Breitbild-Disc ohne Pan Scan
wird in 4:3 Letterbox wiedergegeben.
Eine 4:3-Disc wird in 4:3 wiedergegeben.
16:9 BREIT Beim Abspielen einer Breitbild-Disc
(16:9) wird ein Breitbild (16:9) angezeigt.
Einstellung
Nur DVD-Software für Kinder kann abgespielt werden.
Nur DVD-Software zum allgemeinen Gebrauch und für Kinder kann
abgespielt werden.
DVD-Software von irgendeinem Grad (Erwachsene/Allgemein/Kinder) kann abgespielt werden.
Kindersicherung wird abgebrochen.
Hinweise:
" Wenn ein Paßwort zum ersten Mal eingegeben wird, eine 4-stellige Zahl eintragen. Sie wird automatisch als Ihr Paßwort eingestellt.
" Beim Abspielen einer Disc mit Kindersicherung kann die um eine Paßwort bittende Anzeige erscheinen, um einige beschränkte Szenen zu betrachten. In diesem Fall das Paßwort eingeben, um die Zugriffsebene vorübergehend zu ändern.
" Beim Abspielen einer 4:3-Bild-Disc hängt die Bildgröße von der
Einstellung des angeschlossenen Fernseher ab.
" Wenn Sie mit dem an einen 4:3-Fernseher angeschlossenen
DVD-Player eine Breitbild (16:9)-Disc abspielen, wird das vertikal
verkleinerte Bild angezeigt.
Hinweis:
Beim Abspielen der Disc mit einem fixierten Videoformat ändert sich es nicht, selbst
wenn die Fernsehschirmgröße verändert wird.
- Ändern der DVD-Anfangseinstellung -
Anzeige
! Einstellung der Kindersicherung
Vorbereitung für die Inbetriebnahme
! Videoformat
D-22
02/8/28
SD-AT50H(H)D3.fm
1
SD-AT50H
DX-AT50H
Sprachcodeliste für Disc-Sprache
- Sprachcodeliste für Disc-Sprache -
Vorbereitung für die Inbetriebnahme
DEUTSCH
Code
4747
4748
4752
4759
4764
4765
4771
4772
4847
4851
4853
4854
4855
4860
4861
4864
4947
4961
4965
4971
5047
5051
5072
5158
5160
5161
5165
5166
5167
5247
5255
5256
5261
5264
5271
AA
AB
AF
AM
AR
AS
AY
AZ
BA
BE
BG
BH
BI
BN
BO
BR
CA
CO
CS
CY
DA
DE
DZ
EL
EN
EO
ES
ET
EU
FA
FI
FJ
FO
FR
FY
Sprachname
Afar
Abchasisch
Afrikaans
Amharisch
Arabisch
Assamesisch
Aymarisch
Aserbaidschanisch
Baschkirisch
Weißrussisch
Bulgarisch
Bihari
Bislama
Bengali, Bangla
Tibetisch
Bretonisch
Katalanisch
Korsisch
Tschechien
Walisisch
Dänisch
Deutsch
Bhutani
Griechisch
Englisch
Esperanto
Spanisch
Estisch
Baskisch
Persisch
Finnisch
Fidschi
Faröisch
Französisch
Friesisch
Code
5347
5350
5358
5360
5367
5447
5455
5464
5467
5471
5547
5551
5557
5560
5565
5566
5569
5647
5655
5669
5747
5757
5758
5759
5760
5761
5765
5767
5771
5847
5860
5861
5866
5868
5953
GA
GD
GL
GN
GU
HA
HI
HR
HU
HY
IA
IE
IK
IN
IS
IT
IW
JA
JI
JW
KA
KK
KL
KM
KN
KO
KS
KU
KY
LA
LN
LO
LT
LV
MG
Sprachname
Irisch
Schottisches Gälisch
Galizisch
Guarani
Gujarati
Hausa
Hindi
Kroatisch
Ungarisch
Armenisch
Interlingua
Interlingue
Inupiak
Indonesisch
Isländisch
Italienisch
Hebräisch
Japanisch
Jiddisch
Javanesisch
Georgisch
Kasachisch
Grönländisch
Kambodschanisch
Kannada
Koreanisch
Kaschmiri
Kurdisch
Kirgisisch
Lateinisch
Lingala
Laotisch
Litauisch
Lettisch
Malagassisch
Code
5955
5957
5958
5960
5961
5964
5965
5966
5971
6047
6051
6058
6061
6149
6159
6164
6247
6258
6265
6266
6367
6459
6460
6461
6467
6469
6547
6550
6553
6554
6555
6557
6558
6559
6560
MI
MK
ML
MN
MO
MR
MS
MT
MY
NA
NE
NL
NO
OC
OM
OR
PA
PL
PS
PT
QU
RM
RN
RO
RU
RW
SA
SD
SG
SH
SI
SK
SL
SM
SN
Sprachname
Maori
Makedonisch
Malayalam
Mongolisch
Moldawisch
Marathi
Malayisch
Maltesisch
Burmesisch
Nauru
Nepalesisch
Niederländisch
Norwegisch
Okzitanisch
(Afan) Oromo
Oriya
Pundschabi
Polnisch
Paschto
Portugiesisch
Quechua
Rätoromanisch
Kirundi
Rumänisch
Russisch
Kinyaruanda
Sanskrit
Sindhi
Sangho
Serbo-Kroatisch
Singhalesisch
Slowakisch
Slowenisch
Samoisch
Schona
Code
6561
6563
6564
6565
6566
6567
6568
6569
6647
6651
6653
6654
6655
6657
6658
6660
6661
6664
6665
6666
6669
6757
6764
6772
6855
6861
6961
7054
7161
7254
7267
SO
SQ
SR
SS
ST
SU
SV
SW
TA
TE
TG
TH
TI
TK
TL
TN
TO
TR
TS
TT
TW
UK
UR
UZ
VI
VO
WO
XH
YO
ZH
ZU
D-23
02/8/28
SD-AT50H(H)D3.fm
Sprachname
Somali
Albanisch
Serbisch
Siswati
Sesotho
Sudanesisch
Schwedisch
Suaheli
Tamilisch
Telugu
Tadschikisch
Thai
Tigrinya
Turkmenisch
Tagalog
Setswana
Tonga
Türkisch
Tsonga
Tatarisch
Twi
Ukrainisch
Urdu
Usbekisch
Vietnamesisch
Volapük
Wolof
Xhosa
Yoruba
Chinesisch
Zulu
Einstellen der Uhr
SD-AT50H
DX-AT50H
DEUTSCH
Die - oder -Taste drücken, um die
Stunde einzustellen, und dann die
ENTER-Taste betätigen.
Die - oder -Taste einmal drücken, um die Uhrzeit um 1 Stunde vorzustellen.
Sie gedrückt halten, um die Uhrzeit fortlaufend vorzustellen.
4
Die - oder -Taste drücken, um die
Minuten einzustellen, und dann die
ENTER-Taste betätigen.
" Die - oder -Taste einmal drücken, um die Uhrzeit um 1 Minute vorzustellen.
Zum fortlaufenden Vorstellen sie gedrückt halten.
" Die Stunde geht nicht vorwärts, selbst wenn Minuten von "59" zu "00" vorrükken.
" Die Uhr beginnt ab "0" Sekunden. (Sekunden werden nicht angezeigt.)
" Nach ca. 2 Sekunden kehrt das Display in die normale Anzeige zurück.
Überprüfen der Zeitanzeige:
Die DISPLAY-Taste drücken.
Die Zeitanzeige erscheint ca. 5 Sekunden lang.
Nachstellen der Uhr:
In diesem Beispiel wird die Uhr für 9:30 eingestellt.
1
Die DISPLAY-Taste drücken.
Die Schritte im Abschnitt "Einstellen der Uhr" von Anfang an durchführen.
" Im Schritt 1 wird die Zeit angezeigt. Wenn die Uhr gelöscht wird, erscheint
"ADJUST".
" Die Schritte 2 - 4 befolgen.
Hinweis:
Sie können die Uhr einstellen, selbst wenn sich das System in der BereitschaftsBetriebsart befindet.
Vorsicht:
2
Innerhalb von 5 Sekunden die ENTER-Taste drücken.
Herausziehen der Netzkabel des DVD-Players und der Subwoofer/Verstärker-Einheit
oder ein Stromausfall verursacht Löschung der Uhreinstellung.
Die Schritte im Abschnitt "Einstellen der Uhr" von Anfang an durchführen.
- Einstellen der Uhr -
3
Vorbereitung für die Inbetriebnahme
Durch Einstellen der AV-Steuereinheit auf die richtige Uhrzeit können Sie sie sowohl
als Uhr als auch für die Timer-Wiedergabe verwenden.
D-24
02/8/28
SD-AT50H(H)D3.fm
1
SD-AT50H
DX-AT50H
Rundfunkempfang
DEUTSCH
3
Die BAND-Taste wiederholt drücken, um das gewünschte Frequenzband (FM oder AM) auszuwählen.
4
Die TUNING-Taste ( oder
der einzustellen.
Manuelle Abstimmung:
) drücken, um den gewünschten Sen-
Die TUNING-Taste drücken, bis der gewünschte Sender eingestellt wird.
Abstimmautomatik:
Wenn die TUNING-Taste mehr als 0,5 Sekunden gedrückt wird, startet der Sendersuchlauf automatisch, und der Tuner stoppt am zuerst empfangbaren Rundfunksender.
" Wenn Rundfunkstörung auftritt, kann der Sendersuchlauf im selben Augenblick automatisch stoppen.
" Der Sendersuchlauf überspringt Sender von schwachem Signal.
" Zum Stoppen der Abstimmautomatik die TUNING-Taste noch einmal drükken.
" Wenn ein RDS(Radio-Daten-System)-Sender eingestellt wird, wird die Frequenz zuerst angezeigt, und dann leuchtet die RDS-Anzeige. Danach erscheint der Sendername.
" Für mit "ASPM" gespeicherte RDS-Sender kann vollautomatische Abstimmung erzielt werden (siehe Seite 45).
- Rundfunkempfang -
Grundbedienung
Hinweise:
Empfangen einer UKW-Stereosendung:
Die BAND-Taste drücken, so daß die "STEREO"-Anzeige aufleuchtet.
" "ST" erscheint, wenn eine UKW-Sendung in Stereo ist.
UKW-Stereo-Empfangsanzeige
1
Zum Einschalten der Stromversorgung die ON/STAND-BY-Taste
drücken.
2
Zum Schalten in die Tuner-Funktion ist "FM" oder "AM" anzuzeigen, indem die FUNCTION-Taste gedrückt wird.
Der DVD-Player schaltet automatisch in die Bereitschafts-Betriebsart.
UKW-Stereo-Betriebsartenanzeige
" Bei schwachem UKW-Empfang die BAND-Taste drücken, so daß die "STEREO"Anzeige erlischt. Der Empfang schaltet auf Mono, und der Klang wird klarer.
Nach Gebrauch:
Zum Schalten in die Bereitschafts-Betriebsart die ON/STAND-BY-Taste drücken.
D-25
02/8/28
SD-AT50H(H)D3.fm
Empfangen des gespeicherten Senders
1
Die Schritte 1 - 3 im Abschnitt "Rundfunkempfang" auf Seite 25
durchführen.
2
Die ENTER-Taste drücken, um in die Festsenderspeicherungs-Betriebsart zu schalten.
3
Innerhalb von 5 Sekunden die Taste
TUNER PRESET ( oder ) drükken, um die Vorwahlkanalnummer
anzuwählen.
Die TUNER PRESET-Taste (
Sender auszuwählen.
oder
) drücken, um den gewünschten
Vorwahlkanal
Frequenz und Frequenzband
Wählen eines Festsenders mit den Direkt-Nummerntasten:
Sender 1 - 10:
Sender 11 - 40:
Die entsprechende Nummer ("1" - "10/0") drücken.
Die ">10"-Taste und dann die gespeicherte Festsendernummer
drücken.
Zum Beispiel Anwählen von 28
Die Sender einspeichern, und dabei der Reihe nach mit dem Vorwahlkanal 1 beginnen.
4
Innerhalb von 5 Sekunden die
ENTER-Taste drücken, um den Sender abzuspeichern.
1 Die ">10"-Taste drücken.
2 Die "2"-Taste drücken.
3 Die "8"-Taste drücken.
Innerhalb von 5 Sekunden die Tasten drücken.
! Löschen allen Festsenderspeicherinhalts
1
2
5
DEUTSCH
Die CLEAR-Taste 3 Sekunden oder mehr gedrückt halten.
Während "CLEAR" auf dem Display erscheint, die ENTER-Taste drücken.
Die Schritte 1 - 4 wiederholen, um andere Sender zu speichern
oder einen Festsender zu ändern.
Wenn ein neuer Sender abgespeichert wird, wird der früher gespeicherte Sender
gelöscht.
Grundbedienung
Sie können 40 MW- und UKW-Sender abspeichern und per Tastendruck abrufen.
(Vorabstimmung)
! Abrufen eines gespeicherten Senders
- Empfangen des gespeicherten Senders -
! Abspeichern eines Senders
SD-AT50H
DX-AT50H
Hinweis:
Die Speicherschutzfunktion bleibt einige Stunden die gespeicherten Sender erhalten,
selbst wenn ein Stromausfall eintreten sollte oder das Netzkabel getrennt wird.
D-26
02/8/28
SD-AT50H(H)D3.fm
1
SD-AT50H
DX-AT50H
Abspielen einer Disc
DEUTSCH
Den Fernseher einschalten, und den Eingang dementsprechend auf "VIDEO 1",
"VIDEO 2" usw. schalten.
1
(DVD/CD)
Die ON/STAND-BY-Taste auf der AV-Steuereinheit oder Fernbedienung drücken, um die Stromversorgung einzuschalten.
Wenn die ON/STAND-BY-Taste auf dem DVD-Player gedrückt wird, wird die
Funktion automatisch in DVD umgeschaltet.
2
Wenn die Funktion auf DVD nicht gestellt
ist, die FUNCTION-Taste drücken, um sie
auf "DVD" zu stellen.
3
Zum Öffnen der Disc-Schublade die Taste
- Abspielen einer Disc -
Grundbedienung
" Der Start-Bildschirm erscheint.
" Beim Abspielen einer Audio-CD "DVD" anwählen.
" Durch Drücken der -Taste auf der Fernbedienung
kann dieselbe Operation durchgeführt werden.
drücke
Etikettenseite
Disc-Schublade
Die Disc in die Haken schieben.
(Eine 8 cm Disc kann abgespielt werden.)
" Die Disc mit der Etikettenseite nach oben weisend auf die Schublade legen.
" Wenn sich das Anzeigefenster des DVD-Players auf der Unterseite befindet,
kann eine Disc fallen oder nicht herausgenommen werden.
4
Zum Schließen der Disc-Schublade die -Taste drücken.
Wenn die verwendende Disc die Startautomatik unterstützt, beginnt ihre Wiedergabe automatisch [selbst wenn Sie die (DVD/CD)-Taste nicht drücken], sobald Sie die Disc-Schublade schließen.
5
(DVD/CD)
Wenn Sie im Schritt 4 keine Wiedergabe starten können, die
(DVD/CD)-Taste drücken.
Hinweis:
Wird der DVD-Player eingeschaltet oder die Eingangsquelle in "DVD" umgeschaltet,
wird keine Operation für 5 Sekunden angenommen, da der DVD-Player die Anfangseinstellung ausführt.
D-27
02/8/28
SD-AT50H(H)D3.fm
SD-AT50H
DX-AT50H
DEUTSCH
Hinweise:
" Eine Sicherheitsfunktion stellt automatisch das System auf die BereitschaftsBetriebsart, wenn Sie beim Abspielen von bestimmten Discs den Lautstärkepegel
zu hoch stellen. In diesem Fall den Lautstärkepegel vermindern, und die Wiedergabe neu starten.
" Auf einigen Discs können Haltepositionen aufgezeichnet werden. Beim Abspielen
einer solchen Disc stoppt Wiedergabe dort.
" Beim Betrieb kann " " erscheinen, um darauf hinzuweisen, daß der Discbetrieb
nicht möglich ist.
" Wird der DVD-Player länger als 5 Minuten nach dem Druck auf die Stopptaste
nicht bedient, erscheint ein Bildschirmschoner. Nach Ablauf von weiteren 30
Minuten schaltet der Player in die Bereitschafts-Betriebsart.
! Unterbrechen der Wiedergabe
Die STILL/PAUSE -Taste drücken.
Um die Wiedergabe von derselben Stelle an fortzusetzen, die
-Taste drücken.
! Beenden der Wiedergabe
Die -Taste drücken.
! Fortsetzen der Wiedergabe nach Stopp
(Folgewiedergabe)
Sie können die Wiedergabe von der Stelle an fortsetzen, wo sie gestoppt wird.
1
Während der Disc-Wiedergabe die Taste
drücken.
Das System speichert die gestoppte Stelle.
2
Zum Fortsetzen der Wiedergabe die Taste
(DVD/CD) drücken.
Ab gestoppter Stelle setzt sich Wiedergabe fort.
Abbrechen der Folgewiedergabe:
Die -Taste zweimal drücken.
Hinweise:
" Auf einigen Discs ist die Folgewiedergabefunktion nicht möglich.
" Abhängend von der Disc setzt sich Wiedergabe ab Punkt etwas vor der gestoppten Stelle fort.
! Kopfhörer
" Vor dem Anschließen oder Trennen des Kopfhörers die Lautstärke vermindern.
" Einen Kopfhörer mit 3,5 mm Stecker und 16 Ohm bis 50 Ohm Impedanz verwenden. Die empfohlene Impedanz ist 32 Ohm.
" Beim Anschließen des Kopfhörers werden die Lautsprecher automatisch getrennt.
Die Lautstärke mit den VOLUME-Tasten einstellen.
" Mit dem Kopfhörer können Sie die Surround-Funktion nicht benutzen.
- Abspielen einer Disc -
" Bei der Nichtverwendung die Disc-Schublade schließen. Andernfalls kann sich
Staub im Inneren ansammeln; dies kann Störung des DVD-Players verursachen.
" Der DVD-Player erwärmt sich geringfügig, wenn er längere Zeit in Betrieb gesetzt
wird. Aber der DVD-Player ist nicht beschädigt.
" Wenn Sie versuchen, Discs mit Kratzern oder mit einem anderen Regionalcode,
unabspielbare bzw. beschränkte (*1) Discs abzuspielen, erscheint eine Fehlermeldung auf dem Fernsehschirm, und die Disc wird nicht abgespielt.
(*1) Entsprechend dem Zuschaueralter können einige DVDs nicht betrachtet werden.
Grundbedienung
Vorsicht:
(DVD/CD)
D-28
02/8/28
SD-AT50H(H)D3.fm
1
SD-AT50H
DX-AT50H
Grundbedienung
DEUTSCH
! Schneller Vor-/Rücklauf (Suchlauf)
Während der Disc-Wiedergabe können Sie die gewünschte Stelle suchen.
1
Während der Disc-Wiedergabe die Taste
oder
drücken.
-Taste
" Bei jedem Druck auf die Taste schaltet die Suchlaufgeschwindigkeit wie folgt.
- Grundbedienung -
Fortgeschrittene Disc-Funktionen
Beispiel: Beim Drücken der
2
Sie können das laufende Kapitel (Titel) zum nächsten überspringen.
Während der Disc-Wiedergabe die Taste
oder
drücken.
-Taste springt zum nächsten Kapitel (Titel).
" Die
-Taste springt zum Anfang des laufenden Kapitels (Titel). Die
-Ta" Die
ste erneut drücken, um zum Anfang des vorherigen Kapitels (Titel) zu springen.
Hinweise:
8 (ungefähr 8-fach)
60 (ungefähr 60-fach)
30 (ungefähr 30-fach)
" Schneller Vor- und Rücklauf werden durch der
führt.
(DVD/CD)
! Auffinden des Kapitel- oder Spuranfangs
(Übersprung)
2 (ungefähr 2-fach)
- bzw.
-Taste durchge-
Die Taste (DVD/CD) drücken, um auf die normale Wiedergabe zurückzuschalten.
Hinweise:
" An einigen Discs ist die Suchlauf-Funktion nicht möglich.
" Auf einer DVD funktioniert Suchlauf zwischen Titeln nicht.
" Beim Suchlauf auf einer DVD wird kein Ton gehört, und die Untertitel erscheinen
nicht.
" Für Audio-CDs wird die Abtastgeschwindigkeit auf 16-fach festgesetzt. Während
des Suchlaufs wird der Ton verzerrt, dies ist jedoch nicht defekt.
" Wenn während der DVD-Wiedergabe schneller Suchlauf durchgeführt wird, kann
Vor- oder Rücklauf von Bildern mit der in diesem Handbuch beschriebenen
Geschwindigkeit nicht möglich sein, anhängend von der abzuspielenden Disc
oder Szene.
- oder
" Die gleiche Operation kann durchgeführt werden, indem Sie die
Taste auf dem DVD-Player 2 Sekunden oder länger gedrückt halten.
" Auf einigen Discs ist die Übersprungfunktion nicht möglich. Einige Discs zeigt kein
Kapitel (Spur) an.
" Auf einer DVD ist der Sprung zwischen den Titeln nicht möglich.
- oder
" Die gleiche Operation kann durchgeführt werden, indem Sie die
Taste auf dem DVD-Player drücken.
D-29
02/8/28
SD-AT50H(H)D3.fm
SD-AT50H
DX-AT50H
1
In der Stopp- oder Wiedergabe-Betriebsart die DIRECT-Taste drücken.
Beispiel: Während der DVD-Wiedergabe
Titel
Kapitel
! Standbild/Bildfortschaltung
Cursor
2
" Auf einigen Discs ist Direktwiedergabefunktion nicht möglich.
" Einige Discs können die Kapitelnummer nicht anzeigen.
" Mit DVDs können Sie nur im laufenden Titel die gewünschte Stelle bestimmen
und nicht in einem anderen Titel.
" Mit Audio-CDs können Sie nur im laufenden Titel die gewünschte Stelle bestimmen und nicht in der Disc.
" Einige Discs kann von der bestimmten Stelle an nicht abgespielt werden.
" Auf einigen Discs funktioniert der Zeit-Suchlauf nicht.
" Beim Stoppen der Disc können Sie die Zeit nicht bestimmen.
Innerhalb von 30 Sekunden " " wählen, indem die - oder -Taste
gedrückt wird, und die Titelnummer mit den Direkt-Nummerntasten (0 - 9) eingeben.
Sie können das Bild einfrieren und Einzelbilder einzeln fortschalten.
1
Innerhalb von 30 Sekunden mit Hilfe der Direkt-Nummerntasten (0
- 9) die Kapitelnummer eingeben.
Beispiel:
Wählen des Kapitels 1: "10/0" und "1" drücken.
Wählen des Kapitels 12: "1" und "2" drücken.
drücken.
Bei jedem Druck auf die STILL/PAUSE -Taste in der Standbild-Betriebsart wird
das Einzelbild fortgeschaltet.
Durch Eingeben der Titelnummer können Sie in den Kapitelnummer-Eingabemodus schalten.
3
Während der Disc-Wiedergabe die Taste STILL/PAUSE
2
Die Taste (DVD/CD) drücken, um auf die normale Wiedergabe zurückzuschalten.
Hinweis:
Auf einigen Discs sind die Standbild- und Bildfortschaltungsfunktion nicht möglich.
! Zeitlupenwiedergabe
Wählen und Abspielen des gewünschten Kapitels (Titel):
In der Wiedergabe-Betriebsart die Direkt-Nummerntasten (0 - 9) drükken, um die Kapitelnummer (Titelnummer) anzuwählen.
Bei der Kapitelnummer (Titelnummer) mit 2 Stellen oder mehr ">10" drücken, und
die Nummer eingeben.
Beispiel:
Wählen des Kapitels 14: ">10", "1" und "4" drücken.
Sie können die Wiedergabe-Geschwindigkeit verringern.
1
2
Während der Disc-Wiedergabe die Taste STILL/PAUSE
Beim vorübergehenden Stoppen des Bildes die
drücken.
-Taste drücken.
Drei Geschwindigkeiten sind verfügbar. Bei jedem Tastendruck wechselt die Geschwindigkeit der Zeitlupenwiedergabe in der folgenden Reihenfolge:
Abspielen durch Bestimmen der Zeit (Zeit-Suchlauf):
Durch Bestimmen der Zeit können Sie eine Wiedergabe von der gewünschten Stelle
an machen.
1
2
Während der Wiedergabe die DIRECT-Taste
zweimal drücken.
TOTAL
_:__:__
2:16:13
Innerhalb von 30 Sekunden ist die Zeit mit den
Direkt-Nummerntasten zu bestimmen.
TOTAL
1:23:40
2:16:13
" Um 1 Stunde, 23 Minuten und 40 Sekunden festzusetzen, "12340" eingeben.
" Wenn Sie die falsche Nummer eingeben, die CLEAR-Taste drücken, und
dann wieder eingeben.
1/16 (ungefähr 1/16-fach)
1/8 (ungefähr 1/8-fach)
1/2 (ungefähr 1/2-fach)
Die gleiche Operation kann durchgeführt werden, indem Sie die
-Taste auf
der Frontplatte des DVD-Players anstatt der Fernbedienung länger als 2 Sekunden gedrückt halten.
3
- Grundbedienung -
Wählen und Abspielen des gewünschten Titels und Kapitels:
DEUTSCH
Hinweise:
Fortgeschrittene Disc-Funktionen
! Starten der Wiedergabe ab gewünschter
Stelle (Direktwiedergabe)
Die Taste (DVD/CD) drücken, um auf die normale Wiedergabe zurückzuschalten.
Hinweis:
Auf einigen Discs sind die Zeitlupenwiedergabe-Funktionen nicht möglich.
D-30
02/8/28
SD-AT50H(H)D3.fm
1
SD-AT50H
DX-AT50H
DEUTSCH
Nützliche Funktionen
! Wiedergabe in zufälliger Reihenfolge
(Zufallswiedergabe)
! Wiedergabe in der gewünschten Reihenfolge (programmierte Wiedergabe)
Die Titel auf der Disc können automatisch in zufälliger Reihenfolge abgespielt werden.
Sie können die gewünschten Titel in der gewünschten Reihenfolge abspielen.
Bis zu 99 Titel können programmiert werden.
In der Stopp-Betriebsart die MODE-Taste
zweimal drücken.
1
RANDOM
In der Stopp-Betriebsart die MODE-Taste
drücken.
PROGRAM TIME 0:00:00 1/1
Programmierungs-Bildschirm erscheint.
2
2
Die
(DVD/CD)-Taste drücken.
Eine Titelnummer mit den Direkt-Nummerntasten eingeben.
PROGRAM TIME 8:88:88 1/1
Beeden der Zufallswiedergabe:
Die -Taste drücken.
" Das obige Verfahren wiederholen, wenn Sie weitere Titelnummern eingeben wollen.
" Wenn Sie die falsche Nummer eingeben, die CLEAR-Taste drücken, und
dann wieder eingeben.
" Wenn Sie einen Titel mit 2 oder mehr Stellen eingeben:
Beispiel:
Wählen des Titels 14:
">10", "1" und "4" drücken.
Hinweise:
- Nützliche Funktionen -
Fortgeschrittene Disc-Funktionen
1
" Mit einigen Disc kann diese Funktion nicht benutzt werden.
" Wenn sämtliche Titel in der Zufallswiedergabe-Betriebsart abgespielt worden
sind, stoppt die Wiedergabe automatisch.
" In der Wiedergabe- oder Pausen-Betriebsart können Sie die Zufallswiedergabe
einstellen.
" Während der programmierten Wiedergabe ist Zufallswiedergabe nicht möglich.
" Die ON SCREEN-Taste drücken, um während der Zufallswiedergabe den Zustand
zu überprüfen.
" In der Zufallswiedergabe wählt der DVD-Player automatisch Titel und spielt sie ab.
(Sie können die Titelfolge nicht wählen.)
3
Die Taste
(DVD/CD) drücken, um mit der Wiedergabe zu beginnen.
" Programmierte Titel werden gespeichert, bis eine Disc herausgenommen wird.
" Die Wiedergabe wird mit der -Taste vorübergehend unterbrochen. Beim
Fortsetzen der Wiedergabe beginnt die programmierte Wiedergabe von der
gestoppten Stelle an.
" Durch zweimaliges Drücken der -Taste wird die programmierte Wiedergabe
abgeschaltet. Wenn Sie nach dem Drücken der MODE-Taste mit der Wiedergabe beginnen, startet die programmierte Wiedergabe von Anfang an.
Ändern des programmierten Inhalts:
Das obige Verfahren ab Schritt 1 wiederholen.
Hinweise:
(DVD/CD)
" In der Pausen- oder Wiedergabe-Betriebsart kann Programmierung nicht durchgeführt werden.
" Mit einer Disc, die keine Titelinformation enthält, arbeitet die Sequenzprogrammierung nicht.
" Mit einer Disc, die nicht programmiert werden kann, arbeitet Sequenzprogrammierung nicht.
" Zum Abbrechen der Programmierung die RETURN -Taste drücken.
" Die ON SCREEN-Taste zu drücken, um während der programmierten Wiedergabe den Zustand zu überprüfen.
" Selbst wenn Sie die ON/STAND-BY-Taste drücken, um in die BereitschaftsBetriebsart oder die Funktion von DVD in eine andere umzuschalten, werden die
programmierten Titel gelöscht.
D-31
02/8/28
SD-AT50H(H)D4.fm
SD-AT50H
DX-AT50H
DEUTSCH
1
Während der Disc-Wiedergabe die Taste REPEAT drücken.
Bei jedem Tastendruck wechselt die Wiederhol-Betriebsart in der folgenden Reihenfolge.
DVD:
Audio-CD:
MP3
2
OFF
OFF
CHAPTER
TITLE
TRACK
ALL
Dadurch, daß der gewünschte Teil während der Wiedergabe bestimmt wird, können
Sie ihn wiederholt abspielen.
1
Während der Disc-Wiedergabe die Taste A
- B REPEAT drücken.
[A - ]
Dies registriert den Ausgangspunkt (A).
2
Die Taste A - B REPEAT noch einmal drükken.
[A - B]
Damit beginnt A-B Wiederholung vom Ausgangs- (A) bis zum Endpunkt (B).
OFF
TRACK
ALBUM
DISC
Durch wiederholtes Drücken der REPEAT-Taste "OFF" anwählen,
um in die normale Wiedergabe umzuschalten.
Vorsicht:
Nach Beendigung der wiederholten Wiedergabe ist die -Taste auf jeden Fall zu
drücken. Ansonsten wird die Disc ununterbrochen abgespielt.
Hinweise:
" Mit einigen Disc kann diese Funktion nicht benutzt werden.
" Wenn Sie "ALL" anwählen, indem die REPEAT-Taste während der programmierten Wiedergabe oder Zufallswiedergabe einer Audio-CD gedrückt wird, wird die
Wiedergabe wiederholt.
" Wenn Sie während der wiederholten Wiedergabe eine andere Taste drücken,
kann die Wiedergabe abgebrochen werden.
3
Die Taste A - B REPEAT drücken, um auf die normale Wiedergabe
zurückzuschalten.
Hinweise:
"
"
"
"
Auf einigen Discs funktioniert A-B wiederholte Wiedergabe nicht.
Nur innerhalb eines Titels ist die A-B wiederholte Wiedergabe für DVD möglich.
Die A-B wiederholte Wiedergabe einer Audio-CD innerhalb eines Titels durchführen.
Für einige Szenen in der DVD kann die A-B wiederholte Wiedergabe nicht möglich sein.
! Auswählen eines Titels vom Topmenü der
Disc
Auf einer DVD mit mehreren Titeln können Sie einen Titel vom Topmenü auswählen.
1
2
In der Stopp- oder Wiedergabe-Betriebsart die TOP MENU-Taste drükken, um das Titelmenü anzuzeigen.
Beispiel
1 Drama
2 Action
3 SF
4 Komödie
Die Taste , , oder drücken, um den Titel auszuwählen, und
dann die ENTER-Taste betätigen.
" Der gewählte Titel wird wiedergegeben.
" Je nach der Disc kann ein Titel gewählt werden, indem die Direkt-Nummerntasten (0 - 9) an der Rückseite der Fernbedienung gedrückt wird.
- Nützliche Funktionen -
Sie können ein Kapitel (Spur) oder einen Titel wiederholt abspielen, indem es während der Wiedergabe bestimmt wird.
! Wiederholte Wiedergabe des Inhalts zwischen den bestimmten Punkten (A-B Wiederholung)
Fortgeschrittene Disc-Funktionen
! Wiederholte Wiedergabe
Hinweise:
" Das hier gezeigte Verfahren bietet nur allgemeine Schritte. Es hängt das aktuelle
Verfahren zur Benutzung des Titelmenüs von der verwendeten Disc ab. Siehe
Disc-Hülle für weitere Einzelheiten.
" Wenn die abspielende Disc keine Titelmenü besitzt, erscheint nichts auf dem Bildschirm.
D-32
02/8/28
SD-AT50H(H)D4.fm
1
SD-AT50H
DX-AT50H
MP3-Disc-Betrieb
DEUTSCH
Direkt-Wiedergabe:
1
2
Die DIRECT-Taste drücken.
Die Taste , , oder drücken, um einen Titel anzuwählen; danach die
CD)-Taste betätigen.
(DVD/
Programmierte Wiedergabe:
3
4
In der Stopp-Betriebsart die MODE-Taste drücken.
Die - oder -Taste drücken, um ein Album anzuwählen; danach die ENTER-Taste betätigen.
Die Taste oder drücken, um einen Titel anzuwählen; danach die ENTER-Taste betätigen.
Die -Taste drücken, um zum Albumwahl-Bildschirm zurückzukehren.
Nach Beendigung der Programmierung ist die (DVD/CD)-Taste zu drücken.
Vorsicht:
Wenn Sie bei der Aufnahme auf CD-R/RW MP3- in "Audio-CD"-Daten umwandeln,
sie als Audio-CD abspielen. Die MP3-Operation kann nicht durchgeführt werden.
Hinweise:
- MP3-Disc-Betrieb -
Fortgeschrittene Disc-Funktionen
1
2
(DVD/CD)
! MP3-Disc-Wiedergabe
Sie können CD-R/RWs abspielen, die im MP3-Format aufgezeichnet wurden.
1
Eine Disc mit MP3-Titeln einlegen.
Ein Menü-Bildschirm erscheint.
" "+" erscheint vor dem Albumnamen.
" Bis zu 14 Zeichen können für einen Albumnamen angezeigt werden, und 25 Zeichen für einen Titelnamen. Unterstreichung, Sternchen und Leerzeichen können
nicht angezeigt werden.
" Das System kann insgesamt 255 Alben und Titel erkennen.
" Die 9. oder tiefer Schichten können nicht wiedergegeben werden.
" Mit Hilfe der Direkt-Nummerntasten können Sie einen Titel für die Direkt-Wiedergabe anwählen, wenn die Bildschirmanzeige abgeschaltet wird.
" Der Bildschirm zeigt bis zu 5 Titel für die programmierte Wiedergabe an. Wenn
weitere Titel eingegeben werden, erscheint der nächste Bildschirm. Die
- oder
-Taste drücken, um den Bildschirm umzuschalten.
" Wenn Sie einen falschen Titel eingeben, die CLEAR-Taste drücken.
" Die -Taste zweimal drücken, um die programmierte Wiedergabe zu stoppen.
VOLUME LABEL
FIRST PLAY
+ALBUM01
+ALBUM02
+ALBUM03
+ALBUM04
SELECT:
RETURN:
2
ENTER:
START: PLAY
Die Taste , , oder drücken, um einen Titel anzuwählen; danach die (DVD/CD)-Taste betätigen.
Durch Drücken der TOP MENU-Taste kehrt es zur obersten Schicht zurück.
D-33
02/8/28
SD-AT50H(H)D4.fm
Verschiedene Einstellungen
! Ändern der Audio-Sprache (Audio-Ausgang)
Während er Wiedergabe können Sie die Audio-Sprache (Audio-Ausgang) verändern.
2
Während der Disc-Wiedergabe die Taste
AUDIO drücken.
1. ENG
(DTS 5.1 Surround)
Innerhalb von 5 Sekunden die AUDIO-Taste wiederholt drücken,
um die Audio-Nummer auszuwählen.
DVD:
Sie können eine der Audio-Sprachen anwählen, die auf einer DVD aufgezeichnet sind.
ENG
SPA
FRE
Audio-CD:
STEREO
R-CH
L-CH
Hinweise:
" Die Audio-Sprache auf einigen DVDs kann nicht verändert werden.
" Für Audio-Sprache und -System beziehen Sie sich auf das Handbuch der Disc.
Während der Wiedergabe können Sie die Untertitelsprache ändern oder den Untertitel ausblenden.
1
2
Während der Disc-Wiedergabe die Taste SUB
TITLE drücken.
Innerhalb von 5 Sekunden die SUB TITLE-Taste wiederholt drücken, um die Untertitelsprache auszuwählen.
1.ENG/6
! Wählen einer Untertitel- oder Audio-Sprache vom Discmenü
Sie können die gewünschte Untertitel- oder Audio-Sprache und Tonsystem [Dolby
Digital (5.1 Kanäle) oder DTS Sound] auf der DVD auswählen, wenn sie ein Discmenü besitzt.
1
6.FRE/6
Die SUB TITLE- und dann die - oder -Taste drücken, um den Untertitel auszublenden.
Hinweise:
" Einige DVDs verbieten Änderung der Untertitelsprache.
" Wenn keine Untertitel auf Disc aufgezeichnet sind, wird "NOT AVAILABLE" angezeigt.
" Es kann etwas dauern, bis die Untertitelsprache auf die gewählte geschaltet wird.
" Auf einigen DVDs kann der Untertitel nicht ausgeblendet werden.
2
Bei Stopp oder Wiedergabe der Disc
die MENU-Taste drücken, um das
Discmenü anzuzeigen.
Beispiel
1.Highlights
2.Start Movie
Die Taste , , oder drücken, um die Einstellung zu ändern, und
die ENTER-Taste betätigen.
- Verschiedene Einstellungen -
1
! Ändern der Untertitelsprache
DEUTSCH
Fortgeschrittene Disc-Funktionen
Die gewählte Untertitel- und Audio-Sprache werden zurückgesetzt, wenn Sie den
DVD-Player auf die Bereitschafts-Betriebsart stellen oder die Disc wechseln. Um die
DVD immer in den gewünschten Sprachen abzuspielen, sie in den Anfangseinstellungs-Bildschirm einstellen (siehe Seite 19).
SD-AT50H
DX-AT50H
Für einige Discs können Sie ebenfalls die Direkt-Nummerntasten benutzen.
Hinweis:
Das hier gezeigte Verfahren bietet nur allgemeine Schritte. Es hängt das aktuelle
Verfahren zur Benutzung des Disc-Menüs von der verwendeten Disc ab. Siehe DiscHülle für weitere Einzelheiten.
D-34
02/8/28
SD-AT50H(H)D4.fm
1
SD-AT50H
DX-AT50H
Verschiedene Einstellungen (Fortsetzung)
DEUTSCH
! Aufhellen eines Bildes (Schwarzpegel-Einstellung)
Während der Wiedergabe kann das Bild eingestellt werden.
2
- Verschiedene Einstellungen -
Fortgeschrittene Disc-Funktionen
1
Während der Disc-Wiedergabe die
Taste BLACK LEVEL drücken.
BLACK LEVEL: OFF
Innerhalb von 5 Sekunden die BLACK LEVEL-Taste wiederholt
drücken, um "OFF" oder "ON" anzuwählen.
OFF
ON
Einstellung
Normales Bild
Helles Bild
! Ändern des Blickwinkels
Sie können den Blickwinkel beim Abspielen der DVD-Video ändern, die von mehreren Winkeln aufgezeichnete Szenen enthält.
1
Wenn " " in der rechten oberen Ecke des Fernsehschirms angezeigt wird, die ANGLE-Taste drücken.
2
Innerhalb von 5 Sekunden die ANGLE-Taste wiederholt drücken,
um die Winkelnummer auszuwählen.
Hinweise:
" Einige DVDs verbieten Änderung des Blickwinkels.
" Die Winkelnummer wird nicht angezeigt, wenn keine Blickwinkel auf Disc aufgezeichnet sind.
" Beziehen Sie sich auf das Handbuch der Disc, da die Operation abhängig von der
Disc abweichen kann.
! Heranholen eines Bildes (Zoomen)
Während der DVD-Wiedergabe können Sie Bilder vergrößern.
1
Während der Disc-Wiedergabe die Taste ZOOM
drücken.
ZOOM [x2]
ZOOM-Anzeige
Bei jedem Druck auf die ZOOM-Taste wechselt die Zoomeinstellung wie folgt:
ZOOM [
2
2]
ZOOM [
4]
ZOOM [OFF]
Um den Blickwinkel zu schalten und
den gewünschten Teil eines gezoomten Bildes anzuzeigen, die Taste , , oder wiederholt drücken.
Hinweise:
" Beim Zoomen kann ein Bild verzerrt werden.
" Keine Untertitel können gezoomt werden.
" Für den jetzt angezeigten Teil beziehen Sie sich auf die Anzeige im rechten unteren Teil des Bildschirms.
D-35
02/8/28
SD-AT50H(H)D4.fm
SD-AT50H
DX-AT50H
Während der Disc-Wiedergabe die ON SCREEN-Taste drücken. (Bei jedem Druck
auf diese Taste wechselt sie.)
DVD:
Während der DVD-Wiedergabe beispielsweise erscheinen die folgenden Anzeigen.
Betrieb
Beim Einschalten
ohne Disc
Disc-Daten ist im
Lesen
Audio-CD:
Fernsehschirm
Anzeige des DVD-Players
LOADING
Titel/Zeit
Kapitel/Zeit
Verbleibende
Wiedergabezeit für
das laufende Kapitel
T
Verstrichene Wiedergabezeit
für das laufende Kapitel
4/16 0:03:21 - 0:02:15
Verbleibende
Wiedergabezeit
für den laufenden Titel
Verstrichene Wiedergabezeit
für den laufenden Titel
Gesamtzahl von Kapiteln
Gesamtzahl von Titeln
Gegenwärtige Kapitelnummer
Gegenwärtige Titelnummer
Disctyp
DVD
Stopp
Wiedergabe
Gesamttitel/Zeit
Titel/Zeit
Verbleibende
Wiedergabezeit für
den laufenden Titel
ALL
4/12 0:13:45 - 0:45:40
Gesamte verstrichene
Wiedergabezeit für die Disc
Gesamtzahl von Titeln
Gesamtzahl von Titeln
Gegenwärtige Titelnummer
Gegenwärtige Titelnummer
Bitrate
Schichtnummer
Pause
Gesamte verbleibende
Wiedergabezeit für die Disc
Verstrichene Wiedergabezeit
für den laufenden Titel
Das Display verschwindet.
Anzeige für
Hinweise:
wiederholte Wiedergabe " Für eine MP3-Disc wird das Folgende
angezeigt.
Bildinformation
Zeitlupe
Schneller Vorlauf
(Suchlauf)
Schneller Rücklauf
(Suchlauf)
Gegenwärtiger Titelname (gelb)
Das Display verschwindet.
DEUTSCH
Verstrichene Wiedergabezeit für den
laufenden Titel
" Wenn Sie die RETURN -Taste drükken, verschwindet das Display.
- Verschiedene Einstellungen -
Sie können die Betriebsanzeigen auf dem Fernsehschirm anzeigen oder ausblenden.
! DVD-Modus-Operationsanzeige
Fortgeschrittene Disc-Funktionen
! Schalten der Anzeige auf dem Fernsehschirm
D-36
02/8/28
SD-AT50H(H)D4.fm
1
SD-AT50H
DX-AT50H
Genießen des Surround-Sounds (Sound-Betriebsart)
DEUTSCH
Der Raumklangeffekt wird aktiviert, wenn Sie eine mit Dolby Digital oder DTS aufgezeichnete DVD abspielen. Mit Dolby Pro Logic II können Sie ebenfalls 2-Kanal-Stereo-Sound genießen.
Fortgeschrittene Funktionen
- Genießen des Surround-Sounds (Sound-Betriebsart) -
DVD-Player
Dolb
y
DTS Digital-S
-Sign
ignal
al
Dolby Digital
DTS
Digital-Tuner usw.
al
osign
Stere
Surroundtypen
Quelle
Dolby Digital
Disc mit diesem Warenzeichen
DTS (Digital Theater Systems)
Beschreibung
Umschaltbare
Sound-Betriebsart
Eines von Digital-Audio-Systemen für Aufführung. Sie können den Raumklangeffekt mit dem Heimkino-System genießen.
Die mit Dolby Digital aufgenommene Disc wird automatisch
vom System erkannt, wenn sie abgespielt wird.
Eines von Digital-Audio-Systemen für Theatergebrauch. Als
die Tonqualität betont wird, können Sie den realistischen
Toneffekt im Heimkino-System genießen. Die mit DTS aufgenommene Disc wird automatisch vom System erkannt, wenn
sie abgespielt wird.
Disc mit diesem Warenzeichen
Dolby Pro Logic II
Dolby Pro Logic II
In Stereo aufgenommene Discs und Videobänder
Stereo
Standard
(Dynamischer Sound)
Stereo
Standard
(Dynamischer Sound)
Beim Abspielen von in Stereo aufgenommener Disc oder Vi- Stereo (*)
deoband wird es durch die Dolby Pro Logic II-Funktion erSurround (*)
kannt, und der Ton wird automatisch zum 5.1-Kanal-DigitalSound gewandelt. Natürlicherer Toneffekt kann erzielt wer- Standard
den.
(Dynamischer Sound)
Wenn (*) gewählt wird, erlischt die "
"-Anzeige.
(Siehe Seite 39 zum Wählen der Sound-Betriebsart.)
D-37
02/8/28
SD-AT50H(H)D4.fm
SD-AT50H
DX-AT50H
DEUTSCH
Schalleffekt
Dynamischer Sound
Sie können den normalen Surroundeffekt mit verschiedenen Szenen genießen.
MOVIE:
Zum starken Toneffekt wird der Baßpegel erhöht.
MUSIC:
Durch Wiedergeben des klaren Sounds können Sie lebhaften Klang
genießen.
NIGHT:
Weicher, aber kräftiger Sound wird auch bei niedrigen Lautstärken
erzielt.
Surround
Diese Betriebsart liefert durch den 2Kanal-Sound einen weiten Hörbereich.
Die SURROUND-Anzeige leuchtet
auf.
Stereo
Über Front-Lautsprecher und Subwoofer können Sie die großen Schalleffekte
genießen.
Die STEREO-Anzeige leuchtet auf.
DOLBY DIGITAL/DTS-Anzeige:
Das Eingangssignal wird automatisch erkannt und die Anzeige leuchtet auf.
DOLBY PRO LOGIC II-Anzeige:
" Diese Anzeige leuchtet, wenn die 2-Kanal-Signale eingegeben werden, um sie auf
den 5.1-Kanal-Surround-Sound zu erweitern.
" Sogar der mit Dolby Digital aufgenommene 2-Kanal-Sound wird in 5.1 Kanälen
umgewandelt.
Hinweise:
" Während der Wiedergabe der Disc von mehreren Typen (Dolby Digital, DTS,
usw.) können Sie den Klang schalten (Seite 34).
" Wenn die Surround-Betriebsart auf die Standard- oder Surround-Betriebsart
gestellt wird, wird der Sound von Monosignalen nur über Center-Lautsprecher
gehört.
" Wenn die Surround-Betriebsart auf Stereo gestellt wird, wird der gleiche MonoSound im rechten und linken Kanal wiedergegeben.
" Die Surround-Anzeige leuchtet entsprechend dem Eingangs-Tonquelle.
1 Anzeige für linkes Front-Signal
2
1
3
2 Center-Signal-Anzeige
3 Anzeige für rechtes Front-Signal
4 LFE (Tieftoneffekt)-Signal-Anzeige
5 Anzeige für linkes Surround-Signal
4
6 Surround-Monosignal-Anzeige
7 Anzeige für rechtes Surround-Signal
5
6
Fortgeschrittene Funktionen
Der Surround-Sound von bis zu 5.1 Kanälen wird wiedergegeben, um dreidimensionalen Effekt zu liefern.
Entsprechend dem aufgezeichneten
Audiosignal gibt das System automatisch den 5.1-Kanal-Sound wieder.
Die STANDARD-Anzeige leuchtet
auf.
- Genießen des Surround-Sounds (Sound-Betriebsart) -
Standard
7
D-38
02/8/28
SD-AT50H(H)D4.fm
1
SD-AT50H
DX-AT50H
Genießen des Surround-Sounds (Sound-Betriebsart) (Fortsetzung)
DEUTSCH
! Ändern der Sound-Betriebsart
Genießen in der Standard-Betriebsart:
Beispiel: Dolby Digital 5.1
Kanäle
Fortgeschrittene Funktionen
- Genießen des Surround-Sounds (Sound-Betriebsart) -
Während der Disc-Wiedergabe die Taste STANDARD drücken.
"STANDARD" erscheint.
Genießen mit dynamischem Sound in der Standard-Betriebsart:
Während der Disc-Wiedergabe die Taste DYNAMIC SOUND drücken.
Durch jedem Drücken dieser Taste wird die Betriebsart in der Reihenfolge von "MOVIE" "MUSIC" "NIGHT" geschaltet.
Die STANDARD-Taste drücken, um den normalen Surround-Sound wiederherzustellen.
Genießen in der Surround- oder Stereo-Betriebsart:
Während der Disc-Wiedergabe die Taste STEREO/
SURROUND drücken.
"SURROUND" oder "STEREO" erscheint.
Bei jedem Tastendruck wechselt die Anzeige zwischen "SURROUND" und "STEREO".
Hinweise:
" Die Sound-Betriebsart wird in "STANDARD" umgeschaltet, indem die DYNAMIC
SOUND-Taste in der Stereo- oder Surround-Betriebsart gedrückt wird.
" Wenn die "DOLBY DIGITAL"- oder "DTS"-Anzeige leuchtet, können Sie die Surround-Betriebsart nicht wählen.
" Einige Discs werden mit einer Abtastfrequenz von 96 kHz aufgezeichnet. Wenn
derartige Disc abgespielt wird, wird die Sound-Betriebsart automatisch auf "STEREO" geschaltet. Während der Wiedergabe kann die Sound-Betriebsart nicht
geändert werden.
D-39
02/8/28
SD-AT50H(H)D4.fm
Ändern der Registrierung in der Fernbedienung
! Ändern der Registrierung des Fernsehers
DEUTSCH
1
Die TV ON/STAND-BY-Taste gedrückt halten und indessen die TV
CHANNEL -Taste betätigen.
2
Den Hersteller-Einstellcode (2 Stellen) mit den Direkt-Nummerntasten (0 - 9) eingeben, und die TV ON/STAND-BY-Taste drücken.
Die Einstellung wird registriert, und der Fernseher kann mit der Fernbedienung
dieses Systems bedient werden
Fernsehhersteller
SHARP
PANASONIC
JVC
SONY
MITSUBISHI
HITACHI
TOSHIBA
PIONEER
SANYO
FUJITSU
AIWA
FUNAI
SAMSUNG
Einstellcode
01(*), 02
03, 04, 05
06, 07, 08
09
10, 11, 12, 13
14, 15, 16, 17
18, 19
20
21, 22, 23, 24
25
26
27, 28, 29, 30, 31,
32
33, 34, 35, 36
Fernsehhersteller
EMERSON
FISHER
GE
GOLDSTAR
MAGNAVOX
RCA
ZENITH
PHILIPS
THOMSON
GRUNDIG
FERGUSON
ITT NOKIA
Einstellcode
37, 38, 39, 40
23
41, 42
43
44, 45
46, 47, 48, 49
50, 51
52, 53
54
55
56, 57
58, 59
LOEWE
60, 61
(*): Der vorgegebene Herstellercode ist 01 (SHARP).
Hinweise:
" Was die Hersteller mit 2 oder mehr Einstellcodes betrifft, einen der Codes wählen,
mit der Sie den Fernseher bedienen können.
" Der Code wird nicht eingestellt, wenn die Registrierung innerhalb von 30 Sekunden nicht beendet wird. In diesem Fall die Registrierung noch einmal versuchen.
" Wenn Sie einmal einen Code einstellen, wird der früher gespeicherte Code annulliert.
" Nach dem Auswechseln der Batterien in der Fernbedienung kann der registrierte
Code automatisch auf 01 (SHARP) gestellt werden. In diesem Fall den gewünschten Code wieder registrieren.
" Abhängig vom Fernseher kann eine Registrierung nicht ausgeführt werden. Selbst
wenn Codes eingestellt werden können, können einige Tasten nicht funktionieren.
- Ändern der Registrierung in der Fernbedienung -
Tasten auf den beiden Seiten der Fernbedienung benutzen.
Fortgeschrittene Funktionen
Fernseher von SHARP können mit der Fernbedienung dieses Systems bedient werden, ohne die Operation zu registrieren (außer einigen Modellen). (Siehe Seite 51.)
Durch Ändern der Registrierung in der Fernbedienung können Sie auch Fernseher
anderer Hersteller bedienen.
SD-AT50H
DX-AT50H
D-40
02/8/28
SD-AT50H(H)D4.fm
1
SD-AT50H
DX-AT50H
Lautsprechereinstellungen
DEUTSCH
Die Lautsprecher-Einstellungen werden auf dem Fernsehschirm nicht angezeigt.
Vorsicht:
Zum Einstellen der Lautsprechergröße die Sound-Betriebsart auf "STANDARD" stellen.
Hinweis:
Für die mitgelieferten Lautsprecher wird die empfohlene Größe eingestellt. Für
andere Lautsprecher beziehen Sie sich auf die obenstehende Tabelle auf Seite 42.
Wenn einige der Lautsprecher anders weit von der Hörposition entfernt liegen, können Sie die Lautsprecherverzögerung einstellen, damit es Ihnen vorkommt, als ob
die Lautsprecher gleich weit entfernt liegen.
- Lautsprechereinstellungen -
Fortgeschrittene Funktionen
! Einstellung der Lautsprecherverzögerung
1
Die SETUP AMP-Taste drücken, und die - oder -Taste zum Wählen von "SP DELAY" betätigen. Danach die ENTER-Taste drücken.
2
Innerhalb von 30 Sekunden die - oder -Taste drücken, um die
gewünschten Lautsprecher auszuwählen.
3
Innerhalb von 30 Sekunden die
- oder -Taste drücken, um den
Abstand auszuwählen, und die
ENTER-Taste betätigen.
" Sie können die Entfernung in 0,1 m-Abständen ändern.
" Zum Einstellen des Abstands sonstiger Lautsprecher die Operation ab Schritt
2 wiederholen.
! Einstellung der Lautsprechergröße
Sie können die Größen der nicht mitgelieferten Lautsprecher ändern.
1
Die SETUP AMP-Taste drücken, und die - oder -Taste zum Wählen von "SP SIZE" betätigen. Danach die ENTER-Taste drücken.
2
Innerhalb von 10 Sekunden die - oder -Taste drücken, um die gewünschten Lautsprecher auszuwählen.
Die Anzeigen der gewählten Lautsprecher blinken.
3
Innerhalb von 10 Sekunden die - oder -Taste drücken, um ihre
Größen auszuwählen.
Zum Einstellen von Größen sonstiger Lautsprecher die Operation ab Schritt 2
wiederholen.
Den Abstand zwischen jedem Lautsprecher und der Hörposition messen, und
die Lautsprecherverzögerung einstellen.
In der linken Abbildung liegen die Front-LautCT
sprecher, der Center-Lautsprecher und der
Subwoofer 3 m entfernt und die SurroundFR
FL
Lautsprecher 4 m von der Hörposition entfernt.
3m 3m
SW
3m
3m
4m
4m
SL
SR
Hinweis:
Für den einstellbaren Bereich beziehen Sie sich auf die untenstehende Tabelle auf
Seite 42.
D-41
02/8/28
SD-AT50H(H)D5.fm
SD-AT50H
DX-AT50H
DEUTSCH
! Einstellung des Lautsprecherpegels
! Beenden der Lautsprechereinstellung
Bei ungleichmäßigen Tönen aus den Lautsprechern können Sie sie durch Einstellen
der Lautsprecherpegel ausgleichen.
Die RETURN
2
Innerhalb von 10 Sekunden die - oder -Taste drücken, um die
gewünschten Lautsprecher auszuwählen.
3
Innerhalb von 10 Sekunden die - oder -Taste drücken, um den
Pegel einzustellen.
Lautsprechertyp
Front-Lautsprecher (links, rechts)
Center-Lautsprecher
Surround-Lautsprecher (links, rechts)
" Sie können den Pegel in 1-dB-Abständen einstellen.
" Zum Einstellen der Pegel sonstiger Lautsprecher die Operation ab Schritt 2
wiederholen.
(*) zeigt die Einstellung ab Werk an.
Lautsprechertyp
Hinweise:
" Den Pegel des Subwoofers einstellen, wenn der Ton daraus verzerrt ist.
" Für den einstellbaren Bereich beziehen Sie sich auf die untenstehende Tabelle an
der rechten Seite.
! Prüfton
Sie können den Tonausgang aus den Lautsprechern überprüfen. (Werden die Lautsprecherpegel nicht angeglichen, können auch sie eingestellt werden.)
Die SETUP AMP-Taste drücken, und die - oder -Taste zum Wählen
von "TONE" betätigen. Danach die ENTER-Taste drücken.
Über jeden Lautsprecher wird der Prüfton der Reihe nach in Abständen von ungefähr 2 Sekunden gehört.
FL
CT
FR
SW
SL
SR
Lautsprechergröße
F-LARGE
Groß
F-SMALL *
Klein
C-LARGE
Groß
C-SMALL *
Klein
C-NO
AUS
S-LARGE
Groß
S-SMALL *
Klein
S-NO
AUS
FL
CT
FR
SL
SR
SW
Verzögerungsbereich
Front-Lautsprecher (links)
0,1 m - 9,0 m
Center-Lautsprecher
0,1 m - 9,0 m
Front-Lautsprecher (rechts)
0,1 m - 9,0 m
Surround-Lautsprecher (links)
0,1 m - 9,0 m
Surround-Lautsprecher
0,1 m - 9,0 m
(rechts)
Subwoofer
0,1 m - 9,0 m
Pegelbereich
- 6 dB - + 6 dB
- 6 dB - + 6 dB
- 6 dB - + 6 dB
- 6 dB - + 6 dB
- 6 dB - + 6 dB
- 10 dB - + 10 dB
Einstellungen ab Werk:
Verzögerung - - - 2 m
Pegel - - - 0 dB
- Lautsprechereinstellungen -
Die SETUP AMP-Taste drücken, und die - oder -Taste zum Wählen von "SP LEVEL" betätigen. Danach die ENTER-Taste drücken.
Fortgeschrittene Funktionen
1
-Taste zweimal drücken.
Wenn die Pegel nicht gleich sind:
Während der Prüfton ertönt, die - oder -Taste drücken, um den Pegel einzustellen.
Durch Drücken der - oder -Taste können Sie einen Lautsprecher auswählen.
Hinweis:
Wenn NO (AUS) in der Lautsprechergrößeneinstellung für einen Lautsprecher
gewählt wird, ist kein Ton darüber zu hören.
D-42
02/8/28
SD-AT50H(H)D5.fm
1
SD-AT50H
DX-AT50H
Benutzen des Radio-Daten-Systems (RDS)
RDS ist ein Rundfunkdienst, der heute von einer zunehmenden Zahl von UKWSendern angeboten wird. Diese UKW-Sender senden neben ihren regulären
Programmsignalen zusätzliche Signale. Sie können Ihre Sendernamen und
Information über die Programmart wie Sport oder Musik usw. senden.
Wenn ein RDS-Sender eingestellt wird, werden "RDS" und der Sendername angezeigt.
"TP" (Verkehrsfunkkennung) erscheint auf dem Display, wenn die empfangene Sendung die Verkehrsinformation trägt; "TA" (Verkehrsdurchsagekennung) erscheint,
während eine Verkehrsinformation auf Sendung ist.
Während des Empfangs des Dynamic-PTY-Senders erscheint "PTYI" (DynamicPTY-Anzeige).
Während des Empfangs der Radiotext-Daten erscheint "RT" (Radiotext).
- Benutzen des Radio-Daten-Systems (RDS) -
Fortgeschrittene Funktionen
DEUTSCH
Nur mit Hilfe der Fernbedienung können Sie das RDS steuern.
! Durch RDS gebotene Informationen
Bei jedem Druck auf die RDS DISPLAY-Taste ändert sich das Display wie folgt:
Sendername (PS)
Programmart (PTY)
Frequenz
Radiotext (RT)
Wenn Sie einen anderen Sender als einen RDS-Sender oder einen RDS-Sender,
dessen Signal schwach ist, einstellen, ändert sich das Display in folgender Reihenfolge:
NO PS
NO PTY
FM 98.80 MHz
NO RT
! Hinweise zum RDS-Betrieb
Wenn ein der folgenden Ereignisse eintritt, bedeutet dies nicht, daß
das Gerät defekt ist:
" "PS", "NO PS" und ein Sendername erscheinen abwechselnd, und das Gerät
funktioniert nicht richtig.
" Wenn ein spezifischer Sender nicht richtig sendet oder ein Sender Prüfungen
durchführt, kann die RDS-Empfangsfunktion nicht richtig arbeiten.
" Wenn ein RDS-Sender, dessen Signal zu schwach ist, empfangen wird, können
Informationen wie z.B. der Sendername nicht angezeigt werden.
" "NO PS", "NO PTY" oder "NO RT" blinkt etwa 5 Sekunden lang, und dann wird die
Frequenz angezeigt.
Hinweise zum Radiotext:
" Die ersten 8 Zeichen des Radiotextes erscheinen 4 Sekunden lang; danach rollen
sie über das Display.
" Wenn Sie einen RDS-Sender einstellen, der keinen Radiotext sendet, wird beim
Schalten in die Radiotext-Position "NO RT" angezeigt.
" Während des Empfangs der Radiotext-Daten oder beim Ändern des Textinhalts
wird "RT" angezeigt.
D-43
02/8/28
SD-AT50H(H)D5.fm
SD-AT50H
DX-AT50H
AFFAIRS
INFO
SPORT
EDUCATE
DRAMA
CULTURE
SCIENCE
VARIED
POP M
ROCK M
EASY M
LIGHT M
CLASSICS
OTHER M
WEATHER
FINANCE
CHILDREN
Kurze Beschreibungen über Fakten, Ereignisse und öffentlich ausgedrückte Ansichten, Reportagen und Tatsachen.
Programm über aktuelle Nachrichten, im allgemeinen in verschiedener Behandlungsweise oder Konzeption, einschließlich Debatte oder
Analyse.
Beratungsprogramm (im weitesten Sinne).
Sportprogramm.
Bildungsprogramm (fundamental).
Alle Hörspiele und Serien.
Kulturprogramme (national oder regional, einschließlich Sprache,
Theater usw.)
Programme über Naturwissenschaft und Technik.
Unterhaltungsprogramme wie zum Beispiel Quiz, Ratespiele und
Persönlichkeitsinterviews.
Populäre Musik, oft abhängend von den gegenwärtigen oder letzten
Plattenverkaufslisten.
Moderne Musik, normalerweise geschrieben und aufgeführt von jungen Musikern.
Unterhaltungsmusik, im Gegensatz zu Pop, Rock oder Klassik, oder
Musik wie Jazz, Folk oder Country (normalerweise mit Gesang und
kurzzeitig).
Populäre, klassische Musik. Zum Beispiel Instrumentalmusik und Vokal- oder Chorwerke.
Aufführungen von hauptsächliche Orchesterstücken, Sinfonien, Kammermusik usw. einschließlich großer Oper.
Musik wie zum Beispiel Rhythm & Blues und Reggae.
Wetterberichte, -vorhersagen und -information.
Börsenberichten, Handel, Geschäft usw.
Programme, die auf ein junges Publikum abgezielt sind (in erster Linie Unterhaltung und Interesse).
RELIGION
PHONE IN
TRAVEL
LEISURE
JAZZ
COUNTRY
NATION M
OLDIES
FOLK M
DOCUMENT
TEST
ALARM
NONE
TP
TA
Programme über Soziologie, Geschichte, Geographie, Psychologie
und Gesellschaft.
Glauben einschließlich eines Gottes oder Göttern, der Natur der Existenz und Ethik.
Mitglieder der Öffentlichkeit, die ihre Ansichten telefonisch oder im öffentlichen Forum äußern.
Features und Programme über Reisen in nahe und ferne Orte, Pauschalreisen sowie Reiseideen und -gelegenheiten. Nicht verwendet
für Durchsagen über Probleme, Verzögerungen oder Straßenbauarbeiten, welchedie augenblickliche Reise beeinflussen, wo TP/TA benutzt werden sollte.
Programme über Freizeitaktivitäten, an denen der Hörer (die Hörerin)
teilnehmen könnte. Zum Beispiel Gartenarbeit, Fischen, Antiquitätensammlung, Kochen, Nahrung & Wein usw.
Polyphone, synkopierte Musik, charakterisiert durch Improvisation.
Songs, die aus der musikalischen Tradition der Südstaaten von Amerika entstehen oder sie fortsetzen. Charakterisiert durch eine schlichte Melodie und narrative Handlung.
Gegenwärtige populäre Musik der Nation oder des Gebiets in Muttersprache, im Gegensatz zu internationalem 'Pop' in Englisch, der normalerweise von Amerika oder Großbritannien inspiriert ist.
Musik aus dem sogenannten "goldenen Zeitalter" populärer Musik.
Musik, die der musikalischen Kultur einer besonderen Nation entspricht, normalerweise gespielt auf akustischen Instrumenten. Die Erzählung oder Story kann sich auf geschichtliche Ereignisse oder
Leute stützen.
Programme über sachliche Angelegenheiten, präsentiert in einem recherchierenden Stil.
Sendung beim Prüfen von Notsendegerät oder Empfängern.
Information über Naturkatastrophen.
Keine Programmart (nur Empfang).
Sendungen, in denen Verkehrsdurchsagen gebracht werden.
Verkehrsdurchsagen sind auf Sendung.
- Benutzen des Radio-Daten-Systems (RDS) -
NEWS
SOCIAL
Fortgeschrittene Funktionen
DEUTSCH
Beschreibungen der PTY(Programmartenkennung)-Codes, TP (Verkehrsfunkkennung) und TA (Verkehrsdurchsagekennung).
Sie können die folgenden PTY-, TP- und TA-Signale suchen und empfangen.
D-44
02/8/28
SD-AT50H(H)D5.fm
1
SD-AT50H
DX-AT50H
Benutzen des Radio-Daten-Systems (RDS) (Fortsetzung)
DEUTSCH
! Benutzen des automatischen Senderspeichers (ASPM)
- Benutzen des Radio-Daten-Systems (RDS) -
Fortgeschrittene Funktionen
In der ASPM-Betriebsart sucht der Tuner automatisch nach neuen RDS-Sendern.
Bis zu 40 Sender können gespeichert werden.
Wenn einige Sender bereits abgespeichert sind, verringert sich die Zahl der speicherbaren neuen Sender entsprechend.
1
Zum Schalten in die Tuner-Funktion ist "FM" oder "AM" anzuzeigen, indem die FUNCTION-Taste gedrückt wird.
2
3
Die BAND-Taste drücken, um das UKW-Band zu wählen.
Die ASPM-Taste mindestens 3 Sekunden gedrückt halten.
Abbrechen der ASPM-Operation:
Während des Sendersuchlaufs die ASPM-Taste drücken.
Die bereits abgespeicherten Sender bleiben im Speicher.
Hinweise:
" Wenn derselbe Sender auf verschiedenen Frequenzen sendet, wird die stärkste
Frequenz abgespeichert.
" Ein Sender, der dieselbe Frequenz hat wie ein bereits abgespeicherter Sender,
wird nicht noch einmal gespeichert.
" Sind bereits 40 Sender abgespeichert, wird der Suchlauf abgebrochen. Wenn Sie
die ASPM-Operation noch einmal durchführen möchten, müssen Sie den Festsenderspeicher löschen.
" Wenn keine Sender abgespeichert worden sind, erscheint "END" etwa 4 Sekunden lang.
" Bei sehr schwachen RDS-Signalen können keine Sendernamen abgespeichert
werden.
Löschen allen Festsenderspeicherinhalts:
1 Die CLEAR-Taste 3 Sekunden oder mehr gedrückt halten.
2 Während "CLEAR" auf dem Display erscheint, die ENTER-Taste drücken.
" Mit dieser Operation werden alle Informationen im Festsenderspeicher gelöscht.
1
2
"ASPM" blinkt etwa 4 Sekunden lang, dann beginnt der Suchlauf (87,50 108,00 MHz).
Wenn ein RDS-Sender gefunden wird, erscheint "RDS" eine kurze Weile,
und der Sender wird abgespeichert.
Erneutes Speichern eines Sendernamens beim Abspeichern des falschen Namens:
Es kann möglich sein, mit Hilfe der ASPM-Funktion Sendernamen abzuspeichern,
wenn viel Rauschen vorhanden ist oder wenn das Signal zu schwach ist. In diesem
Falle folgendermaßen vorgehen.
1 Durch Drücken der Taste TUNER PRESET ( oder ) prüfen, ob die Namen richtig sind.
2 Wenn Sie beim Empfangen des Senders einen falschen Namen finden, warten Sie,
bis der richtige Name angezeigt wird. Und dann die ENTER-Taste drücken.
3 Innerhalb von 5 Sekunden die TUNER PRESET-Taste ( oder ) drücken, um
den zu korrigierenden Vorwahlkanal wieder anzuzeigen.
4 Innerhalb von 5 Sekunden die ENTER-Taste drücken.
" Der neue Sendername ist richtig abgespeichert worden.
Hinweise:
3
Nach Abschluß des Suchlaufs wird die Zahl der abgespeicherten Sender 4
Sekunden lang angezeigt, und dann erscheint "END" 4 Sekunden lang.
" Derselbe Sendername kann in verschiedenen Kanälen gespeichert werden.
" In einem gewissen Gebiet oder in gewissen Zeiträumen können die Sendernamen
vorübergehend verschieden sein.
D-45
02/8/28
SD-AT50H(H)D5.fm
SD-AT50H
DX-AT50H
DEUTSCH
Sie können einen Sender von den abgespeicherten Sendern suchen, indem Sie die
Programmart (Nachrichten, Sport, Verkehrsfunk usw. ... siehe Seite 44) bestimmen.
" Wenn das Display mit dem Blinken aufgehört hat, das Verfahren ab Schritt 3 wiederholen.
" Wenn Sie einen anderen Sender hören möchten, der dieselbe Programmart ausstrahlt, die PTY.TI SEARCH-Taste drücken, während die Kanalnummer oder der
Sendername blinkt. Das Gerät sucht dann nach einem nächsten Sender.
" Wenn kein Sender gefunden werden kann, erscheint "NOTFOUND" 4 Sekunden
lang.
1
Zum Schalten in die Tuner-Funktion ist "FM" oder "AM" anzuzeigen, indem die FUNCTION-Taste gedrückt wird.
2
3
Die BAND-Taste drücken, um das UKW-Band zu wählen.
Wenn Sie in Schritt 4 den Verkehrsfunk (TP) auswählen, erscheint "TP". (Dies
bedeutet nicht, daß Sie zu der Zeit die Verkehrsinformation hören können.)
Wenn die Verkehrsinformation gesendet wird, erscheint "TA".
Die PTY.TI-Taste drücken.
Bestimmen von Sendernamen und Wählen von Sendern von Hand:
"PTY TI" und "SELECT" erscheinen etwa 6 Sekunden lang abwechselnd.
4
Innerhalb von 6 Sekunden die Taste
grammart auszuwählen.
oder
drücken, um die Pro-
Bei jedem Tastendruck erscheint die Programmart. Wird die Taste länger als 0,5
Sekunden gedrückt gehalten, erscheint die Programmart fortlaufend.
5
Wenn Sie den Verkehrsfunk auswählen:
Sie können einen Sender von den abgespeicherten Sendern empfangen, indem Sie
den Namen (BBC R1, BBC R2 usw.) bestimmen.
Vor dieser Operation müssen Sie einen oder mehr Sendernamen im Speicher aufbewahren.
1 Zum Schalten in die Tuner-Funktion ist "FM" oder "AM" anzuzeigen, indem die
FUNCTION-Taste gedrückt wird.
2 Die BAND-Taste drücken, um das UKW-Band zu wählen.
3 Die Taste TUNER PRESET ( oder ) drücken, um einen gewünschten Sender
auszuwählen.
4
Der Sendername wird 3 Sekunden lang angezeigt. Danach ändert sich das Display wie folgt.
Während die gewählte Programmart blinkt (innerhalb von 6 Sekunden), die ENTER-Taste drücken.
Die gewählte Programmart leuchtet 2 Sekunden lang, dann erscheint "SEARCH", und der Suchlauf beginnt.
- Benutzen des Radio-Daten-Systems (RDS) -
Bestimmen von Programmarten und Wählen von Sendern (PTY-Suchlauf):
Fortgeschrittene Funktionen
! Abrufen von abgespeicherten Sendern
Hinweise:
D-46
02/8/28
SD-AT50H(H)D5.fm
1
SD-AT50H
DX-AT50H
Timer- und Sleep-Funktion
DEUTSCH
Bei Ablauf der voreingestellten Zeit schaltet sich das System ein und gibt die
gewünschte Quelle (DVD, CD, MP3-Disc oder Tuner) ab.
1
Die Stromversorgung einschalten und die
TIMER-Taste drücken.
- Timer- und Sleep-Funktion -
Fortgeschrittene Funktionen
Wenn "TIMER STANDBY" nicht erscheint, prüfen Sie,
ob die AV-Steuereinheit auf die richtige Uhrzeit eingestellt ist.
2
Innerhalb von 10 Sekunden die - oder -Taste drücken, um "TIMER SET" auszuwählen,
und die ENTER-Taste betätigen.
3
Die - oder -Taste drücken, um die Stunde
einzustellen, und dann die ENTER-Taste betätigen.
4
Die - oder -Taste drücken, um die Minuten einzustellen, und
dann die ENTER-Taste betätigen.
Die Startzeit wird eingestellt, und die Endzeit (1 Stunde später) wird automatisch
angezeigt.
5
6
1
2
Sicherstellen, daß Sie die AV-Steuereinheit auf die richtige Uhrzeit eingestellt
haben (Seite 24).
Wenn die Uhr nicht gestellt wird, können Sie die Timer-Funktion nicht benutzen.
Eine Wiedergabe vorbereiten und den Fernseher auf das gewünschte Kanal
stellen.
Den Eingang mit der - oder -Taste DVD DIGITAL
umschalten, und dann die ENTERTaste drücken.
TUNER
Wenn Sie den Tuner wählen, einen Sender
mit Hilfe der Taste oder auswählen, und VCR
dann die ENTER-Taste drücken.
! Einstellen des Timers
Vor dem Einstellen des Timers:
Nach den Schritten 3 und 4 die Endzeit einstellen.
7
TV
Die Lautstärke mit der - oder -Taste einstellen, und dann die ENTERTaste drücken.
" Die Einstellungen werden der Reihe
nach angezeigt, und das System schaltet
in die Timer-Bereitschafts-Betriebsart.
" Die Timer-Einstellanzeige leuchtet auf.
D-47
02/8/28
SD-AT50H(H)D5.fm
DVD ANALOG
AUX DIGITAL
AUX ANALOG
SD-AT50H
DX-AT50H
DEUTSCH
In der Timer-Wiedergabe-Bereitschafts-Betriebsart die TIMER-Taste drücken.
2
Innerhalb von 10 Sekunden die - oder -Taste drücken, um "TIMER CALL"
auszuwählen, und die ENTER-Taste betätigen.
Das System schaltet in die Timer-Wiedergabe-Bereitschafts-Betriebsart zurück,
nachdem die Einstellungen der Reihe nach angezeigt worden sind.
Beim Erreichen der Startzeit:
Wiedergabe startet automatisch, und die Lautstärke erhöht sich allmählich.
Die Timer-Wiedergabeanzeige blinkt.
Timer-Wiedergabe-Anzeige
Die Timer-Einstellung wird abgespeichert, wenn sie einmal eingegeben wird. Um dieselbe Einstellung wieder zu verwenden, die folgenden Bedienungsschritte durchführen.
1 Die Stromversorgung einschalten und die TIMER-Taste drücken.
Die AV-Steuereinheit richtig stellen, wenn "TIMER STANDBY" nicht erscheint.
2 Innerhalb von 10 Sekunden die ENTER-Taste drücken.
Nachdem die Einstellungen der Reihe nach angezeigt worden sind, wird das System auf die Timer-Wiedergabe-Bereitschafts-Betriebsart gestellt.
Ändern der Timereinstellung:
Die Stromversorgung einschalten, und die Operation ab Schritt 1 im Abschnitt "Einstellen des Timers" (Seite 47) wiederholen.
Abbrechen der Timer-Wiedergabe:
Durch Einschalten der Stromversorgung in der Timer-Wiedergabe-BereitschaftsBetriebsart wird Timer-Wiedergabe abgebrochen. Dieselbe Operation kann nach
dem folgenden Verfahren durchgeführt werden, ohne die Stromversorgung einzuschalten.
1 Die TIMER-Taste drücken.
"TIMER CANCEL" erscheint.
2 Innerhalb von 10 Sekunden die ENTER-Taste drücken.
Timer-Wiedergabe wird abgebrochen (der Einstellungsinhalt wird nicht annulliert.)
Vorsicht:
" Die Einstellungen werden gelöscht, wenn die Netzkabel des Systems herausgezogen werden, oder wenn ein Stromausfall eintreten sollte.
" Dieses System kann den Timer anderen Gerätes nicht einstellen.
" Beim Einstellen der Timer-Wiedergabe mit dem Digital-Tuner, Fernseher oder
Videorecorder sollte das angeschlossene Gerät gleichzeitig auf die Timer-Wiedergabe gestellt werden.
Hinweis:
Bei Discs mit Menüs ist die Timerfunktion nicht möglich.
Beim Erreichen der Endzeit:
Das System wird automatisch auf die Bereitschafts-Betriebsart gestellt.
- Timer- und Sleep-Funktion -
1
Wiederverwendung der gespeicherten Timereinstellung:
Fortgeschrittene Funktionen
Überprüfen der Timereinstellung:
D-48
02/8/28
SD-AT50H(H)D5.fm
1
SD-AT50H
DX-AT50H
Timer- und Sleep-Funktion (Fortsetzung)
DEUTSCH
! Einstellen des Sleep-Timers
Zu der bestimmten Zeit können Sie das System auf die Bereitschafts-Betriebsart
stellen.
2
3
- Timer- und Sleep-Funktion -
Fortgeschrittene Funktionen
1
Innerhalb von 10 Sekunden die - oder -Taste drücken, um "SLEEP SET" auszuwählen,
und die ENTER-Taste betätigen.
Die - oder -Taste drücken, um die Zeit anzuwählen.
Die ENTER-Taste drücken.
"SLEEP" erscheint.
5
1
2
Während "SLEEP" auf dem Display erscheint, die TIMER-Taste drücken.
Innerhalb von 10 Sekunden die - oder -Taste drücken, um "SLEEP" auszuwählen.
Während der Disc-Wiedergabe die Taste
TIMER drücken.
(Maximum: 2 Stunden - Minimum: 1 Minute)
" 2 Stunden - 5 Minuten 5-Minuten-Abstände
" 5 Minuten - 1 Minute 1-Minuten-Abstände
4
Überprüfen der verbleibenden Einschlafzeit:
Nach Ablauf der voreingestellten Zeit schaltet das System automatisch in die Bereitschafts-Betriebsart.
1 Minute vor Abschluß der Sleep-Funktion wird die Lautstärke leiser gestellt.
Sie können die Lautstärke nicht regeln.
Vorsicht:
Dieses System kann den Sleep-Timer anderen Gerätes nicht einstellen.
Beim Einstellen des Sleep-Timers mit dem Digital-Tuner, Fernseher oder Videorecorder sollte das angeschlossene Gerät gleichzeitig auf Sleep-Timer gestellt werden.
Verbleibende Einschlafzeit
" Die verbleibende Einschlafzeit wird ungefähr 10 Sekunden lang angezeigt.
" Während die verbleibende Einschlafzeit auf dem Display erscheint, können Sie
sie dadurch ändern, daß die ENTER-Taste gedrückt wird (Schritte 3 - 4).
Abbrechen der Sleep-Funktion:
Die ON/STAND-BY-Taste drücken, während "SLEEP" auf dem Display erscheint.
Um die Sleep-Funktion abzubrechen, ohne das System auf die BereitschaftsBetriebsart zu stellen, folgendermaßen vorgehen.
1 Die TIMER-Taste drücken.
2 Innerhalb von 10 Sekunden die - oder -Taste drücken, um "SLEEP OFF" auszuwählen, und die ENTER-Taste betätigen.
! Gleichzeitiges Benutzen der Timer- und
Sleep-Funktion
Durch dieselbe CD können Sie einschlafen und aufwachen.
1
Den Sleep-Timer einstellen (Schritte 1 - 4).
Sleep-Funktion startet.
2
Die Timer-Wiedergabe einstellen.
("Einstellen des Timers" auf Seite 47, Schritte 1 - 7)
Sleep-Timer-Einstellung Timer-Wiedergabe-Einstellung Timer-Wiedergabe-Start.
1 Minute - 2 Stunden
Gewünschte Zeit
Die Sleep-Funktion
stoppt automatisch.
D-49
02/8/28
SD-AT50H(H)D5.fm
Endzeit
Audio-Anschluß anderer Geräte
Zu den AudioEingängen
Durch Anschluß des Audio- oder optischen Digitalkabels können Sie den Klang
hören. Wenn Sie den Digital-Tuner mit dem optischen Ausgang verwenden, können
Sie besseren Klang genießen, indem der Tuner an den optischen Digital-Eingang der
AV-Steuereinheit angeschlossen wird.
Fernseher
Videorecorder
Audio-Kabel
(im Handel erhältlich)
Zu den AudioAusgängen
Audio-Kabel
(im Handel erhältlich)
Zu den AudioAusgängen
Fernseher
Anschluß mit Hilfe eines SCART-Adapters:
Digital-Tuner usw.
Zu den AudioEingängen
Zu den Audio-Eingängen
Audio-Kabel
(im Handel erhältlich)
Videorecorder
Zum optischen Digital-AudioEingang
Zur Buchse
SCART
OUT
R AUDIO
L
VIDEO
SCART-Adapter
(OUT)
DEUTSCH
Zum optischen Digital-AudioAusgang
Optisches Digitalkabel
(Option: AD-M3DC)
Digitales Gerät wie MD-Player
Zu den
Audio-Ausgängen
- Audio-Anschluß anderer Geräte -
! Anschluß für den Videorecorder-Sound
! Anschluß für den Digital-Tuner-Sound
(oder anders optisches Digitalgerät wie
MD-Player)
Fortgeschrittene Funktionen
Sie können durch dieses Produkt den Sound anderer Geräte hören. Einen Videorecorder oder Digital-Tuner direkt an den Fernseher anschließen, um die Bilder zu
empfangen (siehe Bedienungsanleitung jeden Gerätes).
SD-AT50H
DX-AT50H
Vorsicht:
Vor diesem Anschluß das andere Gerät ausschalten.
Vorsicht:
Vor diesem Anschluß das andere Gerät ausschalten.
Hinweis:
Die Stecker ganz einstecken, um verschwommene Bilder oder Rauschen zu vermeiden.
Hinweise:
" Mit der DIGITAL/ANALOG-Taste den Ton zwischen Digital und Analog schalten
(Seite 51).
" Die Stecker ganz einstecken, um verschwommene Bilder oder Rauschen zu vermeiden.
" Beim Anschluß mit einem optischen Digitalkabel ist der Digital-Ausgang des Digital-Tuners auf PCM zu stellen. Siehe Bedienungsanleitung des Digital-Tuners.
D-50
02/8/28
SD-AT50H(H)D5.fm
1
SD-AT50H
DX-AT50H
Bedienen des angeschlossenen Fernsehers
DEUTSCH
- Bedienen des angeschlossenen Fernsehers -
Fortgeschrittene Funktionen
Der angeschlossene Fernseher kann mit Hilfe der Fernbedienung dieses Systems
bedient werden. Die Einstellung ab Werk ermöglicht Ihnen, Fernseher und Videorecorder von SHARP zu bedienen.
Um Produkte anderer Hersteller zu bedienen, den in der Fernbedienung registrierten
Inhalt verändern (siehe Seite 40).
! Fernsehen
1
Die TV ON/STAND-BY-Taste drücken, um den Fernseher einzuschalten.
2
Die TV CHANNEL-Taste (
stellen.
3
Die TV VOLUME-Taste ( oder ) drücken, um die Lautstärke des
Fernsehers zu regeln.
Genießen des Sounds über Lautsprecher dieses Systems:
oder
) drücken, um das Kanal einzu-
Das System einschalten, und die FUNCTION-Taste drücken, um "TV" anzuwählen.
" Der DVD-Player schaltet automatisch in die Bereitschafts-Betriebsart.
! Wiedergeben von Bildern mit DigitalTuner, Videorecorder usw.
1
Das System einschalten, und die FUNCTION-Taste drücken.
" Für den Digital-Tuner ist "AUX" anzuwählen.
" Für das Videoband ist "VCR" anzuwählen.
2
3
Den Digital-Tuner, Videorecorder usw. einschalten.
Die TV/VIDEO-Taste drücken, und den Fernseher auf VIDEO 1, VIDEO 2 usw. stellen.
" Wenn Sie Bilder vom Digital-Tuner betrachten, die DIGITAL/ANALOG-Taste
drücken; danach entsprechend dem angeschlossenen Eingang "AUX ANALOG" oder "AUX DIGITAL" wählen.
" Wenn Sie ein Videoband betrachten, die Wiedergabetaste des Videorecorders drücken.
Vorsicht:
Mit dieser Fernbedienung können einige Fernseher und Videorecorder von SHARP
nicht bedient werden.
D-51
02/8/28
SD-AT50H(H)D6.fm
Fehleranzeigen und Warnungen
SD-AT50H
DX-AT50H
DEUTSCH
Wenn Sie eine unabspielbare Disc einlegen oder falsche Bedienungsschritte durchführen, werden die folgenden Meldungen auf der AV-Steuereinheit, dem DVD-Player
und dem Fernseher angezeigt.
Anzeige des DVD-Players
Bedeutung
" Keine eingelegte Disc.
" Kratzer oder Schmutz ist auf der Disc vorhanden,
und sie kann nicht erkannt werden.
" Das System weiter entfernt von der Rauschquelle
aufstellen, oder die Netzkabel an die anderen Steckdosen anschließen. (*)
" Der Lautsprecher ist nicht richtig angeschlossen.
" Der Verstärker ist defekt.
Das System auf die Bereitschafts-Betriebsart stellen, und die Stromversorgung wieder einschalten.
(*)
" Der Verstärker ist defekt.
Das System auf die Bereitschafts-Betriebsart stellen, und die Stromversorgung wieder einschalten.
(*)
" Der Verstärker ist defekt.
Das System weiter entfernt von der Rauschquelle
aufstellen, oder die Netzkabel an die anderen Steckdosen anschließen. (*)
" Wegen Fremdkörper läuft das Kühlgebläse auf der
Rückseite der Subwoofer/Verstärker-Einheit nicht.
Die Subwoofer/Verstärker-Einheit auf die Bereitschafts-Betriebsart stellen, und Fremdkörper um
das Gebläse beseitigen.
" Der Digital-Audio-Eingang ist nicht richtig angeschlossen.
" Normwidriges Signal wird empfangen und kann
nicht erkannt werden.
" Das System-Anschlußkabel ist herausgezogen.
" Die Disc ist verkehrt herum eingelegt.
Fernsehschirm
Bedeutung
Die Disc kann nicht mit diesem System abgespielt werden, oder sie ist falsch eingelegt.
Lesefehler:
Wiedergabe der Disk nicht möglich.
Bitte Disc. entnehmen.
Der Regionalcode der DVD entspricht nicht 2
oder ALL.
Falscher Regionalcode:
Wiedergabe ist in dieser Region
nicht zugelassen.
Bitte Disc. entnehmen.
1/5
8 / 30
01 : 23 : 40
C
Die Disc unterstützt keine Operation, die in dieser Bedienungsanleitung beschrieben ist.
! Kondensation
Plötzliche Temperaturschwankungen und Lagerung oder Betrieb in einer extrem
feuchtigen Umgebung können Kondensatbildung im Gehäuse, (Laserabtaster usw.)
oder auf dem Sender der Fernbedienung verursachen.
Kondensat kann zu Funktionsstörungen des Systems führen. Sollte dieser Fall eintreten, den DVD-Player eingeschaltet lassen, ohne eine Disc einzulegen, bis normale Wiedergabe möglich ist (ca. 1 Stunde). Vor dem Handhaben des Systems
vorhandenes Kondensat auf dem Sender mit einem weichen Tuch abwischen.
Referenzen
Bedeutung
- Fehleranzeigen und Warnungen -
Anzeige der AV-Steuereinheit
" Die Temperatur ist zu hoch.
Das System auf die Bereitschafts-Betriebsart stellen, und eine Weile warten.
(*): Sollte die gleiche Meldung erscheinen, selbst wenn die Netzkabel des DVD-Players und der Subwoofer/Verstärker-Einheit herausgenommen und angeschlossen
werden, oder selbst wenn sie auf die Bereitschafts-Betriebsart gestellt werden und
wieder eingeschaltet, wenden Sie sich an Ihren Händler, bei dem Sie das System
gekauft haben.
D-52
02/8/28
SD-AT50H(H)D6.fm
1
SD-AT50H
DX-AT50H
Fehlersuchtabelle
DEUTSCH
Viele scheinbare Probleme können vom Benutzer ohne Anforderung eines Kundendiensttechnikers gelöst werden.
Falls mit diesem Produkt irgendetwas nicht in Ordnung zu sein scheint, die folgenden
Punkte überprüfen, bevor Sie sich an einen autorisierten SHARP-Fachhändler oder
an ein SHARP-Kundendienstzentrum wenden.
! Allgemeines
Symptom
Referenzen
- Fehlersuchtabelle -
Kein Ton ist zu hören.
Die Töne von Lautsprechern
werden nicht gut ausbalanciert.
Während der Wiedergabe ist
Rauschen zu hören.
Das System reagiert nicht
auf Betätigung einer Taste.
Am Fernsehbild kommt Interferenz oder Störung vor.
Timer-Wiedergabe startet
nicht.
Das Display auf dem System
ist dunkel.
Die Stromversorgung wird
nicht eingeschaltet.
Mögliche Ursache
" Ist der Lautstärkepegel auf "0" gestellt?
" Ist der Kopfhörer angeschlossen?
" Sind die Lautsprecherkabel getrennt?
" Wird die Lautsprechergröße auf NO
(AUS) gestellt?
" Sind die Lautsprecherkabel an die
falsche Kanäle angeschlossen?
" Ist jeder Lautsprecher gleich weit
vom Hörer entfernt aufgestellt?
" Sind die Lautsprecher auf denselben Pegel gestellt?
" Das System weiter entfernt von
Computern oder Handys aufstellen.
" Das System auf die Bereitschafts-Betriebsart stellen und wieder einschalten. Wenn das System noch nicht
richtig funktioniert, es zurücksetzen.
" Ist das System in der Nähe des Fernsehers mit Innenantenne aufgestellt?
Eine Außenantenne benutzen.
" Zogen Sie den Stecker aus der
Steckdose, oder trat ein Stromausfall ein? Die Uhr erneut einstellen.
" Die DISPLAY-Taste auf der Fernbedienung 2 Sekunden oder mehr gedrückt halten, um "ON" auszuwählen.
" Sind die Netzkabel des System herausgezogen?
" Sind die System-Anschlußkabel getrennt?
" Die Schutzschaltung kann aktiviert
werden. Das Netzkabel herausziehen und nach Ablauf von 5 Sekunden oder länger wieder anschließen.
Bezugsseite
S. 18
S. 28
S. 12
S. 41
S. 12
S. 16
S. 42
S. 54
Symptom
In Dolby Digital 5.1 Kanäle
wird kein Ton wiedergegeben.
Keine Bilder werden angezeigt.
Mögliche Ursache
" Ist der Anfangseinstellungs-Bildschirm auf "DPCM" gestellt? Diesen
in "BITSTREAM" schalten.
" Ist der Fernseher eingeschaltet?
" Ist der Eingang des Fernsehers umgeschaltet?
Symptom
Mögliche Ursache
" Ist das System in der Nähe des
Fernsehers oder des Computers
aufgestellt?
" Ist die UKW-Antenne oder MW-Rahmenantenne richtig aufgestellt? Die
Antenne weiter entfernt vom Netzkabel oder System verlegen.
Der Vorwahlkanel kann nicht " Zogen Sie den Stecker aus der Steckabgerufen werden.
dose, oder trat ein Stromausfall ein?
Den Kanal erneut einstellen.
Das Radio erzeugt ungewöhnliches, andauerndes
Rauschen.
Bezugsseite
S. 13
S. 13
S. 26
! Fernbedienung
Die Fernbedienung funktioniert nicht richtig.
S. 24
Mögliche Ursache
"
"
"
"
"
S. 18
"
S. 18
"
S. 11
S. 54
S. 51
S. 51
! Tuner
Symptom
S. 13
Bezugsseite
S. 20
Mit Hilfe der Fernbedienung
kann das System nicht eingeschaltet werden.
"
"
Ist die Polarität der Batterie richtig?
Sind die Batterien erschöpft?
Ist der Abstand oder Winkel falsch?
Sind Hindernisse vor der AV-Steuereinheit vorhanden?
Ist der Fernbedienungsensor starkem
Licht (Leuchtstofflampe, direkte Sonneneinstrahlung usw.) ausgesetzt?
Wird die Fernbedienung für ein anderes Gerät gleichzeitig verwendet?
Werden Tasten auf der Vorder- und
Rückseiten der Fernbedienung
gleichzeitig gedrückt?
Sind die Netzkabel des DVD-Players und der Subwoofer/VerstärkerEinheit angeschlossen?
Sind die Batterien eingesetzt?
D-53
02/8/28
SD-AT50H(H)D6.fm
Bezugsseite
S. 17
S. 17
S. 17
S. 18
S. 17
SD-AT50H
DX-AT50H
DEUTSCH
! DVD-Player
Selbst wenn eine Disc einge- " Ist die Disc verkehrt herum eingelegt?
legt worden ist, wird "- - - - - "
angezeigt.
" Ist die Disc sehr schmutzig?
Bei Wiedergabe kommt es
" Entspricht die Disc der Norm?
zu Aussetzern.
" Ist das System übermäßigen Erschütterungen ausgesetzt?
" Hat sich im System Kondensation
gebildet?
Die Bedienungstasten funk- " Ist die Disc sehr schmutzig?
tionieren nicht. Musik- oder " Entspricht die Disc der Norm?
Videowiedergabe wird unter" Ist das System übermäßigen Erbrochen.
schütterungen ausgesetzt?
" Hat sich im System Kondensation
gebildet?
Aussetzer kommen vor.
" Ist die Disc sehr schmutzig?
" Ist das System übermäßigen Erschütterungen ausgesetzt?
" Hat sich im System Kondensation
gebildet?
Das System funktioniert
" Ist eine Disc außer DVD (Regionalnicht, selbst wenn die Stromcode 2 oder ALL) oder eine Audioversorgung eingeschaltet
CD eingelegt?
wird.
Bild kann nicht wiedergege- " Sind die Video- und Audio-Kabel
ben werden. (Kein Ton ist zu
falsch angeschlossen?
hören.)
" Ist eine Disc außer DVD (Regionalcode 2 oder ALL) oder eine AudioCD eingelegt?
" Ist die Disc sehr schmutzig?
" Ist die Disc verkehrt herum eingelegt?
" Den optischen Abtaster reinigen,
wenn er schmutzig ist.
" Ist der Fernseheingang auf "VIDEO
1/VIDEO 2" usw. gestellt?
" Ist das System eingeschaltet?
Bezugsseite
Wenn dieses Produkt von starker externer Interferenz (mechanischer Stoß, übermäßige statische Elektrizität, anormale Speisespannung infolge von Blitz usw.) beeinflußt oder falsch betrieben wird, kann es nicht korrekt funktionieren.
Wenn derartige Störungen auftreten, wie folgt verfahren:
Zurücksetzen der AV-Steuereinheit:
1
2
S. 52
3
Den Netzkabel der Subwoofer/Verstärker-Einheit herausziehen.
Die ON/STAND-BY-Taste gedrückt halten und indessen das Netzkabel anschließen.
Zu dieser Zeit wird die Komponente nicht eingeschaltet.
Zum Einschalten der Stromversorgung die ON/STAND-BY-Taste noch einmal
drücken.
Vorsicht:
Durch diese Operation werden alle abgespeicherten Daten gelöscht, und verschiedenartige Einstellungen auf den Anfangszustand (Default) zurückgeschaltet.
Zurücksetzen des DVD-Players:
S. 52
Das Netzkabel des DVD-Players herausziehen; nach Ablauf von 5 Minuten oder länger ihn wieder anschließen.
Wenn die Schutzschaltung aktiviert wird:
S. 52
S. 5
Wenn die Lautsprecherkabel kurzgeschlossen werden, oder wenn die Lautstärke zu
hoch gestellt wird, kann die Schutzschaltung aktiviert werden, und das System kann
in die Bereitschafts-Betriebsart schalten.
Das Netzkabel der Subwoofer/Verstärker-Einheit herausziehen; nach Ablauf von 5
Minuten oder länger ihn wieder anschließen.
Wenn zu hoch gestellt, die Lautstärke vermindern.
Referenzen
Mögliche Ursache
- Fehlersuchtabelle -
Symptom
! Wenn Störung auftritt
! Vor dem Transportieren des Systems
S. 11 - 15
1
S. 5
2
3
4
Die ON/STAND-BY-Taste des DVD-Players drücken, um die Stromversorgung
einzuschalten.
Die Disc-Schublade öffnen, und die Disc entnehmen.
Die Disc-Schublade schließen, und das System auf die Bereitschafts-Betriebsart
stellen.
Nach dem Erlöschen der Netzanzeige die Netzkabel des Systems herausziehen.
S. 55
S. 51
S. 18
D-54
02/8/28
SD-AT50H(H)D6.fm
1
SD-AT50H
DX-AT50H
DEUTSCH
Wartung
Technische Daten
! Reinigen des Gehäuses
Bedingt durch fortlaufende technische Verbesserungen behält sich SHARP das
Recht vor, das Design und die Spezifikationen ohne vorherige Ankündigung ändern
zu können. Die angegebenen Leistungswerte stellen die Nennwerte einer in Serienherstellung produzierten Einheit dar. Geringe Abweichungen bei einzelnen Geräten
sind möglich.
Das Gehäuse mit einem weichen Tuch und einem verdünnten Seifenwasser regelmäßig reinigen und dann mit einem trockenen Tuch nachwischen.
" Keine Chemikalien (Benzin, Farbverdünnungsmittel usw.) verwenden. Es kann zur
Beeinflussung von Oberfläche und Farbe führen.
" Niemals das Innere jeder Komponente ölen. Es kann zu Störungen führen.
! AV-Steuereinheit
Referenzen
- Wartung / Optionales Zubehör / Technische Daten -
Abmessungen
Optionales Zubehör
Gewicht
Audio-Eingänge
Nur das bestimmte optionale Zubehör verwenden, um dieses Produkt richtig in
Betrieb zu setzen.
Zur Installation der Lautsprecher lesen Sie die mit den Ständern oder Halterungen
gelieferten Anweisungen durch.
BODEN LAUTSPRECHERSTÄNDER
Modell: AD- AT10ST
LAUTSPRECHER TISCHFUSS
Modell: AD- AT10LS
Audio-Ausgang
Andere Klemmen
Frequenzbereich
Breite: 215 mm
Höhe: 58 mm
Tiefe: 261 mm
1,3 kg
Optischer Digital-Eingang (AUX): Quadratisch 1
Koaxialer Digital-Eingang (DVD/CD): Cinch-Typ 1
Analog-Eingang (DVD/CD): Cinch-Typ 1 Paar (L/R)
Analog-Eingang (TV): Cinch-Typ 1 Paar (L/R)
Analog-Eingang (VCR): Cinch-Typ 1 Paar (L/R)
Analog-Eingang (AUX): Cinch-Typ 1 Paar (L/R)
Kopfhörer: 16 - 50 Ohm (empfohlen: 32 Ohm)
Systemsteuerung 3
UKW: 87,5 - 108 MHz
MW: 522 - 1.620 kHz
LAUTSPRECHER WANDHALTERUNG
OPTISCHES DIGITALKABEL
Modell: AD- AT10SA
Modell: AD-M3DC
Das Aussehen der optionalen Zubehörteile kann von den obigen Abbildungen abweichen.
D-55
02/8/28
SD-AT50H(H)D6.fm
SD-AT50H
DX-AT50H
DEUTSCH
Gewicht
Ausgangsleistung
Verstärkungssystem
A/D-Rauschform
Anschlüsse
Subwoofer
Wechselspannung 230 V, 50 Hz
80 W
Breite: 260 mm
Höhe: 373 mm
Tiefe: 421 mm
10,3 kg
Front-Lautsprecher:
Sinus: 100 W (50 W + 50 W) (10 % Gesamtklirrfaktor, 1
kHz)
Center-Lautsprecher:
Sinus: 50 W (10 % Gesamtklirrfaktor, 1 Hz)
Surround-Lautsprecher:
Sinus: 100 W (50 W + 50 W) (10 % Gesamtklirrfaktor, 1 kHz)
Subwoofer:
Sinus: 50 W (10 % Gesamtklirrfaktor, 100 Hz)
2,8224 MHz (64fs) 1-Bit-Umschaltung (Bemerkungen: fs
= 44,1 kHz)
(Delta - Sigma)-Modulation 7. Grades
Front/Center/Surround-Lautsprecher: 4 Ohm
Systemsteuerung 2
Typ
16 cm-Tieftöner
Max. Belastbarkeit
100 W
Nennbelastbarkeit
50 W
Impedanz
4 Ohm
! Front/Center/Surround-Lautsprecher
Typ
Max. Belastbarkeit
Nennbelastbarkeit
Impedanz
Abmessungen
Gewicht
Vollbereichs-Lautsprechersystem (magnetisch abgeschirmt)
8 cm-Lautsprecher
100 W
50 W
4 Ohm
Breite: 95 mm
Höhe: 114 mm
Tiefe: 104 mm
je 0,7 kg
Spannungsversorgung
Leistungsaufnahme
Abmessungen
Gewicht
Signalsystem
Unterstützte Disctypen
Videosignal
Audiosignal
Audio-Ausgänge
Video-Ausgänge
Andere Klemme
Wechselspannung 230 V, 50 Hz
15 W
Breite: 215 mm
Höhe: 58 mm
Tiefe: 257 mm
2,0 kg
PAL-Farbe
DVD (Regionalcode 2, ALL), Audio-CD, CD-R, CD-RW
Horizontale Auflösung: 500 Zeilen
Rauschabstand: 70 dB
Frequenzgang
Linear PCM DVD:
4 Hz bis 22 kHz (Abtastrate: 48
kHz)
4 Hz bis 44 kHz (Abtastrate: 96
kHz)
CD: 4 Hz bis 20 kHz
Rauschabstand
CD: 96 dB (1 kHz)
Dynamikbereich
Linear PCM DVD: 95 dB
CD: 94 dB
Gesamtklirrfaktor
0,006 % max.
Koaxialer Digital-Ausgang: Cinch-Typ 1
Analog-Ausgang: Cinch-Typ 1 Paar (L/R)
Video-Ausgang: Cinch-Typ 1
S-Video-Ausgang: S-Anschluß 1
Komponentenvideo-Ausgang: Cinch-Typ 3
Systemsteuerung 1
Referenzen
Spannungsversorgung
Leistungsaufnahme
Abmessungen
! DVD-Player
- Technische Daten -
! Subwoofer/Verstärker-Einheit
D-56
02/8/28
SD-AT50H(H)D6.fm
1
ENGLISH
SD-AT50H
DX-AT50H
ENGLISH
Introduction
Thank you for purchasing this SHARP product. To obtain the best performance from
this product, please read this manual carefully. It will guide you in operating your
SHARP product.
" SD-AT50H 1-Bit Digital Home Cinema and DX-AT50H DVD Player should be combined for use.
" The SD-AT50H system includes an AV control unit, a subwoofer/amplifier unit, two
front speakers, two surround speakers and a centre speaker.
" DX-AT50H should be used exclusively with SD-AT50H. All accessories are packaged in SD-AT50H.
The remote control works for both products.
Refer to this operation manual for DX-AT50H operations.
- Introduction / Contents -
General Information
Contents
! General Information
Page
Accessories . . . . . . . . . . . . . . . . . . . . . . . . . . . . . . . . . . . . . . . . . . . . . . . . . . . . . . . 3
Precautions . . . . . . . . . . . . . . . . . . . . . . . . . . . . . . . . . . . . . . . . . . . . . . . . . . . . . . . 4
Description of discs . . . . . . . . . . . . . . . . . . . . . . . . . . . . . . . . . . . . . . . . . . . . . . 5, 6
Controls and indicators . . . . . . . . . . . . . . . . . . . . . . . . . . . . . . . . . . . . . . . . . 7 - 10
! Preparation for Use
System connections . . . . . . . . . . . . . . . . . . . . . . . . . . . . . . . . . . . . . . . . . . . . 11, 12
Aerial connection . . . . . . . . . . . . . . . . . . . . . . . . . . . . . . . . . . . . . . . . . . . . . . . . . 13
TV connection . . . . . . . . . . . . . . . . . . . . . . . . . . . . . . . . . . . . . . . . . . . . . . . . 13 - 15
System installation . . . . . . . . . . . . . . . . . . . . . . . . . . . . . . . . . . . . . . . . . . . . . 15, 16
Remote control . . . . . . . . . . . . . . . . . . . . . . . . . . . . . . . . . . . . . . . . . . . . . . . . . . . 17
General control . . . . . . . . . . . . . . . . . . . . . . . . . . . . . . . . . . . . . . . . . . . . . . . . . . . 18
Changing the initial setting of DVD . . . . . . . . . . . . . . . . . . . . . . . . . . . . . . . 19 - 22
Language code list for disc language . . . . . . . . . . . . . . . . . . . . . . . . . . . . . . . . . 23
Setting the clock . . . . . . . . . . . . . . . . . . . . . . . . . . . . . . . . . . . . . . . . . . . . . . . . . . 24
! Basic Operation
Listening to the radio . . . . . . . . . . . . . . . . . . . . . . . . . . . . . . . . . . . . . . . . . . . . . . 25
Listening to the memorised station . . . . . . . . . . . . . . . . . . . . . . . . . . . . . . . . . . 26
Playing a disc . . . . . . . . . . . . . . . . . . . . . . . . . . . . . . . . . . . . . . . . . . . . . . . . . 27, 28
! Advanced Disc Features
Page
Basic operation
To locate the beginning of a chapter (track) (skip) . . . . . . . . . . . . . . . . . . . . . .
Fast forward/Fast reverse (search) . . . . . . . . . . . . . . . . . . . . . . . . . . . . . . . . . . .
To start playback from the desired point (direct play) . . . . . . . . . . . . . . . . . . .
Still picture/Frame advance . . . . . . . . . . . . . . . . . . . . . . . . . . . . . . . . . . . . . . . . .
Slow-motion play . . . . . . . . . . . . . . . . . . . . . . . . . . . . . . . . . . . . . . . . . . . . . . . . .
29
29
30
30
30
Useful features
To play in random order (random play) . . . . . . . . . . . . . . . . . . . . . . . . . . . . . . . 31
To play in the desired order (programmed playback) . . . . . . . . . . . . . . . . . . . . 31
To play repeatedly (repeat play) . . . . . . . . . . . . . . . . . . . . . . . . . . . . . . . . . . . . . 32
To play the contents between the specified points repeatedly (A-B repeat) . 32
To select a title from the top menu of the disc . . . . . . . . . . . . . . . . . . . . . . . . . 32
MP3 disc operation
MP3 disc playback . . . . . . . . . . . . . . . . . . . . . . . . . . . . . . . . . . . . . . . . . . . . . . . . 33
Various settings
To change the subtitle language . . . . . . . . . . . . . . . . . . . . . . . . . . . . . . . . . . . . . 34
To change the audio language (audio output) . . . . . . . . . . . . . . . . . . . . . . . . . . 34
To select a subtitle or audio language from the disc menu . . . . . . . . . . . . . . . 34
To brighten an image (black level setting) . . . . . . . . . . . . . . . . . . . . . . . . . . . . . 35
To change the angle . . . . . . . . . . . . . . . . . . . . . . . . . . . . . . . . . . . . . . . . . . . . . . . 35
To zoom in on an image (zoom) . . . . . . . . . . . . . . . . . . . . . . . . . . . . . . . . . . . . . 35
To change the display on TV screen . . . . . . . . . . . . . . . . . . . . . . . . . . . . . . . . . . 36
DVD mode operation indicators . . . . . . . . . . . . . . . . . . . . . . . . . . . . . . . . . . . . . 36
E-1
02/8/28
SD-AT50H(H)E1.fm
SD-AT50H
DX-AT50H
ENGLISH
! References
Error indicators and warnings . . . . . . . . . . . . . . . . . . . . . . . . . . . . . . . . . . . . . . .52
Troubleshooting chart . . . . . . . . . . . . . . . . . . . . . . . . . . . . . . . . . . . . . . . . . . .53, 54
Maintenance . . . . . . . . . . . . . . . . . . . . . . . . . . . . . . . . . . . . . . . . . . . . . . . . . . . . . .55
Optional accessories . . . . . . . . . . . . . . . . . . . . . . . . . . . . . . . . . . . . . . . . . . . . . . .55
Specifications . . . . . . . . . . . . . . . . . . . . . . . . . . . . . . . . . . . . . . . . . . . . . . . . .55, 56
Copyright Information:
" Unauthorised copying, broadcast, public display, transmission, public performance and rental (regardless of whether or not such activities are for profit) of disc
contents are prohibited by law.
" This system is equipped with copy protection technology that causes substantial
degradation of images when the contents of a disc are copied to a videotape.
" This system is protected by U. S. patents and other intellectual property rights, the
copyright for which belongs to Macrovision Corporation. The use of Macrovision's
copy protection technology in the system is authorised by Macrovision and is
intended for home use only, unless otherwise authorised in writing by Macrovision.
Reverse engineering or disassembly is prohibited.
The DVD player can play back discs bearing any of the following marks:
Disc type
DVD Video Disc (*1)
Disc contents
Audio and video (movies)
Disc size
12 cm (5")
8 cm (3")
Or DVD-R/DVD-RW recorded in video mode (*2)
Audio CD
Audio
12 cm (5")
8 cm (3")
Or CDV (*3)
Audio CD-R/CD-RW (*4)
Audio
12 cm (5")
8 cm (3")
Or CD-R/CD-RW recorded
in MP3 format (*5)
(*1):
(*2):
Icons used in this operation manual
Some functions may not be available depending on discs. The following icons indicate
the discs that can be used in the section.
... Indicates DVDs.
... Indicates audio CDs.
(*3):
(*4):
(*5):
This DVD player adopts the PAL system. However, it can also play back
NTSC discs as DVD-region 2 using the modified PAL system.
The DVD-R/DVD-RW may not be played back due to properties and scratches of the disc, dirty optical pickup lens, etc.
Only the audio on the CDV can be played.
The CD-R/CD-RW may not be played back properly depending on the recording equipment or the disc.
If the sampling frequency is 44.1 or 48.1 kHz and the fixed bit rate is 128 kbps
or higher, MPEG 1 Audio Layer3 (MP3) files can be played. However, some
of them may not be played depending on their conditions or formats.
- Contents -
Enjoying surround sound (sound mode) . . . . . . . . . . . . . . . . . . . . . . . . . . 37 - 39
Changing the registration in the remote control . . . . . . . . . . . . . . . . . . . . . . . .40
Speaker settings . . . . . . . . . . . . . . . . . . . . . . . . . . . . . . . . . . . . . . . . . . . . . . .41, 42
Using the Radio Data System (RDS) . . . . . . . . . . . . . . . . . . . . . . . . . . . . . . 43 - 46
Timer and sleep operation . . . . . . . . . . . . . . . . . . . . . . . . . . . . . . . . . . . . . . 47 - 49
Audio connection of other equipment . . . . . . . . . . . . . . . . . . . . . . . . . . . . . . . . .50
Operating the connected TV . . . . . . . . . . . . . . . . . . . . . . . . . . . . . . . . . . . . . . . . .51
! Types of playable discs
General Information
! Advanced Features
Page
" For unplayable discs, see page 5.
... Indicates CD-R/RW with MP3 recording.
" Some operations may not be performed depending on discs even if they are described in this manual.
" During operation, " " may be displayed on the screen. This means that the operations described in this manual are prohibited by the disc.
8
E-2
02/8/28
SD-AT50H(H)E1.fm
SD-AT50H
DX-AT50H
Accessories
ENGLISH
Please confirm that the following accessories are included.
Orange
Yellow
"AA" size battery (UM/SUM-3,
R6, HP-7 or similar) 2
AC power lead 1
Video cable 1
Digital audio cable 1
OU
- Accessories -
IN
General Information
Remote control 1
FM aerial 1
AM loop aerial 1
Stand 2
Antislip speaker cushion sheet
(20 pcs.) 1
SCART adaptor 2 (IN/OUT)
Blue
Green
approx. 5 m
(15 feet)
White
approx. 5 m
(15 feet)
(For signal/power)
Red
approx. 5 m
(15 feet)
(For DVD player)
Black
(For sound)
System connection cable 3
Blue
approx. 15 m (45 feet)
Grey
approx. 15 m (45 feet)
Speaker connection lead 5
Note:
Only the above accessories are included.
E-3
02/9/9
T
SD-AT50H(H)E1_2.fm
Precautions
SD-AT50H
DX-AT50H
ENGLISH
! General
Caution:
" Please ensure that the subwoofer/amplifier unit is positioned in a well-ventilated
area and that there is at least 10 cm (4") of free space along the sides and back.
There must also be a minimum of 15 cm (6") of free space on the top of the subwoofer/amplifier unit.
" This subwoofer/amplifier unit is fitted with a cooling
fan at the rear for improved cooling. Do not cover the
opening in this section with any obstacles.
15 cm (6")
10 cm (4")
" Use the system on a firm, level surface free from vibration.
" Keep the system away from direct sunlight, strong magnetic fields, excessive dust,
humidity and electronic/electrical equipment (home computers, facsimiles, etc.)
which generate electrical noise.
" Do not place anything on top of the components.
" Do not expose the system to moisture, to temperatures higher than 60°C (140°F)
or to extremely low temperatures.
" If the system does not work properly, unplug and plug it in again. Then turn on the
system.
" In case of an electrical storm, unplug the DVD player and the subwoofer/amplifier
unit for safety.
" Hold the AC power plug by the head when removing it from the wall socket, as
pulling the lead can damage internal wires.
" Do not remove the outer cover, as this may result in electric shock. Refer
internal service to your local SHARP service facility.
" The ventilation should not be impeded by covering the ventilation openings with
items, such as newspapers, tablecloths, curtains, etc.
" Attention should be drawn to the environmental aspects of battery disposal.
" The system is designed for use in moderate climate.
" This system should only be used within the range of 5°C - 35°C (41°F - 95°F).
Warning:
The voltage used must be the same as that specified by this system. Using this product with a higher voltage other than that specified is dangerous and may result in a
fire or other types of accident, causing damage. SHARP will not be held responsible
for any damage resulting from the use of this system with a voltage other than that
specified.
" The DVD player and the subwoofer/amplifier unit will get warm whilst being used.
Do not touch warm areas of the DVD player and the subwoofer/amplifier unit for
prolonged periods to avoid damage to you.
" This system is equipped with a special function which protects the amplifier circuit
from damages. When it is activated, the sound switch is turned off. In this case,
set the DVD player and the AV control unit to the stand-by mode and turn them on
again.
! Volume control
The sound level at a given volume setting depends on speaker efficiency, location
and various other factors. It is advisable to avoid exposure to high volume levels,
which occur whilst turning the system on with the volume control setting up high, or
whilst continually listening at high volumes.
! Care of DVD/CD discs
DVD/CD discs are fairly resistant to damage, however mistracking can occur due to
an accumulation of dirt on the disc surface. Follow the guidelines below for maximum
enjoyment from your DVD/CD collection and player.
" Do not write on either side of the disc, particularly the non-label side from which
signals are read. Do not mark this surface.
" Keep your discs away from direct sunlight, heat, and excessive moisture.
" Always hold the DVD/CDs by the edges. Fingerprints, dirt, or water on the DVD/
CDs can cause noise or mistracking. If a DVD/CD is dirty or does not play properly, clean it with a soft, dry cloth, wiping straight out from the centre, along the
radius.
- Precautions -
Cooling fan
10 cm (4")
General Information
10 cm (4")
YES
Correct
NO
8
E-4
02/8/28
SD-AT50H(H)E1.fm
SD-AT50H
DX-AT50H
! Discs that cannot be played
! Icons used on DVD discs
" DVDs without the region number "2" or
"ALL".
" DVDs with SECAM system
" DVD-ROM
" DVD-RAM
" DVD-Audio
Check the icons of the DVD case before playing your discs.
"
"
"
"
"
"
CDG
Video CD
Photo CD
CD-ROM
SACD
Discs recorded in special formats, etc.
" The discs above cannot be played at all, or no sound is heard although images
appear on the screen or vice versa.
" Faulty playback may damage the speakers and can have an adverse effect on
your hearing when played at high volume settings.
" This DVD player adopts the PAL system. Check the recording system before
purchasing discs.
" You cannot play illegally produced discs.
Display
Description
Region number (playable area number)
DVD discs are programmed with region
numbers indicating countries in which
they can be played. This system can play
discs with region number "2" or "ALL".
2
1
2
6
ALL
Format recorded on the DVD
You can enjoy wide images on a wide-screen TV, and letterbox size
images on the 4:3 size TV.
" A disc that has scratches or fingerprints on it may not play properly. Refer to "Care
of DVD/CD discs (page 4)" and clean the disc.
" Do not play the discs of special shapes (heart or octagon shaped) as they can be
ejected whilst rotating and cause injury.
You can enjoy wide images on a wide-screen TV, and sides-cut 4:3
images on the 4:3 size TV.
Type of subtitles recorded
! Title, chapter and track
DVDs are divided into "titles" and "chapters". If the disc has more than one movie on
it, each movie is a separate "title". "Chapters" are subdivisions of titles.
2
Example:
1: English
2: Japanese
Number of camera angles
Title 1
Recorded subtitle languages.
A desired language can be selected with
the SUB TITLE button.
Number of angles recorded on the DVD.
A desired angle can be selected with the
ANGLE button.
2
Title 2
To adopt the video format to the connected TVs ("wide-screen TV" or "4:3 size
TV").
Recorded in 4:3.
Notes:
- Description of discs -
General Information
ENGLISH
Description of discs
Number of audio track and audio The number of audio tracks and audio recording system are indicated.
recording system
Chapter 1
Chapter 2
Chapter 3
Chapter 1
Chapter 2
The audio CDs consist of "tracks".
A "track" is each tune on an audio CD.
Track 1
Track 2
Track 3
Track 4
Example:
" The audio recorded on the DVD can
1: Original <English>
be switched by using the AUDIO but(DTS 5.1 Surround)
ton.
2: Japanese (Dolby Digi- " Audio and recording system vary detal 5.1 Surround)
pending on the DVD. Check them in
the DVD's manual.
Track 5
Note:
Title, chapter, or track numbers may not be recorded on some discs.
E-5
02/8/28
SD-AT50H(H)E1.fm
SD-AT50H
DX-AT50H
Names of nations and areas
Republic of Albania
Principality of Andorra
Republic of Austria
State of Bahrain
Kingdom of Belgium
Bosnia and Herzegovina
Republic of Bulgaria
*Channel Islands
Republic of Croatia
Republic of Cyprus
The Czech Republic
Kingdom of Denmark
Arab Republic of Egypt
*Faeroe Islands
Republic of Finland
French Republic
Federal Republic of Germany
*Gibraltar
Hellenic Republic
*Greenland
Republic of Hungary
Republic of Iceland
Islamic Republic of Iran
Republic of Iraq
Ireland
*Isle of Man
State of Israel
Italian Republic
Japan
Hashemite Kingdom of Jordan
State of Kuwait
Lebanon
Lesotho
Liechtenstein
Luxembourg
Macedonia
Malta
Monaco
Netherlands
Norway
Oman
Poland
Portugal
Qatar
Romania
San Marino
Saudi Arabia
Slovakia
Slovenia
South Africa
Spain
Svalbard and Jan Mayen Islands
Swaziland
Sweden
Switzerland
Syrian Arab Republic
Turkey
United Arab Emirates
United Kingdom
Vatican City State
Yemen
Yugoslavia
Names of nations and areas
Republic of Lebanon
Kingdom of Lesotho
Principality of Liechtenstein
Grand Duchy of Luxembourg
Republic of Macedonia
Republic of Malta
Principality of Monaco
Kingdom of the Netherlands
Kingdom of Norway
Sultanate of Oman
Republic of Poland
Portuguese Republic
State of Qatar
Romania
Republic of San Marino
Kingdom of Saudi Arabia
The Slovak Republic
Republic of Slovenia
Republic of South Africa
Kingdom of Spain
*Svalbard and Jan Mayen Islands
Kingdom of Swaziland
Kingdom of Sweden
Swiss Confederation
Syrian Arab Republic
Republic of Turkey
United Arab Emirates
United Kingdom of Great Britain and Northem Ireland
State of the City of Vatican
Republic of Yemen
Federal Republic of Yugoslavia
- Description of discs -
Common names
Albania
Andorra
Austria
Bahrain
Belgium
Bosnia and Herzegovina
Bulgaria
Channel Islands
Croatia
Cyprus
Czech
Denmark
Egypt
Faeroe Islands
Finland
France
Germany
Gibraltar
Greece
Greenland
Hungary
Iceland
Iran
Iraq
Ireland
Isle of Man
Israel
Italy
Japan
Jordan
Kuwait
Common names
General Information
ENGLISH
The list below shows the countries covered by region number 2.
* represents area name.
8
E-6
02/8/28
SD-AT50H(H)E1.fm
SD-AT50H
DX-AT50H
Controls and indicators
ENGLISH
! AV control unit
Display
1 2 3
7
4
5
6
(1) (2) (3) (4) (5) (6)
(8)
(7)
(11) (12) (13)
(9) (10)
11
Front
- Controls and indicators -
General Information
8
9
10
12 13 14
1. RDS Indicator
2. Radio Text Indicator
3. Traffic Programme Indicator
4. Traffic Announcement Indicator
5. Dynamic PTY Indicator
6. Audio Signal Indicators/Speaker Indicators
(1)
(2)
(3)
(4)
Left Front Speaker Indicator
Front Left Signal Indicator
Centre Speaker Indicator
Centre Signal Indicator
(5) Front Right Signal Indicator
(6) Right Front Speaker Indicator
(7) Low Frequency Effect Indicator
15
(8) Subwoofer Indicator
(9) Left Surround Speaker Indicator
(10) Surround Left Signal Indicator
(11) Surround Monaural Signal
Indicator
(12) Surround Right Signal Indicator
(13) Right Surround Speaker Indicator
7. Timer Play Indicator
8. Sleep Indicator
9. FM stereo mode indicator
10.FM Stereo Receiving Indicator
Reference page
<The bottom of the unit>
16
17
18
19
MODEL NO. SD-AT50H
(AV CONTROL UNIT)
1-BIT DIGITAL HOME CINEMA
SHARP CORPORATION
MADE IN MALAYSIA
Back
20
21
22
23
24
25
26
27
11.On/Stand-by Button . . . . . . . . . . . . . . . . . . . . . . . . . . . . . . . . . . .18, 54
12.Timer Set Indicator . . . . . . . . . . . . . . . . . . . . . . . . . . . . . . . . . . . . . .47
13.Function Button . . . . . . . . . . . . . . . . . . . . . . . . . . . . . . . . . . .25, 27, 51
14.Digital/Analog Input Select or Tuner Band Select Button . . . .25, 51
15.Volume Up and Down Buttons . . . . . . . . . . . . . . . . . . . . . . . . . . . . .18
16.Remote Sensor . . . . . . . . . . . . . . . . . . . . . . . . . . . . . . . . . . . . . . . . .17
17.Power Indicator . . . . . . . . . . . . . . . . . . . . . . . . . . . . . . . . . . . . . . . . .18
18.Sound Mode Indicators . . . . . . . . . . . . . . . . . . . . . . . . . . . . . . . .38, 39
19.Headphone Socket . . . . . . . . . . . . . . . . . . . . . . . . . . . . . . . . . . . . . .28
20.System Connection Socket (to DVD player) . . . . . . . . . . . . . . . . . .11
21.Audio Digital Input Socket . . . . . . . . . . . . . . . . . . . . . . . . . . . . . . . .50
22.Coaxial Digital Audio Input Socket . . . . . . . . . . . . . . . . . . . . . . . . .11
23.Audio Input Sockets . . . . . . . . . . . . . . . . . . . . . . . . . . . . . . .11, 15, 50
24.System Connection Sockets (to subwoofer/amplifier unit) . . . . . .11
25.AM Loop Aerial Terminal . . . . . . . . . . . . . . . . . . . . . . . . . . . . . . . . .13
26.Aerial Earth Terminal . . . . . . . . . . . . . . . . . . . . . . . . . . . . . . . . . . . . .13
27.FM 75 Ohms Aerial Socket . . . . . . . . . . . . . . . . . . . . . . . . . . . . . . . .13
E-7
02/8/28
SD-AT50H(H)E1.fm
SD-AT50H
DX-AT50H
ENGLISH
! Subwoofer/amplifier unit
Reference page
Side
4
5
! Satellite speaker 5
Front speaker 2: magnetically shielded
Centre speaker 1: magnetically shielded
Surround speaker 2: magnetically shielded
6
7
1
Reference page
1. Speaker
2. Speaker Terminals . . . . . . . . . . . . . . . . . . . . . . . . . . . . . . . . . . . . . . 12
3. Mounting Holes for Stand or Bracket (Optionally available) . . . . 16
2
Using antislip speaker cushions:
You can install satellite speakers either vertically or horizontally.
Affix the cushions (supplied) to the bottom of the speakers to prevent them from sliding or falling due to vibration.
(Vertical position)
(Horizontal position)
Front
Back
1
- Controls and indicators -
3
General Information
1. Subwoofer
2. Bass Reflex Duct
3. System Connection Socket (to AV control unit) . . . . . . . . . . . . . . 11
4. Speaker Terminals . . . . . . . . . . . . . . . . . . . . . . . . . . . . . . . . . . . . . . 12
5. System Connection Socket (to AV control unit) . . . . . . . . . . . . . . 11
6. AC Power Input Socket . . . . . . . . . . . . . . . . . . . . . . . . . . . . . . . . . . . 18
7. Lead Holder . . . . . . . . . . . . . . . . . . . . . . . . . . . . . . . . . . . . . . . . . . . . 12
Bottom
2
3
A sheet of speaker cushions (20 pcs.) is supplied with this product. Use 4 cushions
per speaker.
8
E-8
02/8/28
SD-AT50H(H)E1.fm
SD-AT50H
DX-AT50H
Controls and indicators (continued)
ENGLISH
! DVD player
Display
1
2
3
5
1. CD Indicator
2. DVD Indicator
3. CD/MP3 Disc Random Play Indicator
4. Disc Repeat or Disc A - B Repeat Indicator
5. DVD Title Indicator
6. Disc Play Indicator
7. Disc Pause Indicator
8. CD/MP3 Disc Track Indicator
9. DVD Chapter Indicator
4
8
6
9
7
10
Front
- Controls and indicators -
General Information
Reference page
10.On/Stand-by Button . . . . . . . . . . . . . . . . . . . . . . . . . . . . . . . . . . . . . .18
11.DVD Chapter Skip or CD/MP3 Disc Track Down Button . . . . .29, 33
12.DVD Chapter Skip or CD/MP3 Disc Track Up Button . . . . . . . .29, 33
13.Disc Stop Button . . . . . . . . . . . . . . . . . . . . . . . . . . . . . . . . . . . . . . . .28
14.Disc Play Button . . . . . . . . . . . . . . . . . . . . . . . . . . . . . . . . . . . . .27, 28
15.Disc Tray Open/Close Button . . . . . . . . . . . . . . . . . . . . . . . . . . . . . .27
16.Disc Tray . . . . . . . . . . . . . . . . . . . . . . . . . . . . . . . . . . . . . . . . . . . . . . .27
17.System Connection Socket (to AV control unit) . . . . . . . . . . . . . . .11
18.Audio Output Sockets . . . . . . . . . . . . . . . . . . . . . . . . . . . . . . . . . . . .11
19.Coaxial Digital Audio Output Socket . . . . . . . . . . . . . . . . . . . . . . . .11
20.Video Output Socket . . . . . . . . . . . . . . . . . . . . . . . . . . . . . . . . . . . . .13
21.S-video Output Socket . . . . . . . . . . . . . . . . . . . . . . . . . . . . . . . . . . .14
22.Component Video Output Sockets . . . . . . . . . . . . . . . . . . . . . . . . .14
23.AC Power Lead . . . . . . . . . . . . . . . . . . . . . . . . . . . . . . . . . . . . . . . . .18
11 12 13 14 15
16
<The bottom of the unit>
MODEL NO. DX-AT50H
DVD PLAYER
230 V ~ 50 Hz 15 W
SERIAL NO.
SHARP CORPORATION
MADE IN CHINA
Back
17
18
19
20
21
22
23
E-9
02/8/28
SD-AT50H(H)E1.fm
SD-AT50H
DX-AT50H
ENGLISH
4
5
6
7
8
9
10
11
12
13
14
15
16
17
18
19
1
Reference page
1. Remote Control Transmitter . . . . . . . . . . . . . . . . . . . . . . . . . . . . . . . . . . . . . . 17
2. Display Brightness Select or Clock Display Button . . . . . . . . . . . . . . . .18, 24
3. TV Display Select Button . . . . . . . . . . . . . . . . . . . . . . . . . . . . . . . . . . . . . . . . 36
4. Direct Button . . . . . . . . . . . . . . . . . . . . . . . . . . . . . . . . . . . . . . . . . . . . . . . . . .30
5. Direct Number Buttons . . . . . . . . . . . . . . . . . . . . . . . . . . . . . . . . . . . . 26, 30, 40
6. Disc Repeat Button . . . . . . . . . . . . . . . . . . . . . . . . . . . . . . . . . . . . . . . . . . . . . 32
7. Disc A - B Repeat Button . . . . . . . . . . . . . . . . . . . . . . . . . . . . . . . . . . . . . . . . 32
8. DVD Menu Button . . . . . . . . . . . . . . . . . . . . . . . . . . . . . . . . . . . . . . . . . . . . . . 34
9. Cursor Button . . . . . . . . . . . . . . . . . . . . . . . . . . . . . . . . . . . . . . . . . . . . 24, 33, 47
10. Disc Fast Reverse, Tuner Preset Down Button . . . . . . . . . . . . . . . . . . . . 26, 29
11. Disc Stop Button . . . . . . . . . . . . . . . . . . . . . . . . . . . . . . . . . . . . . . . . . . . . . . . . 28
12. DVD Chapter Skip, CD/MP3 Disc Track Down or
Tuning Down Button . . . . . . . . . . . . . . . . . . . . . . . . . . . . . . . . . . . . . . 25, 29, 33
13. DVD Top Menu Button . . . . . . . . . . . . . . . . . . . . . . . . . . . . . . . . . . . . . . . . . . .32
14. Digital/Analog Input Select or Tuner Band Select Button . . . . . . . . . . . . . . 25, 51
15. Timer Button . . . . . . . . . . . . . . . . . . . . . . . . . . . . . . . . . . . . . . . . . . . . . . . . . . . 47
16. Sound Mode Select Buttons . . . . . . . . . . . . . . . . . . . . . . . . . . . . . . . . . . . . . . 39
17. Dynamic Sound Select Button . . . . . . . . . . . . . . . . . . . . . . . . . . . . . . . . . . . . 39
18. TV Input Select Button . . . . . . . . . . . . . . . . . . . . . . . . . . . . . . . . . . . . . . . . . . 51
19. Volume Up and Down Buttons . . . . . . . . . . . . . . . . . . . . . . . . . . . . . . . . . . . . . . 18
20. On/Stand-by Button . . . . . . . . . . . . . . . . . . . . . . . . . . . . . . . . . . . . . . . . . . . . . . 17
21. RDS Display Mode Select or DVD Audio Language Select or
CD Audio Output Select Button . . . . . . . . . . . . . . . . . . . . . . . . . . . . . . . . 34, 43
22. RDS Programme Type/Traffic Information Search or
DVD Angle Button . . . . . . . . . . . . . . . . . . . . . . . . . . . . . . . . . . . . . . . . . . . 35, 46
23. RDS ASPM (Auto Station Programme Memory) or
DVD Subtitle Button . . . . . . . . . . . . . . . . . . . . . . . . . . . . . . . . . . . . . . . . . . 34, 45
24. Clear Button . . . . . . . . . . . . . . . . . . . . . . . . . . . . . . . . . . . . . . . . . . . . . . . . 26, 30
25. DVD Initial Setting Button . . . . . . . . . . . . . . . . . . . . . . . . . . . . . . . . . . . . . . . .19
26. Amplifier Initial Setting Button . . . . . . . . . . . . . . . . . . . . . . . . . . . . . . . . . . . . 41
27. CD/MP3 Disc Play Mode Select Button . . . . . . . . . . . . . . . . . . . . . . . . . . . . .31
28. Return Button . . . . . . . . . . . . . . . . . . . . . . . . . . . . . . . . . . . . . . . . . . . . 19, 31, 42
29. Enter Button . . . . . . . . . . . . . . . . . . . . . . . . . . . . . . . . . . . . . . . . . . . . . 24, 33, 47
30. Disc Fast Forward, Tuner Preset Up Button . . . . . . . . . . . . . . . . . . . . . . 26, 29
31. DVD Chapter Skip, CD/MP3 Disc Track Up or Tuning Up Button . .25, 29, 33
32. Disc Play Button . . . . . . . . . . . . . . . . . . . . . . . . . . . . . . . . . . . . . . . . . . . . . . 27, 28
33. Function Button . . . . . . . . . . . . . . . . . . . . . . . . . . . . . . . . . . . . . . . . . . .25, 27, 51
34. DVD Frame Advance, Disc Pause Button . . . . . . . . . . . . . . . . . . . . . . . . 28, 30
35. TV On/Stand-by Button . . . . . . . . . . . . . . . . . . . . . . . . . . . . . . . . . . . . . . . . . .51
36. DVD Zoom Button . . . . . . . . . . . . . . . . . . . . . . . . . . . . . . . . . . . . . . . . . . . . . . 35
37. Black Level Select Button . . . . . . . . . . . . . . . . . . . . . . . . . . . . . . . . . . . . . . . .35
38. TV Volume Up and Down Buttons . . . . . . . . . . . . . . . . . . . . . . . . . . . . . . . . . 51
39. TV Channel Select Buttons . . . . . . . . . . . . . . . . . . . . . . . . . . . . . . . . . . . . . . .51
- Controls and indicators -
2
3
20
21
22
23
24
25
26
27
28
29
30
31
32
33
34
35
36
37
38
39
General Information
! Remote control
Buttons with " " mark in the illustration can be operated on the remote control only.
8
E-10
02/8/28
SD-AT50H(H)E1.fm
SD-AT50H
DX-AT50H
System connections
ENGLISH
! Connecting the components
AM loop aerial
DVD player
Connecting components
Subwoofer/
AV control unit
amplifier unit
Subwoofer/
AV control unit
amplifier unit
System
connection cable
(For DVD
player)
Digital audio cable
AV control unit
DVD player
AV control unit
DVD player
AV control unit
DVD player
FM aerial
- System connections -
Preparation for Use
Connect the DVD player, AV control unit and subwoofer/amplifier unit as follows.
AV control unit
System
connection cable
(For sound, black)
Subwoofer/amplifier unit
Arrow upward
Lead
System connection cable
(For sound, black)
System connection cable
(For signal/power, blue)
System connection cable
(For DVD player)
Digital audio cable
(For digital signal)
Commercially available
RCA lead
(For analog signal)
Connect either a digital audio cable or commercially available RCA lead. Press the
DIGITAL/ANALOG button to switch between digital and analogue signals according to the connection.
Caution:
Closer
Closer
" Make sure to connect the system after unplugging the DVD player and the subwoofer/amplifier unit.
" Put the 2 system connection cables (for sound and signal/power) together. If not,
noises may be heard.
To unplug the system connection cable:
1 Push
Arrow to the left
2 Unplug
System
connection cable
(For signal/power,
blue)
E-11
02/8/28
SD-AT50H(H)E2.fm
SD-AT50H
DX-AT50H
ENGLISH
! Connecting the satellite speakers
Black
Red
Black
Red
(Satellite speaker)
Speaker terminals
Green
Label
Red
Tube
Black
Red
(Subwoofer/amplifier unit)
Speaker plug
Black
White
Plug in with the rising
side facing to the left.
White
Caution:
Red
Green
Grey
" Make sure to connect the speakers after unplugging the DVD player and the subwoofer/amplifier unit.
" Insert the speaker plug fully with the rising side facing to the left.
" Hold the speaker plug when removing it from the subwoofer/amplifier unit. Pulling
the lead may cause malfunction to the subwoofer/amplifier unit.
" Do not mistake the and , and right and left terminals of the speaker leads. (The
right speaker is placed on the right when you face the system. See page 16.)
" Never short-circuit the speaker leads. If the
speaker leads are short-circuited, the protection circuit is activated and the system enters
the stand-by mode. In such a case, check that
the leads are properly connected before turning the power on again.
Subwoofer/
amplifier unit
Blue
Black
Black
Red
Grey
Surround speaker
(Right)
Red
Blue
Surround speaker
(Left)
- System connections -
Red
Insert the speaker plugs to the subwoofer/amplifier unit according to the colour coding.
Connect the speaker leads to the satellite speakers first and then to the subwoofer/amplifier unit.
Front speaker
(Left)
Preparation for Use
Centre speaker
Front speaker
(Right)
" Only the supplied speakers should be used with this product.
" Do not stand or sit on the speakers. You may be injured.
Binding leads:
Tie the leads connected to the subwoofer/amplifier unit with a lead holder.
" All satellite speakers provide the same performance.
Their positions can be exchanged with one another.
Lead holder
8
E-12
02/8/28
SD-AT50H(H)E2.fm
SD-AT50H
DX-AT50H
Aerial connection
TV connection
Supplied FM aerial:
Caution:
ENGLISH
" Before connecting the TV, turn off all the equipment.
" The TV screen display may be scrambled if not PAL system.
Connect the FM aerial wire to the FM 75 OHMS
socket and position the FM aerial wire in the direction where the strongest signal can be received.
Supplied AM loop aerial:
Three types of sockets [VIDEO OUT (VIDEO), VIDEO OUT (S-VIDEO) and COMPONENT VIDEO OUT] are available for TV and DVD player connection.
Connect according to your TV.
Connect the AM loop aerial wire to the AM and
GND terminals. Position the AM loop aerial for
optimum reception. Place the AM loop aerial on
a shelf, etc., or attach it to a stand or a wall with
screws (not supplied).
! Connecting to a TV with a video input
socket
White
Black
Preparation for Use
- Aerial connection / TV connection -
You can enjoy DVD images by connecting your TV and the DVD player with a video
cable.
Notes:
" Placing the aerial on the system or near the AC power lead may cause noise
pickup. Place the aerial away from the system for better reception.
" When static is still heard even after adjusting the position of the AM loop aerial, try
reversing the wire connections.
To video output socket
Installing the AM loop aerial:
< Assembling >
< Attaching to the wall >
Wall
Video cable
(supplied)
Screws (not supplied)
External FM or AM aerial:
Use an external FM or AM aerial if you require better reception. Consult your dealer.
AM loop aerial
External
FM aerial
TV
External
15 m (49 feet ) AM aerial
To video input
socket
7.5 m (25 feet )
Earth wire
Earth rod
Note:
Notes:
When using an external AM aerial, be sure to keep the wire of the AM loop aerial
connected.
" Change the TV input in accordance with the connected socket.
" Do not connect other equipment between the TV and the DVD player. If they are
connected via a VCR, pictures may be distorted.
E-13
02/8/28
SD-AT50H(H)E2.fm
SD-AT50H
DX-AT50H
ENGLISH
! Connecting to a TV with an S-video input
socket
! Connecting to a TV with component video
input sockets
If your TV has an S-video input socket, you can enjoy clearer DVD images by connecting an S-video cable (not supplied).
TV
To component video
input sockets
To S-video
output socket
To component
video output sockets
To S-video input
socket
Caution:
When the video and S-video cables are both connected, the images from the S-video
input socket appears on your TV.
Component video
cable (not supplied)
Notes:
" If your TV has different indications for the component video inputs (Y, CB and CR
or Y, B-Y and P-Y), connect sockets with its matching colour.
" Do not connect to a component video input socket designed for the high-vision system, which is not DVD-compatible (the images may be distorted or not appear).
! Connecting to a TV with a SCART socket
Use a supplied SCART adaptor (IN).
To video output socket
Video cable
(supplied)
- TV connection -
TV
Preparation for Use
S-video cable
(not supplied)
To SCART
socket
TV
IN
R AUDIO
L
VIDEO
SCART
adaptor (IN)
To video
input socket
8
E-14
02/8/28
SD-AT50H(H)E2.fm
SD-AT50H
DX-AT50H
System installation
TV connection (continued)
ENGLISH
! Installing AV control unit and DVD player
To listen to TV sound via the speakers of this system:
Using the audio cable, you can listen to TV sound with this system.
(The audio cable is not supplied. Purchase a commercially available cable.)
White
To audio
input sockets
Audio cable
(not supplied)
Preparation for Use
Red
- TV connection / System installation -
You can place them one above the other or side by side.
Red
With the supplied stands, they can be installed vertically.
White
To audio
output sockets
TV
Connection using a SCART adaptor:
Caution:
White
To audio
input sockets
When installing the DVD player vertically, bring the display window to the
upper side.
When installed vertically, an 8 cm (3") disc cannot be played.
Correct
Audio cable
(not supplied)
Red
To SCART
socket
TV
SCART
adaptor (OUT)
To audio
output sockets
Red
Notes:
OUT
R AUDIO
L
VIDEO
" If the display window of the DVD player is placed on the lower side, a disc may fall
or may not be ejected.
" Avoid changing the DVD player installation (vertical or horizontal) whilst a disc is
playing. The disc may be scratched.
White
E-15
02/8/28
SD-AT50H(H)E2.fm
SD-AT50H
DX-AT50H
ENGLISH
! Placing the speaker system
The speaker stands and speaker wall brackets are optionally available (see page
55). Refer to their instructions for assembly.
The best surround effect will be achieved by placing each speaker at the same distance from the listening position.
It is recommended to arrange the speakers as shown below.
Identify each speaker by the tube colour.
Centre
speaker
Front
speaker (left) (green)
(white)
Front
speaker (right)
(red)
Surround
speaker (right)
(grey)
The speakers may be placed beside or near the TV as they are magnetically
shielded. However, colour variation may occur, depending on the type of the TV.
If colour variation occurs...
Turn off the TV (from the power switch).
After 15 - 30 minutes, turn the TV on again.
Centre speaker (green)
If the colour variation is still present...
Same distance
Same distance
Move the speakers further away from the TV.
Refer to the user's manual of the TV for details.
Caution:
When carrying the subwoofer/amplifier unit, be careful not to touch the subwoofer
located near bottom. Be sure to hold it by the bottom to avoid subwoofer breakage.
Front speaker (left) (white)
- System installation -
Surround
speaker (left)
(blue)
Preparation for Use
Subwoofer/
amplifier unit
Front speaker (right) (red)
Notes:
"
"
"
"
"
Place the TV halfway between the front speakers.
It is recommended that the centre speaker be placed near the television.
Place the surround speakers at a position just above the height of your ears.
Set the subwoofer/amplifier unit on a stable, sturdy floor.
If speakers cannot be placed at equal distances, refer to "Speaker delay setting"
(see page 41).
" The speaker grille is not removable.
Subwoofer
Correct
8
E-16
02/8/28
SD-AT50H(H)E2.fm
SD-AT50H
DX-AT50H
ENGLISH
Remote control
! Battery installation
! Test of the remote control
1 Open the battery cover.
2 Insert the batteries according to the direction indicated in the battery compartment.
Check the remote control after checking all the connections (see pages 11 - 18).
Point the remote control directly at the remote sensor on the AV control unit.
Point the remote control at the AV control unit as well to operate the DVD player.
When inserting or removing the batteries, push them towards the
nals.
battery termi-
3 Close the battery cover.
The remote control can be used within the range shown below:
Press the ON/STAND-BY button. Does the power turn on? Now, you can enjoy your
system.
AV control unit
Precautions for battery use:
- Remote control -
Preparation for Use
DVD player
" Replace all old batteries with new ones at the same time.
" Do not mix old and new batteries.
" Remove the batteries if the system will not be used for long periods of time. This
will prevent potential damage due to battery leakage.
Remote sensor
0.2 m - 6 m
(8" - 20')
Caution:
" Do not use rechargeable batteries (nickel-cadmium battery, etc.).
" Installing the batteries incorrectly may cause the system to malfunction.
Notes concerning use:
" Replace the batteries if the operating distance is reduced or if the operation
becomes erratic. Purchase 2 "AA" size batteries (UM/SUM-3, R6, HP-7 or similar).
" Periodically clean the transmitter on the remote control and the sensor on the AV
control unit with a soft cloth.
" Exposing the sensor on the AV control unit to strong light may interfere with operation. Change the lighting or the direction of the AV control unit.
" Keep the remote control away from moisture, heat, shock, and vibrations.
E-17
02/8/28
SD-AT50H(H)E2.fm
General control
SD-AT50H
DX-AT50H
ENGLISH
! Connecting the AC power lead
! To turn the power on
Subwoofer/amplifier unit:
Press the ON/STAND-BY button.
After checking all the connections, connect the AC power lead to the AC power input
socket, then to the wall socket.
The power indicator lights up.
If the power does not turn on, check if the power leads are plugged in properly.
Notes:
(AC INPUT)
Wall socket
(AC 230 V, 50 Hz)
" When the ON/STAND-BY button on the DVD player is pressed, the system turns
on.
" When the ON/STAND-BY button on the AV control unit or the remote control is
pressed:
In DVD function: The system turns on.
In other functions: The system except the DVD player turns on.
! Volume control
Press the VOLUME + button to increase the volume and the VOLUME - button for
decreasing.
Wall socket
(AC 230 V, 50 Hz)
0
Notes:
" The power is supplied to the AV control unit by the subwoofer/amplifier unit. The
AV control unit is not equipped with a power lead.
" Never use a power lead other than the one supplied. Otherwise, a malfunction or
an accident may occur.
" Unplug the DVD player and the subwoofer/amplifier unit if they will not be used for
a prolonged period of time.
1
2 .....
39
40
! To change the display brightness (2 levels)
When the input is not DVD, you can change the brightness of the AV control unit display by holding down the DISPLAY button on the remote control for 2 seconds or
more.
Dimmed
Brightened
- General control -
After checking all the connections, plug the DVD player into the wall socket.
Preparation for Use
DVD player:
Caution:
When in DVD function, the DISPLAY button cannot switch the brightness.
The display brightness depends on the setting of "PANEL DISPLAY" of "Changing
the initial setting of DVD" (see page 20).
You can switch the display brightness of the AV control unit and the DVD player.
Power indicator
8
E-18
02/8/28
SD-AT50H(H)E2.fm
SD-AT50H
DX-AT50H
Changing the initial setting of DVD
ENGLISH
Turn on the TV, and switch the input to the "VIDEO 1" or "VIDEO 2" etc. accordingly.
A new setting will be retained even if the DVD player is set to the stand-by mode. If
you want to restore or change the setting, reset it.
1
Press the ON/STAND-BY button to turn the power on.
" The startup screen appears.
" If the startup screen does not appear, set the input to "DVD".
" The disc should be stopped at this time.
2
3
After pressing the
Press the
button.
or
button, press the SETUP DVD button.
button to select the menu and press the ENTER
Preparation for Use
- Changing the initial setting of DVD -
SET-UP
1.LANGUAGE
2.DISPLAY
3.AUDIO
4.PARENTAL
SELECT:
SET:
ENTER
SETUP CANCEL: RETURN
EXIT:
4
Press the
button.
or
button to change the setting and press the ENTER
Example: "PLAYER MENU" is selected
SET-UP
LANGUAGE CONTROLS
PLAYER MENU
1.ENGLISH
2.FRANÇAIS
3.ESPAÑOL
4.DEUTSCH
5.ITALIANO
SELECT:
SET:
ENTER
SETUP CANCEL: RETURN
EXIT:
Repeat the operation as instructed.
(The number of repetition depends on the setting item.)
To change other settings, begin from step 3.
5
Press the SETUP DVD button.
The new setting is memorised.
Notes:
" You cannot display the setup screen whilst a disc is playing.
" See page 21 for selecting another language for disc menus.
button whilst selecting
" The previous screen appears by pressing the RETURN
an item or setting.
E-19
02/8/28
SD-AT50H(H)E2.fm
SD-AT50H
DX-AT50H
ENGLISH
Setting
LANGUAGE
Selectable parameters (* indicates initial settings.)
AUDIO
ORIGINAL *
ENGLISH
Description
Selects the language audible from the speakers.
ORIGINAL
OFF
ORIGINAL
ENGLISH
SELECT:
SET:
ENTER
SETUP CANCEL: RETURN
EXIT:
DISPLAY
SUBTITLE
OFF *
ENGLISH
Selects the subtitle displayed on the TV screen.
DISC MENU
ORIGINAL
ENGLISH *
Selects the disc menu language.
PLAYER MENU
ENGLISH *
FRANÇAIS
Selects the initial or playback setting language.
TV ASPECT
4:3 LETTER BOX *
4:3 PAN & SCAN
16:9 WIDE
ON *
OFF
AUTO
ON *
OFF
ON *
OFF
OFF *
ON
BITSTREAM*
DPCM
ON * (BITSTREAM)
OFF (No signal)
OFF * (PCM)
ON (BITSTREAM)
AUTO *
48 kHz
96 kHz
ALL *
8-1
Please enter a 4-digit
password.
The screen mode should be set according to the connecting TV type (for details, see page 22).
SET-UP
DISPLAY CONTROLS
1.TV ASPECT
2.PANEL DISPLAY
3.ANGLE ICON
4.AUTO POWER OFF
4:3 LETTER BOX
ON
ON
ON
SELECT:
SET:
ENTER
SETUP CANCEL: RETURN
EXIT:
PANEL DISPLAY
ANGLE ICON
AUTO POWER OFF
AUDIO
(Digital output)
Do not change the
initial settings.
DRC
SET-UP
AUDIO CONTROLS
1.DRC
2.DOLBY DIGITAL
3.DTS
4.MPEG
5.DOWN SAMPLING
DOLBY DIGITAL
OFF
BITSTREAM
ON
OFF
AUTO
SELECT:
SET:
ENTER
SETUP CANCEL: RETURN
EXIT:
DTS
MPEG
DOWN SAMPLING
PARENTAL
PARENTAL LEVEL
SET-UP
PARENTAL CONTROLS
1.PARENTAL LEVEL
2.CHANGE
ALL
CHANGE
Brightness settings for display (When set to auto, the light
turns off during playback.)
Sets or cancels angle icon ( ) display on the TV screen.
The system automatically enters the stand-by mode when
no operation is entered for more than 35 minutes.
Sets or cancels the control over the volume range.
Selects the type of a sound signal sent from the coaxial digital audio output socket.
Preparation for Use
1.AUDIO
2.SUBTITLE
3.DISC MENU
4.PLAYER MENU
- Changing the initial setting of DVD -
SET-UP
LANGUAGE CONTROLS
Converts the sound signal recorded by PCM of 96 kHz into
48 kHz.
Sets the viewing restriction level of the DVD software.
Password setting or change
"4737" cannot be set as a password.
When you forget your password, cancel the current password
by pressing "4737" using the direct number buttons (0 - 9).
8
E-20
02/8/28
SD-AT50H(H)E2.fm
SD-AT50H
DX-AT50H
Changing the initial setting of DVD (continued)
ENGLISH
! Disc language
Indicator
AUDIO
Setting
A language for audio can be set.
You can specify a language for conversation and narration.
English
ou
nk y
Preparation for Use
- Changing the initial setting of DVD -
Thank you
French
LOADING
CHARGEMENT
ci
Mer
A language for subtitle can be set.
The subtitle is displayed in a specified language.
English
Setting
A language for screen display can be set, such as for initial settings
or messages.
English
French
Tha
SUBTITLE
Indicator
PLAYER
MENU
French
Merci
! Other language settings
You can set the "OTHER" language for audio, subtitle, and disc menu. (Refer to
"Language code list for disc language" on page 23.)
Example: To select 5464 (Croatian) as an audio language
1
Select "LANGUAGE" on the initial setting screen (see steps 1 - 3
on page 19).
2
After selecting "AUDIO" in step 4 on page 19, select "OTHER" and
press the ENTER button.
3
Enter "5464" using the direct number buttons.
"5464 (HR)" will be displayed on the TV screen.
DISC MENU
A language for disc menus can be set.
Menu screens are displayed in a specified language.
4
Press the SETUP DVD button.
Note:
English
French
CAST
ACTEURS
STAFF
PERSONNEL
If the selected language is not recorded, the language set by the disc will be adopted.
E-21
02/8/28
SD-AT50H(H)E3.fm
SD-AT50H
DX-AT50H
ENGLISH
Setting
4:3 LETTER When playing a wide image (16:9) disc,
black bands are inserted at the top and
BOX
bottom and you can enjoy full wide images (16:9) on a 4:3 size TV.
Indicator
Level 1
Levels 2 to 7
Level 8
ALL
A 4:3 disc is played in 4:3.
4:3 PAN & When playing a wide image (16:9) disc,
the left and right sides of the image are
SCAN
cut (pan scan) to display a natural-looking 4:3 size image.
A wide image disc without pan scan
is played back in 4:3 letterbox.
16:9 WIDE
Setting
Only DVD software intended for children can be played back.
Only DVD software intended for general use and children can be
played back.
DVD software of any grade (adult/general/children) can be played
back.
Parental lock is cancelled.
Notes:
" When entering a password for the first time, enter any 4-digit number. It will be set
as your password automatically.
" Whilst playing a disc with parental lock, the display may appear requesting a password in order to watch some restricted scenes. In such a case, enter the password
to temporarily change the parental level.
A 4:3 disc is played in 4:3.
A wide image (16:9) is displayed when
playing a wide image (16:9) disc.
" When playing a 4:3 image disc, the image size depends on the
setting of the connected TV.
" If you play back a wide image (16:9) disc with the DVD player
connected to a 4:3 TV, the vertically shrunk image is displayed.
Note:
Preparation for Use
Indicator
! Parental setting
- Changing the initial setting of DVD -
! Video format
When playing the disc with a fixed video format, it will not change even if the TV
screen size is changed.
8
E-22
02/8/28
SD-AT50H(H)E3.fm
SD-AT50H
DX-AT50H
Language code list for disc language
Preparation for Use
- Language code list for disc language -
ENGLISH
Code
4747
4748
4752
4759
4764
4765
4771
4772
4847
4851
4853
4854
4855
4860
4861
4864
4947
4961
4965
4971
5047
5051
5072
5158
5160
5161
5165
5166
5167
5247
5255
5256
5261
5264
5271
AA
AB
AF
AM
AR
AS
AY
AZ
BA
BE
BG
BH
BI
BN
BO
BR
CA
CO
CS
CY
DA
DE
DZ
EL
EN
EO
ES
ET
EU
FA
FI
FJ
FO
FR
FY
Language name
Afar
Abkhazian
Afrikaans
Ameharic
Arabic
Assamese
Aymara
Azerbaijaniska
Bashkir
Byelorussian
Bulgarian
Bihari
Bislama
Bengali, Bangla
Tibetan
Breton
Catalan
Corsican
Czech
Welsh
Danish
German
Bhutanese
Greek
English
Esperanto
Spanish
Estonian
Basque
Persian
Finnish
Fiji
Faroese
French
Frisian
Code
5347
5350
5358
5360
5367
5447
5455
5464
5467
5471
5547
5551
5557
5560
5565
5566
5569
5647
5655
5669
5747
5757
5758
5759
5760
5761
5765
5767
5771
5847
5860
5861
5866
5868
5953
GA
GD
GL
GN
GU
HA
HI
HR
HU
HY
IA
IE
IK
IN
IS
IT
IW
JA
JI
JW
KA
KK
KL
KM
KN
KO
KS
KU
KY
LA
LN
LO
LT
LV
MG
Language name
Irish
Scots Gaelic
Galician
Guarani
Gujarati
Hausa
Hindi
Croatian
Hungarian
Armenian
Interlingua
Interlingue
Inupiaq
Indonesian
Icelandic
Italian
Hebrew
Japanese
Yiddish
Javanese
Georgian
Kazakh
Greenlandic
Cambodian
Kannada
Korean
Kashmiri
Kurdish
Kirghiz
Latin
Lingala
Laotian
Lithuanian
Latvian, Lettish
Malagasy
Code
5955
5957
5958
5960
5961
5964
5965
5966
5971
6047
6051
6058
6061
6149
6159
6164
6247
6258
6265
6266
6367
6459
6460
6461
6467
6469
6547
6550
6553
6554
6555
6557
6558
6559
6560
MI
MK
ML
MN
MO
MR
MS
MT
MY
NA
NE
NL
NO
OC
OM
OR
PA
PL
PS
PT
QU
RM
RN
RO
RU
RW
SA
SD
SG
SH
SI
SK
SL
SM
SN
Language name
Maori
Macedonian
Malayalam
Mongolian
Moldavian
Marathi
Malay
Maltese
Burmese
Nauruan
Nepali
Dutch
Norwegian
Occitan
(Afan) Oromo
Oriya
Panjabi
Polish
Pashto, Pushto
Portuguese
Quechua
Rhaeto-Romance
Kirundi
Romanian
Russian
Kinyarwanda
Sanskrit
Sindhi
Sango
Serbo-Croatian
Singhalese
Slovak
Slovenian
Samoan
Shona
Code
6561
6563
6564
6565
6566
6567
6568
6569
6647
6651
6653
6654
6655
6657
6658
6660
6661
6664
6665
6666
6669
6757
6764
6772
6855
6861
6961
7054
7161
7254
7267
SO
SQ
SR
SS
ST
SU
SV
SW
TA
TE
TG
TH
TI
TK
TL
TN
TO
TR
TS
TT
TW
UK
UR
UZ
VI
VO
WO
XH
YO
ZH
ZU
E-23
02/8/28
SD-AT50H(H)E3.fm
Language name
Somali
Albanian
Serbian
Siswat
Sesotho
Sundanese
Swedish
Swahili
Tamil
Telugu
Tajik
Thai
Tigrinya
Turkmen
Tagalog
Setswana
Tonga
Turkish
Tsonga
Tatar
Twi
Ukrainian
Urdu
Uzbek
Vietnamese
Volapuk
Wolof
Xhosa
Yoruba
Chinese
Zulu
Setting the clock
SD-AT50H
DX-AT50H
ENGLISH
By setting the correct time on the AV control unit, you can use it not only as a clock
but also for timer playback.
3
Press the or button to adjust the
hour and then press the ENTER button.
Press the or button once to advance the time by 1 hour. Hold it down to advance continuously.
" Press the or button once to advance the time by 1 minute. Hold it down
to advance continuously.
" The hour will not advance even if minutes advance from "59" to "00".
" The clock starts from "0" second. (Seconds are not displayed.)
" The display returns to normal after approx. 2 seconds.
To confirm the time display:
Press the DISPLAY button.
The time display will appear for about 5 seconds.
To readjust the clock:
In this example, the clock is set for 9:30.
1
Press the DISPLAY button.
Perform "Setting the clock" from the beginning.
" In step 1, the time will be displayed. If the clock is cleared, "ADJUST" appears.
" Follow steps 2 - 4.
Note:
You can set the clock even when the system is in the stand-by mode.
- Setting the clock -
Press the or button to adjust the
minutes and then press the ENTER
button.
Preparation for Use
4
Caution:
2
Within 5 seconds, press the ENTER button.
Unplugging the DVD player and the subwoofer/amplifier unit or a power failure will
clear the clock setting.
Perform "Setting the clock" from the beginning.
8
E-24
02/8/28
SD-AT50H(H)E3.fm
SD-AT50H
DX-AT50H
Listening to the radio
ENGLISH
3
Press the BAND button repeatedly to select the desired frequency
band (FM or AM).
4
Press the TUNING (
or
) button to tune in to the desired station.
Manual tuning:
Press the TUNING button as many times as required to tune in to the desired
station.
Auto tuning:
When the TUNING button is pressed for more than 0.5 seconds, scanning will
start automatically and the tuner will stop at the first receivable broadcast station.
" When radio interference occurs, auto scan tuning may stop automatically at
that point.
- Listening to the radio -
Basic Operation
Notes:
" Auto scan tuning will skip weak signal stations.
" To stop the auto tuning, press the TUNING button again.
" When an RDS (Radio Data System) station is tuned in, the frequency will be
displayed first, and then the RDS indicator will light. Finally, the station name
will appear.
" Full auto tuning can be achieved for RDS stations "ASPM", see page 45.
To receive an FM stereo transmission:
Press the BAND button to display the "STEREO" indicator.
" "ST" will appear when an FM broadcast is in stereo.
FM stereo receiving indicator
1
2
Press the ON/STAND-BY button to turn the power on.
To enter tuner function, display "FM" or "AM" by pressing the
FUNCTION button.
The DVD player automatically enters the power stand-by mode.
FM stereo mode indicator
" If the FM reception is weak, press the BAND button to extinguish the "STEREO"
indicator. The reception changes to monaural, and the sound becomes clearer.
After use:
Press the ON/STAND-BY button to enter the power stand-by mode.
E-25
02/8/28
SD-AT50H(H)E3.fm
Listening to the memorised station
! Memorising a station
You can store 40 AM and FM stations in memory and recall them at the push of a
button. (Preset tuning)
! To recall a memorised station
Press the TUNER PRESET (
tion.
or
ENGLISH
) button to select the desired sta-
Perform steps 1 - 3 in "Listening to the radio" on page 25.
Press the ENTER button to enter the preset tuning saving mode.
Within 5 seconds, press the TUNER
PRESET ( or ) button to select
the preset channel number.
Preset channel
Frequency and frequency band
To select a preset station with the direct number buttons:
Stations 1 - 10:
Stations 11 - 40:
Press the corresponding number ("1" - "10/0").
Press the ">10" button and then the memorized preset number.
Store the stations in memory, in order, starting with preset channel 1.
4
Within 5 seconds, press the ENTER
button to store that station in memory.
1 Press the ">10" button.
2 Press the "2" button.
3 Press the "8" button.
Press buttons within 5 seconds.
! To erase all the contents of the preset
memory
1
5
Repeat steps 1 - 4 to set other stations, or to change a preset station.
2
Hold the CLEAR button down for 3 seconds
or more.
Whilst "CLEAR" is displayed, press the ENTER button.
When a new station is stored in memory, the station previously memorised will
be erased.
Note:
The backup function protects the memorised stations for a few hours should there be
a power failure or the AC power lead disconnection.
Basic Operation
For example, to choose 28
- Listening to the memorised station -
1
2
3
SD-AT50H
DX-AT50H
8
E-26
02/8/28
SD-AT50H(H)E3.fm
SD-AT50H
DX-AT50H
Playing a disc
ENGLISH
Turn on the TV, and switch the input to the "VIDEO 1" or "VIDEO 2" etc. accordingly.
1
(DVD/CD)
Press the ON/STAND-BY button on the AV control unit or the remote control to turn the power on.
When the ON/STAND-BY button on the DVD player is pressed, the function will
be automatically switched to DVD.
2
When the function is not DVD, press the
FUNCTION button to set it to "DVD".
3
Press the
button to open the disc tray.
Label side
- Playing a disc -
Basic Operation
" The startup screen appears.
" Select "DVD" when playing an audio CD.
" The same operation can be performed by pressing the button on the remote control.
Disc tray
Slide the disc into the hooks.
(An 8 cm (3") disc cannot be played.)
" Place the disc on the disc tray, label side up.
" If the display window of the DVD player is placed on the lower side, a disc may
fall or may not be ejected.
4
Press the
button to close the disc tray.
If the disc you are using supports auto start, it starts playing automatically [even
if you do not press the (DVD/CD) button], as soon as you close the disc tray.
5
(DVD/CD)
If you cannot start playback in step 4, press the
(DVD/CD) button.
Note:
When the DVD player is turned on or the input source is switched to "DVD", no operation will be accepted for 5 seconds as the DVD player is proceeding the initial setting.
E-27
02/8/28
SD-AT50H(H)E3.fm
SD-AT50H
DX-AT50H
ENGLISH
Notes:
" A safety feature automatically sets the system to the power stand-by mode if you
set the volume level too high whilst playing certain types of discs. If this happens,
lower the volume level and restart playback.
" Stop positions may be recorded on some discs. When you play such a disc, playback stops there.
" During an operation, " " may appear indicating that the operation is disabled by
the disc.
" When the DVD player is left unoperated for more than 5 minutes after pressing the
stop button, a screen saver appears. Then, after additional 30 minutes, the player
enters the stand-by mode.
! To interrupt playback
Press the STILL/PAUSE button.
To resume playback from the same point, press the
button.
! To stop playback
Press the
button.
! To resume playback after stopping
(sequential playback)
You can resume playback from the point that the playback is stopped.
1
Whilst the disc is playing, press the
button.
The system stores the point you stopped.
2
To restart play, press the
(DVD/CD) button.
Play resumes from the point you stopped.
To cancel the sequential playback:
Press the
button twice.
Notes:
" The sequential playback feature is disabled on some discs.
" Depending on the disc, playback may resume from slightly before the stopped
position.
! Headphones
" Before plugging in or unplugging the headphones, reduce the volume.
" Be sure your headphones have a 3.5 mm (1/8") diameter plug and are between 16
ohms and 50 ohms impedance. The recommended impedance is 32 ohms.
" Plugging in the headphones disconnects the speakers automatically. Adjust the
volume using the VOLUME buttons.
" You cannot use the surround feature with headphones.
- Playing a disc -
" Close the disc tray when it is not in use. Otherwise, dust may accumulate inside
and cause malfunction to the DVD player.
" The DVD player is slightly heated when used for a long time. It does not mean the
DVD player is damaged.
" When attempting to play discs with scratches or of a different region number, or
unplayable or restricted (*1) discs, an error message will appear on the TV display
and the disc will not play.
(*1) Viewing is prohibited on some DVDs according to the audience age.
Basic Operation
Caution:
(DVD/CD)
8
E-28
02/8/28
SD-AT50H(H)E3.fm
SD-AT50H
DX-AT50H
Basic operation
ENGLISH
! Fast forward/Fast reverse (search)
You can search the desired point as you play the disc.
1
Whilst a disc is playing, press the
Example: When the
or
button.
button is pressed
2 (about 2 times)
8 (about 8 times)
60 (about 60 times)
- Basic operation -
Advanced Disc Features
" The scanning speed will change as follows at each press of the button.
(DVD/CD)
30 (about 30 times)
" The disc is forwarded by the
2
Press the
button and reversed by the
button.
(DVD/CD) button to return to the normal playback.
Notes:
! To locate the beginning of a chapter (track)
(skip)
You can skip the current chapter (track) to the next.
Whilst a disc is playing, press the
or
button.
button skips to the next chapter (track).
" The
button skips to the beginning of the current chapter (track). Press the
" The
button again to skip to the beginning of the previous chapter (track).
" On some discs, the search function is disabled.
" On a DVD, search does not operate between titles.
" Whilst searching on a DVD, the sound is not heard and the subtitles do not
appear.
" For audio CDs, the scanning speed is fixed to 16 times. The sound will break up
during search, but this is not faulty.
" When search is performed during the DVD playback, pictures may not be forwarded or reversed in the search speed specified in this manual, depending on
the disc or the scene being played.
or
button on
" The same operation can be performed by holding down the
the DVD player for 2 seconds or more.
Notes:
" The skip feature is disabled on some discs. Some discs do not display the chapter
(track).
" On a DVD, skip does not operate between titles.
or
button on the
" The same operation can be performed by pressing the
DVD player.
E-29
02/8/28
SD-AT50H(H)E3.fm
SD-AT50H
DX-AT50H
1
Whilst in the stop or playback mode, press the DIRECT button.
Example: During DVD playback
Title
Chapter
! Still picture/Frame advance
Cursor
2
Within 30 seconds, select " " by pressing the or button and
enter the title number using the direct number buttons (0 - 9).
By entering the title number, you can enter the chapter number input mode.
3
Within 30 seconds, enter the chapter number using the direct number buttons (0 - 9).
Example:
To select chapter 1:
To select chapter 12:
" Direct play feature is disabled on some discs.
" Some discs may not display the chapter number.
" With DVDs, you can specify the desired point only in the current title and not in
another title.
" With audio CDs, you can specify the desired point only in the current track and not
in the disc.
" Some discs cannot play from the specified point.
" Time search feature is disabled on some discs.
" You cannot specify the time whilst the disc is stopped.
You can freeze the image and advance frame by frame.
1
Whilst a disc is playing, press the STILL/PAUSE
Each press of the STILL/PAUSE
2
Press the
button.
button advances the frame in the still mode.
(DVD/CD) button to return to the normal playback.
Note:
Press "10/0" and "1".
Press "1" and "2".
Still picture and frame advance features are disabled on some discs.
! Slow-motion play
To select and play the desired chapter (track):
You can slow down the playback speed.
Whilst in the playback mode, press the direct number buttons (0 - 9)
to select the chapter (track) number.
If the chapter (track) number is 2 digits or more, press ">10" and enter the number.
Example:
To select chapter 14: Press ">10", "1" and "4".
1
2
Whilst a disc is playing, press the STILL/PAUSE
Press the
button.
button whilst the image is paused.
Three speeds are available. Each time the button is pressed, the speed of slowmotion playback changes in the following sequence:
To play by specifying time (time search):
1/16 (about 1/16 times)
1/8 (about 1/8 times)
1/2 (about 1/2 times)
You can play back from the desired point by specifying the time.
1
2
During playback, press the DIRECT button
twice.
Within 30 seconds, specify the time with the direct number buttons.
TOTAL
TOTAL
_:__:__
2:16:13
1:23:40
2:16:13
- Basic operation -
To select and play the desired title and chapter:
ENGLISH
Notes:
Advanced Disc Features
! To start playback from the desired point
(direct play)
The same operation can be performed by pressing down the
button on the
DVD player front panel, instead of the remote control, for more than 2 seconds.
3
Press the
(DVD/CD) button to return to the normal playback.
Note:
On some discs, the slow-motion playback functions are disabled.
" To specify 1 hour 23 minutes and 40 seconds, enter "12340".
" If you enter the wrong number, press the CLEAR button and then reenter.
8
E-30
02/8/28
SD-AT50H(H)E3.fm
SD-AT50H
DX-AT50H
ENGLISH
Useful features
! To play in random order (random play)
! To play in the desired order (programmed
playback)
The tracks on the disc can be played in random order automatically.
You can play back the desired tracks in the sequence you want.
Maximum of 99 tracks can be programmed.
1
Whilst stopped, press the MODE button
twice.
RANDOM
1
Whilst stopped, press the MODE button.
2
Press the
2
(DVD/CD) button.
To cancel random play:
Press the
Enter a track number with the direct number buttons.
PROGRAM TIME 0:00:00 1/1
PROGRAM TIME 8:88:88 1/1
button.
Notes:
- Useful features -
Advanced Disc Features
The programming screen is displayed.
" You may not be able to use this function with some discs.
" When all of the tracks have been played in random play, playback will stop automatically.
" You cannot set the random play whilst in the playback or pause mode.
" Random play is not allowed during programmed playback.
" To check the status during random play, press the ON SCREEN button.
" In random play, the DVD player will select and play tracks automatically. (You cannot select the order of the tracks.)
" Repeat the procedure above if you want to enter other track numbers.
" If you enter the wrong number, press the CLEAR button and then reenter.
" When you enter a track number with 2 or more digits:
Example:
To select track 14:
Press ">10", "1" and "4".
3
Press the
(DVD/CD) button to start play.
" Programmed selections are memorised until a disc is removed.
" Playback is paused with the button. When playback is resumed, programmed playback starts from the point you stopped.
" Pressing the button twice turns off the programmed playback. If you start
playback after pressing the MODE button, programmed playback starts from
the beginning.
To change the programmed contents:
Repeat the above procedures from step 1.
Notes:
(DVD/CD)
" Programming cannot be performed whilst paused or in the playback mode.
" Sequence programming does not work with a disc that does not include track
information.
" Sequence programming does not work with a disc that disables programming.
but" To exit the programming procedure halfway through, press the RETURN
ton.
" To check the status during the programmed playback, press the ON SCREEN or
the MODE button.
" Even if you press the ON/STAND-BY button to enter the stand-by mode or change
the function from DVD to another, the programmed selections will not be cleared.
E-31
02/8/28
SD-AT50H(H)E4.fm
SD-AT50H
DX-AT50H
ENGLISH
! To play repeatedly (repeat play)
You can play a chapter (track) or a title repeatedly by specifying it during playback.
You can play the desired portion repeatedly by specifying it during playback.
Whilst the disc is playing, press the REPEAT button.
Each time the button is pressed, the repeat play mode changes in the following
order.
Audio CD:
OFF
CHAPTER
TITLE
Whilst the disc is playing, press the A - B
REPEAT button.
[A - ]
This registers the start point (A).
2
Press the A - B REPEAT button again.
[A - B]
OFF
TRACK
ALL
This starts A-B repeat from the start point (A) to the end point (B).
MP3:
2
OFF
TRACK
ALBUM
DISC
3
Press the A - B REPEAT button to return to the normal playback.
Notes:
Select "OFF" by pressing the REPEAT button repeatedly to return
to the normal playback.
Caution:
After performing repeat play, be sure to press the
play continuously.
button. Otherwise, the disc will
Notes:
" You may not be able to use this function with some discs.
" If you select "ALL" by pressing the REPEAT button during the programmed/random play of an audio CD, the playback is repeated.
" If you press another button during the repeat play, the playback may be cancelled.
"
"
"
"
A-B repeat play is disabled on some discs.
A-B repeat play for DVD is possible only within a title.
Perform A-B repeat play of an audio CD within a track.
Some scenes in DVD may not allow A-B repeat play.
! To select a title from the top menu of the
disc
On a DVD with multiple titles, you can select a title from the top menu.
1
2
Whilst in the stop or playback mode,
press the TOP MENU button to display its title menu.
Use the , ,
TER button.
or
Example
1 Drama
2 Action
3 SF
4 Comedy
button to select the title, and then press the EN-
- Useful features -
DVD:
1
Advanced Disc Features
1
! To play the contents between the specified
points repeatedly (A-B repeat)
" The selected title is played.
" Depending on the disc, a title can be selected by pressing the direct number
buttons (0 - 9) on the back of the remote control.
Notes:
" The procedure shown here provides only general steps. The actual procedure for
using the title menu depends on the disc you are using. See the disc jacket for
details.
" If the disc you are using does not have a title menu, nothing appears on the
screen.
8
E-32
02/8/28
SD-AT50H(H)E4.fm
SD-AT50H
DX-AT50H
MP3 disc operation
ENGLISH
Direct play:
1
2
Press the DIRECT button.
Press the , , or button to select a track and press the
(DVD/CD) button.
Programmed playback:
1
2
3
4
Whilst in the stop mode, press the MODE button.
Press the or button to select an album and press the ENTER button.
Press the or button to select a track and press the ENTER button.
Press the button to return to the album selection screen.
After programming is completed, press the (DVD/CD) button.
If you convert MP3 data to "audio CD" data when recording on a CD-R/RW, play it as
an audio CD. The MP3 operation cannot be performed.
Notes:
- MP3 disc operation -
Advanced Disc Features
Caution:
" "+" appears in front of the album name.
" Maximum of 14 characters can be displayed for an album name, and 25 characters for a track name. Underline, asterisk, and space may not be displayed.
" The system can recognise a total of 255 albums and tracks.
" The 9th or later layers cannot be played back.
" You can select a track for direct playback using the direct number buttons when
the screen display is turned off.
" The screen displays up to 5 tracks for the programmed playback. If more tracks
are entered, the next screen appears. Press the
or
button to switch the
screen.
" If you enter a wrong track, press the CLEAR button.
" To stop the programmed playback, press the button twice.
(DVD/CD)
! MP3 disc playback
You can play back CD-R/RWs recorded in the MP3 format.
1
Load a disc containing MP3 tracks.
A menu screen appears.
VOLUME LABEL
FIRST PLAY
+ALBUM01
+ALBUM02
+ALBUM03
+ALBUM04
SELECT:
RETURN:
2
Press the , ,
CD) button.
or
ENTER:
START: PLAY
button to select a track and press the
(DVD/
Pressing the TOP MENU button goes back to the uppermost layer.
E-33
02/8/28
SD-AT50H(H)E4.fm
Various settings
SD-AT50H
DX-AT50H
The subtitle language and the audio language you select are reset each time you set
the DVD player to the stand-by mode or change the disc. To always play back the
DVD in the preferred languages, set them in the initial setting screen (see page 19).
! To change the audio language (audio output)
ENGLISH
During playback, you can change the audio language (audio output).
1. ENG
(DTS 5.1 Surround)
Within 5 seconds, press the AUDIO button repeatedly to select the
desired audio number.
DVD:
You can select one of the audio languages that are recorded on a DVD.
ENG
SPA
FRE
Audio CD:
STEREO
R-CH
L-CH
Notes:
" The audio language on some DVDs may not be changed.
" For audio language and audio system, refer to the manual of the disc.
! To change the subtitle language
You can change the subtitle language or hide the subtitle during playback.
1
2
Whilst a disc is playing, press the SUB TITLE
button.
Within 5 seconds, press the SUB TITLE button
repeatedly to select the desired subtitle language.
Press the SUB TITLE button and then the
or
1.ENG/6
You can select the desired subtitle or audio language and sound system [Dolby Digital (5.1ch) or DTS sound] on your DVD if it has a disc menu.
1
6.FRE/6
button to hide the subtitle.
Notes:
"
"
"
"
! To select a subtitle or audio language from
the disc menu
Some DVDs prohibit changing the subtitle language.
If no subtitles are recorded on the disc, "NOT AVAILABLE" is displayed.
It may take a little time to switch the subtitle language to the selected one.
The subtitle cannot be hidden on some DVDs.
2
Whilst the disc is stopped or played,
press the MENU button to display
the disc menu.
Press the , ,
ENTER button.
or
Example
- Various settings -
2
Whilst a disc is playing, press the AUDIO
button.
Advanced Disc Features
1
1.Highlights
2.Start Movie
button to change the setting and press the
You can also use the direct number buttons for some discs.
Note:
The procedure shown here provides only general steps. The actual procedure for
using the disc menu depends on the disc you are using. See the disc jacket for
details.
8
E-34
02/8/28
SD-AT50H(H)E4.fm
SD-AT50H
DX-AT50H
Various settings (continued)
ENGLISH
! To brighten an image (black level setting)
The image can be adjusted during playback.
1
BLACK LEVEL: OFF
Within 5 seconds, press the BLACK LEVEL button repeatedly to
select "OFF" or "ON".
Setting
OFF
ON
Normal image
Bright image
You can change the angle of view when playing a DVD video disc that contains
scenes recorded from multiple angles.
1
When " " is displayed in the upper right corner of the TV screen,
press the ANGLE button.
2
Within 5 seconds, press the ANGLE button repeatedly to select the
desired angle number.
Notes:
" Some DVDs prohibit changing the angle.
" The angle number is not displayed if angles are not recorded on the disc.
" Refer to the manual of the disc as the operation may vary depending on the disc.
! To zoom in on an image (zoom)
You can magnify images during DVD playback.
- Various settings -
Advanced Disc Features
2
Whilst a disc is playing, press the
BLACK LEVEL button.
! To change the angle
1
Whilst a disc is playing, press the ZOOM button.
ZOOM [x2]
ZOOM indicator
Each press of the ZOOM button cycles through the zoom settings as follows:
ZOOM [
2
2]
ZOOM [
4]
ZOOM [OFF]
To shift the view and display the desired part of a zoomed image, press
the , , or button repeatedly.
Notes:
" An image may become distorted when zoomed.
" Subtitles cannot be zoomed.
" For the part currently viewed, refer to the indication in the lower right section of the
screen.
E-35
02/8/28
SD-AT50H(H)E4.fm
SD-AT50H
DX-AT50H
! To change the display on TV screen
! DVD mode operation indicators
ENGLISH
The following are examples of display indicators that appear during DVD playback.
You can display or hide the operation indicators on the TV screen.
Whilst the disc is playing, press the ON SCREEN button. (The display is changed at
each press of this button.)
Audio CD:
Disc data is being
read
Track/Time
T
LOADING
4/16 0:03:21 - 0:02:15
Remaining playback
time for the current chapter
Remaining playback
time for the current track
Elapsed playback time
for the current chapter
Elapsed playback time
for the current track
Total number of chapters
Total number of tracks
Current chapter number
Current track number
Type of disc
DVD
Stop
Play
Total track/Time
Title/Time
ALL
4/12 0:13:45 - 0:45:40
Remaining playback
time for the current title
Total remaining
playback time for the disc
Elapsed playback time
for the current title
Total number of titles
Total elapsed playback
time for the disc
Total number of tracks
Current title number
Current track number
Bit rate
The display disappears.
Layer number
Repeat indicator
Image information
The display disappears.
DVD player display
Notes:
Pause
Slow
Fast Forward
(search)
Fast Reverse
(search)
" For an MP3 disc, the following is displayed.
Current track name (yellow)
- Various settings -
Chapter/Time
TV screen
Advanced Disc Features
DVD:
Operation
When the power is
on without a disc
Elapsed playback time for the current
track
button, the
" If you press the RETURN
display disappears.
8
E-36
02/8/28
SD-AT50H(H)E4.fm
SD-AT50H
DX-AT50H
Enjoying surround sound (sound mode)
ENGLISH
The spatial sound effect is activated when you play a DVD recorded in Dolby Digital
or DTS. You can also enjoy 2-channel stereo sound in Dolby Pro Logic II.
DVD player
Dolb
y
DTS Digital s
ignal
signa
l
Dolby Digital
DTS
Digital tuner, etc.
nal
o sig
Advanced Features
- Enjoying surround sound (sound mode) -
Stere
Types of surround
Source
Dolby Digital
Disc with this trademark
DTS (Digital Theater Systems)
Contents
Switchable sound
mode
One of the digital audio systems for theatrical use. You can
enjoy the stereophonic effect in the home theatre system.
Stereo
The disc recorded in Dolby Digital is recognised by the system automatically when it is played back.
Standard
(Dynamic sound)
Stereo
One of the digital audio systems for theatrical use. As the
sound quality is emphasised, you can enjoy the realistic
sound effect in the home theatre system. The disc recorded
in DTS is recognised by the system automatically when it is
played back.
Disc with this trademark
Dolby Pro Logic II
Dolby Pro Logic II
Stereo-recorded discs and videotapes
Standard
(Dynamic sound)
When playing a stereo-recorded disc or videotape, it is recog- Stereo (*)
nised by the Dolby Pro Logic II function and the sound is
Surround (*)
changed to the 5.1ch digital surround sound automatically.
Standard
More natural sound effect can be achieved.
(Dynamic sound)
If (*) is selected, the "
" indicator goes out.
(To select the sound mode, see page 39.)
E-37
02/8/28
SD-AT50H(H)E4.fm
SD-AT50H
DX-AT50H
ENGLISH
Acoustic effect
Standard
You can enjoy the normal surround with various scenes.
MOVIE:
The bass level is increased for powerful sound effect.
MUSIC:
You can enjoy lively sound by producing the articulate sound.
NIGHT:
Soft but powerful sound is achieved even at low volumes.
Surround
This mode provides an expansive listening area by emitting 2-channel
sound.
The SURROUND indicator lights
up.
Stereo
You can enjoy the great acoustic effects of the front speakers and subwoofer.
The STEREO indicator lights up.
DOLBY DIGITAL/DTS indicator:
The input signal is recognised automatically and the indicator lights up.
DOLBY PRO LOGIC II indicator:
" This indicator is lit when the 2ch signals are entered to extend them to the 5.1ch
surround sound.
" Even the 2ch sound recorded with Dolby Digital will be extended to the 5.1ch.
Notes:
" You can switch the audio whilst playing the disc of multiple types (Dolby Digital,
DTS, etc.) (page 34).
" When the surround mode is set to the standard or surround mode, the sound of
monaural signals is heard only from the centre speaker.
" When the surround mode is set to stereo, the same monaural sound is reproduced
in both the right and left channels.
" The surround indicator is lit according to the input audio source.
1 Front Left Signal Indicator
2
1
3
2 Centre Signal Indicator
3 Front Right Signal Indicator
4 LFE (Low Frequency Effect) Signal Indicator
5 Surround Left Signal Indicator
4
6 Surround Monaural Signal Indicator
7 Surround Right Signal Indicator
5
6
Advanced Features
Dynamic sound
- Enjoying surround sound (sound mode) -
The maximum of 5.1ch surround sound
is reproduced to provide three-dimensional effect. The system automatically
emits the 5.1ch sound according to the
recorded audio signal.
The STANDARD indicator lights up.
7
8
E-38
02/8/28
SD-AT50H(H)E4.fm
SD-AT50H
DX-AT50H
Enjoying surround sound (sound mode) (continued)
ENGLISH
! Changing the sound mode
To enjoy in the standard mode:
Example: Dolby Digital 5.1ch
Whilst the disc is playing, press the STANDARD button.
"STANDARD" will appear.
Advanced Features
- Enjoying surround sound (sound mode) -
To enjoy with dynamic sound in the standard mode:
Whilst the disc is playing, press the DYNAMIC SOUND button.
Each press of this button changes the mode in the order of "MOVIE"
"NIGHT".
"MUSIC"
Press the STANDARD button to restore the normal surround sound.
To enjoy in the surround or stereo mode:
Whilst the disc is playing, press the STEREO/SURROUND button.
"SURROUND" or "STEREO" will appear.
Each time you press the button, the display switches
between "SURROUND" and "STEREO".
Notes:
" The sound mode is changed to "STANDARD" by pressing the DYNAMIC SOUND
button whilst in the stereo or surround mode.
" When the DOLBY DIGITAL or DTS indicator is lit, you cannot select the surround
mode.
" Some discs are recorded at 96kHz of sampling frequency. When this type of disc
is played, the sound mode is changed to "STEREO" automatically. The sound
mode cannot be changed during its playback.
E-39
02/8/28
SD-AT50H(H)E4.fm
Changing the registration in the remote control
ENGLISH
! Changing the TV registration
Use buttons on both sides of the remote control.
1
Whilst holding down the TV ON/STAND-BY button, press the TV
CHANNEL button.
2
Enter the manufacturer setting number (2 digits) with the direct
number buttons (0 - 9) and press the TV ON/STAND-BY button.
TV manufacturer
SHARP
PANASONIC
JVC
SONY
MITSUBISHI
HITACHI
TOSHIBA
PIONEER
SANYO
FUJITSU
AIWA
FUNAI
SAMSUNG
Setting number
01(*), 02
03, 04, 05
06, 07, 08
09
10, 11, 12, 13
14, 15, 16, 17
18, 19
20
21, 22, 23, 24
25
26
27, 28, 29, 30, 31,
32
33, 34, 35, 36
TV manufacturer
EMERSON
FISHER
GE
GOLDSTAR
MAGNAVOX
RCA
ZENITH
PHILIPS
THOMSON
GRUNDIG
FERGUSON
ITT NOKIA
Setting number
37, 38, 39, 40
23
41, 42
43
44, 45
46, 47, 48, 49
50, 51
52, 53
54
55
56, 57
58, 59
LOEWE
60, 61
(*): The default manufacturer number is 01 (SHARP).
Notes:
" As for manufacturers with 2 or more setting numbers, select one of the numbers
with which you can operate the TV.
" The number will not be set unless the registration is completed within 30 seconds.
In that case, try registration again.
" Once you set a number, the number previously memorised will be cancelled.
" After replacing the batteries in the remote control, the registered number may
automatically be set to 01 (SHARP). If it occurs, register the desired number
again.
" Registration cannot be executed depending on TVs. Even if numbers can be set,
some buttons may not work.
Advanced Features
The setting is registered and the TV can be operated with the remote control of
this system.
- Changing the registration in the remote control -
Sharp's TVs can be operated with the remote control of this system without registering the operation (except for some models). (See page 51.) You can also operate
TVs of other manufacturers by changing the registration in the remote control.
SD-AT50H
DX-AT50H
8
E-40
02/8/28
SD-AT50H(H)E4.fm
SD-AT50H
DX-AT50H
Speaker settings
ENGLISH
The speaker settings are not displayed on the TV screen.
Caution:
To set the speaker size, set the sound mode to "STANDARD".
Note:
The recommended size is set for the supplied speakers. See the upper table on page
42 for other speakers.
! Speaker delay setting
- Speaker settings -
Advanced Features
When some of the speakers are at a different distance from the listening point, you
can select the speaker delay to make it seem as though the speaker distances are
the same.
1
Press the SETUP AMP button, and the or
DELAY". Then press the ENTER button.
2
Within 30 seconds, press the
speaker.
3
Within 30 seconds, press the
or button to select the distance
and press the ENTER button.
or
button to select "SP
button to select the desired
" You can change the distance in 0.1 m steps.
" To set the distance of other speakers, repeat the operation from step 2.
! Speaker size setting
You can change the sizes of the speakers if they are not supplied ones.
1
2
Press the SETUP AMP button, and the
SIZE". Then press the ENTER button.
Within 10 seconds, press the
select the desired speaker.
or
or
button to select "SP
Measure the distance between each speaker and the listening position, and set
the speaker delay.
In the left illustration, the front speakers, the
CT
centre speaker, and the subwoofer are positioned at 3 m, and the surround speakers are
FR
FL
at 4 m from the listening position.
SW
3m
3m
3m
3m
button to
4m
4m
SL
SR
The indicators of selected speakers flash.
Note:
3
See the lower table on page 42 for the adjustable range.
Within 10 seconds, press the
or
button to select their sizes.
To set sizes of other speakers, repeat the operation from step 2.
E-41
02/8/28
SD-AT50H(H)E5.fm
SD-AT50H
DX-AT50H
ENGLISH
! Speaker level setting
! To end the speaker setting
If sounds from the speakers are uneven, you can equalise them by adjusting the
speaker levels.
Press the RETURN
2
Within 10 seconds, press the
speaker.
3
Within 10 seconds, press the
or
button to select "SP
Speaker type
Front speaker (Left, Right)
button to select the desired
Centre speaker
or
button to adjust the level.
Surround speaker (Left, Right)
" You can adjust the level at 1 dB intervals.
" To adjust the levels of other speakers, repeat the operation from step 2.
! Test tone
You can check the sound output from the speakers. (If the speaker levels are not
equalised, they can be adjusted, too.)
Press the SETUP AMP button, and the
Then press the ENTER button.
or
button to select "TONE".
Speaker size
Large diameter
Small diameter
Large diameter
Small diameter
OFF
Large diameter
Small diameter
OFF
(*) indicates the default setting.
Notes:
" Adjust the level of the subwoofer if the sound from it is distorted.
" See the lower table on the right for the adjustable range.
F-LARGE
F-SMALL *
C-LARGE
C-SMALL *
C-NO
S-LARGE
S-SMALL *
S-NO
FL
CT
FR
SL
SR
SW
Speaker type
Front speaker (Left)
Centre speaker
Front speaker (Right)
Surround speaker (Left)
Surround speaker (Right)
Subwoofer
Delay range
0.1 m - 9.0 m
0.1 m - 9.0 m
0.1 m - 9.0 m
0.1 m - 9.0 m
0.1 m - 9.0 m
0.1 m - 9.0 m
Level range
- 6 dB - + 6 dB
- 6 dB - + 6 dB
- 6 dB - + 6 dB
- 6 dB - + 6 dB
- 6 dB - + 6 dB
- 10 dB - + 10 dB
Default settings:
The test tone will be heard from each speaker, in order, at about 2-second intervals.
FL
CT
FR
SW
SL
SR
Delay - - - 2 m
Level - - - 0 dB
- Speaker settings -
Press the SETUP AMP button, and the or
LEVEL". Then press the ENTER button.
Advanced Features
1
button twice.
If the levels are not equal:
Whilst the test tone sounds, press the or button to adjust the level.
You can select a speaker by pressing the or button.
Note:
If NO (OFF) is selected for a speaker in the speaker size setting, no test tone will be
heard from it.
8
E-42
02/8/28
SD-AT50H(H)E5.fm
SD-AT50H
DX-AT50H
Using the Radio Data System (RDS)
ENGLISH
RDS is a broadcasting service which a growing number of FM stations provide.
These FM stations send additional signals along with their regular programme
signals. They send their station names, and information about the type of programme such as sports or music, etc.
When tuned to an RDS station, "RDS" and the station name will be displayed.
"TP" (Traffic Programme) will appear on the display when the received broadcast
carries traffic information, and "TA" (Traffic Announcement) will appear whilst a traffic
information is on air.
"PTYI" (Dynamic PTY Indicator) will appear whilst the Dynamic PTY station is
received.
"RT" (Radio Text) will appear whilst the unit receives the Radio text data.
! Information provided by RDS
Each time the RDS DISPLAY button is pressed, the display will switch as follows:
Station name (PS)
Programme type (PTY)
Frequency
Radio text (RT)
Advanced Features
- Using the Radio Data System (RDS) -
You can control the RDS by using the remote control only.
When you are tuning in to a station other than an RDS station or to an RDS station
which sends weak signal, the display will change in the following order:
NO PS
NO PTY
FM 98.80 MHz
NO RT
! Notes for RDS operation
If any of the following events occur, it does not mean that the unit is
faulty:
" "PS", "NO PS" and a station name appear alternately, and the unit does not operate properly.
" If a particular station is not broadcasting properly or a station is conducting tests,
the RDS reception function may not work properly.
" When you receive an RDS station whose signal is too weak, information like the
station name may not be displayed.
" "NO PS", "NO PTY" or "NO RT" will flash for about 5 seconds, and then the frequency will be displayed.
Notes for radio text:
" The first 8 characters of the radio text will appear for 4 seconds and then they will
scroll across the display.
" If you tune in to an RDS station which is not broadcasting any radio text, "NO RT"
will be displayed when you switch to the radio text position.
" Whilst radio text data is received or when the text contents change, "RT" will be
displayed.
E-43
02/8/28
SD-AT50H(H)E5.fm
SD-AT50H
DX-AT50H
AFFAIRS
INFO
SPORT
EDUCATE
DRAMA
CULTURE
SCIENCE
VARIED
POP M
ROCK M
EASY M
LIGHT M
CLASSICS
OTHER M
WEATHER
FINANCE
CHILDREN
Short accounts of facts, events and publicly expressed views, reportage and actuality.
Topical programme expanding or enlarging upon the news, generally
in different presentation style or concept, including debate, or analysis.
Programmes whose purpose is to impart advice in the widest sense.
Programme concerned with any aspect of sport.
Programme intended primarily to educate, of which the formal element is fundamental.
All radio plays and serials.
Programmes concerned with any aspect of national or regional culture, including language, theatre, etc.
Programmes about the natural sciences and technology.
Used for mainly speech-based programmes usually of light-entertainment nature, not covered by other categories. Examples include:
quizzes, panel games, personality interviews.
Commercial music, which would generally be considered to be of current popular appeal, often featuring in current or recent record sales
charts.
Contemporary modern music, usually written and performed by
young musicians.
Current contemporary music considered to be "easy-listening", as opposed to Pop, Rock or Classical, or one of the specialised music
styles, Jazz, Folk or Country. Music in this category is often but not
always, vocal, and usually of short duration.
Classical music for general, rather than specialist appreciation. Examples of music in this category are instrumental music, and vocal or
choral works.
Performances of major orchestral works, symphonies, chamber music, etc., and including Grand Opera.
Musical styles not fitting into any of the other categories. Particularly
used for specialist music of which Rhythm & Blues and Reggae are
examples.
Weather reports and forecasts and meteorological information.
Stock Market reports, commerce, trading, etc.
For programmes targeted at a young audience, primarily for entertainment and interest, rather than where the objective is to educate.
RELIGION
PHONE IN
TRAVEL
LEISURE
JAZZ
COUNTRY
NATION M
OLDIES
FOLK M
DOCUMENT
TEST
ALARM
NONE
TP
TA
Programmes about people and things that influence them individually
or in groups. Includes: sociology, history, geography, psychology and
society.
Any aspect of beliefs and faiths, involving a God or Gods, the nature
of existence and ethics.
Involving members of the public expressing their views either by
phone or at a public forum.
Features and programmes concerned with travel to near and far destinations, package tours and travel ideas and opportunities. Not for
use for announcements about problems, delays, or roadworks affecting immediate travel where TP/TA should be used.
Programmes concerned with recreational activities in which the listener might participate. Examples include, Gardening, Fishing, Antique
collecting, Cooking, Food & Wine, etc.
Polyphonic, syncopated music characterised by improvisation.
Songs which originate from, or continue the musical tradition of the
American Southern States. Characterised by a straightforward melody and narrative story line.
Current Popular Music of the Nation or Region in that country's language, as opposed to International 'Pop' which is usually US or UK
inspired and in English.
Music from the so-called "golden age" of popular music.
Music which has its roots in the musical culture of a particular nation,
usually played on acoustic instruments. The narrative or story may be
based on historical events or people.
Programme concerned with factual matters, presented in an investigative style.
Broadcast when testing emergency broadcast equipment or receivers.
Emergency announcement made under exceptional circumstances to
give warning of events causing danger of a general nature.
No programme type (receive only).
Broadcasts which carry traffic announcements.
Traffic announcements are being broadcast.
Advanced Features
NEWS
SOCIAL
- Using the Radio Data System (RDS) -
ENGLISH
Descriptions of the PTY (Programme Type) codes, TP (Traffic Programme) and
TA (Traffic Announcement).
You can search for and receive the following PTY, TP and TA signals.
8
E-44
02/8/28
SD-AT50H(H)E5.fm
SD-AT50H
DX-AT50H
Using the Radio Data System (RDS) (continued)
Advanced Features
- Using the Radio Data System (RDS) -
ENGLISH
! Using the Auto Station Programme Memory (ASPM)
To stop the ASPM operation before it is complete:
Whilst in the ASPM operation mode, the tuner will automatically search for new RDS
stations. Up to 40 stations can be stored.
If you have already stored some stations in memory, the number of new stations you
can store will be less.
Notes:
1
To enter tuner function, display "FM" or "AM" by pressing the
FUNCTION button.
2
3
Press the BAND button to select the FM band.
Press and hold down the ASPM button for at least 3 seconds.
1
After "ASPM" has flashed for about 4 seconds, scanning will start (87.50 108.00 MHz).
2
When an RDS station is found, "RDS" will appear for a short time and the station will be stored in memory.
Press the ASPM button whilst it is scanning for stations.
The stations which are already stored in memory will be kept there.
" If the same station is broadcasting on different frequencies, the strongest frequency will be stored in memory.
" Any station which has the same frequency as one stored in memory will not be
stored.
" If 40 stations have already been stored in memory, the scan will be aborted. If you
want to redo the ASPM operation, erase the preset memory.
" If no stations have been stored in memory, "END" will appear for about 4 seconds.
" If the RDS signals are very weak, station names may not be stored in memory.
To erase all of the contents of preset memory:
1 Hold the CLEAR button down for 3 seconds or more.
2 Whilst "CLEAR" is displayed, press the ENTER button.
" After performing this operation, all of the preset memory information will be erased.
To store a station name again if the wrong name was stored in memory:
It may be impossible to store station names in memory using the ASPM function if
there is lots of noise or if the signal is too weak. In this case, perform as follows.
1 Press the TUNER PRESET ( or ) button to check whether the names are correct.
2 If you find a wrong name whilst receiving the station, wait until the correct name will
be displayed. And then press the ENTER button.
3 Within 5 seconds, press the TUNER PRESET ( or ) button to display the preset
channel to be corrected again.
4 Within 5 seconds, press the ENTER button.
" The new station name has been stored in memory correctly.
Notes:
" The same station name can be stored in different channels.
" In a certain area or during certain time periods, the station names may temporarily
be different.
3
After scanning, the number of stations stored in memory will be displayed for
4 seconds, and then "END" will appear for 4 seconds.
E-45
02/8/28
SD-AT50H(H)E5.fm
SD-AT50H
DX-AT50H
ENGLISH
You can search a station by specifying the programme type (news, sports, traffic programme, etc. ... see page 44) from the stations in memory.
1
2
3
To enter tuner function, display "FM" or "AM" by pressing the
FUNCTION button.
If you select the traffic programme:
Press the BAND button to select the FM band.
If you select the traffic programme (TP) in step 4, "TP" will appear. (This does not
mean that you can listen to the traffic information at that time.)
When the traffic information is broadcast, "TA" will appear.
Press the PTY.TI button.
To specify station names and select stations manually:
"PTY TI" and "SELECT" will appear alternately for about 6 seconds.
4
" If the display has stopped flashing, start again from step 3.
" If you want to listen to the same programme type of another station, press the
PTY.TI SEARCH button whilst the channel number or station name is flashing.
The unit will look for the next station.
" If no station can be found, "NOTFOUND" will appear for 4 seconds.
Within 6 seconds, press the
type.
or
You can select a station by specifying the name (BBC R1, BBC R2, etc.) from the
stations stored in memory.
Before starting this operation, you must store one or more station names in memory.
1 To enter tuner function, display "FM" or "AM" by pressing the FUNCTION button.
2 Press the BAND button to select the FM band.
3 Press the TUNER PRESET ( or ) button to select a desired station.
button to select the programme
4
The station name will be displayed for 3 seconds. Then the display will change as
follows.
Each time the button is pressed, the programme type will appear. If the button is
held down for more than 0.5 seconds, the programme type will appear continuously.
5
Whilst the selected programme type is flashing (within 6 seconds),
press the ENTER button.
Advanced Features
To specify programmed types and select stations (PTY search):
- Using the Radio Data System (RDS) -
! To recall stations in memory
Notes:
After the selected programme type has been lit for 2 seconds, "SEARCH" will appear, and the search operation will start.
8
E-46
02/8/28
SD-AT50H(H)E5.fm
SD-AT50H
DX-AT50H
Timer and sleep operation
ENGLISH
The system turns on and plays the desired source (DVD, CD, MP3 disc or tuner) at
the preset time.
1
Turn the power on and press the TIMER button.
- Timer and sleep operation -
Advanced Features
If "TIMER STANDBY" does not appear, check that the
AV control unit is set to the correct time.
2
Within 10 seconds, press the or button to
select "TIMER SET", and press the ENTER
button.
3
Press the or button to adjust the hour and
then press the ENTER button.
4
Press the or
ENTER button.
button to adjust the minutes and then press the
The start time is set and the finish time (1 hour later) will be displayed automatically.
5
6
Set the time to finish as in steps 3 and 4 above.
Switch input with the or button, DVD DIGITAL
and then press the ENTER button.
When you select the tuner, select a station
by pressing the or button, and then
press the ENTER button.
! Setting the timer
Before setting timer:
1
2
Ensure you have set the correct time on the AV control unit (page 24).
If the time is not set, you cannot use the timer function.
Prepare for playback and set the TV to the desired channel.
7
TUNER
VCR
AUX DIGITAL
TV
Adjust the volume with the or
button and press the ENTER button.
" Settings are displayed in order and the
system will enter the timer stand-by
mode.
" Timer set indicator will light up.
E-47
02/8/28
DVD ANALOG
SD-AT50H(H)E5.fm
AUX ANALOG
SD-AT50H
DX-AT50H
ENGLISH
Whilst in the timer playback stand-by mode,
press the TIMER button.
2
Within 10 seconds, press the or button to select "TIMER CALL", and press
the ENTER button.
The system returns to the timer playback stand-by mode after the setting contents are displayed in order.
When the start time is reached:
Playback starts automatically and the volume increases gradually.
The timer play indicator flashes.
Timer play indicator
The timer setting will be memorised once it is entered. To reuse the same setting,
perform the following operations.
1 Turn the power on and press the TIMER button.
Set the AV control unit on time if "TIMER STANDBY" does not appear.
2 Within 10 seconds, press the ENTER button.
After the setting contents are displayed in order, the system is set to the timer playback stand-by mode.
Changing the timer setting:
Turn the power on, and repeat the operation from step 1 in "Setting the timer" (page
47).
Cancelling the timer playback:
Timer playback is cancelled by turning the power on whilst in the timer playback
stand-by mode. The same operation can be performed in the following procedure
without turning the power on.
1 Press the TIMER button.
"TIMER CANCEL" will appear.
2 Within 10 seconds, press the ENTER button.
Timer playback will be cancelled (the contents of the setting will not be cancelled).
Caution:
" The contents of the setting will be erased if the system is unplugged or a power
failure occurs. In such cases, set the timer again.
" This system cannot set the timer of other equipment.
" When setting the timer playback using the digital tuner, TV or VCR, the connected
equipment should be set to timer playback at the same time.
Note:
The timer operation is disabled with discs containing menus.
When the finish time is reached:
- Timer and sleep operation -
1
Reusing the memorised timer setting:
Advanced Features
To check the timer setting:
The system is set to the power stand-by mode automatically.
8
E-48
02/8/28
SD-AT50H(H)E5.fm
SD-AT50H
DX-AT50H
Timer and sleep operation (continued)
ENGLISH
! Setting the sleep timer
You can set the system to the power stand-by mode at the specified time.
- Timer and sleep operation -
Advanced Features
1
Within 10 seconds, press the or button to
select "SLEEP SET", and press the ENTER
button.
3
Press the
Whilst "SLEEP" is indicated, press the TIMER button.
Within 10 seconds, press the or button to select "SLEEP".
Remaining sleep time
" The remaining sleep time is displayed for about 10 seconds.
" You can change the remaining sleep time whilst it is displayed by pressing the
ENTER button (steps 3 - 4).
To cancel the sleep operation:
or
button to select the time.
(Maximum: 2 hours - Minimum: 1 minute)
" 2 hours - 5 minutes 5-minute intervals
" 5 minutes - 1 minute 1-minute intervals
Press the ON/STAND-BY button whilst "SLEEP" is indicated.
To cancel the sleep operation without setting the system to the stand-by mode, proceed as follows.
1 Press the TIMER button.
2 Within 10 seconds, press the or button to select "SLEEP OFF", and press the
ENTER button.
Press the ENTER button.
"SLEEP" will appear.
5
1
2
Whilst the disc is playing, press the TIMER
button.
2
4
To confirm the remaining sleep time:
Your system will enter the power stand-by mode automatically after the preset time has elapsed.
The volume will be turned down 1 minute before the sleep operation finishes.
You cannot change the volume.
Caution:
This system cannot set the sleep timer of other equipment.
When setting the sleep timer using the digital tuner, TV, or VCR, the connected
equipment should be set to sleep timer at the same time.
! To use timer and sleep operation together
You can fall asleep and wake up to the same CD.
1
Set the sleep timer (steps 1 - 4).
Sleep operation starts.
2
Set the timer playback.
("Setting the timer" on page 47, steps 1 - 7)
Sleep timer setting
Timer playback setting
1 minute
- 2 hours
1minute
- 2hours
Timer playback starts.
Desired time
Sleep operation will
automatically stop.
E-49
02/8/28
SD-AT50H(H)E5.fm
Finish time
Audio connection of other equipment
You can hear the sound of other equipment via this product. Connect VCR or digital
tuner to TV directly to receive the images (refer to the operation manual of each
equipment).
! Connection for the VCR sound
SD-AT50H
DX-AT50H
! Connection for the digital tuner sound (or
other optical digital equipment such as an
MD player)
ENGLISH
You can hear the sound by connecting one of the audio cable or the optical digital
cable. If you are using the digital tuner with the optical output jack, you can enjoy better sound by connecting the tuner to the optical digital input jack of the AV control
unit.
To audio
input sockets
To audio
Audio cable
output sockets
(commercially available)
Audio cable
(commercially available)
To audio
output sockets
TV
Digital tuner, etc.
Connection using a SCART adaptor:
To audio
input sockets
To optical digital
audio input socket
Audio cable
(commercially available)
VCR
To SCART
socket
OUT
R AUDIO
L
VIDEO
To optical digital audio
output socket
Optical digital cable
(option: AD-M3DC)
SCART
adaptor (OUT)
To audio
output sockets
To audio
input sockets
Advanced Features
VCR
- Audio connection of other equipment -
TV
Digital equipment such as
an MD player
Caution:
Turn off the other equipment before making this connection.
Caution:
Turn off the other equipment before making this connection.
Note:
Insert the plugs fully to avoid fuzzy pictures or noise.
Notes:
" Change the audio between analogue and digital with the DIGITAL/ANALOG button (page 51).
" Insert the plugs fully to avoid fuzzy pictures or noise.
" When connecting with an optical digital cable, set the digital output of the digital
tuner to PCM. Refer to the operation manual of the digital tuner.
8
E-50
02/8/28
SD-AT50H(H)E5.fm
SD-AT50H
DX-AT50H
Operating the connected TV
ENGLISH
The connected TV can be operated with the remote control of this system. The factory setting allows you to operate Sharp's TVs and VCRs with it.
To operate those of other manufacturers, change the contents registered in the
remote control (see page 40).
! Watching TV
1
2
3
Press the TV ON/STAND-BY button to turn on the TV.
Press the TV CHANNEL (
Press the TV VOLUME (
or
or
) button to set the channel.
) button to control the TV volume.
To enjoy the sound from the speakers of this system:
- Operating the connected TV -
Advanced Features
Turn on the system and press the FUNCTION button to select "TV".
" The DVD player automatically enters the power stand-by mode.
! Watching images from digital tuner, VCR,
etc.
1
Turn on the system and press the FUNCTION button.
" For the digital tuner, select "AUX".
" For the videotape, select "VCR".
2
3
Turn on the digital tuner, VCR, etc.
Press the TV/VIDEO button, and set the TV to VIDEO 1, VIDEO 2,
etc.
" When you watch images from digital tuner, press the DIGITAL/ANALOG button and select "AUX ANALOG" or "AUX DIGITAL" depending on the connected input terminal.
" When you watch a videotape, press the playback button of the VCR.
Caution:
Some Sharp TVs and VCRs cannot be operated with this remote control.
E-51
02/8/28
SD-AT50H(H)E6.fm
Error indicators and warnings
SD-AT50H
DX-AT50H
ENGLISH
When you load an unplayable disc or fail to perform operations properly, the following
messages are displayed on the AV control unit, the DVD player and the TV screen.
DVD player display
Meaning
" The disc is not loaded.
" The disc is scratched or dirty and cannot be recognised.
" The speaker is not connected properly.
" The amplifier is defective.
"
"
"
"
"
"
Set the system to the stand-by mode and turn the
power on again. (*)
The amplifier is defective.
Set the system to the stand-by mode and turn the
power on again. (*)
The amplifier is defective.
Place the system away from noise source or plug the
AC power leads to other AC outlets. (*)
The cooling fan on the back of the subwoofer/amplifier does not run due to foreign objects caught in it.
Set the subwoofer/amplifier unit to the stand-by
mode and remove the foreign objects around the
fan.
The digital audio input socket is not connected properly.
Unspecified signal is received and cannot be recognised.
The system connection cable is unplugged.
" The temperature is too high.
Set the system to the stand-by mode and wait a
while.
" The disc is loaded up-side down.
TV screen
Meaning
The disc cannot be played with this system or
it is loaded in an incorrect way.
Disc Error:
Playback feature may not be available
on this Disc.
Please eject the disc.
The region number of the DVD is not 2 or ALL.
Region Error:
Playback is not authorized in your region.
Please eject the disc.
1/5
8 / 30
01 : 23 : 40
C
The disc does not support the operation described in this operation manual.
! Condensation
Sudden temperature changes, storage or operation in an extremely humid environment may cause condensation inside the cabinet (laser pickup, etc.) or on the transmitter on the remote control.
Condensation can cause the system to malfunction. If this happens, leave the power
on with no disc in the DVD player until normal playback is possible (about 1 hour).
Wipe off any condensation on the transmitter with a soft cloth before operating the
system.
References
Meaning
" Place the system away from noise source or plug the
AC power leads to other AC outlets. (*)
- Error indicators and warnings -
AV control unit display
(*): Should the same message appear even if the DVD player and the subwoofer/amplifier unit are unplugged and plugged in or are set to the stand-by mode and on
again, contact your local dealer where you purchased the system.
8
E-52
02/8/28
SD-AT50H(H)E6.fm
SD-AT50H
DX-AT50H
Troubleshooting chart
ENGLISH
Many potential problems can be resolved by the owner without calling a service technician.
If something is wrong with this product, check the following before calling your authorised SHARP dealer or service centre.
! General
Symptom
References
- Troubleshooting chart -
No sound is heard.
The sounds from speakers
are not well balanced.
Noise is heard during playback.
When a button is pressed,
the system does not respond.
Interference or noise occurs
on the TV image.
Timer playback does not
start.
Possible cause
" Is the volume level set to "0"?
" Are the headphones connected?
" Are the speaker wires disconnected?
Reference
page
P. 18
P. 28
P. 12
" Is the speaker size set to NO (OFF)?
" Are the speaker leads connected to
the wrong channels?
P. 41
P. 12
" Is each speaker placed at the same
distance from the listener?
P. 16
" Are speakers adjusted to the same
level?
P. 42
" Move the system away from any
computers or mobile phones.
" Set the system to the power standby mode and then turn it back on. If
the system still malfunctions, reset it.
P. 54
" Is the system placed near TV with internal aerial? Use an external aerial.
P. 13
" Did you remove the plug from the
wall socket, or did a power failure
occur? Reset the clock.
P. 24
The display on the system is " Hold down the DISPLAY button on
dark.
the remote control for 2 seconds or
more to select "ON".
The power is not turned on. " Is the system unplugged?
" Are the system connection cables
disconnected?
" The protection circuit may be activated. Unplug and plug in the power
lead again after 5 minutes or more.
Symptom
The sound is not reproduced " Is the initial setting screen set to
"DPCM"? Change it to "BITin the Dolby Digital 5.1 ch.
STREAM".
No images are displayed.
" Is TV turned on?
" Is the input of TV switched?
P. 18
P. 11
P. 54
Reference
page
P. 20
P. 51
P. 51
! Tuner
Symptom
The radio makes unusual
noises continuously.
The preset channel cannot
be recalled.
Possible cause
" Is the system placed near the TV or
computer?
" Is the FM aerial or AM loop aerial
placed properly? Move the aerial
away from the AC power lead or the
system if located near.
" Did you remove the plug from the
wall socket, or did a power failure
occur?
Set the channel again.
Reference
page
P. 13
P. 13
P. 26
! Remote control
Symptom
P. 18
Possible cause
Possible cause
The remote control does not " Is the battery polarity respected?
operate properly.
" Are the batteries dead?
" Is the distance or angle incorrect?
" Are there any obstructions in front of
the AV control unit?
" Is the remote control sensor exposed to strong light (inverter fluorescent light, direct sunlight, etc.)?
" Is the remote control for another
equipment used simultaneously?
" Are buttons on the front and back
faces of the remote control pressed
simultaneously?
The system cannot be turned " Are the AC power leads of the DVD
on with the remote control.
player and the subwoofer/amplifier
unit plugged in?
" Are the batteries inserted?
E-53
02/8/28
SD-AT50H(H)E6.fm
Reference
page
P. 17
P. 17
P. 17
P. 18
P. 17
SD-AT50H
DX-AT50H
ENGLISH
! DVD player
Even though a disc has been " Is the disc loaded upside down?
loaded, "- - - - - " is displayed. " Is the disc very dirty?
Playback sounds are
" Does the disc satisfy the standards?
skipped.
" Is the system located near excessive vibrations?
" Has condensation formed inside the
system?
The control buttons do not
" Is the disc very dirty?
function. Music or video play- " Does the disc satisfy the standards?
back is interrupted.
" Is the system located near excessive vibrations?
" Has condensation formed inside the
system?
Pictures and sound are
" Is the disc very dirty?
skipped.
" Is the system located near excessive vibrations?
" Has condensation formed inside the
system?
The system does not operate " Is a disc other than a DVD (region
even if the power is on.
number 2 or ALL) or an audio CD
loaded?
Image cannot be played
" Are the video and audio cables conback. (Sound is not heard.)
nected improperly?
" Is a disc other than a DVD (region
number 2 or ALL) or an audio CD
loaded?
" Is the disc very dirty?
" Is the disc loaded upside down?
" Clean the optical pickup if it is dirty.
" Is the TV input set to "VIDEO 1/VIDEO 2", etc.?
" Is the system turned on?
Reference
page
When this product is subjected to strong external interference (mechanical shock,
excessive static electricity, abnormal supply voltage due to lightning, etc.) or if it is
operated incorrectly, it may malfunction.
If such a problem occurs, do the following:
Resetting the AV control unit:
1
2
P. 52
3
Unplug the subwoofer/amplifier unit.
Whilst holding down the ON/STAND-BY button, plug in the AC power lead.
At this time, the component will not be turned on.
Press the ON/STAND-BY button again to turn the power on.
Caution:
This operation will erase all data stored in memory and restore various settings to the
initial status (default).
P. 52
Resetting the DVD player:
Unplug the DVD player and, after waiting 5 minutes or longer, plug it in again.
When the protection circuit is activated:
P. 52
When short-circuiting the speaker leads or turning the volume too high, the protection
circuit may be activated and the system may enter the stand-by mode.
Unplug the subwoofer/amplifier unit and, after 5 minutes or more, plug it in again.
Turn down the volume if set too high.
P. 5
! Before transporting the system
P. 11 - 15
P. 5
1
2
3
4
Press the ON/STAND-BY button of the DVD player to turn the power on.
Open the disc tray and remove the disc.
Close the disc tray and set the system to the stand-by mode.
After the power indicator goes off, unplug the system.
References
Possible cause
- Troubleshooting chart -
Symptom
! If trouble occurs
P. 55
P. 51
P. 18
8
E-54
02/8/28
SD-AT50H(H)E6.fm
SD-AT50H
DX-AT50H
ENGLISH
Maintenance
Specifications
! Cleaning the cabinet
As part of our policy of continuous improvement, SHARP reserves the right to make
design and specification changes for product improvement without prior notice. The
performance specification figures indicated are nominal values of production units.
There may be some deviations from these values in individual units.
Periodically wipe the cabinet with a soft cloth and a diluted soap solution, then with a
dry cloth.
References
- Maintenance / Optional accessories / Specifications -
" Do not use chemicals for cleaning (petrol, paint thinner, etc.). It may damage the
cabinet finish.
" Do not apply oil to the inside of the each component. It may cause malfunctions.
Optional accessories
Use only the specified optional accessories to operate this product properly.
For speaker installation, read instructions supplied with stands or brackets.
FLOOR SPEAKER STAND
Model: AD- AT10ST
TABLE SPEAKER STAND
Model: AD- AT10LS
SPEAKER WALL BRACKET
Model: AD- AT10SA
OPTICAL DIGITAL CABLE
Model: AD-M3DC
! AV control unit
Dimensions
Width: 215 mm (8-1/2")
Height: 58 mm (2-5/16")
Depth: 261 mm (10-5/16")
Weight
1.3 kg (2.9 lbs.)
Audio input terminals Optical digital input (AUX): Square type 1
Coaxial digital input (DVD/CD): RCA type 1
Analog input (DVD/CD): RCA type 1 pair (L/R)
Analog input (TV): RCA type 1 pair (L/R)
Analog input (VCR): RCA type 1 pair (L/R)
Analog input (AUX): RCA type 1 pair (L/R)
Audio output terminal Headphones: 16 - 50 ohms (recommended: 32 ohms)
Other terminals
System control 3
Frequency range
FM: 87.5 - 108 MHz
AM: 522 - 1,620 kHz
The appearance of optional accessories may differ from the illustrations above.
E-55
02/8/28
SD-AT50H(H)E6.fm
SD-AT50H
DX-AT50H
ENGLISH
Weight
Output power
Amplification system
A/D noise shaping
Terminals
Subwoofer
AC 230 V, 50 Hz
80 W
Width: 260 mm (10-1/4")
Height: 373 mm (14-11/16")
Depth: 421 mm (16-5/8")
10.3 kg (22.7 lbs.)
Front speakers:
RMS: 100 W (50 W + 50 W) (10 % T.H.D., 1 kHz)
Centre speaker:
RMS: 50 W (10 % T.H.D., 1 kHz)
Surround speakers:
RMS: 100 W (50 W + 50 W) (10 % T.H.D., 1 kHz)
Subwoofer:
RMS: 50 W (10 % T.H.D., 100 Hz)
2.8224 MHz (64fs) 1-bit switching (remarks: fs = 44.1 kHz)
7th-order
(delta - sigma) modulation
Front speakers, Centre speaker, Surround speakers: 4
ohms
System control 2
Type
16 cm (6-1/2") woofer
Maximum input power 100 W
Rated input power
50 W
Impedance
4 ohms
! Front/centre/surround speakers
Type
Full range speaker system (magnetic shield)
8 cm (3-1/8") Speaker
Maximum input power 100 W
Rated input power
50 W
Impedance
4 ohms
Dimensions
Width: 95 mm (3-3/4")
Height: 114 mm (4-1/2")
Depth: 104 mm (4-1/8")
Weight
0.7 kg (1.5 lbs.)/each
Power source
Power consumption
Dimensions
Weight
Signal system
Supported disc types
Video signal
Audio signal
Audio output
terminals
Video output
terminals
Other terminal
AC 230 V, 50 Hz
15 W
Width: 215 mm (8-1/2")
Height: 58 mm (2-5/16")
Depth: 257 mm (10-1/8")
2.0 kg (4.4 lbs.)
PAL colour
DVD (Region number 2, ALL), audio CD, CD-R, CD-RW
Horizontal resolution: 500 lines
S/N ratio: 70 dB
Frequency
Linear PCM DVD:
charactoristics
4 Hz to 22 kHz (sampling rate:
48 kHz)
4 Hz to 44 kHz (sampling rate:
96 kHz)
CD: 4 Hz to 20 kHz
S/N ratio
CD: 96 dB (1 kHz)
Dynamic range
Linear PCM DVD: 95 dB
CD: 94 dB
Total harmonic
0.006 % maximum
distortion ratio
Coaxial digital output: RCA type 1
Analog output: RCA type 1 pair (L/R)
Video output: RCA type 1
S-video output: S-terminal 1
Component video output: RCA type 3
System control 1
- Specifications -
Power source
Power consumption
Dimensions
! DVD player
References
! Subwoofer/amplifier unit
8
E-56
02/8/28
SD-AT50H(H)E6.fm
SHARP CORPORATION
9906
TINSZ0868AWZZ
02J R HK 2
SDAT50H(H)_BACK
1
02.9.9, 1:56 PM
DOWN
UP
SD-AT50H/DX-AT50H
1-BIT DIGITAL HOME CINEMA/DVD PLAYER