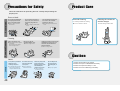
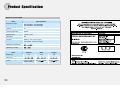
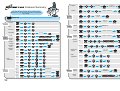
1
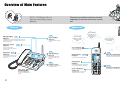
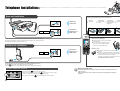
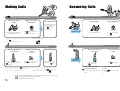
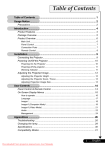
900 DSP Phone GG68-00356B 03/04. Rev.1.0 Overview of Main Features ÀÀ ;; @@ ;; @@ ÀÀ WIDE-900Mega Phone Experience the following various functions. Base set Russian Display Function Remote set A big screen composition that supports full graphic and Russian will allow you to use it easily (You can select a desired display screen). Dialed Number Function You can check the last dialed number. You can check the recorded messages with the remote set. Screen Display A big screen composition will allow you to use this product easily. Page 20, 37 Page 15 Auto Answering Function You can make an extension call (a call between the base set and the remote set). You can activate/deactivate auto answering, and check messages. Page 17 Volume Control You can adjust the speaker and the handset volumes. Two-way Speakerphone Two-way speakerphone will provide you with high speech quality. 2 Built-in backlight allows you to make a call even in dark places. Page 26 You can search a desired telephone number easily from the stored directory. Extension Function If you purchase two more units, you can connect up to three remote sets to one base set. Page 34 Page 6 Directory Search Function Directories and dialed numbers are stored separately for the base set and the remote set. Page 24 Dialed Number Function Page 34 You can check the last dialed number. Directory Search Function You can search a desired telephone number easily from the stored directory. Easy Search Function You can search telephone numbers easily from the Dialed Number List/Directory. Noise Cancellation during Call Page 15 Extension Call Function You can talk to the base set easily. This product reduces noise if noise interferes with the conversation. 3 Contents Preparations and Installation Advanced Functions Advanced functions for making calls Overview of Main Features 2 Contents/Components 4 Product Overview 6 To make a call to the number you once dialed (Make a call after searching the last dialed number) 34 Telephone Installation 8 To delete the dialed number (called number) Transfering the call to another number during a call (Flash) Telephone Basics Making/Answering Calls Setting the Date and Time Transferring a Call Making Extension Calls Selecting the Base set Ringer Type Selecting the Remote set Ringer Type Registering the Morning Call Using the Auto Answering Registering the Directory Searching the Directory Editing the Directory Using the Directory (Making Calls) Using the Directory (Delete) 10 12 14 15 16 18 19 20 24 26 28 30 31 Table of functions available from the outside (Remote Control) 39 34 Table of Functions Available at the Remote set 39 34 Help Function Advanced functions available during calls Display Screen Selection 40 Recording the content of calls (Base set) 35 Toll Restriction 40 Pause during calls (Hold function) 36 Setting the Dialing Mode 40 Adjusting the flash time (In the standby state) 41 Advanced functions for auto answering Functions used for auto answering 37 Low voltage Warning Function 41 Checking the caller’s voice (Caller Identification) 37 To reset the telephone to the initial state (Reset) Selecting the auto-answering ring count (when setup) 42 38 Registering the additional remote sets (In the standby state) 43 Selecting the auto-answering ring count (when released) 38 How to use auto-answering function outside (auto-answering) 38 Note Anything wrong with the telephone? 46 Precautions for Safety 48 Product Care 49 Product Specification 50 Features Summary 52 Components Base set 4 Handset Base set Adaptor (DC 12V 500 mA) Phone Line Cord Remote set Charger Charger Adaptor (DC 12V 500 mA) Battery (3.6V / 600mAh) User’s Manual 5 Product Overview Used to search the directory Base set Used to search the last dialed number Hook Switch Remote set Antenna Antenna Used to play/stop messages, or stop function setting Displays the battery charging/discharging state. Speaker Used to record a greeting message or the content of calls When the remote set moves far from the base set during calls Speaker When the morning call ringer sounds Used to search the dialed numbers/directory, or select a menu When the line is busy with a call ( an extension call ( ) ) or Displays the speech volume during calls. Used to adjust the speaker or the handset volume Displays the ringer volume. Used to make extension calls or transfer calls Used to search the dialed numbers/directory Used to set/cancel a function Used to activate/deactivate the auto answering function Used to put the other party on hold during calls Used to talk over the speakerphone Used to make/answer calls, or hang up. Used to transfer a call to another number connected to the PBX, or to register pause while registering telephone numbers Used to set/cancel the environment Used to turn ON/OFF the power, or to cancel noise or interference during a call Used to make extension calls, use flash, or cancel functions being executed Used to put the other party on hold for a momment Charger 12:00 00/00 00/00 Displays the toll restriction setting Displays the morning call setting. Displays the current time. 6 BELL OFF setup display Displays the total number of voice message. Displays new voice messages. Used to make a call to another number after finishing one call, or putting pause while entering a telephone number Charge Contact Used as DELETE key at the time of performing functions or dialing telephone numbers Used to adjust the ringer or the speech volume Charge Light Power Jack (Rear) 7 Telephone Installation Base set Installation Placing the battery in the remote set Open the Telephone Connection DC 12V 500mA 1 battery lid. Put the battery Put the battery shown in the to the upper 2 aspicture. 3 tight part as shown in 4 the picture. Connect the telephone to a 220V outlet. How to use battery? ● After installation, pick up the handset and make it sure that dial tone is transmitted. ● If there is no dial tone, check the connections of the telephone line and the power line. ● This product should be operated at 220V only. ● Charge the remote set for more than 24 hours before initial use. ● If you do not use the telephone for a long time, make it sure to separate the battery from the remote set and keep it safe. Remote set Installation Battery Life DC 12V Close the battery lid. 500mA Connect the telephone to a 220V outlet. ÀÀ ;; @@ ;; @@ ÀÀ ;; @@ ÀÀ ● We guarantee the battery life of 6 months from the purchase. ● Battery is a consumable, whose life is reduced along with time. If the battery performance is reduced to the half the initial performance, purchase a new battery. To purchase a new battery, contact Supply Division at Samsung Electronics Service Center. ● Place the remote set on the charger and check whether CHARGE light turns on. ● Press button and check whether dial tone is transmitted. ● If there is no dial tone, check whether the base set has been properly installed. To power ON/OFF the remote set ● To power ON: Press button until the unit beeps twice. ● If the unit is not powered on even if you press button, place it on the charger. Later, it will turn on automatically. Charge the unit for one day before using. ● To power ON: Press and hold button in the standby state until the unit beeps. 8 What is the standby state? The stadnby state refers to the state in which no call is made or answered and the unit is ready for ringing. (State in which the user does not speak over the phone and the telephone is waiting for operation.) 9 Telephone Basics Making/Answering Calls Setting the Date and Time Transferring a Call Making Extension Calls Selecting the Base set Ringer Type Selecting the Remote set Ringer Type Registering the Morning Call Using the Auto Answering Registering the Directory Searching the Directory Editing the Directory Using the Directory (Making Calls) Using the Directory (Delete) 10 12 14 15 16 18 19 20 24 26 28 30 31 Making Calls Answering Calls Answering a call with the base set Making a call with the base set (in the standby state) Making a call with the handset Making a call over the speakerphone. With the handset When finished taking With the speakerphone Place the handset on the base set, or press button if you have talked over When the telephone rings the speakerphone. Press Pick up the handset, dial the desired telephone number, and talk. button, dial the desired Pick up the handset and talk. telephone number, and talk. ● You can dial the number, either by pressing the telephone number first and then picking up the handset or by pressing button. Press button, and talk. ● You can adjust the speech and the speaker volumes with ● Call duration is displayed during the call. Answering a call with the remote set Making a call with the remote set (in the standby state) When the remote set is on the charger When it is not on the charger When finished talking When the remote set is on the charger When it is not on the charge (in the standby state) Pick up the remote set, press button, press the desired telephone number, and talk. Press button, press the desired telephone number, and talk. Place the remote set on the charger or press button. ● If you press a wrong telephone number in the standby state, ● You can make a call by pressing button after first pressing the desired telephone number in the standby state. you can make a call by pressing button after deleting ● Call duration is displayed during the call. 10 the wrong number digit by digit using button. When the remote set/base set tries to make a call while the base set/remote set is busy, the call is not made through with warning tone (beep-beep-beep) Try after the other unit finishes the call. When the telephone rings Pick up the remote set, press button, and talk. Press button, and talk. The remote set beeps during use, and warning is displayed? Conversation is interfered with noise? � The remote set has moved too far from the base set. � Press reduced. button, and the noise is 11 Setting the Date and Time (current date and time) ● If you set the current date and time, you can check the time when messages are recorded on the auto answering machine and activate the morning call. ● In case of power failure, the date and time is cleared. So, set the date and time again. Setting Order (Press the buttons in the following order.) 1 2 3 4 5 Setting is completed. �Press button Press 8 digits in the order of day, month, hour, and minute. in the standby state. Operation order (Follow the steps below to operate the phone) 1 �Press 2 button in the standby state. 3 4 When you finished setting, the current date and time is displayed with the confirm tone. Press 8 digits in the order of day, month, hour, and minute. To select a desired item to register a function on the base set, use dial keypad 12 ~ or button (See Features Summary). 13 Making Extension Calls Transferring a Call ● You can make a call between the handset or speakerphone of the base set and the remote set even when the line is not busy. At this time, the call is not charged. Transferring a call to Making an extension call from 1 While the base set is busy (handset call) � 2 � 3 When the extension rings, place the handset. 1 � � When the extension rings, press button. When the extension rings ● If the remote set is not on the charger, press button and talk. 3 Press the remote set number with which you want to make an extension call. ∙Press the button in the standby state. ● If you press or do not press any number within 2 seconds, all remote sets are called. When an additional remote set is registered Press (Press the buttons in the following order.) 2 Pick up the phone, press button, and talk. When the base set unit is busy (speakerphone call) to When you press button on the remote set after the extension rings, a call is connected with the base set speakerphone. ● If you pick up the base set handset and talk, the call is automatically transferred. button and then the desired extension number. (If you do not press an extension number, all registered remote sets will ring.) Transferring a call to Making an extension call from 1 When the remote set is busy � 2 3 (Press the buttons in the following order.) 2 � Press button and when the extension rings, place the remote set on the charger. ( If you press button when the extension rings, the extension call is cancelled.) Pick up the handset and talk. When the extension rings ● Or, press button and talk. When an additional remote set is registered You can transfer the call from a remote set to another. Press ∙Press the button in the standby state. If you press button at the base set after the extension rings, you can talk over the base set speakerphone. ● If pick up the base set handset and talk, the call is automatically transferred. button and then the desired remote set number. If the other party does not pick up the phone when you transfer the call, the call is returned to the originating remote set after 30 seconds. If the remote set is on the charger, however, the ringing continues for another 30 seconds and the call is automatically terminated. 14 1 to If there is an incoming call during an extension call, the telephone does not ring. If the separately installed telephone rings, you can answer the call after finishing the extension call 15 Selecting the base set ringer type Selecting the ringer type Press the buttons in the following order. 1 2 ● There are 10 types of ringers. 3 4 5 The selected ringer sounds. ● Press to to listen to the ringers, and select the desired number. ∙Press the button in the standby state. ● The current ringer sounds. ● Select to off the bell sound of both base and handset units. Only LED flicker. Make it sure to adjust the tone with the handset on the base set. You can set the volume in 3 levels of High, Middle and Low. 벨소리 크기 조절it is set to Middle. ● At the time of purchase, Adjusting the ringer volume Adjusting the speaker volume (In the speakerphone state) 1 2 3 4 5 ● You can adjust the volume in 4 levels. To reduce To increase Adjusting the handset volume (In the handset call state) ● You can adjust the volume in 4 levels. To reduce To increase Press to and select the desired volume. When the telephone rings, you can adjust the ringer volume with 16 button. If you adjust the speaker volume in the standby state, you can control it in 7 levels. (You can control the volumes of announcement tone and regeneration tone.) 17 Selecting the remote set ringer type Registering the morning call ● There are 3 types of ringers. Selecting the ringer type 1 The selected ringer sounds. 3 2 (in the standby state) After beep sound, the remote set turns to the standby state. � � Registering the time for morning call (in the standby state) 1 2 3 4 5 Press the desired number. Registering the time Adjusting the ringer volume. Ex) 6:30 You can adjust the ringer volume either as High or Low. ● At the time of purchase, the ringer volume is set to High. Press four digits for time in the order of hour and minute. Adjusting the ringer volume in the standby state ▼ To reduce : Press To increase : Press After registering the time for morning call, you have to set the morning call as follows. button. button. Adjusting the speech volume (during a call) You can adjust the other party’s speech volume heard from the handset as Low, Middle or High. Whenever you press button, the volume changes Low � Middle � High � Low � Middle � High in turn. ● At the time of delivery from the factory, it is set to Middle. To reduce : Press To increase : Press button. ● Setting the morning call � � ● Cancelling the morning call � � ● Confirming the morning call � � � button. When the morning call is set, the morning call icon is displayed at the bottom of the screen. The morning call rings for 2minutes. You can adjust the volume with checking the current volume with the number of bars displayed. 18 ● In order to stop the ringing, press any button on the base set or pick up the handset. ● For the remote set, press button. 19 Using the Auto Answering ● It is convenient if you use the auto answering when you go out. Activating the auto answering (in the standby state) ● Press (Delete the messages after checking them.) Delete ALL button. ● When the auto answering function is activated, ANSWER button lights on and the auto answering greeting message is transmitted. ● To stop it, press Deleting the recorded voice messages button again. � � � �Delete?� is displayed on the screen. � ● Press the button in the standby state. ● Even if you perform Delete ALL, unheard messages are not deleted. ● If the total recording time is over, messages are not recorded on the auto answering machine and ‘Please call later. Thank you.’ is announced. In this case, check all the unheard messages and then delete them. ● When ‘Delete?’ is displayed, press button to delete or press button to cancel deleting. You can record the auto answer greeting message with your own voice. (See Page 22.) To delete the selected messages Hearing the messages left by the callers (in the standby state) Standby State � ● If there are unheard messages, the number of the messages is displayed on the screen and OUT light blinks. (But, OUT light blinks only when the OUT is set.) This function is available for checking the message. Press button after checking all messages, and the messages are played. When the message to be deleted is played, � � The next message is played. Press ANSWER button. Checking the message with the remote set (in the standby state) � This function is used for checking the message. (Press the button while the message is played.) To check the previous message To check the previous message To check the next message To check the next message To stop playing To stop playing the message 20 21 Using the Auto Answering (Continued) ● The auto answering is available only with the base set To record the auto answering greeting message 1 2 (in the standby state) 3 4 You will then hear a beep tone along with a recorded voice. ● Press and hold RECORD GREETING until the unit beeps. To stop ● To stop recording ● Press button. ● The recorded message is played once. ● Record the message (up to 20 seconds). Mike If the message is not recorded ▶ The message is too short (less than 3 seconds). In this case, the message was not recorded. So, you have to record it again. ▶ If the message quality is not good, it is because you recorded the message too close to or too far from the mike. Record the message at a distance of about 30cm from the mike. Selecting the message from the prerecorded auto answering greeting messages I’ m not able to take your call now. Please call again around 8 o’ clock. ▶ If you have not recorded any message, the message prerecorded on the telephone when the auto answering machine was turned on is selected. When you finished recording the auto answering greeting message, the screen displays as shown in the following picture. 22 � � Message preset in the telephone Message you recorded 23 Registering the Directory ● Register telephone numbers that you use frequently. ● You can register up to 100 telephone numbers (to the base set) (20 to the remote set). Registering the directory with the base set 1 2 3 (Press the buttons in the following order.) 5 4 6 7 Enter the name. ● Press the ● Select the desired letters from the display screen using , , and button in the standby state. buttons, and the press ● Enter the telephone numbers, limiting the number of digits to 32. button. ● Registration is completed. ● Limit the number of letters for names to 15. Press Registering the directory with the remote set 1 2 to remove the old data when registering a new name or phone number. (Press the buttons in the following order.) 3 4 ● Press the button in the standby state. ● The address to which the telephone number is to be registered is displayed. Telephone number to be registered ● Registration is completed. ● Enter the number up to 20 digits. Registering the telephone numbers to the directory when the unit is connected to the PBX or keyphone. In case this telephone unit is connected to the PBX or keyphone, press the external prefix number and then press the telephone number. To store the telephone number, enter pause between the external prefix number and the telephone number. 24 25 Searching the Directory Searching the telephone number by name Searching the telephone numbers in order 1 2 3 1 Select the desired telephone number by pressing and buttons. 2 3 ∙ Select the first letter of the desired name in the display screen using , , and ∙The telephone numbers are displayed always from the one in Address 1. 1 2 3 4 5 Or buttons, and then press button or button. Select the desired telephone number by pressing and buttons. Or 1 2 3 4 5 The names starting with the letter entered are displayed. Select the desired name and telephone name by pressing and buttons. 4 � ∙The telephone numbers are displayed always from the one in Address 1. 5 Searching the telephone numbers with the address. 1 2 3 buttons, and then press button or button. 4 When you ∙Enter the address where you stored the desired telephone number. 1 Or 2 3 4 5 ∙Enter the address where you stored the desired telephone number. 6 6 ∙ Select the first letter of the desired name in the display screen using , , and 7 The names starting with the letter entered are displayed. Select the desired name and telephone name by pressing and buttons. button during the directory search, the unit returns to the previous state. Remote set The entered address and the telephone number are displayed. 1 2 Press the button in the standby state. ● When you 26 7 Select the desired name and telephone name by pressing and buttons. button during the directory search, the unit returns to the previous state. 27 Editing the Directory Editing the directory with the remote set Editing the names/numbers stored in the directory with the base set 1 2 3 When the desired telephone number is displayed, press VOLUME button. ※ See Searching the Directory. 2 3 ● Delete the existing name with Press button when To edit the name only button three times consecutively. ∙Only the name is edited and then editing is finished. button and enter a new name. ● Select the desired letter in the �Change?� is displayed on the screen. 5 28 1 Enter the name to be edited. Select the telephone number you want to edit. ∙Press 4 display screen using and buttons, and the press , , Enter the button in the standby state. Select the number to be edited by pressing ▲ and ▼ buttons. . 6 7 4 ∙Delete the existing telephone number with button ∙Editing is finished. Enter the telephone number to be changed. 5 To edit the telephone number too ∙Press button once. ∙The telephone number is displayed for editing. and enter a new number. 29 Using the Directory (Making Calls) Using the Directory (Delete) Making a call from the directory 1 Standby State See Searching the Directory Deleting the Directory (in the standby state) 2 Or 3 Select the desired name or telephone number, and then pick up the handset or press button. Deleting the selected number 1 See Searching the Directory 2 Select the name or telephone number to be deleted. You can talk to the other party when the call is connected. Delete ALL 3 1 Press VOLUME button. 2 3 �To cancel deleting, press 3 5 2 Press SEARCH key. 2 4 Select the desired number and press button. You can talk to the other party when the call is connected. button. Deleting the telephone number (in the standby state) 1 30 4 �Delete?� is displayed. Standby State See Searching the Directory. 5 �Delete?� is displayed. Making a call from the directory 1 4 Select the telephone number to be deleted using ▲ and ▼ buttons. 3 4 The selected telephone number is deleted. 31 Advanced Functions ■ Advanced functions for making calls To make a call to the number you once dialed (Make a call after searching the last dialed number) To delete the dialed number (called number) Transfering the call to another number during a call (Flash) 34 34 34 ■ Advanced Functions Available during Calls Recording the content of calls (Base set) Pause during calls (Hold function) 35 36 ■ Advanced functions for Auto Answering Functions used for auto answering Checking the caller’s voice (Caller Identification) Selecting the auto-answering ring count (when setup) Selecting the auto-answering ring count (when released) How to use auto-answering function outside (auto-answering) Table of functions available from the outside (Remote Control) Table of functions available with the remote set 37 37 38 38 38 39 39 ■ Help Function Display screen selection Toll restriction Setting the dialing mode Adjusting the flash time Low voltage warning function To reset the telephone to the initial state (Reset) Registering the additional remote sets (In the standby state) 40 40 40 41 41 42 43 Advanced Functions for Making Calls Advanced Functions Available during Calls To make a call to the number you once dialed (Make a call after searching the last dialed number) You can make a call without dialing the number, by Base set searching the Standby State number with button. 1 2 Recording the content of calls (Base set) 3 4 Or Search the telephone number with which you want to make a call, by pressing and buttons. Dialed Number Pick up the handset or press button. When the call is connected, talk to the other party. This function allows recording the important content of calls and then playing again. To Record ÀÀ ;; @@ ;; @@ ÀÀ To stop recording Automatically stops after the call. Busy Remote set Standby State Search the telephone number with which you want to make a call, by pressing and buttons. Press Redial button. Press button. ● Up to 20 numbers can be stored as the last dialed numbers for the base set, and up to 10 telephone numbers of the remote set. ● Press when the remote set is busy, and the call is connected to the number dialed last (most recently). ● Press when the base set is busy, the call is connected to the number dialed last. To delete the dialed number (called number) Base set Standby State 1 2 � � � 5 �Delete� is displayed. Standby State ● It impossible to record the call while talking over the speakerphone. ※ To delete the recorded message 4 3 Checking the recorded message When the call is connected, talk to the other party. � In order to play the recorded message again, press button. ● In order to play the recorded message, press button in the standby state and in order to delete the recorded message, press button Being played. ● To play the previous message with the base set, press ▼. To play the next message, press ▲. Or, press Remote set Standby State � � ● To play the previous message with the remote set, press press ● When“Delete?”is displayed, press ● All the dialed numbers are deleted. button to delete the number or press button to stop. . Or, press . To play the next message, to stop. button to cancel deleting. (Base set) Transfering the call to another number during a call (Flash) Base set Busy Remote set Busy 34 1 3 2 � Press the telephone number to which the call is to be transferred. � Place the handset, or press button to hang up the phone. � Press the telephone number to which the call is to be transferred. � Press button, or place the remote set on the charger. ● Flash function is available only when the remote set is connected to the PBX. 35 Advanced Functions Available during Calls Advanced Functions for Auto Answering Pause during calls (Hold function) Functions used for Auto Answering To resume the call ÀÀ ;; @@ ;; @@ ÀÀ Busy � When using the handset � These functions are set as default when the auto answering function is used. 1. Voice message record time (Time when the message is recorded by the callers) ● The time allowed for the caller to leave a message on the auto answering machine is 3 minutes. ● Correct date and time at which the message is left is announced only when the date and time is set in the unit. 2. Auto Answering Ring Count (Ansewring Ring Count : The number of rings before � the unit switches to auto answering mode when there is an incoming call) To resume the call Holding tone is transmitted to the other party. � When placing the handset � ● The auto-answering bell count can be setup respectively for both auto-answering on and off. Pick up the handset or press button. ● If the other party does not pick up the phone even after �3 minutes�, the holding tone is automatically disconnected. ● If the caller does not speak a word for 10 seconds for recording on the auto answering machine, the call is automatically terminated. Checking the caller’ s voice (Caller Identification) When the remote set is busy To hold during a call, press To resume the call, press button. button again. When the caller is leaving a message in the auto answering mode, you can hear his or her voice through the speaker. Setting the caller identification � � � Canceling the caller identification � � � Confirming the caller identification 36 � � � � 37 Advanced Functions for Auto Answering Advanced Functions for Auto Answering Table of functions available from the outside (Remote Control) Selecting the auto-answering ring count (when setup) � � � � To use these functions � Press the following button After the number of received messages is announced, the messages are played. Selecting the auto-answering ring count (when released) � � � � � ● If you become unable to take calls without activating the auto answering function, �I’ m not able to take your call now. Please call again later� message is transmitted to the calling party after the telephone rings as many times as the set remote answering ring count, and then the call is automatically terminated. ● You can set the auto answering function from the outside through the remote control (See page 39). �Unlimited � 15 times (Until the handset is picked up) � 20 times � 12 times Other functions � 10 times How to use auto-answering function outside (auto-answering) How to change the password You can control the telephone state by making a call to your phone from the outside. At this time, you have to know the password. At the time of purchase, the password for remote control is set to 0000. (To change the password, do as shown here.) � � � � Enter a new 4-digit password. How to use the auto answering function from the outside Turn on the auto answering machine when you go out � Enter the password. (It is set to 0000 at the time of purchase.) Make a call to your telephone from the outside. � � Checking the messages To check unheard messages ● Select "0" to make the bell ring three times for a new voice message, and 6 times for no new voice message. While the answering message is being transmitted � Press the desired button, referring to the function table on Page 39. ※ If you become unable to take calls without turning on the auto answering machine, the telephone rings as many times as the set remote answering ring count (15 times as default) and then the answering message is transmitted. To use the auto-answering function outside, the phone should be in tone dialing mode. Like this To check the next message (Being played) To check the previous message (Being played) To stop the message being played (Being played) To delete the message being played (Being played) Whenever you pressed button, the auto answering function is activated and then deactivated. To activate or deactivate the auto answering function To stop the remote control Table of functions available with the remote set To unit these functions To check the recorded messages with the remote set Press the following button Like this Previous Message � Next Message Stop Message If the buttons are not properly entered at the time of remote control from the outside, press and shortly hold the buttons. 38 39 Help Function Help Function Display Screen Selection Adjusting the flash time (In the standby state) You can adjust the flash time. This function allows you to change the display screen in the base set standby state � � � � � Toll Restriction 1 2 3 ● The flash time is to 0.4 second as default. � Press the button corresponding to the desired time. � � : 0 . 1 sec : 0 . 2 sec : 0 . 3 sec : 0 . 4 sec : 0 . 5 sec : 0 . 6 sec : 0 . 7 sec : 0 . 8 sec : 0 . 9 sec : 1 . 0 sec 4 Low Voltage Warning Function ● When the toll restriction is set, is displayed on the screen and when it is cancelled, disappears. ● Even when the toll restriction is set, you can make a toll call with the base set. But, when you start dialing 8 on the remote set, the unit beeps and then returns to the standby state. � Check � Cancel the toll restriction This function generates warning tone when the battery voltage of the remote set drops below the specification. When the battery charging is insufficient blinks and warning tone is transmitted. � Charge the remote set immediagely. � Set the toll restriction ● Even though there was no low voltage warning in the standby state, the low voltage warning may be generated if you make calls using the remote set as it consumes the battery. Setting the Dialing Mode 1 2 3 4 ● You can set the dialing mode either as rotary dialing or tone dialing. P is displayed during the call and when T is displayed. ● When the rotary dialing is set, the tone dialing is set, � Check � Rotary Dialing � Tone Dialing ● When the dialing mode of the base set is set to the rotary dialing mode Press button while dialing with the base set or the remote set, and the dialing mode is switched to the tone dialing mode. 40 41 Help Function Help Function Registering the additional remote sets (In the standby state) To reset the telephone to the initial state (Reset) 1 This function refers to resetting the telephone to the default state. � � Base set LCD displays �Reset is in progress�, and the unit turns to the standby state. Remote set Standby State In the standby state, and press at the same time. � � Registering at the remote set Connect the power adaptor jack with pressing button, and hold the button for 3 seconds or more. � � Select the same 2-digit number as that of the remote set. If you selected remote set, press . Or LCD displays �Reset...� , and the unit beeps. At the base set 2 � Select the same 2-digit number as that of the remote set. � At the remote set � � at the � When the remote set is not on the charger, press the following buttons when the line is idle. � 2-digit registration � number. � You can select a number from 00~99. If it is press. , ● If you press the button late, it may not be set. So, press it quickly. Telephone Initial State Base set ● Flash Time: 0.4 seconds ● Password (Remote Control): 0000 Designating the remote set (extension numbers) Remote set ● Ringer Volume: High ● Ringer Type: No. 0 ● Caller Identification: Activiated ● Speech Volume: Middle ● Auto Answer: Deactivated ● Morning Call: 6’clock (Deactivated) ● Speakerphone Volume: Level 3 ● Current Time: 12:00 ● Remote set LCD: No. 1 (Remote set) ● Ringer Volume: Middle ● Ringer Type: No. 1 ● Speaker Volume: Level 6 ● Last Dialed Number: None ● Speech Volume: Level 3 ● Directory: None ● Dialing Mode: Rotary Dialing ● Toll Restriction: Deactivated When the remote set is not on the charger, press the following buttons when the line is idle. To set it to No. 1 � � To set it to No. 2 � To set it to No. 3 REFERENCE Remote set No. (Extension No.) ● Remote answering bell count (when setup) : 3 times ● Remote answering bell count (when released) : 3 times(15 times) ● Directory: None ● At the time of purchase, the remote set is set as Extension No.1. ● Last Dialed Number: None ● Display Screen Type: No.5 42 43 Note ÀÀ ;; @@ ;; @@ ÀÀ ;; @@ ÀÀ ■ Anything wrong with the telephone? 46 ■ Precautions for Safety 48 ■ Product Care 49 ■ Product Specification 50 ■ Features Summary 52 ÀÀ ;; @@ ;; @@ ÀÀ ;; @@ ÀÀ Anything wrong with the telephone? The telephone does not work at all. ● Make it sure that the telephone is correctly installed. (See Page 8) ●Make it sure that the adaptor is properly installed according to the specified voltage. (See Page 8) ● Make it sure that the the battery is correctly placed in the remote set. (See Page 9) ●Did you charge the remote set battery enough? (See Page9) ● Is the remote set power ON? (See Page 8) Messages are not recorded even though the auto answering machine is turned on. ●There are too many messages recorded to record any more message. ●Delete the checked messages. (See Page 21) There is no dial tone when I pressed button. Morning call does not work. There is warning tone and I cannot make a call. Cannot make a call with the additional remote set. ●Is the current time set in the unit? (See Page 12) ● Is the morning call time set? (See Page 19) ● Is the morning call function activiated? (See Page 19) ●Is the base set/remote set in use? (See Page10) ●Did you charge the remote set battery enough? ●Make it sure that the remote set is properly installed. (See Page 8) ●Did you charge the remote set battery enough? (See Page 9) ●Did you registered the remote set to the base set? (See Page 43) ●Is the remote set power ON? (See Page 8) Station call and/or flash does not work. The remote set does not ring. The remote set is not charged properly. The remote set beeps during call. ●Make it sure that the telephone is properly installed. (See Page 8) ●Register the remote set to the base set again. (See Page 43) ●Did you designate the extension numbers when you purchased additional remote sets to use? (See Page 43) ●Check the battery in the remote set. (See Page 9) ●Did you charge the remote set battery enough? (See Page 9) ●Is the remote set power ON? (See Page 8) ●Register the remote set to the base set again. (See Page 43) ●Make it sure that the CHARGE contact is clean. ●If the CHARGE contact is dirty, the unit may not be charged properly. Clean the CHARGE contact with cotton swap or eraser. (See Page 48) ● Check if the base set is busy. Try to make a call after the base set finishes its call. ●Make it sure that the remote set isn’t too far from the base set. Move closer to the base set. (See Page 11) ● is displayed on the remote set LCD and the low voltage warning is displayed, finish the call immediately and then charge the remote set enough before using. (See Page 41) ●Make it sure that the telephone line is correctly connected. (See Page 8) ●Make it sure that the power cord is properly connected. (See Page 8) ●Check the speaker volume. (See Page 17) ●Make it sure that the adaptor is installed properly according to the specified voltage. (See Page 8) ●If the remote set is not properly charged even after cleaning, purchase a new battery from the service center. (See Page 9) 46 Cannot talk over the remote set due to noise and interference. ●Press button and you can get clear speech quality. (See Page 11) ●Make it sure that the remote set isn’t too far from the base set. (See Page 11) ● Erect the base set antenna. ● Change the base set installation location. 47 Precautions for Safety Product Care This is the instructions for protecting the user’ s safety and preventing the property loss. Power-related Power-related Do not use the damaged or frayed power cord or plug or the loose outlet. ●Ther is a danger of electric shock or fire. Do not pull out the cord to take it out, or do not touch the power plug with wet hand. ●Ther is a danger of electric shock or fire. Do not bend the power cord too much or do not allow anything to rest on it. ●Ther is a danger of electric shock or fire. Use a damp soft cloth for cleaning. External Cleaning Cleaning the remote set and the charger. ●Do not use benzene or thinner. Clean the charge contact often. Power and Cleaning Cleaning Plug in the power cord. ●This product should be operated only at 220V. Do not use it at other voltage. There is a danger of fire. Be sure to use the specified adaptor only. ● There is a danger of fire. Unplug this product from the wall outlet before cleaning. Do not use water, liquid cleaners or aerosol cleaners. ● There is a danger of fire. Caution Others Others 48 Do not perform any unauthorized disassembly, repair or remodeling on the product. Do not allow water or any other liquid to be spilled over the phone. ● If you need repair work, please contact the service center. If you need repair work, please contact the service center. ● There is a danger of electric shock or fire. If there is any strange noise, smell or smoke from the telephone, unplug the power cord immediately and contact the service center. Do not dispose of the used remote set battery(ies) in fire. ● They may explode. 1. Please use the battery fully charged. 2. Please do not open or disassemble the battery. 3. Please do not place the battery in a fire. 4. Please do not use a different type of battery. ● There is a danger of electric shock or fire. 49 Product Specification Model Name: SP-C802R Specifications Items Frequency range 904.0125Mhz ~ 904.9875Mhz 814.0125Mhz ~ 814.9875Mhz Channel 40 Channel separation 25KHz Output power 10mW or less Modulation FM Duration Waiting : 20 hours or longer Connected : 3 hours or longer Operating temperature Operating humidity Items Weight (g) Remote Base Chager 170 750 107 Sizw (mm) Power 50 3.6V DC, 600mA (Ni-MH battery) DC 12V 500mA (Adaptor) DC 12V 500mA (Adaptor) 51 Features Summary 2.Register Displays �Delete?� 3.Delete Only with the button input, the screen displays in Russian. So, you can use this product even without the manual. 4.Registering the remote set Base set Telephone Number Input Name Input remote set number remote set number 1.Morning Call 1.Check 5.Dialed number 2.Set 3.Cancel 4.Register 2.Delete Displays �Delete?� 1.Message 6. Auto Answering Deletion Displays �Delete?� Time Input 2.Telephone 1.Flash -related Functions 2.Ringer Type 2.Answering Ring Count 1.Set 3.Ringer Volume 4.Holding Tone 5.Dialing Mode 2.Cancel 1. Check 3.Remote Control Password 2. Rotary Dialing 4.Caller Identification 3. Pulse Dialing 6.Toll Restriction ▲/▼(Search) 1.Search Enter 4-digit password. 1.Check 1. Check 2.Set 2. Cancel 3.Cancel 3. Set 1.Search 3.Directory 52 1. Search in order ▲/▼(Search) 2. Search by addresses Address Input 3. Search by names Letters Select 1.Temporary 7.Initial Registration Registration Enter date, month, hour and minute. 2.Display Screen 53 MEMO Functions available at the remote set Registering the telephone numbers with the directory function Register a telephone number Page. 24-2 5 Registering the telephone numbers To check the recorded message with the remote set Page. 39 Selecting the remote set ringer type Page. 1 8 Page. 1 8 Adjusting the ringer volume How to register to the base set Page. 4 3 Press the same 2-digit registration number with that of the base set. 54 55 MEMO 56 MEMO 57