1
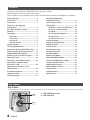
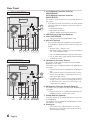
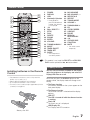
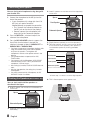
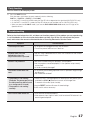
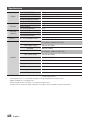
MX-E850 MX-E851 MX-E870 MX-E871 Three-CD Changer MINI-Compact System MP3-CD/WMA-CD/CD-R/RW Playback user manual Imagine the possibilities Thank you for purchasing this Samsung product. To receive more complete service, please register your product at www.samsung.com/register Safety Warnings TO REDUCE THE RISK OF ELECTRIC SHOCK, DO NOT REMOVE THE COVER(OR BACK). NO USER-SERVICEABLE PARTS ARE INSIDE. REFER SERVICING TO QUALIFIED SERVICE PERSONNEL. CAUTION RISK OF ELECTRIC SHOCK DO NOT OPEN This symbol indicates “dangerous voltage” inside CAUTION : TO PREVENT ELECTRIC SHOCK, This symbol indicates important instructions the product that presents a risk of electric shock or MATCH WIDE BLADE OF PLUG TO WIDE SLOT, FULLY accompanying the product. personal injury. INSERT. WARNING • To reduce the risk of fire or electric shock, do not expose this appliance to rain or moisture. CAUTION • Apparatus shall not be exposed to dripping or splashing and no objects filled with liquids, such as vases, shall be placed on the apparatus. • The Mains plug is used as a disconnect device and shall stay readily operable at any time. • This apparatus shall always be connected to an AC outlet with a protective grounding connection. • To disconnect the apparatus from the mains, the plug must be pulled out from the mains socket, therefore the mains plug shall be readily operable. CLASS 1 KLASSE 1 LUOKAN 1 KLASS 1 PRODUCTO LASER PRODUCT LASER PRODUKT LASER LAITE LASER APPARAT LÁSER CLASE 1 CLASS 1 LASER PRODUCT This Compact Disc player is classified as a CLASS 1 LASER product. Use of controls, adjustments or performance of procedures other than those specified herein may result in hazardous radiation exposure. CAUTION • INVISIBLE LASER RADIATION WHEN OPEN AND INTERLOCKS DEFEATED, AVOID EXPOSURE TO BEAM. Accessories Check for the supplied accessories below. FM Antenna Spacers ( 8 EA) (MX-E870/E871 only) User's Manual Remote Control/Batteries(Optional) Back bracket 4 EA /Screws 16 EA (MX-E870/E871 only) AM Antenna (Optional) Connector-Adaptor(Optional) • Figures and illustrations in this User Manual are provided for reference only and may differ from actual product appearance. • An administration fee may be charged if either a. an engineer is called out at your request and there is no defect in the product (i.e. where you have failed to read this user manual) b. you bring the unit to a repair centre and there is no defect in the product (i.e. where you have failed to read this user manual). • The amount of such administration charge will be advised to you before any work or home visit is carried out. 2 Symbols English Important Note Precautions • Ensure that the AC power supply in your house complies with the identification sticker located on the back of your product. • Install your product horizontally, on a suitable base (furniture), with enough space around it for ventilation (7.5~10cm). • Do not place the product on amplifiers or other equipment which may become hot. Make sure the ventilation slots are not covered. • Do not stack anything on top of the product. • Before moving the product, ensure the Disc Insert Hole is empty. • In order to disconnect the product completely from the power supply, remove the AC plug from the wall outlet, especially when left unused for a long period of time. • During thunderstorms, disconnect the AC plug from the wall outlet. Voltage peaks due to lightning could damage the product. • Do not expose the product to direct sunlight or other heat sources. This could lead to overheating and malfunction of the product. • Protect the product from moisture, and excess heat or equipment creating strong magnetic or electric fields (i.e. speakers.). • Disconnect the power cable from the AC supply if the product malfunctions. Your product is not intended for industrial use. • Use of this product is for personal use only. • Condensation may occur if your product or disc has been stored in cold temperatures. If transporting the product during the winter, wait approximately 2 hours until the product has reached room temperature before using. • The batteries used with this product contain chemicals that are harmful to the environment. Do not dispose of batteries in the general household trash. • Maintain an open space of approximately 6 inches (15 cm) on the sides and rear of the system, for ventilation purposes. • Place the loudspeakers at a reasonable distance on either side of the system to ensure good stereo sound. • Direct the loudspeakers towards the listening area. Disc Storage • Do not keep in direct sunlight • Keep in a cool ventilated area • Keep in a clean Protection jacket. Store vertically. • Do not allow the discs to become contaminated with dirt. • Do not load cracked or scratched discs. Handling and Storing Discs If you get fingerprints or dirt on the disc, clean it with a mild detergent diluted in water and wipe with a soft cloth. • When cleaning, wipe gently from the inside to the outside of the disc • Condensation may form if warm air comes into contact with cold parts inside the product. When condensation forms inside the product, it may not operate correctly. If this occurs, remove the disc and let the product stand for 1 or 2 hours with the power on. Disc Types And Disc Format This product does not support Secure (DRM) Media files. CD-R Discs • Some CD-R discs may not be playable depending on the disc recording device (CD-Recorder or PC) and the condition of the disc. • Use a 650MB/74 minute CD-R disc. Do not use CD-R discs over 700MB/80 minutes as they may not be played back. • Some CD-RW (Rewritable) media, may not be playable. • Only CD-Rs that are properly "closed" can be fully played. If the session is closed but the disc is left open, you may not be able to fully play the disc. CD-R MP3 Discs Cautions on Handling and Storing Discs Small scratches on the disc may reduce sound and picture quality or cause skipping. Be especially careful not to scratch discs when handling them. Holding discs • Do not touch the playback side of the disc. • Hold the disc by the edges so that fingerprints will not get on the surface. • Do not stick paper or tape on the disc. • Only CD-R discs with MP3 files in ISO 9660 or Joliet format can be played. • MP3 file names should contain no blank spaces or special characters (. / = +). • Use discs recorded with a compression/decompression data rate greater than 128Kbps. • Only files with the ".mp3" and ".MP3" extensions can be played. • Only a consecutively written multisession disc can be played. If there is a blank segment in the Multisession disc, the disc can be played only up to the blank segment. • If the disc is not closed, it will take longer to begin playback and not all of the recorded files may be played. • For files encoded in Variable Bit Rate (VBR) format, i.e. files encoded in both low bit rate and high bit rate (e.g., 32Kbps ~ 320Kbps), the sound may skip during playback. • A maximum of 999 tracks can be played per CD. • Supported Audio Formats:WMA 56~128kbps Bit rate. English 2 3 Contents Thank you for buying this SAMSUNG mini-compact system. Please take time to read these instructions. They will allow you to operate your system with ease and take full advantage of its features. Safety Warnings.............................................2 Accessories....................................................2 Precautions....................................................3 Cautions on Handling and Storing Discs..................................................3 Disc Types And Disc Format.........................3 Contents.........................................................4 Description.....................................................4 Top Panel..................................................4 Front Panel...............................................5 Rear Panel................................................6 Remote Control........................................7 Display function.............................................7 Connecting Microphone................................8 Stacking the Speakers (MX-E870/E871 Only).........8 Loading and Changing Compact Discs...........9 CD/MP3/WMA-CD Playback........................9 Selecting a CD in the Disc changer............10 Selecting a Track..........................................10 Searching a Track/Folder Quickly...............10 Searching for a Specific Music Passage on a CD.........................................10 Repeat One or All Tracks on the Compact Discs.............................................10 A-B Repeat Playback..................................10 10 Skip Function..........................................11 CD Programming.........................................11 Checking or Editing the Programmed Tracks....................................11 Auto Change function..................................11 Playing USB.................................................12 To Select a Track from USB Device......12 To Search a Folder Quickly...................12 To repeat.................................................12 To Use High Speed Search...................12 To delete a file........................................12 To skip next 10 tracks............................12 Listening a Radio.........................................13 Selecting a Stored Station...........................13 Setting the Clock.........................................13 Timer Function.............................................14 Cancelling the Timer....................................14 Recording Function.....................................15 Recording Speed.........................................15 Selecting EQ Mode.....................................16 Selecting USER EQ Mode...........................16 Using the DYNAMIC SPOT Mode...............16 Using the Stadium Mode.............................16 GIGA SOUND function.................................16 LED LIGHTING function...............................16 Party function...............................................17 Troubleshooting...........................................17 Specifications...............................................18 Description Top Panel 1 2 4 English 1. LED LIGHTING control 2. LED LIGHTING Description Front Panel 2 34 33 32 3 4 5 31 30 1 6 29 28 27 26 25 7 8 9 10 11 12 13 24 23 22 14 15 16 17 18 19 20 1. POWER button • Press this button to switch your mini-compact system. 2. 3. 4. 5. 6. 7. 8. 9. 10. 11. 12. 13. 14. 15. 16. 17. 18. 19. LED LIGHTING button Window display EASY SEARCHING JOG control Search/Skip button MP3/CD button TUNER/AUX button EQ button AUTO CHANGE button PARTY button STOP button RETURN button DELETE button DISC CHANGE button DISC seletion button DISC tray USB 1 jack MIC jack AUX IN 1 jack Connecting an External Component such as an MP3 player. • Connect AUX IN 1 on the front panel of the MINI COMPACT to the Audio Out of the external component/MP3 player. • Press the TUNER/AUX button to select the AUX 1 input. You can select AUX 1 by pressing the FUNCTION button on the remote control. 21 20. PHONE jack Plug a headphones with a 3.5ø jack into the PHONE jack. • The speakers are no longer used to output the sound. • Prolonged use of headphones at a high volume may damage your hearing. • If you use the headphones, GIGA SOUND will automatically turn off. Even if you remove the headphones, it will not turn on. 21. USB 2 REC jack 22. OPEN/CLOSE button 23. ENTER button 24. PLAY/PAUSE button 25. REC SPEED button 26. USB 2 REC button 27. USER EQ button 28. USB 2 button 29. USB 1 button 30. Search/Skip button 31. MASTER VOLUME control 32. STADIUM button 33. DYNAMIC SPOT button 34. GIGA SOUND BLAST button English 4 5 Rear Panel 1. 2.1CH Speaker Connector Terminals (MX-E850/E851) 4.2CH Speaker Connector Terminals (MX-E870/E871) MX-E850/E851 The speakers connector terminals are located on the rear of the system. 1. To achieve the correct sound quality, insert those speaker connector cables to the speaker connector terminals of the system. • Left speaker (marked L). • Right speaker (marked R). • The Rear speakers are only for MX-E870/E871. 8 7 2. LED Terminals of the Front Speakers 3. ONLY FOR SERVICE • This jack is just for testing, please don't use it. 4. AUX IN 2 Terminals 1. Use the Audio Cable (not supplied) to connect AUX IN 2 on the product to Audio Out on the external analog component. 1 2 3 4 • B e sure to match connector colors. • If the external analog component has only one Audio Out jack, connect either left or right. 5 6 5 • Press the TUNER/AUX button to select the AUX 2 input. • You can select AUX 2 by pressing the FUNCTION button on the remote control. MX-E870/E871 5. FM Antenna Connector Terminal The position of FM antenna connector terminal may differ 8 7 depending on your region. This product may not support the AM function depending on your region. 1. Connect the FM antenna (supplied) to the FM Antenna jack. 2. Slowly move the antenna wire around until you find a location where reception is good, then fasten it to a wall or other rigid surface. 3. If reception is poor, you may need to install an outdoor antenna. To do so, connect an outdoor FM antenna to the FM socket on the rear of the system using a 75Ω coaxial cable (not supplied). 6. AM Antenna Connector Terminal (Optional) This product may not support the AM function depending on your region. 1. Plug the connector on the AM antenna (Optional) into the AM terminal on the rear of the system. 7. Voltage Selector (Optional) 1 2 3 4 5 6 5 Check the position of the voltage selector on the rear of the system(optional). This product may not support the Voltage Selector function depending on your region. 8. Cooling fan • The fan always turns when the power is on. Secure a minimum 10 cm of clear space from all sides of the fan when installing the product. 6 English Remote Control 33 1 32 2 3 31 4 5 6 30 29 7 8 9 10 11 12 13 14 15 16 17 18 28 27 26 25 24 23 22 21 20 19 1. 2. 3. 4. POWER DISPLAY USB Number(0~9) button • During playback, press the desired track number. The selected track is played. 5. 6. 7. 8. 9. 10. 11. 12. 13. 14. 15. 16. 17. -10 Skip, RDS PTY * STOP PLAY DELETE SOUND ENTER VOLUME TUNING/ALBUM . MO/ST TIMER ON/OFF TIMER SET SLEEP 18. 19. 20. 21. 22. 23. 24. 25. 26. 27. 28. 29. 30. 31. 32. 33. MY KARAOKE MIC VOLUME -, + REPEAT A-B REPEAT TUNING MODE VOLUME + TUNING/ALBUM , EQ CD REC SPEED USB REC PAUSE SEARCH, RDS DISPLAY* +10 CD DISC SKIP* FUNCTION MUTE • Turn off the sound temporarily. • Set a sleep time to shut off the product. *This product is not used the RDS PTY and RDS DISPLAY function printed the [, ) button above. Display function Installing batteries in the Remote Control `` Place batteries in the remote control so they match the polarity : (+) to (+) and (–) to (–). `` Always replace both batteries at the same time. `` Do not expose the batteries to heat or a flame. `` The remote control can be used up to approximately 23 feet (7 meters) in a straight line. You can view all functions available on the display, adjust the brightness of the display and select the Display/LED either on or off. Each time you press the DISPLAY button on the remote control, the display mode will change as following: ◆◆ The Demo function All functions available on the system appear on the front panel display. ◆◆ The Dimmer function The Dimmer function is selected and the display darkens. ◆◆ LED OFF The LED is turned off while the dimmer function . is working. ◆◆ Clock ON The Clock you set is displayed. ◆◆ LED/Display ON ALL Display and LED turned on. * Battery size: AAA English 6 7 Connecting Microphone You can also insert microphone to sing along with your favorite CDs. 1. Connect the microphone to the MIC jack on the front of the product. `` If your microphone with a larger jack than 3.5ø MIC jack, you need a ConnectorAdaptor(optional) to complete the connection. • First, connect the Connector-Adaptor to the MIC jack on the front of the product, • Second, connect the microphone (with larger jack) to the Connector-Adaptor. 2. Press the MIC VOL-, + button to adjust the volume of the microphone. 3. Press the MY KARAOKE button to suppress the Vocal. Each time the button is pressed, the selection is changed as follows: KARAOK OFF ➞ KARAOK MIN ➞ KARAOK MAX. `` If you hear strange noises (squealing or howling) while using the Karaoke feature, move the microphone away from the speakers. Turning down the microphone's volume or the speaker volume is also effective. `` The microphone does not operate in the AUX, TUNER mode. `` If you connect with the Microphone, GIGA SOUND will automatically turn off. Even if you remove the microphone, it will not turn on. `` After setting my karaoke, EQ/GIGA SOUND does not work. `` After the stop operation, the setting of my karaoke will disappear. `` Only when connected with a Microphone, the MY KARAOKE function is available. Stacking the Speakers (MX-E870/E871 Only) You can stack and install the speakers as described in the figure. 1. Insert 2 spacers into the holes of the Subwoofer (L) and fix them. Spacer Subwoofer Speaker 2. Stack the Front Speaker(L) horizontally on the Subwoofer(L). 8 English 3. Insert 2 spacers into the holes of the Front Speaker(L) and fix them. Spacer Front Speaker Subwoofer Speaker 4. Stack the Rear Speaker(L) on the Front Speaker (L). 5. To fix the speakers securely, attach the back bracket on the rear of the Front speaker(L), Rear speaker (L) and Subwoofer speaker by fastening provided 8 screws. Rear Speaker Back bracket Front Speaker Subwoofer Speaker * The rear of the stacked speakers ◆◆Follow steps 1-5 above to stack the Right Speakers. 6. This is the completion of the speaker stack. Loading and Changing Compact Discs You can play 12 cm compact disc without an adapter. force the compact disc carrousel when opening ☛☛ Nandeverclosing the disc tray. Never press down or place objects on the carrousel. 1. P ress the OPEN/CLOSE button on the main unit. Result: The disc tray opens. 2. P lace one disc in the front slots of the carrousel, with the label on the discs facing upwards. ☛☛ Check that the compact disc has been cor- rectly inserted in the holder before closing the disc disc tray. 3. If you wish to load another compact disc, press the DISC CHANGE button on the main unit. Result: The carrousel rotates by 120°. 4. C lose the disc tray by pressing the OPEN/CLOSE button again. Result: Playback starts automatically. ➣➣To change or unload the compact discs, repeat step 2 to 4. • Keep the disc tray closed whenever you are not using it, to prevent dust from entering. • Do not use force when closing the disc tray, as it may cause damage to the the disc tray. • You can load or unload compact discs when the radio, USB or auxiliary source function is selected, and when you press the Open/Close button, all of the other functions will be changed to the MP3/CD mode. • If no buttons are pressed on the product or remote control for more than 3 minutes when the product is in Pause mode, it will be changed to Stop mode. • If no buttons are pressed on the product or remote control for more than 25 minutes when the product is in Stop mode, the power will automatically turn off. CD/MP3/WMA-CD Playback ☛☛This product is designed to play an audio CD, CD, CD-R, CD-RW, MP3/WMA-CD. • G ently open or close the CD tray and do not apply excessive force. • Do not put force or place a heavy object on the product. • Do not insert an out-of-spec. shape of CD such as a heart or octangle shaped CD. Otherwise, the product may be damaged. • Care must be taken about maintenance of the compact discs. • At least more than one CD should be inserted for playbacks. 1. Press the OPEN/CLOSE button to open the disc tray. 2. Place a disc gently into the tray with the disc's label facing up. 3. Press the OPEN/CLOSE button to close the disc tray, the disc will be played automatically. • If there are more than one CD or an MP3/WMA-CD inserted, replays are then processed in order. • For MP3/WMA-CD audio, it may take several minutes to complete scanning the disc tracks. • If you play a file with an English name or a MP3/WMACD medium in an English title, the song title will be shown in the display. (Other languages besides English may not be indicated.) • An English-titled track containing a special character will not show the title in the display. <CD/MP3/WMA-CD PlaybackDisplay> Track Indicator Playtime Indicator 4. A djust the volume according to needs with the following procedures. • Tuning the VOLUME knob. • Press the Vol + or – button of the remote control. The volume level can be adjust in 31 steps(VOLUME MIN, VOLUME01- VOLUME 29, and VOLUME MAX). 5. Main Unit To pause playback temporarily, press the p button. Press p again to continue playing the disc. Remote control To pause playback temporarily, press the PAUSE(#) button. Press PLAY(+) button to continue playing the disc. 6. To end playing, press the STOP (@) button. • If there is not one CD inserted in the disc tray, it is indicated as “NO DISC”. • The quality of MP3/WMA-CD playback may vary depending on the condition of the disc containing the music files or the condition of the recorder with which the disc was created. • If different types of files or unnecessary folders are on the same disc, you will have problems with playback. English 8 9 Selecting a CD in the Disc changer 1. To select a specific disc, press the DISC SKIP button on the remote control, until the required disc indicator flashes. Result: Each disc is selected. or • P ress the DISC 1, DISC 2 or DISC 3 button on the main unit to select a specific disc while the disc tray is closed. • If the selected disc is not loaded, the next disc is played automatically. Selecting a Track You can select a desired track while the disc is being played. To play the previous track Press the [ button within 3 seconds after the current track started playing. Press the [ button twice at least 3 seconds after the current track started playing. To play the next track Press the ] button. To play the current track Press the [ button 3 seconds later after the current track started playing. To play the track of your choice Press the [ or ] button to move to a desired track. • You can also use the Number(0~9) button on the remote control to select a track. Searching for a Specific Music Passage on a CD When listening to a compact disc, you can quickly search for a specific music passage on a track. To search for... Press ... Forwards..................................... ) Backwards................................... ( You can also press and hold the [, ] button on the main unit to automatically scan for a track. Repeat One or All Tracks on the Compact Discs You can repeat playing CD unlimitedly: • CD containing a specific track. • Whole tracks of a selected CD. 1. P ress the REPEAT button. Each time you press the REPEAT button, the repeat mode will change as following: MP3: OFF➝ TRACK ➝ DIRECTORY ➝ ALL ➝ RANDOM ➝ ALL DISCS CD: OFF➝ TRACK ➝ ALL ➝ RANDOM ➝ ALL DISCS 2. When you wish to stop the Repeat function, press the REPEAT button until "OFF" is displayed. • OFF: Cancels Repeat Playback. • TRACK: Repeatedly plays the selected track. Searching a Track/Folder Quickly You can select a track/folder directly without the [, ] button. CDDA 1. T urn the EASY SEARCHING JOG control left or right on the main unit to select a desired track. 2. Press the ENTER button on the main unit. • You can move to the selected track directly. MP3/WMA CD 1. Turn the EASY SEARCHING JOG control left or right on the main unit to move to the previous/next folder. • Y our Product will take a few seconds to search the previous/next folder. • “SEARCHING” is displayed. 2. When the searching is done, you will see the previous/next folder name. The track will start playing. 10 English • DIRECTORY: Repeatedly plays all tracks in the selected folder. • ALL: Repeatedly plays the entire disc. • RANDOM: Plays tracks in random order. • ALL DISCS: Repeatedly plays the all discs. A-B Repeat Playback You can repeatedly play back a designated section of a CD. 1. Press the REPEAT A-B button at the beginning of desired part. • 'RPT A' will be displayed. 2. Press the REPEAT A-B button at the ending of desired part. • 'RPT AB' will be displayed. 3. To cancel REPEAT A-B function, press the REPEAT A-B button again. • 'OFF' will be displayed. REPEAT A-B function is available within a track. ➣➣ 10 Skip Function Press the +10 or -10 button while in playback mode. This will skip the tracks as many as 10 or -10 from the current track. CD Programming This function is not available during playback of an MP3/WMA-CD. • You can program the playback order of up to 24 tracks of your choice. • However, you must stop playing the CD before selecting tracks. 1. W hile in CD playback mode, press the STOP(@) button to stop playing the CD. 2. Press the ENTER ( message below: ) button to display the (01= program number, --= track number) 3. Use the [ or ] button to move to a desired track. • Press [ to move to the previous track. • Press ] to move to the next track. 4. Press the ENTER ( ) button to confirm your selection, the selection is stored and is displayed. 5. To select a different track, following the steps 3 to 4 above. 6. Press the PLAY (+) button to play the programmed tracks. 7. Press the STOP(@) button to stop playing the programmed tracks, Press the STOP (@) button again to cancel playing the programmed tracks. • If you open the disc tray or turn off the product, your programming will be canceled. Checking or Editing the Programmed Tracks You can check a list of programmed tracks and edit them as you want. 1. If a programmed track is being played, press the STOP (@) button once. 2. Press the ENTER ( the message below: ) button twice to display (C=Check, 01= program number) 3. Repeat pressing the ENTER ( the desired track is displayed. ) button until 4. Press the [ or ] button to select a different track. 5. Press the ENTER ( selection. ) button to confirm your 6. To play the programmed tracks, press the PLAY (+) button. Auto Change Function You can circularly play between the disc and the USB. 1. Press the AUTO CHANGE button on the main unit. Each time press this button, the mode will switch as following: AUTO CHANGE OFF ; AUTO CHANGE ON • When the auto change mode is "ON", the music will be played on DISC1➝DISC2➝DISC3➝USB1➝USB2 continuously. • When the auto change mode is "ON", if you press the POWER button, function change button or the OPEN/CLOSE button, the auto change function automatically switches to "OFF" mode. • When USB is playing, if you disconnected the USB, the auto change function automatically switches to "OFF" mode. • When the auto change mode is "ON", the recording can't work. • When the auto change mode is "ON", the REPEAT, SLEEP function can't work and automatically changes to OFF. • When the auto change mode is "ON", the REC SPEED, USB 2 REC, REPEAT, PROGRAM, DELETE and SLEEP function can't work. • If there's no DISC or no USB, it will jump to next DISC or USB. (For example, the DISC1 plays end, if the DISC 2/3 has no disc, it will jump to play USB1 music.) English 10 11 Playing USB Connect an external storage device such as USB flash memory or external HDD (Hard Disk Drive) to the product. You can play files in MP3/WMA format. Before you begin! • Connect the external USB storage device to your product. • Select the USB mode by pressing the USB 1 or USB 2 button on the main unit or select the USB 1 or USB 2 by pressing the FUNCTION button on the remote control. • The first track of the first directory plays automatically, and the play order is as below: If you select USB1, USB1 ➝ STOP. If you select USB2, USB2 ➝ STOP. ➣➣To stop playing Press the STOP ( @ ) button to stop playing. ➣➣To remove the USB device To Use High Speed Search You can search the desired section quickly during the play. the (,) button. ➣➣•Press Each time you press the button, you will move forward/backward fast. ☛☛The sound will not output in fast playback mode. To delete a file You can delete a file on your USB device. 1. Play a file you want to delete. 2. Press the DELETE button. 3. Turn the EASY SEARCHING JOG control left or right on the main unit or press the [,] buttons on the remote control to select YES. • To cancel the selection, press the RETURN button on the main unit. If you press the STOP ( @ ) button once again, you can remove the USB device safely. 4. Press the ENTER button on the remote control. The selected file will be deleted. damaged. To skip next 10 tracks 1. Press the +10 or -10 button while in playback mode. ☛☛Do not connect a USB recharger to the USB port ☛☛The NTFS file system is not supported. of this product. Otherwise, the product may be To Select a Track from USB Device You can select an MP3 file during the play. f you want to move the next/previous(track), press the ➣➣I[,] buttons shortly. • It moves the next/previous file within the directory. • If you press the [,] buttons more times than the number of the files in the directory, it will move over to the next directory. To Search a Folder Quickly 1. Turn the EASY SEARCHING JOG control left or right on the main unit or press the TUNING/ALBUM button on the remote control to move to the previous/ next folder. 2. When the searching is done, you will see the previous/ next folder name. The track will start playing. To repeat 1. P ress the REPEAT button. Each time you press the REPEAT button, the repeat mode will change as following: OFF➝ TRACK ➝ DIRECTORY ➝ ALL ➝ RANDOM 2. When you wish to stop the Repeat function, press the REPEAT button until "OFF" is displayed. • OFF: Cancels Repeat Playback. • TRACK: Repeatedly plays the selected track. • DIRECTORY: Repeatedly plays all tracks in the selected folder. • ALL: Repeatedly plays all tracks. • RANDOM: Plays tracks in random order. 12 English This will skip the tracks as many as 10 or -10 from the current track. Read through the instructions below before using the USB storage • Some USB devices may not work properly with this product. • This product supports only an external HDD that is formatted in FAT file system. • USB 2.0 HDD should be connected to a separate power source. Otherwise, the USB 2.0 HDD will not work at all. • If an USB external storage is connected to multiple devices, only the MP3 files in the first HDD will be played. • DRM-applied files are not supported. Digital Right Management:This will restrict unauthorized access to a DRM file so that the copyright of the file is protected from piracy. • Even if the extension of the file is .mp3, the file cannot be played if it is formatted in MPEG layer1 or 2. • Do not use an unrecognized USB hub. • Only the first 15 characters of a MP3/WMA file are displayed. • Only removable HDDs with less than 160GB are supported. Depending on the device, a 160GB- or more removable HDD may not be supported. • It will take several minutes to recognize the files in the selected USB device. • The USB device (USB HDD, in particular) may cause a delay to move to the next track. • The USB storage supporting only USB VER1.1 may perform a slow access or may not recognize the file properties. Listening a Radio Selecting a Stored Station You can store up to: 15 FM stations, 15 AM stations (optional). 1. Select FM or AM by pressing the TUNER/AUX button on the main unit. You can select FM or AM by pressing the FUNCTION button on the remote control. 2. To search for a station Press TUNING MODE button Preset.................... Once or more times until PRESET is displayed. You can search the stored frequencies in the Preset mode. Manually ............... Once or more times until MANUAL is displayed. You can search the frequencies one by one in the Manual mode. 3. Select the station to be stored by: • Pressing the TUNING/ALBUM , or . button on the remote control button to select the preset station. or Turn the EASY SEARCHING JOG control left or right to search the station. • Press and hold the TUNING/ALBUM , or . button on the remote control to automatically search for active broadcasting stations. 4. Press the MO/ST button to switch between stereo and mono. • In a poor reception area, select MONO for a clear, interference-free broadcast. • This applies only when listening to an FM station. 5. If you do not want to store the radio station found, revert to Step 3 and search for another station. Otherwise: a. Press the ENTER button. b. Or, press the TUNING/ALBUM button on the remote control to select a program number. c. Press the ENTER button to save the preset. 6. To store any other radio frequencies required, repeat Steps 3 to 4. mode ➣➣In• ITuner n the Manual mode, you can use [ or ] button You can listen to a stored radio station as following: 1. Select FM or AM by pressing the TUNER/AUX button on the main unit. You can select FM or AM by pressing the FUNCTION button on the remote control. 2. Press the TUNING MODE button on the remote control until “PRESET” is displayed. 3. P ress [,] button on the main unit or TUNING/ ALBUM , , . on the remote control to select a desired preset number. or Turn the EASY SEARCHING JOG control left or right on the main unit to select the stored station. Setting the Clock For each step, you have a few seconds to set the required options. If you exceed this time, you must start again. 1. Switch the system on by pressing the POWER ( ) button. 2. Press the TIMER SET button and then press the ENTER ( ) button, "CLOCK" is displayed. 3. Press the ENTER ( ) button, the hour flashes. • Increase the hours: , • Decrease the hours: . 4. When the correct hour is displayed, press the ENTER ( ) button, the minutes flashes. • Increase the minutes: , • Decrease the minutes: . 5. When the correct minute is displayed, press the ENTER ( ) button, " TIMER" appears in the display. • The current time is now set. • You can display the time, even when you are using another function, by pressing the TIMER SET button once. • You can also use ] or [ on the front panel instead of TUNING/ALBUM , or . button in step 3,4. on the main unit to manual search a radio station. • In the Preset mode, you can use [ or ] button or the EASY SEARCHING JOG control on the main unit to search a stored radio station. English 12 13 Timer Function The timer enables you to switch the system on or off at specific times automatically. • Before setting the timer, check that the current time is correct. • For each step, you have a few seconds to set the required options. If you exceed this time, you must start again. • If you no longer want the system to be switched on or off automatically, you must cancel the timer by pressing the TIMER ON/OFF button. Example: You wish to wake up to music every morning. 1. Switch the system on by pressing the POWER ( button. 2. Press the TIMER SET button until displayed. ) 3. P ress the ENTER ( ) button. Result: ON TIME is displayed for a few seconds, you can set the timer switch-on time. 5. Set the timer switch-off time. a Press the TUNING/ALBUM , or . button to set the hours. b Press the ENTER ( ) button. Result: The minutes flash. c Press the TUNING/ALBUM , or . button to set the minutes. d Press the ENTER ( ) button. Result: V OLUME XX is displayed, where XX corresponds to the volume already set. CD/MP3 (compact disc) . ..... Load one or more compact discs. USB1/USB2.............. Connect the USB device. 14 English 2)If you select the RECORD Y, you can set the tuner timing recording. ) button. b.Press the ENTER ( Result: OFF TIME is displayed for a few seconds, you can set the tuner timing recording switch-off time. 4. Set the timer switch-on time. a Press the TUNING/ALBUM , or . button to set the hours. b Press the ENTER ( ) button. Result: The minutes flash. c Press the TUNING/ALBUM , or . button to set the minutes. d Press the ENTER ( ) button. Result: O FF TIME is displayed for a few seconds, you can now set the timer switchoff time. FM/AM (radio) .......... a Press the ENTER ( ) button b Select a preset station by pressing the TUNING/ ALBUM , or . button. 9. Press the ENTER ( ) button. Result: RECORD N is displayed, you can press the TUNING/ALBUM , or . button to select the RECORD Y or RECORD N, and then press ENTER button. 1)If you select the RECORD N, it will cancel tuner timing recording even if you have already set the tuner timing recording. ) button. a.Press the ENTER ( Result: ON TIME is displayed for a few seconds, you can set the tuner timing recording switch-on time. TIMER is 6. P ress the TUNING/ALBUM , or . button to adjust the volume level and press the ENTER ( button. Result: The source to be selected is displayed. 7. Press the TUNING/ALBUM , or . button to select the desired source to be played when the system switches on. If you select... You must also... 8. Press the ENTER ( ) button. Result: C HECK REC (Do you want to record?) is displayed. ) • The maximal tuner timing recording time is 5 hours. • If the timer switch on and off times are identical, the word ERROR is displayed. • You may use ], [ buttons on the main unit to instead of the TUNING/ALBUM , or . button to adjust in step 4 to 9. • If the switch-on or -off time is the same as the timing recording time, only the switch-on or -off time is effective, and the timing recording time is not applied. • If the auto timer is turned on,the MP3/CD or USB function may require an additional step to be activated depending on the disc(or device).So it is better for you to select the tuner function instead. Cancelling the Timer After having set the timer, it will start automatically as shown by the TIMER indication on the display. If you no longer wish to use the timer, you must cancel it. To... Press the TIMER ON/OFF button.... Cancel the timer . ........Once. Result: played. Restart the timer .........Twice. Result: is no longer dis- is displayed again. • When you select the TIMER OFF mode, the TIMER RECORDING and TIME function are not available. Recording Function You can record sound of the CD, the Radio Broadcasting or sound from the external source into the USB storage device. 1. C onnect the external USB storage device you want to record to the USB 2 ( ) on your product. 2. Play a Disc, adjust the Radio frequency or connect the external source to your product. CD • Press the MP3/CD on the main unit to select the CD function. • Press the OPEN/CLOSE button to open the disc tray. • Insert a CD and press the OPEN/CLOSE button to close the disc tray. • Use the CD selection ( [ or ] ) buttons to select the desired song. Tuner • Select TUNER by pressing the TUNER/AUX button on the main unit. • Adjust the Radio frequency you want to record. External Source • Connect an External Component/MP3 player to your product. • Press the TUNER/AUX button to select <AUX> input. • Play a song from the external device. USB 1 • Connect an USB to USB 1 jack of your product. • Press the USB 1 button to select USB 1. • Play a song from the USB 1. 3. P ress the USB REC button on the remote control or the USB 2 REC button on the main unit to start recording. CD • “TRACK RECORDING” is displayed and CD recording starts. • Press and hold the USB REC button on the remote control or press and hold the USB 2 REC button on the main unit to start recording the all tracks of Disc. "FULL CD RECORDING" is displayed. • If you play the MP3/WMA file, the file is copied into the USB device totally. “CHECK FILE”“COPY XX”“COPY END” is displayed. When the recording is done, “STOP” will be displayed. • If there is the same file name, "FILE EXIST" is displayed, and the function is canceled. • Do not disconnect the USB or the AC Cord during the recording as this may cause file damage. • If you disconnected USB device during the recording, the main unit will be power off and you may not delete the recorded file, In this case, please connect the USB device to the PC and backup the USB data on the PC first and then format the USB device. • When the USB memory is not enough, it will be displayed “NOT ENOUGH MEMORY”. • The recording works if the USB device or the HDD is formatted in the FAT file system. (The NTFS file system is not supported.) • When you use CD high speed search function, the CD recording can’t work. • Sometimes, the recording time may be longer with some USB devices. • In the program mode, you can't use the CD recording function. • When the CD recording, the EQ and GIGA SOUND functions can not work and automatically change to OFF. • When the CD recording, the REPEAT function can not work and automatically changes to OFF. • If you use the MIC function during the CD recording, the voice from the microphone will be recorded. • You can not record the radio when searching or no available frequencies in the Tuner mode. • Note that setting the input level too loud when recording music from an external device through the AUX and USB channel may introduce noise into the recording. In that case, lower the external device’s volume level. Recording Speed You can select the recording speed before recording. Each time you press the CD REC SPEED button on the remote control, the recording speed will change as following: RECORD SPD x 1;RECORD SPD x 4 • While the Tuner or External Source is recording, the recording speed does not supported. • When you select RECORD SPD x 4, the audio sound will not be output. • If you connected the Microphone, you just have one recording speed mode: RECORD SPD x 1. • During recording, if you disconnect the Microphone, the recording will stop, even if you reconnect the Microphone, it will still stop. Tuner /External Source • RECORDING is displayed. 4. T o stop recording, press the STOP (@) button and then automatically create and save as the MP3 file. 5. To remove the USB device safely, press the STOP (@) button once again. After the recording, a directory named “RECORDING”(CD), “CD COPY”(MP3 CD), “TUNER RECORDING” or “AUX RECORDING” will be created in your device. English 14 15 Selecting EQ Mode Your mini-compact system supports the predefined equalizer settings between high and low frequencies to be in harmonious with the current music genre. 1. Press the EQ button. Each time you press this button, the sound mode will . switch as following: OFF;FLAT;RANCHERA;SAMBA;CUMBIA ;HABANERA;BOOMBA;REGGAE;PARTY ;POP;HIPHOP;ROCK;JAZZ;CLASSIC ;STADIUM EQ ;DYNAMIC.S;MP3 ENHANCER ; VIRTUAL SOUND;U1+0+0+0;U2+0+0+0 ;U3+0+0+0 2. Set the BASS (left numeric), MIDDLE (middle numeric), TREBLE (right numeric) level. Press the ENTER button when you select the U1 + 0 + 0 + 0/U2 + 0 + 0 + 0/U3 + 0 + 0 + 0 Result: The BASS level(left numeric) flash. Press the TUNING/ALBUM , or . button to select from -06 to 06. Press the ENTER button. Result: The MIDDLE level(middle numeric) flash. Press the TUNING/ALBUM , or . button to select from -06 to 06. Press the ENTER button. Result: The TREBLE level(right numeric) flash. Press the TUNING/ALBUM , or . button to select from -06 to 06. Press the ENTER button. Result: setting is completed. • When CD Recording, the EQ function can't work and the EQ automatically switches to "OFF" mode. • If no buttons is pressed within 8 seconds, your settings will automatically be cancelled and the previous settings will be saved. • The EQ mode may be different depending on your region. Selecting USER EQ Mode You can directly select the user EQ mode by press the USER EQ button. 1. Press the USER EQ button on the main unit until the required option is selected. Each time you press this button, the sound mode will switch as following: OFF ; U1 + 0 + 0 + 0;U2 + 0 + 0 + 0;U3 + 0 + 0 + 0 2. You can refer the above to set the BASS (left numeric), MIDDLE (middle numeric), TREBLE (right numeric) level. • When CD Recording, the USER EQ function can't work and the USER EQ automatically switches to "OFF" mode. • If no buttons is pressed within 8 seconds, your settings will automatically be cancelled and the previous settings will be saved. • The USER EQ mode may be different depending on your region. 16 English Using the Dynamic Spot Mode You can directly select the Dynamic spot mode for listening music. 1. Press the DYNAMIC SPOT button on the main unit. Each time you press this button, the sound mode will switch as following: DYNAMIC.S ; OFF • The DYNAMIC SPOT mode may be different depending on your region. Using the Stadium Mode You can directly select the Stadium mode for listening music. 1. Press the STADIUM button on the main unit. Each time you press this button, the mode will switch . as following: STADIUM EQ ; OFF • The STADIUM mode may be different depending on your region. Giga Sound function Your mini-compact system is equipped with the function of GIGA SOUND mode . The function of GIGA SOUND mode amplifies bass and improves high key or bass twice as much for you to appreciate powerful real sound. 1. P ress the GIGA SOUND BLAST button on the main unit or the SOUND button on the remote control. Each time press this button, the sound will switch as following: OFF ; GIGA SOUND ; ADAPTIVE ; EXPLOSION 2. To cancel this function, press the GIGA SOUND BLAST button until the “OFF” is displayed. • The GIGA SOUND mode may be different depending on your region. LED LIGHTING Function You can switch the LED mode to your preference. 1. Each time you press the LED LIGHTING button on the main unit, the LED display mode will change as following: OFF ; MODE 1 ; MODE2 • If you select the LED OFF, all of the LED Lightings will turn off. • If you select the MODE 1, the front LED will turn on and the top LED LIGHTING will turn off. • If you select the MODE 2, the front LED will turn on and the top LED LIGHTING will turn on. Party function You can choose a desired party mode. 1. P ress the PARTY button. Each time press this button, the party mode will switch as following: PARTY 1 ; PARTY 2 ; PARTY 3 ; DJ LIGHT • On the PARTY 2 and DJ LIGHTING mode, the Top LED will run depend on the signal level.(MX-E870/E871 only) • On the PARTY 1 and PARTY 3 mode, the Top LED will be on or off and does not run. (MX-E870/E871 only) • When you select the DJ LIGHT mode, if you tune the EASY SEARCHING JOG control, the LED Light of the Speaker will flash. Troubleshooting Refer to the chart below when this unit does not function properly. If the problem you are experiencing is not listed below or if the instruction below does not help, turn off the unit, disconnect the power cord, and contact the nearest authorized dealer or Samsung Electronics Service Center. Symptom Check/Remedy I cannot eject the disc. • Is the power cord plugged securely into the outlet? • Turn off the power and then turn it back on. Playback does not start immediately when the Play/Pause button is pressed. • Are you using a deformed disc or a disc with scratches on the surface? • Wipe the disc clean. Sound is not produced. • No sound is heard during fast playback, slow playback. • Are the speakers connected properly? Is the speaker setup correctly customized? • Is the disc severely damaged? The remote control does not work. • Is the remote control being operated within its operation range of angle and distance? • Are the batteries drained? • The product is not working. • While “NO DISC” message appears on the display of the product, press (Example: The power goes out or and hold the STOP (@) button on the main unit for longer than the front panel key doesn't work 5 seconds with no disc (reset function). or a strange noise is heard.) Using the RESET function will erase all stored settings. • The product is not working Do not use this unless necessary. normally. Can't receive radio broadcast. • Is the antenna connected properly? • If the antenna's input signal is weak, install an external FM antenna in an area with good reception. English 16 17 Specifications General FM Tuner AM Tuner (optional) CD Disc Weight (MX-E850/E851) Weight (MX-E870/E871) Dimensions Operating Temperature Range Operating Humidity Range Signal/noise ratio Usable sensitivity Total harmonic distortion Signal/noise ratio Usable sensitivity Total harmonic distortion CD : 12 cm (COMPACT DISC) 6.5 Kg 6.63 Kg 294 (W) x 410 (H) x 433.5 (D) mm +5°C~+35°C 10 % to 75 % 62 dB 10 dB 0.2 % 35 dB 60 dB 3% Reading Speed : 4.8 ~ 5.6 m/sec. Maximum Play Time : 74 min. MX-E850/E851- 900 Watts (MAX. THD) Front speaker output Subwoofer 300 W/CH (6 Ω/100 Hz) 300 W (6 Ω/100 Hz) MX-E870/E871- 1600 Watts (MAX. THD) Amplifier Front speaker output 320 W/CH (6 Ω/100 Hz) Rear speaker output 160 W/CH (12 Ω/100 Hz) Subwoofer 320 W/CH (6 Ω/100 Hz) Frequency range 20Hz~20KHz S/N Ratio 80dB Channel separation 60dB Input sensitivity (AUX)800mV *: Nominal specification - Samsung Electronics Co., Ltd reserves the right to change the specifications without notice. - Weight and dimensions are approximate. - Design and specifications are subject to change without prior notice. - For information on the power supply and power consumption, refer to the label attached to the product. 18 English Contact SAMSUNG WORLD WIDE If you have any questions or comments relating to Samsung products, please contact the SAMSUNG customer care centre. Area Contact Center WebSite Area Contact Center WebSite 0-800-555-555 0-88-555-55-55 8-10-800-500-55-500 0-800-61440 English 18 Code No. AH68-02452B (Rev 0.0)