1
EN+AR-00006K(0.2)
2/20/02 3:40 PM
Page 1
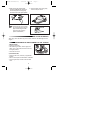
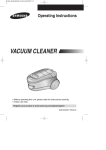
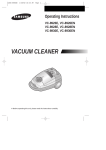
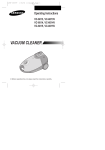
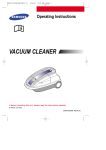
Operating Instructions
VACUUM CLEANER
❈ Before operating this unit, please read the instructions carefully.
EN+AR-00006K(0.2)
2/20/02 3:40 PM
Page 2
IMPORTANT SAFEGUARDS
This appliance must be connected to the same mains voltage as shown on
the rating plate.
This vacuum cleaner is not suitable for removing any kind of liquid.
Carpets treated with a liquid cleaner must be allowed to dry before being
cleaned with the unit.
Never operate the vacuum cleaner without a dust bag.
The cover cannot be closed if a dust bag is not inserted. Please do not close
forcibly.
Keep children away from this vacuum cleaner. It must not be used on people
or animals.
Never use your appliance to vacuum matches, glowing embers, or
cigarette-ends. Avoid vacuuming hard, pointed objects, since they may
damage the appliance or dust bag.
If your vacuum cleaner has a fault, please contact your electrical retailer or an
authorized service agent.
If the mains cable is defective, the complete cable winder must be replaced
by a service agent.
PROTECTING THE ENVIRONMENT
Once you have unpacked the unit, do not simply throw the packing into the
household waste.
Take them to the appropriate collecting points for recycling.
1
EN+AR-00006K(0.2)
2/21/02 1:21 PM
Page 3
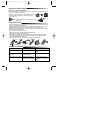
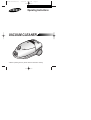
IDENTIFICATIONS OF PARTS
Features marked with * may vary according to model.
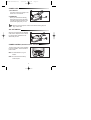
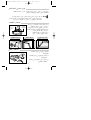
ASSEMBLING THE VACUUM - CLEANER READY FOR USE
1) Connect the suction hose to the
suction tube.
2) Connect the suction tubes together
(depending on model).
3) Connect the nozzle to the suction
tube.
4) Connect the body connector to the
body of the cleaner.
OPTION: Adjusting the telescopic
tube (depending on
model).
2
EN+AR-00006K(0.2)
2/20/02 3:40 PM
Page 4
POWER CORD
1) PULLING OUT
The power cord is long enough to be
drawn out for convenience.
2) REWINDING
When you have finished cleaning,
disconnect the plug from the electrical outlet and simply press the cord
rewind button lightly with your toe.
NOTE: When removing the power cord from the electrical outlet, grasp the
plug, not the cord.
ON / OFF SWITCH
With the cord plugged into an electrical
outlet, start or stop the vacuum cleaner
by pushing lightly downward on the
switch with your toe.
POWER CONTROL (VARIABLE CONTROL TYPE ONLY)
The vacuuming power can be adjusted
to suit any situation with the electrical
power control.
MIN = For delicate fabrics, e.g.net
curtains.
MAX = For hard floors and heavily
soiled carpets.
3
EN+AR-00006K(0.2)
2/20/02 3:40 PM
Page 5
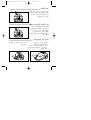
DUST-FULL INDICATOR
If the “Dust-Full” indicator changes to “RED” while you are cleaning, the dust
bag requires replacement.
NOTE: If the “Dust-Full” indicator continues to display “RED” even after
changing the dust bag, turn the cleaner off and check whether the
hose, tube or nozzle is clogged.
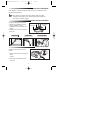
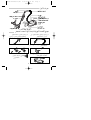
USING THE ACCESSORIES
Pull the tool storage cover upward.
• Crevice tool for radiators, crevice,
corners, between cushions.
• Upholstery brush for cushions and
drapery.
• Dusting brush for furniture, shelves,
books, etc.
CREVICE
DUSTING BRUSH
CREVICE TOOL
DUSTING
UPHOLSTERY
BRUSH
UPHOLSTERY
USING THE BLOWER
Located on the left rear side of the
cleaner.
1) Disconnect the hose from the body
of the
cleaner.
2) Connect the hose clamper to the
blow hole.
4
EN+AR-00006K(0.2)
2/20/02 3:40 PM
Page 6
PARK POSITION
Located in the top rear side of the
vacuum-cleaner, there is a nozzle
support that can be used to park the
nozzle during pauses in cleaning.
TRANSPORTING AND STORING THE VACUUM CLEANER
For easy storage and transportation,
this vacuum cleaner has a clip system
built onto the body, which will keep the
tube, hose and nozzle in a vertical
position.
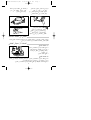
REPLACING THE DUST BAG
1) To open the dust cover of the dust
bag compartment, press the
clamper upward.
(The clamper is located at the front
of the dust cover)
2) Remove the carrying bag from the
cleaner.
yy
;;
;;
yy
5
EN+AR-00006K(0.2)
2/20/02 3:40 PM
3) After removing the used dust bag,
insert the cardboard bag collar of the
new dust bag into the carrying bag,
and then insert it in its original position
Page 7
4) Press the dust cover down gently
until the clamper relocks.
NOTE: Used dust bag can be sealed
by removing the film from the
paper and sticking the latter
over the suction opening.
(ONLY PAPER BAG)
FOR CLOTH FILTER BAG
After using, if the cloth filter bag is full of dust, clean the cloth filter bag and use
it again.
MAINTENANCE OR REPLACEMENT OF THE FILTERS
1) INLET-FILTER.
• Open the dust cover.
• After detaching the filter, wash it lightly with
water, dry it in the shade, and then insert it in
its original position.
• Close the dust cover.
2) OUTLET-FILTER.
• Open the dust cover, and then pull grille-filter
forward.
• Remove and replace the exhausted outlet-filter.
• Push the grille filter, and then close the dust
cover.
6
yyy
;;;
;;
yy
;;;
yyy
;; ;;;
yy
yyy
;; yyy
yy
;;;
;;;
yyy
EN+AR-00006K(0.2)
2/21/02 12:07 PM
Page 8
USAGE OF FLOOR NOZZLE
FOR RUG / FLOOR SELECTOR
Before use make sure that the position of the selector is in the right position for
the type of surface to be cleaned.
Select the carpet indicator ➀ when cleaning carpets.
Select flat surface indicator ➁ when cleaning the
floors, tiles, etc.
NOTE: For optimum efficiency, clean floor brush with
crevice tool.
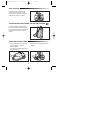
CYCLONIC FILTER
You can use a dust bag in your cleaner for a long time thanks to the Cyclonic Filter system and it
maintain the maximum cleaning efficiency.
The larger particle of dust filtered from Cyclonic Filter remain in Dust Barrel when suctioned air
and dust revolves in the Cyclonic Filter. So the dust bag contains only smaller ones.
When the Dust Barrel is filled with dust up to the indicating line, it needs disposing and cleaning.
Dust Barrel can be cleaned in water.
1.Turn the Dust Barrel to the left and pull it.
2.Disconnect the Cyclonic Filter from extension wand and handle.
3.Remove thread and hair tangled around the net.
4.After cleaning the Dust Barrel and Cyclonic Filter,connect the Cyclonic Filter with extension
wand and handle(washed part should be dried in the shade throughly before assembling).
5.Push and turn the Dust Barrel to the right.
Adjust indicating marks each other carved on Dust Barrel and Cyclonic Filter.
CYCLONIC FILTER
CREVICE
TOOL
DUST BARREL
TROUBLE SHOOTING
PROBLEM
CAUSE
REMEDY
Motor does not start.
No power supply.
Check cable, plug and
socket.
Suction force is gradually
decreasing.
Filter, nozzle, suction hose
or tube is blocked.
Remove the object.
Cord does not rewind fully.
Check that the cord is not
twisted or wound unevenly.
Pull the cord out 2~3m &
push down the cord rewind
button.
DJ68-00006K REV (0.2)
7
EN+AR-00006K(0.2)AR
2/20/02 3:31 PM
Page 1
ﺗﻌﻠﻴﻤﺎت اﻟﺘﺸﻐﻴﻞ
اﳌﻜﻨﺴﺔ اﻟﻜﻬﺮﺑﺎﺋﻴﺔ
Æ“UN'« «c¼ qOGAð q³ W¹UMFÐ ULOKF²« Ác¼ …¡«d ¡Ułd« ¿
EN+AR-00006K(0.2)AR
2/20/02 3:31 PM
Page 2
ﺗﻌﻠﻴﻤﺎت ﻫﺎﻣﺔ ﻣﻦ أﺟﻞ اﻟﺴﻼﻣﺔ
▼
fH½ vKŽ Í—«b'« —UO²« Ãd$% v« “UN'« «c¼ qO'uð s% bÐ ô
ÆWOzUÐdNJ« W5MJLK d¹bI²« WŠu w1 5³% u¼ UL3 —UO²«
ÆŸu½ Í√ s% qzUÝ nOEM² W³ÝUM% dOž WOzUÐdNJ« W5MJ*«
▼
ÆW5MJ*UÐ tHOEMð q³ nOEM²« qzUÝ s% œU−5« nOH& s% bÐ ô
▼
Æ—U³ž fO3 ÊËbÐ WOzUÐdNJ« W5MJ*« Âb$²5ð ô
▼
▼
‰Ušœ≈ …«œ≈ ‰«b³²Ý« s% bÐ ô ¨—dCÐ UÐUB% w5Ozd« pK5« ÊU3 «–«
Æ U%b)« e3d% q³ s% WK%UJ« pK5«
▼
dłU²Ð ‰UBðô« vłd¹ ¨WOzUÐdNJ« W5MJ*« w1 qKš ÀbŠ «–«
Æ U%b$K h²$% qO3Ë Ë√ UO½Ëd²Jö
▼
Ë√ «dL'« Ë√ »UI¦« Ê«bOŽ nOEM² WOzUÐdNJ« W5MJ*« Âb$²5ð ô
ÍœRð b UN½ô …œU(«Ë W³KB« ¡UOý_« nOEMð VM& ÆdzU−5« »UIŽ√
Æ—U³G« fO3 Ë√ “UN'« w1 —d{ À«bŠ≈ v«
▼
«b$²Ý« ÂbŽ s% bÐ ô ÆWOzUÐdNJ« W5MJ*« sŽ «bOFÐ ‰UHÞô« „dð«
ÆÊ«uO(«Ë ’U$ýú WOzUÐdNJ« W5MJ*«
▼
oKGð ô ¨—U³ž fO3 ‰Ušœ≈ ÂbŽ WUŠ w1 ¡UDG« ‚öž≈ lD²5ð r «–«
Æ…uIÐ ¡UDG«
ﺣﻤﺎﻳﺔ اﻟﺒﻴﺌﺔ
±
▼
ÆÊ«—Ëb« …œUŽ≈ qł√ s% tFOL−² 5F% ÊUJ% v« Ácš
▼
w1 W%ULI« WKÝ w1 ‚ËbMB« Âdð ô ¨ ‚ËbMB« s% “UN'« ëdš« bMŽ
ƉeM*«
EN+AR-00006K(0.2)AR
2/20/02 3:31 PM
Page 3
اﻷﺟﺰاء%ﺗﻌﺮﻳ
i³I*«
¡«uN« rEM%
—U³G« jHý ÂuÞdš
kHŠ …dO−Š ¡UDž
«Ëœ_«
—U³G« ¡ö²%« dýR%
wzUÐdNJ« pK5« ‰Ušœ« —“
¿ jHA« …u j³{ ÕU²H%
¿ »u³½_«
ëdš≈ —“
jHý ÂuÞdš
—U³G«
i³I%
qIM«
WO{—_« W¼uH«
ØqOGA²« ÕU²H%
·UI¹ô«
…dO−Š X³¦%
—U³G« fO3 kHŠ
▼
÷—_«ØœU−5« —UO²š« ÕU²H%
Æq¹œu% V5Š …d1u²% ¿ ‡Ð WLKF*« «eO*«
ﲡﻤﻴﻊ اﳌﻜﻨﺴﺔ اﻟﻜﻬﺮﺑﺎﺋﻴﺔ ﺑﺤﻴﺚ أﻧﻬﺎ ﻣﺴﺘﻌﺪة ﻟﻠﺘﺸﻐﻴﻞ
—U³G« jIý VOÐU½√ q'Ë« ©≤
Æ©q¹œu% V5Š® iF³Ð UNCF³Ð
v« —U³G« jHý ÂuÞdš q'Ë« ©±
Æ—U³G« jHý »u³½√
»u³½√ v« WO{—_« W¼uH« q'Ë« ©≥
Æ—U³G« jHý
r5ł v« ÂuÞd)« XÒ³¦% q'Ë« ©¥
WOzUÐdNJ« W5MJ*«
»u³½_« j³{ :اﻻﺧﺘﻴﺎري
ÆwÐuJ5K²«
≤
EN+AR-00006K(0.2)AR
2/20/02 3:31 PM
Page 4
ﺳﻠﻚ اﻟﺘﻴﺎر اﻟﻜﻬﺮﺑﺎﺋﻲ
( ﺳﺤﺐ ﺳﻠﻚ اﻟﺘﻴﺎر اﻟﻜﻬﺮﺑﺎﺋﻲ١
—UO²« pKÝ V×Ý pMJ1
ÆqN5« qOGA²K q¹uD« wzUÐdNJ«
( إدﺧﺎﻟﻪ٢
qB1« ¨nOEM²« s% ¡UN²½ô« bMŽ
¨Í—«b'«—UO²« Ãd$% s% —UO²« fÐU
wzUÐdNJ« pK5« ‰Ušœ≈ —“ vKŽ jG{«
ÆWH$Ð ÂbI« l³'UÐ
¨Í—«b'« —UO²« Ãd$% s% wzUÐdNJ« —UO²« pKÝ V×Ý bMŽ
ÆjI1 —UO²« pKÝ ôË tð«– fÐUI« p5%«
:ﻣﻼﺣﻈﺔ
اﻹﻳﻘﺎف/ﻣﻔﺘﺎح اﻟﺘﺸﻐﻴﻞ
v« —UO²« fÐU qO'uð WUŠ w1
W5MJ*« qGý ¨Í—«bł —UOð Ãd$%
qLF« sŽ UNHË« Ë√ WOzUÐdNJ«
ÂbI« l³'QÐ ÕU²H*« vKŽ jGCUÐ
ÆWH$Ð
( ﻓﻘﻂ%ﺿﺒﻂ ﻗﻮة اﻟﺸﻔﻂ )ﻧﻮع اﻟﻀﺒﻂ اﺨﻤﻟﺘﻠ
W5MJLK jHA« …u j³{ pMJ1
j³{ l% WUŠ Í_ W³ÝUM% WOzUÐdNJ«
ÆWOzUÐdNJ« WUD«
q¦% ¨ WIOd« WALú Ω
اﻷدﻧﻰ
WJ³A*« dzU²5«
bOłU−5«Ë W³KB« ÷—ú Ω
qOI¦« aÝuUÐ WŁuK*«
≥
اﻷﻗﺼﻰ
EN+AR-00006K(0.2)AR
2/20/02 3:31 PM
Page 5
ﻣﺆﺷﺮ ﻣﺴﺘﻮى ﻛﻤﻴﺔ اﻟﻐﺒﺎر
nOEM²« ¡UMŁ√ ¢dLŠ√¢ —U³G« WOL3 Èu²5%¢ dýR% Êu `³'√ «–«
Æ—U³G« fO3 q¹b³ð pOKŽ V−¹ ¨ W5MJ*UÐ
s% rždUÐ ULz«œ ¢dLŠ√¢ —U³G« WOL3 Èu²5% dýR% ÊU3 «–« :ﻣﻼﺣﻈﺔ
h×1«Ë qLF« sŽ WOzUÐdNJ« W5MJ*« nË« ¨—U³G« fO3 q¹b³ð
Æô Â√ …œËb5% W¼uH« Ë√ »u³½ô« Ë√ ¨ ÂuÞd)« ÊU3 «–« ULŽ
اﺳﺘﺨﺪام اﳌﻠﺤﻘﺎت
—U³G« …Uýd1
«– …«œ√
‚uIý
ﻓﺮﺷﺎة اﻟﺘﻨﺠﻴﺪ
…Uýd1
bO−M²«
ÆvKŽ_« v« «Ëœ_« kHŠ …dO−Š ¡UDž V×Ý«
nOEM² Âb$²5ð ‚uIý «– …«œ_« •
ÆbzUÝu 5ÐË U¹«Ëe«Ë ‚uIA«Ë —uðU¹œ«d
nOEM² Âb$²5ð bO−M²K W'U)« …UýdH« •
ÆÀUŁú ÷UHC1 ¡UDžË bzUÝu«
nOEM² Âb$²5ð —U³G« …Uýd1 •
a« ÆÆÆ V²J«Ë ·u1d«Ë ÀUŁ_«
ﻓﺮﺷﺎة اﻟﻐﺒﺎر
أداة ذات ﺷﻘﻮق
اﺳﺘﺨﺪام اﳌﻨﻔﺎخ
W5MJ*« …dšR% w1 œułu% ŒUHM*«
ÆWOzUÐdNJ«
W5MJ*« r5ł v« ÂuÞd)« qB1« ©±
WOzUÐdNJ«
WײH« v« ÂuÞd)« X³¦% q'Ë« ©≤
ÆŒUHM*UÐ W'U)«
¥
EN+AR-00006K(0.2)AR
2/20/02 3:31 PM
Page 6
اﳌﻜﻨﺴﺔ%وﻗ
…dšR% vKŽ√ vKŽ œułu% W¼uH« b½UÝ
t%«b$²Ý« pMJ1Ë ¨WzUÐdNJ« W5MJ*«
W5MJ*« ·UI¹≈ ¡UMŁ√ W¼uH« qL(
ÆnOEM²« sŽ XR*«
ﻧﻘﻞ اﳌﻜﻨﺴﺔ اﻟﻜﻬﺮﺑﺎﺋﻴﺔ وﺣﻔﻈﻬﺎ
UNKI½Ë WOzUÐdNJ« W5MJ*« jH(
UN WOzUÐdNJ« W5MJ*« Ác¼ ¨ WuN5Ð
r5ł w1 wKš«b« p³A*« ÂUE½
¨ »u³½ô« qL×¹ Íc« ¨W5MJ*«
W5MJ*« nË bMŽ W¼uH«Ë ÂuÞd)«Ë
ÆÍœuLŽ qJAÐ
ﺗﺒﺪﻳﻞ ﻛﻴﺲ ﲡﻤﻴﻊ اﻟﻐﺒﺎر
W5MJ*« s% —U³G« fO3 V×Ý« ©≤
ÆWzUÐdNJ«
vKŽ_« v« X³¦*« V×Ý« ©±
¡UDž `²H tOKŽ jGCUÐ
X³¦*« ®Æ—U³G« fO3 kHŠ …dO−Š
kHŠ …dO−Š ¡UDž ÂU%√ vKŽ œułu%
©Æ—U³G« fO3
yy
yy
µ
EN+AR-00006K(0.2)AR
2/20/02 3:31 PM
kHŠ …dO−Š ¡UDž vKŽ jG{« ©¥
r²ð v²Š nDKÐ —U³G« fO3
ÆX³¦*« ‚öž« …œUŽ≈
Page 7
qLF²5*« —U³G« fO3 W«“≈ bFÐ ©≥
fO3 s% ÈuI*« ‚—u« qšœ«
rŁ ¨fOJ« q%UŠ v« b¹b'« —U³G«
ÆwK'_« t½UJ% v« fOJ« qšœ≈
fO3 r²š pMJ1 :ﻣﻼﺣﻈﺔ
o¹dÞ sŽ qLF²5*« —U³G«
ÈuI*« ‚—u« s% rKOH« W«“≈
jHý Wײ1 ‚u1 tUB≈Ë
©jI1 ‚—u« s% fOJ«®Æ—U³G«
ﻟﻠﻜﻴﺲ ﻣﻦ اﳌﺼﻔﺎة اﻟﻘﻤﺎﺷﻴﺔ
¨WOzUÐdNJ« W5MJ*« «b$²Ý« bFÐ —U³GUÐ U¾K²2 wýULI« fOJ« ÊU3 «–«
ÆÈdš√ …d% t%b$²Ý«Ë WOýULI« …UHB*« fO3 nE½
Ò
اﻟﺼﻴﺎﻧﺔ أو اﺳﺘﺒﺪال اﳌﺼﺎﻓﻲ
yyy
yyy
yy
yy yyy
yy yyy
yyy
( ﻣﺼﻔﺎة اﳌﺪﺧﻞ١
Æ—U³G« fO3 kHŠ …dO−Š ¡UDž `²1« •
¡U*UÐ UNK5ž« ¨…UHB*« ëdš« bFÐ •
U¼bŽ« rŁ qE« w1 UNHHłË WH$Ð
ÆUN½UJ% v«
Æ—U³G« ¡UDž oKž« •
( ﻣﺼﻔﺎة اﺨﻤﻟﺮج٢
ÆÂU%_« v« WJ³A*« …UHB*« V×Ý« rŁ ¨—U³G« fO3 kHŠ …dO−Š ¡UDž `²1« •
Æ…b¹b'UÐ UNb³²Ý«Ë ÂœUF« ÃËdš …UHB% Ãdš« •
Æ—U³G« fO3 kHŠ …dO−Š ¡UDž oKž« rŁ WJ³A*« …UHB*« l1œ« •
∂
EN+AR-00006K(0.2)AR
2/21/02 12:15 PM
Page 8
اﻷرض/اﻟﺴﺠﺎد
اﺧﺘﻴﺎر
ﻣﻔﺘﺎح
ﻓﻮﻫﺔ اﻷرض
اﺳﺘﺨﺪام
اﻷرض/ﻻﺧﺘﻴﺎر اﻟﺴﺠﺎدة
`D« ŸuM `O×B« ÷—_«ØœU−« —UO²š« ÕU²H$ l{Ë s$ bQQð ¨WOzUÐdNJ« WMJ*« qOGAð q³*
ÆtHOEMð b¹dð Íc«
bFÐ ‚uIý «– …«œ√ WDÝ«uÐ ÷—_UÐ WU)« …UýdH« nÒE½ ¨nOEM²« s$ WOUF qC√ qł√ s$ •
ÆqOGA²«
—UO²š« ÕU²H* `O×B« l{u« s$ bQQð ¨WOzUÐdNJ« WMJ*« qOGAð q³*
ÆtHOEMð b¹dð Íc« `D« ŸuM UIË ÷—_«ØœU−«
±
≤
ÆbOłU−« nOEMð bMŽ ©±® œU−« dýR$ d²š«
Æa« ÆÆÆ bO$«dI«Ë ÷—_« nOEMð bMŽ ©≤® W×D*« ÷—_« dýR$ d²š«
Æ‚uIý «– …«œ√ WDÝ«uÐ ÷—_« …Uýd nÒE½ ¨…¡UHQ qC√ vKŽ ‰uB×K :ﻣﻼﺣﻈﺔ
ÆbOłU−« nOEMð bMŽ ©±® œU−« dýR$ d²š«
Æa« ÆÆÆ bO$«dI«Ë ÷—_« nOEMð bMŽ ©≤® W×D*« ÷—_« dýR$ d²š«
اﺨﻤﻟﺮوﻃﻴﺔ
اﳌﺼﻔﺎة اﻟﻜﻠﻴﺔ
ﻟﻠﻔﺮﺷﺎة
Ác¼Ë WOÞËd<« …UHB*« ÂUE½ qCHÐ WK¹uÞ …b* WOzUÐdNJ« WMJ*« w —U³ž fOQ «b#²Ý« pMJ1
Æ`DÝ_« lOLł nOEM² ÷—_« W¼u Âb#²Ý«
ÆnOEM²K …¡ UHQ qCQÐ kH²%
:ﻣﻼﺣﻈﺔ
bMŽ —U³G« ¡UŽË w vI³ð WOÞËd<« …UHB*« ‰öš s$ UN²OHBð X9 w²« —U³G« s$ d³Q_« UOze'«
÷—_«—U³G«
…UývKŽ
dÍn
ÒE½—U³G«
¨WMJ*UÐ
nOEMð
qC√
qł√—Ëb¹
s$Ë ¡«uN« ’UB²$«
ÆjI dH_«
u²×¹
fOJ ÆWOÞ
Ëd<« …UHB*«
w —U³G«
ÆnOEM²«Ë —U³G« m¹dHð s$ bÐ ô ¨œb;« È
u²*« v« «–
qB¹ …«œ√
v²Š —U³GUÐ
Æ‚uIý
WDÝ«—U³G«
uÐ ¡UŽË ¡q$ bMŽ
Æ¡U*UÐ —U³G« ¡UŽË nOEMð p²J1
Æt³×Ý«Ë —UO« v« —U³G« ¡UŽË —Ëœ
Ò Æ±
Æi³I*«Ë b¹bL²« …—uÝU$ s$ WOÞËd<« …UHB*« qB« Æ≤
Æ…UHBLK WJ³A« ‰uŠ pÐUA²*« dFA«Ë jO)« ‰“« Æ≥
ﲢﺮى اﳋﻠﻞ واﺻﻼﺣﻪ
i³I*«Ë b¹bL²« …—uÝU$ w WOÞËd<« …UHB*« VQ
Ò — WOÞËd<« …UHB*«Ë —U³G« ¡UŽË nOEMð bFРƥ
©ÆUN½UJ$ v« …UHB*« …œUŽ≈ q³* U$U9 qE« w tHOH& s$ bÐ ô tKž - Íc« ¡e'«®
اﳊﻞ
اﻟﺴﺒﺐ
اﳌﺸﻜﻠﺔ
Æ5LO« v« Á—Ëœ
Ò Ë —U³G« ¡UŽË lœ« Ƶ
ÆWOÞËd<« …UHB*«Ë —U³G« ¡UŽË vKŽ WÐu²J*« …—Uýù« W$öŽ qQ j³{«
¨Í—UO²« pK« h׫
Æ—UO²« Ãd#$Ë fÐUI«Ë
v« WMJ*« quð ô
ÆÍ—«b'« —UO²« Ãd#$
„d;« qLF¹ ô
…UHB$
WOÞËd#$
«– …«œ√
UIzUŽ U¾Oý ‰“«
Ë√ ¨W¼uH« Ë√ ¨ …UHB*«
‚dIý
»u³½« Ë√ jHA« ÂuÞdš
œËb$
jHA«
اﳊﻞ
jHA« …u* iH#Mð
—bð
واﺻﻼﺣﻪUO−¹
ﲢﺮى اﳋﻠﻞ
—U³G« ¡UŽË
¨Í—UO²« pK« h׫
×U)« v« pK« V×Ý«
 ≥ ≠ ≤ v« qB¹ v²Š
‰Ušœ« —“ vKŽ jG{«Ë
ÆpK«
اﻟﺴﺒﺐ
v« WMJ*« quð ô
اﳌﺸﻜﻠﺔ
„d;« qLF¹ ô
dOž pK«
Ê«Ë fÐUI«
h׫
—UO²«
pKÝ qšb¹ ô
Æ—UO²« Ãd#$
Ë
ÆÍ—«b'« —UO²«
Ãd#$
Ë√ ¨W¼uH« Ë√ ¨ …UHB*«
jHA« …u* iH#Mð
—dCÐ »UB$UIzUŽË√U¾Oý͉“«
u²K$
U$U9
»u³½« Ë√ jHA« ÂuÞdš
UO−¹—bð
œËb$ jHA«
Èu²$ dOž qJAÐ
×U)« v« pK« V×Ý«
 ≥ ≠ ≤ v« qB¹ v²Š
‰Ušœ« —“ vKŽ jG{«Ë
ÆpK«
dOž pK« Ê« h׫
—dCÐ »UB$ Ë√ Íu²K$
Èu²$ dOž qJAÐ
—UO²« pKÝ qšb¹ ô
U$U9