1
DVD-P390
ﺟﻬﺎﺯ ﺗﺸﻐﯿﻞ ﺩﻱﻓﻲﺩﻱ
ﺩﻟﻴﻞ ﺍﳌﺴﺘﺧﺪﻡ
ﺗﺨﯿّﻞ ﺍﻹﻣﻜﺎﻧﻳﺎﺕ
.ﺷﻜﺭ ﺍﻠﻛﻡ ﻋﻠﻰ ﺸﺮﺍﺀﻫﺫﺍ ﺍﻠﻤﻨﺘﻭﺝ ﻠﺸﺭﻜﺔ ﺴﺎﻤﺴﻭﻨﺞ
ﻠﻼﺴﺘﻤﺗﺎﻉ ﺑﺄﻔﺿﻞ ﺨﺪﻤﺔ,ﻳﺭﺟﻰ ﺗﺴﺠﻳﻝ ﻤﻨﺘﻭﺟﺗﻙ ﻔﻲ
www.samsung.com/global/register
AK68-01770J
ΕΎσΎϴΘΣϻ
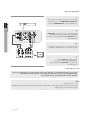
ﺍﻻﺤﺘﻳﺎﻃﺎﺖ
ΩΪϋϹ˺
ιήϘϟ˽
ΕΎϧϮϜϤϟβϳΪϜΗϡΪϋΐΠϳ ٩
ϞϐθϤϟϚϳήΤΗϞΒϗΕΎϧϮϜϤϟϊϴϤΟϞϴϐθΗϑΎϘϳ·ϦϣΪϛ΄Η GGG GG
ΔϳϭΎϤϴϛΩϮϣϰϠϋΞΘϨϤϟάϫϲϓΔϣΪΨΘδϤϟΔϳέΎτΒϟϱϮΘΤΗ
άϬΑΎϬϠϴλϮΗϞΒϗϯήΧϷΕΎϧϮϜϤϟϞϴϐθΗϑΎϘϳ·ϦϣΪϛ΄Η ϞϐθϤϟ
G
G
G
˯ΎϬΘϧϻΪόΑϞϐθϤϟϞϴϐθΗϑΎϘϳ·ϭιήϘϟΝήΧ·ϦϣΪϛ΄Η
G
�
ΓήΘϔϟϪϣΪΨΘγϡΪϋϡΰΘόΗΖϨϛΫ·ΎϤϴγϻϭˬϡΪΨΘγϻϦϣ
GG
G
ΔϠϳϮσ
ΔΌϴΒϟΎΑΓέΎο
GGG
٥
٦
٨
Ύ˱ϳϭΪϳϞΧΪϟϰϟ·ιήϗϷΝέΩϊϓΩϡΪϋΐΠϳ ΔϴΌϴΒϟΕΎϣϮϠόϤϟ˾
˱
ΎϘϓϭˬΔΤϴΤμϟΔϘϳήτϟΎΑΕΎϳέΎτΒϟϦϣκϠΨΘϟϰΟή˵
ϳˬάϟ
ΔϴϠΤϤϟϭΔϴϟϭΪϟϭΔϴϟέΪϴϔϟϦϴϧϮϘϠϟ
GGG
٤
ΔϴϓΎϛΔϳϮϬΗΕΎΤΘϔΑΩϭΰϣϕϭΪϨλϲϓϞϐθϤϟΐϴϛήΘΑϢϗ ϱ΄ΑΔλΎΨϟΔϳϮϬΘϟΕΎΤΘϓΪγϡΪϋΐΠϳϢγ˺˹ϰϟ·̀
˯ϮϬϟϥέϭΪΑΡΎϤδϠϟΕΎϧϮϜϤϟϦϣ
ϦϣιήϘϟϚδϣ
ιήϘϟΕέΎη·τγβϤϟϡΪϋΐΠϳ ϒμΘϨϤϟΎΑΓΩϮΟϮϤϟΔΤΘϔϟϭϑϮΤϟϯΪΣ·
˱
ΔότϗΎ˱ϣΪΨΘδϣδϤϟΎΑΎϘϠτϣϢϘΗϻϭϖϓήΑΔΑήΗϷδϣ
ιήϘϟϕϮϓΎ˱ΑΎϳ·ϭΎ˱ΑΎϫΫεΎϤϗ
GGG
٢
٣
ϲϔϠΨϟ˯ΰΠϟΎΑΩϮΟϮϤϟϒϳήόΘϟϖμϠϣϰϟ·ωϮΟήϟϰΟή˵ϳ ϞϴϐθΘϠϟΔΤϴΤμϟΔϴΘϟϮϔϟΔΟέΩΔϓήόϤϟϞϐθϤϟϦϣ
ΔλΎΨϟεήϟΩϮϣϡΪΨΘγΎΑιήϘϟϒϴψϨΗϡΪϋΐΠϳ ϭϥΎϫΪϟϒϴϔΨΗϞΎγϭϦϳΰϨΒϟϭΕϼϴΠδΘϟδϤΑ
ϲϓΐΒδΘΗΪϗϲΘϟϭϯήΧϷΓήϳΎτΘϤϟΕΎΒϳάϤϟϦϣΎϫήϴϏ
ιήϘϟτδΑϒϠΗΙϭΪΣ
�
GG GGG
˱
ΔϳήϜϓΔϴϜϠϣϕϮϘΤϟΎϘϓϭΔμΧήϣϞϴϟΪϟάϬΑΔϘϓήϤϟΞΘϨϤϟΓΪΣϭ
ϡΪΨΘγϻϰϠϋκϴΧήΘϟάϫήμΘϘϳ
ϯήΧϑήσΕΎϛήθϟΓΩΪΤϣ
GGG
ΕΎϳϮΘΤϤϟϦϣϊϔΘϨϤϟϲΎϬϨϟϞϴϤόϟΔτγϮΑϱέΎΠΘϟήϴϏιΎΨϟ
νήϏϷίΎϬΠϟάϫϡΪΨΘγϻΔΣϮϨϤϣϕϮϘΣΪΟϮΗϻϭ
ΔμΧή˵Ϥϟ
ϩάϫϑϼΨΑϯήΧΞΘϨϣΓΪΣϭϱκϴΧήΘϟάϫϲτϐϳϻ
ΔϳέΎΠΗ
ήϴϏΔϴϠϤϋϭΞΘϨϣΓΪΣϭϱκϴΧήΘϟϞϤθϳϻϚϟάϛϭˬΓΪΣϮϟ
*&&,)ϭ *&&,)ϖΑΎτΗΔμΧήϣ
ϲτϐϳϚϟάϛ
ΔϴϟΎΤϟΞΘϨϤϟΓΪΣϮΑΔϘϓήϣωΎΒΗϡϡΪΨΘδ˵ΗΖϧΎϛ˯Ϯγ
ήϴϔθΗϚϓϭϭήϴϔθΘϟΔϴϟΎΤϟΞΘϨϤϟΓΪΣϭϡΪΨΘγςϘϓκϴΧήΘϟ
ϭ *&&,)ϊϣϖΑΎτΘΗϲΘϟΕϮμϟΕΎϔϠϣ
ΎϤϴϓκϴΧήΘϟάϫΐΟϮϤΑϕϮϘΣϨϣϢΘϳϢϟ
*&&,)
*&&,)ϖΑΎτΗϻϲΘϟϪϔΎχϭϭΞΘϨϤϟΕΰϴϤΑϖϠόΘϳ
*&&,)ϭ
�
�� ���� ���G ����� �������G ������
G ���� ������� ��� �
G � ��� �� �� ���� ���
G ���
G
G
G GG
G ϚΘϣϼδϟ˻
GG
�
G
ήλΎϨϋϡΪΨΘγϱΩΆϳΪϗϭ
έΰϴϠϟωΎόηΞΘϨϤϟάϫϡΪΨΘδϳ
ΎϨϫΔϨϴΒϤϟϚϠΗήϴϏΕ˯ήΟϹ˯ΩϭΕϼϳΪόΘϟϭϢϜΤΘϟ
G
ήϴτΧϞϜθΑωΎόηϺϟνήόΘϟϰϟ·
ϚδϔϨΑΡϼλϹΕΎϴϠϤϋ˯ήΟ·ϭΔϴτϏϷΘϓϡΪϋΐΠϳ ςϘϓϦϴϠϫΆϣϦϴϴϨϔϟΔϧΎϴμϟϝΎϤϋϙήΗ
ϪϴΒϨΗ˼
ΔϴϋΎϨλνήϏϲϓϪϣΪΨΘγϢΘϴϟϞϐθϤϟϢϴϤμΗϢΘϳϢϟ ςϘϓϲμΨθϟϡΪΨΘγϼϟΞΘϨϤϟάϫ
ΔϴϟΰϨϣνήϏϷϦϜϟϭ
� ��� ����� ���� �� ����� ������ ������ ���� ��� ��� ςΒπϟΕΩΪϋ·ϭϢϜΤΘϟέέίϡΪΨΘγϱΩΆϳΪϗϪϴΒϨΗ . ������ ���� ��� ����� ��� ����� ����� ���� ���� �� ���
νήόΘϟϰϟ·ϞϴϟΪϟάϬΑΓΩέϮϟϑϼΨΑΕ˯ήΟ·άϴϔϨΗϭ
ΔϨϛΎδϟ˯ΎΑήϬϜϟϭϕήΒϟΎϛΔϴΟέΎΨϟϞϣϮόϟήΛΆΗϥϦϜϤϳ ήϴτΨϟωΎόηϺϟ ˬΔϠϜθϤϟϩάϫΖϬΟϭΫ·
ϞϐθϤϟάϬϟϲόϴΒτϟϞϴϐθΘϟϰϠϋ
١
١
١
١
١
١
١
١
١
١
١
١
١
٢
٢
٢
٢
٢
٢
٢
٢
٢
٢
٢
έΰϟϰϠϋςϐπϟΎΑϪϠϴϐθΗΪϋϢΛϞϐθϤϟϞϴϐθΗϑΎϘϳΈΑϢϘϓ
ΪϋϢΛΩΩήΘϤϟϲΑήϬϜϟέΎϴΘϟϚϠγϞμϓϭˬ'&.)
ϰϠϋϞϐθϤϟϞϤόϴγ
ΩΩήΘϤϟϲΑήϬϜϟέΎϴΘϟάϔϨϤΑϪϠϴλϮΗ
ϲόϴΒσϮΤϧ
٣
٣
٣
ΕήϴϴϐΗΙϭΪΤϟΔΠϴΘϧϞϐθϤϟϞΧΩϒΛΎϜΗΙϭΪΣΔϟΎΣϲϓ ϮΤϧϰϠϋϞϐθϤϟϞϤόϳϻΎϤΑέˬΓέήΤϟΕΎΟέΩϲϓΓΪϳΪη
ΔΟέΩϲϓϞϐθϤϟϙήΗˬΔϠϜθϤϟϩάϫΙϭΪΣΔϟΎΣϲϓ
ϢϴϠγ
˱
ΎϓΎΟϞϐθϤϟϦϣϲϠΧΪϟ˯ΰΠϟΒμϳϰΘΣΔϓήϐϟΓέήΣ
ϞϤόϠϟΪ˱ όΘδϣϭ
_ﺍﻻﺤﺘﻳﺎﻃﺎﺖ٢
˻
٣
ﻗﺑﻝ ﺑﺪﺀ ﺍﻠﺘﺸﻐﻴﻝ
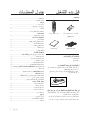
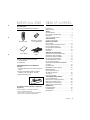
ﺍﻠﻤﻠﺤﻘﺎﺕ
ﺒﻄﺎﺭ ﻴﺎﺕ ﻮ ﺤﺩ ﺓ ﺍﻠﺘﺣﻜﻢ ﻋﻥ ﺑﹸﻌﺩ
ﻮ ﺤﺩ ﺓ ﺍﻠﺘﺣﻜﻢ ﻋﻥ ﺑﹸﻌﺩ
)ﺣﺠﻡ (AAA
ﻜﺎﺑﻝ ﺍﻠﺼﻭﺖ/ﺍﻠﻔﻴﺪﻴﻮ
ﺪﻠﻴﻞ ﺍﻠﻤﺴﺘﺠﺩ ﻡ
ﺍﻠﻤﻠﺣﻗﺎﺕ ﺍﻠﺘﻲﻻ ﻴﺘﻢﺘﻭ ﻓﻴﺮﻫ
• ﻜﺎﺑﻝ ﺍﻠﻤﻜﻭﻦ
• ﻜﺎﺑﻝ ﻀﻭﺌﻲ
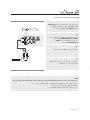
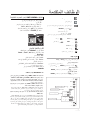
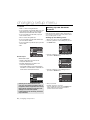
ﺘﺮﻜﻴﺐﺍﻠﺒﺎﺭﻴﺎﺖ ﻔﻲ ﻭﺣﺪﺓ ﺍﻠﺘﺤﻜﻢﻋﻦ ﺑُﻌﺩ
٠١ﺍﻔﺘﺢ ﻏﻃﺎ ﺀ ﺍﻠﺒﻃﺎﺭﻳﺔ ﺍﻠﻤﻮ ﺠﻭﺩ ﺒﺎﻠﺠﺯﺀ ﺍﻠﺨﻠﻓﻲ ﻤﻦﻭﺣﺩﺓ ﺍﻠﺘﺤﻜﻢ ﻋﻦ ﺑُﻌﺩ٠
٠٢ﺮ ﻜﺐ ﺒﻃﺎﺭ ﻴﺘﻴﻦ ﺑﺤﺠﻡ ٠AAA
ﺘﺄﻜﺪ ﻤﻦ ﻤﺣﺎﺫﺍﺓ ﺍﻠﻘﻄﺒﻴﻦ )ﺍﻠﻤﻭﺠﺐ +ﻭﺍﻠﺴﺎﻠﺐ (-ﻋﻠﻰ ﺬﺣﻭ ﺼﺤﻴﺢ٠
٠٣ﺃﻋﺪ ﻏﻃﺎﺀ ﺍﻠﺑﻃﺎﺮﻴﺔ٠
ﻔﻲ ﺤﺎﻠﺔ ﻋﺪﻢ ﺘﺷﻐﻴﻝ ﻭﺣﺩﺓ ﺍﻠﺘﺤﻜﻡ ﻋﻦ ﺑُﻌﺩ ﻋﻰ ﻨﺣﻮ ﺳﻠﻳﻢ:
ﺘﺄﻜﺪ ﻣﻦ ﺼﺤﺔ ﻤﺣﺎﺬﺍﺓ ﺃﻗﻄﺎﺐ ﺍﻠﺑﻂﺎﺭﻴﺎﺕ ﺍﻠﻤﻭ ﺠﺑﺔ ﻭ ﺍﻠﺴﺎﻠﺑﺔ )ﺨﻠﻴﺔ ﺠﺎﻓﺔ(٠ ﺍﻔﺤﺺ ﻠﻠﺘﻜﺪ ﻤﻦ ﻋﺪﻢ ﻨﻔﺎﺪ ﺍﻠﺒﻄﺎﺮﻴﺎﺕ٠ ﺍﻔﺤﺹ ﻠﻠﺘﺄﻜﺪ ﻤﻦ ﻋﺪﻡ ﺍﻨﺳﺪ ﺍﺪ ﻤﺴﺘﺷﻌﺭ ﻭﺤﺪﺓ ﺍﻠﺘﺤﻜﻢ ﻋﻦ ﺑُﻌﺪ ﺑﺎﻠﻌﻭ ﺍﺌﻖ٠ -ﺘﺄﻜﺪ ﻤﻤﺎ ﺇﺫﺍﻜﺎﻦ ﻫﻧﺎﻚ ﺃﻱ ﻤﺼﺪﺮ ﺇﻀﺎﺀﺓﻔﻠﻭﺭ ﺴﻨ ﺑﺎﻠﻘﺮ ﺏ ﻤﻦ ﺍﻠﻭ ﺣﺪﺓ٠
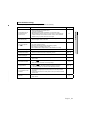
ﺠﺩﻭﻞ ﺍﻠﻤﺤﺗﻭﻴﺎﺕ
ﺍﻻﺤﺘﻳﺎﻃﺎﺖ ٢......................................................................
ﻘﺑﻝ ﺑﺪﺀ ﺍﻠﺘﺷﻐﻳﻝ ٣.................................................................
ﺍﻹﻋﺪﺍﺪ
ﻤﻳﺯﺍﺖ ﻋﺎﻤﺔ ٤.....................................................................
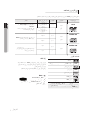
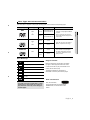
ﻧﻭﻉ ﺍﻠﻘﺮﺺ ﻭ ﺨﺼﺎﺋﺼﻪ٥......................................................
ﺍﻠﻭﺼﻒ ٦..........................................................................
ﺍﺴﺗﻜﺷﺎﻒ ﻭﺤﺩﺓ ﺍﻠﺗﺤﻜﻢ ﻋﻦ ﺑﹸﻌﺩ٨................................................
ﺍﻠﺘﻭﺻﻳﻼﺖ
ﺍﺨﺘﻴﺎﺮ ﺃﺤﺪ ﺍﻠﺘﻭﺼﻴﻼﺖ ٩.........................................................
ﺍﻠﻭﻈﺎﺋﻒ ﺍﻷﺴﺎﺴﻴﺔ
ﺘﺷﻐﻳﻞ ﺍﻠﻘﺭﺺ١٤.................................................................
ﺍﺴﺘﺨﺪﺍﻢ ﻭﻅﻴﻓﺘﻲ ﺍﻠﺑﺤﺚ ﻭﺍﻠﺘﺧﻄﻲ١٥............................................
ﺍﺴﺘﺧﺪﺍﻡ ﻭﻇﻳﻔﺔ ﺍﻠﻌﺭﺾ١٥.......................................................
ﺍﺴﺘﺨﺪﺍﻢ ﻘﺎﺌﻤﺘﻲ ﺍﻠﻌﻧﺎﻭﻳﻦ ١٥......................................................
ﺘﻛﺭﺍﺮ ﺍﻠﺘﺷﻐﻴﻞ١٦.................................................................
ﺍﻠﺗﺷﻐﻴﻞ ﺍﻠﺑﻄﻲﺀ ١٦...............................................................
ﺍﻠﻭﻈﺎﺋﻒ ﺍﻠﺗﻗﺪﻤﺔ
ﺿﺑﻄ ﻨﺴﺒﺔ ﺍﻻﺭ ﺗﻓﺎﻉ ﺇﻠﻰ ﺍﻠﻌﺭﺽ)١٧..........................(EZ VIEW
ﺘﺤﺪﻳﺪ ﻠﻐﺔ ﺍﻠﺻﻭﺖ١٧.............................................................
ﺗﺤﺪﻴﺪ ﻠﻐﺔ ﺍﻠﺗﺮﺟﻤﺔ ﺍﻠﺼﺎ ﺤﺑﺔ١٨.................................................
ﺗﻐﻳﻳﺭﺰﺍﻭﻴﺔ ﺍﻠﻛﺎﻤﻴﺭﺍ ١٨...........................................................
ﺍﺴﺘﺨﺪﺍﻡ ﻭﻅﻳﻔﺔ ﺍﻠﻌﻼﻤﺎﺖ ١٩.....................................................
ﺍﺴﺗﺧﺪﺍﻡ ﻭﻆﻴﻔﺔ ﺍﻠﺗﻛﺑﻴﺭ/ﺍﻠﺘﺼﻐﻳﺭ١٩..............................................
ﻘﺎﺌﻤﺔ ﻤﻘﺎ ﻄﻊ ﻤﻠﻔﺎﺖ /MPEG4/JPEG/WMA/MP3ﻗﺭﺺﺍﻠﻤﺿﻐﻭﻄ ١٩..
ﺗﺤﺪﻴﺩ ﺍﻠﺟﻠﺪ ٢٠....................................................................
ﺘﺸﻐﻴﻞ MP3/WMAﻗﺭﺺ ﺍﻠﺼﻭﺖ ﺍﻠﺿﻐﻭﻄ٢٠............................
ﺘﺸﻐﻴﻞ ٢١............................................................ MPEG4
ﺗﺷﻐﻳﻞ ﻣﻠﻔﺎﺖ ﺍﻠﻭﺳﺎﺋﻄ ﺒﺎﺴﺘﺧﺪﺍﻢ ﻤﻳﺯﺓ ﻤﺿﻴﻒ ٢٢...................... USB
ﺍﻠﻧﺴﺦ ﻤﻦ ﺍﻟﻘﺭﺹ ﺍﻟﻤﹸﺪﻣﹶﺞ٢٣.....................................................
ﺘﺷﻐﻴﻞ ﺍﻠﻘﺭﺺ ﺍﻠﺿﻐﻭﻄ ﺍﻠﺨﺎﺺ ﺑﺎﻠﺻﻭﺭ٢٣...................................
ﺗﻐﻴﻳﺮ ﻗﺎﺋﻣﺔ ﺍﻹﻋﺪﺍﺩ
ﺍﺴﺘﺨﺪﺍﻡ ﻘﺎﺌﻤﺔ ﺍﻹﻋﺪﺍﺪ٢٥.........................................................
ﺇﻋﺪﺍﺪ ﻤﻴﺯﺍﺖ ﺍﻠﻟﻐﺔ٢٥.............................................................
ﺇﻋﺪﺍﺪ ﺧﻳﺎﺭﺍﺖ ﺍﻠﺻﻭﺖ٢٦........................................................
ﺇﻋﺪﺍﺩ ﺨﻴﺎﺭﺍﺖ ﺍﻠﻌﺭﺽ٢٧........................................................
ﺇﻋﺪ ﺗﺤﻜﻢ ﺍﻵ ﺑﺎﺀ٢٨...............................................................
ﺍﻠﺭﺟﻊ
ﺘﺤﺪ ﻴﺚ ﺍﻠﺑﺭﻨﺎﻤﺞ ٣٠..............................................................
ﺍﺴﺘﻛﺷﺎﻒ ﺍﻷﺧﻃﺎﺇﺻﻼ ﺤﻬﺎ٣١...................................................
ﻠﻭﺍﺼﻔﺎﺖ٣٢.......................................................................
ﺍﻠﻌﺭﺑﻴﺔ_ ٣
G
�
٢
ﺍﻹﻋﺩﺍﺩ
● ﺍﻹﻋﺩﺍﺩ
576P
576P
٥
_ ٤ﺍﻹﻋﺩﺍﺩ
٤
¥)f1K
8|G*§I
,|;f¡¼*m*4fG*m*3
8*|E&¸*¢HjªGfkG**§I&¸*ª-MaMÕ+¬{G* .
8*|E&*HªkM
m§Gj)fD,2§/¨< .
8|E¬§ktM fIK C@6L=;=G5@ jª¡-+§MaªG*K
%(
jª+|G*
● ﺍﻹﻋﺩﺍﺩ
)f»*
j7fG*Km§G*)f;K¢HaMaG*aMa³¢Ê j7fG*j)fEÑ1¢HjG§¤+
%(
m§G*9jª¡k+~ªkM§MaªD
8|E §¼*
8|G*m§8K . +,2§/K
m*3jªE4,4f7(f( F§¼*
8|G*ªq-kM 4§Ja-ª-HE&*
M§-KD&*m§8,2§/
lE§G*4K|¯m§G*,2§/
ªkG*¢H~G¨E&¸& * aº*
8|G* q0
m*3
8*|E&ÑGjªE2
a0*§G*¥/§G*
m*3
8*|E&ÑGjªE2
Õ¤/§G*
6
m*3
8*|E&ÑGjªE2
a0*§G*¥/§G*
m*3
8*|E&ÑGjªE2
Õ¤/§G*
6
jªE2
6
jªE2
6
jªE2
6
jªE2
6
8|G* q0
mѪqkG**§I&*
'
m§G*
§MaªG*
'!
m§G*
§MaªG*
&!
m§G*
j¡¼*E4
a+¸Kj¡¼*h0 .
8*|E&*HK
8*|E&*¢HF~ªH|-kM
D*§- a<jGf0·
8|G*ª-¢Ê¨k0:f¡¼*5§H4D*§k-£&*
8|G*ª-kM¢G5§H|G*
jª»*j0§G*¨<¼**{¤Gj¡¼*~H4¨<4§nG*¢ÊK
8|G*mfHÑ<
j¡¼*E4
G3¾((*fHKfªIf¼&*KfI|DK,atk¼*j¼*·($ o+ fI
5@* z?999
D
i
F
D2
2%% D6
2
61
6
1§
1
_>>>0O
_
§ :F.$6DG@B<C?4 FD!
!
vU?
?
?
Q
E
b(
(
٥ _ﺍﻠﻌﺭﺑﻴﺔ
($
«E|G*«gGK2
8|E
§MÎ6*
8|E
«E|G*m§G*
8|E
:F.6BD:7:65 § :F. O6
6
6
M
$%#!
%
$!& ,+
8|E
%(
8|E
¢Ê¸oª0,a0*§G*,|¼*·Da0*K '
8|Ef12(*( ª<hqM
¯-p*a0((*·G3hgkMf¯4Kf¤ª-KÐF*& K&*& Õ8|Ef12*(
'
8*|E&*
ﺍﻹﻋﺩﺍﺩ
ϒλϮϟ
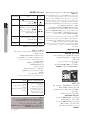
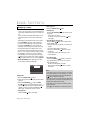
ﺍﻠﻭﺻﻒ
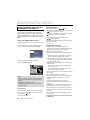
ﺃﺯﺭﺍﺭ ﺗﺤﻜﻢ ﺍﻠﻠﻭﺤﺔ ﺍﻷﻣﺎﻣﻳﺔ
● ﺍﻹﻋﺩﺍﺩ
٥
٦
٤
٢
١
٣
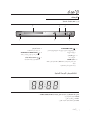
٠٤ﺷﺎﺷﺔ ﺍﻠﻌﺭﺽ
STANDBY/ON ( ) ٠١
ﻴﺘﻢ ﻋﺭﺽ ﻤﺅﺸﺭﺍﺕ ﺍﻠﺘﺸﻐﻴﻞ ﻫﻨﺎ�
فاقيإ/ليغشت متيسو ليغشتلا فاقيإ/ليغشتلاب مق
.لغشملا ليغشت
OPEN/CLOSE/STOP ( ) ٠٥
ﺍﻀﻐﻃ ﻋﻠﻰ ﻫﺫﺍ ﺍﻠﺯﺭ ﻠﻓﺘﺢ ﺪﺭﺝ ﺍﻷﻗﺮﺍﺺ ﻭﺇﻏﻼﻘﻪ�
٠٢ﺪﺭﺝ ﺍﻷﻗﺭﺍﺺ
.ﺿﻊ ﺍﻠﻘﺭ ﺺ ﻫﻨﺎ�
٠٣ﻤﻀﻳﻒ USB
) ٠٦
ﻠﺑﺩﺀﺘﺸﻐﻳﻞ ﺍﻠﻗﺮﺺﺃﻭ ﺇﻴﻘﺎﻒ ﺘﺸﻐﻳﻠﻪ ﻤﺆﻗﺘًﺎ
ﻜﺎﻣﻴﺮﺍ ﺍﻟﺻﻭﺭﺍﺜﺎﺒﺘﺔ ﺍﻠﺭﻗﻤﻳﺔ ﺃﻭ ﻤﺸﻐﻞ MP3ﺃﻭ ﺒﻃﺎﻗﺔ ﺍﻠﺫﺍﻜﺭﺓ ﺃﻭﻘﺎﺭﺉ ﺍﻠﺑﻃﺎﻗﺔ
ﺗﻭﺻﻳﻝ
ﺃﻭ ﻭﺤﺪﺍﺖ ﺍﻠﺘﺨﺯﻴﻥ ﺍﻷﺨﺮﻯ ﺍﻠﻗﺎﺑﻠﺔ ﻠﻺﺯﺍﻠﺔ
ﺷﺎﺷﺔﻋﺭﺾ ﺍﻠﻠﻭﺤﺔ ﺍﻷﻤﺎﻤﻴﺔ
·!ϭ%&!"ϭ"+ϞΜϣΕΎϴϠϤόΑϖϠόΘΗΓΪϳΪϋϞΎγένήόΗϞϴϐθΘϟΖϗϭϲϟΎϤΟ
*
ιήϗϱϝΎΧΩ·ϢΘϳϢϟBC8I
ΡϮΘϔϣιήϗϷΝέΩ&'B
ιήϘϟΕΎϣϮϠόϣϞϴϤΤΘΑϞϐθϤϟϡϮϘϳ#&8
٧
_ ٦ﺍﻹﻋﺩﺍﺩ
˿
( ﺍﻠﺘﺷﻐﻴﻝ/ﺍﻹﻳﻗﺎﻒﺍﻠﺅﻗﺖ
jª»*j0§G*
jª+|G*
● ﺍﻹﻋﺩﺍﺩ
٤
N
١ N ٢N
(
٣
!"! %'!!&%
+fH
&!!&%
+fH
§MaªD12
+f¯*2N K~H5fkG*5f¤/£fF*3*(
+f¼*¦{J awk6*
(
m§G*§MaªG*fgk6*5f¤/K&*5fkGf+m§G*s|1
+f¯ª8§kG
N
N N
%&!!&%
+fH
1 ( (* §MaªD
+f¼*¦{J a-£§H
«gGK2fgk6*5f¤/ª8§kG¢M4§Á*3K&*ffNª)§9ffNªE4 NÑ+fFfH((* awk6*
· CADCB9BG(
+&§MaªG*s|1aMa³¶*3(*( '!!&%
+fE
D*§kH«E4
ak¼*
9*|k6¸*9KªD2*a<((¸*j)fE
5fkG*5f¤q+§MaªDs|1
+f+ª8§kG§MaªD+fF
awk6*
Ô-D5f¤/¨<¬§ktM§MaªDm§8wHª8§kG awk-
j)fE· CADCB9BG!
+&§MaG*s|1aMa³¶*3(*( K&*+
.=89C¨<2*a<(¸
hqM
( *j)fE·§MaªG*s|1g9
«E4«gGK2K&*%(K&
* ,+
(
1*ak¼*
9*|k6¸*9KªD2*a<((¸*
CADCB9BG!
+&
(
(
N
٣
٢
%&!!&%
+fH
«gGK2fgk6*5f¤/ª8§kG¢M4§Á*3K&*ffªN )§9ffªE4
N NÑ+fFfH((* awk6*
D*§kH«E4
Ô-D5f¤/¨<¬§ktM§MaªDm§8wHª8§kG awk-
(
(
«E4«gGK2K&
*%(K&* ,+
(
(
(
٤
(
(
N
gH
$'!!&%
(
N
+
.=89C
g¯
g¼**{Jª8§kG+
.=89C+fF awk6*(
(
(
¨<&*,4§8,2§/¨<§tG5fkG*5f¤q+
(
(
+
.=89C ¨<2*a<&¸*j)fE·§MaªG*s|1g9hqM
( (
(
(
j0ÑH
(
(
(
(
(
m*2f74((*g-* ak¼*
9*|k6¸*ª<a-jGf0·¸ &* ak¼*
9*|k6¸*<aM awk¼*5fkG*£fF*3
(*fHjD|¼5fkG* awkHªG2¾
(*§/|G*«g¡M (
(
˻˿ (
(
( ( 5fkG*)*§E fI· ak¼*
9*|k6¸*m*2*a<((f+kMfªD5fkG* awkHªG2
( (
˻̀ ( aMa³¶*3(* ¸
( *j)fE *awk6*jªªF§0mfH§¼*¢HaM~¼*¨<§tG
M mftG*|I*
+
.=89CK .=89C2*a<(
¸
( *j)fE·CADCB9BG (
+& .=89C'HGDHG
˺́
٢٦~٢٧
(
( M¢D2*a<(
2*a<(¸
( *j)fE *awk6*jªªF§0mfH§¼*¢HaM~¼*¨<§tG M mftG*|I* j0ÑH
¸ &* ak¼*
9*|k6¸*<aM awk¼*5fkG*£fF*3((*fHjD|¼5fkG* awkHªG2¾(*§/|G*«g¡M 5fkG*)*§E fI· ak¼*
9*|k6¸*m*2*a<((f+kMfªD5fkG* awkHªG2
˻˿
˻̀
¸
( *j)fE *awk6*jªªF§0mfH§¼*¢HaM~¼*¨<§tG
89C2*a<(
M¢D2*a<(
¸
( *j)fE·CADCB9BG (
+& .=89C'HGDHG
aMa³¶*3(* ˺́ M mftG*|I*
2*a<(¸
( *j)fE *awk6*jªªF§0mfH§¼*¢HaM~¼*¨<§tG M mftG*|I* ٦
١
٧ _ﺍﻠﻌﺭﺑﻴﺔ
(
ﺍﻹﻋﺩﺍﺩ
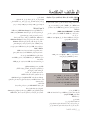
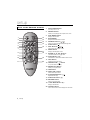
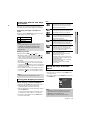
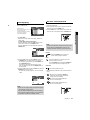
Ϊό˵ΑϦϋϢϜΤΘϟΓΪΣϭϑΎθϜΘγ
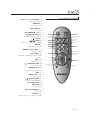
�١ﺍﻠﺯﺭ POWERﻠﺷﻐﻝ ﺃﻗﺮﺍﺺ DVD
ﻠﺘﺸﻐﻴﻝ ﺍﻠﻭ ﺤﺩﺓ ﺃﻭ ﺇﻴﻗﺎﻒ ﺘﺷﻐﻴﻠﻬﺎ�
�٢ﺯﺭ REPEAT
ﻔﺻﻞ ﺃﻭ ﻤﺎﺪﺓ ﻤﺴﺠﻠﺔ ﺃﻭ ﻘﺮﺺ�
�٣ﺯﺭ DISC MENU
ﻹﻅﻬﺎﺮ ﻗﺎﺌﻤﺔ ﺍﻻﻗﺭ ﺍﺺ�
١٢
١٣
١
٢
١٤
٣
٤
١٥
١٦
٥
٦
١٧
١٨
٨
٧
٩
١٩
١٠
٢٠
١١
�٤ﺯﺭ ﺍﻠﻌﻼﻤﺔ BOOKMARK
�٥ﺯﺭﺍ ) SEARCH
/
(
ﻴﺘﻴﺤﺎﻥ ﻠﻚ ﺍﻠﺒﺤﺚ ﺇﻠﻰ ﺍﻷﻤﺎﻢ/ﻠﺨﻠﻒ ﺨﻼﻞ ﺍﻠﻗﺮﺹ�
�٦ﺯﺭ ) STOP
(
�٧ﺯﺭﺍ ) SKIP
/
(
ﻴﺴﺘﺨﺩﻤﺎﻥ ﻠﺘﺨﻃﻲ ﺍﻠﻌﻨﻭ ﺍﻦ ﺃﻭ ﺍﻠﻔﺻﻝ ﺃﻭ ﻠﻤﺎﺪﺓ ﺍﻠﻤﺴﺠﻠﺔ�
�٨ﺯﺭ MENU
ﻹﻇﻬﺎﺮ ﻘﺎﺌﻤﺔ ﻤﺷﻐﻞ ﺃﻘﺮﺍﺺ �DVD
�٩ﺃﺯﺭﺍﺭ ®ENTER /π/†,√/
ﻴﻌﻤﻝ ﻫﺫﺍ ﺍﻠﺯﺭ ﻜﻤﻓﺘﺎﺡ ﺘﺒﺪﻴﻝ�
�١٠ﺯﺭ (√) AUDIO
ﺍﺴﺗﺧﺪﻡ ﻫﺫﺍ ﺍﻠﺯﺮ ﻠﻠﻭﺻﻭﻞ ﺇﻠﻰ ﻭﻅﺎﺌﻒ ﺍﻠﺼﻭﺖ ﺍﻠﻤﺘﻌﺩﺩﺓ ﺍﻠﻤﻭﺠﻭﺪﺓ�
ﻋﻠﻰ ﺍﻠﻗﺮﺺ�
�١١ﺯﺭ INFO
ﻠﻌﺭﺽ ﻭﺿﻊ ﺍﻠﻗﺮﺺ ﺍﻠﺤﺎﻠﻲ�
�١٢ﺯﺭ ) OPEN/CLOSE
(
ﻠﻔﺗﺢ ﺪﺭﺝ ﺍﻷﻘﺮﺍﺺ ﻭ ﺇﻏﻼﻗﻪ�
�١٣ﺯﺭ REPEAT A-B
ﻴﺴﺘﺧﺩﻢ ﻠﺘﻜﺭ ﻴﺭﺍﻠﻌﺭ ﺾ ﺑﻳﻦ Aﻭ Bﻓﻲ ﺍﻠﻘﺭﺺ�
�١٤ﺯﺭ USB
�١٥ﺍﻠﺯﺭ VIDEO SEL.
ﻠﺘﻐﻴﻴﺮ ﻭﻀﻊ ﺧﺭﺝ ﺍﻠﻔﻳﺪﻴﻭ�
�١٦ﺯﺭ ) PLAY/PAUSE
(
ﻠﺒﺩﺀ ﺍﻠﺗﺸﻐﻴﻞ/ﺇﻴﻗﺎﻒ ﺍﻠﺗﺷﻐﻳﻞ ﺍﻠﻣﺆ ﻗﺖ ﻟﻠﻗﺮﺹ�
�١٧ﺯﺭ (π) SUBTITLE
�١٨ﺯﺭ RETURN
ﻟﻠﺭﺠﻭﻉ ﺇﻟﻰ ﻗﺎﺋﻤﺔ ﺴﺎﺒﻗﺔ�
�١٩ﺯﺭ (®) TITLE MENU
ﻻﻅﻬﺎﺮ ﻗﺎﺋﻤﺔ ﺍﻠﻌﻨﺎﻭﻴﻦ.
�٢٠ﺯﺭ CANCEL
ﺍﺴﺘﺧﺩﻢ ﻫﺬﺍ ﺍﻠﺯﺮﻹﺨﻔﺎﺀ ﺍﻟﻘﻮ ﺍﺋﻡ ﺃﻮ ﻋﺮﻮﺾ ﺍﻠﺤﺎﻟﺔ ﻤﻦ ﺍﻠﺸﺎﺸﺔ�
٩
_ ٨ﺍﻹﻋﺩﺍﺩ
٨
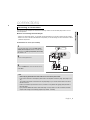
ﺍﻟﺘﻭﺻﻴﻼﺖ
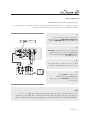
L|1&¸*mfI§¼*K5fkG*5f¤q+ .
8*|E&*Hª8§kG *awk6¸*j)f7mѪ8§-jªGfkG*jnH&¸*
9|-
'
8*|E&*& ¯ª8§kG*gE
f¤DK&*mÑ+fF¬&*ª8§-gEL|1&¸*mfI§¼*K5fkG*K .
8*|E&*Hª-fM(*¢Hf
*( ¢HfN )*2aF&f- *¢Hf)*2aF&
j8f»*mfI§¼*-§0mfH§¼*¢H aP M~H¨<§tGf¤ª8§k+ §-«kG*jªDf9(¸*mfI§G awk¼*ªG2¾*§/|G*¨/|M
*( §/|G*¨/|R *§/|G*¨/|
§MaªG5f-5f¤q+ª8§kG*
ΔϴΑήόϟ
ﺍﻟﺘﻭﺻﻴﻼﺖ
● ﺍﻹﻋﺩﺍﺩ
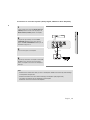
*( ﺇﺣﺩﻯ ﺍﻟﺗﻮﺼﻴﻼﺖ4fªk1*
ﺍﺨﺘﻴﺎﺮ
'!ª8§kG*·|:ª8§k+E§MaªG*m§G*mÑ+fF *awk6f+
8*|E&*H¢H«»*$~¹f+ |0&¸& *K
ª+¸& * AUDIO
&!!&%|8&¸& *
|0&¸& *K
ª+¸& * &! |8&¸& * '!ª8§-·|:.
5fkG*5f¤q+
ﺍﻷﺒﻴﺾ
ﺍﻷﺣﻣﺭ
ﺍﻷﺻﻔﺭ
ﻜﺎﺒﻞ ﺍﻠﺼﻭﺖ
ﺍﻷﺣﻣﺭ
ﺍﻷﺒﻴﺾ
5fkG*K.
8*|E&*Hªk+E
ﻛﺎﺒﻞ ﺍﻟﻓﻴﺪﻴﻭ
ﺍﻷﺻﻔﺭ
aMatkG5fkG*5f¤¹a
R+¢<tkG*,a0§+
aMatkG5fkG*5f¤¹a+¢<tkG*,a0§+
aMatkG5fkG*5f¤¹a
+¢<tkG*,a0§+ %''!4~G*¨<9*
+¢<tkG*,a0§+
'4/09
*(
M§-patMaE
ΔψΣϼϣ
*( ¢HmftG*|I*m§G*wHª8§-jt8¾
*( §/|G*¨/|RªDm§8w¯ª8§kG*m24&**3( *§/|G*¨/|ªDm§8w¯ª8§kG*m24&
*§/|G*¨/|
ϲΑήϬϜϟέΎϴΘϟϞΑΎϛϦϣΏήϘϟΪϳΪηΕϮμϟϞΑΎϛϥΎϛΫ·ζϳϮθΗΙΪΤϳΪϗ
*
*§/|G*¨/|M5fkG*5f¤/h0f¤9§HKª8§kG**|:&
*§/|G*¨/|
(
§/|G*¨/|
M
5fkG*5f¤/h0f¤9§HKª8§kG**|:&
*2a<kwM R
ϴϓˬΕϮλϢΨπϤΑϞϴλϮΘϟΕΩέΫ·
˺˾ϰϟ·˺˽ϦϣΕΎΤϔμϟήψϧ
ΕϮμϟϢΨπϣϞϴλϮΗΔΤϔλϰϟ·ωϮΟήϟϰΟή˵
١٢ ﺇﻠﯽ١٣
ίΎϔϠΘϟΎΑιΎΨϟϡΪΨΘδϤϟϞϴϟΩϰϟ·ωϮΟήϟϰΟή˵ϳ
ίΎϔϠΘϟίΎϬΟΐδΣΎϬόοϮϣϭϞϴλϮΘϟϑήσΩΪϋϒϠΘΨϳ ΩϮΟϮϤϟξϴΑϷ2ήδϳϷ42, &&,+4ϞϴλϮΗϑήτΑϪϠϴλϮΘΑϢϗˬίΎϔϠΘϟίΎϬΠΑΪΣϭΕϮλϞΧΩϞϴλϮΗϑήσΩϮΟϭΔϟΎΣϲϓ -ιήϗϞϐθϤΑ
ϊοϮϟήϴϐΘϳˬιήϗϱϝΎΧΩ·ϡΪϋΔϟΎΣϲϓϭϒϗϮΘϟϊοϭϲϓ-ϞϐθϣϥϮϜϳΎϣΪϨϋ- &*#έίϰϠϋςϐπϟΔϟΎΣϲϓ P-SCANI-SCANĸCOMPOSITE/S-VideoϲϟΎΘϟϞδϠδΘϟΎΑϮϳΪϴϔϟΝήΧ
P-SCAN : I-SCAN
=ϭDϰϠϋ$ ΝήΧΔϗΩςΒοΔϟΎΣϲϓ*-=89CΝήΧϡΪΨΘγέάόΘϳ =ϭDϰϠϋ$ ΝήΧΔϗΩςΒοΔϟΎΣϲϓCADCB9BHϭ-=89C*-=89CΝήΧϡΪΨΘγέάόΘϳ ٩ _ﺍﻠﻌﺭﺑﻴﺔ
ﺍﻟﺘﻭﺻﻴﻼﺖ
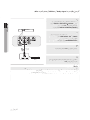
ϞΧΪΗίΎϔϠΗίΎϬΠΑϞϴλϮΘϟ
˯Ύϗέίϭ0˯ΎπϴΑϭ˯ΩϮγΕέΎη·ϰϟ·ΓέϮμϟήμϨϋϥϮϜϤϟϮϳΪϴϓϞμϔϳ
ΔϘϴϗΩϥϮϟϭΔϘΎϓΓΩϮΟΕΫέϮλΓΪϫΎθϤΑϊΘϤΘδΗϑϮγ ΕϮμϟΝήΧϝϼΧΕϮμϟΕέΎη·ΝήΨΗ
ΔϴϘϧϭΔΤοϭέϮλϢϳΪϘΘϟ')˯ήϤΣϭ'
● ﺍﻟﺘﻭﺻﻴﻼﺖ
CADCB9BHϮϳΪϴϔϟΕϼΑΎϛϡΪΨΘγΎΑίΎϔϠΗίΎϬΠΑϞϴλϮΘϟ ˺
ϞϴλϮΗϑήσϞϴλϮΘΑϢϗˬϥϮϜϤϟϮϳΪϴϓΕϼΑΎϛϡΪΨΘγΎΑ
ϞϐθϤϟϲϔϠΨϟ˯ΰΠϟΎΑΩϮΟϮϤϟ!"! &(!!'&
ίΎϔϠΘϟίΎϬΠΑ!"! & ϞϴλϮΗϑήτΑ-ιήϗ
˻
ﺍﻷﺒﻴﺾ
ﺍﻷﺯﺮﻖ
ﺍﻷﺧﺿﺮ
ﺍﻷﺣﻣﺭ
'!!'&ϞϴλϮΗϲϓήσϞϴλϮΘΑϢϗˬΕϮμϟΕϼΑΎϛϡΪΨΘγΎΑ
ϲϓήτΑ-ιήϗϞϐθϣϦϣϲϔϠΨϟ˯ΰΠϟΎΑήϤΣϷϭξϴΑϷ
ϞϴϐθΘΑϢϗ
ίΎϔϠΘϟίΎϬΠΑήϤΣϷϭξϴΑϷ'! ϞϴλϮΗ
ίΎϔϠΘϟϭ-ιήϗϞϐθϣ
ﺍﻷﺣﻣﺭ
ﻜﺎﺑﻝ ﺍﻟﻤﻜﻮﻥ
ﻜﺎﺒﻞ ﺍﻠﺼﻭﺖ
ﺍﻷﺣﻣﺭ
ﺍﻷﺒﻴﺾ
ﺍﻷﺣﻣﺭ
ﺍﻷﺯﺮﻖ
ﺍﻷﺧﺿﺮ
˼
ϰΘΣϥϮϳΰϔϴϠΘϟΎΑΔλΎΨϟΪόΑϦϋϢϜΤΘϟΓΪΣϮΑϞΧΪϟΩΪΤϣϰϠϋςϐο
ϥϮϳΰϔϴϠΘϟΔηΎηϰϠϋ-ϞϐθϣϦϣΓέΩΎμϟϥϮϜ˵ϤϟΓέΎη·ήϬψΗ
˽
ΔϤΎϗϲϓI-SCANϰϠϋϮϳΪϴϔϟΝήΧςΒο
˻̂ϰϟ·˻
٢٨ ﺇﻠﯽ٢٧̀ϦϴΘΤϔμϟήψϧ$ISPLAY3ETUP
ϮϳΪϴϔϟΝήΧϊοϭήϴϴϐΗϲϓ(!%έΰϟϡΪΨΘγϦϜϤϳ
̂ΔΤϔμϟϰϟ·ϊΟέ
ΔψΣϼϣ
١٢ ﺇﻠﯽ١٣
ϰϟ·ϦϣΕΎΤϔμϟήψϧ
ΕϮμϟϢΨπϣϞϴλϮΗΔΤϔλϰϟ·ωϮΟήϟϰΟή˵
ϴϓˬΕϮλϢΨπϤΑϞϴλϮΘϟΕΩέΫ· ˱
0ˬ'ϰϟ·ϦϣΕΎΤϔμϟήψϧ
ΕϮμϟϢΨπϣϞϴλϮΗΔΤϔλϰϟ·ωϮΟήϟϰΟή˵
ˬ')ϦϣϻΪΑ0ˬ6ˬFϭ0ˬ0ˬ)0ΕΎϣϼόϟΎΑίΎϔϠΘϟίΎϬΠΑιΎΨϟϥϮϜϤϟϞϴλϮΗϑήσΰϴϴϤΗϦϜϤϳ
ϴϓˬΕϮλϢΨπϤΑϞϴλϮΘϟΕΩέΫ·
˱
ίΎϔϠΘϟΎΑιΎΨϟϡΪΨΘδϤϟϞϴϟΩϰϟ·ωϮΟήϟϰΟή˵
ϳ ίΎϔϠΘϟίΎϬΟΐδΣΎϬόοϮϣϭϞϴλϮΘϟϑήσΩΪϋϒϠΘΨϳ
ΔόϨμϤϟΔϬΠϠϟΎϘϓϭ
˱
0ˬ'ˬ')ϦϣϻΪΑ0ˬ6ˬFϭ0ˬ0ˬ)0ΕΎϣϼόϟΎΑίΎϔϠΘϟίΎϬΠΑιΎΨϟϥϮϜϤϟϞϴλϮΗϑήσΰϴϴϤΗϦϜϤϳ
=ˬ'ϰϠϋ$ ΝήΧΔϗΩςΒοΔϟΎΣϲϓ*-=89CΝήΧϡΪΨΘγέάόΘϳ
=ˬ'ϰϠϋ$ ΝήΧΔϗΩςΒοΔϟΎΣϲϓCADCB9BHϭ-=89C*-=89CΝήΧϡΪΨΘγέάόΘϳ _ﺍﻟﺘﻭﺻﻴﻼﺖ١٠
˺˺
١
٠
ϡΪϘΘϣίΎϔϠΗίΎϬΠΑϞϴλϮΘϟ
● ﺍﻟﺘﻭﺻﻴﻼﺖ
˺
ϞϴλϮΗϑήσϞϴλϮΘΑϢϗˬΔϘϓήϣήϴϏϥϮϜϤϟϮϳΪϴϓΕϼΑΎϛϡΪΨΘγΎΑ
ϞϐθϤϟϲϔϠΨϟ˯ΰΠϟΎΑΩϮΟϮϤϟ!"! &(!!'&
ίΎϔϠΘϟίΎϬΠΑ!"! & ϞϴλϮΗϑήτΑ-ιήϗ
˻
ﺍﻷﺒﻴﺾ
ﺍﻷﺯﺮﻖ
ﺍﻷﺧﺿﺮ
ﺍﻷﺣﻣﺭ
'!!'&ϞϴλϮΗϲϓήσϞϴλϮΘΑϢϗˬΕϮμϟΕϼΑΎϛϡΪΨΘγΎΑ
ϲϓήτΑ-ιήϗϞϐθϣϦϣϲϔϠΨϟ˯ΰΠϟΎΑήϤΣϷϭξϴΑϷ
ϞϐθϣϞϴϐθΘΑϢϗ
ίΎϔϠΘϟίΎϬΠΑήϤΣϷϭξϴΑϷ'! ϞϴλϮΗ
ίΎϔϠΘϟϭ-ιήϗ
ﺍﻷﺣﻣﺭ
ﻜﺎﺑﻝ ﺍﻟﻤﻜﻮﻥ
ﻜﺎﺒﻞ ﺍﻠﺼﻭﺖ
ﺍﻷﺣﻣﺭ
ﺍﻷﺒﻴﺾ
ﺍﻷﺣﻣﺭ
ﺍﻷﺯﺮﻖ
ﺍﻷﺧﺿﺮ
˼
ϰΘΣϥϮϳΰϔϴϠΘϟΎΑΔλΎΨϟΪόΑϦϋϢϜΤΘϟΓΪΣϮΑϞΧΪϟΩΪΤϣϰϠϋςϐο
ϥϮϳΰϔϴϠΘϟΔηΎηϰϠϋ-ϞϐθϣϦϣΓέΩΎμϟϥϮϜϤϟΓέΎη·ήϬψΗ
˽
ΔϤΎϗϲϓ0-SCANϰϠϋϮϳΪϴϔϟΝήΧςΒο
˻̂ϰϟ·˻
٢٨ ﺇﻠﯽ٢٧̀ϦϣΕΎΤϔμϟήψϧ$ISPLAY3ETUP
ϮϳΪϴϔϟΝήΧϊοϭήϴϴϐΗϲϓ(!%έΰϟϡΪΨΘγϦϜϤϳ
̂ΔΤϔμϟϰϟ·ϊΟέ
ˬϡΪϘΘϤϟϮϳΪϴϔϟΝήΧνήόϟ
νήόΘγϻϢϋΪϳίΎϔϠΘϟϥΎϛΫ·ϭϻϡϡΪϘΘϤϟνήόΘγϻϢϋΪϳϡΪΨΘδϤϟίΎϔϠΘϟϥΎϛΫ·ΎϣΔϓήόϤϟίΎϔϠΘϟϡΪΨΘδϣϞϴϟΩϰϟ·ωϮΟήϟϲϐΒϨϳ ίΎϔϠΘϟϡΎψϧΔϤΎϗϲϓϡΪϘΘϤϟνήόΘγϻΕΩΪϋΈΑϖϠόΘϳΎϤϴϓίΎϔϠΘϟϡΪΨΘδϣϞϴϟΩϲϓΓΩέϮϟΕΎϤϴϠόΘϟϊΒΗΎϓˬϡΪϘΘϤϟ
ϩϼϋϲΤϴοϮΘϟϞϜθϟϦϋϞϴλϮΘϟΔϘϳήσϒϠΘΨΗΪϗˬίΎϔϠΘϟίΎϬΠϟΎϘϓϭ ΔψΣϼϣ
ˮϡΪϘΘϤϟνήόΘγϻϮϫΎϣ ΔϘϳήσϚΤϨϤΗϥϦϜϤϳ
ϞΧΪΘϟΝήΧΔϘϳήτΑΔλΎΨϟνήόΘγϻρϮτΧϒόονήόΘγρϮτΧϦϤπΘϳϪϧ΄ΑϡΪϘΘϤϟνήόΘγϻΰϴϤΘϳ ϞπϓϭοϭΓέϮλΓΩϮΟϡΪϘΘϤϟνήόΘγϻ
=ˬ'ϰϠϋ$ ΝήΧΔϗΩςΒοΔϟΎΣϲϓ *-=89CΝήΧϡΪΨΘγέάόΘϳ ١١ _ﺍﻠﻌﺭﺑﻴﺔ
˺˻
ˮ"˰ΑΩϮμϘϤϟΎϣ D
ϡΎψϧϦϋΓέΎΒϋϕΎτϨϟϲϟΎϋϲϤϗήϟϯϮΘΤϤϟΔϳΎϤΣ'ϥ·
ΚϴΤΑ- ήΒϋΎϬΟήΧ·ϢΘϳϲΘϟ-ΕΎϳϮΘΤϣΔϳΎϤΤϟϡΪΨΘδϳ
˱
ϮϳΪϴϓέΪμϣϦϴΑΎϨ˱ ϣΎ˱ϴϤϗέϻΎμΗϡΎψϨϟάϫήϓϮϳϭ
ΎϬΨδϧϢΘϳϻ
ΔϟϭϥϮϳΰϔϴϠΘϟνήόϟίΎϬΟϭϚϟΫϰϟ·Ύϣϭ-ϭήΗϮϴΒϤϜϟ
ϊϨϤϟέΪμϤϟίΎϬΠϟϲϓϯϮΘΤϤϟήϴϔθΗϢΘϳϭ
ϚϟΫϰϟ·Ύϣϭνήόϟ
ΔμΧήϣήϴϏΦδϧ˯Ύθϧ·
ΕϮμϟϭϮϳΪϴϔϟΕΎϧΎϴΒϟϲϤϗήϟϞϘϨϟΎΑϤδΗΔϬΟϭϦϋΓέΎΒϋ$
ςϘϓΪΣϭϞλϮϣϡΪΨΘγΎΑ
ϮϳΪϴϓϭΕϮλΓέΎη·-ϞϐθϣϞϘϨϳˬ$ ϡΪΨΘγϝϼΧϦϣ
ϞΧΩβΒϘϤΑΩϭΰϤϟϥϮϳΰϔϴϠΘϟϰϠϋΔϴϫίΓέϮλνήόϳϭΔϴϤϗέ
$
ΔϠλϭϒλϭ D
ﺍﻟﺘﻭﺻﻴﻼﺖ
ϮϳΪϴϓΕΎϧΎϴΑϭΔϴϤϗέΕϮλΕΎϧΎϴΑϦϋΓέΎΒϋΎϤϫϼϛ$ ϞλϮϣ ΖΒϟΕΪΣϭϖϓΪΗΕΎϧΎϴΑϭ#'$ΔσϮϐπϣήϴϏ
ϞϐθϤϟΝήΨ˵ϳˬ$ ϞΑΎϛϡΪΨΘδϳϞϐθϤϟϥϦϣϢϏήϟϰϠϋ ϥϮϳΰϔϴϠΘϟϰϟ·ςϘϓΔϴϘϧΔϴϤϗέΓέΎη·
ΕϮϨϘϟϲΎϨΛΕϮλϢΨπϣΕϮλϡΎψϨΑϞϴλϮΘϟ
ϲϟΎϋϲϤϗήϟϯϮΘΤϤϟΔϳΎϤΣ'ϢϋΪϳϻϥϮϳΰϔϴϠΘϟϥΎϛΫ·ϭ
ΔηΎθϟϰϠϋϥϮϠϟξϴΑζϳϮθΗήϬψϳˬϕΎτϨϟ
˺
'!!'&ϞϴλϮΗϲϓήσϞϴλϮΘΑϢϗˬΕϮμϟΕϼΑΎϛϡΪΨΘγΎΑ
ϲϓήτΑ-ιήϗϞϐθϣϦϣϲϔϠΨϟ˯ΰΠϟΎΑξϴΑϷϭήϤΣϷ
ΕϮμϟϢΨπϤΑξϴΑϷϭήϤΣϷ'! ϞϴλϮΗ
ﺍﻟﺘﻭﺻﻴﻼﺖ
jª+|G* ●
jª+|G*
ϰϠϋϭ
ΔϳήχΎϨΗΕϮλϮϳΪϴϓΓέΎη·ΔϳήχΎϨΘϟϥϮϳΰϔϴϠΘϟΓΰϬΟΐϠτΘΗ
ϢΘϳϲΘϟΕΎϧΎϴΒϟϥΈϓˬ-ιήϗΪΣϞϴϐθΗΪϨόϓˬϚϟΫϦϣϢϏήϟ
ϝϮΤϣϡΪΨΘγϦϴόΘϳϢΛϦϣϭ
ΔϴϤϗέΕΎϧΎϴΑϥϮϜΗϥϮϳΰϔϴϠΘϟϰϟ·ΎϬϠϘϧ
ϲϤϗέϰϟ·ϱήχΎϨΗϝϮΤϣϭ-ϞϐθϣϲϓϱήχΎϨΗϰϟ·ϲϤϗέ
ΐΒδΑΓέϮμϟΓΩϮΟϯΩήΘΗˬϞϳϮΤΘϟΔϴϠϤϋ˯ΎϨΛ
ϥϮϳΰϔϴϠΘϟϲϓ
ϻΎϬϧ·ΚϴΣϞπϓϷϲϫ- ΔϴϨϘΗΪόΗ
ΓέΎηϹϥΪϘϓϭζϳϮθΘϟ
ϰϟ·ϞϐθϤϟϦϣΔϴϘϧΔϴϤϗέΓέΎη·ϞϘϨΗϭϱήχΎϨΗϲϤϗέϞϳϮΤΗΐϠτΘΗ
ϥϮϳΰϔϴϠΘϟ
˻
ﺍﻷﺒﻴﺾ
ϞϴλϮΘϟϑήσϞϴλϮΘΑϢϗˬϮϳΪϴϔϟΕέΎη·ΕϼΑΎϛϞΑΎϛϡΪΨΘγΎΑ
ϲϔϠΨϟ˯ΰΠϟΎΑ!"! &!'&ϭ(!
ϭ(!ϞϴλϮΗϑήτΑ-ιήϗϞϐθϣϦϣ
ίΎϔϠΘϟίΎϬΠΑ!"! &
ﺍﻷﺣﻣﺭ
˼
ΕϮμϟϢΨπϣϭίΎϔϠΘϟϭ-ιήϗϞϐθϣϞϴϐθΘΑϢϗ
ﻜﺎﺒﻞ ﺍﻠﺼﻭﺖ
ﺍﻷﺣﻣﺭ
ﻤﺿﺧﻡ ﺍﺴﺘﺮﻴﻭ ﺜﻧﺎﺌﻲ ﺍﻠﻘﻧﻮﺍﺕ
ﺍﻷﺒﻴﺾ
˽
ϞΧΪϟΪϳΪΤΘϟΕϮμϟϢΨπϤΑιΎΨϟϞΧΪϟΪϳΪΤΗέίϰϠϋςϐο
-ϞϐθϣϦϣΕϮμϟωΎϤδϟϲΟέΎΨϟ
ΔψΣϼϣ
ϥΫϷϰϠϋήϴΛ΄ΘϟϭΕΎϋΎϤδϟϒϠΗΙϭΪΣΊΟΎϔϤϟΕϮμϟωΎϔΗέΐΒδϳΪϘϓΕϮμϟϢΨπϣϞϴϐθΗΪϨϋΕϮμϟϯϮΘδϣξϔΧϰΟή˵ϳ ˱
ϘϓϭΔϤΎϘϟΔηΎηϲϓΕϮμϟςΒοϰΟή˵
ϳ (٢٧ ̀˻ ﺇﻠﯽϦϣΕΎΤϔμϟήψϧ
ΕϮμϟϢΨπϤϟΎ
٢٦)
ΕϮμϟϢΨπϣΐδΣϞϴλϮΘϟϑήσϊοϮϣϒϠΘΨϳ ΕϮμϟϢΨπϤΑιΎΨϟϡΪΨΘδϤϟϞϴϟΩϰϟ·ωϮΟήϟϰΟή˵ϳ _ﺍﻟﺘﻭﺻﻴﻼﺖ١٢
١
m*§¡G*«)f¡.m§8wHm§8 f¡+ª8§kG*
%$ m§G*wHK&* "
K&* 96-B/424=,6m§8 f¡+ª8§kG*
٢
ﺍﻟﺘﻭﺻﻴﻼﺖ
jª+|G* ●
jª+|G*
&!!&% ª8§-·|:ª8§k+Em§G*mÑ+fF *awk6f+
m§G*w %
ª8§-·|+ .
8*|E&*H¢H«»*$~¹f+
ª+&¸& *K|0¸& *
|:ª8§k+DD|HÔ=¢M4§Á*3NÑ+fF awk-l¡F*3(*
ª8§-|:ª8§k+DD|HÔ=«)§G*+fG* awk-l¡F*3(
m§G*w¯
ª+&
¸& *K |0&¸& * &!
!)
ª8§-
2§/§¼* %&!!&%
!"%
«»*$~¹f+2§/§¼*
%&!!&%
ª8§-|+
.
8*|E&
*¼«»*$~¹f+
&! !"%ª8§-|+ .
8*|E&*¼
IN (COAXIAL)
m§G*w¼ %&!
m§G*w¼
%
|:ª8§k+DD|HÔ=¢M4§Á*3NÑ+fF awk-l¡F*3(*
2§/§¼* %&!!&%!) ª8§ª8§kG**|:&*ª8§k+E§MaªG*m*4f7(
(*mÑ+fF+fF *awk6f+
ª8§-|+.
8*|E&
*¼«»*$~¹f+
«»*
$~¹f+
!"!
*( mÑ+fF+fF *awk6f+
%!&%
K&* '!
IN (COAXIAL)
m§G*w¼
%&!
ª8§kG**|:&
*ª8§k+E§MaªG*m*4f7(
ª8§kG**|:
ª8§kG**|:&
*ª8§k+E§MaªG*m*4f
K&
*
'!
ª8§-|+
.
8*|E&
*H¢H
$~¹f+ !"!
%!&%
K&
*
$'!
K&
*
$
$~¹f+ !"! %!&% K '!
5fkG*5f¤q+
!"!
8*|E*H¢H
%
K&ª8§kG**|:
* '!ª8§-|+
.
8*|E&*H¢H«»*
K* '
ª8§-|
5fkG*5f¤q+2§/§¼*
!"!
%!&%
K&
*
$'!
5fkG*5f¤q+2§/§¼* !"! %!&%
ª8§kG**|:&*ª8§k+E§MaªG*m*4f7(*( mÑ+fF+fF *awk6f+
$~¹f+ !"! %!&% K&* $'! K&* '!
m§G*wHK5fkG*K .
8*|E&*Hªk+E
K&* '!ª8§-|+.
8*|E&*H¢H«»*
5fkG*5f¤q+2§/§¼* !"! %!&% K&* $'!
m§G*wHK5fkG*K.
8*|E&*Hªk+E
|0&¸& *
«)§9+fF
D|HHÔ=
|0&¸& *
K&*
ª+&¸& *
ª+&¸& *
¢M4§ÁK3+fF
Kabel Coaxial
Tidak
disediakan
¢M4§ÁK3+fF
D|HÔ=
ﻣﺤﻭﺮﻴﻥD|HÔ=
ﻜﺎﺑﻞ ﺫﻭ
()ﻏﻴﺮﻤﺮﻓﻖ
ﻤﺿﺨﻢ ﺻﻭﺖ ﺪﻭﻠﺑﻲ ﺮﻗﻣﻲ
DTS ﺃﻭ
m§G*wHK5fkG*K.
8*|E&*Hªk+E
fG «/4f»* 1aG*aMatkGm§G*w¼1aG*aMa³45¨<9*
.
8*|E&*H¢Hm§G*
fG «ª/4f»*1aG*aMatkGm§G*w¼1aG*aMa³45¨<9*
.
8*|E&*H¢Hm§G*
j j0ÑH
0Ñ
j0ÑH
,aMa7$f9§9¥¡H4ak6K
fG «ª/4f»*1aG*aMatkGm§G*w¼1aG*aMa³45¨<9*
£3&£3&
¸& *¨<Ô.
|MR |RM .
8*|E&*H¢Hm§G*
&¸*¨<Ô.
f& kG*Kmf<fG*-pKa0d/f¼*m§G*f-4*hgMaDm§G*wHª-a¡<m§G*L§kH
1¨/|
£f& kG*Kmf<fG*-pKa0d/f¼*m§G*f-4*hgMaDm§G*wHª-a¡<m§G*L§kH
1¨/|
˻˿
˻˻˿
¾(
¢HmftG*|I*m§G*w¼f
fNDKj)fG*j7f7·m§G*g9¨/||MR ˻̀ (* ﺇﻠﯽ٢٦)
˻̀
(٢٧
¾(˻˿
*( ¢HmftG*|I*m§G*w¼f
fNDKj)fG*j7f7·m§G*g9¨/||MR m§G*w¯
8f»* awk¼*ªG2¾(
*
(
§/|G*¨/|
|
M
m§G*wHh0ª8§kG**|:&
*9§HkwM
m§G*w¯
8f
* awk¼*ªG2
R |RMm§G*wHh0ª8§kG**|:&
m§G*w¯
8f»* awk¼*ªG2¾(*( §/|G*¨/|
*9§HkwM
j0ÑH
R
m§G*s|wM¢D !11 ¨<¥g9¶*3(*( m§G*2*a<*j)fE·
(
!8 ¨<%$ g9* %$
8|Eª-K %$ m§G*w¯'
8*|E&*& Hª8§-a¡< ,aMa7$f9§9¥¡H4ak6K&*
£3&¸& *¨<Ô.f& kG*Kmf<fG*-pKa0d/f¼*m§G*f-4*hgMaDm§G*wHª-a¡<m§G*L§kH
1¨/||MR ¾(*( ¢HmftG*|I*m§G*w¼ffNDKj)fG*j7f7·m§G*g9¨/||RM m§G*w¯
8f»* awk¼*ªG2¾(*( §/|G*¨/||RMm§G*wHh0ª8§kG**|:&*9§HkwM R
_ﺍﻠﻌﺭﺑﻴﺔ
١٣
ﺍﻟﻭﻆﺎﺋﻑ ﺍﻷﺴﺎﺳﻳﺔ
N
ﺗﺸﻐﯿﻞ ﺍﻟﻘﺮﺹ
ﻗﺒﻝ ﺍﻠﺗﺷﻐﻴﻝ
● ﺍﻟﻭﻆﺎﺋﻑ ﺍﻷﺴﺎﺳﻳﺔ
ﺑﺘﺸﻐﻴﻝ ﺠﻬﺎﺯ ﺍﻠﺘﻠﻔﺎﺯ ﻭ ﺍﺿﺑﻃﻪ ﻋﻠﻰ ﺪﺧﻝ ﺍﻠﻔﻴﺪﻴﻭ ﺍﻠﺼﺣﻴﺢ ﺒﺎﻠﺿﻐﻂﻋﻠﻰ ﺍﻠﺯﺮ TV/VIDEOﺑﻭ ﺣﺪﺓ ﺍﻠﺘﺣﻛﻢ ﻋﻦ ﺒُﻌﺪ ﺍﻠﺧﺎﺼﺔ ﺒﺎﻠﺘﻠﻔﺎﺯ.
ﻓﻲ ﺣﺎﻠﺔ ﺗﻭ ﺼﻴﻝ ﻨﻆﺎﻢ ﺽﻮﺕ ﺧﺎﺭﺠﻲ ،ﻗﻢ ﺑﺘﺷﻐﻴﻝ ﻧﻅﺎﻢ ﺍﻠﺼﻭﺕﻭ ﺍﻀﺒﻂﻪ ﻋﻠﻰﺪﺧﻝ ﺍﻠﺼﻭﺕ ﺍﻠﺼﺣﻴﺢ.
ﺑﻌﺪ ﺘﻭ ﺼﻴﻝ ﺍﻠﻣﺷﻐﻝ ،ﺘﻅﻬﺮ ﻫﺬﻩ ﺍﻠﺷﺎﺷﺔ ﻓﻲ ﺍﻠﻤﺮﺓ ﺍﻷﻭ ﻠﻰ ﺍﻠﺘﻲ ﺘﺿﻐﻄ ﻓﻴﻬﺎ
ﻋﻠﻰ ﺍﻠﺯﺮ POWERﺍﻠﺣﺎﺹ ﺒﻤﺷﻐﻝ ﺃﻗﺮ ﺍﺹ .DVDﺇﺫﺍ ﺃﺭﺪﺕ ﺍﺧﺘﻴﺎﺮ
ﻋﻠﻰﺯﺮ †، π/ﺛﻢ ﺍﻀﻐﻄ ﻋﻠﻰ ﺍﻠﺰﺮ ). ENTERﺘﻅﻬﺮ ﻫﺫﻩ ﺍﻠﺷﺎ ﺷﺔ ﻔﻘﻃ ﻋﻨﺪ
ﺇﺣﺪﻯ ﺎﻠﻠﻐﺎﺕ ،ﻓﺎﺿﻐﻄ
ﺘﻭﺼﻴﻝ ﺍﻠﻤﺷﻐﻝﻠﻠﻣﺮ ﺓ ﺍﻷﻭﻠﻰ(.
ﺇﺬﺍ ﻠﻢ ﻳﺘﻢ ﻀﺑﻄ ﺷﺎﺸﺔ ﺑﺪﺀ ﺍﻠﺘﺷﻐﻴﻝ ،ﻓﻘﺪ ﺘﺘﻐﻴﺮ ﺍﻹﻋﺪﺍﺪﺍﺕ ﺣﻴﻨﻤﺎ ﺘﻘﻭ ﻢ ﺑﺎﻠﺘﺷﻐﻴﻝ
ﺇﺫﺍ ﻠﻢ ﻳﺘﻢ ﻀﺑﻄ ﺷﺎﺷﺔ ﺒﺪﺀ ﺍﻠﺴﺑﺐ ،ﺘﺄﻜﺪ ﻣﻦ ﺍﺧﺘﻴﺎﺮ ﺍﻠﻐﺔ ﺍﻠﻤﺮ ﺍﺪ ﺍﺳﺘﺧﺪ ﺍﻣﻬﺎ
ﺑﻣﺠﺭﺪ ﺍﺧﺘﻴﺎﺮﺇﺣﺪﻯﻠﻐﺎﺕﺍﻠﻘﺎﺌﻤﺔ ،ﻴﻤﻛﻨﻚﺘﻐﻳﻳﺮﻫﺎﺒﺎﻠﺿﻐﻄﻋﻠﻰﺍﻠﺰﺮ
ﺒﺎﻠﻠﻭ ﺣﺔ ﺍﻷﻣﺎﻣﻴﺔ ﻠﻠﻭﺣﺪﺓ ﻠﻤﺪﺓ ﺘﺯﻴﺪ ﻋﻦ ﻩ ﺛﻭﺍﻦﻤﻊﻮ ﺟﻭﺪ ﺍﻠﻘﺮﺹ ﻓﻲ ﺍﻠﻭﺣﺪﺓ.
ﺛﻢ ،ﻴﻅﻬﺮﺇﻂﺎﺮ SELECT MENU LANGUAGEﻤﺭﺓ ﺃﺧﺭﻯ ﺣﻴﺚ
ﻴﻤﻜﻨﻙ ﺇﻋﺎﺪﺓ ﺘﻌﻴﻦ ﺍﻠﻠﻐﺔ ﺍﻠﻤﻔﻀﻠﺔ ﺇﻠﻴﻚ.
English
ﻋﺭﺒﻳﺔ
ﺍﻠﺘﺷﻐﻳﻝ
( .ﻴﻨﻁﻔﺊ ﻀﻭ ﺀ ﺍﻠﻤﺆﺷ
.١ﺍﺿﻐﻃ ﻋﻠﻰ ﺍﻠﺯﺮ ) OPEN/CLOSE
STANDBYﻭ ﻴﺘﻢ ﻓﺘﺢ ﺍﻠﺪﺮﺝ.
.٢ﺿﻊ ﺍﻠﻘﺮﺺ ﺒﺮﻓﻖ ﻓﻲ ﺍﻠﺪﺭﺝ ﺒﺣﻴﺚ ﻴﻛﻭﻦ ﻭ ﺠﻪ ﻤﺎﺼﻖ ﺍﻠﻘﺹﻷﻋﻠﻰ.
.٣ﺍﻀﻐﻄ ﻋﻠﻰ ﺍﻠﺯﺮ ( ) PLAYﺃﻭ ﺍﻠﺯﺮ OPEN/CLOSE
) ( ﻹ ﻏﻼﻖ ﺪﺭﺝ ﺍﻷﻗﺭ ﺍﺺ .ﻋﻨﺪ ﺇﻴﻘﺎﻒ ﺘﺸﻐﻴﻝ ﺍﻠﻘﺮﺺ ،ﻴﺣﺘﻔﻅ ﺍﻠﻣﺷﻐﻝ ﺑﺎﻠﻤﻭﺿﻊ
ﺍﻠﺬﻱ ﺘﻢ ﺇﻴﻘﺎﻒ ﺍﻠﺘﺷﻐﻴﻝ ﻋﻨﺪﻩ ،ﻠ ﺬﺍ ﻋﻨﺪ ﺍﻠﻀﻐﻄ ﻋﻠﻰ ﺍﻠﺯﺮ PLAY
) ( ﻤﺮ ﺓ ﺃﺧﺭﻯ ،ﺴﻴﺧﺘﺎﺮ ﺍﻠﻤﺸﻐﻝ ﺍﻠﻤﻭ ﻀﻊ ﺍﻠﺬﻱ ﺘﻭ ﻗﻔﺕ ﻋﻨﺪﻩ.
.٤ﺇﻳﻘﺎﻑ ﺍﻠﺘﺷﻐﻴﻝ
ﺍ ﻀﻐﻄ ﻋﻠﻰ ﺍﻠﺯﺮ ) ( ﺃﺛﻨﺎ ﺀ ﺍﻠﺘﺷﻐﻴﻝ.
١
_١٤ﺍﻟﻭﻆﺎﺋﻑ ﺍﻷﺴﺎﺳﻳﺔ
.٥ﺇﺧﺮ ﺍﺝ ﺍﻠﻘﺮ ﺹ
ﺍﻀﻐﻄ ﻋﻠﻰ ﺍﻠﺯﺮ .( ) OPEN/CLOSE
.٦ﺇﻴﻘﺎﻒ ﺍﻠﺘﺷﻐﻴﻝ ﻤﺆ ﻗﺘًﺎ
ﺍﻀﻐﻄ ﻋﻠﻰ ﺍﻠﺯﺮ ( ) PAUSEﺍﻠﻣﻭ ﺠﻮﺪ ﻓﻲ
ﻮﺣﺪﺓ ﺍﻠﺘﺣﻜﻢ ﻊﻦ ﺒُﻌﺪ ﺃﺛﻨﺎ ﺀ ﺍﻠﺘﺷﻐﻴﻝ.
ﺘﺘﻭ ﻗﻒ ﺍﻠﺸﺎﺷﺔ ،ﻭ ﻻ ﻴﺼﺪﺮ ﺼﻭ ﺘًﺎ.ﻻﺴﺘﺌﻨﺎﻒ ﺍﻠﺘﺷﻐﻴﻝ ،ﺍﻀﻐﻄ ﻋﻠﻰ ﺍﻠﺯﺮ ) ( ﻤﺮ ﺓ ﺃﺧﺮ ﻯ.
.٧ﺍﻠﺘﺸﻐﻴﻝ ﺑﺎﻠﺣﺮ ﻜﺔ ﺍﻠﺒﻄﻴﺌﺔ
ﺍﻀﻐﻄ ﻋﻠﻰ ﺍﻠﺯﺮ ) SEARCH
( /ﻻﺧﺘﻳﺎﺮ ﺴﺮ ﻋﺔ ﺍﻠﺘﺷﻐﻴﻝ ﻤﻦ ﺒﻴﻦ ١/١٦
ﻮ ١/٤ ١/٢ﻮ ١/٨ﻠﻠﺴﺮ ﻋﺎﺖ ﺍﻠﻌﺎﺩﻴﺔ ﺃﺛﻧﺎ ﺀ ﺍﻠﻮﻀﻊ .PAUSE
ﻻ ﻴُﺴﻤﻊ ﺃﻱ ﺼﻭ ﺕ ﺃﺛﻨﺎﺀ ﺍﻠﻮ ﻀﻊ ﺍﻠﺑﻃﻲ ﺀ. ﺍﻀﻐﻄ ﻋﻠﻰ ﺍﻠﺯﺮ ( ) PLAYﻻﺴﺘﺌﻨﺎﻒ ﺍﻠﺘﺷﻐﻴﻝ ﺍﻠﻌﺎﺪﻱ. .٨ﺘﺷﻐﻴﻝ ﺇﻃﺎﺮ ﺑﺈﻃﺎﺮ )ﺑﺎﺴﺘﺛﻨﺎﺀ ﺍﻠﻘﺮ ﺹ ﺍﻠﻀﻐﻭ ﻄ(
ﺍﻀﻐﻄ ﻋﻠﻰ ﺍﻠﺯﺮ STEPﺒﻭ ﺣﺪﺓ ﺍﻠﺘﺣﻛﻢﻋﻦ ﺒُﻌﺪﺃﺛﻨﺎ ﺀ ﺍﻠﺘﺷﻐﻴﻝ.
ﻴﻆﻬﺮ ﺇﻃﺎﺮ ﺠﺪﻴﺪ ﻔﻲ ﻜﻝ ﻤﺮﺓ ﺘﻀﻐﻄ ﻔﻴﻬﺎ ﻋﻠﻰ ﺍﻠﺯﺮ. ﻻ ﻳُﺴﻤﻊ ﺃﻱ ﺼﻭﺕ ﺃﺛﻨﺎﺀ ﺘﺷﻐﻴﻝﺍﻠﻭ ﻀﻊ .STEP ﺍﻀﻐﻄ ﻋﻠﻰ ﺍﻠﺯﺮ ( ) PLAYﻻ ﺴﺘﺌﻨﺎﻒ ﺍﻠﺘﺸﻐﻴﻝ ﺍﻠﻌﺎﺪﻱ. -ﻴﻤﻜﻦ ﻔﻘﻄ ﺇﺠﺭ ﺍﺀ ﺘﺷﻑﻴﻝ ﺇﻄﺎ ﺮ ﻨﺈﻃﺎﺮ ﻔﻲ ﺍﻻﺘﺠﺎﻩﺍﻷﻣﺎﻤﻲ.
ﻣﻼﺣﻇﺔ
ﻔﻲ ﺣﺎﻠﺔﺘﺮﻚ ﺍﻠﺸﻐﻝ ﻓﻲ ﻭ ﺿﻊ ﺍﻠﺘﻭ ﻗﻒ ﻠﺪ ﺓ ﺘﺰ ﻴﺪ ﻋﻦ ﺪ ﻗﻴﻘﺔﻭ ﺍﺤﺪ ﺓ ﺒﺪﻭﻦﺘﺪ ﺧﻝ ﺍﻠﻣﺴﺘﺧﺪﻢ ،ﻳﺘ ﺘﻨﺷﻴﻄ ﺷﺎ ﺷﺔ ﺍﻠﺘﻭ ﻗﻒ.ﺍ ﻀﻐﻄ ﻋﻠﻰ ﺍﻠﺯﺮ
( ) PLAYﻻ ﺴﺘﺌﺎﻒ ﺍﻠﺘﺷﻐﻴﻝ ﺍﻠﻌﺎﺪﻱ.
ﻓﻲﺤﺎﻠﺔﺘﺿﻚﺍﻠﻣﺷﻐﻝ ﻓﻲﻮ ﻀﻊ ﺍﻠﺘﻭﻗﻒ ﻠﻤﺪﺓ ﺘﺯﻴﺪ ﻋﻦ ٣٠ﺪﻗﻴﻘﺔ ﺘﻘﺮ ﻳﺑًﺎ ،ﻳﺘﻢﺇﻏﻼﻖﻠﺘﺷﻐﻴﻝ ﺘﻠﻘﺌﯾًﺎ ﺇﻻ ﻋﻧﺪ ﺘﻭﺼﻴﻝ) .ﻭ ﻅﻴﻔﺔ ﺇﻴﻘﺎﻒ ﺍﻠﺘﺷﻐﻴﻝ ﺘﻠﻘﺎﺌﯾًﺎ(
ﺳﻴﺘﻭ ﻗﻒ ﺍﻠﻣﺷﻐﻝ ﻔﻲ ﺣﺎﻠﺔ ﺘﺮ ﻜﻪ ﻠﻤﺪﺓ ﻩ ﺪﻗﺎ ﺌﻖ ﺘﻘﺭ ﻳَﺎ ﻓﻲ ﻭ ﻀﻊ ﺍﻹﻴﻗﺎﻒﺍﻠﻣﺆﻗﺕ.
-ﻴﺷﻴﺮ ﺍﻠﺮ ﻤﺯ) ( ﺇﻠﻰ ﻤﺣﺎﻭ ﻠﺔ ﺍﻠﻀﻐﻃ ﻋﻠﻰﺯﺭ ﻏﻴﺭ ﺼﺤﻴﺢ.
ﺍﺳﺘﺣﺩﺍ ﻡ ﻮ ﻅﻳﻔﺘﻲ ﺍﻠﺒﺤﺖ ﻮﺍ ﻠﺛﺨﻂﻲ
ﺃﺛﻨﺎﺀﺍﻠﺗﺸﻐﻳﻞﻋﻛﻧﻚ ﺍﻟﺒﺤﺙ ﺒﺳﺭ ﻋﺓ ﺧﻼ ﻞ ﻔﺼﻞ ﺃﻭ ﻣﺎ ﺪ ﺓ ﻤﺳﺠﻟﺔ
ﻭ ﺍ ﺴﺘﺧﺮ ﺍ ﻡ ﻮ ﻈﻳﻔﺔ ﺍ ﻟﺗﺧﻁﻲ ﻟﻼ ﺒﺘﻘﺎ ﻞ ﺇ ﻟﻰ ﺍ ﻟﺘﺣﺪ ﻴﺪ ﺍﻠﺘﺎ ﻠﻲ
ﺍ ﻟﺒﺣﺙ ﺠﻼﻝﺃﻮ ﻤﺎﺪﺓ ﻣﺴﺟﻟﺔ
2X, 4X, 64X, 128X
DVD
4X, 8X
VCD
2X, 4X, 8X
CD
ﻣﻼ ﺤﻆﺔ
ﻗﺪ ﺜﺧﻳﻟﻒ ﺍﻟﺳﺮﻋﺔﺍﻜﺑﻳﺑﺔ ﻔﻲﻫﺬﻩﺍﻟﻮ ﻅﻴﻔﺔﻋﻦ ﺴﺮﻋﺔ ﺍﻠﺘﺸﻐﻳﻞ ﺍﻠﻔﻌﻠﻴﺔ.-ﻻﻴﺼﺪﺮﺃﻱ ﺻﻮﺖﺃﺛﻧﺎﺀﻮﻀﻊﺍﻟﺑﺣﺚ).ﺑﺎﺴﺘﺛﻧﺎﺀ ﺍﻷﻗﺮﺍﻟﻐﻌﻠﻳﺔ.
ﺘﺧﻁﻲﺍﻟﻮﺍﺪﺍﻟﺴﺠﻟﺔ
ﺃﻮ
ﺃﺛﻨﺎﺀﺪ ﺘﺛﻔﻳﻞ،ﺍﻀﻐﻁﻋﻠﻰ ﻟﺯﺮ SKIP
ﺃﻮ
ﻋﻧﺪ ﺘﺸﻐﻳﻝ ﻗﺭ ﺼﻦ ،DVDﺈﺬﺍﻘﻣﺖ ﻧﺎ ﻟﻀﻐﻂ ﻋﺎﻰ ﻟﺯﺮ SKIPﻔﺴﻴﻨﺘﻘﻞﺇﻟﻰﺍﻠﻔﺼﻞﺇﻟﻰﺍﻠﻔﺼﻞ ﻟﺘﺎ ﻟﻲ.ﻓﻲ ﺤﺎﻟﺔ ﻧﺎﻟﻀﻐﻂﻋﺎﻰ ﻟﺯﺮ SKIPﺃﻮ
ﻳﻨﺘﻗﻞ ﺈﻠﻰ ﺍﻟﻐﺼﻞ.ﺘ�ﺪﻲ ﻀﻐﻂﺔ ﺃﺧﺮ ﻯﻋﻠﻴﻪ ﺇﻠﻰﺍﻨﺘﻘﺎ ﻠﻪﺇﻟﻰ ﺒﺪﺍﻴﺔ ﻓﺼﻞ ﺳﺎ ﺑﻖ.
ﻋﻨﺪ ﺘﺷﻐﻴﻝ ﻘﺭﺹ VCD 2.0ﻔﻲﻮﺿﻊ Menu offﺃﻭﻘﺮ ﺺVCD 1.1ﺃﻮ ﻘﺭﺺﻣﻀﻐﻮ ﻂ،ﺇﺫﺍ ﻀﻐﻃﺕ ﻋﺎﻰ ﻟﺯﺮ ،( )SKIPﻔﺴﻳﻧﺘﻘﻞ ﺇﻟﻰ ﺍﻠﺎﺪﺓ
ﺍﻠﺴﺟﻟﺔ ﺍﻠﻳﺔ.ﻘﻲﺣﺎﻟﺔﺍﻟﻀﻐﻂﻋﻠﻰ ﻟﺯﺮ ،( )SKIPﻴﻧﺘﻘﻞﺇﻟﻰﺑﺪﺇﻳﺔ
ﺍﻠﺎﺪﺓﺍﻠﺴﺠﻠﺔ.ﺘﻮﺪﻱ ﻀﻐﻃﺔﺃﺧﺭﻯﻋﻠﻴﻪﺇﻟﻰﺍﻧﺘﻘﺎ ﻠﻪ ﺇﻟﻰ ﺒﺪﺍﻳﺔ ﻣﺎﺪ ﺓ ﻤﺴﺟﻟﺔ ﺴﺎﺒﻘﺔ.
ﺇﺬﺍ�ﺎﻮﺯﺕﻣﺩﺓﺍﻠﺎﺪﺓﺍﻟﺎﺪﻩﺍﺪﻘﻴﻘﺔﻋﻨﺪ ﺘﺸﻐﻴﻞﻘﺭﺹ VCDﻮﻘﻤﺕ
ﻧﺎﻟﻀﻐﻃﻋﻟﻰﺍﻟﺰﺭ ،ﻔﺴﻳﻨﺘﻘﻞﺈﻠﻰﺍﻷﻤﺎﻡ.ﻋﻘﺩﺍﺭﻩ ﺩﻘﺎﺋﻕ.
،ﻔﺳﻳﻨﺘﻘﻞ ﺇﻟﻰ ﺍﻠﺧﻠﻒ.ﻋﻘﺩﺍﺭﻩﺩﻘﺎﺋﻕ.
ﺇﺬﺍ ﺿﻐﻃﺕ ﻋﻟﻰﺍﻟﺰﺭ
Chapter
ﻠﻠﻮﺼﻮﻝﺍﻠﻰﺍﻠﻌﻧﻮﻥﺍﻠﻄﻠﻮﺐﻘﻲ ﺤﺎﻠﺔﻋﺩﻡﻋﻮﺪﺃﻜﺛﺯﻤﻥﻗﺭﺺ.
ﻋﻠﻰﺴﺑﻴﻝ ﺍﻠﺛﺎﻝ،ﻘﻲﺤﺎﻠﺔﻮﺤﻮﺩﺃﻜﺗﺮﻣﻥﻔﻴﻠﻢﻠﻰﻗﺯﺺ،DVD
ﻳﺘﻢﺍﻠﺘﻌﺭﻒﻋﻠﻰﻛﻝﻔﻴﻠﻢ
ﻴﺘﻢﺗﺴﺟﻳﻝﻣﻌﻇﻢﻘﺭﺍﺹ DVDﻔﻲﻔﺼﻮﻝﺤﺗﻰﻋﻴﻜﻨﻚﺍﻠﻌﺛﻮﺭﻋﻠﻰ
ﻣﻘﻄﻊﻤﺤﺭﺩ)ﺗﺜﺑﻪﺍﻠﻮﺍﺪﺍﻠﺴﺟﻠﺔﺍﺪﺍﻠﺴﺠﻠﺔﻠﻰﻗﺭﺼﺻﻮﺖﻤﻀﻐﻮﻄ(.
Time
ﻹﺘﺎﺧﺔﺘﺸﻔﻴﻝﺍﻠﻔﻳﻠﻡﻤﻥﺍﻠﻮﻗﺖﺍﻠﻄﻠﻮﺐ.ﻳﺑﺟﺏﺇﺪﺨﺎﻝﻮﻗﺕﺍﻠﺑﺩﺀ
ﻜﻤﺮﺠﻊ.ﻻﺗﻌﻣﻝﻮﻇﻴﻔﺔﺍﻟﺑﺤﺚﻋﻥﺍﻠﻮﻗﺖﻣﻊﺑﻌﺽﺍﻷﻗﺮﺍﺹ.
Audio
ﻠﻺﺸﺎﺮﺓﺇﻠﻰﻠﻐﺔﺍﻠﻤﺎﺩﺓﺍﻠﺻﻮﺗﻳﺔﻠﻠﻔﻳﻠﻢ.ﻓﻲﺍﻠﻣﺛﺎﻝ،ﻳﺗﻢﺗﺸﻐﻴﻝﺍﻟﻤﺎﺩﺓ
ﺍﻟﺼﻮﺗﻴﺔﺍﻟﻣﺴﺟﻠﺔﻔﻰﺻﻮﺕ .English 5.1CHﻋﻳﻜﻥﺃﻥ ﻴﺤﺘﻮﻱ
ﺍﻗﺭﺹDVDﻋﻠﻰﻣﺎﻳﺻﻝﺇﻠﻰﺘﻣﺎﻥﻣﻮﺍﺩﺼﻮﺗﻳﺔﻣﺴﺟﻠﺔﻣﺤﺗﻠﻔﺔ.
Subtitle
ﻠﻺﺸﺎﺮﺓﺇﻠﻰﻠﻐﺎﺖﺍﻟﺗﺭﺠﻤﺔﺍﻠﻣﺼﺎﺤﺑﺔﺍﻠﻣﺗﻮﻠﻘﻮﺓﻋﻠﻰﺍﻠﻗﺭﺺ.ﺴﺗﺗﻣﻛﻦ
ﻣﻦﺍﺨﺗﻳﺎﺭﻠﻐﺎﺖﺍﻠﺘﺭﺟﻣﺔﺍﺍﻠﻣﺻﺎﺤﺑﺔﺃﻮﺇﻴﻗﺎﻒﺗﺸﻐﻳﻠﻬﺎﻤﻥﺍﻠﺸﺎﺸﺔ،ﺇﺫﺍ
ﻛﻧﺕ ﺗﻓﺿﻝﺫﻠﻚ.ﻋﻳﻜﻥﺃﻥﻳﺤﺗﻮﺺDVDﻋﻠﻰﻤﺎﻳﺻﻝﺇﻠﻰ
٣٢ﺗﺭﺣﻣﺔﻣﺼﺎﺤﺑﺔﻤﺧﺗﻠﻔﺔ.
ﻠﻠﻮﺻﻮﻝﺇﻠﻰﻮﻇﻴﻓﺔ Bookmarkﺃﻮ Angleﺍﻠﻣﻄﻠﻮﺑﺔ.
ﺑﻌﺽﺃﻗﺭﺍﺹ DVDﻬﺎﻮﻆﺎﺋﻒﺯﺍﻮﻳﺔﺃﻜﺛﺭﺑﻛﺛﻳﺭﻣﻣﺎﻔﻲ
ﺃﻳﺔﺼﻮﺮﺓ.
ﺘﺘﻳﺢﻠﻚﻮﻈﻳﻔﺔ Bookmarkﺍﻠﻌﺜﻮﺭﻋﻠﻰﻤﺎﺪﺓﻣﺴﺠﻠﺔﺃﻮﻔﺻﻝﻤﻥ
ﻗﺭﺺ DVDﺃﻮ ﴿VCDﻮﻈﻳﻔﺔ .﴾Menu off
ﺘﺴﺘﺨﺩﻡﺍﻠﻮﻈﻴﻔﺔ ﴿ EZ Viewﻋﺭﺽ ﴾EZﻟﻐﻳﻳﺭﻨﺴﺑﺔﺍﻠﻌﺭ
ﺾﺇﻠﻰﺍﻻﺭﻉﺑﺎﻠﻗﺭﺺ DVD
ﺘﺴﺘﺨﺩﻡﺍﻠﻮﻈﻴﻔﺔ Zoomﻟﻐﻳﻳﺭﻨﺴﺑﺔﺍﻠﻌﺭ ﻠﺘﻜﺒﻴﺮ ﺻﻭﺮﺓ DVD
ﺍﺴﺘﺨﺪﺍﻢ ﻘﺎﺌﻤﺘﻲ ﺍﻠﻌﻧﺎﻭﻳﻦ
ﺍﺴﺗﺨﺪﺍﻡ ﻘﺎﺌﻤﺔ ﺍﻷﻗﺭﺍﺺ
.١ﺃﺛﻧﺎﺀﺘﺸﻐﻳﻝ ﻘﺭﺹDVDﺍﺿﻐﻄ ﻋﻠﻰ ﻟﺯﺭ MENU
ﺒﻮﺤﺩﺓ ﺍﻠﺗﺤﻜﻢ ﻋﻥ ﺑُﻌﺪ.
.٢ﺍﻀﻐﻁ ﻋﻟﻰ ﺍﻟﺰﺮﻳﻥ† π/ﻟﺗﺤﺩﻴﺩ ،Disc Menuﺛﻢﺍﺿﻐﻄ ﻋﻠﻰ
ﺍﻟﺯﺮﺃ ® ﺃﻭﺍﻟﺰﺮ ENTER
ﻣﻼ ﺤﻆﺔ
ﻋﻧﺪ ﺘﺸﻐﻳﻝ ﻗﺭ ﺼﻦ ،VCDﻗﺩﻻﺘﻌﻤﻝ ﻭﻅﻳﻓﺔ Disc menuﻭﻓﻘًﺎﻠﻟﻘﺮﺺ.
● ﺍﻟﻭﻆﺎﺋﻑ ﺍﻷﺴﺎﺳﻳﺔ
ﺃﺜﻨﺎﺀ ﺍﻠﺘﺸﻐﻳﻞ� ﺍﻀﻐﻄ ﻋﻟﻰ ﺍﻟﺯ ﺮ )SEARCHﺃﻮ
ﻠﻤﺩﺓ ﺘﺯﻴﺪ ﻋﻦ ﺜﺎﻨﻴﺔ.
( ﺒﻮﺤﺮﺓﺍﻠﺘﺤﻜﻡﻋﻥ ﺑﻌﺪ
ﻣﻼ ﺤﻆﺔ
Title
ﺍ
Note
٢
ﺍﺳﺘﺨﺩﺍﻡ ﻮﻅﻳﻔﺔ ﺍﻟﻌﺮﺽ
ﻋﻧﺪﺘﺛﻐﻴﻞﻗﺭﺺ DVD/VCD
.١ﺃﺜﻧﺎﺀﻟﺘﻐﻴﻞ،ﻀﻐﻂﻋﻟﻰﺍﻟﺯﺭ INFOﺑﻮﺣﺪﺓﺍﻟﺘﺣﻜﻣﻋﻥﺑﻌﺩ.
�ﻋﻜﻦ�ﺪ ﻳﺪﺍﻠﻌﻠﻮ ﻣﺎﺕ ﻓﻲ ﻘﺎﺌﻣﺔﺍﻟﻮ ﻆﺎﺌﻒ ﺑﺎﻠﻀﻐﻂﻋﻟﻰﺍﻟﺯﺭ .MENUﻣﻼ ﺤﻆﺔ
.٢ﺍﺿﻐﻂﻋﻟﻰﺯﺮ† π/ﻟﺘﺣﺪ ﻳﺪﺍﻠﻌﻨﺼﺭﺍﻟﻁﻟﻮﺐ.
ﻗﺩﻻﺘﻌﻤﻝﻭﻅﻳﻓﺔ Disc menuﻭﻓﻘًﺎﻠﻟﻘﺮﺺ. ﻋﻧﺪ ﺘﺸﻐﻳﻝ ﻗﺭ ﺼﻦ ،VCDﻗﺩﻻﺘﻌﻤﻝ ﻭﻅﻳﻓﺔ Disc menuﻭﻓﻘًﺎﻠﻟﻘﺮﺺ. .٣ﺍﻀﻐﻃ ﻋﻠﺯﺭ® √/ﻹﺣﺮﺇﻹﻋﺪ ﺍﺪ ﺍﻠﻁﻠﻮ ﺏ ،ﺛﻡ ﺍ ﻀﻐﻁ ﻋﻟﻰ ﻠﺯﺮ - .ENTERﻜﺬﻟﻙ،ﻋﻴﻛﻧﻚﺍﺳﺗﺨﺩﺍﻡﻘﺎﺋﻤﺔﺍﻷﻘﺮﺍﺺ،ﺒﺎﺴﺗﺨﺩﻡﺍﻟﺯﺮ DISC
MENUﺒﻭﺤﺩﺓﻟﺗﺣﻜﻡﻋﻦ ﺒُﻌﺩ .
ﻘﺩ ﺘﺴﺘﺧﺪﻢﺍﻠﺨﺎﺻﺔ ﺑﻮ ﺤﺩﺓﺍﻟﺗﺣﻛﻢ ﻋﻦﺒﻌﺪ ﻟﻟﻮ ﺼﻮﻝ. ﻋﻧﺪ ﺘﺸﻐﻳﻝ ﻗﺭ ﺼﻦ ،VCDﻗﺩﻻﺘﻌﻤﻝ ﻭﻅﻳﻓﺔ Disc menuﻭﻓﻘًﺎﻠﻟﻘﺮﺺ.ﻤﺑﺎﺸﺭﺓﺇﻠﻰﻋﻧﻮﺍﻥﺃﻮﻠﺑﺩﺀﺍﻠﺗﺙﻐﻴﻝ ﻤﻥ ﺍﻠﻮﻘﺖﺍﻠﻄﻠﻮﺏ.
.٤ﻹﺨﻔﺎﺀﺍﻠﺸﺎﺸﺔ،ﺍﻀﻐﻄ ﻋﻠﻰﺍﻠﺯ INFOﻣﺭﺓﺃﺨﺭﻯ.
ﺍﻠﻌﺭﺑﻴﺔ_ ١٥
٤
٤
ﺍﻟﻭﻆﺎﺋﻑ ﺍﻷﺴﺎﺳﻳﺔ
.١ﺃﺗﻧﺎﺀﺘﺸﻐﻳﻞﻘﺮﺺ،DVDﺍﻀﻐﻃﻋﻟﻰﺍﻟﺯﺮ MENUﺑﻭﺣﺩﺓﺍﻠﺘﺣﻛﻡ
ﻋﻥﺑُﻌﺩ.
.٢ﺍﻀﻐﻄﻠﻰﺯﺭ† π/ﻠﺗﺤﺪ ﻳﺩ ، Title menuﺛﻢﺍﺿﻐﻄﻋﻠﻰ
ﺍﻠﺯﺭ ®.ﺃﻭﻠﺯﺭ†ENTERπ/
ﺍﺳﺘﺧﺪﺍﻡﻭﻆﻳﻔﺔﺗﻜﺭﺍﺭA-B
.١ﺍﻀﻐﻂ ﻋﻠﻰ ﺍﻠﺯﺭ REPEATﺒﻮﺣﺪﺓﺍﻠﺘﺣﻛﻢ ﻋﻦ ﺑﻌﺪ.
.٢ﺍﻀﻐﻁ ﻋﻠﻰ ﺍﻠﺯﺭﻳﻦ® √/ﻠﺘﺣﺪﻳﺪﺍﻠﺰﺭ .A-B .
.٣ﺍﻀﻐﻄﻋﻠﻰﺍﻠﺯﺭ ENTERﻋﻧﺪﺍﻠﻨﻗﻄﺔﺍﻠﺘﻲﺘﺮﻏﺏﻓﻲﺑﺪﺀﺘﻛﺮﺍﺭ
ﺍﻠﺘﺸﻐﻳﻝ﴿﴾Aﻋﻨﺪﻫﺎ.ﻴﺘﻢ ﻋﺳﺰ Bﺘﻠﻘﺎﺌﻴﺎ.
.٤ﺍﻀﻐﻄﻋﻠﻰﺍﻠﺯﺭ ENTERﻋﻧﺪﺍﻠﻨﻗﻄﺔﺍﻠﺘﻲﺘﺮﻏﺏﻓﻲﺑﺪﺀﺘﻛﺮﺍﺭ
ﺍﻠﺘﺸﻐﻳﻝ﴿﴾Bﻋﻨﺪﻫﺎ.
ﻠﻠﺮﺟﻭﻉﺇﻠﻰ ﺍﻠﺘﺷﻌﻳﻝﺍﻠﻌﺎﺪﻱ،ﺍﻀﻐﻂﻋﻠﻰﺍﻠﺯﺮ﴿.﴾CANCEL .٥ﻠﻠﺮﺟﻭﻉﺇﻠﻰ ﺍﻠﺘﺷﻌﻳﻝﺍﻠﻌﺎﺪﻱ،ﺍﻀﻐﻂﻋﻠﻰﺍﻠﺯﺮ﴿ ﴾REPEATﻣﺮﺓ.
ﺃﺧﺮﻯ،ﺛﻡﺍﺿﻐﻄﻋﻠﻰﺍﻠﺯﺮﻳﻦ® √/ﻠﺘﺤﺪﻳﺪ OFFﻭﺍﺿﻐﻄﻋﻠﻰ.
ﺍﻠﺯﺭ .ENTER
DVD/VCD
ﻣﻼ ﺤﻆﺔ
ﻗﺪﻻﺘﻌﻣﻝﻭﻈﻳﻔﺔ Title Menuﻭﻔﻘﺎ ﻠﻠﻘﺭﺹ. ﺴﻳﺘﻢﻋﺭﺽﻭﻅﻳﻔﺔ Title Menuﻓﻘﻈﻔﻲﺤﺎﻠﺔﻭﺩﺧﻭﺪﻋﻧﻭﺍﻧﻳﻥﻋﻠﻰﺍﻷﻗﻝ ﻋﻠﻰﺍﻠﻗﺭﺹ.
ﺘﻜﺭﺍﺭA-
ﺘﻜﺭﺍﺭA-B
ﺘﻛﺭﺍﺭﺍﻠﺗﺸﻐﻳﻝ
ﺗﺴﺗﻳﻊ ﺘﻛﺭﺍﺭﺘﺸﻐﻳﻝ ﺍﻠﻤﺎﺪﺓ ﺍﻠﻤﺴﺠﻠﺔﺃﻭﺍﻠﻔﺼﻝﺃﻮﺍﻠﻌﻧﻭﺍﻥﺍﻠﺤﺎﻠﻲﺃﻮﻘﺴﻡﻣﺨﺗﺎﺭ
﴿ ﴾A-Bﺃﻭﺍﻠﻘﺭﺹﺑﺂﻛﻣﻟﻪ.
ﻋﻧﺩﺗﺸﻐﻳﻝﻗﺭDVD/VCD
.١ﺍﺿﻐﻄﻋﻠﻰﺍﻠﺯﺮ Repeatﺒﻮﺤﺩﺓ ﺍﻠﺘﺤﻜﻣﻋﻦ ﺑُﻌﺪ.
ﻓﺗﻇﻬﺭ ﺸﺎﺸﺔﺍﻠﺗﻛﻠﺭﺍﺭ.
.٢ﺍﻀﻐﻃﻋﻠﻰ ﺍﻠﺯﺮﻳﻥ†π/ﻠﺗﺤﺪﻳﺪChapterﺃﻭ Titleﺃﻭ،A-Bﺛﻡﺍﺿﻐﻄ
ﻋﻠﻰﺍﻠﺯﺭ .ENTER
ﻳﻜﺮﻗﺭﺺ DVDﺍﻟﺘﺸﻐﻳﻝﺤﺳﺏﺍﻠﻓﺻﻝﺃﻮﺍﻟﻌﻧﻭﺍﻥﻭﺗﻜﺮﺭﺃﻘﺭﺍﺺ VCDﺍﻠﺜﺷﻐﻳﻝﺤﺳﺏﺍﻟﻘﺭﺺﺃﻭﺍﻠﻣﺎﺪﺓﺍﻟﻣﺴﺟﻠﺔ.
: CHAPTERﻠﺗﻜﺭﺍﺭﺍﻠﻓﺻﻝﺍﻠﺤﺎﺮﻱﺘﺸﻐﻳﻠﺔ. : TITLEﻟﺘﻛﺭﺍﺭﺍﻟﻌﻧﻭﺍﻥﺍﻠﺤﺎﺮﻱﺘﺸﻐﻳﻠﺔ. : DISCﻟﺘﻜﺭﻠﻗﺮﺹﺍﻟﺣﺎﺮﻱﺘﺸﻐﻳﻟﻪ. : TRACK -ﻟﺗﻜﺮﺍﺭﺍﻟﻤﺎﺩﺓﺍﻟﻤﺳﺠﻟﺔﺍﻟﺤﺎﺭﻱﺗﺸﻐﻳﻟﻬﺎ.
١
VCD
DVD
ﻏﻠﻖ ﺗﻛﺭﺍﺬ
ﻏﻠﻖ ﺗﻛﺭﺍﺬ
ﻤﺴﺎﺮ
ﺑﺎﺐ
ﺍﻠﺪﺴﻚ
ﺼﻚ
_ ١٦ﺍﻟﻭﻆﺎﺋﻑ ﺍﻷﺴﺎﺳﻳﺔ
ﻏﻠﻖ ﺗﻛﺭﺍﺬ
ﻣﻼ ﺤﻆﺔ
ﻗﺪﻻﺘﻌﻣﻝﻮﻅﻳﻓﺔ DISC MENUﻭﻓﻗﺎﻠﻠﻘﺮﺹ. ﻜﺫﻠﻚ،ﻋﻳﻜﻧﻙ ﺍﺳﺘﺧﺪﺍﻢﻘﺎﺋﻤﺔﺍﻷﻘﺮﺍﺹ،ﻦﺎﺴﺘﺧﺪﺍﻢﺍﻟﺯﺭ DISC MENU MENUﺒﻮﺣﺪﺓﺍﻟﺘﺣﻛﻢﻋﻥﺑﻌﺪ .
ﻋﻧﺪ ﺘﺸﻐﻳﻝ ﻗﺭ ﺼﻦ ،VCDﻗﺩﻻﺘﻌﻤﻝ ﻭﻅﻳﻓﺔ Disc menuﻭﻓﻘًﺎﻠﻟﻘﺮﺺ.
ﺍﻠﺘﺷﻐﻴﻝ ﺍﻠﺑﻃﻲﺀ
ﺘﺷﻴﺢ ﻠﻙ ﻫﺯﻩ ﺍﻠﻤﻴﺯﺓ ﺍﻠﺘﺸﻐﻳﻝ ﺍﻠﺑﻄﻲﺀﻠﻠﻤﺷﺎ ﻫﺪ ﺍﻠﺘﻲﺘﺣﺘﻭ ﻱ ﻋﻠﻰ ﻤﺸﺎ ﻫﺪﺍ ﺴﺘﺧﺪﺍﻢ.
ﺎﻷﺪﻮﺍﺕ ﺍﻠﺭ ﻳﺎﻀﻴﺔﻭﺍﻠﺣﺮﻛﺔﻮﺍﻠﻣﻭ ﺳﻳﻘﻰﻭﻏﻳﺮﻫﺎﺑﺣﻴﺕ ﻋﻴﻛﻧﻚ ﺪﺭﺍﺳﺘﻬﺎﻋﻦﻗﺮﺏ.
ﻋﻧﺩﺘﺷﻐﻳﻝﻗﺭﺹ DVD
.١ﺃﺛﻧﺎﺀﺍﻠﺘﺸﻐﻳﻝ،ﺍﻀﻐﻄ ﻋﻠﻰﺍﻠﺯﺭ﴾ )PLAY PAUSE
.٢ﺍﻀﻔﻄ ﻋﻠﻰ ﺍﻠﺯﺭ ( / )SEARCHﻻﺧﺘﻴﺎﺭﺳﺮﻋﺔﺍﻠﺘﺷﻐﻳﻝ ﻣﻥﺑﻳﻦ
٢/١ﻭ ٤/١ﻮ ٨/١ﻣﻦ ﻤﻌﺪﻝ ﺍﻠﺴﺮ ﻋﺔ ﺍﻠﻃﻳﻌﻲ ﻘﻲ ﺍﻠﻮﻀﻊ PAUSEﺃﻭ
ﺍ
ﺍﻟﻭﻆﺎﺋﻑ ﺍﻠﻣﺗﻗﺪﻤﺔ
ﺇﺪﺍ ﻜﻨﺖ ﺗﺴﺗﺨﺪﻡ ﺗﻠﻔﺎﺯ ﺑﻧﺴﺑﺔﺍﻻﺭﺗﻔﺎﻉﺇﻠﻰﺍﻠﻌﺭﺾ ٣:٤
ﻀﺒﻃ ﻨﺴﺒﺔ ﺍﻻﺮﺘﻔﺎﻉ ٳﻠﻰ ﺍﻠﻌﺮﺾ
)(EZ View
)(DVD
�١ﺃﺛﻨﺎﺀ ﻮﻀﻊ ﺍﻠﺘﺷﻐﻴﻞ ،ﺍﺿﻐﻃ ﻋﻠﻰ ﺍﻠﺯﺮ INFOﺒﻮﺣﺩﺓ ﺍﻠﺘﺤﻛﻢﻋﻦ ﺒُﻌﺪ�
�٢ﺍﺿﻐﻁ ﻋﻠﻰ ﺍﻠﺯﺮﻴﻦ † π/ﻠﺘﺤﺩﻴﺩ Shortcut
�٣ﺍﻀﻐﻂ ﻋﻠﻰ ﺍﻠﺯﺮﻴﻦ ® √/ﻠﺗﺤﺩﻴﺩ ، EZ Viewﺜﻢ ﺍﻀﻐﻁ ﻋﻠﻰ ENTER
ﻳﺘﻐﻴﺮ ﺤﺠﻢ ﺍﻠﺷﺎﺷﺔ ﻋﻨﺪ ﺍﻠﺿﻐﻁ ﻋﻠﻰ ﺍﻠﺯﺮ ﺑﺷﻜﻞ ﻤﺘﻛﺮﺮ� ﻳﻌﻤﻞ ﻭﻀﻊ ﺗﻜﺑﻴﺮ /ﺗﺼﻐﻴﺮﺍﻠﺷﺎﺷﺔ ﺒﺷﻜﻞ ﻤﺧﺗﻠﻒ ﻮﻓﻘًﺎ ﻹﻋﺩﺍﺩ ﺍﻠﺷﺎﺸﺔ ﻔﻲﻗﺎﺌﻤﺔ Display Setup.
EZ VIEW
ﺸﺎﺸﺔ ﻋﺮﻴﺿﺔ
ﺇﺫﺍ ﻛﻨﺖ ﺘﺴﺘﺨﺩﻢ ﺘﻠﻔﺎﺯًﺍ ﺑﻨﺴﺑﺔ ﺍﻻﺭﺘﻓﺎﻉ ﺇﻠﻰ ﺍﻠﻌﺮﺾ٩�١٦
ﻠﻸﻗﺭﺍﺺﺍﻠﺘﻲ ﺘﻌﻤﻝ ﺑﻨﺴﺑﺔ ﺍﻻﺭﺘﻓﺎﻉ ﺇﻠﻰ ﺍﻠﻌﺮﺾ٩�١٦
WIDE SCREENﻠﻌﺮﺾ ﻤﺤﺘﻭﻯ ﻋﻨﻮﺍﻦ DVDﻔﻲ ﻨﺴﺑﺔ ﺍﻻﺭ ﺗﻔﺎﻉ ﺇﻠﻰ ﺍﻠﻌﺭﺾ�٩�١٦
Screen Fitﻴﺗﻡ ﺍﻗﺘﺻﺎﺺ ﺍﻷﺟﺯ ﺍﺀ ﺍﻠﻌﻠﻭﻳﺔ ﻭ ﺍﻠﺴﻔﻠﻳﺔ ﻤﻥ ﺍﻠﺸﺎﺷﺔ .ﻋﻨﺪ ﺘﺸﻐﻴﻝ ﻗﺭﺺ ﺑﻨﺴﺑﺔ
ﺍﻻﺮﺗﻗﺎﻉ ﺇﻠﻰ ﺍﻠﻌﺭﺽ ،١�٢٫٣٥ﺗﺨﺗﻔﻲ ﺍﻷﺸﺮﻄﺔ ﺍﻠﺴﻭﺪﺍﺀ ﺍﻠﻌﻠﻭﺘﺔ ﻭ ﺍﻠﺴﻔﻠﻴﺔ
ﺍﻷﺸﺔ .ﻳﺗﻢ ﻣﹶﺪ ﻤﻇﻬﺭ ﺍﻠﺼﻭﺭﺓ ﺭ ﺃﺴﯾًﺎ).ﺤﺴﺏ ﻧﻭﻉ ﺍﻠﻗﺭﺺ ،ﻗﺩ ﻻ ﺗﺨﺗﻔﻲ
Zoom Fitﻳﺘﻢ ﺍﻗﺗﺻﺎﺹ ﺍﻷﺟﺯﺍﺀ ﺍﻠﻌﻠﻭﻳﺔ ﻮ ﺍﻠﺴﻓﻠﻴﺔ ﻮﺍﻠﻴﺴﺭﻯ ﻭ ﺍﻠﻳﻤﻧﻰ ﻤﻦ ﺍﻠﺸﺎﺸﺔ ﺑﺎﻹﺿﺎﻓﺔ
ﺇﻠﻰ ﺗﻜﺑﻳﺭ ﺍﻠﺟﺯﺀ ﺍﻷﻭﺴﻃ ﻤﻥ ﺍﻠﺸﺎﺸﺔ
ﻤﻼﺤﻈﺔ
ﻘﺪ ﺗﺆﺪﻱ ﻫﺫﻩ ﺍﻠﻭ ﻅﻳﻔﺔ ﺇﻠﻰ ﻧﺗﺎﺌﺞ ﻣﺨﺘﻠﻔﺔ ﺤﺴﺏ ﻧﻭﻉ ﺍﻠﻘﺭﺹ�
ﺗﺤﺩﻳﺩ ﻠﻐﺔ ﺍﻠﺻﻭﺖ
ﻠﻸﻗﺮﺍﺹ ﺍﻠﺗﻲ ﺘﻌﻣﻞ ﺑﻧﺴﺑﺔ ﺍﻻﺭﺘﻓﺎﻉ ﺇﻠﻰ ﺍﻠﻌﺭﺾ ٣�٤
NORMAL WIDEﻠﻌﺮﺽ ﻤﺤﺘﻭﻯ ﻋﻧﻭﺍﻦ DVDﺑﻨﺴﺑﺔ ﺍﻻﺭﺗﻔﺎ ﻉ ﺇﻠﻰ ﺍﻠﻌﺮﺾ . ٩:١٦ﻳﺗﻢ ﻣﹶﺪ
ﻣﻆﻬﺭ ﺍﻠﺻﻭﺭﺓ ﺃﻓﻗﯾًﺎ.
Screen Fit
ﻳﺘﻡ ﺍﻘﺗﺼﺎﺺ ﺍﻷﺟﺯﺍﺀ ﺍﻠﻌﻠﻭﻴﺔ ﻭ ﺍﻠﺴﻔﻠﻴﺔ ﻤﻦ ﺍﻠﺷﺎﺷﺔ ﺑﺎﻹﺿﺎﻔﺔ ﺇﻠﻰﻋﺮﺾ
ﺍﻠﺷﺎﺷﺔ ﺍﻠﻛﺎﻣﻠﺔ�
ﻳﺗﻢ ﻣﹶﺪ ﻤﻅﻬﺭ ﻠﺻﻭﺮﺓ ﺭﺃﺳﯾًﺎ�
Zoom Fitﻴﺘﻢ ﺍﻗﺘﺻﺎﺺ ﺍﻷﺟﺯﺍﺀ ﺍﻠﻌﻠﻭﻳﺔ ﻭﺍﻠﺴﻔﻠﻳﺔ ﻭﺍﻠﻳﺴﺮﻯ ﻭﺍﻠﻴﻤﻨﻰ ﻤﻥ ﺍﻠﺸﺎﺸﺔ ﺑﺎﻹ ﺿﺎﻓﺔ
ﺇﻠﻰ ﺘﻜﺑﻴﺮ ﺍﻠﺠﺯﺀ ﺍﻷﻭﺴﻄ ﻤﻥ ﺍﻠﺸﺎﺸﺔ.
VERTICAL FITﻋﻧﺩ ﻋﺭﺽﻗﺭﺺ DVDﺑﻧﺴﺑﺔ ﺍﻻﺭ ﺘﻔﺎﻉ ﺇﻠﻰ ﺍﻠﻌﺭﺽ ٣:٤ﺑﺎﺴﺗﺨﺪﺍﻡ ﺗﻠﻓﺎﺯ
ﺫﻱ ﻧﺴﺑﺔ ، ٩:١٦ﺘﻅﻬﺭ ﺍﻷﺷﺮﻃﺔ ﺍﻠﺴﻭﺩﺍﺀ ﻋﻠﻰ ﺍﻠﺠﺎﻧﺐ ﺍﻷﻳﺴﺭ ﻭﺍﻷﻳﻤﻥ ﻟﻠﺷﺎﺷﺔ
ﻠﻤﻧﻊ ﺤﺪﻭﺚ ﺍﻤﺗﺪﺍﺪ ﺃﻔﻘﻲ ﻔﻲ ﻤﻆﻬﺭ ﺍﻠﺼﻭﺭﺓ.
ﻠﻸﻗﺭﺍﺺ ﺍﻠﺗﻲ ﺘﻌﻤﻞ ﺑﻧﺴﺑﺔ ﺍﻻﺮﺘﻔﺎﻉ ﺇﻠﻰ ﺍﻠﻌﺮﺾ ٣:٤
NORMAL SCREENﻠﻌﺮﺽ ﻤﺤﺗﻭﻯ ﻋﻨﻭ ﺍﻥ DVDﺑﻨﺴﺑﺔ ﺍﻻﺭﺘﻔﺎﻉ ﺇﻠﻰ ﺍﻠﻌﺮﺽ �٣�٤
Screen Fitﻳﺗﻢ ﺍﻘﺗﺼﺎﺺ ﺍﻷﺠﺯ ﺍﺀ ﻠﻌﻠﻭﻴﺔ ﻭﺍﻠﺴﻔﻠﻳﺔ ﻤﻥ ﺍﻠﺸﺎﺷﺔ ﺑﺎﻹﺿﺎﻔﺔ ﺇﻠﻰ ﻋﺮﺽ ﺍﻠﺸﺎﺷﺔ ﺍﻠﻛﺎ ﻤﻠﺔ.
ﻳﺗﻢ ﻣﹶﺪ ﻤﻅﻬﺮ ﺍﻠﺻﻭﺭﺓ ﺭﺃﺳﯾًﺎ.
Zoom Fitﻳﺗﻡ ﺍﻗﺗﺻﺎﺺ ﺍﻷﺠﺯﺍﺀ ﺍﻠﻌﻠﻭﻳﺔ ﻭﺍﻠﺴﻔﻠﻴﺔ ﻭﺍﻠﺴﻔﻠﻳﺔ ﻭﺍﻠﻳﺴﺭﻯ ﻭﺍﻠﻴﻤﻧﻰ ﻤﻦ ﺍﻠﺸﺎﺸﺔ ﺑﺎﻹ ﺿﺎﻔﺔ ﺇﻠﻰ
ﺘﻛﺑﻴﺮ ﺍﻠﺠﺯﺀ ﺍﻷﻭ ﺴﻄ ﻤﻥ ﺍﻠﺸﺎﺷﺔ.
ﻴﻤﻛﻨﻙ ﺘﺣﺪﻴﺪ ﻠﻐﺔ ﺍﻠﺼﻭﺕ ﺍﻠﻤﻃﺎﻭﺒﺔ ﻋﻠﻰ ﻧﺣﻭ ﺴﺮﻴﻊﻭﺴﻬﻝ ﺑﺎﺴﺘﺧﺪﺍﻢ
ﺍﻠﺯﺭ .√/AUDIO
ﺍﺴﺘﺧﺪﺍﻢ ﺍﻠﺯﺮ(DVD/VCD/MPEG4) √/AUDIO
.١ﺍﻀﻐﻄ ﻋﻠﻰ ﺍﻠﺯﺮ .√/AUDIOﻳﺘﻐﻴﺭ ﺍﻠﺼﻭﺕ ﻋﻧﺪ ﺍﻠﻀﻐﻄ ﻋﻠﻰ ﺍﻠﺯﺮ
ﺑﺷﻛﻝ ﻤﺘﻜﺮﺮ .ﻴﺘﻢ ﻋﺮ ﺾ ﻠﻐﺎﺕ ﺍﻠﺼﻭﺕ ﺑﺎﺴﺘﺧﺪ ﺍﻢ ﺍﻻﺧﺘﺼﺎﺮ ﺍﺕ.
DVD
AUDIO
ENG Dolby Digital 5.1CH
VCD
AUDIO
ﺍﺴﺗﻴﺭﻴﻭ
ﻋﻨﺪ ﺘﺷﻐﻴﻝ ﻗﺮ ﺹ ،VCDﻴﻤﻛﻧﻚ
ﺍﻻﺧﺘﻴﺎﺮ ﻤﻦ ﺑﻴﻦ Stereoﺃﻭ
Rightﺃﻭ .Left
ﺍﻠﻌﺭﺑﻴﺔ_ ١٧
● ﺍﻟﻭﻆﺎﺋﻑ ﺍﻠﻣﺗﻗﺪﻤﺔ
ﺍﻷﺴﺎﺳﻳﺔ
ﻠﻠﺘﺷﻐﻴﻞ ﺒﺎﺴﺘﺨﺪﺍﻢ ﻨﺴﺒﺔ ﺍﻻﺮﺘﻔﺎﻉ ٳﻠﻰ ﺍﻠﻌﺮﺾ
ﻠﻸﻗﺭﺍﺺ ﺫﺍﺖ ﻨﺴﺑﺔ ﺍﻻﺭ ﺘﻔﺎﻉ ﺇﻠﻰ ﺍﻟﻌﺭﺽ٩�١٦
4:3 Letter Boxﻣﺤﺗﻭﻯ ﻋﻧﻭﺍﻦ DVDﺑﻧﺴﺑﺔ ﺍﻻﺭﺗﻔﺎﻉ ﺇﻠﻰ ﺍﻠﻌﺭﺽ �٩�١٦ﺴﺗﻇﻬﺭ ﺍﻷﺸﺭ ﻄﺔ ﻠﺴﻭﺪﺍﺀ
ﻠﻌﺭﺾ
4:3 Pan Scanﺍﻗﺗﺼﺎﺺ ﺍﻷﺠﺯﺍﺀ ﺍﻠﻴﺴﺮﻯ ﻭﺍﻠﻴﻣﻧﻰ ﻤﻦ ﺍﻠﺸﺎﺸﺔ ﺑﺎﻹﺿﺎﻔﺔ ﺇﻠﻰ ﻋﺮﺽ ﺘﻜﺑﻳﺮ ﺍﻠﺟﺯﺀ
ﺍﻷﻭﺴﻃ ﻤﻦ ﺍﻠﺸﺎﺸﺔ ﺑﻧﺴﺑﺔﺍﻻﺭﺘﻔﺎ ﻉ ﺇﻠﻰ ﺍﻠﻌﺭﺽ �٩�١٦
Screen Fitﻴﺘﻢ ﺍﻗﺗﺼﺎﺺ ﺍﻷﺟﺯﺍﺀ ﺍﻠﻌﻠﻭﻴﺔ ﻭﺍﻠﺴﻔﻠﻳﺔ ﻭﺍﻠﻴﺴﺮﻯ ﻭﺍﻠﻴﻤﻧﻰ ﻤﻦ ﺍﻠﺸﺎﺷﺔ ﺑﺎﻹﺿﺎﻔﺔ ﺇﻠﻰ
ﺘﻛﺑﻳﺭ ﺍﻠﺠﺯﺀ ﺍﻷﻭﺴﻄ ﻤﻦ ﺍﻠﺸﺎﺸﺔ�
Zoom Fitﻴﺘﻢ ﺍﻗﺗﺼﺎﺺ ﺍﻷﺟﺯﺍﺀ ﺍﻠﻌﻠﻭﻴﺔ ﻭﺍﻠﺴﻔﻠﻳﺔ ﻭﺍﻠﻴﺴﺮﻯ ﻭﺍﻠﻴﻤﻧﻰ ﻤﻦ ﺍﻠﺸﺎﺷﺔ ﺑﺎﻹﺿﺎﻔﺔ ﺇﻠﻰ
ﺘﻛﺑﻳﺭ ﺍﻠﺠﺯﺀ ﺍﻷﻭﺴﻄ ﻤﻦ ﺍﻠﺸﺎﺸﺔ�
-
ﺍ
ﺗ
﴿
ﻋ
١
٢
D
-
٦
,~ª¼*¦{JGuªk9BH'::9K
ª;K *awk6*
ªkG*9K$f¡.&*
¢M4~G*¨<9*
%#
*ÔHfG*jMK*5Ôªﺘﻐﻴﻴﺮ ﺯﺍﻭﻴﺔ ﺍﻠﻜﺎﻣﻴﺮﺍ
¡ÊÕHa¤¼,2akHfM*K5¨<¬§ktM.
8|E£fF*3(*
&$jª;K *awk6*
ﻴﻤﻛﻨﻚ، ﻴﺣﺘﻭ ﻱ ﻋﻠﻰ ﺯﻭ ﺍﻴﺎ ﻤﺘﻌﺪﺪﺓ ﻠﻤﺷﻬﺪ ﻤﻌﻴﻦDVD ﺇﺬﺍ ﻜﺎﻦ ﻗﺭﺹ
'
8*|E&* jª;K *awk6*
.ANGLE
ﺍﺴﺘﺧﺪﺍﻢ ﻭ ﻅﻴﻔﺔ
j7fG*¨<&$jª;§G*|¤kD,2akHfM*K5¨<kM
8|G*£fF*3(
*
(DVD )ﺃﻗﺮﺍﺺANGLE ﺍﺴﺘﺧﺪ ﺍﻢ ﻭ ﻇﻴﻔﺔ
ANGLE
ﻓﺴﺘﻅﻬﺮ ﺍﻠﻭ ﻅﻴﻔﺔ
،ﻤﺘﻌﺪﺪﺓ
ﺇﺬﺍﻜﺎﻦ ﺍﻠﻘﺮﺹ ﻳﺤﺘﻮﻱ ﻋﻠﻰ ﺯﻮ ﺍﻴﺎ
a+R ¢<tkG*,a0§+
a+¢<tkG*,a0§+
& 4~G*¨<9*ªkG*9K$f¡.&
*
INFO
.ﺍﻠﺸﺎﺷﺔ
ﻋﻠﻰ
4~G*K&* ¨<9*..Shortcut
>8.=498 aMatkG
¢M4~G*¨<9*
. ﺑﻭﺣﺪﺓ ﺍﻠﺘﺣﻜﻢﻋﻦ ﺑُﻌﺪINFO ﺍﻀﻐﻄ ﻋﻠﻰ ﺍﻠﺯﺮ،ﻀﻊﺍﻠﺘﺷﻐﻳﻝ%#
ﺃﺜﻧﺎﺀ ﻭ.١
¢M4~G*¨<9*
. Shortcut
ﻳﺪaMatkG
ﻠﺘﺣﺪπ/†ﻴﻥ¢M4~G*¨<9*
ﺍﻀﻐﻄ ﻋﻠﻰ ﺍﻠﺰﺮ.٢
4~G*K&*
¨<9*.
8260
ENTER
.ENTER ﺜﻢ ﺍﻀﻐﻄ ﻋﻠﻰAngle √ ﻠﺘﺣﺪﻴﺪ/®ﻋﻠﻰﺍﻠﺰﺭ ﻴﻦ%#
ﺍﻀﻐﻄ.٣
819
MPEG4
MP3 1/1
AUDIO
√/AUDIO ﺍﺿﻐﻁ ﻋﻠﻰ ﺍﻠﺯﺮ
ﺑﻭ ﺣﺪﺓ ﺍﻠﺘﻛﻢ ﻋﻦ ﺒﻌﺪ ﺑﺷﻜﻝ
ﻤﺘﻜﺮ ﻠﺘﺣﺪﻳﺪ ﺍﻠﺼﻭﺕ ﺍﻠﻣﻃﻠﻭ ﺐ
ﺛﻢ ﺍﻀﻐﻃ ﻋﻠﻰMPEG4 ﻋﻠﻰ
.ENTER ﺍﻠﺯﺭ
● ﺍﻟﻭﻆﺎﺋﻑ ﺍﻠﻣﺗﻗﺪﻤﺔ
* *awk6*
ﺍﻟﻭﻆﺎﺋﻑ ﺍﻠﻣﺗﻗﺪﻤﺔ
RETURN ﺃﻭ ﺍﻠﺯﺮCANCEL ﺍﺿﻐﻄ ﻋﻠﻰ ﺍﻠﺯﺮ،AUDIO � ﻹﺯﺍﻠﺔ ﺍﻠﺮﻣﺯ٢
ﻣﻼﺣﻇﺔ
ﺘﻌﺘﻤﺪ ﻫﺬﻩ ﺍﻠﻭ ﻆﻴﻔﺔ ﻋﻠﻰ ﻠﻐﺎﺕ ﺍﻠﺼﻭﺕ ﺍﻠﺘﻲ ﺘﻢ ﺘﺸﻔﻴﺮ ﻫﺎ ﻋﻠﻰ ﺍﻠﻘﺮﺹ.ﻭﻗﺪ ﻻ ﺘﻌﻤﻝ
. ﻠﻐﺎﺕ ﺻﻭ ﺕ٨ ﻋﻠﻰ ﻤﺎ ﻴﺼﻝ ﺇﻠﻰDVD ﻴﻤﻜﻦ ﺃﻦ ﻳﺣﺘﻭ ﻯ ﻗﺮ ﺹ؛DVD ﻻﺴﺘﺧﺪﺍﻢ ﻨﻔﺲ ﻠﻐﺔ ﺍﻠﺼﻭ ﺕ ﻣﺘﻰ ﺘﻢ ﺘﺷﻐﻴﻝ ﻗﺮ ﺹ
.٢٧ ﻴﺮﺠﻰ ﺍﻠﺮﺠﻮﻉ ﺇﻠﻰ "ﺍﺴﺧﺪﺍﻢ ﻠﻐﺔ ﺍﻠﺼﻭﺕ" ﺒﺼﻔﺣﺔ
+997
9957,;5
#0:0,=
+'40@
4~G*¨<9*
4~G*¨<9*
#
4~G*K&*
ENTER
8260
.√ ﺑﻭ ﺣﺪ ﺓ ﺍﻠﺘﺣﻛﻢ ﻋﻦ ﺑُﻌﺪ ﻠﺘﺣﺪﻴﺪ ﺍﻠﺯﺍﻭ ﻴﺔ ﺍﻠﻣﻄﻠﻭ ﺑﺔ/®ﺍﻀﻐﻄ ﻋﻠﻰ ﺍﻠﺰﺭ ﻴﻦ.٤
8=0;
#0=>;8
08>
a+¢<tkG*,a0§+ fE4&
a
R+¢<tkG*,a0§+ fE4&¸*4*45&* *awk6*¡ÊK&*
4/6
mfHÑG*
j0ÑH
jª;Kvfk-
&-45¨<
%9BH'B
§Ih0
¤H$f<ak6*
§»*.fk-M
jt+
4~G*¨<9*
jª+|G*
¾(*( §8§G*a¡<
·aJfHj.Ñ.
¢M4~G*¨<9*
j+§¼*jMK*~G*aMatkG
ﻣﻼﺣﻇﺔ
.ﻓﻠﻦ ﺘﻌﻤﻝ ﻫﺬﻩ ﺍﻠﻤﻴﺰ ﺓ، ﺇﺬﺍﻛﺎﻦﺍﻠﻘﺮﺹ ﻳﺣﺘﻭﻱ ﻋﻠﻰ ﺯﺍﻭﻴﺔ ﻭ ﺍﺤﺪﺓ ﻓﻘﻄj0ÑH
. ﻴﺤﺘﻭ ﻱ ﻋﺪﺪ ﻗﻠﻴﻝ ﻤﻦ ﺍﻷﻗﺮ ﺍﺹ ﻋﻠﻰ ﻫﺬﻩ ﺍﻠﻣﻴﺯﺓ، ﺣﺎﻠﻴًﺎ
,~ª¼*¦{J-¢DD,a0*KjMK*5¨<¬§ktM
8|G*£fF*3((*
ﻫﺬﻩ¸ﺍﻠﻭ ﻅﺎﺌﻒ
ﻧﻭﻉ ﺍﻠﻘﺮﺹ ﻗﺪ ﻻ ﺘﻌﻤﻝªGf0
ﺣﺴﺏ,~ª¼*¦{J¨<
8*|E&
*¢HªE2a<¬§ktMfªGf0
*¢HªE2a<¬§ktMf
N
)f;§G*¦{J-¸aE
8|G*§Ih0
¬4§G*ªkG*,2f<(*( «wkG*jª;K *awk6*
*awk6f+,|D*§k¼*jg0f¼*j/ÎG*mfG
9|<kM $&%%4~G*¨<9*
4|kH+4~G*¨<G*a¡<jg0f¼*j/ÎG*Ôª-kMm*4fk1¸*
.
Off
++
DVD
9|G*¾(*( f-4¸*jg
9|G*¾(*( f-4¸*jg¡+
! jHfG*j7fG*
9|<¾(*( jDf9¸
¸f+j7fG*¢HjªG*K
( f+j7fG*¢HjªG*K
MPEG4
'
8|E&*& ¬4§G*ªkG*,2f<*( jª;K *awk6*
¾((*jDf9(¸f+j7fG*¢H¨¡ªG*KL|ªG*KjªG*Kj
j7f
¦{J *awk6f+L|1&*NN,|H¥9|<IfHf( gDÕHa¤H
9|<-fD*3*(
jª;§G*
»*¾(*( ¿fº*a¤¼*k¡ªD $% %#"*4~G*¨<G*¶*3(*
¥ª-kMKfgM|-
¥ª-kMKf
NgM|-P£*§.4*a¯
8|G*§Ih0jkÂr)fk
m
$% %$" 4~G*¨<9*
jªHfH&*P££*§.ªkG*¨wkª
*§.ªkG*¨wkª6
j0ÑH
)f;§G*¦{J-¸aE
8|G*§Ih0
-!' 4~G* *awk6f+M|6§tI¨<j+§
MPEG4
#&
§»*.fk-M
jt+
4~G*¨<9*
¾((*jDf9(¸f+j7fG*¢H¨¡ªG*KL|ªG*KjªG*Kj
j7f
SUBTITLE
¿fº*a¤¼*¢HjªHfH&*P£*§.ªkG*¨wkM«Gjª;§G*¦{J awk6*
jHÑ<uH
9|G*¾((*f-4
ﺍﻠﺘﺮ$*2§G*j:|7&
ﻴﻤﻜﻧﻚ ﺘﺣﺪﻳﺪ
¸*|¤k6
9|G*¾*f-4¸*jg¡+
*( f-4¸*jg¡+
j7fG*¢
.SUBTITLE/πﺑﺎﺴﺘﺧﺪﺍﻢ ﺍﻠﺯﺮ
(DVD/VCD/MPEG4) SUBTITLE/πﺍﻠﺯﺮ
ﺑﺎﺴﺘﺧﺪﺍﻢ
$~¹*Ôg-
9|<¾(*( jDf9¸
( f+j7fG*¢H¨¡ªG*KL
9|G*¾(*( f-4¸
ﻋﺮﺾﻠﻐﺎﺕ ﺍﻠﺘﺮ ﺠﻣﺔ ﺍﻠﻣﺼﺎﺣﺑﺔ
ﻴﺘﻢ.SUBTITLE/πﺍﻀﻐﻄ ﻋﻠﻰ ﺍﻠﺯﺮ.١
jg0f¼*j/ÎG*jGaMa³
.ﺍﻠﻤﺘﻭ ﺍﻓﺮ ﺓ ﺑﺎﺴﺘﺧﺪ ﺍﻢ ﺍﻻﺧﺘﺼﺎﺮ ﺍﺕ
4~G* *awk6f+M|6§tI¨<j+§¼*jg0f¼*j/ÎG*aMa³¡Ê
¾((*jDf9(¸f+j7fG*¢H¨¡ªG*KL|ªG*KjªG*Kj
.
8*|E&* +-,!,$ 4~G* *awk6*
ﻋﻨﺪ+-,!,$
ﻴﺘﻢ ﺘﻐﻴﻴﺮ ﺍﻠﺘﺮ ﺠﻤﺔ ﺍﻠﻣﺼﺎﺣﺑﺔ
j7f
'
8*|E&* $&%% 4~G* *awk6*
.ﺍﻠﻀﻐﻄ ﻋﻠﻰ ﺍﻠﺯﺮ ﺑﺷﻜﻝ ﻣﺘﻛﺮﺮ
¬4§G*«wkG*jª;K *awk6*
4~G*¨<9*
9|G*¾(*( f-4¸*jg¡+5f
j0ÑH
ﺠﻤﺔ ﺍﻠﻣﺼﺎﺣﺑﺔ
ﺘﺤﺪﻳﺪ ﻠﻐﺔ ﺍﻠﺘﺮ
-¸aEK
8|G*¨<fJÔ-¶«kG*m§G*mfG¨<jª;§G*¦{Jak- m§8mfG¾(*( MfH¨< .
8|EL§ktM£&*¢Ê .
8|Eª-¶¨kHm§G*jG
I *awk6¸
ﺟﻣﺔ ﺍﻠﻣﺼﺎ ﺤﺑﺔ ﺍﻠﻤﻄﻠﻭﺔ ﻋﻠﻰ ﻨﺣﻭ ﺴﺮ ﻴﻊ
jt+ NNm§G*jG *awk6*NN ¾(*/4
!:91
Off
%'&&
SUBTITLE
&
ﺍﻀﻐﻂ
4|kH+4~G*¨<G*a¡<m§G*ÔkM
35"4)4,%π/SUBTITLE
R c;;
W77f
f ﻋﻠﻰﺍﻠﺯﺮ
m*4fk1¸* j
ﺑﺷﻛﻝ
ﺑﻌﺪ
ﺍﻠﺘﺣﻜﻢ
ﺍﻠﺮ ﺟﻤﺔﺑﻭ ﺣﺪﺓ
Q
Oﻋﻦ
O
F<
<
F77
.
D
OQ d F
D2
c;;
2%% ﻣﺘﻛﺮ ﺮ ﻠﺘﺣﺪﻴﺪ ﻠﻐﺔ
R c;;
W77f
f _ #&
ﺍﻠﻤﺼﺎﺣﺒﺔ ﺍﻠﻤﻄﻠﻭ ﺒﺔ ﻋﻠﻰ
!*%
vq£b
p !&$
&!
.MPEG4
#%&# 4~G*K&* 4~G*¨< 9* $&%% ~H|G*jG*5(¸
( j0ÑH
j)fE·j+§¼*jg0f¼*j/ÎG*Ôª-¾
j)fE·j+§¼*jg0f¼*j/ÎG*Ôª-¾(*( sfk³aE
4~G*¨<9*
8|G*§Ih0
¨<fJÔ-¶«kG*jg0f¼*j/ÎG*mfG¨<jª;§G*¦{Jak-
.
8*|E&*F¨<-¸aEK
8|G*
jg0f¼*j/ÎGjG¾(*( MfH¨<.
8|EL§ktM£&*¢Ê
¬&*·.
8|Eª-a¡<jg0f¼*j/ÎG*jG
I
9|G
jt+NNjg0f¼*j/ÎG*jG *awk6*NN ¾(*/4*lEK
.
$=0;09
&!
_ﺍﻟﻭﻆﺎﺋﻑ ﺍﻠﻣﺗﻗﺪﻤﺔ١٨
$=0;09
#&
&!
¡Ê
K
١
!
¦OQ
c;;
#%&# 4~G*K&* 4~G*¨<
ﺍﺴﺘﺧﺪﺍﻢ ﺍﻠﻭ ﻆﻳﻔﺔ ﺍﻠﺘﻜﺑﻳﺮ/ﺍﻠﺘﺼﻐﻳﺮ
ﺍﺴﺘﺧﺪﺍﻢ ﺍﻠﻭ ﻆﻳﻔﺔ ﺍﻠﻌﻼﻤﺎﺖ
ﺗﺗﻳﺢ ﻠﻚ ﻫﺫﻩ ﺍﻠﻴﺯﺓ ﻭﺿﻊ ﻋﻼﻤﺔ ﻋﻠﻰ ﺃﺟﺯﺍﺀ ﻗﺭﺺ DVDﺃﻭﻗﺭﺺ VCD
)ﻭﺿﻊ (Menu Offﺑﺤﻳﺙ ﻴﻤﻜﻨﻚ ﺍﻠﻭ ﺻﻭﻞ ﺇﻠﻴﻬﺎ ﺑﺴﺭﻋﺔ ﻓﻲ ﻭﻗﺖ ﻻﺤﻖ.
ﺍﺴﺘﺧﺪﺍﻢ ﺍﻠﻭ ﻆﻳﻔﺔ ﺍﻠﻌﻼﻤﺎﺖ
)(DVD/VCD
DVD/VCD
Enter
ﻋﻼﻤﺔ
Shortcut
.٣ﺍﻀﻐﻄ ﻋﻠﻰ ﺍﻠﺰﺭ ﻴﻦ® √/ﻠﺘﺣﺪﻴﺪ Bookmarkﺜﻢ ﺍﻀﻐﻄ ﻋﻠﻰ .ENTER
2X
.٤ﻋﻧﺪ ﺍﻠﻭﺻﻭﻞ ﺇﻠﻰ ﺍﻠﺷﻬﺪ ﺍﻠﻄﻠﻭﺏ ﺘﻤﻴﻳﺯﻩ ،ﺍﺿﻐﻃ ﻋﻠﻰ ﺍﻠﺯﺮ ENTERﻴﻤﻛﻦ ﺘﻤﻳﻴﺯ ﺤﺘﻰ
ﺜﻼﺜﺔ ﻤﺷﺎﻫﺪ ﻔﻲ ﺍﻠﺭﺓ ﺍﻠﻭﺍﺤﺩﺓ.
1 - -
ﻣﻼ ﺤﻈﺔ
ﻋﻧﺪ ﺘﺸﻐﻳﻝ ﻗﺭ ﺼﻦ ،VCDﻗﺩﻻﺘﻌﻤﻝ ﻭﻅﻳﻓﺔ Disc menuﻭﻓﻘًﺎﻠﻟﻘﺮﺺ . -ﺤﺴﺏ ﻧﻭﻉ ﺍﻠﻗﺭﺺ ،ﻗﺪﻻ ﺘﻌﻣﻞ ﻭﻅﻳﻔﺔ Bookmark
ﺍﺴﺗﺪﻋﺎﺀ ﻣﺸﻬﺪ ﻤﻤﻴﺯ ﺑﻌﻼﻣﺔ
. ٣-١ﺘﺗﻤﺎﺜﻞ ﺍﻠﺧﻄﻭﺍﺖ ﻣﻦ ٣-١ﻤﻊ ﺗﻠﻚﺍﻠﻭﺍﺮﺪﺓ ﻔﻲ "ﺍﺴﺧﺪﺍﻡ ﻭﻅﻴﻔﺔ ﻠﻌﻼﻤﺎﺖ"
.٤ﺍﺻﻐﻄ ﻋﻠﻰ ﺍﻠﺯﺭﻳﻥ ® √/ﻠﺗﺤﺪﻳﺪ ﻣﺸﻬﺪ ﻣﻤﻳﺯ ﺑﻌﻼﻣﺔ.
ﻗﺎﺌﻤﺔ ﻤﻘﺎ ﻃﻊ ﻣﻠﻔﺎﺕ JPEG/WMA/MP3
/MPEG4/ﻗﺮﺺ ﺍﻠﻣﻀﻐﻭﻃ.
ﺘﺣﺘﻭﻱ ﺃﻗﺮ ﺍﺹ ﺍﻠﺼﻭﺕ ﺍﻠﻣﻀﻐﻭ ﻃﺔ ﺃﻮ ﺍﻷ ﻗﺮ ﺍﺹ ﺍﻠﺘﻲ ﺘﺘﻀﻤﻦ ﻤﻠﻔﺎﺕ
MPEG4/JPEG/WMA/MP3ﻋﻠﻰ ﺃﻏﺎ ﻦٍ ﺧﺎﺼﺔﻮ/ﺃﻭ ﺍﻠﺼﻭﺮ ﺍﻠﺘﻲ
ﻳﻤﻜﻦ ﺘﻧﻅﻴﻤﻬﺎ ﻓﻲ ﻤﺟﻠﺪﺍﺕ ﻋﻟﻰ ﺍﻠﻨﺣﻭ ﺍﻠﻤﻭ ﻀﺢ ﺃﺪ ﺑﺎﻩ.
ﻭﻫﻲ ﺘﺘﺸﺎ ﺑﻪ ﻣﻊ ﻂﺭ ﻳﻘﺔ ﺍﺴﺘﺧﺪﺍﻢ ﺍﻠﻛﻤﺑﻳﻭ ﺘﺮ
ﻠﻮ ﻀﻊ ﺍﻠﻤﻠﻔﺎﺕ ﻓﻲ ﻤﺣﻠﺪﺍﺕ ﻣﺧﺘﻠﻔﺔ.
1 2 3
ﺇﻳﻗﺎﻒ
.٥ﺍﺿﻐﻃ ﻋﻠﻰ ﺍﻠﺯﺮ )PLAY/PAUSE
( ﻟﺗﺨﻄﻲ ﺍﻠﺷﻬﺪ ﺍﻟُﻤﻳﺯﺑﻌﻼﻣﺔ
ﻤﺴﺢ ﻋﻼﻤﺔ
ﺇﻴﻘﺎﻒ
ﻓﺘﺢ ﺪﺮﺝ ﺍﻷﻗﺮﺍﺹ.
ﻀﻊ ﺍﻠﻘ ﺹ ﻓﻲ ﺍﻠﺪﺭ ﺝ.
ﺃﻏﻠﻖ ﺍﻠﺪﺮﺝ.
ﻴﺘﻢﺇ
ﺍﻠﺷﺎ ﺷﺔ ﺍﻠﺘﺎﻠﻴﺔ.
. ٣-١ﺘﺗﻤﺎﺜﻞ ﺍﻠﺧﻄﻭﺍﺖ ﻣﻦ ٣-١ﻤﻊ ﺗﻠﻚﺍﻠﻭﺍﺮﺪﺓ ﻔﻲ "ﺍﺴﺧﺪﺍﻡ ﻭﻅﻴﻔﺔ ﻠﻌﻼﻤﺎﺖ"
.٤ﺍﺿﻐﻄ ﻋﻠﻰ ﺍﻠﺯﺭﻳﻦ ® √/ﻠﺗﺤﺩﻴﺪ ﺮﻗﻢ ﺍﻠﻌﻼﻤﺔ ﺍﻠﻄﻠﻭﺐ ﺤﺫﻔﻬﺎ.
1 2 3
ﺍﻠﻌﺭﺑﻴﺔ_ ١٩
ﺍ
● ﺍﻟﻭﻆﺎﺋﻑ ﺍﻠﻣﺗﻗﺪﻤﺔ
.١ﺃﺜﻧﺎﺀ ﻭ ﻀﻊ ﺍﻠﺘﺷﻐﻳﻝ ،ﺍﻀﻐﻄ ﻋﻠﻰ ﺍﻠﺯﺮ INFOﺑﻭﺣﺪﺓ ﺍﻠﺘﺣﻜﻢﻋﻦ ﺑُﻌﺪ.
.٢ﺍﻀﻐﻄ ﻋﻠﻰ ﺍﻠﺰﺮ ﻴﻥ† π/ﻠﺘﺣﺪ ﻳﺪ Shortcut
ﺍﺴﺘﺧﺪﺍﻢﻭ ﻅﻳﻔﺔ ﺍﻠﺘﻜﺑﻴﺭ )ﺃﻗﺮﺍﺹ (DVD/VCD
.١ﺃﺜﻧﺎﺀ ﻭ ﻀﻊ ﺍﻠﺘﺷﻐﻳﻝ ،ﺍﻀﻐﻄ ﻋﻠﻰ ﺍﻠﺯﺮ INFOﺑﻭﺣﺪﺓ ﺍﻠﺘﺣﻜﻢﻋﻦ ﺑُﻌﺪ.
.٢ﺍﻀﻐﻄ ﻋﻠﻰ ﺍﻠﺰﺮ ﻴﻥ† π/ﻠﺘﺣﺪ ﻳﺪ Shortcut
.٣ﺍﻀﻐﻄ ﻋﻠﻰ ﺍﻠﺰﺭ ﻴﻦ® √/ﻠﺘﺣﺪﻴﺪ Zoomﺜﻢ ﺍﻀﻐﻄ ﻋﻠﻰ .ENTER
ﺃﺛﻨﺎﺀ ﺗﺷﻐﻴﻞ ﻗﺭﺺ ،DVDﺍﺿﻐﻄ ﻋﻠﻰ ﺨﺸﺯ ﻠﺘﻜﺑﻴﺮ No◦I/٢/٤/٢ﺑﺎﻠﺘﺭ ﺘﻴﺏ. ﺃﺛﻨﺎﺀ ﺗﺷﻐﻴﻞ ﻗﺭﺺ ،VCDﺍﺿﻐﻄ ﻋﻠﻰ ﺨﺸﺯ -ﻠﺘﻜﺑﻴﺮ No◦I/٢/٤/٢ﺑﺎﻠﺘﺭ ﺘﻴﺏ.
ﺍ
٢
٨
ﺍﻟﻭﻆﺎﺋﻑ ﺍﻠﻣﺗﻗﺪﻤﺔ
ﺘﺷﻔﻴﻝ
ﺇﻳﻗﺎﻒ
jª+|G*
. ﺿﻊ ﺍﻠﻘﺭ ﺺ ﻓﻲ ﺍﻠﺩﺭ ﺝ. ﺍﻓﺗﺢ ﺪﺭﺝ ﺍﻷﻗﺮ ﺍﺹ.١
.ﺃﻏﻟﻖ ﺍﻠﺪﺮﺝ
ﻳﺘﻢ ﺘﺷﻐﻴﻝ ﻨﻭﻉ ﺍﺣﺪ ﻓﻘﻄ ﻤﻦ ﺍﻠﻣﻠﻔﺎﺕ ﻣﺘﻰ ﺍﺤﺘﻭ ﻯ ﺍﻠﻘﺮﺹ.WMA ﻮMP3 ﺃﻭ ﺍﻠﻤﺠﻠﺪ ﻋﻠﻰﻜﻝٍ ﻤﻦ ﻤﻠﻔﺎﺕ
. ﺃﻭ ﺍﻠﺯﺭﻴﻦ ﻠﺘﺣﺪﻴﺩ ﻤﻠﻒ ﺃﻏﻨﻴﺔπ/† ﺍﻀﻐﻄﻋﻠﻰ ﺍﻠﺯﺭﻴﻦ.٢
. ﻠﺑﺪ ﺀ ﺘﺷﻐﻴﻝ ﻤﻠﻒ ﺍﻷ ﻏﻨﻴﺔENTER ﺍﻀﻐﻄ ﻋﻠﻰ
ff
fªGf0ªkG*aªE¼*6*
ªN NªGf0ªkG*aªE¼*6*
fªGf0ªkG*aªE¼*6*
Gf0ªkG*aªE¼*6*
¿fº*ªkG*¢H5 ¢<hª-ÎGf+fJaMa³¢Êf9K&*j+4&*a/§-¿fº*ªkG*9K #"%4~G*¨<G*M|:
¬2f<ª- ':: jªGfº*jq¼*,2f¼*4*|- ,E57?
¿fº*aÖ* 4*|-+("#.
«)*§<hª-Î+
8|G*¨<,2§/§¼*mf¼*ª-kª6 *"+) '
,a0§+
%# ~G*
...
H~H4
¿fº*aÖ*~H4 %( H~H4
/% H~H4 REPEAT
"( H~H4 , [;; R
u
§Hm§8
8|EH~H4
ﺍﻠﺘﻜﺭﺍﺭﻭﺍﻠﺘﺷﻐﻴﻝ ﺍﻠﻌﺷﻭﺍﺌﻲ
. ﻠﺘﻐﻴﻴﺮ ﻭﺿﻊ ﺍﻠﺘﺸﻐﻴﻝREPEAT ﺍﻀﻐﻄ ﻋﻠﻰ ﺍﻠﺯﺭ
Folder ﻮTrack ﻮOff ﺘﻭﺠﺪ ﺃﺮﺑﻌﺔ ﺃﻭﺿﺎ ﻉ ﺘﺸﻐﻴﻝ
.Random ﻮ
ﺗﺷﻐﻴﻝ ﻋﺎﺪﻱ: Off . ﻠﺘﻜﺮﺍﺮ ﻤﻡﻒ ﺍﻷ ﻏﻨﻳﺔ ﺍﻠﺣﺎﻠﻲ: Track ﻠﺘﻜﺮ ﺍﺮ ﻤﻠﻔﺎﺕ ﺍﻷ ﻏﺎﻨﻲ ﺍﻠﻣﺘﺷﺎﺑﻬﺔ ﻓﻲ ﺍﻻﻤﺘﺪ: Folder .ﺍﺪ ﺑﺘﺮ ﺘﻴﺐ ﻋﺸﻭﺍﻠﺌﻲ
ﺴﻴﺘﻢ ﺘﺷﻐﻴﻝ ﻤﻠﻔﺎﺖ ﺍﻷﻏﺎﻨﻲ ﺍﻠﻣﺘﻄﺎﺒﻘﺔ ﻓﻲ: Random .ﺍﻻﻤﺗﺪ ﺍﺪ ﺑﺘﺮﺘﻴﺐ ﻋﺷﻭ ﺍﺌﻲ
ﺍﻀﻐﻃ ﻋﻠﻰ ﺍﻠﺯﺭ، ﻻ ﺴﺘﺌﻨﺎﻒ ﺍﻠﺘﺸﻐﻴﻝ ﺍﻠﻌﺎﺪﻱ
.CANCEL
ϯϮγ
● ﺍﻠﻭﻈﺎﺌﻑ ﺍﻠﻣﺗﻗﺩﻤﺔ
έήϜΗ
ςϐο
&::
C@89F
+=H@9
%# 4~G*
¦Ôgk+i§¼*j7f
(@5L K&*+GCD 9§G*¢HF·aÖ*aMa³¢Ê
«ª)|G*aÖ*aMatkG
¢M4~G*¨<9*K&*«ª)|G*aÖ*¾(*( *(fkIÑG
fkIÑG #%&# 4~G*¨<9*
«ª)|G*aÖ*¾((*(*k¡-«F
k¡-«F %# ¨<9*.
aMatkG
%#¨<9*.i§¼*aÖ*aMatkG
Ô¡G*aÖ*aMatkG
¢M4~G*¨<9*
«<|G*aÖ*aMatkG
$ιήϘΑ")ϒϠϣ
ϲϠϳΎϣϰϟ·ωϮΟήϟϰΟήϳˬ$ιήϗϰϠϋ)ϭ"ΕΎϔϠϣϞϴΠδΗΪϨϋ
!&ϭ%!ϖϴδϨΘΑ)ϭ"ΕΎϔϠϣϥϮϜΗϥΐΠϳ
ϞϴϐθΘϟϡΎψϧϊϣ.$ϭ$'ΕΎϔϠϤϟ!C@=9Hϭ *&ϖϴδϨΗϖϓϮΘϳ DD@9$57ϞϴϐθΘϟϡΎψϧϭ$=7FCGC:H.=B8CKGϭ$=7rCGC:H&* Ύ˱ϣΪΨΘγήΜϛϷϖϴδϨΘϟϮϫϭ ΐΠϳϭϑϭήΣ́ϢγϻίϭΎΠΘϳϻΐΠϳˬ)ϭ"ΕΎϔϠϣΔϴϤδΗΪϨϋ
ϒϠϤϟΩΪΘϣΎϛA8-ϭ8;ϝΎΧΩ· Ϊϛ΄ΗˬϥϮϨόϟϦϳϮϜΗΪϨϋ
+=H@9
KA5ϭ+=H@9
ADϢγϼϟϡΎόϟϖϴδϨΘϟ ϡΪΨΘγΐϨΠΗϭϢγϻϲϓΕΎϓΎδϣΩϮΟϭϡΪϋϭϞϗϭϑϭήΣ́ϡΪΨΘγϦϣ ˬˬ3ˬˬ
ϚϟΫϲϓΎϤΑΔλΎΨϟϑϭήΤϟ ϞϴΠδΗΪϨϋΔϴϧΎΜϟϲϓΖϳΎΑϮϠϴϛ˺˻́ϦϋϞϘϳϻςϐοϚϓϞϘϧϝΪόϣϡΪΨΘγ
"ΕΎϔϠϣ ςϐπϟϚϓςϐπϟϝΪόϣϰϠϋϲγΎγϞϜθΑ$'ΕΎϔϠϣΕϮλΓΩϮΟΪϤΘόΗ ΔϨϴϋϝΪόϣήϓϮΗρϮϐπϤϟΕϮμϟιήϗΕϮλϰϠϋϝϮμΤϟΐϠτΘϳ
ΩΪΤϤϟ ϮϠϴϛ˺˻́ϦϋϞϘϳϻΎϤΑˬ$'ϖϴδϨΗϰϟ·ϞϳϮΤΘϟϲϨόϳΎϤΑˬϲϤϗέϱήχΎϨΗ ΕϻΪόϤϟέΎϴΘΧϱΩΆϳϻΎϤϨϴΑ
ΔϴϧΎΜϟϲϓΖϳΎΑϮϠϴϛ˺˿˹ϰΘΣϭΔϴϧΎΜϟϲϓΖϳΎΑ ΕϮλΓΩϮΟϰϠϋϝϮμΤϟϰϟ·ˬΪϳΰϳΎϣϭΔϴϧΎΜϟϲϓΖϳΎΑϮϠϴϛ˺̂˻ϞΜϣˬϰϠϋϷ ϚϓϝΪόϣΕΫΕΎϔϠϤϟϞϴϐθΗϢΘϳϦϟˬβϜόϟΎΑϭ
ΓέΩΎϨϟΕϻΎΤϟϲϓϻ·Ϟπϓ ϴΤλϞϜθΑΔϴϧΎΜϟϲϓΖϳΎΑϮϠϴϛ˺˻́ϦϋϞϘϳϱάϟςϐπϟ ¦Ôgk+
%#i§¼*
4~G*K&* j7f
¨
aÖ*aMa³
%#¨<9*.i§¼*aÖ*aMatkG
˺
˻
=J//=J= 1 2 3
● ﺍﻟﻭﻆﺎﺋﻑ ﺍﻠﻣﺗﻗﺪﻤﺔ
ﻗﺭﺺ ﺍﻠﺼﻭﺖ ﺍﻠﺿﻐﻭﻄMP3/WMA ﺘﺸﻐﻴﻞ
¢M4~G*¨<9*
§P"
"
P"
-#
"%'*0
&
`
Ob D
f
f
D
F?
?D
D
f
f
F?
D
#&
c9
9?
?
b%
%
c9
9?
£§L
F?
?
Q
D
f
f
D
mfH¢
·f¤ª¡-¢Ê«kG*4
|-§ªgG* *awk6*j
d
D
d
y F?
?=
=
[;
;
F?
[;
F
§D
D
f
f
F
z F?
?=
=
[;
;
F?
[;
{ F?
?=
=
[;
;
[;
D 9
WMA
JPEG
MP3
#& D8
8;
;
8;
MPEG4
Enter
_ﺍﻟﻭﻆﺎﺋﻑ ﺍﻠﻣﺗﻗﺪﻤﺔ٢٠
٢
٠
ϴΤλϞϜθΑΔϴϧΎΜϟϲϓΖϳΎΑϮϠϴϛ˺˻́ϦϋϞϘϳϱάϟςϐπϟ MPEG4 ﻭﺼﻒﻮﻅﻴﻔﺔ
jHÑG*E4 {º 4~G*¨<9*
ﺍﻠﺼﻔﺣﺔﺍﻠﻤﺮﺠﻌﻴﺔ
ﺍﻠﻭﺼﻒ
ﺍﻀﻐﻄ ﻋﻠﻰ ﺍﻠﺯﺮ, ﺃﺛﻨﺎ ﺀ ﺍﻠﺘﺷﻐﻴﻝ
● ﺍﻟﻭﻆﺎﺋﻑ ﺍﻠﻣﺗﻗﺪﻤﺔ
ﻓﻴﻘﻭﻢﺑﺎﻲﺘﻘﺪﻢﻠﻸﻤﺎﻢ ﺃﻭ ﺍﻠﺮﺠﻭ ﻉ،
. ﺪﻗﺎﺌﻖ5 ﻠﻠﺧﻠﻒ ﺑﻤﻘﺪﺍﺮ
(
Skip
ﺃﻮ
ϦϣήΜϛϭΔϴϧΎΜϟϲϓΖϳΎΑϮϠϴϛ˿˽ϦϣϞϗϷςϐπϟϚϓΕϻΪόϣΕΫΕΎϔϠϤϟ
) ������ ���� ���� ���� ������� ���� ϴΤλϞϜθΑΔϴϧΎΜϟϲϓΖϳΎΑϮϠϴϛ
ΔϴΑήόϟ
ΔϴΑήόϟ
ﺃﻮ
-
1 2 3
ﻠﻭﻆﻴﻔﺔ
ϞϴΠδΗΪϨϋΔϴϧΎΜϟϲϓΖϳΎΑϮϠϴϛ˿˽ϦϋϞϘϳϻςϐοϚϓϞϘϧϝΪόϣϡΪΨΘγ
)ΕΎϔϠϣ ΩΪΤϤϟςϐπϟϚϓςϐπϟϝΪόϣϰϠϋϲγΎγϞϜθΑ.$ΕΎϔϠϣΕϮλΓΩϮΟΪϤΘόΗ
ΔϨϴϋϝΪόϣήϓϮΗρϮϐπϤϟΕϮμϟιήϗΕϮλϰϠϋϝϮμΤϟΐϠτΘϳ
ϮϠϴϛ˿˽ϦϋϞϘϳϻΎϤΑˬ.$ϖϴδϨΗϰϟ·ϞϳϮΤΘϟϲϨόϳΎϤΑˬϲϤϗέϱήχΎϨΗ
ϮϠϴϛ˿˽ϦϋϞϘϳϻΎϤΑˬ.$ϖϴδϨΗϰϟ·ϞϳϮΤΘϟϲϨόϳΎϤΑˬϲϤϗέϱήχΎϨΗ
ϞϴϐθΗϢΘϳϦϟˬβϜόϟϰϠϋϭ
ΔϴϧΎΜϟϲϓΖϳΎΑϮϠϴϛ˺̂˻ϰΘΣϭΔϴϧΎΜϟϲϓΖϳΎΑ
ϞϴϐθΗϢΘϳϦϟˬβϜόϟϰϠϋϭ
ΔϴϧΎΜϟϲϓΖϳΎΑϮϠϴϛ˺̂˻ϰΘΣϭΔϴϧΎΜϟϲϓΖϳΎΑ
ήθϨϟϭϊΒτϟϕϮϘΣΐΟϮϤΑΔϴϤΤϤϟ"ΕΎϔϠϣϞϴΠδΗϝϭΎΤΗϻ
.���� ����
30 �� ���� WMA ������ ����
ϴΤλϞϜθΑΔϴϧΎΜϟϲϓΖϳΎΑϮϠϴϛ
ϲϧϮϧΎϘϟήϴϏΦδϨϟϊϨϤϟίϮϣήϟΎΑΎϬΘϳΎϤΣϭΔϴϤΤϤϟΕΎϔϠϤϟξόΑήϴϔθΗϢΗ
ήθϨϟϭϊΒτϟϕϮϘΣΐΟϮϤΑΔϴϤΤϤϟ"ΕΎϔϠϣϞϴΠδΗϝϭΎΤΗϻ
SEARCH ﺍﻀﻐﻄ ﻋﻠﻰ ﺍﻠﺰﺮ،ﺃﺜﻨﺎﺀ ﺍﻠﺘﺸﻐﻴﻝ
+$
ΔϴΗϵωϮϧϷϰϟ·ΕΎϔϠϤϟϩάϫϲϤΘϨΗ
ΔϳέΎΠΗΔϣϼϋ.=B8CKG$98=5
ϲϧϮϧΎϘϟήϴϏΦδϨϟϊϨϤϟίϮϣήϟΎΑΎϬΘϳΎϤΣϭΔϴϤΤϤϟΕΎϔϠϤϟξόΑήϴϔθΗϢΗ
) ﺃﻮ ( ﻭ ﺍﻀﻐﻃ ﻤﺮ ﺓً ﺃﺧﺮ ﻯ ﻠﻠﺒﺣﺚ
Search
+$
ϭ$=7FCGC:H B7ΔϛήθϟΔϠΠδϣ
ΔϛήθϟΔϠΠδϣΔϳέΎΠΗΔϣϼϋ*$ +$
ΔϴΗϵωϮϧϷϰϟ·ΕΎϔϠϤϟϩάϫϲϤΘϨΗ
ΔϳέΎΠΗΔϣϼϋ.=B8CKG$98=5
ﻴﺘﻴﺢ ﺍﻠﺒﺣﺚ ﺑﺴﺮ ﻋﺔ ﺃﻜﺑﺮ ﻓﻲ.) ﺃﻮ ( ﺑﺴﺮ ﻋﺔ ﺃﻜﺑﺮ
ΕΎϔϠϤϟϩάϫϞΜϣΦδϧϚϨϜϤϳϻ
*$
CIB85H=CB
+$
ϭ$=7FCGC:H B7ΔϛήθϟΔϠΠδϣ
ΔϛήθϟΔϠΠδϣΔϳέΎΠΗΔϣϼϋ*$
AVI.(٨X, ٤X,٢X) ﻤﻠﻒ
ϡΎϫ
ΕΎϔϠϤϟϩάϫϞΜϣΦδϧϚϨϜϤϳϻ
*$ CIB85H=CB
¢M4~G*
* ¸
¢M4~G* ¨< 9**
,a0§+ & 4~G*¨<9*lE§¼*fM
§' ¼*fM
( *K&*ªkG*9K$f¡.&
-ιήϗϞϐθϣϥ΄ΑΎϧ˱ ΎϤοϩϼϋΓέϮϛάϤϟΕΎϴλϮΘϟέΎΒΘϋϦϜϤϳϻ
ϡΎϫ
%#
4~G*¨<9*
%# ~G* * ¨<9* +99 aatkG
<9*
aM4~G*
a+¢<tkG*
R+¢<tkG*
ΔψΣϼϣΐΠϳ
ΕϮμϟΓΩϮΟϰϠϋ
Ϊ˱ ϴϛ΄Ηϭˬ$'ΕϼϴΠδΗϞϴϐθΘΑϡϮϘϴγ
-ιήϗϞϐθϣϥ΄ΑΎϧ˱ ΎϤοϩϼϋΓέϮϛάϤϟΕΎϴλϮΘϟέΎΒΘϋϦϜϤϳϻ
9 .
8|E ª-$f¡.*
AVI.
ﻤﻠﻒ
ﻓﻲ
ﺃﻗﻝ
ﻋﺔ
ﺑﺴﺮ
ﺍﻠﺒﺣﺚ
ﻴﺘﻴﺢ
ﺗﺸﻐﻴﻝﺑﺎﻠﺣﺮﻜﺔ
ϊϨϤΗ)GιήϗϰϠϋ$'ΕΎϔϠϣϞϴΠδΗΐϴϟΎγϭΕΎϴϨϘΗξόΑϥ
$~/ aMatkG
¢M4~G*
K&*
¨< 9* ¢M4~G*
¦Ôgk+
%#i§¼*
4~G*K&* j7fG*
¨<9*.
>8.=498
aMatkG
¢M4~G*¨<9*
ΔψΣϼϣΐΠϳ
ΕϮμϟΓΩϮΟϰϠϋΪ˱ ϴϛ΄Ηϭˬ$'ΕϼϴΠδΗϞϴϐθΘΑϡϮϘϴγ
١٥ ﺼﻔﺤﺔ
(١/٨X,١/٤X,١/٢X)
ﻠﺑﻃﻴﺌﺔ
-ιήϗϞϐθϣϡΪΨΘγΎΑΕΎϔϠϤϟϩάϬϟϞΜϣϷϞϴϐθΘϟ
%# 4~G*¨<9*
ϊϨϤΗ)GιήϗϰϠϋ$'ΕΎϔϠϣϞϴΠδΗΐϴϟΎγϭΕΎϴϨϘΗξόΑϥ
%# 4~G*K&* ¨<9*. +997aMatkG
¢M4~G*¨<9*
ΕΎϔϠϤϟΓ˯ήϗϦϋΕϻΎΤϟξόΑϲϓϞϐθϤϟΰΠϋϭΕϮμϟΓΩϮΟνΎϔΨϧΎϛ
~1 ¨<9* .
8|Eª-$f¡.&*
-ιήϗϞϐθϣϡΪΨΘγΎΑΕΎϔϠϤϟϩάϬϟϞΜϣϷϞϴϐθΘϟ
¦Ôgk+i§¼*j7fG*$~/aMatkG
¢M4~G*K&
*
¢M4~G*¨<9*
hª-ÎGf+ &CQ@ÔgkG
ϲϓϰμϗΪΤϛΪϠΠϣ˾˹˹ϭϒϠϣ˾˹˹ϰΘΣϞϴϐθΗΓΪΣϮϟϩάϫϊϴτΘδΗ
ΕΎϔϠϤϟΓ˯ήϗϦϋΕϻΎΤϟξόΑϲϓϞϐθϤϟΰΠϋϭΕϮμϟΓΩϮΟνΎϔΨϧΎϛ
٢٠ ﺼﻔﺤﺔ
ﺑﺎﻠﺘﺮ ﺘﻴﺐ٢X/٤X/٢X
ZOOM
%#
4~G*¨<9*
~1 ¨<9* .
8|Eª-$f¡.&
*
ΪΣϮϟιήϘϟ ϲϓϰμϗΪΤϛΪϠΠϣ˾˹˹ϭϒϠϣ˾˹˹ϰΘΣϞϴϐθΗΓΪΣϮϟϩάϫϊϴτΘδΗ
~1¨<9*
.
8|Eª-$f¡.&
*
hª-ÎGf+
&CQ@
ÔgkG
ΪΣϮϟιήϘϟ
.MPEG4
ﻤﻠﻒ
ﺣﺴﺏ
ﺍﻠﻭﻅﺎﺌﻒﻭﺫﻠﻚ
ﻫﺬﻩ
ﺘﻌﻤﻝ
ﻻ
ﻗﺪ
"ϞϴϐθΗ
hª-ÎGf+ &CQ@ÔgkG
~1¨<9* .
8|Eª-$f¡.&*
MPEG4 ﺘﺸﻐﻴﻝ
hª-ÎGf+ &CQ@ÔgkG CD-R ﻋﻠﻰ ﻗﺮﺹAVI ﻤﻠﻑ
: AVI ﺑﺈﻤﻜﺎﻦ ﻫﺬﺍ ﺍﻠﺠﻬﺎﺯ ﺘﺷﻐﻴﻝ ﺘﻨﺴﻴﻘﺎﺕ ﻀﻐﻄ ﺍﻠﻔﻳﺪﻴﻮ ﺍﻠﺘﺎﻠﻴﺔ ﺪﺍﺧﻝ ﺘﻨﺴﻴﻖ ﺍﻠﻤﺎﻒ
DivX 3.11 ﻤﺣﺘﻭﻴﺎﺕMPEG4 ﻭﻆﻴﻔﺔ ﺘﺸﻐﻴﻝ
(MPEG-4 Simple Profile )ﺣﺴﺐDivX 4 ﻤﺣﺘﻭﻴﺎﺕ. ﺑﻐﺮﺾ ﺍﺤﺘﻭﺍﺀ ﺑﻴﺎﻧﺎﺕ ﻓﻴﺪﻴﻭ ﻭﺼﻭﺕAVI ﻴﺘﻢ ﺍﺴﺘﺧﺩ ﺍﻢ ﻣﻠﻔﺎﺕ
ﻋﻼﻭﺓ ﻋﻠﻰMPEG-4 )ﺍﻠﻭﻀﻊ ﺍﻠﺒﺴﻴﻄ ﺍﻠﺧﺎﺹ ﺏDivX 5 ﻤﺣﺘﻭﻴﺎﺕ ﻓﻘﻄ ﺬﺍﺕAVI ﻓﻼ ﻴﻤﻜﻦ ﺘﺷﻐﻴﻝ ﺴﻭ ﻯ ﺍﻠﻤﻠﻔﺎﺕ ﺒﺘﻨﺴﻴﻖ
ﻜﻣﺎ ﻳﺘﻢﺪﻋﻢ. ﺍﻠﻣﻴﺰ ﺍﺕ ﺍﻹﺿﺎ ﻓﻴﺔ ﻤﺜﻝ ﺍﻹﻃﺎﺮ ﺍﺕ ﺛﻨﺎﺌﻴﺔ ﺍﻻﺘﺠﺎ ﻫﺎﺕ
."avi." ﺍﻻﻤﺘﺪﺍﺪ
(. ﺃﻴﻀًﺎGMC ﻮQpel
. ﺿﻊ ﺍﻠﻘﺭ ﺺ ﻓﻲ ﺍﻠﺩﺭ ﺝ. ﺍﻓﺗﺢ ﺪﺭﺝ ﺍﻷﻗﺮ ﺍﺹ.١
.MPEG-4 ﻤﺘﻭ ﺍﻓﻗﺔ ﻤﻊXvid ﻤﺣﺘﻭ ﻴﺎﺕ.ﺃﻏﻟﻖ ﺍﻠﺪﺮﺝ
DVD-RW & DVD+R ﺃﻗﺮﺍﺹ
avi ﻟﺘﺣﺪﻴﺪ ﻤﻠﻒπ/†/ √/® ﺍﻀﻐﻄﻋﻠﻰ ﺍﻠﺯﺭﻴﻦ.٢
:DivX ﺍﻠﺘﻨﺴﻴﻖ ﺍﻠﺬﻱ ﻴﺪﻋﻢ
.ENTERﺛﻢ ﺍﺿﻐﻄ ﻋﻠﻰ ﺍﻠﺯﺮ، (DivX/XviD)
DivX3.11/4.12/5.x ﺍﻷ ﺴﺎ ﺴﻲDivX ﺘﻨﺴﻴﻖﺇﻳﻗﺎﻒ
ﺇﻳﻗﺎﻒ
( ﻮMPEG-4 )ﺑﺮﻨﺎﻤﺞ ﻓﻚ ﺍﻠﺘﺷﻔﻴﺮ ﺍﻠﻤﺘﻭ ﺍﻓﻖ ﻣﻊXvid
DivX Pro
*.avi, *.div, *.divx. : ﺘﻨﺴﻴﻖ ﺍﻠﻣﻠﻒ.ﻴﺪﻋﻢ ﻫﺬﺍ ﺍﻠﺟﺎﺰ ﻜﺎﻓﺔ ﺪﺮﺟﺎﺕ ﺍﻠﺪﻗﺔ ﺣﺘﻰ ﺃﻗﺼﻰ ﺪﻗﺔ ﻣﻌﺭ ﻭ ﻀﺔ ﺃﺪﻧﺎﻩ
ÔkG*ÔgkG*jª;§G* *awk6*
''
8*|E&&*ÔgkG*jª;K *awk6*
T
...
DivX5
DivX3.11 & DivX4 & Xvid
"%'*0%'7-!-0
mfH:fHj)fE
ﺇﻃﺎﺭًﺍ٣٠ ﺑﻤﻌﺪﻝ٤٨٠
x ٧٢٠
ﻗﺪ ﻴﺘﻐﻴﺮ ﻤﻌﺪﻝ ﺍﻠﺑﻴﺎ ﻧﺎﺕ ﺑﺼﻭﺮﺓ
ﻓﻲ ﺍﻠﺛﺎﻨﻴﺔ
:ﻏﻴﺮ ﻤﻨﺘﻆﻤﺔ
ﺇﻃﺎﺭًﺍ٣٥ ﺑﻤﻌﺪﻝ٥٧٦ x ٧٢٠
ﻗﺪ ﻴﺘﺧﻂﻰ ﻠﺠﻬﺎﺰ ﻓﻚ ﺘﺷﻔﻴﺮ
ﻓﻲ ﺍﻠﺛﺎﻨﻴﺔ
ﺍﻠﺑﻵﺎﻨﺎﺖ
mfH¢k-«kG*
8*|E&
¸*K&ﻧﻘﻝ
*j:§¼*m§G*
8*|E&
*¬§k³ ﺍﻷﺟﺯﺍﺀﺬﺍﺕ ﻤﻌﺪﻞ ﻨﻘﻝ
ﻤﻴﺠﺎﺑﺎﻴﺕ٤:ﺒﻴﺎﻨﺎﺕ
ﺃﺼﻰ ﻤﻌﺪﻝ:
ﺍﻟﻤﺮ ﺘﻔﻊﻮﻴﺑﺪﺃ ﻓﻙ ﺍﻠﺘﺷﻔﻴﺮ ﻤﺮ ﺓ
·f¤ª¡-¢Ê«kG*4§G*K&*Kj8f1 P£f=&*¨< -0%'"(7-!-0
ﻓﻲ ﺍﻠﺛﺎﻨﻴﺔ
ﺃﺧﺮ ﻯ ﻋﺫﺪﻤﺎ ﻴﻌﻭ ﺪ ﻤﻌﺪﻝ ﻨﻘﻝ
|-§ªgG* *awk6*jM|:H¥+fk-«JK¦fI2&*u9§¼*§t¡G*¨<m*aÀ
.ﺍﻠﺒﻴﺎﻧﺎﺕ ﺇﻠﻰ ﺍﻠﻤﻌﺪﻝ ﺍﻠﻃﺑﻴﻌﻲ
§Hm§8
8|E
jkÂm*aÀ·mf¼*9§G
ﻣﻼﺣﻇﺔ
ﺍﻠﺘﻲ ﺘﻢ ﺇﻧﺷﺎﺆ ﻫﺎ ﻋﻠﻰMPEG-4 ﻗﺪ ﻳﺘﻌﺬﺮ ﺘﺷﻐﻴﻝ ﺑﻌﺾ ﻤﻠﻔﺎﺕﻭﻫﺬﺍ ﻴﻔﺴﺮﺳﺑﺐﻋﺪﻢ ﺪﻋﻢ ﻧﻭﻉ ﺑﺮﻧﺎﻣﺞ ﻓﻚ ﺍﻠﺘﺷﻔﻴﺮ.ﺘﺮﺸﺧﺼﻲ
8*|E&¸*s42ukD
ﻛﻤﺑﻴﻭ
.ﺓ ﻠﻠﻤﻮ ﺍﺼﻔﺎﺕs4aG*·
8|G*9
ﻮﺍﻹﺼﺪ ﺍﺭ ﻭ ﺍﻠﺪﻗﺔ ﺍﻷ ﻋﻠﻰ ﺍﻠﻣﺘﺠﺎﻭﺯ
s4aG*=&
*
MPEG4 ﺍﻠﻤﻜﺘﻭ ﺑﺔ ﺑﺘﻨﺴﻴﻖCD-R/RW ﻴﺪﻋﻢ ﻫﺬﺍ ﻠﻠﺠﻬﺎﺯ ﺃﻗﺮﺍﺹ*( kM
."ISO9660" ﺍﻠﺘﻨﺴﻴﻖ
ﻮ ﺍﻠﻣﺘﻭ ﺍﻓﻘﺔ ﻤﻊ
jªGfkG*j7fG*
D 9
D 9
T
WMA
JPEG
MP3
MPEG4
Enter
Return
00:00:00
Menu
٢١ _ﺍﻠﻌﺭﺑﻴﺔ
ﺘﻜﺮﺍﺮ ﺘﺸﻐﻴﻝ
ﻫﻨﺎﻚ. ﻠﺘﻐﻴﻴﺮ ﻭﻀﻊ ﺍﻠﺘﺷﻐﻴﻝREPEAT ﺍﻀﻐﻄ ﻋﻠﻰ ﺍﻠﺯﺮ
.Title ﻭFolder ﻭOff ﻣﺛﻝ، ﺛﻼﺛﺔ ﺃﻭﻀﺎﻉ
ﺫﺍﺕ ﺍﻻﻤﺘﺪﺍﺪ ﺍﻠﻤﺘﻣﺎﺜﻝ ﻓﻲAVI ﻠﺘﻜﺭﺍﺮﻣﻠﻔﺎﺕ: Folder .ﺍﻠﻣﺠﻠﺪ ﺍﻠﺣﺎﻠﻲ
. ﻠﺘﻜﺭﺍﺮ ﺍﻠﻌﻨﻭﺍﻥ ﺍﻠﺠﺎﺭﻱ ﺘﺷﻐﻳﻠﺔ: Title A-B Repeat ﺍﺴﺘﺧﺪﺍﻢﻮﻅﻴﻔﺔ
ﻋﺫﺪ ﺍﻠﻤﻭ ﻀﻊREPEAT A-B ﺍﺿﻐﻄ ﻋﻠﻰ ﺍﻠﺯﺮ
.(A) ﺍﻠﻤﻄﻠﻭﺐ ﺑﺫﺀ ﺘﻜﺭ ﺍﺮ ﺍﻠﺗﺸﻐﻴﻝ ﻋﻨﺪﻩ
ﻋﺫﺪ ﺍﻠﻤﻭ ﻀﻊREPEAT A-B ﺍﺿﻐﻄ ﻋﻠﻰ ﺍﻠﺯﺮ
.(B) ﺍﻠﻤﻄﻠﻭﺐ ﺍﻴﻘﺎﻒ ﺘﻜﺭ ﺍﺮ ﺍﻠﺗﺸﻐﻴﻝ ﻋﻨﺪﻩ
ﺍﻀﻐﻄ ﻋﻠﻰﺍﻠﺯﺮ،ﻠﻠﺮ ﺠﻭ ﻉ ﺇﻠﻰ ﺍﻠﺘﺷﻐﻴﻝ ﺍﻠﻌﺎﺪﻱ
.CANCEL
ﺍﻟﻭﻆﺎﺋﻑ ﺍﻠﻣﺗﻗﺪﻤﺔ
ﺗﺷﻐﻳﻞ ﻣﻠﻔﺎﺖ ﺍﻠﻭﺳﺎﺋﻄ ﺒﺎﺴﺘﺧﺪﺍﻢ ﻤﻳﺯﺓ ﻤﺿﻴﻒ
USB
● ﺍﻟﻭﻆﺎﺋﻑ ﺍﻠﻣﺗﻗﺪﻤﺔ
ﻴﻣﻜﻨﻚ ﺍﻻﺴﺘﻤﺘﺎ ﻉ ﺑﻠﻔﺎﺕ ﺍﻠﻭﺴﺎﺌﻃ ﻤﺛﻝ ﺍﻠﺼﻭﺮﻭ ﺎﻷﻓﻼﻢﻭ ﺍﻠﻨﻐﻤﺎﺕ ﺍﻠﻤﺤﻔﻭ ﻆﺔ
ﺑﻣﺸﻐﻝ MP3ﺃﻭ ﺬﺍﻜﺮ ﺓ USBﺃﻭ ﺍﻠﻜﺎﻣﻴﺮﺍ ﺍﻠﺮ ﻗﻤﻴﺔ ﺑﺼﻭﺖ ﻤﺮ ﺘﻔﻊ
ﻋﻦ ﻂﺮ ﻴﻖ ﺘﻭ ﺼﻴﻝ ﻭ ﺤﺪﺓ ﺍﻠﺘﺧﺰﻴﻦ ﺒﻣﻨﻔﺬ USBﺍﻠﻤﻭﺠﻭﺪ ﺑﻤﺷﻐﻝ ﺃﻗﺮ
ﺍﺹDVD
ﺍﺴﺘﺧﺪﺍﻢ ﻤﻴﺯ ﺓ ) USBHOSTﻤﺿﻴﻒ (USB
.١ﻗﻢ ﺑﺘﻭ ﺼﻴﻝ ﻭ ﺣﺪﺓ USBﺑﻤﻨﻔﺬ USBﺍﻠﻤﻭ ﺠﻭﺪ ﺑﺎﻠﺠﺯ ﺀ ﺍﻷﻤﺎ ﻤﻲ
ﻤﻦ ﺍﻠﻭ ﺤﺪﺓ.
.٢ﻓﻲﺤﺎﻠﺔﻭ ﺪ ﻗﺳﻢ ،USBﺍﺿﻐﻄ ﻋﻠﻰ ﺍﻠﺯﺮ † π/ﻠﺘﺤﺪﻴﺪ ﻗﺴﻢ ،USB
ﺛﻢ ﺍﻀﻐﻄ ﻋﻠﻰ ) OKﻤﻭﺍﻓﻖ(.
ﺍﻠﺩﺴﻚ
.٣ﺍﻀﻐﻄ ﻋﻠﻰﺍﻠﺯﺮ ﻴﻦ ® √/ﺃﻭ † π/ﻠﺘﺣﺪﻴﺪ ﻤﻠﻒ ﻓﻲ . USB
ﺍﻀﻐﻄ ﻋﻠﻰ ) ENTERﻤﻭﺍﻓﻖ( ﻠﻔﺘﺢ ﺍﻠﻣﻠﻒ.
ﺇﻳﻗﺎﻒ
ﺇﻳﻗﺎﻒ
00:00:00
ﻣﻼﺣﻇﺔ
ﻭ ﻓﻲ ﻜﻝ ﻤﺮ ﺓ ﻴﺘﻢ ﺍﻠﻀﻐﻄ ﻋﻠﻰ ﺯﺮ USBﻓﻲ ﺠﻬﺎﺯﺍﻠﺘﺣﻛﻢ ،ﺴﻭﻒ ﻴﻆﻬﺮ ﺇﻃﺎﺮ ﺍﺧﺘﻴﺎﺮ ﺠﻬﺎﺯ .USB
ﻴﻅﻬﺮ ﺍﻻ ﺧﺘﺼﺎﺮ " "USBﻋﻠﻰﺷﺎ ﺷﺔ ﺍﻠﻌﺮﺽ. ﺘﻆﻬﺮ ﺍﻠﺸﺎﺷﺔ ) USB MENUﻗﺎﺌﻤﺔ (USBﻋﻠﻰ ﺷﺎﺷﺎﺷﺔ ﺍﻟﺘﻠﻔﺎﺯ،ﺛﻢ ﻴﺘﻡ ﺘﺷﻐﻴﻝ ﺍﻠﻤﻠﻒ ﺍﻠﻣﺣﻔﻭ ﻇ.
ﺇﺯﺍﻠﺔ USBﻋﻠﻰ ﻨﺤﻭ ﺁﻤﻦ
ﺘﻓﺎﺩﻱ ﺘﻠﻒ ﺍﻠﺫﺍﻜﺮﺓ ﺍﻠﻤﺧﺰﻨﺔ ﺑﻭﺤﺪﺓ ،USBﻗﻢ ﺑﺈﺯ ﺍﻠﺔ ﺁﻤﻨﺔ ﻘﺑﻞ ﻔﺻﻞ ﻛﺎﺑﻞ .USB
ﺍﺿﻐﻄ ﻋﻠﻰﺍﻠﺯﺮ)■( ) STOPﺇﻴﻗﺎﻒ(.
ﺃﺯﻞ ﻛﺎﺑﻝ .USBﺍﻠﺘﺷﻐﻴﻞ ﺍﻠﺴﺮﻳﻊ
ﺃﺜﻨﺎﺀ ﺍﻠﺘﺷﻐﺑﻝ ،ﺍﺿﻐﻄ ﻋﻠﻰ ﺍﻠﺯﺮ )(
ﻔﻲ ﺤﺎﻠﺔ ﻭﺠﻭﺪ ﺃﻛﺛﺭ ﻤﻦ ﻤﻠﻒ ،ﻳﺘﻢ ﺘﺤﺩﻳﺩ ﺍﻠﻤﻠﻒ ﺍﻠﺗﺎﻠﻲﻋﻧﺪ ﺍﻠﺿﻐﻄ ﻋﻠﻰ ﺍﻠﺯﺮ -ﺤﺎﻠﺔ ﻭﺟﻭﺩ ﺃﻛﺜﺮ ﻤﻦ ﻤﻠﻒ ،ﻳﺗﻢ ﺘﺤﺪﻴﺪ ﺍﻠﻤﻠﻒ ﺍﻠﺴﺎﺒﻕ ﻋﻧﺪ ﺍﻠﺿﻐﻄ ﻋﻠﻰ ﺍﻠﺯﺮ
٢
_ ٢٢ﺍﻟﻭﻆﺎﺋﻑ ﺍﻠﻣﺗﻗﺪﻤﺔ
ﺍﻠﺘﺷﻐﻴﻞ ﺍﻠﺴﺭﻴﻊ
ﻠﺗﺷﻐﻴﻞ ﺍﻠﻘﺮﺺ ﺒﺴﺮ ﻋﺔ ﺃﻋﻠﻰ ،ﺍﺿﻐﻄ ﻋﻠﻰ ﺍﻠﺯﺮ ﺃﺜﻨﺎﺀ ﺍﻠﺘﺷﻐﻴﻞ)(/
ﻓﻲ ﻜﻝ ﻣﺭﺓ ﻳﺘﻡ ﻓﻴﻬﺎ ﺍﻠﺿﻐﻃ ﻌﻠﻰ ﺃﻱﻤﻦ ﺍﻠﺯﺮﻴﻦ ،ﺗﺘﻐﻳﺭ ﺴﺮﻋﺔ ﺍﻠﺘﺸﻐﻴﻞ ﻜﻣﺎ ﻴﻠﻲ :
) ٢xﺑﻣﻌﺪﻞ ﻣﺮﺗﻴﻥ( ) ٤xoﺑﻤﻌﺪﻝ ٤xﻤﺮﺍﺖ( ) ٨xoﺑﻤﻌﺩﻞ ٨ﻣﺮﺍﺖ(
ﺍﻷ ﺠﻬﺮﺓ ﺍﻠﻤﺘﻭ ﺍﻓﻗﺔ
.١ﻭﺤﺪﺍﺖ USBﺍﻠﺘﻲ ﺘﺩﻋﻢ) USB Mass Storage V1.0.ﻭﺤﺩﺍﺖ USB
ﺍﻠﺗﻲ ﺘﻌﻤﻞ ﻜﻗﺮﺺ ﻗﺎﺑﻞ ﻠﻺﺯ ﺍﻠﺔ ﻓﻲ ﻧﻆﺎﻢ ﺍﻠﺘﺷﻐﻴﻞ ) Windowsﺍﻹﺻﺪﺍﺭ 2000
ﺃﻭ ﺍﻹﺼﺪﺍﺮ ﺍﻷﺤﺪﺚ( ﺑﺪﻭﻦ ﺘﺛﺑﻴﺖ ﺑﺮﻨﺎﻣﺞ ﺘﺷﻐﻴﻞ ﺍﺿﺎﻓﻲ(.
.٢ﻣﺸﻐﻞ : MP3ﻤﺷﻐﻝ MP3ﻤﻦ ﻧﻭﻉ ﺍﻠﻔﻼﺶ ﻭﻣﺤﺮﻚ ﺍﻷﻗﺮﺍﺺ ﺍﻠﺼﻠﺑﺔ.
.٣ﺍﻠﻛﺎﻤﻳﺭﺍ ﺍﻠﺮﻗﻤﻴﺔ :ﺍﻠﻛﺎ ﻣﻴﺭﺍﺖ ﺍﻠﺘﻲ ﺗﺩﻋﻢ ﻭﺤﺩﺍﺖ .USB Mass Storage 1.0
ﺍﻠﻛﺎﻤﻴﺮ ﺍﺖ ﺍﻠﺘﻲ ﺘﻌﻤﻞ ﻛﻗﺮﺹ ﻗﺎﺑﻝ ﻠﻺﺰﺍﻠﺔ ﻓﻲ ﻧﻇﺎﻢ ﺍﻠﺘﺸﻐﻴﻞ Windows)ﺍﻹﺻﺩﺍﺮ 2000ﺃﻭ ﺍﻹﺻﺪﺍﺮ ﺍﻷﺤﺩﺚ( ﺑﺪﻭﻦ ﺘﺛﺑﻴﺖ ﺑﺭﻧﺎﻣﺞ ﺘﺷﻐﻴﻞ ﺇﺿﺎﻓﻲ.
ﻣﺤﺭﻙ ﺃﻗﺮﺍﺺ ﻓﻼﺶ USBﻭﻣﺭﻙ ﺍﻷﻗﺮﺍﺺ ﺍﻠﺼﻠﺑﺔ : USBﺍﻻﺠﻬﺯﺓ ﺍﻠﺘﻲ ﺘﺩﻋﻡ
USB2.0ﺍﻭ .USB
ﻗﺪ ﺘﺟﺩ ﺍﺧﺘﻼﻔﺎ ﻓﻲ ﺠﻭﺪﺓ ﺍﻠﺘﺸﻐﻴﻞ ﻋﻧﺪ ﺗﻭﺻﻴﻞ ﻭﺣﺪﺓ .USB1.1 ﺒﺎﻠﻨﺴﺑﺔ ﻠﻤﺤﺮﻙ ﺍﻷﻗﺮﺍﺺ ﺍﻠﺼﻠﺑﺔ ،USBﺘﺎﻛﺪ ﻤﻥ ﺘﻭﺼﻴﻞ ﺴﻟﻠﻚﺘﻳﺮ ﺇﺿﺎﻓﻲﺑﻤﺤﺭﻚ ﺍﻷﻗﺮﺍﺺ ﺍﻠﺼﻠﺑﺔ USBﻟﻠﺗﺷﻐﻴﻞ ﻋﻠﻲ ﻧﺤﻭ ﺴﻠﻳﻢ.
.٥ﻗﺎﺭﺉ ﺑﻄﺎﻗﺔ : USBﻗﺎﺮﺉ ﺑﻄﺎﻗﺔ USBﺫﻭﻓﺘﺤﺔ ﻭ ﺍﺤﺪﺓ ﻭﻗﺎﺮﺉ USBﻤﺗﻌﺩﺪ
ﺑﻄﺎﻗﺎﺖ ﻤﺘﻌﺩﺪﺓ.
.٦ﻓﻲ ﺤﺎﻟﺔ ﺍﺴﺗﺧﺩﺍﻡ ﻜﺎﺑﻞ ﺗﻭﺼﻳﻝ ، USBﻗﺪﻻ ﺘﻢ ﺍﻠﺘﻌﺭﻒ ﻋﻠﻰ ﺟﻬﺎﺯ .USB
CBIﻏﻳﺮ ﻤﺩﻋﻭﻡ )ﺘﺤﻛﻢ/ﺘﺿﺨﻳﻡ/ﻗﻄﻊ(. ﻭﺃﻳﻀًﺎﺍﻠﻛﺎﻤﻴﺭﺍﺖ ﺍﻠﺭﻗﻤﻴﺔ ﺍﻠﺘﻲ ﺘﺴﺘﺨﺩﻡﺑﺭﻭﺘﻭﻛﻭﻝ PTPﺃﻭﺍﻠﺘﻲ ﺗﺘﻄﺎﺏ ﺘﺛﺑﻳﺖ ﺑﺭﻧﺎﻣﺞ ﺇﺿﺎﻓﻲ
ﻋﻧﺪ ﺘﻭ ﺻﻳﻬﺎ ﺑﺎﻠﻜﻤﺑﻴﻭﺘﺭ ﻏﻴﺭ ﻤﺩﻋﻭﻤﺔ.
ﻭﻻ ﺘﻴﻢ ﺩﻋﻢﺍﻠﺟﻬﺎﺯ ﻴﺴﺘﺨﺪﻡ ﻨﻅﺎﻡ ﻤﻠﻒ .NTFS)ﻳﺘﻡ ﻓﻗﻄ ﺪﻋﻢ ﻧﻆﺎﻢ ﻤﻠﻒ )32/16 FATﺠﺪﻭﻞ ﺘﻭﻴﻊ ﺍﻠﻣﺎﻒ.(32/16
ﺑﻌﺾ ﻤﺸﻐﻼﺖ MP3ﻋﻧﺪ ﺘﻭ ﺻﻴﻟﻬﺎ ﺑﻬﺫ ﺍﻠﻣﻧﺘﺞ ﻭﻫﺫﺍ ﻴﻌﺘﻣﺪ ﻋﻠﻰ ﺤﺟﻢ ﻗﻄﺎﻉ
ﻭﻗﺪﻻ ﻳﺘﻢ ﺘﺷﻐﻴﻞﻨﻈﺎﻢ ﺍﻠﻣﻟﻓﺎﺖ.
ﺗﻛﻭﻦ ﻭﻅﻳﻓﺔ USB HOSTﻏﻴﺮ ﻤﺪﻋﻭﻤﺔ ﻓﻲ ﺤﺎﻠﺔ ﺘﻭﺻﻴﻞﺍﻟﻤﻧﺘﺞ ﺍﻠﺫﻱ ﻳﻗﻭﻢ ﺑﻧﻗﻞ ﻣﻠﻓﺎﺖ ﺍﻠﻭﺴﺎﺋﻄ
ﻻﻳﻣﻛﻥ ﺍﻠﺗﺷﻐﻴﻞﻤﻊ ﺃﺟﻬﺯﺓ ) MPTﺑﺭﻭﺘﻭﻞ ﻧﻗﻞ ﺍﻠﻭﺴﺎﺋﻄ( ﺍﻠﺘﻲ ﺘﻣﻛﻦ .Janusﻟﻠﺤﺼﻭﻞ ﻋﻠﻰ ﻣﻌﻟﻭﻣﺎﺖ ﺤﻭﻞ ﺍﻷﺟﻬﺯﺓ ﺍﻠﻣﺪﻋﻭﻣﺔ ،ﺍﻨﻅﺮ ﺼﻓﺤﺔ .USB
١
.
9*
:
f¼
f * j)
j fEf · ,4§G
§ * H
§G
aM
a atk
atkG
tkG
¢M4~G* ¨<
9*
9* %#4~G*¨<
i§¼*j)fG*aMatkGa+¢<tkG*,a0§+
i§¼*j)fG*aMatkGa
R+¢<tkG*,a0§+ !4~G*¨<9*
%#4~G*¨<9*.f¤9|<
ﺍ
u
٢
jª+|G*
j0ÑH
:f¼*j)fE¾(*§/|G+,'(4~G*¨<9*
9|-#C85?(=7GHE9
8|Eª-a¡<
:f¼*j)fE
ªGKN,|7fgH4§G*,a0§G*
q
H
§ p
ﺘﺤﺪﻴﺪ
ﺑﺪﺀ
^ F
Q
H
D ] M<
<
^??771
1
v, D88;;
d
d4
4
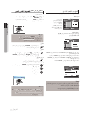
ﻠﺘﺤﺪﻴﺪ ﺍﻠﻘﺮﺹ.١
qrywz tryw| t rywp
π/† ﺍﻀﻐﻄ ﻋﻠﻰ ﺍﻠﺯﺭ،ﻤﻊﻭﺣﺪﺓ ﻓﻲ ﻭﻀﻊ ﺍﻹ ﻴﻘﺎﻒ
_ Q
^ d OO
D
Q>>5
5 ^??771
1
.( )ﺍﻠﻘﺮﺹDISC ﻠﺘﺣﺪﻴﺪ
v)*& R c;;
W773
3 D>>?? b4
4
b4
4
©D
wrzwr|wrﺇﻴﻘﺎﻒz E??Q
Track 01
0%%#
ﺇﻴﻘﺎﻒ
qQ??70702
2wQ??::p
T
Track 01
Track 02
DEV : USB1
v[eeD
b ¦P
^0<
<66 h O #& [;;
c;;
ªﺘﺤﺪﻴﺪ
D<
<
u
ﺑﺪﺀ
$( Q66
F
b70
703
3%% bO??88 D90
90??
== ^??70
701
1 O
b ¦P
Y?0
?04
4
v
,
[;
;
\?
?
=
=
£
i
ENTER ﺛﻢ ﺍﻀﻐﻄ ﻋﻠﻰ ﺍﻠﺯﺭ،" "ﺘﺣﺪﻳﺪSELECT ﻻ ﺧﺘﻳﺎﺭπ/†` ﻋﻠﻰ ﺍﻷﺯﺭﺍﺮ
ﺍﻨﻘﺮ.٢
u)*|G*
9|<
W??
[Q66 [;;
D
c;;
p :F. Db
u
.ENTER "ﺒﺪﺀ" ﺜﻢ ﻧﻘﻢ ﺍﻨﻘﺮ ﺍﻠﺯﺮSTART ﻠﺘﺤﺪﻴﺪπ/† ﺍﺿﻐﻄ ﻋﻠﻰ ﺍﻠﺰﺮ.٣
q
#&
.ﺴﻭ ﻒ ﻴﺑﺪﺃ ﻨﺴﺦ ﺍﻠﻤﻠﻒ
P
8fDa+fª)f-4§G*ÔkkD
8fDa+f
Nª)f-4§G*ÔkkD %# 4~G*¨<G*K~H|G**{JaMa³ a¡<
ffgM|-
§ «¡
§.
«¡H¡H5
H5
NgM|-P£*§.
P
4§G*Õ+«¡H~G*8fG*g9hqMu)*|G*
9|<$a+gE P
8fDa+fª)f-4§G*Ôk8fDa+f
Nª)f-4§G*Ôk- fgN M|-jªIf.
fgM|-jªIf.
8fDa+fª)f-4§G*Ôk8fDa+f
ªN )f-4§G*Ôk- fgM|-jªIf.
f
gN M|-jªIf.
.ﺍﻠﻠﻧﺴﺦ
ﺠﻤﻳﻊ
:F.
ﺍﻠﻣﻠﻔﺎﺕ
Db
ﻠﺘﺣﺪﻴﺪ
u
. ﻤﺭﺓ ﺃﺧﺭﻯENTER ﺍﻀﻐﻄ ﻋﻠﻰ ﺍﻠﺯﺮ، ﻹﻠﻐﺎﺀ ﺘﺤﺪﻴﺪ ﻨﺴﺦ ﺠﻤﻴﻊ ﺍﻠﻤﻠﻔﺎﺕ-
.""ﺇﻠﻐﺎﺀ
ﺍﻠﺯﺭ
ﻋﻠﻰ
ﻧﺴﺦ
FDf
fkD #&
W?CANCEL
?
[Q66
[;
;
pﺍﻀﻐﻃ،
:F.ﺍﻠﺘﻘﺪﻢ
Dﻗﻴﺪb
ﻹﻠﻐﺎﺀ
u 'A6= F
§R%% F??>>??
b D
k ^
R??
_
c
qv# §
ﺘﺸﻐﻴﻞ
P
P
v.F:#& Y
F99b%% Db.
. u
ﺇﻴﻘﺎﻒ
T
v¦D F
f
fb%% S??D099%%D F
D1
1 F O
bDEV
¦P
_
O
:
USB1
ﺇﻠﻐﺎ
ﺍﻠﻤﺩﻤﺞ
ﺑﺪﺀ ﻠﻧﺴﺦ ﻤﻦ ﺍﻠﻘﺮﺺ
Track 05
Track 06
:F.
Track 07
.F:§ :F.ﺇﻠﻐﺎﺀﺍﻠﻧﺴﺦ
§ :F.
G £O66
PP O
Q??881
1 ] d4
4
D>>"
" ¤b99 O
G hO66
d2
2 d0 O§ F??D66 G hO66
R
#3AC
b
O==
¨Q
Q
Q??881
1 ]
ﻣﻼﺣﻇﺔ
vd66??4
4 ¦b
%% G £O66
H7AC
H7AC
%# #%&#
j0ÑH
fNkÂ
kÂ,4§8
k
§ F Õ+ 8f
§8
8fG
8fG* ¢H~G* 4*aH
a £§M aE
aH
a ¼
* q0
h
h0
0 ªGaG**{J¢<
Ñ ffª)f-u)*|G*
9|<&
Ñ1
Nª)f-u)*|G*
9|<&*agªD45¬&*¨<G*kM½*3(* «9*ÎD*+P£*§.
٢٣ _ﺍﻠﻌﺭﺑﻴﺔ
T
ÔgkG*
u)*|G*
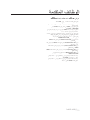
9|<9K¾(*,a0§G*k¡- USB ﻤﻦ ﺍﻠﻘﺭ ﺹ ﺇﻠﻰﺠﻬﺎﺯQ]
ﺍﻠﺼﻭﺕ
]XXx ﻤﻠﻔﺎﺕA3ﻨﺴﺦ
3::
XXﻫﺬﺓ
x ﺘﺘﻴﺢ ﻠﻚ
R W77f
f t^??771
1 D==
d4
4
.MP3 ﺒﺘﻧﺴﻴﻖ
§ ¤D
j 'O99;; t §
q § p
ﺇﻴﻘﺎﻒ
v\e
eD ﺪﺮﺝ
} ﺍﻔﺘﺢ
O%% [;;
;ﺘﺷﻐﻴﻞ
; D
k
.ﺍﻠﻘﺮﺹ
ﺍﻠﺩﺴﻚ
a |- ¬{G
aM
¬{aM
j ¬{G
ff
G
G* $~/
aG*atk
a$~/
tkG aM
tkG
¢M4~G* ¨<
9*
9* a*|-j7
¬{
j ff
j7
G
aM
a atk
atkG
tkG ¢M4~G* K&*
%#4~G*¨<G*¬2'§M %# 4~G*¨<9*¦ÔgG
G* 4*a¯
a ,4§G
a¯
§ * Ôg§G
Ôg ¾(* ,|H F
%#
z{
{
|MKakG*
4*a¯,4§G*|MKa-¾(*,|HF· %#4~G*¨<G*¬2'§M j<fG*i4f<¦f±*·j/42
A33::
ﻤﻦ
XXxﺍﻠﻨﺴﺦ
Q]
]
ﻤُﺪ ﻣَﺦ#
ﺍﻠﻘﺭﺹ ﺍﻠ
ﺍﻠﻤﺪﻣﺞ ﺍﻠﺼﻭﺘﻲ
ﺍﻠﻘﺭﺹ
ﺿﻊ
c;;
W77f
f ^??771
1 D==
ﺍﻠﺪﺮﺝ ﺜﻢ
_ ﻋﻠﻰ
(CD
W77f
f
qDA) § p )(
.ﺒﺈﻏﻼﻗﻪ
ﻗﻢ
vQ F
Q
H
;; ¨Q
Q
ﺇﻠﻰQ
USB
ﺼﻴﻝ
ﻗﻢ
ﺠﻬﺎﺯ
F
Q
ﺒﺘﻭH
D ] M<
<
.ﻤﻘﺪﻤﺔ ﺍﻠﻤﺷﻐﻝ
qrﻓﻲ
tUSB
r| ﻤﻀﻴﻒ
trzp v, D88;;
d
.ﺳﻴﺘﻢ ﻋﺭﺾ ﻩﺬﻩ ﺍﻠﺷﺎﺷﺔ
z{
ﺃ
-
u
%# #%&#
٢
ﺇ
PxJJ""x A
33]
]
i§¼*aÖ*2a0
● ﺍﻟﻭﻆﺎﺋﻑ ﺍﻠﻣﺗﻗﺪﻤﺔ
ﻋ
4§Gf+
8f»* §¼*4§G*
8|Eª-
REPEAT
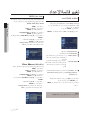
ﻋﻨﺪﻤﺎ ﺘﺘﻢ ﻤﻌﺎﻠﺠﺔ ﺍﻠﻨﺴﺦ ﻤﻦ ﺍﻠﻗﺭﺺ ﺍﻠﻤﺪﻤﺞ ﺳﻭ ﻒ ﻳﺼﺑﺢ ﺍﻟﻤﺷﻐﻝ ﻓﻲ ﺍﻷﻗﺭ ﺍﺹ ﺍﻠﻣﺪﻤﺠﺔ.ﺣﺎﻠﺔ ﺍﻠﺘﺷﻐﻴﻝ ﺘﻠﻘﺎﺌﻴًﺎ
. ( ﺍﻠﺘﻲ ﻴﻤﻜﻦ ﺍﻠﻧﺴﺦ ﻤﻨﻬﺎCD DA) ﺘﻴﺔA0
ﺍﻠﺼﻭ
0__ vd2
2
Qb??<< c;; DD1
1 & d00 #& D88;; V66 ^??771
1 `::)
) h O u
vD88g
gb<<;; c;;L FO§ qOg
gp ,6BC:@? § qR?0?0Q bp @564*IA6 _ _ h P
vn)% \??
==n Y \b D(
( #& d0 Fb::%% (
(- O
b ¦P _O u
9*.:f¼*j)fE· %( HaMatkG
2*a<(¸( ¸*j)fG* *awk6*
*j)fG* *awk6*
jG*mѪ-aMatk+vfG*M|:¢<
jG*mѪ-aMatk+vfG*M|:¢<.
. H
ªwH
ªw-+9GHD
+9GHDj)fG*Guªkj)fG*GuªkMaG,|D§k¼*5fkG*j7f7§I¨<¼*g9K+«ª)4L§kH2*a<(
MaG,|D§k¼*5fkG*j7f7§I¨<¼*g9K+«ª)4L§kH2*a<(*( KjkØ*
*( KjkØ*
jª+|G*
tkG*,a0§+
tkG*,a0§+ &
& 4~G*¨<9*
4~G*¨<9* +GCD
+GCD 9§G*¨<,a0§G*g9$f¡.&
9§G*¨<,a0§G*g9$f¡.&*
*
%#
¢M4~G* awk6*a
+R ¢<
%#4~G*K&
4~G*K&** ¨<9*.
¨<9*. $0=>:
$0=>:aMatkG
aMatkG
¢M4~G* awk6*a
¢M4~G* awk6*a+¢<
R
¢M4~G* ¨< 9* %# 4~G*¨<
.:f¼*j)fE· "( HaMatkG
¢M4~G* ¨< 9* %# 4~G*¨<9*
jM*agG*¢H¨ª6§¼*ª-kª6
ªkG*fM((*aM|-fHa¡<+GCD 4~G*¨<9*
ﺍﻟﻭﻆﺎﺋﻑ ﺍﻠﻣﺗﻗﺪﻤﺔ
j0ÑH
8|G*
I¨<,2§/§H "(K %( mfH£§-£&*hqM
"2*akHf+mfHm*3 #
8*|E&*
jG*2*a<(
$5B;H5;H9+9GHD
$
jG*2*a<(¸¸
$5B;H5;H9+9GHD
m§G*m*4fª12*a<(
(¸
m§G*m*4fª12*a<(¸
( H8=C+9GHD
H8=C+9GHD
§IaMatkG4fª»**{J awk6*
9|G*j7f7m*4fª12*a<(
§IaMatkG4fª»**{J awk6*
9|G*j7f7m*4fª12*a<(¸(¸(=FD@5L+9GHD
=FD@5L+9GHD
9|G*j7fG,2akHm*4fª1¾(
¾*( *jDf9¸f+f¤9|<i§¼*j7f
9¸f+f¤9|<i§¼*j7fG
(¸
9|G*j7fG,2akHm*4fª1¾(
9|G*j7fG,2akHm*4fª1¾*jDf9
*( jDf9
*jDf9(
jDf9
¸f+f¤9|<i§¼*j7fG*
( f+f¤9|<i§¼*j7fGG*G*
L§k¼*
L§k¼*g9ÕHawkGuªkM«ª)|G*L§k¼*2*a<(
g9ÕHawkGuªkM«ª)|G*L§k¼*2*a<(¸(¸((5E9BG5@+9GHD
(5E9BG5@+9GHD
ÑD&
ÑD&¸¸*nHj)ÑG*Ô= ÑD&
*nHj)ÑG*Ô= ÑD&¸¸*
9|<¢Hf:&
*
9|<¢Hf:&¸¸*¡¼ 5ÑG*
*¡¼ 5ÑG*
xG(
xG(*( D4fgGf+j8f»*mf<§9§¼*K¡<aJfH¢k-«kG*
*( D4fgGf+j8f»*mf<§9§¼*K¡<aJfH¢k-«kG*
¤¤¤O
^7
771
1
%%^?
??
^?
??0?
R
¤¤O
Q
:F.(
??
D
D
^7
71
^?
?
^?0
?0
R
O
D
D
Q
:F.(^?
^?
?
?
¤O
1%
vvGGG5:FH4@>
F@5
^9
99
O
R%
%% _;_;;;6
66
vv:F.(,:56@%?6>2?5
??
==
c
^9
9
O
R%
GGG5:FH4@>
F@5c
;6
6
:F.(,:56@%?6>2?5\
\?
?
=
=
K&K&**
¨<
9* jkØ* m*~ª¼*
¾(*(*( §8§G
¢M4~G*
¨< 9* ¨<9*jkØ*
m*~ª¼*¾(
§8§G
¢M4~G*¨<9*
jª<|G*m*~ª¼*¾(
jª<|G*m*~ª¼*¾((*§8§G
(*§8§G %#
%# 4~G*
4~G*
N,N,|H
&4~G*¨<9*2*a<(
(¸
|H 4~G*¨<9*2*a<((¸¸
( *$*|/
*$*|/(*a+2*a<
*( a+2*a<(¸¸
( *j7f7
9|<$f1
*j7f7
9|<$f1¸
( L|1
L|1&&**
j0ÑH
j0ÑH
D NN"(K >D;2*akH¸*m*3mf¼*ª-¢Ê
jDfGª-4{kMaEKªkG*$agG§:&*ffNkEK|kªDHÔ=
8|G*£fF*3(* jq¼*mf¼*
ª¡k+ "(mfH¨<k-«kG* *
8*|E&*ª-¢Ê
D "C@=9G K&* !+'
¨<kM¸&*hqMKK|0¢H§:&* "( H6*£§M£&*5§qM¸
j8f1K|0K&*j=4fDmfDfH
mf¹*
8|EL§k0**3(*( Dj+fkkHmf/¨<¥k+fkFlµ
8|Eª-¢Ê
D4fG*¼*¨k0
9|G*ª-¢ªD4fDH¨<,2ak¼*
a0*K§H
8|E¨<¨E&*atF,4§8ªq-¢Ê
#C85?(=7GHE9
8*|E&* *awk6f+u¡¡RM
"(mfHª-¢Ê#C85?(=7GHE9
8|Eª-a¡<
4§G*aÀ· D
aÀ·,2§/§¼*"( mfHª-¢Ê #C85?(=7GHE9
8|E
«)f-+4§G*
mfH2atD,4§G*
9|<aM|-l¡F*3(* #CB=75(=7GHE9
8|E
:f¼*j)fE· "(
"(mfH2atD,4§G*
9|<aM|-l¡F*3(* H>=(=7GHE9
8|E
:f¼*j)fE ·
8|Eª-,a0§G*ªk-¸aE )++(=7GHE9
8|E
)++(=7GHE9
¢ªDH¢<aM~MDa0*K
8|E·,2§/§¼*mf¼*2a<£fF*3(*( D "(ª¡k+Hª¢ªDaÀ¢<aM~MDa0*K
8|E·,2§/§¼*m*aÖ*2a<£fF*3(*( aÀ·D "( mfHª-
+,-(%&-
¸aE
8| G*h 0
+,-(%&-·j0fk¼*m*4fª»*
+·j0fk¼*m*4fª»*
+-¸aE
8|G*h0
_ﺍﻟﻭﻆﺎﺋﻑ ﺍﻠﻣﺗﻗﺪﻤﺔ٢٤
ﺘﻐﻳﻴﺭﻗﺎﺌﻣﺔﺍﻹﻋﺪﺍﺩ
ﺍﺴﺘﺧﺩﺍﻢ ﻗﺎﺋﻣﺔﺍﻹﻋﺩﺍﺩ
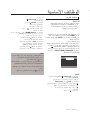
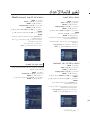
ﺍﺴﺧﺪﻢ ﺍﻠﺯﺮﻴﻦ† π/ﻠﺘﺣﺪﻴﺪ ، Setupﺛﻢ ﺍﺿﻐﻄ ﻋﻠﻰ ® ﺃﻭ ﺍﻠﺯﺭ .ENTER
ﺇﺬﺍ ﺘﻢ ﺿﺑﻄ ﻗﺎﺌﻤﺔ ﺍﻠﻤﺷﻐﻝﻭ ﻗﺎﺌﻤﺔ ﺍﻷﻗﺮﺺﻭﻠﻐﺔ ﺍﻠﺼﻮ ﺕ ﻭ ﻠﻐﺔ ﺍﻠﺘﺭ ﺠﻤﺔ ﺍﻠﻣﺼﺎ ﺣﺒﺔ
ﺒﺷﻜﻝ ﻤﺴﺑﻖ ،ﻓﺳﺘﻆﻬﺭ ﺠﻣﻴﻌًﺎ ﺑﺷﻜﻝ ﺘﻠﻗﺎﺌﻲ ﻔﻲ ﻜﻝ ﻤﺮ ﺓ ﻳﺘﻢ ﻓﻴﻬﺎ ﻋﺮ ﺽ ﻔﻴﺎﻢ.
ﺍﺴﺘﺨﺪ ﺍﻢ ﻠﻐﺔ ﻗﺎﺌﻤﺔ ﺍﻠﻤﺷﻐﻝ
.١ﺍﺿﻐﻄ ﻋﻠﻰ ﺍﻠﺯﺭ .MENU
.٢ﺍﻀﺒﻆ ﻋﻠﻰ ﺍﻠﺯ ﺭﻴﻦ † π/ﻠﺘﺣﺪﻳﺪ Setup
،ﺛﻢ ﺍﻀﻐﻄ ﻋﻠﻰ ® ﺃﻭ ﺍﻠﺯﺭ .ENTER
.٣ﺍﻀﺒﻆ ﻋﻠﻰ ﺍﻠﺯ ﺭﻴﻦ † π/ﻠﺘﺣﺪﻳﺪ Language Setup
،ﺛﻢ ﺍﻀﻐﻄ ﻋﻠﻰ ® ﺃﻭ ﺍﻠﺯﺭ .ENTER
. ٤ﺍﺿﻐﻃ ﻋﻠﻰ ﺍﻠﺯﺭ ﻴﻦ † π/ﻠﺘﺣﺪﻳﺪ ،Player Menuﺛﻢ ﺍﻀﻐﻄ ﻋﻠﻰ ® ﺃﻭ ﺍﻠﺯﺭ
.ENTER
. ٥ﺍﺿﻐﻃ ﻋﻠﻰ ﺍﻠﺯﺭ ﻴﻦ † π/ﻠﺘﺣﺪﻳﺪ ﺍﻠﻠﻐﺔ ﺍﻠﻣﻄﻠﻭﺑﺔ،
ﺛﻢ ﺍﻀﻐﻄ ﻋﻠﻰ ® ﺃﻭ ﺍﻠﺯﺭ .ENTER
ﻴﺘﻢ ﺘﺪﻳﺪ ﺍﻠﻠﻐﺔ ﻭ ﺘﻌﻭ ﺪ ﺍﻠﺷﺎﺷﺔ ﺇﻠﻰ ﻗﺎﺌﻣﺔ .Language Setup -ﻹﺧﻔﺎﺀ ﻋﺭﺾﻗﺎﺌﻤﺔ ﺍﻹﻋﺪﺍﺪ ،ﺍﺿﻐﻄ ﻋﻠﻰ ﺍﻠﺯﺭ .Menu
١
٢
٣
٤
:Language Setupﻹﻋﺪﺍﺪ ﺍﻠﻠﻐﺔ.
:Audio Setupﻹﻋﺪﺍﺪ ﺧﻴﺎﺭﺍﺕﺍﻠﺼﻭﺕ.
:Display Setupﻹ ﻋﺪ ﺎﺪ ﺧﻴﺎﺮﺍﺖ ﺸﺎﺷﺔ ﺍﻠﻌﺮ ﺾ .ﺍﺴﺘﺧﺪﻢ ﻫﺬﺍ ﺍﻠﺧﻴﺎﺭ ﻠﺘﺤﺪﻴﺪ
ﻨﻭﻉ ﺍﻠﺸﺎﺷﺔ ﺍﻠﻤﻃﻠﻮﺏ ﻋﺮﻀﻬﺎ ﺑﺎﻹ ﻀﺎﻓﺔ ﺇﻠﻰ ﺧﻳﺎﺮ ﺍﺕ ﻣﺘﻌﺪﺪﺓ
ﻠﺸﺎﺷﺔ ﺍﻠﻌﺮﺾ.
: Parental Setupﻹ ﻋﺪﺍﺪ ﺍﻠﻣﺳﺘﻭﻰ ﺍﻠﺭﺌﻴﺴﻲ .ﻳﺘﻴﺢ ﻠﻠﻤﺳﺘﺧﺪﻣﻴﻦ ﻀﺑﻂ ﺍﻠﻤﺴﺘﻭﻯ
ﺍﻠﻼﺯﻢ ﻠﻤﻧﻊ ﺍﻷ ﻄﻔﺎﻝ ﻤﻦ ﻋﺭﺾ ﺍﻷﻔﻼﻢ ﻏﻴﺮ ﺍﻠﻼﺌﻗﺔ ﻣﺛﻝ ﺍﻷﻔﻼﻢ
ﺍﻠﺘﻲ ﺘﺘﻀﻤﻦ ﻤﺷﺎ ﻫﺪ ﻋﻧﻑﻭ ﺍﻠﻤﻮ ﺿﻭ ﻋﺎﺕ ﺍﻠﺧﺎﺼﺔ ﺑﺎﻠﻜﺑﺎﺭ
ﻔﻗﻄ ﺇﻠﺦ.
٥ﺗﺴﺟﻴﻞ DivX(R) :ﺑﺭﺟﺎﺀ ﺍﺴﺘﺨﺩﺍﻡ ﺭﻣﺯ ﺍﻠﺘﺳﺟﻳﻞ ﻠﺘﺴﺟﻳﻞ ﺍﻠﺷﻐﻞ ﺑﺎﺴﺗﺨﺪﺍﻢ
DivX(R) Video Onﻠﺗﻠﻢ ﺍﻠﺯﻳﺩ ﺍﻨﺗﻗﻞ ﺇﻠﻰ .www.divx.com/vod
ﺗﻨﺴﻳﻖ Demand
.٢ﺍﺿﻐﻄ ﻋﻠﻰ ﺍﻠﺯﺭﻴﻦ† π/ﻠﻠﻮﻝ ﺇﻠﻰ ﺍﻠﻣﻴﺯ ﺍﺕ ﺍﻠﻤﺨﺘﻠﻔﺔ .ﺍﺿﻐﻄ ﻋﻠﻰ ®
ﺃﻭ ﺍﻠﺯﺮ ENTERﻠﻠﻭ ﺼﻭﻝ ﺇﻠﻰ ﺍﻠﻣﻳﺯ ﺍﺕ ﺍﻠﻔﺮ ﻋﻴﺔ.
.٣ﻹﺨﻔﺎ ﺀ ﻋﺮ ﺾ ﺷﺎﺷﺔ ﺍﻹ ﻋﺪﺍﺪ ﺑﻌﺪ ﺇﺠﺮ ﺍﺀ ﺍﻹ ﻋﺪﺍﺪ ،ﺍﺿﻐﻄ ﻋﻠﻰ ﺍﻠﺯﺭ MENU
ﻣﺮﺓً ﺃﺧﺮﻯ.
ﺍﺴﺘﺧﺪﺍﻢﻠﻐﺔ Disc Menu
ﺘﺆﺪﻱ ﻫﺬﻩ ﺍﻠﻭ ﻅﻴﻔﺔ ﺇﻠﻰ ﺘﻐﻳﺭ ﻠﻐﺔ ﺍﻠﻨﺹ ﺍﻠﻣﻌﺭﻭﺽ ﻋﻠﻰﺷﺎﺷﺎﺕ ﻗﺎﺌﻤﺔ ﺍﻠﻗﺭ ﺹ ﻓﻘﻃ.
.١ﺍﺿﻐﻄ ﻋﻠﻰ ﺍﻠﺯﺭ .MENU
.٢ﺍﻀﺒﻆ ﻋﻠﻰ ﺍﻠﺯ ﺭﻴﻦ † π/ﻠﺘﺣﺪﻳﺪ Setup
،ﺛﻢ ﺍﻀﻐﻄ ﻋﻠﻰ ® ﺃﻭ ﺍﻠﺯﺭ .ENTER
.٣ﺍﻀﺒﻆ ﻋﻠﻰ ﺍﻠﺯ ﺭﻴﻦ † π/ﻠﺘﺣﺪﻳﺪ Language Setup
،ﺛﻢ ﺍﻀﻐﻄ ﻋﻠﻰ ® ﺃﻭ ﺍﻠﺯﺭ .ENTER
. ٤ﺍﺿﻐﻃ ﻋﻠﻰ ﺍﻠﺯﺭ ﻴﻦ † π/ﻠﺘﺣﺪﻳﺪ ،Disc Menuﺛﻢ ﺍﻀﻐﻄ ﻋﻠﻰ ﺃﻭ ﺍﻠﺯﺭ
.ENTER
. ٥ﺍﺿﻐﻃ ﻋﻠﻰ ﺍﻠﺯﺭ ﻴﻦ † π/ﻠﺘﺣﺪﻳﺪ ﺍﻠﻠﻐﺔ ﺍﻠﻣﻄﻠﻭﺑﺔ،
ﺛﻢ ﺍﻀﻐﻄ ﻋﻠﻰ ﺃﻭ ﺍﻠﺯﺭ ENTER
ﻴﺘﻢ ﺘﺪﻳﺪ ﺍﻠﻠﻐﺔ ﻭ ﺘﻌﻭ ﺪ ﺍﻠﺷﺎﺷﺔ ﺇﻠﻰ ﻗﺎﺌﻣﺔ .Language Setup -ﻹﺧﻔﺎﺀ ﻋﺭﺾﻗﺎﺌﻤﺔ ﺍﻹﻋﺪﺍﺪ ،ﺍﺿﻐﻄ ﻋﻠﻰ ﺍﻠﺯﺭ .Menu
ﻣﻼﺣﻇﺔ
ﺣﺴﺐ ﺍﻠﻗﺭ ﺺ ،ﻗﺪ ﻻ ﺘﻌﻤﻝ ﺒﻌﺽ ﺧﻴﺎﺭ ﺍﺕﻗﺎﺌﻤﺔ .Setup
ﺍﻠﻌﺭﺑﻴﺔ_ ٢٥
● ﺘﻐﻳﻴﺭﻗﺎﺌﻣﺔﺍﻹﻋﺪﺍﺩ
ﺘﺘﻴﺡ ﻠﻚ ﺍﻠﻘﺎﺌﻤﺔ Setupﺘﺧﺼﻴﺹ ﻤﺷﻐﻝ DVDﻋﻦ ﻄﺭﻴﻖ ﺍﻠﺴﻤﺎﺡ ﺒﺘﺣﻳﺪ
ﺘﻔﺿﻳﻼﺕ ﺍﻠﻠﻐﺔ ﺍﻠﻤﺧﺘﻠﻔﺔﻭﺇﻋﺪﺍﺪ ﻣﺴﺘﻭﻯ ﺮ ﺌﻴﺴﻲ ،ﺑﻝ ﻭﻀﺑﻄ ﺍﻠﻤﺷﻐﻝ ﻋﻠﻰ ﻧﻭ ﻉ
ﺷﺎﺷﺔ ﺍﻠﺘﻠﻴﻔﺯ ﻴﻭﻦ ﺍﻠﻣﺘﻭ ﻔﺮﺓ ﻠﺪﻳﻚ.
.١ﺍﺿﻐﻄ ﻋﻠﻰ ﺍﻠﺯﺭ MENUﺒﻭ ﺤﻜﻢ ﻋﻦ ﺑُﻌﺪ.
ﺇﻋﺩﺍﺩ ﻤﻳﺯﺍﺕﺍﻠﻠﻐﺔ
ﺘﻐﻳﻴﺭﻗﺎﺌﻣﺔﺍﻹﻋﺪﺍﺩ
ﺍﺴﺘﺧﺪ ﺍﻢ ﻠﻐﺔ ﺍﻠﺼﻭﺕ
● ﺘﻐﻳﻴﺭﻗﺎﺌﻣﺔﺍﻹﻋﺪﺍﺩ
.١ﺍﺿﻐﻄ ﻋﻠﻰ ﺍﻠﺯﺭ .MENU
.٢ﺍﻀﺒﻆ ﻋﻠﻰ ﺍﻠﺯ ﺭﻴﻦ † π/ﻠﺘﺣﺪﻳﺪ Setup
،ﺛﻢ ﺍﻀﻐﻄ ﻋﻠﻰ ® ﺃﻭ ﺍﻠﺯﺭ .ENTER
.٣ﺍﻀﺒﻆ ﻋﻠﻰ ﺍﻠﺯ ﺭﻴﻦ † π/ﻠﺘﺣﺪﻳﺪ Language Setup
،ﺛﻢ ﺍﻀﻐﻄ ﻋﻠﻰ ® ﺃﻭ ﺍﻠﺯﺭ .ENTER
. ٤ﺍﺿﻐﻃ ﻋﻠﻰ ﺍﻠﺯﺭ ﻴﻦ † π/ﻠﺘﺣﺪﻳﺪ ،Audioﺛﻢ ﺍﻀﻐﻄ ﻋﻠﻰ ® ﺃﻭ ﺍﻠﺯﺭ
.ENTER
. ٥.ﺍﺿﻐﻃ ﻋﻠﻰ ﺍﻠﺯﺭ ﻴﻦ † π/ﻠﺘﺣﺪﻳﺪ ﺍﻠﻠﻐﺔ ﺍﻠﻣﻄﻠﻭﺑﺔ،
ﺛﻢ ﺍﻀﻐﻄ ﻋﻠﻰ ® ﺃﻭ ﺍﻠﺯﺭ ENTER
ﺤﺪﺪ " "Originalﺇﺫﺍ ﻜﻨﺖ ﺘﺭﻴﺪ ﻀﺑﻂ ﺍﻠﻐﺔ ﺍﻻﻓﺘﺮ ﺍﻀﻴﺔ ﻠﻣﺎﺪﺓ ﺍﻠﻣﺴﺠﻠﺔ ﺑﺣﻴﺚﺘﻜﻭﻥ ﺍﻠﻠﻐﺔ ﺍﻷ ﺼﺎﻴﺔ ﻠﺘﺴﺟﻴﻝ ﺍﻠﻗﺭ ﺹ.
ﺇﺫﺍ ﻜﺎﻨﺕ ﺍﻠﻠﻐﺔ ﺍﻠﻣﺤﺪﺪﺓ ﻏﻴﺭ ﻣﺴﺠﻠﺔ ﻋﻠﻰ ﺍﻠﻗﺮﺹ ،ﻓﺴﻳﺘﻢﺘﺤﺪﻳﺪ ﺍﻠﻠﻐﺔ ﺍﻷﺼﻠﻴﺔﻤﺴﺑﻗﺔ ﺍﻠﺗﺳﺠﻴﻝ.
ﻳﺘﻢ ﺘﺤﺪﻳﺪ ﺍﻠﻠﻐﺔ ﻭ ﺘﻌﻭ ﺪ ﺍﻠﺸﺎﺷﺔ ﺇﻠﻰ ﻗﺎﺌﻣﺔ .Language Setup -ﻹ ﺧﻓﺎ ﺀ ﻋﺭ ﺾ ﻘﺎﺌﻣﺔ ،Setupﺍﺿﻐﻃ ﻋﻠﻰ ﺍﻠﺯﺭ .MENU
ﺭ
ﺍﺴﺘﺧﺪ ﺍﻢ ﻠﻐﺔ ﺍﻠﺘﺭ ﺟﺘﺮ ﺍﻠﻤﺼﺎﺤﺑﺔ
.١ﺍﺿﻐﻄ ﻋﻠﻰ ﺍﻠﺯﺭ .MENU
.٢ﺍﻀﺒﻆ ﻋﻠﻰ ﺍﻠﺯ ﺭﻴﻦ † π/ﻠﺘﺣﺪﻳﺪ Setup
،ﺛﻢ ﺍﻀﻐﻄ ﻋﻠﻰ ® ﺃﻭ ﺍﻠﺯﺭ .ENTER
.٣ﺍﻀﺒﻆ ﻋﻠﻰ ﺍﻠﺯ ﺭﻴﻦ † π/ﻠﺘﺣﺪﻳﺪ Language setup
،ﺛﻢ ﺍﻀﻐﻄ ﻋﻠﻰ ® ﺃﻭ ﺍﻠﺯﺭ .ENTER
. ٤ﺍﺿﻐﻃ ﻋﻠﻰ ﺍﻠﺯﺭ ﻴﻦ † π/ﻠﺘﺣﺪﻳﺪ ،Subtitleﺛﻢ ﺍﻀﻐﻄ ﻋﻠﻰ ® ﺃﻭ ﺍﻠﺯﺭ
.ENTER
. ٤ﺍﺿﻐﻃ ﻋﻠﻰ ﺍﻠﺯﺭ ﻴﻦ † π/ﻠﺘﺣﺪﻳﺪ ﺍﻠﻠﻐﺔ ﺍﻠﻣﻄﻠﻭﺑﺔ ،ﺛﻢ ﺍﻀﻐﻄ ﻋﻠﻰ ® ﺃﻭ ﺍﻠﺯﺭ
.ENTER
ﺤﺪﺪ " "Automaticﺇﺫﺍ ﻜﻨﺖ ﺘﺭﻴﺪ ﻀﺑﻂ ﺍﻠﻐﺔ ﺍﻠﻣﺼﺎﺣﺑﺔ ﻋﻠﻰ ﻨﻔﺲﺍﻠﻠﻐﺔ ﺍﻠﺘﻲ ﺘﻢ ﺣﺪﻴﺪﻫﺎ ﻜﻠﻐﺔ ﺍﻠﺼﻮﺕ.
ﻗﺪ ﻻ ﺘﺷﻤﻝ ﺑﻌﺾ ﺍﻷﻗﺭ ﺍﺺ ﺍﻠﻠﻐﺔ ﺍﻠﺘﻲ ﺘﻢ ﺘﺣﺪ ﻳﺪ ﻫﺎ ﻜﻠﻐﺔ ﺃﻭﻠﻰ ،ﻭﻓﻲ ﺘﻠﻚﺍﻠﺤﺎﻠﺔ ﻳﺴﺘﺧﺪﻢ ﺍﻠﻗﺭﺹ ﺇﻋﺪﺍﺪ ﺍﻠﻠﻐﺔ ﺍﻷﺼﻠﻴﺔ.
ﻳﺘﻢ ﺘﺤﺪﻳﺪ ﺍﻠﻠﻐﺔ ﻭ ﺘﻌﻭ ﺪ ﺍﻠﺸﺎﺷﺔ ﺇﻠﻰ ﻗﺎﺌﻣﺔ .Language Setup -ﻹ ﺧﻓﺎ ﺀ ﻋﺭ ﺾ ﻘﺎﺌﻣﺔ ،Setupﺍﺿﻐﻃ ﻋﻠﻰ ﺍﻠﺯﺭ .MENU
ﻒ
(Off
٢
_٢٦ﺘﻐﻳﻴﺭﻗﺎﺌﻣﺔﺍﻹﻋﺪﺍﺩ
ﺍﺴﺘﺧﺪﺍﻢ ﻠﻐﺔ ﺍﻠﺘﺮﺠﻤﺔ ﺍﻠﻣﺼﺎﺣﺑﺔ DivX
.١ﺍﺿﻐﻄ ﻋﻠﻰ ﺍﻠﺯﺭ .MENU
.٢ﺍﻀﺒﻆ ﻋﻠﻰ ﺍﻠﺯ ﺭﻴﻦ † π/ﻠﺘﺣﺪﻳﺪ Setup
،ﺛﻢ ﺍﻀﻐﻄ ﻋﻠﻰ ® ﺃﻭ ﺍﻠﺯﺭ .ENTER
.٣ﺍﻀﺒﻆ ﻋﻠﻰ ﺍﻠﺯ ﺭﻴﻦ † π/ﻠﺘﺣﺪﻳﺪ Language setup
،ﺛﻢ ﺍﻀﻐﻄ ﻋﻠﻰ ® ﺃﻭ ﺍﻠﺯﺭ .ENTER
. ٤ﺍﺿﻐﻃ ﻋﻠﻰ ﺍﻠﺯﺭ ﻴﻦ † π/ﻠﺘﺣﺪﻳﺪ ،DivX Subtitleﺛﻢ ﺍﻀﻐﻄ ﻋﻠﻰ ® ﺃﻭ ﺍﻠﺯﺭ
ENTER.
. ٥ﺍﺿﻐﻃ ﻋﻠﻰ ﺍﻠﺯﺭ ﻴﻦ † π/ﻠﺘﺣﺪﻳﺪ ﺍﻠﻠﻐﺔ ﺍﻠﻣﻄﻠﻭﺑﺔ ،ﺛﻢ ﺍﻀﻐﻄ ﻋﻠﻰ ® ﺃﻭ ﺍﻠﺯﺭ
.ENTER
ﺤﺪﺩ" "Automaticﺇﺬﺍ ﻛﻧﺕ ﺗﺭﻳﺪ ﺿﺑﻄ ﻠﺔ ﺍﻠﺗﺭﺠﻣﺔ ﺍﻠﻤﺻﺎﺤﺑﺔ ﻋﻠﻰ ﻨﻔﺲ ﺍﻟﻠﻐﺔﺍﻠﺗﻲﺗﻢ ﺘﺤﺩﻴﺩﻫﺎ ﻛﻠﻐﺔﺍﻠﺼﻭﺖ.
ﻗﺪﻻ ﺘﺷﺘﻤﻞ ﺑﻌﺾ ﺍﻷﻘﺭﺍﺺ ﻋﻠﻰ ﻠﻐﺔ ﺍﻠﺘﻲ ﺗﻡ ﺘﺤﺩﻴﺪﻫﺎ ﻜﻠﺔ ﺃﻭﻠﻰ ،ﻭﻔﻲ ﻫﺬﻩ ﺍﻟﺣﺎﻠﺔ
ﻴﺷﺘﺨﺩﻢ ﺍﻠﻗﺭﺺ ﺇﻋﺩﺍﺪ ﺍﻟﻠﻐﺔ ﺍﻷﺻﻠﻴﺔ.
ﻴﺘﻢ ﺘﺪﻳﺪ ﺍﻠﻠﻐﺔ ﻭ ﺘﻌﻭ ﺪ ﺍﻠﺷﺎﺷﺔ ﺇﻠﻰ ﻗﺎﺌﻣﺔ ﺍﻹﻋﺪﺍﺪ. -ﻹﺧﻔﺎﺀ ﻋﺭﺾﻗﺎﺌﻤﺔ ﺍﻹﻋﺪﺍﺪ ،ﺍﺿﻐﻄ ﻋﻠﻰ ﺍﻠﺯﺭ .Menu
ﺇﻋﺩﺍﺩ ﺧﻴﺎﺭﺍﺕ ﺍﻠﺼﻭﺕ
ﺘﺘﻴﺢ ﻠﻠﻚ ﺧﻴﺎﺭ ﺍﺕ ﺍﻠﺼﻭﺕ ﺇﻋﺪﺍﺪ ﺠﻬﺎﺯ ﺍﻠﺼﻭﺕﻭﺇﻋﺪﺍﺪﺍﺕ ﺤﺎﻠﺔ ﺍﻠﺼﻭﺕ
ﺤﺴﺐ ﻨﻅﺎﻢ ﺍﻠﺼﻭ ﺕ ﺍﻠﻤﺴﺘﺧﺪﻢ.
.١ﺍﺿﻐﻄ ﻋﻠﻰ ﺍﻠﺯﺭ .MENU
.٢ﺍﻀﺒﻆ ﻋﻠﻰ ﺍﻠﺯ ﺭﻴﻦ † π/ﻠﺘﺣﺪﻳﺪ Audio Setup
،ﺛﻢ ﺍﻀﻐﻄ ﻋﻠﻰ ® ﺃﻭ ﺍﻠﺯﺭ .ENTER
. ٣ﺍﺿﻐﻃ ﻋﻠﻰ ﺍﻠﺯﺭ ﻴﻦ † π/ﻠﺘﺣﺪﻳﺪ ﺍﻠﻣﺼﺮ ﺍﻠﻤﻄﻠﻮﺐ ،ﺛﻢ ﺍﻀﻐﻄ ﻋﻠﻰ ﺃﻭ ﺍﻠﺯﺭ
،ﺛﻢ ﺍﻀﻐﻄ ﻋﻠﻰ ® ﺃﻭ ﺍﻠﺯﺭ .ENTER
Dolby Digital Output ١
:PCMﻠﻠﺘﺣﻭﻳﻝ ﺇﻠﻰ ﺼﻮﺕ ).PCM(2CH : Bitstreamﻹﺧﺭ ﺍﺝ ﺇﺷﺎﺮﺍﺕ Dolby Digitalﻤﻦ ﺧﻼﻝﺍﻠﺧﺭ ﺝ ﺍﻠﺮ ﻘﻣﻲ .ﺣﺪﺪ Bitstream
ﺘﺘﻴﺢ ﻠﻚ ﺧﻳﺎﺮ ﺍﺕ ﺍﻠﻌﺮ ﺽ ﺿﺑﻃ ﻭ ﻆﺎ ﺌﻑ ﺍﻠﻔﻳﺪﻴﻭ ﺍﻠﻣﺧﺘﻠﻔﺔ ﻠﻠﻣﺷﻐﻝ.
.١ﺍﺿﻐﻄ ﻋﻠﻰ ﺍﻠﺯﺭ .MENU
.٢ﺍﻀﺒﻆ ﻋﻠﻰ ﺍﻠﺯ ﺭﻴﻦ † π/ﻠﺘﺣﺪﻳﺪ Setup
،ﺛﻢ ﺍﻀﻐﻄ ﻋﻠﻰ ® ﺃﻭ ﺍﻠﺯﺭ .ENTER
. ٣ﺍﺿﻐﻃ ﻋﻠﻰ ﺍﻠﺯﺭ ﻴﻦ † π/ﻠﺘﺣﺪﻳﺪ ،Display setupﺛﻢ ﺍﻀﻐﻄ ﻋﻠﻰ ﺃﻭ ﺍﻠﺯﺭ
،ﺛﻢ ﺍﻀﻐﻄ ﻋﻠﻰ ® ﺃﻭ ﺍﻠﺯﺭ .ENTER
. ٤ﺍﺿﻐﻃ ﻋﻠﻰ ﺍﻠﺯﺭ ﻴﻦ † π/ﻠﺘﺣﺪﻳﺪ ﺍﻠﻣﺼﺮ ﺍﻠﻤﻄﻠﻮﺐ ،ﺛﻢ ﺍﻀﻐﻄ ﻋﻠﻰ ﺃﻭ ﺍﻠﺯﺭ
،ﺛﻢ ﺍﻀﻐﻄ ﻋﻠﻰ ® ﺃﻭ ﺍﻠﺯﺭ .ENTER
ﻣﻼﺣﻇﺔ
ﻋﻧﺪ ﺘﺸﻐﻴﻝ ﻗﺮ ﺹ ﻳﺷﺘﻤﻝ ﻋﻠﻰ ﺼﻭﺕ MPEGﻓﻲ ﺘﺣﺪﻴﺪ bistream
،ﻗﺪ ﻻ ﻴﺜﺘﻤﻝ ﺍﻡﻤﺣﻭﺮ ﻋﻠﻰ ﺧﺮﺝ ﺼﻭﺕﻭﻫﻭ ﻳﺴﺘﻨﺩﺇﻠﻰﻣﺴﺘﻘﺑﻝ ﺍﻠﺼﻭﺕ.
Dynamic Compression ٣
:Onﻠﺘﺣﺪﻳﺪ ﺍﻠﻀﻐﻃ ﺍﻠﺪﻴﻨﺎﻣﻴﻜﻲ. : Offﻠﺘﺤﺪﻳﺪ ﺍﻠﻧﻄﺎﻖ ﺍﻠﻣﻌﻳﺎﺭ ﻱ.PCM Down Sampling ٤
:Onﺤﺪﺪ ﻫﺫﺍ ﺍﻠﺧﻴﺎﺭ ﻋﻨﺪﻣﺎ ﻳﻜﻭﻦ ﻣﺿﺧﻢ ﺍﻠﺼﻭﺕ ﺍﻠﻣﺘﺼﻝ ﺒﺎﻠﻤﺷﻐﻝ ﻏﻴﺭﻣﺘﻭﺍﻔﻖﻣﻊ ﺘﺭﺪ ٩٦ﻛﻴﻠﻭ ﻫﺭ ﺘﺯ .ﻔﻲ ﻫﺬﻩﺍﻠﺤﺎﺍﻠﺔ ،ﺴﻳﺘﻢ ﺧﻔﺾ ﺇﺷﺎﺮ ﺍﺕ ﺍﻠﺘﺭ ﺪﺪ
٩٦ﻜﻳﻠﻭ ﻫﺭ ﺘﺯ ﺇﻠﻰ ٤٨ﻛﻴﺎﻭ ﻫﺮ ﺘﺯ.
: Offﺤﺪﺪ ﻫﺬﺍ ﺍﻠﺧﻴﺎﺮ ﻋﺬﺪﻣﺎ ﻴﻛﻭﻦ ﻣﻀﺧﻢ ﺍﻠﺼﻭﺕ ﺍﻠﻣﺘﺼﻝ ﺒﺎﻠﻤﺸﻐﻝ ﻣﺘﻭ ﺍﻔﻖﺤﺪﺪ ﻫﺬﺍ ﺍﻠﺧﻴﺎﺮ ﻋﺬﺪﻤﺎ ﻴﻜﻭﻦ ﻣﺿﺧﻢ ﺍﻠﺼﻭﺕ ﺍﻠﻣﺘﺼﻝ ﺑﺎﻠﻤﺸﻐﻝ ﻣﺘﻭ ﺍﻔﻕ
ﺇﺟﺭ ﺍﺀﺃﻱ ﺘﻐﻴﻴﺮ.
Power On Music ٥
ﺘﺴﺘﺧﺪﻢ ﻩﺬﻩ ﺍﻠﻗﺎﺌﻤﺔ ﻠﺘﻨﺸﻴﻄ ﺃﻭ ﺇﻠﻐﺎﺀ ﺘﻨﺷﻴﻄ ﺼﻭﺕ ﺑﺪﺀ ﺍﻠﺘﺸﻐﻴﻝ ﻋﻧﺪ ﺘﺸﻐﻴﻝ ﻤﺷﻐّﻝ
.DVD
ﺇﻴﻗﺎﻑ :ﻭﺍﻠﻔﻴﺪﻴﻭ ﻠﺘﺷﻐﻴﻝ ﺍﻠﻤﻭﺴﻴﻘﻰ
ﺘﺷﻐﻴﻝ :ﻹ ﻴﻘﺎﻒ ﺘﺷﻐﻴﻝ ﺒﺪﺀ ﺘﺷﻐﻴﻝ ﺍﻠﻥﻭ ﺴﻴﻘﻰ
ﻣﻼﺣﻇﺔ
ﺤﺘ ﺃﺛﻧﺎ ﺀ ﻀﺒﻄ PCM Down Samplingﻋﻠﻰ off
• ﺴﺘﻗﻭﻢ ﺒﻌﺾ ﺍﻷﻗﺮ ﺍﺺ ﺑﺈﺧﺮﺍﺝ ﺍﻠﺼﻭ ﺖ ﺬﻱ ﺍﻠﻣﻌﺎﻴﻧﺔ
ﺍﻠﻤﻨﺧﻓﺿﺔ ﻓﻘﻄ ﻣﻦﺧﻼﻝ ﻋﻣﻠﻳﺎﺕ ﺍﻠﺧﺭ ﺝ ﺍﻠﺮ ﻗﻤﻲ.
ﻹﺧﻔﺎﺀﻋﺭﺾﻗﺎﺌﻤﺔ ، Setupﺍﻀﻐﻄ ﻋﻠ ﺍﻠﺯﺭ .MENU
● ﺘﻐﻳﻴﺭﻗﺎﺌﻣﺔﺍﻹﻋﺪﺍﺩ
ﻋﻨﺪ ﺍﻠﺘﻭ ﺼﻴﻝ ﺑﺠﻬﺎﺯ ﻔﺎﻚ ﺘﻔﺷﻳﺭ ﺪﻭﻠﺒﻲﺮﻗﻤﻲ.
MPEG-2 Digital Out ٢
:PCMﻠﻠﺘﺣﻭﻳﻝ ﺇﻠﻰ ﺼﻮﺕ ).PCM(2CH : Bitstreamﻠﻠﺘﺣﻭﻴﻝ ﺇﻠﻰ MPEG-2 Digital Bitstream). (5.1CHﺤﺪﺪ Bitstreamﻋﻨﺪ ﺍﺴﺘﺧﺪﺍﻢ ﺧﺮ
ﺝ ﺍﻠﺼﻭﺕ ﺍﻠﺭ ﻗﻤﻲ.
ﺇﻋﺩﺍﺩ ﺧﻳﺎﺮﺍﺕ ﺍﻠﻌﺮﺾ
TV Aspect
١
ﺣﺴﺐ ﻧﻭ ﻉ ﺍﻠﺘﻠﻴﻔﺯ ﻳﻭﻦ ﺍﻠﻤﺘﻭ ﻔﺭ ﻠﺪﻳﻚ ،ﻗﺪ ﺘﺣﺗﺎ ﺝ ﺇﻠﻰ
ﺿﺒﻃ ﺇﻋﺪﺍﺪ ﺍﻠﺸﺎﺷﺔ )ﻨﺴﺒﺔ ﺍﻻﺮ ﺘﻔﺎﻉ ﺇﻠﻰ ﺍﻠﻌﺭ ﺾ(.
:4:3 Letter Boxﺤﺪﺪ ﻫﺫﺍ ﺍﻠﺧﻴﺎﺮ ﻋﻨﺪﻣﺎ ﺘﺮﻴﺪ ﻋﺭ ﺾ ﺍﻠﺸﺎﺷﺔ ﺍﻠﺘﻲ ﺘﻣﻝﺑﻨﺴﺑﺔ ﺍﻻﺮﺘﻔﺎ ﻉ ﺇﻠﻰ ﺍﻠﻌﺮﺾ ٩:١٦ﺍﻠﺘﻲ ﺘﻭ ﻔﺮ ﻫﺎ ﺃﻗﺭ ﺍﺹ ،DVDﺘﻰ
ﻓﻲ ﺣﺎﻠﺔ ﻀﺒﻄ ﺍﻠﺘﻠﻴﻓﺯﻴﻭﻦ ﻋﻠﻰ ﻧﺴﺒﺔ ﺍﻻﺮ ﺘﻔﺎﻉ ﺇﻠﻰ ﺍﻠﻌﺮ ﺾ . ٣:٤ﺴﺘﻅﻬﺭ
ﺍﻷﺷﺮ ﻂﺔ ﺍﻠﺴﻭ ﺪﺍﺀ ﻓﻲ ﺍﻠﺠﺯﺀ ﺍﻠﻌﻠﻮﻱ ﻭ ﺍﻠﺴﻔﻠﻲ ﻤﻦ ﺍﻠﺸﺎﺷﺔ.
:4:3 Pan&Scanﺤﺪﺪ ﻫﺫﺍ ﺍﻠﺧﻴﺎﺮﺃﺠﻬﺰ ﺓ ﺍﻠﺘﻠﻳﻔﺯﻳﻭﻦ ﺬﺍﺕ ﺍﻠﺣﺠﻢﺍﻠﺘﻗﻠﻳﺪﻱ ﻋﻨﺪﻣﺎﺘﺮﻳﺪ ﻋﺭ ﺾ ﺍﻠﺠﺯ ﺀ ﺍﻠﺭ ﺌﻳﺴﻲ ﻣﻦ ﺍﻠﺶﺎﺷﺔ ﺍﻠﺘﻲ ﺘﻌﻤﻝ ﺑﻨﺴﺒﺔ
ﺍﻻ ﺭ ﺘﻔﺎﻉ ﺇﻠ ﺍﻠﻌﺭ ﺾ ) .٩:١٦ﺴﻴﺘﻢ ﺍﻗﺘﺼﺎﺹﺍﻠﺠﺎﻨﺐ ﺍﻷﻴﺴﺭ ﻭ ﺍﻷﻳﻤﻦ
ﺍﻷﻗﺼﻰ ﻣﻦ ﺼﻭﺭ ﺓ ﺍﻠﻓﻳﻠﻢ(.
:16:9 Wideﻴﻤﻜﻨﻚ ﻋﺮﺾ ﺍﻠﺼﻭﺮﺓ ﺍﻠﻜﺎﻤﻠﺔ ﺍﻠﺘﻲ ﻳﺘﻢ ﻋﺮﻀﻬﺎ ﺑﻨﺳﺑﺔﺍﻻﺮﺘﻔﺎﻉ ﺇﻠﻰ ﺍﻠﻌﺭﺾ ٩:١٦ﻋﻠﻰ ﺍﻠﺘﻠﻴﻔﺯ ﻴﻭﻦ ﺬﻱ ﺍﻠﺸﺎﺷﺔ ﺍﻠﻌﺮﻴﺿﺔ.
ﺘﻢ ﺍﻠﺘﺼﻨﻴﻊ ﺑﻤﻭ ﺟﺐ ﺘﺮ ﺧﻴﺹ ﻣﻦ .Dolby Laboratories
" "Dolbyﻭﺭﻤﺯ ﺣﺮ ﻒ Dﺍﻠﻣﺯ ﻭﺪ ﺝ ﻳﻤﺛﻼﻦ ﻋﻼﻣﺘﻴﻦ
ﻠ .Dolby Laboratories
" " DTSﻭ " "DTS Digital Outﻋﻼﻣﺘﺎﻦ ﺘﺠﺎﺮ ﻳﺘﺎﻦ ﻣﺴﺠﻠﺘﺎﻦ
.Digital Theater System, Inc
٣
٣
Screen Messages
ﻳﺘﻢ ﺍﺴﺘﺧﺪ ﺍﻢ ﻫﺬﺍ ﺍﻠﺧﻳﺎﺭ ﻠﺘﺸﻐﻴﻝ ﺍﻠﺮﺴﺎﺌﻝ ﺍﻠﻣﻌﺮﻭﻀﺔ ﻋﻠﻰ ﺍﻠﺸﺎﺷﺔ ﺃﻭ ﺇﻴﻘﺎﻒ
Black Level
: Black Levelﻴُﺴﺘﺧﺪﻢ ﻫﺬﺍ ﺍﻠﺨﻴﺎﺮ ﻠﻀﺒﻄ ﺴﻄﻭﻉ ﺍﻠﺷﺎﺷﺔ On) ،ﺃﻭ (Offﻭﻻ ﻴﻌﻤﻝ ﻓﻲ ﺍﻠﻭﺿﻊ Progressiveﺃﻭ .PAL
ﺍﻠﻌﺭﺑﻴﺔ_ ٢٧
٢
٣
٦
ﺘﻐﻳﻴﺭﻗﺎﺌﻣﺔﺍﻹﻋﺪﺍﺩ
٤
TV System
: NTSCﻔﻲ ﺤﺎﻠﺔ ﺍﺴﺘﺧﺪ ﺍﻢ ﻗﺮﺹ NTSC• ﺇﺫﺍ ﻜﺎﻦ ﻨﻅﺎﻢ ﺍﻠﺘﻠﻴﻔﺯ ﻴﻭﻦ ﻳﺤﺘﻭ ﻱ ﻋﻠﻰ ﺪﺧﻝ ﻓﻳﺪﻴﻭ PALﻔﻗﻃ ،ﻔﻴﺠﺐ ﻋﻠﻴﻚ
ﺍﺧﺘﻳﺎﺭ " ."PALﺇﺬﺍ ﺘﻡ ﺍﺧﺘﻳﺎﺭ " ،"PALﻔﺴﻳﺘﻢ ﻀﺑﻃ ﺘﻨﺴﻳﻖ ﺧﺭ ﺝ ﺍﻠﺘﺪ ﺍﺧﻝ
● ﺘﻐﻳﻴﺭﻗﺎﺌﻣﺔﺍﻹﻋﺪﺍﺩ
ﻋﻠﻰ ﺧﺭ ﺝ PALﺑﺘﺭﺪﺪ ٦٠ﻫﺭﺘﺯ.
• ﺇﺬﺍ ﻜﺎﻦ ﻨﻅﺎﻢ ﺍﻠﺘﻠﻴﻔﺯ ﻴﻭﻦ ﻳﺣﺘﻭ ﻱ ﻋﻠﻰ NTSCﻓﻗﻂ ،ﻔﻴﺠﺐ ﻋﻠﻳﻚ
ﺍﺨﺘﻴﺎﺮ "."NTSC
: PALﻓﻲ ﺤﺎﻠﺔ ﺍﺴﺘﺧﺪﺍﻢﻗﺮﺹ PAL• ﺇﺫﺍ ﻜﺎﻦ ﻨﻅﺎﻢ ﺍﻠﺘﻠﻴﻔﺯ ﻴﻭﻦ ﻳﺤﺘﻭ ﻱ ﻋﻠﻰ ﺪﺧﻝ ﻓﻳﺪﻴﻭ NTSCﻔﻗﻃ ،ﻔﻴﺠﺐ
ﻋﻠﻴﻚﺍﺧﺘﻴﺎﺮ "."NTSC
• ﺇﺫﺍ ﻜﺎﻦ ﻨﻅﺎﻢ ﺍﻠﺘﻠﻴﻔﺯ ﻴﻭﻦ ﻳﺤﺘﻭ ﻱ ﻋﻠﻰ ﺪﺧﻝ PALﻔﻗﻃ ،ﻔﻴﺠﺐ
ﻋﻠﻴﻚ ﺍﺧﺘﻴﺎﺮ "."PAL
AUTO -
ﺇﻋﺩ ﺘﺤﻜﻢ ﺍﻵﺒﺎﺀ
ﺘﻤﻝ ﻭﻆﻴﻔﺔ Parental Controlﺒﺎﻻﺷﺘﺮ ﺍﻚ ﻤﻊ ﺃﻗﺮﺍﺺ DVDﺍﻠﺙﻲ
ﺘﻢﺘﻌﻳﻳﻦ ﺘﺼﻨﻳﻒ ﻠﻬﺎ ﺒﺤﻳﺚ ﺘﺴﺎ ﻋﻠﻰ ﺍﻠﺘﺤﻜﻢ ﻔﻲ ﺃﻗﺮ ﺍﺺ DVD
ﺍﻠﺘﻲ ﺘﺷﺎ ﻫﺪ ﻫﺎ ﺍﻷ ﺴﺭ ﺓ .ﻴﻭ ﺠﺪ ﻣﺎ ﻴﺼﻝ ﺇﻠﻰ ٨ﻣﺴﺘﻭ ﻴﺎﺕ ﺘﺼﻨﻳﻑ ﻋﻠﻰ ﺍﻠﻘﺮ ﺺ.
ﻋﺪﺍﺪ ﻣﺴﺘﻭ ﻯ ﺍﻠﺘﺼﻨﻳﻑ
.١ﺍﺿﻐﻄ ﻋﻠﻰ ﺍﻠﺯﺭ .MENU
.٢ﺍﻀﺒﻆ ﻋﻠﻰ ﺍﻠﺯ ﺭﻴﻦ † π/ﻠﺘﺣﺪﻳﺪ ،Setupﺛﻢ ﻀﻐﻂ ﻋﻠﻰ® ﺃﻭ
ﺍﻠﺯﺭ .ENTER
.٣ﺍﻀﺒﻆ ﻋﻠﻰ ﺍﻠﺯ ﺭﻴﻦ † π/ﻠﺘﺣﺪﻳﺪ ،Parental Setupﺛﻢ ﺍﻀﻐﻂ ®
ﺍﻠﺯﺭ .ENTER
٥
Video Output
ﺤﺪﺪ.Video Output
): Component (I-SCANﺤﺪﺪﻩﻋﻨﺪﻣﺎﺘﺭﻴﺪﺍﺴﺘﺧﺪﺍﻢ ﺧﺭ ﺝ.Component Interlace
ﻇﺎﺒﻭ
): Component (P-SCANﺤﺪﺪﻩﻋﻨﺪﻣﺎﺘﺭﻴﺪﺍﺴﺘﺧﺪﺍﻢ ﺧﺭ ﺝ.Component Progressive
Display
.٤ﺍﻀﺒﻆ ﻋﻠﻰ ﺍﻠﺯ ﺭﻴﻦ † π/ﻠﺘﺣﺪﻳﺪ ،Rating Levelﺛﻢ ﻀﻐﻂ ﻋﻠﻰ® ﺃﻭ
ﺍﻠﺯﺭ .ENTER
.٥ﺃﺪﺨﻝ ﻜﻠﻣﺔ ﺍﻠﻤﺮﻭﺮ.
ﺍﺮﺠﻊ ﺇﻠﻰ ﺪﻠﻳﻝ ﻤﺴﺘﺧﺪﻢ ﺍﻠﺘﻠﻴﻔﺯﻴﻭﻦ ﻠﻠﺘﻌﺮ ﻒ ﻋﻰ ﻤﺎ ﺇﺫﺍ ﻜﺎﻦ
ﺍﻠﺘﻠﻴﻔﺯ ﻴﻭﻦ ﻴﺪ ﻋﻢ ﺍﻠﻤﺴﺢ ﺍﻠﻣﺘﻘﺪﻢ ﺃﻢ ﻻ .ﻭﺇﺫﺍ ﻜﺎﻦ ﺍﻠﺘﻠﻴﻔﺯ ﻴﻭﻦ ﻴﺪ ﻋﻢ
ﺍﻻﺴﺘﻌﺮ ﺍﺾ ﺍﻠﻣﺘﻗﺪﻢ ،ﻔﺎﺘﺑﻊ ﺍﻠﺘﻌﻠﻴﻤﺎﺕ ﺍﻠﻭﺍﺭﺪﺓ ﻔﻲ ﺪﻠﻴﻝ ﻤﺴﺘﺠﺪﻢ
ﺍﻠﺘﻠﻴﻔﺯ ﻴﻭﻦ ﻔﻤﺎ ﻴﺘﻠﻖﻴﺎﻋﺪﺍﺪﺍﺕ ﺍﻻﺴﺘﻌﺭ ﺍﺾ ﺍﻠﻣﺘﻗﺪﻢ ﻔﻲ ﻘﺎﺌﻤﺔ
ﻨﻅﺎﻢ ﺍﻠﺘﻠﻴﻔﺯﻴﻮﻦ.
ﻔﻴ ﺤﺎﻠﺔ ﻀﺑﻃ Video Outputﺑﻃﺮﻴﻘﺔ ﻏﻳﺮ ﺼﺣﻴﺤﺔ ،ﻘﺪ ﻻ
ﺘﻆﻬﺭ ﺍﻠﺸﺎﺷﺔ.
٢
_٢٨ﺘﻐﻳﻴﺭﻗﺎﺌﻣﺔﺍﻹﻋﺪﺍﺩ
ﺍﻠﺮ ﺠﺍﺀ ﺘﻐﻴﻴﺮ ﻜﻠﻤﺔ ﺍﻠﺴﺮ ﺇﻠﻰ ﻜﻠﻤﺔ ﻣﺧﺘﻠﻔﺔ ﻋﻦ 0000 ﻴﺘﻢ ﻀﺒﻄ ﻜﻠﻤﺔ ﺍﻠﻤﺭﻭﺭ ﻋﻠﻰ ، 0000ﺑﺷﻜﻝ ﺍﻓﺘﺮ ﺍﻀﻲ.ﻠﺘﻨﺷﻴﻄ ﻮ ﻅﻴﻔﺔ ﺍﻠﺘﺤﻜﻢ ﺍﻷﺒﻭ ﻱ.
.٤ﺍﻀﻐﻃ ﻋﻠﻰ ﺍﻠﺯﺭ† π/ﻠﺘﺤﺪﻴﺪ Rating Levelﺍﻠﻣﻃﻠﻭﺐ ® ،ﺛﻢ ﺍﻀﻐﻂ
ﻋﻠﻰ ﺃﻭ ﺍﻠﺯﺭ .ENTER
ﻤﺛﺎﻝ( ﺍﻹﻋﺪﺍﺪ ﻔﻲ ﺍﻠﻭﻀﻊ .Kids Safe
● ﺘﻐﻳﻴﺭﻗﺎﺌﻣﺔﺍﻹﻋﺪﺍﺩ
ﻹﺧﻔﺎﺀ ﻋﺮﺾ ﻗﺎﺋﻣﺔ ﺍﻹﻋﺪﺍﺪ ،ﺍﻀﻐﻄ ﻋﻠﻰ ﺍﻠﺯﺭ .MENUﻓﻣﺛﻷ ﺇﺬﺍ ﺘﻢ ﺘﺤﺪ ﻴﺪ ﺣﻰ
، level 6ﻔﻠﻦ ﻴﺘﻢ ﺘﺷﻐﻴﻝ ﺍﻷﻗﺭﺍﺹ ﺍﻠﺘﻲ ﺘﺷﺘﻣﻝ ﻋﻠﻰ .Level 8، level 7
ﺘﻐﻴﻴﺮ ﻜﻠﻣﺔ ﺍﻠﻣﺮﻭﺭ
.١ﺍﺿﻐﻄ ﻋﻠﻰ ﺍﻠﺯﺭ .MENU
.٢ﺍﻀﺒﻆ ﻋﻠﻰ ﺍﻠﺯ ﺭﻴﻦ † π/ﻠﺘﺣﺪﻳﺪ ،Setupﺛﻢ ﻀﻐﻂ ﻋﻠﻰ® ﺃﻭ
ﺍﻠﺯﺭ .ENTER
ﻣﻼﺣﻇﺔ
ﺇﺫﺍ ﻨﺴﻴﺕ ﻜﻠﻤﺔ ﺍﻠﻤﺮﻭﺭ ﺍﻠﺨﺎﺼﺔ ﺑﻚ ،ﻔﺎﻨﻆﺮ"ﻨﺴﻴﺎﻦ ﻜﻠﻤﺔ ﺍﻠﻣﺮﻭﺭ"
ﻓﻲﺪﻠﻴﻝ ﺍﺴﺘﻜﺸﺎﻒﺍﻷﺨﻃﺎﺀﻭﺇﺼﻼﺤﻬﺎ
.٣ﺍﻀﻐﻃ ﻋﻠﻰ ﺍﻠﺯﺭ† π/ﻠﺘﺤﺪﻴﺪ ،Parental Setupﺛﻢ ﻀﻐﻂ ﻋﻠﻰ® ﺃﻭ
ﺍﻠﺯﺭ .ENTER
ﻇﺎﺒﻭ
.٤ﺍﻀﻐﻃ ﻋﻠﻰ ﺍﻠﺯﺭ† π/ﻠﺘﺤﺪﻴﺪ ،Change Passwordﺛﻢ ﻀﻐﻂ ﻋﻠﻰ® ﺃﻭ
ﺍﻠﺯﺭ .ENTERﺃﺪﺠﻝ ﻜﻠﻤﺔ ﺍﻠﻣﺮﻮﺭ ﺍﻠﺠﺪﻴﺪﺓ .ﺃﻋﺪ ﺇﺪﺨﺎﻝ ﻜﻠﻣﺔ ﺍﻠﻣﺭﻭﺭ ﺍﻠﺠﺪﻴﺪﺓ ﻤﺠﺪﺌﺍ.
ﺍﻠﻌﺭﺑﻴﺔ_ ٢٩
٨
اﳌﺮﺟﻊ
ﺘﺤﺪﻳﺚ ﺍﻠﺑﺭﻧﺎﻤﺞ
● اﳌﺮﺟﻊ
ﻤﻘﺪﻤﺔ
ﻤﻭ ﻗﻌﻬﺎ ﺍﻠﺘﺎﻠﻲﺪﻭ ﻣًﺎ ﻋﻠﻰ ﺪﻋﻢ ﺘﺣﺪﺘﺚ ﺍﻠﺒﺭ ﺍﻤﺞ ﻤﻦ ﺃﺠﻝ Samsungﺴﺘﻌﻤﻝ ﺷﺭﻜﺔ
ﺘﺤﺴﻳﻦ ﺃﺪﺍﺀ ﻫﺫﺍ ﺍﻠﺠﻬﺎﺯ ﻷ ﺤﺪﺙ ﻭﻀﻊ ﻭﺫﻠﻚ ﻤﻦ ﺨﻼﻝ
) (www.samsung.comﻋﻠﻰ ﺍﻹﻧﺘﺭ ﻧﺕ.
ﺍﻠﺠﺪﻳﺪ ﻔﻲ ﺍﻷﺴﻭ ﺍﻖ MPEG4ﻭﺫﻠﻚ ﺑﻔﺿﻝ ﻅﻬﻭﺮ ﺒﺭﻧﺎﻤﺞ ﻓﻚ ﺍﻠﺘﺛﻔﻳﺭ
ﺘﺘﻭ ﻗﻒ ﺃﺷﻜﺎﻝ ﺍﻠﺘﺤﺴﻳﻧﺎﺕ ﺍﻠﺘﻲ ﻳﺘﻢ ﺇﺠﺭ ﺍﺆ ﻫﺎ ﻋﻠﻰ ﺑﺭ ﻧﺎﻤﺞ ﺍﻠﺘﺣﺪﻴﺚ ﺍﻠﺬﻱ
ﻗﺒﻝ ﺍﻠﺘﺣﺪﻳﺚ DVDﺘﺴﺘﺠﺪﻤﻪ ﻭ ﻛﺬﻠﻚ ﺍﻠﺒﺭ ﺍﻣﺞ ﺍﻠﻤﺿﻤﻧﺔ ﻔﻲ ﻤﺷﻐﻝ ﺃﻗﺭ ﺍﺺ.
ﻜﻴﻔﻴﺔ ﺇﻧﺷﺎ ﺀ ﻘﺭ ﺺ ﺘﺣﺪﻳﺙ
ﻗﻢ ﺑﻨﻘﻝ ﺍﻠﻤﻠﻒ ﺍﻠﺬﻱ ﺘﻢ ﺘﻨﺯ ﻳﻠﻪ ﻋﻠﻰ ﻗﺭﺺ ﻔﺎﺭﻍ CD-Rﺃﻭ CD-RW
ﺑﺎﺴﺘﺠﺪﺍﻢ ﺍﻹﻋﺪﺍﺪﺍﺕ ﺍﻠﺘﺎﻠﻴﺔ:
.١ﻴﺟﺐ ﺘﻧﺯ ﻳﻝ ﻣﻠﻒ ﺠﺪﻴﺪ ﻤﻦ ﺨﻼﻝ ﻤﺭﻜﺯ ﺍﻠﺘﻨﺯ ﻴﻝ ﺍﻠﻤﺘﻭ ﻔﺮ ﺑﻤﻭ ﻗﻊ ﺷﺮ ﻜﺔ Samsung
ﻋﻠﻰ ﺍﻹﻨﺘﺭ ﻨ ).(www.samsung.com
. ٢ﺍﻨﻠﻒ ﻋﻠﻰ ﺍﻠﻘﺮ ﺺ ﺒﺎﺴﺘﺨﺪ ﺍﻡ ﺠﻬﺎﺯ CD-RWﺑﺎﻠﻜﻤﺑﻳﻭﺘﺭ.
ﻣﻼﺣﻇﺔ
File System CD-ROM ISO Level Character set ISO 9660 ﺍﻨﺘﻬﻰ ،ﺟﻠﺳﺔﻭﺍﺤﺪﺓ -ﺴﺮﻋﺔ ﺍﻠﻨﻘﻝ ﺒﻄﻴﺋﺔ
. ٢ﺍﻀﻐﻄ ﻋﻠﻰﺫﺭ ﺍﻹﺪﺨﺎﻝ ﺃﻭ ﺍﻠﺘﺷﻐﻴﻝ ﻠﺒﺩ ﺀ ﺍﻠﺘﺭ ﻗﻴﺔ.
ﺍﻀﻐﻄ ﻋﻠﻰ ﺃﻱﺯﺭ ﺁﺧﺮ ﻹﻠﻐﺎﺀ ﺍﻠﺘﺮ ﻗﻳﺔ ﻭ ﺍﻠﺮﺠﻭ ﻉ ﺇﻠ ﺷﻌﺎﺭ Samsungﺛﻡ ﺃﺧﺭ ﺝ ﺍﻠﻘﺭﺹ.
Old Version : 090109.00.B.P490K2XEG
New Version : 090123.R2.B.P490K2XEG
ﺘﺒﺪﺃ ﻋﻣﻠﻴﺔ ﺘﺤﺪﻴﺚ ﺍﻠﺑﺮ ﺍﻤﺞ
ﻔﻲ ﻤﻨﺘﺼﻒ ﻋﻣﻠﻴﺔ ﺍﻠﻧﻘﻝ ،ﺴﻴﺘﻢ ﻔﺕﺢ ﺍﻠﺪﺭ ﺝ ﺘﻠﻘﺎﺌﻳ� .ﺑﻌﺩ ﺇﺠﺭ ﺍﺝ ﺍﻠﻘﺭ ﺹ ،ﻴﺭ ﺠﻰﺍﻻﻨﺘﻇﺎﺭ ﻠﻣﺪ ﺓ ﺪﻗﻴﻘﺘﻴﻦ ﺘﻘﺮ ﻴﺑ�.
ﻨﺟﺤﺖ ﻋﻣﻠﻴﺔ ﺘﺣﺪﻴﺚ ﺍﻠﺠﻬﺎﺯ ،ﻓﺴﻳﺘﻢ ﺍﻴﻗﺎﻒ ﺘﺷﻐﻴﻝ ﺍﻠﻭ ﺣﺪ ﺓ ﻭ ﺘﺷﻐﻳﻠﻬﺎ ﺑﻌﺪ ﺇﻏﻼﻖ
ﺇﻠﺪﺭ ﺝ ﺘﻠﻘﺎﺌﻳ� .ﻋﺫﺪ ﺘﺛﻐﻴﻝ ﺍﻠﺠﻬﺎﺯ ،ﺴﻴﺘﻢ ﻋﺭﺾ ﻫﺬﻩ ﺍﻠﺷﺎﺷﺔ.
ﺇﺫﺍ . ٣ﺍﻀﻐﻄ ﻋﻠﻰ ﺍﻠﺯﺭﻴﻦ†π/ﻠﺘﺣﺪﻳﺪ ﺍﻠﻠﻐﺔ ﺍﻠﻤﻃﻠﻭ ﺑﺔ
،ﺷﻢ ﺍﻀﻐﻄ ﻋﻠﻰ ﺍﻠﺯﺮ .ENTER
English
ﻋﺭﺒﻳﺔ
ﺇﺠﺭ ﺍﺀ ﺍﻠﺘﺣﺪﻴﺚ
. ١ﺍﻔﺘﺢﺪﺭﺝ ﺍﻷﻗﺭﺍﺹ .ﻀﻊ ﺍﻠﻘﺭﺹ ﻔﻲ ﺍﻠﺪﺭﺝ .ﺃﻏﻠﻖ ﺍﻠﺪﺭ ﺝ.
ﺘﻆﻬﺭ ﺸﺎﺷﺔ ﺘﺣﺪﻴﺚ ﺍﻠﺑﺭ ﺍﻤﺞ.
Old Version : 090109.00.B.P490K2XEG
New Version : 090123.R2.B.P490K2XEG
ﺘﻅﻬﺮ ﻋﻤﻠﻴﺔ ﺘﺤﺪﻳﺚ ﺍﻠﺑﺭﺍﻤﺞ
ﻋﻠﻰ ﺍﻠﺷﺎﺷﺔ.
٣
_ ٣٠اﳌﺮﺟﻊ
ﻣﻼﺣﻇﺔ
ﺇﺬﺍ ﻠﻢ ﺘﻅﻬﺮ " ، "Select Menu Languageﻴﺭ ﺠ ﺍﻻﺘﺼﺎﺑﻣﺭﻜﺯ ﺍﻠﺧﺪﻤﺔ ﺍﻠﺘﺎﺑﻊ ﻠﺷﺮ ﻛﺔ .Samsung
ﻻ ﻳﺠﺐ ﺍﻠﻀﻐﻃ ﻋﻠﻰ ﺃﻱﺯﺭ ﻭﻔﺼﻝ ﺳﻠﻚ ﺃﺛﻨﺎﺀ ﺍﻠﺘﺤﺪﻴﺚ. ﻘﺪ ﺘﺘﻐﻴﺭ ﺇﺠﺭ ﺍﺀﺍﺕ ﺍﻠﺘﺤﺪﻴﺚ ،ﻴﺭ ﺠﻰ ﺍﻠﺮ ﺠﻭﻉ ﺇﻠﻰ ﻤﻮﻗﻊ ﺍﻠﻭﻴﺐ).(www.samsung.com
ا
● اﳌﺮﺟﻊ
ﺍﻠﻌﺭﺑﻴﺔ_ ٣١
٠
اﳌﺮﺟﻊ
ﺍﻠﻭﺍﺼﻓﺎﺕ
ﻋﺎﻤﺔ
ﻤﺘﻃﺎﺑﺎﺖ ﺍﻠﺘﻴﺎﺭ ﺍﻠﻜﻬﺭ ﺑﻲ
١١٠ـ ٢٤٠ﻔﻭ ﻠﺕ ﻤﻦ ﺍﻠﺘﻴﺎﺭ ﺍﻠﻤﺘﺮﺪﺪ ،ﺒﺘﺭﺪﺪ ٦٠/٥٠ﻫﺭ ﺗﺯ
ﺍﺴﺘﻬﻼﻚ ﺍﻠﺘﻴﺎﺭ ﺍﻠﻜﻬﺭ ﺑﻲ
٨ﻭﺍﺕ
ﺍﻠﻭﺯﻦ
٠،٩٧٦ﻜﺨﻡ
ﺍﻷﺑﻌﺎﺪ
) ٣٧ (Hﻤﻠﻢ )ﻋﺭﺾ( ٢٠٣ Xﻤﻠﻢ )ﻋﻤﻖ( ٤٣٠ Xﻤﻠﻢ )ﺍﺭﺘﻓﺎﻉ(
ﻧﻄﺎﻖ ﺪﺮ ﺠﺔ ﺣﺭ ﺍﺭ ﺓ ﺍﻠﺘﺛﻐﻳﻝ
ﻨﻄﺎﻕ ﺭﻄﻭ ﺑﺔ ﺍﻠﺘﺛﻐﻴﻝ
DVD
)ﺍﻠﻘﺭ ﺺ ﺍﻠﺭ ﻗﻤﻲ ﻤﺘﻌﺩﺩ ﺍﻻﺳﺘﺠﺪﺍﻢ(
ﺍﻷﻗﺭ ﺍﺹ
٪١٠
ﺇﻠﻰ ٪٧٥
ﺳﺮ ﻋﺔ ﺍﻠﻘﺮ ﺍﺀﺓ ٤،٠٦-٣،٤٩ :ﻤﻴﺠﺎ/ﺍﻠﺛﺎﻨﻳﺔ.
ﺯ ﻤﻦ ﺍﻠﺘﺷﻐﺘﻝ ﺍﻠﺘﻘﺭ ﻴﺑﻲ
)ﻗﺭﺺ ﺃﺣﺎﺪﻱﺍﻠﺠﺎﻧﺐ،ﻗﺭﺺ ﺃﺣﺎﺪﻱ ﺍﻠﻄﺒﻘﺔ( ١٣٥ :ﺪﻗﻴﻘﺔ.
١٢ : CDﺴﻢ
)ﺍﻠﻗﺭ ﺺ ﺍﻠﻣﻀﻐﻭ ﻃ(
ﺳﺮ ﻋﺔ ﺍﻠﻘﺮ ﺍﺀﺓ ٥،٦-٤،٨ :ﻤﻴﺠﺎ/ﺍﻠﺛﺎﻨﻳﺔ.
ﺯﻤﻦ ﺍﻠﺘﺷﻐﻳﻞ ﺍﻷﻗﺼﻰ ٧٤:ﺪﻗﻴﻗﺔ.
٨ : CDﺴﻢ
)ﺍﻠﻗﺭ ﺺ ﺍﻠﻣﻀﻐﻭ ﻃ(
ﺳﺮ ﻋﺔ ﺍﻠﻘﺮ ﺍﺀﺓ ٥،٦-٤،٨ :ﻤﻴﺠﺎ/ﺍﻠﺛﺎﻨﻳﺔ.
ﺯﻤﻦ ﺍﻠﺘﺷﻐﻳﻞ ﺍﻷﻗﺼﻰ ٢٠:ﺪﻗﻴﻗﺔ.
١٢ : VCDﺴﻢ
ﻔﻴﺪ ﻳﻭ ﻤﺮ ﻜﺐ
ﺨﺮ ﺝ ﺍﻠﻔﻴﺪﻳﻭ
+5°Cﺇﻠﻰ +35°C
ﺳﺮ ﻋﺔ ﺍﻠﻘﺮ ﺍﺀﺓ ٥،٦-٤،٨ :ﻤﻴﺠﺎ/ﺍﻠﺛﺎﻨﻳﺔ.
ﺯﻤﻦ ﺍﻠﺘﺷﻐﻳﻞ ﺍﻷﻗﺼﻰ ٧٤:ﺪﻗﻴﻗﺔ )ﻔﻴﺪﻳﻭ +ﺼﻭﺕ(
ﻘﻨﺎﺓ ) 1.0 Vp-p : ١ﺤﻤﻞ ٧٥ﺃﻭﻢ(
) Y : 1.0 Vp-pﺤﻤﻞ ٧٥ﺃﻭﻢ(
ﻤﻜﻮ ﻦ ﺍﻠﻔﻴﺪ ﻴﻭ
) Pr : 0.70 Vp-pﺤﻤﻞ ٧٥ﺃﻭﻢ(
) Pb : 0.70 Vp-pﺤﻤﻞ ٧٥ﺃﻭﻢ(
* ﺃﻘﺼﻰ ﻤﺴﺘﻭ ﻯ ﻠﻺ ﺠﺭ ﺍﺝ
ﺠﺭ ﺝ ﺍﻠﺼﻭ ﺕ
* ﺍﺴﺘﺠﺎ ﺑﺔ ﺍﻠﺘﺪﺪ
* ﺧﺮ ﺝ ﺼﻭ ﺕ ﺮ ﻗﻣﻲ
Vrms ٢
ﻄﺮ ﻒ ﺛﻨﺎﺌﻲ ﺍﻠﻤﺤﻭﺭ )(S/PDIF
٢٠ﻫﺭﺘﺯ ﺇﻠﻰ ٢٠ﻜﺘﻠﻭ ﻫﺭﺘﺯ
* :ﺍﻠﻤﻭ ﺍﺼﻔﺎﺕ ﺍﻠﻌﺎﺪﻴﺔ
ﻤﻼ ﺤﻅﺔ
ﺘﺤﺘﻔﻆ ﺷﺭ ﻜﺔ Samsung Electronics Co., Ltdﺑﺤﻕ ﺘﻐﻴﻴﺭ ﺍﻠﻤﻮﺍﺼﻔﺎﺕﺪﻭﻦﺇﺸﻌﺎﺭ. -ﻗﻴﻢ ﺍﻠﻭﺯﻦ ﻭ ﺍﻷﺑﻌﺎﺪ ﻫﻲ ﻗﻳﻢ ﺘﻘﺭ ﻴﻴﻴﺔ .
_٣٢اﳌﺮﺟﻊ
ا
٢
ENG
Contact SAMSUNG WORLD WIDE
center.
care
If you have any questions or comments relating to Samsung products, please contact the SAMSUNG customer care center.
Region
North America
Latin America
Country
CANADA
MEXICO
U.S.A
ARGENTINE
BRAZIL
CHILE
NICARAGUA
HONDURAS
COSTA RICA
ECUADOR
EL SALVADOR
GUATEMALA
JAMAICA
PANAMA
PUERTO RICO
REP. DOMINICA
TRINIDAD & TOBAGO
VENEZUELA
COLOMBIA
BELGIUM
CZECH REPUBLIC
DENMARK
FINLAND
FRANCE
Europe
CIS
Asia Pacific
Middle East &
Africa
GERMANY
HUNGARY
ITALIA
LUXEMBURG
NETHERLANDS
NORWAY
POLAND
PORTUGAL
SLOVAKIA
SPAIN
SWEDEN
U.K
EIRE
AUSTRIA
SWITZERLAND
RUSSIA
KAZAKHSTAN
UZBEKISTAN
KYRGYZSTAN
TADJIKISTAN
UKRAINE
LITHUANIA
LATVIA
ESTONIA
AUSTRALIA
NEW ZEALAND
CHINA
HONG KONG
INDIA
INDONESIA
JAPAN
MALAYSIA
PHILIPPINES
SINGAPORE
THAILAND
TAIWAN
VIETNAM
TURKEY
SOUTH AFRICA
U.A.E
Contact Center 1-800-SAMSUNG(726-7864)
01-800-SAMSUNG(726-7864)
1-800-SAMSUNG(726-7864)
0800-333-3733
0800-124-421, 4004-0000
800-SAMSUNG(726-7864)
00-1800-5077267
800-7919267
0-800-507-7267
1-800-10-7267
800-6225
1-800-299-0013
1-800-234-7267
800-7267
1-800-682-3180
1-800-751-2676
1-800-SAMSUNG(726-7864)
0-800-100-5303
01-8000112112
02 201 2418
800-726-786 (800 - SAMSUNG)
70 70 19 70
030-6227 515
3260 SAMSUNG (€ 0,15/Min)
08 25 08 65 65 (€ 0,15/Min)
01805 - SAMSUNG(726-7864 € 0,14/Min)
06-80-SAMSUNG(726-7864)
800-SAMSUNG(726-7864)
02 261 03 710
0900-SAMSUNG (726-7864 € 0,10/Min)
815-56 480
0 801 801 881, 022-607-93-33
80820-SAMSUNG(726-7864)
0800-SAMSUNG(726-7864)
902-1-SAMSU(72678)
0771-400 200
0845 SAMSUNG (7267864)
0818 717 100
0800-SAMSUNG(726-7864)
0800-SAMSUNG(726-7864)
8-800-555-55-55
8-10-800-500-55-500
8-10-800-500-55-500
00-800-500-55-500
8-10-800-500-55-500
8-800-502-0000
8-800-77777
8000-7267
800-7267
1300 362 603
0800 SAMSUNG (0800 726 786)
800-810-5858, 400-810-5858, 010-6475 1880
3698-4698
3030 8282, 1800 110011, 1-800-3000-8282
0800-112-8888
0120-327-527
1800-88-9999
1800-10-SAMSUNG(726-7864)
1800-SAMSUNG(726-7864)
1800-29-3232, 02-689-3232
0800-329-999
1 800 588 889
444 77 11
0860-SAMSUNG(726-7864 )
800-SAMSUNG (726-7864), 8000-4726
Web Site
www.samsung.com/ca
www.samsung.com/mx
www.samsung.com/us
www.samsung.com/ar
www.samsung.com/br
www.samsung.com/cl
www.samsung.com/latin
www.samsung.com/latin
www.samsung.com/latin
www.samsung.com/latin
www.samsung.com/latin
www.samsung.com/latin
www.samsung.com/latin
www.samsung.com/latin
www.samsung.com/latin
www.samsung.com/latin
www.samsung.com/latin
www.samsung.com/latin
www.samsung.com.co
www.samsung.com/be
www.samsung.com/cz
www.samsung.com/dk
www.samsung.com/fi
www.samsung.com/fr
www.samsung.de
www.samsung.com/hu
www.samsung.com/it
www.samsung.com/lu
www.samsung.com/nl
www.samsung.com/no
www.samsung.com/pl
www.samsung.com/pt
www.samsung.com/sk
www.samsung.com/es
www.samsung.com/se
www.samsung.com/uk
www.samsung.com/ie
www.samsung.com/at
www.samsung.com/ch
www.samsung.ru
www.samsung.com/kz_ru
www.samsung.com/kz_ru
www.samsung.ua
www.samsung.lt
www.samsung.com/lv
www.samsung.ee
www.samsung.com/au
www.samsung.com/nz
www.samsung.com/cn
www.samsung.com/hk
www.samsung.com/in
www.samsung.com/id
www.samsung.com/jp
www.samsung.com/my
www.samsung.com/ph
www.samsung.com/sg
www.samsung.com/th
www.samsung.com/tw
www.samsung.com/vn
www.samsung.com/tr
www.samsung.com/za
www.samsung.com/ae
ELECTRONICS
AK68-01770J
DVD-P390
DVD Player
user manual
imagine the possibilities
Thank you for purchasing this Samsung product.
To receive more complete service, please register your
product at
www.samsung.com/global/register
AK68-01770J
precautions
1. Setting up
- Refer to the identification label located on
the rear of your player for its proper operating voltage.
- Install your player in a cabinet with adequate ventilation holes. (7~10cm) Do not
block ventilation holes on any of the components for air circulation.
- Do not push the disc tray in by hand.
- Do not stack components.
- Be sure to turn all components off before
moving the player.
- Before connecting other components to this
player, be sure to turn them off.
- Be sure to remove the disc and turn off the
player after use, especially if you are not
going to use it for a long time.
- The mains plug is used as a disconnect
device and shall stay readily operable at
any time.
- When condensation forms inside the player
due to sharp changes in temperature, the
player may not operate correctly. If this
occurs, leave the player at room temperature until the inside of the player becomes
dry and operational.
4. Disc
- Do not clean disc using record-cleaning
sprays, benzene, thinner, or other volatile
solvents that may cause damage to the disc
surface.
- Do not touch the disc’s signal surface. Hold
by the edges or by one edge and the hole
in the center.
- Wipe the dirt away gently; never wipe a
cloth back and forth over the disc.
5. Environmental info
- The battery used in this product contains chemicals that
are harmful to the environment.
2. For your safety
- This product utilizes a laser. Use of controls
or adjustments or performance of procedures other than those specified herein may
result in hazardous radiation exposure.
- Do not open covers and do not repair yourself. Refer servicing to qualified personal.
3. Caution
- Your player is not intended for industrial use
but for domestic purposes. Use of this product is for personal use only.
- Apparatus shall not be exposed to dripping
or splashing and no objects filled with liquids, such as vases, shall be placed on the
apparatus.
- Exterior influences such as lightning and
static electricity can affect normal operation
of this player. If this occurs, turn the player
off and on again with the POWER button,
or disconnect and then reconnect the AC
power cord to the AC power outlet. The
player will operate normally.
2_ precautions
- So, dispose of batteries in the proper man ner, according
to federal, state, and local regulations.
The product unit accompanying this user manual
is licensed under certain intellectual property rights
of certain third parties. This license is limited to
private non-commercial use by end-user consumers for licensed contents. No rights are granted for
commercial use. The license does not cover any
product unit other than this product unit and the
license does not extend to any unlicensed product
unit or process conforming to ISO/OUR 11172-3 or
ISO/OUR 13818-3 used or sold in combination with
this product unit. The license only covers the use of
this product unit to encode and/or decode audio files
conforming to the ISO/OUR 11172-3 or ISO/OUR
13818-3. No rights are granted under this license for
product features or functions that do not conform to
the ISO/OUR 11172-3 or ISO/OUR 13818-3.
CAUTION: USE OF ANY CONTROLS,
ADJUSTMENTS, OR PROCEDURES OTHER
THAN SPECIFIED HEREIN MAY RESULT IN
HAZARDOUS RADIATION EXPOSURE.
before you start
Accessories
Check for the supplied accessories below
Remote Control
User’s Manual
Batteries for Remote
Control (AAA Size)
Video/Audio
Cable
The accessories which do not supplied
1. Component cable
2. Coaxial cable
Install Batteries in the Remote
control
1. Open the battery cover on the back of the remote
control.
2. Insert two AAA batteries. Make sure that the
polarities (+ and -) are aligned correctly.
3. Replace the battery cover.
If remote control doesn’t operate
properly:
- Check the polarity + - of the batteries (Dry-Cell)
- Check if the batteries are drained.
- Check if remote control sensor is blocked by obstacles.
- Check if there is any fluorescent lighting nearby.
table of contents
Precautions . . . . . . . . . . . . . . . . . . . . . . . . . . . . . . .2
Before you start . . . . . . . . . . . . . . . . . . . . . . . . . . .3
Setup
General Features . . . . . . . . . . . . . . . . . . . . . . . . . .4
Disc Type and Characteristics . . . . . . . . . . . . . . . .5
Description . . . . . . . . . . . . . . . . . . . . . . . . . . . . . . .6
Tour of the Remote Control . . . . . . . . . . . . . . . . . . .8
Connections
Choosing a Connection . . . . . . . . . . . . . . . . . . . . .9
Basic Functions
Playing a Disc . . . . . . . . . . . . . . . . . . . . . . . . . . .14
Using the Search and Skip Functions . . . . . . . . .15
Using the Display Function . . . . . . . . . . . . . . . . .15
Using the Disc and Title Menu . . . . . . . . . . . . . . .15
Repeat Play . . . . . . . . . . . . . . . . . . . . . . . . . . . . .16
Slow Play . . . . . . . . . . . . . . . . . . . . . . . . . . . . . . .16
Advanced Functions
Adjusting the Aspect Ratio (EZ View) . . . . . . . . . .17
Selecting the Audio Language . . . . . . . . . . . . . . .17
Selecting the Subtitle Language . . . . . . . . . . . . . .18
Changing the Camera Angle . . . . . . . . . . . . . . . . .18
Using the Bookmark Function . . . . . . . . . . . . . . . .19
Using the Zoom Function . . . . . . . . . . . . . . . . . . .19
Clips Menu for MP3/WMA/JPEG/MPEG4
CD Audio . . . . . . . . . . . . . . . . . . . . . . . . . . . . . . . .19
Folder Selection . . . . . . . . . . . . . . . . . . . . . . . . . .20
MP3/WMA/CD Audio Playback . . . . . . . . . . . . . . .20
MPEG4 Playback . . . . . . . . . . . . . . . . . . . . . . . . .21
Playing media files Using
the USB Host Feature . . . . . . . . . . . . . . . . . . . . . .22
CD Ripping . . . . . . . . . . . . . . . . . . . . . . . . . . . . . .23
Picture CD Playback . . . . . . . . . . . . . . . . . . . . . . .23
Changing Setup Menu
Using the Setup Menu. . . . . . . . . . . . . . . . . . . . . .25
Setting Up the Language Features . . . . . . . . . . . .25
Setting Up the Audio Options . . . . . . . . . . . . . . . .26
Setting Up the Display Options . . . . . . . . . . . . . . .27
Setting Up the Parental Control . . . . . . . . . . . . . .28
Reference
Firmware upgrade . . . . . . . . . . . . . . . . . . . . . . . . .30
Troubleshooting . . . . . . . . . . . . . . . . . . . . . . . . . . .31
Specifications . . . . . . . . . . . . . . . . . . . . . . . . . . . .32
English _3
setup
General Features
Excellent Sound
Dolby Digital, a technology developed by Dolby
Laboratories, provides crystal clear sound reproduction.
Screen
Both regular and widescreen(16:9) pictures can be
viewed.
Slow Motion
An important scene can be viewed in slow motion.
Parental Control (DVD)
The parental control allows users to set the level
necessary to prohibit children from viewing harmful
movies such as those with violence, adult subject
matter, etc.
Various On-Screen Menu Functions
You can select various languages (Audio/Subtitle)
and screen angles while enjoying movies.
Progressive Scan
Progressive scanning creates an improved picture
with double the scan lines of a conventional interlaced picture.
EZ VIEW (DVD)
Easy View enables picture adjustment to match
your TV's screen size (16:9 or 4:3).
Digital Photo Viewer (JPEG)
You can view Digital Photos on your TV.
Repeat
You can repeat a song or movie simply by pressing
the REPEAT button.
MP3/WMA
This unit can play discs created from MP3/WMA
files.
MPEG4
This unit can play MPEG4 formats within an avi file.
CD Ripping
This feature lets you to copy audio files from disc to
USB device into MP3 format. (Only Audio CD (CD
DA)).
4_ setup
Note
- Discs which cannot be played with this
player.
• DVD-ROM
• DVD-RAM
• CD-ROM
• CDV
• CDI
• CVD
• CDGs play audio only, not graphics.
- Ability to play back may depend on recording
conditions.
• DVD-R, +R
• CD-RW
• DVD+RW, -RW (V mode)
- The unit may not play certain CD-R, CD-RW
and DVD-R due to the disc type or recording
conditions.
COPY PROTECTION
Many DVD discs are encoded with copy protection.
Because of this, you should only connect your DVD
player directly to your TV, not to a VCR. Connecting
to a VCR results in a distorted picture from copyprotected DVD discs.
This product incorporates copyright protection
technology that is protected by methods claims of
certain U.S. patents and other intellectual property
rights owned by Macrovision Corporation and other
rights owners. Use of this copyright protection
technology must be auzthorized by Macrovision
Corporation, and is intended for home and other
limited viewing uses only unless otherwise authorized by Macrovision Corporation. Reverse engineering or disassembly is prohibited.
PROGRESSIVE SCAN OUTPUTS
(576p)
“CONSUMERS SHOULD NOTE THAT NOT ALL
HIGH DEFINITION TELEVISION SETS ARE FULLY
COMPATIBLE WITH THIS PRODUCT AND MAY
CAUSE ARTIFACTS TO BE DISPLAYED IN THE
PICTURE, IN CASE OF 576 PROGRESSIVE SCAN
PICTURE PROBLEMS, IT IS RECOMMENDED
THAT THE USER SWITCH THE CONNECTION
TO THE ‘STANDARD DEFINITION’ OUTPUT. IF
THERE ARE QUESTIONS REGARDING YOUR TV
SET COMPATIBILITY WITH THIS MODEL 576p
DVD PLAYER, PLEASE CONTACT SAMSUNG'S
CUSTOMER SERVICE CENTER.”
Disc Type and Characteristics
This DVD player is capable of playing the following types of discs with the corresponding logos:
Disc Types (Logos)
Recording Types
DVD
VIDEO-CD
Audio
+
Video
AUDIO-CD
Max. Playing Time
12 Cm
Single-sided 240 min.
Double-sided 480 min.
- DVD contains excellent sound and
video due to Dolby Digital and MPEG2 system.
8 Cm
Single-sided 80 min.
Double-sided 160 min.
- Various screen and audio functions
can be easily selected through the onscreen menu.
12 Cm
74 min.
- Video with CD sound, VHS quality &
MPEG-1 compression technology.
8 Cm
20 min.
12 Cm
74 min.
8 Cm
20 min.
Audio
- CD is recorded as a Digital Signal
with better audio quality, less distortion and less deterioration of audio
quality over time.
Disc Markings
Region Number
~
PAL
Play Region Number
PAL broadcast system in U.K, France,
Germany, etc.
Dolby Digital disc
STEREO
DIGITAL
SOUND
Stereo disc
Digital Audio disc
Both the DVD player and the discs are coded
by region. These regional codes must match
in order for the disc to play. If the codes do not
match, the disc will not play.
The Region Number for this player is
described on the rear panel of the player.
DTS disc
MP3 disc
You must only insert one DVD disc at a time.
Inserting two or more discs will not allow to
play them back and it may cause damage to
the DVD player.
DivX Certification
DivX, DivX Certified,
and associated logos are trademarks of
DivXNetworks, Inc and are used under
license
English _5
● SETUP
Audio
+
Video
Characteristics
Disc Size
setup
Description
Front Panel Controls
2
4
3
1
5
6
1.
STANDBY/ON ( )
Turn on/off and the player is turned on/off.
4.
DISPLAY
Operation indicators are displayed here.
2.
DISC TRAY
Place the disc here.
5.
OPEN/CLOSE ( ) / STOP (■)
Press to open and close the disc tray, Stops disc play.
3.
USB Host
Connect digital still camera, MP3 player, memory stick,
Card reader, or another removable storage devices
6.
PLAY/PAUSE ( )
Begin or pause disc play.
Front Panel Display
Total playing time/Displays various messages concerning operations such as PLAY,
STOP, LOAD ...
nodISC: No disc loaded.
OPEn: The disc tray is open.
LOAd: Player is loading disc information.
6_ setup
Rear Panel
4
● SETUP
1
2
3
1.
AUDIO OUT JACKS
- Connect to the Audio input jacks of your television or
audio/video receiver.
2.
VIDEO OUT JACK
- Use a video cable to connect to the Video input jack
on your television.
3.
COMPONENT VIDEO OUT JACKS
- Use these jacks if you have a TV with Component
Video in jacks. These jacks provide PR, PB and Y
video.
- If P-SCAN Video Output is selected in Setup Menu,
progressive scan mode will work.
- If I-SCAN Video Output is selected in Setup Menu,
interlaced scan mode will work.
4.
DIGITAL AUDIO OUT JACKS
- Use either a coaxial digital cable to connect to a compatible Dolby Digital receiver.
- Use either a coaxial digital cable to connect to an
A/V Amplifier that contains a Dolby Digital, MPEG2 or
DTS decoder.
Note
- Consult your TV User’s Manual to find out if your TV supports Progressive Scan.
If Progressive Scan is supported, follow the TV User’s Manual regarding Progressive Scan settings in
the TV’s menu system.
- See pages 26-27 to get more information on how to use the setup menu.
English _7
setup
Tour of the Remote Control
1
12
2
13
3
4
14
5
6
1.
DVD POWER Button
Turns the power on or off.
2.
REPEAT Button
Allows you to repeat play a title, chapter, track, or disc.
3.
DISC MENU Button
Brings up the Disc menu.
4.
BOOKMARK
Quickly find bookmark sections of a DVD.
5.
SEARCH Buttons (
)
/
Allow you to search forward/backward through a disc.
6.
STOP Button (
7.
SKIP Buttons (
)
/
Use to skip the title, chapter or track
15
16
7
)
8.
17
18
MENU Button
Brings up the DVD player’s menu.
9.
ENTER /π/†,√/® Buttons
This button functions as a toggle switch.
10
19
10. AUDIO Button (√)
Use this button to access various audio functions on a disc.
11
20
11. INFO Button
Displays the current disc mode.
8
9
12. OPEN/CLOSE (
) Button
To open and close the disc tray.
13. REPEAT A-B Button
Allows you to repeat A-B disc.
14. USB Button
15. VIDEO SEL. Button
Selects video output formats.
16. PLAY/PAUSE Button (
Begin/Pause disc play.
)
17. SUBTITLE Button (π)
18. RETURN Button
Returns to a previous menu.
19. TITLE MENU Button (®)
Brings up the Title menu.
20. CANCEL Button
Use to remove menus or status displays from the screen.
8_ setup
connections
Choosing a Connection
Before Connecting the DVD Player
- Always turn off the DVD player, TV, and other components before you connect or disconnect any cables.
- Refer to the user’s manual of the additional components you are connecting for more information on those
particular components.
Connection to a TV (For Video)
1
Using video/audio cables, connect the VIDEO (yellow)/
AUDIO (red and white) OUT terminals on the rear of the
DVD player to the VIDEO (yellow)/AUDIO (red and white)
IN terminals of TV.
2
WHITE
RED
Turn on the DVD player and TV..
YELLOW
Audio
Cable
3
RED
WHITE
Video
Cable
YELLOW
Press the TV/VIDEO button on the TV's remote control to
select Video.
Note
- Noise may be generated if the audio cable is too close to the power cable.
- If you want to connect to an Amplifier, please refer to the Amplifier connection page. (See pages 12 to
13)
- The number and position of terminals can vary depending on your TV set. Please refer to the user's
manual of the TV.
- If there is one audio input terminal on the TV, connect it to the [AUDIO OUT][left] (white) terminal of
the DVD player.
- If you press the VIDEO SEL. button when DVD Player is in stop mode or no disc is inserted, the Video
Output mode changes in the following sequence: (P-SCAN ➝ I-SCAN).
English _9
● CONNECTIONS
The following shows examples of connections commonly used to connect the DVD player with a TV and
other components.
connections
Connection to a TV (Interlace)
- Connecting to your TV using Component video cables.
- You will enjoy high quality and accurate color reproduction images. Component video separates the picture element into black and white(Y), blue(PB), red(PR) signals to present clear and clean images. (Audio
signals are delivered through the audio output.)
1
Using component video cables, connect the COMPONENT
VIDEO OUT terminal on the rear of the DVD player to the
COMPONENT IN terminal of TV.
2
Using the audio cables, connect the AUDIO (red and
white) OUT terminals on the rear of the DVD player to the
AUDIO (red and white) IN terminals of TV. Turn on the
DVD player and TV.
WHITE
BLUE
RED
RED
3
Press the input selector on your TV remote control until the
Component signal from the DVD player appears on the TV
screen.
GREEN
Component cable
Audio Cable
RED
WHITE
RED
BLUE
GREEN
4
Set the Video Output to I-SCAN in the Display Setup menu.
(See pages 27-28)
You can use the VIDEO SEL. button to change the Video
Output mode. (See page 9).
Note
- If you want to connect to an Amplifier, please refer to the Amplifier connection page.
(See pages 12 to 13)
- The component terminal of TV can be marked by “R-Y, B-Y, Y” or “Cr, Cb, Y” instead of “PR, PB, Y”
depending on the manufacturer. The number and position of terminals can vary depending on the TV
set. Please refer to the user's manual of the TV.
10_ connections
Connection to a TV (Progressive)
1
Using component video cables, connect the COMPONENT
VIDEO OUT terminal on the rear of the DVD player to the
COMPONENT IN terminal of TV.
Using the audio cables, connect the AUDIO (red and
white) OUT terminals on the rear of the DVD player to the
AUDIO (red and white) IN terminals of TV. Turn on the
DVD player and TV.
WHITE
BLUE
GREEN
RED
RED
3
Press the input selector on your TV remote control until the
Component signal from the DVD player appears on the TV
screen.
Component cable
Audio Cable
RED
WHITE
RED
BLUE
GREEN
4
Set the Video Output to P-SCAN in the Display Setup
menu. (See pages 27-28)
You can use the VIDEO SEL. button to change the Video
Output mode. (See page 9).
To see the progressive video output,
- Consult your TV User’s Manual to find out if your TV supports Progressive Scan. If Progressive
Scan is supported, follow the TV User’s Manual regarding Progressive Scan settings in the TV’s
menu system.
- Depending on your TV, the connection method may differ from the illustration above.
Note
- What is "Progressive Scan"?
Progressive scan has twice as many scanning lines as the interlace output method has. Progressive
scanning method can provide better and clearer picture quality.
English _11
● CONNECTIONS
2
connections
Connection to an Audio System (2 Channel Amplifier)
1
Using the audio cables, connect the AUDIO (red and
white) OUT terminals on the rear of the DVD player to the
AUDIO (red and white) IN terminals of the Amplifier.
2
Using the video signal cable(s), connect the VIDEO,
COMPONENT OUT terminals on the rear of the DVD player
to the VIDEO, COMPONENT IN terminal of your TV as
described on pages 9 to 11.
WHITE
RED
3
Turn on the DVD player, TV, and Amplifier.
Audio Cable
RED
WHITE
4
Press the input select button of the Amplifier to select
external input in order to hear sound from the DVD player.
Refer to your Amplifier's user manual to set the Amplifier's
audio input.
Note
- Please turn the volume down when you turn on the Amplifier. Sudden loud sound may cause damage to
the speakers and your ears.
- Please set the audio in the menu screen according to the Amplifier. (See pages 26-27)
- The position of terminals can vary depending on the Amplifier.
Please refer to the user's manual of the Amplifier.
12_ connections
Connection to an Audio System (Dolby Digital, MPEG2 or DTS Amplifier)
1
● CONNECTIONS
If using a coaxial cable, connect the DIGITAL AUDIO OUT
(COAXIAL) terminal on the rear of the DVD player to the
DIGITAL AUDIO IN (COAXIAL) terminal of the Amplifier.
2
Using the video signal cable(s), connect the VIDEO
COMPONENT OUT terminals on the rear of the DVD
player to the VIDEO, COMPONENT IN terminal of your TV
as described on pages 9 to 11.
3
Turn on the DVD player, TV, and Amplifier.
Coaxial Cable
4
Press the input select button of the Amplifier to select external input in order to hear sound from the DVD player.
Refer to your Amplifier's user manual to set the Amplifier's
audio input.
Note
- Please turn the volume down when you turn on the Amplifier. Sudden loud sound may cause damage
to the speakers and your ears.
- Please set the audio in the menu screen according to the Amplifier. (See pages 26-27)
- The position of terminals can vary depending on the Amplifier.
Please refer to the user's manual of the Amplifier.
English _13
basic functions
Playing a Disc
5. Removing Disc
Press the OPEN/CLOSE ( ) button.
Before Play
- Turn on your TV and set it to the correct Video Input
by pressing TV/VIDEO button on the TV remote control.
- If you connected an external Audio System, turn on
your Audio System and set it to the correct Audio
Input.
After plugging in the player, the first time you press
the DVD POWER button, this screen comes up: If
you want to select a language, press π/† button
and then press ENTER button. (This screen will
only appear when you plug in the player for the first
time.)If the language for the startup screen is not
set, the settings may change whenever you turn the
power on or off. Therefore, make sure that you select
the language you want to use. Once you select a
menu language, you can change it by pressing the
button on the front panel of the unit for more than
5 seconds with no disc in the unit. Then the SELECT
MENU LANGUAGE window appears again where
you can reset your preferred language.
English
ﻋﺮﺑﻳﺔ
Playback
1. Press the OPEN/CLOSE ( ) button.
2. Place a disc gently into the tray with the disc’s label
facing up.
3. Press the PLAY/PAUSE ( ) button or OPEN/
CLOSE ( ) button to close the disc tray. When
you stop disc play, the player remembers where you
stopped, so when you press PLAY/PAUSE ( )
button again, it will pick up where you left off.
4. Stopping Play
Press the STOP ( ) button during play.
14_ basic functions
6. Pausing Play
Press the PLAY/PAUSE ( ) on the remote control
during play.
- Screen stops, no sound.
To resume, press the PLAY/PAUSE ( ) button
once again.
7. Step Motion Play (Except CD)
Press the SKIP ( ) button on the remote control
during PAUSE mode.
- Each time the button is pressed, a new frame will
appear.
- No sound is heard during STEP mode.
- Press the PLAY/PAUSE ( ) button to resume
normal play.
- You can only perform step motion play in the
forward direction.
8. Slow Motion Play
Press the SEARCH ( / ) button to choose the
play speed between 1/2, 1/4 and 1/8 of normal
during PAUSE mode.
- No sound is heard during slow mode.
- Press the PLAY/PAUSE ( ) button to resume
normal play.
Note
- If the player is left in the stop mode for more than
one minute without any user interaction, a screen
saver will be activated. Press the PLAY/PAUSE
( ) button to resume normal play.
- If the player is left in the stop mode for more than
about 30 minutes, the power will automatically shut
off.(Automatic Power-Off Function)
- If the player is left for about 5 minutes in pause
mode, it will stop.
- This (
) icon indicates an invalid button press.
Using the Search and Skip
Functions
Note
Title
During play, you can search quickly through a chapter or
track, and use the skip function to jump to the next selection.
During play, press the SEARCH (
or
remote control for more than 1 second.
Chapter
) button on the
Time
DVD
2X, 4X, 64X, 128X
VCD
4X, 8X
CD
2X, 4X, 8X
Most DVD discs are recorded in chapters
so that you can quickly find a specific passage (similar to tracks on an video CD).
Note
- The speed marked in this function may be
different from the actual playback speed.
- No sound is hearing during search mode
(Except CD).
Skipping Tracks
During play, press the SKIP (
or
) button.
- When playing a DVD, if you press the SKIP ( ) button,
it moves to the next chapter. If you press the SKIP (
) button, it moves to the beginning of the chapter. One
more press makes it move to the beginning of the previous chapter.
- When playing a VCD 2.0 or a VCD 1.1 or a CD, if you
press the SKIP ( ) button, it moves to the next track. If
you press the SKIP ( ) button, it moves to the beginning
of the track. One more press makes it move to the beginning of the previous track.
- If a track exceeds 15 minutes when playing a VCD and
you press the
button, it moves forward 5 minutes. If
you press the
button, it moves backward 5 minutes.
Note
- When playing VCD, the Disc Menu may not work.
Audio
Subtitle
Shortcut
Allows playback of the film from a desired
time. You must enter the starting time as
a reference.The time search function does
not operate on some disc.
Refers to the language of the film
soundtrack. In the example, the soundtrack
is played in English 5.1CH. A DVD disc
can have up to eight different soundtracks.
Refers to the subtitle languages available
in the disc. You will be able to choose the
subtitle languages or, if you prefer, turn
them off from the screen. A DVD disc can
have up to 32 different subtitles.
To access the desired Bookmark, Angle,
Zoom or EZ View function.
Some DVD discs are have more angle
function from any picture.
Bookmark function make you easily and
quickly to find a track or chapter from DVD
or VCD ( Menu Off).
The EZ View function is use for changing
the aspect ratio in DVD.
The Zoom function is use for enlarge
Picture in DVD.
Using the Disc and Title
Menu
Using the Disc Menu
1. During stop mode of a DVD disc, press the MENU button
on the remote control.
2. Press the π/† buttons to select Disc Menu, then press the
® or ENTER button.
Using the Display Function
Press ENTER key
for Disc Menu
When Playing a DVD/VCD/MPEG4
1. During play, press the INFO button on the remote control.
2. Press the π/† buttons to select the desired item.
- When playing VCD, the Disc Menu may notwork.
3. Press the √/® buttons to make the desired setup and then
press the ENTER button.
You may use the number buttons of the remote control
to directly access a title, chapter or to start the play
4. To make the screen disappear, press the CANCEL button.
back from a desired time.
Enter
Return
Menu
Note
- Depending on a disc, the Disc Menu may not work.
- You can also use the Disc Menu, using the DISC
MENU button on the remote control.
- When playing VCD, the Disc Menu may not work.
English _15
● BASIC FUNCTIONS
Searching through a Chapter or
Track
To access the desired title when there is
more than one in the disc. For example, if
there is more than one movie on a DVD,
each movie will be identified.
basic functions
Using the Title Menu
Using the A-B Repeat function
1. During stop mode of a DVD disc, press the MENU button
on the remote control.
2. Press the π/† buttons to select Title Menu, then press the
® or ENTER button.
2. Press the REPEAT A-B button at the point where you
want repeat play to start (A).
Press the REPEAT A-B button at the point where you
want the repeat play to stop (B).
- To return to normal play, press the CANCEL button.
3. To return to normal play, press REPEAT button again.
Press ENTER key
for Title Menu
DVD/VCD
Repeat:AEnter
Return
Menu
Note
- Depending on a disc, the Title Menu may not
work.
- Title Menu will only be displayed if there are at
least two titles in the disc.
Repeat:A-B
Repeat:Off
- When playing VCD, the Disc Menu may not work.
Note
Repeat Play
Repeat the current track, chapter, title, a chosen
section (A-B), or all of the disc.
When playing a DVD/VCD
1.Press the REPEAT buttons to select Chapter, Title, Track,
- A-B REPEAT allows you to set point (B) until at
least 5 seconds of play back time has elapsed
after point (A) has been set
- Depending on a disc, the Repeat function may not
work.
- When playing VCD, the Disc Menu may not work.
Disc or Repeat:Off
- DVD repeats play by chapter or title, VCD repeat play
by disc or track.
- Chapter : repeats the chapter that is playing.
- Title : repeats the title that is playing.
- Track : repeats the track that is playing.
- Disc : repeats the disc that is playing.
DVD
VCD
Repeat:Off
Repeat:Off
Chapter
Track
Title
Disc
16_ basic functions
Slow Play
This feature allows you slowly to repeat scenes containing sports, dancing, musical instruments being
played etc., so you can study them more closely.
When playing a DVD
1. During play, press the PLAY/PAUSE (
) button.
2. Press the SEARCH ( / ) button to choose the play
speed between 1/2, 1/4 and 1/8 of normal during PAUSE
Mode.
advance functions
Adjusting the Aspect Ratio
(EZ View)
1. During play, press the INFO button on the remote control.
2. Press the π/† buttons to select Shortcut, then press
the ENTER button.
3. Press the √/® buttons to select EZ View, then press the
ENTER button.
- The screen size changes when the button is pressed
repeatedly.
- The screen zoom mode operates differently depending on the
screen setting in the Display Setup menu.
WIDE SCREEN
EZ VIEW
If you are using a 16:9 TV
For 16:9 aspect ratio discs
- NORMAL WIDE
Displays the content of the DVD title in 16:9 aspect ratio.
- SCREEN FIT
The top and bottom portions of the screen are cut off.
When playing a 2.35:1 aspect ratio disc, the black bars at
the top and bottom of the screen will disappear. The picture
will look vertically stretched. (Depending on a type of disc,
the black bars may not disappear completely.)
- ZOOM FIT
The top, bottom, left and right of the screen are cut off and
the central portion of the screen is enlarge
- VERTICAL FIT
When a 4:3 DVD is viewed on a 16:9 TV, black bars will
appear at the left and right of the screen in order to prevent
the picture from looking horizontally stretched.
For 4:3 aspect ratio discs
- NORMAL SCREEN
Displays the content of the DVD title in 16:9 aspect ratio.
The picture will look horizontally stretched.
- SCREEN FIT
The top and bottom portions of the screen are cut off and
the full screen appears.
The picture will look vertically stretched.
- ZOOM FIT
The top, bottom, left and right portions of the screen are
cut off and the central portion of the screen is enlarged.
For 16:9 aspect ratio discs
- 4:3 Letter Box
Displays the content of the DVD title in 16:9 aspect ratio. The
black bars will appear at the top and bottom of the screen.
- 4:3 Pan Scan
The left and right portions of the screen are cut off and the
central portion of the 16:9 screen is displayed.
- SCREEN FIT
The top and bottom portions of the screen are cut off and a
full screen appears. The picture will look vertically stretched.
- ZOOM FIT
The top, bottom, left and right of the screen are cut off and
the central portion of the screen is enlarged.
For 4:3 aspect ratio discs
- NORMAL SCREEN
Displays the content of the DVD title in 4:3 aspect ratio.
- SCREEN FIT
The top and bottom portions of the screen are cut off and the
full screen appears. The picture will look vertically stretched.
- ZOOM FIT
The top, bottom, left and right portions of the screen are cut
off and the central portion of the screen is enlarged.
Note
This function may behave differently depending on
the type of disc.
Selecting the Audio
Language
You can select a desired audio language quickly and
easily with the AUDIO / √ button.
Using the AUDIO button (DVD/VCD/
MPEG4)
1. Press the AUDIO / √ button. The Audio changes when the
button is pressed repeatedly.
The audio languages are DVD
represented by
ENG Dolby Digital 5.1CH
abbreviations.
AUDIO
When playing a VCD you
can select among Stereo,
Right or Left.
VCD
Stereo
AUDIO
English _17
● ADVANCED FUNCTIONS
To play back using aspect ratio
(DVD)
If you are using a 4:3 TV
advanced functions
Press Audio / √ button
at remocon repeatedly to
select the desired Audio
on MPEG4 then press
the ENTER .
MPEG4
MP3 1/1
2. To remove the SUBTITLE icon, press the CANCEL or
RETURN button.
AUDIO
2. To remove the AUDIO icon, press the CANCEL or RETURN
button.
Note
- This function depends on audio languages are
encoded on the disc and may not work.
- A DVD disc can contain up to 8 audio languages.
- To have the same audio language come up
whenever you play a DVD;
Refer to “Using the Audio Language” on page 26.
Note
- You have to change the desired subtitle in the
Disc Menu, according to discs. Press the DISC
MENU button.
- This function depends on what subtitles are
encoded on the disc and may not work on all DVDs.
- A DVD disc can contain up to 32 subtitle lan
guages.
- To have the same subtitle language come up
whenever you play a DVD; Refer to “Using the
Subtitle Language” on page 26.
- When playing VCD, the Disc Menu may not work.
Changing the Camera
Angle
Selecting the Subtitle
Language
You can select a desired subtitle quickly and
easily with the SUBTITLE button.
Using the SUBTITLE button (DVD/
When a DVD contains multiple angles of a particular
scene, you can use the ANGLE function.
Using the ANGLE button (DVD)
If the disc contains multiple angles, the ANGLE
appears on the screen.
MPEG4)
1. Press the SUBTITLE / π button. The subtitle languages are
represented by abbreviations.
The subtitle changes when
DVD
the button is pressed
repeatedly.
Off
1. During play, press the INFO button on the remote control.
2. Press the π/† buttons to select Shortcut.
3. Press the √/® buttons to select Angle, then press the
ENTER button.
SUBTITLE
Shortcut
Angle
Enter
MPEG4
4. Press the √/® buttons on the remote control to select the
desired angle.
Subtitle Selection
External Subtitle Off
readme.TXT
External Subtitle option
will appear, depends on
the DivX disc.
4/6
Non-standard fonts are not supported
Enter
Press SUBTITLE /
π button at remocon
repeatedly to select the
desired subtitle language
on a MPEG4 then press
the ENTER .
Return
MPEG4
18_ advanced functions
Off
SUBTITLE
Menu
Note
- If the disc has only one angle, this feature won’t
work. Currently, very few discs have this feature.
- Depending on the disc, these functions may not
work.
Using the Bookmark
Function
5. Press the CANCEL button to delete a bookmark number.
1. During play, press the INFO button on the remote control.
2. Press the π/† buttons to select Shortcut.
DVD/VCD
Shortcut
Bookmark
Enter
3. Press the √/® buttons to select Bookmark,
then press the ENTER button.
1 2 3
Using the Zoom Function
Using the Zoom Function (DVD/
VCD)
1. During play, press the INFO button on the remote control.
2. Press the π/† buttons to select Shortcut.
3. Press the √/® buttons to select Zoom,
then press the ENTER button.
- During DVD play, press ENTER to zoom in 2X/4X/2X/
Normal in order.
- During VCD play, press ENTER to zoom in
2X/4X/2X/Normal-in order.
4. When you reach the scene you want to mark, press the
ENTER button. Up to three scenes may be marked at a time.
1 - -
2X
Note
- When playing VCD, the Disc Menu may notwork.
- Depending on a disc, the Bookmark function may not
work.
Recalling a Marked Scene
1~3. The first 1~3 steps are the same as those for “Using the
Bookmark Function”.
4. Press the √/® buttons to select a marked scene.
1 2 3
5. Press the PLAY/PAUSE (
scene.
) button to skip to the marked
Clearing a Bookmark
1~3. The first 1~3 steps are the same as those for “Using the
Bookmark Function”.
4. Press the √/® buttons to select the bookmark number you
want to delete.
Clips Menu for MP3/WMA/
JPEG/ MPEG4/CD Audio
CD Audio or discs with MP3/WMA/JPEG/MPEG
contain individual songs and/or pictures that can be
organized into folders as shown below. They are
similar to how you use your computer to put files
into different folders.
Stop
Off
Open the disc tray.
Place the disc on the tray.
Close the tray.
The tray closes and this
screen displays.
English _19
● ADVANCED FUNCTIONS
This feature lets you bookmark sections of a DVD or
VCD (Menu Off mode) so you can quickly find them
at a later time.
Using the Bookmark Function
(DVD/VCD)
advanced functions
-
: Name of currently playing file.
-
: Current Playback Time.
-
: Current Playback Mode : There are four
modes. They can be selected in order by
pressing the REPEAT button.
MP3/WMA/CD Audio
Playback
1. Open the disc tray. Place the disc on the tray. Close the tray.
- Only one kind of file is played back when a disc or a
folder contains both MP3 and WMA files.
2. Press the π/† or √/® buttons to select a song file.
Press ENTER to begin playback of the song file.
- Off: Normal Playback
- Track: Repeats the current track.
Play
Off
- Folder: Repeats the current folder
- Random: Files in the disc will be played in
...
random order.
-
: MP3 file icon.
-
: CD Audio file icon.
-
: WMA file icon.
-
: Folder icon.
-
: JPEG file icon
-
: Current Folder icon.
-
: AVI file icon.
Folder Selection
The folder can be selected in Stop or Play mode.
- To select the Parent Folder
Press the RETURN button to go to parent folder, or press
the π/† buttons to select “..” and press ENTER to go to the
parent folder.
- To select the Peer Folder
Press the π/† buttons to select the desired folder, then
press ENTER.
- To select the Sub-Folder
Press the π/† buttons to select the desired folder,
then press ENTER.
Root
WMA
JPEG
Parent Folder
MP3
MUSIC
Current Folder
1st
Sub-Folders
2nd
SONG FILE 1
Peer Folders
SONG FILE 2
SONG FILE 3
MPEG4 FILES
20_ advanced functions
REPEAT
Repeat/Random playback
Press the REPEAT button to change the playback mode. There
are four modes, such as Off, Track, Folder and Random.
- Off: Normal Playback
- Track: Repeats the current song file.
- Folder: Repeats the song files which have the same exten
sion in the current folder.
- Random: Song files which have the same extension will be
played in random order.
To resume normal play, press the CANCEL button.
CD-R MP3/WMA file
When you record MP3 or WMA files on CD-R, please refer
to the following.
- Your MP3 or WMA files should be ISO 9660 or JOLIET
format.
ISO 9660 format and Joliet MP3 or WMA files are compatible
with Microsoft's DOS and Windows, and with Apple's Mac.
This format is the most widely used.
- When naming your MP3 or WMA files, do not exceed 8
characters, and enter “.mp3, .wma” as the file
extension.
General name format : Title.mp3. or Title.wma. When composing your title, make sure that you use 8 characters or
less, have no spaces in the name, and avoid the use of special characters including: (.,/,\,=,+).
- Use a decompression transfer rate of at least 128 Kbps
when recording MP3º files.
Sound quality with MP3 files basically depends on the rate
of compression/decompression you choose. Getting CD
audio sound requires an analog/digital sampling rate, that
is conversion to MP3 format, of at least 128 Kbps and up to
160 Kbps. However, choosing higher rates, like 192 Kbps or
more, only rarely give better sound quality. Conversely, files
with decompression rates below 128 Kbps will not be played
properly.
MPEG4 Playback
MPEG4 Play Function
AVI files are used to contain the audio and video data. Only
AVI format files with the “.avi” extensions can be played.
1. Open the disc tray. Place the disc on the tray.
Close the tray.
2. Press the π/† or √/® buttons to select an avi file
(DivX/XviD) and then press ENTER button.
Stop
Off
T
...
2. Press the REPEAT A-B button at the point where you
want repeat play to start (A).
Press the REPEAT A-B button at the point where you
want the repeat play to stop (B).
- To return to normal play, press the CANCEL button.
3. To return to normal play, press REPEAT button again.
MPEG4 Function Description
Function
(
(
Skip
or
)
Search
or
)
Slow Motion
Play
ZOOM
Description
Reference
page
During play, press the
or
button, it moves forward or backward 5 minutes.
-
During play, press the SEARCH
( or ) button and press again to
search at a faster speed. Allows you
to search at a faster speed in an
AVI file. (2X, 4X, 8X)
-
Allows you to search at a slower
speed in an AVI file. (1/2X, 1/4X,
1/8X)
P 16
2X/4X/2X/Normal in order
P 19
- These functions may not work depending on MPEG4
file.
CD-R AVI file
This unit can play the following video compression formats
within the AVI file format:
- DivX 3.11 contents
- DivX 4 contents (Based on MPEG-4 Simple Profile)
- DivX 5 contents (MPEG-4 simple profile plus additional
features such as bi-directional frames. Qpel and GMC are
also supported.)
- XviD MPEG-4 compliant Contents.
This unit supports all resolutions up to maximum below.
DivX3.11 & DivX4 & XviD
DivX5
Bitrate may fluctuate:
Device may skip decoding
the high bitrate portions
and begin decoding again
when Bitrate returns to
normal.
720 x 480 @30fps
720 x 576 @25fps
: Maximum bitrate : 4Mbps
Repeat playback
1. Press the REPEAT button to change playback mode.
There are 3 modes, such as Off, Track and Folder, (a dis
tance between two points appointed by user).
- Title : repeats the title that is playing.
- Folder : repeats the AVI files which have the same extension in the current folder.
Note
• Some MPEG-4 files created on a personal computer
may not be play back. That is why Codec Type,
Version and Higher resolution over specification is
not supported.
• This unit supports CD-R/RW written in MPEG4 in
accordance with the “ISO9660 format”.
English _21
● ADVANCED FUNCTIONS
- Use a decompression transfer rate of at least 64Kbps
when recording WMA files.
Sound quality with WMA files basically depends on the rate
of compression/decompression you choose.
Getting CD audio sound requires an analog/digital sampling
rate, that is conversion to WMA format, of at least 64Kbps
and up to 192Kbps. Conversely, files with decompression
rates below 64Kbps or over 192Kbps will not be played
properly.
- Do not try recording copyright protected MP3 files.
Certain "secured" files are encrypted and code protected
to prevent illegal copying. These files are of the following
types: Windows MediaTM (registered trade mark of Microsoft
Inc) and SDMITM (registered trade mark of The SDMI
Foundation). You cannot copy such files.
- Important:
The above recommendations cannot be taken as a
guarantee that the DVD player will play MP3 recordings,
or as an assurance of sound quality. You should note that
certain technologies and methods for MP3 file recording on
CD-Rs prevent optimal playback of these files on your DVD
player (degraded sound quality and in some cases, inability
of the player to read the files).
- This unit can play a maximum of 500 files and 500 folders
per disc.
advanced functions
Playing Media Files Using
the USB Host feature
You can enjoy the media files such as pictures,
movies and tunes saved in an MP3 player, USB
memory or digital camera in high audio by connecting the storage device to the USB port of the DVD
Player.
Using the USB HOST feature
1. Connect the USB device to the USB port on the front of the
unit.
2. Press the USB button, Press the π/† button to select
the one of partision from USB, then Press ENTER.
Disc
USB
3. Press the π/† or √/® buttons to select a file in
USB. Press ENTER to Open file.
Stop
Off
00:00:00
Note
• Each time the USB button on the remote control is
pressed, a frame of the USB device selection will
appear.
• “USB” appears on the display screen.
• USB MENU screen appears on the TV screen and the
saved file is played.
Safe USB Removal
To prevent damage to the memory stored in the USB device,
perform safe removal before disconnecting the USB cable.
- Press the STOP (
) button
- Remove the USB cable.
22_ advanced functions
Skip Forward/Back
During playback, press the (
/
) button.
• When there is more than one file, when you press the
button, the next file is selected.
• When there is more than one file, when you press the
button, the previous file is selected.
To play back the disc at a faster speed, press
(
/
) during playback.
• Each time you press either button, the playback speed
will change as follows:
2x ➞ 4x ➞ 8x.
Compatible Devices
1. USB devices that support USB Mass Storage v1.0.
(USB devices that operate as a removable disk in Windows
(2000 or later) without additional driver installation.)
2. MP3 Player: Flash type MP3 player.
3. Digital camera: Cameras that support USB Mass Storage
v1.0.
• Cameras that operate as a removable disk in Windows
(2000 or later) without additional driver installation.
4. USB Flash Drive: Devices that support USB2.0 or USB1.1.
• You may experience a difference in playback quality when
you connect a USB1.1 device.
5. USB card Reader: One slot USB card reader and Multi slot
USB card reader
• Depending on the manufacturer. the USB card reader
may not be supported.
• If you install multiple memory devices into a multi card
reader, you may experience problems.
6. If you use a USB extension cable, the USB device might not
be recognized.
• CBI (Control/Bulk/Interrupt) is not supported.
• Digital Cameras that use PTP protocol or require additional
program installation when connected to a PC are not
supported.
• A device using NTFS file system is not supported.
(Only FAT 16/32 (File Allocation Table 16/32) file system is
supported.)
• Some MP3 players, when connected to this product,may not
operate depending on the sector size of their file system.
• The USB HOST function is not supported if a product that
transfers media files by its manufacturer-specific program is
connected.
• Does not operate with Janus enabled MTP(Media Transfer
Protocol) devices.
• The USB host function of this product does not support
all USB devices.
Picture CD Playback
CD Ripping
This feature lets you to copy audio files from disc to USB
device into MP3 format.
Play
Off
T
ENTER RETURN
1. To Select DISC
With the unit in Stop mode, Press the π/† buttons to
select DISC.
To Select DEV (storage media device)
Press the ® button to select the DEV (storage media
device) menu, then press the ENTER button.
Press the π/† buttons to select USB, then press the
ENTER button.
Stop
Note
- Press the STOP button to return to the clips menu.
- When playing a Kodak Picture CD, the unit
displays the Photo directly, not the clips menu.
Off
Track 01
T
Track 01
Track 02
Rotation
: Each time the ENTER button is pressed, the
picture rotates 90 degrees clockwise.
Zoom
2. Press the π/† buttons to select SELECT, then press
the ENTER button to marked all files to be copying.
- To unmarked copying all files press the ENTER button
again.(UNSELECT Menu)
- If you want to marked several files to be copying,
press the √ button, then press the ENTER button on
the selected file.
3. Press the π/† buttons to select START,-then-press the
ENTER button.File copy begins.
- To cancel the copying in progress, press the CANCEL
button.
Play
: Press the π/† buttons to select the part of the
screen you want to zoom in on.
Press the ENTER button. Each time the ENTER button is pressed, the picture is enlarged up to 2X.
Slide Show
•
: The unit enters slide show mode.
• Before beginning the Slide Show, the picture interval must
be set.
•
: When this icon is selected and ENTER is
pressed, the pictures change automatically
with about a 6 second interval.
•
: The pictures change automatically with
about a 12 second interval.
•
: The pictures change automatically with
about a 18 second interval.
Off
T
Track 05
Track 06
Track 07
REPEAT
Note
- When the CD ripping being processed the player
will automatic in play mode.
- Only the Audio CD(CD DA) dics can be ripping.
- During the CD ripping process, do not use/press
other button besides the CANCEL button.
TIMER :
ENTER RETURN
English _23
● ADVANCED FUNCTIONS
Open the dics tray.
Place the Audio CD(CD DA) disc on the
tray, and close the tray.
Connect the USB device to the USB
port on the front of the unit.
This screen will displayed.
1. Select the desired folder.
2. Press the π/† buttons to select a Picture file in the clips
menu and then press the ENTER button.
3. Press the INFO button on the remote control to select the
menu you want to view and then press the ENTER button.
advanced functions
Note
- Depending on a file size, the amount of time between
each picture may be different from the manual.
- If you don’t press any button, the slide show will
start automatically in about 10 seconds by default.
CD-R JPEG Disc
- Only files with the “.jpg” and “.JPG” extensions can be played.
- If the disc is not closed, it will take longer to start playing and
not all of the recorded files may be played.
- Only CD-R discs with JPEG files in ISO 9660 or Joliet format
can be played.
- The name of the JPEG file may not be longer than 8
characters and should contain no blank spaces or special
characters (. / = +).
- Only a consecutively written multi-se ssion disc can be
played. If there is a blank segment in the multi-session disc,
the disc can be played only up to the blank segment.
- A maximum of 500 images can be stored on a single CD.
- Kodak Picture CDs are recommended.
- When playing a Kodak Picture CD, only the JPEG files in the
pictures folder can be played.
- Kodak Picture CD: The JPEG files in the pictures folder can
be played automatically.
- Konica Picture CD: If you want to see the Picture, select the
JPEG files in the clips menu.
- Fuji Picture CD: If you want to see the Picture, select the
JPEG files in the clips menu.
- QSS Picture CD: The unit may not play QSS Picture CD.
- If the number of files in 1 Disc is over 500, only 500 JPEG
files can be played.
- If the number of folders in 1 Disc is over 500, only JPEG
files in 500 folders can be played
24_ advanced functions
changing setup menu
Using the Setup Menu
1. With the unit in Stop mode, press the MENU button on the
remote control. Use the π/† buttons to select Setup, then
press the ® or ENTER button.
Language Setup
®
Audio Setup
®
Display Setup
®
Parental Setup :
®
DivX(R) Registration
Enter
Return
®
Menu
❶ Language Setup: Setup of the Language.
❷ Audio Setup : Setup of the Audio Options.
❸ Display Setup : Setup of the Display Options. Use to
select which type of screen you want to
watch and several display options.
❹ Parental Setup : Setup of the Parental Level. Allows
users to set the level necessary to
prevent children from viewing unsuitable
movies such as those with violence,
adult subject matter, etc.
❺ Divx(R) Registration : Please use the Registration code
to register this player with the
DivX(R) Video On Demand
format. To learn more go to
www.divx.com/vod.
2. Press the π/† buttons to access the different features.
Press the ® or ENTER button to access the sub features.
3. To make the setup screen disappear after setting up, press
the MENU button again.
Note
Depending on the disc, some Setup Menu
selections may not work.
If you set the player menu, disc menu, audio and subtitle
language in advance, they will come up automatically every
time you watch a movie.
Using the Player Menu Language
1. With the unit in Stop mode, press the MENU button.
2. Press the π/† buttons to select Setup, then press the ®
or ENTER button.
3. Press the π/† buttons to select Language Setup, then
press the ® or ENTER button.
4. Press the π/† buttons to select Player Menu, then press
the ® or ENTER button.
5. Press the π/† buttons to select the desired language,
then press the ® or ENTER button.
- The language is selected and the screen returns to
Language Setup menu.
- To make the setup menu disappear, press the MENU
button.
LANGUAGE SETUP
Player Menu
Disc Menu
: English
√ English
: English
ﻋﺮﺑﻳﺔ
Audio
Subtitle
DivX Subtitle
Enter
Return
Menu
Using the Disc Menu Language
This function changes the text language only on the disc
menu screens.
1. With the unit in Stop mode, press the MENU button.
2. Press the π/† buttons to select Setup, then press the ®
or ENTER button.
3. Press the π/† buttons to select Language Setup, then
press the ® or ENTER button.
4. Press the π/† buttons to select Disc Menu, then press
the ® or ENTER button.
5. Press the π/† buttons to select the desired language,
then press the ® or ENTER button.
If the selected language is not recorded on the disc, the original pre-recorded language is selected.
The language is selected and the screen returns to Language
Setup menu.
To make the setup menu disappear, press the MENU button.
LANGUAGE SETUP
English _25
● CHANGING SETUP MENU
The Setup menu lets you customize your DVD player by
allowing you to select various language preferences, set
up a parental level, even adjust the player to the type of
television screen you have.
Setting Up the Language
Features
changing setup menu
Using the Audio Language
Using the DivX Subtitle Language
1. With the unit in Stop mode, press the MENU button.
2. Press the π/† buttons to select Setup, then press the
® or ENTER button.
3. Press the π/† buttons to select Language Setup, then
press the ® or ENTER button.
4. Press the π/† buttons to select Audio, then press the
® or ENTER button.
5. Press the π/† buttons to select the desired language,
then press the ® or ENTER button.
Select “Original” if you want the default soundtrack lan
guage to be the original language the disc is recorded in.
If the selected language is not recorded on the disc, the
original pre-recorded language is selected.
The language is selected and the screen returns to
Language Setup menu.
To make the setup menu disappear, press the
MENU-button.
1. With the unit in Stop mode, press the MENU button.
2. Press the π/† buttons to select Setup, then press the ®
or ENTER button.
3. Press the π/† buttons to select Language Setup,-then
press the ® or ENTER button.
4. Press the π/† buttons to select DivX Subtitle, then press
the ® or ENTER button.
5. Press the π/† buttons to select the desired -language,
then press the ® or ENTER button.
The language is selected and the screen returns to
Language Setup menu.
To make the setup menu disappear, press the
MENU button.
LANGUAGE SETUP
Player Menu
: English
Disc Menu
: English
Audio
LANGUAGE SETUP
: English
Subtitle
DivX Subtitle
√ Unicode
Arabic
Setting Up the Audio
Options
Using the Subtitle Language
1. With the unit in Stop mode, press the MENU button.
2. Press the π/† buttons to select Setup, then press the
® or ENTER button.
3. Press the π/† buttons to select Language Setup,-then
press the ® or ENTER button.
4. Press the π/† buttons to select Subtitle, then press the
® or ENTER button.
5. Press the π/† buttons to select the desired -language,
then press the ® or ENTER button.
- Select “Automatic” if you want the subtitle language
to be the same as the language selected as the audio
language.
- Some discs may not contain the language you select
as your initial language; in that case the disc will use its
original language setting.
The language is selected and the screen returns to
setup menu.
To make the setup menu disappear, press the MENU
button.
LANGUAGE SETUP
Audio Options allows you to setup the audio device
and sound status settings depending on the audio
system in use.
1. With the unit in Stop mode, press the MENU button.
2. Press the π/† buttons to select Setup, then press the ®
or ENTER button.
3. Press the π/† buttons to select Audio Setup, then press
the ® or ENTER button.
4. Press the π/† buttons to select the desired item, then
press the ® or ENTER button.
Language Setup
®
Audio Setup
®
Display Setup
®
Parental Setup :
®
DivX(R) Registration
®
AUDIO SETUP
Dolby Digital Out
: PCM
MPEG-2 Digital Out
: PCM
Dynamic Compression : On
26_ changing setup menu
PCM Down Sampling
: On
Power On Music
: On
❶ Dolby Digital Out
- PCM : Converts to PCM(2CH) audio.
- Bitstream : Outputs Dolby Digital or DTS via the digital
output. Select Bitstream when connecting to
a Dolby Digital or DTS Decoder.
❸ Dynamic Compression
- On : To select dynamic compression.
- Off : To select the standard range.
❹ PCM Down Sampling
- On : Select this when the Amplifier connected to the
player is not 96KHz compatible. In this case, the
96KHz signals will be down converted to 48KHZ.
- Off : Select this when the Amplifier connected to the
player is 96KHz compatible. In this case, all signals
will be output without any changes.
❺ Power On Music
This menu is used to activate or deactivate the
opening sound when you turn on the DVD player.
- On : To turn On Start up music
- Off : To turn Off start up music
Note :
Even when PCM Down sampling is Off
• Some discs will only output down sampled
audio through the digital outputs.
• To make the Setup menu disappear, press the
MENU-button.
• There is no analog audio output when you play a
DTS sound disc.
Display options enable you to set various video functions of
the player.
1. With the unit in Stop mode, press the MENU button.
2. Press the π/† buttons to select Setup, then press the
® or ENTER button.
3. Press the π/† buttons to select Display Setup, then
press the ® or ENTER button.
4. Press the π/† buttons to select the desired item, then
press the ® or ENTER button.
Language Setup
®
Audio Setup
®
Display Setup
®
Parental Setup :
®
DivX(R) Registration
®
❶ TV Aspect
Depending on a type of television you have, you
may want to adjust the screen setting (aspect ratio).
- 4:3 Letter Box : Select when you want to see
the total 16:9 ratio screen DVD
supplies, even though you have a TV with a 4:3
ratio screen. Black bars will appear at the top
and bottom of the screen.
- 4:3 Pan&Scan : Select this for conventional
size TVs when you want to see the central portion of the 16:9 screen. (Extreme left and right
side of movie picture will be cut off.)
- 16:9 Wide : You can view the full 16:9
picture on your wide screen TV.
DISPLAY SETUP
TV Aspect
Screen Message
Black Level
Manufactured under license from Dolby
Laboratories. “Dolby” and the double-D symbol
are trademarks of Dolby Laboratories.
“DTS” and “DTS Digital Out” are trademarks of
Digital Theater Systems, Inc.
4:3 Letter Box
4:3 Pan&Scan
√ 16:9 Wide
TV System
: PAL
Video Output
: I-SCAN
❷ Screen Messages
Use to turn on-screen messages On or Off.
❸ Black Level
Adjusts the brightness of the screen.(On or Off) It
does not function in PAL and Progressive mode.
English _27
● CHANGING SETUP MENU
❷ MPEG-2 Digital Out
- PCM : Converts to PCM(2CH) audio.
- Bitstream : Converts to MPEG-2 Digital Bitstream
(5.1CH or 8CH). Select Bitstream when using the
Digital Audio Output.
Setting Up the Display
Options
changing setup menu
❹ TV System
- NTSC : In case of using NTSC disc
• If your TV system only has PAL-Video input, you
must choose “PAL”. When you choose “PAL”,
Interlace output format is PAL 60 Hz output.
• If your TV system only has NTSC, input you
must choose “NTSC ”.
- PAL : In case of using PAL disc
• If your TV system only has NTSC-Video input,
you must choose “NTSC”.
• If your TV system only has PAL input, you must
choose “PAL ”.
- Auto
DISPLAY SETUP
TV Aspect
: Wide
Screen Messages
: On
Black Level
Setting Up the Parental
Control
The Parental Control function works in conjunction with
DVDs that have been assigned a rating, which helps you
control the types of DVDs that your family watches. There
are up to 8 rating levels on a disc.
Setting Up the Rating Level
1. With the unit in Stop mode, press the MENU button.
2. Press the π/† buttons to select Setup, then press the
® or ENTER button.
Language Setup
®
Audio Setup
®
Display Setup
®
Parental Setup :
®
DivX(R) Registration
®
NTSC
PAL
√ Auto
TV System
Video Output
3. Press the π/† buttons to select Parental Setup, then
press the ® or ENTER button.
❺ Video Output
Select Video Output.
- I-SCAN : Select when you want to use
Component Interlace Out.
- P-SCAN : Select when you want to use
Component Progressive Out.
• If the Yes/No selection in the Display Setup
sub Menu is not made within 10 seconds, the
screen returns to the previous menu.
Language Setup
®
Audio Setup
®
Display Setup
®
Parental Setup :
®
DivX(R) Registration
®
4. Press the π/† buttons to select Rating Level, then
press the ® or ENTER button.
PARENTAL SETUP
DISPLAY SETUP
TV Aspect
: Wide
Screen Messages
: On
Black Level
: Off
Rating Level
: Kids Safe
Change Password
TV System
Video Output
√ I-SCAN
P-SCAN
• Consult your TV User’s Manual to find
out if your TV supports Progressive Scan. If
Progressive Scan is supported, follow the TV
User’s Manual regarding Progressive Scan
settings in the TV’s menu system.
• If Video Output is set incorrectly, the screen
may be blocked.
28_ changing setup menu
5. Enter your password.
By default, password-is set to 0000.
- Press the π/† buttons then press the ENTER button.
- Please Change password to other than 0000 to
parental control function activated.
PARENTAL SETUP
PARENTAL SETUP
Rating Level
:Kids Safe
Change Password
Rating Level
:Kids Safe
Change Password
Enter Password
0
Enter
Return
Menu
PARENTAL SETUP
Rating Level
Enter Password
0
PARENTAL SETUP
Rating Level
√ Kids Safe
Change Passwor
Level 2
Level
Level
Level
Level
3
4
5
6
:Kids Safe
Change Password
Enter
Return
Menu
PARENTAL SETUP
Rating Level
:Kids Safe
Change Password
Enter New Password
0
To make the setup menu disappear, press the MENU
button. For example, if you select up to Level 6, discs
that contain Level 7,8 will not play.
Enter
Return
Menu
Note
If you have forgotten your password, see
“Forgot Password” in the Troubleshooting Guide.
Changing the Password
1. With the unit in Stop mode, press the MENU button.
2. Press the π/† buttons to select Setup, then press the
® or ENTER button.
Language Setup
®
Audio Setup
®
Display Setup
®
Parental Setup :
®
DivX(R) Registration
®
3. Press the π/† buttons to select Parental Setup, then
press the ® or ENTER button. The Enter Password
screen appears. Enter your password.
Language Setup
®
Audio Setup
®
Display Setup
®
Parental Setup :
®
DivX(R) Registration
®
4. Press the π/† button to select Change Password, then
press the ® or ENTER button.
- Press the π/† buttons then press the ENTER button.
Enter your new password again.
English _29
● CHANGING SETUP MENU
6. Press the π/† buttons to select the Rating Level you
want, then press the ® or ENTER button.
e.g) Setting up in Kids Safe.
reference
Firmware upgrade
2. Press the √/® buttons to select Total, then press the
ENTER button.
Introduction
Samsung will often support the software upgrade to
improve the performance of this unit to the latest status, through Samsung Internet Site (www.samsung.
com).
Because the specially new mpeg4 codec continues and
it is appearing. What improvements are made depends
on the upgrade software you are using as well as the
software that your DVD-player contained before the
upgrade.
How to make an upgrade disc
Write the downloaded file onto a blank CD-R or CDRW disc, using the following settings:
1. You have to download a new file through Download Center
of Samsung Internet Site (www.samsung.com).
2. Write the file to Disc using CD-RW of your computer.
Firmware upgrade starts
- In the middle of the writing, the tray will open
automatically. After taking out the disc, please wait for
about 2 minutes.
- If the unit was succesfully updated, the unit will turn off
and on after closing the tray automatically. When the
unit turns on, this screen will display.
3. Press the π/† buttons and then press ENTER.
English
Note
- File System CD-ROM ISO Level
- Character set ISO 9660
- Finalized, single session
- Write speed low
ﻋﺮﺑﻳﺔ
Upgrade procedure
1. Open the disc tray. Place the disc on the tray. Close the
tray. The Firmware upgrade screen appears.
Firmware upgrade
appears on the display
30_ reference
Note
- If the “Select Menu Language” doesn’t appear,
please contact to “Samsung Service Center”.
- Do not press any button and unplug the power
cord during upgrade.
- The upgrade procedure may change, refer to
the web site (www.samsung.com).
Troubleshooting
Before requesting service (troubleshooting), please check the following.
Problem
Disc does not play.
• Check the batteries in the remote control.
They may need replacing.
• Operate the remote control at a distance of no more than 20 feet.
• Remove batteries and hold down one or more buttons for several minutes
to drain the microprocessor inside the remote control to reset it. Reinstall
batteries and try to operate the remote control again.
• Ensure that the disc is installed with the label side facing up.
• Check the region number of the DVD.
Page
P3
P5
The icon appears
on screen.
• The features or action cannot be completed at this time because:
1. The DVD’s software restricts it.
2. The DVD’s software doesn’t support the feature (e.g., angles).
3. The feature is not available at the moment.
4. You’ve requested a title or chapter number or search time that is out of range.
Disc Menu doesn’t appear.
• Check if the disc has a Menu.
Play mode differs from
the Setup Menu selection.
• Some of the functions selected in the Setup Menu may not work properly if
the disc is not encoded with the corresponding function.
P25 ~ 29
The screen ratio
cannot be changed.
• The Screen Ratio is fixed on your DVDs.
P27 ~ 28
No audio
• Make sure you have selected the correct Digital Output in the Audio
Options Menu.
P27 ~ 28
The screen is blocked
• Press the
button (in front panel) for more than 5 seconds under no disc
inside. All settings will revert to the factory settings.
Forgot password
button (in front panel ) for more than 5 seconds
• Press the
under no disc inside. All settings including the password will revert
to the factory settings. Don't use this unless absolutely necessary.
If you experience other
problems.
• Go to the contents and find the section of the instruction book that contains
the explanations regarding the current problem, and follow the procedure
once again.
• If the problem still cannot be solved, please contact your nearest authorized
service center.
The picture is noisy or
distorted
• Make sure that the disc is not dirty or scratched.
• Clean the disc.
P14
P28 ~ 29
P2
English _31
● REFERENCE
No operations can be
performed with the
remote control.
Action
reference
Specifications
General
Power Requirements
AC 110-240 V ~ 50/60 Hz
Power Consumption
8W
Weight
Dimensions
+5°C to +35°C
Operating Humidity Range
10 % to 75 %
(DIGITAL VERSATILE DISC)
CD : 12Cm
(COMPACT DISC)
CD : 8Cm
(COMPACT DISC)
VCD : 12Cm
Composite Video
Video Output
430mm (W) X 203mm (D) X 37mm (H)
Operating Temperature Range
DVD
Disc
1.6 Kg
Reading Speed : 3.49 ~ 4.06 m/sec.
Approx. Play Time
(Single Sided, Single Layer Disc) : 135 min.
Reading Speed : 4.8 ~ 5.6 m/sec.
Maximum Play Time : 74 min.
Reading Speed : 4.8 ~ 5.6 m/sec.
Maximum Play Time : 20 min.
Reading Speed : 4.8 ~ 5.6 m/sec.
Maximum Play Time : 74 min. (Video + Audio)
1 channel : 1.0 Vp-p (75 Ω load)
Y : 1.0 Vp-p (75 Ω load)
Component Video
Pr : 0.70 Vp-p (75 Ω load)
Pb : 0.70 Vp-p (75 Ω load)
*Maximum Output level
Audio
Output
Digital Audio Output
*Frequency Response
2 Vrms
Terminal Coaxial (S/PDIF)
20Hz ~ 20Khz
*: Nominal specification
- Samsung Electronics Co., Ltd reserves the right to change the specifications with out notice.
- Weight and dimensions are approximate.
32_ reference
ENG
Contact SAMSUNG WORLD WIDE
If you have any questions or comments relating to Samsung products, please contact the SAMSUNG customer care center.
Region
North America
Latin America
Country
CANADA
MEXICO
U.S.A
ARGENTINE
BRAZIL
CHILE
NICARAGUA
HONDURAS
COSTA RICA
ECUADOR
EL SALVADOR
GUATEMALA
JAMAICA
PANAMA
PUERTO RICO
REP. DOMINICA
TRINIDAD & TOBAGO
VENEZUELA
COLOMBIA
BELGIUM
CZECH REPUBLIC
DENMARK
FINLAND
FRANCE
Europe
CIS
Asia Pacific
Middle East &
Africa
GERMANY
HUNGARY
ITALIA
LUXEMBURG
NETHERLANDS
NORWAY
POLAND
PORTUGAL
SLOVAKIA
SPAIN
SWEDEN
U.K
EIRE
AUSTRIA
SWITZERLAND
RUSSIA
KAZAKHSTAN
UZBEKISTAN
KYRGYZSTAN
TADJIKISTAN
UKRAINE
LITHUANIA
LATVIA
ESTONIA
AUSTRALIA
NEW ZEALAND
CHINA
HONG KONG
INDIA
INDONESIA
JAPAN
MALAYSIA
PHILIPPINES
SINGAPORE
THAILAND
TAIWAN
VIETNAM
TURKEY
SOUTH AFRICA
U.A.E
Contact Center 1-800-SAMSUNG(726-7864)
01-800-SAMSUNG(726-7864)
1-800-SAMSUNG(726-7864)
0800-333-3733
0800-124-421, 4004-0000
800-SAMSUNG(726-7864)
00-1800-5077267
800-7919267
0-800-507-7267
1-800-10-7267
800-6225
1-800-299-0013
1-800-234-7267
800-7267
1-800-682-3180
1-800-751-2676
1-800-SAMSUNG(726-7864)
0-800-100-5303
01-8000112112
02 201 2418
800-726-786 (800 - SAMSUNG)
70 70 19 70
030-6227 515
3260 SAMSUNG (€ 0,15/Min)
08 25 08 65 65 (€ 0,15/Min)
01805 - SAMSUNG(726-7864 € 0,14/Min)
06-80-SAMSUNG(726-7864)
800-SAMSUNG(726-7864)
02 261 03 710
0900-SAMSUNG (726-7864 € 0,10/Min)
815-56 480
0 801 801 881, 022-607-93-33
80820-SAMSUNG(726-7864)
0800-SAMSUNG(726-7864)
902-1-SAMSU(72678)
0771-400 200
0845 SAMSUNG (7267864)
0818 717 100
0800-SAMSUNG(726-7864)
0800-SAMSUNG(726-7864)
8-800-555-55-55
8-10-800-500-55-500
8-10-800-500-55-500
00-800-500-55-500
8-10-800-500-55-500
8-800-502-0000
8-800-77777
8000-7267
800-7267
1300 362 603
0800 SAMSUNG (0800 726 786)
800-810-5858, 400-810-5858, 010-6475 1880
3698-4698
3030 8282, 1800 110011, 1-800-3000-8282
0800-112-8888
0120-327-527
1800-88-9999
1800-10-SAMSUNG(726-7864)
1800-SAMSUNG(726-7864)
1800-29-3232, 02-689-3232
0800-329-999
1 800 588 889
444 77 11
0860-SAMSUNG(726-7864 )
800-SAMSUNG (726-7864), 8000-4726
Web Site
www.samsung.com/ca
www.samsung.com/mx
www.samsung.com/us
www.samsung.com/ar
www.samsung.com/br
www.samsung.com/cl
www.samsung.com/latin
www.samsung.com/latin
www.samsung.com/latin
www.samsung.com/latin
www.samsung.com/latin
www.samsung.com/latin
www.samsung.com/latin
www.samsung.com/latin
www.samsung.com/latin
www.samsung.com/latin
www.samsung.com/latin
www.samsung.com/latin
www.samsung.com.co
www.samsung.com/be
www.samsung.com/cz
www.samsung.com/dk
www.samsung.com/fi
www.samsung.com/fr
www.samsung.de
www.samsung.com/hu
www.samsung.com/it
www.samsung.com/lu
www.samsung.com/nl
www.samsung.com/no
www.samsung.com/pl
www.samsung.com/pt
www.samsung.com/sk
www.samsung.com/es
www.samsung.com/se
www.samsung.com/uk
www.samsung.com/ie
www.samsung.com/at
www.samsung.com/ch
www.samsung.ru
www.samsung.com/kz_ru
www.samsung.com/kz_ru
www.samsung.ua
www.samsung.lt
www.samsung.com/lv
www.samsung.ee
www.samsung.com/au
www.samsung.com/nz
www.samsung.com/cn
www.samsung.com/hk
www.samsung.com/in
www.samsung.com/id
www.samsung.com/jp
www.samsung.com/my
www.samsung.com/ph
www.samsung.com/sg
www.samsung.com/th
www.samsung.com/tw
www.samsung.com/vn
www.samsung.com/tr
www.samsung.com/za
www.samsung.com/ae
AK68-01770J