1
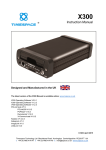
F205 IP Camera IP Module User’s Manual Version 1.1 (2007-06-08) Content Welcome.............................................................................................................................................. 4 Important Safeguards and Warnings .............................................................................................. 5 1 General Introduction ................................................................................................................... 6 1.1 Product Introduction ..................................................................................................... 6 1.2 System Requirement .................................................................................................... 6 2 Specification and Features ........................................................................................................ 7 2.1 Technical Specification ................................................................................................ 7 2.2 Feature ........................................................................................................................... 7 2.3 Interface .......................................................................................................................... 8 2.3.1 Alarm Input and Output ....................................................................................... 11 2.4 SD Card Installation .................................................................................................... 12 3 Client Operation ........................................................................................................................ 13 3.1 Operation flow ............................................................................................................. 13 3.2 IE Security Setup ........................................................................................................ 13 4 Web Operation .......................................................................................................................... 16 4.1 Network connection .................................................................................................... 16 4.2 Login and logout .......................................................................................................... 16 4.3 Go to real-time monitor mode ................................................................................... 17 4.4 Video (Right click mouse menu) ............................................................................... 17 4.4.1 Start Dialog ........................................................................................................... 18 4.4.2 Playback Control Bar ........................................................................................... 18 4.4.3 Volume Adjustment.............................................................................................. 18 4.4.4 Alarm Settings ...................................................................................................... 18 4.4.5 Net Data Flux ........................................................................................................ 19 4.4.6 Full-screen ............................................................................................................ 19 4.4.7 Video Zoom ........................................................................................................... 19 4.4.8 PTZ Control ........................................................................................................... 19 4.5 Search........................................................................................................................... 20 4.6 Configure ...................................................................................................................... 21 4.6.1 Load and save configuration .............................................................................. 22 4.6.2 General .................................................................................................................. 23 4.6.3 Scheduled Time ................................................................................................... 23 4.6.4 Image ..................................................................................................................... 24 4.6.5 Alarm ...................................................................................................................... 25 4.6.6 Motion Detection .................................................................................................. 26 4.6.7 Video Parameter .................................................................................................. 26 4.6.8 Network.................................................................................................................. 27 4.7 Assistant ....................................................................................................................... 28 5 6 4.7.1 Change Language ............................................................................................... 29 4.7.2 User Manage ........................................................................................................ 29 4.7.3 Record control ...................................................................................................... 31 4.7.4 Log Information .................................................................................................... 32 4.7.5 Date Time .............................................................................................................. 32 4.7.6 System Information .............................................................................................. 32 4.7.7 Alarm Prompt ........................................................................................................ 33 4.7.8 Camera Title ......................................................................................................... 33 4.7.9 Upgrade BIOS ...................................................................................................... 33 4.7.10 Mail Setting .................................................................................................... 34 4.7.11 Reboot ............................................................................................................ 35 4.7.12 Record Directory ........................................................................................... 35 4.7.13 Auto Maintenance ......................................................................................... 35 4.7.14 HDD Management ........................................................................................ 35 4.7.15 About ............................................................................................................... 36 4.8 Un-install web control ................................................................................................. 36 Auto Search IP Tool ................................................................................................................. 37 5.1 General Operation ...................................................................................................... 37 5.2 Restore Factory Default Setup ................................................................................. 37 Appendix: Factory Default Setup ............................................................................................ 38 6.1 General ......................................................................................................................... 38 6.2 Schedule....................................................................................................................... 38 6.3 Video ............................................................................................................................. 38 6.4 Alarm ............................................................................................................................. 38 6.5 Motion Detection ......................................................................................................... 38 6.6 Network......................................................................................................................... 39 6.7 Video setup .................................................................................................................. 39 6.8 Assistant setup ............................................................................................................ 39 Welcome This user’s manual is designed to be a reference tool for the installation and operation of your system. Here you can find information about this series IP module’s features and functions. Before installation and operation please read the following safeguards and warnings carefully! Important Safeguards and Warnings 1.Electrical safety All installation and operation here should conform to your local electrical safety codes. We assume no liability or responsibility for all the fires or electrical shock caused by improper handling or installation. 2.Transportation security No heavy stress, violent vibration or water splash are allowed during transportation, storage and installation. 3.Installation Keep upwards. Handle with care. Do not apply power to the IP module before completing installation. 4.Qualified engineers needed All the examination and repair work should be done by the qualified service engineers. We are nor liable for any problems caused by unauthorized modifications or attempted repair. 5.Environment This series IP module should be installed in a cool, dry place away from direct sunlight, inflammable, explosive substances and etc. 6. About Camera Camera should be installed away from direct sunlight or other strong artificial lights to avoid blooming and smear. Only use mild detergent or dry cloth to clean the camera. 7. About Accessories Be sure to use all the accessories recommended by manufacturer. 1 General Introduction 1.1 Product Introduction This IP module has the following features: z Embedded Linux technology, work stable and reliable z Embedded network structure, 24-hour work, no on-site PC needed z Built-in Web Server, support http configuration server to realized frame rate management, bit rate management, and resolution option. View video and audio via web browser. z Network cable output interface. OTG technology. z SD card memory function, support short time backup when encounter network error z Support POE(IEEE802.3af) ,convenient installation z On-site alarm interface to activate front IPC record function. z Unique auto front recording function before and after alarm, so that you can conveniently search the video material before and after alarm occurred. z Manual electronic zoom in function z White balance auto chasing or manual lock function z Auto iris switch function z Dual channel function: support analog output & network digital output at the same time. z Support MPEG4 CBR/VBR z Motion detection function to activate external alarm and front recording function, support FTP and Email notification z Support five resolutions :VGA,QVGA,CIF,QCIF,D1 z Network video playback speed: PAL 1-25f/s,NTSC 1-30f/s(optional) z Support various network protocols: UDP/IP,TCP/IP,group broadcast IP(Multicast), DNS & DHCP, PPPoE, DDNS; z Audio monitor function, adopt G.711PCM audio compression algorithm z Built-in RS485 communication interface, remote PTZ control z Support firmware upgrade, remote network operation. 1.2 System Requirement This series IP camera has the following system requirement. z Processor Pentium 4, 1.5 GHz or higher(Pentium 4, 2.4 GHz or higher recommended ) z RAM 256 MB or higher z OS Microsoft Windows 2000, Windows XP z Network Browser Internet Explorer 6.0 or higher 2 Specification and Features 2.1 Technical Specification Input voltage: 12VDC Electric Input power <3W Indication MPEG4 Video Format Network protocol TCP/IP、HTTP、FTP、SMTP、ARP、 Communication BOOTP、PPP Max frame/s PAL:25f/s NTSC:30f/s Password authentication: super user /ordinary user Security Hardware 100MIPS CPU; FLASH ROM:8MB;Memory:32MB Indoor Environment System Windows, Linux, Unix, OS/2, Macintosh,embedded Software OS Platform IE6.0 or higher Browser Version Alarm Interface 2-ch input,1-ch output RS485 COM Working 0 ~50 Temperature 2.2 Feature User Management Backup Function z z z z z z Alarm Function z z z z z Network Monitor z z z Different user rights for each group, one user belongs to one group. You can freely set monitor right when there is no user login Support central server backup function in accordance with your configuration and setup in alarm or schedule setting Support local record function and backup recorded video in client end,. Support SD card memory backup function, support short time backup when encounter network connection failure. Real-time respond to external alarm input( within 200MS) as user pre-defined activation setup and exert corresponding message in screen and audio prompt(allow user to pre-record audio file) Provide central management server management option so that system can initiatively send alarm notice remotely. Alarm input can connect with various peripheral equipments. Provide prompt or alarm option when encounter video loss. Reserve 9M for you to record and backup audio and video file Support SMS(short messaging service) function when alarm occurs. IPC one-channel audio/video data transmit to network terminal and then decode. Delay within 1 second(network bandwidth support needed) Max support 10 connections Adopt the following audio and video transmission protocol: HTTP、TCP、UDP、MULTICAST、RTP/RTCP z Send some alarm data or message via SMTP 7 z z Network Management z z Peripheral Equipment z z z Assistant Function z Support web access, used in WAN. Realize IPC configuration and management via Ethernet Support web and client end Support peripheral equipment management, each peripheral equipment control protocol and interface can be set freely Support serial port(RS485) transparent data transmission Support switch between NTSC and PAL Support system resource information and running status realtime display. Support log function. 2.3 Interface Please refer to Figure 2-1 for interface connection information. Figure 2-1 Please refer to Figure 2-2 for A/C pin function definition. 8 Figure 2-2 Please refer to Figure 2-3 for B/D pin function definition. Figure 2-3 9 Please refer to Error! Reference source not found. for indoor device connection layout. Indoor device connection layout Figure 2-4 Please refer to Figure 2-5 for indoor connection and plugs layout information. Reset Button GND MIC-IN +12V Power input Alarm &485 Network Port Figure 2-5 Please refer to Figure 2-6 for MID9-9-pin outlet line definition. 10 ORNAGE: ALARM_NO BLACK: ALARM_NO BROWN: ALARM_COM YELLWO: ALARMIN1 RED: ALARMIN2 GREY: 485_A GREEN: 485_B PURPLE/BLUE: GND Figure 2-6 Please refer to Figure 2-7 for outdoor device connection. Auxiliary margin is for indoor device only. Outlet line is for outdoor device only. Figure 2-7 2.3.1 Alarm Input and Output Connect peripheral device with alarm output port of IP camera I/O. 11 In the main menu, from configuration to alarm setup, you need to set alarm type as normal open. See chapter 4.6.5. You can refer to Figure 2-8 for alarm input information. Figure 2-8 Please refer to Figure 2-9 for alarm output information. Figure 2-9 2.4 SD Card Installation Dismantle the IP camera lens and the whole rear panel, and then take the middle circuit board out. Insert SD card into the groove. Now you can install the lens and real panel back. Please ask for your local professional engineer’s guidance, if it is your first time to install SD card. 12 3 Client Operation 3.1 Operation flow Please follow the operation flows below if it is the first time for you to operate IP module. (For reference only) Please make sure IP module connections are right and then connect it to network. Provide 12VDC power. Set PC IP address in the same network segment of the IP module factory default setup. Such as PC IP Address is 192.168.xxx.xxx, subnet mask and gateway is the same with factory default setup. IP camera factory default setup: IP:192.168.1.108; Subnet mask:255.255.255.0; Gateway:192.168.1.1 Use ping xxx.xxx.xxx.xxx (IP camera IP address) to check network connection. The return value should be less than 255. Open IE browser and then input IP camera address in the address column: such as 192.168.xxx.xxx. Open system, you can see security alarm interface asking you whether install IP camera web control webrec.cab or not. Please click OK; you can see system begins auto installation. After installation, you can enter the main interface. Please input your user name and password to login. You can modify default IP address, sub mask and gateway after login. Please refer to chapter 3.6.2 for IE setup modification if you can not install controls properly. Factory default account is: Username: admin Password: admin 3.2 IE Security Setup 13 You need to modify your IP security setup if you can not install controls properly. Open your IE browser, Tools->Internet Options->Security, select Local Intranet. See Figure 3-1. Figure 3-1 Click custom level, the interface is shown as below. See Figure 3-2. Figure 3-2 14 Please set as below. z Set “initialize and script ActiveX controls not marked as safe” as enable or prompt. z Set “download unsigned ActiveX controls” as enable or prompt. Click OK to save modification, system pops up warning dialogue box asking you to confirm modification, please click Yes. Then system goes back to Figure 3-1, click “sites” button, system pops up the following dialogue box. See Figure 3-3. Figure 3-3 Click advanced button, system pops up the following dialogue box. See Figure 3-4. Click add button to add a website to the zone. Figure 3-4 15 4 Web Operation 4.1 Network connection Before web client operation, please check the following items: z Network connection is right z IP camera and PC network setup is right. z Use order ping ***. ***. ***. *** (* IP camera address) to check connection is OK or not. Usually the return TTL value should be less than 255. 4.2 Login and logout Open IE and input IP camera address in the address column. For example, if your camera IP is 10.1.27.200, then please input http:// 10.1.27.200 in IE address column. System pops up warning information to ask you whether install controls or not. Please click OK button. After installation, the interface is shown as below. See Figure 4-1. Input your IP address Video window Figure 4-1 There are six function keys: login, logout, video, search, configuration and assistant. See Figure 4-2. Figure 4-2 Click login the following interface will pop up. See Figure 4-3. Please input your user name and password. 16 Default factory name is admin and password is admin. Note: For security reasons, please modify your password after you first login! Figure 4-3 4.3 Go to real-time monitor mode After you logged in, the menu bar is shown as below. See Figure 4-4. Click 1 to view current video. Figure 4-4 Or you can right click mouse and then click real-time monitor button. See Figure 4-5. Figure 4-5 4.4 Video (Right click mouse menu) In real-time monitor mode, click video button, the interface is shown as below. See Figure 4-6. Comparing with Figure 4-5, you can see there is a newly added item “PTZ Control”. Figure 4-6 17 4.4.1 Start Dialog Click start dialog, you can enable network audio talk function. 4.4.2 Playback Control Bar In real-time monitor mode, the playback bar is shown as Figure 4-7, you can record or capture image besides playback function. Recorded video is automatically saved in “download” folder under installation folder. The saved file is named as “recording starting time (year/ month/ day/ minute /second) +channel number + recording end time (year /month /day /minute /second), such as 20060405084519-1-060405084523.dav. Captured image is saved in “picture” folder under installation folder. Record Stop Snapshoot Full-screen Close Figure 4-7 4.4.3 Volume Adjustment Click set volume, the interface is shown as in Figure 4-8 . You can drag the slide bar to adjust volume or draw a √ before “Mute” to turn off audio. Figure 4-8 4.4.4 Alarm Settings Click alarm settings, you can see the dialog box is shown as in Figure 4-9. You can draw a √ before the check box to select alarm input and alarm output. Figure 4-9 Click alarm log, you can see the following interface. See Figure 4-10. 18 Here you can select alarm sound. You can select AlarmSound. wav in system32 folder. Figure 4-10 4.4.5 Net Data Flux Click net data flux, you can view current data flux. See Figure 4-11. Figure 4-11 4.4.6 Full-screen Click full screen, system switch to full screen display mode. 4.4.7 Video Zoom Click video windows, the interface is shown as in Figure 4-12. You can select corresponding display mode.40/60/80/100 Figure 4-12 4.4.8 PTZ Control Click PTZ control, the interface is shown as in Figure 4-13. Note: If you see some items such as preset protocol or speed protocol in grey color which you can not set, please apply your local network administrator for proper rights. 19 SIT is 3D positioning button. Around SIT are eight PTZ Left key: zoom out. Right key: zoom in. Left key: zoom in. Right key: zoom out Left key: turn dark. Right key: turn bright. Figure 4-13 Click parameter button in Figure 4-13. The interface is shown as below. See Figure 4-14. Figure 4-14 Here is for you to control direction operation. There are eight levels ranging from 1 to 8. Level 8 is the fastest speed. In Figure 4-14, click PTZ set button. You can see the following dialogue box. See Figure 4-15. You can select from Up/down/left/right dropdown list. Figure 4-15 20 4.5 Search Click search button, the interface is shown as below. See Figure 4-16. Here you can select file type and time, then click search button. Figure 4-16 In the search result, you can select one or more files to download to your local PC. The playback bar is shown as below. See Figure 4-17. 1: Save 2: Stop 3: Snapshoot 4: Fast Backward 5: Play 6: Pause 7: Fast play 8: Hide 9. Full-screen 10. Close 1 2 3 4 5 6 7 8 9 10 Figure 4-17 Download file name is usually made up of: file name +Channel N +date +time. File extension name is .dav(such as 20070307002450-1-20070307002503.dav.) 4.6 Configure 21 In web menu click configuration button, the interface is shown as in Figure 4-18. There are totally seven function keys. (Grey menu is null) z Motion Detection z Network z Video Parameter z General z Schedule Time z Image z Alarm Figure 4-18 4.6.1 Load and save configuration 4.6.1.1 Save configuration Click save configuration button in Figure 4-18.You can save current configuration to a file. The file extension name is CFG. See Figure 4-19. Figure 4-19 22 4.6.1.2 Load configuration You can draw a √ before checkbox to load you previously backup file. See Figure 4-20.Click Ok button and then select file of extension name .CFG. Now you have updated system setup. Figure 4-20 4.6.2 General In Figure 4-18, click general button. You can see an interface is shown as in Figure 4-21. Here is for you to input network information and select corresponding protocol. Figure 4-21 4.6.3 Scheduled Time Click scheduled time the interface is shown as below. See Figure 4-22. Here is for you to set record information. There are three record modes: record, motion and alarm. You can draw a √ in the corresponding check box. Please click save button after all the setup. 23 Figure 4-22 4.6.4 Image Click image button, the interface is shown as in Figure 4-23. Here you can set style, FPS, and quality etc in each channel. Click <save> to save a channel configuration and click <save> in the bottom to save all setup. z F/S:PAL:1/2/3/6/12/25;NTSC: 1/2/4/7/15/30. z Video:Only MPEG4 is available. z Quality: There are six levels ranging from 1to 6. 6-level is the best image quality, but the largest data flux. z Size :D1/CIF/QCIF/VGA / QVGA. z Camera display: you can select display camera number or not. z Time: You can select display time or not. z Data: there are two options: VBR/CBR. ¾ CBR: constant bit rate, bit rate is based on other parameters setting, for example FPS, image quality, size etc. See details in appendix, on the last page. ¾ VBR: variable bit rate, no more than 1M. Alarm when video lost:Here you can set system alerts you or not when video loss occurs. Please draw a √ before channel number to activate this function. Network Transport Protocol: Here you can review protocol of monitor and play back. (This information is for reference only, you can not modify.) Note: z VBR is recommended for monitoring z Please refer to appendix for more information (Appendix is for your reference only). The bit rate may be different because of different network or different images. 24 Figure 4-23 4.6.5 Alarm Click alarm button, the interface is shown as in Figure 4-24, here is for you to set alarm parameters. z Alarm Port:1、2 and all. Select alarm port. You can select from the drawdown list. z Alarm type: there are two types: normal close, normal open. Figure 4-24 25 Record Channel:You can draw a √ before check box 1 to activate this function. When alarm occurs in port 1, the channel 1 will begin recording z Output port: You can draw a √ before check box 1 to activate this function. z Mail Send:You can draw a √ before check box 1 to activate this function. When alarm occurs, IP camera will send out mail to alert you. When you finish all the setup here please clicks “save” in the bottom to save all configurations. z 4.6.6 Motion Detection Motion detection interface is shown as in Figure 4-25. This function becomes activated excluding the scheduled time. You can click your mouse in the detection region to set motion detection area. The grey area is the motion detection zone. z Channel: here is for you to select channel number. z Delay time: system delays specified time you have set after alarm is cancelled. z Sensitivity: here you can set area sensitivity. z Alarm out: You can draw a √ before check box 1 to activate this function. z Record video: You can draw a √ before check box 1 to activate this function. Figure 4-25 4.6.7 Video Parameter Video parameter setup interface is shown as in Figure 4-26. Please select channel number first, z Audio enable: You can select to close or open audio. z Auto WBL (Auto white balance): You can select to close or open auto white balance function or not. 26 Record type: there are three options: related network/network disconnection recording/network disconnection dynamic recording. z Image: You can adjust color, contrast, brightness and saturation. After having finished all channels setup, you can click <save> at the button to save all configurations. z Figure 4-26 4.6.8 Network Click network button, you can see the following interface. See Figure 4-27. 4.6.8.1 PPPoE Connection Set PPPOE as on, and then please input “PPPoE name” and “PPPoE password” you get from your ISP (Internet service provider). After saving it, you need to restart to active your configuration. After rebooting, IP camera will connect to internet automatically. The IP in the PPPoE IP is the dynamic value. 4.6.8.2 Web visit via PPPoE There are two ways. a. visit through current IP After IP camera connected with Internet by PPPoE, please get your device’s current IP. Now you can visit this IP camera via this IP. b. Visit via DNS You need a PC of fixed IP in the internet and there is the DDNS software running in this PC. In other words, this PC is a DNS (domain name server). In network DDNS, input your PPPoE name you get from you IPS and server IP (PC with DDNS ) . Click save and then reboot system. Click save button, system prompts for rebooting to get all setup activated. After rebooting, open IE and input as below: http://(DDNS server IP)/(virtual directory name)/webtest.htm 27 e.g.: http://10.6.2.85/IP camera _DDNS/webtest.htm.) Now you can open DDNSServer web search page. Figure 4-27 4.7 Assistant In the main interface, click assistant button, the interface is shown as in Figure 4-28. Assistant button includes the sixteen items Figure 4-28 28 4.7.1 Change Language System can switch between simplified Chinese and English. It needs to reboot before modification becomes activated. 4.7.2 User Manage Here is for you to manage users and user groups. See Figure 4-29, upper level is group level, and click ’+’ to see the whole group list. Figure 4-29 4.7.2.1 Add Group Click <add group> to input group name. See Figure 4-30. Figure 4-30 Click <Power> to set group power. Click <Save> to save configuration 4.7.2.2 Delete Group Click <Delete Group> the interface is shown as in Figure 4-31. Note: You can only delete empty group (E.g.: There is no user in current group). Figure 4-31 4.7.2.3Modify Group Click modify group, the interface is shown as in Figure 4-32. You can modify group name and click power button to set proper right for the whole group. 29 Figure 4-32 4.7.2.4 Add User Click <Add User> the interface is shown as in Figure 4-33. Figure 4-33 Input user name, password, group, you can click confirm password 4.7.2.5 Power When you add new user or new group (such as in Figure 4-30,Figure 4-33. ), click power button, the interface is shown as in Figure 4-34. Here is for you to set user’s power. There are two power groups: main power and monitor power. The main power includes the following twelve items: z Shut down: shut down machine. z Replay: replay recorded video file. z Record: record video file. z Backup: backup video file. z PTZ Control: Control Pan/tilt. z Account: user management. z System information: check system configuration, and mail setting. z Alarm: modify alarm menu. z Configuration: modify system and mail configuration; and modify time. z Query Log: review log file. z System Update: Update system. z Control: modify channel name. The monitor power includes the following items: z CAM_01: user has the power to monitor current channel. 30 Figure 4-34 4.7.2.6Modify user Click modify user button, the interface is shown as in Figure 4-35. Figure 4-35 4.7.2.7Delete user Click delete user button, system pops up a dialogue box to ask your confirmation. See Figure 4-36. Figure 4-36 4.7.3 Record control Hers is for you to set record status. See Figure 4-37. 31 Figure 4-37 4.7.4 Log Information Here is for you to view all recorded log files. See Figure 4-38. Note:All log information here is for reference only. Figure 4-38 4.7.5 Date Time You can set time in the following dialog box. See Figure 4-39. Figure 4-39 4.7.6 System Information Click system information, the interface is shown as in Figure 4-40. Figure 4-40 32 Here you can view disk information, file information, video transparent mode and video type. Audio: you can open or close audio. Audio recycle monitoring: you can open or close this function. Interval: you can set proper interval between windows. 4.7.7 Alarm Prompt Alarm prompt is shown as in Figure 4-41, you can select alarm type and enable audio. Figure 4-41 4.7.8 Camera Title Here is for you to modify channel name. See Figure 4-42.You can click modify button to edit channel name. Here you can input numeral, English character, Chinese character. Please clicks save to save modified channel name Figure 4-42 4.7.9 Upgrade BIOS Click open file to select update file (you can download upgrade file from our website or you get from our local technical engineer). The interface is shown as in Figure 4-43. Figure 4-43 33 After successfully upgrade, a dialog will pop up to alert you and then system begins rebooting. 4.7.10 Mail Setting Mail setup is shown as in Figure 4-44.Here you can add server IP and input receiver information. Figure 4-44 Add/Modify server IP: In Figure 4-44, click add button, the interface is shown as in Figure 4-45. You can input IP and port, then click save to add a new server address. You can also select current user and modify its IP information. Figure 4-45 Receiver: User is allowed to set 1~3 mail address,the same mail will be sent simultaneously to the mail address you have set, you can also set mail title freely. When you have finished the setup, click test to send test mail to the mail addresses to verify the mail address is correct or not. System will alter you whether the address is wrong or not. 34 4.7.11 Reboot Click reboot button, system pops up a warning dialogue box to alert you. See Figure 4-46. Figure 4-46 4.7.12 Record Directory Here is for you to modify record path for you video file. See Figure 4-47. Figure 4-47 4.7.13 Auto Maintenance Here allow you to set auto maintenance information. See Figure 4-48. You can set auto reboot time and auto delete file tile from the dropdown list Figure 4-48 4.7.14 HDD Management Click disk manage, you can see the following interface as in Figure 4-49. Here you can view the disk amount. The HDD serial number is named from left to right, from up to down. Click perform button, you can modify HDD property. There are several options for you: z Read-only disk z Read-write disk z Redundant disk 35 z Clear all data on current disk. System needs to reboot to get all the modification here activated. Note: z Search function only applies to read-only disk or read-write disk. z Recorded files can only be memorized in read-write disk or redundant disk. z You can set one or more redundant disk(s). Once redundant disk is full, system auto rewrite the old data. Please note, when you enable redundant disk function, do remember setting at least one read-write disk, otherwise system can not record video. z When you want to playback files in redundant disk, you can need to modify its property as read-only disk or read-write disk. Or you can dismantle the disk to playback in other PC. HDD management interface is shown as in Figure 4-49. Here you can see HDD information or clear data in the HDD. Figure 4-49 4.7.15 About Here is for you to view current version, BIOS version, device name, user name, IP. See Figure 4-50. Figure 4-50 4.8 Un-install web control There are three ways for you to un-install web control. z From start, click run and then input order regsvr32 -u WebRec.ocx. z Use web un-install tool uninstall web.bat to un-install web control. z Go to system disk and delete WebRec.ocx in file folder system32. 36 5 Auto Search IP Tool 5.1 General Operation Open search IP tool folder, click .exe file ( ), you can see the following interface. See Figure 5-1. You can select IP address in the device list and then click connect button to connect selected device. After successful connection, you can click configuration button to set device name, IP address and etc. Click reboot button to restart device. This tool does not have refresh button. Reopen tool to refresh device IP list. Figure 5-1 5.2 Restore Factory Default Setup Press reset button for at least five seconds, IP module all setups restore to factory default setup. 37 6 Appendix: Factory Default Setup 6.1 General z When HDD is full:Overwrite z IP Address:192.168.1.108 z Subnet Mask:255.255.255.0 z Gateway:192.168.1.1 z Domain Server:10.1.0.2 z Http Port:80 z TCP Port:37777 z Channel:1 z Protocol:NONE z Address:8 z Baud rate:9600 z Video format:PAL 6.2 Schedule z Channel:1 z Week:Week of current set-time z Start time:0:0 z End time:24:0 z Record:Yes z Motion Detection:No z Alarm:No 6.3 Video z Channel:1 z Frame Rate:25 z Data Stream:CBR z Quality:4 z Compression algorithm:MPEG4 z Resolution:CIF z Channel Display:Yes z Time Display:Yes z Alarm when video loss occurs:No z Network Transmission Protocol:Monitor:TCP 6.4 Alarm z Alarm port:1 z Alarm type:Normal Open z Record channel 1:No z Output port 1:No z Start time:0:0 z End time:0:0 z SMS:No 6.5 Motion Detection z Motion Detection:No z Channel:1 z Delay:10 Playback:TCP 38 z Sensitivity:3 z Alarm Output 1:No z Record Channel 1:Yes 6.6 Network z PPPOE Setup:No z PPPOE User name:NO z PPPOE Password:No z PPPOE Address:0.0.0.0 z DDNS Setup:NO z Device Host Name:NO z DDNS Server Address:0.0.0.0 z DDNS Server Port:0 z FTP setup:NO z Remote directory:Empty z Server IP :0.0.0.0 z Port:0 z User name:Empty z Password:Empty z File length:0 z Time interval:0 z Channel:1 z Start time:0:0 z End time:0:0 z Motion detection:No z Alarm:No 6.7 Video setup z Channel:1 z Audio encode:Close z Record Type:Has no relationship with network z Chroma:50 z Contrast:50 z Brightness:50 z R Gain:32 z B Gain:32 6.8 Assistant setup z Language:English z User management:There are two levels. ¾ Administrator: User name 888888. Password: 888888. User name: admin. Password: admin. ¾ Ordinary user User name: 666666. Password: 666666 User name: default. Password: default. z Record Control:Stop z Time and Date:The previous setup time. z Alarm Prompt:No 39 z z z Channel Name:CAM 1 Record Path:C:\download Auto maintenance:Never Slight difference may be found in user interface. All the designs and software here are subject to change without prior written notice. Please visit our website for more information. 40