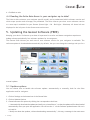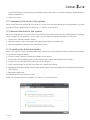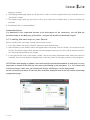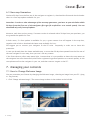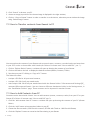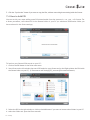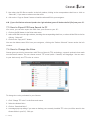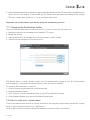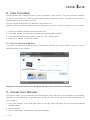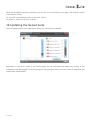
1
User Manual
Contents
1. Introduction
2
2. Geosat Suite installation
2
3. First connection
2
6.2 Loading the new map on your Geosat
7
6.3 New map Guarantee
8
7. Managing your contents
8
7.1 How to Change Welcome Image
8
7.2 How to Transfer contents from Geosat to PC9
4. Basic Operations
3
4.1 Starting the Suite
3
7.4 How to Add POI
10
4.2 Closing the Suite
3
7.5 How to Export POI from Geosat to PC
11
4.3 How to change the Software Language
3
7.6 How to Change the Voice
11
7.7 Changing the Destination folder
12
4.4 Reading the Suite Main Menu: is your
7.3 How to Add Contents from PC
9
navigator up-to-date?
4
7.8 How to add your custom maps
12
5. Updating the Geosat Software
4
8. How to backup
13
5.1 Updates options
4
8.1 How to restore a Backup
13
5.2 Automatic download of the update
5
5.3 Manual download of the update
5
9. Geosat User Manuals
13
5.4 Installing the Software Update
5
10.Updating the Geosat Suite
14
6. Updating the maps
6
6.1 Downloading the new maps
6
Your journey, Our technology
1. Introduction
The Geosat Suite is a PC application that helps you keeping your Geosat up-to-date and allows you
customizing your contents and sharing them with your friends.
Geosat Suite helps you downloading contents from the AvMap server such as the latest software updates,
user manuals, voices and the freshest maps.
Through the Geosat Suite you can also load on your Geosat other contents such as special Points of
Interests or welcome images to personalize your Geosat.
Geosat Suite makes it easier to share your saved contacts, routes and tracks with friends, as it helps
exchanging contents from Geosat to PC and vice versa.
2. Geosat Suite installation
1. Download the Geosat Suite from www.avmap.it, and save it on your PC.
2. Unzip the downloaded file
3. Launch the executable file
4. Choose a destination folder to save it or use the default one
5. Accept the End User License Agreement
6. Click on the END button to complete the installation, a shortcut to the Geosat Suit will be created on your
desktop.
7. Choose the language: click on the correspondent check box, then click on “Set Language” button and confirm
your choice by clicking Ok.
8. The Geosat Suite will open up showing this message: ‘Please connect the navigator and press Ok.’
3. First connection
1.Connecting the Geosat to the PC
The Suite cannot be used unless the navigator is connected.
1. Unplug the Geosat from the power supply cable (if plugged)
Warning! Do not connect the USB cable while the power supply cable is plugged as it could PERMANENTLY
damage the internal GPS receiver.
2. Connect the Geosat to your PC, using the USB cable provided
3. Wait for the device recognition: when the operating system of your PC recognizes the navigator as a mass
storage device (a splash screen showing the USB icon appears on the navigator’s display),
4. Click OK on the Geosat Suite window.
2. Identifying your Geosat
When the application is opened for the first time, you are requested to insert the serial number of your
navigator (you can find this code on the silver label attached on the Geosat). This procedure is needed only
the first time. Geosat Suite will recognize your Geosat and will ask you to Login.
3. User Log in / User Account Registration
Already a registered user?
If you already registered on the AvMap web site, use your AvMap account Login and Password that were sent
2 - AvMap
you via email at the time of the web registration
Not a registered User? Register user account now!
if you never registered on the AvMap web site, you can create your user account now in order to have access
to all the Suite functionalities.
ATTENTION! The navigator must be connected during the whole registration process.
4.Associating the navigator to the user
Geosat Suite will then ask if you want to associate the connected Geosat to your user account:
Click Yes, the Geosat Suite home page opens up.
This way, your Geosat is linked to your user account. Remember: you can have more than one device linked
to your account, but a device can belong to only one user account.
A Geosat Suite installed on a PC can be used to update more devices belonging to different users provided
each user logs in with his own login and password.
5.My Account
You can see your name displayed on the top bar of the Geosat Suite; Click on My account to view your account
details. In this page you can change your password and modify your data.
4. Basic Operations
4.1 Starting the Suite
The procedure described in par.3. is needed only the first time the Suite is started. Next time, you will
just have to connect the Geosat to the PC and the Suite will be open up automatically by default, then
you will just have to insert login and password to enter.
You can modify the start options of the suite, choose between:
1. “Automatically start when device is connected” this option starts the Suite automatically when your computer
detects the navigator (default)
2. “Don’t start automatically”, this option lets you open the suite manually by clicking on its icon on the PC.
4.2 Closing the Suite
To close the Suite:
1. Click on the Disconnect button next to the Navigator Image on the left part of the Geosat Suite Home page,
and wait for the Geosat to be disconnected
2. Click on Exit on the upper right corner, and confirm by clicking yes.
4.3 How to change the Software Language
You can change the language in the Suite at any moment:
1. Click on Settings on the bottom bar of the Geosat Suite
2. Click on Language
3. Choose the language, clicking on the correspondent check box
3 - AvMap
4. Click Back to exit.
4.4 Reading the Suite Main Menu: is your navigator up-to-date?
The Suite is able to detect your navigator specific model, and to understand which software version and
which maps (version and coverage) are preloaded. The Suite informs you when a new software version
or a new map is available for your Geosat (Green Light = Ok - Red Light = Obsolete). All these info are
displayed in the left part of the Geosat suite main menu.
5. Updating the Geosat Software (FREE)
Keeping your device’ Software up-to-date is important for a safer and better navigation experience.
AvMap releases periodically free software updates for its navigators.
The Geosat Suite informs you each time a new software version for your navigator is available. The
software update is downloaded automatically by default, but you can change the settings and opt for a
manual update.
5.1 Updates options
You can choose how to handle the software update: automatically or manually, both for the Suite
application and for navigator.
1. Click on Settings on the bottom bar of the Geosat Suite
2. Click on Updates Options
3. Choose between two options by clicking the correspondent check box:
• “Automatically download the updates and notify me to install them”, so that the updates will be downloaded
automatically when you open the application. You will see the ‘1’ on the Software update button click on it
to install it.
•“Notify me about the updates, without downloading automatically”, this way, a message in the main menu
4 - AvMap
of the Suite informs you when they are available, but you will have to click on the Software update button in
order to download it.
4. Click done to exit.
5.2 Automatic download of the update
When a new software update for the Geosat or for the Suite has been automatically downloaded, you will
see the Software update button marked by ‘1’ click on it to install it.
5.3 Manual download of the update
When the software box in the left side of the Geosat Suite main menu shows the red light and the message
‘Your navigator is not updated’, or the upper grey bar shows an update available for the Suite,
1. Click on the “Software Update” button
2. Read the release notes of the update describing improvements and fixed bugs.
3. Start the download, clicking on the “Download” button
5.4 Installing the Software Update
Both in the case you have chosen the automatic download or the manual download, follow this procedure
to install the Software update:
4. Click on “Install” button to install the software in your device
5. At the end of the installing process, please follow the procedure that appears on the screen:
6. Locate the two reset holes in the lower part of the navigator
7. Insert a pointy object in the first hole (inner one, close to the SD slot)
8. Keeping the first hole pressed, insert another pointy object in the second Reset hole (the external one marked
with “Reset”)
9. Release the Reset hole
10.Release the first hole (the inner one).
After the software has been updated, it’s better to restart the Suite.
5 - AvMap
6. Updating the maps
6.1 Downloading the new maps
The Suite is able to detect whether your map is up-to-date or if a newer version is available. When a new
version is available, a message will appear in the left part of the Suite main menu. You can buy the map
only if you are logged in (otherwise the Map update button is disabled):
1. Click on the Map Update button: the Management page is divided into two parts: the left column shows the
maps present in the navigator, while the right column shows the purchased maps (downloaded in the PC). For
each map it is displayed Name, version and a status light: if the map us still up-to-date the light is green, if
the map is obsolete the light is red, and a “Purchase update” link appears.
2. To update the map with the latest available version, click on “Purchase update” , the new available map will
be displayed.
3. Click on Download.
4. The Shopping Cart page opens up: choose the payment method (Credit Card or PayPal).
5. The Shipping Address page opens up: fill the form in order to receive a regular the invoice, then click on “Send
Order” button.
6. The Payment page opens up: you have to fill in your credit card or PayPal data, in order to finalize the
purchase.
7. Proceed and click on “Download Map”.
Purchasing a new map with different coverage
It is also possible to buy new maps, with a different coverage than the one preloaded on your navigator.
1. Click on the “Map Update” button
2. In the Management page click on “Purchase a new map” in the bottom right corner of the Suite
3. Choose the desired Map
4. Click on “Download”.
5. The Shopping Cart page opens up: choose the payment method (Credit Card or PayPal). Click on the “Checkout”
6 - AvMap
button to continue.
6. The Shipping Address page opens up: fill the form in order to receive a regular the invoice, and then click on
“Send Order” button
7. The Payment page opens up: you have to fill in your credit card or PayPal data, in order to finalize the
purchase.
8. Proceed and click on “Download Map”.
Problem Resolution:
If a download is not completed because of an interruption of the connection, you will find the
purchased map in the Map page of the Suite,, and you will be able to download it again.
6.2 Loading the new map on your Geosat
Before installing the new maps, backup the old map version:
1. In the left column click on the “Backup” button for each obsolete map.
2. After the back up, the “Delete” button will appear next to each map. Click on “Delete” to free space on your
SD card. This way the map will be deleted from the navigator memory card, but it will be saved on your PC,
so it will be always possible to use it again.
3. In the right column click on the button “Install” next to the newly downloaded map. When the process is
complete, the new map should be displayed also in the left column of the page (content of your navigator).
ATTENTION: when buying an update, more than one file could be downloaded; in that case it is very
important to install all the files for the correct functioning of the navigator. E.g. For Geosat 4x4
Crossover Europe: make sure you install both Europe and Europe + Africa background.
At the end of the procedure all the new files should be displayed also in the left column of the Map
management page.
7 - AvMap
6.3 New map Guarantee
You have 30 days from the first use of the navigator to register it, download the Suite and check whether
there is a free map update available for you.
Attention: in order to take advantage of the new map guarantee, you have to open the Suite within
30 days from the first use of the navigator (first gps fix acquisition at a certain speed). You can
download only one free map update.
Moreover, each time you buy a map, if a newer version is released within 30 days form your purchase, you
are granted the update for free.
In both cases, if a free update is available for you, a green rosette icon will appear in the map box,
together with a link to download the latest map available for free.
We suggest you to connect your navigator to the PC suite frequently in order not to loose this
promotion.
In case you already have the latest available map, or more than 30 days have passed from the first use of
the new navigator or new map, then you won’t see any rosette.
If the Suite shows a yellow map status light, it means that it is not possible to detect the map status as
the navigator has never been used (it has never registered a gps fix acquisition at a certain speed); in this
case please use first the navigator in your car, and then connect it again to the PC.
7. Managing your contents
7.1 How to Change Welcome Image
You can customize your Geosat by changing the Welcome image, choosing an image from your PC (.Jpeg
or .Png format).
1. Click “Change welcome image”: The current image is shown in the window on the left side
8 - AvMap
2. Click “Search” to browse your PC
3. choose an image (a preview of the chosen image is displayed in the right window)
4. Click on “Copy to Geosat” button in order to transfer it to the device, otherwise you can delete the image
using “Delete Image” button.
7.2 How to Transfer contents from Geosat to PC
You can explore the content of your Geosat such as saved routes, contacts, recorded tracks and save them
in your PC in order to share them with friends (for Points of interest read “How to add POI” par. ? ).
1. Click on “Explore Device” button, a window will open up showing the contents of your Geosat.
2. Click on the links on the left to display the desired contents (Routes, Contacts, Tracks)
3. Save them on your PC clicking on “Copy to PC” button.
The Suite will create:
• A unique .GPX file for all your saved contacts,
• A unique .GPX file for all your saved tracks,
• And a unique .XML file for all your saved routes inside the Geosat folder C:\Documents and Settings\[PC_
username]\Documents\Geosat\. You can choose a different destination folder in the Settings menu, in
the “Destination Folders” page. These contents can be imported in another Geosat
7.3 How to Add Contents from PC
Contents can be shared with friends. You can add contents (routes, contacts, tracks) from your PC to your
Geosat (For Points of interest read “How to add POI” par.?):
1. Click the ’Add contents from PC’ button: a window will open up showing the contents of your PC (Geosat
folder)
2. Click the “Add” button to browse other folders in your PC
3. Choose the file to transfer (.GPX file with contacts, GPX file with Tracks or .XML file with Routes)
4. Click the “Replace” button to overwrite the files existing in your Geosat
9 - AvMap
5. Click the “Synchronize” button if you want to copy the files, without overwriting those existing inside the Geosat.
7.4 How to Add POI
You can enrich your maps adding extra POIs downloaded from the internet in .csv, .gsp, .ov2 format. For
a faster procedure, save these POI in the Geosat folder of your PC (or whichever destination folder you
have selected in the Suite settings)
To load on your Geosat POIs stored on your PC:
1. Click on the POI button in the Suite main menu
2. You will see on the left window the extra POI loaded on your Geosat and on the Right window the POI inside
the Geosat folder on your PC, (C:\Documents and Settings\[PC_username]\Documents\Geosat\)
3. Select the POI in the right window or click on the Add button if you want to browse other folders in your PC
4. select the folder and open the file to transfer
10 - AvMap
5. Now select the POI file to transfer in the left window, clicking in the correspondent check box or click on “Select All”, if you want to select more than a file
6. click on the “Copy to Geosat” button to load the selected POI in your navigator.
N.B. if you click Delete selected (under the right window) you will delete the Poi file from your PC.
7.5 How to Export POI from Geosat to PC
Vice versa, you can also export the POIs from your Geosat to your PC:
1. Click on the POI button in the Suite main menu
2. select a POI file from the right window, checking the corresponding check box, or select all the POIs in the list
clicking “Select All”
3. Click on the “Copy to PC” button.
You can also delete some POIs from your navigator, clicking the “Delete Selected” button under the left
window.
7.6 How to Change the Voice
Geosat gives you driving instructions with Text-to-Speech (TTS) technology, a speech synthesis that reads
out the streets names. You can choose several TTS voices (male / female) and languages. You can store
in your device only one TTS voice at a time.
To change the voice preloaded in your Geosat:
1. Click “Change TTS voice” in the Suite main menu
2. Select the desired Voice
3. Click on “Download Voice”
4. A message pops up asking if you want to backup your currently installed TTS voice (it will be saved in the
Geosat folder in your PC). Click yes
11 - AvMap
5. After the download process is complete, a pop up message informs you that TTS voice will be installed on your
device: click on “Yes” button. If you click NO, you can install it at a later time, just clicking on the “Change
TTS voice” button (that will have a “1” on it) in the Suite main menu.
Important: do not disconnect your device during the installation process!
7.7 Changing the Destination folder
You can choose the destinations folders on your PC in order to store the files when you:
1. Download contents from the AvMap server (manuals, TTS voices)
2. Backup the SD card
3. Add contents to PC from navigator and vice versa (contacts, tracks, routes)
4. Transfer POI from navigator to PC and vice versa.
The default folder is named “Geosat“ folder and it is automatically created on your PC (C:\Documents
and Settings\[PC_username]\Documents\Geosat\) when the Suite is installed.
To choose a different folder on your PC:
1. Click on Settings on the bottom bar of the Geosat Suite
2. Click on Destination Folders
3. Click “Browse” to set the destination folder in your PF for each kind of content
4. Click on Restore Default to go back to the default Geosat folder.
7.8 How to add your custom maps
Click on the MapConverter button to convert and load on the navigator custom maps created with Google
Earth or other mapping software (e.g. OziExplorer).
Click on Map Converter manual to download detailed instructions about this feature.
12 - AvMap
8. How to backup
You can save all the contents present in your SD (Software, map, license, TTS voices and user contents)
on your PC and restore it, in case you have some problems with your device. We advice you to keep an
updated backup of your data in your PC.
You can use the default folder for backup or set another one.
Important! You must be sure that there is enough space on your PC to save all contents of your SD card!
1. Click on the “Backup” button on the Suite main menu
2. In the right window you will see the contents of the backup folder in your PC
3. If you want you select another folder on your PC, click “Search button”
4. Click on the “Backup” button and confirm.
8.1 How to restore a Backup
If you want to restore the contents in your Geosat after selecting the correct folder in your PC, click on
the Restore button and confirm.
Important! Do not disconnect your navigator during backup and restore processes!
9. Geosat User Manuals
Through the Suite, you can download the latest Geosat 6 user manuals. As the manuals are periodically
updated, we recommend you to get the latest version, in order to find out all the new functionalities of
your navigator.
1. Click “User manual” in the Suite main menu. In the right side of the page, you can see all the manuals
available online:
2. Select a manual
3. Click on “Download” and click yes in the pop up message
13 - AvMap
When the download has been completed, you can see it in the left side of the page, (the manual is saved
in the Geosat folder).
To can read it immediately select it and click “Open”.
To delete it, select it and click “Delete”.
10.Updating the Geosat Suite
You can update Geosat Suite application when new versions are available.
Depending on the choice made in the Setting page, you can download the updates by clicking in the
information link that appears in the main page (in the upper grey bar) or you can choose to download and
install them automatically.
14 - AvMap