1
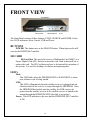
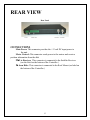
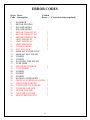
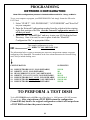
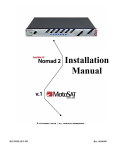
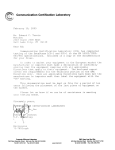
Satellite TV
FREEDOM SD2
USER GUIDE
v.2 / MotoSAT
ALL RIGHTS RESERVED
901-FREEDOM Manual
Rev 28 Sept 2009
2
INDEX
Front Panel description
Rear Panel description
OPERATION
Power Up
Test Dish
Find Satellite
Memory Card
Firmware Upgrade
Network Configuration
Log Files
Error Messages
Error Codes defined
Programming Network Configurations
Performing a TEST DISH
MotoSAT Technical Support Information
4
5
6
7
7
8
8
8
9
10
10
11
COMPONENT AND FUNCTIONAL DEFINITIONS
Mount – FREEDOM Dome and dish mechanics
FREEDOM SD2 - Positioner, Controller or Control Box
SD Card – The memory card used to load programming code and configuration
LNB – The device under the dome that receives the satellite signal
Control Cable – The 9 conductor cable that connects the Mount to the FREEDOM SD2
SD Card – The data storage device which provides software and configuration updates
Azimuth Motor – The motor on the mount that controls azimuth movement
Elevation Motor – The motor on the mount that controls elevation movement
Scotch Locks – The devices used to splice electrical wires on the mount
LED – The lights on the front panel of the FREEDOM SD2 that indicate system status
Software – Code which instructs the mount to locate and identify satellites
Configuration File – The code that tells the mount which satellites to identify
Log Files - Diagnostic files for monitoring the system as it goes through its various routines
800-247-7486 – The number that you may call if you have any questions concerning your
FREEDOM or its operation
3
FRONT VIEW
Front Panel
SD Card Slot
Status Indicators
Power
The Front Panel consists of three buttons; STOW, SEARCH and POWER. It also
has 4 LED indicators; Stow, Search, LNB and Power.
BUTTONS
POWER: This button acts as the SEARCH button. When depressed it will
activate the FREEDOM Controller
SD CARD
SD Card Slot: This card slot receives a Multimedia Card (MMC) or a
Secure Digital Card (SD). Push in to insert the card. Push in then pull out to
remove the card. The SD Card does not have to be inserted for operation of
the system. It is used for loading of software and capturing data.
LED’s
Find:
This LED blinks when the FREEDOM SD2 is SEARCHING or when
new software code is being loaded.
LNB:
This LED is illuminated when the satellite receiver is plugged into an
electrical outlet if the receiver is looped through the FREEDOM. Once
the FREEDOM has locked onto the satellite, the LNB receives its
power from the satellite receiver if the satellite receiver is linked to the
mount through the FREEDOM SD22 (this link is an option.)
Power: This LED indicates to the user that the FREEDOM SD2 Controller
is ON.
4
REAR VIEW
Rear Panel
12 VDC
Control Cable
To Receiver To Mount
CONNECTIONS
Main Power: This connector provides the +12 volt DC input power to
the unit.
Motor Control: This connector sends power to the motors and receives
position information from the dish
Out to Receiver: This connector is connected to the Satellite Receiver
(see the label on the bottom of the Controller.)
In from Dish: This connector is connected to the Roof Mount (see label on
the bottom of the Controller.)
5
OPERATION
The following is a basic operation of the FREEDOM SD2 Controller and is meant
to get the operator up and running in a short period of time.
POWER UP
Pressing the POWER button will activate the SEARCH routine.
• If you are currently ON satellite then the system will re-peak. If
programmed to go to another satellite the system will begin the move
to the next satellite programmed.
• If you are not currently ON satellite then the system would begin the
search for the programmed satellite.
TEST DISH
This operation will test the Azimuth and Elevation functions of the mount.
To implement this function you must create a new configuration file by adding 128
to the present configuration number. For example if your present Configuration is
DirecTV satellite 101 you would add 1 to the configuration for that satellite. This
is done in your NomadSD.dat file. For Example:
• DirecTV 101 is configuration 002 + 128 = 130 which is the TEST
DISH for your configuration (see Programming Network
Configuration in this manual.) This is generally used for diagnosis
purposes when the dish cover is removed. It allows for visual
confirmation of the Elevation and Azimuth motors running.
• Upon completion of the TEST DISH you must change your
NomadSD.dat file back to its proper configuration for the network that
you are subscribed to (subtract 128 from the previously altered
Configuration number) or your system will perform a TEST DISH
each and every time it is deployed.
FIND SATELLITE
To search for a satellite, press the POWER button once and the dish will
begin to search for the desired satellite depending on the network configuration.
The FIND led will blink indicating movement of the dish. Once the controller has
locked on the appropriate satellite, the POWER and FIND led will go OUT and the
FREEDOM Controller will turn OFF.
6
MEMORY CARD
The memory card feature allows the user to do three things:
1. Upgrade the firmware application, i.e. (nsd_xxxx.hex) from the Root
Directory)
2. Change the network configuration, i.e. (NomadSD.dat) from the Root
Directory.
3. Record the debug information into Log Files (LOGFILES).
The card is inserted by pushing in the card until it clicks into place. To
remove the card, push the card in once again and the socket will eject the card.
Then simply remove it the rest of the way. Any MMC or SD Card can be used as
long as it is formatted to FAT32 file format.
FIRMWARE UPGRADE
1. The FREEDOM SD2 Controller’s firmware can be upgraded by
simply copying the latest firmware upgrade into the Root Directory of
the SD memory card using a computer capable of utilizing SD
Memory Cards. Be sure to copy the file into the SD card "root
directory" and not into a subdirectory or folder. You can find the
latest firmware upgrade for the controller on our web site at:
www.motosat.com.
2. Power OFF the controller then insert the SD memory card into the
card slot the front of the FREEDOM.
3. Power ON the FREEDOM. The FREEDOM SD2 Controller will
detect the upgrade and automatically install the new upgrade code.
New software upgrades will cause the LED’s on the front panel to
blink.
During the upgrade process the FIND led will blink in rapid succession indicating
that programming is taking place. DO NOT remove the SD memory card from
the Controller until this process is complete. If no upgrade is detected or the
upgrade is an older version than what is already installed in the controller,
an upgrade will not take place. NOTE: The controller will not permit installing
previous numbered (older) upgrades. It will only recognize upgrades with a higher
number than the last one stored.
After a FIRMWARE UPGRADE has completed, the system MUST be powered
OFF then powered ON to store new upgrade.
7
NETWORK CONFIGURATION
The program provider and satellite selections are configured using a
configuration file (NomadSD.dat) that is placed in the root directory of the
memory card (see Network Configuration.) This file is edited for the program
provider. During initialization, the controller reads this file and makes changes to
its configuration accordingly. Once this is done the Configuration File should be
moved and stored in the “MotoSAT Configuration File” or appropriate folder and
not in the root directory. If the Configuration File is left in the root directory and
remains in the Controller then every time the system is turned on it will look at the
Configuration File on the card and reconfigure from that file rather than the data
that is stored in memory (which would execute much faster.) This process is only
needed to be done once per installation.
LOG FILES
Log Files are a diagnostic tool for monitoring the system as it goes through
its various routines. The Log Files are created in the Log Files directory which is
located in the root directory. If there is not a Log Files directory, the FREEDOM
SD2 will create one automatically. The memory card must not be write-protected
for Log Files to be created and stored. If it is write-protected the FREEDOM SD2
will ignore the disk. The latest log File is the one with the highest incremental
number in the file name. To read a log file, simply open it using Word Pad or any
other Text Editor. The Controller creates a new Log File upon every initialization
and every time it locks on satellite.
ERROR MESSAGES
The FREEDOM SD2 has some internal diagnostic capabilities that will not
allow the unit to operate should a Critical Error occur. If a critical error occurs, the
Stow and Search LED’s will blink together at the same time in one second
intervals. The number of repetitions will indicate the specific number code of the
error. After a two (2) second pause the FREEDOM SD2 will blink out the error
number again. The system can not function after experiencing a critical error. The
unit will have to be powered OFF and powered back ON. The FREEDOM SD2
will also record a text message indicating the error into the Log File provided an
SD card was inserted at the time of the error. If the card was not inserted at the
time of the error simply turn off the power and insert the SD card and turn on the
power to the FREEDOM SD2. The system will produce a log file onto the SD
card which is the captured information that can be sent to the MotoSAT Technical
Support Department to be analyzed.
The following page has a list of each error, its number code, and whether or
not it is a critical error.
8
ERROR CODES
Error Error
Code Description
0
1
2
3
4
5
6
7
8
9
10
11
12
13
14
15
16
17
18
19
20
21
22
23
24
25
26
27
28
29
30
Critical
Error = ! (Corrective action required)
NO ERROR
MOTOR, MOVING
INVALID MODE 1
INVALID MODE 2
MOTOR, TIMEOUT EL
MOTOR, TIMEOUT AZ
MOTOR, TIMEOUT SK
LIMIT ERROR, EL
LIMIT ERROR, AZ
LIMIT ERROR SK
TUNER FAILURE
AGC, NO LOCK
MAIN SAT FOUND ONLY
MAIN SAT NOT FOUND
UNUSED
UNUSED
NO SATELLITES FOUND
OVER TEMP
DISH HEIGHT ERROR
COAX ERROR
UNUSED
UNUSED
UNUSED
NO MAIN AFTER SKEW
CRITICAL INTERNAL FAILURE
LNB POWER FAILURE
TUNER AMP ON, FAILURE
TUNER ID, FAILURE
MOTOR, FAILURE
COUNTER, FAILURE
MOUNT MISS-MATCH
9
!
!
!
!
!
!
!
!
!
!
!
!
!
!
!
!
!
PROGRAMMING
NETWORK CONFIGURATION
Note: This configuration process is limited to Microsoft PC’s. Sorry, no Mac’s.
To use your computer to program your FREEDOM SD2 Card simply format the SD card to
FAT32 and:
1. Select “START”, “ALL PROGRAMS”, “ACCESSORIES” and “Note Pad”
on your computer.
2. Enter the Network Configuration number from the selection below starting
at the first position of the file. Just the Network Configuration number is
all that you need.
3. Name this file “NomadSD.dat” and save it onto your SD Card in the Root
Directory. Once it is used, be sure to place it into the “MotoSAT
Configuration File” or appropriate folder.
This sample configuration is set for
002 DIRECTV NON SKEWABLE 101
002
The information below is used for obtaining the Network Configuration Number for proper
configuring of the NomadSD. The numbers in the first column determine the Network being
used. Always include leading zeros.
CONFIGURATION
SATELLITES
000
002
004
006
014
016
018
119/110
101
92/81
101/119
119/110/61.5
110/110/148
119/110
DISH NETWORK MODE, NON SKEWABLE,
DIRECTV MODE, NON SKEWABLE,
BELL EXPRESSVU MODE, NON SKEWABLE
DIRECTV ENHANCED MODE, NON SKEWABLE,
DISH NETWORK EAST MODE, NON SKEWABLE
DISH NETWORK WEST MODE, NON SKEWABLE
DISH NETWORK MODE, NON SKEWABLE
TO PERFORM A TEST DISH
To do a TEST DISH simply add 128 to any of the above i.e. 000 becomes 128, 003 becomes
131 and so on. After you perform a TEST DISH return the configuration
(NomadSD2.dat) back to the original configuration so that it will not perform
a TEST DISH each time the power is turned on.
10
For additional information at this time contact
MotoSAT Technical Support @ 800-247-7486
The MotoSAT Technician will ask you “What is your “Network
Configuration?” Be prepared to tell him the code that you have in your Network
Configuration File which will be found in your “MotoSAT Configuration File” folder on
your SD Card. It will appear as a file labeled “NomadSD.dat”. Open this file and it will
be the first 3 digits on the first line.
Thank you for your assistance,
Your Friends at MotoSAT
11