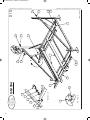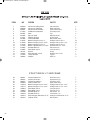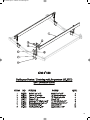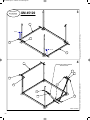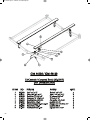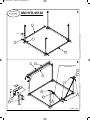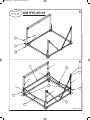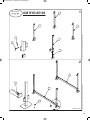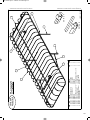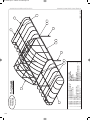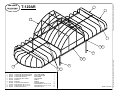
1
lifts manual:Layout 1 04/03/09 12:57 PM Page 1
Élévateur
Manuel d’instruction
Lifts
Owners Manual
GM 6120 / GM 984
GM 1260 / GM 1263V
GM 1596 / GM 2096
GM 35108 / GM 35120
GM 45108 / GM 45120
GM 55120
GM–Hyd 45120 / GM–Hyd 65120
Toiture / Canopy
revision 03/2009
Addendum -Mar
qui
s
e/Canopy2010
112
lifts manual:Layout 1 04/03/09 12:58 PM Page 4
Installation ;
1. Après l’assemblage, installez l’élévateur dans l’eau.
2. Ajustez les quatre (4) pattes et mettre au niveau.
3. Ajustez le lit centrale a la coque de l’embarcation et serrez tous les boulons et écrous.
4. Stationnez l’embarcation dans l’élévateur et vérifiez l’ajustement du lit centrale par rapport a la coque de l’embarcation. Vous devez laisser une distance
minimum de 1 pouce (254 mm) entre la coque et la structure de l’élévateur.
5. Lorsque vous stationnez l’embarcation dans l’élévateur, assurez vous que la partie arrière ne dépasse pas plus de 12 - 18 pouces 305 - 457 mm). Un mauvais stationnement pourrais causez des dommages ou de graves blessures.
6. Installez et ajustez les accessoires optionnels s’il y a lieu.
Précautions ;
1. S’assurer que toutes personnes utilisant l’élévateur comprennent son fonctionnement.
2. Ne jamais utiliser avec des personnes dans le bateau.
3. Se tenir éloigner de l’élévateur lors de la montée ou la descente.
4. Ne jamais dépasser la capacité maximale.
5. Un bateau rempli d’eau durant un orage peut dépasser la capacité maximale de l’élévateur, assurer vous d’enlever le bouchon de drainage du bateau.
6. Lorsque stationner, soulever le bateau le plus haut possible de sorte que les vagues ne puissent toucher au bateau.
7. Ne pas travailler sur ou sous le bateau lorsqu’il est soulevé.
8. Descendre la plate-forme complètement si vous voulez travailler sur l’élévateur ou sur votre bateau.
9. Ne jamais passer un membre a travers les rayons de la roue.
10. Si la roue tourne rapidement lors de la descente, ne pas essayer de la stopper. Laisser tourner la roue et le bateau descendra dans l’eau sans danger.
11. Sécuriser la roue a la structure avec un cadenas pour protection contre le vandalisme et le vol.
12. Il n’est pas recommandé de laisser l’élévateur dans l’eau durant la saison hivernale. La glace causerait des bris irréparables.
13. A la fin de la saison, la toile pour la toiture doit être enlever car une accumulation de neige causerait des dommages a la structure. Assurer vous de bien
sécher la toile, enrouler la et l’entreposer dans un endroit sec.
14. Vérifier régulièrement ;
- l’usure du ou des câbles
- le fonctionnement des poulies
- que les boulons et écrous soient serrés
- graisser le treuil si nécessaire
- remplacer les pièces usées ou endommagées
Installation ;
1. The lift properly assembled, place lift in the water.
2. Level the lift to the water surface using the four adjustables legs.
3. Adjust the bunk to the hull of the boat and tighten all nuts and bolts.
4. Drive boat onto the lift and re-adjust the bunk if necessary. You must have a minimum of 1 inch (254 mm) between the hull of the boat and the structure of
the lift.
5. Whenever the boat is on the lift, it must be on far enough so that no more than 12 to 18 inches (305 - 457 mm) of the back of the boat is over the rear of
the lift.
6. Install and adjust all the accessories if applicable.
Safety Precautions ;
1. Be sure all people using this hoist understand the proper operating procedure.
2. Do not operate this hoist with people on board.
3. Keep people clear while raising or lowering the hoist.
4. Do not exceed maximum hoist capacity, this may cause serious personal injury and / or equipment failure.
5. A boat filling with water during a rain storm could exceed your hoist capacity, be sure to pull the drain plug on craft.
6. When unattended, the boat must be raised as high as possible in the lift, so that the waves do not catch the hull of the boat.
7. Do not work on craft while raised position and do not allow adult or children to play on, under or near the hoist.
8. Completely lower the platform when servicing any hoist component.
9. Do not reach through the spokes of the wheel for any reason.
10. Never attempt to stop the hoist wheel should it begin to spin down freely. This could cause serious injury. Allow the hoist platform and craft to simply
spin down in the water. Nothing will be damaged.
11. For theft, a locking device should be installed on the wheel when unattended.
12. Do not leave the hoist into the water during winter, damage to the frame may occur due to ice.
13. At the end of the season, remove the canopy cover from the frame. Wipe it down if damp, roll it and store it in a dry place. If cover is left on during winter, damage to the frame may occur due to snow accumulation.
14. Inspect cables for fraying and cable ends to be sure they are securely fastened.
15. Check pulleys to be sure they are turning.
16. Check all bolts and nuts if tighten.
17. Replace or repair the parts if necessary.
Installation - Précautions / Installation Safety precautions
4
lifts manual:Layout 1 04/03/09 12:58 PM Page 5
Garantie (Usage résidentiel seulement)
Garantie / Warranty
Quai de l’Estrie garantie ses élévateurs a bateau et ses quais contre tout défaut de matériau et de fabrication. La durée de la garantie de ses élévateurs a bateau
et de ses quais (exception des treuils mécaniques et des moteurs électriques) est de cinq (5) ans. La période de garantie pour les treuils mécaniques et moteurs
électriques est de 3 ans.
Durant la période de la garantie, Quai de l’Estrie, a sa discrétion, réparera ou remplacera le produit défectueux, sans frais.
Cependant, si Quai de l’Estrie, détermine que les modalités de la garantie n’ont pas été respectées, les frais de réparation et d’expédition seront facturés à l’acheteur.
La présente garantie fait l’objet des exclusions suivantes ;
1. La présente garantie couvre l’utilisation normale du produit, mais exclut tous dommages qui de l’avis de Quai de l’Estrie, sont attribuables aux abus, accident, poids excédent la capacité maximale, mauvais entreposage, mauvais ajustement, négligence, mauvais assemblage, mauvaise utilisation, mauvaise
installation.
2. Tous dommages causés par une réparation ou une tentative de réparation effectuée par un centre de service non autorisée par Quai de l’Estrie, invalideront
la présente garantie.
3. Modifications ou altérations du produit.
4. Cas de force majeure (acte de dieu).
5. Cette garantie ne couvre pas la rouille.
6. Dommage causé par l’eau, l’eau salée ou la glace.
7. L’enlèvement, l’altération ou la dégradation du numéro de série invalideront la garantie.
8. Les frais d’installation et d’enlèvement ne sont pas couverts par la garantie.
Pour obtenir un service en garantie, communiqué avec le détaillant le plus près ou ;
Quai de l’Estrie inc.
770 Lakeside
Foster, Québec Canada J0E 1R0
Sans frais 1-888-539-5331
Tél
1-450-539-4334
Fax
1-450-539-5331
E-mail
[email protected]
Warranty (Residential use only)
Eastern Townships Docks warrants that ETD boat lifts and docks are free from defects in material and workmanship. The warranty period for boat lifts and
docks (excluding brake winch and power unit) is five (5) years from the date of purchase. The warranty period for the brake winch and power unit is three (3)
years from the date of purchase.
During the warranty period ETD will, at it’s option, repair or replace the defective product free of charge. However, if ETD determines that the warranty conditions cannot be applied, the purchaser will be billed for the repair and shipping.
This warranty is subject to the following exceptions ;
1. This warranty covers normal consumer use and does not cover abnormal operating conditions, abuse, accident, excess weight, improper storage, maladjustment, neglect, poor assembling, poor installation.
2. Damage caused by a repair or an attempt to repair by other than a service centre authorized by ETD will void the warranty.
3. Modifications or alterations of the products.
4. And act of god.
5. This warranty does not cover rust.
6. Damage done by water, salt water or ice.
7. Alteration, defacing or removal of the serial number will void the warranty.
8. Removal and reinstallation costs are not covered by this warranty.
In order to obtain warranty performance, contact your nearest service center or ;
Eastern Townships Docks
770 Lakeside
Foster, Quebec, Canada J0E 1R0
Toll free
Phone
Fax
E-mail
1-888-539-5331
1-450-539-4334
1-450-539-5331
[email protected]
5
lifts manual:Layout 1 04/03/09 12:58 PM Page 6
GM 6120
GM 6120
6
ITEM
NO
1
2
3
4
5
6
7
8
9
10
11
12
13
14
15
16
17
18
19
20
21
22
23
24
25
26
27
28
29
30
31
32
33
34
40-0010
40-0011
21-3003
40-0006
40-0012
40-0013
20-3026
58-0002
40-2001
40-3001
21-3011
30-1002
58-0004
30-2003
21-3013
31-1007
31-1001
31-1003
31-0209
31-0213
31-0215
31-1010
31-1012
33-0003
33-0009
32-0011
32-0003
32-0015
30-1201
21-3014
30-0003
40-4002
21-3017
31-1004
PIÈCES
PARTS
Structure de Côté
Structure Avant & Arrière
Stabilisateur Secondaire
Structure en "H"
Structure du Lit (Avant)
Structure du Lit (Arrière)
Tube
Lit 2" x 6" x 10'
Patte
Roue du Treuil
Poignée de Roue
Treuil "DLB-1200"
Poulie
Cable
Tube 1.25"
Manille
Boulon œil 3/8 x 2.5"
Boulon en "U" 3/8 x 1.5 pipe
Boulon Hexagon 3/8-16 x 2-1/2"
Boulon Hexagon 3/8-16 x 3-1/2"
Boulon Hexagon 3/8-16 x 4"
Boulon à Épaulement 1/2 x 1-3/4"
Tire fond 3/8 x 1-1/4"
Rondelle plate 3/8
Rondelle Frein 3/8
Écrou Hexagon Galvanisé 3/8-16
Écrou Nylon 3/8-16
Écrou Hexagon 1/2-20
Ressort
Loquet de Patte
Goupille
Support
Plaque 3/8 x 2 x 4
Boulon en "U" 3/8 x 2 pipe
Side frame
Front & Back frame
Secondary brace
"H" frame
Bunks frame (Front)
Bunks frame (Back)
Tube
Bunks 2" x 6" x 10'
Leg
Wheel for winch
Spinner knob
Winch "DLB-1200"
Pulley
Cable
Spacer 1.25"
Shackle
Eye bolt 3/8 x 2.5"
"U" bolt 3/8 x 1.5 pipe
Hexagon bolt 3/8-16 x 2-1/2"
Hexagon bolt 3/8-16 x 3-1/2"
Hexagon bolt 3/8-16 x 4"
Shoulder bolt 1/2 x 1-3/4"
Lag bolt 3/8 x 1-1/4"
Flat washer 3/8
Lock washer 3/8
Hexagon nut Galvanize 3/8-16
Lock Nut 3/8-16
Hexagon nut 1/2-20
Spring
Leg pin
Hitch pin
Support
Plaque 3/8 x 2 x 4
"U" bolt 3/8 x 2 pipe
QTÉ.
2
2
2
2
1
1
2
2
4
1
1
1
2
1
2
2
2
1
18
12
4
1
8
10
2
2
45
1
1
4
4
4
4
4
7
9
30
31
LAC BROME (QUÉBEC)
DE L'ESTRIE
LES QUAIS
1
21
27
11
22
29
28
GM 6120
2
27
24
10
12
24
21
27
3
19
2
1
200812 / 60-0011
19
27
1/2
This drawing cannot be reproduce without our authorization
Ce dessin ne peut être reproduit sans notre autorisation
lifts manual:Layout 1 04/03/09 12:58 PM Page 7
LES QUAIS
26
24
DETAIL A
25
LAC BROME (QUÉBEC)
6
15
17
16
27
33
34
32
13
GM 6120
4
27
5
19
8
23
4
7
27
A
20
14
18
27
200812 / 60-0011
24
2/2
Ce dessin ne peut être reproduit sans notre autorisation
This drawing cannot be reproduce without our authorization
8
DE L'ESTRIE
lifts manual:Layout 1 04/03/09 12:58 PM Page 8
lifts manual:Layout 1 04/03/09 12:58 PM Page 9
GM 6120
(02 / 2009)
Français
Assemblage ;
* L’assemblage doit se faire de préférence sur un terrain plat.
* Évitez de serrer les boulons et les écrous avant de terminer l’assemblage.
* Afin de faciliter la recherche des pièces lors de l’assemblage, faites l’inventaire des boulons, des rondelles, des écrous, etc.
* Lire le guide de Précautions avant l’utilisation de l’élévateur.
Page 1 / 2
1. Insérez les pattes réglables (# 9) dans les structures de coté (# 1).
2. Insérez les verrous de patte (# 30 et # 31).
3. Installez la structure avant et arrière (# 2) et insérez ensuite les boulons et les écrous.
4. Installez les stabilisateurs secondaires (# 3) et insérez ensuite les boulons et les écrous.
5. Serrez maintenant les boulons et les écrous.
6. Installation du treuil (# 12), de la roue (# 10) et de la poignée pour roue (# 11).
Page 2 / 2
1. Installez la structure en H (# 4) à la base avant et arrière (# 2) et insérez ensuite les boulons et les écrous.
2. Positionnez la structure du lit avant et arrière (# 5 et # 6) à la structure en H (# 4) et insérer ensuite les boulons et les écrous.
3. Installez la structure de coté du lit (# 7) à la structure du lit avant et arrière (# 5 et # 6) et insérez ensuite les boulons et les écrous.
4. Serrez maintenant les boulons et les écrous (serrez mais ne pas écraser le profilé en U).
5. Installez les poulies (# 13) à la structure du lit avant (# 5).
6. Installez le câble du treuil (# 14) : attachez l’extrémité du câble au boulon en U (# 18), insérez le câble dans les poulies et attachez-le au treuil.
7. Soulevez le lit en tournant la roue dans le sens des aiguilles d’une montre.
8. Installez les tubes (# 32) des guides centralisateurs à la structure avant et arrière du lit et insérez ensuite les boulons en U (# 34), plaque (# 33) et les
écrous.
9. Installez les deux guides centralisateurs (# 8) aux tubes des guides (# 32).
10. Ajustez les guides en fonction de la largeur de votre catamaran. Il est conseiller de laisser environ 1 pouces (25.4 mm) de chaque coté des flotteurs.
English
Assembly;
* Assembly must be done preferably on flat ground.
* Do not tighten the nuts and bolts before assembly is complete.
* To facilitate the search for parts at the time of assembly, make an inventory of the bolts, washers, nuts, etc.
* Read the Safety Precaution guidelines before using the hoist.
Page 1 / 2
1. Insert the adjustable legs (#9) in the side structures (#1).
2. Insert the leg locks (#30 and #31).
3. Install the forward and rear structure (#2) and then insert the bolts and the nylon nuts.
4. Install the secondary stabilizers (#3) and then insert the bolts and the nylon nuts.
5. Now tighten the bolts and the nylon nuts.
6. Installation of the winch (#12), wheel (#10) and wheel handle (#11).
Page 2 / 2
1. Install the structure in H (#4) at the forward and rear base (#2) and then insert the bolts and the nylon nuts.
2. Place the forward and rear bunk structure (#5 and #6) on the structure in H (#4) and insert the bolts and nylon nuts.
3. Install the structure on the side of the bunk (#7) on the forward and rear bunk structure (#5 and #6) and insert the bolts and nylon nuts.
4. Now tighten the bolts and nylon nuts (tighten but do not crush the profile in U).
5. Install the pulleys (#13) on the front bunk structure (#5).
6. Install the winch cable (#14): attach the end of the cable to the bolt in U (#18), insert the cable in the pulleys and attach it to the winch.
7. Raise the bunk, turning the wheel clockwise.
8. Install the tubes (#32) of the central guides on the forward and rear structure of the bunk and then insert the bolts in U (#34), plate (#33) and the
nylon nuts.
9. Install the two central guides (#8) on the tubes of the guides (#32).
10. Adjust the guides according to the width of your catamaran. It is recommended to leave about one inch (25.4 mm) on each side of the floats.
9
lifts manual:Layout 1 04/03/09 12:58 PM Page 10
GM 984
GM 984
10
ITEM
NO
1
2
3
4
5
6
7
8
9
10
11
12
13
14
15
16
17
18
19
20
21
22
23
24
25
26
27
28
29
30
31
32
40-0044
40-0045
40-0003
21-3003
40-0004
40-0007
58-0001
40-2001
40-3001
21-3011
30-1002
58-0004
30-2037
21-3013
31-1007
31-1001
31-1002
31-0209
31-0211
31-0213
31-0215
31-0302
31-1010
31-1012
33-0003
33-0009
32-0011
32-0003
32-0015
30-1201
21-3014
30-0003
PIÈCES
PARTS
Structure de Côté gauche
Structure de Côté droit
Structure Avant & Arrière
Stabilisateur Secondaire
Structure en "H"
Structure du Lit
Lit 2" x 6" x 8'
Patte
Roue du Treuil
Poignée de Roue
Treuil "DLB-1200"
Poulie
Cable
Tube 1.25"
Manille
Boulon œil 3/8 x 2.5"
Boulon œil 3/8 x 4.5"
Boulon Hexagon 3/8-16 x 2-1/2"
Boulon Hexagon 3/8-16 x 3"
Boulon Hexagon 3/8-16 x 3-1/2"
Boulon Hexagon 3/8-16 x 4"
Boulon Hexagon 1/2-13 x 3/4"
Boulon à Épaulement 1/2 x 1-3/4"
Tire fond 3/8 x 1-1/4"
Rondelle plate 3/8
Rondelle Frein 3/8
Écrou Hexagon Galvanisé 3/8-16
Écrou Nylon 3/8-16
Écrou Hexagon 1/2-20
Ressort
Loquet de Patte
Goupille
Left side frame
Right side frame
Front & Back frame
Secondary brace
"H" frame
Bunks frame
Bunks 2" x 6" x 8'
Leg
Wheel for winch
Spinner knob
Winch "DLB-1200"
Pulley
Cable
Spacer 1.25"
Shackle
Eye bolt 3/8 x 2.5"
Eye bolt 3/8 x 4.5"
Hexagon bolt 3/8-16 x 2-1/2"
Hexagon bolt 3/8-16 x 3"
Hexagon bolt 3/8-16 x 3-1/2"
Hexagon bolt 3/8-16 x 4"
Hexagon bolt 1/2-13 x 3/4"
Shoulder bolt 1/2 x 1-3/4"
Lag bolt 3/8 x 1-1/4"
Flat washer 3/8
Lock washer 3/8
Hexagon nut Galvanize 3/8-16
Lock Nut 3/8-16
Hexagon lock 1/2-20
Spring
Leg pin
Hitch pin
QTÉ.
1
1
2
2
2
1
2
4
1
1
1
3
1
2
2
2
1
8
2
8
4
4
1
8
8
2
2
25
1
1
4
4
11
LAC BROME (QUÉBEC)
DE L'ESTRIE
LES QUAIS
8
31
32
2
GM 984
21
9
28
10
23
30
29
28
25
3
11
21
25
28
4
19
1
200812 / 60-0016
18
28
1/2
This drawing cannot be reproduced without our authorization
Ce dessin ne peut être reproduit sans notre autorisation
lifts manual:Layout 1 04/03/09 12:58 PM Page 11
27
LES QUAIS
26
22
12
DETAIL B
15
DETAIL A
14
16
LAC BROME (QUÉBEC)
24
5
GM 984
6
A
20
28
B
12
17
7
13
25
28
5
200812 / 60-0016
28
20
25
28
2/2
Ce dessin ne peut être reproduit sans notre autorisation
This drawing cannot be reproduced without our authorization
12
DE L'ESTRIE
lifts manual:Layout 1 04/03/09 12:58 PM Page 12
lifts manual:Layout 1 04/03/09 12:58 PM Page 13
GM 984
(02 / 2009)
Français
Assemblage ;
* L’assemblage doit se faire de préférence sur un terrain plat.
* Évitez de serrer les boulons et les écrous avant de terminer l’assemblage.
* Afin de faciliter la recherche des pièces lors de l’assemblage, faites l’inventaire des boulons, des rondelles, des écrous, etc.
* Lire le guide de Précautions avant l’utilisation de l’élévateur.
Page 1 / 2
1. Insérez les pattes réglables (# 8) dans les structures de coté (# 1 et # 2).
2. Insérez les verrous de patte (# 31 et # 32).
3. Installez la structure avant et arrière (# 3) et insérez ensuite les boulons et les écrous.
4. Installez les stabilisateurs secondaires (# 4) et insérez ensuite les boulons et les écrous.
5. Serrez maintenant les boulons et les écrous.
6. Installation du treuil (# 11), de la roue (# 9) et de la poignée pour roue (# 10).
Page 2 / 2
1. Installez la structure en H (# 5) à la base avant et arrière (# 3) et insérez ensuite les boulons et les écrous.
2. Positionnez la structure du lit (# 6) à la structure en H (# 5) et insérez ensuite les boulons et les écrous.
3. Serrez maintenant les boulons et les écrous (serrez mais ne pas écraser le profilé en U).
4. Installez les poulies (# 12) à la structure du lit (# 6) et le guide poulie a la structure de coté droite (#2).
5. Installez le câble du treuil (# 13) : attachez l’extrémité du câble avec boulon a œil a la structure de coté gauche (#1), insérez le câble dans les
poulies et attachez-le au treuil.
6. Soulevez le lit en tournant la roue dans le sens des aiguilles d’une montre.
7. Installez les deux lits centraux (# 7) à la structure du lit principal (# 6).
English
Assembly;
* Assembly must be done preferably on flat ground.
* Do not tighten the nuts and bolts before assembly is complete.
* To facilitate the search for parts at the time of assembly, make an inventory of the bolts, washers, nuts, etc.
* Read the Safety Precaution guidelines before using the hoist.
Page 1 / 2
1. Insert the adjustable legs (#8) in the structures to the side (#1 and #2).
2. Insert the leg locks (#31 and #32).
3. Install the forward and rear structure (#3) and then insert the bolts and the nylon nuts.
4. Install the secondary stabilizers (#4) and then insert the bolts and the nylon nuts.
5. Now tighten the bolts and the nylon nuts.
6. Installation of the winch (#11), wheel (#9) and handle for the wheel (#10).
Page 2 / 2
1. Install the structure in H (#5) at the forward and rear base (#3) and then insert the bolts and the nylon nuts.
2. Place the bunk structure (#6) on the structure in H (#5) and then insert the bolts and nylon nuts.
3. Now tighten the bolts and nylon nuts (tighten but do not crush the profile in U).
4. Install the pulleys (#12) on the bunk frame (#6) and the guide pulley to the right side frame (#2).
5. Install the winch cable (#13): attach the end of the cable with the eye bolt to the left side frame (#1), insert the cable in the pulleys and attach it to
the winch.
6. Raise the bunk, turning the wheel clockwise.
7. Install the two central bunks (#7) on the main bunk structure (#6).
13
lifts manual:Layout 1 04/03/09 12:58 PM Page 14
GM 1260
GM 1260
14
ITEM
NO
1
2
3
4
5
6
7
8
9
10
11
12
13
14
15
16
17
18
19
20
21
22
23
24
25
26
27
28
29
30
31
32
40-0044
40-0045
40-0009
21-3003
40-0005
40-0008
58-0001
40-2001
40-3001
21-3011
30-1002
58-0004
30-2036
21-3013
31-1007
31-1001
31-1002
31-0209
31-0211
31-0213
31-0215
31-0302
31-1010
31-1012
33-0003
33-0009
32-0011
32-0003
32-0015
30-1201
21-3014
30-0003
PIÈCES
PARTS
Structure de Côté gauche
Structure de Côté droit
Structure Avant & Arrière
Stabilisateur Secondaire
Structure en "H"
Structure du Lit
Lit 2" x 6" x 8'
Patte
Roue du Treuil
Poignée de Roue
Treuil "DLB-1200"
Poulie
Cable
Tube 1.25"
Manille
Boulon œil 3/8 x 2.5"
Boulon œil 3/8 x 4.5"
Boulon Hexagon 3/8-16 x 2-1/2"
Boulon Hexagon 3/8-16 x 3"
Boulon Hexagon 3/8-16 x 3-1/2"
Boulon Hexagon 3/8-16 x 4"
Boulon Hexagon 1/2-13 x 3/4"
Boulon à Épaulement 1/2 x 1-3/4"
Tire fond 3/8 x 1-1/4"
Rondelle plate 3/8
Rondelle Frein 3/8
Écrou Hexagon Galvanisé 3/8-16
Écrou Nylon 3/8-16
Écrou Hexagon 1/2-20
Ressort
Loquet de Patte
Goupille
Left side frame
Right side frame
Front & Back frame
Secondary brace
"H" frame
Bunks frame
Bunks 2" x 6" x 8'
Leg
Wheel for winch
Spinner knob
Winch "DLB-1200"
Pulley
Cable
Spacer 1.25"
Shackle
Eye bolt 3/8 x 2.5"
Eye bolt 3/8 x 4.5"
Hexagon bolt 3/8-16 x 2-1/2"
Hexagon bolt 3/8-16 x 3"
Hexagon bolt 3/8-16 x 3-1/2"
Hexagon bolt 3/8-16 x 4"
Hexagon bolt 1/2-13 x 3/4"
Shoulder bolt 1/2 x 1-3/4"
Lag bolt 3/8 x 1-1/4"
Flat washer 3/8
Lock washer 3/8
Hexagon nut Galvanize 3/8-16
Lock Nut 3/8-16
Hexagon lock 1/2-20
Spring
Leg pin
Hitch pin
QTÉ.
1
1
2
2
2
1
2
4
1
1
1
3
1
2
2
2
1
8
2
8
4
4
1
8
8
2
2
25
1
1
4
4
15
LAC BROME (QUÉBEC)
DE L'ESTRIE
LES QUAIS
8
31
32
GM 1260
2
21
9
28
10
23
30
29
28
3
25
11
28
25
21
4
19
1
200812 / 60-0017
18
28
1/2
This drawing cannot be reproduced without our authorization
Ce dessin ne peut être reproduit sans notre autorisation
lifts manual:Layout 1 04/03/09 12:58 PM Page 15
LES QUAIS
27
22
DETAIL A
26
14
16
LAC BROME (QUÉBEC)
24
DETAIL B
15
12
6
GM 1260
20
28
A
5
12
17
B
7
13
28
25
5
28
200812 / 60-0017
20
25
28
2/2
Ce dessin ne peut être reproduit sans notre autorisation
This drawing cannot be reproduced without our authorization
16
DE L'ESTRIE
lifts manual:Layout 1 04/03/09 12:58 PM Page 16
lifts manual:Layout 1 04/03/09 12:58 PM Page 17
GM 1260
(02 / 2009)
Français
Assemblage ;
* L’assemblage doit se faire de préférence sur un terrain plat.
* Évitez de serrer les boulons et les écrous avant de terminer l’assemblage.
* Afin de faciliter la recherche des pièces lors de l’assemblage, faites l’inventaire des boulons, des rondelles, des écrous, etc.
* Veuillez lire le guide de Précautions avant l’utilisation de l’élévateur.
Page 1 / 2
1. Insérez les pattes réglables (# 8) dans les structures de coté (# 1 et # 2).
2. Insérez les verrous de patte (# 31 et # 32).
3. Installez la structure avant et arrière (# 3) et insérez ensuite les boulons et les écrous.
4. Installez les stabilisateurs secondaires (# 4) et insérez ensuite les boulons et les écrous.
5. Serrez maintenant les boulons et les écrous.
6. Installation du treuil (# 11), de la roue (# 9) et de la poignée pour roue (# 10).
Page 2 / 2
1. Installez la structure en H (# 5) à la base avant et arrière (# 3) et insérez ensuite les boulons et les écrous.
2. Positionnez la structure du lit (# 6) à la structure en H (# 5) et insérez ensuite les boulons et les écrous.
3. Serrez maintenant les boulons et les écrous (serrez mais ne pas écraser le profilé en U).
4. Installez les poulies (# 12) à la structure du lit (# 6) et le guide poulie a la structure de coté droite (#2).
5. Installez le câble du treuil (# 13) : attachez l’extrémité du câble au boulon en U (# 17), insérez le câble dans les poulies et attachez-le au treuil.
6. Soulevez le lit en tournant la roue dans le sens des aiguilles d’une montre.
7. Installez les deux lits centraux (# 7) à la structure du lit principal (# 6).
English
Assembly;
* Assembly must be done preferably on flat ground.
* Do not tighten the nuts and bolts before assembly is complete.
* To facilitate the search for parts at the time of assembly, make an inventory of the bolts, washers, nuts, etc.
* Read the Safety Precaution guidelines before using the hoist.
Page 1 / 2
1. Insert the adjustable legs (#8) in the structures to the side (#1 and #2).
2. Insert the leg locks (#31 and #32).
3. Install the forward and rear structure (#3) and then insert the bolts and the nylon nuts.
4. Install the secondary stabilizers (#4) and then insert the bolts and the nylon nuts.
5. Now tighten the bolts and the nylon nuts.
6. Installation of the winch (#11), wheel (#9) and handle for the wheel (#10).
Page 2 / 2
1. Install the structure in H (#5) at the forward and rear base (#3) and then insert the bolts and the nylon nuts.
2. Place the bunk structure (#6) on the structure in H (#5) and then insert the bolts and nylon nuts.
3. Now tighten the bolts and nylon nuts (tighten but do not crush the profile in U).
4. Install the pulleys (#12) on the bunk frame (#6) and the guide pulley to the right side frame (#2).
5. Install the winch cable (#13): attach the end of the cable with the eye bolt to the left side frame (#1), insert the cable in the pulleys and attach it to
the winch.
6. Raise the bunk, turning the wheel clockwise.
7. Install the two central bunks (#7) on the main bunk structure (#6).
17
lifts manual:Layout 1 04/03/09 12:58 PM Page 18
GM 1263
GM 1263V
18
ITEM
NO
1
2
3
5
6
7
8
9
10
11
12
13
14
15
16
17
18
19
20
21
22
23
24
25
26
27
28
29
30
40-0049
40-0050
40-0048
40-2001
40-3001
21-3011
30-1006
31-0203
31-0209
31-0215
31-1010
33-0003
32-0003
30-1201
32-0015
21-3014
30-0003
50-0029
58-0004
58-0001
31-1012
33-0004
33-0010
32-0012
31-0302
33-0009
32-0011
31-0207
30-2021
PIÈCES
PARTS
Structure de Côté gauche
Structure de Côté droit
Structure Avant & Arrière
Patte
Roue du Treuil
Poignée de Roue
Treuil "DLB-2500"
Boulon Hexagon 3/8-16 x 1"
Boulon Hexagon 3/8-16 x 2-1/2"
Boulon Hexagon 3/8-16 x 4"
Boulon à Épaulement 1/2 x 1-3/4"
Rondelle Plate 3/8
Écrou Nylon 3/8-16
Ressort
Écrou Hexagon 1/2-20
Loquet de Patte
Goupille
Structure de Lit Ass.
Poulie
Lit 2" x 6" x 8'
Tire fond 3/8 x 1-1/4"
Rondelle Plate 1/2
Rondelle Frein 1/2
Écrou Hexagon Galvanisé 1/2-13
Boulon Hexagon 1/2-13 x 3/4"
Rondelle Frein 3/8
Écrou Hexagon Galvanisé 3/8-16
Boulon Hexagon 3/8-16 x 2"
Câble du Treuil
Left side frame
Right side frame
Front & Back frame
Leg
Wheel for winch
Spinner knob
Winch "DLB-2500"
Hexagon bolt 3/8-16 x 1"
Hexagon bolt 3/8-16 x 2-1/2"
Hexagon bolt 3/8-16 x 4"
Shoulder bolt 1/2 x 1-3/4"
Flat washer 3/8
Lock Nut 3/8-16
Spring
Hexagon lock 1/2-20
Leg pin
Hitch pin
Bed frame ass'y
Pulley
Bunks 2" x 6" x 8'
Lag bolt 3/8 x 1-1/4"
Flat washer 1/2
Lock washer 1/2
Hexagon nut Galvanize 1/2-13
Hexagon bolt 1/2-13 x 3/4"
Lock washer 3/8
Hexagon nut Galvanize 3/8-16
Hexagon bolt 3/8-16 x 2"
Winch Cable
QTÉ.
1
1
2
4
1
1
1
8
8
2
1
7
21
1
1
4
4
1
1
2
8
1
1
1
4
3
3
2
1
19
LAC BROME (QUÉBEC)
DE L'ESTRIE
LES QUAIS
3
GM 1263
2
14
11
12
7
14
13
8
14
9
10
1
6
15
16
3
200901 / 60-0015
5
17
18
1/2
This drawing cannot be reproduce without our authorization
Ce dessin ne peut être reproduit sans notre autorisation
lifts manual:Layout 1 04/03/09 12:58 PM Page 19
20
LAC BROME (QUÉBEC)
LES QUAIS
DE L'ESTRIE
B
GM 1263
A
13
27
28
B
14
25
24
23
29
C
D
A
20
21
19
30
200901 / 60-0015
C
2/2
22
26
This drawing cannot be reproduce without our authorization
Ce dessin ne peut être reproduit sans notre autorisation
lifts manual:Layout 1 04/03/09 12:58 PM Page 20
lifts manual:Layout 1 04/03/09 12:58 PM Page 21
GM 1263-V
(02 / 2009)
Français
Assemblage ;
* L’assemblage doit se faire de préférence sur un terrain plat.
* Évitez de serrer les boulons et les écrous avant de terminer l’assemblage.
* Afin de faciliter la recherche des pièces lors de l’assemblage, faites l’inventaire des boulons, des rondelles ressort, des écrous, etc.
* Veuillez lire le guide de Précautions avant l’utilisation de l’élévateur.
Etape 1/2
1. Insérez les pattes réglables (# 5) dans les structures de coté (# 1 et # 2).
2. Insérez les verrous de patte (# 17 et # 18).
3. Installez la structure avant et arrière (# 3) et insérer ensuite les boulons, les rondelles ressort et les écrous.
4. Serrez maintenant les boulons et les écrous.
5. Installation du treuil (# 8), de la roue (# 6) et de la poignée pour roue (# 7).
Etape 2/2
1. Positionnez la structure du lit (# 19) entre les structures de côté.
2. Attachez le câble avant (B) et les deux câbles de côté (A et C) dans la partie inférieure de la structure.
3. Attachez ensuite la partie opposée des câbles (boulon a oeil) dans la partie supérieure de la structure.
4. Installez la poulie (# 20) à la structure du lit.
5. Installez le câble du treuil (# 30 ou D) : insérez le câble dans la poulie et attachez-le au treuil.
6. Soulevez le lit (hauteur d’environ 24 po.) en tournant la roue dans le sens des aiguilles d’une montre.
7. Ajustement du lit ;
- le câble du treuil (# D) n’a besoin d’aucun ajustement.
- le câble (# B) sert de balancier lorsque vous stationner l’embarcation dans l’élévateur. Il suffit de mettre une légère tension sur le câble en serrant le
boulon à oeil. Il ne sert a rien de mettre trop de tension, cela risque d’endommager les poulies.
- les câbles de côté (# A et # C) sert a mettre le lit au niveau. Prendre la mesure aux quatre coins et vous ne devez pas avoir une différence de au plus
1/2” (13 mm) entre le coin le plus haut et le plus bas. L’ajustement se fait en vissant ou dévissant le boulon a oeil.
8. Installez les deux lits centraux à la structure du lit principale . Ajustez le lit central à la coque de votre embarcation. Vous devez avoir tout au plus
un pouce (25.4 mm) entre la coque du bateau et la structure du lit.
English
Assembly;
* Assembly must be done preferably on flat ground.
* Do not tighten the nuts and bolts before assembly is complete.
* Do not tighten the cables (end with eyebolt) before assembly is complete to make the adjustment of the bunk easy.
* To facilitate the search for parts at the time of assembly, make an inventory of the bolts, washers, nuts, etc.
* Read the Safety Precaution guidelines before using the hoist.
Stage 1/2
1. Insert adjustable legs (#5) into side structures (#1 and #2).
2. Insert leg locks (#17 and #18).
3. Install front and rear structures (#3) and insert bolts, spring lock washers and nuts.
4. Tighten all bolts and nuts.
5. Install the winch (#8), wheel (#6) and spinner knob (#7).
Stage 2/2
1. Position bed structure (#19) between side structures.
2. Attach front cable (B) and side cables (A & C) to the lower part of the structure.
3. Attach opposite end of cables (eye bolt) to the upper part of the structure.
4. Install pulley (#20) to the frame structure.
5. Install winch cable (#30 or D) : insert the cable into the pulley and fasten to winch.
6. Raise frame (approx. height 24 in.) by turning the wheel clockwise.
7. Adjustment of the bed :
- winch cable (#D) does not need to be adjusted.
- cable (#B) is used for balancing when you park the boat on the hoist. It is enough to leave a slight tension on the cable by tightening the eyebolts. Do
not leave too much tension since you would risk damaging the pulleys.
- side cable (#A and #C) is used to a make the bunk level. Measure the four corners. You must not have a difference of more 1/2” (13 mm) between
the topmost and the lowest corner. Adjustment is done by tightening or loosening the eyebolt.
8. Install the two central bunks to the main bunk structure. Adjust the central bunk to the hull of your boat. You must have an inch (25.4 mm) at the
most between the hull of the boat and the bunk structure.
21
lifts manual:Layout 1 04/03/09 12:58 PM Page 22
GM 1596
GM 1596
ITEM
NO
1
2
3
4
5
6
7
8
9
10
11
12
13
14
15
16
17
18
40-0029
40-0030
40-0031
21-3023
40-2001
40-3004
21-3011
30-1006
31-0203
31-0209
31-0215
31-1010
33-0003
32-0003
30-1201
32-0015
21-3014
30-0003
PIÈCES
PARTS
Structure de Côté gauche
Structure de Côté droit
Structure Avant & Arrière
Stabilisateur Secondaire
Patte
Roue du Treuil
Poignée de Roue
Treuil "DLB-2500"
Boulon Hexagon 3/8-16 x 1"
Boulon Hexagon 3/8-16 x 2-1/2"
Boulon Hexagon 3/8-16 x 4"
Boulon à Épaulement 1/2 x 1-3/4"
Rondelle Plate 3/8
Écrou Nylon 3/8-16
Ressort
Écrou Hexagon 1/2-20
Loquet de Patte
Goupille
Left side frame
Right side frame
Front & Back frame
Secondary brace
Leg
Wheel for winch
Spinner knob
Winch "DLB-2500"
Hexagon bolt 3/8-16 x 1"
Hexagon bolt 3/8-16 x 2-1/2"
Hexagon bolt 3/8-16 x 4"
Shoulder bolt 1/2 x 1-3/4"
Flat washer 3/8
Lock Nut 3/8-16
Spring
Hexagon lock 1/2-20
Leg pin
Hitch pin
QTÉ.
1
1
2
2
4
1
1
1
10
10
2
1
2
23
1
1
4
4
STRUCTURE DU LIT / BED FRAME
50
51
52
53
54
55
56
57
58
59
60
61
22
50-0011
50-0012
50-0013
58-0004
31-0209
31-0313
32-0003
32-0004
33-0004
33-0010
32-0012
30-2021
Structure Arrière Ass.
Structure Avant Ass.
Structure de Côté Ass.
Guide de Cable Ass.
Boulon Hexagon 3/8-16 x 2-1/2"
Boulon Hexagon 1/2-13 x 3-1/2"
Écrou Nylon 3/8-16
Écrou Nylon 1/2-13
Rondelle Plate 1/2
Rondelle Frein 1/2
Écrou Hexagon Galvanisé 1/2-13
Cable du Treuil
Rear frame ass'y
Front frame ass'y
Side frame ass'y
Guide Cable Ass'y
Hexagon bolt 3/8-16 x 2-1/2"
Hexagon bolt 1/2-13 x 3-1/2"
Lock Nut 3/8-16
Lock Nut 1/2-13
Flat washer 1/2
Lock washer 1/2
Hexagon nut Galvanize 1/2-13
Winch Cable
1
1
2
1
2
8
2
8
4
4
7
1
23
10
4
9
LAC BROME (QUÉBEC)
DE L'ESTRIE
LES QUAIS
2
GM 1596
3
14
11
13
14
8
14
3
14
9
6
10
15
16
1
7
12
200901 / 60-0004
5
17
18
1/2
This drawing cannot be reproduce without our authorization
Ce dessin ne peut être reproduit sans notre autorisation
lifts manual:Layout 1 04/03/09 12:58 PM Page 23
24
58
B
C
60
LAC BROME (QUÉBEC)
DE L'ESTRIE
LES QUAIS
59
60
GM 1596
50
52
B
56
60
59
58
C
54
D
A
53
51
61
200901 / 60-0004
A
2/2
55
57
This drawing cannot be reproduce without our authorization
Ce dessin ne peut être reproduit sans notre autorisation
lifts manual:Layout 1 04/03/09 12:58 PM Page 24
lifts manual:Layout 1 04/03/09 12:58 PM Page 25
GM 1596
(02 / 2009)
Français
Assemblage ;
* L’assemblage doit se faire de préférence sur un terrain plat.
* Évitez de serrer les boulons et les écrous avant de terminer l’assemblage.
* Évitez de serrer les câbles (extrémité avec boulon a oeil) avant de terminer l’assemblage pour faciliter l’ajustement du lit.
* Afin de faciliter la recherche des pièces lors de l’assemblage, faites l’inventaire des boulons, des rondelles, des écrous, etc.
* Veuillez lire le guide de Précautions avant l’utilisation de l’élévateur.
Etape 1/2
1. Insérez les pattes réglables (# 5) dans la structure de côté gauche (# 1) et dans la structure de coté droite (# 2).
2. Insérez les verrous de patte (# 17 et # 18).
3. Installez la structure avant et arrière (# 3) et insérez ensuite les boulons et les écrous.
4. Installez les stabilisateurs secondaires (# 4) et insérez ensuite les boulons et les écrous.
5. Serrez maintenant les boulons et les écrous pour les étapes 1 - 2 - 3 et 4.
6. Installation du treuil (# 8), de la roue (# 6) et de la poignée pour roue (# 7).
Etape 2/2
1. Installez la structure arrière (# 50) et la structure avant (# 51) aux structures de coté (# 52) et insérez ensuite les boulons et les écrous.
2. Serrez maintenant les boulons et les écrous.
3. Installez le guide de câble (# 53) a la structure arrière du lit (# 50).
4. Installez le câble du treuil (# D) : attachez l’extrémité du câble (boulon a oeil) à la structure de coté gauche (# 1) , insérez ensuite le câble dans le guide de câble et
attachez-le au treuil.
5. Installez le câble (# B) : attachez le bout avec la cosse à la base de la structure de coté gauche ( # 1), attachez ensuite l’extrémité du câble (boulon a oeil) a la structure
de coté droit (# 2).
6. Installez les câbles de coté (# A et # C) : attachez le bout avec la cosse à la base des structures de coté gauche et droite ( # 1 et # 2), attachez ensuite l’extrémité du
câble (boulon a oeil) a l’extrémité supérieur des structures de coté gauche et droit.
7. Soulevez le lit en tournant la roue dans le sens des aiguilles d’une montre.
8. Ajustement du lit :
- le câble du treuil (# D) n’a besoin d’aucun ajustement, serrez le boulon à oeil et installez la rondelle ressort et l’écrou.
- les câbles de côté (# A et # C) sert a mettre le lit au niveau. Prendre la mesure aux quatre coins et vous ne devez pas avoir une différence de au plus 1/2” (13 mm) entre
le coin le plus haut et le plus bas. L’ajustement se fait en vissant ou dévissant le boulon a oeil.
- le câble (# B) sert de balancier lorsque vous stationner l’embarcation dans l’élévateur. Il suffit de mettre une légère tension sur le câble en serrant le boulon à oeil. Il ne
sert a rien de mettre trop de tension, cela risque d’endommager les poulies.
9. Installez les deux lits centraux à la structure du lit principale . Ajustez le lit central à la coque de votre embarcation. Vous devez avoir tout au plus un pouce (25.4 mm)
entre la coque du bateau et la structure du lit.
English
Assembly;
* Assembly must be done preferably on flat ground.
* Do not tighten the nuts and bolts before assembly is complete.
* Do not tighten the cables (end with eyebolt) before assembly is complete to make the adjustment of the bunk easy.
* To facilitate the search for parts at the time of assembly, make an inventory of the bolts, washers, nuts, etc.
* Read the Safety Precaution guidelines before using the hoist.
Stage 1/2
1. Insert the adjustable legs (#5) in the left side frame (#1), and the right side frame (#2).
2. Insert the leg locks (#17 and #18).
3. Install the forward and rear structure (#3) and then insert the bolts and the nylon nuts.
4. Install the secondary stabilizers (#4) and then insert the bolts and nylon nuts.
5. Now tighten the bolts and nylon nuts for stages 1, 2, 3 and 4
6. Installation of the winch (#8), wheel (#6) and wheel handle (#7).
Stage 2/2
1. Install the rear structure (#50) and forward structure (#51) on the side structures (#52) and insert the bolts and nylon nuts.
2. Now tighten the bolts and the nylon nuts.
3. Install the cable guide (#53) on the rear frame (#50).
4. Install the winch cable (#D): attach the end of the cable (eyebolt) to the left side frame (#1),then insert the cable in the cable guide and attach it to the winch.
5. Install the cables (#B): attach the end with the terminal to the base of the left side frame (#1), then attach the end of the cable (eyebolt) to the top right side frame (#2).
6. Install the side cables (#A and #C): attach the end with the terminal to the base of the left and right side frame ( #1 and #2), then attach the end of the cable (eyebolt)
to the top left and right side frame.
7. Raise the bunk, turning the wheel clockwise.
8. Adjustment of the bed :
- winch cable (#D) does not need to be adjusted, tighten the eyebolt and install the spring washer and the nut.
- side cable (#A and #C) is used to a make the bunk level. Measure the four corners. You must not have a difference of more 1/2” between the topmost and the lowest
corner. Adjustment is done by tightening or loosening the eyebolt.
- cable (#B) is used for balancing when you park the boat on the hoist. It is enough to leave a slight tension on the cable by tightening the eyebolts. Do not leave too
much tension since you would risk damaging the pulleys.
9. Install the two central bunks to the main bunk structure. Adjust the central bunk to the hull of your boat. You must have an inch (25.4 mm) at
the most between the
hull of the boat and the bunk structure.
25
lifts manual:Layout 1 04/03/09 12:58 PM Page 26
GM 1596 Lit centrale /
Bunks
26
lifts manual:Layout 1 04/03/09 12:58 PM Page 27
GM 1596 Guide de
côté / Step Rails
27
lifts manual:Layout 1 04/03/09 12:58 PM Page 28
GM 2096
GM 2096
ITEM
NO
1
2
3
4
5
6
7
8
9
10
11
12
13
14
15
16
17
18
19
20
21
22
23
24
25
26
27
28
40-1004
40-1002
40-1003
40-1001
40-2002
40-0014
20-3028
20-3030
20-3039
20-3041
21-3022
21-3023
30-1004
40-3002
21-3011
31-0104
31-0203
31-0209
31-0211
31-0217
31-1010
33-0002
33-0003
32-0003
30-1203
30-1202
21-3014
30-0003
PIÈCES
PARTS
Poteau du Treuil
Poteau arrière droit
Poteau avant droit
Poteau avant gauche
Patte
Structure Avant & Arrière
Structure de Côté gauche
Structure de Côté droit
Structure de Côté droit (haut)
Stabilisateur Principal
Espaceur
Stabilisateur Secondaire
Treuil "B-3500"
Roue du Treuil
Poignée de Roue
Boulon Hexagon 5/16-18 x 1-1/4"
Boulon Hexagon 3/8-16 x 1"
Boulon Hexagon 3/8-16 x 2-1/2"
Boulon Hexagon 3/8-16 x 3"
Boulon Hexagon 3/8-16 x 4-1/2"
Boulon à Épaulement 1/2 x 1-3/4"
Rondelle Plate 5/16
Rondelle Plate 3/8
Écrou Nylon 3/8-16
Espaceur
Ressort
Loquet de Patte
Goupille
Winch post
Rear right post
Front right post
Left front post
Leg
Front & Back frame
Left side frame (29-0031)
Right side frame (29-0032)
Right frame (up) (29-0022)
Main brace (29-0023)
Spacer
Secondary brace
Winch "B-3500"
Wheel for winch
Spinner knob
Hexagon bolt 5/16-18 x 1-1/4"
Hexagon bolt 3/8-16 x 1"
Hexagon bolt 3/8-16 x 2-1/2"
Hexagon bolt 3/8-16 x 3"
Hexagon bolt 3/8-16 x 4-1/2"
Shoulder bolt 1/2 x 1-3/4"
Flat washer 5/16
Flat washer 3/8
Lock Nut 3/8-16
Spacer
Spring
Leg pin (29-1041)
Hitch pin
QTÉ.
1
1
1
1
4
2
1
1
1
2
4
2
1
1
1
1
10
4
10
10
1
1
2
35
1
1
4
4
STRUCTURE DU LIT / BED FRAME
50
51
52
53
54
55
56
57
58
59
60
61
62
63
28
50-0001
50-0002
50-0014
58-0005
31-0211
31-0313
33-0010
32-0004
32-0003
33-0004
32-0012
33-0009
33-0003
32-0011
Structure Arrière Ass.
Structure Avant Ass.
Structure de Côté Ass.
Guide de Cable Ass. 3/8
Boulon Hexagon 3/8-16 x 3"
Boulon Hexagon 1/2-13 x 3-1/2"
Rondelle Frein 1/2
Écrou Nylon 1/2-13
Écrou Nylon 3/8-16
Rondelle Plate 1/2
Écrou Hexagon Galvanisé 1/2-13
Rondelle Frein 3/8
Rondelle Plate 3/8
Écrou Hexagon Galvanisé 3/8-16
Rear frame ass'y
Front frame ass'y
Side frame ass'y
Guide Cable Ass'y 3/8
Hexagon bolt 3/8-16 x 3"
Hexagon bolt 1/2-13 x 3-1/2"
Lock washer 1/2
Lock Nut 1/2-13
Lock Nut 3/8-16
Flat washer1/2
Hexagon nut Galvanize 1/2-13
Lock washer 3/8
Flat washer 3/8
Hexagon nut Galvanize 3/8-16
1
1
2
1
4
8
5
8
4
5
5
1
1
1
lifts manual:Layout 1 04/03/09 12:58 PM Page 29
LES QUAIS
DE L'ESTRIE
1
GM 2096
3
LAC BROME (QUÉBEC)
2
4
28
Ce dessin ne peut être reproduit sans notre autorisation
1
27
5
2
24
17
200503 / 60-005
This drawing cannot be reproduce without our authorization
6
29
lifts manual:Layout 1 04/03/09 12:58 PM Page 30
LES QUAIS
DE L'ESTRIE
3
GM 2096
LAC BROME (QUÉBEC)
8
4-5/16"
Ce dessin ne peut être reproduit sans notre autorisation
19
4-5/16"
7
24
ÉTIQUETTE AVERTISSEMENT
9
4
- WARNING LABEL -
11
18
24
24
20
20
200503 / 60-0005
30
This drawing cannot be reproduce without our authorization
10
lifts manual:Layout 1 04/03/09 12:58 PM Page 31
LES QUAIS
5
GM 2096
DE L'ESTRIE
LAC BROME (QUÉBEC)
24
15
21
26
13
23
20
25
24
22
Ce dessin ne peut être reproduit sans notre autorisation
16
17
24
12
14
19
6
60
E
D
56
51
59
C
52
C
A
57
B
62
63
E
A
53
D
50
52
B
58
54
200503 / 60-0005
This drawing cannot be reproduced without our authorization
55
61
31
lifts manual:Layout 1 04/03/09 12:58 PM Page 32
GM 2096
(02 / 2009)
Français
Assemblage ;
* L’assemblage doit se faire de préférence sur un terrain plat.
* Évitez de serrer les boulons et les écrous avant de terminer l’assemblage.
* Évitez de serrer les câbles (extrémité avec boulon a oeil) avant de terminer l’assemblage pour faciliter l’ajustement du lit.
* Afin de faciliter la recherche des pièces lors de l’assemblage, faites l’inventaire des boulons, des rondelles, des écrous, etc.
* Veuillez lire le guide de Précautions avant l’utilisation de l’élévateur.
Etape 1
1. Insérez les pattes réglables (# 5) dans le poteau avant gauche (# 4), poteau arrière droit (# 2), poteau avant droit (# 3) et le poteau du treuil (# 1).
2. Insérez les verrous de patte (# 27 et # 28).
Etape 2
1. Installez la structure avant et arrière (# 6) et insérez ensuite les boulons et les écrous.
Etape 3
1. Installez les structures de coté gauche et droit (# 7 et #8) et insérez ensuite les boulons et les écrous. (Portez une attention particulière au positionnement des structures de coté pour ne pas les inverser, la distance des trous aux extrémités est différente).
Etape 4
1. Installez la structure de coté droit haut (# 9) aux poteaux arrière et avant droit (# 2 et # 3) et insérez ensuite les boulons et les écrous.
2. Installez les stabilisateurs principaux (# 10) et les espaceurs (# 11) au poteau avant gauche (# 4) et au poteau du treuil (# 1) et insérez ensuite les
boulons et les écrous.
3. Positionnez le stabilisateur principal avec le collant Attention du coté du poteau du treuil.
Etape 5
1. Installez les stabilisateurs secondaires (# 12) et insérez ensuite les boulons et les écrous.
2. Serrez maintenant les boulons et les écrous pour les étapes 1 - 2 - 3 - 4 et 5.
3. Installation du treuil (# 13), de la roue (# 14) et de la poignée pour roue (# 15).
Etape 6
1. Installez le guide de câble (# 53) au poteau du treuil.
2. Installez la structure arrière (# 50) et la structure avant (# 51) aux structures de coté (# 52) et insérez ensuite les boulons et les écrous.
3. Serrez maintenant les boulons et les écrous.
4. Installez le câble du treuil (# A) : attachez l’extrémité du câble (boulon a oeil) à la structure de coté droit haut (# 9) , insérez ensuite le câble dans le
guide de câble et attachez-le au treuil.
5. Installez les câbles de coté (# B et # E) : attachez le bout avec la cosse à la base des structures de coté gauche et droite ( # 7 et # 8), attachez ensuite
l’extrémité du câble (boulon a oeil) au poteau avant gauche (# 4) pour le câble # B et à la structure de coté droit haut pour le câble # E.
6. Installez les câbles (# D et # C) : attachez le bout avec la cosse à la base des structures de coté gauche et droite ( # 7 et # 8), attachez ensuite l’extrémité du câble (boulon a oeil) au poteau avant gauche (# 4) pour le câble # C et à la structure de coté droit haut pour le câble # D.
7. Soulevez le lit en tournant la roue dans le sens des aiguilles d’une montre.
8. Ajustement du lit :
- le câble du treuil (# A) n’a besoin d’aucun ajustement, serrez le boulon à oeil et installez la rondelle ressort et l’écrou.
- le câble de côté (# E et # B) sert a mettre le lit au niveau. Prendre la mesure aux quatre coins et vous ne devez pas avoir une différence de au plus
1/2” (13 mm) entre le coin le plus haut et le plus bas. L’ajustement se fait en vissant ou dévissant le boulon a oeil.
- le câble (# D et # C) sert de balancier lorsque vous stationner l’embarcation dans l’élévateur. Il suffit de mettre une légère tension sur le câble en serrant les boulons à oeil. Il ne sert a rien de mettre trop de tension, cela risque d’endommager les poulies. Lors du stationnement, il se peut que l’un
des câbles deviennent flasque, ceci est normal.
9. Installez les deux lits centraux à la structure du lit principale . Ajustez le lit central à la coque
de votre embarcation. Vous devez avoir tout au plus un pouce (25.4 mm) entre la coque du bateau et la structure du lit.
32
lifts manual:Layout 1 04/03/09 12:58 PM Page 33
GM 2096
(02 / 2009)
English
Assembly;
* Assembly must be done preferably on flat ground.
* Do not tighten the nuts and bolts before assembly is complete.
* Do not tighten the cables (end with eyebolt) before assembly is complete to make the adjustment of the bunk easy.
* To facilitate the search for parts at the time of assembly, make an inventory of the bolts, washers, nuts, etc.
* Read the Safety Precaution guidelines before using the hoist.
Stage 1
1. Insert the adjustable legs (#5) in the forward left post (#4), rear right post (#2), forward right post (#3) and the winch post (#1).
2. Insert the leg locks (#27 and #28).
Stage 2
1. Install the forward and rear structure (#6) and then insert the bolts and the nylon nuts.
Stage 3
1. Install the left and right structures (#7 and #8) and then insert the bolts and the nylon nuts. (pay particular attention to the position of the side structures to avoid reversing them; the distance of the holes to the ends varies).
Stage 4
1. Install the right frame up (#9) on the rear and forward right posts (#2 and #3) and then insert the bolts and nylon nuts.
2. Install the main stabilizers (#10) and the spacers (#11) on the forward left post (#4) and on the winch post (#1) and then insert the bolts and nylon
nuts.
3. Place the main stabilizer bearing the sticker that says Warning on the side of the winch post.
Stage 5
1. Install the secondary stabilizers (#12) and then insert the bolts and nylon nuts.
2. Now tighten the bolts and nylon nuts for stages 1, 2, 3, 4 and 5
3. Installation of the winch (#13), wheel (#14) and wheel handle (#15).
Stage 6
1. Install the cable guide (#53) on the winch post.
2. Install the rear structure (#50) and forward structure (#51) on the side structures (#52) and insert the bolts and nylon nuts.
3. Now tighten the bolts and the nylon nuts.
4. Install the winch cable (#A): attach the end of the cable (eyebolt) to the top right structure (#9), then insert the cable in the cable guide and attach it
to the winch.
5. Install the side cables (#B and #E): attach the end with the terminal to the base of the left and right structures ( #7 and #8), then attach the end of
the cable (eyebolt) to the forward left post (#4) for cable #B and to the top right structure for cable #E.
6. Install the cables (#D and #C): attach the end with the terminal to the base of the left and right structures (#7 and #8), then attach the end of the
cable (eyebolt) to the forward left post (#4) for cable #C and to the top right structure for cable #D.
7. Raise the bunk, turning the wheel clockwise.
8. Adjustment of the bed :
- winch cable (#A) does not need to be adjusted, tighten the eyebolt and install the spring washer and the nut.
- side cable (#E and #B) is used to a make the bunk level. Measure the four corners. You must not have a difference of more 1/2” between the topmost
and the lowest corner. Adjustment is done by tightening or loosening the eyebolt.
- cable (#D and #C) is used for balancing when you park the boat on the hoist. It is enough to leave a slight tension on the cable by tightening the eyebolts. Do not leave too much tension since you would risk damaging the pulleys. When parking, one of the cables may come loose. This is normal.
9. Install the two central bunks to the main bunk structure. Adjust the central bunk to the hull of your boat. You must have an inch (25.4 mm) at the
most between the hull of the boat and the bunk structure.
33
lifts manual:Layout 1 04/03/09 12:58 PM Page 34
GM 2096 Lit centrale /
Bunks
34
lifts manual:Layout 1 04/03/09 12:58 PM Page 35
GM 2096 Guide de
coté / Step Rails
35
lifts manual:Layout 1 04/03/09 12:58 PM Page 36
GM 35108
GM 35108
ITEM
NO
1
2
3
4
5
6
7
8
9
10
11
12
13
14
15
16
17
18
19
20
21
22
23
24
25
26
27
28
40-1004
40-1002
40-1003
40-1021
40-2002
40-0015
20-3029
20-3031
40-0046
20-3042
21-3022
21-3023
30-1004
40-3002
21-3011
31-0104
31-0203
31-0209
31-0211
31-0217
31-1010
33-0002
33-0003
32-0003
30-1203
30-1202
21-3014
30-0003
PIÈCES
PARTS
Poteau du Treuil
Poteau arrière droit
Poteau avant droit
Poteau avant gauche
Patte
Structure Avant & Arrière
Structure de Côté gauche
Structure de Côté droit
Structure de Côté droit (haut)
Stabilisateur Principal
Espaceur
Stabilisateur Secondaire
Treuil "B-3503"
Roue du Treuil
Poignée de Roue
Boulon Hexagon 5/16-18 x 1-1/4"
Boulon Hexagon 3/8-16 x 1"
Boulon Hexagon 3/8-16 x 2-1/2"
Boulon Hexagon 3/8-16 x 3"
Boulon Hexagon 3/8-16 x 4-1/2"
Boulon à Épaulement 1/2 x 1-3/4"
Rondelle Plate 5/16
Rondelle Plate 3/8
Écrou Nylon 3/8-16
Espaceur
Ressort
Loquet de Patte
Goupille
Winch post
Rear right post
Front right post
Left front post
Leg
Front & Back frame
Left side frame (29-0031)
Right side frame (29-0032)
Right frame (up)
Main brace (29-0023)
Spacer
Secondary brace
Winch "B-3503"
Wheel for winch
Spinner knob
Hexagon bolt 5/16-18 x 1-1/4"
Hexagon bolt 3/8-16 x 1"
Hexagon bolt 3/8-16 x 2-1/2"
Hexagon bolt 3/8-16 x 3"
Hexagon bolt 3/8-16 x 4-1/2"
Shoulder bolt 1/2 x 1-3/4"
Flat washer 5/16
Flat washer 3/8
Lock Nut 3/8-16
Spacer
Spring
Leg pin (29-1041)
Hitch pin
QTÉ.
1
1
1
1
4
2
1
1
1
2
4
4
1
1
1
1
12
4
12
10
1
1
2
39
1
1
4
4
STRUCTURE DU LIT / BED FRAME
50
51
52
53
54
55
56
57
58
59
60
61
62
63
36
50-0003
50-0004
50-0031
58-0005
31-0211
31-0313
33-0010
32-0004
32-0003
33-0004
32-0012
33-0009
33-0003
32-0011
Structure Arrière Ass.
Structure Avant Ass.
Structure de Côté Ass.
Guide de Cable Ass. 3/8
Boulon Hexagon 3/8-16 x 3"
Boulon Hexagon 1/2-13 x 3-1/2"
Rondelle Frein 1/2
Écrou Nylon 1/2-13
Écrou Nylon 3/8-16
Rondelle Plate 1/2
Écrou Hexagon Galvanisé 1/2-13
Rondelle Frein 3/8
Rondelle Plate 3/8
Écrou Hexagon Galvanisé 3/8-16
Rear frame ass'y
Front frame ass'y
Side frame ass'y
Guide Cable Ass'y 3/8
Hexagon bolt 3/8-16 x 3"
Hexagon bolt 1/2-13 x 3-1/2"
Lock washer 1/2
Lock Nut 1/2-13
Lock Nut 3/8-16
Flat washer1/2
Hexagon nut Galvanize 1/2-13
Lock washer 3/8
Flat washer 3/8
Hexagon nut Galvanize 3/8-16
1
1
2
1
4
8
5
8
4
5
10
1
1
1
lifts manual:Layout 1 04/03/09 12:58 PM Page 37
LES QUAIS
DE L'ESTRIE
1
GM 35108
3
LAC BROME (QUÉBEC)
4
2
Ce dessin ne peut être reproduit sans notre autorisation
28
1
27
5
6
24
17
200812 / 60-0018
This drawing cannot be reproduced without our authorization
2
37
lifts manual:Layout 1 04/03/09 12:58 PM Page 38
LES QUAIS
DE L'ESTRIE
3
GM 35108
LAC BROME (QUÉBEC)
8
Ce dessin ne peut être reproduit sans notre autorisation
4-5/16"
19
4-5/16"
7
24
4
ÉTIQUETTE AVERTISSEMENT
- WARNING LABEL 9
24
11
18
10
24
20
200812 / 60-0018
38
This drawing cannot be reproduced without our authorization
20
lifts manual:Layout 1 04/03/09 12:58 PM Page 39
LES QUAIS
DE L'ESTRIE
5
24
GM 35108
LAC BROME (QUÉBEC)
15
14
23
21
24
13
Ce dessin ne peut être reproduit sans notre autorisation
20
26
16
24
25
17
22
12
19
60
E
52
6
D
56
51
60
C
59
C
B
A
57
62
55
A
E
53
D
50
52
B
58
54
200812 / 60-0018
This drawing cannot be reproduced without our authorization
61
63
39
lifts manual:Layout 1 04/03/09 12:58 PM Page 40
GM 35108
(02 / 2009)
Français
Assemblage ;
* L’assemblage doit se faire de préférence sur un terrain plat.
* Évitez de serrer les boulons et les écrous avant de terminer l’assemblage.
* Évitez de serrer les câbles (extrémité avec boulon a oeil) avant de terminer l’assemblage pour faciliter l’ajustement du lit.
* Afin de faciliter la recherche des pièces lors de l’assemblage, faites l’inventaire des boulons, des rondelles, des écrous, etc.
* Veuillez lire le guide de Précautions avant l’utilisation de l’élévateur.
Etape 1
1. Insérez les pattes réglables (# 5) dans le poteau avant gauche (# 4), poteau arrière droit (# 2), poteau avant droit (# 3) et le poteau du treuil (# 1).
2. Insérez les verrous de patte (# 27 et # 28).
Etape 2
1. Installez la structure avant et arrière (# 6) et insérez ensuite les boulons et les écrous.
Etape 3
1. Installez les structures de coté gauche et droit (# 7 et # 8) et insérez ensuite les boulons et les écrous. (Portez une attention particulière au positionnement des structures de coté pour ne pas les inverser, la distance des trous aux extrémités est différente).
Etape 4
1. Installez la structure de coté droit haut (# 9) aux poteaux arrière et avant droit (# 2 et # 3) et insérez ensuite les boulons et les écrous.
2. Installez les stabilisateurs principaux (# 10) et les espaceurs (# 11) au poteau avant gauche (# 4) et au poteau du treuil (# 1) et insérez ensuite les
boulons et les écrous.
3. Positionnez le stabilisateur principal avec le collant Attention du coté du poteau du treuil.
Etape 5
1. Installez les stabilisateurs secondaires (# 12) et insérez ensuite les boulons et les écrous.
2. Serrez maintenant les boulons et les écrous pour les étapes 1 - 2 - 3 - 4 et 5.
3. Installation du treuil (# 13), de la roue (# 14) et de la poignée pour roue (# 15).
Etape 6
1. Installez le guide de câble (# 53) au poteau du treuil.
2. Installez la structure arrière (# 50) et la structure avant (# 51) aux structures de coté (# 52) et insérez ensuite les boulons et les écrous.
3. Serrez maintenant les boulons et les écrous.
4. Installez le câble du treuil (# A) : attachez l’extrémité du câble (boulon a oeil) à la structure de coté droit haut (# 9) , insérez ensuite le câble dans le
guide de câble et attachez-le au treuil.
5. Installez les câbles de coté (# B et # E) : attachez le bout avec la cosse à la base des structures de coté gauche et droite ( # 7 et # 8), attachez ensuite
l’extrémité du câble (boulon a oeil) au poteau avant gauche (# 4) pour le câble # B et à la structure de coté droit haut pour le câble # E.
6. Installez les câbles (# D et # C) : attachez le bout avec la cosse à la base des structures de coté gauche et droite ( # 7 et # 8), attachez ensuite l’extrémité du câble (boulon a oeil) au poteau avant gauche (# 4) pour le câble # C et à la structure de coté droit haut pour le câble # D.
7. Soulevez le lit en tournant la roue dans le sens des aiguilles d’une montre.
8. Ajustement du lit :
- le câble du treuil (# A) n’a besoin d’aucun ajustement, serrez le boulon à oeil et installez la rondelle ressort et l’écrou.
- le câble de côté (# E et # B) sert a mettre le lit au niveau. Prendre la mesure aux quatre coins et vous ne devez pas avoir une différence de au plus
1/2” (13 mm) entre le coin le plus haut et le plus bas. L’ajustement se fait en vissant ou dévissant le boulon a oeil.
- le câble (# D et # C) sert de balancier lorsque vous stationner l’embarcation dans l’élévateur. Il suffit de mettre une légère tension sur le câble en
serrant les boulons à oeil. Il ne sert a rien de mettre trop de tension, cela risque d’endommager les poulies. Lors du stationnement, il se peut que
l’un des câbles deviennent flasque, ceci est normal.
9. Installez les deux lits centraux à la structure du lit principal . Ajustez le lit centrale à la coque de votre embarcation. Vous devez avoir tout au plus
un pouce (25.4 mm) entre la coque du bateau et la structure du lit.
40
lifts manual:Layout 1 04/03/09 12:58 PM Page 41
GM 35108
(02 / 2009)
English
Assembly;
* Assembly must be done preferably on flat ground.
* Do not tighten the nuts and bolts before assembly is complete.
* Do not tighten the cables (end with eyebolt) before assembly is complete to make the adjustment of the bunk easy.
* To facilitate the search for parts at the time of assembly, make an inventory of the bolts, washers, nuts, etc.
* Read the Safety Precaution guidelines before using the hoist.
Stage 1
1. Insert the adjustable legs (#5) in the forward left post (#4), rear right post (#2), forward right post (#3) and the winch post (#1).
2. Insert the leg locks (#27 and #28).
Stage 2
1. Install the forward and rear structure (#6) and then insert the bolts and the nylon nuts.
Stage 3
1. Install the left and right structures (#7 and #8) and then insert the bolts and the nylon nuts. (pay particular attention to the position of the side structures to avoid reversing them; the distance of the holes to the ends varies).
Stage 4
1. Install the right frame up (#9) on the rear and forward right posts (#2 and #3) and then insert the bolts and nylon nuts.
2. Install the main stabilizers (#10) and the spacers (#11) on the forward left post (#4) and on the winch post (#1) and then insert the bolts and nylon
nuts.
3. Place the main stabilizer bearing the sticker that says Warning on the side of the winch post.
Stage 5
1. Install the secondary stabilizers (#12) and then insert the bolts and nylon nuts.
2. Now tighten the bolts and nylon nuts for stages 1, 2, 3, 4 and 5
3. Installation of the winch (#13), wheel (#14) and wheel handle (#15).
Stage 6
1. Install the cable guide (#53) on the winch post.
2. Install the rear structure (#50) and forward structure (#51) on the side structures (#52) and insert the bolts and nylon nuts.
3. Now tighten the bolts and the nylon nuts.
4. Install the winch cable (#A): attach the end of the cable (eyebolt) to the top right structure (#9), then insert the cable in the cable guide and attach it
to the winch.
5. Install the side cables (#B and #E): attach the end with the terminal to the base of the left and right structures ( #7 and #8), then attach the end of
the cable (eyebolt) to the forward left post (#4) for cable #B and to the top right structure for cable #E.
6. Install the cables (#D and #C): attach the end with the terminal to the base of the left and right structures (#7 and #8), then attach the end of the
cable (eyebolt) to the forward left post (#4) for cable #C and to the top right structure for cable #D.
7. Raise the bunk, turning the wheel clockwise.
8. Adjustment of the bed :
- winch cable (#A) does not need to be adjusted, tighten the eyebolt and install the spring washer and the nut.
- side cable (#E and #B) is used to a make the bunk level. Measure the four corners. You must not have a difference of more 1/2” between the topmost
and the lowest corner. Adjustment is done by tightening or loosening the eyebolt.
- cable (#D and #C) is used for balancing when you park the boat on the hoist. It is enough to leave a slight tension on the cable by tightening the eyebolts. Do not leave too much tension since you would risk damaging the pulleys. When parking, one of the cables may come loose.This is normal.
9. Install the two central bunks to the main bunk structure. Adjust the central bunk to the hull of your boat. You must have an inch (25.4 mm) at the
most between the hull of the boat and the bunk structure.
41
lifts manual:Layout 1 04/03/09 12:58 PM Page 42
GM 35120
GM 35120
ITEM
NO
1
2
3
4
5
6
7
8
9
10
11
12
13
14
15
16
17
18
19
20
21
22
23
24
25
26
27
28
40-1004
40-1002
40-1003
40-1021
40-2002
40-0016
20-3029
20-3031
40-0046
20-3042
21-3022
21-3023
30-1004
40-3002
21-3011
31-0104
31-0203
31-0209
31-0211
31-0217
31-1010
33-0002
33-0003
32-0003
30-1203
30-1202
21-3014
30-0003
PIÈCES
PARTS
Poteau du Treuil
Poteau arrière droit
Poteau avant droit
Poteau avant gauche
Patte
Structure Avant & Arrière
Structure de Côté gauche
Structure de Côté droit
Structure de Côté droit (haut)
Stabilisateur Principal
Espaceur
Stabilisateur Secondaire
Treuil "B-3500"
Roue du Treuil
Poignée de Roue
Boulon Hexagon 5/16-18 x 1-1/4"
Boulon Hexagon 3/8-16 x 1"
Boulon Hexagon 3/8-16 x 2-1/2"
Boulon Hexagon 3/8-16 x 3"
Boulon Hexagon 3/8-16 x 4-1/2"
Boulon à Épaulement 1/2 x 1-3/4"
Rondelle Plate 5/16
Rondelle Plate 3/8
Écrou Nylon 3/8-16
Espaceur
Ressort
Loquet de Patte
Goupille
Winch post
Rear right post
Front right post
Left front post
Leg
Front & Back frame
Left side frame (29-0031)
Right side frame (29-0032)
Right frame (up)
Main brace (29-0023)
Spacer
Secondary brace
Winch "B-3500"
Wheel for winch
Spinner knob
Hexagon bolt 5/16-18 x 1-1/4"
Hexagon bolt 3/8-16 x 1"
Hexagon bolt 3/8-16 x 2-1/2"
Hexagon bolt 3/8-16 x 3"
Hexagon bolt 3/8-16 x 4-1/2"
Shoulder bolt 1/2 x 1-3/4"
Flat washer 5/16
Flat washer 3/8
Lock Nut 3/8-16
Spacer
Spring
Leg pin (29-1041)
Hitch pin
QTÉ.
1
1
1
1
4
2
1
1
1
2
4
4
1
1
1
1
12
4
12
10
1
1
2
39
1
1
4
4
STRUCTURE DU LIT / BED FRAME
50
51
52
53
54
55
56
57
58
59
60
61
62
63
42
50-0005
50-0006
50-0031
58-0005
31-0211
31-0313
33-0010
32-0004
32-0003
33-0004
32-0012
33-0009
33-0003
32-0011
Structure Arrière Ass.
Structure Avant Ass.
Structure de Côté Ass.
Guide de Cable Ass. 3/8
Boulon Hexagon 3/8-16 x 3"
Boulon Hexagon 1/2-13 x 3-1/2"
Rondelle Frein 1/2
Écrou Nylon 1/2-13
Écrou Nylon 3/8-16
Rondelle Plate 1/2
Écrou Hexagon Galvanisé 1/2-13
Rondelle Frein 3/8
Rondelle Plate 3/8
Écrou Hexagon Galvanisé 3/8-16
Rear frame ass'y
Front frame ass'y
Side frame ass'y
Guide Cable Ass'y 3/8
Hexagon bolt 3/8-16 x 3"
Hexagon bolt 1/2-13 x 3-1/2"
Lock washer 1/2
Lock Nut 1/2-13
Lock Nut 3/8-16
Flat washer1/2
Hexagon nut Galvanize 1/2-13
Lock washer 3/8
Flat washer 3/8
Hexagon nut Galvanize 3/8-16
1
1
2
1
4
8
5
8
4
5
10
1
1
1
lifts manual:Layout 1 04/03/09 12:58 PM Page 43
DE L'ESTRIE
1
GM 35120
3
LAC BROME (QUÉBEC)
2
4
Ce dessin ne peut être reproduit sans notre autorisation
LES QUAIS
1
28
27
5
6
24
17
200812 / 60-0019
This drawing cannot be reproduced without our authorization
2
43
lifts manual:Layout 1 04/03/09 12:58 PM Page 44
LES QUAIS
DE L'ESTRIE
3
GM 35120
LAC BROME (QUÉBEC)
8
Ce dessin ne peut être reproduit sans notre autorisation
4-5/16"
19
4-5/16"
24
7
4
ÉTIQUETTE AVERTISSEMENT
9
- WARNING LABEL 18
24
11
10
24
20
200812 / 60-0019
44
This drawing cannot be reproduced without our authorization
20
lifts manual:Layout 1 04/03/09 12:58 PM Page 45
LES QUAIS
DE L'ESTRIE
5
24
GM 35120
LAC BROME (QUÉBEC)
15
21
14
23
20
13
24
25
17
24
Ce dessin ne peut être reproduit sans notre autorisation
26
16
22
12
19
6
60
E
52
D
51
56
60
C
59
C
A
57
B
62
61
A
53
E
D
50
B
58
52
54
200812 / 60-0019
This drawing cannot be reproduced without our authorization
55
63
45
lifts manual:Layout 1 04/03/09 12:58 PM Page 46
GM 35120
(02 / 2009)
Français
Assemblage ;
* L’assemblage doit se faire de préférence sur un terrain plat.
* Évitez de serrer les boulons et les écrous avant de terminer l’assemblage.
* Évitez de serrer les câbles (extrémité avec boulon a oeil) avant de terminer l’assemblage pour faciliter l’ajustement du lit.
* Afin de faciliter la recherche des pièces lors de l’assemblage, faites l’inventaire des boulons, des rondelles, des écrous, etc.
* Veuillez lire le guide de Précautions avant l’utilisation de l’élévateur.
Etape 1
1. Insérez les pattes réglables (# 5) dans le poteau avant gauche (# 4), poteau arrière droit (# 2), poteau avant droit (# 3) et le poteau du treuil (# 1).
2. Insérez les verrous de patte (# 27 et # 28).
Etape 2
1. Installez la structure avant et arrière (# 6) et insérez ensuite les boulons et les écrous.
Etape 3
1. Installez les structures de coté gauche et droit (# 7 et # 8) et insérez ensuite les boulons et les écrous. (Portez une attention particulière au positionnement des structures de coté pour ne pas les inverser, la distance des trous aux extrémités est différente).
Etape 4
1. Installez la structure de coté droit haut (# 9) aux poteaux arrière et avant droit (# 2 et # 3) et insérez ensuite les boulons et les écrous.
2. Installez les stabilisateurs principaux (# 10) et les espaceurs (# 11) au poteau avant gauche (# 4) et au poteau du treuil (# 1) et insérez ensuite les
boulons et les écrous.
3. Positionnez le stabilisateur principal avec le collant Attention du coté du poteau du treuil.
Etape 5
1. Installez les stabilisateurs secondaires (# 12) et insérez ensuite les boulons et les écrous.
2. Serrez maintenant les boulons et les écrous pour les étapes 1 - 2 - 3 - 4 et 5.
3. Installation du treuil (# 13), de la roue (# 14) et de la poignée pour roue (# 15).
Etape 6
1. Installez le guide de câble (# 53) au poteau du treuil.
2. Installez la structure arrière (# 50) et la structure avant (# 51) aux structures de coté (# 52) et insérez ensuite les boulons et les écrous.
3. Serrez maintenant les boulons et les écrous.
4. Installez le câble du treuil (# A) : attachez l’extrémité du câble (boulon a oeil) à la structure de coté droit haut (# 9) , insérez ensuite le câble dans le
guide de câble et attachez-le au treuil.
5. Installez les câbles de coté (# B et # E) : attachez le bout avec la cosse à la base des structures de coté gauche et droite ( # 7 et # 8), attachez ensuite
l’extrémité du câble (boulon a oeil) au poteau avant gauche (# 4) pour le câble # B et à la structure de coté droit haut pour le câble # E.
6. Installez les câbles (# D et # C) : attachez le bout avec la cosse à la base des structures de coté gauche et droite ( # 7 et # 8), attachez ensuite l’extrémité du câble (boulon a oeil) au poteau avant gauche (# 4) pour le câble # C et à la structure de coté droit haut pour le câble # D.
7. Soulevez le lit en tournant la roue dans le sens des aiguilles d’une montre.
8. Ajustement du lit :
- le câble du treuil (# A) n’a besoin d’aucun ajustement, serrez le boulon à oeil et installez la rondelle ressort et l’écrou.
- le câble de côté (# E et # B) sert a mettre le lit au niveau. Prendre la mesure aux quatre coins et vous ne devez pas avoir une différence de au plus
1/2” (13 mm) entre le coin le plus haut et le plus bas. L’ajustement se fait en vissant ou dévissant le boulon a oeil.
- le câble (# D et # C) sert de balancier lorsque vous stationner l’embarcation dans l’élévateur. Il suffit de mettre une légère tension sur le câble en
serrant les boulons à oeil. Il ne sert a rien de mettre trop de tension, cela risque d’endommager les poulies. Lors du stationnement, il se peut que
l’un des câbles deviennent flasque, ceci est normal.
9. Installez les deux lits centraux à la structure du lit principale . Ajustez le lit central à la coque de votre embarcation. Vous devez avoir tout au plus
un pouce (25.4 mm) entre la coque du bateau et la structure du lit.
46
lifts manual:Layout 1 04/03/09 12:58 PM Page 47
GM 35120
(02 / 2009)
English
Assembly;
* Assembly must be done preferably on flat ground.
* Do not tighten the nuts and bolts before assembly is complete.
* Do not tighten the cables (end with eyebolt) before assembly is complete to make the adjustment of the bunk easy.
* To facilitate the search for parts at the time of assembly, make an inventory of the bolts, washers, nuts, etc.
* Read the Safety Precaution guidelines before using the hoist.
Stage 1
1. Insert the adjustable legs (#5) in the forward left post (#4), rear right post (#2), forward right post (#3) and the winch post (#1).
2. Insert the leg locks (#27 and #28).
Stage 2
1. Install the forward and rear structure (#6) and then insert the bolts and the nylon nuts.
Stage 3
1. Install the left and right structures (#7 and #8) and then insert the bolts and the nylon nuts. (pay particular attention to the position of the side structures to avoid reversing them; the distance of the holes to the ends varies).
Stage 4
1. Install the right frame up (#9) on the rear and forward right posts (#2 and #3) and then insert the bolts and nylon nuts.
2. Install the main stabilizers (#10) and the spacers (#11) on the forward left post (#4) and on the winch post (#1) and then insert the bolts and nylon
nuts.
3. Place the main stabilizer bearing the sticker that says Warning on the side of the winch post.
Stage 5
1. Install the secondary stabilizers (#12) and then insert the bolts and nylon nuts.
2. Now tighten the bolts and nylon nuts for stages 1, 2, 3, 4 and 5
3. Installation of the winch (#13), wheel (#14) and wheel handle (#15).
Stage 6
1. Install the cable guide (#53) on the winch post.
2. Install the rear structure (#50) and forward structure (#51) on the side structures (#52) and insert the bolts and nylon nuts.
3. Now tighten the bolts and the nylon nuts.
4. Install the winch cable (#A): attach the end of the cable (eyebolt) to the top right structure (#9), then insert the cable in the cable guide and attach it
to the winch.
5. Install the side cables (#B and #E): attach the end with the terminal to the base of the left and right structures ( #7 and #8), then attach the end of
the cable (eyebolt) to the forward left post (#4) for cable #B and to the top right structure for cable #E.
6. Install the cables (#D and #C): attach the end with the terminal to the base of the left and right structures (#7 and #8), then attach the end of the
cable (eyebolt) to the forward left post (#4) for cable #C and to the top right structure for cable #D.
7. Raise the bunk, turning the wheel clockwise.
8. Adjustment of the bed :
- winch cable (#A) does not need to be adjusted, tighten the eyebolt and install the spring washer and the nut.
- side cable (#E and #B) is used to a make the bunk level. Measure the four corners. You must not have a difference of more 1/2” between the topmost
and the lowest corner. Adjustment is done by tightening or loosening the eyebolt.
- cable (#D and #C) is used for balancing when you park the boat on the hoist. It is enough to leave a slight tension on the cable by tightening the eyebolts. Do not leave too much tension since you would risk damaging the pulleys. When parking, one of the cables may come loose.This is normal.
9. Install the two central bunks to the main bunk structure. Adjust the central bunk to the hull of your boat. You must have an inch (25.4 mm) at the
most between the hull of the boat and the bunk structure.
47
lifts manual:Layout 1 04/03/09 12:58 PM Page 48
GM 35120 Lit pour ponton / Bunks for
Pontoon
5
48
lifts manual:Layout 1 04/03/09 12:58 PM Page 49
GM 35120 Guide pour ponton / Centering Rails for Pontoon
5
49
lifts manual:Layout 1 04/03/09 12:58 PM Page 50
GM 35108 / 35120 Lit centrale / Bunks
5
50
5
lifts manual:Layout 1 04/03/09 12:58 PM Page 51
GM 35108 / 35120 Guide de
coté / Step Rails
5
5
51
lifts manual:Layout 1 04/03/09 12:58 PM Page 52
GM 45108
GM 45108
ITEM
NO
1
2
3
4
5
6
7
8
9
10
11
12
13
14
15
16
17
18
19
20
21
22
23
24
25
26
27
40-1004
40-1005
40-1006
40-1021
40-2002
40-0017
20-3029
20-3031
40-0047
20-3042
21-3022
21-3023
30-1005
40-3003
21-3011
32-0014
31-0203
31-0211
31-0217
31-0313
31-1010
33-0005
33-0003
32-0003
32-0004
21-3014
30-0003
PIÈCES
PARTS
Poteau du Treuil
Poteau arrière droit
Poteau avant droit
Poteau avant gauche
Patte
Structure Avant & Arrière
Structure de Côté gauche
Structure de Côté droit
Structure de Côté droit (haut)
Stabilisateur Principal
Espaceur
Stabilisateur Secondaire
Treuil "HM"
Roue du Treuil
Poignée de Roue
Écrou Capuchon 5/8-11
Boulon Hexagon 3/8-16 x 1"
Boulon Hexagon 3/8-16 x 3"
Boulon Hexagon 3/8-16 x 4-1/2"
Boulon Hexagon 1/2-13 x 3-1/2"
Boulon à Épaulement 1/2 x 1-3/4"
Rondelle Plate 5/8
Rondelle Plate 3/8
Écrou Nylon 3/8-16
Écrou Nylon 1/2-13
Loquet de Patte
Goupille
Winch post
Rear right post
Front right post
Left front post
Leg
Front & Back frame
Left side frame (29-0031)
Right side frame (29-0032)
Right frame (up)
Main brace (29-0023)
Spacer
Secondary brace
Winch "HM"
Wheel for winch
Spinner knob
Cap Nut 5/8-11
Hexagon bolt 3/8-16 x 1"
Hexagon bolt 3/8-16 x 3"
Hexagon bolt 3/8-16 x 4-1/2"
Hexagon bolt 1/2-13 x 3-1/2"
Shoulder bolt 1/2 x 1-3/4"
Flat washer 5/8
Flat washer 3/8
Lock Nut 3/8-16
Lock Nut 1/2-13
Leg pin (29-1041)
Hitch pin
QTÉ.
1
1
1
1
4
2
1
1
1
2
4
4
1
1
1
1
12
12
10
4
1
1
2
35
4
4
4
STRUCTURE DU LIT / BED FRAME
50
51
52
53
54
55
56
57
58
59
60
61
62
63
52
50-0007
50-0008
50-0015
58-0005
31-0211
31-0313
33-0010
32-0004
32-0003
33-0004
32-0012
33-0009
33-0003
32-0011
Structure Arrière Ass.
Structure Avant Ass.
Structure de Côté Ass.
Guide de Cable Ass. 3/8
Boulon Hexagon 3/8-16 x 3"
Boulon Hexagon 1/2-13 x 3-1/2"
Rondelle Frein 1/2
Écrou Nylon 1/2-13
Écrou Nylon 3/8-16
Rondelle Plate 1/2
Écrou Hexagon Galvanisé 1/2-13
Rondelle Frein 3/8
Rondelle Plate 3/8
Écrou Hexagon Galvanisé 3/8-16
Rear frame ass'y
Front frame ass'y
Side frame ass'y
Guide Cable Ass'y 3/8
Hexagon bolt 3/8-16 x 3"
Hexagon bolt 1/2-13 x 3-1/2"
Lock washer 1/2
Lock Nut 1/2-13
Lock Nut 3/8-16
Flat washer1/2
Hexagon nut Galvanize 1/2-13
Lock washer 3/8
Flat washer 3/8
Hexagon nut Galvanize 3/8-16
1
1
2
1
4
8
5
8
4
5
10
1
1
1
lifts manual:Layout 1 04/03/09 12:58 PM Page 53
LES QUAIS
DE L'ESTRIE
GM 45108
1
3
LAC BROME (QUÉBEC)
2
Ce dessin ne peut être reproduit sans notre autorisation
4
1
27
26
5
6
24
17
200812 / 60-0020
This drawing cannot be reproduced without our authorization
2
53
lifts manual:Layout 1 04/03/09 12:58 PM Page 54
LES QUAIS
DE L'ESTRIE
3
GM 45108
LAC BROME (QUÉBEC)
8
Ce dessin ne peut être reproduit sans notre autorisation
4-5/16"
24
18
4-5/16"
7
4
ÉTIQUETTE AVERTISSEMENT
- WARNING LABEL -
9
11
20
25
24
19
24
19
200812 / 60-0020
54
This drawing cannot be reproduced without our authorization
10
lifts manual:Layout 1 04/03/09 12:58 PM Page 55
LES QUAIS
DE L'ESTRIE
5
24
GM 45108
15
LAC BROME (QUÉBEC)
21
14
22
Ce dessin ne peut être reproduit sans notre autorisation
19
24
13
23
16
17
24
12
18
E
60
52
6
D
56
51
60
59
C
C
B
A
57
62
63
E
A
53
D
52
50
B
58
54
200812 / 60-0020
This drawing cannot be reproduced without our authorization
55
61
55
lifts manual:Layout 1 04/03/09 12:58 PM Page 56
GM 45108
(02 / 2009)
Français
Assemblage ;
* L’assemblage doit se faire de préférence sur un terrain plat.
* Évitez de serrer les boulons et les écrous avant de terminer l’assemblage.
* Évitez de serrer les câbles (extrémité avec boulon a oeil) avant de terminer l’assemblage pour faciliter l’ajustement du lit.
* Afin de faciliter la recherche des pièces lors de l’assemblage, faites l’inventaire des boulons, des rondelles, des écrous, etc.
* Veuillez lire le guide de Précautions avant l’utilisation de l’élévateur.
Etape 1
1. Insérez les pattes réglables (# 5) dans le poteau avant gauche (# 4), poteau arrière droit (# 2), poteau avant droit (# 3) et le poteau du treuil (# 1).
2. Insérez les verrous de patte (# 26 et # 27).
Etape 2
1. Installez la structure avant et arrière (# 6) et insérez ensuite les boulons et les écrous.
Etape 3
1. Installez les structures de coté gauche et droit (# 7 et # 8) et insérez ensuite les boulons et les écrous. (Portez une attention particulière au positionnement des structures de coté pour ne pas les inverser, la distance des trous aux extrémités est différente).
Etape 4
1. Installez la structure de coté droit haut (# 9) aux poteaux arrière et avant droit (# 2 et # 3) et insérez ensuite les boulons et les écrous.
2. Installez les stabilisateurs principaux (# 10) et les espaceurs (# 11) au poteau avant gauche (# 4) et au poteau du treuil (# 1) et insérez ensuite les
boulons et les écrous.
3. Positionnez le stabilisateur principal avec le collant Attention du coté du poteau du treuil.
Etape 5
1. Installez les stabilisateurs secondaires (# 12) et insérez ensuite les boulons et les écrous.
2. Serrez maintenant les boulons et les écrous pour les étapes 1 - 2 - 3 - 4 et 5.
3. Installation du treuil (# 13), de la roue (# 14) et de la poignée pour roue (# 15).
Etape 6
1. Installez le guide de câble (# 53) au poteau du treuil.
2. Installez la structure arrière (# 50) et la structure avant (# 51) aux structures de coté (# 52) et insérez ensuite les boulons et les écrous.
3. Serrez maintenant les boulons et les écrous.
4. Installez le câble du treuil (# A) : attachez l’extrémité du câble (boulon a oeil) à la structure de coté droit haut (# 9) , insérez ensuite le câble dans le
guide de câble et attachez-le au treuil.
5. Installez les câbles de coté (# B et # E) : attachez le bout avec la cosse à la base des structures de coté gauche et droite ( # 7 et # 8), attachez ensuite
l’extrémité du câble (boulon a oeil) au poteau avant gauche (# 4) pour le câble # B et à la structure de coté droit haut pour le câble # E.
6. Installez les câbles (# D et # C) : attachez le bout avec la cosse à la base des structures de coté gauche et droite ( # 7 et # 8), attachez ensuite l’extrémité du câble (boulon a oeil) au poteau avant gauche (# 4) pour le câble # C et à la structure de coté droit haut pour le câble # D.
7. Soulevez le lit en tournant la roue dans le sens des aiguilles d’une montre.
8. Ajustement du lit :
- le câble du treuil (# A) n’a besoin d’aucun ajustement, serrez le boulon à oeil et installez la rondelle ressort et l’écrou.
- le câble de côté (# E et # B) sert a mettre le lit au niveau. Prendre la mesure aux quatre coins et vous ne devez pas avoir une différence de au plus
1/2” (13 mm) entre le coin le plus haut et le plus bas. L’ajustement se fait en vissant ou dévissant le boulon a oeil.
- le câble (# D et # C) sert de balancier lorsque vous stationner l’embarcation dans l’élévateur. Il suffit de mettre une légère tension sur le câble en serrant les boulons à oeil. Il ne sert a rien de mettre trop de tension, cela risque d’endommager les poulies. Lors du stationnement, il se peut que l’un
des câbles deviennent flasque, ceci est normal.
9. Installez les deux lits centraux à la structure du lit principale . Ajustez le lit central à la coque de votre embarcation. Vous devez avoir tout au plus
un pouce (25.4 mm) entre la coque du bateau et la structure du lit.
56
lifts manual:Layout 1 04/03/09 12:58 PM Page 57
GM 45108
(02 / 2009)
English
Assembly;
* Assembly must be done preferably on flat ground.
* Do not tighten the nuts and bolts before assembly is complete.
* Do not tighten the cables (end with eyebolt) before assembly is complete to make the adjustment of the bunk easy.
* To facilitate the search for parts at the time of assembly, make an inventory of the bolts, washers, nuts, etc.
* Read the Safety Precaution guidelines before using the hoist.
Stage 1
1. Insert the adjustable legs (#5) in the forward left post (#4), rear right post (#2), forward right post (#3) and the winch post (#1).
2. Insert the leg locks (#26 and #27).
Stage 2
1. Install the forward and rear structure (#6) and then insert the bolts and the nylon nuts.
Stage 3
1. Install the left and right structures (#7 and #8) and then insert the bolts and the nylon nuts. (pay particular attention to the position of the side structures to avoid reversing them; the distance of the holes to the ends varies).
Stage 4
1. Install the right frame up (#9) on the rear and forward right posts (#2 and #3) and then insert the bolts and nylon nuts.
2. Install the main stabilizers (#10) and the spacers (#11) on the forward left post (#4) and on the winch post (#1) and then insert the bolts and nylon
nuts.
3. Place the main stabilizer bearing the sticker that says Warning on the side of the winch post.
Stage 5
1. Install the secondary stabilizers (#12) and then insert the bolts and nylon nuts.
2. Now tighten the bolts and nylon nuts for stages 1, 2, 3, 4 and 5
3. Installation of the winch (#13), wheel (#14) and wheel handle (#15).
Stage 6
1. Install the cable guide (#53) on the winch post.
2. Install the rear structure (#50) and forward structure (#51) on the side structures (#52) and insert the bolts and nylon nuts.
3. Now tighten the bolts and the nylon nuts.
4. Install the winch cable (#A): attach the end of the cable (eyebolt) to the top right structure (#9), then insert the cable in the cable guide and attach it
to the winch.
5. Install the side cables (#B and #E): attach the end with the terminal to the base of the left and right structures ( #7 and #8), then attach the end of
the cable (eyebolt) to the forward left post (#4) for cable #B and to the top right structure for cable #E.
6. Install the cables (#D and #C): attach the end with the terminal to the base of the left and right structures (#7 and #8), then attach the end of the
cable (eyebolt) to the forward left post (#4) for cable #C and to the top right structure for cable #D.
7. Raise the bunk, turning the wheel clockwise.
8. Adjustment of the bed :
- winch cable (#A) does not need to be adjusted, tighten the eyebolt and install the spring washer and the nut.
- side cable (#E and #B) is used to a make the bunk level. Measure the four corners. You must not have a difference of more 1/2” between the topmost
and the lowest corner. Adjustment is done by tightening or loosening the eyebolt.
- cable (#D and #C) is used for balancing when you park the boat on the hoist. It is enough to leave a slight tension on the cable by tightening the eyebolts. Do not leave too much tension since you would risk damaging the pulleys. When parking, one of the cables may come loose. This is normal.
9. Install the two central bunks to the main bunk structure. Adjust the central bunk to the hull of your boat. You must have an inch (25.4 mm) at the
most between the hull of the boat and the bunk structure.
57
lifts manual:Layout 1 04/03/09 12:58 PM Page 58
GM 45120
GM 45120
ITEM
NO
1
2
3
4
5
6
7
8
9
10
11
12
13
14
15
16
17
18
19
20
21
22
23
24
25
26
27
40-1004
40-1005
40-1006
40-1021
40-2002
40-0018
20-3029
20-3031
40-0047
20-3042
21-3022
21-3023
30-1005
40-3003
21-3011
32-0014
31-0203
31-0211
31-0217
31-0313
31-1010
33-0005
33-0003
32-0003
32-0004
21-3014
30-0003
PIÈCES
PARTS
Poteau du Treuil
Poteau arrière droit
Poteau avant droit
Poteau avant gauche
Patte
Structure Avant & Arrière
Structure de Côté gauche
Structure de Côté droit
Structure de Côté droit (haut)
Stabilisateur Principal
Espaceur
Stabilisateur Secondaire
Treuil "HM"
Roue du Treuil
Poignée de Roue
Écrou Capuchon 5/8-11
Boulon Hexagon 3/8-16 x 1"
Boulon Hexagon 3/8-16 x 3"
Boulon Hexagon 3/8-16 x 4-1/2"
Boulon Hexagon 1/2-13 x 3-1/2"
Boulon à Épaulement 1/2 x 1-3/4"
Rondelle Plate 5/8
Rondelle Plate 3/8
Écrou Nylon 3/8-16
Écrou Nylon 1/2-13
Loquet de Patte
Goupille
Winch post
Rear right post
Front right post
Left front post
Leg
Front & Back frame
Left side frame (29-0031)
Right side frame (29-0032)
Right frame (up)
Main brace (29-0023)
Spacer
Secondary brace
Winch "HM"
Wheel for winch
Spinner knob
Cap Nut 5/8-11
Hexagon bolt 3/8-16 x 1"
Hexagon bolt 3/8-16 x 3"
Hexagon bolt 3/8-16 x 4-1/2"
Hexagon bolt 1/2-13 x 3-1/2"
Shoulder bolt 1/2 x 1-3/4"
Flat washer 5/8
Flat washer 3/8
Lock Nut 3/8-16
Lock Nut 1/2-13
Leg pin (29-1041)
Hitch pin
QTÉ.
1
1
1
1
4
2
1
1
1
2
4
4
1
1
1
1
12
12
10
4
1
1
2
35
4
4
4
STRUCTURE DU LIT / BED FRAME
50
51
52
53
54
55
56
57
58
59
60
61
62
63
58
50-0009
50-0010
50-0015
58-0005
31-0211
31-0313
33-0010
32-0004
32-0003
33-0004
32-0012
33-0009
33-0003
32-0011
Structure Arrière Ass.
Structure Avant Ass.
Structure de Côté Ass.
Guide de Cable Ass. 3/8
Boulon Hexagon 3/8-16 x 3"
Boulon Hexagon 1/2-13 x 3-1/2"
Rondelle Frein 1/2
Écrou Nylon 1/2-13
Écrou Nylon 3/8-16
Rondelle Plate 1/2
Écrou Hexagon Galvanisé 1/2-13
Rondelle Frein 3/8
Rondelle Plate 3/8
Écrou Hexagon Galvanisé 3/8-16
Rear frame ass'y
Front frame ass'y
Side frame ass'y
Guide Cable Ass'y 3/8
Hexagon bolt 3/8-16 x 3"
Hexagon bolt 1/2-13 x 3-1/2"
Lock washer 1/2
Lock Nut 1/2-13
Lock Nut 3/8-16
Flat washer1/2
Hexagon nut Galvanize 1/2-13
Lock washer 3/8
Flat washer 3/8
Hexagon nut Galvanize 3/8-16
1
1
2
1
4
8
5
8
4
5
10
1
1
1
lifts manual:Layout 1 04/03/09 12:58 PM Page 59
LES QUAIS
DE L'ESTRIE
GM 45120
1
3
LAC BROME (QUÉBEC)
2
Ce dessin ne peut être reproduit sans notre autorisation
4
1
27
26
5
6
24
17
200812 / 60-0021
This drawing cannot be reproduced without our authorization
2
59
lifts manual:Layout 1 04/03/09 12:58 PM Page 60
LES QUAIS
DE L'ESTRIE
3
GM 45120
LAC BROME (QUÉBEC)
8
Ce dessin ne peut être reproduit sans notre autorisation
4-5/16"
24
18
4-5/16"
7
4
9
ÉTIQUETTE AVERTISSEMENT
- WARNING LABEL -
11
10
24
25
24
19
19
200812 / 60-0021
60
This drawing cannot be reproduced without our authorization
20
lifts manual:Layout 1 04/03/09 12:58 PM Page 61
LES QUAIS
DE L'ESTRIE
5
24
GM 45120
15
LAC BROME (QUÉBEC)
21
14
24
13
23
19
16
Ce dessin ne peut être reproduit sans notre autorisation
22
24
17
12
18
60
6
E
52
D
56
60
51
C
59
C
A
B
62
63
E
55
A
53
D
50
52
B
58
54
200812 / 60-0021
This drawing cannot be reproduced without our authorization
57
61
61
lifts manual:Layout 1 04/03/09 12:58 PM Page 62
GM 45120
(02 / 2009)
Français
Assemblage ;
* L’assemblage doit se faire de préférence sur un terrain plat.
* Évitez de serrer les boulons et les écrous avant de terminer l’assemblage.
* Évitez de serrer les câbles (extrémité avec boulon a oeil) avant de terminer l’assemblage pour faciliter l’ajustement du lit.
* Afin de faciliter la recherche des pièces lors de l’assemblage, faites l’inventaire des boulons, des rondelles, des écrous, etc.
* Veuillez lire le guide de Précautions avant l’utilisation de l’élévateur.
Etape 1
1. Insérez les pattes réglables (# 5) dans le poteau avant gauche (# 4), poteau arrière droit (# 2), poteau avant droit (# 3) et le poteau du treuil (# 1).
2. Insérez les verrous de patte (# 26 et # 27).
Etape 2
1. Installez la structure avant et arrière (# 6) et insérez ensuite les boulons et les écrous.
Etape 3
1. Installez les structures de coté gauche et droit (# 7 et # 8) et insérez ensuite les boulons et les écrous. (Portez une attention particulière au positionnement des structures de coté pour ne pas les inverser, la distance des trous aux extrémités est différente).
Etape 4
1. Installez la structure de coté droit haut (# 9) aux poteaux arrière et avant droit (# 2 et # 3) et insérez ensuite les boulons et les écrous.
2. Installez les stabilisateurs principaux (# 10) et les espaceurs (# 11) au poteau avant gauche (# 4) et au poteau du treuil (# 1) et insérez ensuite les
boulons et les écrous.
3. Positionnez le stabilisateur principal avec le collant Attention du coté du poteau du treuil.
Etape 5
1. Installez les stabilisateurs secondaires (# 12) et insérez ensuite les boulons et les écrous.
2. Serrez maintenant les boulons et les écrous pour les étapes 1 - 2 - 3 - 4 et 5.
3. Installation du treuil (# 13), de la roue (# 14) et de la poignée pour roue (# 15).
Etape 6
1. Installez le guide de câble (# 53) au poteau du treuil.
2. Installez la structure arrière (# 50) et la structure avant (# 51) aux structures de coté (# 52) et insérez ensuite les boulons et les écrous.
3. Serrez maintenant les boulons et les écrous.
4. Installez le câble du treuil (# A) : attachez l’extrémité du câble (boulon a oeil) à la structure de coté droit haut (# 9) , insérez ensuite le câble dans le
guide de câble et attachez-le au treuil.
5. Installez les câbles de coté (# B et # E) : attachez le bout avec la cosse à la base des structures de coté gauche et droite ( # 7 et # 8), attachez ensuite
l’extrémité du câble (boulon a oeil) au poteau avant gauche (# 4) pour le câble # B et à la structure de coté droit haut pour le câble # E.
6. Installez les câbles (# D et # C) : attachez le bout avec la cosse à la base des structures de coté gauche et droite ( # 7 et # 8), attachez ensuite l’extrémité du câble (boulon a oeil) au poteau avant gauche (# 4) pour le câble # C et à la structure de coté droit haut pour le câble # D.
7. Soulevez le lit en tournant la roue dans le sens des aiguilles d’une montre.
8. Ajustement du lit :
- le câble du treuil (# A) n’a besoin d’aucun ajustement, serrez le boulon à oeil et installez la rondelle ressort et l’écrou.
- le câble de côté (# E et # B) sert a mettre le lit au niveau. Prendre la mesure aux quatre coins et vous ne devez pas avoir une différence de au plus
1/2” (13 mm) entre le coin le plus haut et le plus bas. L’ajustement se fait en vissant ou dévissant le boulon a oeil.
- le câble (# D et # C) sert de balancier lorsque vous stationner l’embarcation dans l’élévateur. Il suffit de mettre une légère tension sur le câble en serrant les boulons à oeil. Il ne sert a rien de mettre trop de tension, cela risque d’endommager les poulies. Lors du stationnement, il se peut que l’un
des câbles deviennent flasque, ceci est normal.
9. Installez les deux lits centraux à la structure du lit principale . Ajustez le lit central à la coque de votre embarcation. Vous devez avoir tout au plus
un pouce (25.4 mm) entre la coque du bateau et la structure du lit.
62
lifts manual:Layout 1 04/03/09 12:58 PM Page 63
GM 45120
(02 / 2009)
English
Assembly;
* Assembly must be done preferably on flat ground.
* Do not tighten the nuts and bolts before assembly is complete.
* Do not tighten the cables (end with eyebolt) before assembly is complete to make the adjustment of the bunk easy.
* To facilitate the search for parts at the time of assembly, make an inventory of the bolts, washers, nuts, etc.
* Read the Safety Precaution guidelines before using the hoist.
Stage 1
1. Insert the adjustable legs (#5) in the forward left post (#4), rear right post (#2), forward right post (#3) and the winch post (#1).
2. Insert the leg locks (#26 and #27).
Stage 2
1. Install the forward and rear structure (#6) and then insert the bolts and the nylon nuts.
Stage 3
1. Install the left and right structures (#7 and #8) and then insert the bolts and the nylon nuts. (pay particular attention to the position of the side structures to avoid reversing them; the distance of the holes to the ends varies).
Stage 4
1. Install the right frame up (#9) on the rear and forward right posts (#2 and #3) and then insert the bolts and nylon nuts.
2. Install the main stabilizers (#10) and the spacers (#11) on the forward left post (#4) and on the winch post (#1) and then insert the bolts and nylon
nuts.
3. Place the main stabilizer bearing the sticker that says Warning on the side of the winch post.
Stage 5
1. Install the secondary stabilizers (#12) and then insert the bolts and nylon nuts.
2. Now tighten the bolts and nylon nuts for stages 1, 2, 3, 4 and 5
3. Installation of the winch (#13), wheel (#14) and wheel handle (#15).
Stage 6
1. Install the cable guide (#53) on the winch post.
2. Install the rear structure (#50) and forward structure (#51) on the side structures (#52) and insert the bolts and nylon nuts.
3. Now tighten the bolts and the nylon nuts.
4. Install the winch cable (#A): attach the end of the cable (eyebolt) to the top right structure (#9), then insert the cable in the cable guide and attach it
to the winch.
5. Install the side cables (#B and #E): attach the end with the terminal to the base of the left and right structures ( #7 and #8), then attach the end of
the cable (eyebolt) to the forward left post (#4) for cable #B and to the top right structure for cable #E.
6. Install the cables (#D and #C): attach the end with the terminal to the base of the left and right structures (#7 and #8), then attach the end of the
cable (eyebolt) to the forward left post (#4) for cable #C and to the top right structure for cable #D.
7. Raise the bunk, turning the wheel clockwise.
8. Adjustment of the bed :
- winch cable (#A) does not need to be adjusted, tighten the eyebolt and install the spring washer and the nut.
- side cable (#E and #B) is used to a make the bunk level. Measure the four corners. You must not have a difference of more 1/2” between the topmost
and the lowest corner. Adjustment is done by tightening or loosening the eyebolt.
- cable (#D and #C) is used for balancing when you park the boat on the hoist. It is enough to leave a slight tension on the cable by tightening the eyebolts. Do not leave too much tension since you would risk damaging the pulleys. When parking, one of the cables may come loose. This is normal.
9. Install the two central bunks to the main bunk structure. Adjust the central bunk to the hull of your boat. You must have an inch (25.4 mm) at the
most between the hull of the boat and the bunk structure.
63
lifts manual:Layout 1 04/03/09 12:58 PM Page 64
GM 45120 Lit pour ponton /
Bunks for Pontoon
64
lifts manual:Layout 1 04/03/09 12:58 PM Page 65
GM 45120 Guide pour ponton /
Centering Rails for Pontoon
65
lifts manual:Layout 1 04/03/09 12:58 PM Page 66
GM 45108 / 45120 Lit centrale
/ Bunks
66
lifts manual:Layout 1 04/03/09 12:58 PM Page 67
GM 45108 / 45120 Guide de
coté / Step Rails
67
lifts manual:Layout 1 04/03/09 12:58 PM Page 68
GM 55120
GM 55120
ITEM
NO
1
2
3
4
5
6
7
8
9
10
11
12
13
14
15
16
17
18
19
20
21
22
23
24
25
26
27
28
29
30
40-1010
40-1008
40-1009
40-1007
40-2003
40-0034
20-3070
20-3071
20-3075
20-3076
21-3022
21-3023
30-1005
40-3003
21-3011
32-0014
31-0203
31-0211
31-0217
31-0313
31-1010
33-0005
33-0003
32-0003
32-0004
21-3053
30-0003
21-3042
31-0215
31-0219
PIÈCES
PARTS
Poteau du Treuil
Poteau arrière droit
Poteau avant droit
Poteau avant gauche
Patte
Structure Avant & Arrière
Structure de Côté gauche
Structure de Côté droit
Structure de Côté droit (haut)
Stabilisateur Principal
Espaceur
Stabilisateur Secondaire
Treuil "HM"
Roue du Treuil
Poignée de Roue
Écrou Capuchon 5/8-11
Boulon Hexagon 3/8-16 x 1"
Boulon Hexagon 3/8-16 x 3"
Boulon Hexagon 3/8-16 x 4-1/2"
Boulon Hexagon 1/2-13 x 3-1/2"
Boulon à Épaulement 1/2 x 1-3/4"
Rondelle Plate 5/8
Rondelle Plate 3/8
Écrou Nylon 3/8-16
Écrou Nylon 1/2-13
Loquet de Patte
Goupille
Stabilisateur Petit
Boulon Hexagon 3/8-16 x 4"
Boulon Hexagon 3/8-16 x 5"
Winch post
Rear right post
Front right post
Left front post
Leg
Front & Back frame
Left side frame
Right side frame
Right frame (up)
Main brace (29-0023)
Spacer
Secondary brace
Winch "HM"
Wheel for winch
Spinner knob
Cap Nut 5/8-11
Hexagon bolt 3/8-16 x 1"
Hexagon bolt 3/8-16 x 3"
Hexagon bolt 3/8-16 x 4-1/2"
Hexagon bolt 1/2-13 x 3-1/2"
Shoulder bolt 1/2 x 1-3/4"
Flat washer 5/8
Flat washer 3/8
Lock Nut 3/8-16
Lock Nut 1/2-13
Leg pin (29-1041)
Hitch pin
Small Brace
Hexagon bolt 3/8-16 x 4"
Hexagon bolt 3/8-16 x 5"
QTÉ.
1
1
1
1
4
2
1
1
1
2
2
4
1
1
1
1
14
14
6
4
1
1
2
39
4
4
4
2
2
2
STRUCTURE DU LIT / BED FRAME
50
51
52
53
54
55
56
57
58
59
60
61
62
63
68
50-0026
50-0030
50-0017
58-0005
31-0211
31-0313
33-0010
32-0004
32-0003
33-0004
32-0012
33-0009
33-0003
32-0011
Structure Arrière Ass.
Structure Avant Ass.
Structure de Côté Ass.
Guide de Cable Ass. 3/8
Boulon Hexagon 3/8-16 x 3"
Boulon Hexagon 1/2-13 x 3-1/2"
Rondelle Frein 1/2
Écrou Nylon 1/2-13
Écrou Nylon 3/8-16
Rondelle Plate 1/2
Écrou Hexagon Galvanisé 1/2-13
Rondelle Frein 3/8
Rondelle Plate 3/8
Écrou Hexagon Galvanisé 3/8-16
Rear frame ass'y
Front frame ass'y
Side frame ass'y
Guide Cable Ass'y 3/8
Hexagon bolt 3/8-16 x 3"
Hexagon bolt 1/2-13 x 3-1/2"
Lock washer 1/2
Lock Nut 1/2-13
Lock Nut 3/8-16
Flat washer1/2
Hexagon nut Galvanize 1/2-13
Lock washer 3/8
Flat washer 3/8
Hexagon nut Galvanize 3/8-16
1
1
2
1
4
12
5
12
4
5
10
1
1
1
lifts manual:Layout 1 04/03/09 12:58 PM Page 69
LES QUAIS
1
GM 55120
DE L'ESTRIE
3
LAC BROME (QUÉBEC)
2
4
Ce dessin ne peut être reproduit sans notre autorisation
27
26
1
5
2
24
17
200507 / 60-0010
This drawing cannot be reproduce without our authorization
6
69
lifts manual:Layout 1 04/03/09 12:58 PM Page 70
LES QUAIS
DE L'ESTRIE
3
GM 55120
LAC BROME (QUÉBEC)
8
Ce dessin ne peut être reproduit sans notre autorisation
4-5/16"
24
18
4-5/16"
7
ÉTIQUETTE AVERTISSEMENT
- WARNING LABEL -
9
4
24
10
29
20
24
24
19
19
11
200507 / 60-0010
70
This drawing cannot be reproduce without our authorization
25
lifts manual:Layout 1 04/03/09 12:58 PM Page 71
LES QUAIS
5
GM 55120
DE L'ESTRIE
LAC BROME (QUÉBEC)
24
18
28
15
21
13
23
30
24
22
24
Ce dessin ne peut être reproduit sans notre autorisation
16
17
12
18
14
E
60
56
6
D
C
52
60
51
B
59
C
62
A
61
57
63
E
53
A
D
50
B
57
52
55
58
54
200507 / 60-0010
This drawing cannot be reproduce without our authorization
55
71
lifts manual:Layout 1 04/03/09 12:58 PM Page 72
GM 55120
(02 / 2009)
Français
Assemblage ;
* L’assemblage doit se faire de préférence sur un terrain plat.
* Évitez de serrer les boulons et les écrous avant de terminer l’assemblage.
* Évitez de serrer les câbles (extrémité avec boulon a oeil) avant de terminer l’assemblage pour faciliter l’ajustement du lit.
* Afin de faciliter la recherche des pièces lors de l’assemblage, faites l’inventaire des boulons, des rondelles, des écrous, etc.
* Lire le guide de Précautions avant l’utilisation de l’élévateur.
Etape 1
1. Insérez les pattes réglables (# 5) dans le poteau avant gauche (# 4), poteau arrière droit (# 2), poteau avant droit (# 3) et le poteau du treuil (# 1).
2. Insérez les verrous de patte (# 26 et # 27).
Etape 2
1. Installez la structure avant et arrière (# 6) et insérer ensuite les boulons et les écrous nylons.
Etape 3
1. Installez les structures de coté gauche et droit (# 7 et # 8) et insérer ensuite les boulons et les écrous nylons. (Attention particulière au positionnement des structures de coté pour ne pas les inversez, la distance des trous aux extrémités sont différentes)
Etape 4
1. Installez la structure de coté droit haut (# 9) aux poteaux arrière et avant droit (# 2 et # 3) et insérer ensuite les boulons et les écrous nylons.
2. Installez les stabilisateurs principales (# 10) et les espaceurs (# 11) au poteau avant gauche (# 4) et au poteau du treuil (# 1) et insérer ensuite les
boulons et les écrous nylons.
3. Positionnez le stabilisateur principal avec le collant Attention du coté du poteau du treuil.
Etape 5
1. Installez les stabilisateurs secondaires (# 12) et insérer ensuite les boulons et les écrous nylons.
2. Serrez maintenant les boulons et les écrous nylons pour les étapes 1 - 2 - 3 - 4 et 5
3. Installation du treuil (# 13), de la roue (# 14) et de la poignée pour roue (# 15).
Etape 6
1. Installez le guide de câble (# 53) au poteau du treuil.
2. Installez la structure arrière (# 50) et la structure avant (# 51) aux structures de coté (# 52) et insérer ensuite les boulons et les écrous nylons.
3. Serrez maintenant les boulons et les écrous nylons.
4. Installez le câble du treuil (# A) : attachez l’extrémité du câble (boulon a oeil) a la structure de coté droit haut (# 9) , ensuite insérez le câble dans le
guide de câble et attachez-le au treuil.
5. Installez les câbles de coté (# B et # E) : attachez le bout avec la cosse a la base des structures de coté gauche et droite ( # 7 et # 8), ensuite attachez
l’extrémité du câble (boulon a oeil) au poteau avant gauche (# 4) pour le câble # B et a la structure de coté droit haut pour le câble # E.
6. Installez les câbles (# D et # C) : attachez le bout avec la cosse a la base des structures de coté gauche et droite ( # 7 et # 8), ensuite attachez l’extrémité du câble (boulon a oeil) au poteau avant gauche (# 4) pour le câble # C et a la structure de coté droit haut pour le câble # D.
7. Soulevez le lit en tournant la roue dans le sens des aiguilles d’une montre.
8. Ajustement du lit :
- câble du treuil (# A) n’a besoin d’aucun ajustement, serrez le boulon a oeil et installer la rondelle ressort et l’écrou.
- câble de côté (# E et # B) sert a mettre le lit au niveau. Prendre la mesure aux quatre coins et vous ne devez pas avoir une différence de au plus 1/2”
entre le coin le plus haut et le plus bas. L’ajustement se fait en vissant ou dévissant le boulon a oeil.
- câble (# D et # C) sert de balancier lorsque vous stationner l’embarcation dans l’élévateur. Il suffit de mettre une légère tension sur le câble en serrant les boulons a oeil. Il ne sert a rien de mettre trop de tension, cela risque d’endommager les poulies. Lors du stationnement il se peut que l’un
des câbles viennent détendue, ceci est normal.
9. Installez les deux lits centraux a la structure du lit principale . Ajustez le lit central a la coque de votre embarcation. Vous devez avoir entre la coque
du bateau et la structure du lit tout au plus un pouce (25.4 mm).
72
lifts manual:Layout 1 04/03/09 12:58 PM Page 73
GM 55120
(02 / 2009)
English
Assembly;
* Assembly must be done preferably on flat ground.
* Do not tighten the nuts and bolts before assembly is complete.
* Do not tighten the cables (end with eyebolt) before assembly is complete to make the adjustment of the bunk easy.
* To facilitate the search for parts at the time of assembly, make an inventory of the bolts, washers, nuts, etc.
* Read the Safety Precaution guidelines before using the hoist.
Stage 1
1. Insert the adjustable legs (#5) in the forward left post (#4), rear right post (#2), forward right post (#3) and the winch post (#1).
2. Insert the leg locks (#26 and #27).
Stage 2
1. Install the forward and rear structure (#6) and then insert the bolts and the nylon nuts.
Stage 3
1. Install the left and right structures (#7 and #8) and then insert the bolts and the nylon nuts. (pay particular attention to the position of the side structures to avoid reversing them; the distance of the holes to the ends varies).
Stage 4
1. Install the right frame up (#9) on the rear and forward right posts (#2 and #3) and then insert the bolts and nylon nuts.
2. Install the main stabilizers (#10) and the spacers (#11) on the forward left post (#4) and on the winch post (#1) and then insert the bolts and nylon
nuts.
3. Place the main stabilizer bearing the sticker that says Warning on the side of the winch post.
Stage 5
1. Install the secondary stabilizers (#12) and then insert the bolts and nylon nuts.
2. Now tighten the bolts and nylon nuts for stages 1, 2, 3, 4 and 5
3. Installation of the winch (#13), wheel (#14) and wheel handle (#15).
Stage 6
1. Install the cable guide (#53) on the winch post.
2. Install the rear structure (#50) and forward structure (#51) on the side structures (#52) and insert the bolts and nylon nuts.
3. Now tighten the bolts and the nylon nuts.
4. Install the winch cable (#A): attach the end of the cable (eyebolt) to the top right structure (#9), then insert the cable in the cable guide and attach it
to the winch.
5. Install the side cables (#B and #E): attach the end with the terminal to the base of the left and right structures ( #7 and #8), then attach the end of
the cable (eyebolt) to the forward left post (#4) for cable #B and to the top right structure for cable #E.
6. Install the cables (#D and #C): attach the end with the terminal to the base of the left and right structures (#7 and #8), then attach the end of the
cable (eyebolt) to the forward left post (#4) for cable #C and to the top right structure for cable #D.
7. Raise the bunk, turning the wheel clockwise.
8. Adjustment of the bed :
- winch cable (#A) does not need to be adjusted, tighten the eyebolt and install the spring washer and the nut.
- side cable (#E and #B) is used to a make the bunk level. Measure the four corners. You must not have a difference of more 1/2” between the topmost
and the lowest corner. Adjustment is done by tightening or loosening the eyebolt.
- cable (#D and #C) is used for balancing when you park the boat on the hoist. It is enough to leave a slight tension on the cable by tightening the eyebolts. Do not leave too much tension since you would risk damaging the pulleys. When parking, one of the cables may come loose. This is normal.
9. Install the two central bunks to the main bunk structure. Adjust the central bunk to the hull of your boat. You must have an inch (25.4 mm) at the
most between the hull of the boat and the bunk structure.
73
lifts manual:Layout 1 04/03/09 12:58 PM Page 74
GM 55120 Lit centrale / Bunks
74
lifts manual:Layout 1 04/03/09 12:58 PM Page 75
GM 55120 Guide de coté /
Step Rails
75
lifts manual:Layout 1 04/03/09 12:58 PM Page 76
GM–Hyd 45120
GM-HYD 45120
ITEM
NO
1
2
3
4
5
6
7
8
9
10
11
12
13
14
16
17
18
19
20
22
23
24
25
26
27
40-1017
40-1018
40-1019
40-1020
40-2002
40-0018
40-0041
20-3131
20-3132
58-0020
10-3027
20-3076
21-3022
21-3023
21-3053
30-0003
31-1020
31-0203
31-0211
31-0217
31-0303
32-0003
32-0004
31-0219
58-0017
PIÈCES
PARTS
Poteau arrière gauche
Poteau arrière droit
Poteau avant droit
Poteau avant gauche
Patte
Structure Avant
Structure Arrière
Structure de Côté gauche
Structure de Côté droit
Support de Cylindre Ass.
Couvercle
Stabilisateur Principal
Espaceur
Stabilisateur Secondaire
Loquet de Patte
Goupille
Vis # 10 x 3/4"
Boulon Hexagon 3/8-16 x 1"
Boulon Hexagon 3/8-16 x 3"
Boulon Hexagon 3/8-16 x 4-1/2"
Boulon Hexagon 1/2-13 x 1"
Écrou Nylon 3/8-16
Écrou Nylon 1/2-13
Boulon Hexagon 3/8-16 x 5"
Boite de Contrôle Ass.
Rear left post
Rear right post
Front right post
Front left post
Leg
Front frame
Back frame
Left side frame
Right side frame
Cylinder Support Ass.
Cover
Main brace (29-0023)
Spacer
Secondary brace
Leg pin (29-1041)
Hitch pin
Screw # 10 x 3/4"
Hexagon bolt 3/8-16 x 1"
Hexagon bolt 3/8-16 x 3"
Hexagon bolt 3/8-16 x 4-1/2"
Hexagon bolt 1/2-13 x 1"
Lock Nut 3/8-16
Lock Nut 1/2-13
Hexagon bolt 3/8-16 x 5"
Contrôle Box Ass.
QTÉ.
1
1
1
1
4
1
1
1
1
1
1
2
4
4
4
4
14
12
16
6
8
36
8
2
1
STRUCTURE DU LIT / BED FRAME
50
51
52
53
54
55
80
81
50-0022
50-0023
20-3167
31-0311
31-0313
32-0004
33-0005
32-0016
Structure Avant Ass.
Structure Arrière Ass.
Structure de Côté Ass.
Boulon Hexagon 1/2-13 x 3"
Boulon Hexagon 1/2-13 x 3-1/2"
Écrou Nylon 1/2-13
Rondelle Plate 5/8
Écrou Nylon 5/8-11
Front frame ass'y
Rear frame ass'y
Side frame ass'y
Hexagon bolt 1/2-13 x 3"
Hexagon bolt 1/2-13 x 3-1/2"
Lock Nut 1/2-13
Flat Washer 5/8
Lock Nut 5/8-11
1
1
2
2
8
10
2
2
20061221
76
lifts manual:Layout 1 04/03/09 12:58 PM Page 77
LES QUAIS
DE L'ESTRIE
1
GM HYD-45120
3
LAC BROME (QUÉBEC)
2
17
Ce dessin ne peut être reproduit sans notre autorisation
4
1
16
5
2
24
7
19
200901 / 60-0012
This drawing cannot be reproduced without our authorization
6
77
lifts manual:Layout 1 04/03/09 12:58 PM Page 78
LES QUAIS
DE L'ESTRIE
3
GM HYD-45120
LAC BROME (QUÉBEC)
9
Ce dessin ne peut être reproduit sans notre autorisation
4-5/16"
24
20
8
11
4
18
ÉTIQUETTE AVERTISSEMENT
- WARNING LABEL 13
12
10
24
22
27
25
23
26
200901 / 60-0012
78
This drawing cannot be reproduced without our authorization
24
lifts manual:Layout 1 04/03/09 12:58 PM Page 79
LES QUAIS
DE L'ESTRIE
5
GM HYD-45120
Ce dessin ne peut être reproduit sans notre autorisation
LAC BROME (QUÉBEC)
24
19
14
20
6
C
52
50
81
80
A
D
55
B
54
B
53
52
51
200901 / 60-0012
This drawing cannot be reproduced without our authorization
A
79
lifts manual:Layout 1 04/03/09 12:58 PM Page 80
GM - Hyd 45120
(02 / 2009)
Français
Assemblage :
* L’assemblage doit se faire de préférence sur un terrain plat.
* Évitez de serrer les boulons et les écrous avant de terminer l’assemblage.
* Évitez de serrer les câbles (extrémité avec boulon à oeil) avant de terminer l’assemblage pour faciliter l’ajustement du lit.
* Afin de faciliter la recherche des pièces lors de l’assemblage, faites un inventaire des boulons, rondelles, écrous, etc.
* Lisez le Guide de sécurité avant d’utiliser l’élévateur.
Étape 1
1. Insérez les pattes réglables (no 5) dans le poteau avant gauche (no 4), poteau arrière droit (no 2), poteau avant droit (no 3) et poteau arrière gauche
(no 1).
2. Insérez les verrous de patte (no 16 et no 17).
Étape 2
1. Installez la structure avant / sans boyau (no 6) et arrière / avec boyau (no 7), puis insérez les boulons et les écrous en nylon.
Étape 3
1. Installez les structures de côté gauche et droit (no 8 et no 9), puis insérez les boulons et les écrous en nylon (veuillez porter une attention particulière au positionnement des structures de côté pour ne pas les inverser ; la distance des trous aux extrémités est différente).
Étape 4
1. Installez le support de cylindre (no 10) aux poteaux arrière et avant droit (no 2 et no 3), puis insérez les boulons et les écrous en nylon. Le collant
sur le support a cylindre doit être positionné à l’extérieur.
2. Installez les stabilisateurs principaux (no 12) et les espaceurs (no 13) sur le poteau avant gauche (no 4) et sur le poteau arrière gauche (no 1), puis
insérez les boulons et les écrous en nylon.
3. Positionnez le stabilisateur principal avec le collant Attention du coté du poteau arrière gauche (no 1).
4. Installez la boite de contrôle (no 27) entre le haut du poteau arrière gauche (#1) et le stabilisateur principale.
Étape 5
1. Installez les stabilisateurs secondaires (no 14), puis insérez les boulons et les écrous en nylon.
2. Serrez maintenant les boulons et les écrous en nylon installés aux étapes 1, 2, 3, 4 et 5.
Étape 6
1. Installez la structure arrière (no 51) et la structure avant (no 50) aux structures de côté (no 52), puis insérez les boulons et les écrous en nylon.
2. Serrez maintenant les boulons et les écrous en nylon.
3. Installez les câbles du cylindre (D et C) : attachez l’extrémité des câbles (tige filetée) à la structure de côté droit (no 52).
4. Installez les câbles de levier (A et B) : attachez le bout avec la cosse à la base de la structure de côté droit (no 9), puis attachez l’extrémité du câble
(tige filetée) au poteau avant gauche (no 4) pour le câble A et au poteau arrière gauche (no 1) pour le câble B.
5. Installez les deux boyaux au cylindre. Le boyau droit avec la valve de sûreté. Le boyau à angle (45∞) avec l’embout à 45∞. Ensuite, installez les
deux autres extrémités à la pompe hydraulique. Suivre les codes de couleurs.
Monter et redescendre l’élévateur au complet (2 à 3 fois) pour faire sortir l’air dans les boyaux.
6. Positionnez la boîte de la pompe hydraulique sur le quai et ancrez celle-ci pour qu’elle ne bouge plus.
7. Ajustement du lit :
- Les câbles du cylindre (C et D) n’ont besoin d’aucun ajustement, serrez le boulon à oeil et installez la rondelle à ressort et l’écrou.
- Les câbles de levier (A et B) servent à mettre le lit à niveau. Prendre la mesure aux quatre coins. Vous ne devez pas avoir une différence dépassant
plus de 1/2” entre le coin le plus haut et celui le plus bas. L’ajustement se fait en vissant ou en dévissant la tige filetée.
8. Installez les deux lits centraux à la structure du lit principal. Ajustez le lit central à la coque de votre embarcation. Vous devez avoir une distance
maximale de 1” (25,4 mm) entre la coque du bateau et la structure du lit.
80
lifts manual:Layout 1 04/03/09 12:58 PM Page 81
GM - Hyd 45120
(02 / 2009)
English
Assembly:
* The assembly must be done on flat land.
* Avoid tightening bolts and nuts before finishing the assembly.
* Avoid tightening cables (ends with eye bolts) before finishing the assembly in order to ease bed adjustments.
* To ease the search for parts during the assembly, make an inventory of the bolts, washers, nuts, etc.
* Read the Safety Instructions before using the elevator.
Step 1
1. Insert the adjustable legs (No.5) into the front left post (No.4), back right post (No.2), front right post (No.3) and back left post (No.1).
2. Insert the leg bolts (No.16 and No.17).
Step 2
1. Install the front structure / without a pipe (No.6) and back / with a pipe (No.7), then insert the nylon bolts and nuts.
Step 3
1. Install the left and right side structures (No.8 and No.9), then insert the nylon bolts and nuts (please pay particular attention to the location of the
side structures in order not to invert them; the distance of the holes at the end is different).
Step 4
1. Install the cylinder support (No.10) in the back and front right posts (No.2 and No.3), then insert the nylon bolts and nuts. The sticker on the cylinder must be on the outside.
2. Install the main stabilizers (No.12) and the spacers (No.13) on the left front post (No.4) and back left post (No.1), then insert the nylon bolts and
nuts.
3. Position the main stabilizer with the sticker “Warning” facing the left back post (No.1).
4. Install the control box (No.27) between the top of the back left post (No.1) and the main stabilizer.
Step 5
1. Install the secondary stabilizers (No.14), then insert the nylon bolts and nuts.
2. Tighten all the nylon bolts and nuts installed in steps 1, 2, 3, 4 and 5.
Step 6
1. Install the back structure (No.51) and the front structure (No.50) into the side structures (No.52), then insert the nylon bolts and nuts.
2. Tighten right away all the nylon bolts and nuts.
3. Install the cables of the cylinder (D and C): attach the ends of the cables (screw-spindle) to the right side structure (No.52).
4. Install the lever cables (A and B): attach the end with the connection at the base of the right side structure (No.9), then attach the end of the cable
(screw-spindle) to the front left post (No.4) for cable A and to the left back post (No.1) for cable B.
5. Attach both pipes to the cylinder. The right pipe with the security valve. The angle pipe (45°) with the 45° nozzle. Then, attach the two other ends to
the hydraulic pump. Follow the colour codes.
Make the elevator go up and down completely (2 to 3 times) to remove the air from the pipes.
6. Position the hydraulic pump box of the deck and anchor it so cannot move.
7. Bed adjustment:
- The cables of the cylinder (C and D) need no adjustment, tighten the eye bolt and install the spring washer and nut.
- The lever cables (A and B) serve to level the bed. Take a measurement at the four corners. The difference must not exceed 1/2” between the highest
and lowest corners. Adjustments are done by screwing or unscrewing the screw-spindle.
8. Install both central beds in the main bed structure. Adjust the central bed with the hull of your boat. The distance between the hull of the boat and
the structure of the bed must not exceed 1” (25.4 mm).
81
lifts manual:Layout 1 04/03/09 12:58 PM Page 82
GM–Hyd 65120
GM-HYD 65120
ITEM
NO
1
2
3
4
5
6
7
8
9
10
11
12
13
14
15
16
17
18
19
20
21
22
23
24
25
26
40-1013
40-1014
40-1015
40-1016
40-2003
40-0034
40-0039
20-3127
20-3128
58-0016
10-3027
20-3076
21-3022
21-3023
21-3064
21-3053
30-0003
31-1020
31-0203
31-0211
31-0215
31-0217
31-0303
32-0003
32-0004
58-0017
PIÈCES
PARTS
Poteau arrière gauche
Poteau arrière droit
Poteau avant droit
Poteau avant gauche
Patte
Structure Avant
Structure Arrière
Structure de Côté gauche
Structure de Côté droit
Support de Cylindre Ass.
Couvercle
Stabilisateur Principal
Espaceur
Stabilisateur Secondaire
Stabilisateur Petit
Loquet de Patte
Goupille
Vis # 10 x 3/4"
Boulon Hexagon 3/8-16 x 1"
Boulon Hexagon 3/8-16 x 3"
Boulon Hexagon 3/8-16 x 4"
Boulon Hexagon 3/8-16 x 4-1/2"
Boulon Hexagon 1/2-13 x 1"
Écrou Nylon 3/8-16
Écrou Nylon 1/2-13
Boite de Contrôle Ass.
Rear left post
Rear right post
Front right post
Front left post
Leg
Front frame
Back frame
Left side frame
Right side frame
Cylinder Support Ass.
Cover
Main brace (29-0023)
Spacer
Secondary brace
Small Brace
Leg pin (29-1041)
Hitch pin
Screw # 10 x 3/4"
Hexagon bolt 3/8-16 x 1"
Hexagon bolt 3/8-16 x 3"
Hexagon bolt 3/8-16 x 4"
Hexagon bolt 3/8-16 x 4-1/2"
Hexagon bolt 1/2-13 x 1"
Lock Nut 3/8-16
Lock Nut 1/2-13
Contrôle Box Ass.
QTÉ.
1
1
1
1
4
1
1
1
1
1
1
2
2
4
2
4
4
14
16
16
2
6
8
40
8
1
STRUCTURE DU LIT / BED FRAME
50
51
52
53
54
55
80
81
50-0024
50-0025
20-3130
31-0311
31-0313
32-0004
33-0005
32-0016
Structure Avant Ass.
Structure Arrière Ass.
Structure de Côté Ass.
Boulon Hexagon 1/2-13 x 3"
Boulon Hexagon 1/2-13 x 3-1/2"
Écrou Nylon 1/2-13
Rondelle Plate 5/8
Écrou Nylon 5/8-11
Front frame ass'y
Rear frame ass'y
Side frame ass'y
Hexagon bolt 1/2-13 x 3"
Hexagon bolt 1/2-13 x 3-1/2"
Lock Nut 1/2-13
Flat Washer 5/8
Lock Nut 5/8-11
1
1
2
2
8
10
2
2
20061221
82
lifts manual:Layout 1 04/03/09 12:58 PM Page 83
LES QUAIS
DE L'ESTRIE
GM HYD-65120
1
3
LAC BROME (QUÉBEC)
2
Ce dessin ne peut être reproduit sans notre autorisation
4
17
1
16
5
2
6
7
19
200901 / 60-0013
This drawing cannot be reproduce without our authorization
24
83
lifts manual:Layout 1 04/03/09 12:58 PM Page 84
LES QUAIS
DE L'ESTRIE
3
GM HYD-65120
LAC BROME (QUÉBEC)
Ce dessin ne peut être reproduit sans notre autorisation
9
24
20
8
4
18
11
ÉTIQUETTE AVERTISSEMENT
- WARNING LABEL -
10
24
22
12
24
26
13
25
23
22
200901 / 60-0013
84
This drawing cannot be reproduce without our authorization
21
lifts manual:Layout 1 04/03/09 12:58 PM Page 85
LES QUAIS
5
GM HYD-65120
DE L'ESTRIE
LAC BROME (QUÉBEC)
15
24
Ce dessin ne peut être reproduit sans notre autorisation
19
14
20
6
C
52
81
50
80
A
D
A
B
53
52
51
200901 / 60-0013
This drawing cannot be reproduce without our authorization
54
55
B
85
lifts manual:Layout 1 04/03/09 12:58 PM Page 86
GM - Hyd 65120
(02 / 2009)
Français
Assemblage :
* L’assemblage doit se faire de préférence sur un terrain plat.
* Évitez de serrer les boulons et les écrous avant de terminer l’assemblage.
* Évitez de serrer les câbles (extrémité avec boulon à oeil) avant de terminer l’assemblage pour faciliter l’ajustement du lit.
* Afin de faciliter la recherche des pièces lors de l’assemblage, faites un inventaire des boulons, rondelles, écrous, etc.
* Lisez le Guide de sécurité avant d’utiliser l’élévateur.
Étape 1
1. Insérez les pattes réglables (no 5) dans le poteau avant gauche (no 4), poteau arrière droit (no 2), poteau avant droit (no 3) et poteau arrière gauche
(no 1).
2. Insérez les verrous de patte (no 16 et no 17).
Étape 2
1. Installez la structure avant / sans boyau (no 6) et arrière / avec boyau (no 7), puis insérez les boulons et les écrous en nylon.
Étape 3
1. Installez les structures de côté gauche et droit (no 8 et no 9), puis insérez les boulons et les écrous en nylon (veuillez porter une attention particulière au positionnement des structures de côté pour ne pas les inverser ; la distance des trous aux extrémités est différente).
Étape 4
1. Installez le support de cylindre (no 10) aux poteaux arrière et avant droit (no 2 et no 3), puis insérez les boulons et les écrous en nylon. Le collant
sur le support à cylindre doit être positionné à l’extérieur.
2. Installez les stabilisateurs principaux (no 12) sur le poteau avant gauche (no 4) et sur le poteau arrière gauche (no 1), puis installez les espaceurs (no
13) entre le stabilisateur principal et la structure de côté gauche (no 8) et insérez ensuite les boulons et les écrous en nylon.
3. Positionnez le stabilisateur principal avec le collant « Attention » du côté du poteau arrière gauche (no 1).
4. Installez la boîte de contrôle (no 26) entre le haut du poteau arrière gauche (no 1) et le stabilisateur principale.
Étape 5
1. Installez les stabilisateurs secondaires (no 14), puis insérez les boulons et les écrous en nylon.
2. Installez les petits stabilisateurs (no 15), puis insérez les boulons et les écrous en nylon.
3. Serrez maintenant les boulons et les écrous en nylon installés aux étapes 1, 2, 3, 4 et 5.
Étape 6
1. Installez la structure arrière (no 51) et la structure avant (no 50) aux structures de côté (no 52), puis insérez les boulons et les écrous en nylon.
2. Serrez maintenant les boulons et les écrous en nylon.
3. Installez les câbles du cylindre (D et C) : attachez l’extrémité des câbles (tige filetée) à la structure de côté droit (no 52).
4. Installez les câbles de levier (A et B) : attachez le bout avec la cosse à la base de la structure de côté droit (no 9), puis attachez l’extrémité du câble
(tige filetée) au poteau avant gauche (no 4) pour le câble A et au poteau arrière gauche (no 1) pour le câble B.
5. Installez les deux boyaux au cylindre. Le boyau droit avec la valve de sûreté. Le boyau à angle (45∞) avec l’embout à 45∞. Ensuite, installez les
deux autres extrémités à la pompe hydraulique. Suivre les codes de couleurs.
Monter et redescendre l’élévateur au complet (2 à 3 fois) pour faire sortir l’air dans les boyaux.
6. Positionnez la boîte de la pompe hydraulique sur le quai et ancrez celle-ci pour qu’elle ne bouge plus.
7. Ajustement du lit :
- Les câbles du cylindre (C et D) n’ont besoin d’aucun ajustement, serrez le boulon à oeil et installez la rondelle à ressort et l’écrou.
- Les câbles de levier (A et B) servent à mettre le lit à niveau. Prendre la mesure aux quatre coins. Vous ne devez pas avoir une différence dépassant
plus de 1/2” entre le coin le plus haut et celui le plus bas. L’ajustement se fait en vissant ou en dévissant la tige filetée.
8. Installez les deux lits centraux à la structure du lit principal. Ajustez le lit central à la coque de votre embarcation. Vous devez avoir une distance
maximale de 1” (25,4 mm) entre la coque du bateau et la structure du lit.
86
lifts manual:Layout 1 04/03/09 12:58 PM Page 87
GM - Hyd 65120
(02 / 200)
English
Assembly:
* The assembly must be done on flat land.
* Avoid tightening bolts and nuts before finishing the assembly.
* Avoid tightening cables (ends with eye bolts) before finishing the assembly in order to ease bed adjustments.
* To ease the search for parts during the assembly, make an inventory of the bolts, washers, nuts, etc.
* Read the Safety Instructions before using the elevator.
Step 1
1. Insert the adjustable legs (No.5) into the front left post (No.4), back right post (No.2), front right post (No.3) and back left post (No.1).
2. Insert the leg bolts (No.16 and No.17).
Step 2
1. Install the front structure / without a pipe (No.6) and back / with a pipe (No.7), then insert the nylon bolts and nuts.
Step 3
1. Install the left and right side structures (No.8 and No.9), then insert the nylon bolts and nuts (please pay particular attention to the location of the
side structures in order not to invert them; the distance of the holes at the end is different).
Step 4
1. Install the cylinder support (No.10) in the back and front right posts (No.2 and No.3), then insert the nylon bolts and nuts. The sticker on the cylinder must be on the outside.
2. Install the main stabilizers (No.12) on the left front post (No.4) and back left post (No.1), then install the spacers (No.13) between the main stabilizer and the left side structure (No.8) and insert the nylon bolts and nuts.
3. Position the main stabilizer with the sticker “Warning” facing the left back post (No.1).
4. Install the control box (No.26) between the top of the back left post (No.1) and the main stabilizer.
Step 5
1. Install the secondary stabilizers (No.14), then insert the nylon bolts and nuts.
2. Install the small stabilizers (No.15), then insert the nylon bolts and nuts.
3. Tighten all the nylon bolts and nuts installed in steps 1, 2, 3, 4 and 5.
Step 6
1. Install the back structure (No.51) and the front structure (No.50) into the side structures (No.52), then insert the nylon bolts and nuts.
2. Tighten right away all the nylon bolts and nuts.
3. Install the cables of the cylinder (D and C): attach the ends of the cables (screw-spindle) to the right side structure (No.52).
4. Install the lever cables (A and B): attach the end with the connection at the base of the right side structure (No.9), then attach the end of the cable
(screw-spindle) to the front left post (No.4) for cable A and to the left back post (No.1) for cable B.
5. Attach both pipes to the cylinder. The right pipe with the security valve. The angle pipe (45°) with the 45° nozzle. Then, attach the two other ends to
the hydraulic pump. Follow the colour codes.
Make the elevator go up and down completely (2 to 3 times) to remove air from the pipes.
6. Position the hydraulic pump box of the deck and anchor it so that it cannot move.
7. Bed adjustment:
- The cables of the cylinder (C and D) need no adjustment, tighten the eye bolt and install the spring washer and nut.
- The lever cables (A and B) serve to level the bed. Take a measurement at the four corners. The difference must not exceed 1/2” between the highest
and lowest corners. Adjustments are done by screwing or unscrewing the screw-spindle.
8. Install both central beds in the main bed structure. Adjust the central bed with the hull of your boat. The distance between the hull of the boat and
the structure of the bed must not exceed 1” (25.4 mm).
87
lifts manual:Layout 1 04/03/09 12:58 PM Page 88
GM–Hyd 45120 / 65120 Lit centrale
/ Bunks
88
lifts manual:Layout 1 04/03/09 12:58 PM Page 89
GM–Hyd 45120 / 65120 Guide
de coté / Step Rails
89
lifts manual:Layout 1 04/03/09 12:58 PM Page 90
Dépannage
Dépannage GM–Hyd 45120 /
65120
GM–Hyd 45120 / 65120
Problème
Lorsque la charge est levée, le lit
redescend seul
Signification
- tuyau du cylindre inversé
Solution
- charge trop lourde
- réinstallez les boyaux en suivant les codes de
couleurs
- défectuosité dans la pompe
- vérifiez le poids total de votre embarcation
- communiquez avec le fabricant
Le lit redescend trop rapidement
avec la charge
- valve de contrôle de débit mal ajustée
- charge trop lourde
- tournez la valve de contrôle de débit à la
pompe de 1/4 - 3/4 de tour dans le sens des
aiguilles d’une montre
- vérifiez le poids total de votre embarcation
Élévateur ne lève pas avec la
charge
- valve de contrôle de débit mal ajustée
- courant électrique trop faible, batterie
trop faible (12 V)
- courant électrique trop faible, fil de
rallonge non conforme (110 V)
- niveau d’huile dans le réservoir trop bas
- charge trop lourde
- boyaux mal serrés ou mal installés
- tournez la valve de contrôle de débit à la
pompe de 1/4 - 3/4 de tour dans le sens
contraire des aiguilles d’une montre
- rechargez la batterie
- remplacez le fil de rallonge par un plus gros
calibre / voir un électricien qualifié
- ajout d’huile hydraulique biodégradable ESSO
Univis Bio 40 Lorsque le lit est soulevé, le
niveau d’huile doit être à 1" en bas du haut
du réservoir
- vérifiez le poids total de votre embarcation
- réinstallez les boyaux ou resserrez les embouts
Fuite d’huile
- boyaux mal serrés ou mal installés
- niveau d’huile trop élevé
- réinstallez les boyaux ou resserrez les embouts
- enlevez le surplus d’huile
Lorsque le lit est soulevé, le niveau d’huile ne
doit pas dépasser 1" en bas du haut du
réservoir
Batterie ne garde pas sa charge
- panneau solaire mal dirigé
- connexion corrodée ou mal serrée
- batterie trop faible
Pompe ne fonctionne pas
- positionnez le panneau solaire sur son support
face au soleil de midi (12h00)
- nettoyez les bornes de la batterie ou serrez les
bornes
- utilisation trop grande dans une même
journée
- rechargez la batterie
- batterie défectueuse
- remplacez la batterie
- courant électrique trop faible, batterie
trop faible (12 V)
- rechargez la batterie
- courant électrique trop faible, fil de
rallonge non conforme (110 V)
- niveau d’huile dans le réservoir trop bas
- disjoncteur
- connexion corrodée ou mal serrée
- boyaux mal serrés ou mal installés
- remplacez le fil de rallonge par un plus gros
calibre / voir électricien certifié
- ajoutez de l’huile hydraulique biodégradable
ESSO Univis Bio 40 Lorsque le lit est soulevé,
le niveau d’huile doit être à 1" en bas du haut
du réservoir
- vérifiez le disjoncteur sur le réceptacle
GFI (110 V)
- nettoyez les bornes de la batterie ou serrez les
bornes
- réinstallez les boyaux ou resserrez les embouts
90
lifts manual:Layout 1 04/03/09 12:58 PM Page 91
Troubleshooting
Troubleshooting GM–Hyd 45120
/ 65120
GM–Hyd 45120 / 65120
Problem
When the load is raised, the bed comes
back down by itself
Reason
- reversed cylinder pipe
- load too heavy
- defective pump
Solution
- Reinstall the pipes according to colour
codes
- Check the total weight of your boat
- Contact the manufacturer
The bed comes down too quickly when
loaded
- debit control valve wrongly adjusted
- load too heavy
- Turn the pump debit control valve
1/4 - 3/4 turn clockwise
- Check the total weight of your boat
The elevator does not go up when
loaded
- Debit control valve wrongly adjusted
- Turn the pump debit control valve
1/4 - 3/4 turn counter clockwise
- electric current too weak, battery to
weak (12 V)
- recharge the battery
- electric current too weak, substandard
extension cable (110 V)
- replace the extension cable by a larger
size / see a qualified electrician
- oil level in tank too low
- add hydraulic biodegradable oil ESSO
Univis Bio 40 – When the bed is
raised, the oil level must be 1"
below the top of the tank
- load too heavy
- pipes not sufficiently tightened or
wrongly installed
- check the total weight of your boat
- reinstall the pipes or tighten the
nozzles
Oil leak
- pipes not sufficiently tightened or
wrongly installed
- reinstall the pipes or tighten the
nozzles
- oil level too high
- take out excess oil
When the bed is raised, the oil level
must be 1" below the top of the
tank
Battery does not stay charged
- solar panel wrongly positioned
- corroded connections or not sufficiently
tightened
Pump does not function
- position the solar panel on its support
so that it faces the noon sun (12:00)
- battery too weak
- clean the battery posts or tighten the
posts
- used too many times in one day
- recharge the battery
- defective battery
- replace the battery
- electric current too weak, battery too
weak (12 V)
- electric current too weak, substandard
extension cable (110 V)
- oil level too low
- breaker
- corroded connections or not sufficiently
tightened
- pipes not sufficiently tightened or
wrongly installed
- recharge the battery
- replace the extension cable by a larger
size / see a qualified electrician
- add hydraulic biodegradable oil ESSO
Univis Bio 40 – When the bed is
raised, the oil level must be 1" below
the top of the tank
- check the breaker on the receptacle
GFI (110 V)
- clean the battery posts or tighten the
posts
- reinstall the pipes or tighten the
nozzles
91
- Ê+ 1 -
$
%5$6*$8&+(
%5$6'52,7
),;$7,21(18
3/$48('(),;$7,21
*283,//(
528(
%28/21(18
e&5281</21
%28/21+(;$*21
&$%/(,12;&52&+(7
/( ) 7 $ 5 0
5,* + 7$5 0
8 ) , ; $ 7 , 2 1
) , ; $ 7 ,2 1 3 / $ 7 (
+,7&+ 3,1
: +(( /
8 % 2 / 7 /2 & . 1 8 7 +(; $*2 1% 2 / 7 6 7 $ ,1 / ( 6 6 & $ % / ( + 2 2 .
'(7$,/$
2/5% $%42!.30/24 42!.30/24 +)4
) 4 % - . / 0 ) µ # % 3 3 $ 5 7 6 1 4 ² /$&%520(48e%(&
&H GHVVLQ QH SHXW rWUH UHSURGXLW VDQV QRWUH DXWRULVDWLRQ
7KLV GUDZLQJ FDQQRW EH UHSURGXFH ZLWKRXW RXU DXWKRUL]DWLRQ
92
Ê ¿-/ , lifts manual:Layout 1 04/03/09 12:58 PM Page 92
Roue de transport /
Transport Kit
lifts manual:Layout 1 04/03/09 12:58 PM Page 93
93
lifts manual:Layout 1 04/03/09 12:58 PM Page 94
Marquise / Canopy
01 / 2007
Marquise / Canopy
1 – Boulonner les côtés de la marquise en utilisant les boulons 3/8" x 2-1/2".
Insérez les terminaisons de la marquise le plus loin possible dans les côtés.
Assurez-vous que les attaches sont dessous, à l’endroit où se terminent les tubes du dessus.
Serrez tous les boulons.
2 – Insérez les pattes de la marquise dans les quatre coins.
Assurez-vous qu’elles sont toutes de la même longueur.
Boulonnez les pattes en utilisant les boulons 3/8" x 4" ou 3/8" x 4-1/2", selon le modèle.
Serrez tous les boulons.
3 – Installez le cadre de la marquise sur les profilés en U.
Ajuster à partir du devant jusqu’à l’arrière selon la grandeur du bateau.
Boulonnez la marquise en utilisant les boulons 3/8" x 2-1/2".
Serrez tous les boulons.
4 – Note : pour les marquises de 27' uniquement
Installez les décharges de la marquise, tel que montré, à l’endroit où le surplomb est le plus long.
Serrez tous les boulons.
5 – Installez les décharges (58" de long) sur le dessus.
Les installer au tiers de la longueur de la marquise, aux deux extrémités.
Pour la marquise de 24' et 27', installez une 3e décharge au centre.
6 – Placez la toile sur le cadre en laissant un débordement égal sur tous les côtés.
(1) Tendez tous les quatre coins.
(2) Tendez les extrémités.
(3) Tendez les côtés.
Après quelques jours, lorsque la toile sera plus détendue, resserrez les courroies.
Mise en garde
- À la fin de la saison, retirer la toile du cadre.
- Au besoin, séchez-la avec un chiffon, roulez-la et entreposez-la dans un endroit sec.
- Si la toile reste en place durant l’hiver, elle pourrait endommager le cadre à cause d’une trop grande accumulation de neige.
1 – Bolt the canopy sides together using 3/8" x 2-1/2" bolts.
Slide canopy ends into sides as far as possible.
Make sure the tabs are underneath, where the top tube ends.
Tighten all the bolts.
2 – Insert the canopy legs into all four corners.
Make sure that they are all at the same height.
Bolt them using 3/8" x 4" or 3/8" x 4-1/2" bolts, depending on the model.
Tighten all the bolts.
3 – Install the canopy frame into the canopy channels.
Adjust from front to rear to fit boat.
Bolt the canopy using 3/8" x 2-1/2" bolts.
Tighten all the bolts.
4 – Note: for 27' canopy only
Install canopy braces as shown, where overhang is the longest.
Tighten all the bolts.
5 – Install braces (58" in length) on top.
Install them at 1/3 of the canopy’s length, at both ends.
For the 24' & 27' canopy, install a 3rd brace in the middle.
6 – Place canvas over the frame with equal overhang on all sides.
(1) Tighten all four corners.
(2) Tighten the ends.
(3) Then do the sides.
After a couple of days, as the canvas settles, tighten all the straps again.
Warning
- At the end of the season, remove the canvas from the frame.
- Wipe it dry if damp, roll it and store it in a dry place.
- If the canvas is left on during the winter, it could damage the frame because of a too large snow accumulation.
94
4
6 7 5 8 & 7 8 5 ( ' ( & ( 1 7 5 (
6 7 5 8 & 7 8 5 ( ' ( % 2 8 7
% 5 $ 6 % 2 8 / 2 1 + ( ; [ e & 5 2 8 1 < / 2 1 & ( 1 7 ( 5 ) 5 $ 0 (
( 1')5 $0 (
$ 5 0 + ( ; $ * 2 1 % 2 / 7 [ / 2 & . 1 8 7 ) 4 % - . / 0 ) µ # % 3 3 $ 5 7 6 1 4 ² /$&%520(48e%(&
Ê ¿-/ , &H GHVVLQ QH SHXW rWUH UHSURGXLW VDQV QRWUH DXWRULVDWLRQ
7KLV GUDZLQJ FDQQRW EH UHSURGXFH ZLWKRXW RXU DXWKRUL]DWLRQ
- Ê+ 1 -
lifts manual:Layout 1 04/03/09 12:58 PM Page 95
95
- Ê+ 1 -
4
%
6758&785('(&Ð7e
6758&785('(%287
% 5 $ 6 % 5 $ 6 % 2 8 / 2 1 + ( ; [ e & 5 2 8 1 < / 2 1 6 7 $ % , / , 6 $ 7 ( 8 5 & ( 1 7 5 $ /
6,' ()5 $ 0 (
( 1 ' ) 5 $ 0 (
$50
$50
+ ( ; $ * 2 1 % 2 / 7 [ / 2 &.1 8 7
& ( 1 7 5 $ / % 5 $ & (
) 4 % - . / 0 ) µ # % 3 3 $ 5 7 6 1 4 ² /$&%520(48e%(&
$
'(7$,/$
'(7$,/%
&H GHVVLQ QH SHXW rWUH UHSURGXLW VDQV QRWUH DXWRULVDWLRQ
7KLV GUDZLQJ FDQQRW EH UHSURGXFH ZLWKRXW RXU DXWKRUL]DWLRQ
96
Ê ¿-/ , lifts manual:Layout 1 04/03/09 12:58 PM Page 96
4
%
6758&785('(&Ð7e
6758&785('(%287
% 5 $ 6 % 5 $ 6 % 2 8 / 2 1 + ( ; [ e & 5 2 8 1 < / 2 1 6 7 $ % , / , 6 $ 7 ( 8 5 & ( 1 7 5 $ /
6,' ()5 $ 0 (
( 1 ' ) 5 $ 0 (
$50
$50
+ ( ; $ * 2 1 % 2 / 7 [ / 2 &.1 8 7
& ( 1 7 5 $ / % 5 $ & (
) 4 % - . / 0 ) µ # % 3 3 $ 5 7 6 1 4 ² /$&%520(48e%(&
Ê ¿-/ , $
'(7$,/$
'(7$,/%
&H GHVVLQ QH SHXW rWUH UHSURGXLW VDQV QRWUH DXWRULVDWLRQ
7KLV GUDZLQJ FDQQRW EH UHSURGXFH ZLWKRXW RXU DXWKRUL]DWLRQ
- Ê+ 1 -
lifts manual:Layout 1 04/03/09 12:58 PM Page 97
97
- Ê+ 1 -
%
6758&785('(&Ð7e
6758&785('(%287
% 5 $ 6 % 5 $ 6 % 2 8 / 2 1 + ( ; [ e & 5 2 8 1 < / 2 1 6 7 $ % , / , 6 $ 7 ( 8 5 & ( 1 7 5 $ /
6,' ()5 $ 0 (
( 1 ' ) 5 $ 0 (
$50
$50
+ ( ; $ * 2 1 % 2 / 7 [ / 2 &.1 8 7
& ( 1 7 5 $ / % 5 $ & (
) 4 % - . / 0 ) µ # % 3 3 $ 5 7 6 1 4 ² /$&%520(48e%(&
4
$
'(7$,/%
'(7$,/$
&H GHVVLQ QH SHXW rWUH UHSURGXLW VDQV QRWUH DXWRULVDWLRQ
7KLV GUDZLQJ FDQQRW EH UHSURGXFH ZLWKRXW RXU DXWKRUL]DWLRQ
98
Ê ¿-/ , lifts manual:Layout 1 04/03/09 12:58 PM Page 98
4
%
6758&785('(&Ð7e
6758&785('(%287
% 5 $ 6 % 5 $ 6 % 2 8 / 2 1 + ( ; [ e & 5 2 8 1 < / 2 1 6 7 $ % , / , 6 $ 7 ( 8 5 & ( 1 7 5 $ /
6,' ()5 $ 0 (
( 1 ' ) 5 $ 0 (
$50
$50
+ ( ; $ * 2 1 % 2 / 7 [ / 2 &.1 8 7
& ( 1 7 5 $ / % 5 $ & (
) 4 % - . / 0 ) µ # % 3 3 $ 5 7 6 1 4 ² /$&%520(48e%(&
Ê ¿-/ , $
'(7$,/%
'(7$,/$
&H GHVVLQ QH SHXW rWUH UHSURGXLW VDQV QRWUH DXWRULVDWLRQ
7KLV GUDZLQJ FDQQRW EH UHSURGXFH ZLWKRXW RXU DXWKRUL]DWLRQ
- Ê+ 1 -
lifts manual:Layout 1 04/03/09 12:58 PM Page 99
99
100
4
%
6758&785('(&Ð7e
6758&785('(%287
% 5 $ 6 % 5 $ 6 % 2 8 / 2 1 + ( ; [ e & 5 2 8 1 < / 2 1 6 7 $ % , / , 6 $ 7 ( 8 5 & ( 1 7 5 $ /
6,' ()5 $ 0 (
( 1 ' ) 5 $ 0 (
$50
$50
+ ( ; $ * 2 1 % 2 / 7 [ / 2 &.1 8 7
& ( 1 7 5 $ / % 5 $ & (
14 %
) 4 % - . / 0 ) µ # % 3 3 $ 5 7 6 3 4 $ ( 9 $
/$&%520(48e%(&
Ê ¿-/ , $
'(7$,/%
'(7$,/$
&H GHVVLQ QH SHXW rWUH UHSURGXLW VDQV QRWUH DXWRULVDWLRQ
7KLV GUDZLQJ FDQQRW EH UHSURGXFH ZLWKRXW RXU DXWKRUL]DWLRQ
- Ê+ 1 -
lifts manual:Layout 1 04/03/09 12:58 PM Page 100
4
%
6758&785('(&Ð7e
6758&785('(%287
% 5 $ 6 % 5 $ 6 % 2 8 / 2 1 + ( ; [ e & 5 2 8 1 < / 2 1 6 7 $ % ,/ , 6 $ 7 ( 8 5 & ( 1 7 5 $ /
6 7 $ % ,/ , 6 $ 7 ( 8 5 6,' ()5$ 0 (
( 1 ' ) 5 $ 0 (
$ 5 0 $ 5 0 + ( ; $ * 2 1 % 2 / 7 [ /2 &.1 8 7
& ( 1 7 5 $ / % 5 $ & (
%5 $ & (
14 %
) 4 % - . / 0 ) µ # % 3 3 $ 5 7 6 3 4 $ ( 9 $
/$&%520(48e%(&
Ê ¿-/ , $
'(7$,/%
'(7$,/$
&H GHVVLQ QH SHXW rWUH UHSURGXLW VDQV QRWUH DXWRULVDWLRQ
7KLV GUDZLQJ FDQQRW EH UHSURGXFH ZLWKRXW RXU DXWKRUL]DWLRQ
- Ê+ 1 -
lifts manual:Layout 1 04/03/09 12:58 PM Page 101
101
102
NO
40-6014
40-6015
40-6008
40-6013
40-5044
40-5045
40-5046
31-0209
31-0217
32-0003
ITEM
1
2
3
4
5
6
7
8
9
10
3
4
LEFT SIDE FRAME
RIGHT SIDE FRAME
END FRAME
ARCH FRAME
ARM 32"
ARM 44"
CENTRAL BRACE
HEXAGON BOLT 3/8-16 x 2-1/2"
HEXAGON BOLT 3/8-16 x 4-1/2"
LOCK NUT 3/8-16
PARTS
T-120AR
STRUCTURE DE CÔTÉ GAUCHE
STRUCTURE DE CÔTÉ DROITE
STRUCTURE DE BOUT
STRUCTURE DE L'ARCHE
BRAS 32"
BRAS 44"
STABILISATEUR CENTRAL
BOULON HEX. 3/8-16 x 2-1/2"
BOULON HEX. 3/8-16 x 4-1/2"
ÉCROU NYLON 3/8-16
PIÈCES
LAC BROME (QUÉBEC)
DE L'ESTRIE
1
1
1
1
1
3
1
10
6
16
QTÉ.
8
10
5
9
10
2
6
8
10
7
200901 / 60-3019
1
Ce dessin ne peut être reproduit sans notre autorisation
This drawing cannot be reproduce without our authorization
LES QUAIS
lifts manual:Layout 1 04/03/09 12:58 PM Page 102
lifts manual:Layout 1 04/03/09 12:58 PM Page 103
103
lifts manual:Layout 1 04/03/09 12:58 PM Page 104
Cable 2009
Modèle / Model
104
# Pièce / Part #
Cable
Qty
Longueur / Length
Treuil niveleur / Height winch
247-24
1
3/16 x 120"
Roue transport / transport kit
247-23
2
3/16 x 24"
GM 6120
247-22
1
3/16 x 264" - treuil / winch
GM 984
247-39
1
3/16 x 218 1/2" - treuil / winch
GM 1260
247-38
1
3/16 x 198"
GM 1263V
247-01
247-34
247-35
1
1
2
1/4 x 138" - treuil / winch
1/4 x 119" - devant / front
1/4 x 126 1/2" - coté / side
GM 1596
247-01
247-02
247-03
1
1
2
1/4 x 138" - treuil / winch
1/4 x 153 3/4" - devant / front
1/4 x 138 3/4" - coté / side
GM 2096
247-04
247-05
247-06
1
2
2
5/16 x 258" - treuil / winch
1/4 x 162 1/2" - coté / side
1/4 x 166 1/2" - arrière / back
GM 35108
247-07
247-08
247-09
1
2
2
5/16 x 270" - treuil / winch
1/4 x 174 1/2" - coté / side
1/4 x 181 1/2" - arrière / back
GM 35120
247-20
247-08
247-12
1
2
2
5/16 x 282" - treuil / winch
1/4 x 174 1/2" - coté / side
1/4 x 194" - arrière / back
GM 45108
247-25
247-21
247-09
1
2
2
5/16 x 270" - treuil / winch
5/16 x 174" - coté / side
1/4 x 181 1/2" - arrière / back
GM 45120
247-26
247-21
247-12
1
2
2
5/16 x 282" - treuil / winch
5/16 x 174" - coté / side
1/4 x 194" - arrière / back
GM 55120
247-26
247-16
247-13
1
2
2
5/16 x 282" - treuil / winch
5/16 x 190 1/2" - coté / side
5/16 x 192 3/4" - arrière / back
GM–Hyd 45120
247-28
247-29
247-30
2
1
1
5/16 x 202 1/2" - levier
5/16 x 80" - cylindre court
5/16 x 209" - cylindre long
GM–Hyd 65120
247-31
247-32
247-33
2
1
1
3/8 x 202 3/4" - levier
3/8 x 79 1/4" - cylindre court
3/8 x 208 1/4" - cylindre long
LAC BROME (QUÉBEC)
D E L 'E S T R I E
# 3 = C Ô T É G A U C HE / L E F T S I D E # 4
# 5 = CÔTÉ DROIT / RIGHT SIDE # 6
A = CÔTÉ GAUCHE / LEFT SIDE
C = CÔTÉ DROIT / RIGHT SIDE
D
ANNEXE -AS I D E V I EW
V U E DE C Ô TÉ
GM 1263V / GM 1596
200701 / 60-2017
Ce dessin ne peut être reproduit sans notre autorisation
This drawing cannot be reproduce without our authorization
L ES Q U AI S
lifts manual:Layout 1 04/03/09 12:58 PM Page 105
105
L ES Q U AI S
LAC BROME (QUÉBEC)
#2
ANNEXE -B-
B
F RO N T VIEW
VU E A VANT
GM 1263V / GM 1596
#1
200701 / 60-2018
Ce dessin ne peut être reproduit sans notre autorisation
This drawing cannot be reproduce without our authorization
106
D E L 'E S T R I E
lifts manual:Layout 1 04/03/09 12:58 PM Page 106
LAC BROME (QUÉBEC)
D E L 'E S T R I E
#3
A
F R O N T VI E W
VUE A VAN T
#2
G M 2 0 9 6 / G M 3 5 1 0 8 -1 2 0 / G M 4 5 1 0 8 - 12 0 / G M 5 5 1 2 0
ANNEXE -C-
#1
200701 / 60-2019
Ce dessin ne peut être reproduit sans notre autorisation
This drawing cannot be reproduce without our authorization
L ES Q U AI S
lifts manual:Layout 1 04/03/09 12:58 PM Page 107
107
L ES Q U AI S
LAC BROME (QUÉBEC)
#8
C
ANNEXE -D-
#9
V U E D E D E S S U S / T O P V IE W
R E A R V IE W
V U E A R R IÈ R E
G M 2 0 9 6 / G M 3 51 0 8 -1 2 0 / G M 4 51 0 8 -1 2 0 / G M 5 51 2 0
D
# 10
200701 / 60-2020
Ce dessin ne peut être reproduit sans notre autorisation
This drawing cannot be reproduce without our authorization
108
D E L 'E S T R I E
lifts manual:Layout 1 04/03/09 12:58 PM Page 108
LAC BROME (QUÉBEC)
D E L 'E S T R I E
S ID E V I E W
VU E DE CÔTÉ
G M 2 0 9 6 / G M 3 5 1 0 8 -1 2 0 / G M 4 5 1 0 8 -1 2 0 / G M 5 5 1 2 0
# 4 = C Ô T É G AU C H E / L E F T S I D E # 5
# 6 = C Ô TÉ DRO IT
/ R I G H T S ID E # 7
B = CÔTÉ GAUCHE / LEFT SIDE
E = C Ô TÉ D R O IT / RIG H T SID E
ANNEXE -E-
200701 / 60-2021
Ce dessin ne peut être reproduit sans notre autorisation
This drawing cannot be reproduce without our authorization
L ES Q U AI S
lifts manual:Layout 1 04/03/09 12:58 PM Page 109
109
- Ê+ 1 -
/$&%520(48e%(&
$ $ 9 $ 1 7 ) 5 2 1 7
% $55,Ê5(5($5
!..%8%&
) 5 2 1 7 9 , ( :
6 5 %!6 ! . 4
' - ( 9 $ ' - ( 9 $ ! $ 9 $ 1 7 ) 5 2 1 7
" $ 5 5 ,Ê 5 ( 5 ( $ 5
&H GHVVLQ QH SHXW rWUH UHSURGXLW VDQV QRWUH DXWRULVDWLRQ
7KLV GUDZLQJ FDQQRW EH UHSURGXFH ZLWKRXW RXU DXWKRUL]DWLRQ
110
Ê ¿-/ , lifts manual:Layout 1 04/03/09 12:58 PM Page 110
/$&%520(48e%(&
Ê ¿-/ , #
$
#
!..%8%'
6 ,'(9,(:
6 5 % $ % # ¼ 4 ²
' - ( 9 $ ' - ( 9 $ $
&H GHVVLQ QH SHXW rWUH UHSURGXLW VDQV QRWUH DXWRULVDWLRQ
7KLV GUDZLQJ FDQQRW EH UHSURGXFH ZLWKRXW RXU DXWKRUL]DWLRQ
- Ê+ 1 -
lifts manual:Layout 1 04/03/09 12:58 PM Page 111
111
lifts manual:Layout 1 04/03/09 12:58 PM Page 112
Canada
770 Lakeside
Lac Brome (Québec)
J0E 1R0
Sans frais:
Tél.:
Fax.:
Internet:
112
USA
P.O. Box 531
Richford, VT
05476–0531
(888) 539–5331
(450) 539–4334
(450) 539–5331
www.docks.qc.ca
[email protected]
Canada
770 Lakeside
Brome Lake (Quebec)
J0E 1R0
Toll free:
Tel.:
Fax.:
Web:
USA
P.O. Box 531
Richford, VT
05476–0531
(888) 539–5331
(450) 539–4334
(450) 539–5331
www.docks.qc.ca
[email protected]
Printed in Canada
DE L'ESTRIE
T-120AR
Ce dessin ne peut être reproduit sans notre autorisation
LES QUAIS
2
LAC BROME (QUÉBEC)
1
4
7
8
10
6
5
3
8
ITEM
NO
1
2
3
4
5
6
7
8
9
10
40-6014
40-6015
40-6021
40-6013
40-5044
40-5045
40-5046
31-0209
31-0217
32-0003
10
PIÈCES
PARTS
STRUCTURE DE CÔTÉ GAUCHE
STRUCTURE DE CÔTÉ DROITE
STRUCTURE DE BOUT
STRUCTURE DE L'ARCHE
BRAS 32"
BRAS 44"
STABILISATEUR CENTRAL
BOULON HEX. 3/8-16 x 2-1/2"
BOULON HEX. 3/8-16 x 4-1/2"
ÉCROU NYLON 3/8-16
LEFT SIDE FRAME
RIGHT SIDE FRAME
END FRAME
ARCH FRAME
ARM 32"
ARM 44"
CENTRAL BRACE
HEXAGON BOLT 3/8-16 x 2-1/2"
HEXAGON BOLT 3/8-16 x 4-1/2"
LOCK NUT 3/8-16
10
QTÉ.
1
1
1
1
1
3
1
10
6
16
200912 / 60-3020
This drawing cannot be reproduce without our authorization
9
Ce dessin ne peut être reproduit sans notre autorisation
LES QUAIS
T-6312
DE L'ESTRIE
LAC BROME (QUÉBEC)
1
5
2
3
ITEM
NO
1
2
3
4
5
40-6022
40-6019
40-5058
31-0209
32-0003
PIÈCES
STRUCTURE DE CENTRE
STRUCTURE DE BOUT
BRAS 28"
BOULON HEX. 3/8-16 x 2-1/2"
ÉCROU NYLON 3/8-16
PARTS
CENTER FRAME
END FRAME
ARM 28"
HEXAGON BOLT 3/8-16 x 2-1/2"
LOCK NUT 3/8-16
QTÉ.
1
1
4
4
4
200912 / 60-3021
This drawing cannot be reproduce without our authorization
4
DE L'ESTRIE
T-9618
Ce dessin ne peut être reproduit sans notre autorisation
LES QUAIS
2
7
LAC BROME (QUÉBEC)
1
8
A
6
B
4
3
DETAIL A
ITEM
1
2
3
4
5
6
7
8
NO
40-6023
40-6024
40-6020
40-5044
40-5045
31-0209
32-0003
40-5046
PIÈCES
STRUCTURE DE CÔTÉ GAUCHE
STRUCTURE DE CÔTÉ DROITE
STRUCTURE DE BOUT
BRAS 32"
BRAS 44"
BOULON HEX. 3/8-16 x 2-1/2"
ÉCROU NYLON 3/8-16
STABILISATEUR CENTRAL
PARTS
LEFT SIDE FRAME
RIGHT SIDE FRAME
END FRAME
ARM 32"
ARM 44"
HEXAGON BOLT 3/8-16 x 2-1/2"
LOCK NUT 3/8-16
CENTRAL BRACE
QTÉ.
1
1
1
1
3
8
8
2
DETAIL B
200912 / 60-3022
This drawing cannot be reproduce without our authorization
5
DE L'ESTRIE
T-9621
Ce dessin ne peut être reproduit sans notre autorisation
LES QUAIS
2
7
LAC BROME (QUÉBEC)
1
8
A
6
B
4
3
DETAIL A
ITEM
1
2
3
4
5
6
7
8
NO
40-6025
40-6026
40-6020
40-5044
40-5045
31-0209
32-0003
40-5046
PIÈCES
STRUCTURE DE CÔTÉ GAUCHE
STRUCTURE DE CÔTÉ DROITE
STRUCTURE DE BOUT
BRAS 32"
BRAS 44"
BOULON HEX. 3/8-16 x 2-1/2"
ÉCROU NYLON 3/8-16
STABILISATEUR CENTRAL
PARTS
LEFT SIDE FRAME
RIGHT SIDE FRAME
END FRAME
ARM 32"
ARM 44"
HEXAGON BOLT 3/8-16 x 2-1/2"
LOCK NUT 3/8-16
CENTRAL BRACE
QTÉ.
1
1
1
1
3
8
8
2
DETAIL B
200912 / 60-3023
This drawing cannot be reproduce without our authorization
5
DE L'ESTRIE
T-10821
7
2
LAC BROME (QUÉBEC)
1
8
A
Ce dessin ne peut être reproduit sans notre autorisation
LES QUAIS
6
B
4
3
ITEM
1
2
3
4
5
6
7
8
NO
40-6017
40-6018
40-6016
40-5044
40-5045
31-0209
32-0003
40-5046
PIÈCES
STRUCTURE DE CÔTÉ GAUCHE
STRUCTURE DE CÔTÉ DROITE
STRUCTURE DE BOUT
BRAS 32"
BRAS 44"
BOULON HEX. 3/8-16 x 2-1/2"
ÉCROU NYLON 3/8-16
STABILISATEUR CENTRAL
PARTS
LEFT SIDE FRAME
RIGHT SIDE FRAME
END FRAME
ARM 32"
ARM 44"
HEXAGON BOLT 3/8-16 x 2-1/2"
LOCK NUT 3/8-16
CENTRAL BRACE
DETAIL A
QTÉ.
1
1
1
1
3
8
8
2
DETAIL B
200912 / 60-3024
This drawing cannot be reproduce without our authorization
5
DE L'ESTRIE
7
T-10824
2
LAC BROME (QUÉBEC)
1
8
A
Ce dessin ne peut être reproduit sans notre autorisation
LES QUAIS
6
B
4
3
ITEM
1
2
3
4
5
6
7
8
NO
40-6027
40-6028
40-6016
40-5044
40-5045
31-0209
32-0003
40-5046
PIÈCES
STRUCTURE DE CÔTÉ GAUCHE
STRUCTURE DE CÔTÉ DROITE
STRUCTURE DE BOUT
BRAS 32"
BRAS 44"
BOULON HEX. 3/8-16 x 2-1/2"
ÉCROU NYLON 3/8-16
STABILISATEUR CENTRAL
PARTS
LEFT SIDE FRAME
RIGHT SIDE FRAME
END FRAME
ARM 32"
ARM 44"
HEXAGON BOLT 3/8-16 x 2-1/2"
LOCK NUT 3/8-16
CENTRAL BRACE
DETAIL A
QTÉ.
1
1
1
1
3
9
9
3
DETAIL B
200912 / 60-3025
This drawing cannot be reproduce without our authorization
5
DE L'ESTRIE
7
T-12024
2
LAC BROME (QUÉBEC)
1
8
A
Ce dessin ne peut être reproduit sans notre autorisation
LES QUAIS
6
B
4
3
ITEM
1
2
3
4
5
6
7
8
NO
40-6029
40-6030
40-6021
40-5044
40-5045
31-0209
32-0003
40-5046
PIÈCES
PARTS
DETAIL A
QTÉ.
STD
STRUCTURE DE CÔTÉ GAUCHE LEFT SIDE FRAME
1
STRUCTURE DE CÔTÉ DROITE RIGHT SIDE FRAME
1
STRUCTURE DE BOUT
END FRAME
1
BRAS 32"
ARM 32"
1
BRAS 44"
ARM 44"
3
BOULON HEX. 3/8-16 x 2-1/2"
HEXAGON BOLT 3/8-16 x 2-1/2" 9
ÉCROU NYLON 3/8-16
LOCK NUT 3/8-16
9
STABILISATEUR CENTRAL
CENTRAL BRACE
3
HYD
1
1
1
0
4
9
9
3
DETAIL B
200912 / 60-3026
This drawing cannot be reproduce without our authorization
5
DE L'ESTRIE
T-12027
2
7
LAC BROME (QUÉBEC)
1
8
A
Ce dessin ne peut être reproduit sans notre autorisation
LES QUAIS
6
B
4
3
9
ITEM
1
2
3
4
5
6
7
8
9
NO
40-6031
40-6032
40-6021
40-5044
40-5045
31-0209
32-0003
40-5046
58-0023
PIÈCES
STRUCTURE DE CÔTÉ GAUCHE
STRUCTURE DE CÔTÉ DROITE
STRUCTURE DE BOUT
BRAS 32"
BRAS 44"
BOULON HEX. 3/8-16 x 2-1/2"
ÉCROU NYLON 3/8-16
STABILISATEUR CENTRAL
STABILISATEUR 5'
PARTS
LEFT SIDE FRAME
RIGHT SIDE FRAME
END FRAME
ARM 32"
ARM 44"
HEXAGON BOLT 3/8-16 x 2-1/2"
LOCK NUT 3/8-16
CENTRAL BRACE
BRACE 5'
QTE.
STD HYD
1
1
1
1
3
9
9
3
2
1
1
1
0
4
9
9
3
2
DETAIL A
DETAIL B
200912 / 60-3027
This drawing cannot be reproduce without our authorization
5