1
Maplewood ConnectEd User Guide
For AMDSB Elementary Teachers Grades 1 to 8
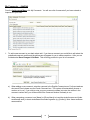
Table of Contents
Login Information
……………………………………….
Page 3
Pop-Up Blockers
………………………………………
Page 4
Internet Browsers
........................................................ Page 4
Main Menu
……………………………………….
Page 5
Student Menu
……………………………………….
Page 5
Attendance / Seating Plan
………………………………………
Page 6-7
Individual Achievement Entry
………………………………………
Page 8-11
Class Achievement Entry
………………………………………
Page 12-13
Class Comments by Group
………………………………………
Page 14-15
My Comments – Add/Edit
………………………………………
Page 16
Filtering Comments
………………………..……………..
Page 17
Import/Export Comments
……………………………………....
Page 18-19
Report Card Details
…..…………………………………
Page 20
Report Card Spell Checker
……………………………………
Page 21
Missing Marks/Comment
…………………………………….
Page 22
Printing Report Cards
………….………………………….
Page 23
Progress Report Card
…………………………….……….
Page 24
Standardized School-Wide Assessments ………………….…………….
Page 25
Appendix 1 (Class Codes)
……………………………….…….
2
Page 26
Maplewood ConnectEd - Teachers’ Guide
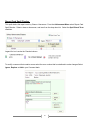
Login
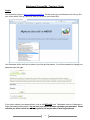
You connect by going to: https://maplewood.amdsb.ca. On this screen you scroll down the list until you find
your school name, click on it and it will take you directly to your school URL.
Your username will be the first four letters of your first and last names. You will be prompted to change your
password upon first login.
If you wish to change your password later, click on the MY Profile Icon. Passwords must be 8 characters in
length and alpha/numeric/capital. Do not have your Internet Browser remember your password. Please
note that you will be locked out of the program for 30 minutes after 5 failed login attempts.
3
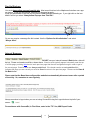
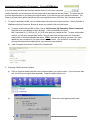
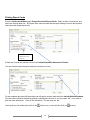
Pop-Up Blockers
You must always allow pop-ups from this site. Most saved functions in the Maplewood interface use a pop
up window. If pop ups are Blocked, data may not be saved properly.
If pop ups are blocked on the site you will receive a Red message indicating so. If you right click on the icon
below it will let you select “Always allow Pop-ups from This Site”.
Or you may receive a message like this instead. Use the “Options for this site button” and select
“Always allow”.
Internet Browsers
DO NOT use your internet browser’s Back button, data will
be lost. Please use bread crumb links, shown above. Bread crumbs typically appear horizontally near the top
of a Web page, providing links back to each previous page that the user navigates through in order to get to
the current page. Bread crumbs are always underlined. If the bread crumbs are not underlined this
indicates the page you are currently on must be Saved to return to the previous page. Please use the Save &
Go Back button.
Please note that the Board has configured the website to automatically disconnect users after a period
of inactivity. So, remember to save regularly.
Always remember to logout when you are not using ConnectEd using the Logout button at top left of your
screen.
For assistance with ConnectEd, in First Class, enter in the “TO” line, MW Report Cards.
4
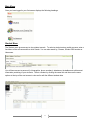
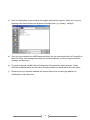
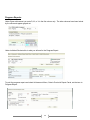
Main Menu
Once you have logged in your first screen displays the following headings.
Student Menu
The Student menu gives access to view student records. To select a student enter a partial surname, enter a
few letters of the surname and then click Search. You can also search by, Classes, Student OEN number or
Homeroom.
You will have access to personal (i.e biographics, phone numbers), attendance, timetables and achievement
information pertaining to your students. Select a student by clicking the name link and then use the menu
options at the top of the next screen to view and/or edit the different student data.
5
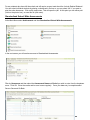
Attendance / Seating Plan Menu
Teachers can set up class or homeroom seating plans simply by accessing the Attendance and Seating Plan
menu. Here you will be able to set dimensions for the seating plan and place students. The homeroom
attendance portion of this menu is locked.
1. From the main menu, click the Attendance and Seating Plan link. On the following screen select
Attendance and Seating Plan again.
2. Before looking at the class layout, you may want to first change the seating plan layout, click the
currently displayed link under the Seating heading, 7 x 5. Above it shows 7 columns (wide) by 5
students in each row.
3. If the layout is fine, you can go ahead and select your homeroom or class from the list. If not modify the
dimensions and select Save & Go Back
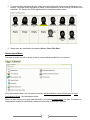
4. A grid displaying the seating plan will appear. You'll see student pictures or placeholder if no images
are available. The students' names will appear below the image. The seating plan can be printed.
6
5. To move students around on the grid, simply click and hold the left mouse button and drag to a new
location. The name will be highlighted in yellow. In the image below, we are moving Ivan Dixon to the
row below. The 'Empty' title will be replaced with the image and student name.
6. Always save any modification by selecting Save or Save & Go Back.
Achievement Menu
This menu provides you with a variety of tools to enter achievement data for your students.
At the Achievement Menu, you can select to enter by Individual Student, Class Achievement or Class
Comments by Group. See descriptions below.
When you start entering your report card information, you should regularly save your data. The board has
configured the website to automatically disconnect users after 30 minutes of inactivity.
7
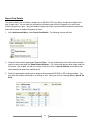
Entering Achievement for an Individual Student
Using this menu you can enter marks and comments for an individual student. This screen is also the entry
point for student that are ESL/ELD or IEP. For teachers who like to compose student comments
individually, this is a good option. If marks and comments were previously entered, this option is also an
excellent way to check your entries. Select Individual Student from the Achievement Menu.
For any students who have left the school and still require a report card check the Show Deleted Students
BEFORE choosing the subject. Click on the subject and then student.
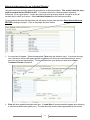
1.
A new screen will appear. Select the appropriate Term under the student’s name. If you select a wrong
term, that term’s columns will appear greyed out because the office has locked these terms to ensure
entry into the correct reporting term. To use comments from your library you need to have Show
Comments Preview checked off.
2.
Enter the letter grade/mark beside each topic. A Letter Box will now automatically appear when selecting
a column that allows letter grades entry. The letter box only contains letters appropriate for that column.
8
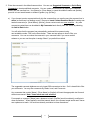
3. Enter the comment in the default comment box. You can use Suggested Comments or Quick Entry
Comments to insert predefined comments. You can create new comments by entering the comment
directly into the comment box. Use {Name} or {Given Name} to insert the student's name and {he/she}
pronoun to insert words based on student's gender (e.g. {his/her}).
a)
If you choose to enter comments directly into the comment box you must be sure the comment box is
active (so that there is a flashing cursor). Be sure to Insert Context Sensitive Words if creating new
teacher comments (ie. {Usual Name}, {he/she}), these context words are case sensitive. Any new
comments created here can be added to My Comments bank directly from this screen by selecting
the Add to Bank button.
You will notice that the program has automatically numbered this comment using
next available number. Click on the Save button. There are two options to how to filter your
comments. You can re-number the comment in your comment bank if you use a number
schema or you can use the option to assign filters if you prefer this method.
The suggested comment database can only import 500 comments at a time. So it is beneficial to filter
your comments. You may filter comments by Grade, Level, and Course etc.
Any comments that contain {Name}, {Given Name} or {his/her} will insert the appropriate text for each
student once saved. Note: these words are case sensitive.
For example, a comment "{Name} was a pleasure to teach. {He/She} would consistently contribute to
class discussions”. When applied to a student named James, the comment saved would read "James
was a pleasure to teach. He would consistently contribute to class discussions."
9
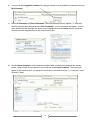
b)
You can use the Suggested Comment link (top right corner) to insert predefined comments from your
My Comments.
c)
Select All Comments or Filtered Comments if filters have been previously applied. To search for
filtered comments apply filters and select Find Comments. A list of comments will appear. You can
either double click the comment you wish to use or highlight and use the Insert button to move the
comment from the suggested box to the Comment entry box.
d)
Use the Quick Comment to enter comments numbers when numbers to be assigned are already
known. Enter number of the comment in your bank and select Insert Comment. The number will
appear in the comment area. You can enter more than one comment at a time. i.e. comment 1 insert,
comment 5 insert.
10
e)
Save and the comments will now appear.
f)
Use the Spell Check button to spell check the comment just entered.
g)
If the scroll bar appears in the Comment box, the comment may be too long for the report card. Click
the Comment Preview button to see exactly how the comment will appear in the report card. The
Preview button will also translate the Quick Comment number entries into actual comments, and if you
like the comments, you may click Apply Comment to show the comment text rather than
numbers. You must still save the comment for it to be applied to Report Card. Once saved, the
comments will turn red if you have exceeded the report card comment area.
h)
Clicking any of the Save options will save all the information on the page. Clicking Save & Next will
save the information for the current student and then load the page for the next student alphabetically
in the list. Similarly, Save & Previous will save and then load the page for the previous student. You
can also have the option to Save & Go Back or just to Save.
i)
To verify your Report Card entries for this student use the Print Verification Sheets link. The link is
found in the top left hand corner of the screen. The verification reports are created in PDF format.
Note: Adobe Acrobat Reader must be installed if you are planning to print reports.
11
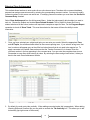
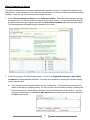
Entering Class Achievement
This method allows teachers to enter marks for an entire class at once. Teachers with a comment database
prepared can assign comments as well by entering the corresponding comment number. You can only modify
comment numbers in this screen not actual text. If modifying comment numbers you must have the Use Quick
Comment Entry checked.
Select Class Achievement form the Achievement Menu. Under the topics specify which subject you want to
work on. Choose the Subject and include Show Deleted Students. This is helpful for those who have a
student who have left the school, and are still required to complete a report for them. For the Progress Report
remember to check off Show Totals. This must be selected so that users will have the ability to enter
information.
1.
Once you have selected your subject and topic you can enter your marks. Select the appropriate Term
and All Topics, the software should default to the current reporting term. If you select a wrong term, that
term’s columns will appear grey as the office has locked terms that do not need to be reported on. To
apply comments to the whole class make sure that the Teacher Comment #’s is chosen. Enter the
comment number in the box appearing in the comment area. You can enter the complete class at once.
Remember to save often while entering by class. By selecting the Save and go back button, it takes you
back to the main Class Achievement screen.
2.
By default, the mark entry tabs vertically. When adding numerical marks this is appropriate. When adding
Learning Skills and Comment #’s you may wish to uncheck the Tab Vertically box. This allows you to tab
horizontally (top right corner of the screen).
12
3.
Another feature has been added to allow teachers to use the keyboard arrow/enter keys rather than the
tab key. Please check the Use Arrow/Enter Keys checkbox to use this feature.
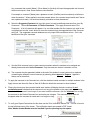
4.
A ‘Letter Box’ will automatically appear when selecting a column that allows letter grades entry. The letter
box only contains letters appropriate for that column. Letters grades or indicators can be entered in the
“Grade”, “Interview” and “Learning Skills” columns.
5.
For Comment Options choose Teacher Comment #’s if you have My Comments defined
(see page 19).
a)
The comment may be appended (added to the end of the student's current comment) or replaced
(overwriting the student's current comment) by selecting either Append or Replace radio buttons.
The default in Maplewood ConnectEd is always Append.
b)
Enter comment numbers into the Comment Box. Separate each comment number by a comma ‘,’ or
a plus sign ‘+’. Once saved, the comments will turn to text and/or turn red if you have exceeded the
report card comment area.
c)
If you have entered the wrong comment you can correct it by entering the correct comment number
but make sure that the Replace button is checked off and save.
6.
Please save your work on a regular basis. In the Class Achievement screen you have two options to
save your work. Use Save to save and keep the page open or use Save & Go Back to return to your
class lists.
7.
To verify your Report Card entries for this class use the Print Verification Sheets link. The verification
reports are created in PDF format. Note: Adobe Acrobat Reader must be installed if you are planning to
print reports.
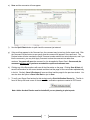
8.
When you save, a new pop up screen is presented saying “Processing Information, Please Wait”. Once
the page has been refreshed, the form will disappear. While this program is processing, it is important not
to touch any keys in order maintain data integrity.
13
Class Comments by Group
This option provides an area to change multiple student comments at once (i.e. students that may have like
achievement – Level 4 students etc.) As well, this option allows you to view and modify an individual student’s
comment. Currently, you cannot modify marks using this screen.
1.
Select Class Comments by Group from the Achievement Menu. Select the terms and topics and sort
the student list if you wish by using the red arrow at top of each column. For any students who have left
the school and still require a report card check the Show Deleted Students before choosing the subject.
The following screen will appear listing the students in your class.
2.
Enter the comment in the default comment box. You can use Suggested Comments or Quick Entry
Comments to insert predefined comments. Or create new comments by entering the comment directly
into the comment box.
a)
If you choose to enter comments directly into the comment box. The comment box must be active
(select so that there is a flashing cursor). Be sure to ‘Insert Context Sensitive Words’ if creating new
teacher comments (ie. {Usual Name}, {he/she}), these context words are case sensitive. Any new
comments created here can be added to My Comments bank directly from this screen by selecting
the Add to Bank button.
14
Any comments that contain {Name}, {Given Name} or {he/she} will insert the appropriate text for each
student once saved. Note: these words are case sensitive.
For example, a comment "{Name} was a pleasure to teach. {He/She} would consistently contribute to
class discussions." When applied to a student named James, the comment saved would read "James
was a pleasure to teach. He would consistently contribute to class discussions."
b)
Select the Suggested Comment link (top right corner) to insert predefined comments from your ‘My
Comments’. Select All Comments or Filtered Comments. Then apply filters and select Find
Comments. A list of comments will appear. You can either double click the comment you wish to use
or highlight and use the ‘Insert’ button to move the comment from the suggested box to the Comment
entry box. The suggested comment database can only import 500 comments at a time. So it is be
beneficial to filter your comments.
c)
Use the Quick comment entry to enter comment numbers when the numbers to be assigned are
already known and select Insert Comment. Only the comment number is inserted, not text.
d)
The comment may be appended (added to the end of the student's current comment) or replaced
(overwriting the student's current comment) by selecting either Append or Replace. Append is
always set as the default.
3.
To apply the comment in the Comment box, click the checkbox beside a student or multiple students in the
Apply column and then click Save or Save & Go Back to attach the comment to those students.
4.
Placing the mouse over the comment beside each student will display the entire comment. A red
exclamation mark indicates that the comment is too long to be printed on the report card without being
truncated. If the comment is too long or if you want to edit the comment, click the clipboard icon to copy
the comment to the Default Comment box and make your changes. The red exclamation mark will
disappear when the comment is saved and is no longer too long.
5.
To verify your Report Card entries for this class use the ‘Print Verification Sheets’ link. The link is found in
the top left hand corner of the screen. The verification reports are created in PDF format.
Note: Adobe Acrobat Reader must be installed if you are planning to print reports.
15
My Comments – Add/Edit
From the Achievement Menu click My Comments. You will see a list of comments if you have entered or
imported into your bank.
1.
To add a new comment to your bank select add. If you have a comment you would like to edit select the
underlined comment number and the edit screen will appear for you to make corrections. After you are
finished select Save Changes & Go Back. This will bring you back to your list of comments.
a)
When adding a new comment, enter the comment in the English Comment area. For those teachers
who teach French please use the French Comment box. The system will automatically choose a
number not in use. If you wish to enter your own comment numbers just enter the number in the
comment number field, you will be notified if the Comment Number is already in use.
b)
When composing a comment, use {Name} or {Given Name} to insert the student's name and {male
word/female word} to insert words based on student's gender (e.g. {his/her}). Note: these words are
case sensitive.
16
Applying Filters
Under the Filter options you have different option available to filter your comments.
Courses - you will see a list of your classes (i.e. AD2 –Drama)
Topics - subject and strand; you can choose more than one per comment.
Comment Type - strength, area of improvement and next steps
Grades - 1-8
Levels - 1-4, R
Departments – Not Applicable
Terms - Progress, Report 1, Report 2, KCHK (Kindergarten Checklist) and KFIN (Kindergarten Final)
Category - Knowledge and Understanding, Thinking and Inquiry, Communication and Application
1.
The Filter area is only visible after a comment is initially saved. Therefore, filters can be set up when you
edit an existing comment. If you are defining a comment for the first time, click Save, rather than Save and
Go Back to have the comment Filter screen available. If you add filters to your Comment list you will be
able to search a smaller group of comments when within the Individual Student or Class Comments by
Group areas. The different filters that can be added to your comments are listed below. Select the “+” sign
beside each type of filters to expand and define. More than one filter can be defined on an individual
comment. To select multiple choices in the course, comment type, grades, levels hold down the Ctrl key
and at the same time using your mouse, click on the values you want selected.
2.
To print a copy of your comments, click on Print Comments in the top right corner of the My Comments
window. Select My Comments. Using the checkboxes, check off which fields you want included and then
click the VIEW button at the bottom right of the screen. This creates a PDF in a pop window.
17
Importing and Exporting Comments – ConnectEd/Media-x
If you are leaving a school and moving to another school in our board, comments
can be exported in a text format from the old school and be imported into the new school. The export text file
must be requested prior to you leaving the original school, if you wait too long your data will be cleared. The
Export (red) and Import (green) buttons are at the top right hand corner of the main My Comments screen.
1. To import comments into MW, click on Achievement, My comments, Import comment. Select eTeacher or
Maplewood as your file source. Browse to where you saved the file and click Import.
a)
b)
To export comments from MW to share, click on Achievement, My Comments, Export Comments.
Save this file to your desktop or home directory. It will automatically be named
MW_Comments12_01_2010.txt (12_01_2010 is the date you created the file). To share with another
teacher, you will have to email them the file. They will then have to import them into ConnectEd,
making sure to choose the Maplewood option. It WILL overwrite any existing comment if you have
added any new comments to your new school comment bank. You will have to re-number your
existing comments before importing from your previous comment bank.
It will not transfer from school to school like eTeacher did.
2. Exporting eWeb Comment Libraries
a)
Click on Comment builder and then on the comment library you wish to export. If you have more than
one, you will have to export them separately. Select the export Library icon.
b)
When this screen appears select save.
18
c)
Save it to the desktop of your machine, the program automatically names it, library.xml. If you are
exporting more than one library the program will number them. (e.g. Library1, Library2).
d)
Once you have exported your eWEB comments library you can now import them into ConnectEd or,
open First Class, new message and attach your comment libraries. You do not need to send this
message, just leave as is.
e)
To import comments into MW, click on Achievement, My comments, Import comment. Select
eTeacher or Maplewood as your file source. Browse to where you saved the file and click Import.
f)
Please import your comment database into the new school prior to making any additions or
modifications to My Comments.
19
Report Card Details
This option enables you to indicate a student who is ESL/ELD, IEP or the NA for a subject not taught at the
time of report card. You can enter the information individually under Student Programs or by class under
Student Programs by Class. Using the Student Programs by Class is more efficient therefore the instructions
below will be based on Student Programs by Class.
1.
At the Achievement Menu, select Report Card Details. The following schreen will load.
2.
Select the class and the appropriate Term and Topic. For any students who have left the school and still
require a report card check the Show Deleted Students. For a strand that has not been taught under the
NA column, click on ALL, this will put a check in each box. Click on Save & Go Back, and continue with
other classes that need to be marked as NA.
3.
Select the appropriate checkboxes to assign student programs ESL/ELD or IEP for those students. You
can select the student individually or by clicking on ALL. Save your work by selecting Save or Save & Go
Back.
20
Report Card Spell Checker
This spell checks the report cards by Class or Homeroom. From the Achievement Menu select Report Card
Spell Checker. Select a class or homeroom, and term from the drop down list. Select the Spell Check Term
checkbox.
Legend for icon’s under the Checked column
To modify a comment that contains errors select the error number that is underlined to make changes Select
Ignore, Replace or Add to your Comment bank.
21
Select close and it will take you back to the class list.
Searching for Missing Marks / Comments
Use this feature will find missing marks, learning skills, comments and comments that overrun the space
provided. Select the appropriate term and the options you wish to search for. Select the search button and a
list of student names will appear indicating the errors.
A report screen will appear. The red ‘X’ indicates that there is missing data.
The report lists the student name and class for you to review prior to printing report cards.
22
Printing Report Cards
From the Achievement Menu select Ontario Provincial Report Cards. Select a class or homeroom, and
term from the drop down list. By Report Date, enter the date that the report cards go home to the students,
and choose the proper report card.
This date is
defaulted by the
program.
If there are 2 homeroom teachers click on the Include Alternative Homeroom Teacher.
You can choose to print the report cards by homeroom or class.
For any students who have left the school and still require a report card check the Include Deleted Students.
You can select individual students by placing a checkmark in the box or you can select ‘ALL’ if you want to
print the entire homeroom. Click on the view button. This will open the .pdf
At this point you can either print (click on the
printer icon), or save this file (Click on
23
to save).
Progress Reports
Under Class achievement you enter D, W, or V in the first column only. The other columns have been locked
by the office and appear greyed out.
Under Individual Students this is what you will see for the Progress Report.
To print the progress report card select Achievement Menu, Ontario Provincial Report Cards, set the term to
Progress Report.
24
For any students who have left the school and still require a report card check the ‘Include Deleted Students’.
You can select individual students by placing a checkmark in the box or you can select ‘ALL’ if you want to
print the entire homeroom. Click on the view button. This will open the .pdf. At this point you can either print
(click on the printer icon), or save this file (click save).
Standardized School-Wide Assessments
At the Main Menu select Achievement and then Standardized School-Wide Assessments.
In the next screen you will see have access to Standardized Assessments.
Filter by Homeroom and then select the Assessment Name and Period you wish to enter from the dropdown
menu. Click OK. Enter the results and be sure to save regularly. Once your data entry is complete select
Save or Save and Go Back.
25
Appendix 1
Course Codes
EN – Language
MA – Mathematics
PA-Physical Education
PP-Healthy Active Living
SN-Science and Technology
HS – Social Studies (grades 1 to 6 only)
FS – Core French (grades 4 to 8 only)
FI – French Immersion (all grades)
CG – Geography (grades 7 & 8 only)
CH – History (grades 7 & 8 only)
AD- Drama
AM- Music
AT-Dance
AV- Visual Arts
26