1
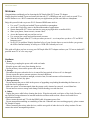
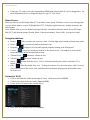
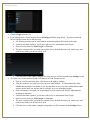
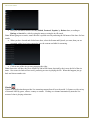
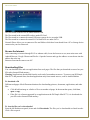
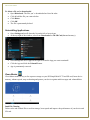
Mini PC User Guide DCSimple Mini PC™ Powered by Android™ DC SIMPLE September 23, 2014 Mini PC User Guide Contents Welcome ................................................................................................................................................................................. 2 Cautions .................................................................................................................................................................................. 2 What’s in the box .................................................................................................................................................................... 3 Port Description ...................................................................................................................................................................... 3 Connection .............................................................................................................................................................................. 3 Home Screen ........................................................................................................................................................................... 4 Navigation buttons.................................................................................................................................................................. 4 Connect to Wi-Fi ..................................................................................................................................................................... 4 Set Date and Time ................................................................................................................................................................... 5 Add Google Account ............................................................................................................................................................... 5 Updating 1Channel ................................................................................................................................................................. 7 Customize the Home Screen ................................................................................................................................................... 7 Launcher.................................................................................................................................................................................. 8 Watching TV Shows and Movies ............................................................................................................................................. 8 Using SD Card ........................................................................................................................................................................ 11 Explorer ................................................................................................................................................................................. 11 Browse the Internet .............................................................................................................................................................. 12 Downloading Files ................................................................................................................................................................. 12 Uninstalling Applications ...................................................................................................................................................... 13 Clean Master ....................................................................................................................................................................... 13 Troubleshooting .................................................................................................................................................................... 14 Mini PC User Guide Welcome Congratulations and thank you for choosing the DCSimple Mini PC™ smart TV adapter. Simply plug this Android™ powered smart stick into any TV’s HDMI port and you’re ready to watch TV or surf the Internet over a Wi-Fi connection and run your applications just like on a tablet or smartphone. Enjoy this powerful and easy-to-use Wi-Fi /Internet HDMI smart stick to: • Use your TV just like an Android™ powered tablet or smartphone • Access the Google Play store to download thousands of applications • Stream thousands of TV shows and movies (stop paying high cable or satellite bills!) • Share your photos, listen to music, stream videos • Access the Internet and your on-line services • Use your on-line e-mail and social network accounts • Take the DCSimple Mini PC™ with you when you travel… use it anywhere you have a TV and Wi-Fi Internet access! • No Wi-Fi? No problem! Simply download a few of your favorite shows or movies before you go onto the 8GB of internal memory or add up to a 32GB SD Card and you’re set! This guide will show you how to set up your DCSimple Mini PC™ adapter and turn your TV into an Android™ powered smart TV in a few easy steps. Cautions 1. Power · Do not plug or unplug the power cable with wet hands. · Keep the power cable away from heating devices. · Do not put heavy items on the power cable or the unit. 2. Storage · Disconnect the power when the device is unused for long periods of time or if it is damaged. · Do not expose the unit to extreme moisture, dust and vibrations. · Store the unit away from direct sunlight, excessive heat, fire and extreme cold environments. · Store the unit in a cool, dry place. 3. Data protection · Do not interrupt the power while in the process of upgrading or uploading/downloading the firmware, to avoid data loss or program error. · Make sure power is not interrupted when the storage card is inserted or removed, to avoid data loss. · Do not insert or remove storage card during file downloading, to avoid data loss. 4. Others · Unplug the power cable before cleaning the device. Wipe the unit with a soft piece of dry cloth. Do not let any liquid or foreign substance be inserted inside the unit that could result in a short circuit with fire or electrocution hazards. · When connect the unit and TV with the HDMI cable, disconnect power first. · Do not attempt disassembling or remodeling of the unit. When the unit is not working properly, please contact DC Simple for repair. · When connecting the unit to other devices, read the user guide of other devices for safety cautions. Do not connect the unit to incompatible products. Mini PC User Guide What’s in the box • DCSimple Mini PC™ HDMI stick • USB-to-Micro USB power cable to provide power to DCSimple Mini PC™ • AC adapter with USB port (in case TV’s USB does not supply enough power) • HDMI extension cable Note: The DCSimple Mini PC™ has a micro-SD card slot that supports cards up to 32 GB Port Description USB Host Port - Connect to USB mouse, USB keyboard or mobile Hard Drive etc. HDMI Port - Connects to HDMI port on TV (supports up to 1080P) Mini USB Port - Connects to USB cable to supply power SD Card Slot- Insert SD card into the slot. You can play files on the SD card RJ45 Network Port(only on cam model) - Connect to network cable to surf the web RCA A/V Ports(only on cam model) – Connects to A/V ports on older model TVs Connection Connect to TV • Plug the DCSimple Mini PC™ directly into an available HDMI port on the back or side of the TV set. Depending on the model, use the HDMI plug on the device or the included HDMI cable. Connect external devices • Plug the USB dongle for the wireless mouse and/or keyboard into the USB port on the DCSimple Mini PC™. If only using a mouse, a soft keyboard will be provided on the screen. Connect power • Plug the small end of the provided USB cable into the micro USB port on the DCSimple Mini PC™, connect the other end into an available USB port on the TV. If there are no USB ports on the TV, use the provided power supply attachment. Note: Ports on your unit may not be in same position as shown. Use caution when connecting cables, ensuring to plug into correct port. • Turn on the TV. When the Mini PC is powered on an LED light will be visible. Mini PC User Guide • Using your TV remote, select the corresponding HDMI input that the Mini PC stick is plugged into. For more information on how to change the input see your TV User Guide. Home Screen When you turn on your DCSimple Mini PC™, the Home screen opens. The Home screen is your starting point to access all the features on your DCSimple Mini PC™. It displays application icons, widgets, shortcuts, and other features. At the bottom of the screen, the Status bar displays the time, information about the status of your DCSimple Mini PC™ and function buttons. (Return, Home, Camera[screenshots], Power, Hide. In respective order) Navigation buttons • • Return – Home – • Programs – • Camera – Allows you to take screenshots of the current screen. Screenshots are stored in the Screenshots folder on the internal flash memory. • Volume Down – • • Volume Up – Increases volume on unit. Power – Powers down the device. Device will automatically power back on when the TV is turned on again. • Hide – Hides the toolbar from view. To bring it back into view, move the mouse until it is out of view at the bottom of the screen, click and hold left mouse button, drag upwards until toolbar comes back into view. Takes you back one screen at a time. Clicking right mouse button performs same action. Takes you directly back to the homescreen. Displays a list of recently opened programs running in the background. Decreases volume on unit. Connect to Wi-Fi • • • Click on the Status bar in the bottom right of screen. In the menu click on Wi-Fi. Click to put a check in the box beside Turn on Wi-Fi. Locate your Wi-Fi name in the list and click it. • Enter your Wi-Fi password and click Connect. Mini PC User Guide Note: Once the Wi-Fi is connected you will see the signal icon in the bottom right Status bar. This icon will be white if the Date and Time is not set correctly. Once Date and Time is set it will turn blue, which indicates proper internet connection. Set Date and Time • • • Locate and open Settings from one of the home screens. Scroll through list on left and click Date & Time. Remove any checks from Automatic date & time, Automatic time zone. • • • Click Select time zone, then locate your time zone in the list and select it. Press Done to return to the Date & Time window. Click Set date, click the month that is showing in the middle on the left, type the first 3 letters of the month you want on the keyboard that appears at the bottom. Click Next to go to day and year. When finished click Done. Put a check in the box beside Use 24-hour format to change the time to 24-hour format. Click Choose date format to set how the date format is shown. Click Set time, set the correct time. Click Done when finished. Once all date and time settings are correct, put the checks back in the Automatic date & time & Automatic time zone boxes at the top. • • • • Add Google Account Adding a Google Gmail account allows you to access content within 1Channel and the Google Play Store. • Open Settings from the home screen. • Scroll down the left to locate Accounts. • Click +Add Account. Mini PC User Guide • • • Choose Google from the list. If you already have a Gmail account, choose Existing and follow steps below. If you do not already have a Gmail account, skip to the next step. For Existing account, type in email address and password then click arrow to the right. Uncheck newsletter option if you do not wish to receive information from Google. On next screen choose to Join Google+ or Not now. The next screen provides you with sync options, leave checked the items you want to sync and uncheck any items you do not wish to sync. Click the arrow to the right to complete the setup and you will be returned to the Settings screen. To create a new Gmail account to add click New on the Add Account screen. Type in your First and Last name, click arrow to the right to continue. Type the username you wish to use for your new email address. It will automatically check whether that username is available or not, you may have to try a few times with different alphanumeric names until you find one that is available, try to use something unique. Once a username is accepted you are prompted to create a password, must be alpha-numeric, minimum 8 characters. Uncheck newsletter option if you do not wish to receive information from Google. On next screen choose to Join Google+ or Not now. The next screen provides you with sync options, leave checked the items you want to sync and uncheck any items you do not wish to sync. Click the arrow to the right to complete setup and you will be returned to the Settings screen. Mini PC User Guide Updating 1Channel In order to stream movies and shows from 1Channel you will need to update and make a one-time purchase of tokens totalling $6 to unlock the content. Click on the 1Channel icon to open it. Click on Update at the bottom of the list. In the list of tokens select the Prime Token first. You will be prompted to accept the purchase, click Ok. You may be asked to enter your Gmail account credentials. Choose method of payment (credit card, Google Play card or PayPal). Enter your payment details. If using credit card ensure that your name and address are exactly as they are on your bill. This will create a Google Wallet account linked to your Gmail account. Next choose the 1Channel Token, you should be able to make the purchase without re-entering your payment details. Lastly choose the Icefilms Token. Once all tokens have been purchased the 1Channel app will be updated and unlocked to stream all the content. Customize the Home Screen You can add application icons, shortcuts, widgets, and other items to any part of the Home screen. You can also change the wallpaper. Rolling the wheel in the middle of the mouse allows you to scroll through different screen panels or scroll through files. Rolling up scrolls to the left, rolling down scrolls to the right. Also use the mouse wheel to scroll up or down within settings and apps. To set Wallpaper • Click Settings, Display, then choose Gallery, Live Wallpapers or Wallpapers. • Click Gallery to use a picture that you have copied to your DCSimple Mini PC™ or have stored on an SD card. You can crop the picture before setting it as a wallpaper. • Click Live wallpapers to open a scrolling list of animated wallpapers installed on your DCSimple Mini PC™. Some live wallpapers change according to the time of day, in response to clicking the screen or offer other information. Some live wallpapers have a Settings button. • Click Wallpapers to open a screen where you can sample the wallpaper images that come with your DCSimple Mini PC™. • Slide the miniature images left and right to view the samples. Click a sample to view a larger version. • Click Save or Set wallpaper. To drag an item from the Launcher to the Home screen • Left click & hold the item you want to move, until it displays a glow around it. Don’t lift your finger. • The system automatically comes back to the Home screen and the item displays on the Home screen. • Drag the item to where you want it, and then lift your finger. To move an item on the Home screen • Left click & hold the item you want to move, until it displays a glow around it. Don’t lift your finger. Drag the item to a new location on the screen. • Pause at the edge of the screen to drag the item onto another Home screen pane. • When the item is where you want it, lift your finger. To remove an item from the Home screen Mini PC User Guide • • • Left click & hold the item you want to remove, until it displays a glow around it. Don’t lift your finger. You will see X Remove at the top of the screen. Drag the item to X Remove. When the icon turns red, lift your finger. Launcher Click the Launcher icon at the bottom middle of the screen to view all installed applications. Roll the middle mouse wheel to scroll through the screens of applications and widgets. To open an application • On the Home screen, click the Launcher icon to access all applications. Move the cursor to the desired application, then click the left mouse button to open the application. To switch to a recently used application • Click the Programs icon located on the left of the toolbar at the bottom of the screen. This window displays a list of all recently opened apps still running in the background. To close a running program • Click and hold the left mouse button on the program until a small menu comes up, click Remove from list. Watching TV Shows and Movies There are a couple of pre-installed programs that provide access to free TV shows and movies. These programs gather content from multiple internet sources and display it to you in an easy to navigate format. The videos are streamed directly from the internet, therefore we cannot guarantee the quality or content of the video. Showbox Showbox is a very easy to navigate program that provides a very large variety of popular shows and movies, both old and new. • Left click on Showbox icon from the home screen, program opens to Movies section. • Sections are listed across the top of the screen. Movies, Shows, My Library, Updates. Movies – Displays full thumbnail list of movies Shows – Displays full thumbnail list of TV shows My Library – Displays list of shows or movies you have added to My Library Updates – Displays list of the most recent shows or movies as they have been aired, most recent first • The Movies and Shows sections feature a Search box that allows you to search for a particular movie or show. Click on the Search box in the top left corner to display the keyboard, begin typing the name of the show, results start appearing in the list below as they match what you’re typing. Note: You usually don’t have to type the full name of the show before it appears in the list. If the show doesn’t appear after you have typed the full name, check the spelling. If it is spelled correctly and still doesn’t appear, then the show is not available in Showbox. • To add a show or movie to My Library, locate and click on the show or movie you want. Mini PC User Guide • Once open, click on Add to Library in the top left corner of the show screen. • • • • • • • Show will now be listed under My Library for quick access. To play a movie or show, locate the show to watch and left click to open it. Select the Season from the drop down list on the right under the cover picture. Click the episode to watch. (A popup ad will appear, just click the X in the top right corner) Choose the resolution. (Low(SD), Med(720p), High(1080p)) Click Watch Now. Video will begin loading, may take up to a minute. If you click Download, video will download to the internal memory of the unit or to the SD Card if one is inserted, and will be displayed under Downloads within My Library. This allows you to watch the video without Internet connection. To Pause, Fast-forward or Rewind a show during play, click anywhere on the screen to bring up the playback controls. • 1Channel The 1Channel application is a great source for a wide variety of shows and movies. Usually it will have shows that are not available in Showbox. Note: 1Channel requires a Google account to operate and you must buy Tokens to unlock the content. Tokens are a one-time total purchase of $6-$10. • Left click on the 1Channel icon to open. • Select from the list of content access options (1Channel TV/Movies, IceFilms TV/Movies) • Once you have chosen either 1Channel or Icefilms content, another list appears. Mini PC User Guide • Here you can choose between recently Added, Featured, Popular, by Release date, according to Ratings or Search for a title by typing the name or using the A->Z search. Note: When typing out a search, ensure the title is spelled correctly and using the full name of the show for best results. • When you have located and clicked on a show, select the Season and Episode you want, then you are presented with a list of sites reported to have the content available for streaming. • Click on one of the sites to start streaming the video. Note: Some sites will have the file in SD(DVD) and/or HD format, depicted by the icon to the left of the site name. Also some site links will not work, producing an error in playing the file. When this happens just go back and choose another site. FilmOn FilmOn is an application that provides live streaming content from all over the world. It features a wide variety of channels listed by genre, culture, country or content. Clicking on a channel automatically starts the live stream of what is playing at that time. Mini PC User Guide Clicking the Full Screen icon in the bottom left of the show window will bring the video to full screen mode. Some channels feature a guide displaying show times. Click the guide for that channel. icon to the left of the channel to open the Using SD Card You can safely insert the SD card into your DCSimple Mini PC™ any time when the unit is on or off. Gently slide the card into the SD card slot until you hear a click sound. “Preparing SD card” will be displayed on the status bar for one second. Note: The card is not flush with the case of the unit when inserted fully, so you may need to use your fingernail to push it all the way in. You can safely remove the SD card from your DCSimple Mini PC™ any time the unit is turned off. If you need to remove the SD card while your DCSimple Mini PC™ is on, you must unmount the storage card form the device first, to prevent corrupting or damaging the storage card. • Click Settings, to open the Settings application. • Scroll down left side to locate Storage. • Scroll down right side to locate SD Card. Click Unmount SD card. You can now safely remove the SD card from your DCSimple Mini PC™. Explorer Use mouse to click the Explorer icon on the Home screen or in the Launcher, then the following file manager interface appears. Mini PC User Guide The files stored on the device are under Internal Flash The files stored in the external SD card are under SD Card. The files stored in a connected external USB mass storage device are under USB. The files stored in a connected external SATA Hard Drive are under SATA. Network Places allows you to connect to files and folders which have been shared from a PC or Storage device connected to your local network. Browse the Internet After connecting to internet through Wi-Fi or ethernet cable, locate the browser to use, most units come with Android Browser, Google Chrome and Firefox. Open the browser and type the address or search term into the address bar at the top. Browsers function the same as on a PC. Downloading Files You can download files and even applications from web pages. The files that you download are stored on your SD card or Internal Flash memory. Warning! Applications downloaded from the web can be from unknown sources. To protect your DCSimple Mini PC™ and personal data, download applications only from trusted sources, such as Android Market. To download a file Different webpages offer different mechanisms for downloading pictures, documents, applications, and other files. • Click & hold an image or a link to a file or to another webpage. In the menu that opens, click Save, open or copy. • If the file is in a format supported by an application on the DCSimple Mini PC™, it is downloaded to your SD card or Internal Flash memory. To view the files you’ve downloaded From the left Homescreen panel, locate and click Downloads. The files you’ve downloaded are listed in order. Click a file to open it. Mini PC User Guide To delete a file you’ve downloaded • Open Downloads. The files you’ve downloaded are listed in order. • Click & hold the file you want to delete. • Click Delete. • Click OK. • The file is permanently deleted. Uninstalling Applications • • Open Settings and scroll down the list on the left to locate Apps. At the top right of the window, select from Downloaded or On SD Card(Internal memory). • • • Scroll through the list of Apps on the right to locate the App you want to uninstall. Click the App and click the Uninstall button. App is permanently removed. Clean Master Clean Master makes it easy to free up more storage on your DCSimple Mini PC™ and SD card, boost device memory, enhance speed, stop overheating and protect your device against malicious apps and vulnerabilities. Junk File Cleaning Delete cache and residual files to reclaim storage, boost speed and improve the performance of your device and SD card. Mini PC User Guide Memory Boost Boost your games and apps, free up memory (RAM) and speed up your device. Our 1 Tap Boost features make it easy to optimize directly from your homescreen. Antivirus Scan the system, pre-installed and user-installed apps to keep your device safe from viruses, trojans, vulnerabilities, adware and spyware. Keep your privacy safe by scrubbing personal info from your device. App Manager Uninstall unwanted apps or bloatware and back up important ones. Some devices will be able to move apps to the SD card as well as uninstall pre-installed and system apps. Our own Picks section lets you find useful apps that match your interests. Troubleshooting 1. No signal on the HDTV • Check if the HDMI cable is securely connected. • Check if you have selected the correct HDMI input on your HDTV. 2. The DCSimple Mini PC™ will not power on. • Check if the power connector has been completely plugged into the DC socket of your DCSimple Mini PC™. • Check if the power supply is stable. 3. Cannot connect to network • Make sure the network cable is securely connected and the Ethernet works well.(For Ethernet capable units) • Make sure Wi-Fi network is connected and the security key for the encrypted network is correct. • Remove check from Enable Wi-Fi, wait until Wi-Fi is completely off then put check back in to re-enable WiFi. • Make sure you select the correct IP address settings. 4. Streaming videos pause and start frequently • Check speed of internet connection by using the Speedtest app. Connection should be at least 5Mbps download, although streaming may work on as low as 2.5Mbps. • If connection speed is lower than 5Mbps you may need to reset your internet modem/router. 5. Slow Internet connection or low speed test results • Power cycle modem and/or router by following the steps below Unplug the cable modem and router (if separate unit) from the electrical outlet. Wait 10 seconds, then plug the cable modem back into the electrical outlet. Mini PC User Guide Wait 30 seconds then plug your router back in. Retest speed when internet connection is restored.