1
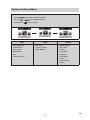
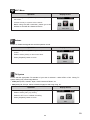
ACTION CAMERA GC-XA1 Read this first Before use, be sure to read “Read This Before Using the Camera” (p.2 -p.4) Detailed User Guide Read This Before Using the Camera Safety Instructions • Before using the product in water, be sure to read p.3 and to use the product correctly. • Malfunction due to misuse by the customer is not covered by warranty. • Do not use this product in water deeper than 5 m (16.4 ft) or for longer than 30 minutes. • Do not drop, puncture or disassemble the camera. • Use the camera with care. Rough handling may damage the internal components. • Do not expose the camera to high temperature. • Please notice that the camera body may become warm when operating it for an extended period. • Test for proper operation before using the camera. • Only use accessories supplied by the manufacturer, such as adapter and battery. • In order to prevent the External Short Circuit of battery, please use the battery bag. • Remove the battery if the camera is not going to be used for long periods. • When temperature of the camera reaches to 67°C (152°F), an alarm icon will pop out ( reaches to 70°C (158°F), the camera will turn off automatically for safety concern. ). Once it Product Information • Designs and specifications of the camera are subject to change without notice. This includes primary product specifications, software, and this user’s manual. • This User’s Manual is a general reference guide for the camera. • The illustrations in this manual may not be the same as the actual design of your camera and those you see on the LCD screen. Using at low temperatures On ski slopes, at high elevations, and in other cold areas where the temperature drops below freezing 0°C (32°F), keep the camera warm inside clothing or other insulating material. • Prolonged contact with the metallic portions of the exposed can trigger frostbite and other damage to the skin. • Temperatures between 0 and -10°C (32 and 14°F) temporarily lower battery performance, reducing the time available for photography. • Charging is not possible at temperatures below freezing 0°C (32 °F). • Turning on the thoroughly chilled camera can result in lower LCD monitor performance, producing a slightly darker screen, afterimages, and other temporary issues. • Leaving snow and water droplets on the camera in a freezing environment can produce ice crystals inside the gaps surrounding the power button, control buttons, speaker, microphone, etc., interfering with button operation and reducing sound levels. 2 EN IMPORTANT: Water, dust, and shock resistance • Water resistance The camera operates for 30 minutes at depths up to 5 m (16.4 ft). This is equivalent to the IEC Standard publication 529 IPX8. • Dust resistance This is equivalent to the IEC Standard publication 529 IP6X. • Shock resistance This camera clears company testing compliant with MIL-STD-810F Method 516.5 Shock: dropping onto plywood 3 cm (1-3/16”) thick from a height of 2 m (6.5 ft). Note • Do not immerse the camera in hot springs or other water with temperatures of 40°C (104°F) or above. • Do not expose the camera to high pressures or shocks associated with swift currents, waterfalls, diving into water, etc. • Dropping or otherwise exposing the camera to shocks voids the waterproof warranty. Contact your JVC Service representative. • This camera does not float. Use a strap or other measure to prevent losing it in the water. • Before opening or closing the cover, wipe off any moisture and move to a low-humidity environment. • Immediately wipe off any detergent, soap, hot spring, bath additive, oil, sunscreen, or other chemicals coming into contact with the camera. Make sure that the cover rim seal, the SD slot, and the jacks are intact and free of hair, lint, sand, dust, and other foreign matter. If there is any damage, contact your distributor or JVC Service representative. securely close the cover. Press the cover until it closes with an audible snap. 3 EN IMPORTANT: Water, dust, and shock resistance After Using After underwater use or exposure to dusty conditions, promptly rinse the camera with fresh water and thoroughly dry. 1. Hold down the power button for a second to turn off the camera. Make sure that the cover is securely closed. 2. Rinse with fresh water. Immerse the camera in a container with enough fresh water to cover completely it. Operate the buttons to force out any material caught in the gaps around them. Do not clean with soap, detergent, alcohol, or other chemicals. Do not rinse the camera under taps or other powerful water sources 3. Dry. Thoroughly wipe with a dry, soft cloth and dry in a well ventilated location out of direct sunlight. Face the microphone opening downward or take other measures to eliminate any water trapped inside. Allowing sand to dry on the camera risks scratching. Wash it off and wipe the camera dry. Thoroughly wipe off any foreign matter or water droplets inside the bottom cover. Notes • Do not dry with a hair dryer or other heat source. Degraded water resistance can result. • Do not leave the camera for extended periods in freezing temperatures or at temperatures of 40°C (104°F) or above: under direct sunlight, in a parked car in the hot sun, or near a heater, for example. Degraded water resistance can result. • After using the camera in or near the ocean, first soak it for ten minutes in abundant fresh water to dissolve the salt and then rinse it with more fresh water. • Do not leave the camera in salt water or with salt water droplets on it. Corrosion, discoloration, and degraded water resistance can result. • Detach the strap before rinsing the camera in fresh water. • Remove all water droplets before connecting cables or charging the camera. • We shall bear no responsibility for data lost due to water immersion. • We recommend replacing the seal annually to maintain water resistance. Contact your JVC Service representative. (Charges apply.) • Always keep the battery cover closed before use. • Attach with proper tripod and install with the product with good care in case of slipping off. • Do not contact with any metal material to the metal parts of the product when operate in case of breakdown. 4 EN Contents Read This Before Using the Camera .................................................... 2 Section 1 Getting to Know Your Camera............................................ 6 Section 2 Getting Started..................................................................... 9 Section 3 Enjoying the Record Mode............................................... 12 Section 4 Enjoying the Playback Mode............................................ 18 Section 5 Setting Your Camera ........................................................ 21 Section 6 WiFi to PC-WiVideo Program .......................................... 25 Section 7 WiFi to Mobile-WiVideo Program..................................... 29 Section 8 WiFi to Cloud-Ustream...................................................... 37 Section 9 Viewing Photos and Videos on TV................................... 40 Section 10 Viewing Video & Photo on PC.......................................... 41 Section 11 Specifications and System Requirements...................... 42 Section 12 Troubleshooting................................................................ 44 Section 13 Wi-Fi Warning.................................................................... 46 Cautions Remember that this unit is intended for private consumer use only. Any commercial use without proper permission is prohibited. (Even if you record an event such as a show, performance or exhibition for personal enjoyment, it is strongly recommended that youobtain permission beforehand.) Trademarks TM • HDMI is a trademark of HDMILicensing, LLC. • Windows® is either registered trademark or trademark of Microsoft Corporation in the United States and/or other countries. • Macintosh is a registered trademark of Apple Inc. • iMovie, iPhone and iPhoto are trademarks of Apple Inc., registered in the U.S. and other countries. • YouTube™, the YouTube logo and Android™ are trademarks and/or registered trademarksof Google Inc. • Intel, Intel Core, and Pentium are trademarks or registered trademarks of Intel Corporation or its subsidiaries in the United States and other countries. • Wi-Fi, Wi-Fi logo, Wi-Fi CERTIFIED, Wi-Fi CERTIFIED logo, WPA, and WPA2 are trademarks or registered trademarks of Wi-Fi Alliance. • Other product and company names included in this instruction manual are trademarks and/or registered trademarks of their respective holders. • Marks such as ™ and ® have been omitted in this manual. 5 EN Section 1 Getting to Know Your Camera Overview This camera with a 5 Mega Pixel sensor can take H.264 format videos. The H.264 technology allows for extended video recording with less memory. High quality images 5 mega-pixels can also be delivered smoothly. With a color LCD monitor, you can view and examine the video and photo easily. The camera also features video recording at an HD resolution of 1920x1080. You can also connect it to an HDTV via an HDMI cable, and easily playback the recorded high-definition videos on the wide screen HDTV. Moreover, the camera is equipped with WiFi module and the exclusive application. You can broadcast live streaming of the camera on Ustream website via WiFi. Your family and friends can watch the live video streaming of the camera on their smart phones, tablets, or computers. The camera can also connect with your computer via WiFi. It can be a wireless webcam for your on-line video chatting. Through WiFi connecting, you can transfer the videos and photos on your computer, and monitor live video from your camera. White balance can either be adjusted automatically or changed manually. A 5x digital zoom helps you to control over the video and photo you take. The varied effect options, such as Time Lapse, make recording more fun. Note • Partial memory of the built-in memory is used for the camera’s Firmware code and software. • For the WiFi connectivity working correctly, make sure the bundled WiVideo program (for Windows® based systems only) is installed and the wireless LAN module of your computer is activated. Standard Accessories Unpack the package and make sure all standard accessories listed are included: • • • • • • • Battery Pack USB Cable Flexible Mount Flexible Mount Base Goggle Mount Lens Protector Cover LCD Protector Film 6 EN Front View [Record]/[SET]/[Play]/[Pause]Button [Tele]/[Next] Button Power Button Speaker [Wide]/[Previous]Button Microphone Power/Charge Light LCD Monitor Lens Bottom View Tripod Socket Strap Hook Protect from dropping with a strap or similar measures 7 EN Side/Rear View [MENU]/[Delete] Button [Playback]/[Exit] Button Battery Slot (inside) HDMI Mini Connector (inside) Port/Slot Cover Latch SD Slot (inside) Mini USB 2.0 Port (Inside) Tripod Mounting Socket 8 EN Section 2 Getting Started Loading the Battery Before using the camera, you must load the supplied Lithium-ion rechargeable battery. 1.To open cover, follow and push 2 directions as shown. 2.Press the button down and then push the cover outward. 3.Insert the battery according to the correct polarity marks ( + or -). 4.Close the battery cover firmly. 1 2 Note • Different battery types and surrounding temperatures may affect the battery performance. • Never expose the battery to a heating equipment (e.g., microwave oven) and attempt to dispose of a battery by burning or by throwing it into a fire. Heat can cause the battery to explode and/ or release caustic liquid, both which may possibly cause serious injury. • Turn the power off and stop using the battery if you observe the condition of excessive heat on the battery. 9 EN Charge your battery You must use JVC authenticated adapter (AC-V17LU) and the USB cable. Connect USB cable, press < / > to select [Adapter], and then press [SET] button. A blinking light will indicate active charging. In adapter charging mode, the full charging time for a depleted battery is about 3.5 hours and the light will turn off automatically after the charging is completed. In PC USB charging mode, a longer charging time is required.(about 5.5 hours) Note • Never charge the battery by a method other than as instructed. Doing so may cause a fire or explosion possibly resulting in serious injury. • Use JVC authenticated adapter (AC-V17LU) only with the indicated power supply voltage. • Use with any other power supply voltage might cause electric shock. • Be sure that the power outlet you plug the adapter into is easily accessible. When you need to disconnect power from the camera, be sure to unplug the power cord from the electrical outlet. • It is not feasible to take a video while adapter is applied, though Endless REC/Time Lapse would still work. Inserting and Removing a SD Card (Optional) 1.Remove the battery cover and the battery. 2.Insert the memory card into the slot until it locks properly. 3.To remove an installed SD card, press the card inwards to release it. 4.When the card pops out, gently remove it from its slot. 5.Recommended memory capacity: 2GB or above. 10 EN Turning the Video Camera On • To turn on the camera: • Press the [Power Button] for two second to turn it on. Configuring the Initial Date and Time Setup • The time setting screen appears to allow you to setup date and time: Operation Display Screen 1. Adjust the numeric value by pressing 2. Press the [SET button]( ) to go to the next setting. / Getting Started • To record video: Press the MENU button then press the [ SET button ] ( ). Select icon) on the screen to switch to the Video mode ( ). Press the [ Record button video. To stop recording, press it again. ( on-screen ] to record • To take a photo: Press the MENU button then press the [ SET button ] ( ). Select screen icon) on the screen to to switch to the Photo mode ( ). Press the [ Record button take photo. • To view stored videos and photos: Touch ( on] to to switch to the Playback mode. Turning the Camera Off • To turn off the camera: You can either press the [ Power Button ] for two second. 11 EN Section 3 Enjoying the Record Mode Button Function To power on or off: • Hold it for two seconds. • After idling for 5 minutes, the camera will turn off automatically. To record: • In Video Mode, press to take video. • In Photo Mode, press to take photo. To zoom in or out: • +: Zoom In. • -: Zoom out. To access menu • Press to open the option menu. • Use / to change between the options. (e.g. VIDEO/PHOTO MODE, WIFI, RESOLUTION, WHITE BALANCE). To review videos/photos • Press to go to the playback mode. • You can view or delete the recorded files. 12 EN Video Recording • Select (on-screen icon) on the screen to switch to the Video mode ( ). • Press the [Record Button ] to start recording. When a video is being recorded, a time indicator will display on the LCD monitor ( ). To stop recording, press it again. • Press to view the recorded video. • Four resolution settings are available: Video Quality Full HD (1080p 30fps) HD (960p 30fps) HD (720p 60fps) HD (720p 30 fps) WVGA (848x480) Photo Capturing • Select (on-screen icon) on the screen to switch to the Photo mode ( • Press the [ Record Button • Press ). ] to take photo. to view the photo. Using Zoom Function • The zoom magnifies images when recording video or taking photo. 1.To zoom in/out, press the Tele/Wide (+/-) Button. 2.It can be set from 1X~5X (5X Digital zoom) 13 EN Options for Record Menu Menu Flow 1. Press 2. Use on the screen to open the Menu. / 3. Press the SET Video • • • • • • Video Resolution White Balance Time Lapse Endless REC DIS Picture Inversion to change the pages. button to select. Photo • Self-Timer • Picture Inversion • White Balance 14 Setting • • • • • • • • • VIDEO/PHOTO Wi-Fi Menu Volume TV System Language Time Setting Format Default Setting Update EN Video Resolution Four resolution settings are available. • Full HD (1080p 30) :Record videos at 1920x1080p 30 fps resolution. • HD (960p 30):Record videos at 1280x960p 30 fps resolution. • HD (720p 60):Record videos at 1280x720p 60 fps resolution. • HD (720p 30):Record videos at 1280x720p 30 fps resolution. • WVGA (848X480): Record videos at 848x480p 30 fps resolution. Operation Display Screen 1. In the menu page, select the [ Video Resolution ] icon on the screen. 2. Press [ Previous ] or [ Next ] button to choose the desired option. 3. Press the [ SET button ] to validate the setting. 4. Press the [ Playback button ] to return. White Balance The camera adjusts the color balance of images automatically. Six manual white balance settings are available: • Auto: The camera automatically adjusts white balance. • Daylight: Under outdoor condition. • Fluorescent: Under fluorescent light condition. • Tungsten: Under tungsten light condition. • Blue (marine): Under blue water condition. • Green (marine): Under green water condition. Operation Display Screen 1. In the menu page, choose the [ White Balance ] icon on the screen. 2. Press [ Previous ] or [ Next ] button to choose the desired option. 3. Press the [ SET button ] to validate the setting.. 4. Press the [ Playback button ] to return.. 15 EN DIS(Digital Image Stabilization) Record with an effect of reducing camera shake to result in more stable video. Operation Display Screen 1. In the menu page, choose the [ DIS ] icon on the screen. 2. Press [ Previous ] or [ Next ] button to choose the desired option. 3. Press the [ SET button ] to validate the setting. 4. Press the [ Playback button ] to return. Without Stabilization Stabilization ON Time Lapse Record still images at specific intervals you can set and play them as one video file. This effect is good for recording cloudscapes, seed germinating and flowers opening. • Off: Disable Time Lapse. • 1 Second.: Record one frame per second. • 5 Seconds: Record one frame every 5 seconds. Operation Display Screen 1. In the menu page, choose the [ Time Lapse ] icon on the screen. 2. Press [ Previous ] or [ Next ] button to choose the desired option. 3. Press the [ SET button ] to validate the setting. 4. Press the [ Playback button ] to return. 16 EN Self-Timer The self-timer allows you to take photos with a ten-second time delay. The LED light on the front of the camera will also blink. The speed of blinking will increase just before the photo is taken. Operation Display Screen 1. In the menu page, choose the [ Self-Timer ] icon on the screen. 2. Press [ Previous ] or [ Next ] button to choose the desired option. 3. Press the [ SET button ] to validate the setting. 4. Press the [ Playback button ] to return. Endless REC The Endless REC allows you to record video with a fifteen-minute time interval without stopping. Operation Display Screen 1. In tthe menu page, choose the [ Endless REC ] icon on the screen. 2. Press [ Previous ] or [ Next ] button to choose the desired option. 3. Press the [ SET button ] to validate the setting. 4. Press the [ Playback button ] to return. Note • Video Resolution of this function is 720p30 only. Picture Inversion The Picture Inversion allows you to review the pictures inversely. Operation Display Screen 1. In the menu page, choose the [ Picture Inversion ] icon on the screen. 2. Press [ Previous ] or [ Next ] button to choose the desired option. 3. Press the [ SET button ] to validate the setting. 4. Press the [ Playback button ] to return. 17 EN Section 4 Enjoying the Playback Mode Button Function The Buttons have the following functions in Playback Mode. To power on or off: • Press down for two seconds to turn on or turn off the camera. To choose and enable the file: • Press down to choose and enable the file you want to review. To turn next or previous: • >: Next. • <: Previous. To delete files: • Press to delete the files. To exit the playback mode • Press to exit the playback mode. 18 EN Video Playback Operation Display Screen 1. In the Video Playback mode, press [ SET ] button to play or pause the video. 2. Press [ Previous ] button to go to the previous video; press [ Next ] button to go to the next video. 3. While playing video, press [ Previous ] or [ Next ] button to enable fast rewind or forward function. 4. Press [ Playback ] button to exit. Note • The number at the top left corner is recording time; top right is the number of images. Delete Videos Operation Display Screen 1. Press [ MENU ] button to go to the Delete option screen. 2. Press [ Yes ] to delete the current video or [ No ] to cancel the operation and to exit. Note • If a memory card has been inserted, you can only delete those videos stored on the card. 19 EN Photo Playback Operation Display Screen 1. In the Photo Playback mode, press [ Previous ] button to go to the previous photo; press [ Next ] button to go to the next photo. 2. Press [ Playback ] button to exit. Delete Photo Operation Display Screen 1. Press delete button to go to the Delete option screen. 2. Select [ Yes ] to delete the current video or [ No ] to cancel the operation and to exit. Note • If a memory card has been inserted, you can only delete those photos stored on the card. 20 EN Section 5 Setting Your Camera Setting Menu Operation Display Screen 1. Press [ MENU ] button to open the menu. The menu will show on the screen. 2. Press the [ Previous ] or [ Next ] button to change the page. 3. The page contains options for configuring your camera setup including VIDEO/PHOTO, Wi-Fi, Language, Time Setting, Volume, TV System, Format, Default Setting, and Update. 4. Press [ Playback ] button to exit. VIDEO/PHOTO Operation Display Screen 1. In the Setting menu, select the [ VIDEO/PHOTO ] icon on the screen. 2. Press [ Previous ] or [ Next ] button to select the video or photo mode. 3. Press [ SET button ] to validate the setting. 4. Press [ Playback ] button to return. 21 EN Wi-Fi Menu Operation Display Screen 1. In the Setting menu, press the [ Wi-Fi Menu ] icon on the screen. 2. Choose the way to connect to the network. 3. Before using the WiFi connection, please go to the WiVideo to set WiFi ID & Password via PC. Volume Enable or disable the keypad tone and the operation sound. Operation Display Screen 1. In the Setting menu, press the [ Volume ] icon on the screen. 2. Press to select [ Mute ] or other sound level. 3. Press [ Playback ] button to return. TV System Ensure that the appropriate TV standard of your area is selected – either NTSC or PAL. Wrong TV system setting may cause image flickers. • NTSC(60Hz):USA, Canada, Japan, South Korea and Taiwan, etc. • PAL(50Hz):UK, Europe, China, Australia, Singapore and Hong Kong, etc. Operation Display Screen 1. In the Setting menu, press the [ TV ] icon on the screen. 2. Press to select [ PAL ] or [ NTSC ]. 3. Press the SET icon to validate the setting. 4. Press [ Playback ] button to return. 22 EN Language Use this option to select the language of the user interface. Operation Display Screen 1. In the Setting menu, press the [ Language ] icon on the screen. 2. Press to select the desired option. 3. Press the [ SET ] icon to validate the setting. 4. Press [ Playback ] button to return. Time Setting Operation Display Screen 1. In the Setting menu, press the [ Time Setting ] icon on the screen to enter the time setting screen. 2. Press [ SET ] to set Year, Month, Day, Hour, and Minute. 3. Adjust the numeric value by pressing previous / next button to validate the setting. 4. Press [ Playback ] button to return. Format • Yes: Format the Memory Card (When a memory card is installed). • No: Do not format the Memory Card (When a memory card is installed). Operation Display Screen 1. In the Setting menu, press the [ Format ] icon on the screen. 2. Press to select [ Yes ] or [ No ] to confirm. 3. Press [ Playback ] button to return. Note • All the data will be erased if the memory card is formatted. Make sure all the data are copied to your PC before formatting the memory card. 23 EN Default Setting To restore the default factory setting, select this option. Operation Display Screen 1. In the Setting menu, press the [ Default Setting ] icon on the screen. 2. Press to select [ Yes ] or [ No ] to confirm. 3. Press [ Playback ] button to return. Note • The WiFi setting, such as profile of access points and Ustream account information will be erased. The following table indicates the camera’s default settings Setting Resolution Default Factory Setting HD (720p 60) for Video 5MP for Photo White Balance Auto DIS Off Time Lapse Off Self-Timer Off Password of WiFi ID 0000 TV System Depends on shipping area Language Depends on shipping area Volume Level 4 Wi-Fi Off Endless REC Off Picture Inversion Normal 24 EN Section 6 WiFi to PC-WiVideo Program Advanced Operation on Your Computer - WiVideo The camera can connect to your computer via WiFi or USB. Once you launch the [WiVideo] application (for Windows® based systems only) on your computer, it will search for your camera and connect to it. Then, you can operate more functions on your computer. There are several functions as below: • Transfer the files from the camera. ( WiFi/USB connection) • Watch live streaming video from the camera on your computer. ( WiFi connection) • Use the camera as a wireless webcam for online video chatting. ( WiFi connection) Install [ WiVideo ] on your computer To connect to the camera and launch [ WiVideo ] application via WiFi correctly, you have to install this program firstly. It is a perfect platform for you to watch live streaming video from your camera and use the camera as a webcam for your online video chatting. Follow the steps below to install the [ WiVideo ] on the computer. 1.Connect the camera to your computer by using the supplied USB cable. 2.After making a USB connection, the program installs automatically, or the AutoPlay window appears. (It may be different based on OS recognition.) If the AutoPlay window does not appear. Please click [ My Computer ]-->[ WiVideo ] to execute the installation of this program. Windows XP Windows 7 (Install automatically) (AutoPlay window) 3.Follow the on-screen instructions to complete the installation. 4.The shortcut of WiVideo ( Program].) ) shows on the desktop. (Or you can find the application at [Start]-->[All 5.The main screen appears automatically on the desktop. 25 EN Note • WiVideo program will install the H.264 Codec (ffdshow-a free software under GPL license) for viewing the videos correctly. • To install correctly, you have to log out /quit from the Instant Message (IM) application before the installation. • WiVideo is for Windows® based systems only. 6.When the installation is completed, you can unplug the USB cable. Using WiVideo via WiFi Connection Operation Screen On your camera: In the Menu page, go to [ WiFi to PC ] and press [ SET ] Button. (The default password is 0000.) 26 EN On your computer: 1. Double click [ WiVideo ] shortcut on the desktop. (make sure the [ WiVideo ] application is installed in your computer.) 2. Click [ Detect WiFi Camera ] button to search for your camera. *One task window may pop out to ask you to select your camera when there are two or more WiFi cameras in the same wireless network range. 3. Select the WiFi ID and input the Password shown on your camera for the WiVideo task window. Then, click [ OK ]. 4. Once the connection is established, the connection signal between mobile and camera via WiFi will be shown on the top left of the screen. The WiVideo application serves 3 functions via WiFi: Function TRANSFER Description You can remote access the videos and photos stored in your camera. You can transfer or delete the files on your computer. LIVE VIDEO Watch live streaming from your camera on your computer. The video resolution can be selected. VIDEO CHAT Use your camera as a wireless webcam for online video chatting (You have to select this device as your webcam on the camera/audio setting first.)* *You have to select [ WiVideo Camera ] as your webcam/microphone for the online video chatting. Note • For WiFi connection correctly, make sure the bundled WiVideo (for Windows® based systems only) is installed and the wireless LAN module of your computer is activated. • Make sure your computer connects with your access point (AP) correctly and your camera is in the same range of the WLAN. • For a better stable video streaming when using LIVE VIDEO or VIDEO CHAT, please make sure the WiFi signal strength shows 2 bars ( ) or above on the camera. • To boost the WiFi signal strength, you can move the camera closer to your computer. • If the camera is far from your computer or the AP device, it may take longer to connect to the network. ( The signal and the radio frequency may be interfered.) • To prevent the camera from turning off accidentally, please be sure the battery is fully charged. • Account/WiFi setup are not available without connection via USB cable. 27 EN Using WiVideo via USB Connection 1.Connect the camera to your computer by using the supplied USB cable. 2.After making a USB connection, the main screen will appear. Or please click [ WiVideo ] shortcut on the desktop to execute the application. Or you can find it at [ Start ]-->[ All Program ]. The WiVideo application serves 3 functions via USB: Function TRANSFER Description You can access the videos and photos in your camera and upload the files to a social websites. Upload 1. Select the videos/photos on the thumbnail screen. 2. Click on [ Upload ]. 3. The website options appears. 4. Select the website and check the Username/Email and password of the specific social website in the fields. 5. Click on [ SET ] to upload. SETUP Account Setup Set up your social website account information and save them to your camera. WiFi Setup Configure and synchronize your WiFi profile to your camera. Name your camera and create your security password. Note • LIVE VIDEO and VIDEO CHAT are not available via USB connection. • Some social websites may not be allowed to access in certain regions or networks. • Your computer must have internet access to upload files to the website. • If you do not have a account, please sign up on the website first. • The social website is subject to update without notice. Please visit the website first to update your account setting. 28 EN Section 7 WiFi to Mobile-WiVideo Program Advanced Operation on Your Mobile - WiVideo Use your mobile as a remote control to take photo/videos from camera wirelessly. It makes the camera become a handy accessory to go with your mobile, which allows you to record any scene, any time and any where. There are several functions as below: • Use your mobile as a remote control to take photos/videos from your camera wirelessly. • Tele/ Wide the zoom lens via your mobile. Install [ WiVideo ] on Your Mobile To connect to the camera, you have to install [ WiVideo ] application program firstly. There are two systems to install WiVideo APP onto your mobile. It depends on which system your mobile is applied with. For Android system, please download this APP from Google Play. For iOS system, please refer to Apple APP Store for installation. (p. 31-36) Follow the steps below to install [ WiVideo ] on your mobile. 1. Download WiVideo APP from Google Play (OS: Android2.2 or higher) or Apple APP Store (OS: iOS4 or higher) onto your mobile. 2. Follow the on-screen instructions to complete the installation. 3. The shortcut of WiVideo ( ) shows on the screen. Share Hotspot to Camera [ from Mobile ] There are two methods to share your Hotspot depends on which system you use, as follows: • iOS System: 1. First press [ Setting ] on your mobile. 2. Then select [ Personal Hotspot ]. 3. Last tap [ On]to enable[Personal Hotspot ]. • Android System: 1. First press [ Setting ] on your mobile. 2. Then select [ Wireless and network ]. 3. Last choose [ Tethering and Mobile AP ] to enable [ Mobile AP ]. 29 EN WiFi Modes to Mobile System Mode Page Connect via AP 31 Android Connect via Mobile Hotspot 32 Connect via AP 33 Connect via Mobile Hotspot 34 iPhone/iPad Connect Directly to Camera 35 Note • Before proceed any connection between Mobile and Camera, please connect to PC via USB cable and set up Wi-Fi profile with WiVideo (Enter SSID and Password). • WiVideo is for Windows® based systems only. 30 EN WiFi to Mobile (Android: AP Mode) • 1 • Mobile: Install WiVideo WiVideo is a software to connect wireless between camera and mobile/tablet. Download WiVideo APP from Google Play onto mobile/tablet. Mobile: Connect to Access Point 2 • Go to [ Settings ] → [ Wireless & network ] → [ Wi-Fi settings ] → [ Wi-Fi ] (Enable WiFi and connect to AP) [MENU] Button [SET] Button 3 Camera: Connect to Same AP • 4 Press [ MENU ] → select [ WiFi ]→ choose [ WiFi to Mobile ] to scan available AP →connect camera to the same AP Mobile: • Launch WiVideo APP Press [ WiVideo ] APP icon → detecting cameras → enter the password (The default is 0000 and it can be edited via WiVideo APP Setup) → start preview and remote control. 31 EN WiFi to Mobile (Android: Mobile Hotspot Mode) 1 • • Mobile: Install WiVideo WiVideo is a software to connect wireless between camera and mobile/tablet. Download WiVideo APP from Google Play onto mobile/tablet. Mobile: Enable Mobile Hotspot/AP 2 • Go to [ Settings ] → [Wireless & network] → Enable mobile hotspot/AP Note 3 • Operation may vary, please refer to each individual model. • Be aware of using Hotspot service may not be provided in some countries. [MENU] Button [SET] Button Camera: Connect to Hotspot/AP • 4 Press [ MENU ] → select [ WiFi ]→ choose [ WiFi to Mobile ] to scan available AP →connect camera to mobile hotspot/AP Mobile: • Launch WiVideo APP Press [ WiVideo ] APP icon → detecting cameras → enter the password (The default is 0000 and it can be edited via WiVideo APP Setup) → start preview and remote control. 32 EN WiFi to Mobile (iPhone/iPad: AP Mode) 1 • • 2 • 3 [MENU] Button [SET] Button WiVideo is a software to connect wireless between camera and mobile/tablet. Download WiVideo APP from App Store onto iPhone/ iPad. Mobile: Connect to Access Point Go to [ Settings ] → [ WiFi ] → Enable WiFi and connect to AP Camera: Connect to Same AP • 4 Mobile: Install WiVideo Press [ MENU ] → select [ WiFi ] → choose [ WiFi to Mobile ] to scan available AP →connect camera to the same AP Mobile: • Launch WiVideo APP Press [ WiVideo ] APP icon → detecting cameras → enter the password (The default is 0000 and it can be edited via WiVideo APP Setup) → start preview and remote control. 33 EN WiFi to Mobile (iPhone/iPad: Mobile Hotspot Mode) 1 • • 2 Mobile: Install WiVideo WiVideo is a software to connect wireless between camera and mobile/tablet. Download WiVideo APP from App Store onto iPhone/iPad. Mobile: Enable Personal Hotspot • Go to [ Settings ] → [ WiFi ] → Enable [ Personal Hotspot ] Note 3 [MENU] Button [SET] Button • Be aware of using Hotspot service may not be provided in some countries. Camera: Connect to Hotspot • 4 Press [ MENU ] → select [ WiFi ]→ choose [ WiFi to Mobile ] to scan available AP →connect camera to mobile hotspot/AP Mobile: • Launch WiVideo APP Press [ WiVideo ] APP icon → detecting cameras → enter the password (The default is 0000 and it can be edited via WiVideo APP Setup) → start preview and remote control. 34 EN WiFi to Mobile (iPhone/iPad: Direct Mode) 1 • • 2 [MENU] Button [SET] Button WiVideo is a software to connect wireless between camera and mobile/tablet. Download WiVideo APP from App Store onto your iPhone/ iPad. Camera: Enable Direct Mode • 3 Mobile: Install WiVideo Press [ MENU ] → select [ WiFi ] → choose [ WiFi to Mobile ] →select [Direct Mode]→camera ID shown on the screen Mobile: Connect to Camera • Go to [ Settings ]→[ WiFi ] → Select camera ID to connect Note • Once the icon [ ]shows, the Direct Mode connection is activated. It will take a while for [ ] to show up.(More than 1 minute) 4 Mobile: • Remote Control Camera Press [ WiVideo ] APP icon → detecting cameras → enter the password (The default is 0000 and it can be edited via WiVideo APP Setup) → start preview and remote control. 35 EN Using WiVideo via WiFi Connection Operation Screen Connect Camera to Your Mobile: 1. Press the [ MENU ] Button on camera. 2. Select [ 3.Choose [ ]to turn on the function of WiFi. ]and then press [ SET ] button to scan available Access Point. 4. Select the hotspot of your mobile and follow steps from one of the systems. Remote Control Your Camera (from Mobile): 1. Press [ WiVideo ] APP icon on your mobile. 2. Detect the available cameras automatically from your mobile. 3. Enter the password (The default is 0000 and it can be edited via [ SETUP ] from WiVideo APP.) 4. Enjoy playing your camera via your mobile. 36 EN Section 8 WiFi to Cloud-Ustream Sign up and Store Ustream Account to Camera Ustream enables you to free broadcast the live video of your camera. People can watch your broadcasting on their iPhone, iPad, iPod press, Android phones/tablets, or PC on Ustream website/ APP anytime, anywhere. Operation Screen (1) Create an account (skip this if a Ustream account is ready) 1. 1. Go to WiVideo and create a new account for Ustream. 2. Click [ Create A New Account ] and then fill up the information requested step by step. 3. Then click [ Sign Up ]. Note • Remember to plug the USB cable between PC and your camera for connection. 2. • The screen will go back to WiVideo settings once sign up successfully. (2) Store/Remove an account to/from your camera Enter Username/Password and click Store/Remove. (3) Choose your channel You could only choose one channel created by you from Ustream. Note • You may encode Password for your channel. Update account/channel There is one account stored only, so you may change account/channel in your camera. 37 EN Prepare to broadcast on Ustream Ensure you have a working AP (Access Point) device to get ready to start broadcasting. Broadcast live streaming on Ustream Start Video Streaming of Camera 1. Select Ustream on [ Wi-Fi Menu ] page. 2. Choose AP for connection. 3. Live video start Note • When execute [Default Setting], the account information of the websites will be erased. Watch Live Video from Mobile 1. Install Ustream App from Google Play or Apple Store. 2. Click Ustream App 3. Search your account. 4. The mobile connects to Ustream server and view video streaming from camera. Watch Live Video from PC 1. The video streaming will be broadcasted on the Ustream website. www.ustream.tv 2. People who has your account, they can visit Ustream website and watch the live video streaming from camera through computers. 38 EN Note • The possible reasons for “Connecting Failed” could be (1) wrong password ; (2) you are not in the wireless network area of the AP. (3) the camera does not support the type of encryption used on the AP. This model only supports WEP/WPA/WPA2 personal type of encryption, but not up to enterprise level (4) your network requires PPPoE account/password information. • This camera only supports the AP(SSID) named in English/number/symbols (ASCII characters). • You can only enter text in English, regardless of the OSD language. • Some AP routers do not allow you to connect to the network (e.g. firewall). • The camera cannot connect to the network while it is connected to HDTV via the cable, or vice versa. • It may take time to scan and connect to the AP/network or to upload. The stream speed is affected by the Internet connection speed or other factors. • Please be sure the battery is fully charged before connecting to the network. • Ustream may not be allowed to access in certain regions or networks. 39 EN Section 9 Viewing Photos and Videos on TV Connecting to a High-Definition 16:9(Wide) TV 1.Connect the HDMI cable to your camera’s HDMI out port. 2.Connect the other end of the cable to a television. 3.Set the video input source of your TV to “ HDMI.” 4.The steps for viewing stored videos and photos on HDTV are exactly the same as for viewing them on the LCD monitor. Note • • • • Some icons on the LCD screen do not display when the camera is connected to an HDTV. Some functions may not be accessible while the camera is connected to HDTV. Video/photo taking is not applied while HDMI cable is on. WiFi function would not be applied while HDMI cable is used with TV. 40 EN Section 10 Viewing Video & Photo on PC Transferring Photos or Videos to a Computer You can transfer photos or videos stored on your camera to a computer and send them in e-mails to friends or post them on the web sites. To do this you should: 1. Connect the computer and camera with the supplied mini USB 2.0 cable. 2. To access photos and videos on your memory card: Videos and photos can be found on your computer at My Computer\ SD\DCIM\100MEDIA (path will vary depending on the name of the memory card). 3. Under this folder, you can view, delete, move, or copy any video/photo you want. 41 EN Section 11 Specifications and System Requirements Specification Image sensor 5 Mega pixel CMOS sensor Operation modes Video record, Photo record, Live streaming via WiFi, Wireless webcam Lens Fixed Focus (F 2.8) Focus range 60 cm ~ infinity Zoom 1X~5X (5X Digital zoom) Shutter Electronic LCD monitor 1.5” LCD Storage media SD/SDHC/SDXC card slot support (up to 64GB) Image resolution 5MP: 2592x1944 (5M pixels) Video resolution Full HD (1080p 30): 1920X1080(30fps) HD (960p 30): 1280X960(30fps) HD (720p 60): 1280X720(60fps) HD (720p 30): 1280X720(30fps) WVGA (848X480): 848X480(30fps) White balance Auto, Daylight, Fluorescent, Tungsten, Marine Blue, Marine Green Self-timer 10 seconds delay File format Photo: JPG Video: MP4 (H.264) Image play Single image/Slideshow PC interface Mini USB 2.0 port TV out HDMI Mini WiFi Compatible with WiFi 802.11 b/g Battery Lithium-ion rechargeable battery Dimension 74mm x 53mm x 35mm (2-15/16” x 2-1/8” x 1-7/16”) (L x H x W) Weight 104g (0.23lbs) ( without battery) Operating environment Allowable operating temperatures: -10 to 40°C (14 to 104°F) Note: Temperatures between 0 and -10°C (32 and 14°F) temporarily lower battery performance, reducing the time available for photography. Allowable storage temperatures: -20 to 50°C (-4 to 122°F) Allowable relative humidity: 35% to 80% Water resistance Equivalent to IEC Standard publication 529 IPX8 (30 minutes at depths up to 5 m (16.4ft)) Dust resistance Equivalent to IEC Standard publication 529 IP6X 42 EN Shock resistance This camera clears company testing compliant with MIL-STD-810F Method 516.5 Shock: dropping onto plywood 3 cm (1-3/16”) thick from a height of 2 m (6.5ft). Recordable Time/Number of Images Approximate Video Recording Time Quality Full HD (1080p30) HD (960p30) HD (720p60) HD (720p30) WVGA (848x480) SDHC/SDXC Card 4GB 8GB 16GB 32GB 48GB 35m 1h10m 2h20m 4h50m 7h10m 60m 2h00m 4h00m 8h00m 12h 40m 1h20m 2h40m 5h20m 8h10m 1h20m 2h40m 5h20m 10h30m 15h50m 3h00m 5h50m 11h50m 23h40m 35h30m 64GB 9h30m 16h00m 10h50m 21h00m 47h20m Approximate Number of Still images (Unit : Number of Shots) Quality 5MP: 2592x1944 4GB 1800 8GB 3600 SDHC/SDXC Card 16GB 32GB 48GB 7200 9999 9999 64GB 9999 Approximate Recording Time (Using Battery) Charging Time (Adapter):3h30m Continuous Recording Time 1h10m (USB):5h30m 1h10m Actual Recording Time 40m 40m The approximate recordint time is only a guide. The actual recording time may shorten de pending on the shooting environment. System requirements • Windows XP Home Edition or Professional (Pre-installed versions only) Service Pack 3 Windows Vista 32/64-bit Home Basic or Home Premium (Pre-installed versions only) Service Pack 2 Windows 7 32/64-bit Home Premium (Pre-installed versions only) Service Pack 1 • Intel Core Duo 1.7GHz or higher • 1GB System memory and free • 2GB System hard disk space • Available USB /2.0 port or above • WiFi b/g capability Note • The LCD screen is manufactured using extremely high-precision technology, so over 99.99% of the pixels are operational for effective use. However, some tiny black and/or bright dots (white, red, blue or green) may appear on the LCD screen. These dots are a normal result of the manufacturing process, and do not affect the recording. 43 EN Section 12 Troubleshooting Troubleshooting If the camera fails to function as expected, check the list of the common problems below. Problem/Situation Cannot turn on the camera. The power turns off suddenly. Camera cannot be turned on after plugging power adapter. WiFi icon does not appear after pressing WiFi button. The files on the memory card do not display smoothly when the LCD shows the “!” marking. Remediation/Solution • Battery pack is weak or depleted. Recharge the battery pack. • Please make sure that you use the supplied power adapter and connect it to the power outlet correctly. • Battery pack is low. Recharge the battery pack. • “!” means the SD card is low speed or contains corrupted files. To solve this, format the SD card using the camera instead of a computer. (Please refer to the detailed Format instruction in Section 5). • The card has some problems and can not be recognized. Change the card with another one. • Or please change the SD card to a high speed one. Cannot take video/photo. • Memory is full. Delete some unnecessary videos/photos or insert a new SD card. • Power is off. Press the [Power Button] to turn on. The camera is frozen. • Please remove the battery/unplug the adapter. Then, insert the battery/plug the adapter and turn on the camera again. The date imprinted on the photo • Set the date and time in the [Setting] menu. is incorrect Why do some of my indoor photos loSET blurry and dark? • Poor lighting. Take photo in better lighting. • The camera extends photo exposure time under low light/ indoor condition. Keep the camera (and the target subject) steady for several seconds when taking photos. • Place the camera on a flat and steady surface, or use a tripod when take photo. The color of the video/photo is • Select the proper white balance option to match the light not natural. source. When the camera is connected • “DV” indicates the internal memory of the camera. to the PC via USB cable, many • “Removable Disk” indicates the external memory (memory Autoplay windows may pop out. card installed in the camera). They indicate the disks of the • “WiVideo” indicates the bundled program. If you want camera. to install this program, please double-click on it to start installation automatically. 44 EN The LCD shows [Connecting Failed] after pressing WiFi Button. • The password configuration does not match to the AP you want to connect. • The AP router or the computer is not turned on. Turn the AP router or your computer on. • The camera is not in the wireless network service area or weak network signal. Please make sure the AP router is able to access the Internet. • The camera does not support the type of encryption used on the AP. This model only supports WEP/WPA/WPA2 personal type of encryption, but not up to enterprise level. • Your network requires PPPoE account/password information. • Some AP routers do not allow you to connect to the network (e.g. firewall). • The social websites update their websites without notice. Please visit the website first to update your account setting or upgrade the firmware and WiVideo program. The WiVideo program cannot be • Check the computer system compatibility. installed. Wi-Fi connections break off. • The camera disables any Wi-Fi connection three minutes after shooting starts. Use the menu to re-enable it. Reconnect in a clear radio environment. Remember that the communication speed drops, interfering with connection, if the receiver is too far away, there is something in between blocking communications, or there is a microwave or wireless equipment in use nearby. Connecting a USB cable stops photography. Photography is not possible with a USB cable connected. • Only time lapse and endless recording are available with a USB cable connected. (Endless recording is limited to 720p 30 fps.) There is no HDMI output. • HDMI output is disabled during recording. The thermometer icon appears. • Turn off the camera and allow it time to cool down. 45 EN Section 13 Wi-Fi Warning FCC: Federal Communication Commission Interference Statement This equipment has been tested and found to comply with the limits for a Class B digital device, pursuant to Part 15 of the FCC Rules. These limits are designed to provide reasonable protection against harmful interference in a residential installation. This equipment generates, uses and can radiate radio frequency energy and, if not installed and used in accordance with the instructions, may cause harmful interference to radio communications. However, there is no guarantee that interference will not occur in a particular installation. If this equipment does cause harmful interference to radio or television reception, which can be determined by turning the equipment off and on, the user is encouraged to try to correct the interference by one or more of the following measures: • Reorient or relocate the receiving antenna. • Increase the separation between the equipment and receiver. • Connect the equipment into an outlet on a circuit different from that to which the receiver is connected. • Consult the dealer or an experienced radio/TV technician for help. This device complies with Part 15 of the FCC Rules. Operation is subject to the following two conditions: (1) This device may not cause harmful interference, and (2) this device must accept any interference received, including interference that may cause undesired operation. Any changes or modifications not expressly approved by the party responsible for compliance could void the user’s authority to operate this equipment. For product available in the USA/Canada market, only channel 1~11 can be operated. Selection of other channels is not possible. Federal Communication Commission (FCC) Radiation Exposure Statement This EUT is compliance with SAR for general population/uncontrolled exposure limits in ANSI/IEEE C95.1-1992 and had been tested in accordance with the measurement methods and procedures specified in OET Bulletin 65 Supplement C. IC: This device complies with Industry Canada licence-exempt RSS standard(s). Operation is subject to the following two conditions: (1) this device may not cause interference, and (2) this device must accept any interference, including interference that may cause undesired operation of the device. IC Radiation Exposure Statement This EUT is compliance with SAR for general population/uncontrolled exposure limits in IC RSS-102 and had been tested in accordance with the measurement methods and procedures specified in IEEE 1528-2003. This Class [B] digital apparatus complies with Canadian ICES-003. Cet appareil numérique de la classe [B] est conforme à la norme NMB-003 du Canada. 46 EN