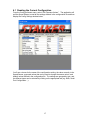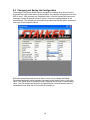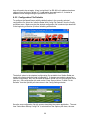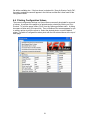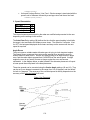
1
S Scoreboard PC Application
&
S Pro II Speed Sensor User Manual
ii
Any changes or modifications not expressly approved by Stalker Radar / Applied Concepts, Inc., could void
the user’s authority to operate the S Pro II Speed Sensor.
Not intended for Law Enforcement use.
S RADAR
Stalker/Applied Concepts
2609 Technology Drive
Plano, TX 75074 USA
1-800-STALKER
(972) 398-3750 Sales
(972) 398-3751 Fax
www.stalkerradar.com
iii
iv
Table of Contents
1 2 3 4 Introduction ................................................................................................................. 1 The Target Types ....................................................................................................... 2 Quick Start .................................................................................................................. 3 Connecting the Speed Sensor.................................................................................... 7 4.1 Connecting to Power .......................................................................................... 7 4.2 Connecting to an RS-232 Controller ................................................................... 7 4.3 Connecting to an RS-485 Controller ................................................................... 8 4.4 Auxiliary Connections ......................................................................................... 9 5 Communicating with the Speed Sensor ................................................................... 11 5.1 Loading the Developer’s Kit CD........................................................................ 11 5.2 Polling for Speed Sensor Product ID ................................................................ 11 5.3 Troubleshooting Communication Issues........................................................... 12 6 Configuring the Speed Sensor ................................................................................. 15 6.1 Reading the Current Configuration ................................................................... 17 6.2 Changing and Saving the Configuration ........................................................... 18 6.3 Configuration Settings ...................................................................................... 19 6.4 Changing the Baud Rate .................................................................................. 19 6.5 Default Settings ................................................................................................ 19 6.5.1 Factory Defaults .......................................................................................... 19 6.5.2 Configuration File Defaults .......................................................................... 20 6.6 Printing Configuration Values ........................................................................... 21 7 Operating the Speed Sensor .................................................................................... 22 7.1 Scoreboard Application Main Screen ............................................................... 22 7.2 Monitoring Speed Data ..................................................................................... 24 7.3 Fork Test........................................................................................................... 26 7.4 Interference Problems ...................................................................................... 27 7.5 Logging Speed Data ......................................................................................... 28 7.6 The AUX Pin ..................................................................................................... 28 8 Upgrading Speed Sensor Software .......................................................................... 30 8.1 Checking for a New Version of Software .......................................................... 30 8.2 Programming the Speed Sensor ...................................................................... 30 9 Configuring the Stalker Scoreboard Application ....................................................... 31 9.1 Application Control File ..................................................................................... 31 9.2 Speed Sensor Configuration File ...................................................................... 33 10 Custom Applications to Control Speed Sensors ................................................... 35 11 Service Information ............................................................................................... 37 12 Specifications ........................................................................................................ 38 Appendix A Streaming Speed Data Protocols......................................................... A-1 Appendix B Handshake Speed Data Protocols ....................................................... B-1 Appendix C Configuration Setting Descriptions....................................................... C-1 Appendix D Configuration Settings Table................................................................ D-1 Appendix E Configuration Protocol ......................................................................... E-1 Appendix F Accessories...........................................................................................F-1 v
1 Introduction
The S Pro II Speed Sensor is a complete Doppler Radar in a small, rugged
housing. It measures the speed of a wide variety of objects such as baseballs, vehicles,
tennis balls and just about anything that moves.
The S Pro II Speed Sensor sends out very high frequency radio waves and
measures the change in the frequency after it bounces off a moving object. This is
commonly referred to as Doppler Radar. This invisible radio wave is extremely low
power (about 1/100th of a watt) and is completely safe for close and continuous
operation.
The S Pro II Speed Sensor is a true digital radar system. It converts the reflected
microwave signals into a digital stream of data. The sensor’s own computer then
processes this data stream using sophisticated programming to interpret, filter and
measure the speeds. This type of radar system has the potential to provide substantially
superior performance and accuracy over conventional radar systems.
The S Pro II Speed Sensor is a directional radar. It can tell the difference
between targets moving toward it and targets moving away from it. Using its direction
sensing capabilities and its feature-rich configuration settings, it can track and report
pitch speeds and hit speeds at the same time or filter out undesired targets and focus on
your targets of interest.
Depending on the model purchased, the S Pro II Speed Sensor connects via an
RS-232 or an RS-485 link to the serial port on a PC or other controller. This interface is
used to configure the unit and to monitor the speed data it sends out. The Speed
Sensor can be configured to report the speeds of targets it acquires in many formats –
from short ASCII character strings to larger data packets with speed and status
information.
The RS-232 model can stream speed data and monitor for commands from the
controller at the same time. The RS-485 model only communicates one way at a time,
so it never streams data since it is the slave on the link. It only responds to commands
and speed requests from the controller. It has the benefit of operating over longer cable
distances from the controller, and also multiple addressed units can be controlled from a
single serial port.
The compact, waterproof unit can be mounted almost anywhere. Just supply DC power
between 9 and 28 volts, and the S Pro II Speed Sensor produces speed data
configured for your application.
1
2 The Target Types
The S Pro II Speed Sensor is actually four different radars in one – depending on
its Target Type setting as listed below. The radar processes and displays targets
differently depending on the selected target type. Processing for short-lived targets like
thrown or hit balls must quickly pick a small target out of the surrounding environment.
Processing for vehicles assumes that the target will be present for a longer duration and
displays its changing speed over a longer period of time.
Baseball
When configured for baseball mode, the factory default, the Pro II Speed Sensor
measures the peak (release) speed and the live (roll-down) speed of a baseball
pitch. It analyzes not only the ball but also the pitcher’s motion to report the most
accurate release speed. It can also measure the speed of a ball hit in the
opposite direction and can report all three speeds (release, roll-down and hit) at
the same time. The ideal location for monitoring baseball speeds is on the
straight line beginning at the pitcher, going by the catcher, and continuing to the
radar with a clear view of the pitched ball’s path.
Carnival
The Pro II Speed Sensor can be operated in carnival mode to report the speed of
balls thrown only a few feet at a backdrop target in a carnival booth setting. In
this application the radar is often mounted on a side support for the booth, so
there is a large angle between the ball’s trajectory and the radar’s aim. The Pro
II Speed Sensor can automatically adjust for the angle error to display true ball
speed.
Carnival mode can also be used for other targets with very short flight durations
like bullets or BBs.
Car
Car mode is used to measure the speed of cars, planes, racers, snowmobiles,
people, or other moving vehicles. The most accurate readings are acquired
when the object being measured is traveling directly toward or directly away from
the radar. Any angle between the vehicle’s path and the radar’s aim results in
lower readings, but the Pro II Speed Sensor can be set to automatically
compensate for angle error to display true vehicle speed.
Tennis
Tennis mode is much like baseball mode in that the Pro II Speed Sensor
measures the peak (serve) speed and the decelerating live speed of a served
tennis ball. Since tennis balls are served at a wide range of angles, a good
compromise location to mount and run the radar is at the middle of each end of
the court. From this spot, many serves travel directly toward or away from the
radar down the center of the court, and the most accurate speeds are reported.
Speeds for those serves traveling at a large angle to the radar’s aim will be
reported low because of the angle error.
2
3 Quick Start
The easiest way to start using a Speed Sensor is to connect it to a PC using a S
Speed Sensor Power/Programming Box. As shown in the pictures below, there are
connections for a cable to the Speed Sensor (To RADAR), a cable to the PC (To
Computer) and a power connector (9-12VDC).
You’ll need:
•
•
•
•
A S Speed Sensor
A PC with a serial port. For the quickest start, we recommend a PC with a standard
9-pin D serial port connector. If your PC only has USB ports, use a USB to Serial
Adapter Cable. These are available at any store that sells computer cables, or you
can order one from Stalker Radar from the Shared Accessories list in Appendix F.
A DC voltage power source in the range of 9-28VDC. If you do not have a cigarette
plug power source available, use the optional AC to 12VDC Power Adaptor listed
with other accessories in Appendix F.
A Programming Box/Developer’s Kit. There are two kits available, one to interface
with RS-232 Speed Sensors (200-0863-00) and one to interface with RS-485 models
(200-0864-00).
Quick Start Steps:
1. Connect the Speed Sensor to the box with the cable provided in the kit.
3
2. Connect to the PC using the provided serial cable. This is a “straight-through”
serial cable. (Do not replace it with a “null modem” cable which will swap the
transmit and receive wires.) The box in the RS-485 kit has an internal converter,
so the RS-485 signals on the Speed Sensor side are converted to RS-232 for
direct connection to a PC.
3. Connect to power by plugging the cigarette plug into a 12VDC (nominal) power
supply.
4. Load the Developer’s Kit CD on your PC. Insert the disc and allow
the automatic installer to run to completion. You will now have a
new icon on your desktop – a stylized S S in a red circle.
For Vista or Windows 7 users:
• The installer may not start automatically. Select “Run setup.exe” after the
disc has been recognized.
• After installation right-click the Scoreboard desktop icon; select Properties;
choose the Compatibility tab; at the bottom of the window under Privilege
Level, check the box for “Run this program as administrator”.
5. Turn on the Speed Sensor by flipping the On/Off switch on the Programming
Box. The green LED should turn on
6. Open the demo application called Stalker Scoreboard to show the main screen
below. The text in the blue title bar at the top of the screen will depend on the last
used configuration file.
7. Make sure the Transmit status shows that the unit is transmitting. If it shows as
Hold, click on the Transmit/Hold softkey to turn the radar transmitter on. If the
4
Fork Mode status is On, click on its softkey to turn Fork Mode Off. When Fork
Mode is on, reported speeds are limited to the 20 to 100 MPH range of tuning
forks.
8. Move your hand towards or away from the radar lens or point the Speed Sensor
toward a moving object to see speeds displayed in the windows. You may need
to change the Target Direction and/or lower the Low Speed Threshold to see
speeds. Targets moving directly toward or away from the radar are measured
with the most accuracy. The radar can not measure the speed of objects moving
across its beam at all. The Speed Sensor can pick up large and small moving
objects as well as unsuspected targets such as PC fans and leaves blowing in
the wind.
9. If you have a tuning fork, strike it and hold it in front of the radar lens to see its
calibrated speed readout. Reading a fork works best when the Speed Sensor is
in Fork Mode. If the Fork Mode status on the main screen shows as Off, click the
soft key to toggle the fork mode to On. Since a tuning fork is not a directional
target and only simulates a Doppler frequency, Fork Mode is provided to turn off
the standard directionality filtering in the radar. When fork mode is enabled, the
speed range of the unit is limited to 20-100 MPH.
Refer to the following sections if there are any problems in the steps above or for a more
thorough description of the basic and advanced features of the Speed Sensors.
Section 4 describes the physical connections of a Speed Sensor to power, to a
computer or controller and to auxiliary external devices.
Section 5 describes details of loading the Developer’s Kit Stalker Scoreboard
application CD and the basics of Speed Sensor communications over the controller’s
serial port.
Section 6 describes viewing and changing the configuration of a Speed Sensor using
the PC application.
Section 7 describes operation of a Speed Sensor using the Stalker Scoreboard
application.
Section 8 describes updating the software in the Speed Sensor.
Section 9 describes the control files used to configure the Stalker Scoreboard
application and how to tailor their operation to specific user needs.
Section 10 describes the Speed Sensor configuration/control protocol to aid users in
developing their own custom applications.
Section 11 provides service and warranty information.
Section 12 lists the Speed Sensor specifications.
The appendices at the end of the manual contain detailed information for in-depth
understanding of speed sensor operation.
Appendix A contains detailed descriptions of the data fields in the streaming speed
data protocols.
Appendix B contains the same type of information for the handshake (polled) speed
data protocols.
Appendix C contains detailed descriptions for each of the control and configuration
settings available on the speed sensor. They are arranged in groups of related function.
5
Appendix D contains a table with all of the control and configuration settings listed by
ID number. It shows all of the available settings and the factory default setting for each.
Appendix E contains a description of the data fields for the protocol used to control and
configure speed sensors.
Appendix F lists speed sensor accessories available from Stalker Radar.
6
4 Connecting the Speed Sensor
As recommended above in the Quick Start section, the fastest and easiest way to get a
Speed Sensor connected and running is by using a Developer’s Kit Programming Box.
In this section the simple box cabling is described in more detail along with alternative
custom solutions for connections to the unit. Cables referenced below are listed in
Appendix F with other optional accessories.
The Speed Sensor has a single connector used to provide it power, to control and
configure it and to monitor speed information. Its pinout is shown below as viewed from
outside the unit. Pin 1 is between the polarizing slots, and pins 2 through 5 are
numbered in a counter-clockwise direction.
Pin 1 – RX – Receive Data – toward the Speed Sensor (COMM+ for RS-485 units)
Pin 2 – PWR – 12VDC (nominal)
Pin 3 – AUX – Auxiliary Input/Output
Pin 4 – TX – Transmit Data – from the Speed Sensor (COMM- for RS-485 units)
Pin 5 – GND – Ground
4.1 Connecting to Power
Using the Programming Box, the power connection is made from the cigarette plug,
through the box, and to pins 2 and 5 of the Speed Sensor over the 155-2223-00 Speed
Sensor and Power I/O Cable. If the Speed Sensor needs to be mounted farther from the
Programming Box, the optional 155-2290-00 Extension Cable is available for an extra 15
feet.
For custom user cabling, connect pin 2 to a DC voltage source in the range from 9 to 28
volts. Connect pin 5 to the source’s ground return. The Speed Sensor draws less than
.5 A of current at a nominal 12 VDC.
NOTE: When mounting the Speed Sensor on a metal structure, electrically isolate the
Speed Sensor from the metal structure. The Standard Mounting Bracket kit listed in
Appendix F is supplied with nylon shoulder washers which electrically isolate the Speed
Sensor from the mounting bracket.
4.2 Connecting to an RS-232 Controller
Using the RS-232 version of the Developer’s Kit, 200-0863-00, the connection between
the Speed Sensor and the RS-232 PC controller runs over the 155-2223-00 Speed
Sensor Power and I/O Cable, through the box, and to the controller’s 9-pin D serial port
7
over the 155-2130-00 RS-232 Straight-Through Cable. (Do not replace this RS-232
cable with a “null modem” cable which will swap the transmit and receive wires.)
Some PCs are not configured with the recommended 9-pin D serial ports and have USB
ports instead. In these cases, acquire a USB to serial port adapter to perform the
necessary conversion. These products vary and may or may not work well. In some
cases they provide undesirable buffering and delay, and a different brand should be
used. The USB to Serial Adapter Cable listed in Appendix F is available from Stalker
Radar.
For custom user cabling, the serial connection uses pins 1, 4 and 5 of the Speed Sensor
connector. Pin 1 is the Receive Data pin for data transmitted from the controller toward
the Speed Sensor. Pin 4, Transmit Data, is for data transmitted from the Speed Sensor
toward the controller. Pin 5 is the common ground.
Speed Sensors are configured for 10 bit asynchronous serial communications with 1
start bit, 8 data bits, 1 stop bit and no parity (8N1). This is standard for PC serial ports,
but a custom controller may need to be modified to match these settings.
To assist with custom cable development, the 155-2227-00 Power I/O User Cable Parts
Kit can be used to interface the 155-2223-00 Power and I/O Cable to custom
connections.
4.3 Connecting to an RS-485 Controller
One of the benefits of the RS-485 model is distance. The Speed Sensor can be
mounted farther from the controller and still work properly. The trade-off is that the
connection only works in one direction at a time. The RS-232 Speed Sensors can
stream speed messages on the Transmit line and at the same time receive commands
from the controller on the separate Receive line. The RS-485 COMM+ and COMMlines, on the other hand, are used together as a pair for either sending messages or
receiving them – but not at the same time.
To prevent messages in the two directions from colliding, the RS-485 protocol requires
that there be a master on one end of the link and a slave on the other. An RS-485
Speed Sensor always acts as the slave device, and the controller is always the master.
The RS-485 Speed Sensors only answer commands or requests for speeds from the
controller. They never send any data without receiving a request first.
The other benefit of RS-485 communications is that, from a single COM port, one
controller can control multiple speed sensors all connected to the same pair of wires.
This type of link configuration is called point-to-multipoint. For this to work, each of the
speed sensors must have a unique address so that the controller can direct commands
to one unit at a time or broadcast commands to all units at the same time.
The address of each RS-485 unit as shipped from the factory is 2. It can be set to a
different address using the protocol described in Section 10. Once the address is
changed in this manner, the unit will retain the new address until changed using the
same method. A hard reset of the unit or loading a new version of software changes
other configuration settings to the factory defaults, but the unit’s address does not
change.
8
Using the RS-485 version of the Developer’s Kit, 200-0864-00, the connection between
the Speed Sensor and the RS-232 PC controller runs over the 155-2239-02 Speed
Sensor Power and I/O Cable, through the box where the data signals are converted from
RS-485 to RS-232, and to the PC controller’s 9-pin D serial port over the 155-2130-00
RS-232 Straight-Through Cable. (Do not replace this RS-232 cable with a “null modem”
cable which will swap the transmit and receive wires.)
Some PCs are not configured with the recommended 9-pin D serial ports and have USB
ports instead. In these cases, acquire a USB to serial port adapter to perform the
necessary conversion. These products vary and may or may not work well. In some
cases they provide undesirable buffering and delay, and a different brand should be
used. The USB to Serial Adapter Cable listed in Appendix F is available from Stalker
Radar.
For custom user cabling to RS-485 controllers, the serial connection uses pins 1 and 4
of the Speed Sensor connector. These signals, COMM+ and COMM-, are used as a
pair for either transmitting or receiving data messages. No ground wire is needed for
RS-485 communication.
Speed Sensors are configured for 10 bit asynchronous serial communications with 1
start bit, 8 data bits, 1 stop bit and no parity (8N1). This is standard for PC serial ports,
but a custom controller may need to be modified to match these settings.
To assist with custom cable development, the optional 155-2239-00 RS-485 Speed
Sensor Cable connects to the unit and has loose wires on the far end to interface to
custom connections.
4.4 Auxiliary Connections
The Aux I/O jack on the side of the Programming Box provides access to the AUX pin
(pin 3) on the Speed Sensor connector. During standard use of the Speed Sensor, the
AUX pin can be an input or an output from the unit. As an input, it can be configured as
a Radar Trigger. As an output, it can be configured as a Speed Alarm or to send out
Doppler Audio. Its default setting is for no function. Refer to Section 7.6 for more
information on configuring and monitoring the AUX pin.
Using a standard audio plug in the jack on the Programming Box, the AUX signal is
available on the tip conductor, and Ground is on the ring conductor.
Although the Aux signal in the Speed Sensor is protected from static electricity (ESD), a
system designer integrating the Speed Sensor into a custom design should still take
proper ESD precautions into account in their design. The Aux signal should also be
allowed to be pulled high upon applying power to the unit or it may go into programming
mode and have all the user settings reset to factory defaults.
As a Speed Alarm, the AUX pin outputs a simple logic level signal (3.3V for alarm
condition or 0V for no alarm) and can drive a maximum of 10mA.
For audio, the AUX pin output is a 3.3 V audio output signal. A system integrator must
provide external filtering for best audio quality.
9
Pressing the red Reset button on the Programming Box shorts the AUX pin to ground.
This acts as a trigger pull when the unit is configured for a radar trigger. It can also be
used to force a Speed Sensor’s settings back to factory defaults as described in the
Factory Defaults section (6.5.1).
10
5 Communicating with the Speed Sensor
5.1 Loading the Developer’s Kit CD
Insert the Developer’s Kit CD in your PC, and the automatic installer should begin within
a few seconds. Allow the install to complete normally by clicking on the prompts for
default installation. The process installs the following items on your PC under
C:\Program Files\Stalker (or C:\Program Files (x86)\Stalker on 64 bit versions of Vista or
Windows 7):
• Stalker Scoreboard application that can be used to configure, monitor and control
Pro II Speed Sensors.
• A .pdf version of this manual.
• Configuration files for each of the models.
• Cable drawings for reference.
The installation process also creates a shortcut icon on the desktop for the
Scoreboard application. And shortcuts to the application and this manual are
created under the Stalker tab in the Windows Start Menu.
For Vista or Windows 7 users: After installation right-click on the Scoreboard desktop
icon; select Properties; choose the Compatibility tab; at the bottom of the window under
Privilege Level, check the box for “Run this program as administrator”.
5.2 Polling for Speed Sensor Product ID
After turning on the Speed Sensor with the switch on the interface box, double-click the
Stalker Scoreboard desktop icon to start the application. The main screen below
appears.
11
When a speed sensor is found on the link, the application reads its configuration and
initializes itself for operation. Click on “About” on the menu bar, and a smaller window
pops up as shown below. It identifies the version of the Scoreboard application software
running on the PC: in this case it is 2.0.0.0. It also identifies the version of software
loaded into the Speed Sensor: here it shows version 1.0.1 for the RS-232 model of the
Pro II Speed Sensor. The display of this version is assurance that the unit is powered
and communicating since the application must poll it to find out this information.
5.3 Troubleshooting Communication Issues
If the unit is not communicating with the PC, the problem could be a power problem with
the Speed Sensor or a communication link problem between the PC and Speed Sensor.
If no Speed Sensor is found when the app is opened, it displays the following screen.
Make sure the unit is powered up, and click on the Search button. The Scoreboard app
then tries different baud rates in an attempt to find the Speed Sensor as shown.
12
To manually change the serial port or the baud rate, click on “Options” in the main
screen and select “Change Serial Port Settings” from the pull-down menu.
Change the Port setting to match the PC’s serial port being used by the Scoreboard
application and the Baud Rate to match the baud rate setting in the Speed Sensor. It
may help to close and reopen the Scoreboard app to make sure the changes have been
made successfully.
If there is still no luck communicating with the unit, there is a way to force the Speed
Sensor to a known baud rate. To change it to its factory default 9600 baud setting,
perform the sequence outlined in the Factory Defaults section (6.5.1). Be careful using
this method because all of the Speed Sensor’s settings are changed back to factory
defaults – not just the baud rate. If other settings were configured for a custom
application, they will need to be set again.
For suspected power issues, check the power source and cabling. If the green LED on
the Programming Box does not turn on when the switch is turned on, the box is not
13
getting power. Make sure the power source is on and has a good connection to the box.
The cigarette plug has an internal fuse that can be checked. Unscrew the knurled knob
on the nose of the plug to access the fuse. Replace it with one of the same size and
ratings if it is blown.
If the green LED does come on, power is making it to the box but maybe not to the
Speed Sensor. Unscrew the Speed Sensor Power and I/O Cable from the unit and
measure for proper voltage (9-28 VDC) between pins 2 and 5 on the cable.
14
6 Configuring the Speed Sensor
When viewing the main screen of the Scoreboard application, the name of a
configuration file is displayed in the title bar (e.g. [Configure Pro II Speed Sensor 232
1.0.1.cfg]). This file defines all of the configurable settings that are available on a
particular model of Speed Sensor and is fully described in Section 9.2. Since features
and settings are added and changed in different versions of software, the filename also
includes the version (1.0.1) that the file’s settings apply to.
If the filename is for a different unit or version, open a list of other available configuration
files by selecting “Select New Startup Config File” from the Config pull-down menu.
The dialog box below opens and allows for a selection to be made. It is important that
the model and software version in the configuration filename match the model and
version in the unit. The dialog box contains the Speed Sensor model and current
software version in the blue title bar.
15
If there are no .cfg files in the list, make sure the “Look in” window is set for the
Configuration Utilities folder under C:\Program Files\Stalker (or C:\Program Files
(x86)\Stalker) – the standard installation location for these files. If the correct file is still
unavailable, a lower version number for that model will work, but it may not provide
access to newer features. The matching configuration file is always available from
Stalker. Check our website at
http://www.stalkerradar.com/ProIISpeedSensorDownloads/files.html to download the file
you need. Or contact us so we can send it to you.
16
6.1 Reading the Current Configuration
From the Config pull-down menu, select “Edit Firmware Values”. The application will
poll the Speed Sensor to read all the settings defined in the configuration file and then
display the Config Settings window below.
You’ll see columns for the name of the configuration setting, the value currently in the
Speed Sensor, proposed values that can be used to change the sensor values, and
default values defined in the configuration file. The settings are grouped by type, and
the different types can be selected by clicking on the appropriate tab (e.g. Main, Serial
Port Configuration…).
17
6.2 Changing and Saving the Configuration
The settings in the Speed Sensor can be changed by selecting other values from the
Proposed Value pull-down menus as shown below, for example, changing the units from
MPH to km/h. After selecting new Proposed Values, click the Options pull-down menu
and select “Upload Proposed Values to Sensor” to save the setting changes to the
Speed Sensor. The changes can be confirmed by observing that the Sensor Values are
now equal to the Proposed Values.
When the Upload Proposed Values to Sensor menu item is clicked, the Stalker
Scoreboard application sends separate commands to the Speed Sensor to set each
value. The Speed Sensor responds to each command with its new or current setting
value. The new settings are stored in the Speed Sensor’s internal memory and are
remembered even when the unit is turned off and back on.
18
6.3 Configuration Settings
There are many Speed Sensor configuration settings. All settings for the Pro II Speed
Sensor models are described in detail in Appendix C where they are organized in the
following groups of related function. You may also recognize these as the tab headings
in the Config Settings window:
1.
2.
3.
4.
5.
6.
Basic Configuration
Serial Port Configuration
Speed Presentation
AUX Pin Functions
Testing
System
In Appendix D, all settings are listed in the order of their ID number. The table there
shows all available values for each setting and its factory default value.
6.4 Changing the Baud Rate
Since the baud rate of the Speed Sensor and the baud rate of the Scoreboard
application must be the same for communications to work, use the following steps to
change the baud rate.
1. Open the Config Settings grid as described above and click on the Serial Port
Configuration tab to see the serial port settings.
2. Change the baud rate to the new desired value and save the setting. At this
point the Speed Sensor and the Scoreboard application are still communicating
with the previous baud rate; the baud rate of the Speed Sensor has not changed
yet.
3. Turn the Speed Sensor off and back on to complete the baud rate change in the
unit.
4. Configure the Scoreboard application’s baud rate to the new desired value as
described in Section 5.3 above. You may need to close and reopen the
application to complete the process.
6.5 Default Settings
There are two types of default values for the Speed Sensors. Factory defaults are hardcoded into the unit and can not be modified. Configuration File defaults are saved in the
configuration files discussed above. They can be changed in the file and saved for
custom user default values.
6.5.1 Factory Defaults
The factory defaults for each setting are listed in Appendix D. To return all values to
their factory defaults, perform the following sequence:
• Turn the Speed Sensor off using the switch on the Programming Box.
• Press and hold the red Reset button on the box (or ground the AUX pin) while
turning the unit back on.
• Release the red button after 2 or 3 seconds.
• Turn the unit off briefly and then back on again.
• All configurable settings are now set for factory defaults.
Be careful using this method because all of the Speed Sensor’s settings are changed
back to factory defaults. If some settings had been configured for a custom application,
19
they will need to be set again. Keep in mind that if an RS-485 unit’s address has been
changed from the factory default of 2, it will not be changed back to 2; it retains its
address unless changed using the procedure in Section 4.3.
6.5.2 Configuration File Defaults
To configure the Speed Sensor with the default values in the currently selected
configuration file, select the “Initialize Radar With Config File Defaults” from the Config
pull down menu. Make sure that the desired configuration file is selected (as described
in the beginning of Section 6) before initializing with defaults.
The default values in the standard configuration files available from Stalker Radar are
equal to the factory defaults listed in Appendix D. If changes are made to values for a
custom configuration, they may be saved as default values in a new configuration file for
later use. Once all changes are made, select “Save Sensor Values To New File As
Defaults” from the Options pull-down menu in the Config Settings window.
Save the new configuration file with a name describing the custom application. The next
time “Select New Startup Config File” is selected from the Options pull-down, the new
20
file will be available also. If the box above is checked for “Save As Startup Config File”,
the newly created file name will appear in the title bar and that file is then used for the
configuration tasks.
6.6 Printing Configuration Values
The current configuration settings in a Speed Sensor can easily be printed for a record
of values. A preview of the pages to be printed can be selected by clicking on “Print
Preview”. To print the pages, select “Print” from the Options pull-down menu. A dialog
box opens to allow entry of a report title. Then a Windows Print screen appears for you
to select a printer to print the report to. Select the desired printer or use the default
printer. The table of configuration values prints with the title entered above at the top of
each page.
21
7 Operating the Speed Sensor
7.1 Scoreboard Application Main Screen
The main screen for the Scoreboard application is shown below. It has fields showing
Speed Sensor status as well as softkeys for control of the unit.
The softkeys are:
Target Type – Displays the current selected Target Type. Clicking on it cycles through
the Target Types: Baseball, Carnival, Car and Tennis. Note that when the Target
Type is changed, the Low and High Speed Threshold values also change
because a set of these values is stored for each Target Type.
Target Direction – Displays and cycles through the Target Direction values Outbound,
Inbound and Both.
Units – Displays and selects the unit of measure for the reported speeds displayed in
the speed windows. As the Units are changed, the Low and High Speed
Threshold values are converted and displayed in the newly selected Units.
Low Speed Threshold – Displays and cycles through values that can be selected as
the Low Speed Threshold. Speeds below this value will not be reported by the
unit. Separate Low Speed Threshold values are stored in the Speed Sensor for
each Target Type.
High Speed Threshold – Displays and cycles through values that can be selected as
the High Speed Threshold. Speeds above this value will not be reported by the
unit. Separate High Speed Threshold values are stored in the Speed Sensor for
each Target Type.
Transmit/Hold – Clicking this button turns on and off the radar transmitter. The current
status displays as Transmit or Hold.
22
Fork Mode – Toggles the fork mode on and off. Used when testing with a tuning fork as
described in Section 7.3.
Locking Speeds – Though not shown as a soft key, a Strong Target in Car mode can
be locked by clicking the Strong Target window. The locked speed will be shown
in the Locked Target window. To clear the locked speed, click the Locked Target
window.
The status bar at the bottom of the main window displays information about the
operating status of the Scoreboard application and the attached Speed Sensor. It may
display the following:
Polling Config – The Scoreboard normally polls the Speed Sensor to fill in the softkeys
with the unit’s current configuration.
Streaming A – When an RS-232 unit is streaming out speed data, the format of the data
messages displays here (A, b, bE or S Format – ref Appendix A).
Polling EE – Shows when the Scoreboard is polling an RS-232 or RS-485 unit for
Format EE speed reports. Since the Scoreboard is usually also polling for
configuration, you will likely see the status as Polling Config,EE.
RS-232 or RS-485 – Shows the type of Speed Sensor that the Scoreboard is
communicating with.
23
7.2 Monitoring Speed Data
The radar transmitter must be in Transmit mode for the Speed Sensor to register
speeds. The unit will get warm to the touch when the transmitter is on for long periods,
but this is normal and no cause for alarm.
The Scoreboard PC application can be used to monitor speeds that the Speed Sensor
detects. Other equipment or applications can also monitor the speed data from the unit
by decoding the messages it transmits over the serial link.
Several message formats are available and can be selected in the Config Settings
window as shown below. Refer to Appendix A and Appendix B for the content and
organization of the fields for the different formats. They vary from simple ASCII
character strings to longer formats reporting multiple speeds and status information.
The RS-232 model of the Pro II Speed Sensor can stream data in any format except EE
which is reserved as a polling-only format. Whenever the radar transmitter is on, the
Speed Sensor streams out speed messages in the selected message format at a fixed
number of messages each second.
The RS-232 model can also communicate using the Format EE handshaking (or polling)
method. Instead of automatically streaming data out, it sends a single Format EE speed
message packet only when the controller asks for one.
To enable Format EE polling, make sure the radar transmitter is on and that the
Message Format is configured for EE. Then select “Start EE Polling” from the Options
pull-down menu on the main screen as shown below. The application will then begin
24
sending EE Format Requests and displaying the values returned from the Speed
Sensor. To stop the polling from the application, select “Stop Polling” from the same
menu.
The RS-485 model can only use handshaking methods since it is always a slave on the
link. It never sends data unless the controller asks for it. It can communicate using
Format EE polling as described above, but only if its address is 2. Refer to Section 4.3
for more detail describing how to check or set the Speed Sensor address.
The RS-485 model can also use the more flexible EA polling. With this method, the
controller sends an EA request as described in Appendix B, and the Speed Sensor
returns a single message of whatever Message Format is selected (A, A1, b, bE, S).
Since the EA request has address fields, the controller can poll any individual unit on the
link and get back a speed report from only that unit.
The Stalker Scoreboard application displays the speeds it receives in the speed
windows at the bottom of its main screen. Depending on the unit’s configuration and the
data format selected, the Speed Sensor reports live speeds, peak speeds, hit speeds,
the highest peak speed it has seen since it was turned on, and locked target speeds.
When the Target Type is set for Baseball or Carnival the peak speed appears in the
Pitch Speed window, the live speed in the Rolldown Speed window, the hit speed in the
Hit Speed window (not used for Carnival), and the highest peak speed in the Highest
Pitch Speed window. Remember that hit balls will fly away from the radar in a wide
range of angles. The speed of a line drive to center field will display more accurately
than a hit toward first or third base which will have a large angle error.
25
The Tennis mode is similar with the peak speed in the Serve Speed window, the live
speed in the Rolldown Speed window, the hit speed in the Return Speed window, and
the highest peak speed in the Highest Serve Speed window.
When the Target Type is set for Car mode the live speed appears in the Strong Target
window, and the fastest speed seen for that target appears in the Peak Target window.
The live target can be locked by clicking in its display window; the speed at the time of
lock then displays in the Locked Target window. To clear the locked speed, simply click
in the Locked Target window.
In the example below, a Speed Sensor in Baseball mode is reporting a pitch speed of 56
MPH, a rolldown speed of 55 MPH and a highest peak speed of 57 MPH. Hit speeds
are disabled. Note the arrows above the speed windows. The down arrows signify that
the targets are approaching the radar (inbound speeds). Up arrows signify targets
moving away (outbound speeds).
7.3 Fork Test
A Fork Test can be run to ensure proper operation of the Speed Sensor radar. Tuning
forks are calibrated to ring at a certain frequency that simulates a Doppler return from a
moving object. Since they are not truly directional signals and since the radar normally
filters out non-directional signals, a “fork mode” is provided to easily read tuning forks.
When the Fork Mode status on the Scoreboard application’s main screen is On, strike a
fork and hold it in front of the radar’s lens to see its calibrated speed readout in the target
window. If the speed stamped on the tuning fork matches the speed displayed, the
radar is seeing targets and reporting them properly. You can disregard the Low and
26
High Speed Threshold settings while the unit is in Fork Mode; any fork calibrated for
speeds between 20 and 100 MPH will register. You can also disregard the Auto-Clear
Delay setting; the speed is cleared immediately when the fork is removed.
Fork Mode is automatically turned on for 30 seconds when the Speed Sensor is
powered up. This allows a quick fork test before the mode is automatically turned off
and the radar again processes only directional targets. (Note: When the Scoreboard
application is opened, it automatically turns off Fork Mode when it queries the unit for its
configuration.)
If a longer fork period is desired, turn on fork mode using the Fork Mode soft key in the
Scoreboard main window. When enabled in this manner, fork mode stays on for 10
minutes before it automatically turns off again. It is not possible to turn on fork mode
and leave it on indefinitely.
7.4 Interference Problems
Interference Frequencies
The S Pro II Speed Sensor transmits at a frequency of 34.7 GHz
(34,700,000,000 Hz) using a Ka-Band Transmitter. The receiver is designed to read the
Doppler frequency (the change in frequency) which is much lower and lies between 100
Hz and 93,000 Hz. There are very few devices other than another radar gun that could
cause interference in a radar gun’s transmission frequency range. However, there are a
number of devices that could interfere with a radar gun in the receiver’s frequency range.
What Does Interference Do?
Interference can cause a radar gun to read random readings, or make it harder for the
radar gun to “see” the intended target.
Random readings are an obvious sign that there is interference. However, a loss of
sensitivity can be subtle. A common situation occurs when a large number of
professional baseball scouts operate many radar guns in close proximity.
A loss of sensitivity can cause the radar gun to be unable to “see” far enough away to
get the ball speed right when it leaves the pitcher’s hand. Then, as the ball gets closer to
the plate, the radar is able to get a reading, but only after the ball has slowed down. The
result: the peak speed registers lower than the actual release speed.
Sources of Interference
There are two main sources that can cause ghost (random) readings in radar guns:
electrical devices and objects that move or vibrate.
• Electrical sources include television monitors, fluorescent lights, cellular
phones, computers, some radio transmitters, and power transformers.
• Moving or vibrating objects include ventilation fans, PC fans, motors, and
blowing debris that can produce a nearly constant speed reading.
Ways to Eliminate Interference
If you are experiencing erroneous readings, try these solutions:
• Change your position to affect where the gun is aimed.
• Lower the sensitivity by changing the Range to a lower setting.
27
•
•
If the erroneous readings are at low speeds (often interference from nearby
motors) change the Low Speed Threshold setting to a higher value to completely
eliminate all readings below the set speed.
Likewise if the erroneous readings are at high speeds, change the High Speed
Threshold to a lower cutoff.
7.5 Logging Speed Data
When the Speed Sensor is sending speed data in the EE Format handshake protocol,
the Scoreboard application can log the data to a file for later review. This commadelimited file lists each speed entry with a timestamp and can easily be imported to a
spreadsheet or text editor. Logging is not enabled by default, so a few settings in the
application’s control file are necessary to get it started. Refer to the next chapter for
complete details of this control file, but follow the steps below to enable logging:
• Locate the file named Scoreboard.ini in the “C:\Program
Files\Stalker\Scoreboard\Application” folder. (On 64 bit versions of Vista or
Windows 7, the file is in C:\Program Files (x86)\Stalker\Scoreboard\Application.)
• If the file is not in that location, right click on the Scoreboard application
desktop icon and select “Properties” to open the properties window for the
icon. Click on the Shortcut tab and look in the “Start in:” field for the location
of the application executable file and the Scoreboard.ini file.
• Open the Scoreboard.ini file in any text editor such as WordPad or Notepad.
• Find the ENABLE_SPEED_LOGGING line and ensure the parameter is set =1.
• If logging of zero speeds is desired, set the LOG_ALL_SPEED_DATA parameter
=1. If only non-zero speeds are desired, set it =0.
• Type in the desired name and location of the log file after the DATA_LOG_FILE
parameter. The default is C:\SpeedLog.csv. If not changed, the log file will be
created in the top level of the C:\ drive.
• Set the polling interval with the EE_FORMAT_INTERVAL parameter. The
number represents the time in milliseconds between receipt of the last response
and sending of the next poll, and the default value is 100 ms.
To initiate logging, make sure the radar transmitter is on and that the Message Format is
configured for EE. Then select “Start EE Polling” in the Actions pull-down menu. To
stop logging, select “Stop Polling”. The Scoreboard application appends new data to the
log each time the EE Format is started. To clear the earlier logged speeds, delete the
entries in the file manually, or rename or delete the whole file. The Scoreboard will
create a new file with the default name if one does not already exist.
7.6 The AUX Pin
The AUX Pin Configuration setting enables the AUX pin to perform different functions as
an input or an output from the Speed Sensor. Look under the AUX Pin Functions tab on
the Config Settings screen for parameters to control the functions. Refer to Section 4.4
Auxiliary Connections for connection location and other physical requirements.
As an input, the AUX pin can be configured as a remote radar trigger.
• In Continuous mode, the radar transmitter is on while the AUX pin is grounded
(red Reset button held down) and off when it is released. Before using this
mode, change the Transmit/Hold status on the main screen to Hold to allow the
AUX pin to control the transmitter.
28
•
•
In Start-Stop mode, the radar transmitter turns on the first time the AUX pin is
grounded and released and stays on until the AUX pin is grounded and released
again. Before using this mode also, change the Transmit/Hold status on the
main screen to Hold to allow the AUX pin to control the transmitter.
When monitoring the speed of a vehicle while the Target Type is set for Car, the
AUX pin can act in Lock mode. The radar transmitter is forced on, and
grounding the AUX pin alternately locks and releases the live target speed.
Used as a speed alarm output, the AUX pin is grounded by the Speed Sensor when
target speeds are below the Alarm Speed Threshold. When the target speed is equal to
or greater than the threshold, the AUX pin is set to 3.3VDC. The output of the Aux pin is
limited to a maximum of 10mA. A buffer circuit is required to drive a mechanical relay or
some other external warning device.
When configured for Doppler audio, the Speed Sensor outputs an audio sine wave at a
frequency relative to the target’s speed. This can be helpful when tracking vehicles in
Car mode. With squelch, the audio is silent when no target is being reported.
29
8 Upgrading Speed Sensor Software
The Scoreboard program has the ability to upload new software to Pro II Speed
Sensors. This section details the process of uploading a new software load to your
Speed Sensor.
Each time a unit is loaded with a different version, all configuration values are set to the
factory defaults for that version. All configuration changes made while the previous
version was running will be lost. The one exception is the unit’s address. If it had been
changed as described in Section 4.3, the unit will retain its current address until changed
again using the same process.
8.1 Checking for a New Version of Software
Contact the Customer Service Department at Stalker Radar and inquire about a new
version of software. Please have your current version available when asked so it can be
determined if there is a new load for your model of Speed Sensor. A new version can be
sent by email and will install on your hard drive under C:\Program Files\Stalker\.... in a
sub folder for each model. You can also check our website at
http://www.stalkerradar.com/ProIISpeedSensorDownloads/files.html to see if a new
version is available and to download it yourself.
8.2 Programming the Speed Sensor
Once the new code has been installed on your hard disk, open the Scoreboard program.
Click on the “Options” menu and then click on “Reprogram Radar”. A new window will
open to show the available files that can be uploaded to the unit.
Select the program that is to be uploaded to the unit, in this case “s3pro2_101.p” located
under the Stalker S3 Pro II section. In this example, this program is the latest version
available for the Pro II Speed Sensor. Double click on the icon of the desired version
and click on “OK” on the popup window. After a pause of a few seconds, the program
will start to upload the code and a progress meter will show at the bottom of the Program
Unit window. When the upload is complete, another popup window will appear to
announce a successful upload.
30
9 Configuring the Stalker Scoreboard Application
The Stalker Scoreboard application for communicating with and configuring Pro II Speed
Sensors consists of a set of files which reside on the PC. The Developer’s Kit CD
provided with the Speed Sensor Programming Box Kits installs all of the files listed
below (in italics) on the user’s PC under the C:\Program Files\Stalker folder. For
installations on 64 bit Vista or Windows 7 PC’s, the files will be under the C:\Program
Files (x86)\Stalker folder.
ScoreBoard.exe is the PC application executable file used to control and communicate
with the Speed Sensors.
ScoreBoard.ini is the control file for the application.
These two files are installed in the C:\Program Files\Stalker\Scoreboard\Application
folder.
The ScoreBoard.exe executable file and the ScoreBoard.ini control file are used as a
pair when the application is running. The executable file reads parameters from the
control file during initialization. And the executable file also updates the control file
during operation. For this reason, only one executable file in a folder should be run at a
time. If more than one executable is running and trying to use the same ScoreBoard.ini
file, the executables will interfere with each other.
It is possible to run more than one application at a time on one PC if, for example, there
is another Speed Sensor connected to a different serial port. Simply copy the
Scoreboard folder to a different location where the duplicate application can run without
interference.
There are also unique standard configuration files for each model and software version
of Speed Sensor:
Configure Pro II Speed Sensor 232 1.0.1.cfg is for an RS-232 model version 1.0.1.
Configure Pro II Speed Sensor 485 1.0.1.cfg is for an RS-485 model version 1.0.1.
These files are installed in the C:\Program Files\Stalker\Configuration Utilities folder.
9.1 Application Control File
The control file, ScoreBoard.ini, is an ASCII text file that may be edited with any text
editor such as WordPad or Notepad. It has several control parameters that can be
changed to affect the operation of the Scoreboard application. See a copy of the file
below with explanations of the parameters following.
[Stalker]
PORT=COM1
BAUD=9600
232_DESTINATION_ADDRESS=2
485_DESTINATION_ADDRESSES=2
CONFIG_FILE=C:\Program Files\Stalker\Configuration Utilities\Configure
Pro II Speed Sensor 232 1.0.1.cfg
GET_CFG_INTERVAL=500
POLLING_INTERVAL=100
31
ENABLE_SPEED_LOGGING=1
LOG_ALL_SPEED_DATA=1
DATA_LOG_FILE=C:\SpeedLog.csv
PORT defines the PC serial port used for communication with the Speed Sensor. When
the serial port is changed using the Options pull-down “Change Serial Port Settings”
function, this parameter in the Scoreboard.ini file is automatically changed. It can also
be changed by editing the file. After the COM port is changed, the application may need
to be closed and re-opened for the newly selected port to be used.
BAUD defines the baud rate to be used for communication with the Speed Sensor. As
with PORT above, this parameter can also be changed via the Options pull-down
“Change Serial Port Settings” function or by editing the file. After changing the baud
rate, the application may need to be closed and re-opened for the setting to take effect.
232_DESTINATION_ADDRESS is always set to 2. When communicating with an RS232 Speed Sensor, the PC running Scoreboard is always the master of the link (Address
1) and the Speed Sensor is always the slave (Address 2). Do not change this value.
485_DESTINATION_ADDRESSES shows the addresses of RS-485 Speed Sensors
when the Scoreboard was last used. Addresses in the range from 2 through 254 are
available. As above, Address 1 is reserved for the PC running Scoreboard.
CONFIG_FILE defines the Speed Sensor configuration file used during a session. This
parameter is updated by the application when “Select New Startup Config File” is
selected from the Config pull-down menu. The content of configuration files is discussed
in detail in Section 9.2.
GET_CFG_INTERVAL defines how often (in milliseconds) the application polls the
Speed Sensor to update the status fields in the main window. This parameter applies to
the configuration fields only (Target Type, Target Direction, Units…) – not the speed
windows. The default is 500 ms (½ second). This parameter value can be increased to
reduce the message traffic on the link, but main window status update timing will be
affected.
POLLING_INTERVAL defines (in milliseconds) how long after a polling response is
received before the Scoreboard sends another EE poll. Polling begins after selecting
“Start EE Polling” from the Options pull-down menu, and polling stops after selecting
“Stop Polling”. The default value is 100 ms (1/10 second). The value can be increased
or decreased to speed up or slow down the rate of polling.
ENABLE_SPEED_LOGGING defines whether a speed log file is generated for the
current session. Logging is enabled when the parameter is set =1 and disabled when
set =0. Logging only takes place if the Speed Sensor’s Serial Port Data Format is set for
EE Format. The default location for this log file is directly under the C:\ drive.
LOG_ALL_SPEED_DATA is used to inhibit logging 0 speeds. When set =1 all speeds
are logged including 0 speeds. When set =0 only speeds above 0 are logged, and the
length of the log file is reduced.
DATA_LOG_FILE defines the path and filename for the speed log.
32
9.2 Speed Sensor Configuration File
The Speed Sensor configuration files are ASCII files which can be edited with a text
editor. Stalker Radar provides a different file for each different model of Speed Sensor
and for each different software version for each model. These standard configuration
files define the settings from Appendix D that the application can control in a unit. A
short portion of a configuration file is shown below. Note that the file is organized in a
series of text blocks: three blocks in the example below.
The order of the blocks in the .cfg file determines the order in which the settings and
their values will be displayed in the Config Settings window. As long as the blocks are
moved as units, they can be arranged in any order.
Blocks for the settings used most often could be placed at the top of the section so their
values appear at the top of the Config Settings window. Blocks for settings that are
never used could even be deleted from the file to speed up the “Edit Firmware Values”
process. We recommend copying the standard file provided by Stalker Radar to a file
with a new name before making changes. In that way, many custom configuration files
can be created for different uses, and the standard file is always available to fall back on
for complete control.
33
Each block represents a different configuration setting and has the following format:
[Transmitter Control]
PACKET_TYPE=1
COMMAND_ID=42
ANTENNA_NUMBER=1
VALUE_BYTES=1
DATA_TYPE=1
VALUE_MIN=
VALUE_MAX=
VALUE_ITEMS_DISPLAY=Hold,Transmit
VALUE_ITEMS_FIRMWARE=0,1
DEFAULT_VALUE=1
DISPLAY=1
The first line in the block defines the name of the setting in brackets. This is the setting
description that displays in the left column of the Config Settings screen, and it can be
changed to any name desired.
PACKET_TYPE should be set =1. Do not change this value. It is used in the Packet
Type field of the Configuration Protocol described in Appendix E when the application is
building commands to send to the Speed Sensor.
COMMAND_ID is the Setting ID (in decimal format) from Appendix D that corresponds
to the setting description.
ANTENNA_NUMBER should be set =1. Do not change this value. It is used in the
Antenna Number field of the Configuration Protocol described in Appendix E when the
application is building commands to send to the Speed Sensor.
VALUE_BYTES is the number of bytes that the setting value uses. Do not change this
value from the value provided in the standard configuration files from Stalker Radar.
DATA_TYPE controls the behavior of the value fields. When set = 1 (list type), only the
values listed in VALUE_ITEMS_DISPLAY are valid. When set = 2 (free-form numeric
type), in addition to the values in the list, the user can also enter any numeric value in
the range from VALUE_MIN through VALUE_MAX.
VALUE_MIN defines the minimum acceptable value when DATA_TYPE=2.
VALUE_MAX defines the maximum acceptable value when DATA_TYPE=2.
VALUE_ITEMS_DISPLAY defines the text that will appear as pull-down selections in
the row for a given setting in the Config Settings window. The values are separated by
commas with no spaces and may be set to any desired text.
VALUE_ITEMS_FIRMWARE defines the actual values the application uses to
communicate with the Speed Sensor. These values are also separated by commas, and
the order correlates on a one to one basis with the order of the list for
VALUE_ITEMS_DISPLAY. The available values for each setting are defined in
Appendix D.
DEFAULT_VALUE is the default value described in the Configuration File Defaults
section. It may be set to any legal value for the setting – either from the
VALUE_ITEMS_FIRMWARE list or between VALUE_MIN and VALUE_MAX.
DISPLAY defines whether the setting is displayed in the Config Settings screen. When
set =1, the setting is displayed. When set =0, the setting is not displayed. This method
can be used to skip displaying settings of no interest without having to delete the whole
block from the file.
34
10 Custom Applications to Control Speed Sensors
This chapter discusses in detail the protocol used to communicate with the Speed
Sensors. It is the protocol used by the Scoreboard application described earlier in this
manual and can be used by designers to develop custom applications to control Speed
Sensors. A basic knowledge of hexadecimal math is required, but the protocol fields are
basically “fill in the blank”.
Using the configuration protocol described in Appendix E, a designer can “get” the
current value of a setting from the unit, “set” the setting to a new value or “change
(increment)” the value. When a PC or other controller sends a configuration command
packet to the Speed Sensor, the Speed Sensor responds immediately with a packet in
the same format. The only values changed in the returned packet are the Destination
Address, Source Address, Configuration Value and the Checksum. The Payload Length
may also change depending on the length of the returned Configuration Value.
The PC or controller is always defined to be the master (Address = 0x01) so commands
from the controller will always have 0x01 as the Source Address and responses from
speed sensors will always have 0x01 as the Destination Address.
The address for all RS-232 units is 0x02 and can not be changed since there can only
be a single Speed Sensor on the RS-232 link.
Multiple RS-485 units can work simultaneously on a single link to the controller. The
address of each one must be unique and in the range of 2-254 (0x02 – 0xFE). Address
0 is undefined and should not be used. Address 255 (0xFF) is the broadcast address.
Every unit on the link acts on commands sent to Address 255, so a controller can, for
example, turn all the radar transmitters on or off with a single command. Be aware that
each unit also sends a response packet to a broadcast command, and that the
responses are likely to be garbled on the shared link. For this reason, always disregard
responses to broadcast commands unless there is only one Speed Sensor on the link. If
the response from a single unit on a multipoint link is desired, always address that unit in
the command.
Another good use for a broadcast command is to find out the address of a Speed Sensor
that may not be responding to its expected address. Make sure the unit is the only one
on the link, and send the Get Speed Sensor Address command (116) to the broadcast
Destination Address 255 (0xFF). As long as the baud rate is correct, the unit will
respond back using its address as the Source Address in the response packet.
All of the methods (get, change and set) use the same packet format defined in
Appendix E. The differences are in the use of the Command ID and the Configuration
Value fields.
• The “change” command and the “get” command are similar in that the Command
ID field is set equal to the Setting ID (in hex) from the list of settings in Appendix
D.
o For a “change” command, the Configuration Value is set to 1 to instruct
the Speed Sensor to increment the value by 1 and return it: change(1). If
the incremented value exceeds the legal range for the setting, the value
rolls around to the lowest value in the range.
35
For a “get” command, the Configuration Value is set to 0 basically
instructing the Speed Sensor not to increment the current value but to
simply return it. This is essentially a change(0) command.
For a “set” command, the Command ID field is set equal to 0x80 plus the Setting
ID value (in hex) from the list in Appendix D (essentially turning on the high-order
bit). The Configuration Value field is set to the new desired value.
o
•
In the response packet, the Speed Sensor inserts the value of the requested setting in
the Configuration Value field.
36
11 Service Information
A Check List Before Servicing the Pro II Speed Sensor
•
•
•
•
Check the Connections – If you are having a problem with your Pro II Speed
Sensor, first make sure it is connected properly. The cables and interface boxes
for the RS-232 units are different than those for the RS-485 units. Refer to
Section 4 on physical connections for details.
Check the Communications Path – Make sure that basic communications are
working between the Speed Sensor and the PC or controller. Refer to Section 5
for details on communications.
Check the Settings – Make sure that the configuration settings are correct for
your application. Refer to Section 6 regarding configuration.
Call Customer Service - If the problem is not rectified with these steps, call
Customer Service at 1- 877-STALKER for help. A service representative will
determine if the unit needs to be sent to the factory.
Factory Service Center Address
Applied Concepts, Inc.
Attn. Repair Department
2609 Technology Drive
Plano, TX 75074
1-877-STALKER Toll Free
Phone: (972) 801-4807
Fax: (972) 398-3781
Warranty Information
The Pro II Speed Sensor is covered for One (1) Full Year, Parts and Labor, against
defects in workmanship, parts, or materials, and is guaranteed to operate within
specifications for that period.
S Radar will repair or replace, at their option, any component or system found to
be defective. The customer is responsible for shipping the defective product to the
factory (freight prepaid), and S Radar will pay for the return shipping via UPS
ground service back to the customer. Any expedited air shipping charges are to be paid
by the customer.
This full warranty does not cover damage due to dropping, water, salt, improper voltage,
fire, attempted repairs or modifications by an unauthorized service agent, or any other
abuse of any kind.
37
12 Specifications
GENERAL SPECIFICATIONS
Product Type
Processor
Operating Temperatures
Storage Temperatures
Stationary Doppler Radar Speed Sensor
Digital Signal Processor
-30°C to +70°C (-22°F to +158°F), 90% relative humidity
-40°C to +85°C (-40°F to +185°F)
MICROWAVE SPECIFICATIONS
Operating Frequency
Frequency Stability
Antenna Type
Polarization
3 db Beam Width
Microwave Source
Receiver Type
Power Output
Power Density
34.7 GHz (Ka-band)
±100 MHz
Conical Horn
Circular
12°±1°
Gunn-Effect Diode
Two direct-conversion homodyne receivers using four low-noise
Schottky barrier mixer diodes
10 mW minimum
15 mW nominal
25 mW maximum
2
1 mW/cm maximum at 5 cm from lens
The Federal Communications Commission requires that all transmitting equipment carry a Grant
of Type Acceptance. The S Speed Sensors comply with Part 90 of the FCC rules and are
Type Accepted by the FCC under Type Acceptance number IBQACMI002.
The FCC also requires that an operating license be obtained by the user of the equipment.
PERFORMANCE SPECIFICATIONS
Speed Range
Accuracy
Maximum Clocking
Distance
Audio Output
Speed Alarm Output
Max target speed: 890+ MPH
Min target speed: < 1 MPH
+/- 0.3%
In ones resolution, speeds are rounded down to nearest integer.
In tenths resolution, speeds are rounded down to nearest tenth.
500 Feet for baseballs
1 ¾ Miles for an average auto
Raw 3.3 V analog audio output signal is provided for Doppler audio –
must be filtered and amplified for best audio quality.
With speeds below the Alarm Threshold, the Aux pin output is 0V.
With speeds at or above the Alarm Threshold, the Aux pin is 3.3V and
can drive 10mA.
ELECTRICAL SPECIFICATIONS
Supply Voltage
Current (at 12 VDC
nominal)
9 – 28 VDC
Transmitter On: 390 mA
Transmitter Off: 138 mA
PHYSICAL SPECIFICATIONS
Weight
Diameter
Length
Case Material
1.15 lb (0.52 kg)
2.6 in (6.7 cm)
4.7 in (11.8 cm)
Aluminum die cast
38
Appendix A
Streaming Speed Data Protocols
When a streaming protocol is selected on the RS-232 model, the Speed Sensor sends
continuous speed updates in the selected output format at a specified message period.
When one of these protocols is selected on the RS-485 model, the Speed Sensor sends
only a single message in the selected output format in response to each EA Poll from
the controller.
Refer to the Serial Port Configuration section in Appendix C for settings that affect the
content and timing of these messages.
The following streaming protocol message formats are supported.
A – ASCII single speed only (up to 999.9)
A1 – ASCII single speed only (up to and > 1000)
b – ASCII multiple speeds (up to 999) + status
bE – ASCII all speeds (up to and > 1000) + status
S – ASCII multiple speeds (up to 999.9) + status
A-1
A Format – Single Speed Only – Ones Resolution
Byte #
1
2
3
4
Description
Speed hundreds digit
Speed tens digit
Speed ones digit
Carriage Return
Value
ASCII ‘0’ through ‘9’ or space
ASCII ‘0’ through ‘9’ or space
ASCII ‘0’ through ‘9’ or space
0x0D
A Format – Single Speed Only – Tenths Resolution
Byte #
1
2
3
4
5
6
Description
Speed hundreds digit
Speed tens digit
Speed ones digit
Decimal Point
Speed tenths digit
Carriage Return
Value
ASCII ‘0’ through ‘9’ or space
ASCII ‘0’ through ‘9’ or space
ASCII ‘0’ through ‘9’ or space
0x2E
ASCII ‘0’ through ‘9’ or space
0x0D
The A format is a simple ASCII format which reports a single speed in each message
packet: either live speed, peak speed (the default) or hit speed. A Pro II Speed Sensor
configured to stream data in this format can connect directly to any serial printer, PC or
display sign (such as the S LED Speed Sign) that receives ASCII data.
The simplest A Format message is 4 bytes in length as shown in the top table above. If
the Unit Resolution setting (21) is configured for speeds in tenths, the format includes a
decimal point and tenths digit as shown in the second table above. Other configuration
settings also affect the content and length of A Format messages and are covered in
detail in the Serial Port Configuration section of Appendix C; they are Format A Speed
(104), Leading Zero Character (23) and Message Termination (101).
To ensure that each message in this format is sent out before time to start the next one,
the Serial Port Baud Rate should be set for 9600 or higher.
A-2
A1 Format – Single Speed Only – Ones Resolution
Byte #
1
2
3
4
5
Description
Speed thousands digit
Speed hundreds digit
Speed tens digit
Speed ones digit
Carriage Return
Value
ASCII ‘0’ through ‘9’ or space
ASCII ‘0’ through ‘9’ or space
ASCII ‘0’ through ‘9’ or space
ASCII ‘0’ through ‘9’ or space
0x0D
A1 Format – Single Speed Only – Tenths Resolution
Byte #
1
2
3
4
5
6
7
Description
Speed thousands digit
Speed hundreds digit
Speed tens digit
Speed ones digit
Decimal Point
Speed tenths digit
Carriage Return
Value
ASCII ‘0’ through ‘9’ or space
ASCII ‘0’ through ‘9’ or space
ASCII ‘0’ through ‘9’ or space
ASCII ‘0’ through ‘9’ or space
0x2E
ASCII ‘0’ through ‘9’ or space
0x0D
As a comparison of the A1 Format tables above with the A Format tables on the
preceding page shows, the A1 Format is exactly like the A Format except that A1
includes a byte for a thousands digit. All notes for the A Format also apply to the A1
Format. Some devices that accept and display speeds in the A Format may not work
with the A1 format due to the extra digit.
A-3
b Format – Multiple Speeds + Status
Byte #
1
2
3
4
5
6
7
8
9
10
11
12
13
14
15
16
Description
Message Type
Unit Configuration
Unit Status
unused byte
unused byte
unused byte
Locked speed hundreds digit
Locked speed tens digit
Locked speed ones digit
Peak speed hundreds digit
Peak speed tens digit
Peak speed ones digit
Live speed hundreds digit
Live speed tens digit
Live speed ones digit
Carriage Return
Value
0x81
(see detail below)
(see detail below)
ASCII ‘0’ or space
ASCII ‘0’ or space
ASCII ‘0’ or space
ASCII ‘0’ through ‘9’ or space
ASCII ‘0’ through ‘9’ or space
ASCII ‘0’ through ‘9’ or space
ASCII ‘0’ through ‘9’ or space
ASCII ‘0’ through ‘9’ or space
ASCII ‘0’ through ‘9’ or space
ASCII ‘0’ through ‘9’ or space
ASCII ‘0’ through ‘9’ or space
ASCII ‘0’ through ‘9’ or space
0x0D
The b Format reports multiple ASCII speeds plus unit configuration and status bytes.
When the Unit Resolution setting (21) is set for tenths, the speeds reported are
multiplied by ten: 58.5 MPH is reported as 585. The decimal point is assumed.
Therefore a b Format message can carry a maximum speed in tenths of 99.9.
To ensure that each message in this format is sent out before time to start the next one,
the Serial Port Baud Rate should be set for 9600 or higher.
Notes:
Unit Configuration byte
Bit 7-6:
always = 01 (to force displayable ASCII characters)
Bit 5:
lock status (0=no speed locked, 1=speed locked)
Bit 4:
target direction (0=inbound, 1=outbound)
Bit 3:
fork mode (0=off/normal, 1=fork mode enabled)
Bit 2:
always = 0
Bit 1:
always = 1
Bit 0:
transmitter status (0=Hold, 1=Transmit)
Unit Status byte
Bit 7-6:
always = 01 (to force displayable ASCII characters)
Bit 5-3:
always = 000
Bit 2:
peak speeds enabled (0=disabled, 1=enabled)
Bit 1-0:
always = 00
A-4
bE Format – All Speeds + Status
Byte #
1
2
3
4-6
7
Description
Message Type
Unit Configuration
Unit Status
reserved bytes
Number of Speed Blocks Reported
Fifteen bytes for each Speed Block:
1 Speed ID
2
3
4
5
6
7
8
9
10
11-15
Last Byte
Speed Block Status
Primary speed hundreds digit
Primary speed tens digit
Primary speed ones digit
Primary speed tenths digit
Secondary speed hundreds digit
Secondary speed tens digit
Secondary speed ones digit
Secondary speed tenths digit
reserved bytes
Carriage Return
Value
0x88
(see detail below)
(see detail below)
ASCII ‘0’ or space
ASCII ‘1’ through ‘3’: One for live
speed + one for Peak Speed if
enabled + one for Hit Speed if
enabled.
ASCII ‘4’: Live Speed Block
ASCII ‘5’: Peak Speed Block
ASCII ‘6’: Hit Speed Block
(see detail below)
ASCII ‘0’ through ‘9’ or space
ASCII ‘0’ through ‘9’ or space
ASCII ‘0’ through ‘9’ or space
ASCII ‘0’ through ‘9’ or space
ASCII ‘0’ through ‘9’ or space
ASCII ‘0’ through ‘9’ or space
ASCII ‘0’ through ‘9’ or space
ASCII ‘0’ through ‘9’ or space
ASCII Space (0x20)
0x0D
The bE Format can report multiple speeds in each message (live, peak, hit) as well as
configuration and status information. It always contains a live speed block. It also
contains a peak speed block if peak speeds are enabled (using the Peak Speed Enable
setting 13) and a hit speed block if hit speeds are enabled (using the Hit Speed Enable
setting 105).
A Pro II Speed Sensor configured to stream data in this format can connect directly to a
S LED Speed Sign which is configurable and intelligent enough to choose one of
the speeds (live, peak or hit) to display. It is also possible to connect the serial output of
the speed sensor to three S LED Speed Signs which can each be configured to
display a different type of speed.
To ensure that each message in this format is sent out before time to start the next one,
if the message contains one or two speed blocks the Serial Port Baud Rate should be
set for 19200 or higher. For a full bE Format message containing three speed blocks,
the Serial Port Baud Rate should be increased to 38400.
Notes:
Unit Configuration byte
Bit 7-6:
always = 01 (to force displayable ASCII characters)
Bit 5:
always = 0
Bit 4:
unit resolution (0=ones, 1=tenths)
Bit 3-2:
always = 00
Bit 1:
peak speeds enabled (0=disabled, 1=enabled)
A-5
Bit 0:
fork mode (0=off/normal, 1=fork mode enabled)
Unit Status byte
Bit 7-6:
always = 01 (to force displayable ASCII characters)
Bit 5-0:
always = 000100
Speed Block Status byte
Bit 7-6:
always = 01 (to force displayable ASCII characters)
Bit 5-3:
always = 000
Bit 2:
secondary target direction (0=outbound, 1=inbound)
Bit 1:
primary target direction (0=outbound, 1=inbound)
Bit 0:
transmitter status (0=Hold, 1=Transmit)
Speed Block Type
Live Speed Block
Peak Speed Block
Hit Speed Block
Primary Speed
Live Speed
Peak Speed
Hit Speed
Secondary Speed
Locked Live Speed
Highest Peak Speed
unused – ASCII spaces
bE Format for Speeds Greater than 999.9
If either the primary or secondary speed is greater than 999.9, it will not fit in the
standard Speed Block defined above because there are no bytes defined for thousands
digits. In this case, an alternate Speed Block is defined as shown below with Speed ID’s
7, 8 and 9 analogous to the standard Speed ID’s of 4, 5 and 6. Depending on the
magnitude of the speeds, there may be a mix of standard and alternate speed blocks in
a complete bE message packet.
S LED Speed Signs with software version 3.3 or earlier do not recognize the new
Speed ID’s of 7, 8 and 9. They will not display speeds higher than 999.
Fifteen bytes for alternate Speed Block:
1 Speed ID
2
3
4
5
6
7
8
9
10
11
12
13-15
Speed Block Status
Primary speed thousands digit
Primary speed hundreds digit
Primary speed tens digit
Primary speed ones digit
Primary speed tenths digit
Secondary speed thousands digit
Secondary speed hundreds digit
Secondary speed tens digit
Secondary speed ones digit
Secondary speed tenths digit
reserved bytes
A-6
ASCII ‘7’: Live Speed Block
ASCII ‘8’: Peak Speed Block
ASCII ‘9’: Hit Speed Block
(see detail below)
ASCII ‘0’ through ‘9’ or space
ASCII ‘0’ through ‘9’ or space
ASCII ‘0’ through ‘9’ or space
ASCII ‘0’ through ‘9’ or space
ASCII ‘0’ through ‘9’ or space
ASCII ‘0’ through ‘9’ or space
ASCII ‘0’ through ‘9’ or space
ASCII ‘0’ through ‘9’ or space
ASCII ‘0’ through ‘9’ or space
ASCII ‘0’ through ‘9’ or space
ASCII Space (0x20)
S Format – Multiple Speeds + Status
Byte #
1
2
Description
Message Type
Peak target direction
3
4
5
6
7
Peak speed hundreds digit
Peak speed tens digit
Peak speed ones digit
Peak speed tenths digit
Live target direction
8
9
10
11
12
13
14
15
16
17
18
19
Live speed hundreds digit
Live speed tens digit
Live speed ones digit
Live speed tenths digit
Live target strength hundreds digit
Live target strength tens digit
Live target strength ones digit
Signal strength ratio hundreds digit
Signal strength ratio tens digit
Signal strength ratio ones digit
Status
Carriage Return
Value
0x83
‘A’ = “away/outbound”
‘C’ = “closing/inbound”
ASCII ‘0’ through ‘9’ or space
ASCII ‘0’ through ‘9’ or space
ASCII ‘0’ through ‘9’ or space
ASCII ‘0’ through ‘9’ or space
‘A’ = “away/outbound”
‘C’ = “closing/inbound”
ASCII ‘0’ through ‘9’ or space
ASCII ‘0’ through ‘9’ or space
ASCII ‘0’ through ‘9’ or space
ASCII ‘0’ through ‘9’ or space
ASCII ‘0’ through ‘9’ or space
ASCII ‘0’ through ‘9’ or space
ASCII ‘0’ through ‘9’ or space
ASCII ‘0’ through ‘9’ or space
ASCII ‘0’ through ‘9’ or space
ASCII ‘0’ through ‘9’ or space
(see detail below)
0x0D
The S Format reports live and peak target speeds as well as unit and target status
information.
To ensure that each message in this format is sent out before time to start the next one,
the Serial Port Baud Rate should be set for 9600 or higher.
Notes:
Status byte
Bit 7-6:
Bit 5:
Bit 4:
Bits 3-0:
always = 01 (to force displayable ASCII characters)
always = 0
fork mode (0=off/normal, 1=fork mode enabled)
always = 0000
Live target strength values are relative and in the range 1-32.
Signal strength ratio is a measure of the directionality of the target. A higher number is
more directional.
A-7
Appendix B
Handshake Speed Data Protocols
When a handshake (polling) protocol is selected, the Speed Sensor sends only one
speed message for each speed data request (poll) it receives from the controller. Refer
to Section 7.2 for instructions on configuring the Scoreboard application to send EE
Format polls.
The simple EE Format Request is a two byte message as shown below. The response
from the Speed Sensor is a four byte message carrying fields for live speed (in
hexadecimal) and direction. Since there is no addressing in the request message, it is
assumed that it is directed to a unit with a Speed Sensor Address of 2; and only a unit
with address of 2 responds to it. Both RS-232 and RS-485 models respond to EE
Format polling.
EE Format Request (from Controller to Speed Sensor)
#
1
2
Description
Start ID
Check byte
Value
0xEE
0x12 (0xEE + 0x12 = 0 (mod 256))
EE Format Response (from Speed Sensor to Controller)
#
1
2-3
Description
Start ID
Live speed
4
Check byte
Value
0xEE
Bit 15 – valid bit (1=valid speed)
Bit 14-13 – direction (11=away,
00=neither/fork,
01=closing
Bit 12 – unused
Bit 11-0 – speed in selected units and unit resolution
Bytes 1-4 sum to 0 (mod 256)
EA Format Request messages are like those for EE, but they contain Destination and
Source Addresses as shown below. The source address is always 1 for the controller.
The destination address can be any value in the range from 2 through 254, and only a
Speed Sensor with that address will respond. Its response to the EA poll is to send a
single speed message in the format selected by the Message Format setting (30): A, b,
bE, S or EE. Only RS-485 models respond to EA Format polling.
EA Format Request (from Controller to Speed Sensor)
#
1
2
3
4
Description
Start ID
Destination Address
Source Address
Check byte
Value
0xEA
0x02 – 0xFE (2-254)
0x01
Bytes 1-4 sum to 0 (mod 256)
B-1
Appendix C
Configuration Setting Descriptions
All the control and configuration settings available for the Pro II Speed Sensor are
described in this appendix. Here, they are arranged in the following groups of related
function.
1.
2.
3.
4.
5.
6.
Basic Configuration
Serial Port Configuration
Speed Presentation
AUX Pin Functions
Testing
System
The table in Appendix D lists all the settings in order of Setting ID number. It shows all
possible values and the factory default value for each setting. Refer to the table while
reading this appendix for a better understanding of the settings.
1. Basic Configuration
SETTING
Transmitter Control
Target Type
Target Direction
Range
Units
Unit Resolution
Peak Speed Enable
Hit Speed Enable
Low Speed Threshold
High Speed Threshold
Live Target Lock
ID
42
103
2
4
20
21
13
105
7
11
43
The Transmitter Control setting (42) turns the radar transmitter on (Transmit) or off
(Hold). The transmitter must be on for the radar to register speeds, and this is its default
value.
The Target Type setting (103) controls what type of target the radar is looking for. The
options are Baseball (the default), Carnival, Car and Tennis. Refer to Section 2 for a full
description of each type.
Using the Target Direction setting (2), the unit can be configured to monitor targets
moving away from the radar (Outbound), targets moving toward the radar (Inbound is
the default) or targets moving in either direction (Both). For Baseball and Tennis target
types, the target direction corresponds to the direction of the pitch or serve. Hit speed is
measured in the opposite direction. Hit speeds are not reported if the target direction is
set for Both.
The Range setting (4) affects the sensitivity (clocking distance and target size) of the
radar. The value is in the range from 0 to 7. A higher number increases the radar’s
C-1
sensitivity and lengthens the clocking distance. On the highest setting, it “looks” as far
away as possible for targets and gives the radar the highest level of performance. It is
also able to “see” smaller targets. This is the default setting.
Use lower range values for targets closer to the unit and when you want to restrict it from
seeing smaller objects or objects farther out in the background.
The Units setting (20) selects the units of speed measurement. The available options
are MPH (the default), km/h, knots, feet/sec and meters/sec.
The Unit Resolution setting (21) can be set to report speeds in whole units (ones), as
25, or tenths of units, as 25.4. The default is ones.
Use the Peak Speed Enable setting (13) to turn on and off the acquisition of the peak
speed of targets. It is enabled by default. For example, when tracking a baseball pitch,
the peak speed is the same as the release speed since a ball only slows down after it is
thrown. When tracking a vehicle in Car mode, the peak speed is the highest speed
attained as the vehicle speeds up or slows down.
The Hit Speed Enable setting (105) disables or enables the acquisition of hit speeds.
The default value for this setting is disabled. When it is enabled and the unit is in
Baseball or Tennis mode, the radar looks for targets going the opposite way from the
Target Direction setting and reports them as hit speeds. Hit speeds are not acquired if
the Target Type is Car or if the Target Direction is set for Both.
The Low Speed Threshold setting (7) is a speed value under which the radar will not
report targets. Likewise the radar will not report speeds higher than the High Speed
Threshold setting (11). These settings can be used together to define a speed range to
filter out undesired targets.
When monitoring for high speed indoors, don’t be surprised to see “speeds” generated
by fluorescent lights, other electrical sources, moving/rotating objects, or vibrating
objects. Because of the great sensitivity of the Pro II Speed Sensor, indoor use will
usually require a lower Range setting.
Setting values for Low and High Speed Thresholds are retained separately for each
target type. Be sure to select the Target Type prior to setting the Low and High Speed
Threshold settings to ensure you are setting up the correct Low and High Speed cutoffs.
The default threshold settings for each target type are defined in the Recommended
Basic Settings below.
The available settings also depend on the type of units selected. Those shown in
Appendix D are for MPH units. When reading the configuration of the unit as described
in Section 6.1, the MPH values will show in the grid. When configured for different Units,
the columns in the tables below show the converted thresholds in those units. These
converted thresholds show in the Low and High Speed Threshold softkeys on the
Scoreboard’s main window.
Units Low Speed Threshold
MPH OFF, 5,10, 15, 20, 30, 40, 50, 60,100, 200, 300, 400, 500, 600, 700, 800
KM/H OFF, 8,16, 24, 32, 48, 64, 80, 97,161, 322, 483, 644, 805, 966,1126,1287
KNOTS OFF, 4, 9, 13, 17, 26, 35, 43, 52, 87, 174, 261, 348, 434, 521, 608, 695
C-2
F/S
M/S
OFF, 7,15, 22, 29, 44, 59, 73, 88,147, 293, 440, 587, 733, 880,1027,1173
OFF, 2, 4, 7, 9, 13, 18, 22, 27, 45, 89, 134, 179, 224, 268, 313, 358
Units High Speed Threshold
MPH 150, 200, 300, 400, 500,
KM/H 241, 322, 483, 644, 805,
KNOTS 130, 174, 261, 348, 434,
F/S 220, 293, 440, 587, 733,
M/S
67, 89, 134, 179, 224,
600, 700, 800,
966,1127,1287,
521, 608, 695,
880,1027,1173,
268, 313, 358,
OFF
OFF
OFF
OFF
OFF
While monitoring a target’s changing speed, the Speed Sensor can “lock-in” the speed at
any point in time while still tracking the changing speed of the target (track-through lock).
Lock and release speeds using the Live Target Lock (43) command. The current
locked speed must be released before any other speed can be locked.
Recommended Basic Settings
Baseball
It is important that the radar is set correctly when measuring baseballs. Check these
settings:
Baseball
Target Type
Low Speed Threshold
50 MPH (80 km/h, 43 knots, 73 f/s, 22 m/s)
High Speed Threshold
150 MPH (241 km/h, 130 knots, 220 f/s, 67 m/s)
Range
8 – For maximum sensitivity
Peak Speed Enable
ON - This shows ball release speeds.
Carnival
Experiment with the Range setting depending on what motion and what rides are around
the radar.
Carnival
Target Type
Low Speed Threshold
30 MPH (48 km/h, 26 knots, 44 f/s, 13 m/s)
High Speed Threshold
150 MPH (241 km/h, 130 knots, 220 f/s, 67 m/s)
Range
1 – To mask other nearby moving objects.
Peak Speed Enable
ON - To capture the highest speed of the target.
Car
Using a Low Speed Threshold of 0 (Off) allows the radar to report the instantaneous
speed of a vehicle from before it begins moving for an acceleration run and until it stops
completely for a braking test.
Target Type
Car
Low Speed Threshold
0 MPH (OFF)
High Speed Threshold
300 MPH (483 km/h, 261 knots, 440 f/s, 134 m/s)
Range
8 – Use maximum sensitivity for greater distances
Peak Speed Enable
OFF - To focus on the target’s live speed.
Tennis
Using a Low Speed Threshold of 50 MPH helps to ignore targets around the court other
than tennis balls.
Target Type
Tennis
Low Speed Threshold
50 MPH (80 km/h, 43 knots, 73 f/s, 22 m/s)
C-3
High Speed Threshold
Range
Peak Speed Enable
150 MPH (241 km/h, 130 knots, 220 f/s, 67 m/s)
8 – Change to a lower setting if you track outside
motion
ON - This is for serve speed numbers
2. Serial Port Configuration
SETTING
Serial Port Baud Rate
Message Format
Message Period
Format A Speed
Peak Message Type
Leading Zero Character
Message Termination
ID
29
30
31
104
102
23
101
Use the settings in this section to configure the speed messages transmitted from the
serial port.
The Serial Port Baud Rate setting (29) configures the baud rate in the range from 300
to 115200 bits per second. The default value is 9600. Regardless of the baud rate, the
serial port is always configured for 10 bit asynchronous data with 1 start bit, 8 data bits,
1 stop bit and no parity (8N1).
After the baud rate setting has been changed in the speed sensor, it does not take
effect until the unit has been powered off and back on. Refer to Section 6.4 for
more details on the steps to take to coordinate the baud rate of the unit and the baud
rate of the Scoreboard application.
The Speed Sensor can transmit speed and status messages out the serial port in
different formats for different applications. The Message Format setting (30) selects the
format for transmitted messages. Refer to Appendices A and B for details on the
message contents for different formats. The A Format is the default message format.
The RS-485 Speed Sensor model can not be configured to stream out continuous speed
data because it would never be able to receive a command from the controller. For this
reason, it is limited to the EE and EA handshaking formats in Appendix B and only sends
out a speed message when requested (or polled) by the controller.
The RS-232 model can be configured to stream speed data messages in any of the
formats described in Appendix A, and it can also operate in EE polling mode.
When configured for a streaming message format, the Speed Sensor sends a message
each time the radar generates a new internal speed measurement – just over 46 times
per second or every 21 milliseconds. This is the default, and fastest, rate for streaming
messages. If that rate is too fast for a user’s application, it can be slowed down using
the Message Period setting (31). With a range of 0 to 10,000 milliseconds, a delay of
up to 10 seconds can be configured for the time between the beginning of one message
and the next.
C-4
Since the A /A1 Formats can only report a single speed, use the Format A Speed
setting (104) to select the speed to be transmitted in the data message: the last/live
speed, the peak speed or the hit speed. The default setting is for the peak speed.
When configured to stream A /A1 Format messages with the peak speed, use the Peak
Message Type setting (102) to change how the messages are sent out. When set for
Continuous, the messages stream out normally. When set for Single, only one message
will be sent out for each peak speed acquired. This setting may be convenient if the
Speed Sensor is connected to a printer and a “one line per pitch” printout is desired.
The Leading Zero Character setting (23) defines the character used for leading zeros
on speeds in the data messages. For any format, it can be set = 0 for a zero character
(ASCII 0x30) or = 1 for a space character (ASCII 0x20). For the A /A1 Formats only, it
can also be set = 2 for no character. In this case the message will be shorter for speeds
with leading zeros. Examples below show how different numbers would appear on a
speed sign or print-out.
• Zero – ASCII zeros are used for leading zero characters
“500”
“050”
“005”
“000”
• Space – ASCII spaces are used for leading zero characters
“500”
“ 50”
“ 5”
“ 0”
• None – For the A /A1 Format, leading zero characters are not transmitted,
and the message length is reduced by the number of skipped zeros.
“500”
“50”
“5”
“0”
For formats other than A/A1 Format, the speed fields are fixed-length, so
if None is selected, the leading zeros will be replaced with ASCII spaces.
The Message Termination setting (101) only applies if the Message Format is set for
the A /A1 Format. It defines the way each A /A1 Format message is terminated.
Examples below show the ASCII string that would be sent with each setting for a 100
mile per hour speed message. The 0x0D and 0x0A nomenclature used below
represents the hexadecimal values used in serial data transmission to control a printer or
display cursor position. The 0x0D character represents a “carriage return” which moves
the cursor back to the first character in the current line. The 0x0A character represents
a “line feed” which moves the cursor down to the next line.
• Carriage Return only – Each message is terminated with only a carriage
return. This is the default setting.
“100(0x0D)”
• Carriage Return / Line Feed – Each message is terminated with a carriage
return followed by a line feed.
“100(0x0D,0x0A)”
• Units and Carriage Return – Each message is terminated with the speed’s
unit of measure followed by a carriage return.
C-5
•
“100MPH(0x0D)”
Units and Carriage Return / Line Feed – Each message is terminated with the
speed’s unit of measure followed by a carriage return and then a line feed.
“100MPH(0x0D,0x0A)”
3. Speed Presentation
SETTING
Auto-Clear Delay
Cosine Angle 1
Cosine Angle 2
ID
88
18
19
The internal measurements made by the radar are modified and presented to the user
depending on the settings in this section.
The Auto-Clear Delay setting (88) defines the time that the speed reading is held after
the target is lost and before the display screen clears. The default is 2 seconds. If set
for OFF, the last speed displayed never clears and stays on the screen until the next
speed is acquired.
Angle Errors
The most common mistake made with radar guns is trying to clock targets at angles.
The Speed Sensor measures the most accurate speeds when targets are moving
directly toward or away from it. As with any radar, aiming at an angle results in angle
error, and the radar reports a speed that is LOWER than the actual speed. At slight
angles the error is very small; however at larger angles the error can become
substantial. In the diagram below, a radar located in the alternate placement will report
a lower speed than one placed in the ideal placement.
These low speeds can be corrected using the Cosine Angle settings (18 and 19). They
can be set in one degree increments in the range from 0 to 45 degrees, and the default
for both is 0 degrees. The accuracy of the corrected speed is directly dependent on the
accuracy of the estimated angle that is set.
Radar Gun Placement
C-6
Two cosine angle settings are provided so two corrections can be made simultaneously.
The two settings are independent and interchangeable. Either one can be used by itself
or with the other as a pair. One cosine angle setting might be used for the horizontal
“alternate placement” angle shown in the diagram above. The other might be set for the
vertical “above-the-field” angle if the Speed Sensor is mounted on a pole. When the aim
of the radar is aligned with the target’s path, the angles should be set for 0 degrees, and
no correction takes place.
4. AUX Pin Functions
SETTING
AUX Pin Configuration
Radar Trigger Mode
Alarm Speed Threshold
ID
16
60
12
The AUX Pin Configuration setting (16) sets up the AUX pin for a variety of functions.
It is turned off by default, but it can be enabled as an input to the Speed Sensor for
Radar Trigger functions or as an output from the unit for Speed Alarm or Doppler Audio
functions. Refer to Section 4.4 for information concerning physical connections to the
AUX pin and to Section 7.6 for a more thorough description of the feature operation.
•
•
•
When configured as a Radar Trigger, use the Radar Trigger Mode setting
(60) to choose continuous (the default), start-stop or locking functionality.
When configured for a Speed Alarm output, the Alarm Speed Threshold
setting (12) sets up the alarm speed in the range from 0 to 1500. The default
is 1500.
Doppler audio is a tone that can be helpful when tracking targets like
vehicles. The tone has a higher pitch when the vehicle is moving faster, and
it lowers as the vehicle slows down. When squelch is on, there is only a tone
when the Speed Sensor has identified a target; when squelch is off, there is
always some background noise in the audio.
5. Testing
SETTING
Get Product ID
Fork Mode
ID
37
47
A simple test to confirm that the serial link is active is for the controller to query the unit
with the read-only Get Product ID command (37). The return message from the Speed
Sensor contains an ASCII string with the product model name and the version of
software loaded into it. An example is “Pro II Speed Sensor 232 Ver: 1.0.1”. This value
can not be changed by the user; it is a constant value and only changes when a new
software version is loaded into the unit.
The Scoreboard application sends this query when reading the Product ID as described
Section 5.2
Tuning forks can be used to verify that the radar is able to register accurate speeds.
They are calibrated to ring at a frequency equal to the Doppler frequency for a given
C-7
speed and thus emulate a target. Since the Speed Sensors normally acquire only
directional targets and since tuning forks are non-directional and only simulate a speed,
the Speed Sensor can be configured to ignore the directionality requirement of target
acquisition.
Use the Fork Enable setting (47) to accomplish this. At power-up of the Speed Sensor,
the fork mode is automatically enabled for 30 seconds to allow for a quick fork test.
Strike the fork and hold it in front of the Speed Sensor lens (thin edge toward the lens) to
ensure that the simulated speed is acquired and reported by the unit. After the 30
seconds is up, fork mode is automatically disabled, and the radar focuses only on
directional targets again.
Fork mode may be turned on at any time by setting Fork Enable to On. Whenever it is
enabled by the user like this, it will stay on for ten minutes before automatically turning
itself off. It may be turned off at any time before its automatic timeout by setting Fork
Enable to Off. Another way to turn off fork mode at any time is to turn the radar
transmitter off and then back on.
A 55 MPH tuning fork is available from Stalker Radar and is listed with other accessories
in Appendix F.
6. System
SETTING
Get Product ID
Get Product Type
Get Software Version
Speed Sensor Address
ID
37
79
81
116
The first three settings (or commands) in this section are used to query the Speed
Sensor for information about itself. The values can not be changed by the user; they are
constant and depend on the model of the unit and version of software loaded into it.
A Speed Sensor responds to a Get Product ID command (37) with an ASCII string
containing the product model name and the version of software loaded into it. An
example is “Pro II Speed Sensor 232 Ver: 1.0.1”.
The response to a Get Product Type command (79) is a three byte hexadecimal value
associated with the model of the Speed Sensor. The values are:
0xB40B53
RS-232 Pro II Speed Sensor
0x35B04B
RS-485 Pro II Speed Sensor
The Get Software Version command (81) returns an ASCII string with the loaded
software’s version. e.g. “1.0.1”.
The last setting in this section, Speed Sensor Address (116), controls the address of
the unit used in control and configuration applications as described in Section 10. All
RS-232 models have an address of 2, and it can not be changed.
Since multiple RS-485 models can be used on the same link, they must have different
addresses. Their address range is 2-254 (0x02 – 0xFE). When shipped from the factory
all RS-485 models have an address of 2, but the user can change a unit’s address using
this command.
C-8
Appendix D
Configuration Settings Table
All of the settings available for the Pro II Speed Sensors are listed below in numerical
order of the Setting ID.
The Setting ID column shows the setting ID number in decimal and hexadecimal
representations.
The Setting Description column shows the setting names. It also has references to the
section in Appendix C where the setting is described in detail.
The Default Setting column contains the factory default values for each setting.
√ in this column means that the setting is not used to configure a setting. It is used to
request an action or status from the Speed Sensor.
The Available Values column shows all possible values for each setting.
Setting ID
Setting Description
Appendix C Ref
Dec
Hex
2
0x02
Target Direction
4
0x04
Range
7
0x07
Low Speed Threshold in
MPH
1 – Basic Configuration
1 – Basic Configuration
Default
Setting
1
7
7
1 – Basic Configuration
11
0x0B
High Speed Threshold in
MPH
0
1 – Basic Configuration
12
0x0C
Alarm Speed Threshold
13
0x0D
Peak Speed Enable
4 – AUX Pin Functions
1 – Basic Configuration
1500
1
D-1
Available Values
0 = Outbound
1 = Inbound
2 = Both
0 (min) – 7 (max) (0-7 coding values
correspond to 1-8 user values)
0 = Off
10 = 200
1=5
11 = 300
2 = 10
12 = 400
3 = 15
13 = 500
4 = 20
14 = 600
5 = 30
15 = 700
6 = 40
16 = 800
7 = 50
8 = 60
9 = 100
0 = 150
5 = 600
1 = 200
6 = 700
2 = 300
7 = 800
3 = 400
8 = Off
4 = 500
0 – 1500
(can be a two byte value)
0 = Disabled
1 = Enabled
Setting ID
Dec
Setting Description
Appendix C Ref
Hex
16
0x10
AUX Pin Configuration
18
0x12
Cosine Angle 1
19
0x13
Cosine Angle 2
4 – AUX Pin Functions
3 – Speed Presentation
3 – Speed Presentation
20
0x14
Units
21
0x15
Unit Resolution
23
0x17
Leading Zero Character
29
0x1D
Serial Port Baud Rate
30
0x1E
Message Format
31
0x1F
Message Period
37
0x25
42
0x2A
Transmitter Control
43
0x2B
Live Target Lock
47
0x2F
Fork Mode
60
0x3C
Radar Trigger Mode
79
0x4F
Get Product Type
1 – Basic Configuration
1 – Basic Configuration
2 – Serial Port Configuration
2 – Serial Port Configuraton
2 – Serial Port Configuraton
2 – Serial Port Configuraton
Get Product ID
5 - Testing
6 - System
1 – Basic Configuration
1 – Basic Configuration
5 - Testing
4 – AUX Pin Functions
6 - System
Default
Setting
Available Values
1
0 = Radar Trigger (input)
1 = Off
2 = Speed Alarm (output)
3 = Doppler without Squelch (output)
4 = Doppler with Squelch (output)
0
0-45 degrees (1° increments)
0
0-45 degrees (1° increments)
0
0
1
5
1
0
√
1
0
0
0
√
D-2
0 = MPH
1 = km/h
2 = knots
3 = feet/sec
4 = meters/sec
0 = ones
1 = tenths
0 = zero (ASCII 0x30)
1 = space (ASCII 0x20)
2 = none
0 = 300 baud
5 = 9600 baud
1 = 600 baud
6 = 19200 baud
2 = 1200 baud
7 = 38400 baud
3 = 2400 baud
8 = 57600 baud
4 = 4800 baud
9 = 115200 baud
0 = None (no speed data output)
1 = A Format
2 = b Format
3 = bE Format
4 = S Format
5 = EE Format
6 = A1 Format
0 – 10000 ms (10 sec) message delay
1 = Request the return of an ASCII
string containing product model and
software version (read only)
0 = Hold
1 = Transmit
0 = Release
1 = Lock
0 = Fork mode off (normal)
1 = Fork mode on (non-directional)
0 = Continuous
1 = Start-Stop
2 = Lock
1 = Request the return of a three byte
code associated with the product
model (read only)
Setting ID
Setting Description
Appendix C Ref
Dec
Hex
81
0x51
Get Software Version
88
0x58
Auto-Clear Delay
101
0x65
Message Termination
102
0x66
Peak Message Type
103
0x67
Target Type
104
0x68
Format A Speed
105
0x69
Hit Speed Enable
116
0x74
Speed Sensor Address
6 - System
3 – Speed Presentation
2 – Serial Port Configuration
2 – Serial Port Configuration
1 – Basic Configuration
2 – Serial Port Configuration
1 – Basic Configuration
6 - System
Default
Setting
√
2
0
0
0
1
0
2
D-3
Available Values
1 = Request the return of an ASCII
string containing the software version
(read only)
0 = 0 sec
6 = 6 sec
1 = 1 sec
7 = 7 sec
2 = 2 sec
8 = 8 sec
3 = 3 sec
9 = 9 sec
4 = 4 sec
10 = 10 sec
5 = 5 sec
11 = Off
0 = Carriage Return only
1 = Carriage Return / Line Feed
2 = Units and Carriage Return
3 = Units and Carriage Return / Line
Feed
0 = Continuous
1 = Single
0 = Baseball
1 = Carnival
2 = Car
3 = Tennis
0 = Last/Live
1 = Peak
2 = Hit
0 = Disabled
1 = Enabled
2 – 254 (0x02 – 0xFE)
Appendix E
Configuration Protocol
Refer to Section 10 on Custom Applications to Control Speed Sensors for details on
using this protocol to control Speed Sensors.
Configuration packet format
#
1
2
3
4
5
Description
Start ID
Destination Address
Source Address
Packet Type
Payload Length (LSB)
6
7
Payload Length (MSB)
Command ID
8
9
Antenna Number
Configuration Value
10
Checksum (LSB)
11
Checksum (MSB)
Value
0xEF
2 – 254 (0x02 – 0xFE) For broadcast: 255 (0xFF)
0x01
Reserved (use 0x00 or 0x01)
The Payload Length is a 2-byte word which is the
number of bytes starting with byte #7 through and
including the last byte before the checksum bytes.
(see above)
Get method: Value = Setting ID in hex (and byte #9 =
0x00): causes the Speed Sensor to return the current
setting
Change method: Value = Setting ID in hex (and byte
#9 = 0x01): causes the Speed Sensor to select the
next possible setting
Set method: Value = Setting ID in hex + 0x80:
causes the Speed Sensor to use the value in byte #9
as the new configuration setting
Reserved (use 0x00 or 0x01)
Get method: Value = 0x00
Change method: Value = 0x01
Set method: Value = new desired value in hex (for
multi-byte values, the LSB is first and is followed by
the more significant bytes in low to high order)
The checksum should equal the 16-bit sum of pairs of
bytes in LSB, MSB order starting with byte #1 as the
first LSB through and including the last byte before
the Checksum (in this case, byte #9). In the case of
an odd number of bytes, 0x00 is used as the last MSB
value. (See example below.)
(see above)
The following is an example showing a command to set UNITS to km/h.
#
1
2
3
4
5
6
7
Description
Start ID
Destination Address
Source Address
Packet Type
Payload Length (LSB)
Payload Length (MSB)
Command ID
Value
0xEF
0x02
0x01
0x00
0x03 (length = 0x0003 = 3 bytes)
0x00
0x94 = 0x14 (Setting 20) + 0x80 (set method)
E-1
8
Antenna Number
0x00
9
Configuration Value
0x01 (km/h)
10 Checksum (LSB)
0x88
11 Checksum (MSB)
0x03
Checksum = 0x0388 (truncated to the low order 2 bytes) = 0x02EF + 0x0001 + 0x0003 +
0x0094 + 0x0001
E-2
Appendix F
Accessories
RS-232 Speed Sensor Accessories
ACI P/N
200-0863-00
Accessory
**RS-232 Pro II Speed
Sensor Developer’s Kit
200-0865-00
**Scoreboard PC
Application CD
**RS-232 Straight-Through
Serial Cable
**Speed Sensor Power and
I/O Cable, 12’
**Speed Sensor Power I/O
User Cable Parts
155-2130-00
155-2223-00
155-2227-00
155-2290-00
Speed Sensor Power and
I/O Extension Cable, 15’
Description
Items in this table marked with ** are
included in this kit with the programming
box. The box provides a cigarette plug for
power input, connections for the Speed
Sensor and serial port cables, an on/off
switch, a reset button and auxiliary I/O
access.
Installation CD containing the Scoreboard
PC application and user manual
Connects the Programming Box to a PC
RS-232 serial port
Connects the Speed Sensor to the
Programming Box
Loose parts that can be used to interface
the 155-2223-00 Power and I/O Cable to
user-developed custom power and I/O
connections
Extender cable for the 155-2223-00
Power and I/O Cable that allows
placement of the Speed Sensor farther
away from the Programming Box
RS-485 Speed Sensor Accessories
ACI P/N
200-0864-00
Accessory
**RS-485 Pro II Speed
Sensor Developer’s Kit
200-0865-00
** Scoreboard PC
Application CD
**RS-232 Straight-Through
Serial Cable
**RS-485 Speed Sensor
Power and I/O Cable, 82’
Speed Sensor Cable RS485, 82’
155-2130-00
155-2239-02
155-2239-00
F-1
Description
Items in this table marked with ** are
included in this kit with the programming
box. The box provides a cigarette plug for
power input, connections for the Speed
Sensor and serial port cables, an on/off
switch, a reset button and auxiliary I/O
access. The box also converts the RS485 signals from the Speed Sensor to
RS-232 signals to directly interface to a
PC serial port
Installation CD containing the Scoreboard
PC application and user manual
Connects the Programming Box to a PC
RS-232 serial port
Connects the Speed Sensor to the
Programming Box
Connects to RS-485 version Speed
Sensor providing loose wires on the
distant end for custom installations
Other Shared Accessories
ACI P/N
200-0244-00
Accessory
Standard Mounting Bracket
200-0771-00
Tuning Fork, 55 MPH
015-0174-00
USB to Serial Adapter
Cable
019-7031-00
Power Adaptor, AC to
12VDC
F-2
Description
Secures the Speed Sensor to most
surfaces
Used as an artificial target to verify correct
operation of the Speed Sensor
Converts a standard RS-232 9-pin D
connection to USB. Use to interface to
PCs without a 9-pin serial connector.
Converts 110-120 VAC power from a
standard wall outlet to a 12 VDC cigarette
jack to power a Programming Box
The S Speed Sensor Radars
are Manufactured by Applied Concepts, Inc.
Copyright © 2011 by Applied Concepts, Inc.
STALKER RADAR
2609 Technology Dr.
Plano, TX 75074 USA
1-800-STALKER
(1-800-782-5537)
(972) 398-3750 Sales
(972) 398-3751 Fax
www.stalkerradar.com
Made in U.S.A
*011011600*
011-0116-00 Rev. B