1
Batch Monitor
User Manual
Copyright © 2009 Apple Inc. All rights reserved.
Your rights to the software are governed by the
accompanying software license agreement. The owner or
authorized user of a valid copy of Final Cut Studio or
Logic Studio software may reproduce this publication for
the purpose of learning to use such software. No part of
this publication may be reproduced or transmitted for
commercial purposes, such as selling copies of this
publication or for providing paid for support services.
The Apple logo is a trademark of Apple Inc., registered in
the U.S. and other countries. Use of the “keyboard” Apple
logo (Shift-Option-K) for commercial purposes without
the prior written consent of Apple may constitute
trademark infringement and unfair competition in violation
of federal and state laws.
Every effort has been made to ensure that the information
in this manual is accurate. Apple is not responsible for
printing or clerical errors.
Note: Because Apple frequently releases new versions
and updates to its system software, applications, and
Internet sites, images shown in this manual may be slightly
different from what you see on your screen.
Apple
1 Infinite Loop
Cupertino, CA 95014
408-996-1010
www.apple.com
Apple, the Apple logo, Final Cut, Final Cut Studio, Logic,
and Logic Studio are trademarks of Apple Inc., registered
in the U.S. and other countries.
UNIX is a registered trademark of The Open Group.
Other company and product names mentioned herein
are trademarks of their respective companies. Mention of
third-party products is for informational purposes only
and constitutes neither an endorsement nor a
recommendation. Apple assumes no responsibility with
regard to the performance or use of these products.
Contents
Preface
Chapter 1
5
5
5
6
7
8
10
11
12
14
16
Welcome to Batch Monitor
About Batch Monitor
About the Batch Monitor Documentation
Additional Resources
Using Batch Monitor
About the Batch Monitor Main Window
About the Inspector Window
Viewing or Changing the Status of a Submitted Batch
Batch Monitor and Distributed Processing
Batch Monitor Preferences
Using the Command Line
3
Preface
Welcome to Batch Monitor
Batch Monitor is an easy-to-use application for viewing or adjusting the status of batches
and jobs processed by Compressor or Apple Qmaster.
This preface covers the following:
• About Batch Monitor (p. 5)
• About the Batch Monitor Documentation (p. 5)
• Additional Resources (p. 6)
About Batch Monitor
You use Batch Monitor to monitor the transcoding progress of batches and jobs. You can
pause, resume, cancel, and get the status for any submitted batch or any individual job,
target, or target segment. You can also use Batch Monitor to view detailed history for
recently completed batches and jobs.
About the Batch Monitor Documentation
The Batch Monitor User Manual (this document) describes the Batch Monitor application
only. For information about Compressor, see the Compressor User Manual, available in
Compressor Help. For information on how to create a complete network for Apple Qmaster
processing, see the Distributed Processing Setup Guide, available in Compressor Help and
Apple Qmaster Help. (To access onscreen help for an application, open the application
and choose the application’s help from the Help menu.)
• Batch Monitor User Manual: This brief document describes how to use Batch Monitor
to monitor the transcoding progress of batches and jobs.
• Compressor User Manual: This is a comprehensive document that describes the
Compressor interface, commands, and menus and gives step-by-step instructions for
using Compressor and accomplishing specific tasks. It is written for users of all levels
of experience.
• Distributed Processing Setup Guide: This manual explains how to set up and maintain a
distributed processing network for use with Compressor or digital visual effects software
packages.
5
Additional Resources
There are a variety of Apple websites that you can visit to find additional information.
Compressor Website
For general information and updates, as well as the latest news on Compressor, go to:
• http://www.apple.com/finalcutstudio/compressor
Apple Service and Support Websites
For software updates and answers to the most frequently asked questions for all Apple
products, go to the general Apple Support webpage. You’ll also have access to product
specifications, reference documentation, and Apple and third-party product technical
articles.
• http://www.apple.com/support
For software updates, documentation, discussion forums, and answers to the most
frequently asked questions for Compressor, go to:
• http://www.apple.com/support/compressor
For discussion forums for all Apple products from around the world, where you can search
for an answer, post your question, or answer other users’ questions, go to:
• http://discussions.apple.com
6
Preface
Welcome to Batch Monitor
Using Batch Monitor
1
Just as Printer Setup Utility allows you to view print jobs submitted to a printer,
Batch Monitor lets you view the status of batches submitted for processing. For example,
Batch Monitor displays each batch’s name, details of where it originated, the percentage
of completion, and the estimated time before completion. Batches not yet running appear
as pending. Each batch, job, target, and target segment includes status information and
a progress bar, as well as buttons you can use to pause, resume, cancel, and get the status
of a transcode that is currently in progress.
Note: The most popular use of Batch Monitor is viewing the progress of the Compressor
transcoding batches. By default, Batch Monitor does not automatically open when you
submit a Compressor batch. To have Batch Monitor open automatically, in Compressor
choose Compressor > Preferences > Auto launch Batch Monitor. See the Compressor
User Manual for more information.
This chapter covers the following:
• About the Batch Monitor Main Window (p. 8)
• About the Inspector Window (p. 10)
• Viewing or Changing the Status of a Submitted Batch (p. 11)
• Batch Monitor and Distributed Processing (p. 12)
• Batch Monitor Preferences (p. 14)
• Using the Command Line (p. 16)
7
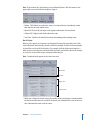
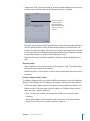
About the Batch Monitor Main Window
Most of the Batch Monitor controls are available in the Batch Monitor main window.
Toolbar buttons
User buttons
Status buttons
Batch display
Cluster list
The Batch Monitor main window includes the following sections:
General Interface
For details about the toolbar buttons and the batch display, see the next sections.
• Batch display: Provides a hierarchical display of batch, job, target, and segment
information for current and completed batches. Also includes controls to pause, resume,
cancel, and get status for any individual batch, job, target, or segment.
• Toolbar: Use the toolbar to adjust the display of items you are monitoring. See Toolbar
Buttons for details.
• Cluster list: Displays a list of computers available for processing batches, including “This
Computer” (the one using Batch Monitor) and all enabled Apple Qmaster processing
clusters on your network. Select any cluster in the list to monitor its activity.
• User buttons: Click the Me button to display batches you submitted. Click All to display
all batches for the selected cluster. (For information about permissions and password
protection, see the Distributed Processing Setup Guide, available in Compressor Help
and Apple Qmaster Help.)
• Status buttons: Click the Active button to display batches that the selected cluster is
currently processing. Click Completed to display batches that the selected cluster has
already completed. Click All to display all batches for the selected cluster.
Toolbar Buttons
Batch Monitor contains a toolbar with the following buttons that let you adjust the display
of batch status information.
8
Chapter 1 Using Batch Monitor
Note: If the toolbar isn’t visible when you open Batch Monitor, click the button in the
upper-right corner of the Batch window to open it.
• Refresh: Click Refresh to update the status of a selected cluster immediately, rather
than wait for the next update event.
• Expand All: Reveals all job, target, and segment information for every batch.
• Collapse All: Displays batch-level information only.
• Sort Order: Switches the batch list between descending and ascending order.
Batch Display
Batches, jobs, targets, and segments are displayed in hierarchical (nested) views. Each
view in the batch view hierarchy contains a disclosure triangle. Click the disclosure triangles
to reveal the next level of the hierarchy. For example, click the disclosure triangle in a
batch view to reveal the jobs contained within the batch, and click the disclosure triangle
in a job view to reveal the targets contained within the job.
Note: Completed tasks appear in the same view area.
Batch views
Job view
Target views
Segment views
• Batch view: Displays the batch name, the number of jobs and targets contained within
the batch, the date and time on which the batch was submitted, the name of the user
who submitted the batch, and the status.
Chapter 1 Using Batch Monitor
9
• Job view: Displays the name, the number of targets and segments contained within
the job, the input file type (displayed as an icon), and the status.
• Target view: Displays the type (displayed as an icon), the name, the number of segments
that the target has been broken down into, and the status.
• Segment view: Displays a description (a time-based or frame-based description of the
portion of the target being processed), the machine name (service node that the
segment is being processed on), the status, and the machine type (displayed as an
icon). Segment information is available only while a batch is being processed.
About the Inspector Window
To get detailed information about any submitted batch, job, target, or segment, click its
Show Info button to open the Inspector for that item. The Inspector includes two tabs:
the Status tab and the Log tab.
Status Tab
The Status tab displays the full text of status messages on any batch, job, target, or
segment, such as Name, Submission Time, Owner, Time Elapsed, Time Remaining, Percent
Complete, and Status.
10
Chapter 1 Using Batch Monitor
Log Tab
The Log tab displays detailed text information on any batch, job, target, or segment. This
information is useful for troubleshooting distributed processing issues, and it can be
saved to a file and processed with XML tools and UNIX scripts.
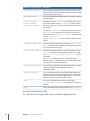
Log and Notification Labels
The following table lists the service labels used in logs and email notifications.
Processing
Notification
Local Compressor service
servicecontroller:com.apple.stomp.transcoder
Distributed Compressor service
servicecontroller:com.apple.stomp.transcoderx
Distributed Apple Qmaster
service
servicecontroller:com.apple.qmaster.executor
Viewing or Changing the Status of a Submitted Batch
You open Batch Monitor to see the status of a submitted batch and all the jobs contained
within it. Because it is a standalone application, you can view the Batch Monitor window
whether or not Compressor or Apple Qmaster is open and whether or not you have
submitted anything.
Note: By default, Batch Monitor opens automatically whenever you submit a batch using
Apple Qmaster. You can enable the same automatic behavior for Compressor by selecting
the “Auto launch Batch Monitor” checkbox in Compressor preferences.
To view the status of your batch
1 To manually open Batch Monitor, do one of the following:
• Double-click the Batch Monitor icon in the Utilities folder.
• Click the Batch Monitor button in either the Compressor window or the Apple Qmaster
window.
Chapter 1 Using Batch Monitor
11
Batch Monitor opens. If you just submitted a batch, you should see it being processed.
If you didn’t recently submit a batch, the table is empty.
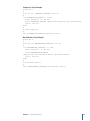
2 View the batch processing details and take any necessary action.
• To reveal information about the component parts of a batch, job, or target: Click the
disclosure triangle next to the item name.
• To pause a job, batch, or target: Click the corresponding Pause/Resume button.
• To restart the processing for an item: Click the corresponding Pause/Resume button.
• To cancel a job, batch, or target: Click its Cancel button.
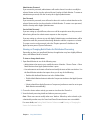
Click the disclosure triangle
next to an item to reveal
more information.
Show Info
Pause/Resume
Cancel
When the progress bar reaches 100 percent, your media file has been successfully
transcoded and saved in the designated destination folder. Completed batch and job
items are marked “Successful” and remain in the batch display. Unsuccessful batch and
job items are marked “Failed” and remain in the batch display.
3 Click the Show Info button for any item in the batch display to view information about
that item.
4 In the Inspector window that appears, click either the Status tab or the Log tab to view
the respective details.
5 Open the destination folder to view the newly transcoded output media file.
Batch Monitor and Distributed Processing
If you have set up an Apple Qmaster distributed processing system to process Compressor
or Apple Qmaster jobs, Batch Monitor will offer some additional features. For example,
both administrators and client users can use Batch Monitor to monitor the processing of
submitted jobs. Administrators can stop or cancel any batch, as long as they have the
administrator password for the cluster that is processing the batch, and users can stop
or cancel their own batches.
Batch Monitor and Passwords
There are different kinds of passwords that may affect how you use Batch Monitor. For
more information, see the Distributed Processing Setup Guide, available in Compressor
Help and Apple Qmaster Help.
12
Chapter 1 Using Batch Monitor
Administrator Password
If you create this password, administrators will need to know it in order to modify the
selected cluster and to view the selected cluster’s batches in Batch Monitor. To create an
administrator password, click the Security tab in Apple Qadministrator.
User Password
If you create this password, users will need to know it in order to submit batches to the
selected cluster and to view those batches in Batch Monitor. To create a user password,
click the Security tab in Apple Qadministrator.
Service Node Password
If you are setting up a QuickCluster, other users will be required to enter this password
before being allowed to submit remote requests to the computer.
If you are setting up a cluster to use with Apple Qadministrator, an administrator will be
required to enter this password before being allowed to add the computer to a cluster.
To create a service node password, select the “Require password” checkbox in the
Apple Qmaster pane of System Preferences.
Viewing or Changing Batch Status for Distributed Processing
Depending on how you open Batch Monitor, the application may have slightly different
views, with different levels of control.
To view or change batch status
1 Open Batch Monitor in one of the following ways.
• Administrators who want to see or modify the status of batches: Choose Cluster > Show
Batch Monitor when Apple Qadministrator is open.
• Users who want to see the status of batches and modify the status of their own batches: Use
the Batch Monitor window that opens when you do any of the following:
• Double-click the Batch Monitor icon in the Utilities folder.
• Click the Batch Monitor button in either the Compressor window or the Apple Qmaster
window.
• Submit a batch from Apple Qmaster or Compressor (preferences must be set to open
Batch Monitor automatically).
2 Choose the cluster whose activity you want to view from the Cluster list.
3 View the batch processing details and take any necessary action.
Note: Client users cannot modify other users’ batches. When they select a batch or job
submitted by another user, the Cancel and Pause/Resume buttons are not available.
For more details, see Setting Batch Monitor Preferences and Viewing or Changing the
Status of a Submitted Batch.
Chapter 1 Using Batch Monitor
13
Batch Monitor Preferences
You can use the Batch Monitor Preferences window to configure several aspects of
Batch Monitor. Most of the information displayed in Batch Monitor can be shown or
hidden using settings in Batch Monitor preferences.
About the Batch Monitor Preferences Window
The Batch Monitor Preferences window includes the following view options and network
options:
View Options
• Show Jobs: Select this checkbox to show job views (and target and segment views) in
the Batch Monitor batch display.
• Show Targets: Select this checkbox to show target views (and segment views) in the
Batch Monitor batch display.
• Show Segments: Select this checkbox to show segment views in the Batch Monitor
batch display.
14
Chapter 1 Using Batch Monitor
• “Update every” field: Enter the number of seconds between updates from processing
computers to control how often Batch Monitor information is updated.
You can set how many
seconds should pass
before Batch Monitor
updates with information
sent by the processing
computer.
The Status Interval setting in Apple Qadministrator cluster preferences takes precedence
over the update frequency setting in Batch Monitor preferences. Batch Monitor can
provide new status information only as often as it receives it from the cluster controller,
as set in the Status Interval field of the Apple Qadministrator Cluster Preferences window.
For more information, see “Setting Cluster Preferences” in the
Distributed Processing Setup Guide, available in Compressor Help and Apple Qmaster
Help.
Network Options
• “Enter IP addresses or ranges for manually selected computers” table: This table displays
information about remote host computers.
• Add/Remove button: Use the button to add or remove information about remote host
computers.
Remote Computer Address Dialog
This dialog is displayed when you click the Add/Remove button in the main Preferences
dialog. Use this dialog to enter IP addresses or ranges for manually selected computers.
• Host/Host IP Address Range buttons: These buttons control whether this dialog is in IP
Address mode (in which you enter a specific address) or IP Address Range mode (in
which you enter a range of addresses).
• Host: Use this mode to enter a host name and IP address for a specific remote
computer.
• Host IP Address Range: Use this mode to enter a name and set of range numbers
(Range From, Range To) for a range of remote IP addresses.
Chapter 1 Using Batch Monitor
15
Setting Batch Monitor Preferences
Use the Batch Monitor Preferences window to configure several aspects of Batch Monitor.
µ
To set Batch Monitor preferences
Choose Batch Monitor > Preferences, or press Command-Comma (,).
The Batch Monitor Preferences window opens.
Any changes you make to the Batch Monitor preference settings take effect only when
you click OK. If you make changes but decide not to use them, click Cancel.
Using the Command Line
If you are accustomed to doing your work from Terminal shells, and you need or prefer
to run Batch Monitor, Compressor, or the Apple Qmaster distributed processing system
from the command line with minimal use of application interfaces, this appendix is for
you.
Note: On any given Final Cut Studio system or network, the Compressor and
Apple Qmaster versions (numbers) and the version of QuickTime must all match. For
example, Compressor 3.0.5 will work only with the 3.0.5 version of Apple Qmaster, and
no other version. In this example, the correct version of QuickTime is QuickTime 7.5.5 or
later. Non-matching configurations are not supported.
Installing Apple Qmaster from the Command Line
Follow these steps to install Apple Qmaster software on each computer you want to use
for distributed processing. (All computers must be on the same subnet.)
To install Apple Qmaster software from the command line
1 Copy the standalone installer package (AppleQmasterNode.mpkg) to the remote system.
Note: Do not alter the file hierarchy of the packages.
2 Log in to the remote system.
3 Enter the following command:
sudo installer -pkg AppleQmasterNode.mpkg -target /
Apple Qmaster processes start automatically after installation.
4 Repeat these steps for each computer in your distributed processing network.
Tip: You can also install Apple Qmaster using Apple Remote Desktop. Just select a node,
click Install Package, and select the standalone installer package
(AppleQmasterNode.mpkg). The copy and installation process is done automatically.
16
Chapter 1 Using Batch Monitor
Shell Commands for Configuring Service Nodes and Cluster Controllers
As an alternative to using the Apple Qmaster pane in System Preferences, you can use
the command qmasterprefs, with command-line options for enabling and disabling
service node and cluster-controlling services.
In the command-line descriptions below, angle brackets < > indicate a mandatory
argument in a command, and brackets [ ] indicate an optional argument.
Synopsis
Below is a synopsis of the command for enabling and disabling Apple Qmaster services
on a computer. The qmasterprefs command is located in /usr/sbin.
qmasterprefs [options] [-cluster <on | off> [options]] [-service <name> <on
| off> [options]]
Command Options
This table provides information about each of the enabling and disabling service-node
and cluster-controlling services on a computer.
Preference command option
Description
-help
Displays information about supported options for qmasterprefs.
-list
Lists the current qmasterprefs settings.
-resetCluster
[cancelJobs]
Restarts cluster processes. cancelJobs deletes batches in the
queue.
-allowBonjourDiscovery
<on | off>
Enables or disables Bonjour advertisements.
-startSharing
[servicesOnly |
servicesAndCluster |
servicesAndQuickCluster]
Sets sharing state. (Similar to the Apple Qmaster pane in System
Preferences.)
-stopSharing
Stops Apple Qmaster services on local computer.
-restart
Restarts all Apple Qmaster services.
-reset
Resets Apple Qmaster services to default configuration.
-launchContentAgent <on
| off>
Automatically launches content agent at startup.
-log [0-5] [truncate on
| off]
Sets logging level. Default is 3. Off is 0. Sets whether logs are
overwritten when services are restarted.
-statusMenu <on | off>
Displays service node status indicator in menu bar.
Chapter 1 Using Batch Monitor
17
Preference command option
Description
-cluster <on | off>
[options]
Turns cluster-controlling services on or off. All [options] are:
-service “name” [on|off]
[options]
Turns service on or off. Valid names are Rendering or
"Compressor Processing". All [options] are: [timeout min]
[sharing on|off] [instances n] [autorestart on|off] [unmanaged on|off]
[log [0-5] [truncate on|off ]]
[timeout min] [[quickcluster] servername name]
[maxactivetargets val] [maxactivesegments val]
[storagepath path] [privatestorage on|off]
[publishedstorage on|off]
[storagecleanupthreshold days] [unmanagedservices
on|off] [unmanagedmulticapturethreshold sec]
[networkinterface allinterfaces | <bsd name>]
[log [0-5] | [truncate on|off]]
Note: For a complete list of shell command options, enter qmasterprefs
-help.
Example of the qmasterprefs Command
In the following example, the computer is set to be a cluster controller, bound to the
primary network interface (en0), with logging set to verbose, with the logs not overwritten.
The Rendering service is on, with 4 managed services and logging set to verbose, with
the logs not overwritten. The Compressor Processing service is configured with the
same settings, with two instances.
qmasterprefs -sharingType servicesAndCluster -cluster on networkinterface
en0 log 5 truncate off -service Rendering on sharing on instances 4 unmanaged
off log 5 truncate off -service "Compressor Processing" on sharing on
instances 2 unmanaged off log 5 truncate off
µ
To reset controller and service configurations
Enter the following:
qmasterprefs -reset
µ
To reset all controller and service processes and cancel all batches in queue
Enter the following:
qmasterprefs -resetCluster cancelJobs
µ
To stop sharing
Enter the following:
qmasterprefs -stopSharing
µ
To start sharing
Enter the following:
qmasterprefs -startSharing
18
Chapter 1 Using Batch Monitor
µ
To change the cluster storage path to an Xsan volume
Enter the following:
qmasterprefs -cluster off storagepath /Volumes/XsanVol
µ
To change the number of Compressor Processing services from 2 to 4
Enter the following:
qmasterprefs -service "Compressor Processing" off sharing on instances 4
µ
To turn off the Rendering service
Enter the following:
qmasterprefs -service Rendering off
µ
To turn on unmanaged services for Compressor Processing
Enter the following:
qmasterprefs -service “Compressor Processing” on unmanaged on
µ
To configure a service-only node
Enter the following:
qmasterprefs -stopSharing -sharingType servicesOnly -startSharing
µ
To create a QuickCluster
Enter the following:
qmasterprefs -stopSharing -sharingType servicesAndQuickCluster -startSharing
Shell Commands for Submitting Compressor Jobs
You can run the Compressor application from the command line using the Compressor
command, with a number of command-line options for submitting jobs.
In the command-line descriptions below, angle brackets < > indicate a mandatory
argument in a command, and brackets [ ] indicate an optional argument.
Synopsis
Below is a synopsis of the command for submitting a job to a cluster. The Compressor
command is located in /Applications/Compressor.app/Contents/MacOS/.
Compressor [-clustername <name>][-clusterid
<username:password@ipaddress:portNumber>] [-batchfilepath <path>] [-batchname
<batchname>] [-priority <value>] [-jobpath <path>] [-settingpath <path>]
[-destinationpath <path>] [-info <xml>] [-timeout <seconds>] [-help] [-show]
In this example, -jobpath, -settingpath, and -destinationpath can be repeated as
many times as the number of jobs you want to submit.
Note: Not all the options are necessary. For example, you can specify the cluster either
by its -clustername or by its -clusterid. You do not need to specify both. If both are
specified, only -clusterid is used.
Chapter 1 Using Batch Monitor
19
Additionally, if you specify -batchfilepath, then -jobpath, -settingpath, and
-destinationpath are not necessary because the previously saved batch file already
contains information about the job, settings, and destination.
Example of -batchfilepath:
Compressor -clustername "This Computer" -batchfilepath
"/Volumes/Hermione/SavedCompressorBatches/FreeChampagne.compressor"
Once the job is submitted successfully, this command displays the batch ID (identifier)
and job ID (identifier) in the shell, and you can monitor the progress of a batch in
Batch Monitor.
Command Options
This table provides information about each of the command options for submitting jobs.
Submission command option
Description
-clustername <name>
Use to specify the name of the cluster to which you want to send
the job. Using the cluster name, Compressor looks for the cluster
on the network in order to use it.
-password <value>
User password for the cluster specified by ID or name.
-batchname <name>
Use to specify a name for the batch so that you can easily recognize
it in Batch Monitor.
-clusterid <user
name:password@IP
address:port number>
Optionally, you can use -clusterid to enter the cluster ID and
port number instead of using -clustername. (When you enter
the cluster ID and port, less time is required to find the cluster on
the network.)
Or, if you used -clustername and the cluster requires a password,
use -clusterid to specify the user name and password. (You
need to include the IP address:port number as well whenever
you use -clusterid.)
Use Compressor -show to see a cluster's IP address and port
number.
20
-priority <value>
Specifies the priority level for a job.
-jobpath <url>
Specifies the location of the source file.
-settingpath <url>
Specifies the location of the settings for the job.
-destinationpath <url>
Specifies the destination file URL for the job.
-info <xml>
Gives detailed information for a batch or a job.
-timeout <seconds>
Use to specify the number of seconds before Compressor can quit
when looking for a cluster. The default value is 0, which puts no
limit on the timeout and allows Compressor to browse the network
for as long as it needs to find the cluster.
-show
Shows the ID information for the cluster specified with
-clustername or -clusterid, or for all clusters if no cluster is
specified.
Chapter 1 Using Batch Monitor
Submission command option
Description
-help
Displays information regarding the required parameters for the
Compressor command.
Example of Compressor Command XML
The code below is an example of XML code for submitting a Compressor command.
Notice that because it needs to be entered as one command line, every character after
-options that isn’t alphanumeric must be preceded with a backslash (\).
./Compressor -clusterid tcp://127.0.0.1:51737 -batchname myBatch -jobpath
/Volumes/Source/ShortClips/NTSC24p.mov -settingpath
/Users/stomper10/Library/Application\ Support/Compressor/PhotoJPEG.setting
-destinationpath /Users/machinename/Movies/myDestinationFilename.mov.
This command has the following elements:
• Cluster address is tcp://127.0.0.1:51737.
• Batch name is myBatch.
• Job path is /Volumes/Source/ShortClips/NTSC24p.mov.
• Setting path is /Users/stomper10/Library/Application
Support/Compressor/PhotoJPEG.setting.
• Destination path is /Users/machinename/Movies.
Shell Commands for Submitting Apple Qmaster Jobs
You can use the Apple Qmaster command, Apple
command-line options for submitting jobs.
Qmaster,
with a number of
In the command-line descriptions below, angle brackets < > indicate a mandatory
argument in a command, and brackets [ ] indicate an optional argument.
Synopsis
Below is a synopsis of the command for submitting a job to a cluster. The Apple
command is located in /Applications/Apple Qmaster.app/Contents/MacOS/.
Qmaster
Apple Qmaster [-clustername <name>] [-clusterid <user name:password@IP
address:port number>][-command <command type> -options <XML command>
[-wd<working directory>] [-timeout <seconds>] [-show] [-batchname <name>]
[-help]
Once the job is submitted successfully, this command displays the batch ID (identifier)
and job ID (identifier) in the shell.
Command Options
This table provides information about each of the command options for submitting jobs.
Chapter 1 Using Batch Monitor
21
Submission command option
Description
-clustername <name>
Use to specify the name of the cluster to which you want to send
the job. Using the cluster name, Apple Qmaster looks for the cluster
on the network in order to use it.
-batchname <name>
Use to specify a name for the batch so that you can easily recognize
it in Batch Monitor.
-clusterid <user
name:password@IP
address:port number>
Optionally, you can use -clusterid to enter the cluster ID and
port number instead of using -clustername. (When you enter
the cluster ID and port, less time is required to find the cluster on
the network.)
Or, if you used -clustername and the cluster requires a password,
use -clusterid to specify the user name and password. (You
need to include the IP address:port number as well whenever
you use -clusterid.)
Use Apple Qmaster -show to see a cluster’s IP address and port
number.
-command <command type>
Specifies the kind of command you are entering: Shell, Shake,
Maya, or other command, depending on the application you want
to use for distributed processing.
-options <XML command>
Specifies the command with XML code. Enter the XML code after
-options, with the necessary qualifiers for entering it in a shell.
See Shell Commands for Submitting Apple Qmaster Jobs, next, for
an example.
If no -option is entered, the values from the application’s
preferences file, in ~/Library/Preferences/, are used (which are the
values of the most recent job submitted).
-wd <working directory>
Use to specify the working directory path (from which the command
should be executed). The default working directory is
/Applications/Shake.
-timeout <seconds>
Use to specify the number of seconds before Apple Qmaster can
quit when looking for a cluster. The default value is 0, which puts
no limit on the timeout and allows Apple Qmaster to browse the
network for as long as it needs to find the cluster.
-show
Shows the ID information for the cluster specified with
-clustername or -clusterid, or for all clusters if no cluster is
specified.
-help
Displays information about supported options for Apple Qmaster.
Example of Shake Command XML
The code below is an example of XML code for submitting a Shake command.
22
Chapter 1 Using Batch Monitor
/Applications/Apple\ Qmaster.app/Contents/MacOS/Apple\ Qmaster -clustername
elvis -command "Shake" -options "<command
executable="/Applications/Shake/shake.app/Contents/MacOS/shake"
script="/Volumes/Data/scripts/applestyle.shk" start="1" end="1000"
stepsOf="1" minCount="10" otherOptions="" previewNode="" previewWidth="0"
shutterOn="yes" motion="yes" proxyFlags="0" proxyScale="1.000000"
proxyRatio="1000.000000" shutter="1.000000"></command>"
Note: Apple Qmaster stores the XML code for the last command you entered in
~Library/Preferences/com.apple.AppleQmaster.plist. You can copy the command in XML
form there, and customize it to use for a new job submission.
Shell Commands for Monitoring Batches
You can use the Batch Monitor command, Batch
options for monitoring jobs.
Monitor, with a number of command-line
In the command-line descriptions below, angle brackets < > indicate a mandatory
argument in a command, and brackets [ ] indicate an optional argument.
Synopsis
Below is a synopsis of the command for monitoring batches. The Batch Monitor command
is located in /Applications/Utilities/Batch Monitor.app/Contents/MacOS/.
Batch Monitor [-clustername <name>] [-clusterid <user name:password@IP
address:port number>] [-jobid <identifier> -batchid <identifier>] [-timeout
<seconds>] [-query <seconds>] [-help]
µ
To cancel a job or batch
Use the following command:
Batch Monitor [-clustername <name>] [-clusterid <IP address> <port number>
<user name> <password>] -kill -jobid <identifier> -batchid <identifier>
Command Options
This table provides information about each of the command options for monitoring
batches.
Monitoring command option
Description
-clustername <name>
Use to specify the name of the cluster to which the job was sent.
-password <value>
User password for the cluster specified by ID or name.
-clusterid <user
name:password@IP
address:port number>
Optionally, you can use -clusterid to enter the cluster ID and
port number instead of using -clustername.
Or, if you used -clustername and the cluster requires a password,
use -clusterid to specify the user name and password. (You
need to include the IP address:port number as well whenever
you use -clusterid.)
Use Apple Qmaster -show or Compressor -show to see a
cluster’s IP address and port number.
Chapter 1 Using Batch Monitor
23
Monitoring command option
Description
-jobid <identifier>
-batchid <identifier>
Use to specify the job you want to monitor.
When you use the -jobid option, you must also specify the
-batchid, in the form of the name that was given to the batch
when it was submitted. (The -batchid and -jobid are displayed
after a batch is submitted.)
If you do not use the -jobid option, all the jobs submitted to the
specified cluster are listed.
-timeout <seconds>
Use to specify the number of seconds before Batch Monitor can
quit when looking for a cluster. The default value is 0, which puts
no limit on the timeout and allows Batch Monitor to browse the
network for as long as it needs to find the cluster.
-query <seconds>
Use to specify how frequently, in seconds, the job status should be
updated.
-kill -jobid
<identifier> -batchid
<identifier>
Cancels the specified job or batch.
-help
Displays information about supported options for Batch Monitor.
Using Scripts to Run Apple Qmaster, Compressor, and Batch Monitor
To simplify your use of the command line, you can add command-line-friendly scripts to
/usr/bin. Each script sets an env variable for location and then executes the binary. Using
the following scripts would be useful if you frequently use the command line for
submissions or automated submissions. You do not need to specify the full path, and
you can add frequently used env variables and options to speed up the submission
process. To run Apple Qmaster, Compressor, or Batch Monitor, you can simply open up
a terminal and type qmaster, compressor, or batchmonitor.
Apple Qmaster Script Example
#!/bin/csh -f
#
# set env var, QMASTER_LOCATION if not set
#
if ${? QMASTER_LOCATION} == 0 then
pushd `dirname $0` >& /dev/null
setenv QMASTER_LOCATION /Applications/Apple\ Qmaster
popd >& /dev/null
endif
#
# launch qmaster
#
exec ${QMASTER_LOCATION}/Apple\ Qmaster.app/Contents/MacOS/Apple\ Qmaster
$argv:q
24
Chapter 1 Using Batch Monitor
Compressor Script Example
#!/bin/csh -f
#
# set env var, COMPRESSOR_LOCATION if not set
#
if ${?COMPRESSOR_LOCATION} == 0 then
pushd `dirname $0` >& /dev/null
setenv COMPRESSOR_LOCATION /Applications/Compressor.app/Contents/MacOS
popd >& /dev/null
endif
#
# launch Compressor
#
exec ${COMPRESSOR_LOCATION}/Compressor $argv:q
Batch Monitor Script Example
#!/bin/csh -f
#
# set env var, BATCHMONITOR_LOCATION if not set
#
if ${?BATCHMONITOR_LOCATION} == 0 then
pushd `dirname $0` >& /dev/null
setenv BATCHMONITOR_LOCATION
"/Applications/Utilities/Batch Monitor.app/Contents/MacOS"
popd >& /dev/null
endif
#
# launch Batch Monitor
#
exec "${BATCHMONITOR_LOCATION}/Batch Monitor" $argv:q
Chapter 1 Using Batch Monitor
25