1
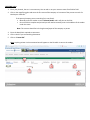
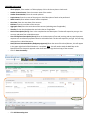
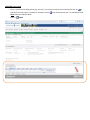
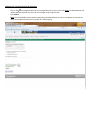
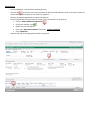
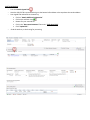
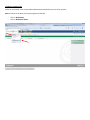
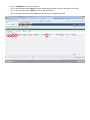
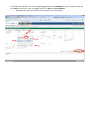
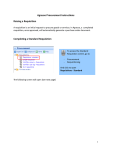
FAST Web Requisition for PSA’s User Manual PSA PROCESS LOGGING INTO FAST WEB REQUISTION Log into the Web Requisitions module through MyTRU. Click on the Employee Resources tab, and then on Web Requisitions in the FAST Suite on the right. Click on “Web Requisitioning” on the right under Applications. Click on “Web Requisitioning” Click on “Requisitions” and select “New PSA” CREATING A PSA 1. Enter your phone #, the ext. is not necessary. You can tab or use your mouse to move from field to field. 2. Click on the magnifying glass and enter the first name of the company or last name of the person to search. Ex. Kamloops or Peterson. If the person/company you are searching for is not found; Manually enter the vendor name in Selected Vendor and it will print on the PSA. Once the PSA is complete and printed you will need to manually write in the address of the vendor under the name. Note: The contract should be in the legal name/payee of the company or person 3. Enter the date PSA is required to commence 4. Click to check if you are attaching documents 5. Click on “Create PSA” Note: Anything written in the comments box will appear on the PO which is sent to the vendor. 1 4 2 3 5 CREATING A PSA cont’d TRU Employee; if the vendor is a TRU employee, click in this box to place a check mark Vendor Contact Person; Enter the contact name of the vendor Vendor Phone Number; Enter the vendor phone # Project Name; Enter the name of the project or brief description of work to be performed Work Location; Enter where the work will be completed Start Date; Enter the start date of the contract End Date; Enter the end date of the contract Aggregate Total; Enter the total value of the contract (excluding taxes if applicable) Taxable; Click on the drop down box and select the tax if applicable Services Description (Part I); Enter in the complete Services Description. The box will expand as you type. You can copy and paste from a Word document. Fees and Expenses Description (Part II); Enter in the description of fees and invoicing and any special payment requests such as milestone payments based on achievable tasks. The box will expand as you type. You can copy and paste from a Word document. Dean/Director Recommendation (Budgetary Approval); Enter the name of the Dean/Director, this will appear in the upper right hand of the PSA when it is complete. Note: You will need to send the Web Req. to the Dean/Director for electronic approval rather than have them sign the hard copy of the contract. Click on Save Commodity Click Add Accounting Item CREATING A PSA cont’d Enter in your financial coding (Fund, Org, Acct etc.), if you have more than one accounting line click on to save the first line and open a second line, otherwise click on . Only the boxes with the * are mandatory fields. Note: Leave the index box blank Click on Submit SENDING PSA FOR DEAN/DIRECTOR APPROVAL Click on the by employee and search for the Dean/Director by first or last name. Note: the Dean/Director will need to approve the web req. only and will no longer need to sign the PSA. Click Submit Note: You will probably need to send an email asking the Dean/Director to return to originator so that you are aware of the approval and can print the PDF for vendor signing. PRINTING PSA Once the Web Req. is returned from the Dean/director, Click the pdf 1 to print the PSA. Check to make sure that the vendor address printed, if not write it under the vendor name before sending it to the vendor for signature. Send the complete 3 page PSA to the vendor for signature Once the signed PSA is returned from the vendor, scan it and attach it to the web req. Click on “Attach Additional Information” 2 Click on the add item icon Browse for your scanned file Click in the “Document Comments” box write: “Vendor Signed PSA” Click “Upload File” Send the web req. to the appropriate AVP/VP for approval. 2 1 AVP/VP APPROVAL 3 Print the Vendor signed PSA Have the AVP/VP TRU representative sign at the bottom left and date at the top above the vendor address Scan signed PSA and attach to the web req. Click on “Attach Additional Information” Click on the add item icon Browse for your scanned file Click in the “Document Comments” box write: “AVP signed PSA” Click “Upload File” Send the web req. to Purchasing for processing 3 Tracking or Viewing PSA A PSA can be viewed, notes can be made and documents attached at any time in the process. Note: A search can be done only by the originator of the PSA. Click on Requisitions Click on Requisition Status In Specific Requisition enter the PSA # using only upper case and no spaces Ex. PSA20278, and Execute Report Click on PSA20278 to view a PDF of the PSA Click on the red asterisk below Notes to view or add comments (these notes will not appear on the PSA) Click on the red asterisk below Attach to view or add attachments Click on the green check mark below PO to see the PO number assigned to the PSA. To view all PSA’s and WR’s, click on the magnifying glass below the Created By box, type in your last name and click Search, click on your name to highlight and click on Add, then Execute Report. o Web Req’s will appear at the top of the list and PSA’s are at the bottom.