1
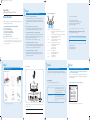
SNV6520_Belga_ENG
04-08-2005
11:29
Pagina 1
2
Philips SNV6520
ADSL Modem Multiservices PSTN Voice
Step 2
Before You Start
This Before You Start card will help you to get your ADSL Modem Multiservices set up and connected to
the Internet quickly and easily. Just follow these steps:
Step
Step
Step
Step
Step
Step
Set up your ADSL Modem Multiser vices PSTN Voice
SNV6520 LED Indicator Lights
1. Select a location for your ADSL Modem Multiservices
Install the ADSL Modem Multiservices near your PC or another location where you have easy access.
Keep ethernet cables away from power cords and other sources of electrical interference. Place the
ADSL Modem Multiservices, with the antenna in upright position, in a location where air can circulate
freely around it.
Configure Your PC for Dynamic Addressing
1. Phone2, 1
3. Connect the ADSL Modem Multiservices to your ADSL RJ11 wall jack.
Plug one end of the black RJ-11 Telephone Cable into the port labeled “ADSL” on the ADSL Modem
Multiservices back panel until you feel it click. Insert the other end of the telephone cable into the
telephone jack (or filter/ splitter) connected to your ADSL service.
The ADSL light should blink for up to two minutes and then come on solid green.
> > > Before you install the unit, check that your ADSL line is working correctly on the phone socket where you plan
to connect your ADSL Modem Multiservices. Make sure that you have properly installed a splitter (not included, refer
to your Service Provider documentation).
2.TEL
3. USB
4. Connect the ADSL Modem Multiservices to your computer
Connect one end of the Gray RJ-45 Ethernet Cable to your PC’s Ethernet port and the other end to
one of the LAN ports of the ADSL Modem Multiservices.The LAN indicator light should come on
solid green for the port where you connected your Ethernet cable and your PC is on.
4. LAN 1, 2, 3, 4
5. Connect the ADSL Modem Multiservices to your Telephone
Plug one end of the black RJ-11 Telephone Cable into the port labeled “Phone1” on the ADSL
Modem Multiservices back panel until you feel it click. Insert the other end of the telephone cable
into the telephone jack of your telephone.
6. ON LINE
5. WL
7. ADSL
8. PWR
1
Step 1
3
SNV6520 Rear View
Check your package contents
You should have all of these:
8
7
6
5
1
2
3
4
2. Plug the Power Supply into an appropriate electrical outlet.
Connect the other end to the Power Input on the backside of the ADSL Modem Multiservices. Turn
the power ON with the Off/On Switch.The LED light (PWR) should come on solid green.
1: Check your package contents
2: Set up your ADSL Modem Multiservices
3: Configure your PC for Dynamic Addressing
4: Configure your Wireless Modem Multiservices
5: Configure your Telephone Settings
6: Configure Wireless Security (optional)
Step
Step
Step
Step
Proceed to the next section ‘Step 4: Configure Your Philips ADSL Modem Multiservices’.
• ON: When Phone is OFF-Hook talking on a Call
• Blinking Green: On an Incoming Telephone Call when it rings the phone or in
call waiting stage
• Off: When modem is having no communication on ADSL or Internet Telephony
• Solid Green: When Telephone registration is successful
• Off: When there is no connection
• Solid Green: When USB device is up and connected
• Off: When there is no connection
• Green when connected to each port on the LAN
• Blinking green when there is activity on each port
• Off = Wireless disabled
• On = Wireless enabled
• Blinking = Wireless traffic
• Green when Link is Up
• Blinking when sending and receiving data
• Blinking green when initializing
• Green when initialized
• Green when power is on
Step 3
Manual on CD
Configure your PC for Dynamic Addressing
Repeat these steps for each computer that you want to connect to your ADSL Modem Multiservices.
A maximum of four computers or devices may access the Internet via the ADSL Modem Multiservices at one
time
LAN1
LAN2
LAN3
LAN4
PWR
RESET USB
Phone1
a). for Window 98, ME, and 2000 :
Start menu > Settings > Control Panel > Network
(or Network and Dial-up Connections > Local Area
Connection > Properties) > TCP/IP [your network card]
or Internet protocol [TCP/IP] > Properties
b). for Window XP Click
Start menu > Control Panel > Network and Internet
Connections > Network Connection > Local Area
Connection > Properties > Internet protocol [TCP/IP]
> Properties
Phone2
ON/OFF
Before You Start Card
a. Mac OS 9 follows a path like this: Apple Menu > Control Panels > TCP/IP Control Panel
b. Mac OS X follows a path like this: Apple Menu > System Preferences > Network
Step 2: Select Built- in Ethernet.
Step 3: Select Configure Using DHCP.
Step 4: Close and Save, if prompted.
4
Configure your ADSL Modem Multiser vices PSTN Voice
1. Open your Web browser (e.g. Netscape or Internet Explorer) from the computer that is
connected to the ADSL Modem Multiservices.
Enter http://192.168.1.1 in the URL Address text box and press the Enter key. In case the Philips ADSL
Modem Multiservices displays the Login Screen, click the “Login” button (leave the Password field blank) to
proceed to the Quickstart page.
2.The ADSL Modem Multiservices displays the Quickstart Web page.
Power Supply
ADSL
Black RJ-11
Telephone Cable
Macintosh Mac OS 9.2 and higher or Mac OS X 10.1.5 or higher :
Step 1: Access the TCP/ IP or Network control panel.
Step 4
Microsoft Windows:
Step 1: Go to the TCP/ IP Properties settings on your computer by:
ADSL Modem Multiservices
2: Select “Obtain an IP address automatically”.
3: Select “Obtain DNS server address automatically”, if available.
4: Remove any previously configured Gateways, if available.
5: Click OK. Restart if prompted.
Grey RJ-45
Ethernet Cable
Enter the Username and Password supplied by your Internet Service Provider.
If you don ’t have everything, contact your supplier immediately.
Connect each computer or other device in your network to the ADSL Modem Multiservices with an
Ethernet cable or wirelessly.
A maximum of four computers or devices may access the Internet via the ADSL Modem Multiservices at
one time
SNV6520_Belga_ENG
04-08-2005
11:29
Pagina 2
3. Enable Wireless
The wireless function is enabled by default. If you want to disable the wireless function of the ADSL
Modem Multiservices, you can uncheck the “Enable Wireless” checkbox.
3. Click the “Ok” button.
Congratulations! Your Telephone configuration is complete. Click “OK” to continue.
In case of error or dysfunction, use the Back Button of the browser, and repeat the process.
4. Enable Broadcast
The ADSL Modem Multiservices broadcasts its Wireless ID by default.This means that the SSID will
appear as an available network when scanned for by wireless- enabled devices.
If you uncheck this checkbox, you must manually type in the identical SSID in your wireless devices or
clients in order to connect to the ADSL Modem Multiservices network.
2. Specify MAC Filtering (optional)
MAC Filtering allows you to specify which computers are allowed to join the wireless network based on
their unique hardware (MAC) address.To enable this feature, click on Advanced Settings > Firewall >
MAC Filtering. Enable MAC Filtering (MAC address control) by selecting “Yes” (1).
Once it is enabled, only MAC addresses that have been entered in the MAC Filtering Table will be
accepted onto the wireless network. All unlisted addresses will be blocked.
1
5.Wireless ID (SSID)
The Wireless ID is preset to “WiFi_xx?”.The “xx” corresponds with an unique number in your ADSL
Modem Multiservices.You can either leave it as is, or change it. On client PCs’ software, this might also be
called the Network Name.The Wireless ID is used to identify this particular wireless network. Please refer
to the manual of your wireless client on how to connect to the ADSL Modem Multiservices.
6.Telephone Service
The telephone service is disabled by default. If you want to enable the Telephone function of the ADSL
Modem Multiservices you can check the enable box to turn on the “Telephone Service” function.
7. Click the “Save Settings/Next” button.
Once you leave your Telephone Service disabled please click on “Save Settings” and continue with Step 6.
You can now surf to your favorite websites by typing an URL in your browser’s location box or by selecting one of your favorite Internet bookmarks. If you enabled the Telephone Service please click on “Next”
and continue with Step 5.
4
2
5
6
Once it is saved, only the MAC addresses in the list will be accepted onto the Wireless Network.
All other addresses will be blocked.
Step 6
Configure Wireless Security (optional)
1. Enable WEP Encryption (optional)
WEP is a wireless privacy protection. It will encrypt the data you are transmitting.There are 2 options,
using either 64- or, 128 - bit WEP Encryption (depending on the capability of your client wireless
card).
It is strongly recommended that you enable WEP encryption.
5
1. Phone Number Selection
Please indicate which number you want to use and click “Next”. For this example scenario with “3
Phone numbers” has been choosen to explain the generic configuration.
Appendix: Problem solving
If your ADSL Modem Multiservices is not able to connect you to the Internet, you may see one or
more of the following messages:
DSL connection is down. Please check the following:
• Phone line is securely connected to your ADSL Modem Multiservices
• DSL Sync light on front of your ADSL Modem Multiservicesis green and not blinking
• Filters have been installed on all phone jacks that have telephone devices connected to them.
Please try again to connect.
Login failed: Please check your UserName and Password and try again.
To change your Username or Password click on “Advanced Settings” > “WAN” > ATM PVC > VC1.
Step 5
Configure Wireless Security (optional)
3
You can enter a MAC Address to the table by scrolling
down and then selecting the computer that you want to
add from the list presented under the DHCP Client List
(2). Select the position where you want to copy it (3) to
and click “copy to” (4).You can also, when you know the
number, enter the MAC Address in the table directly.
When you are finished adding MAC addresses click the
“Save settings” button (5).
To enable WEP, enter http://192.168.1.1 in the URL Address text box of your Internet browser and
press the Enter key. Login and click on “Advanced Settings” in the left hand menu. Select wireless >
Security.Then from the pull down menu select “WEP Only” and than click “Save Settings”.
2. Phone Number Settings
Enter the telephone number, Login and Password supplied by your Internet Service provider. Repeat
this for each available Phone Number.The ADSL Home Gateway can append telephone numbers to
outgoing calls. Select the number you want to use for each port. Click “Save Settings”.The connection
status page will appear.
Network Connection Problems
Cannot ping the ADSL Modem Multiservices from the attached LAN, or the ADSL Modem
Multiservices cannot ping any deviceon the attached LAN
• Verify that the IP addresses are properly configured. For most applications, you should use the ADSL
Modem Multiservices DHCP function to dynamically assign IP addresses to hosts on the attached
LAN. However, if you manually configure IP addresses on the LAN, verify that the same network
address (network component of the IP address) and subnet mask are used for both the ADSL
Modem Multiservices and any attached LAN devices.
• Be sure the device you want to ping (or from which you are pinging) has been configured for TCP/IP.
If this problem persists, please contact the help desk (on the number provided by your Internet Service
Provider).
The WEP configuration page will appear.
Leave the “WEP Mode”, “Entry Method”, “Key Provisioning” and “Default Key ID” default values.
Checkmark the box after “Passphrase” and fill in a passphrase. Now you have to click “Save Settings”
on the bottom of the page.This action will automatically generate a series of 4 codes/keys.
Hereby, Philips Consumer Electronics, BLC P&ACC, declares that this SNV6520 is in compliance with
the essential requirements and other relevant provisions of Directive 1999/EC.
To ensure that the other devices in your network
have the same WEP settings, please make sure that
the WEP settings in your other devices are identical to the generated code behind “Key 1”.
Date of issue: August 2005
Specifications are subject to change without notice
Trademarks owned by Royal Philips Electronics
2005 © Royal Philips Electronics - All rights reserved
For further information and explanation on security, please check the manual on the CD.
www.philips.com
Quick Start Guide
Philips SNV6520
ADSL Modem Multiservices PSTN Voice