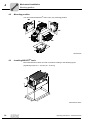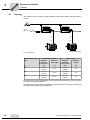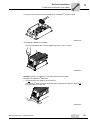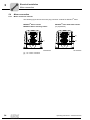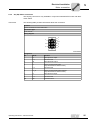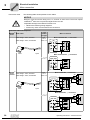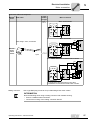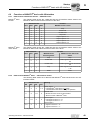
1
Drive Technology \ Drive Automation \ System Integration \ Services
Operating Instructions
MOVIFIT® basic
Edition 04/2011
17098416 / EN
SEW-EURODRIVE—Driving the world
Contents
Contents
1
2
General Information ............................................................................................ 5
1.1
How to use this documentation ................................................................... 5
1.2
Structure of the safety notes ....................................................................... 5
1.3
Rights to claim under limited warranty ........................................................ 6
1.4
Exclusion of liability..................................................................................... 6
1.5
Copyright..................................................................................................... 6
1.6
Product names and trademarks .................................................................. 6
Safety Notes ........................................................................................................ 7
2.1
Preliminary information ............................................................................... 7
2.2
General information .................................................................................... 7
2.3
Target group ............................................................................................... 7
2.4
Designated use ........................................................................................... 7
2.5
Other applicable documentation ................................................................. 8
2.6
Transportation, storage ............................................................................... 8
2.7
Installation ................................................................................................... 8
2.8
Electrical connection ................................................................................... 8
2.9
Safe disconnection...................................................................................... 9
2.10 Operation .................................................................................................... 9
3
4
5
6
Unit Structure .................................................................................................... 10
3.1
MOVIFIT® basic ........................................................................................ 10
3.2
Variants..................................................................................................... 10
3.3
Accessories............................................................................................... 11
3.4
Type designations..................................................................................... 12
Mechanical Installation..................................................................................... 13
4.1
Installation instructions.............................................................................. 13
4.2
Mounting position...................................................................................... 14
4.3
Installing MOVIFIT® basic......................................................................... 14
Electrical Installation ........................................................................................ 15
5.1
Installation instructions.............................................................................. 15
5.2
Topology ................................................................................................... 18
5.3
Power bus connection (line cable) ............................................................ 19
5.4
Motor connection ...................................................................................... 24
5.5
Control unit connection ............................................................................. 28
5.6
Connections of MOVIFIT® basic with AS-Interface................................... 29
5.7
Connections of MOVIFIT® basic with binary control ................................. 31
5.8
Connection of LT-BG keypad.................................................................... 33
5.9
PC connection........................................................................................... 34
Startup................................................................................................................ 35
6.1
Important startup notes ............................................................................. 35
6.2
Requirements............................................................................................ 36
6.3
Startup procedure for the MOVIFIT® basic inverter .................................. 37
6.4
MOVIFIT® basic motor starter – startup procedure .................................. 39
6.5
Assigning the AS-Interface slave address ................................................ 40
Operating Instructions – MOVIFIT® basic
3
Contents
6.6
Parameterization with LT-BG keypad ....................................................... 42
6.7
Parameterization with the PC ................................................................... 44
6.8
Parameter directory of the MOVIFIT® basic inverter ................................ 45
6.9
Functions of MOVIFIT® basic with AS-Interface ....................................... 49
6.10 Functions of MOVIFIT® basic with binary control ..................................... 50
7
8
9
Operation ........................................................................................................... 51
7.1
Operating displays (LEDs) ........................................................................ 51
7.2
Operating displays of LT-BG keypad ........................................................ 52
7.3
Manual mode with LT-BG keypad............................................................. 53
7.4
Manual mode with the PC......................................................................... 55
Service ............................................................................................................... 58
8.1
Diagnostics with LT-BG keypad ................................................................ 58
8.2
Error list of MOVIFIT® basic...................................................................... 59
8.3
Inspection/Maintenance ............................................................................ 60
8.4
Shutdown .................................................................................................. 61
8.5
Storage ..................................................................................................... 61
8.6
Extended storage...................................................................................... 61
8.7
Disposal .................................................................................................... 61
Technical Data................................................................................................... 62
9.1
CE marking, UL approval and C-Tick ....................................................... 62
9.2
MOVIFIT® basic with AS-Interface............................................................ 63
9.3
MOVIFIT® basic with binary control .......................................................... 65
9.4
Accessories............................................................................................... 66
9.5
Dimension drawings.................................................................................. 67
10
Declaration of Conformity ................................................................................ 68
11
Address List ...................................................................................................... 69
Index................................................................................................................... 70
4
Operating Instructions – MOVIFIT® basic
General Information
How to use this documentation
1
General Information
1.1
How to use this documentation
1
The documentation is an integral part of the product and contains important information
on operation and service. The documentation is written for all employees who assemble,
install, startup, and service this product.
The documentation must be accessible and legible. Make sure that persons responsible
for the system and its operation, as well as persons who work independently on the unit,
have read through the documentation carefully and understood it. If you are unclear
about any of the information in this documentation, or if you require further information,
contact SEW-EURODRIVE.
1.2
Structure of the safety notes
1.2.1
Meaning of the signal words
The following table shows the grading and meaning of the signal words for safety notes,
notes on potential risks of damage to property, and other notes.
Signal word
1.2.2
Meaning
Consequences if disregarded
DANGER
Imminent danger
Severe or fatal injuries
WARNING
Possible dangerous situation
Severe or fatal injuries
CAUTION
Possible dangerous situation
Minor injuries
NOTICE
Possible damage to property
Damage to the drive system or its environment
INFORMATION
Useful information or tip: Simplifies the handling of the drive
system.
Structure of the section-related safety notes
Section safety notes do not apply to a specific action, but to several actions pertaining
to one subject. The used symbols indicate either a general or a specific hazard.
This is the formal structure of a section safety note:
SIGNAL WORD
Type and source of danger.
Possible consequence(s) if disregarded.
•
1.2.3
Measure(s) to prevent the danger.
Structure of the embedded safety notes
Embedded safety notes are directly integrated in the instructions just before the description of the dangerous action.
This is the formal structure of an embedded safety note:
•
SIGNAL WORD Nature and source of hazard.
Possible consequence(s) if disregarded.
– Measure(s) to prevent the danger.
Operating Instructions – MOVIFIT® basic
5
General Information
Rights to claim under limited warranty
1
1.3
Rights to claim under limited warranty
A requirement of fault-free operation and fulfillment of any rights to claim under limited
warranty is that you adhere to the information in the documentation. Read the documentation before you start working with the unit!
1.4
Exclusion of liability
You must comply with the information contained in this documentation to ensure safe
operation of and to achieve the specified product characteristics and performance features. SEW-EURODRIVE assumes no liability for injury to persons or damage to equipment or property resulting from non-observance of these operating instructions. In such
cases, any liability for defects is excluded.
1.5
Copyright
© 2011 – SEW-EURODRIVE. All rights reserved.
Unauthorized duplication, modification, distribution or any other use of the whole or any
part of this documentation is strictly prohibited.
1.6
Product names and trademarks
All brands and product names in this documentation are trademarks or registered trademarks of their respective titleholders.
6
Operating Instructions – MOVIFIT® basic
Safety Notes
Preliminary information
2
2
Safety Notes
The following basic safety notes must be read carefully to prevent injury to persons and
damage to property. The operator must ensure that the basic safety notes are read and
adhered to. Make sure that persons responsible for the plant and its operation, as well
as persons who work independently on the unit, have read through the operating instructions carefully and understood them. If you are unclear about any of the information in
this documentation or if you require further information, please contact SEWEURODRIVE.
2.1
Preliminary information
The following safety notes are primarily concerned with the use of drives. If you use
other SEW components, also refer to the safety notes for the respective components in
the corresponding documentation.
Please also observe the supplementary safety notes in the individual sections of this
documentation.
2.2
General information
Never install or start up damaged products. Submit a complaint to the shipping company
immediately in the event of damage.
During operation, drives can have live and bare parts as well as hot surfaces, depending on their enclosure.
Removing covers without authorization, improper use as well as incorrect installation or
operation may result in severe injuries to persons or damage to property. Refer to the
documentation for additional information.
2.3
Target group
Only qualified electricians are authorized to install, startup or service the units or correct unit faults (observing IEC 60364 or CENELEC HD 384 or DIN VDE 0100 and
IEC 60664 or DIN VDE 0110 as well as national accident prevention guidelines).
Qualified personnel in the context of these basic safety notes are persons familiar with
installation, assembly, startup and operation of the product who possess the necessary
qualifications.
Any activities regarding transportation, storage, operation, and disposal must be carried
out by persons who have been instructed appropriately.
2.4
Designated use
drives are components intended for installation in electrical systems or machines.
In case of installation in machines, startup of units (i.e. start of designated operation) is
prohibited until it is determined that the machine meets the requirements stipulated in
the Machinery Directive 2006/42/EC.
Startup (i.e. the start of designated use) is only permitted under observance of the EMC
directive 2004/108/EC.
Operating Instructions – MOVIFIT® basic
7
Safety Notes
Other applicable documentation
2
The units meet the requirements stipulated in the Low Voltage Directive 2006/95/EC.
The standards given in the declaration of conformity apply to the units.
You must observe the technical data and information on the connection requirements
as provided on the nameplate and in the documentation.
2.4.1
Safety functions
units may not perform safety functions.
2.4.2
Hoist applications
units are not designed for hoist applications.
2.5
Other applicable documentation
Note also the following documentation:
•
"DR.71-225, 315 AC Motors" operating instructions
You can download or order this publication on the Internet (http://www.sew-eurodrive.de, under the heading "Documentation").
2.6
Transportation, storage
You must observe the notes on transportation, storage and proper handling. Comply
with the requirements for climatic conditions stated in section "Technical Data".
2.7
Installation
The units must be installed and cooled according to the regulations and specifications
in the corresponding documentation.
Protect the units from improper strain.
The following applications are prohibited unless the unit is explicitly designed for such
use:
2.8
•
Use in potentially explosive atmospheres.
•
Use in areas exposed to harmful oils, acids, gases, vapors, dust, radiation, etc.
•
Use in non-stationary applications with strong mechanical oscillation and impact
loads; see section "Technical Data".
Electrical connection
Perform electrical installation according to the pertinent regulations (e.g. cable cross
sections, fusing, protective conductor connection). For any additional information, refer
to the applicable documentation.
For notes on EMC compliant installation, such as shielding, grounding, arrangement of
filters and routing of lines, refer to chapter "Installation instructions". The manufacturer
of the system or machine is responsible for maintaining the limits established by EMC
legislation.
8
Operating Instructions – MOVIFIT® basic
Safety Notes
Safe disconnection
2
Protective measures and protection devices must comply with the regulations in force
(e.g. EN 60204 or EN 61800-5-1).
A voltage test according to EN 61800-5-1:2007 chapter 5.2.3.2 is required for the drives
prior to startup in order to ensure the insulation.
2.9
Safe disconnection
The units meet all requirements for safe disconnection of power and electronic connections in accordance with EN 61800-5-1. All connected circuits must also satisfy the requirements for safe disconnection.
2.10
Operation
Systems with integrated units must be equipped with additional monitoring and protection devices according to the applicable safety guidelines, such as the law governing
technical equipment, accident prevention regulations, etc. Additional protective measures may be necessary for applications with increased potential risk.
Do not touch live components or power connections immediately after disconnecting
from the supply voltage because some capacitors may still be charged. Wait at least 10
minutes after the supply voltage is switched off.
Once the supply voltages are applied to , the connection box must be closed, i.e. the
cover must be screwed on and all the plugs must be connected.
The fact that the status LEDs and other display elements are no longer illuminated does
not indicate that the unit has been disconnected from the supply system and no longer
carries any voltage.
Mechanical blocking or internal safety functions of the unit can cause a motor standstill.
Eliminating the cause of the problem or performing a reset may result in the drive restarting automatically. If, for safety reasons, this is not permitted for the driven machine,
disconnect the unit from the supply system before correcting the error.
Caution: Danger of burns: The surface temperatures of the drives can exceed 60 °C
during operation.
Operating Instructions – MOVIFIT® basic
9
Unit Structure
MOVIFIT® basic
3
3
Unit Structure
3.1
MOVIFIT® basic
MOVIFIT® basic is a decentralized drive unit for controlling AC motors.
[2]
[3]
[1]
[4]
[5]
[8]
[7]
[6]
2816397195
[1]
[2]
[3]
[4]
[5]
[6]
[7]
[8]
3.2
Control unit
EBOX with cooling fins and electronics (inverter or motor starter)
X8 connection for motor (only with dual motor starter design)
X9 connection for motor
Nameplate
PE connection 댷 (outside)
Cable seal for cable diameter 13 – 15 mm
ABOX with FieldPower contact module (connection unit)
Variants
MOVIFIT® basic is available in the following variants:
•
Inverter
For 1 motor with CW and CCW operation and 4 setpoint speeds
•
Dual motor starter for 2 motors with 1 direction of rotation each (in preparation)
The direction of rotation depends on the phase
sequence.
•
Reversing starter
For 1 motor with CW and CCW operation
MOVIFIT® basic is available with the following control units:
10
•
Drives with AS-Interface
•
Control unit with binary signal inputs and outputs
Operating Instructions – MOVIFIT® basic
Unit Structure
Accessories
3.3
3
Accessories
You can order the following accessories for MOVIFIT® basic from the company Weidmüller Interface GmbH & Co. KG (see www.weidmueller.com):
Accessories
Part number
(Weidmüller)
Cable seal, for cables with Ø = 7.5 – 9 mm
4329610000
Cable seal, for cables with Ø = 9 – 11 mm
4323210000
Cable seal, for cables with Ø = 11 – 13 mm
Cable seal for cables with Ø = 13 – 15 mm
4323230000
1)
4323220000
Cable seal, for cables with Ø = 15 – 17 mm
4324010000
Seal (without cable entry)
4323990000
Stripping tool AM 16 (for round cables)
9204190000
Stripping tool AMF 6/10 (for flat cables)
9204180000
®
1) The scope of delivery of MOVIFIT basic units comprises 2 of those cable seals.
Operating Instructions – MOVIFIT® basic
11
Unit Structure
Type designations
3
3.4
Type designations
3.4.1
Nameplate
The following figure gives an example of a nameplate of the MOVIFIT® basic inverter:
3782535691
3.4.2
Type designation
The following table shows the MOVIFIT® basic type designation:
MBF07A-K1-A1
Connection module
Version
Control
K = via AS-Interface
B = binary control
Version
Motor power/variant
07 = 0.75 kW inverter
15 = 1.5 kW inverter
4R = Reversing starter
4D = dual-motor starter (in preparation)
Design
F = Inverter
S = Motor starter
Unit series
MB = MOVIFIT® basic
12
Operating Instructions – MOVIFIT® basic
Mechanical Installation
Installation instructions
4
Mechanical Installation
4.1
Installation instructions
4.1.1
General information
4
NOTICE
Loss of warranted degree of protection if the MOVIFIT® basic inverter is installed
incorrectly or not at all.
Damage to the MOVIFIT® basic unit.
•
If you remove the EBOX from the ABOX, you have to protect the EBOX and the
ABOX from moisture and dust.
Note the following when installing the MOVIFIT® basic unit:
•
Observe the general safety notes.
•
Only install the MOVIFIT® basic unit on a level, low-vibration, and torsionally rigid
support structure.
•
Ensure sufficient clearance around the unit to allow for adequate cooling. Warm
outlet air of other units must not be drawn in.
•
Strictly observe all instructions as to the technical data and the permissible conditions regarding the place of installation.
•
Do only use provided attachment options when mounting the drive.
•
Cover the unused plug connectors with blind caps.
The degree of protection specified in the technical data only applies for a correctly
installed MOVIFIT® basic unit.
4.1.2
Installation requirements
Make sure that the following requirements are met before you start installing the unit:
•
The nameplate data of the MOVIFIT® basic unit match the voltage supply system
•
The MOVIFIT® basic unit is undamaged (no damage caused by transportation or
storage).
•
The ambient temperature corresponds to the specifications in chapter "Technical
Data".
•
The MOVIFIT® basic unit must not be installed under the following harmful ambient
conditions:
– Potentially explosive atmospheres
– Oils
– Acids
– Gases
– Vapors
– Radiation
– etc.
Operating Instructions – MOVIFIT® basic
13
Mechanical Installation
Mounting position
4
4.2
Mounting position
You can install the MOVIFIT® basic unit in any mounting position.
M6
M1
M2
M4
M5
M3
2816420235
4.3
Installing MOVIFIT® basic
Mount the MOVIFIT® basic unit with 4 screws according to the following figure:
(Tightening torque 2.0 – 2.4 Nm (18 – 21 lb.in))
23
9
6
M5
1
3
4
9007202071159307
14
Operating Instructions – MOVIFIT® basic
Electrical Installation
Installation instructions
5
Electrical Installation
5.1
Installation instructions
5.1.1
Earth-leakage circuit breaker
5
WARNING
Electric shock due to incorrect earth-leakage circuit breaker type.
Severe or fatal injuries.
•
5.1.2
MOVIFIT® basic can cause direct current in the protective earth conductor. When
an earth-leakage circuit breaker is used for protection against direct or indirect
contact, only install a type B earth-leakage circuit breaker on the power supply end
of the MOVIFIT® basic unit.
•
Do not use a conventional earth leakage circuit-breaker as a protective device.
Universal current-sensitive earth leakage circuit-breakers (tripping current 300 mA)
are permitted as a protective device. During normal operation of MOVIFIT® basic
units, earth-leakage currents > 3.5 mA can occur.
•
SEW-EURODRIVE recommends that you do not use earth-leakage circuit breakers.
However, if an earth-leakage circuit breaker is stipulated for direct or indirect protection against contact, observe the note above in accordance with EN 61800-5-1.
Line contactor
NOTICE
Damage due to jogging.
Damage to the MOVIFIT® basic unit.
•
•
•
Do not use the line contactor for jogging, but only for switching the MOVIFIT® basic
unit on and off. In jog mode, use the control signals (AS-Interface bits or binary
inputs).
Observe a minimum switch-off time of 2 s for the line contactor.
Only use a contactor of utilization category AC3 (EN 60947-4-1) as a line contactor.
Operating Instructions – MOVIFIT® basic
15
Electrical Installation
Installation instructions
5
5.1.3
Notes on PE connection
WARNING
Electric shock due to incorrect connection of PE.
Severe or fatal injuries.
•
PE connection in
the unit
Observe the following notes regarding PE connection.
Establish a PE connection in the unit.
L1
N
PE
L2
PE
L3
1
or
BK GY
or 2
WT K or
B
/YE
GN r 3
o
BK
BK ed
us
un
WT
GN
RD
BR
BU
BK YE
/
GN
GY
3160365451
PE connection on
the outside of the
housing
During normal operation of the MOVIFIT® basic inverter, earth-leakage currents
≥ 3.5 mA can occur. To meet the requirements of EN 61800-5-1, you must establish 2
PE connections.
Install a second PE conductor with a cross section of at least the cross section of the
supply system cable:
M5
(2,0 – 2,5 Nm)
(18 - 21 lb.in)
2816416395
16
Operating Instructions – MOVIFIT® basic
Electrical Installation
Installation instructions
5.1.4
5
EMC-compliant installation
INFORMATION
This drive system is not designed for operation on a public low voltage supply system
that supplies residential areas.
This is a product with restricted availability in accordance with IEC 61800-3. It may
cause EMC interference. In this case, it is recommended for the operator to take
suitable measures.
For detailed information on EMC compliant installation, refer to the publication
"Electromagnetic Compatibility in Drive Engineering" from SEW-EURODRIVE.
With respect to the EMC regulation, frequency inverters cannot be operated as standalone units. Regarding EMC, they can only be evaluated when they are integrated in a
drive system. Conformity is declared for a described, CE-typical drive system. These
operating instructions contain further information.
5.1.5
Installation altitude above 1000 m above sea level
MOVIFIT® basic drives can be also used in altitudes of 1000 – 4000 m above sea level1).
Observe the following basic conditions:
5.1.6
•
The nominal continuous power is reduced due to the reduced cooling above 1000 m
(see chapter "Technical Data").
•
Above 2000 m asl, the air and creeping distances are only sufficient for overvoltage
class 2. If the installation calls for overvoltage class 3, you will have to install
additional external overvoltage protection to limit overvoltage peaks to 2.5 kV phaseto-phase and phase-to-ground.
•
If safe electrical disconnection is required, it must be implemented outside the unit
for altitudes of 2000 m above sea level and higher (safe electrical disconnection in
accordance with EN 61800-5-1).
•
In installation altitudes between 2000 m to 4000 m above sea level, the permitted
nominal line voltages are reduced by 6 V per 100 m.
Protection devices
•
5.1.7
MOVIFIT® basic drives are equipped with integrated protection devices against overload of the drive. External motor protection devices are not necessary.
UL compliant installation (in preparation)
UL and cUL approval for the MOVIFIT® basic unit series is in preparation.
1) The maximum altitude is limited by creeping distances and flameproof components, such as capacitors.
Operating Instructions – MOVIFIT® basic
17
Electrical Installation
Topology
5
5.2
Topology
The following figure shows a typical MOVIFIT® basic drive system with AS-Interface
control:
AC 3 x
380 - 480 V
K
[2]
[1]
[3]
[4]
[4]
[5]
[5]
9007201945761931
K: Line contactor
Line protection fuse
Type
Power bus (line cable)
Motor cable
Minimum
conductor
Cross section
Maximum
Total length
Minimum
conductor
Cross section
Maximum
Length
[1]
[2]
[3]
[4]
[5]
B16
2.5 mm2
AWG14
130 m
2.5 mm2
AWG14
10 m
B20
4.0 mm2
AWG12
170 m
2.5 mm2
AWG14
3m
B25
6.0 mm2
AWG10
190 m
2.5 mm2
AWG14
3m
The table shows typical characteristics at an ambient temperature of 40 °C with routing
type B2 according to EN 60204-1.
The applicable country-specific standards and regulations must also be observed for
individual project planning and installation.
18
Operating Instructions – MOVIFIT® basic
Electrical Installation
Power bus connection (line cable)
5.3
5
Power bus connection (line cable)
WARNING
Electric shock due to charged capacitors
Severe or fatal injuries.
•
•
•
De-energize the MOVIFIT® basic drive using a suitable external cut-off device
before removing the EBOX from the ABOX.
Secure the drive against unintended re-connection to the voltage supply.
Then wait at least for 10 minutes.
WARNING
Danger of burns due to hot surfaces of the MOVIFIT® basic unit.
Severe injuries.
•
Do not touch the MOVIFIT® basic until it has cooled down sufficiently.
Connect the MOVIFIT® basic unit to the power bus (line cable) as follows.
1. Loosen the 4 screws and lift up the EBOX.
2839862283
2. Loosen the EBOX straps and install them according to the mounting position, see
following figure.
[1]
9007202094605195
Operating Instructions – MOVIFIT® basic
19
5
Electrical Installation
Power bus connection (line cable)
3. Pull both locking tabs to the outside and tilt up the upper part of the FieldPower®
contact module.
2839866123
4. Loosen the 4 screws and remove the strain relief brackets.
Remove the two cable seals.
2839868043
12
0
13
0
5. Remove the sheath of the line cable with a suitable stripping tool.
2839869963
Line cable
Round cable
Flat cable
20
Stripping tool
Strip length
AM 16
130 mm
AMF 6/10
120 mm
Operating Instructions – MOVIFIT® basic
Electrical Installation
Power bus connection (line cable)
5
6. Fix the cable seals around the line cable.
NOTICE Ingression of moisture or dust due to incorrect cable seal.
Damage to the MOVIFIT® basic unit.
•
Only use cable seals approved for the line cable diameter.
Insert the cable seals with the line cable in the recesses in the ABOX.
2839871883
7.
WARNING Risk of crushing due to wrong sense of rotation or damage due to
reverse connection of phases.
Severe or fatal injuries, irreparable damage to the unit.
•
Observe the following connection diagram.
•
Prevent short circuits.
Insert the conductors of the line cable in the cable guides according to the following
wiring diagram:
L1
N
UL 1277
TC-ER
UL 62
STOOW
IEC
60757
BK or 1
BK
BR
unused
BU
WT or GY
L2
BK or 2
WT
BK
PE
GN/YE
GN
GN/YE
L3
BK or 3
RD
GY
2839873803
Operating Instructions – MOVIFIT® basic
21
5
Electrical Installation
Power bus connection (line cable)
8. Screw the strain relief brackets to the ABOX and fix the line cable with the brackets
(tightening torque: 0.6 Nm, 5.3 lb.in).
2839875723
9. Place the upper part of the contact module on the hinge hooks.
Tilt down the upper part of the contact module until it latches on both sides.
2839877643
10.Use the screwdriver (blade width 3 – 3.5 mm) to lever the contacts of the insulation
displacement connector downwards.
A
90°
B
2839879563
22
Operating Instructions – MOVIFIT® basic
Electrical Installation
Power bus connection (line cable)
5
11.Plug in the line connector of the EBOX to the FieldPower® contact module.
2839881483
12.Position the EBOX on the ABOX.
Screw on the EBOX with 4 screws (tightening torque: 2 Nm, 18 lb.in).
2839860363
NOTICE Ingression of moisture or dust when bending the line cable.
Damage to the MOVIFIT® basic unit.
•
Do not bend the line cable for at least 50 mm.
≥
50
The MOVIFIT® basic unit only meets the IP54 requirements if the line cable is not
bent within 50 mm of the unit.
Operating Instructions – MOVIFIT® basic
3756680203
23
Electrical Installation
Motor connection
5
5.4
Motor connection
5.4.1
Motor connection variants
The following figure shows the motor plug connector variants for MOVIFIT® basic:
MOVIFIT® basic inverter
MOVIFIT® basic dual motor starter
MOVIFIT® basic reversing starter
(In preparation)
X8
X9
[1]
2816406795
[1]
[2]
24
X8
[2]
X9
[1]
2816404875
X9 Motor connection
X8 Motor connection
Operating Instructions – MOVIFIT® basic
Electrical Installation
Motor connection
5.4.2
5
X9, (X8): Motor connection
The X8 plug connector is only available in conjunction with MOVIFIT® basic with dualmotor starter
Connection
The following table provides information about this connection:
Function
Power connection for motor with brake
Connection type
Q 8/0, female
Wiring diagram
2
3
1
PE
5
4
7
8
6
2441429259
Assignment
No.
Name
Function
1
U
Motor phase U output
2
n. c.
Not connected
3
W
Motor phase W output
4
L1
Supply of mechanical brake
(only with MOVIFIT® basic inverter)
5
n. c.
Not connected
6
L2_S
Supply of mechanical brake switched
(only with MOVIFIT® basic inverter)
7
V
Motor phase V output
8
n. c.
Not connected
PE
PE
Protective earth
Operating Instructions – MOVIFIT® basic
25
5
Electrical Installation
Motor connection
Connection cable
The following table shows possible motor cables:
NOTICE
Danger in case of incorrect wiring of U1, V1, and W1 or short circuit. The motor outputs
of MOVIFIT® basic are not protected against short circuits.
Irreparable damage to the MOVIFIT® basic unit.
•
•
Observe the following wiring diagrams.
Prevent any short circuits between the conductors.
Connection cable and component
MOVIFIT®
Motor cable
basic
Cable design: 4G2.5, shielded
Cable design: 4G2.5, unshielded
Length/
Installation type
Max.
10 m
Max. 3 m
Motor connection
Motor without brake, 댴 connection
U1
3
2
5
8
Q 8/0
Open
1
4
7
6
V1
W1
U1
2
5
8
1
4
7
V2
6
V1
W1
W2
U2
V2
Motor with brake, 댴 connection
Max.
10 m
Max. 3 m
WH
U1
3
2
5
8
Q 8/0
U2
Motor without brake, 쑶 connection
3
MOVIFIT®
Cable design: 7G2.5, shielded
basic
inverter Cable design: 7G2.5, unshielded
W2
1
4
7
6
V1
W1
W2
1
2
3
RD
4
5
BU
BG
U2
V2
Open
Motor with brake, 쑶 connection
WH
U1
3
2
5
8
26
1
4
7
6
V1
W1
W2
1
2
3
RD
4
5
BU
BG
U2
V2
Operating Instructions – MOVIFIT® basic
Electrical Installation
Motor connection
5
Connection cable and component
Length/
Installation type
Max.
10 m
MOVIFIT®
Motor cable
basic
Motor connection
Motor without brake
U1
3
2
5
8
1
4
7
6
V1
W1
W2
U2
V2
Motor with brake
WH
Cable design: 4G2.5, unshielded
U1
3
MOVIFIT®
basic
motor
starter
2
5
8
Q 8/0
1
4
7
6
V1
W1
1
2
3
RD
4
5
BU
W2
BGE
BG
U2
V2
Open
Motor with brake and BSR brake controller
WH
U1
3
2
5
8
1
4
7
6
BU
1
2
3
RD
4
5
BGE
BG
W2
V1
U2
W1
V2
For applications with regenerative mode, SEWEURODRIVE recommends the BSR brake controller.
Mating connector
Use a type Q8/0 plug connector for pre-fabricating these motor cables:
INFORMATION
Note the following when using a mating connector with metallic housing:
•
•
Ensure a suitable shield connection.
Connect the housing of the mating connector with PE.
Operating Instructions – MOVIFIT® basic
27
Electrical Installation
Control unit connection
5
5.5
Control unit connection
The following figure shows the control unit variants for MOVIFIT® basic:
MOVIFIT® basic with AS-Interface
[1]
DI3
[4]
MOVIFIT® basic with binary control
[2]
[5]
DI2 STATUS AS-Interface
DI3
[3]
[8]
9007202071153547
[1]
[2]
[3]
[4]
28
X22
X21
X50
X23
Binary input sensor 2
AS-Interface connection
Diagnostic interface
Binary input sensor 3
[6]
DI2 STATUS DI1
DI0
[7]
2816402955
[5]
[6]
[7]
[8]
X12
X11
X50
X13
Signal inputs DI2 + DI3
Signal inputs DI0 + DI1
Diagnostic interface
Signal outputs DO0 + DO1
Operating Instructions – MOVIFIT® basic
Connections of
MOVIFIT®
Electrical Installation
basic with AS-Interface
5.6
Connections of MOVIFIT® basic with AS-Interface
5.6.1
X21: AS-Interface connection
5
The following table provides information about this connection:
Function
AS-Interface – input
Connection type
M12, 4-pole, male, A-coded
Wiring diagram
2
1
3
4
2384154763
Assignment
5.6.2
No.
Name
Function
1
AS-Interface +
AS-Interface +
2
n. c.
Not connected
3
AS-Interface −
AS-Interface −
4
n. c.
Not connected
X22: Binary input sensor 2
The following table provides information about this connection:
Function
Binary input sensor 2
Connection type
M12, 5-pole, female, A-coded
Wiring diagram
1
2
4
5
3
2264816267
Assignment
No.
Name
Function
1
+24 V
DC 24 V output (sensor supply)
2
n. c.
Not connected
3
0V24
0V24 reference potential
4
DI2
Binary input sensor 2
5
PE
Equipotential bonding/protective earth conductor
Operating Instructions – MOVIFIT® basic
29
Electrical Installation
Connections of MOVIFIT® basic with AS-Interface
5
5.6.3
X23: Binary input sensor 3
The following table provides information about this connection:
Function
Binary input sensor 3
Connection type
M12, 5-pole, female, A-coded
Wiring diagram
1
2
4
5
3
2264816267
Assignment
5.6.4
No.
Name
Function
1
+24 V
DC 24 V output (sensor supply)
2
n. c.
Not connected
3
0V24
0V24 reference potential
4
DI3
Binary input sensor 3
5
PE
Equipotential bonding/protective earth conductor
X50: Diagnostic interface
The following table provides information about this connection:
Function
Diagnostics and programming interface
Connection type
RJ11 (6P6C)
Wiring diagram
1
6
3163123211
Assignment
30
No.
Name
Function
1
n. c.
Not connected
2
RS+
RS-485 data cable (+)
3
RS −
RS-485 data cable (–)
4
+24 V
DC 24 V output for keypad
5
0V24
0V24 reference potential for keypad
6
n. c.
Not connected
Operating Instructions – MOVIFIT® basic
Connections of
MOVIFIT®
Electrical Installation
basic with binary control
5.7
Connections of MOVIFIT® basic with binary control
5.7.1
X11: Signal inputs 0 and 1 of MOVIFIT® basic
5
The following table provides information about this connection:
Function
Binary inputs 0 and 1
Connection type
M12, 4-pole, male, A-coded
Wiring diagram
2
1
3
4
2718233355
Assignment
5.7.2
No.
Name
Function
1
n. c.
Not connected
2
DI1
Binary input 1
3
0V24
0V24 reference potential
4
DI0
Binary input 0
X12: Signal inputs 2 and 3 of MOVIFIT® basic
The following table provides information about this connection:
Function
Binary inputs 2 and 3
Connection type
M12, 4-pole, male, A-coded
Wiring diagram
2
1
3
4
2718233355
Assignment
No.
Name
Function
1
n. c.
Not connected
2
DI3
Binary input 3
3
0V24
0V24 reference potential
4
DI2
Binary input 2
Operating Instructions – MOVIFIT® basic
31
Electrical Installation
Connections of MOVIFIT® basic with binary control
5
5.7.3
X13: Signal outputs 0 and 1 of MOVIFIT® basic
The following table informs about this connection:
Function
Binary outputs 0 and 1
Connection type
M12, 5-pole, female, A-coded
Wiring diagram
1
2
4
5
3
2264816267
Assignment
5.7.4
No.
Name
Function
1
+24 V
DC 24 V output
2
DO1
Binary output 1 (manual mode)
0: MOVIFIT® basic control via control signals
1: Manual control of MOVIFIT® basic
3
0V24
0V24 reference potential
4
DO0
Binary output 0 (ready signal)
0: MOVIFIT® basic is not ready
1: MOVIFIT® basic is ready
5
PE
Equipotential bonding/protective earth conductor
X50: Diagnostic interface
The following table informs about this connection:
Function
Diagnostics and programming interface
Connection type
RJ11 (6P6C)
Wiring diagram
1
6
3163123211
Assignment
32
No.
Name
Function
1
n. c.
Not connected
2
RS+
RS-485 data line (+)
3
RS −
RS-485 data cable (–)
4
+24 V
DC 24 V output for keypad
5
0V24
0V24 reference potential for keypad
6
n. c.
Not connected
Operating Instructions – MOVIFIT® basic
Electrical Installation
Connection of LT-BG keypad
5.8
5
Connection of LT-BG keypad
The MOVIFIT® basic inverter is equipped with an X50 diagnostic interface (RJ-11
socket) for startup, parameterization and service.
The diagnostic interface is located in the connection block of the control unit.
You must remove the screw plug before plugging in the connector into the diagnostic
interface.
DANGER Danger of burns due to hot surfaces of the MOVIFIT® basic unit.
Severe injuries.
•
Wait for the MOVIFIT® drive to cool down sufficiently before touching it.
Use the cable enclosed with the keypad to connect the keypad to the MOVIFIT® basic
unit.
Scope of delivery:
Type
Part number
Scope of delivery
LT-BG
1 820 864 9
– LT-BG keypad
– Cable with RJ11 – RJ11 plug connectors
9007202071155467
Operating Instructions – MOVIFIT® basic
33
Electrical Installation
PC connection
5
5.9
PC connection
The MOVIFIT® basic inverter is equipped with an X50 diagnostic interface (RJ-11
socket) for startup, parameterization and service.
The diagnostic interface is located in the connection block of the control unit.
You must remove the screw plug before plugging in the connector into the diagnostic
interface.
DANGER Danger of burns due to hot surfaces of the MOVIFIT® basic unit.
Severe injuries.
•
Wait for the MOVIFIT® drive to cool down sufficiently before touching it.
The diagnostic interface can be connected to a conventional PC/laptop with the following accessories:
•
USB11A interface adapter
•
and OP LT 003 C adapter
Scope of delivery:
Type
Part number
Scope of delivery
USB11A
0 824 831 1
– USB11A interface adapter
– USB cable
– Cable with RJ10 – RJ10 plug connectors
OP LT 003 C
1 824 368 1
– OP LT 003 C adapter
with DC 24 V -> DC 5 V voltage converter
– Cable with RJ45 – RJ11 plug connectors
USB
PC +
®
MOVITOOLS
RJ10
RJ45
RJ11
USB11A
OP LT 003 C
®
MOVIFIT basic
9007202071149707
34
Operating Instructions – MOVIFIT® basic
Startup
Important startup notes
I
6
0
6
Startup
6.1
Important startup notes
INFORMATION
You must comply with the general safety notes in chapter "Safety Notes" during
startup.
WARNING
Risk of crushing due to missing or defective protective covers.
Severe or fatal injuries.
•
•
Install the protective covers of the plant according to the instructions, also see the
operating instructions of the gear unit.
Never start up the drive if the protective covers are not installed.
WARNING
Electric shock due to dangerous voltages in the ABOX.
Severe or fatal injuries.
•
•
•
De-energize the MOVIFIT® basic unit using a suitable external cut-off device
before removing the EBOX.
Secure the MOVIFIT® basic unit against unintended re-connection to the voltage
supply.
Wait for at least 10 minutes before removing the EBOX.
WARNING
Danger of burns due to hot surfaces of the MOVIFIT® basic unit.
Severe injuries.
•
Do not touch the MOVIFIT® basic until it has cooled down sufficiently.
Warning
Unit malfunction due to incorrect unit setting.
Severe or fatal injuries.
•
•
•
Observe the startup instructions.
The installation must only be carried out by qualified personnel.
Only use settings that are consistent with the function.
INFORMATION
To ensure fault-free operation, do not disconnect or connect power or signal cables
during operation.
Operating Instructions – MOVIFIT® basic
35
I
6
Startup
Requirements
0
6.2
Requirements
The following conditions apply to startup:
•
The MOVIFIT® basic unit must be installed correctly both mechanically and electrically.
•
Appropriate safety measures prevent the drives from starting up unintentionally.
•
Appropriate safety measures must be taken to prevent risk of injury or damage to
machine.
The following hardware must be available for startup and parameterization of the
MOVIFIT® basic inverter:
•
PC or laptop, see chapter "PC connection"
The following software must be available on the PC or laptop for startup and parameterization of the MOVIFIT® basic inverter:
•
"LT Shell", Version 3.10 or later
INFORMATION
For startup of the MOVIFIT® basic motor starter, you do not require a PC/laptop and
software.
36
Operating Instructions – MOVIFIT® basic
Startup procedure for the
MOVIFIT®
Startup
basic inverter
I
6
0
6.3
Startup procedure for the MOVIFIT® basic inverter
Proceed as follows to startup the MOVIFIT® basic inverter:
1. Check the connection of the MOVIFIT® basic unit.
See chapter "Electrical Installation".
2. Make sure that the motor cannot start
e.g. by unplugging the motor connector(s) from the MOVIFIT® basic unit.
3. Switch on the line voltage.
The "Status" LED is now illuminated.
4. Connect the LT-BG keypad or the PC to the MOVIFIT® basic unit.
See chapter "LT-BG keypad connection" (page 33).
or chapter "PC connection" (page 34).
WARNING During the auto-tune phase in vector control, the motor axis briefly
rotates.
If you set the parameter P4-02 Auto-tune = "1", the inverter performs a calibration
process (Auto-tune). The inverter releases the brake and the motor briefly rotates.
Severe injuries.
•
During the auto-tune phase, observe a sufficient safety distance to all parts driven
by the motor.
5. Set the following parameters:
Motor parameters:
For V/f control
•
•
•
P1-07 = Nominal motor voltage
P1-08 = Nominal motor current
P1-09 = Nominal motor frequency
For vector control
•
•
•
•
•
•
P1-07 = Nominal motor voltage
P1-08 = Nominal motor current
P1-09 = Nominal motor frequency
P4-01 = Control mode
P4-02 = Auto-tune
P4-05 = motor power factor
System parameters:
•
•
•
•
•
•
P1-03 = Acceleration ramp
P1-04 = Deceleration ramp
P1-11 = Speed n1
P2-02 = Speed n2
P2-03 = Speed n3
P2-04 = Speed n4
See chapter "Parameterization with LT-BG keypad" (page 43).
or chapter "Parameterization with PC" (page 44).
6. Make sure the screw plug of the diagnostics interface has a seal and screw it in.
NOTICE Loss of the ensured degree of protection if the screw plug of the diagnostic
interface is not installed or not installed correctly.
Damage to the MOVIFIT® basic unit
•
Make sure the screw plug of the diagnostic interface has a seal and screw it in.
Operating Instructions – MOVIFIT® basic
37
6
I
Startup
Startup procedure for the MOVIFIT® basic inverter
0
7. Switch off the line voltage.
8. Set the AS-Interface slave address of the MOVIFIT® basic unit (only for MOVIFIT®
basic with AS-Interface).
See chapter "Assigning the AS-Interface address" (page 40).
9. Start up the higher-level controller.
10.Plug in the motor connector(s) at MOVIFIT® basic.
11.Switch on the line voltage.
You can now control the MOVIFIT® basic drive with the higher-level controller (via binary
signals or AS-Interface).
38
Operating Instructions – MOVIFIT® basic
MOVIFIT®
Startup
basic motor starter – startup procedure
I
6
0
6.4
MOVIFIT® basic motor starter – startup procedure
WARNING
Electric shock due to dangerous voltages in the ABOX.
Severe or fatal injuries.
De-energize the MOVIFIT® basic unit using a suitable external cut-off device
before removing the EBOX.
Secure the MOVIFIT® basic unit against unintended re-connection to the voltage
supply.
•
•
Proceed as follows to startup the MOVIFIT® basic motor starter:
1. Check the connection of the MOVIFIT® basic unit.
See chapter "Electrical Installation".
2. Set the nominal motor current via the potentiometer IMotor according to the motor
nameplate, factory setting: about 100%.
NOTICE Damage due to incorrect setting via potentiometer IMotor. The potentiometer
is to protect the motor against overload.
Damage to the motor.
Set the nominal motor current via the potentiometer IMotor according to the
motor nameplate.
0
40
80
60
10
•
I Motor [A]
10
20
8
6
4
2
0
0
20
40
60
80
100
[1]
3759803915
[1]
Potentiometer setting
3. Make sure that the motor cannot start
e.g. by unplugging the motor connector(s) from the MOVIFIT® basic unit.
4. Set the AS-Interface slave address of the MOVIFIT® basic unit (only for MOVIFIT®
basic with AS-Interface).
See chapter "Assigning the AS-Interface address" (page 40).
5. Start up the higher-level controller.
6. Plug in the motor connector(s) at MOVIFIT® basic.
7. Switch on the line voltage.
You can now control the MOVIFIT® basic drive with the higher-level controller (via binary
signals or AS-Interface).
Operating Instructions – MOVIFIT® basic
39
I
6
Startup
Assigning the AS-Interface slave address
0
6.5
Assigning the AS-Interface slave address
SEW-EURODRIVE supplies MOVIFIT® basic with AS-Interface with address 0.
You have the following options for assigning the AS-Interface address of MOVIFIT®
basic (address 1 - 31):
•
Addresses are assigned automatically within a configured AS-Interface system
when replacing a MOVIFIT® basic drive.
The following prerequisites must be fulfilled:
– The new MOVIFIT® basic drive must have address 0.
– If you need to replace multiple MOVIFIT® basic drives, you must exchange them
individually (one after another).
•
Manual address assignment via the plant master
Connect the drives to the AS-Interface cable one after another. Doing so prevents
several MOVIFIT® basic drives being assigned the same AS-Interface address.
•
Manual address assignment using a hand-held AS-Interface programming
device.
Observe the notes in the following section when connecting the MOVIFIT® basic
drive to the AS-Interface cable.
40
Operating Instructions – MOVIFIT® basic
Startup
Assigning the AS-Interface slave address
I
6
0
6.5.1
Assigning the slave address using a hand-held programming device
Hand-held AS-Interface programming devices offer the following functions:
•
Reading out and changing an AS-Interface slave address
•
Reading out the AS-Interface profile
•
Reading out and changing the data and parameter bits
•
Function check and test run.
When using a hand-held programming device, you need a connection cable that fits onto
the AS-Interface plug connector X21 of MOVIFIT® basic (see the following figure).
2
1: AS-Interface +
2. n. c.
3: AS-Interface −
4: n. c.
1
4
3
2384154763
Example:
1. Disconnect the AS-Interface nodes from the AS-Interface network one at a time and
assign addresses via the hand-held programming device (A).
2. Then reconnect the respective AS-Interface node to the AS-Interface network (B).
A
B
MOVIFIT ®basic
MOVIFIT ®basic
[1]
9007202092542475
[1] AS-Interface hand-held programming device
Operating Instructions – MOVIFIT® basic
41
I
6
Startup
Parameterization with LT-BG keypad
0
6.6
Parameterization with LT-BG keypad
6.6.1
Description of LT-BG keypad
Function
You can use the LT-BG keypad for startup, parameterization and manual operation of
MOVIFIT® basic inverters. In addition to that, the keypad displays important information
about the state of the drive.
Features
•
Illuminated display
•
Keypad with 5 keys
•
Connection cable
Key assignment
The following figure shows the key assignment of the LT-BG keypad:
2669822603
42
Key
Navigate
•
•
•
Switch menu
Saving parameter values
Show real-time information
Key
Up
•
•
Increase speed
Increase parameter values
Key
Down
•
•
Decrease speed
Decrease parameter values
Key
Stop
•
•
Stop drive
Resetting the drive
Key
Start
•
•
Enabling the drive
Changing the direction of rotation
Operating Instructions – MOVIFIT® basic
Startup
Parameterization with LT-BG keypad
I
6
0
Parameterization
Proceed as follows to change the parameter values:
1. Check the connection of the MOVIFIT® basic unit.
See chapter "Electrical Installation".
2. Connect the LT-BG keypad to the MOVIFIT® basic unit.
See chapter "LT-BG keypad connection" (page 33).
3. Make sure that the motor cannot start
e.g. by unplugging the motor connector(s) from the MOVIFIT® basic unit.
4. Switch on the line voltage.
After initialization, the keypad shows the rotational frequency "H",
the output current "A", or the motor power "P".
To change the display, briefly press the
5. Use the
(press
key.
key to activate parameter mode.
P1-01
key for more than 1 s)
6. Use the
key and the
7. Use the
key to activate the setting mode.
8. Use the
value.
H 50.0
key and the
key to select the desired parameter.
key to set the required parameter
P1-03
5.0
2.0
9. Use the
key to quit setting mode.
P1-03
10. Use the
key to quit parameter mode.
StoP
(press
key for more than 1 s)
The keypad shows "StoP", "H ", "A ", or "P ".
11. Switch off the line voltage.
12. Plug in the motor connector(s) at the MOVIFIT® basic unit.
13. NOTICE Damage due to missing or incorrectly mounted screw plug of the diagnostic interface X50. The degree of protection of MOVIFIT® basic specified in chapter
"Technical Data" only applies if the screw plug of the diagnostic interface is mounted
correctly.
Damage to the MOVIFIT® basic unit.
•
•
Once you have finished working with the keypad, unplug the connector from the
diagnostic interface.
Screw the screw plug of the diagnostic interface back in with the seal.
For a description of the parameters, refer to chapter "Parameter list – MOVIFIT® basic
inverter"
Operating Instructions – MOVIFIT® basic
43
I
6
Startup
Parameterization with the PC
0
6.7
Parameterization with the PC
(Only for MOVIFIT® basic inverter)
Proceed as follows to change the parameter values via the PC:
1. Check the connection of the MOVIFIT® basic unit.
See chapter "Electrical Installation".
2. Connect the PC/laptop to the MOVIFIT® basic unit.
See chapter "PC connection".
3. Start the LT Shell .. .exe software.
4. Select the COM port of the PC/laptop, the MOVIFIT® basic unit is connected to.
3759803915
5. Read the parameter set with the
®
key of the MOVIFIT basic.
The parameter menu is displayed:
[1] [2] [3]
[4] [5]
[6]
3759803915
[1]
[2]
[3]
[4]
[5]
[6]
Open parameter set
Save parameter set on PC
Print parameter set
Read parameter set from MOVIFIT® basic unit.
Transmit parameter set to MOVIFIT® basic unit.
Select parameter group
6. Select the required parameter group [6].
7. Double-click the required parameter.
8. Enter the new parameter value into the input field.
9. Transmit the parameter set from the PC to the MOVIFIT® basic via the
44
key.
Operating Instructions – MOVIFIT® basic
Parameter directory of the
MOVIFIT®
Startup
basic inverter
I
6
0
6.8
Parameter directory of the MOVIFIT® basic inverter
The following tables show the unit-relevant parameters. The keypad shows additional
parameters that are without function for MOVIFIT® basic.
6.8.1
Standard parameters
The following table shows the standard parameters:
No.
Name
Section
Standard
Description
P1-01
Upper speed limit
[Hz] or [rpm]
P1-02 – P1-09 x 5
(up to 2000 Hz max.)
50,0 Hz
Setting the upper speed limit.
The display in [Hz] or [rpm]
depends on parameter P1-10.
P1-02
Lower speed limit
[Hz] or [rpm]
0 – P1-01
0.0 Hz
Setting the lower speed limit.
The display in [Hz] or [rpm]
depends on parameter P1-10.
P1-03
Acceleration ramp
0.0 s – 3000 s
5.0 s
Time for acceleration along the
ramp from 0 to the nominal
frequency (P1-09).
P1-04
Deceleration ramp
0.0 s – 3000 s
5.0 s
Time for deceleration from the
nominal frequency (P1-09) to 0.
At P1-04 = "0", the maximum
deceleration is realized.
P1-06
Energy optimization
(for V/f mode only)
0:
Deactivated
0
1:
Activate
With P1-06 = "1", the unit reduces
the supplied motor voltage in case
of light loads.
P1-07
Rated motor voltage
0.20 – 500 V
400 V
Set the nominal motor voltage
according to the motor nameplate.
With P1-07 = "0", voltage compensation is deactivated.
P1-08
Nominal motor current
0.4 – 2.2 A (with MBF07A..)
2,2 A
0.8 – 4.1 A (with MBF15A..)
4,1 A
Set the nominal motor current
according to the motor nameplate
[A].
P1-09
Rated motor frequency
25 – 500 Hz
50 Hz
Set the nominal motor frequency
according to the motor nameplate
[Hz].
P1-10
Rated motor speed
0 – 30000 min-1
0
Set the nominal motor speed
With P1-10 ≠ 0, all speed-related
parameters are displayed in rpm.
P1-11
Speed n1
-P1-01 – +P1-01
50 Hz
The drive runs with this speed in jog
mode, or when the speed n1 was
selected by the higher-level
controller.
P1-12
Control mode of the
drive
0:
Binary signals or
AS-Interface
0
Setting the control mode
1:
Manual mode
(only clockwise)
2:
Manual mode
(CW and CCW operation)
Display of
the most
recent error
The most recent error is displayed
first.
Exception: Undervoltage errors are
only logged once.
P1-13
Error log
The 4 most recent errors are
logged.
Operating Instructions – MOVIFIT® basic
45
I
6
Startup
Parameter directory of the MOVIFIT® basic inverter
0
6.8.2
Advanced parameters
The following table shows the advanced parameters:
No.
Name
Section
Standard
Description
P2-02
Speed n2
-P1-01 – +P1-01
10 Hz
The drive runs with the speed that
was selected by the higher-level
controller.
P2-03
Speed n3
-P1-01 – +P1-01
25 Hz
P2-04
Speed n4
-P1-01 – +P1-01
50 Hz
P2-16
Zero speed holding
time
0 – 60 s
0.2 s
Time during which the speed "0" is
held at the output before the drive is
inhibited.
P2-19
Keypad restart mode
0:
Minimum speed
0
1:
Most recently used
speed
Speed selection when drive is
restarted.
P2-21
Scaling factor
0.000 – 30.000
0.000
Scaling factor of the display
variable P2-22:
With P2-21 = "0", the display
function is deactivated.
P2-22
Display variable
1:
Motor speed
1
2:
Motor torque
3:
Motor current
Selection of variables displayed by
the unit.
This variable is scaled with
parameter P2-21.
16 kHz
Effective switching frequency of the
power section.
A higher switching frequency
means less motor noise, but also
higher energy losses in the power
section.
0
Blocking/enabling parameter
changes.
When the lock is active, you cannot
change any parameters.
P2-24
Effective switching
frequency
4 kHz
8 kHz
16 kHz
P2-38
46
Parameter lock
0:
Enabled
1:
Disabled
P2-39
Operating hours
counter
0 – 99999 hours
Display
Total number of operating hours of
the drive.
P2-40
Inverter power
–
Display
Display of the power of
MOVIFIT® basic.
Operating Instructions – MOVIFIT® basic
Parameter directory of the
MOVIFIT®
Startup
basic inverter
I
6
0
6.8.3
Motor control parameters
The following table lists the parameters for motor control:
No.
Name
Section
Standard
Description
P4-01
Control modes
0:
Speed control
(Vector)
2
1:
Setting can not be used for
MOVIFIT® basic.
2:
Speed control (V/f)
Control mode selection
To ensure optimum motor power,
you must perform an auto-tune
process (P4-02) each time you
change the control mode.
Auto-tune motor
parameters
0:
Deactivated
0
1:
Enable
If you set parameter P4-02 = "1",
the inverter performs a static measurement of the motor parameters.
You must set the parameters P1-07,
P1-08, and P1-09 according to the
data on the motor nameplate before
you can start the auto-tune process.
Auto-tune is performed:
• When receiving the first enable
signal after operation with
factory-set parameters
• Or when P1-08 has been
changed
No hardware enable is required for
this.
Motor power factor
0.50 – 0.99
Inverter
power
Setting the power factor cos Φ of
the motor according to the motor
nameplate.
This setting is mandatory for all
vector control modes.
P4-02
P4-05
Operating Instructions – MOVIFIT® basic
47
I
6
Startup
Parameter directory of the MOVIFIT® basic inverter
0
6.8.4
Monitoring parameters
The following table shows the monitoring parameters:
The parameter group 0 is used to display internal drive parameters for monitoring
purposes. You cannot change these parameters.
No.
Name
Display range
Description
P0-03
Setpoint speed
-500% – +500%
Speed display (100% = nominal motor frequency)
P0-04
Setpoint speed
-P1-01 – +P1-01
[Hz] or [rpm]
Speed display in Hz or rpm
P0-13
Output torque
0 - 200%
Output torque (100% = nominal motor torque)
P0-20
DC link voltage
[V DC]
Internal DC link voltage
P0-21
Inverter temperature
[°C]
Temperature inside the unit
P0-25
Calculated rotor speed
[Hz] or [rpm]
Calculated motor speed
(only valid in a vector control mode)
P0-26
kWh counter
0.0 - 999.9 kWh
Energy consumption in [kWh]
P0-27
MWh counter
0.0 - 60000 MWh Energy consumption in [MWh]
P0-28
Software ID, IO processor
e.g. "1.00",
"493F"
Version number and check sum of the I/O
processor in the unit
P0-29
Software ID, motor control
e.g. "1.00",
"7A5C"
Version number and check sum of the motor
controller in the unit
P0-30
Serial number of the inverter
000000 - 999999
00-000 - 99-999
Serial number of the unit
e.g. 540102 / 24 / 003
INFORMATION
In addition to the parameters described above, the keypad or the parameter menu
show other parameters. However, these are irrelevant for the drive, thus they are not
described here.
48
Operating Instructions – MOVIFIT® basic
Functions of
MOVIFIT®
Startup
basic with AS-Interface
I
6
0
6.9
Functions of MOVIFIT® basic with AS-Interface
6.9.1
Data transfer AS-Interface master → MOVIFIT® basic
MOVIFIT® basic
inverter
The following table shows the 4 data bits that the AS-Interface master sends to the
MOVIFIT® basic inverter and the functions of the drive:
AS-Interface bit
MOVIFIT® basic
motor starter
Function
DO3
DO2
DO1
DO0
MOVIFIT® basic inverter
X
X
0
0
Stop
X
X
0
1
Enable CW
X
X
1
0
Enable CCW
X
X
1
1
Stop/reset
0
0
X
X
Setpoint speed = n1
0
1
X
X
Setpoint speed = n2
1
0
X
X
Setpoint speed = n3
1
1
X
X
Setpoint speed = n4
The following table shows the 4 data bits that the AS-Interface master sends to the
MOVIFIT® basic motor starter and the functions of the drive:
AS-Interface bit
6.9.2
Function
MOVIFIT®
DO2
DO1
DO0
basic
Reversing starter
MOVIFIT® basic dual motor
starter
0
0
0
Stop
Stop
0
0
1
Enable CW
Enable signal for motor at terminal
X9
0
1
0
Enable CCW
Enable signal for motor at terminal
X8
0
1
1
Stop
Enable signal for both motors at X9
+ X8
1
X
X
Reset
Reset
Data transfer MOVIFIT® basic → AS-Interface master
The following table shows the 4 data bits that MOVIFIT® basic sends back to the ASInterface master:
AS-Interface bit
Meaning
DI3
DI2
DI1
DI0
X
X
X
1/0
X
X
1/0
X
Manual mode
0: MOVIFIT® basic control via AS-Interface
1: Manual control of MOVIFIT® basic
X
1/0
X
X
Sensor input 2
0: The signal of sensor 2 = "0"
1: The signal of sensor 2 = "1"
1/0
X
X
X
Sensor input 3
0: Signal of sensor 3 = "0"
1: Signal of sensor 3 = "1"
Ready signal
0: The MOVIFIT® basic drive is not ready
1: The MOVIFIT® basic drive is ready for operation
X = any status
Operating Instructions – MOVIFIT® basic
49
I
6
Startup
Functions of MOVIFIT® basic with binary control
0
6.10
Functions of MOVIFIT® basic with binary control
6.10.1 Data transfer PLC → MOVIFIT® basic
MOVIFIT® basic
inverter
The following table shows the control signal that the higher-level controller (e.g. PLC)
sends to the MOVIFIT® basic inverter and the functions of the drive:
Control signals
MOVIFIT® basic
motor starter
Function
DI3
DI2
DI1
DI0
MOVIFIT® basic inverter
X
X
0
0
Stop
X
X
0
1
Enable CW
X
X
1
0
Enable CCW
X
X
1
1
Stop/reset
0
0
X
X
Setpoint speed = n1
0
1
X
X
Setpoint speed = n2
1
0
X
X
Setpoint speed = n3
1
1
X
X
Setpoint speed = n4
The following table shows the control signal that the higher-level controller (e.g. PLC)
sends to the MOVIFIT® basic motor starter and the functions of the drive:
Control signals
Function
MOVIFIT®
DI2
DI1
DI0
basic
Reversing starter
MOVIFIT® basic
Dual motor starter
0
0
0
Stop
Stop
0
0
1
Enable CW
Enable signal for motor at terminal
X9
0
1
0
Enable CCW
Enable signal for motor at terminal
X8
0
1
1
Stop
Enable signal for both motors at X9
+ X8
1
X
X
Reset
Reset
6.10.2 Data transfer MOVIFIT® basic → PLC
The following table shows the binary signals that MOVIFIT® basic sends back to the
higher-level controller (e.g. PLC):
Binary
signals
Meaning
DO1
DO0
X
1/0
1/0
X
Ready signal
0: The MOVIFIT® basic drive is not ready
1: The MOVIFIT® basic drive is ready for operation
Manual mode
0: MOVIFIT® basic control via control signals
1: Manual control of MOVIFIT® basic
X = any status
50
Operating Instructions – MOVIFIT® basic
Operation
Operating displays (LEDs)
7
Operation
7.1
Operating displays (LEDs)
7
The following figure shows the LEDs of MOVIFIT® basic:
MOVIFIT® basic with AS-Interface
[1]
[2]
DI3
[3]
MOVIFIT® basic with binary control
[4]
[5]
DI2 STATUS AS-Interface
[6]
DI3
[7]
[8]
DI2 STATUS DI1
[9]
DI0
2816401035
[1]
[2]
[3]
[4]
7.1.1
7.1.2
7.1.3
LED "DI3"
LED "DI2"
LED "Status"
LED "AS-Interface"
2816399115
[5]
[6]
[7]
[8]
[9]
LED "DI3"
LED "DI2"
LED "Status"
LED "DI1"
LED "DI0"
LEDs "DI0 – DI3"
LED color
LED status
Meaning
–
Off
Input signal at binary input DI. open or "0"
Yellow
Illuminated
Input signal present at binary input DI.
LED color
LED status
Meaning
–
Off
No voltage supply
Green
Illuminated
MOVIFIT® basic drive is enabled
Yellow
Illuminated
MOVIFIT® basic drive is ready for operation
Red
Illuminated
An error has occurred
LED "Status"
LED "AS-Interface"
LED color
LED status
Meaning
–
Off
No 24 V supply connected to the AS-Interface
Green
Illuminated
Normal mode
24 V supply connected to the AS-Interface OK
Communication present
Red
Illuminated
Communication interrupted or slave address is set to 0
Green/red
Flashing
Communication or peripheral error
Operating Instructions – MOVIFIT® basic
51
Operation
Operating displays of LT-BG keypad
7
7.2
Operating displays of LT-BG keypad
The LT-BG keypad has the following operating displays:
SCAN..
The keypad is scanning the connection to MOVIFIT® basic.
Err-SC
Communication error between keypad and MOVIFIT® basic.
LOAD..
The keypad is loading the configuration data from MOVIFIT® basic.
P-deF
StoP
The default parameters (factory setting) are loaded.
The power section of MOVIFIT® basic is switched off.
This message is displayed when the drive is at a standstill and no error
is pending. MOVIFIT® basic is ready for normal operation.
P1-03
5.0
Display of the selected parameter (parameter mode)
Display of the selected parameter value (setting mode)
H
50.0
Display of the current motor frequency in [Hz]
C
50.0
Display of the display variables P2-22
A
1.2
P
0.75
... ...
Flashing dots
Auto-t
Display of the actual output current of MOVIFIT® basic in [A].
Display of the actual motor power in [kW].
The actual output current of MOVIFIT® basic exceeds the nominal
motor current (parameter P1-08).
Auto-tune is being performed.
During this process, the motor parameters are measured and
configured.
Enable is not required for starting the auto-tune process.
52
Operating Instructions – MOVIFIT® basic
Operation
Manual mode with LT-BG keypad
7.3
7
Manual mode with LT-BG keypad
(only for MOVIFIT® basic inverter)
7.3.1
Manual mode activation (parameter P1-12)
Proceed as follows to activate manual mode:
1. Set parameter P1-12
•
to "1" => CW operation only
•
or to "2" => CW and CCW operation
2. Enable the drive via the higher-level controller.
7.3.2
•
For MOVIFIT® basic with binary control: DI0 and DI1 = "0"!
•
For MOVIFIT® basic with AS-Interface: DO0 and DO1 = "0"!
Manual mode with MOVIFIT® basic inverter
The following functions of the MOVIFIT® basic inverter can be executed in manual
mode:
Enabling the drive
Use the
key to enable the drive.
With a setpoint speed ≠ "0", the drive will start.
Changing the setpoint Use the
speed
speed.
key and the
key to set the required setpoint
The drive follows the setpoint speed.
Changing direction of Use the
key to change the direction of rotation.
rotation
Requirement: P1-12 = "2" (enable CW and CW operation)
Stop drive
Use the
key to stop the drive.
The drive brakes with the deceleration ramp (P1-04) to a
standstill.
Starting the drive
(with setpoint speed)
At standstill, press the
key and use the
key to select the required setpoint speed.
Press the
key and the
key to confirm your selection.
Then use the
key to start the drive.
The drive accelerates with the acceleration ramp (P1-03) until it
reaches the target speed.
Error reset
If an error occurs during manual mode, the display shows the
corresponding error message.
Eliminate the cause of the error.
Use the
key to reset the error.
After the fault reset, manual mode remains active.
Operating Instructions – MOVIFIT® basic
53
Operation
Manual mode with LT-BG keypad
7
7.3.3
Deactivating manual mode
WARNING
WARNING Risk of crushing due to unintended start of the drive. The signals of the
higher-level controller become effective immediately after deactivating manual mode.
The drive runs with the speed that is specified by the higher-level controller.
Severe or fatal injuries.
•
•
During deactivation, observe a sufficient safety distance to all parts driven by the
motor.
or, before deactivating manual mode, make sure that the drive is not enabled by
the higher-level controller.
Deactivate manual mode by setting parameter P1-12 to "0".
INFORMATION
The inverter briefly releases the brake when you set parameter P1-12 to "0".
54
Operating Instructions – MOVIFIT® basic
Operation
Manual mode with the PC
7.4
7
Manual mode with the PC
(only for MOVIFIT® basic inverter)
7.4.1
Manual mode activation (parameter P1-12)
Proceed as follows to activate manual mode:
1. Check the connection of the MOVIFIT® basic unit.
See chapter "Electrical Installation".
2. Connect the PC/laptop to the MOVIFIT® basic unit.
See chapter "PC connection".
3. Start the LT Shell software.
4. Select the COM port of the PC/laptop, the MOVIFIT® basic unit is connected to.
3759803915
5. Read the parameter set with the
button of the
MOVIFIT®
basic.
6. Set parameter P1-12
•
to "1" => CW operation only
•
or to "2" => CW and CCW operation
CW and CCW operation is not possible with the MOVIFIT® basic dual motor
starter.
7. Transmit the parameter set from the PC to the MOVIFIT® basic via the
button.
8. Activate the drive via "Local Drive Control" / "Enable Drive".
Now the menu lists the available drives.
9. Click on the MOVIFIT® basic drive.
Operating Instructions – MOVIFIT® basic
55
Operation
Manual mode with the PC
7
7.4.2
Manual mode with MOVIFIT® basic inverter
The following figure shows the manual mode menu of the MOVIFIT® basic inverter:
[1] [2] [3] [4]
[5]
[6]
[7] [8]
[9]
3785442315
[1]
[2]
[3]
[4]
[5]
[6]
[7]
[8]
[9]
Enable drive button
Stop drive button
Reverse direction button
Reset error button
Input field for setpoint speed
Confirm setpoint speed setting button (Enter)
Scan network button
Abort scan button
Status line of the drive (display of the current parameter)
The following functions are available in manual mode:
Enabling the drive
Use the
button to enable the drive.
With a setpoint speed ≠ "0", the drive will start.
Changing the setpoint Use the input field [6] to enter the required setpoint speed. Use
speed
the
button to confirm the setting.
The drive follows the setpoint speed.
Changing the direc- Use the
button to change the direction of rotation.
tion of rotation
Requirement: P1-12 = "2" (enable CW and CW operation)
Stopping the drive
Use the
button to stop the drive. The drive brakes with the
deceleration ramp (P1-04) to a standstill.
Error reset
If an error occurs in manual mode, the "Motor Speed" column of
the status line [9] shows the "Tripped" message. You can read
out the error designation from parameter P1-13.
Eliminate the cause of the error.
Use the
button to reset the error.
After the fault reset, manual mode remains active.
Network scan
Scan the network via the
the status line of a drive.
Use the
56
button if the menu does not display
button to abort the scan.
Operating Instructions – MOVIFIT® basic
Operation
Manual mode with the PC
7.4.3
7
Deactivating manual mode
WARNING
WARNING Risk of crushing due to unintended start of the drive. The signals of the
higher-level controller become effective immediately after deactivating manual mode.
The drive runs with the speed that is specified by the higher-level controller.
Severe or fatal injuries.
•
•
During deactivation, observe a sufficient safety distance to all parts driven by the
motor.
or, before deactivating manual mode, make sure that the drive is not enabled by
the higher-level controller.
Deactivate manual mode by setting parameter P1-12 to "0".
INFORMATION
The inverter briefly releases the brake when you set parameter P1-12 to "0".
Operating Instructions – MOVIFIT® basic
57
Service
Diagnostics with LT-BG keypad
8
8
Service
8.1
Diagnostics with LT-BG keypad
The following table helps you with troubleshooting:
Error
Cause
Solution
Overload or overcurrent error of the
unloaded motor during acceleration
•
Check the star/delta terminal connection in the
motor.
The nominal operating voltages of motor and
MOVIFIT® basic must match.
The delta connection always yields the lower
voltage of a multi-voltage motor.
The motor axis is
not rotating
Overload or overcurrent
•
•
Check whether the rotor of the motor is blocked.
Make sure that the mechanical brake is released (if
installed).
Display remains
on "StoP"
No enable signal
for the drive
•
Check whether the enable signal from the higherlevel controller is present.
Make sure the M12 connectors are plugged in
correctly.
Check the parameter P1-12 for terminal control/
manual mode.
Press the <Start> key while in manual mode. The
line voltage must correspond with the specified
values.
•
•
•
The drive does
not start in very
cold environments
Ambient temperature below −10 °C
Drive does not run properly in vector
mode.
•
Provide for a heat source that keeps the ambient
temperature of the drive above -10 °C.
•
You must set the parameters P1-07, P1-08, and
P1-09 according to the data on the motor nameplate before starting the auto-tune process.
Start auto-tune by setting P4-02 = "1".
•
58
Operating Instructions – MOVIFIT® basic
Service
Error list of MOVIFIT® basic
8.2
8
Error list of MOVIFIT® basic
The LT-BG keypad displays the errors that occurred at the MOVIFIT® basic drive. In
addition, you can read out the 4 latest errors from parameter P1-13 error protocol on the
PC.
Error code
P-dEF
O-I
hO-I
Error
Solution
The factory-set parameters
were loaded.
Press the <Stop> key.
The drive can now be configured for the desired
application.
Overcurrent at inverter
output to the motor.
Motor overload.
Overtemperature at the
heat sink of the inverter.
•
•
•
•
•
•
I_ t-trP
An inverter overload error
occurs when the inverter
has delivered > 100% of the
nominal current for a certain
time (defined in P1-08). The
display is flashing to indicate the overload.
•
•
•
•
•
•
PS-trP
Check motor and connection cables for phase
short circuits or ground faults.
Check load for blocking, stalling, or shock
loads.
Make sure that the parameters P1-07, P1-08,
and P1-09 were set correctly according to the
motor nameplate.
For vector control (P4-01 = "0" or "1"): Check
motor power factor in P4-05.
Make sure that the auto-tune process for the
connected motor has been completed
successfully.
Increase the ramp time in P1-03.
Increase the acceleration ramp or reduce the
motor load.
Make sure that the cable length meets the
requirements.
Make sure that the parameters P1-07, P1-08,
and P1-09 were set correctly according to the
motor nameplate.
In vector control mode (P4-01 = "0" or "1"),
check the motor power factor in P4-05.
Make sure that the auto-tune process for the
connected motor has been completed
successfully.
Check the load mechanically. Make sure that
the load can move freely and that there are no
blockages or other mechanical faults.
Internal output stage error
Error when enabling the drive:
• Check for incorrect wiring or short circuit.
• Check for phase short circuits or ground faults.
Error during operation:
• Check for sudden overload or overtemperature.
• Provide additional space or cooling, if necessary.
O_Uo lt
DC link overvoltage
•
•
U_Uo lt
DC link undervoltage
Occurs routinely when switching off the inverter.
• Check line voltage if this occurs while the drive
is running.
O-t
Overtemperature at heat
sink
•
•
U-t
Undertemperature
Occurs at an ambient temperature below -10 °C.
• Increase the ambient temperature to above 10 °C before switching on the inverter.
th-Flt
Faulty thermistor at heat
sink.
•
P-LOSS
Input phase failure error
One input phase failed in an inverter designed for
operation on a three-phase system.
Operating Instructions – MOVIFIT® basic
Check whether the supply voltage is too high.
If the inverter switches off during deceleration,
increase the deceleration ramp in P1-04.
Check inverter cooling.
Provide additional space or cooling, if necessary.
Contact the SEW-EURODRIVE Service.
59
Service
Inspection/Maintenance
8
Error code
Error
Solution
Phase asymmetry
Asymmetry of > 3% occurs for more than 30 s in
the supply input voltage.
• Check input voltage and fuses.
dAtA-F
Internal memory error
•
•
•
•
At-FO1
Auto-tune error
The measured stator resistance of the motor
fluctuates between the phases.
• Make sure that the motor is connected
correctly and without error.
• Check the winding for correct resistance and
symmetry.
Ph-lb
8.3
Parameters not saved.
Factory settings loaded.
Try again.
If this problem occurs repeatedly, contact the
SEW-EURODRIVE service.
At-F02
The measured stator resistance of the motor is too
high.
• Make sure that the motor is connected
correctly.
• Check whether the power rating of the motor
corresponds with the power rating of the
connected inverter.
At-F03
The measured motor inductivity is too low.
• Make sure that the motor is connected
correctly.
At-F04
The measured motor inductivity is too high.
• Make sure that the motor is connected
correctly.
• Check whether the power rating of the motor
corresponds with the power rating of the
connected inverter.
At-F05
The measured motor parameters are contradictory.
• Make sure that the motor is connected
correctly.
• Check whether the power rating of the motor
corresponds with the power rating of the
connected inverter.
Inspection/Maintenance
The MOVIFIT® basic unit does not require maintenance. SEW-EURODRIVE does not
prescribe any inspection or maintenance work for the MOVIFIT® basic unit.
Exception: In case of long-term storage, observe the notes in chapter "Service" /
Extended storage".
60
Operating Instructions – MOVIFIT® basic
Service
Shutdown
8.4
8
Shutdown
To shut down the drive, deenergize the MOVIFIT® basic unit using appropriate
measures.
WARNING
Electric shock due to charged capacitors
Severe or fatal injuries.
•
8.5
Observe a minimum switch-off time of 10 minutes after disconnecting the power
supply.
Storage
Observe the following instructions when shutting down or storing the MOVIFIT® basic
unit:
•
If you shut down and store the MOVIFIT® basic unit, you must close open cable
entries and cover contacts with protective caps.
•
Make sure that the unit is not subject to mechanical impact during storage.
Observe the notes on storage temperature in the "Technical Data" chapter.
8.6
Extended storage
MOVIFIT® basic is equipped with capacitors which are subject to aging effects when deenergized.
The capacity and impedance of the built-in capacitors of MOVIFIT® basic do not change
significantly during extended storage. However, the leakage current of the capacitors
slowly increases.
If the unit is stored for a long time, connect it to the supply system voltage for at least
5 minutes every 2 years. Otherwise, the unit's service life may be reduced.
8.6.1
Procedure if maintenance has been neglected
When maintenance has been neglected, SEW-EURODRIVE recommends to operate
the unit for 1 hour with the permitted nominal voltage at room temperature. Keep the
connected motor running during the entire time. After you have completed the regeneration process, the unit can be used immediately or stored again for an extended period
with maintenance.
8.7
Disposal
This product consists of:
•
Aluminum
•
Plastics
•
Electronic components
Dispose of all components in accordance with applicable regulations!
Operating Instructions – MOVIFIT® basic
61
kVA
9
i
f
n
Technical Data
CE marking, UL approval and C-Tick
P Hz
9
Technical Data
9.1
CE marking, UL approval and C-Tick
9.1.1
CE marking
•
Low voltage directive:
The MOVIFIT® basic drive system complies with the regulations of the low voltage
directive 2006/95/EC.
•
Electromagnetic compatibility (EMC):
MOVIFIT® basic units are designed for use as components for installation in machinery and systems. They comply with the EMC product standard EN 61800-3
"Variable-speed electrical drives". Provided that you comply with the installation
instructions, the CE marking requirements for the entire machine/system in which
they are installed are satisfied on the basis of the EMC directive 2004/108/EC. For
detailed information on EMC compliant installation, refer to the publication "Electromagnetic Compatibility in Drive Engineering" from SEW-EURODRIVE.
The CE mark on the nameplate indicates conformity with the Low Voltage Directive
2006/95/EC and the EMC Directive 2004/108/EC.
9.1.2
UL approval (in preparation)
UL and cUL approval for the MOVIFIT® basic unit series is in preparation.
9.1.3
C-Tick (in preparation)
C-Tick approval for the MOVIFIT® basic unit series is in preparation.
C-Tick certifies conformity with ACA (Australian Communications Authority) standards.
62
Operating Instructions – MOVIFIT® basic
MOVIFIT®
9.2
kVA
Technical Data
basic with AS-Interface
i
f
n
9
P Hz
MOVIFIT® basic with AS-Interface
MOVIFIT® basic type
Part number
MBF07A-K1-A1
MBF15A-K1-A1
MBS4DA-K1-A1
MBS4RA-K1-A1
1 825 245 1
1 825 248 6
1 825 252 4
1 825 250 8
Dual motor
starter
Reversing
starter
6.9 kVA
6.9 kVA
AC 10 A
AC 10 A
Inverter
Apparent output power at
Vline = AC 380 - 480 V
SN
Supply voltages
Permitted range
Vline
AC 3 x 380 V –10% – AC 480 V +10%
Line frequency
fline
50 – 60 Hz ± 10%
Nominal line current
(at Vline = AC 400 V)
Iline
AC 2.9 A
Output voltage
VO
1.8 kVA
2.8 kVA
AC 5.4 A
0 – Vline
Vline
Output is not short-circuit proof
Output is not short-circuit proof
2 – 120 Hz
0.01 Hz
400 V at 50 Hz
fline
–
–
Output frequency
Resolution
Operating point
fo
Rated output current
IN
AC 2.2 A
AC 4.1 A
AC 2 x 5.0 A
AC 10.0 A
PMot
0.75 kW
1.0 HP
1.5 kW
2.0 HP
2 x 2.2 kW
2 x 3.0 HP
4.0 kW
5.4 HP
Motor power S1
PWM frequency
Current limitation
(Output is not shortcircuit proof)
4 (factory setting)/8/16 kHz
Imax
–
motor: 150%, 60 s
Regenerative: 150%, 2 s
None
Max. motor cable length
3 m unshielded
10 m shielded
Interference immunity
Meets EN 61800-3
Interference emission
Meets category C3 according to EN 61800-3
Ambient temperature
ϑA
Climate class
Storage
10 m unshielded
-10 – +40 °C
PN reduction: 3% IN per K to max. 60 °C
EN 60721-3-3, class 3K3
temperature1)
-30 to +85 °C (EN 60721-3-3, class 3K3)
Maximum permitted
vibration and shock load
according to EN 50178
Degree of protection
IP54 (MOVIFIT® basic housing closed and all plug connections sealed).
Duty type
S1 (EN 60149-1-1 and 1-3)
Cooling type (DIN 41751)
Self-cooling
Installation altitude
h ≤ 1000 m: No reduction
h > 1000 m: IN reduction by 1% per 100 m
h > 2000 m: Vline reduction by AC 6 V per 100 m,
Overvoltage class 2 according to DIN 0110-1
hmax = 4000 m
Also see chapter "Installation altitudes above 1000 m asl" (page 17)
Required preventive
measures
Grounding the unit
Weight
Dimensions
3.3 kg
WxHx
D
Brake rectifier
Operating Instructions – MOVIFIT® basic
3.0 kg
2.7 kg
See chapter "Dimension drawings"
BG brake rectifier for SEW brakemotors
Brake voltage = supply voltage Vline
63
9
kVA
i
f
n
Technical Data
MOVIFIT® basic with AS-Interface
P Hz
MOVIFIT® basic type
Part number
MBF07A-K1-A1
MBF15A-K1-A1
MBS4DA-K1-A1
MBS4RA-K1-A1
1 825 245 1
1 825 248 6
1 825 252 4
1 825 250 8
Dual motor
starter
Reversing
starter
Inverter
Control input
Connection of the AS-Interface data line via M12 plug connector
Control functions
DO0 – DO3, see chapter "Functions of MOVIFIT® basic with AS-Interface"
Signaling functions
DI0 – DI3, see chapter "Functions of MOVIFIT® basic with AS-Interface"
Sensor connections
DI2 binary input sensor 2
DI3 binary input sensor 3
Sensor inputs
PLC compatible according to EN 61131-2, sampling time ≤ 8 ms
Ri about 3.0 kΩ
IE about 10 mA
Signal level
+15 – +30 V
-3 – +5 V
Maximum sensor cable length
15 m
"1"
"0"
AS-Interface
Protocol variant
AS-Interface binary slave with a S-7.F
profile "four bit I/O mode slave"
AS-Interface binary slave with S7.A.E profile "4 I/3O AB slave"
AS-Interface profile
S-7.F
S-7.A.E
I/O configuration
7hex
7hex
ID code
Fhex
Ahex
ext. ID code 2
Ehex
Ehex
ext. ID code 1
Fhex
Fhex
Address
1 – 31
Factory setting 0
Can be changed as often as required
1A – 31A, 1B – 31B (AB slave)
Factory setting 0
Can be changed as often as required
1) If the unit is stored for a long time, connect it to the supply system voltage for at least 5 minutes every 2 years. Otherwise, the unit's
service life may be reduced.
64
Operating Instructions – MOVIFIT® basic
MOVIFIT®
9.3
kVA
Technical Data
basic with binary control
i
f
n
9
P Hz
MOVIFIT® basic with binary control
MOVIFIT® basic type
Part number
MBF07A-B1-A1
MBF15A-B1-A1
MBS4DA-B1-A1
MBS4RA-B1-A1
1 825 247 8
1 825 249 4
1 825 253 2
1 825 251 6
Dual motor
starter
Reversing
starter
6.9 kVA
6.9 kVA
AC 10 A
AC 10 A
Inverter
Apparent output power at
Vline = AC 380 - 480 V
SN
Supply voltages
Permitted range
Vline
AC 3 x 380 V –10% – AC 480 V +10%
Line frequency
fline
50 – 60 Hz ± 10%
Nominal line current
(at Vline = AC 400 V)
Iline
AC 2.9 A
Output voltage
VO
1.8 kVA
2.8 kVA
AC 5.4 A
0 – Vline
Vline
Output is not short-circuit proof
Output is not short-circuit proof
2 – 120 Hz
0.01 Hz
400 V at 50 Hz
fline
–
–
Output frequency
Resolution
Operating point
fo
Rated output current
IN
AC 2.2 A
AC 4.1 A
AC 2 x 5.0 A
AC 10.0 A
PMot
0.75 kW
1.0 HP
1.5 kW
2.0 HP
2 x 2.2 kW
2 x 3.0 HP
4.0 kW
5.4 HP
Motor power S1
PWM frequency
Current limitation
(Output is not shortcircuit proof)
4 (factory setting)/8/16 kHz
Imax
–
motor: 150%, 60 s
Regenerative: 150%, 2 s
None
Maximum motor cable
length
3 m unshielded
10 m shielded
Interference immunity
Meets EN 61800-3
Interference emission
Meets category C3 according to EN 61800-3
Ambient temperature
ϑA
Climate class
Storage
10 m unshielded
-10 – +40 °C
PN reduction: 3% IN per K to max. 60 °C
EN 60721-3-3, class 3K3
temperature1)
-30 to +85 °C (EN 60721-3-3, class 3K3)
Maximum permitted
vibration and shock load
according to EN 50178
Degree of protection
IP54 (MOVIFIT® basic housing closed and all plug connections sealed).
Duty type
S1 (EN 60149-1-1 and 1-3)
Cooling type (DIN 41751)
Self-cooling
Installation altitude
h ≤ 1000 m: No reduction
h > 1000 m: IN reduction by 1% per 100 m
h > 2000 m: Vline reduction by AC 6 V per 100 m,
Overvoltage class 2 according to DIN 0110-1
hmax = 4000 m
Also see chapter "Installation altitudes above 1000 m asl" (page 17)
Weight
Dimensions
3.3 kg
WxHx
D
2.7 kg
See chapter "Dimension drawings"
Required preventive
measures
Grounding the unit
Brake rectifier
BG brake rectifier for SEW brakemotors
Brake voltage = supply voltage Vline
Operating Instructions – MOVIFIT® basic
3.0 kg
65
9
kVA
i
f
n
Technical Data
Accessories
P Hz
MOVIFIT® basic type
MBF07A-B1-A1
MBF15A-B1-A1
MBS4DA-B1-A1
MBS4RA-B1-A1
1 825 247 8
1 825 249 4
1 825 253 2
1 825 251 6
Dual motor
starter
Reversing
starter
Part number
Inverter
4 binary inputs
Isolated via optocoupler; PLC compatible (EN 61131-2)
Ri ≈ 3.0 kΩ , IE ≈ 10 mA, sampling interval ≤ 8 ms
Signal level
+13 – +30 V
-3 – +5 V
Control functions
DI0 – DI3, see chapter "Functions of MOVIFIT® basic with binary control"
2 binary outputs
= "1", contact closed
= "0", contact open
PLC-compatible to EN 61131-2, interference-voltage and short-circuit proof
Signal level
+15 V – +30 V
–3 V – +5 V
"1"
"0"
Total current
Max. 100 mA
Signaling functions
DO0 – DI1, see chapter "Functions of MOVIFIT® basic with binary control"
1) If the unit is stored for a long time, connect it to the supply system voltage for at least 5 minutes every 2 years. Otherwise, the unit's
service life may be reduced.
9.4
Accessories
9.4.1
Operator panel
LT-BG
9.4.2
Type
LT-BG-00
Part number
1 820 864 9
Function
Operator panel
Connection
with 3 m cable and RJ11 plug connector
for connection to the X50 diagnostic interface
Degree of protection
IP54 (EN 60529) when installed in a control cabinet door
IP20 (EN 60529) without mounting
Ambient temperature
0 – +50 °C
Storage temperature
0 – +60 °C
Accessories for PC connection
USB11A
Type
USB11A
Part number
0 824 831 1
Function
USB – RS -485 interface adapter
Scope of delivery
–
–
–
Type
OP LT 003 C
Part number
1 824 368 1
Function
RJ10 – RJ45 adapter
DC 24 V -> DC 5 V voltage converter
Scope of delivery
–
–
USB11A interface adapter
USB cable
Cable with RJ10 – RJ10 plug connectors
OP LT 003 C
66
OP LT 003 C adapter
Cable with RJ45 – RJ11 plug connectors
Operating Instructions – MOVIFIT® basic
Technical Data
Dimension drawings
9.5
Dimension drawings
9.5.1
Dimension drawing of MOVIFIT® basic
DI2 STATUS AS-Interface
150
159
DI3
9
255
2816410635
9.5.2
Dimension drawing of LT-BG keypad
70
65
81
55
21
3
55
Recess
for control cabinet installation
2689204875
The keypad meets the requirements of IP54 when it is installed correctly.
Operating Instructions – MOVIFIT® basic
67
kVA
10
i
10
f
n
Declaration of Conformity
Dimension drawings
P Hz
Declaration of Conformity
3947025035
EC Declaration of Conformity
901120011
SEW-EURODRIVE GmbH & Co KG
Ernst-Blickle-Straße 42, D-76646 Bruchsal
declares under sole responsibility that the
units of the series
MOVIFIT® basic
MBF..
MBS..
are in conformity with
Low Voltage Directive
2006/95/EC
EMC Directive
2004/108/EC
Applied harmonized standards
EN 61800-5-1:2007
EN 60204-1:2006
EN 61800-3:2007
EN 55011:2007
4)
4)
According to the EMC Directive, the listed products are not independently operable products. EMC
assessment is only possible after these products have been integrated in an overall system. The
assessment was verified for a typical system constellation, but not for the individual product.
Bruchsal
16.05.11
Johann Soder
Place
Date
Managing Director Technology
a) b)
a) Authorized representative for issuing this declaration on behalf of the manufacturer
b) Authorized representative for compiling the technical documents
68
Operating Instructions – MOVIFIT® basic
Address List
11
11
Address List
Germany
Headquarters
Production plant
Sales
Bruchsal
SEW-EURODRIVE GmbH & Co KG
Ernst-Blickle-Straße 42
76646 Bruchsal
P.O. box
Postfach 3023 • 76642 Bruchsal
Phone +49 7251 75-0
Fax +49 7251 75-1970
http://www.sew-eurodrive.com
[email protected]
Haguenau
SEW-USOCOME
48-54 route de Soufflenheim
B. P. 20185
F-67506 Haguenau Cedex
Phone +33 3 88 73 67 00
Fax +33 3 88 73 66 00
http://www.usocome.com
[email protected]
Rotterdam
VECTOR Aandrijftechniek B.V.
Industrieweg 175
NL-3044 AS Rotterdam
Postbus 10085
3004 AB Rotterdam, Netherlands
Phone +31 10 4463-700
Fax +31 10 4155-552
http://www.vector.nu
[email protected]
Vienna
SEW-EURODRIVE Ges.m.b.H.
Richard-Strauss-Strasse 24
A-1230 Wien
Phone +43 1 617 55 00-0
Fax +43 1 617 55 00-30
http://www.sew-eurodrive.at
[email protected]
Basle
Alfred lmhof A.G.
Jurastrasse 10
CH-4142 Münchenstein bei Basel
Phone: +41 61 4171717
Fax: +41 61 4171700
http://www.imhof-sew.ch
[email protected]
Bilbao
SEW-EURODRIVE ESPAÑA, S.L.
Parque Tecnológico, Edificio, 302
E-48170 Zamudio (Vizcaya)
Phone +34 94 43184-70
Fax +34 94 43184-71
http://www.sew-eurodrive.es
[email protected]
France
Production plant
Sales
Service
The Netherlands
Assembly plant
Sales
Service
Austria
Assembly plant
Sales
Service
Switzerland
Assembly plant
Sales
Service
Spain
Assembly plant
Sales
Service
Operating Instructions – MOVIFIT® basic
69
Index
Index
A
Accessories............................................................11
Additional documentation.........................................8
AS-Interface
Connection.........................................................29
Input/output bits .................................................49
Technical data....................................................64
B
Binary control signals .............................................50
Binary inputs DI0+DI1, X11....................................31
Binary inputs DI2+DI3, X12....................................31
Binary outputs DO0+DO1, X13..............................32
C
Cable seal ..............................................................11
CE marking ............................................................62
Changing the setpoint speed (manual operation) .53,
56
Conductor cross section.........................................18
Connection
AS-Interface, X21...............................................29
Binary inputs DI0+DI1, X11................................31
Binary inputs DI2+DI3, X12................................31
Binary outputs DO0+DO1, X13..........................32
Control unit.........................................................28
Diagnostic interface X50 ..............................30, 32
For MOVIFIT® basic with AS-Interface ..............29
For MOVIFIT® basic with binary control.............31
Line cable...........................................................19
LT-BG keypad....................................................33
Motor............................................................24, 25
Motor cable ........................................................26
PC ......................................................................34
PE ......................................................................16
Power bus ..........................................................19
Safety notes .........................................................8
Sensor 2, X22 ....................................................29
Sensor 3, X23 ....................................................30
Wiring diagram...................................................21
Connection diagram ...............................................18
Contact module
Connection.........................................................20
Control signals of AS-Interface master ..................49
70
Cooling air..............................................................13
Copyright .................................................................6
C-Tick ....................................................................62
D
Data transfer
MOVIFIT® basic with AS-Interface ....................49
MOVIFIT® basic with binary control...................50
Derating .................................................................17
Designated use........................................................7
Diagnostic interface X50, connection ..............30, 32
Diagnostics
With LT-BG keypad ...........................................58
Dimension drawing
LT-BG keypad....................................................67
MOVIFIT® basic.................................................67
Disposal .................................................................61
Documentation, additional .......................................8
Dual motor starter ..................................................10
E
Earth-leakage circuit breaker.................................15
Electrical installation ..............................................15
Embedded safety notes ...........................................5
EMC-compliant installation ....................................17
Enabling the drive (manual mode) ...................53, 56
Error list .................................................................59
Error reset (manual operation).........................53, 56
Exclusion of liability..................................................6
Extended storage...................................................61
F
FieldPower® contact module .................................20
Functions
MOVIFIT® basic with AS-Interface ....................49
MOVIFIT® basic with binary control...................50
Fuse.......................................................................18
H
Hoist applications.....................................................8
Hole pattern ...........................................................14
I
Input/output signals of binary control .....................50
Operating Instructions – MOVIFIT® basic
Index
Installation ................................................................8
Earth-leakage circuit breaker .............................15
Electrical ............................................................15
Line contactor ....................................................15
Mechanical.........................................................13
MOVIFIT® basic .................................................14
Installation altitude .................................................17
Installation dimensions...........................................14
Installation instructions...........................................15
Insulation displacement connector.........................22
Inverter ...................................................................10
L
LEDs, description ...................................................51
Line contactor ........................................................15
LT shell
Inverter manual mode ........................................56
MOVIFIT® basic manual mode ..........................55
MOVIFIT® basic parameterization .....................44
LT-BG
Connection.........................................................33
Description .........................................................42
Diagnostics ........................................................58
Dimension drawing ............................................67
Error list..............................................................59
Inverter manual operation ..................................53
Keys ...................................................................42
Manual operation ...............................................53
Operating displays .............................................52
Parameterization of MOVIFIT® basic.................43
Recess for control cabinet installation ...............67
Technical data....................................................66
M
Maintenance ..........................................................61
Manual mode with LT Shell
Deactivation .......................................................57
Manual mode with LT shell
Activation ...........................................................55
Manual mode with with LT shell
Inverter manual operation ..................................56
Manual operation
With LT-BG keypad............................................53
With the PC........................................................55
Manual operation with LT-BG
Inverter manual operation ..................................53
Operating Instructions – MOVIFIT® basic
Manual operation with LT-BG keypad
Activation ...........................................................53
Deactivation .......................................................54
Mechanical installation...........................................13
Motor cable ............................................................26
Mounting position...................................................14
N
Nameplate .............................................................12
Neglected maintenance .........................................61
Network scan (manual mode) ................................56
Notes
Designation in the documentation .......................5
O
Operating displays
LEDs ..................................................................51
LT-BG keypad....................................................52
Operation
Safety notes.........................................................9
Other applicable documentation ..............................8
P
Parameter description
MOVIFIT® basic inverter....................................45
Parameter list
MOVIFIT® basic inverter....................................45
Parameterization
With LT-BG keypad ...........................................42
With the PC (LT shell software) .........................44
PC, connection ......................................................34
PE connection........................................................16
Product names.........................................................6
Protection devices .................................................17
Protective cover .....................................................35
R
Requirements for startup .......................................36
Reversing starter ...................................................10
Rights to claim under limited warranty .....................6
S
Safe disconnection ..................................................9
Safety functions .......................................................8
71
Index
Safety notes .............................................................7
Designation in the documentation........................5
Electrical connection ............................................8
General information .............................................7
Installation............................................................8
Operation .............................................................9
Storage ................................................................8
Structure of the embedded safety notes ..............5
Structure of the section-related safety notes .......5
Transportation......................................................8
Section-related safety notes ....................................5
Sensor 2, connection .............................................29
Sensor 3, connection .............................................30
Shut down ..............................................................61
Shutdown ...............................................................61
Signal words in the safety notes ..............................5
Software LT shell
MOVIFIT® basic manual mode ..........................55
MOVIFIT® basic parameterization .....................44
Startup
MOVIFIT® basic inverter ..............................37, 39
Notes..................................................................35
Requirements.....................................................36
Storage ..............................................................8, 61
Strain relief .............................................................22
Stripping tool ....................................................11, 20
T
Target group ............................................................7
72
Technical data
CE marking ........................................................62
C-Tick ................................................................62
LT-BG keypad....................................................66
MOVIFIT® basic with AS-Interface ....................63
MOVIFIT® basic with binary control...................65
UL approval .......................................................62
Topology ................................................................18
Trademarks..............................................................6
Transportation..........................................................8
Type designation ...................................................12
U
UL approval ...........................................................62
UL compliant installation (in preparation) ..............17
Unit structure .........................................................10
V
Variants..................................................................10
X
X11, Connection of binary inputs DI0+DI1.............31
X12, Connection of binary inputs DI2+DI3.............31
X13, binary outputs DO0+DO1 ..............................32
X21, AS-Interface connection ................................29
X22, sensor 2 connection ......................................29
X23, sensor 3 connection ......................................30
X50, diagnostic interface .................................30, 32
Operating Instructions – MOVIFIT® basic
SEW-EURODRIVE—Driving the world
SEW-EURODRIVE
Driving the world
SEW-EURODRIVE GmbH & Co KG
P.O. Box 3023
D-76642 Bruchsal/Germany
Phone +49 7251 75-0
Fax +49 7251 75-1970
[email protected]
www.sew-eurodrive.com