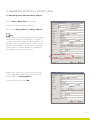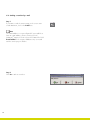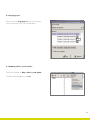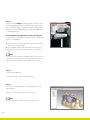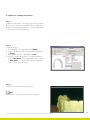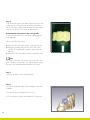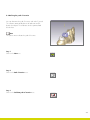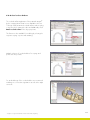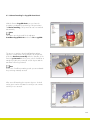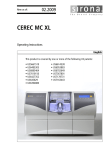
1
User manual etkon™_visual 4.6 Overview 1. Foreword 3 2. 2.1 Getting started Starting the system 4 4 3. 3.1 3.2 3.3 3.4 3.5 3.6 3.7 3.8 3.9 3.10 3.11 3.12 3.13 User-specific settings of etkon™_visual Determining master data and delivery addresses Language and animation time Pontic presettings and gingiva resolution Anterior and posterior connectors Anterior and posterior tooth database Help picture and tooth chart Model base and model template Date set-up Sleeve holder configuration and Exclude scan cylinder 7 Debug mode Highlights Color gradient Sending screenshot by e-mail 5 5 6 7 8 9 9 10 11 11 11 12 13 14 4. 4.1 4.2 4.3 4.4 4.5 4.6 4.7 Functions of etkon™_visual Project toolbar Single view toolbar (horizontal) Single view toolbar (vertical) Modeling toolbar Hiding objects and displaying them transparently Copying project Updating etkon™_visual software 16 17 19 20 21 22 23 23 5. Workflow in etkon™_visual 5.1 Scanning in detail 5.2Requirements of the cut model 5.3 Scan Manager 5.3.1Rules for scanning models 5.3.2Rules for scanning single dies 5.3.3Rules for scanning bite registrations 5.3.4Rules for scanning wax matrices 5.4 Defining the path of insertion 5.5 Design the framework 5.6 Porcelain margin reduction 5.6.1 Gripper colors 5.6.2 Die parameters 5.6.3 Coping parameters 5.6.4 Designing pontics 5.6.5Exchanging pontic 5.6.6Reduction of pontic from the alveolar ridge 5.6.7 Designing connectors 5.6.8Exchanging connectors 24 24 25 27 27 29 30 33 35 40 45 51 51 51 52 53 54 56 58 5.6.9 Freely defined help lines and planes 5.6.10 Undoing previous step 2 59 60 6. Special indications 6.1Inlay and Maryland bridge 6.2 Attachments 6.3 CopyCAD 6.4 CopyCAD bridge 6.5 Single units in bridge context 6.6 Separating bridges 6.7 Duplicating an order 6.8 Primary crowns 6.9 Straumann® CADCAM abutments 6.9.1 Technical requirements 6.9.2Registration and configuration 6.9.3 Lab procedure and scan process 6.10 Occlusal surface database 6.11 Occlusal surface reduction 6.12 Design of undercut bridges 6.13 Bar function 61 61 67 71 76 80 81 82 82 88 89 90 96 111 115 116 118 7. Sending the order to Straumann CADCAM GmbH 119 8. 8.1 8.1.1 8.1.2 8.1.3 8.2 8.3 8.4 8.5 8.6 8.7 8.8 Problems and solutions Non-referenced bite registrations or wax matrices Manual matching of the jaw Manual matching of the bite registration/wax matrix Manual matching for CopyCAD Pontic Basis Die with holes Manual determination of preparation lines for dies that cannont be chamfered sufficiently Manual editing of preparation lines for dies that are chamfered underneath Display of parameter-induced undercuts inside the crown Help video Flashing of the bounding box on dies with undercuts greater than 10 μm Construction dimensions function 123 123 123 125 127 128 129 132 133 133 134 134 9. Service and support 9.1 Sending e-mail to Straumann® support 9.2 Contacting Straumann® teleservice 9.3 Status of the LED displays on the es1 scanner 9.4Error codes 135 135 135 136 137 10. 139 Index 1. Foreword The etkon™ system es1 is a CADCAM system for use in dental laboratories. The system supports the dental technician in acquiring very accurate digital data on the jaw and die, in modeling corresponding frameworks and transferring automatically generated milling information to Straumann CADCAM GmbH via Internet connection. The frameworks are fabricated at Straumann CADCAM GmbH out of the material defined by the dental technician. After a thorough quality inspection, the finished frameworks are sent to the dental lab directly by express delivery. Purpose of this manual This manual is directed primarily to users of the etkon™ system es1 who already have initial experience with the system and are now looking for more detailed information on certain topics, for example scanning wax-ups, bite registrations or wax matrices. Furthermore, the project workflows are explained in this manual, including the workflow for producing primary crowns, inlay shells or even inlay bridges, veneer bridges and also all-metal bridges. The manual is a valuable aid for producing high quality dental restorations. 3 2. getting started 2.1 Starting the system Step 1 1. Switch the scanner on by pressing the switch on the back. 2. Switch the monitor on. 3. Switch the computer on. Step 2 After the system has booted, the log-in dialog is displayed. Enter your access data. Note Do not make any changes in the Session Type box. Step 3 etkon™_visual starts automatically at system start. Alternatively, you can also double click on the etkon™_visual icon. 4 User name: etscan Password: etscan 3. User-specific settings of etkon™_visual 3.1 Determining master data and delivery addresses Click on Extras > Master data in the menu bar. Here you can save further delivery addresses. Click on either Delivery address 1 or Delivery address 2. Note Please change only your address data. All the fields marked with an asterisk have to be completed, since our logistics company requires all these data. Should the numbers in the upper part of the window be missing, they will be entered by your regional Straumann® sales manager or Straumann® customer support. The master data are preconfigured if all the data are known at the time of purchase. A further entry window opens in which you can enter the corresponding address data. Please enter your personal delivery address into Delivery address 1. Confirm the entry at the end with OK. 5 3.2 Language and animation time Click on Extras > Options in the menu bar. Change language Here you can define the relevant language of etkon™_visual. Confirm the entry with OK. Animation time The animation time for centering the selected object during designing can be d efined in milliseconds. Setting “0” means that no delay takes place in centering the object. Confirm the entry with OK. 6 3.3 Pontic presettings and gingiva resolution Pontic presettings Here you can determine the basic shape for the pontics. Confirm the entry with OK. Gingiva resolution Here you can define the resolution for the display of the alveolar ridge. Confirm the entry with OK. 7 3.4 Anterior and posterior connectors Anterior connector Here you can preset the default connector shape in the anterior region. An additional connector, called design connector, is available. It is divided into three sections which can be modified independently from each other. Posterior connector Here you can preset the default connector shape in the posterior region in the same way as described above for anterior connectors. You can choose between four different connector shapes. Confirm the entries with OK. 8 3.5 Anterior and posterior tooth database Anterior tooth database Here you can preset the default tooth shape in the anterior region. Posterior tooth database Here you can preset the default tooth shape in the posterior region. Confirm the entries with OK. 3.6 Help picture and tooth chart Help picture in the Scan Manager Here you can determine whether or not you want to see the help picture in the Scan Manager. The help picture is a reminder of the important rules for positioning dies and models inside the scanner. Confirm the entry with OK. 9 Tooth chart Select either international or USA. Confirm the entry with OK. 3.7 Model base and model template Here you can define whether you want to see the model base and model template or not. Confirm the entries with OK. 10 3.8 Date set-up You can choose between two different date formats. Confirm the entry with OK. 3.9 Sleeve holder configuration and Exclude scan cylinder 7 See chapter 6.9 (Straumann® CADCAM abutments). 3.10 Debug mode Only to be used by Straumann® support. 11 3.11 Highlights Click on Visualize > Show highlights in the menu to switch the highlights effect on or off. To deactivate this display click again in the menu bar on Visualize > Show highlights. 12 3.12 Color gradient With the color gradient in the background of etkon™_visual the spatial display is improved. To deactivate this display click in the menu bar on Visualize > Color gradient. 13 3.13 Sending screenshot by e-mail Step 1 If you want to send the current image on the screen as an e-mail attachment, click on the E-mail icon. Note The e-mail address is not preconfigured. If you would like to have an e-mail address, please contact your local Straumann® support. You can only use this feature if the field E-mail address in the customer database entry connected with the current project is filled in. Step 2 Click Yes to take a screenshot. 14 Step 3 Drag the cursor over the desired area of the graphic while holding down the left mouse button to take the screenshot. Step 4 The e-mail window is displayed. The default recipient is the e-mail address in the customer data connected with the current project. However, it is possible to edit the e-mail address. You can also add a message to the e-mail. The patient reference as well as the associated project number are entered automatically in the reference field. 15 4. Functions of etkon™_visual etkon™_visual offers numerous functions to design dental restorations quickly and without special prior knowledge. Different functions are available in etkon™_visual during the individual steps of the workflow (scanning, visualizing, modeling). All the main functions for designing dental restorations can be reached through a single toolbar. Further functions and options for special indications are available in an additional menu bar. Access to functions is via three toolbars: pp Project pp Single view pp Modeling 16 4.1 Project toolbar Icon Name Function Back Loads the preceding activity in the workflow. Changes e.g. from Modeling back to Path of insertion. Next Loads the next activity in the workflow. Changes e.g. from Secondary path of insertion to Die path of insertion. Create new project Creation of a new project. The current project is saved auto matically. Add order Adds new orders (copings, bridges, etc.) to the current project. Open Scan Manager Displays the dialog for scanning the parts of the projects. Save project Saves the current project status. Send project Sends finalized projects to Straumann CADCAM GmbH via Straumann. Load project Loads a saved project. The current project is saved automatically. Send e-mail Displays the window for sending e-mails. Show path of insertion Shows the object from occlusal and the alignment of the framework in relation to the dies. Side view Displays the object in the view from the left. 17 Icon 18 Name Function Front view Displays the front of the object. Isometry Shows the object in isometric projection. Zoom on model Displays the object in the full image. Zoom selection Magnifies the selected region. Selection mode Activates the cursor for selecting single objects or details. Rotation mode Activates rotation mode. In the rotation mode the displayed object can be rotated (about the central axis of the window) by clicking with the left mouse button or by rolling the mouse wheel. To view this more accurately, you can alternatively move the mouse with the mouse wheel pressed to rotate the object on the screen. Move object Activates the shift mode. In the shift mode the object can be moved to the left/right/up/down with the cursor with the left mouse button pressed. Zoom mode Activates zoom mode. In the zoom mode the display of the object can be magnified/reduced in size by up/down movement of the cursor with left mouse button pressed. Construction dimensions Displays the dimensions of the object, as well as the Z optimization of the design. Display model template Displays the model in relation to the template. 4.2 Single view toolbar (horizontal) Icon Name Function Enlarge window Enlarges the window. Reduce window Reduces the window. Show previous objects Displays the previously scanned single object of the project. Show next object Displays the next scanned single object of the project. Close holes Closes all holes of the die. Smooth margins Jagged margins can be smoothed by this (this function is recommended only for inlays). Path of insertion See “Project toolbar” Buccal view Displays the object from the buccal view. Activate toolbar Shows and hides the toolbar on the left side. Rotation mode See “Project toolbar” Move object See “Project toolbar” Zoom mode See “Project toolbar” Transparent Shows a transparent display of the die. Display scan cylinder Displays the scanned object with the Scan cylinder to simplify the detection of scanning errors. Display scan data Displays all scanned points of the object. 19 4.3 Single view toolbar (vertical) Icon 20 Name Function Selection brush Activates brush. The preparation surface can be marked roughly with the brush. Keep the left mouse button pressed. Selection polygon Activates selection polygon. A preparation region can also be marked with the selection polygon. Line selection Determines the course of a preparation line for inlays and onlays: shortest path or course with the greatest curvatures. Create spline Manual determination of the preparation line. Edit preparation line Edits the preparation line. Expand selected area Expands the selected area. Reduce selected area Corresponds to an eraser to remove too many marked regions. Invert selection Inverts the selection. Surplus regions are marked blue. Deselect all Cancels the marking of selected areas. Delete selection Deletes the blue areas. Conversion of the selection to Maryland/inlay Converts the selected region into a preparation region for Maryland or inlay. 3 point match Manual referencing of bite registrations and wax matrices . Undo last cut Recalls the last cut. 4.4 Modeling toolbar Icon Name Function Some of the icons are identical with those of the project toolbar. Undo Restores the last three saved states. Sectional view Displays the selected object with a quarter section. By clicking on this button again, the next quarter is removed (object must still be activated). Substract gingiva Displays a dialog for entering the distance between the basal surface of the pontic and the alveolar ridge (in mm). Wax-up tool Displays a dialog for determining the shape, strength and radius of the Wax-up tool. To build up a segment click with the right mouse button on the desired point. Tape measure Measures objects. Click the left mouse button on the start and end points of the object. The measured length is displayed in the bar below. Wax knife Individual modeling of copings. Smoothing tool Smoothes the object surface. Occlusal surface Creates an occlusal surface on the selected coping or pontic. Transparency Apart from the selected tooth, all other teeth are visualized with a transparency of 20 %. Help line Produces help line for simplifying modeling. Help plane Produces help plane for simplifying modeling. Delete help object Deletes the selected help line or plane. 21 4.5 Hiding objects and displaying them transparently Show/Hide object To display and hide objects double-click on the desired object in the feature tree. Alternatively, right click on the corresponding object in the feature tree. Transparency Right click on the corresponding object in the feature tree and select Object transparency. 22 4.6 Copying project When you use the Copy project function you can either copy the whole project or only selected objects. 4.7 Updating etkon™_visual software Click in the menu bar on Help > etkon™_visual update. Confirm the following question with Yes. 23 5. workflow in etkon™_visual 5.1 Scanning in detail To start a scan, you must first enter the master data as well as the order data belonging to the project. What can be scanned? The following can be scanned with the etkon™ es1 system: pp complete model pp up to seven dies simultaneously (if more than 7 dies have to be scanned, the scan is divided automatically into several scans) pp neighboring teeth pp bite registrations pp wax matrices pp dies with knife-edge, shoulder, chamfer and inlay preparation, according to indication pp wax-ups pp abutments For copings you only have to scan the associated dies. For modeling bridges you must scan the following: 1. the model 2. the associated dies and, if required, the neighboring teeth 3. if necessary, a corresponding bite registration or wax matrix 24 5.2 Requirements of the cut model The following conditions should be fulfilled: 1. Approved preparation types: pp Knife-edge preparation pp Shoulder preparation pp Chamfer preparation pp Inlay preparation 2. T he preparation margins must be completely visible. Note For automatic detection of the preparation line the die must be clearly chamfered underneath the preparation line. 3. Each die must be removable. 25 4. T he surface of the dies should have the following features: pp matt, non-reflecting surface pp homogeneous color gradient Untreated plaster has been proven to be suitable. 5. T he design height must not exceed the material-specific blank height. Note The design height can be checked and compared to the blank height at any time by clicking on the Construction dimensions icon. Design height 26 5.3 Scan Manager The scan is started and controlled by the Scan Manager. Note Before starting the scan the following conditions should be met: pp The plaster model meets the requirements described in chapter 5.2. pp The scanner is switched on. The scanner lid is closed. pp Suitable order data has been entered for the project. Note The Scan Manager starts after a project is created. 5.3.1 Rules for scanning models Please perform the following steps before starting the scanning processes: Step 1 Use the setup aid for aligning the model. All preparation lines must be on one plane with the metal rod (2). In more complex situations, make sure that the vestibular part of the preparation lines for all dies is in the area between the red (1) and the blue (3) line. Check this with the aid of the metal rod on the setup aid. 27 Step 2 Open the scanner lid and rotate the model plate until it snaps into position. The white dot must be aligned with the white line. Step 3 Place the model on the small plate in the scanner. Use the acrylic template to find the optimum position for the model. The model should be aligned according to the following criteria: pp If the preparation lines were aligned with the red mark, the vestibular cusps or the incisal edges must be in the area of the red line. pp If the preparations lines were aligned with the metal rod, the vestibular cusps or the incisal edges must be in the area of the green line. pp If the preparation lines were aligned with the blue mark, the vestibular cusps or the incisal edges must be in the area of the blue line. Note The template should be removed from the scanner before starting the scan. 28 5.3.2 Rules for scanning single dies Each die should be positioned as follows: pp centrally pp preparation line (PL) at least 1 mm above the edge of the Scan cylinder pp vestibular side aligned with the white mark on the Scan cylinder Step 4 Close the scanner and click on the Next icon. 29 Step 5 The progress of the scan is displayed in the Scan Manager window if you click on Details. 5.3.3 Rules for scanning bite registrations Step 1 Please prepare the bite registration according to the following criteria. The bite registration should be reduced to minimum size: pp Reduce the vestibular and oral sides so that at least half of the vestibular side of the dies is still visible. pp The basal part should be reduced until the bite registration is fixed to the occlusal/vestibular edge of the dies. pp The bite registration must be cut into single parts with a maximum length of 25 mm so that it fits into the Scan cylinder. pp The cut surfaces of the individual parts should be marked with a black pen. 30 Note The preparation line must be visible on the vestibular side. Step 2 Create a new order: 1. Select material, color and order type as Bridge. 2. C lick on all abutment teeth in the dental arch and define these as Coping. 3. Now click on all pontics and define these as Pontic. 4. S elect the copings and pontics once again and define them as Bite registration. A maximum of three objects per registration can be defined as Bite registration. Step 3 Scan the entire model with bite registration(s). In our example two bite registrations were used. Follow the instructions of the Scan Manager. Note Tilt the model slightly towards the vestibular side so that the scanner can acquire the occlusal part of the bite registration. 31 Step 4 Scan the model without the bite registration. Simply remove the bite registration from the model for this purpose, rotate the model plate again so that the white dot is aligned with the white line and magnetized. The model does not have to be aligned anew. Positioning the bite registration in the Scan cylinder Position the bite registration in the Scan cylinder as indicated by the Scan Manager: pp Each section ot the bite registration must be placed in the centre of the Scan cylinder. pp The vestibular side must be aligned with the white line. pp Each part of the bite registration must be completely visible. Note The order in which the bite registrations are positioned in the cylinders is not important. The Scan Manager references the parts of the bite registration automatically to the model. Step 5 Scan the individual dies. Follow the instructions of the Scan Manager. Step 6 The scan is completed and the Scan Manager is closed automatically. You then see the scanned objects on the screen. Note The bite registration can be edited in the single view. 32 5.3.4 Rules for scanning wax matrices Step 1 Prepare the wax matrices according to the following criteria: pp To scan a wax matrix a scannable surface is required. pp We recommend Aqua Spacer1 for covering plastic teeth, wax or similar reflecting materials. Step 2 Create the project: 1. Select material, color and order type as Bridge. 2. Click on all abutment teeth in the dental arch and define as Coping. 3. Now click on all pontics and define as Pontic. 4. Select the copings and pontics once again and define them as Wax matrix. Define a maximum of three objects as Wax matrix. It is only possible to define a maximum of three objects per wax matrix. Step 3 Scan the entire model with the wax matrices. Note Wax matrices longer than 25 mm must be separated. 1 Aqua Spacer is a brand of al dente, dentalprodukte, Dieselstrasse 20, 88074 Meckenbeuren, Germany 33 Step 4 Scan the model without wax matrix. Simply remove the wax matrix from the model and rotate the model plate again so that the white dot is aligned with the white line and magnetized. The model does not have to be aligned anew. Positioning the wax matrix in the Scan cylinder Position the wax matrix in the cylinder as indicated by the Scan Manager. Observe the following criteria: pp No part of the wax matrix may be longer than 25 mm. pp Each part should be placed in the center of the Scan cylinder. The vestibular side should be aligned with the white line. pp Each part of the wax matrix should be completely visible. Note The order in which the wax matrices are positioned in the Scan cylinders is not important. The Scan Manager assigns the parts of the wax matrix automatically to the model. Step 5 Follow the instructions of the Scan Manager. Step 6 The scan is completed and the Scan Manager closes automatically. The scanned object will appear on the screen. It is now possible to edit the wax matrix in the single view. 34 5.4 Defining the path of insertion You can determine the path of insertion with etkon™_visual. The software automatically detects all undercuts and indicates their depth. The undercuts can be optimized and blocked out. Note The yellow arrow indicates the path of insertion. Step 1 Click on the Next icon. Step 2 Click on the Path of insertion icon. Step 3 Click on the Calculate path of insertion icon. 35 You now see the object in the path of insertion. If the preparation margin is not visible from this perspective, it is likely that an undercut is present. To view this more accurately, keep the mouse wheel pressed and move the mouse to rotate the object on the screen. Step 4 If areas are marked in color directly at the preparation line, blocking out would result in an open margin. In order to determine the severity of the undercut, click on the Details button. The value of the shift in the marginal region is given in micrometers (µm). The color scale indicates the general undercuts. Step 5 1. Display the occlusal view. 2. T o optimize the existing undercuts you can correct the path of insertion by clicking on the arrow icons. 36 Correcting the path of insertion is possible exclusively by using these arrows. For better orientation the current status of the model position is displayed for calculating the path of insertion. Red arrow display The red mark indicates that the display on the screen does not correspond with the current path of insertion. 37 Green arrow display The green mark indicates that the display on the screen corresponds to the current path of insertion. 3. T he undercuts are calculated for the new path of insertion by clicking on the red button marked in the picture. 38 The color of the icon changes from red to green, which means that the new path of insertion has been calculated. 4. Check the undercuts again (see Step 3). When you have found the optimum path of insertion, click on the Next icon. 39 5.5 Design the framework You can start designing after you have defined the path of insertion. Note You can see from the feature tree whether the activity for defining the insertion direction is completed or not. pp Red means that the activity is not yet completed. pp Green means that the activity is completed. Step 1 Click on the Next icon. The screen changes to the designing mode. Further tools such as the Wax-up tool and a calculation tool for a uniform reduction of the pontic from the alveolar ridge are available. 40 Designing objects If you want to change parameters such as the cement gap or die spacer, you should do this at the start of designing. Caution The new calculation of parameters will reset the current design to the default design. Step 2 Check the parameters and change them if necessary. Right click on the coping in the feature tree or directly on the object and then select Object properties. 41 The Coping-manager dialog is displayed. Click on Die parameters. The standard settings are displayed for: pp Cement gap pp Die spacer pp Beginning of spacer above PL (preparation line) pp Correction of milling radius On the right side there is a diagram that shows you the area of influence of all parameters. To change the parameters simply move the corresponding slider. Confirm the changes with OK. 42 The Coping-manager dialog is displayed again. Click on Coping parameters. The default settings are displayed here for pp Wall thickness pp PL thickness pp Cutting angle pp Width of cut surface pp Ledge for ceramic (the start and end angle as well as the collar height) Ledge for ceramic The collar runs as standard from mesial to distal over the oral region. The start angle is 110° and the end angle 250°. To shorten or lengthen the collar, simply change the angles. The 0° position is located in the center of the vestibular surface and then runs counterclockwise. After the activation of the Ledge for ceramic you will see a preview of the selected option in 3D mode. You can modify the height and the extension of the ledge for ceramic via the colored grippers. As an alternative the familiar scroll bar is available for modifying the dimensions. When both options are selected the respective function becomes visible by activating the View button. Confirm the changes with OK. 43 The Coping-manager dialog is displayed again. To accept the chosen parameters click on Set parameters. 44 5.6 Porcelain margin reduction A reduction for a ceramic margin on the coping can be activated via the order dialog. Subsequently, define the start and end point as well as the height of the ceramic margin reduction similarly to the collar. After the activation of the Porcelain margin reduction you will see a preview of the s elected option in 3D mode. You can modify the height and the extension of the porcelain margin reduction via the colored grippers. As an alternative the familiar scroll bar is available for modifying the dimensions. When both options are selected the respective function b ecomes visible by activating the View button. 45 You can now start to design the coping to support the ceramic. There are three ways of doing this: pp Wax-up Tool pp Occlusal coping pp Wax knife 46 The Wax-up tool Select the corresponding object in the design screen and click on the Wax-up tool icon. Now rotate the object so that you are looking directly at the area to be built up. Click on this area with the right mouse button. The build-up direction then points exactly towards you. There are three controls to influence the build-up: pp Radius – size of the area of influence pp Strength – material application, also stated as value in millimeters below the controls pp Shape – varies the shape between flat and pointed If you want to build up another area on the same crown, simply right click on it. When finished click on End. 47 The occlusal coping If the prepared occlusal space is very large, you can use this tool to build up the object. Select the object and click on the menu bar on Conversions and then on Coping to occlusal coping. Now click on Preview. You can now edit the object: pp Yellow grippers change the size of the object. pp Red, blue, green, white grippers change the object axially. pp Pink grippers move the object. If you have achieved the desired shape and position click on Fusion. The CopyCAD Manager then opens where you can still change parameters (see chapter 6.3). Then click on Set parameters. 48 The wax knife Select the object in the design screen and click on the Wax knife icon. The cursor changes to a small wax knife. Now keep the left mouse button pressed and move the wax knife over the region of the crown that you want to build up. When the left mouse button is released the material applied is added to the object. 49 You can also use the wax knife to remove material from the design. You can activate the Erase function in the parameters (right click the mouse on the screen which opens the parameter window) or you can use the space key on your keyboard. Now proceed as usual. To smooth the coping surface, click on the Smoothing tool icon. The cursor changes into a transparent red ball. Now keep the left mouse button pressed and move the red ball over the region of the coping that you want to smoothen. 50 5.6.1 Gripper colors Gripper color Description Pink Parallel shift of the entire object Blue Rotating the object about its sagittal axis Red Rotating the object about its transverse axis Yellow Changing the size in the direction of the gripper used White Rotating the object about the mesial axis or distal axis Green Rotating the object about the vertical axis 5.6.2 Die parameters Die parameter Description Cement gap Thickness of the cement gap Die spacer Thickness of the virtual die spacer Beginning of spacer above PL Start of the virtual die spacer above the preparation line (in mm) Correction of milling radius in % States by how many percent the occlusal edges should be blocked out. 0 % switches the milling radius correction off. 5.6.3 Coping parameters Coping parameter Description Wall thickness Wall thickness PL thickness Thickness of the framework wall along the preparation line Cutting angle Angle to the base plate for setting the cutter Width of surface Width of the cut surface With ledge for ceramic Activates collar Note For collar in the palatal or lingual region the start angle should be set to 110° and the end angle to 260°. A 360° collar is also possible. Start point in degrees Start angle of the collar in degrees 0° means the same as the center of the vestibular side The course is counterclockwise Endpoint in degrees End angle of collar in degrees Height of ledge for ceramic Collar height 51 5.6.4 Designing pontics Double-click on the pontic in the 3D display. Alternatively, click on the corresponding pontic once with the left mouse button in the feature tree. The pontic now has a red frame with grippers to adjust the size and reposition as needed. Color code of grippers: pp Yellow grippers change the size of the object. pp Red, blue, green, white grippers change the object axially. pp Pink grippers move the object. 52 5.6.5 Exchanging pontic Step 1 Right click on the corresponding pontic in the feature tree. Now click on Replace object. Step 2 The Pontic selection dialog is displayed. Step 3 Set the required options: pp Basal type: plane, concave, convex pp Basal subtype: pointed, round pp Pontic number Step 4 Click on OK. 53 5.6.6 Reduction of pontic from the alveolar ridge With the aid of this function you can reduce the pontic at the base virtually in order to create a uniform space between the pontic and the alveolar ridge. This is the last step of designing the pontic. Step 1 Select the pontic you want to work on. Note To reduce the pontic basally, the pontic must have contact with the alveolar ridge. Step 2 Click on the Substract gingiva icon. Note It is important not to move the pontic or change its dimensions after this point. 54 Step 3 Enter the distance (in mm). The pontic is reduced basally by this value. Now it is visible how the distance between alveolar ridge and pontic was uniformly calculated. 55 5.6.7 Designing connectors Step 1 Left click on the required connector in the feature tree. Alternatively, double-click on the connector in the 3D view. Step 2 The selected object is displayed within a red frame. Automatically, all other objects become transparent for optimum positioning of the selected connector. The dimensions and position can be adjusted by using the colored gripper as described earlier. Notes pp If the selected connector turns red, you must adjust the object size so that the connector turns white again. pp The red color signals that the minimum cross-section has not been reached. pp If the selected connector turns red the minimum crosssection has not been reached and must be adjusted accordingly. 56 The dimensions of the selected object are displayed on the bottom right of the screen. When the design connector has been activated the Connector manager opens up automatically in a new window. To individualize the design connector you have the possibility to modify the connecting areas by means of the shown grippers. For this please use the free 3D view or activate one of the three sections via the displayed Connector manager. After the activation of a section the connector and the adjacent object are automatically hidden and the boundary line which can be modified is shown on the active object. Move the grippers with the left mouse button to the required position. You deactivate this mode by reactivating the manager or by selecting another object. If the designed shape of the connector is below the required minimum cross section the connector appears in red color as usual. The section which is below the minimum cross section turns red in the small Connector manager window. Please correct the cross section of the highlighted section to the material-specific minimal geometry. 57 If possible, please consider to carry out the positioning of the pontics prior to the individualization of the connector. If major changes of the position are still necessary the design connector can be reinitiated via the context menu by a right click. For this please select the option Go one state back G Shape. 5.6.8 Exchanging connectors Step 1 To select another connector shape, right click the connector in the feature tree and then click on Replace object. Step 2 You can choose between three different default connector shapes as well as the design connector. 58 5.6.9 Freely defined help lines and planes You can define arbitrary help lines and planes for support during the designing process. To draw a help line, click on the corresponding icon and then set two arbitrary points on the model. To define a help plane, activate the corresponding icon and then set three arbitrary points on the model. To remove the created help lines and planes click on the Delete help object icon while the object is selected. 59 5.6.10 Undoing previous step You can reset the last three saved states with the Undo function. To save the design status click on the Save (floppy disk) icon. To restore the previous situation, click on the red arrow (see marking). 60 6. Special indications 6.1 Inlay and Maryland bridge The preparation line (PL) of inlays and Maryland bridges is not detected automatically during the scan. You can determine the preparation lines quickly and simply with the Line selection function. Step 1 Define the order. Depending on the indication you can choose between the Inlay or the Maryland tooth type. Step 2 Follow the instructions of the Scan Manager. 61 Step 3 Display the die in the single view. To do so right click on the required die in the feature tree and select Load single object. Step 4 For defining the preparation line three options are available: pp Selection polygon pp Line selection pp Create spline 62 Option A – Selection polygon Click on the Selection polygon icon. 1. Move the cursor to any point on the margin and click. 2. D efine the PL with the blue line. Fix the points of each line section by left clicking the mouse button. 3. This action is ended by setting the last point of the line back on the start point. Note The object cannot be rotated in this mode. After the prepared inlay surface is marked completely blue, click on the Inlay/Maryland conversion icon. After successful conversion the area marked blue becomes white. Now click on the Next icon. 63 Option B – Line selection Click on the Line selection icon. Notes pp The object can be rotated in this mode. pp The more points used along the preparation line, the more accurately this is defined. pp You can remove the point last set in each case by clicking with the right mouse button. 1. With the aid of the controller define the criteria according to which the line is generated. 2. S et the first point of the preparation margin by clicking with the mouse. 3. Set further points of the preparation line counterclockwise. 4. Join the start and end points of the preparation line by clicking once again on the start point. 5. After the prepared inlay surface is marked completely blue, click on the Inlay/Maryland conversion icon. After successful conversion the area marked blue becomes white. Now click on the Next icon. 64 Option C − Create spline The course of the preparation line is defined via the icon Create spline as usual by left mouse clicks. When the preparation line is closed you can move the points on the object using the left mouse button in 3D mode to carry out corrections. If the distance between 2 points is too large to carry out the required adjustment, you can add additional points by double-clicking with the left mouse button onto the object. Alternatively, you can add the additional points via the + key as usual. The transformation is carried out as usual by activating the green Continue arrow or in the case of inlays via the function Conversion of selection into Maryland/Inlay. 65 Step 5 After successful definition, now define the path of insertion. Step 6 Now design the inlay/Maryland structure. Step 7 Finalize the work with a click on the Next/finalize icon. You can now send the project (see chapter 7). 66 6.2 Attachments Note Due to the complexity of the subject, it is advisable to contact technical support before starting work in difficult designs. Step 1 Define the order type as Bridge. Define the tooth as Attachment where the attachment is to be placed. Step 2 Follow the instructions of the Scan Manager. Step 3 Define the path of insertion. 67 Step 4 Activate the designing mode and design the crown. Position the attachment. Step 5 Adjust the attachment to the path of insertion. Follow the neighboring tooth to align the attachment for the secondary path of insertion. Furthermore, you can adapt the attachment basally with the Wax-up tool and reduce it basally with the Substract gingiva function. 68 Step 6 Finalize the work and send the project (see chapter 7). Step 7 Once you have adjusted the primary structure, you can start the secondary design. Define the matrix as an Inlay. Define all of the other elements as usual. Notes pp Close the gap between the attachment and the alveolar ridge with wax. Separate the alveolar ridge so that this fits in the Scan cylinder for the single scan of the attachment. pp If the attachment is on a bridge, you should duplicate the model and then separate the attachment. 69 Step 8 Now define the limit of the attachment, as you already know from the inlay function. Step 9 Define the overall path of insertion of the bridge. Step 10 Design the secondary construction. Generate an adhesive gap by widening the cement gap and die spacer using the inlay parameters of the inlay. 70 Step 11 The primary and the secondary design are now finished. Note Hide the alveolar ridge after finalizing and check the secondary attachment from the basal aspect. Step 12 Finalize the work with a click on the Next/finalize icon. You can now send the project (see chapter 7). 6.3 CopyCAD You can scan wax-ups with the CopyCAD function. Notes pp The wax-ups must: - be removable - fit easily and securely on the die - not reflect pp The wax used must be suitable for scanning, e.g. etkon™ CopyCAD wax. pp Waxing down to the preparation line is not required but is recommended, since the die is scanned separately to create the margin. 71 Step 1 Define the order. Independently of the order type (Single unit or Bridge) select the relevant tooth/teeth in the dental arch and define as Die + copyCAD. Step 2 Scan the project. Wax-ups are scanned in two steps: 1. A normal scan of the die 2. A scan of the die with the wax-up placed on it For bridges all dies are scanned first and then with the applied wax-ups. Note The position of the die in the Scan cylinder must not be changed while placing the wax-up for the second scan. Step 3 Define the path of insertion. The CopyCAD is automatically hidden when determining the path of insertion and it will be displayed again in the design stage. 72 Step 4 Design the project. Click on the Next icon. In the modeling view, the coping and wax-up are shown here merged with one another. Step 5 Activate the CopyCAD manager by right clicking on the CopyCAD object and selecting Object properties. 73 The CopyCAD manager dialog is displayed. Step 6 Click on Die parameters. Here the standard settings are shown for: pp Cement gap pp Die spacer pp Beginning of spacer above PL (preparation line) pp Correction of milling radius On the right is a diagram that shows the area of influence of all parameters. To change the parameters, simply move the corresponding slider. Confirm the changes with OK. 74 Step 7 Click on CopyCAD parameters. The standard settings are shown for: pp PL thickness pp Cutting angle pp Width of cut surface pp Cut-Height over PL Cut-Height over PL determines at which height above the preparation line the scanned wax-up ends. On the right side there is a diagram that shows the area of influence of all parameters. Step 8 Click on the Next icon. 75 6.4 CopyCAD bridge Preparation Please note that in model production for bridges with several pontics in succession, the individual alveolar ridge parts are separated from one another and can be removed individually from the model. For scanning each pontic must fit in the Scan cylinder with the corresponding alveolar ridge part. Wax up the bridge completely in scannable wax. Underline the pontics with silicone, so that each pontic is held securely on the alveolar ridge after separation of the bridge. Fix the silicone ring onto the model before the first scan. Note Since the bridge must be divided for the scan, it is important to fix the position of the pontic for the scan. The pontic must be in the exact position that it had in the bridge. It cannot be corrected later. Advantages pp This reproduces the basal shape of the pontic reliably. pp The position of the pontic in the bridge is secured. pp Referencing is simplified. 76 Step 1 To define a CopyCAD bridge, select the abutment teeth in the tooth diagram and define these as Die + copyCAD. Define the pontic as PonticBase+CopyCAD Pontic. Step 2 After scanning successfully, the basal surface must be defined first. Using the Next icon you are guided automatically to this step. Step 3 The best way to define the basal area is with the Selection polygon or the Line selection as described in chapter 6.1 (Inlay and Maryland bridge). 77 Step 4 Now convert the area marked blue by clicking on the icon Inlay/Maryland conversion. Note After the conversion the previously blue area turns white and the remainder of the die is beige. Step 5 You can now align the connectors of the bridge and, if necessary, change parameter settings. 78 Step 6 Finalize by clicking on the Next/finalize icon. You can now send the project (see chapter 7). 79 6.5 Single units in bridge context To design several single copings in the arch, it is helpful to see all copings in context. In the order dialog define the order type as Single units in bridge context. You can now edit all copings simultaneously on the model. 80 6.6 Separating bridges You can separate bridges that must be divided subsequently into several orders with a single mouse click. The separation must be performed before selecting the path of insertion. Caution pp This process cannot be reversed! pp Create a copy of the project for safety before separating. Note Please note that the separating direction runs clockwise. In our example, the bridge should be separated between 13 and 14. Right click on die 14 and select Separate order here. Then continue as usual with the path of insertion and designing. Note Once you have finalized the first bridge, it will also be displayed when the next bridge is designed. 81 6.7 Duplicating an order If you want to have a work produced several times, you can duplicate orders. Right click the mouse on the corresponding bridge or coping in the feature tree and select Duplicate order. Note Duplicating can be done in every status before dispatching. 6.8 Primary crowns Step 1 Define the order. Select the Primary/Telescopic crowns order type. Select all teeth in the tooth diagram that should be primary crowns and click on Primary/Telescopic crown in the tooth type section. Note The model could be set on a parallelometer to achieve the optimum secondary path of insertion. 82 Step 2 Follow the instructions of the Scan Manager. Step 3 Click on the Next icon. Define the Secondary path of insertion. The Secondary path of insertion dialog is displayed. Note The secondary path of insertion in etkon™_visual corresponds to the path of insertion of a secondary construction on the finished primary crowns. Setting up this secondary path of insertion is the same definition of the direction on a parallelometer. The secondary path of insertion corresponds to the overall insertion of the project. Step 4 Define the path of insertion for the individual dies. Click on the Next icon. 83 Step 5 Define the individual path of insertion for each die. Note This step must be performed for each die. Then click on Complete and close. Click on the Next icon. Note The path of insertion for the die corresponds to the path of insertion of the primary crown on the die. Step 6 Design the project. Click on the Next icon. 84 Activate the Primary crown manager for each primary crown. Right click on the corresponding primary crown in the feature tree and select Object properties. Click on Die parameters. The fit of the primary crown is defined by the following parameters: pp Cement gap pp Die spacer pp Beginning of spacer above PL pp Correction of milling radius in % Confirm with OK. 85 Click on Line of friction parameters. Define the following parameters for the friction area: pp Coning angle – angle of the primary crown pp Minimum wall thickness pp Base radius – width of the transition from the lower friction line to the friction area Confirm with OK. Click on Line of friction – shape. The course of the upper and of the lower friction line is defined here: pp Adjustment area – The slider defines the length of the friction line over which the change of form is performed pp Smooth – compensates major irregularities of the friction line pp Reset – Sets the friction line back to the starting position Confirm with OK. Note Work with the largest possible area of influence to generate a homogeneous line form. 86 Click on Primary crown parameters. General parameters for crowns: pp PL thickness pp Cutting angle pp Width of cut surface Confirm with OK. Step 7 Finalize the work by clicking on the Next/finalize icon. You can now send the project (see chapter 7). 87 6.9 Straumann® CADCAM abutments Intended use pp Cement-retained crowns and bridges pp Screw-retained, directly veneered crowns (zirconium dioxide abutments only) Materials pp Titanium pp Zirconium dioxide Straumann® CADCAM abutments are available for Straumann® Bone Level and Straumann® Soft Tissue Level implants. 88 6.9.1 Technical requirements The following components are required for designing and ordering Straumann® CADCAM abutments: Scanner etkon™ es1 The wax-up of the abutment is scanned with the etkon™ es1 scanner. etkon™ Wax-up Kit etkon™ Wax-up Kit The etkon™ Wax-up Kit includes all Wax-up sleeve holders required for restoration of the complete Straumann® Dental Implant System. Wax-up sleeve holders are required for correct scanning of the customized abutment. Wax-up sleeves Wax-up sleeves Wax-up sleeves are used for waxing-up the abutment. A set of Wax-up sleeves is included with every etkon™ Wax-up Kit. Note NN RN WN NC RC The Wax-up sleeves are designed for single use only. If the sleeves are used more than once, accurate reproduction of the position of the abutment with reference to the implant position cannot be guaranteed and the milling results may be inaccurate. 89 6.9.2 Registration and configuration 6.9.2.1 Initial registration in the Straumann® CARES™ Webshop via etkon™_visual Before you can create your first order using etkon™_visual you need to register with the Straumann® Webshop. Note For registration you need a current valid e-mail account that you can access. If you do not have an e-mail account, it can be set up for you with the Straumann® Support Hotline. Open the Straumann® form by clicking on Straumann® form. The e-mail address entered into the etkon™_visual software will automatically be transferred. Click on the Straumann® login link (it is not necessary to enter a password in this step). 90 The Straumann® login link takes you to the Registration – Information about your customer account page of the Straumann® Webshop. The master data is automatically transferred from etkon™_visual to the Webshop. Please complete the information on language of preference, country etc. and set your personal password. Note Note that your billing address can only be changed by your Straumann® representative. It cannot be changed via the Straumann® Webshop later on. After checking your customer data, a ccept the general terms and conditions and confirm it by clicking on Register. 91 You will receive the activation code for your account at the e-mail address you entered during registration. The account is activated by clicking on the green link in the message. 92 Activation in etkon™_visual After confirming the activation link, switch back to the Straumann® form (in etkon™_visual). Enter the same personal password you entered in the Straumann® Webshop. Note If a new password is required for the Straumann® Webshop, it must also be changed in etkon™_visual. Both passwords must be identical. 93 Link to Straumann® CARES™ Webshop Right click on the desktop to open the applications window. Click on etkon™, then on Straumann® Webshop to open the Straumann® Webshop. Once you have entered your e-mail a ddress and password in the opening page of the Webshop, you can access the account overview via My Account. The account overview allows you to display your account history. You can also change your password on this page. Note If you change your password here, you must also change it in the Straumann® form in etkon™_visual. 94 6.9.2.2 Wax-up sleeve holder configuration All supplied Wax-up sleeve holders are individually measured after manufacturing and will be given a unique code (for example 01-1005-n34-p17), which ensures the correct alignment of the milled abutment. 01-1005-n34-p17 Wax-up abutments are always scanned in Scan cylinder 7. To be able to leave the Adapter for sleeve holder (see chapter 6.9.3.3) permanently in this Scan cylinder, enable Exclude scan cylinder 7. This will prevent this cylinder from being included in other scanning p rocedures. Before scanning a wax-up abutment for the first time, please enter the codes of your personal Wax-up sleeve holders into the Sleeve holder configuration (Extras > Options > Sleeve holder configuration). 95 6.9.3 Lab procedure and scan process 6.9.3.1 Fabrication of the master cast Fabricate the master cast using standard methods and Type 4 dental plaster (ISO 6873). A gingival mask should always be used to ensure that the emergence profile of the crown is optimally contoured. A full anatomical wax-up should also be prepared for optimal aesthetic planning. Prepare a silicone key over the full wax-up to determine the optimal shape of the customized abutment. 96 6.9.3.2 Modeling the abutment shape Insert a Wax-up sleeve into the master cast. Use the Wax-up sleeve to model the shape of the abutment. Notes pp Use a scannable wax to ensure an accurate scan (e.g. CopyCAD Wax from Straumann®). If no scannable wax is used apply Aqua Spacer1 scanning lacquer. pp The projecting part of the Wax-up sleeve must always be cut off before scanning, otherwise this section will also be scanned and therefore milled. pp Do not wax below the basal margin of the Wax-up sleeve (see also illustration on the next page). 1 Aqua Spacer is a brand of al dente, dentalprodukte, Dieselstrasse 20, 88074 Meckenbeuren, Germany 97 Preparing wax-ups The required components are described in chapter 6.9.1 “Technical requirements”. Shortening the Wax-up sleeve and shaping the preparation margins The projecting part of the Wax-up sleeve must always be cut off before scanning, otherwise this section will also be scanned and therefore milled. Sharp-edged modeling must be avoided. Surface The wax-up of the customized abutment should have no burrs or chips and should have a clean, unpolished surface. The screw channel does not have to be plugged with wax. The wax-up should be fabricated from scannable wax (otherwise Aqua Spacer1 scanning lacquer can be used). Minimum body of Wax-up sleeves NN RN WN NC RC The section above the implant shoulder represents the minimum body, and must not be ground (displayed red in the graphic to the left). Only in the upper section can the Wax-up sleeve be reduced (displayed green in the graphic to the left). Do not wax below the basal margin of the Wax-up sleeve (red arrow). 98 1 Aqua Spacer is a brand of al dente, dentalprodukte, Dieselstrasse 20, 88074 Meckenbeuren, Germany 6.9.3.3 Scanning Under Project, open Create New Project. Select a customer from your customer database, enter the reference of the patient and practitioner in the New Project window and click OK. The Add Order window will open. Note You have to anonymize the patient data prior to sending as described in chapter 6.9.3.4. You must ensure traceability. Select the required tooth in the maxilla or mandible in the order form. From the drop-down menu select Material > WaxAbutment > Straumann® ZrO2 or Straumann® Titanium. Under Tooth Types click on WaxAbutment and select the appropriate implant platform. The available platforms for the selected material are displayed. Note The position of the implant must be given. 99 Positioning the wax-up abutment in the scanner pp Fix the modified Wax-up sleeve on the corresponding Wax-up sleeve holder. Please note that for each implant platform the appropriate Wax-up sleeve and Wax-up sleeve holder must be used. pp Insert the Wax-up sleeve holder into the Adapter for sleeve holder. Make sure that the peg of the Wax-up sleeve holder is in line with the white marking on the Adapter for sleeve holder. Only then the Wax-up sleeve holder is correctly positioned and completely inside the Adapter for sleeve holder. Integrated magnets and a rotation lock help to position it correctly. pp Position the complete Adapter for sleeve holder in Scan cylinder 7 of the etkon™ es1 scanner. Wax-up sleeve Wax-up sleeve holder Adapter for sleeve holder White marking Scan cylinder Notes pp The Wax-up sleeve must be correctly positioned on the Wax-up sleeve holder to ensure an accurate scan. pp When correctly positioned there is no rotation and no gap between the Wax-up sleeve and the Wax-up sleeve holder. pp To ensure an accurate fit Wax-up sleeves are intended for single use only. 100 Scanning Make sure once again that there is no wax below the basal edge of the Wax-up sleeve and ensure that the wax-up is correctly positioned in Scan cylinder 7 as described above. Close the lid of the scanner and follow the instructions of the scan manager. After the scan process, the 3D object will be displayed digitally. 101 Simplified process In the simplified process only the minimum and maximum geometries are monitored. The design suggested by the etkon™_visual software is accepted. Small design changes can be made with the customizing tools. Click on the green arrow to switch to the design mode. The software connects the preparation margin with the implant configuration. In the design mode the minimum and maximum geometries are automatically shown for checking. Ensure that the abutment does not exceed the maximum dimensions. Notes pp The minimum geometry is defined by the Wax-up sleeve. For this reason the lower section of the Wax-up sleeve must not be ground. It is also important to make sure that no wax has been placed below the basal edge of the Wax-up sleeve. pp Areas outside the displayed dimension cannot be fabricated. The minimum and maximum geometries can be displayed and hidden separately. The following customization tools can be used for minor design changes in the design mode: pp Individual segments can be built up with the Wax-up tool. pp The Wax knife can be used to shape the abutment individually. pp The Smoothing tool is used to smooth the abutment surface. To finalize and order the object refer to the section "Finalizing the abutment" in this chapter. 102 Advanced process If the suggested design of the etkon™_visual software does not meet your requirements in the basal region, it can be processed in two different ways (Option A and Option B). Load single object Right click on WaxAbutment and then select Load Single Object. Option A – Automatic Definition of the preparation margins If the software does not display a clean margin in the basal region of the abutment, the margin can be smoothed with the Smooth margins function (icon). 103 The function Edit preparation line (icon) is used to display the preparation margins. Now the exact position of every single point can be changed with the arrow keys. Click on the green arrow to accept the changes to the preparation margin. Click on the green arrow again to change to design stage. The software fills in the missing data points from the preparation margin down to the implant configuration (light-grey area in the illustration to the right). 104 Note Even when the preparation is smoothed, the extrapolation of the missing data points may result in distortions, which will be reproduced on the surface of the milled abutment. Manual definition of the preparation line is recommended for a clean surface in the basal region (Option B). The following customization tools can be used for minor design changes in the design mode: pp Individual segments can be built up with the Wax-up tool. pp The Wax knife can be used to shape the abutment individually. pp The Smoothing tool is used to smooth the abutment surface. To finalize and order the object refer to the section "Finalizing the abutment" in this chapter. 105 Option B – Manual definition of the preparation margins If the software does not display a clean margin in the basal region of the abutment, the preparation margin can be defined with the Create spline function (icon). Place points along the preparation margin. The preparation line is closed with the last click on the start point. Now the exact position of every single point can be changed with the arrow keys. Click on the green arrow to remove the basal region of the abutment. 106 Click on the green arrow to have the software calculate the missing data points from the manually defined preparation margin down to the implant configuration and display the abutment on the implant. The following customization tools can be used for minor design changes in the design mode: pp Individual segments can be built up with the Wax-up tool. pp The Wax knife can be used to shape the abutment individually. pp The Smoothing tool is used to smooth the abutment surface. To finalize and order the object refer to the section "Finalizing the abutment" in this chapter. 107 Finalizing the abutment The modeling height of the wax abutment can be set to its optimum value in Project Properties. Note The following is recommended: Right-click on wax Abutment, then select Object Properties > WaxAbutment > esign Height and set it to 0.6 mm. D Finalize the work by clicking on the Next/finalize icon (green arrow). 108 6.9.3.4 Ordering Choose your delivery address to send the order. You must encode the patient reference by checking the check-box Anonymize. Confirm with OK. As the last step check the two checkboxes and click on Start. Notes General Terms and Conditions The general terms and conditions must be accepted when confirming the order. Prices The prices for the Straumann® CADCAM abutments are available by clicking on the Price list Straumann® link. 109 In the Webshop you can check the c urrent status of your order. As soon as the order leaves the p roduction center and is given to the courier, you will receive an e-mail m essage with an order tracking number to be used on the courier’s website to follow the progress of your order. 110 6.10 Occlusal surface database The occlusal surface application of the patented artegral®1 by the company Merz Dental is now available to the user. To design a fully anatomical occlusal surface mark a coping or a pontic when creating the order and additionally check Attach occlusal surface in the object properties. This function is also available for modeling by selecting the respective coping or pontic and activating. Multiple selections of occlusal surfaces for copings and pontics are also possible. For an ideal design of the occlusal surface we recommend including one or more bite registrations as well as the adjacent teeth. 1 artegral® is a registered trademark of Merz Dental GmbH, Lütjenburg 111 Initial suggestion After the bite registration has been cut to size in single view and the path of insertion has been defined, the etkon™_visual software shows the initial design for the created order when you click on the green arrow. The tooth types selected in global settings are used here. Designing When modeling, single objects can be processed one after the other via the Occlusal surface button. After activation of the Occlusal surface manager the following functions can be accessed: pp Adjustment of die parameters pp Selection of occlusal surface template pp Adjustment of approximal contacts with neighboring teeth (scanning of adjacent teeth is an advantage) pp Adjustment to bite registration pp Merging of the object Additionally, the object can be moved and scaled via the familiar grippers of the bounding box. The modeling tools (wax knife, Wax-up tool and smoothing tool) can also be used to modify the occlusal surfaces after leaving the Occlusal surface manager. If no occlusal surfaces were selected when creating the order, these can be generated by highlighting the object and selecting the function Occlusal surface. 112 Adjust to bite registration function Position or design the occlusal surface so that the bite registration is penetrated by the occlusal surface on the required contact areas, and activate the Adjust to bite registration function. This adjusts the occlusal surfaces to the respective bite registration. When the occlusal surface is reduced in accordance with the registration, the minimum wall thickness is checked for the first time. 113 If the wall thickness falls below the minimum, the color of the object changes from standard grey into yellow. The critical areas are marked in red. Note It is not possible to continue without corrections. These areas must be adjusted using the modeling tools. As soon as the defined minimum wall thickness is reached again, the color of the object changes back to gray. After all bridge units have been processed, the connectors must also be put into the required shape and position before the entire job can be finalized by clicking the green Continue arrow. 114 6.11 Occlusal surface reduction The additional button Reduce occlusal surface reduces the previously anatomically modelled occlusal surface of a coping, pontic or copyCAD. After marking the object, the Reduction manager can be called via the function Reduce occlusal surface. Afterwards it is possible to set the level of reduction by means of a scroll bar (incremental value is 0.1 mm). After the reduction level has been determined you can carry out this reduction via the button Reduce. The previous fully contoured design is still shown in the transparency mode. The reduction can be repeated several times until the required form has been reached. Confirm the reduction via the button Accept to conclude the reduction process. The previous model then shown in the transparency mode can be hidden at any time via the feature tree. After the reduction you can use all familiar modeling tools. 115 6.12 Design of undercut bridges Single dies in a bridge can be excluded from the overall path of insertion as follows. After scanning, change to Path of insertion as usual. The undercuts will be shown after the path of insertion has been evaluated. The example shows a situation where the divergent die 21 cannot be corrected via the overall path of insertion. Now select the die to be removed from the path of insertion, open the context menu with a right mouse click and select Exclude from path of insertion. In the next step, confirm the query in the dialog box and finish the definition of the path of insertion as usual. Correction of the undercuts of the excluded die is carried out in the next step. 116 Continue by clicking on the green arrow and arrange the excluded die in its individual insertion direction. The maximum tilting amounts to ±10°. The separately arranged die will be indicated in the feature tree by an additional arrow on the die. Designing the framework follows the usual process. 117 6.13 Bar function To edit the shape and position of the bar, highlight the bar and use the grippers. The following grippers are available: Pink grippers with arrows You can shape the bar either in horizontal or vertical direction using the pink grippers with arrows. To change the direction, please press the space bar. Active grippers are shown in red. Yellow grippers With these grippers you can change the height and width of the bar in a vertical or horizontal direction. Active grippers are shown in red. Green, blue and red gripper These grippers rotate the object around its respective axis. 118 7. Sending the order to straumann cadcam gmbh After the design is finalized you can send the project to Straumann CADCAM GmbH via Straumann. Step 1 Click on the Next arrow to send the data. Step 2 Check all project data in the displayed summary and select the delivery address. Note Please enter your personal delivery address into Deliv. add 1. 119 Step 3 – ONLY FOR GERMANY Select between the extended patient guarantee Q5 of 5 years or the legal warranty of 2 years. The Straumann guarantee Q5 includes reimbursement of the cost for new production including material, laboratory costs and dentist's fee. Step 4 – ONLY FOR GERMANY If you have selected the extended patient guarantee Q5, a further window opens automatically. Here you must complete all boxes marked with an asterisk (mandatory boxes). Completeness of the data is very important since these are forwarded directly to the ZAG Plus insurance company. Accept the guarantee conditions and confirm your entry with OK. Under the link Guarantee conditions you will find all information on the conditions for the guarantee, damage reporting and your rights of recourse. 120 Step 5 – Anonymizing You must encode the patient reference. 121 Step 6 Select a Shipping method. Step 7 Accept the general terms and conditions of Straumann® by checking the box. General Terms and Conditions of Straumann® are available by clicking on the corresponding link. Click on Start. 122 8. Problems and solutions 8.1 Non-referenced bite registrations or wax matrices 8.1.1 Manual matching of the jaw If a yellow-red checkmark is in front of the Arch with bite registration/wax matrix, you can solve the problem as follows. Step 1 Right click on Arch with bite registration/wax matrix and select Rereference manually. Step 2 In single view click on the 3-point match icon on the left. 123 Step 3 Now define a triangle by placing three points in a similar arrangement. Choose three distinct spots you can easily recognize in both displays. Start with the Arch with bite (in the highlighted box). Step 4 Referencing is initiated automatically by setting the last point. A message follows telling you whether referencing was successful or nor. Note If referencing is not successful, you can also determine the position of the model manually and accept it with the Next icon. 124 8.1.2 Manual matching of the bite registration/wax matrix If a yellow-red checkmark appears in front of the Bite registration/wax matrix, you can solve the problem as follows. Step 1 Right click on Bite registration/wax matrix and select Rereference manually. Step 2 In single view click on the 3-point match icon on the left. 125 Step 3 Now define a triangle by placing three points in a similar arrangement. Begin with the Bite registration/wax matrix (in the display bite on the right). Step 4 Referencing is initiated automatically by setting the last point. Note If referencing is not successful, you can also determine the position of the bite registration manually and accept it with the Next icon. 126 8.1.3 Manual matching for CopyCAD Pontic Basis With the function CopyCAD Pontic you now have the possibility to undertake the positioning of the pontic basis via Manual matching, if the pontic basis was not matched automatically. Note This option can only be used for the indication PonticBase+CopyCAD Pontic and not for Die + copyCAD. The process is analog to the already familiar matching. Open the context menu of the pontic base by a right click and select Rereference manually. After the activation of the function 3-point match the three points, which should form a triangle if possible, are positioned on both objects and the automatic referencing is started. Note In the case of insufficient matching results you can undertake the positioning manually as usual. After successful matching the respective object is checked with a green mark in the feature tree and you can continue with the process as usual. 127 8.2 Die with holes Problem After scanning, a hole is displayed in the die. Solution You can close the hole by proceeding as follows. Step 1 Right click on the corresponding object in the feature tree and select Load single object. Step 2 Click on the Close holes icon. Step 3 Click on the Next icon. 128 8.3 Manual determination of preparation lines for dies that cannot be chamfered sufficiently Step 1 Select the corresponding tooth by clicking in the tooth diagram in the order dialog. Select Coping as the tooth type. To manually define the preparation line, click the corresponding box in the parameter list on the right. If you right click on Coping this allows yout to select the manual preparation line definition. This is also possible in Die + copyCAD and Primary crowns. Step 2 After scanning click on the Next icon. Step 3 First define a provisional path of insertion which displays undercut regions when setting the points (as described in chapter 5.4). 129 Step 4 Click on the Create spline icon. pp Set points along the preparation line. pp For corrections delete the last set point by right clicking. pp The preparation line is closed with the last click on the start point. pp You can still edit the exact position of each individual point. pp You can move the point higher or lower with the vertical arrow keys. pp You can go to the next point with the horizontal arrow keys. pp A 2D sectional image of the current view is available for precise determination of the preparation line. pp You can activate or deactivate the function optionally via the Extras > Cross-sectional view on menu. 130 The green straight line of a point shows that this point is not in the undercut area. If the straight line turns red the point lies in the undercut of the tooth. To add further points on the line, click on the + sign. To remove a point, click on the – sign. Step 5 Click on the Next icon. 131 8.4 Manual editing of preparation lines for dies that are chamfered underneath If the preparation line was not chamfered sufficiently underneath for automatic line detection, this can be corrected in the single view. Click on the Edit preparation line icon. pp The preparation line is now displayed accordingly. pp You can still change the position of each point. pp You can move the point higher or lower with the vertical arrow keys. pp You can go to the next point with the horizontal arrow keys. pp To add further points on the line click on the + sign. pp To remove a point click on the – sign. To accept the changes of the preparation line, click on the Next icon. 132 8.5 Display of parameter-induced undercuts inside the crown With parallel walled dies there can be a slight undercut that cannot be milled due to application of the virtual die spacer. This is now also displayed graphically in the design stage inside the crown. As you already know from determining the path of insertion, the corresponding color states the amount of the undercut. The display serves solely for visualizing these areas, and can help as reference when adapting the framework. 8.6 Help video By clicking on MPEG2 Play in the Scan Manager you can view a small video that shows you how to align a die or a model in the scanner. Alternatively, you can also view the videos without going into the Scan Manager. Click on Help in the menu bar and select Help videos. 133 8.7 Flashing of the bounding box on dies with undercuts greater than 10 µm If in the definition of the path of insertion an undercut leading to open margins is created, the bounding box around the corresponding die flashes. 8.8 Construction dimensions function To check whether the designed work fits in the available blanks, use the Construction dimensions function. You can now check the positioning in the blank and correct the design if necessary. Automatic Z optimization Even bridges with a very flat path of insertion can be produced with the automatic Z optimization. The bridge is aligned optimally in the blank by Z optimization. 134 9. Service and Support 9.1 Sending e-mail to Straumann® support You can contact our support through the Help menu. To simplify communication with our support team, contact your local support team via Help > E-mail to Straumann® support. Note To use this feature an e-mail account needs to be accessible on your computer. 9.2 Contacting Straumann® teleservice Step 1 1. In the etkon™_visual menu bar select Help > Straumann® teleservice. The following window is displayed. 2. Click on Yes. The following dialog is displayed. 135 Step 2 Contact your local Straumann® support by phone and follow the instructions. 9.3 Status of the LED displays on the es1 scanner Status LED 1 pp After a prolonged lighting phase there is no communication between scanner and etkon™_visual (not initialized). pp Flashing LED: the scanner is in standby mode. Status LED 2 pp LED is orange: scanner lid is open. Status LED 3 pp LED is yellow: scanner is in motion and should not be opened. Status LED 4 pp LED is green: scanner has been booted and is now ready. 136 9.4 Error codes Error code Cause Solution ERR_COMM = -1 pp Communication ERR_MATCHING = -2 pp Error error pp Contact in referencing partial views cable is not connected pp Object is inserted in the wrong Scan cylinder pp Check pp Die not found in the data stock positioned too high for scanning pp Deviation between model scan and die alignment during the single scan is too big pp Check ERR_FILE_NOT_FOUND = -4 pp File pp Contact ERR_NOMEM = -5 pp Insufficient ERR_ALREADY_RUNNING = -6 pp etkon™_visual pp Video ERR_REFERENCE_NOT_FOUND = -3 pp Model error hard disk memory was started twice technical support alignment of the die in the Scan cylinder pp Check correct connection of video cable alignment of the die in the Scan cylinder and restart scan technical support pp Save older projects on CD-ROM and then delete them from the hard disk pp Delete older projects from the hard disk pp Contact technical support pp Restart scan technical support pp Contact ERR_AXIS_MOVE = -7 pp Scanner was opened during scanning ERR_FILE_SAVE = -8 pp File ERR_STOPPED = -9 pp Scan ERR_PREPARATION = -10 pp Preparation error pp Restart scan pp Contact interrupted by user line was not recognized pp Restart technical support scan pp Die must be undercut more clearly alignment of the die in the scan cylinder pp Check ERR_DOORSWITCH = -11 pp Scanner lid open pp Close ERR_ENDSWITCH = -12 pp Scanner axis has moved to limit switch pp Contact ERR_EMERGENGY_STOP = - 13 pp Scanner was opened during scanning interrupted by user pp Close pp Scan pp Restart ERR_USERBREAK = -14 pp Scan interrupted by user pp Restart ERR_MOVE_TIMEOUT = -15 pp Maximum intended waiting time exceeded (timeout) scanner lid and restart scan technical support scanner lid scan scan pp Contact technical support 137 Error code Cause Solution ERR_LOW_POWER_STATE = -16 pp Scanner in standby mode pp Switch the scanner off and on again status of the LED lights (see status overview) pp Check ERR_AXIS_NOT_REFERENCED = -17 ERR_NO_ANSWER = -18 pp Axes could not be referenced was opened during calibration ERR_GENERIC_ERROR = -20 138 the scanner off and on again scan pp Restart pp Scanner pp Connect switched off not connected with the computer pp Scanner ERR_UNKNOWN_ANSWER = -19 pp Switch pp Scanner pp Scanner has received unknown command scanner to functioning power supply pp Check cable connections pp Check status of the LED lights (see status overview) pp Contact technical support pp Contact technical support 10. index 3-point match 20, 123, 125 Abutment 24, 31, 33, 88, 95 Activate toolbar 19 Activation code 92 Adapter for sleeve holder 95, 100 Add order 17, 99 Adhesive gap 70 Adjust lines 86 Adjust to bite registration 11, 113 Adjustment area 86 Alveolar ridge 7, 54, 69, 71, 76 Animation time 6 Anonymizing 121 Anterior connectors 8 Anterior occlusal surface 9 Anterior tooth database 9 Arch with bite registration/wax matrix 123 Attach occlusal surface 111 Attachment 67 Back 17 Bar function 118 Basal 30, 53, 76, 86, 97, 103, 106 Basic shape for pontics 7 Beginning of spacer above PL 42, 51, 74, 85 Billing address 91 Bite registration 24, 30, 111 non-referenced 123 Bite registration/wax matrix 125 Blue line 27 Bridge 24, 33, 72, 76, 81 Bridge context 80 CADCAM abutments 88 Calculate path of insertion 35 Cement gap 42, 51, 70, 74, 85 Chamfer 24, 129, 130 Change language 6 Close hole 19, 128 Collar 43 Color gradient 13 Complete and close 84 Coning angle 86 Connector 56, 114 anterior 8 bridge 78 cross-section 56 default shape 8 exchanging 58 manager 57 posterior 8 shape 58 Contruction dimensions 18, 26, 134 Conversion of the selection to Maryland/inlay 20, 65 Coping 24, 31, 33, 41, 80, 111, 129 Coping manager 42 Coping parameters 43, 51 Coping to occlusal coping 48 Copy project 23 CopyCAD 71 bridge 76 parameters 75 pontic 127 wax 71 CopyCAD manager 48, 73 Correction of milling radius 42, 74, 85 Create project 17, 33, 99 Create spline 20, 103, 130 Cross-sectional view on 130 Crown 68, 72, 84 Cut-Height over PL 75 Cut model 25 Cut surface 30 Cutting angle 43, 51, 75, 87 Date set-up 11 Debug mode 11 Default connector shape 8 Delete help object 21, 59 Delete selection 20 Delivery address 5, 119 Dental arch 31, 33 Deselect all 20 Design connecter 8 Design height 26, 108 Design mode 40, 68, 102 Designing connector 8, 56 Designing object 41 Designing pontic 52 Details 30, 36 Die 24, 32, 62 chamfer 24 inlay preparation 24 knife-edge 24 139 shoulder 24 single 29 surface 26 with hole 128 with undercut 134 Die + copyCAD 72, 77, 129 Die parameters 42, 51, 74, 85, 112 Die spacer 41, 51, 70, 74, 85, 133 Die varnish start above PL 74 Display model template 10, 18 Display scan cylinder 19 Display scan data 19 Distance pontic - alveolar ridge 54 Duplicate model 69 Duplicate order 82 Edit preparation line 20, 103, 132 Edit bite registration 32, 34 Edit coping 80 Edit wax matrix 34 Edit in single view 32 E-mail 13, 90, 96 Endpoint 43, 51 Enlarge window 19 Exchange pontic 53 Exchange connector 58 Exclude from path of insertion 116 Exclude scan cylinder 7 11, 95 Expand selected area 20 Friction area 86 Friction line 86 Front view 18 Fusion 48 Gingiva 54 Gingiva resolution 7 Gingival mask 96 Green arrow display 38 Green line 28 Gripper 43, 45, 48, 52, 56, 112, 118 blue 48, 51, 52, 118 colors 51 green 48, 51, 52, 118 pink 48, 51, 52, 118 red 48, 51, 52, 118 white 48, 51, 52 yellow 48, 51, 52, 118 Guarantee 120 Height of ceramic margin reduction 45 140 Height of ledge for ceramic 51 Height of porcelain margin reduction 43 Help line 21, 59 Help picture 9 Help plane 21, 59 Help video 133 Hide model base 10 Hide object 22 Highlights 12 Implant shoulder 98 Incisal edges 28 Inlay 61, 69 preparation 24 Inlay parameters 70 Inlay/Maryland conversion 63, 64, 78 Inlay/Maryland structure 66 Invert selection 20 Isometry 18 Jaw record 31 Language 6 Ledge for ceramic 43 Limit of attachment 70 Line of friction - shape 86 Line of friction parameters 86 Line selection 20, 61, 62, 64, 77 Load project 17 Load single object 62, 103, 128 Margin, open 134 Maryland bridge 61 Master cast 96 Master data 5, 93 Material 31, 33, 99 Matrix 69 Merging of object 112 Milling radius correction 51 Minimum wall thickness 86 Model 24, 27, 32, 34, 76 Model base 10 Model plate 28, 32, 34 Model template 10 Modeling 98, 112 height 108 toolbar 21 tools 114 view 73 Move object 18, 19 New order 31 New project 99 Next 17 Object properties 41, 73, 85 Object transparency 22 Occlusal coping 46, 48 Occlusal edge 30 Occlusal surface 21, 111, 113 anterior 9 posterior 9 reduction 115 Occlusal surface manager 112 Occlusal view 36 Open margin 36 Open Scan Manager 17 Oral side 30 Order, define 72 Order data 24, 27 Order type 31, 33, 67, 72, 80, 82 Ordering 109, 119 Path of insertion 19, 35, 66, 72, 81 84, 112, 116, 129 of secondary construction 83 overall 70 secondary 68, 82 Patient guarantee 120 PL thickness 42, 51, 74, 75, 87 Pontic 31, 33, 54, 76, 111 number 53 presettings 7 selection 53 PonticBase+CopyCAD Pontic 77 Porcelain margin reduction 45 Posterior connectors 8 Posterior occlusal surface 9 Posterior tooth database 9 Preparation, chamfer 25 Preparation, inlay 25 Preparation, knife-edged 25 Preparation, shoulder 25 Preparation line 25, 27, 36, 61, 63, 71, 105, 129, 130, 132 Preparation margin 25, 36, 64, 98, 103, 106 Preselection of pontic shape 7 Preview 48 Primary crown 82, 84, 129 Primary crown manager 85 Primary crown parameters 87 Primary design 71 Primary structure 69 Primary/Telescopic crowns 82 Project, new 99 Project properties 108 Project toolbar 17 Reduce basally 54, 68 Reduce occlusal surface 115 Reduce selected area 20 Reduce window 19 Reduction for ceramic margin 45 Reduction manager 115 Reduction of pontic from alveolar ridge 54 Replace object 53, 58 Rereference manually 123, 125 Reset 86 Rotation mode 18, 19 Save 60 project 17 Scan cylinder 29, 32, 34, 76, 95, 100 Scan cylinder 7 11 Scan manager 9, 27, 31, 34, 61, 67, 83, 101, 133 open 17 window 30 Scanning 24 bite registration 30 single die 29 wax matrix 33 Secondary construction 70 Secondary design 69, 71 Secondary path of insertion 83 Sectional view 21 Selection brush 20 Selection mode 18 Selection polygon 20, 62, 63, 77 Send e-mail 13, 17 Send order 119 Send project 17 Send screenshot 13 Separate order here 81 Separating alveolar ridge 69 Separating bridge 81 Separating direction 81 Separating wax matrix 33 Set parameters 44 Setup aid 27 141 Shift in marginal region Shoulder Show help Show highlights Show next object Show object Show path of insertion Show previous object Side view Single die Single unit Single units in bridge context Single view Single view toolbar (horizontal) Single view toolbar (vertical) Sleeve holder configuration Smooth Smooth margins Smoothing tool Spacer Startpoint Straumann® form Straumann® login Straumann® support Straumann® teleservice Straumann® webshop Substract gingiva Support hotline Tape measure Tooth chart Tooth database, anterior Tooth database, posterior Tooth type Inlay Maryland WaxAbutment Transparency Transparent Type of order Undercut bridge inside crown parameter-induced Undo Undo last cut Update software 142 36 24 9 12 19 22 17 19 17 29, 116 72, 80 80 32, 62, 112 19 20 11, 95 86 19, 103 21, 50, 102, 112 42, 74, 85 43, 51 90, 94 90, 91 135 135 90, 94 21, 54, 68 90 21 9 9 9 61, 99, 112 61 61 99 21, 22 19 31, 33, 67, 72, 80, 82 35, 38, 116, 134 116 133 133 21, 60 20 23 Upper line User name Vestibular cusp Vestibular edge Vestibular part Vestibular side View modeling Visualize Wall thickness Wax abutment Wax knife erase Wax matrix non-referenced WaxAbutment Wax-up anatomical Wax-up kit Wax-up sleeve Wax-up sleeve holder Wax-up tool Webshop White mark Width of cut surface With ledge for ceramic Z optimization Zoom mode Zoom on model Zoom selection 86 4 28 30 27 29, 30, 31, 32, 34 73 12 43, 51, 114 95, 99 21, 46, 49, 102, 112 50 24, 33, 34 123 97, 103, 108 24, 71, 72, 89, 98, 100 96 89 89, 97, 100 89, 95, 100 21, 46, 47, 68, 102, 112 90, 110 28, 29, 32, 34, 100 42, 43, 51, 75, 87 43, 51 134 18, 19 18 18 Notes Notes National Distributor w w w.straumann.com Manufacturer Straumann CADCAM GmbH Lochhamer Schlag 6 D-82166 Gräfelfing, Germany Phone+49 (0)89 30 90 75 0 Fax +49 (0)89 30 90 75 599 © Institut Straumann AG, 2009. All rights reserved. Straumann ®,and/or other trademarks and logos from Straumann ® that are mentioned herein are the trademarks or registered trademarks of Straumann Holding AG and/or its affiliates. All rights reserved. 02/09 International Headquarters Institut Straumann AG Peter Merian-Weg 12 CH-4002 Basel, Switzerland Phone+41 (0)61 965 11 11 Fax +41 (0)61 965 11 01