1
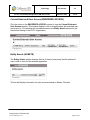
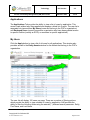
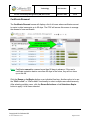
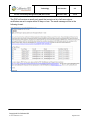
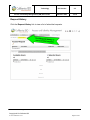
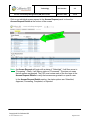
Access and Identity Management (AIM) User Guide Document Owner: Radha Madrigal Owner: Radha Madrigal Business Solutions Copyright 2013 California ISO Doc ID: 6DJSCMM56APN-32-160 Page 1 of 42 Technology Access and Identity Management (AIM) User Guide ISO Version: 2.3 Effective Date: 7/1/14 REVISION HISTORY VERSION NO. DATE REVISED BY DESCRIPTION 1.0 1.1 1.2 1.3 1.4 2.0 2.1 7/16/13 8/29/13 9/9/13 9/17/13 10/9/13 12/23/13 3/5/14 RMadrigal RMadrigal RMadrigal RMadrigal RMadrigal RMadrigal RMadrigal 2.2 7/1/14 RMadrigal 2.3 7/25/14 RMadrigal Initial document created Supplemental edits Supplemental edits Updated screenshots Final edits Added release 2 functionality Added list of auto-provisioned applications. Added notes regarding certificate creation and renewal. Added note regarding requests for endorsed users. Updated with ACL functionality, weekly expiry email. Updated with new Create ACL Group button (Must match header) Owner: Radha Madrigal Business Solutions Copyright 2013 California ISO Doc ID: 6DJSCMM56APN-32-160 Page 2 of 42 Technology Access and Identity Management (AIM) User Guide ISO Version: 2.3 Effective Date: 7/1/14 TABLE OF CONTENTS Introduction ..................................................................................................................... 5 Auto-provisioned Applications ......................................................................................... 5 Data Accuracy ................................................................................................................. 5 Review of AIM Screens ................................................................................................... 6 POC Profile .................................................................................................................. 6 Users ........................................................................................................................... 9 Create New User ......................................................................................................... 9 My Users ................................................................................................................... 10 User Profile (PROFILE) ............................................................................................. 12 Current User Access (ACCESS) ............................................................................... 13 Entity Assets (ASSETS) ............................................................................................ 14 Endorsed Users ......................................................................................................... 14 Current Endorsed User Access (ENDORSED ACCESS) .......................................... 15 Entity Assets (ASSETS) ............................................................................................ 15 Applications ............................................................................................................... 16 My Users ................................................................................................................... 16 Entity Assets (ASSETS) ............................................................................................ 17 Endorsed Users ......................................................................................................... 18 Entity Assets (ASSETS) ............................................................................................ 18 Certificate Renewal.................................................................................................... 19 ACL Groups ............................................................................................................... 21 New ACL Group......................................................................................................... 21 Add Assets to an ACL Group ..................................................................................... 22 Remove Assets from an ACL Group.......................................................................... 23 View ACL Group ........................................................................................................ 24 Edit ACL Group.......................................................................................................... 24 Access Request ......................................................................................................... 26 New Request ............................................................................................................. 26 Request History ......................................................................................................... 31 Owner: Radha Madrigal Business Solutions Copyright 2013 California ISO Doc ID: 6DJSCMM56APN-32-160 Page 3 of 42 Technology Access and Identity Management (AIM) User Guide ISO Version: 2.3 Effective Date: 7/1/14 Step-by-Step Overview of AIM Functionality ................................................................. 33 Add a New User......................................................................................................... 33 Submit an Access Request ........................................................................................ 33 Check Status of an Access Request.......................................................................... 34 Revoke a Certificate .................................................................................................. 34 Renew a Certificate ................................................................................................... 35 Let a Certificate Expire .............................................................................................. 35 Add ACL Group ......................................................................................................... 36 Add/Remove Assets from an ACL Group .................................................................. 36 Edit ACL Group.......................................................................................................... 36 Features of User Interface ............................................................................................. 37 Application Toolbar .................................................................................................... 37 Filter Toolbar – User Access Tab .............................................................................. 37 Filter Toolbar – Applications Tab ............................................................................... 38 Results Window ......................................................................................................... 38 Results Window – Multiple Pages.............................................................................. 38 Multiple Column Sorting ............................................................................................. 39 Export Menu .............................................................................................................. 40 Export Wizard ............................................................................................................ 40 Print Menu ................................................................................................................. 41 Print Wizard ............................................................................................................... 41 Owner: Radha Madrigal Business Solutions Copyright 2013 California ISO Doc ID: 6DJSCMM56APN-32-160 Page 4 of 42 Technology Access and Identity Management (AIM) User Guide ISO Version: 2.3 Effective Date: 7/1/14 Introduction The Access and Identity Management (AIM) application has been developed to improve the process for requesting, obtaining, updating and maintaining user access to ISO applications. The ISO maintains approximately 4,000 secured customer accounts granting access to roughly two dozen ISO applications. Each customer has designated one or more individuals within their organization to act as the point of contact (POC), authorized to initiate and maintain access to ISO applications. To view a list of DRS or OMAR users, contact your client representative or send an email to [email protected]. The AIM application provides registered POCs with the ability to view application-level access for all of their organization’s users as well as any users from other organizations who have access to their resources (endorsed users). Additionally, the AIM application will allow the registered POC to view the expiration date of their users’ certificates and automatically request a renewal from within the application. If you are not a registered AIM POC, please submit a request to [email protected] to be placed in the queue to obtain access as AIM will be the only method to renew your users’ certificates going forward. Auto-provisioned Applications The following applications can be auto-provisioned from within AIM: SIBR, CMRI, MRI-S, MFRD, RAAM, CIDI, MPP, CRTMGT, and RIMS GEN. Access changes will continue to be submitted via the AARF form through CIDI for the applications that are not automated in AIM, and for endorsed users. Data Accuracy The data displayed in AIM represents actual end user access to ISO systems. This information is updated twice per day, by approximately 9:00am and 9:00pm. Customer POCs are responsible for validating the accuracy of the information presented and following the appropriate process for modifying end user access. Please email [email protected] with any questions. Owner: Radha Madrigal Business Solutions Copyright 2013 California ISO Doc ID: 6DJSCMM56APN-32-160 Page 5 of 42 Technology Access and Identity Management (AIM) User Guide ISO Version: 2.3 Effective Date: 7/1/14 Review of AIM Screens POC Profile The POC Profile Tab displays contact information for an individual POC. Owner: Radha Madrigal Business Solutions Copyright 2013 California ISO Doc ID: 6DJSCMM56APN-32-160 Page 6 of 42 Technology Access and Identity Management (AIM) User Guide ISO Version: 2.3 Effective Date: 7/1/14 POC Status (read/write) POC ID: This is an internal reference number within AIM Account No: This is an internal reference number within AIM Primary POC: This indicates whether or not the POC is listed as the primary contact for the organization. There is no functional differentiation between the primary and secondary POC(s) within AIM. Weekly Expiry Email: Click the pencil icon to change this field to No in order to opt-out of the weekly certificate expiry email messages. Start Date: The date the individual became an AIM registered POC. End Date: This is the projected end date of the POC term. This will typically be an arbitrary date far into the future. Contact Information (read/write) The Contact Information section contains the personal contact information for the POC. Click on the pencil icon to update email, phone number, or address information. The First Name, Last Name, and Organization fields cannot be changed by the POC. If these items need to be updated, contact your client representative or send an e-mail to [email protected]. Organization (read/write) The address listed in the Organization section is for the home office of the organization. This may be a different address than what is listed for the POC Contact Info. Click on the pencil icon to update the organization’s address. The Name cannot be changed by the POC as this is the organization’s legal name. If the organization name needs to be updated, contact your client representative or send an e-mail to [email protected]. Authorized Contracts (read only) The Authorized Contracts section displays a list of the contract types that are associated with the POC. Owner: Radha Madrigal Business Solutions Copyright 2013 California ISO Doc ID: 6DJSCMM56APN-32-160 Page 7 of 42 Technology Access and Identity Management (AIM) User Guide ISO Version: 2.3 Effective Date: 7/1/14 Associated Applications (read only) The Associated Applications section displays a list of the ISO applications that the POC is authorized to provision access to, based on contract types. Authorized Entity (read only) The Authorized Entity section displays a list of the organization’s entities that are associated with the POC. Authorized ACL Group (read only) The Authorized ACL Group section displays a list of the Access Control List (ACL) groups that isolate and grant access to a single asset (or group of assets). Owner: Radha Madrigal Business Solutions Copyright 2013 California ISO Doc ID: 6DJSCMM56APN-32-160 Page 8 of 42 Technology Access and Identity Management (AIM) User Guide ISO Version: 2.3 Effective Date: 7/1/14 Users The Users Tab provides the ability to view a list of users. This is also the screen that the POC will access in order to create a new user. The user list is separated into two sections: My Users (users who belong to the POC’s organization) and Endorsed Users (users from another organization who have been granted access to specific Entities (usually an SCID) or resources in specific applications). Create New User Click the Create New User button to add a new user to the organization. Enter the user’s name and address information and click the Submit button. Note: The user must be created before an access request can be submitted. A new user will have a status of “New” until a certificate is posted for the user; at which time, the status will change to “Active”. Note: After a new user is created, the POC will receive an email regarding the certificate that has been created for the new user. The POC has the option to forward this email to the user, or register for the certificate directly and then install it on the user’s machine. Owner: Radha Madrigal Business Solutions Copyright 2013 California ISO Doc ID: 6DJSCMM56APN-32-160 Page 9 of 42 Technology Access and Identity Management (AIM) User Guide ISO Version: 2.3 Effective Date: 7/1/14 My Users The user list will display 100 users per page. There are a number of filtering options which provide the ability to view a subset of users. AIM provides the ability to filter the following fields using the asterisk (*) wildcard search parameter: User ID, First Name, Last Name, and Email. AIM also provides the ability to filter by Certificate Expiration (e.g., all certificates expiring in less than 60 days), Status (Active/Inactive), and Account Type (External/External System). An External account type is a human user, while an External System account type is an integration certificate or machine certificate. Some columns in the user list are hidden by default. Click on the hidden column. icon to view a Note: Columns in ALL CAPS contain clickable fields that will display a pop up window containing additional information. (See the following screenshot). Owner: Radha Madrigal Business Solutions Copyright 2013 California ISO Doc ID: 6DJSCMM56APN-32-160 Page 10 of 42 Technology Access and Identity Management (AIM) User Guide ISO Version: 2.3 Effective Date: 7/1/14 Note: You may see California ISO test user accounts with the name structure of “AIM Tester#” and “AIM Tester#x#” listed as endorsed users with access to your resources. These are internal CAISO Quality Assurance certificates and are used for internal testing purposes. During periods of ISO testing, these users may be listed as belonging to your organization. PLEASE DO NOT EDIT OR DELETE THESE USERS as they are critical to the ISO’s internal testing of the AIM application. When the test cycle is complete, these users will no longer appear as belonging to your organization. Owner: Radha Madrigal Business Solutions Copyright 2013 California ISO Doc ID: 6DJSCMM56APN-32-160 Page 11 of 42 Technology Access and Identity Management (AIM) User Guide ISO Version: 2.3 Effective Date: 7/1/14 User Profile (PROFILE) The User Profile window contains the personal contact and certificate information for the selected user. This is the screen that the POC will access in order to revoke all access from a specific user. Click on the pencil icon to update email, phone number, or address information for the user. The First Name, Last Name, and Organization fields cannot be changed by the POC. If these items need to be updated, contact your client representative or send an e-mail to [email protected]. Note: The email address is particularly important as this is the email address that will be used when the user’s certificate needs to be renewed. If an email address is changed in the user profile, this change will not be reflected in other portions of AIM until the data is updated during the next data sync period (usually within 12 – 24 hours). The User Certificates panel displays the user’s certificate history. The active certificate is at the top of the list. There may also be additional inactive certificates shown from previous years. Owner: Radha Madrigal Business Solutions Copyright 2013 California ISO Doc ID: 6DJSCMM56APN-32-160 Page 12 of 42 Technology Access and Identity Management (AIM) User Guide ISO Version: 2.3 Effective Date: 7/1/14 Current User Access (ACCESS) The Current User Access window displays a list of all applications and Entities the selected user has access to. This window also provides access to the Entity Assets window for the Assets that belong to the POC’s organization. The access list will display 25 rows per page. Note: If the user has been endorsed by another organization, the Entity for that organization (usually an SCID) will be included on this list. Owner: Radha Madrigal Business Solutions Copyright 2013 California ISO Doc ID: 6DJSCMM56APN-32-160 Page 13 of 42 Technology Access and Identity Management (AIM) User Guide ISO Version: 2.3 Effective Date: 7/1/14 Entity Assets (ASSETS) The Entity Assets window displays the list of Assets (resources) that the selected user is able to view for the selected application. This list will display information for each resource based on Master File data. Endorsed Users Click the Endorsed Users Tab to view the list of endorsed users. The user list will display 100 users per page. There are a number of filtering options which provide the ability to view a subset of users. AIM provides the ability to filter the following fields using the asterisk (*) wildcard search parameter: User ID, First Name, Last Name, and Email. AIM also provides the ability to filter by Certificate Expiration (e.g., all certificates expiring in less than 60 days), Status (Active/Inactive), and Account Type (External/External System). An External account type is a human user, while an External System account type is an integration certificate or machine certificate. It is important to always use the asterisk (*) at the end of each search to ensure that you retrieve all current access for that user. Owner: Radha Madrigal Business Solutions Copyright 2013 California ISO Doc ID: 6DJSCMM56APN-32-160 Page 14 of 42 Technology Access and Identity Management (AIM) User Guide ISO Version: 2.3 Effective Date: 7/1/14 Current Endorsed User Access (ENDORSED ACCESS) Click the button in the ENDORSED ACCESS column to view the Current Endorsed User Access window. This window displays a list of all applications the endorsed user has access to. This window also provides access to the Entity Assets window for the Assets that belong to the POC’s organization. Entity Assets (ASSETS) The Entity Assets window displays the list of Assets (resources) that the endorsed user is able to view for the selected application. This list will display information for each resource based on Master File data. Owner: Radha Madrigal Business Solutions Copyright 2013 California ISO Doc ID: 6DJSCMM56APN-32-160 Page 15 of 42 Technology Access and Identity Management (AIM) User Guide ISO Version: 2.3 Effective Date: 7/1/14 Applications The Applications Tab provides the ability to view a list of users by application. This screen loads without any filters applied and displays a blank list of users. The user list is separated into two sections: My Users (users who belong to the POC’s organization) and Endorsed Users (users from another organization who have been granted access to specific Entities (usually an SCID) or resources in specific applications). My Users Click the Apply button to view a list of all users for all applications. This window also provides access to the Entity Assets window for the Assets that belong to the POC’s organization. The user list will display 100 users per page. There are a number of filtering options which provide the ability to view a subset of users by application. AIM provides the ability to filter the following fields using the asterisk (*) wildcard search parameter: Entity, First Name, and Last Name. Owner: Radha Madrigal Business Solutions Copyright 2013 California ISO Doc ID: 6DJSCMM56APN-32-160 Page 16 of 42 Technology Access and Identity Management (AIM) User Guide ISO Version: 2.3 Effective Date: 7/1/14 AIM also provides the ability to filter by Application, Certificate Expiration, Role, Environment, and Account Type. To identify which users have been endorsed by other organizations, click the icon in the column on the far left of the My Users window to show the Endorsed column. If a user has been given access to an Entity that belongs to another organization, you will see a check mark in the Endorsed Access column next to the line entry for that specific Entity (usually an SCID) for that application. Entity Assets (ASSETS) The Entity Assets window displays the list of Assets (resources) that the selected user is able to view for the selected application. This list will display information for each resource based on Master File data. Owner: Radha Madrigal Business Solutions Copyright 2013 California ISO Doc ID: 6DJSCMM56APN-32-160 Page 17 of 42 Technology Access and Identity Management (AIM) User Guide ISO Version: 2.3 Effective Date: 7/1/14 Endorsed Users Click the Endorsed Users Tab and click the Apply button to view a list of all endorsed users for all applications. This window also provides access to the Entity Assets window for the Assets that belong to the POC’s organization. The user list will display 100 users per page. There are a number of filtering options which provide the ability to view a subset of users by application. AIM provides the ability to filter the following fields using the asterisk (*) wildcard search parameter: Entity, First Name, and Last Name. AIM also provides the ability to filter by Application, Certificate Expiration, Role, Environment, and Account Type. Entity Assets (ASSETS) The Entity Assets window displays the list of Assets (resources) that the endorsed user is able to view for the selected application. This list will display information for each resource based on Master File data. Owner: Radha Madrigal Business Solutions Copyright 2013 California ISO Doc ID: 6DJSCMM56APN-32-160 Page 18 of 42 Technology Access and Identity Management (AIM) User Guide ISO Version: 2.3 Effective Date: 7/1/14 Certificate Renewal The Certificate Renewal screen will display a list of all users whose certificates are set to expire in date increments up to 90 days. The POC will access this screen to manage the renewal of user certificates. Note: Certificates cannot be renewed more than 90 days in advance. If the user’s certificate expiration date is more than 90 days in the future, they will not show up on this list. Click the Renew or Let Expire button on an individual line item. Another option is to use the “Shift + click” or “Ctrl + click” functionality to select multiple users simultaneously. After selecting multiple users, click the Renew Selections or Let Selections Expire button to apply it to all items selected. Owner: Radha Madrigal Business Solutions Copyright 2013 California ISO Doc ID: 6DJSCMM56APN-32-160 Page 19 of 42 Technology Access and Identity Management (AIM) User Guide ISO Version: 2.3 Effective Date: 7/1/14 The POC will receive an email each week that contains a list of all users whose certificates are set to expire within 90 days or less. The email message will be in the following format: Owner: Radha Madrigal Business Solutions Copyright 2013 California ISO Doc ID: 6DJSCMM56APN-32-160 Page 20 of 42 Technology Access and Identity Management (AIM) User Guide ISO Version: 2.3 Effective Date: 7/1/14 ACL Groups An Access Control List (ACL) defines the access rights each user has to particular assets. The ACL Groups screen provides the POC with the ability to create new ACL groups to isolate and grant access to a single asset (or group of assets). New ACL Group Click the Create ACL Group button to create an ACL group. Select the Entity Name, Environment, and enter a Description for the ACL group. Select a Start Date and an End Date for the ACL group and click the Submit button. Owner: Radha Madrigal Business Solutions Copyright 2013 California ISO Doc ID: 6DJSCMM56APN-32-160 Page 21 of 42 Technology Access and Identity Management (AIM) User Guide ISO Version: 2.3 Effective Date: 7/1/14 Add Assets to an ACL Group Click the Edit button to add assets to the ACL group. Note: The Group Name entry is automatically generated by AIM when the ACL group is created. Select an asset from the Available Assets list and click the Add button to add an asset to the ACL group. Note: The asset is automatically added to the group once the Add button is clicked. Simply close the window when all assets have been added. Owner: Radha Madrigal Business Solutions Copyright 2013 California ISO Doc ID: 6DJSCMM56APN-32-160 Page 22 of 42 Technology Access and Identity Management (AIM) User Guide ISO Version: 2.3 Effective Date: 7/1/14 Remove Assets from an ACL Group Click the Edit button to remove assets from the ACL group. Select an asset from the Assets list and click the Remove button to remove it from the ACL group. Note: The asset is automatically removed from the group once the Remove button is clicked. Simply close the window when all assets have been removed. Owner: Radha Madrigal Business Solutions Copyright 2013 California ISO Doc ID: 6DJSCMM56APN-32-160 Page 23 of 42 Technology Access and Identity Management (AIM) User Guide ISO Version: 2.3 Effective Date: 7/1/14 View ACL Group Click on an entry in the ACL Groups section to view the list of asset(s) associated with that group. Edit ACL Group Click on an entry in the ACL Groups section to edit the group. Click on the pencil icon to change the Description of the ACL Group or adjust the Start Date/End Date. Click the Update button when finished. Owner: Radha Madrigal Business Solutions Copyright 2013 California ISO Doc ID: 6DJSCMM56APN-32-160 Page 24 of 42 Technology Access and Identity Management (AIM) User Guide ISO Version: 2.3 Effective Date: 7/1/14 Note: An ACL Group cannot be deleted once it is created. If the ACL Group is no longer valid, the POC should adjust the End Date of the group. The Status of the ACL Group will be set to Inactive once the date has expired. Owner: Radha Madrigal Business Solutions Copyright 2013 California ISO Doc ID: 6DJSCMM56APN-32-160 Page 25 of 42 Technology Access and Identity Management (AIM) User Guide ISO Version: 2.3 Effective Date: 7/1/14 Access Request The POC will use the Access Request screen to submit new application access requests as well as view the status of submitted requests. New Request Click the pencil icon and then the New Row button to create an access request. Owner: Radha Madrigal Business Solutions Copyright 2013 California ISO Doc ID: 6DJSCMM56APN-32-160 Page 26 of 42 Technology Access and Identity Management (AIM) User Guide ISO Version: 2.3 Effective Date: 7/1/14 Enter a Description for the access request and click the Update button. Select an individual user or use the “Shift + click” or “Ctrl + click” functionality to select multiple users and click the Add button. Or, click the Add All button to add all users to the request. Owner: Radha Madrigal Business Solutions Copyright 2013 California ISO Doc ID: 6DJSCMM56APN-32-160 Page 27 of 42 Technology Access and Identity Management (AIM) User Guide ISO Version: 2.3 Effective Date: 7/1/14 Select one or more applications and roles and add them to the access request. Note: Requests to grant or remove access for an endorsed user are handled through CIDI and the AARF process. Newly-provisioned access for endorsed users will be visible within AIM after the next data sync period. Owner: Radha Madrigal Business Solutions Copyright 2013 California ISO Doc ID: 6DJSCMM56APN-32-160 Page 28 of 42 Technology Access and Identity Management (AIM) User Guide ISO Version: 2.3 Effective Date: 7/1/14 The Copy Current User Access tab allows the POC to view an existing user’s access and select one or more applications and roles from that access to add to the request. Click the Preview button to review the access request. Owner: Radha Madrigal Business Solutions Copyright 2013 California ISO Doc ID: 6DJSCMM56APN-32-160 Page 29 of 42 Technology Access and Identity Management (AIM) User Guide ISO Version: 2.3 Effective Date: 7/1/14 After reviewing the request, click the Submit button to complete the request. Owner: Radha Madrigal Business Solutions Copyright 2013 California ISO Doc ID: 6DJSCMM56APN-32-160 Page 30 of 42 Technology Access and Identity Management (AIM) User Guide ISO Version: 2.3 Effective Date: 7/1/14 Request History Click the Request History link to view a list of submitted requests. Owner: Radha Madrigal Business Solutions Copyright 2013 California ISO Doc ID: 6DJSCMM56APN-32-160 Page 31 of 42 Technology Access and Identity Management (AIM) User Guide ISO Version: 2.3 Effective Date: 7/1/14 Click on an individual access request in the Access Request panel to show the Access Request Details at the bottom of the screen. Note: An Access Request will begin with a status of “Submitted”. It will then move to “Processing”. Finally, it will have a status of “Processed”. This does not mean that all access was granted. The POC must review each of the line items in the Access Request Details to verify that access was granted to a specific user. In the Access Request Details section, the status options are: Submitted, Approved, Processing, Completed, or Rejected. Owner: Radha Madrigal Business Solutions Copyright 2013 California ISO Doc ID: 6DJSCMM56APN-32-160 Page 32 of 42 Technology Access and Identity Management (AIM) User Guide ISO Version: 2.3 Effective Date: 7/1/14 Step-by-Step Overview of AIM Functionality Add a New User 1. To add a new user, navigate to the Users tab and click the Create New User Button. 2. Enter the user’s first name, last name, email address, and address information. 3. Select an account type of Externals for an individual person or Externals_System for system accounts. 4. Click Submit. Submit an Access Request 1. 2. 3. 4. 5. Navigate to the Access Request tab. Click the pencil icon to add a new request. Click the New Row button. Type a description for the request and click the Update button. From the Select Users tab, choose the names from the list of Available Users. (Note: Use “Ctrl + click” or “Shift + click” to select multiple names). 6. Click on the Select Applications and Roles Tab. 7. Click on the desired application and role and click the Add button. (Note: Use “Ctrl + click” or “Shift + click” to select multiple applications). 8. (Optional) To remove access, click on the drop-down button in the Action column to change the selection from ADD to REMOVE. 9. (Optional – Copy Current User Access tab). a. To view the access of a specific user in order to grant the same access to a new user, click the Copy Current User Access tab. b. Click a name in the Current Users panel to view that user’s access in the Current User Access panel. c. Click on the desired application/role/environment and click the Add button. (Note: Use “Ctrl + click” or “Shift + click” to select multiple application/role/environment options). 10. After all users, applications, roles, and environments are selected, click the Preview button in the Access Request panel. 11. Review the request to ensure that it is accurate. 12. Click the Submit button in the Access Request Preview window to submit the request. (Note: If changes need to be made, close the preview window and edit the request as needed. Click the Preview button again, then click the Submit button.) Owner: Radha Madrigal Business Solutions Copyright 2013 California ISO Doc ID: 6DJSCMM56APN-32-160 Page 33 of 42 Technology Access and Identity Management (AIM) User Guide ISO Version: 2.3 Effective Date: 7/1/14 Check Status of an Access Request 1. To check the status of an access request, navigate to the Access Request tab and click on the Request History link. 2. Click on an individual line item in the Access Request panel. 3. The list of items requested will display in the Access Request Details panel. 4. Review the Status column for each line item to verify that the requested access was granted. a. Submitted: The access request has been submitted and is waiting for the approval process to run. b. Approved: The access request has been approved and is waiting to be processed. c. Processing: The access request is being processed. d. Completed: The access request has been completed and the user can now access the application. e. Rejected: The access request has been rejected and will not be processed. See the notes column for the reason it was rejected. Revoke a Certificate To revoke a user’s certificate, navigate to the User tab. Find the correct user and click on the button in the Profile column. From the User Profile screen, click the Revoke User button. A confirmation message will appear that states: “Are you sure you want to revoke the user certificate and remove all application access for this user? This action cannot be undone.” 5. Click OK to revoke the user’s certificate. 6. Once the OK button is clicked, the certificate will be revoked and all application access will be removed. This change will be reflected in AIM after the next data sync period (usually within 12 – 24 hours). 1. 2. 3. 4. Note: If a user’s certificate is revoked by mistake, the POC must create a new user and reprovision all access for that user as there is no undo functionality for this action in AIM. Owner: Radha Madrigal Business Solutions Copyright 2013 California ISO Doc ID: 6DJSCMM56APN-32-160 Page 34 of 42 Technology Access and Identity Management (AIM) User Guide ISO Version: 2.3 Effective Date: 7/1/14 Renew a Certificate 1. To renew a certificate, navigate to the Certificate Renewal tab. 2. The Certificate Renewal tab will display the My Users With Expiring Certificates list. This list will show all users whose certificates are expiring within 90 days or less. (Note: If the certificate expiration date is further into the future, the user will not appear on this list.) 3. Click the Renew button on an individual line item. Another option is to use the “Shift + click” or “Ctrl + click” functionality to select multiple users simultaneously. After selecting multiple users, click the Renew Selections button to apply it to all items selected. Let a Certificate Expire 1. To let a certificate expire, navigate to the Certificate Renewal tab. 2. The Certificate Renewal tab will display the My Users With Expiring Certificates list. This list will show all users whose certificates are expiring within 90 days or less. (Note: If the certificate expiration date is further into the future, the user will not appear on this list.) 3. Click the Let Expire button on an individual line item. Another option is to use the “Shift + click” or “Ctrl + click” functionality to select multiple users simultaneously. After selecting multiple users, click the Let Selections Expire button to apply it to all items selected. Owner: Radha Madrigal Business Solutions Copyright 2013 California ISO Doc ID: 6DJSCMM56APN-32-160 Page 35 of 42 Technology Access and Identity Management (AIM) User Guide ISO Version: 2.3 Effective Date: 7/1/14 Add ACL Group 1. 2. 3. 4. To add an ACL group, navigate to the ACL Groups tab. Click the Create ACL Group button to add a new group. Select the Entity Name, Environment, and enter a Description. Select a Start Date and an End Date and click the Submit button. Add/Remove Assets from an ACL Group 1. To add or remove an asset from an ACL Group, navigate to the ACL Groups tab. 2. Click the Edit button next to the ACL group. 3. Select an asset from the Available Assets list and click the Add button to add an asset to the ACL group. 4. Or, select an asset from the Assets list and click the Remove button to remove it from the ACL group. Note: The asset is automatically added to or removed from the group once the Add/Remove button is clicked. Simply close the window when the update is complete. Edit ACL Group 1. To edit an ACL group, navigate to the ACL Groups tab. 2. Click on an entry in the ACL Groups section to edit the group. 3. Click on the pencil icon to change the Description of the ACL Group or adjust the Start Date/End Date. 4. Click the Update button when finished. Note: An ACL Group cannot be deleted once it is created. If the ACL Group is no longer valid, the POC should adjust the End Date of the group. The Status of the ACL Group will be set to Inactive once the date has expired. Owner: Radha Madrigal Business Solutions Copyright 2013 California ISO Doc ID: 6DJSCMM56APN-32-160 Page 36 of 42 Technology Access and Identity Management (AIM) User Guide ISO Version: 2.3 Effective Date: 7/1/14 Features of User Interface Application Toolbar The application toolbar contains the application or browser-based functions. Goes to the previous display in browsing history Goes to the next display in browsing history Stops loading the current display Refreshes the display in the current window Zoom out Zoom in Log out Filter Toolbar – User Access Tab The filter toolbar contains the account filtering options. Refreshes user data with the filters Restores filters to default settings * wildcard search Use the asterisk (*) wildcard symbol to search for user information. (e.g. Enter Chris* in the First Name field and click the Apply button to display a list of users whose first names begin with “Chris”. The search results will display users who are named Chris, Christopher, Christine, etc.) To ensure that you see all records meeting your search criteria add the “*” at the end to display multiple records. Owner: Radha Madrigal Business Solutions Copyright 2013 California ISO Doc ID: 6DJSCMM56APN-32-160 Page 37 of 42 Technology Access and Identity Management (AIM) User Guide ISO Version: 2.3 Effective Date: 7/1/14 Filter Toolbar – Applications Tab The filter toolbar contains the account filtering options. Refreshes application data with the filters Restores filters to default settings * wildcard search Use the asterisk (*) wildcard symbol to search for application information. (e.g. Enter CISO* in the Entity field and click the Apply button to display a list of applications and users for all SCID’s that begin with “CISO”. The search results will display results for CISO, CISO1, CISO2, etc.) Results Window Restore sort to default setting (removes user-created multiple column sorting, which is described in detail on the following page) The Inline Filter works as a toggle. Click the icon to filter data based on the content of a particular column. Press Enter after entering the filter criteria. (Note: Wildcard symbols can be used in this column, but they are not necessary. For example, searching for *POC* or POC will provide the same results.) Exporting (to Excel, Word, CSV) Printing. (Note: The Print Menu is accessible from the Current User Access, Current Endorsed User Access, and Entity Assets pages.) Results Window – Multiple Pages Navigate to the first page of data Navigate to the previous page of data Navigate to the next page of data Navigate to the last page of data Go to specific line item entered in search box Owner: Radha Madrigal Business Solutions Copyright 2013 California ISO Doc ID: 6DJSCMM56APN-32-160 Page 38 of 42 Technology Access and Identity Management (AIM) User Guide ISO Version: 2.3 Effective Date: 7/1/14 Multiple Column Sorting Clicking on a column in the results window enables the user to sort the data in ascending or descending order. Here is an example of how to use multiple sorting: Click a column header. The data is sorted in ascending order and the following icon appears in the column header: . This indicates the first level sorting. Click another column. The data is sorted in ascending order. The icon in the first column changes to: . The following icon appears in the second column: . This indicates the second level sorting. Click another column. The data is sorted in ascending order and the following icon appears in the column header: . Click the same column again. The data is sorted in descending order. The icon in the column header is changed to: . Continue to click column headers to deselect and then reprioritize the sorting order. The following image shows the example explained above: Owner: Radha Madrigal Business Solutions Copyright 2013 California ISO Doc ID: 6DJSCMM56APN-32-160 Page 39 of 42 Technology Access and Identity Management (AIM) User Guide ISO Version: 2.3 Effective Date: 7/1/14 Export Menu Export All Export Page Export Wizard All data points will be exported to Excel The current page will be exported to Excel The user can customize the data export Export Wizard The Export Wizard enables the user to export data in the following three file types: Export Excel Export CSV Export Word The Export Wizard can be customized using the following options: Enable Grid Export: If a display contains multiple grids, the user can select specific grids to export. (Note that the CSV format can only export one grid). Display Name: The user can modify the name of a column that will appear in the data export. Enable/Disable Column Visibility: The user can select which columns to include in the exported file. Custom Column Width: The user can choose to modify the width of a specific column Rows to Export: All Rows, or the Original Page Once the user has selected the export parameters, click the Export button to generate a file. Owner: Radha Madrigal Business Solutions Copyright 2013 California ISO Doc ID: 6DJSCMM56APN-32-160 Page 40 of 42 Technology Access and Identity Management (AIM) User Guide ISO Version: 2.3 Effective Date: 7/1/14 Note: The maximum number of rows that can be exported is 10,000. If the number of rows available exceeds 10,000, only the first 10,000 rows will be exported. It is recommended to use filters to limit the number of results that are displayed in order to export all rows. Print Menu The Print Menu is accessible from the Current User Access, Current Endorsed User Access, and Entity Assets pages. Print All Print Page Print Wizard All data will be printed Only the data shown on the current page will be printed The user can customize the data that is printed Print Wizard The Print Wizard provides the option to print in the following four combinations of page size and orientation: A4 / Letter Portrait A4 / Letter Landscape 11”x17” Portrait 11”x17” Landscape Note: The option for portrait or landscape must also be set in the standard printer selection window. Owner: Radha Madrigal Business Solutions Copyright 2013 California ISO Doc ID: 6DJSCMM56APN-32-160 Page 41 of 42 Technology Access and Identity Management (AIM) User Guide ISO Version: 2.3 Effective Date: 7/1/14 The Print Wizard can be customized using the following options: Enable Grid Print: If a display contains multiple grids, the user can select specific grids to export. Display Name: The user can modify the name of a column that will appear on the printed document. Column Visibility: The user can select which columns to include on the printed document. Enable Wrapping: The user can choose to enable or diable text wrapping for a column. Custom Column Width: The user can choose to modify the width of a specific column. Rows to Print: The user can choose to print All Rows, or just the Original Page. After the user has selected the print parameters, click the Print button. AIM will generate a print preview, as shown below. Note: The column names do not appear in the print preview window. However, the column names will appear on the hard copy of the document. After reviewing the print preview, click the Print button and the standard print window will display. Choose a printer from the list and modify the printing preferences as appropriate (e.g. portrait or landscape) and print the document. Owner: Radha Madrigal Business Solutions Copyright 2013 California ISO Doc ID: 6DJSCMM56APN-32-160 Page 42 of 42