1
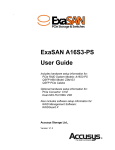
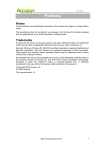
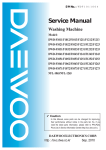
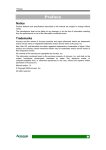
SANit Package Installation User’s Manual SANit: SAN management software installation For SANit v5.3.3 only Nov. 2013, Version 1.0.4 PREFACE Notice The product features and specifications described in this guide are subject to change without notice. The manufacturer shall not be liable for any damage, or the loss of information resulting from the performance or use of the information contained herein. About This Manual Congratulations on your purchase of the SANit (pronounced SAN-it) Compact, a breakthrough turn-key SAN management software solution, specifically designed for small-to-medium-sized Accusys SANit collaborative workgroups. It delivers shared data access, exceptional performance, and scalable capacity at a very affordable ownership cost and only requires a low maintenance budget. This guide contains instructions for installing and using the ExaSAN storage and switch, as well as an introduction to SANit and ExaSAN technologies. If you are new to SANit and ExaSAN, this guide will help you to become familiar with these technologies, and the best ways you can use them to your advantages. If you are already familiar with these technologies, use this guide as a reference for implementing your ExaSAN Compact Solution to achieve maximum performance and reliability. Trademarks Accusys and the names of Accusys products (ExaSAN, SANit, etc…) and logos referenced herein are trademarks and/or service marks or registered trademarks and/or service marks of Accusys, Inc. Linux, CentOS, Windows and Mac are either registered trademarks or trademarks of their respective owners. All contents of this manual are copyrighted by Accusys, Inc. The information contained herein is the exclusive property of Accusys, Inc. and shall not be copied, transferred, photocopied, translated on paper, film, electronic media, or computer-readable form, or otherwise reproduced in any way, without the express written permission of Accusys Inc. Document version 1.0.1 Date Published: July, 2012 © Copyright 2012 Accusys, Inc. All Rights Reserved. ~2~ Table of Contents Release History .................................................................................................................... 5 1. SANit Introduction ......................................................................................................... 6 1.1 SANit Highlights...................................................................................................................... 7 1.2 Device Power-on Sequence .............................................................................................. 8 1.3 What’s in the SANit package? ........................................................................................... 9 2. MDC Server Setup ....................................................................................................... 11 2.1 Is this the right section for you? ........................................................................................ 13 2.2 Terminology ......................................................................................................................... 13 2.3 Hardware Checklist ............................................................................................................ 13 2.4 MDC Setup Procedures ..................................................................................................... 14 2.4.1 MDC Hardware Installation .................................................................................... 14 2.4.1.1 InneRAID® Slim SATA Details and Installation ............................................ 14 2.4.1.2 QSFP HBA Card Installation .......................................................................... 17 2.4.2 MDC Software Installation ...................................................................................... 19 2.4.2.1 CentOS Installation ........................................................................................ 20 2.4.2.2 Install the QSFP HBA Card Driver in CentOS 5.3 ........................................ 27 2.4.2.3 Install SANit FS ................................................................................................. 29 3. SANit Setup (MDC Side) ............................................................................................... 30 3.1 Equipment Checklist .......................................................................................................... 30 3.2 SANit Setup Procedures ..................................................................................................... 31 Active SANit ................................................................................................................ 32 3.2.1 Import License .......................................................................................................... 33 3.2.1.1 Trial Version of SANit ...................................................................................... 33 3.2.1.2 Official Licensed Version of SANit ............................................................... 36 3.2.2 SAN Volume Creation (Quick Wizard) .................................................................. 39 3.2.3 Delete SAN Volume (Quick Wizard) ...................................................................... 39 3.2.4 Add SAN Client IP on SANit (MDC Side) ............................................................... 41 4 Add Clients (Client Side) ............................................................................................... 42 4.1 Supported Operating Systems and Platforms in Client ................................................ 43 4.2 Windows Clients .................................................................................................................. 44 4.2.1 Install SANit Client on Windows Platform .............................................................. 44 4.2.2 Configure SANit Client on Windows Platform ...................................................... 47 4.3 MAC Client .......................................................................................................................... 49 4.3.1 Install SANit Client on Mac Platform ...................................................................... 49 4.3.2 Configure SANit Client on a MAC Platform ......................................................... 53 4.4 Linux Clients ......................................................................................................................... 59 4.4.1 Install and Configure SANit Linux Client Software ............................................... 61 5. Maintenance ................................................................................................................. 62 5.1 System Status ....................................................................................................................... 62 5.2 System Logs ......................................................................................................................... 62 5.3 File Management Configuration ..................................................................................... 63 6. Customer Service and Support ................................................................................... 64 ~3~ 6.1 Contact Us ........................................................................................................................... 64 6.2 Our Website ......................................................................................................................... 64 ~4~ Release History Version No. Release Note V1.0 V1.0.1 First release Modify section 1.3 and 4.1 and add a drawing on page21(section 2.4.2.1) Add an important notice on section 3.2.4 to remind users. Modify /fsmnt/SANit to be /fsmnt/ExaSAN on page 61 Modify supported Mac OS on page 43. Add FSClient user name (root) and password (accusys) on page 48. V1.0.2 V1.0.3 V1.0.4 ~5~ 1. SANit Introduction In the past, users paid a very high price for the set up of a total multiple workstation SAN system for collaborative film editing operations. At the same time, compatibility issues resulting from obtaining components from different vendors and loss of valuable production time still needed to be overcome: Now, Accusys is launching its SANit Software full SAN solution, as the most complete answer to these major shared storage system issues. Originally utilized for single DAS workstations, users can simply purchase the ExaSAN Switch with SANit Software to upgrade to the perfect SAN working environment solution. Figure 1 ~6~ 1.1 SANit Highlights Includes mainstream SAN management software (StorNext, MetaSAN, XSAN…) functions Supports all cross-platform Linux, Windows, LINUX and Mac OSX operations. Block level access – SANit Block level to save data and has the virtualization feature that enhances user’s volume with more flexibility. Proprietary file system - SANit creates a file system that allows clients to have cross-platform access for more compatibility and performance. One button event-log download - Download an event log through the management page. Users can download all SANit event logs to shorten down times and allow your system to quickly return to peak performance. Configuration file save / restore – Users can save a SANit configuration file when they complete SANit installation. They can also restore the configuration file to SANit if the MDC server needs to go back to the original setting. Easy Setup The industry's first three steps to a complete SAN system setup in 20 minutes. Easy installation, maintenance, technical support all through a single window. Fitness for Video Applications On-Line Bandwidth adjustment Small SAN environment fits video applications (Up to 12 clients) Excellent Cost-Performance High speed transmission PCIe File System Sharing (Up to 20Gb/s bandwidth for a single client). Save on construction costs and improve efficiency. Optimized for HD video editing performance. ~7~ 1.2 Device Power-on Sequence Figure 2 ~8~ 1.3 What’s in the SANit package? When you open the SANit package, you should find the following: 1. SANit file system CD (includes MDC software, user manual, trial version license and MAC client software). 2. InneRAID Slim SATA (includes 2.5” 8GB SLC SSD x 2) 3. Key for opening the trays of the InneRAID slim SATA front panel. ~9~ 4. Screw pack 5. SATA cable (for ACS-75211 connecting) 6. Packing list ~ 10 ~ 2. MDC Server Setup System Installation Requirements Before continuing with SANit file system SAN management Software installation, there are system requirements that are necessary to prepare your existing system to accept the upgrade to SANit. Your existing MDC Server will need to have the CentOS operating system as well as the InneRAID Slim SATA (Model name: ACS75211) 2.5” disk drive mirror box installed: CentOS (Linux ) Operating System InneRAID Slim (Model name:ACS-75211) SATA 2.5" disk drive mirror box (for metadata of SANit) CentOS: CentOS operating system installation is required before SANit software installation can continue. Note that a SAN environment must include at least one MDC server that has CentOS installed CentOS utilizes a Linux driver; however, clients can use any OS, such as Windows, MAC, Linux, or others. See figure 3: Important: Only CentOS version 5.3(x86 64-bit), with 2.6.18-128.el5 OS kernel, can be used. Figure 3 Figure 3 is a SAN Environment example for up to 7 clients and at least 1 MDC server / client. ~ 11 ~ InneRAID Slim SATA (model name:ACS-75211): In addition, you will also need to be sure that the InneRAID Slim SATA disk interface (2.5" 8GB SLC SSD x 2) is installed in the workstation PC that is assigned as the MDC server. Important: A minimum of one CentOS MDC server is required. Other operating systems may be used by clients such as Windows, Mac, and Linux. Your SAN configuration may vary. Note: If you want to add more clients to the SAN environment, you can choose Switches such as the SW16-Q4 or SWF16-Q4, which have 16 ports for up to 12 clients and 4 ExaSAN storages. Please visit the Accusys web site http://www.accusys.com.tw or contact your ExaSAN supplier for more information. ~ 12 ~ 2.1 Is this the right section for you? You are a user of SANit. You are building a SAN environment and need SANit file system management to take maximum advantage of having all your server and client workstation PCs sharing and accessing a single, efficient, and expandable central storage system. 2.2 Terminology MDC (Metadata Controller): An MDC is a SAN server assigned as a metadata controller. If a SAN environment is just like a body, the MDC is the “brains” of the SAN system providing integration and data configuration. CentOS: The CentOS is a Linux server open source OS (operating system) and is required in the MDC server. Note: Confirm that CentOS version 5.3 has Kernel version 2.6.18-128.e15. ExaSAN: A family of ExaSAN storage systems, such as the 2U 12-bay A12S2-PS, based on PCI Express 2.0 technology, that fulfills all broadcast and post production film/video editing requirements. ExaSAN Switch: The ExaSAN switch is a complete 8 to 12 workstation SAN Switch solution, for example, the SW08-Q4 / SW16-Q4 that provides full scalability options and shared 8 / 12 workflows of up to 4 ExaSAN storage systems. ExaSAN Storage: A family of ExaSAN storage systems, such as the 2U 12-bay A12S2-PS, based on PCI Express 2.0 technology, that fulfills all broadcast and post production film/video editing requirements. QSFP HBA Card: A node card installed on the PC to transfer data between the ExaSAN switch and the PC. It requires the installation of a QSFP HBA Card driver to fit the O.S. of the PC. ExaSAN QSFP HBA Cards provide Windows, Linux and MAC drivers. 2.3 Hardware Checklist 1. CentOS version 5.3, with OS kernel 2.6.18-128.e15 installation CD/DVD/USB (CentOS is a free operating system. You can find it from the official CentOS web site, download it from its’ mirror web site or contact Accusys FAE directly.) 2. A Workstation PC (Recommended: HP Z210, Z400, Z800, or other server based PC.) with necessary devices such as keyboard, mouse, LCD panel… (If your PC is not in the recommended list, you should contact your system provider or Accusys FAE for assistance.) The PC “MUST” support the ACHI mode in its motherboard. For more information, please see section 2.4.2 “MDC Software Installation.” ~ 13 ~ 3. InneRAID Slim SATA (model name: ACS-75211) removable disk drive trays (for 2.5" 8GB SLC SSD x 2), which must be installed in the workstation PC assigned as an MDC server. 2.4 MDC Setup Procedures 2.4.1 MDC Hardware Installation The following two hardware installation sections will instruct you on how to install the InneRAID Slim SATA and how to install the QSFP HBA Card. 2.4.1.1 InneRAID® Slim SATA Details and Installation Front View Figure 4: Front view of the InneRAID Slim SATA Meanings of all LED light indicators are given in the table below, for example, a red light indicates failure of a hard disk drive: Table of LED Status Status indicator Access indicator Disk status Green Off Disk is properly installed Green On/flash (Yellow) Disk is being accessed Red Off No disk installed or disk failure Flash (Red/Green) On/flash (Yellow) Disk is rebuilding Note: A beeper will sound to indicate status. A slow beep indicates data rebuilding. A fast beeping sound will indicate an error or disk failure. See below: ~ 14 ~ Sound of beeping System Status Bi~~ bi—bi—bi—bi…and so on bi-bi-bi---bi-bi-bi… and so on System boot up and ready MetaData rebuilding One SSD has failed Rear view Figure 5: Rear view of the InneRAID Slim SATA 1. *SATA DC power input connector 2. SATA host connector 3. For Engineering purposes (not for users) 4. For Engineer debugging (not for users) 5. *Standard AT/ATX DC power input connector Warning: Only one power input must be used, either SATA DC power input” or “Standard AT/ATX DC power input.” The InneRAID® Slim SATA can be installed inside the external 3.5in drive bay at the front of your computer case. The steps below describe the installation procedure: Caution: Turn off and disconnect all electrical power from the system before beginning installation. 1. Remove the MDC server case. Note: You will install the InneRAID Slim SATA using the same method used to install a standard 3.5” disk drive. (Figure 6). 2. Feed the *power cable through the rear opening of the InneRAID unit. (Figure 4). *Warning: Only one power cable input must be used, either “SATA DC power input” or “Standard AT/ATX DC power input.” (Figure 6). 3. Feed the SATA cable through the rear opening of the InneRAID unit. See (Figure 4). 4. Connect the two cables to the connectors in the rear of the InneRAID® Slim SATA. ~ 15 ~ 5. Finally, Insert the InneRAID® Slim SATA into the MDC server bay, and secure it in place with the screws provided. (Figure 6). Important: Install the InneRAID Slim SATA device in the front disk drive bay of the computer so that the front LED status lights of the InneRAID Slim SATA can be easily seen. (Figure 6) Figure 6 ~ 16 ~ 2.4.1.2 QSFP HBA Card Installation Before the ExaSAN Compact Solution components are ready to be connected and powered on, you must install one QSFP HBA Card in each workgroup client system. The QSFP HBA Card is compatible with PCIe x4, x8, and x16 slots. If a choice is given, use the fastest PCIe slot available. Although the QSFP HBA CARD is compatible with both PCIe 1.1 and 2.0 standards, only PCIe 2.0 is recommended for best performance. Follow these steps to install the card in each client system: 1. Hold the HBA with mounting plate facing your left. Locate the “mode” jumper switch on the north edge at center-right, as shown and labeled below. Figure 7 2. This HBA card can be used both in DAS and SAN applications, whether or not the HBA card was just purchased or originally used in storage. In this case, the HBA card is used for connecting the Switch. Please confirm that the switch button is toward the “1” position, as shown below: Figure 8 3. Position the connector of the card over the slot, insert the connector into the slot by pressing gently but firmly until it is securely seated. 4. Secure the metal bracket of the card to the system case with the screws. 5. Replace the outer casing cover. ~ 17 ~ Figure 9 6. Install the HBA device driver. (Please refer to 2.5.2.2 install QSFP Card driver for more information.) ~ 18 ~ 2.4.2 MDC Software Installation The following three software installation sections will instruct you on how to install all the CentOS Operating System, SANit and the QSFP HBA Card driver. Important: Enable AHCI of SATA mode before you install CentOS for the purpose of enabling the InneRAID Slim to become MetaData volume. Important: Enable AHCI of SATA mode before you install CentOS for the purpose of enabling the InneRAID Slim to become MetaData volume. If you don’t enable AHCI mode, the InneRaid Slim SATA (model name: ACS-75211) may not be recognized by your SANit. ~ 19 ~ 2.4.2.1 CentOS Installation CentOS Operating System Installation in the MDC Server The CentOS 5.3 (x86 64-bit) operating system for the MDC server is designed for mass data high-performance storage solution SAN environments. CentOS (Community Enterprise Operating System) supports free and open source software based on Linux kernel RPM-based packages. Please follow the CentOS installation procedures given below: Note: Some VGA Cards do not support the graphics mode in Linux. If there is no support, then use the text mode (CentOS) will go to the text mode automatically). Step 1: Select “Next” to continue Step 2: Select “English(English),” then click “Next” as shown below: ~ 20 ~ Step 3: Select “U.S.English” to proceed with installation. Step 4: Accept default settings. Then check “Customize now” and click “Next”. ~ 21 ~ Step 5: Development: Check “Development Tools” Then click “Optional Packages” to select all packages. Step 6: Base Station: Check “Base.” Then click “Optional Packages” to accept all default ~ 22 ~ settings and to accept additional setting; “iscsi-initiator-utils-6.2.0.868-0.18.eI5.x86_64.”. Step 7: See Optional Package page. Important: “iscsi-initiator-utils-6.2.0.868-0.18.eI5.x86_64” must be checked. Step 8: Click “Reboot.” System will automatically enter the installation process. ~ 23 ~ Step 9: After rebooting is completed, see the screen below and then click “Forward” to continue installation procedure: Step 10: In the “Firewall” window, choose “Disabled,” then Click “Forward” as shown below: ~ 24 ~ Step 11: Confirm that firewall is shutdown as shown below. Click “Yes”,and confirm close of Firewall: Step 12: Enter the SELinux interface. In the SELinux Setting, choose “Disabled,” click “Forward” and confirm that the firewall is closed as shown below: Step 13: Confirm that SELinux dialogue box is shut down by clicking “Yes” and then confirm close and restart (reboot) of SELinux to continue setup. See below: ~ 25 ~ Step 14: Log into OS using “Root.” Step 15: Click desk top “Computer” icon into the directory: “Computer”->“Filesystem”->“etc”->“sysconfig”->“network-scripts” Note If you use the text mode, please type the following command to enter the following directory: [root@MDC network-scripts]# cd /etc/sysconfig/network-scripts/ Step 16: Create and open configuration file: ifcfg-eth0 Step 17: Modify ifcfg-eth0 file by typing the following: DEVICE=eth0 ONBOOT=yes BOOTPROTO=static IPADDR=<MDC IP address> (example: 10.10.55.100) NETMASK=255.255.255.0 Step 18: Save and close. Step 19: Right click on desk top to choose “Open Terminal.” Step 20: In Terminal type: “service network restart,” then confirm MDC IP address. Step 21: Open your browser, for example, Firefox browser. Step 22: In the Web browser URL type http://<MDC IP address>: 85. (example: http://10.10.55.100:85) ~ 26 ~ 2.4.2.2 Install the QSFP HBA Card Driver in CentOS 5.3 Step1: Copy the ExaSAN RAID system driver files onto your GUI desktop. Open a terminal window. Step 2: Type the following commands: # cd 'NT_Linux_Drv_x.xx.xx’ Example: # make Example: Step 3: The Linux compiler should now begin compiling the driver. Verify that acs_nt.ko has been compiled. If so, please type the following commands: # insmod acs_nt.ko # lsmod Example: ~ 27 ~ Step 4: The driver should now be loaded in CentOS 5.3. Note If you want to start the driver automatically, please put the compiled driver (acs_nt.ko) as follows: 1. #cp acs_nt.ko /lib/modules/ 2.6.18-128.el5 }/kernel/drivers/scsi. 2. Type the following command #depmod –a. 3. Reboot the MDC after these steps. The QSFP HBA card driver will loaded automatically. ~ 28 ~ 2.4.2.3 Install SANit FS Installation of the SANit FS is as follows: Step 1: rpm –ivh SANIT-5.3.3-520.x86_64.rpm Step 2: Type “sanit-setup” and then Step 3: key in “yes” to install. ~ 29 ~ 3. SANit Setup (MDC Side) SANit is a powerful SAN management software and file system specifically designed for extremely reliable high-performance, cross platform and file-level shared access workflows. Be sure your MDC environment is already set up. Begin utilizing your SANit SAN management software by following the steps shown below: 3.1 Equipment Checklist The system requirements for continuing SANit installation is as follows: 1. MDC server installed Cent OS 5.3 (2.6.18-128.el5) x86 64-bit 2. SANit software 3. License 4. Ethernet ~ 30 ~ 3.2 SANit Setup Procedures In addition to the ExaSAN PCIe network, all computers for the SAN must be connected to a private Ethernet network (the Private LAN). SANit MDC servers and clients use this network to exchange file system metadata. Connect each SAN client and MDC server to two Ethernet networks: one private subnet for the SAN metadata and a separate connection for directory service, intranet, and Internet traffic (the Public LAN). The steps below apply to the Private LAN only. We assume that the Public LAN is already in place. Step 1: Connect your workgroup client system #1 to the private LAN Ethernet switch with a CAT-5 cable (LAN switch hub). Step 2: Repeat Step 1 for client system #2. Step 3: Connect the ExaSAN switch to the private LAN Ethernet switch with a CAT-5 cable (For the monitor switch of the RAID Guard X configuration). Client and metadata controller computers need static (fixed) IP addresses for Ethernet network connections. Don’t use DHCP to assign dynamic IP addresses to SANit devices. We suggest that you use the following range of IP addresses for the SANit private metadata network: Note: Subnet mask: 255.255.255.0 Note: Text mode: If your VGA card is not supported in Linux, any client can connect to and enter the MDC server through the Web browser. You must enter the IP address of the MDC server then type the IP address on the client side Web browser to view graphic version. Step 4: ~ 31 ~ Enter your MDC* IP address in the URL of your computer and then enter port number 85. See below. Step 5: http://[MDC IP address]: 85, for example, http://10.10.55.100:85. See below. Step 6: 2. Select Language, enter User Name (Default user name is admin) and Password (Default password is 00000000,”eight zeros”), and then click Log In. See below. Active SANit Step 1: Import license. See section 3.2.1 Step 2: SAN Volume Create (Quick Wizard). See section 3.2.2 Step 3: Add SAN Client IP in SANit (MDC side). See section 3.2.4 Step 4: Add Clients (Client side Install & Set up). See section 4 ~ 32 ~ 3.2.1 Import License After installing SANit software, you will then need to activate the software. To activate SANit software, you must decide if you want a trial version or an official version and you need to obtain a Signature File. Please the steps below: 3.2.1.1 Trial Version of SANit Step 1: Click “License” and then “Import.” Step 2: Enter import file name, then click “Browse” to obtain the trial version license from your SANit provider. ~ 33 ~ Note: You should receive the license file as a zip file. Before you browse to obtain the license, please unzip the file that you receive from your SANit provider first. Step 3: Click “Evaluate.” See example below: Step 4: Click “Import”. Step 5: See the information shown below: ~ 34 ~ ~ 35 ~ 3.2.1.2 Official Licensed Version of SANit If the trial version was a success, you can obtain an official licensed version of SANit. The first step is to obtain a Signature File. Steps 1 through 5 will show you how to obtain a Signature File. See the steps below: Step 1: Select “License.” Step 2: Click “Get signature” and then save Signature File in your desktop. Step 3: Send the Signature file to your SANit provider/retailer to obtain the official license. ~ 36 ~ Step 4: After you obtain the official license, please unzip the zip file and then save the license file on your desktop. Step 5: Open the web browser, such as Firefox, to enter the “License” of the configuration menu. Click “Import.” Step 6: Click” Browse” to find the license on your desktop. Step 7: See License File and click “Evaluate.” See example below: Step 8: Click “Import” to import the official licensed File. See the example below: ~ 37 ~ ~ 38 ~ 3.2.2 SAN Volume Creation (Quick Wizard) Select Quick Wizard from the menu. Select Metadata and Data volume devices using the boxes (□) as shown below. Enter Yes in the configure box below and click “Configure.” Step 1: Give the file system name you require. (example ExaSAN) Step 2: Select metadata volume (InneRAID slim SA). Step 3: Select the data volume (A12S2-PS). Step 4: Enter “Yes” then press . 3.2.3 Delete SAN Volume (Quick Wizard) Step 1: Click “Yes” and click “Force Delete.” See below: ~ 39 ~ Step 2: Click “OK” to delete SAN volume including both data and metadata. Warning: Some data maybe lost. ~ 40 ~ 3.2.4 Add SAN Client IP on SANit (MDC Side) Add each client IP to join a SAN group. Before you add a client IP, ensure that your IP can “Ping” to MDC IP. See the steps below: Step 1: Click “Client Management” and then click “Add.” Step 2: Enter your computer’s IP address in the Client IP box. Step 3: See Client Management screen below. (For checking the status of the added clients) Important: Ensure that you have seen the RAID Volume then you can do the installation. Besides, DO NOT change the client’s IP address after you add the client’s IP in the “Client IP” list. If you still need to change the IP of the client, please add the new IP address of the client into the “client IP” list as a new one and then you can erase the old IP of the client from the list. ~ 41 ~ 4 Add Clients (Client Side) You can easily add clients by following the client side installation and set up procedures. See the steps below: Step 1: After adding the client IP(example: 10.10.55.223), you can go to this page to download client software. Step 2: Click “Download Client Software and Document.” Step 3: Select the client software that you require for installation. ~ 42 ~ 4.1 Supported Operating Systems and Platforms in Client Supported Operating Systems and Platforms in Client O.S. type Windows Linux Operating System Kernel or Release Windows 2003 Server SP2 Windows 2008 Server SP1 Windows XP SP2, SP3 Windows Vista SP1 Windows 7 --- Red Hat Enterprise Linux 4 Update1~7 Red Hat Enterprise Linux 5 Update1~3 CentOS 4 Update1~7 x86 64-bit CentOS 5 Update1~3 x86 64-bit 2.6.16-46-0.12 (SP1) SUSE Linux Enterprise Server 10 2.6.16-60-0.27 (SP2) MAC MAC OS ~ 43 ~ Platform x86 32-bit x86 64-bit x86 32-bit x86 64-bit x86 32-bit x86 64-bit x86 32-bit x86 64-bit x86 32-bit x86 64-bit x86 32-bit x86 64-bit x86 32-bit x86 64-bit x86 32-bit x86 64-bit x86 32-bit x86 64-bit 10.6 workstation 10.7 workstation 10.8 workstation 4.2 Windows Clients 4.2.1 Install SANit Client on Windows Platform Step 1: Select the “Computer Management” file in your computer. Select “Device Management” and then select: Disk drives.” Confirm that the device, with installed driver, appears in the Disk Drive as shown below: If you cannot see the client you created, then you cannot mount the SAN volume. Step 2: Choose a language, and then follow the steps in the installation procedures as shown. Continue installation using the FS Client 5.3.3 Setup Wizard by clicking “Next.” Step 3: Enter the Destination Folder and click “Next”. ~ 44 ~ Step 4: Enter the folder name (“FS Client” is the default name or you may choose) and then click “Install.” Step 5: Select “Reboot now” and then click “Finish.” Computer system will then reboot. ~ 45 ~ ~ 46 ~ 4.2.2 Configure SANit Client on Windows Platform The steps below will help you configure SANit clients on the Windows platform: Step 1: Select the Start menu in the lower left side of your computer screen and select “All Programs.” Select the FS Client (or other folder name, see “Enter the folder name and click Install.”). Then select “FS Client.” Step 2: See the screen below. Click “Servers” and then right click “Add Server.” ~ 47 ~ Step 3: Enter your computer’s server IP Address. Use the same IP address (example: 10.10.55.100) of your computer MDC (Metadata Controller). Then click “OK.” Step 4: Select the server IP Address and then right click “Connect Server.” Step 5: Log into the MDC a. Type the user name(root) and password(accusys) of the MDC server. b. Check “Remember Password” c. Check “Automount” d. Click “Connect.” ~ 48 ~ Step 6: Click the SAN volume path and then right click “Mount.” When you see “Mount Status” is “Mounted”, it means the client has mounted to the MDC successfully. Step 7: Finally, click the “Computer” icon on your desk top. See client local hard disks and SAN hard disk storage location and capacity status as shown below: 4.3 MAC Client 4.3.1 Install SANit Client on Mac Platform Add each client IP to join the SAN group. Before you add a client IP, ensure that your ~ 49 ~ IP(example: 10.10.55.223) can “Ping” to the MDC IP(example: 10.10.55.100). See the steps below: Step 1: After you download the SANit Mac client software, please follow the installation procedures as follows: Note: In SANit version 5.3.3, you may not find the MAC client software in the “Download Client Software and Document.” Future version may support Mac client software. Please contact your SANit supplier or visit the Accusys web site http://www.accusys.com.tw to learn more. Step 2: Double click “SANit Mac client software” to install it and then click “Continue.” Step 3: Click “Install.” ~ 50 ~ Step 4: Click “Continue Install.” Step 5: You will see the installation progress bar as shown below: Step 6: After the installation is completed, please click “Restart” to restart (Reboot) your MAC system. ~ 51 ~ ~ 52 ~ 4.3.2 Configure SANit Client on a MAC Platform The following will show you how to configure SANit clients on a MAC platform. See below: Step 1: Click “Go” and then click “Utilities” Step 2: Click “SANit.app” icon . Step 3: Then click “Add Server.” Step 4: Add the MDC server IP address (example: 10.10.55.100). ~ 53 ~ Step 5: See blue status bar with “Unmounted” and “Manual Mount” as shown below: Step 6: See status information as shown below:. ~ 54 ~ Step 7: In the “Value” column, click the arrows in the “Disabled” row. See below: Step 8: See the below options. Click “Enabled.”: ~ 55 ~ Step 9: See the below information: Step 10: Select “Mount” by clicking the arrow to the vertical position as shown below: ~ 56 ~ Step 11: See the below information: Step 12: You will see the ExaSAN Hard Drive icon on your desk top computer to confirm that you have full read/write and auto volume mounting to fully utilize your San system for Mac clients in normal operations. Step 13: If you decide to unmount (end normal read/write and auto mount operations), then click the arrows in the server column as shown below: ~ 57 ~ Step 14: Click the arrow as shown below: Step 15: When the mounting is finished, you will see the “Volume” icon (ExaSAN hard drive icon) on your Desktop. ~ 58 ~ 4.4 Linux Clients Add clients IP to join the SAN group. Before you add a client IP, ensure that your IP can “Ping” to the MDC IP. See below: Step 1: Click “Download Client Software and Document.” ~ 59 ~ ~ 60 ~ 4.4.1 Install and Configure SANit Linux Client Software Step 1: Install the SANit Linux client. Type “./client_installer.sh install” on command. Step 2: Mount the SANit volume,type “mount –t enfs –o _netdev <MDC_IP_ADDRESS>:/fsmnt/<SANit file system name> /mnt/” Note: Please enter the SANit configuration menu and go to “System Status”. You can find “Mount point” (See below). For example, if you find the mount point is /fsmnt/ExaSAN,you can type the following command: mount –t enfs –o _netdev 10.10.55.100:/fsmnt/ExaSAN /mnt ~ 61 ~ 5. Maintenance 5.1 System Status You can open the page below to obtain SANit FS operational status information: 5.2 System Logs Click to send logs back to support account if you develop any problems using SANit. ~ 62 ~ 5.3 File Management Configuration If your MDC crashes, you can easily restore it back to its normal status. If you have a backup configuration file, we suggest that you backup config file after the SANit FS is created. ~ 63 ~ 6. Customer Service and Support 6.1 Contact Us For customer service and technical support, locate an Accusys office near you from the link below: http://www.accusys.com.tw/about/contact.htm Or, you may email us at [email protected] 6.2 Our Website Please visit our websites frequently for the most up-to-date product and support information. All countries: www.accusys.com.tw Korea: http://accusys.co.kr ~ 64 ~