1
ARCHER 1.0
ARCHER Toolset
End User Guide
• XDMS
• ARCHER Collaborative Workspace
• Hermes
ARCHER Toolset ............................................................................................. 1
What is the ARCHER Data Tool Set? ..................................................................2
How the ARCHER Tool Set is Established and Operated ........................................3
How Information is Organised in XDMS ..............................................................5
How to Login to XDMS .....................................................................................8
About the XDMS Main Screen ......................................................................... 11
How to Create a New Project Folder in XDMS .................................................... 13
How to Create a New Experiment Folder in XDMS.............................................. 16
How to Create a New Sample in XDMS............................................................. 20
How to Create or Modify a Dataset Folder in XDMS............................................ 23
How to Edit Metadata in XDMS........................................................................ 27
Using the Archer Collaborative Workspace........................................................ 29
Using Hermes to Transfer Data ....................................................................... 30
Error Messages ............................................................................................. 33
Glossary of Terms Used in the Archer Tool Set.................................................. 35
ARCHER Toolset End User Guide v1.0
30 Sept 2008
Page 1 of 36
What is the ARCHER Data Tool Set?
In this topic:
Introduction
Description
The individual tools
Introduction
ARCHER is an initiative:
• to develop software tools for the research community, and
• funded by the Australian Department of Innovation, Industry, Science and
Research (DIISR) via an SII Grant.
Description
The software tools developed by ARCHER operate in a secure environment, and assist
researchers to:
- collect, capture and retain large data sets from a range of different sources
including scientific instruments
- populate eResearch data repositories with associated metadata
- permit data set annotation and discussion in a collaborative environment, and
- support next-generation methods for research publication, dissemination and
access.
The individual tools
The ARCHER Data Services tool set is made up of:
Software Tool What it Does
DIMSIM
Captures and monitors data. Passes data from instruments to the
research repository or SRB (Storage Resource Broker).
Note: A Storage Resource Broker(SRB):
- is a uniform interface for dissimilar data storage resources
over a network.
- allows distributed storage and monitoring of large files.
Hermes
Transfers data from a desktop to the SRB.
XDMS
Manages project data and meta data to a Storage Resource
Broker(SRB). A web-based dataset management tool used to
MDE
Allows editing of Metadata.
Archer
Collaborative
Workspace
Allows document publishing and collaboration. Built with Plone it
consists of the ARCHER SRB content and Plone.
Next Topic – How the ARCHER Tool Set is Established and Operated
Back to Table of Contents
ARCHER Toolset End User Guide v1.0
30 Sept 2008
Page 2 of 36
How the ARCHER Tool Set is Established and Operated
In this topic:
Roles
Establishment
Operation
Roles
The roles of people establishing and using the ARCHER Tool Set would usually be:
• Systems Administrator
• Research Department Head
• Project Administrator
• Team Member, and
• External Research Collaborator
Establishment
These 2 stages describe how to establish ARCHER for use by researchers.
Stage
Description
1
Establishing the
platform
2
Establishing the
project
What Happens
The Systems Administrator sets up and manages the:
• configuration, and
• XDMS Super Admin access.
The Research Head (Super Admin) sets up for each
project the:
• definition including types of permitted:
- experiment(s)
- sample(s)
- dataset(s), and
- metadata schema.
• administrator group, and
• team group.
Note: Access to the research repository is by
membership of a project. The Research Head may
change the Project Admin and Team group(s) for a
specific project.
Operation
There are 8 stages in the operation of ARCHER.
Stage
1
Description
Maintaining the
project
ARCHER Toolset End User Guide v1.0
30 Sept 2008
What Happens
The Project Administrator sets up the project
structure and:
• creates project folder(s)
• creates experiment(s)
• creates sample(s)
• creates datasets and deposits data
• edits metadata within an experiment, and
• moves data and datasets within a project.
Note: Only the Research Head (Super Admin) can
delete experiment(s), sample(s), or dataset(s).
Page 3 of 36
Stage
Description
2
Managing
Instruments and
Collecting Data
3
Transferring and
managing project
data
4
Managing Desk
Top Data
5
Collaborating
6
Creating and
Managing
Metadata
What Happens
The system:
• monitors the experiment, and
• collects instrument data.
The Project Team Member (or Administrator):
• accesses the project
• creates datasets, transfers data, and
• edits metadata for individual files.
The Project Team Member (or Administrator):
• downloads
• analyses, and
• uploads data.
The Project Team Member (or Administrator):
• accesses experimental data
• manages personal content, and
• publishes data sets for collaboration.
The External Collaborator accesses specified datasets
with read permission only.
The Project Team Member (or Administrator):
• enters metadata, and
• manages metadata.
Next Topic – How Information is Organised In XDMS
Previous Topic – What is the ARCHER Data Tool Set?
ARCHER Tool Set Table of Contents
ARCHER Toolset End User Guide v1.0
30 Sept 2008
Page 4 of 36
How Information is Organised in XDMS
In this topic:
Introduction
Information structure
How the information structure works
Source of the data structure
Specific XDMS Terms
Definitions
Introduction
XDMS is the web based interface for managing the datasets that describe the outputs
of a research project
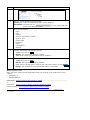
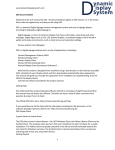
Information structure
This is the XDMS information structure for a research project.
How the information structure works
• A Project has a Manager and may contain many Experiments.
• An Experiment may be linked to many Samples and may have one or more
Datasets.
• A Dataset may be linked to either one Sample or none. The linked Sample must
be associated with the Experiment to which the Dataset belongs.
• A Dataset may contain many data files but not another Dataset. Dataset types
may be configured.
Source of the data structure
The information structure for XDMS is derived from the CCLRC metadata model.
See: CCLRC Scientific Metadata Model: version 2
ARCHER Toolset End User Guide v1.0
30 Sept 2008
Page 5 of 36
Specific XDMS Terms
• Project corresponds to Study in the CCLRC's, and
• Experiment corresponds to Investigation the CCLRC.
Definitions
Term
ARCHER Meaning
Project
A group of activities to explore some area of science. Typically funded
as a single item.
Experiment
A group of activities to resolve a single research question. Generally
they:
• test a particular hypothesis, or
• gather information about a particular phenomenon.
Dataset
A collection of datafiles relating to an experiment. Datasets come in
different types, depending on the kind of information they contain.
XDMS recognises the following dataset types:
• Data collection
• Processing results
• Solution results
• Published results
• Other
Data
Collection
datasets
Datasets that contain observations of the world typically generated by
scientific instruments. All files needed to make sense of the
observation are included in the dataset. Examples include:
• image files
• sensor outputs, and
• sensor logs.
Processing
datasets
Datasets that contain the files generated when other datasets are
transformed or filtered. Typically this is the result of running software
over a dataset. Processing datasets are intermediate results of working
with the primary data (Data Collection datasets). They can also be
generated from other Processing datasets.
Solution
datasets
Datasets that contain the final stage of data processing, which answer
the research question for the experiment.
Publication
datasets
Datasets that connect the experiment to the version of the data as
published in the scientific literature.
Sample
The subject matter of a dataset. In astronomy, it would be a star; in
biology, a specimen; in crystallography, a particular crystal.
The sample does not involve datafiles, and is not stored on the research
repository. It is a description, used to make sense of where the data
came from.
Next Topic – How to Login to XDMS
ARCHER Toolset End User Guide v1.0
30 Sept 2008
Page 6 of 36
Previous Topic – How ARCHER is Established and Operated
Back to the ARCHER Tool Set Table of Contents
ARCHER Toolset End User Guide v1.0
30 Sept 2008
Page 7 of 36
How to Login to XDMS
In this topic:
When to use
Before you begin
What you will see
Fields and functions
Logging in
What happens next
When to use
You will use this procedure when you wish to log on to XDMS to review, maintain, or
transfer project data.
Before you begin
Ensure you have the correct level of access for what you want to do.
See: How ARCHER is Established and Operated
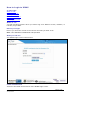
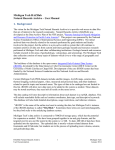
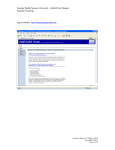
What you will see
The XDMS Login screen looks like this.
Fields and functions
These are the fields and functions of the XDMS Login screen.
ARCHER Toolset End User Guide v1.0
30 Sept 2008
Page 8 of 36
Field
Function
Username
Your identifier given to you by your Research Head/Project
Administrator.
Password
Your password, given to you by your Research Head/Project
Administrator.
SRB Host
Displays the address of your research database.
Security Code
Enter the letters and numbers shown. Not case-sensitive.
Dataset Identifier
[optional]:
Allows input of a unique identifier for a dataset so that when
you log on you go directly to that dataset.
Example: 102.100.archer/6MWZ7Y4RH
Logging in
Follow these steps to log in.
Step
Action
1
• Type in your Username, and
• press [Tab].
Result:
The cursor moves to Password.
2
Type in your Password.
3
Type in the Security Code.
4
Do you want to enter a Dataset Identifier to open a specific dataset?
• If yes, then press [Tab] until the cursor is in Dataset Identifier
[optional], and type in the Dataset Identifier. Go to Step 4.
• If no, then go to Step 4.
5
Click on
Result:
in, to
•
•
.
You are logged in to XMDS, and depending on how you logged
either the:
specific dataset, or
common project area.
What happens next
Once you are logged in you may go on to:
• Create:
- a project
- an experiment
- a dataset, and/or
- sample.
• Edit metadata for a Sample
• Edit metadata for a Dataset
• Transfer data
• Publish data
ARCHER Toolset End User Guide v1.0
30 Sept 2008
Page 9 of 36
Next Topic – About the XDMS Main Screen
Previous Topic – How Information is Organised in XDMS
Back to the ARCHER Tool Set Table of Contents
ARCHER Toolset End User Guide v1.0
30 Sept 2008
Page 10 of 36
About the XDMS Main Screen
In this topic:
What you will see
Fields and functions
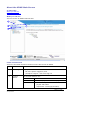
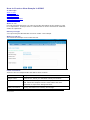
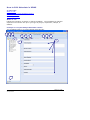
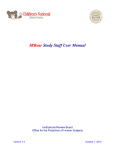
What you will see
The first screen of XDMS looks like this.
1
2
4
3
Fields and functions
These are the fields and their functions on the first screen of XDMS.
No
Field
Function
1
ID and logout
Displays the :
• ID of the person logged in, and
• prompt for Logout – click on to log out.
2
Function
buttons
The function buttons are:
Button
Function
Home
Returns/displays the XDMS first page.
Search
Allows search by:
• project and status
• experiment: name/type/number/
ARCHER Toolset End User Guide v1.0
30 Sept 2008
Page 11 of 36
No
Field
Function
•
•
•
3
4
Data areas
Current area
investigator name
sample
dataset: name/type, and/or
datafile: name/format/ date last modified
Reports
Reports on all datasets associated with a
selected experiment including:
• name
• dataset type
• status
• identifier
• name of associated sample, and
• file size of the dataset
Personal
Content
Transfer
Transfers data uploaded via Hermes, to a
dataset in the Common Project area.
Staging
Content
Transfer
Transfers data uploaded via DIMSIM to a
dataset in the Common Project area.
There are three data areas:
Area
Function
Personal
holds data from your desktop for eventual
transfer to the Common Project area.
DIMSIM
staging
holds data from an instrument for eventual
transfer to the Common Project area.
Common
Project
displays your project folders, and on:
• right click – tasks for the folder level you
have clicked, or
• left click - the experiment or dataset
folder(s) in the selected folder.
Displays the contents of a selected data area.
Next Topic – How to Create a Project Folder in XDMS
Previous Topic – How to Log on to XDMS
Back to the ARCHER Tool Set Table of Contents
ARCHER Toolset End User Guide v1.0
30 Sept 2008
Page 12 of 36
How to Create a New Project Folder in XDMS
In this topic:
When to use
Before you begin
What you will see
Fields and entries
Creating a new project folder
What happens next
When to use
Use this procedure whenever you are:
• funded for a new project, and
• setting up the project in the research repository.
Before you begin
You require Research Head access to create a new project folder. You will need to
enter the Project Status, Admin and Team Groups, and Manager so ensure you are
familiar with Rules for Project Folder Creation.
Note: The Admin and Team Groups are set up outside XDMS.
What you will see
The Create New Project Folder screen looks like this.
Fields and entries
These are the new project folder fields and what to enter in them.
ARCHER Toolset End User Guide v1.0
30 Sept 2008
Page 13 of 36
Project
Entry
name
Alphanumeric, follow your standard naming conventions.
purpose
Free format, use to state the project intention.
status
Defined by your Research Head, select from the list.
Note: These terms may be changed during initial database setup.
See: The XDMS Developers Reference.
Use…
For…
New
new projects.
WIP
work in progress
Funded
funded projects.
Complete
completed projects
admin group
Defined by the Research Head, select from the list. Membership of this
group allows users to set up a project structure.
Rule: Must be different from team group.
team group
Defined by the Research Head, select from the list. Membership of this
group allows users to access the project and add data.
Rule: Must be different from admin group.
start date
Type in or select from the calendar. Can be backdated.
manager
Select the project lead from the drop down list of names.
related
material
Alphanumeric, free format. Supporting information for the project.
Can include citations.
Creating a new project folder
Follow these steps to create a new project folder.
Step
Action
1
In the Common Project area, Right Click on the highest level or first folder.
Result:
The Create New Project Folder prompt displays.
2
Click on Create New Project Folder.
Result:
The Create a New Project Folder screen displays.
ARCHER Toolset End User Guide v1.0
30 Sept 2008
Page 14 of 36
Step
Action
3
Enter the Project:
• name
• purpose
• status from the list
• admin group from the list
• team group from the list
• start date
• manager from the list, and
• related material
4
Is all the project folder information correct?
• If yes, then click on
.
Result: The project folder is created.
•
5
If no, then correct the information and go to Step 5.
Are you satisfied that all the information is correct?
• If yes, then click on
.
Result: The new project folder is created.
•
If no, and you decide not to create a new project folder, click on
Result: The creation of a new project folder is cancelled.
.
What happens next
After you have created a new project folder any member of the Project Admin Group
may go on to create one or more new experiment folder(s).
Next Topic – How to Create a New Experiment Folder in XDMS
Previous Topic – About the XDMS Main Screen
Back to the ARCHER Tool Set Table of Contents
ARCHER Toolset End User Guide v1.0
30 Sept 2008
Page 15 of 36
How to Create a New Experiment Folder in XDMS
In this topic:
When to use
Before you begin
What you will see
Fields and entries
Creating a new experiment folder
What happens next
When to use
Use this procedure whenever you:
• want to set up a new experiment area under an existing project, or
• you are about to run a new experiment and need somewhere to manage the
resulting data.
Before you begin
You require Project Administrator access to create a new experiment folder. Your
Research Head will tell you the Experiment type to select.
What you will see
The Create a New Experiment Folder screen looks like this.
Fields and entries
These are the new experiment folder fields and what to enter in them.
ARCHER Toolset End User Guide v1.0
30 Sept 2008
Page 16 of 36
Field
Entry
Name
Alphanumeric, follow your standard naming conventions.
Type
Defined by your Research Head, select from the list.
Number
Numeric, follow your standard numbering conventions.
Previous experiment
number
Numeric, follow your standard numbering conventions. Use
this field if an experiment follows on from a previous
experiment.
Example: 02 if this is a experiment following from the
original of 01.
Grant ID
If this experiment has received a grant, then the name or id
of the grant.
Release date
The release date of the experiment.
Keywords
Comma separated list of keywords, following your
conventions.
Topics
One or more topics for the experiment. Click “Add” to add
second and subsequent topics.
Note: To change the list of available topics, ask your system
administrator to edit the database.
Investigator
One or more investigators assigned to the experiment. For
each, also choose a role.
Click “Add” to add second and subsequent investigators.
Note: To change the list of available investigators, ask your
system administrator to edit the database.
Experiment abstract
Up to 4000 characters of free text summary of the
experiment.
Creating a new experiment folder
Follow these steps to create a new experiment folder
Step
1
Action
In the Common Project area:
• select the project for the new experiment folder, and
• Right Click.
Result:
The project task prompt displays.
ARCHER Toolset End User Guide v1.0
30 Sept 2008
Page 17 of 36
Step
Action
2
Click on “Create New Experiment Folder”.
Result: The create new experiment folder screen displays.
Alternative: You may click on
on the right hand side
of the “View Project” screen.
3
Enter the experiment:
• name
• type
• number
• previous experiment number
• grant id, and
• release date
• keywords
• topics
• investigators
• abstract
4
Is all the experiment information correct?
• If yes, then click on
.
•
5
Result: The experiment folder is created.
If no, then correct the information and go to Step 5.
Are you satisfied that all the information is correct?
• If yes, then click on
.
Result: The experiment folder is created.
•
If no, and you decide not to create a new experiment folder, click on
Result: The creation of a new experiment folder is cancelled.
What happens next
After you have created a new experiment folder you may go on to create one or more
related:
• sample(s), or
• dataset folder(s).
Next Topic – How to Create a New Sample in XDMS
or
Next Topic – How to Create or Modify a Dataset Folder In XDMS
Previous Topic – How to Create a New Project Folder in XDMS
ARCHER Toolset End User Guide v1.0
30 Sept 2008
Page 18 of 36
.
Back to the ARCHER Tool Set Table of Contents
ARCHER Toolset End User Guide v1.0
30 Sept 2008
Page 19 of 36
How to Create a New Sample in XDMS
In this topic:
When to Use
Before you begin
What you will see
Fields and entries
Creating a New Sample
What happens next
When to use
Use this procedure whenever you want to provide descriptions of the sample(s) used
in an experiment. A sample must be created before it can be associated to a dataset
within an experiment.
Before you begin
You require Project Administrator access to create a new sample.
What you will see
The Create New Sample screen looks like this.
Fields and entries
These are the new sample fields and what to enter in them.
Field
Entry
Sample name
Alphanumeric, follow your standard naming conventions.
Sample instance
Any aspect of this sample instance that you should record.
Use: When two samples have the same name and more
information is required to distinguish them.
Safety information
Warning information for handling and storage.
ARCHER Toolset End User Guide v1.0
30 Sept 2008
Page 20 of 36
Creating a New Sample
Follow these steps to create a new sample.
Step
Action
1
In the Common Project area:
• select the experiment for the new sample, and
• Right Click.
Result:
The experiment task prompt displays.
2
Click on “Create New Sample”.
on the right hand side of the
Alternative: You may click on
“View Experiment” screen.
Result: The Create a New Sample Screen displays.
3
Enter the sample:
• name
• instance information, and
• safety information.
4
Is all the sample information correct?
• If yes, then click on
.
Result: The sample with basic metadata is created.
•
5
If no, then correct the information and go to Step 5.
Are you satisfied that all the information is correct?
• If yes, then click on
.
Result: The sample with basic metadata is created.
•
If no, and you decide not to create a new sample , click on
Result: The creation of a new sample is cancelled.
.
What happens next
After you have created a new sample, you may go on to:
• edit the metadata for the sample, and/or
• create one or more new sample(s) or dataset(s).
Next Topic – How to Create or Modify a Dataset Folder in XDMS
or
How to Edit the Metadata in XDMS
ARCHER Toolset End User Guide v1.0
30 Sept 2008
Page 21 of 36
Previous Topic – How to Create a New Experiment Folder in XDMS
Back to the ARCHER Tool Set Table of Contents
ARCHER Toolset End User Guide v1.0
30 Sept 2008
Page 22 of 36
How to Create or Modify a Dataset Folder in XDMS
In this topic:
When to use
Before you begin
What you will see
Fields and entries
Creating a new dataset folder
What happens next
When to use
Use this procedure whenever you need to:
• assign an area for data before it is uploaded, or
• modify an existing dataset.
Not used: If you are moving datasets from the Transfer areas, then the transfer
procedure creates the required dataset folder.
Before you begin
You require Project Team membership access to create a new dataset folder.
What you will see
The Create or Modify Dataset folder screen looks like this.
Fields and entries
These are the dataset folder fields and what to enter in them.
Field
Entry
Dataset name Alphanumeric, follow your standard naming conventions.
ARCHER Toolset End User Guide v1.0
30 Sept 2008
Page 23 of 36
Field
Entry
Dataset type
Select from the list. Standard defaults are:
Use…
For…
Data Collection
raw data from an instrument.
Processing
Results
intermediate results from manipulating data.
Published
Results
data in the form it was externally published.
Solution Results final results answering the experiment research
question.
Other
data not described by any other category.
Dataset status Select from the list. Tells how the experiment’s research question
was addressed. Only for solution or published dataset types.
Use…
For datasets which…
Solved
confirm the research hypothesis.
Failed
disprove the research hypothesis.
Unsolved
are inconclusive about the research hypothesis.
Associated
sample
Select from the drop down list of samples already attached to this
experiment in this project.
Dataset
Description
Alphanumeric, free format.
Creating a new dataset folder
Follow these steps to create a new dataset folder.
Step
Action
1
In the Common Project area:
• select the experiment for the new dataset folder, and
• Right Click.
Result:
The experiment task prompt displays.
2
Click on “Create New Dataset Folder”.
Result:
The Create a New Dataset Folder screen displays.
ARCHER Toolset End User Guide v1.0
30 Sept 2008
Page 24 of 36
Step
Action
3
Enter the dataset:
• name
• type
• status
• associated sample, and
• description.
4
Is all the dataset information correct?
• If yes, then click on
.
•
5
Result: The dataset folder is created.
If no, then correct the information and go to Step 5.
Are you satisfied that all the information is correct?
• If yes, then click on
.
Result: The sample folder is created.
•
If no, and you decide not to create a new sample folder, click on
Result: The creation of a new sample folder is cancelled.
What happens next
After you have created a new dataset folder you may go on to:
• create one or more new dataset(s) folder(s)
• edit the metadata for the dataset or
• upload data.
Next Topic – How to Edit Metadata in XDMS
Previous Topic – How to Create a New Sample in XDMS
or
How to Create a New Experiment Folder in XDMS
Back to the ARCHER Tool Set Table of Contents
ARCHER Toolset End User Guide v1.0
30 Sept 2008
Page 25 of 36
.
How to Upload Data to XDMS
Formatted: Idea
In this topic:
<complete>
Formatted: Normal
Formatted: Idea
Uploading one Datafile in XDMS
ARCHER Toolset End User Guide v1.0
30 Sept 2008
Page 26 of 36
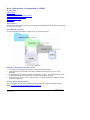
How to Edit Metadata in XDMS
In this topic:
When to use
Example of a Crystal Metadata schema
Fields and entries
What happens next
When to use
Follow this procedure to add to or change metadata. The metadata you add will
depend on the schema set up for your type of project, experiment, sample, or
dataset.
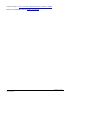
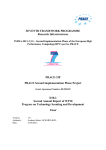
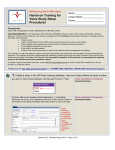
Example of a Crystal Sample Metadata schema
The metadata page for a crystal sample looks like this.
1
2
3
5
6
7
8
9
10
4
12
11
13
ARCHER Toolset End User Guide v1.0
30 Sept 2008
Page 27 of 36
Fields and entries
This table describes how to use each of the numbered fields.
Number Field
Use
1
File Menu
Select from three functions of:
• Save the metadata record
• Cancel the metadata record without saving, or
• Close and prompt to Save or not Save any values
entered.
2
Edit Menu
To validate all entered metadata.
3
Help Menu
Select from three functions of:
• Help to open a PDF user document.
• Release Notes to open the MDE release notes in a
browser window, or
• About ... to see the current version information.
4
Elements
Displays the element names of all of the elements in the
record. Position the mouse pointer over an element to see
a more detailed description as hover-text.
5
Save
Save the metadata record.
6
Validate
Validates the values entered to schema and schema rules.
7
Cancel
•
•
8
Drop Down
List
Displays a list of other elements that may be added to the
schema for this record.
9
Add
Adds the element selected from the drop down list.
10
Remove
Removes the selected element
11
Check Box
Selects an element for removal.
12
Data Fields
Editable values of the metadata schema.
13
Settings
Records Editor setting which can only be changed if you
have access to do so.
Cancels the metadata record, and
prompts to Save or not Save any values entered.
What happens next
When you have added a metadata record you may add more records or go on to
another type of transaction.
Next Topic – How to Create a New Sample in XDMS
or
Next Topic – How to Create or Modify a Dataset Folder in XDMS
Back to the ARCHER Tool Set Table of Contents
ARCHER Toolset End User Guide v1.0
30 Sept 2008
Page 28 of 36
Using the Archer Collaborative Workspace
Introduction
When to use
How to use Plone
Introduction
The Archer Collaborative Workspace is Plone. Plone is an open source CMS for:
• Content Management
• Document Management, and
• Knowledge Management.
Plone is built using Zope, an object oriented application server. The language that
drives Zope and Plone is Python. It is distributed under the GNU GPL license.
When to use
Use Plone to share information collaboratively and to:
• post documents
• browse the SRB
• upload information
• comment on items
• paste links to items in the SRB
• email documents of interest to others, or
• co-locate documents and make them available to others
How to use Plone
For information about how to use Plone go to http://plone.org/
Back to the ARCHER Tool Set Table of Contents
ARCHER Toolset End User Guide v1.0
30 Sept 2008
Page 29 of 36
Using Hermes to Transfer Data
In this topic:
Introduction
Connecting for the first time
New connection fields and entries
How to transfer data in the File Management workspace
SRB Workspace
ICAT Management
Introduction
Hermes is used to transfer data between network data sources to which you have
access. The data is transferred to the research repository personal storage area.
Connecting for the first time
The first time that you connect to a directory for file transfers you will need to Create
a new Connection. Select New Connection from the File Menu.
Result: The Create New Connection dialogue box displays.
New connection fields and entries
These are the new connection fields and what to enter in them.
Field
Entry
Protocol
•
•
srb:// (Storage Resource Broker) – most likely use.
gsiftp:// (gridFTP)
ARCHER Toolset End User Guide v1.0
30 Sept 2008
Page 30 of 36
Field
Entry
•
•
sftp:// (secure file transfer protocol) - unlikely use
ftp:// (file transfer protocol) - unlikely use
Options for srb protocol
Display Name
A unique name to identify the server in Hermes.
Host
The IP address for the server.
Example: gftp.university.edu.au.
Port
The network port to connect to the server on. Default 5544.
Zone
Optional. The name of the zone to which this server belongs. See
http://www.sdsc.edu/srb/index.php/Zones
Domain
Optional. The name of the SRB domain.
Home
Optional. <name of home directory on SRB?>
Resource
Optional. Which SRB resource is being used. Generally
corresponds to the name of a hard disk, a database, etc. If left
blank, the default resource of “demoResc” is used.
Options for gsiftp protocol
Display Name
A name to identify the server in Hermes.
Host
The IP address for the GridFTP server
Example: gftp.university.edu.au.
Port
The network port to connect to the server on. Default 2811.
User Path
Not used.
Mode
Not used.
sftp/ftp protocol
Display Name
A name to identify the server in Hermes.
Host
The IP address for the SFTP server.
Example: gftp.university.edu.au.
Port
The network port to connect to the server on. Default FTP 21 and
SFTP 22.
User Path
Not used.
Mode
Not used.
ARCHER Toolset End User Guide v1.0
30 Sept 2008
Page 31 of 36
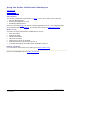
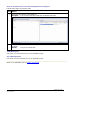
How to transfer data in the File Management workspace
Follow these steps to transfer data.
Step Action
1
Select the file directory and data file.
Example: The Hermes workspace tab with a Datafile selected.
2
Drag and drop the selected file to the file directory where you want to transfer
the data.
Result:
The file is transferred.
SRB Workspace
Not used or tested extensively in the ARCHER Project.
ICAT Management
Not used or tested extensively in the ARCHER Project.
Back to the ARCHER Tool Set Table of Contents
ARCHER Toolset End User Guide v1.0
30 Sept 2008
Page 32 of 36
Error Messages
In this topic:
Errors creating a new project folder
Errors creating a dataset
Errors transferring data
Errors creating a new project folder
You may see these error messages when creating a new project folder.
Error Message
Reason and Response
You must enter a project
name
All projects must have a unique name; type in a name.
You must enter a purpose
for the project
All projects must have a unique purpose; type in a
purpose.
Project status is required.
All projects must have a unique status; type in a purpose.
Project admin group name All projects must have an admin group. Either:
is required.
• select a group from the list, or
• ask the Research Head to create a new one.
Project team group name
is required.
All projects must have an team group. Either:
• select a group from the list, or
• ask the Research Head to create a new one.
Project admin and team
group cannot be same.
The admin and team groups should be kept distinct even
if they have the same members.
Recommendation: Some users should not be able to
change the experimental structure.
Project start date is
required.
All projects must have a starting date; select a date from
the calendar. Projects can be backdated.
Project manager id is
required.
All projects must have a user named as Project Manager
responsible for the project
Service unavailable at the There is a problem with the network connection between
moment. Please try again XDMS and the resource repository. Please wait.
later.
Errors creating a dataset folder
You may see these error messages when creating a dataset.
Error Message
Reason and Response
Dataset already exists:
PPPP/EEEE/DDDD
You have tried to create a duplicate record. A dataset
with the same name already exists.
Errors transferring data
You may see these error messages when transferring data.
ARCHER Toolset End User Guide v1.0
30 Sept 2008
Page 33 of 36
Error
Message/Condition
Reason and Response
Data not transferring
You have used an illegal character in the project folder
name. Illegal characters are:
• *
• ?
• ()
• ()
• []{}
• !
• @
• #
• $
• %
• ^
• &
• =
• +
• ,
• <>
• /
• |
• \
Back to the ARCHER Tool Set Table of Contents
ARCHER Toolset End User Guide v1.0
30 Sept 2008
Page 34 of 36
Glossary of Terms Used in the Archer Tool Set
In this topic:
Archer Terms
XDMS Terms
Database Terms
Archer Terms
These terms are specific to Archer.
Term
Meaning
Archer
The ARCHER project is to:
• analyse e Research data collection, information management
needs and requirements, and
• build on the DART and ARROW projects’ prototype software
to provide a set of tools for the collection and manipulation of
research data in a collaborative environment.
Hermes
A dataset management tool used to transfer data from a desktop
to XDMS.
XDMS
A web-based dataset management tool used to upload Project
data to a Storage Resource Broker(SRB).
Note: A Storage Resource Broker(SRB) is a uniform interface
for dissimilar data storage resources over a network.
MDE
Metadata editing tool
DIMSIM
Data capture and monitoring tool that passes data to XDMS.
Hydrant
Web-based Kepler Workflow management tool
XTAL
A document publishing and collaboration tool built with Plone.
XDMS Terms
These terms have a specific meaning in XDMS.
Term
Meaning
Folder
A data file.
Project
A Project folder is the data file for a group of related
experiments.
Experiment
An Experiment folder is the data file for a group of related
datasets.
Dataset
A Dataset folder is the data file for a group of related
measurements.
Sample
A Sample folder is the data file for a sample that will be
measured.
ARCHER Toolset End User Guide v1.0
30 Sept 2008
Page 35 of 36
Database Terms
These are database terms.
Term
Meaning
Metadata
Metadata is a way of describing or cataloguing information to
assist in the finding of that information.
Example:
Metadata
Schema
On an MP3 player, the metadata embedded in the
music files is the:
• album names
• song titles, and
• album art
This metadata is used to generate the artist and
song listings.
A metadata schema is the standard tags or labels applied to the
data providing a set of consistent elements for searching, finding
and reporting data.
Example:
A subset of the Dublin Core metadata schema is:
•
Title
•
Creator
•
Subject
•
Description
•
Publisher
•
Contributor
•
Date.
CCLRC
The Council for the Central Laboratory of Research Councils has
published a metadata schema for scientific data. The CCLRC
schema has provided a base for the Archer software tools.
SRB
The Storage Resource Broker provides a uniform interface to
heterogeneous data storage resources over a network. It
implements a logical namespace and maintains metadata on
files, users, groups, resources, collections, and other items in an
SRB Metadata Catalogue (MCAT) stored in a relational database
management system.
MCAT
Metadata Catalogue
ICAT
•
•
XDMS database, and
the repository for the database.
Back to the ARCHER Tool Set Table of Contents
ARCHER Toolset End User Guide v1.0
30 Sept 2008
Page 36 of 36