1
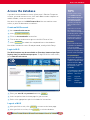
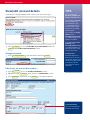
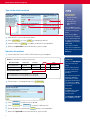
NLIS Database
User Guide
December 2008
PRODUCERS &
feedlots
Contents
This User Guide explains the main NLIS database tasks and reports for producers and feedlots. When you
login to the database, you will only see options for your account type.
The Guide provides step-by-step instructions on the left side of the page. Once you are familiar with the
database, you may rarely need the TIPS information on the right side. If you can’t find what you want in the
Guide, there may be a Tech Tip on the NLIS website. Alternatively, you can click ‘Help’ buttons on the NLIS
screens.
If you want to know about NLIS Express, a free software program that lets you transfer cattle and run simple
queries using a compatible mobile phone, contact the NLIS Database Helpdesk (see the contact details on
the back cover of this Guide).
Suggestions for improvements to the User Guide or requests for an
NLIS Express Pocket Guide may be sent to [email protected]
Notifying the database
Access the database . . . . . . . . . . . . . . . . . . . . . . . . . . . . . . . . 1
View/edit account details . . . . . . . . . . . . . . . . . . . . . . . . . . . . 2
Cattle moved off/onto property . . . . . . . . . . . . . . . . . . . . . . . 3
Cattle that died on property . . . . . . . . . . . . . . . . . . . . . . . . . . 6
Device status . . . . . . . . . . . . . . . . . . . . . . . . . . . . . . . . . . . . . . 8
PIC reconciliation . . . . . . . . . . . . . . . . . . . . . . . . . . . . . . . . . 11
Replaced tags . . . . . . . . . . . . . . . . . . . . . . . . . . . . . . . . . . . . 12
Transfer correction . . . . . . . . . . . . . . . . . . . . . . . . . . . . . . . . 14
ERP enquiry. . . . . . . . . . . . . . . . . . . . . . . . . . . . . . . . . . . . . . 17
Key:
EU status downgrade . . . . . . . . . . . . . . . . . . . . . . . . . . . . . . 18
Producers and feedlots
Generating reports
Producers only
Generating reports . . . . . . . . . . . . . . . . . . . . . . . . . . . . . . . . 19
Feedlots only
Customising reports . . . . . . . . . . . . . . . . . . . . . . . . . . . . . . . . 20
Audit property report . . . . . . . . . . . . . . . . . . . . . . . . . . . . . . 21
Beast enquiries report . . . . . . . . . . . . . . . . . . . . . . . . . . . . . 22
Carcase feedback query . . . . . . . . . . . . . . . . . . . . . . . . . . . . 23
ERP PIC status report . . . . . . . . . . . . . . . . . . . . . . . . . . . . . 24
Search the PIC register. . . . . . . . . . . . . . . . . . . . . . . . . . . . . . 25
View devices on property . . . . . . . . . . . . . . . . . . . . . . . . . . . 26
View large report results . . . . . . . . . . . . . . . . . . . . . . . . . . . 27
View transaction history. . . . . . . . . . . . . . . . . . . . . . . . . . . . 28
View/generate all reports . . . . . . . . . . . . . . . . . . . . . . . . . . 29
Access the database
Access the database
TIPS
If you don’t have a database account, follow steps 1–5 below. To open an
account, you need Internet access, an E-mail address and a telephone or
mobile number, so we can contact you.
To protect your account,
your database session
ends automatically if you
stay on one screen for
more than 20 minutes.
If you do, you may lose
data you hadn’t sent to
NLIS.
You must also agree to the NLIS Terms of Use. You can read the terms
online, or print the document to read later.
Create an NLIS account
1
Go to www.nlis.mla.com.au
2
Click 4Create a new account
3
Fill in the Account details form online.
4
Tick the box at the bottom to agree to the NLIS Terms of Use.
5
Click 4Continue to submit the completed form to the database.
You will be issued with a user ID and password, usually within 7 days.
Login to NLIS
The NLIS Database may be unavailable on Thursdays between 6pm–7pm
(Sydney time), for maintenance purposes. To login to NLIS at other times,
go to www.nlis.mla.com.au
Some users access the
NLIS database through
other software packages. If
you do this, please consult
your software vendor’s
guide on how to interact
with the NLIS database.
Excel files
If you create an Excel file
to upload to the database,
save the file in CSV
(Comma Separated Values)
format, for example, NLIS\
Transfer cattle 110908.csv
Notepad/Wordpad
If you create a Notepad or
WordPad file to upload, use
commas to separate fields
and save the file in TXT
(Text) format, for example,
NLIS\Transfer cattle
110908.txt
To find Notepad or Wordpad
on your computer, go to:
Windows Start menu
1
Enter your user ID and password and click 4Login
2
Select an option from the home page for your account.
3
Refer to the appropriate topic in this Guide for instructions.
Select Programs
Select Accessories
Select Notepad
(or Wordpad)
Log out of NLIS
1
After you finish a task, click 4Home
2
After you finish a session, click 4Log out to exit the database.
to return to the home page.
1
View/edit account details
View/edit account details
TIPS
If your details change, update them online so we can contact you.
You can change your
password, telephone, fax,
mobile and E-mail address.
If you change your E-mail,
you must update your
account details or your
account may be locked.
If you don’t have a fixed
telephone line, a mobile
number will do.
If you change your postal
address, notify
[email protected]
so the NLIS Helpdesk can
update your address.
1
Click 4Change or select View/edit my account details and click
4Go to see the Account/information screen.
Change password
1
Click 4Change password
If you buy or sell a cattle
property, notify
[email protected]
so the NLIS Helpdesk can
link a PIC to your account,
or lock your account.
Password rules
type the details and click 4Send
Passwords may be 2–8
alpha-numeric characters
e.g. Donny5. You may enter
characters in upper, lower
or mixed case. Do not
enter spaces or special
characters.
Edit phone, fax and mobile numbers
1
Click 4Continue to see the Profile information screen.
2
Edit details and 4Continue until you see a Confirmation screen.
3
Click 4Send to confirm or click 3Back
to change the details.
Profile information
You can only change the
fields with an asterisk*
2
Cattle moved off/onto property
Cattle moved off/onto property
TIPS
State regulations specify who is responsible for recording cattle transfers.
If cattle are bought or sold through a saleyard, or sold to an abattoir, the
saleyard or abattoir records the transfer on the database.
Print the Entering device
numbers Tech Tip.
The person who receives the cattle must ensure that the transfer is
recorded. If cattle are bought or sold privately, you or a third party acting
for you (usually an agent) may record the transfer.
Transfer cattle ONTO your PIC when you …
• buy cattle privately and move them onto your property
• move cattle between properties that you own, if the properties have
different Property Identification Codes (PICs)
Transfer cattle OFF your PIC when you …
• sell cattle privately and move them to the buyer’s PIC (on the buyer’s
behalf)
• move cattle to an agistment property owned by someone else
To transfer cattle, you
need the NLISID or RFID
numbers, the PICs they are
moving from and to, the
NVD or Waybill number (if
there is one) and date the
cattle moved.
PIC number
A unique property
Identification Code, for
example, SA123456
NLISID number
The number printed
on the outside of the
electronic ear tag, or
on the management tag
matching a rumen bolus,
for example
SA123456VBA00001
RFID number
The electronic chip
number inside the tag or
bolus, for example
999 000001234567
Leave one space after the
first three numbers.
You can copy an electronic
list of devices to the
clipboard and use the type
in the details method to
paste the numbers on
screen.
Methods
1
2
Select Cattle moved off my property or select
Cattle moved onto my property and click 4Go
Choose one of three methods:
• Click 4type in the details … see page 4.
• Click 4upload a file
… see page 4.
• Click 4choose from the list … see page 5.
• Use type in the details
to enter the details on
the screen
• Use upload a file if you
have a file containing all
the transfer details
• Use choose from the
list to view devices on
your property and tick
cattle that moved off
3
Cattle moved off/onto property
TIPS
Type in the details method
Enter the details
(Screen Step 1)
•
•
•
•
•
NLISIDs or RFIDs
Source PIC
Destination PIC
NVD (optional)
Date
Press the Enter key after
each device to transfer that
number to the large box
below.
3
Enter details in the fields shown above.
4
Click 4Continue or click 3Back to change the details.
5
Confirm and click 4Send
6
Retain the Upload ID of the transaction for your records.
to submit the details to the database.
If you make a mistake,
select the wrong NLISID or
RFID number and press the
Delete key.
Upload a file method
1
Create and save a file in CSV or TXT format on your computer.
Excel file example to transfer two cattle:
NLIS ID (or RFID)
Source PIC
Dest PIC
Create a file
NVD
Date
SA123456VBA00001
SA123456
MABC1234
11/09/2008
SA123455VBA00002
SA123456
MABC1234
11/09/2008
Notepad/Wordpad file example:
SA123456VBA00001,SA123456,MABC1234,,11/09/2008
SA123455VBA00002,SA123456,MABC1234,,11/09/2008
2
Alternatively, copy an
electronic list of numbers
to the clipboard (Ctrl and
C). Click in the large box
and paste in the numbers
(Ctrl and V).
Follow steps 1–2 on page 3 and click 4upload a file
If there is no NVD/Waybill,
leave the fourth field
empty.
If your reader software
does not create the file,
use Excel, Notepad or
Wordpad.
Use commas to separate
Notepad or Wordpad
fields. When you finish
typing the information for
one animal, press Enter
to start a new line for the
next animal.
Save a file
Save Excel files in CSV
(Comma Separated
Values) format.
Save Notepad or Wordpad
files in TXT (Text) format
4
3
Click 4Browse… to find the file to upload.
4
Click 4Continue or 4Browse… to choose a different file.
5
Follow prompts to confirm and 4Send details to the database.
6
Retain the Upload ID of the transaction for your records.
Cattle moved off/onto property
Choose from the list method
TIPS
You can only use this option to move cattle off a property.
You may record the
transfer off your property
to ensure the cattle
are removed from your
account.
1
Click 4choose from the list
2
Enter details in the fields shown below.
Choose your cattle
(Screen Step 1)
• Choose one option
• Select the PIC
• For cattle moved onto
or cattle bred on,
choose a date range
3
Click 4Continue or click 3Back to change the details.
4
Tick all the cattle that you want to move off the property.
Choose your cattle
(Screen Step 2)
4Help explains how to
sort the list of items.
4Select all ticks items
on the current screen.
4
4Next page means
there are more pages to
view and choose from.
To view all items on one
page select All from the
Items per page box.
To search for specific
items click 4Filter by
• Select a field to filter
by, enter the text
you want to find and
4Apply
or
• Select Status as the
field to filter by, tick
status types to include
and 4Apply
Export results
5
Click 4Continue or click 3Back to change the details.
6
Enter details in the fields below.
Click 4Export if you
want to save the data as a
file on your computer.
Enter the details
(Screen Step 3)
• Enter the PIC
• Choose the date
7
Click 4Continue or click 3Back to change the details.
8
Follow prompts to confirm and 4Send details to the database.
9
Retain the Upload ID of the transaction for your records.
• Enter NVD/Waybill
(optional)
5
Cattle that died on property
Cattle that died on property
When cattle die on your property, it is advisable to notify the database of
the device numbers for those cattle. As deceased animals are not listed on
current holdings reports, this makes it easier to reconcile your current cattle
holdings with your database account.
1
Select Cattle that have died on property and click 4Go
2
Choose one of two methods:
• Click 4type in the details … see steps 3–6 below.
• Click 4choose from the list … see page 7.
Type in the details method
3
Enter details in the fields shown below.
TIPS
Methods
• Use type in the details
to enter the details on
the screen
• Use choose from the
list to view devices on
your property and tick
cattle that died
Enter the details
(Screen Step 1)
• NLISIDs or RFIDs
• PIC cattle died on
• Date cattle died
Press the Enter key after
each device to transfer that
number to the large box
below.
Alternatively, copy an
electronic list of numbers
to the clipboard (Ctrl and
C). Click in the large box
and paste in the numbers
(Ctrl and V).
6
4
Click 4Continue or click 3Back to change the details.
5
Follow prompts to confirm and 4Send details to the database.
6
Retain the Upload ID of the transaction for your records.
If you make a mistake,
select the wrong NLISID or
RFID number and press the
Delete key.
Cattle that died on property
Choose from the list method
Rather than having to type the details on-screen, this method allows
you to select the device numbers of the dead cattle from a list.
1
Click 4choose from the list
2
Enter details in the fields shown below.
TIPS
Choose your cattle
(Screen Step 1)
• Choose one option
• Select the PIC
• For cattle moved onto
or cattle bred on,
choose a date range
3
Click 4Continue or click 3Back to change the details.
4
Tick all the cattle that you want to move off the property.
Choose your cattle
(Screen Step 2)
4Help explains how to
sort the list of items.
4Select all ticks items
on the current screen.
4Next page means
there are more pages to
view and choose from.
4
To view all items on one
page select All from the
Items per page box.
To search for specific items
click 4Filter by
• Select a field to filter by,
enter the text you want
to find and 4Apply
or
• Select Status as the
field to filter by, tick
status types to include
and 4Apply
Export results
Click 4Export if you
want to save the data as a
file on your computer.
5
Click 4Continue or click 3Back to change the details.
6
Choose the date and click 4Continue
Enter the details
(Screen Step 3)
• Choose the date the
cattle died
7
Follow prompts to confirm and 4Send details to the database.
8
Retain the Upload ID of the transaction for your records.
7
Device status
Device status
TIPS
Under the NLS (NLIS) program code, you can assign a ‘status’ code to a device
to indicate when:
Print the Program and
status codes Tech Tip.
• a non-EU Breeding (B) animal is on an EU-accredited property
EU-accredited producers
and feedlots must obtain
approval from EUCAS
before moving non-EU
breeding animals onto
their property.
• a device is Damaged (D1)
• a device was Lost after attachment (L2) to an animal
• a device is Inactive (IA)
If you don’t know if a device is lost or damaged, or if the animal associated
with the device is dead, has strayed, or has moved off the property, you can
assign the Inactive (IA) status to that device.
If a device with an IA status is transferred or slaughtered, and the transaction
is recorded on NLIS, the status is automatically removed. It can also be
removed manually by setting the status to ‘Off’.
Inactive devices are automatically excluded from ‘current holdings’ reports,
which makes is easier to reconcile cattle on the property with the database
account.
If you prefer to include some status types on these reports, see Customising
reports – Filter by on page 20 for more information.
A Breeding (B) status
should be assigned to
those devices on the
database.
To assign a device status,
you must know the NLISID
or RFID numbers of the
devices, the date the
status changed and the
status type you want to
assign, or remove.
If a tag becomes damaged
when applied to an
animal’s ear, or is lost
after attachment, you can
assign a status to that
device.
You can also record when
a tag is replaced (see the
Replaced tags topic).
Methods
• Use type in the details
to enter the details on
the screen
• Use upload a file if you
have a file containing
all the status details
• Use choose from the
list to view devices
on your property and
tick the cattle to be
assigned a status
1
Select Device status and click 4Go
2
Choose one of three methods:
• Click 4type in the details … see page 9.
• Click 4upload a file
… see page 9.
• Click 4choose from the list 8
… see page 10.
Device status
TIPS
Type in the details method
Enter the details
(Screen Step 1)
•
•
•
•
NLISIDs or RFIDs
Status date
Status type
Status On (or Off)
Press Enter after each
device to transfer that
number to the large box
below.
3
4
Enter details in the fields shown above.
Click 4Continue or click 3Back to change the details.
5
Follow prompts to confirm and 4Send details to the database.
6
Retain the Upload ID of the transaction for your records.
Upload a file method
1
If you make a mistake,
select the wrong NLISID
or RFID number and press
the Delete key.
Create and save a file in CSV or TXT format on your computer.
Create a file
Excel file example to assign the IA status to one device:
NLISID (or RFID)
999 000001234567
Date status
assigned
11/10/2008
Program code
NLS
Status code
IA
Setting
(ON or OFF)
ON
Notepad/Wordpad file example
999 000001234567,11/10/2008,NLS,IA,ON
2
Alternatively, copy an
electronic list of numbers
to the clipboard (Ctrl and
C). Click in the large box
and paste in the numbers
(Ctrl and V).
Follow steps 1–2 on page 8 and click 4upload a file
If you upload a file, you
must include the NLS
Program code.
If your reader software
does not create the file,
use Excel, Notepad or
Wordpad.
Use commas to separate
Notepad or Wordpad fields.
When you finish typing the
information for one animal,
press Enter to start a new
line for the next device.
Save a file
Save Excel files in CSV
(Comma Separated Values)
format.
Save Notepad or Wordpad
files in TXT (Text) format.
3
Click 4Browse… to find the file to upload.
4
Click 4Continue or 4Browse… to choose a different file.
5
Follow prompts to confirm and 4Send details to the database.
6
Retain the Upload ID of the transaction for your records.
9
Device status
Choose from the list method
1
Click 4choose from the list
2
Enter details in the fields shown below.
TIPS
Choose your cattle
(Screen Step 1)
• Choose one option
• Select the PIC
• For cattle moved onto
or cattle bred on,
choose a date range
Choose your cattle
(Screen Step 2)
3
Click 4Continue or click 3Back to change the details.
4
Tick all the cattle that you want to move off the property.
4Help explains how to
sort the list of items.
4Select all ticks items
on the current screen.
4Next page means there
are more pages to view and
choose from.
4
To view all items on one
page select All from the
Items per page box.
To search for specific items
click 4Filter by
• Select a field to filter by,
enter the text you want
to find and 4Apply
or
• Select Status as the
field to filter by, tick
status types to include
and 4Apply
Export results
5
Click 4Continue or click 3Back to change the details.
6
Enter details in the fields shown below.
Click 4Export if you
want to save the data as a
file on your computer.
Enter the details
(Screen Step 3)
• Status date
• Status type
• Status On (or Off)
7
Click 4Continue or click 3Back to change the details.
8
Follow prompts to confirm and 4Send details to the database.
9
Retain the Upload ID of the transaction for your records.
10
PIC reconciliation
PIC reconciliation
TIPS
The PIC reconciliation option helps you to reconcile the cattle on your
property with devices registered to your PIC on the database. You can use
this option anytime, but like the Audit property report, once or twice a year is
usually enough.
Print the PIC reconciliation
Tech Tip for an example of
the results displayed after
you submit a list.
First, you must create a list of Active devices, preferably in electronic form
on your computer. The list should include the NLISID or RFID numbers of all
devices attached to cattle on your property, plus all devices purchased, but not
yet attached to cattle.
If you use the type in the details method to submit your list to the database,
the results are displayed on-screen in four groups:
1.Active devices registered to the PIC
2.Devices not registered to the PIC
3.Devices registered but not submitted (not on your list)
4.Inactive devices registered to the PIC (IA device status)
If you use the upload a file method to submit your list, you will receive the
results by E-mail as CSV file attachments.
Whichever method you use, after reviewing the results, it is recommended
that you take appropriate action to reconcile your database account.
If your Active device list is
electronic, copy the list to
the clipboard, and use the
type in the details method
to paste the numbers onto
the screen.
If there are more than 300
devices, the upload a file
method may be faster.
If you upload a file, you will
receive the Results as CSV
files. To assign or remove
the IA status for any
devices, you must use the
Device status option.
Reconcile results
• Devices not registered
to PIC
You can 4Export the
device numbers from the
Results screen and save
them as a file on your
computer. Then, use the
Cattle moved onto my
property (Upload a file)
option to move those
devices onto your PIC.
• Registered devices not
submitted
If the devices are no longer
on your PIC, tick those
devices on the Results
screen to assign an IA
status.
• Inactive devices
1
Select PIC reconciliation and click 4Go
2
View the information screen and click 4Continue
3
Choose one of two methods:
If devices with an IA status
on the database are active
on your PIC, tick those
devices on the Results
screen to remove the IA
status.
• Click 4type in the details • Click 4upload a file
11
Replaced tags
Replaced tags
TIPS
You should only replace a device if it is lost after attachment to an animal, or
becomes damaged when the device is applied to the animal’s ear.
You must know the
NLISID or RFID number
of the old tag that was
replaced, the new device
number and the date the
tag was replaced.
To preserve any statuses associated with the animal, for example, LT (Lifetime
traceable), the old and new device numbers must be linked on the database.
If you don’t know the old device number, you cannot link the device numbers,
so the LT status will be lost.
If you don’t know the number of the old device, the LT status will be lost.
1
Select Replaced tags and click 4Go
2
Choose one of two methods:
12
• Click 4type in the details … see page 13.
• Click 4upload a file
… see page 13.
Methods
• Use type in the details
to enter the details for
one replaced device on
the screen
• Use upload a file if
you want to record
the replacement
of multiple devices
and you have a file
containing details for
all the replaced tags
Replaced tags
TIPS
Type in the details method
Enter the details
(Screen Step 1)
• NLISID or RFID of the
old device
• NLISID or RFID of the
new device
• Date replaced
If you make a mistake,
select the wrong NLISID
or RFID number and
press the Delete key.
3
Enter details in the fields shown above.
4
Click 4Continue or click 3Back to change the details.
5
Follow prompts to confirm and 4Send details to the database.
6
Retain the Upload ID of the transaction for your records.
Upload a file method
1
Create and save a file in CSV or TXT format on your computer.
Create a file
Excel file example to replace two tags:
Old NLIS ID (or RFID)
New NLIS ID (or RFID)
Date device replaced
999 000001234567
999 000001234998
23/10/2008
999 000001234588
999 000001234599
30/10/2008
Notepad/Wordpad file example:
999 000001234567,999 000001234998,23/10/2008
999 000001234588,999 000001234599,30/10/2008
2
Follow steps 1–2 on page 12 and click 4upload a file
If your reader software
does not create the file,
use Excel, Notepad or
Wordpad.
Use commas to separate
Notepad or Wordpad
fields. When you finish
typing the information for
one animal, press Enter
to start a new line for the
next device.
Save a file
Save Excel files in CSV
(Comma Separated
Values) format.
Save Notepad or
Wordpad files in TXT
(Text) format.
3
Click 4Browse… to find the file to upload.
4
Click 4Continue or 4Browse… to choose a different file.
5
Follow prompts to confirm and 4Send details to the database.
6
Retain the Upload ID of the transaction for your records.
13
Transfer correction
Transfer correction
TIPS
EU-accredited producers and feedlots must obtain approval from EUCAS
before submitting a transfer correction.
You can correct data you
submitted to NLIS.
You can only record a Transfer correction for property-to-property cattle
transfers. The correction can only be:
• submitted by the account that uploaded the original transfer
• processed if it relates to the most recent transfer recorded for a device
• used to correct the Transfer date, Source PIC, Destination PIC and
NVD/Waybill number
• used to remove a transfer if the wrong device was transferred
The database retains the
original transfer details
but the transaction history
for the device shows the
modified transfer details.
You can edit or remove
a transfer for a specific
device once only, so check
changes carefully.
If you make a mistake,
contact the NLIS Helpdesk
or your State DPI to
request assistance.
See the back cover of the
User Guide for the contact
details.
1
Select Transfer correction and click 4Go
If you don’t know the
upload ID that contains
the transfers you want
to remove or edit, select
View my transaction
history from the home
page.
Select the date you
uploaded the transfer
and click 4Go
Enter the upload ID that contains the transfers,
then select Edit or Remove and click 4Continue
2
14
• To Edit transfers
… see page 15.
• To Remove transfers … see page 16.
Transfer correction
Edit transfers
You can edit a transfer for a specific device only once, so before you send
changes to the database, check the details carefully.
3
To edit details for individual transfers, click the Edit item link.
• Enter details in the Edit item window.
or
To edit the same details for a group of transfers, tick each transfer you
want to edit, then click 4Enter selected items
• Enter details in the Edit selected items window.
TIPS
4Help explains how to
sort the list of items.
4Select all ticks items
on the current screen.
4Next page means
there are more pages to
view and choose from.
To view all items on one
page select All from the
Items per page box.
To search for specific
items click 4Filter by
• Select a field to filter
by, enter the text you
want to find and
4Apply
or
• Select Status as the
field to filter by, tick
status types to include
and 4Apply
4
4
Click 4Submit
to confirm or 4Cancel
to see the previous screen.
After you submit, edited transfers are shaded in orange.
5
When you have finished editing transfers, click 4Continue
6
Click 4Send to proceed or click 3Back to change the details.
7
Follow prompts to confirm and 4Send details to the database.
8
Retain the Upload ID of the transaction for your records.
15
Transfer correction
Remove transfers
If you transferred the wrong device(s), you can remove a transfer.
You can do this for a specific device only once, so before you confirm and
send changes to the database, check the details carefully.
3
Tick each transfer that you want to remove or click 4Select all to tick all
items on the current screen.
TIPS
4Help explains how to
sort the list of items.
4Select all ticks items
on the current screen.
4Next page means
there are more pages to
view and choose from.
To view all items on one
page select All from the
Items per page box.
To search for specific items
click 4Filter by
4
• Select a field to filter by,
enter the text you want
to find and 4Apply
or
• Select Status as the
field to filter by, tick
status types to include
and 4Apply
4
When you have selected all the transfers to be removed, click 4Continue
5
Check that the transfers you want to remove are displayed on the
Confirm details screen.
6
Click 4Send to proceed or click 3Back to select different transfers.
7
Follow prompts to confirm and 4Send details to the database.
8
Retain the Upload ID of the transaction for your records.
16
ERP enquiry
ERP enquiry
TIPS
There are two ways a feedlot can check the Extended Residue Program (ERP)
status of properties consigning cattle to the feedlot.
Print the Program and
status codes Tech Tip.
1. Submit an ERP enquiry (follow the steps below).
2. Generate an ERP PIC status report (see page 24).
For an enquiry, you must create a file to upload. The results are returned by
E-mail as a CSV file attachment. If you are permitted to view details for the
PIC numbers you submitted, the enquiry results will indicate the current ERP
status codes for those PICs.
To submit an ERP enquiry,
you must know the PIC
numbers and create a file
to upload those numbers
to the database.
If there are no ERP statuses associated with those PICs, the results will
indicate ‘Clear No Test’. The Livestock Production Assurance (LPA) Program
status of the properties is also displayed (if applicable).
Create a file
1
Create and save a file in CSV or TXT format on your computer.
2
Select ERP enquiry and click 4Go
An Excel file to check the
status of three PICs looks
like this:
QABC1234
NA123456
SA123456
For a Notepad or WordPad
file, press Enter to start a
new line for the next PIC.
QABC1234
NA123456
SA123456
Save a file
3
Click 4Browse… to find the file to upload.
4
Click 4Continue or 4Browse… to choose a different file.
5
Follow prompts to confirm and 4Send details to the database.
6
Retain the Upload ID of the transaction for your records.
Save Excel files in CSV
(Comma Separated
Values) format.
Save Notepad or Wordpad
files in TXT (Text) format
17
EU status downgrade
EU status downgrade
TIPS
On the database, cattle on feedlots accredited under the EUCAS (European
Union Cattle Accreditation Scheme) automatically have an EU status of ‘Yes’.
If an animal on the feedlot is not EU-eligible, you can downgrade its status by
sending the device number to NLIS.
All animals in the NLIS
database have an EU
status. This is either Yes
(the animal is eligible
for the EU market) or No
(not eligible for the EU
market).
1
Select EU status downgrade and click 4Go
2
Choose one of two methods.
Type in the details method
Methods
• Use the type in the
details method for one
animal
• Use the upload a file
method for multiple
animals
Excel file (3 animals):
999 000000001234
999 000000001255
999 000000001256
Notepad/Word file:
999 000000001234
3
Enter the NLISID or RFID number of the animal.
4
Click 4Continue to confirm and 4Send details to the database.
999 000000001256
5
Retain the Upload ID of the transaction for your records.
Press Enter to start a new
line for the next tag.
Upload a file method
3
Click 4Browse… to find the file to upload.
4
Click 4Continue or 4Browse… to choose a different file.
5
Follow prompts to confirm and 4Send details to the database.
6
Retain the Upload ID of the transaction for your records.
18
999 000000001255
Save a file
Save Excel files in CSV
(Comma Separated
Values) format.
Save Notepad or Wordpad
files in TXT (Text) format.
Generating reports
Generating reports
Generating reports
Generating reports
Generating reports
TIPS
To comply with the National Traceability Performance Standards, States must
be able to trace cattle within 24 hours to contain disease outbreaks or control
chemical residue incidents.
Selecting reports
If cattle are bought or sold through a saleyard, or sold to an abattoir, the
saleyard or abattoir records the transfer on the database. If you buy or sell
cattle privately and record the transfer yourself, or authorise someone else to
do it, it is still your responsibility to ensure that the information recorded for
your property is accurate.
There are various database reports to help you monitor transfers on and off
your property, reconcile your current holdings with your database account and
check any ‘statuses’ recorded for your cattle.
If you can’t see the report you want on the home page, see View/generate all
reports on page 29.
Click the i icon next to
the Report name for a
description. If this is the
report you want, click
4Go
After selecting a report,
click 4Help if you
want more information
on how to generate the
report.
Output types
On-screen and XML
reports will usually
be delivered in a few
minutes.
E-mail reports will
usually be delivered
within two hours.
If you request an
On-screen report, but
there is too much data to
display, you will receive
an email message and
can then access the
report via the View large
report results option.
Printing reports
When the report is
displayed on-screen, click
4Print preview to see
how the printed report
would look.
1
Select the report you want and click 4Go
To print the report, go to
the File menu in Print
preview and choose
Print.
2
Enter the details for the specific report and click 4Go
Customising reports
See page 20 for
instructions
19
Customising reports
Customising reports
Sorting by fields
RFID t
TIPS
Issue date s
Click a column heading to sort the report by that field. For example, to sort
by the RFID field, click the RFID button at the top of the column. s Indicates
data is sorted in ascending order and t indicates descending order. Click the
button again to change the order.
Next page / Items per page
Page 1 of 3 1 2 3
4Next page
The report automatically displays 20 items on each page. If there are more
than 20 items, you will see a Next page button. To view all items on one
screen, select All from the Items per page box.
Column display
4Column display
To choose which columns are displayed, click the Column display button. A
pop-up window lists the column names in the report. Un-tick checkboxes for
any columns you don’t want to view and click the Submit button to update the
report information on the screen.
Filter by
4Filter by
You can only filter or search by one field at a time. To filter or search for
particular records within the report, click the Filter by button. Select the field
you want to search or filter by, enter the text you want to find and click the
Apply button. To search by status, select Status and tick the Status types you
want to view. To remove a filter, click the Remove filter button.
Export
4Export
Results for any report can be exported to a file that can be saved on your
computer or imported into other software programs. To export the report
results displayed on screen, click the Export button, then click the Help
button on the Export results screen and follow the instructions.
20
After a report is displayed
on screen, you can
customise it to suit your
needs.
Audit property report
Audit property report
TIPS
The Audit property report helps you to reconcile the cattle on your property with
devices registered to your PIC on the database. You can generate this report
anytime, but like PIC reconciliation, once or twice a year is usually enough.
Print the Audit property
report Tech Tip to see
an example of the report
results.
If there are many cattle on your property and many transactions recorded for
your database account, depending on the date range you specify, the report
can contain a lot of information. The results are therefore delivered by E-mail
as a CSV file attachment.
After reviewing the report results, take appropriate action to reconcile the
cattle on your property with your database account.
1
Select Audit property and click 4Go
2
Select the PIC for which you want the report and click 4Go
3
Select the Start Date and End Date and click 4Go
The report information
is grouped in sections –
cattle on your property,
deceased cattle, cattle
transferred on and off your
property, inactive devices,
purchased devices, system
transfers etc.
Due to the potential size
of this report, the default
Output type is E-mail. The
report may take up to two
hours to process and will
be delivered to you as a
CSV file attachment.
Depending on the number
of cattle movements on
and off your property, and
the date range you specify,
your Audit property report
may be many pages.
21
Text
Beast enquiries report
Beast enquiries report
TIPS
If you know the NLISID numbers of devices and need the matching RFID
numbers, you can find out using the Beast enquiries report.
Print the LT Reason for
loss codes Tech Tip.
If the device numbers entered are registered to a PIC linked to your account,
the report will display the Current PIC, RFID, NLIS ID, EU status and LT status.
If the devices were previously registered to that PIC, only the RFID and NLISID
will be displayed. If the device was never registered to that PIC, you will be
advised ‘You are not authorised to view information for that device.’
1
Select Beast enquiries and click 4Go
2
Choose an Output type for the report.
3
Enter the NLISID or RFID numbers and click 4Go
Customising and printing
reports
See TIPS pages 19–20.
Press the Enter key after
each device to start a new
line.
Alternatively, copy an
electronic list of numbers
to the clipboard (Ctrl and
C). Click in the large box
and paste in the numbers
(Ctrl and V).
If you make a mistake,
select the wrong NLISID
or RFID number and press
the Delete key.
22
Carcase feedback query
Text
Carcase feedback query
TIPS
When an abattoir slaughters cattle, it uploads the device numbers to the
database. Depending on State regulations, the abattoir may also upload
carcase feedback (CFB) data, usually within 48 hours. In Western Australia,
abattoirs must upload data within seven days.
Print the Carcase
feedback query Tech Tip
for a description of the
query results.
The data uploaded varies according to the State and the software program
used by the abattoir. You can submit a Carcase feedback query to the
database but you will only be able to view data if the abattoir records the PIC
of consignment (where the cattle came from). If the data is inaccurate or
incomplete, contact the abattoir.
2
Select Carcase feedback query and click 4Go
Enter a date range, select a PIC and click 4Continue
3
Select one or more lots, and click 4Continue
1
Customising and printing
reports
See TIPS pages 19–20.
If you specify a wide date
range when you submit
the query, or if there is a
lot of CFB data, the query
may take a few minutes to
process.
To select more than one
lot, click and drag down
the list or press the Ctrl
key and click the lots you
want. For each lot you
select, the CFB data will
be listed in a separate row
on the results screen
When the query results
are displayed, click
4Export
if you want to
save the CFB data as a file
on your computer.
23
ERP PIC status report
ERP PIC status report
TIPS
There are two ways a feedlot can check the Extended Residue Program (ERP)
status of properties consigning cattle to the feedlot.
Print the Program and
status codes Tech Tip.
1. Submit an ERP enquiry (see page 17).
Customising and printing
reports
2. Generate an ERP PIC status report (follow the steps below).
See TIPS pages 19–20
If you choose the report, the results are displayed on-screen. If you are
permitted to view details for the PIC numbers you submitted, the results will
indicate the current ERP status codes for those PICs.
1
Select ERP PIC status and click 4Go
2
Choose an Output type for the report.
3
Type or paste in the PIC numbers and click 4Go
If there are no ERP
statuses associated with
the PICs you enter, the
results will indicate ‘Clear
No Test’.
The Livestock Production
Assurance (LPA) Program
status of the properties
will be displayed (if
applicable).
24
Search the PIC register
Search the PIC register
TIPS
Property Identification Code (PIC) registers maintained by States are uploaded
to the NLIS Database to create a National PIC register.
Customising and printing
reports
You can search the register to find information about other properties. For
example, you may know the PIC number, but not the name of the owner or
business associated with that PIC.
State privacy laws specify what information may be disclosed, and to whom.
If you are permitted to view the information, any records matching the details
you typed in the search fields will be displayed.
See TIPS pages 19–20.
If you cannot see the
Search the PIC register
report on the home page
menu, select View/
generate all reports,
scroll to the PIC queries
group and select the
report.
The report returns all
records matching the
information you entered
and displays the contact
details.
1
Select View/generate all reports and click 4Go
2
Select Search the PIC register and click 4Go
3
Choose an Output type for the report.
4
Type information in one or more fields and click 4Go
Click the PIC hyperlink to
display additional Town
and State information.
25
Text
View devices on property
View devices on property
TIPS
This report downloads a list of devices registered to your PIC. There are eight
options for this report. The default option is all devices currently on your PIC
(no date range), but you can also request a list of purchased devices, a list
of all deceased cattle, a list of cattle movements onto your property for a
specific period etc.
Print the LT reason for
loss codes Tech Tip.
The Lifetime traceable
status is Yes or No.
The European Union
status codes are:
Y EU eligible
N Not EU eligible
B Breeding animal
D Deceased animal
1
Select View devices on my property and click 4Go
2
Choose an Output type for the report.
3
Select the PIC for which you want to view devices.
4
Select one of the eight report types and click 4Go
5
Choose a date range (if applicable) and click 4Go
Customising and printing
reports
See TIPS pages 19–20.
4Next page means
there are more pages to
view.
To view all items on one
page, select All from the
Items per page box.
The list automatically
excludes devices with an
IA (Inactive) status.
If you want to include
Inactive devices (or other
status types) click
4Filter by
• Select a field to filter
by, enter the text
you want to find and
4Apply
or
• Select Status as the
field to filter by, tick
status types to include
and 4Apply
Click 4Export if you
want to save the data as a
file on your computer.
26
View large report results
Text
View large report results
TIPS
As some reports contain a large amount of data, they take a while to process.
If your report is too large to display on-screen, you will be notified by E-Mail
when the report is ready to view.
Large report results are
stored for seven days and
then removed.
1
When you are notified that the report is ready to view, click the
hyperlink in the E-mail message to open the report.
2
If the link doesn’t display the report, login to NLIS.
3
Select View large report results and click 4Go
4
Click the Report name hyperlink for the report.
If you are logged onto the
database when the E-Mail
message arrives, you can
click a hyperlink within
the message to see the
report.
If you are not logged
on when the message
arrives, the link will not
be ‘active’.
If you did not request any
large reports, or your
report is not complete,
the screen states:
There are no results
available. Please try
again later.
5
When the File download screen appears:
• click
Open
to view the file, or
• click
Save
to save the file on your computer, or
• click
Cancel
if you prefer not to download a file.
27
View transaction history
View transaction history
TIPS
To ensure that files were processed successfully, view your transaction history
after every database session. After you submit transactions to the database,
you will see a Receipt screen. You can click the 4View my transaction history
button on that screen, or generate the report from the home page menu.
Print the Upload status
categories Tech Tip.
The report lists all transactions submitted to the database for your account,
the dates they were uploaded and the Upload status.
A COMPLETE status means files were processed successfully. A WARNING
status may not require action but an ERROR usually does.
1
Select View my transaction history and click 4Go
2
Choose a date range and click 4Continue
4Next page means there
are more pages to view.
To view all items on one
page, select All from the
Items per page box.
Note the Upload ID of a
transaction, so you can
follow it up with the NLIS
Helpdesk if necessary.
Click the User file name
hyperlink to view the file
contents.
Click the Upload status
hyperlink to find out about
ERRORS or WARNINGs.
Click 4Export if you
want to save the data as a
file on your computer.
28
View/generate all reports
View/generate all reports
TIPS
If you can’t see the report you want in the Reports menu on the home page,
select View/generate all reports to choose from a list of supplementary
reports.
Customising and printing
reports
See TIPS pages 19–20.
The report options for feedlot accounts are slightly different from those shown
below, but the report process is the same.
1
Select View/generate all reports and click 4Go
2
Select the report you want and click 4Go
3
Choose an Output type for the report.
4
Enter the details for the specific report and click 4Go
After selecting a report,
click 4Help if you want
more information on
generating reports.
Click the i icon next to
the Report name for a
description of the report.
If this is the one you want,
click 4Go to generate
the report.
You can also choose
Reports available for
this account, then click
4Go to display a list
and description of all the
reports you can run.
29
Text
Contact information
NLIS Database Helpdesk
Phone: 1800
654 743
Email: [email protected]
Meat & Livestock Australia operates the Helpdesk from 8am–6pm (Sydney time), Monday–Friday. If you have
trouble with the database and can’t solve the problem using 4Help buttons on the website, note your
user ID and the upload ID before you contact the Helpdesk. You may also need the device numbers
mentioned in NLIS E-mail messages.
NLIS State Co-ordinators
For information regarding the rules governing NLIS, contact your local State Department:
New South Wales
Department of Primary Industries
[email protected]
Northern Territory
Department of Regional Development,
Primary Industries, Fisheries and Resources
Phone: 08 8999 2034
[email protected]
Queensland
Department of Primary Industries
DPI Call centre: 13 2523
[email protected]
South Australia
Primary Industries & Resources of South Australia
NLIS Hotline: 1800 654 688
[email protected]
Tasmania
Department of Primary Industries & Water
Phone: 1300 368 550
[email protected]
Victoria
Department of Primary Industries
Helpline: 1800 678 779
[email protected]
Western Australia
Department of Agriculture and Food
Phone: 08 9780 6202
[email protected]
NVD/Waybills and LPA
For information on National Vendor Declarations,
contact the NVD/LPA Hotline:
Phone: 1800 683 111
Fax: 02 9463 9182
[email protected]
European Union Cattle
Accreditation Scheme
EUCAS Hotline: 1800 305 544
Fax: 02 6272 5442
[email protected]
NLIS is an initiative of SAFEMEAT, the partnership between the Australian
meat and livestock industry and State and Federal governments. Meat &
Livestock Australia manages the NLIS Database on behalf of SAFEMEAT.
Funding partners of the NLIS Database include:
Due to continued enhancements to the NLIS, information contained in this document may become out
of date. To obtain the most recent version, contact the NLIS Helpdesk on 1800 654 743 or go to the
NLIS website at www.nlis.mla.com.au
Level 1, 165 Walker St
North Sydney NSW 2060
www.mla.com.au
This publication is published by Meat & Livestock Australia Limited ABN 39 081 678 364.
Care has been taken to ensure the accuracy of information in this document, but MLA cannot accept
responsibility for errors in the accuracy or completeness of the information. Reproduction of this
material is permitted with due acknowledgement of MLA.
Published December 2008
ISBN 9781741911 473
© Meat & Livestock Australia
ABN 39 081 678 364