1
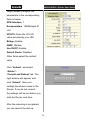
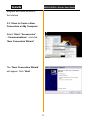
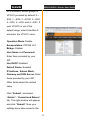
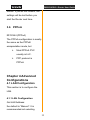
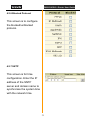
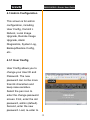
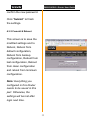
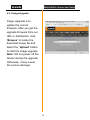
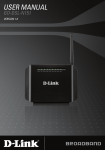
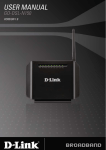
D820R ADSL2+ Router User Guide 0 D820R ADSL2+ Router User Guide Copyright Statement is the registered trademark of Shenzhen Tenda Technology Co., Ltd. All the products and product names mentioned herein are the trademarks or registered trademarks of their respective holders. Copyright of the whole product as integration, including its accessories and software, belongs to Shenzhen Tenda Technology Co., Ltd. Without the permission of Shenzhen Tenda Technology Co., Ltd, any individual or party is not allowed to copy, plagiarize, imitate or translate it into other languages. All the photos and product specifications mentioned in this guide are for references only. As the upgrade of software and hardware, there will be changes. And if there are changes, Tenda is not responsible for informing in advance. If you want to know more about our product information, please visit our website at www.tenda.cn. 1 D820R ADSL2+ Router User Guide Package Contents Unpack the packet and the following contents should be founded. One D820R External ADSL2+ Router One AC Power Adapter (AC9V/1A) One Voice Splitter One RJ-45 Ethernet Network Cable Two RJ-11 Telephone Line One Quick Installation Guide One CD-ROM If any of the listed items are missing or damaged, please contact the Tenda reseller from whom you purchased for replacement immediately. 2 D820R ADSL2+ Router User Guide Contents Chapter 1 Overview .....................................................................1 1.1 Product Introduction...........................................................1 1.2 Product Features................................................................1 1.3 Supporting Protocol............................................................2 1.4 Data Encapsulation ............................................................2 Chapter 2 Hardware Description .................................................3 2.1 External Components.........................................................3 2.1.1 The Front Panel...........................................................3 2.1.2 Back Panel ..................................................................4 2.2 Minimum Requirements .....................................................5 2.3 Installation Environment.....................................................6 2.3.1 Physical Environment Requirement ............................6 2.3.2 Working Environment ..................................................6 2.4 Hardware Installation .........................................................6 2.4.1 Installation Requirement .............................................6 2.4.2 Hardware Installation Procedures ...............................7 Chapter3 Internet Connection Configurations .............................9 3.1 PC Configuration................................................................9 3.1.1 How to Set the Network Configurations ......................9 3.1.2 How to Check the Network Connection .................... 11 3.2 Login ................................................................................12 3 D820R ADSL2+ Router User Guide 3.3 External Dial-Up(Bridge) .............................................13 3.3.1 How to Create a New Connection on My Computer .15 3.4 The Internal Dial-Up Connection (Route).........................18 3.4.1 PPPoE.......................................................................18 3.4.1.1 Before Configuring....................................................... 18 3.4.1.2 Configuring Parameters............................................... 19 3.5 Static IP ............................................................................20 3.5.1 Before Configuring ....................................................20 3.5.2 Configuring Parameters ............................................20 3.6 PPPoA ...........................................................................22 Chapter 4 Advanced Configurations ..........................................22 4.1 LAN Configuration............................................................22 4.1.1 LAN Configuration.....................................................22 4.1.2 DHCP Server.............................................................23 4.1.3 DHCP Pool Information .............................................23 4.2 System Service ................................................................24 4.2.1 NAT............................................................................24 4.2.2 RIP ............................................................................29 4.2.3 Firewall ......................................................................30 4.2.4 IP and Bridge Filter....................................................30 4.2.5 UPNP ........................................................................30 4.2.6 Blocked Protocol .......................................................31 4.2.7 SNTP.........................................................................31 4.3 Admin Configuration.........................................................32 4.3.1 User Config ...............................................................32 4.3.2 Commit & Reboot ......................................................33 4 D820R ADSL2+ Router User Guide 4.3.3 Image Upgrade..........................................................34 Chapter 5 Appendix ...................................................................35 Appendix 1: Troubleshooting .................................................35 Appendix 2: FAQ ....................................................................36 5 D820R ADSL2+ Router User Guide Chapter 1 Overview 1.1 Product Introduction D820R ADSL2+ Router complies with ADSL, ADSL2 and ADSL2+ standards. Supporting up to 24Mbps downstream rate and 1Mbps upstream rate, it supports multiple protocols and provides NAT Router and Bridge functions. In addition, the intelligent software, Setup Wizard, can assist you to access the Internet fast and easily. Powerful performance and exquisite appearance, it is the best choice for SOHO and small enterprise users to share the Internet. 1.2 Product Features Provides up to 24Mbps downstream rate and 1Mbps upstream rate Supports DHCP, NAT, IGMP, ICMP, ARP One10/100M Auto-Negotiation RJ-45 Ethernet port for network adapter and switch connectivity One RJ-11 port and Voice Splitter included Provides Web-based management and firmware upgrade Complies with ADSL, ADSL2 and ADSL2+ standards Compatible with all mainstream DSLAM (CO) Provides PPPOE, PPPOA, CLIP protocol 1 D820R ADSL2+ Router User Guide Supports firewall and hacker attack prevention Supports Internet Multi Media Provides static and dynamic route Up to 6.5km transmission distance 1.3 Supporting Protocol Supports full-rate ADSL2+ standard ANSI T1. 413 Issue 2 ITU-T G. 992. 1 (G. dmt) ITU-T G. 992. 2 (G. Lite) ITU-T G. 992. 3 ITU-T G. 992. 5 1.4 Data Encapsulation Supports RFC 1483 Bridge、RFC 1483 Router Supports Classical IP over ATM (RFC 1577) Supports PPP over ATM(RFC 2364) Supports PPP over Ethernet (RFC 2516) 2 D820R ADSL2+ Router User Guide Chapter 2 Hardware Description 2.1 External Components 2.1.1 The Front Panel D820R Front Panel Five LED indicators are located on the front panel. Through these indicators’ working status, we can tell the Router whether it is working normally. The LED indicator’s description is shown below. LED Indicator PWR Color Status Description Green ON The device is powered on. OFF Power failure — 3 D820R ADSL2+ Router User Guide Indicates the connection is ON ADSL Green established. Blinking Blinking Fast Indicates the connection is not established. Indicates the device gets through handshake with physical layer device. Indicates the Router is ACT Green Blinking transmitting/receiving data packets. Indicates the Router is LAN Green Blinking transmitting/receiving data packets to LAN devices. Indicates the device is Green ON transmitting/receiving data packets at 100Mbps. 100M — Indicates there is no OFF connection on LAN. 2.1.2 Back Panel D820R Back Panel 4 D820R ADSL2+ Router User Guide 1) ON/OFF: Turn on/off the Router’s power 2) POWER: The power socket for power adapter. Notice: please use the matched power adapter (9V~50Hz 1A). Use of a different voltage may damage your Router. 3) RESET: The reset button for restoring to factory default settings. Notice: Press the button three times with one conoid thing. After all indicators turn off, the Router will reboot and restore to default settings. 4) LAN: RJ-45 LAN port for connecting to hub, switch or PC’s network adapter in your local network. 5) LINE: Connect to the Modem port the Voice Splitter or connecting the telephone line. 2.2 Minimum Requirements 64MB Memory 200MHz CPU 10/100M Network Adapter Internet Explorer 5.0 Operating system supporting TCP/IP protocol Broadband Internet service (XDSL/Cable Modem) 5 D820R ADSL2+ Router User Guide 2.3 Installation Environment 2.3.1 Physical Environment Requirement Install the device horizontally. Do not wipe off dirt with wet cloth. Make sure there’s adequate space for proper heat dissipation and adequate ventilation around the device. Keep the environment clean and dry. Power off the device and unplug the power adapter in heavy rain and lightning day. 2.3.2 Working Environment Operating temperature: 0 ℃~40 ℃ Storage temperature: -40 ℃~70 ℃ Humidity: 10%~90% RH non-condensing 2.4 Hardware Installation 2.4.1 Installation Requirement Before you install the device, please make sure you the following requirements are acquired. 6 D820R ADSL2+ Router User Guide Have acquired at least one WAN IP address or user name and password provided by your ISP One or more 10Base-T/100Base-T Network Adapter on your PC Internet Explorer 5.0 or above 2.4.2 Hardware Installation Procedures 1. Connect the Modem port of the Voice Splitter with the D820R ADSL2+ Router LINE port by telephone line. While you need to use a telephone, please attach telephone line into the PHONE port of the Voice Splitter. 2. Connect the ADSL2+ Router’s LAN port to your computer’s network adapter with network cable. 3. Plug one end of the AC Power Adapter into the Power socket on the Ethernet ADSL Router and the other end to a standard electrical outlet, and turn on the power switch. 4. Check the line connection as the below figure to see if everything is ready. 7 D820R ADSL2+ Router User Guide D820R Hardware Installation Plan 8 D820R ADSL2+ Router User Guide Chapter3 Internet Connection Configurations D820R provides the plug-and-play solution. You have two ways to configure the device: 1. Use the external dial-up software 2. Use the built-in dial-up software If you use the built-in dial-up software, please refer to the following instruction to configure the device. 3.1 PC Configuration 3.1.1 How to Set the Network Configurations Right click “My Network Places” and select “Properties”. Right click “Local Area Network Connection” and select “Properties”. 9 D820R ADSL2+ Router User Guide Select “Internet Protocol (TCP/IP)” and click “Properties”. Select “Obtain an IP address automatically” and “Obtain DNS server address automatically”. Click “OK” to save the configurations. Or select “Use the following IP address” and enter the IP address, Subnet mask, Default gateway as shown right. IP address: 192.168.1.XXX (XXX is a number between 2 and 254.) Subnet mask: 255.255.255.0 Default gateway: 192.168.1.1 10 D820R ADSL2+ Router User Guide DNS server: Enter the DNS server provided by your ISP. Or use the gateway (192.168.1.1) as the DNS proxy server and click “OK”. Notice:Windows 98 users can open TCP/IP Properties according to the following: Right-click Network Neighbor -> Choose Properties -> Double-click TCP/IP. Windows 2000/NT/XP users can TCP/IP Properties according to the following: Right-click Network Neighbor -> Choose Properties -> Right-click Local Connection -> Choose Properties -> Double-click Internet Protocol (TCP/IP). 3.1.2 How to Check the Network Connection Select “Start”—All Programs”—“Accessories”— 11 D820R ADSL2+ Router User Guide “Command Prompt”. Input the “ping 192.168.1.1” and press “Enter”. If the screen displays as the right figure, it means your PC is connected to your router successfully. If the figure is shown as right, it means your PC is not connected to the Router. Please check if the physical cabling and power supply are OK. 3.2 Login Enter the Router’s IP address: http://192.168.1.1 and press “Enter”. Please input the “admin” in both User Name and Password. Click “OK”. Note:It is recommended 12 D820R ADSL2+ Router User Guide to check the “Remember my password” for fast login next time. The window will appear as right: 3.3 External Dial-up (Bridge) After the D802R is connected to your ISP successfully (ADSL Link indicator/ON), launch the dial-up program on your computer, enter the accounts and password to access the Internet. D802R provides seven groups of VPI/VCI by default: 8/32, 8/35, 0/100,8/81, 0/32, 0/35 and 0/81. If your VPI/VCI is out of the default 13 D820R ADSL2+ Router User Guide range, please configure the parameters in the corresponding field as below: ATM Interface: 1 Encapsulation: 1483Bridged IP LLC VPI/VCI: Enter the VPI/VCI value provided by your ISP. Bridge: Enable IGMP: Disable Use DHCP: Enable Default Route: Disabled Other fields select the default value. Click “Submit”, and select “Admin”> “Commit and Reboot” tab. The right window will appear, and click “Submit”. Now your settings have been saved in the Router. If you do not commit, the settings will be lost before you start the Router next time. After the rebooting is completed, you can launch the dial-up 14 D820R ADSL2+ Router User Guide program and have access to the Internet 3.3.1 How to Create a New Connection on My Computer Select “Start”-“Accessories” -“Communications”, and click “New Connection Wizard”; The “New Connection Wizard” will appear. Click “Next”. 15 D820R ADSL2+ Router User Guide Select “Connect to the Internet” and click “Next”. Select “Set up my connection manually” and click “Next”. Select “Connect using a broadband connection that…” and click “Next”. 16 D820R ADSL2+ Router User Guide Enter your ISP name and click “Next”. Enter the User name and Password provided by your ISP, and click “Next”. Check “Add a shortcut to this connection to my desktop” and click “Finish”. 17 D820R ADSL2+ Router User Guide A shortcut icon will appear to your desktop. Double click this icon, enter the correct user name and password as shown right and click “Connect”. A new icon will appear in the right-down desktop, which means the connection is established. 3.4 The Internal Dial-up Connection (Route) 3.4.1 PPPoE 3.4.1.1 Before Configuring Before you configure the device, please make sure you have acquired the following information from your ISP: VPI/VCI, Encapsulation, 18 D820R ADSL2+ Router User Guide Accounts, and Password. 3.4.1.2 Configuring Parameters In the “Home” screen, click “Quick Configuration”. The right window will appear. Please fill the following parameters in the corresponding field. ATM Interface: seven groups of VPI/VCI provided by default: 0→ 8/32, 1→8/35, 2→0/100, 3→8/81, 4→0/32, 5→0/35, and 6→0/81. If your VPI/VCI is out of the default range, select Interface 0 and enter the VPI/VCI value. Operation Mode: Enable Encapsulation: PPPOE LLC Bridge: Disable User Name and Password:Enter them provided by your ISP. Use DHCP: Enabled Default Route: Enabled Other fields select the default value. 19 D820R ADSL2+ Router User Guide Click “Submit”, and select “Admin”> “Commit and Reboot” tab. The right window will appear, and click “Commit”. Now your settings have been saved in the Router. If you do not commit, the settings will be lost before you start the Router next time. 3.5 Static IP 3.5.1 Before Configuring Before you configure the device, please make sure you have acquired the following information from your ISP: VPI/VCI, Encapsulation, IP Address, Subnet Mask, Gateway and DNS. 3.5.2 Configuring Parameters In the “Home” screen, click “Quick Configuration”. The right window will appear. Please fill the following parameters in the corresponding field. 20 D820R ADSL2+ Router User Guide ATM Interface: seven groups of VPI/VCI provided by default: 0→ 8/32, 1→8/35, 2→0/100, 3→8/81, 4→0/32, 5→0/35, and 6→0/81. If your VPI/VCI is out of the default range, select Interface 0 and enter the VPI/VCI value. Operation Mode: Enable Encapsulation: PPPOE LLC Bridge: Disable User Name and Password: Enter them provided by your ISP. Use DHCP: Enabled Default Route: Enabled IP Address, Subnet Mask, Gateway and DNS Server: Enter these provided by your ISP. Other fields select the default value. Click “Submit”, and select “Admin”> “Commit and Reboot” tab. The right window will appear, and click “Submit”. Now your settings have been saved in the 21 D820R ADSL2+ Router User Guide Router. If you do not commit, the settings will be lost before you start the Router next time. 3.6 PPPoA RFC2364 (PPPoA) The PPPoA configuration is mostly the same as the PPPoE encapsulation mode, but Most PPPoA PVC usually is LLC. PPP protocol is PPPoA Chapter 4 Advanced Configurations 4.1 LAN Configuration This section is to configure the LAN. 4.1.1 LAN Configuration Get LAN Address: the default is “Manual”. It is recommended not selecting 22 D820R ADSL2+ Router User Guide others in this field. Otherwise, you may not enter the Web-based utility. LAN IP Address: the default address is 192.168.1.1. LAN Network Mask: the default address is 255.255.255.0. If the IP address is changed, please make the network mask matched. 4.1.2 DHCP Server After you modify the IP address of the Router, you may find you need more IP addresses. So select the “IP Server” tab, click the “Add” button if you need an IP pool. If you need a new IP pool which overlaps the configured IP, you can click the “Garbage Can” icon to delete the configured IP pool. 4.1.3 DHCP Pool Information After you click “Add”, the right 23 D820R ADSL2+ Router User Guide screen will appear.Please enter the “Start IP Address”, “End IP Address” and “Netmask”, click “Submit” to save the configuration. Note: the start IP can not be vertical with the end IP address.The other fields can leave blank. 4.2 System Service You can configure the following items: NAT, RIP, Firewall, IP Filter, Bridge Filter, DNS, Blocked Protocol, DDNS, UPnP, and SNTP. 4.2.1 NAT NAT allows a signal device to act as an intermediary between the Internal and a local network, which usually assigns a public address to a PC (or group of 24 D820R ADSL2+ Router User Guide computer).Select “NAT” tab, and in “NAT Option” select “NAT Rule Entry”.Click “Add” to create a new NAT rule. The window will appear as right. Rule Flavor: Basic Rule:The Basic flavor translates the private (LAN-side) IP address to a public (WAN-side) address, Filter Rule: translates public and private IP addresses on a one-to-one basis. NAPT Rule:The NAPT flavor translates private source IP addresses to a single public IP address. The NAPT rule also translates the source port numbers to port numbers that are defined on the NAT Global Configuration page 25 D820R ADSL2+ Router User Guide Bimap Rule: performs address translations in both the outgoing and incoming directions RDR Rule:The RDR rule flavor allows you to make a computer on your LAN, such as a Web or FTP server, available to Internet users without having to obtain a public IP address for that computer. The computer's private IP address is translated to your public IP address in all incoming and outgoing data packets. Pass Rule: allow a range of IP addresses to remain untranslated even when another rule is 26 D820R ADSL2+ Router User Guide defined that would otherwise perform a translation on them. Rule ID: The lower rule ID number, the higher the priority. IF Name:Select the corresponding WAN interface, such as PPP, 1483B and so on. Protocol:Select one protocol from (TCP/UDP/ICMP). Local Address From:The starting local address 0.0.0.0 means all; Local Address To: The ending local address. 255.255.255.0 means all; Global Address 27 D820R ADSL2+ Router User Guide From:0.0.0.0; Global Address To: 0.0.0.0; Destination Port From:The starting destination port; Destination Port To: The ending destination port Local Port:The local IP port Example 1: Providing Web service on 192.168.1.3: 1. Click “Add” in NAT Rule Entry 2. Rule Flavor: RDR 3. IP Name: select the corresponding WAN protocol 4. Protocol: ANY 5. Local Address From: 192.168.1.3 6. Local Address To: 192.168.1.3 7. Destination Port From: 80 28 D820R ADSL2+ Router User Guide 8. Destination Port To: 80 Now the other PCs on the WAN can access the Router through this WAN IP address. Please configure it as right. Example 2: 30 PCs (192.168.1.2~192. 168.1.31) can share the ADSL Internet resources over the NAPT rule. Please configure it as right. 4.2.2 RIP This Router uses the RIP protocol to communicate with other device. The table lists all interfaces (usually LAN interface) and presents the protocol version. 29 D820R ADSL2+ Router User Guide 4.2.3 Firewall This screen is the firewall general configuration. You can configure the “Blacklist Status”, “Blacklist Period”, “Attack Protection”, DOS Protection…and Log Destination. 4.2.4 IP and Bridge Filter To configure the LAN access rule, you can set the IP and Bridge Filter.When you select the Bridge connection mode, you can configure the Bridge Filter. 4.2.5 UPNP This screen is to enable/disable the UPnP configuration. 30 D820R ADSL2+ Router User Guide 4.2.6 Blocked Protocol This screen is to configure the blocked/unblocked protocol. 4.2.7 SNTP This screen is for time configuration. Enter the IP address of the SNTP server and domain name to synchronize the system time with the network time. 31 D820R ADSL2+ Router User Guide 4.3 Admin Configuration This screen is for admin configuration, including User Config, Commit﹠ Reboot, Local Image Upgrade, Remote Image Upgrade, Alarm Diagnostics, System Log, Backup/Restore Config, etc.. 4.3.1 User Config User Config allows you to change your User ID and Password. The new password can not be more than 64 characters and keep case-sensitive. Select the pen icon to enter the change password screen. First, enter the old password, admin (default). Second, enter the new password. Last, re-enter to 32 D820R ADSL2+ Router User Guide confirm the new password. Click “Submit” to finish the settings. 4.3.2 Commit & Reboot This screen is to save the modified settings and to Reboot, Reboot from default configuration, Reboot from backup configuration, Reboot from last configuration, Reboot from clean configuration and reboot from minimum configuration. Note: Everything you configured in this Router needs to be saved in this part. Otherwise, the settings will be lost after login next time. 33 D820R ADSL2+ Router User Guide 4.3.3 Image Upgrade Image Upgrade is to update the current firmware. After you get the upgrade firmware from our URL or distributors, click “Browse” to locate the download image file and select the “Upload” button to start the image upgrade. Note: DO not power off the Router during the upgrade. Otherwise, it may cause the serious damage. 34 D820R ADSL2+ Router User Guide Chapter 5 Appendix Appendix 1: Troubleshooting Trouble Case Power Indicator Off Troubleshooting ● Check if the power adapter is connected properly. ● Check if the power adapter is matched. ● Check if the ADSL cable connection is ADSL LINK Off OK. ● Make sure the telephone line is OK with your phone. ● Check the phone line cabling is right. ● Check the Ethernet cable is OK. LAN LINK ● Make sure the PC’s NIC indicator is ON. Off ● Make sure the NIC works normally. ● Make sure the above troubles are clear. ● Make sure the dial-up connection is established and set up. Can’t access the Internet ● Make sure the user name and password are right. ● If the dial-up is OK, please make sure the IE proxy server is configured properly. ● Please try opening multiple web pages 35 D820R ADSL2+ Router User Guide Appendix 2: FAQ 1. Q: What are VPI, VCI? A:VPI (Virtual Path Identifier) and VCI (Virtual Channel Identifier) are to identify ATM terminal (ADSL) for DSLAM, usually provided the local ISP. 2. Q: What related parameters are required from your ISP? A: For dial user, Connection protocol, User name, Password, Value of VPI/VCI, Encapsulation mode and so on. 3. Q: The firmware upgrade fails and I can’t enter the Web-based management interface? A: Contact the technical engineer for support or after-sales service engineer. Note: please download the upgrade packets from the Tenda website. 4. Q: Have completed all configurations, but can’t dial through computer? A: 1) Check the indicator of ADSL, it should be working in normally. 2) Check the accuracy of parameter of value of VPI/VCI, Encapsulation mode and so on. 36 D820R ADSL2+ Router User Guide 3) Make sure the dial-up connection is established. 4) You can check whether your ADSL Modem succeeds in connection through PING command. 37