1
Operating Instructions
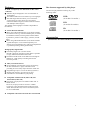
DIGITAL VIDEO DISC PLAYER
MODEL: DVD - 2000
Type Tested
Electrical
Safety
AS/NZS 3250 Lic 4168
Standards Australia
APP No: CS7554N
PALSONIC CORPORATION PTY LTD
1 JOYNTON AVE
WATERLOO NSW 2017 AUSTRALIA
TEL:(02)93137111
FAX:(02)93137555
PALSONIC CUSTOMER SERVICE
TELEPHONE
AUSTRALIA: 1300 657 888
DVD/VIDEO
CD/AUDIO
CD PLAYER
DIGITAL
AUDIO
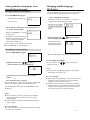
Dear Customers
Precautions
May we take this opportunity to thank you for
purchasing this DVD/VIDEO CD/CD player.
We strongly recommend that you carefully study the
Operating instructions before attempting to operate
the unit and that you note the listed precautions.
Please read these precautions before operating this unit.
Safety information
l Note:
This unit can be used only where the power supply is AC 110240V, 50/60 Hz. It cannot be used elsewhere
l CAUTION:
DVD/VIDEO CD/CD PLAYER IS A CLASS 1 LASER
PRODUCT. HOWEVER THIS DVDNIDEO CD/CD
PLAYER USES A VISIBLE LASER BEAM WHICH
COULD CAUSE HAZARDOUS RADIATION
EXPOSURE IF DIRECTED. BE SURE TO OPERATE
THE DVD/VIDEO CD/CD PLAYER CORRECTLY AS
INSTRUCTED.
WHEN THIS DVD/VIDEO CD/PLAYER IS
PLUGGED TO THE WALL OUTLET, DO NOT PLACE
YOUR EYES CLOSE TO THE OPENINGS TO LOOK
INTO THE INSIDE OF THIS PLAYER.
USE OF CONTROLS OR ADJUSTMENTS OR
PERFORMANCE OF PROCEDURES OTHER THAN
THOSE SPECIFIED HEREIN MAY RESULT IN
HAZARDOUS RADIATION EXPOSURE.
DO NOT OPEN COVERS AND DO NOT REPAIR BY
YOURSELF. REFER SERVICING TO QUALIFIED
PERSONNEL.
l
WARNING:
TO REDUCE THE RISK OF FIRE OR ELECTRIC
SHOCK, DO NOT EXPOSE THIS EQUIPMENT TO
RAIN OR MOISTURE.
TO REDUCE THE RISK OF FIRE OR ELECTRIC
SHOCK, AND’ANNOYING INTERFERENCE, USE THE
RECOMMENDED ACCESSORIES ONLY.
l THIS DEVICE IS INTENDED FOR CONTINUOUS
OPERATION !
l
Power cord protection
To avoid any malfunctions of the units, and to protect
against electric shock, fire or personal injury, please
observe the following.
Do not connect or disconnect the AC power cord
when your hands are wet.
Keep the AC power cord away from heating appliances.
Never put any heavy object on the AC power cord.
Do not attempt to repair or reconstruct the AC
power cord in any way.
l
Placement
Avoid placing the unit in areas
direct sunlight or heating radiators, or closed
automobiles
high temperature (over 350 C or high humidity (over 90%)
excessive dust
vibration impact or where the surface is tilted;
As the internal parts may be seriously damaged.
l
Non-use Periods
When the unit is not being used, turn the unit off.
When left unused for a long period of time, the unit
should be unplugged from the household AC outlet.
l
No fingers or other objects inside
Touching internal parts of this unit is dangerous, and
may cause serious damage to the unit. Do not attempt
to disassemble the unit.
Do not put any foreign object on the disc tray.
l
Keep away from water and magnets.
Keep the unit away from flower vases, tubs, sinks, etc. If
liquids are spilled into the unit, serious damage could occur.
Never bring magnetic objects such as speakers near to
this unit.
l
Stacking
Place the unit in a horizontal position, and do not
place anything heavy on it.
Do not place the unit on amplifiers or other
equipment which may become hot.
l
Condensation
Moisture may form on the lens in the following conditions.
immediately after a heater has been turned on.
in a steamy or very humid room.
when the unit is moved from a cold environment to a
warm one.
If moisture forms inside this unit, it may not operate
properly. In this case, turn on the power and wait about
one hour for the moisture to evaporate.
l If there is noise interference on the TV while
a broadcast is being received
Depending on the reception condition of the TV,
interference may appear on the TV screen while you are
watching a TV broadcast and the unit is left on. This is
not a malfunction of the unit or the TV. To watch a TV
broadcast, turn off the unit.
2
Features
l DVD: a completely new dimension in video entertainment
Subtitles may be displayed in one of a maximum of
32 languages.
The audio soundtrack can be heard in up to 8 languages.
The multi-angle function allows you to choose the
viewing angle of scenes which were shot from a
number of different angles.(Limited to DVD recorded
with multiple camera angles.)
The number of the languages recorded is dependent on
the software.
l Various Karaolte functions
When using a DVD Karaoke disc (5ch) which includes
two master vocals (e.g. male and female parts) recorded
on a different channel, selecting either channel makes
it possible to practice a duet song by yourself. (Virtual
duet)
When using a DVD Karaoke disc (5ch) which includes
a guide melody for vocal recorded separately on a
channel, enjoying Karaoke only with an accompaniment
is possible by turning off the guide melody.
Disc formats supported by this player
The unit can play back discs bearing any of the
following marks:
DVD
( 8 cm disc/l 2 cm disc )
VCD
( 8 cm disc/l2 cm disc)
CD
DIGITAL AUDIO
( 8 cm disc/l 2 cm disc )
Accessories
(accessories are listed on the accessories bill)
l High quality digital audio
The Dolby Digital (AC-3)/Linear PCM
decoder is built into the player which makes it possible
to enjoy Multi-Channel Surround sound.
With linear PCM sound of a 48 kHz/16 bit through 96
kHz/24 bit , audio quality exceeding that of CDs
becomes possible.
l Many convenient features
GUI (Graphical User Interface) screens for showing
the disc information or player information and
providing access to many major functions of this unit.
Programming of up to 5 scenes in memory (marker).
Parental lock setting to prevent play of discs
unsuitable for some audiences. [only DVD]
l Compatible with PAL DVD (Video CD) and
NTSC DVD (Video CD)
This player can play discs recorded in either PAL or
NTSC format.
However, the player must be connect to a Multi
system TV to play both PAL DVD (Video CD) and
NTSC DVD (Video CD). The use of a Multi-system
TV is recommended.
l Compatible with Video CD and CD as well as DVD.
3
Table of contents
Getting Started
Safety infromation................................................... 2
Precautions............................................................... 2
Features.................................................................... 3
Accessories............................................................... 3
Control reference guide........................................... 5
Basic Connection..................................................... 6
Optional audio connections..................................... 7
Basic Operations
Basic play............................................................... 9
l Basic play............................................................... 9
l Stopping play......................................................... 9
Skipping ahead or back.......................................... 9
Rapid advance (Rapid reverse).......................... 10
Still picture (Pause)............................................. 10
Frame advanced (DVD/Video CD).................... 10
Slow-motion play (DVD/Video CD)................... 10
Enjoy Video CDs with playback control without
using menus (Video CD)..................................... 10
Enjoying Karaoke
Enjoying Karaoke............................................. 11
l Basic Karaoke play........................................... 11
l Changing the key of a song (Key Control)....... 11
l changing the audio channels (Virtual Control)
(DVD Karaoke only)........................................ 11
l Enjoying Karaoke only with the accompaniment
(Guide Melody) (DVD Karaoke only)............. 11
l Increasing the volume of the master vocal
automatically (Voice Change).......................... 11
l Enjoying Karaoke using the ordinary disc
(One Touch Karaoke)....................................... 11
Karaoke request play........................................ 12
Enjoying Karaoke using Karaoke GUI
screen.................................................................. 12
Advance Operation
Program play (Video CD/CD)............................ 16
Random play (Video CD/CD)............................. 16
Repeat Play............................................................ 17
l Repeat viewing (listening)................................... 17
l Repeating section between to spcific points
(A-B repeat)......................................................... 17
Storing markers in memory to be viewed
(listen) again......................................................... 18
l Storing a marker in the memory......................... 18
l Recalling/clearing marker................................... 18
Changing subtitle language (DVD only)............. 18
Changing audio soundtrack language
(DVD only)............................................................. 19
Switching vocals ON or OFF for Karaoke discs
(DVD/Video CD)................................................... 19
Viewing from another angle (DVD only)............ 19
Using a title menu (DVD only)............................. 19
Using a DVD menu (DVD only)........................... 20
Initial Settings
Initial settings.................................................... 20
l Common procedures of intial settings................. 20
l Selecting rating level (DVD only)....................... 20
l Selecting language of On Screen Display menu. 21
l Switching the On Screen Display ON or OFF..... 21
l Selecting the display brightness........................... 21
l Selecting TV screen type..................................... 22
l Selecting digital output........................................ 22
l Speaker settings.................................................... 23
l Other settings....................................................... 23
For Your Reference
Definition of terms................................................ 24
Specifications......................................................... 24
Troubleshooting.................................................... 25
Self-diagnosis display function............................. 26
Disc handling and maintenance........................... 26
Operation Using GUI Screen
General information about GUI screen............. 13
l Comm procedures............................................... 13
Detailed descriptions of each GUI icon.............. 14
l Screen for disc information................................ 14
l Screen for play information................................ 15
l Screen for slow-motion play and rapid advance
(reverse).............................................................. 15
4
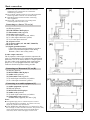
Control reference guide
Main Unit
(1) POWER
Press to switch the unit from on to standby mode or
vice versa. In standby mode, the unit is still consuming a small amount of power.
(2) MIC LEVEL controls (1, 2)
(3) ECHO control
(4) Remote control signal sensor
(5) Display Window
(6) ANGLE indicator
(7) STANDBY indicator
When the unit is connected to the AC mains supply,
the indicator lights up in standby mode and goes
out when the unit is turn on.
(8) OPEN/CLOSE button
(9) SKIP buttons
(10) PLAY button
(11) Shuttle dial (SEARCH)
(12) KEY CONTROL button
(13) STILL/PAUSE button
(14) STOP button
(15) Numeric buttons
l To select a 2-digit number
Example: To select track 23
Press "> 10", “2” and then “3”
(16) Disc tray
(17) MIC jacks (1,2)
Remote Control Unit
(1) POWER button
(2) PLAY MODE button
(3) MARKER button
(4) Numeric buttons
)
(5) SKIP buttons ( ,
(6) STOP button ( n )
(7) STILL/PAUSE button (
)
(8) DISPLAY button
(9) Joystick button ( , ,
,
(10) TITLE button
(11) MENU button
(12) KARAOKE MODE button
(13) GUIDE MELODY button
(14) ONE TOUCH button
(15) OPEN/CLOSE button
(16) CLEAR button
(17) SETUP button
(18) REPEAT MODE button
(19) A-B REPEAT button
(20) SUBTITLE button
(21) AUDIO button
(22) ANGLE button
(23) SLOW/SEARCH buttons ( ,
(24) PLAY button ( )
(25) SELECT button
(26) RETURN button
(27) KARAOKE DISP. button
(28) KEY CONTROL buttons
(29) VOICE button
(30) REQUEST button
)
, STOP
)
5
Basic connection
l Ensure that the power switch of this unit and other
equipment to be connected is set to off before
commencing connection.
l Do not block ventilation holes of any of the equipments
and arrange them so that air can circulate freely.
l Read through the instructions before connecting
other equipment.
l Ensure that you observe the color coding when
connecting audio and video cords.
[A]
Connecting to a Stereo TV set [A]
(1) TV set (optional)
(2) DVD/VIDEO CD/CD player
(3) Video/audio cord (supplied)
(4) S-video cord (supplied)
(5) To audio input connectors (red, white)
(6) To video input connectors (yellow)
(7) To S-video input connector
(8) AC power cord
(9) To power outlet (AC 110-240V, 50/60 Hz)
(10) Power switch
(11) Signal ground terminal
Connect the signal ground terminal to ground to
reduce noise from microphone cable during
Karaoke. (This is not a safety earth.)
.................................
[B]
S-video output connector
The S (separate) video output connector separates the
color (C) and luminance (Y) signals before transmitting
them to the TV set in order to achieve a sharper picture.
Use the S-video cord (supplied) when connecting the
player to a TV set equipped with an S-video input
connector for the best picture clarity possible.
Connecting to a Monoaural TV set [B]
i
(1) TV set (optional)
(2) DVD/VIDEO CD/CD player
(3) Audio cord (optional)
(4) Video/audio cord (supplied)
(5) To audio input connectors (red, white)
(6) To video input connectors (yellow)
.................................
[C]
Connecting to an audio equipment [C]
(1) Audio equipment (optional)
(2) TV set (optional)
(3) DVD/Video CD/CD player
(4) Audio cord (optional)
(5) To audio input connectors (red, white)
(6) Video/audio cord (supplied)
S-video cord (supplied) (See above [A])
Notes:
l During DVD play, the TV volume may be at a lower
level than during TV broadcasts, etc. If this is the case,
adjust the volume to the desired level.
l If the DVD/Video CD/CD player is connected to the
TV through a video cassette recorder, the picture may
not be played back normally with some DVDs If this
is the case, do not connect the player via the VCR.
6
Optional audio connections
Connecting to an AV amplifier with 5.1ch
input connector supporting Dolby Digital
(AC-3)
The player contains a Dolby Digital (AC-3) decoder.
This enables the playback of DVDs recorded in Dolby
Digital, Linear PCM without the need for an external
decoder with Dolby Digital, Linear PCM processing.
When the player is connected to an AV amplifier with
5.1ch input connectors, you can enjoy theater-quality
audio in your home when playing discs recorded in
Digital, Linear PCM.
(1) TV set (optional)
(2) DVDNIDEO CD/CD player
(3) Video/audio cord (supplied)
S-video cord (supplied)
(see page6 [A])
(4) AV Amplifier with 5.1 ch input connector
(5) Audio cords (optional)
(6) To audio input connector (CENTER)
(7) To audio input connector (SUBWOOFER)
(8) To audio input connector (SURROUND L , R)
(9) To audio input connector (FRONT L , R)
(10) Center speaker
(11) Front speaker (Left)
(12) Front speaker (right)
(13) Subwoofer (left)
(14) Surround speaker
(15) Surround speaker (right)
(All sold separately.)
Notes:
After connection is made, set the “Speaker setting”
(such as Yes/No and Large/Small) according to your
speaker system.. (see page 23).
l If the surround speakers or center speaker can’t be
installed at an equal distance to (or further away from)
the front speakers from the listening position, then
change the delay time setting at “Speaker setting" on
page 23, to compensate.
l If the type of the speakers connected does not satisfy
the channels recorded in a Linear PCM disc, the disc
will not be played in all the channels but only in 2
channels. (For example, even if the front speakers and
the center speaker are connected, a disc recorded in 5
channels will be played back only in 2 channels.)
l DVDS recorded in Linear PCM/96 kHz sampling in
which “Center Speaker” is contained will also be
played back only in 2ch.
l No surround sound will be delivered during playback
of DVD Karaoke.
l When the microphone is connected or the Karaoke
functions such as Key control, Voice changer and
One touch Karaoke are activated for the DVDs which
are not designed for Karaoke, sound will be delivered
only through the front speakers (L/R). (See pages
11-12.)
When using speakers other than the front speaker
(L/R), disconnect the microphone and stop using the
Karaoke function. If still no sound will be delivered,
press OPEN/CLOSE twice.
l
7
Optional audio connection
Connecting to a decoder with Dolby Digital
(AC-3) processing [A]
[A]
When DVDs recorded in Dolby Digital are played, Dolby
Digital bitstream is output from the player’s OPTICAL
digital audio output connector or COAXIAL digital audio
output connector. When the player is connected to a Dolby
Digital decoder, you can enjoy theater-quality audio in your
home. [An optical digital cable or coaxial audio cable (both
optional) is required when an optional Dolby Digital
decoder is used.]
(1) TV set (optional)
(2) DVDNIDEO CD/CD player
(3) Video/audio cord(supplied)
S-video cord (supplied)
(4) Decoder or Amplifier with Dolby Digital
(AC-3) processing (optional)
(5) Coaxial audio cable/Optical digital cable (optional)
(6) To coaxial digital audio input connector/To
optical digital audio input connector
Notes when connecting the optical digital cable (optional)
l Remove the dust protection cap from the connector and
connect the cable firmly so that the configurations of both
the cable and the connector match ( [B] )
l Keep the dust protection cap and always reattach the cap
when not using the connector to protect against dust.
Concerning the audio output from the unit’s optical/coaxial
digital audio output connector
Disc
Sound recording format
DVD Dolby Digital
(AC-3)
VCD
CD
*1
*2
Linear PCM
(48/96kHz
16/20/24 bit)
MPEG 1
Linear PCM
Optical/coaxial digital audio
output from connector
Dolby Digital bitstream (2-5.lch)
or PCM (2ch) (48 kHz/16 bit)* 1
Linear PCM (2ch)
(48 kHz sampling/16 bit only)*2
or no output*1
PCM (44.1 kHz sampling)
Linear PCM (44.1 kHz
sampling)
The type of audio output from the connector can be selected
by the initial settings. (See page 22.)
Sound having 96 kHz sampling is converted into 48kHz
sampling when it is output from the unit’s optical/coaxial
digital audio output connector.
For your reference:
l Dolby Digital (AC-3) is a digital sound compression technique
developed by the Dolby Laboratories Licensing Corporation.
Supporting 5.1-channel surround sound, as well as stereo
(2-channel) sound, this technique enables a large quantity
of sound data to be efficiently recorded on a disc
l Linear PCM is a signal recording format used in CDs.
While CDs are recorded in 44.1 kHz/16 bit, DVDs are
recorded in 48 kHz/16 bit up to 96 kHz/24 bit
l If you have a Dolby Pro Logic Surround decoder, you will
obtain the benefit of Pro Logic from the same DVD movies
that provide full 5. l-channel Dolby Digital soundtracks, as
well as from titles with the Dolby Surround mark.
...................................
[B]
Caution for the optical/coxial digital audio output connector:
l Do not connect an amplifier (with an optical/coxial digital
input connector) which does not contail Dolby Digital (AC-3).
l Otherwise ant attempt to play DVDs may cause such a high level of
noise that it may be hamful to yourears and damage your spaekers.
l Video CDs and CD's can be played as they would normally be
may be played.
Dust protection cap
8
Before enjoying DVD/Video CD/CD
The On-Screen menu language of your player has
been factory pre-set to English
In the explanation given below it is assumed that
English has been selected as the menu language
Basic play
Preparations
l Remote control preparation
Insert the batteries while observing the correct(+) and
(-) polarities
Notes:
(1) The batteries normally last for about one year
although this depends on how often and for what
operations the remote control is used.
(2) If the remote control unit fails to work even when
it is operated near the player, replace the batteries.
(3) Use size 7 batteries.
(4) Remote control operation range: point the remote
control unit no more than about 7 m from the
remote control sensor and within about 60 of the
front of the unit.(the operating distance may vary
according to the brightness of the room.)
l Switch the TV ON and select “Video” as the TV input.
l Switch on the stereo system’s power if the player has
been connected to stereo system.
Basic play
Stopping play and returning to the menu screen
l DVD
Press TITLE, MENU or RETURN.
(Which button is pressed differs depending on the disc used.)
l Video CD
Press RETURN.
l Play is suspended, and the menu screen is displayed.
After operation
When the unit is not in use, remove the disc and press
POWER to turn off the unit.
The power will automatically turn off after 30 minutes or so
have elapsed in the stop mode. (Auto power-off function)
Notes
l The disc continues to rotate while the menu is displayed
even after the player has finished playing a particular item.
When no further selections are to be played, be sure to
press the STOP button to clear the menu display.
l If the disc is placed in upside down (and it is a single
sided disc), the DVD display will indicate “NO DISC”.
Basic play
For your reference:
l When appears while a button is being operated, it
means that the corresponding operation is prohibited by
the player or the disc.
1 Turn on the power switch on the rear panel.
Stopping play
2 press POWER to switch on the power.
Press STOP.
3 Press OPEN/CLOSE to open the disc tray.
5 Press PLAY.
The disc tray is automatically closed and play begins.
l When the disc tray is closed by pressing OPEN/CLOSE,
press PLAY to commence play.
For your convenience:
l When play is stopped, the unit records the point where
STOP was pressed (RESUME function). (" " flashes
on the unit’s display when this function is activated.)
Press PLAY again and play will resume from this
point.When the tray is opened or STOP is pressed
again the RESUME function will be cleared.
The RESUME function works only with discs for
which the elapsed playing time appears on the unit’s
display during playback.
This feature will not be cleared when the power is
turned OFF and then ON.
l
Skipping ahead or back
4 Place a disc onto the disc tray.
Hold the disc without touching either of its surfaces,
position it with the printed title side facing up, align it
with the guides, and place it in its proper position.
When a menu screen appears on the TV monitor
In case of interactive DVD or Video CD withs
playback control, a menu screen appears on the TV
monitor. Perform step 5 to commence play.
6 Tilt the joystick to the
/
direction
/
and
press SELECT, or press the numeric button(s),
to select the preferred item.
l The joystick is not effective for selecting items for
Video CDs.
Play of the selected item now begins.
When the menu continues onto another screen
After step 4, press SKIP
(SKIP buttons may not be
effective depending on the disc.)
l TO return to the previous menu screen
Press
SKIP.
l For operation, refer also to the jacket of the disc concerned.
Skipping ahead
Press SKIP
during play
A chapter (DVD) or a track (Video CD/CD) is skipped
each time the button is pressed.
Skipping back
Press
SKIP during play
When the button is pressed once midway through a
chapter/track, play returns to the’ start of that
chapter/track. When it is pressed again, a chapter/track
is skipped each time the button is pressed.
For your reference:
SKIP
is pressed during menu play of
l When
Video CDs, a menu screen may sometimes be recalled.
9
Rapid advance (Rapid reverse)
By the remote control unit
Press SLOW/SEARCH
(Reverse direction) or
(Forward direction) during play.
l The speed of advance (reverse) is relatively slow at first.
When the button is pressed again, the speed becomes
faster. (Each time the button is pressed, the speed
increases up to 5 steps.)
To return to normal play
Press PLAY.
By the remote control unit
Press SLOW/SEARCH
(Reverse direction) or
(Forward direction)
l The speed of slow-motion is relatively slow at first.
When the button is pressed again, the speed becomes
faster. (Each time the button is pressed, the speed
increases up to 5 steps.)
To return to normal play
Press PLAY.
On the main unit
Turn the shuttle dial in the still picture mode.
Low Low
On the main unit
Turn the shuttle dial during play.
Low
Low
High
Slow-motion play [DVD/Video CD ]
High
High
Reverse direction
Reverse direction
High
Forward direction
l The speed increases up to 5 steps.
l Norma1 play is resumed when the shuttle dial is
Forward direction
l The speed increases up to 5 steps.
l Still picture mode is resumed when the shuttle dial is
released.
For your reference:
l For Video CDs, slow-motion playback in reverse
released.
direction is not possible.
For your reference:
l When SLOW/SEARCH or the shuttle dial is used
during menu play of Video CDs, a menu screen may
sometimes be recalled.
Still picture (Pause)
Press STILL/PAUSE during play
l DVD/Video CD:
Still
The player will be placed in the
still picture mode
l CD:
The player will be placed in the
pause mode.
(DVD/Video CD)
To return to normal play
Press PLAY.
Enjoying Video CDs with
playback control without using
meuns [Video CD Only]
1. Press STOP after the menu screen appears (after step
5 on page 9).
("PBC" will be cleared from the unit’s display.)
2. Press the numeric button(s) to select the preferred track.
(Play begins.)
l Refer to the jacket etc. of the disc concerned for the
track numbers.
l Press “1” to start play from the beginning of the disc.
To return to menu play
Press STOP to stop playback and press MENU.
("PBC" will light up on the unit’s display and the menu
is resumed.)
Perform step 6 on page 9.
Frame advance [DVD/VIDEO CD]
Press STILL/PAUSE in the still picture mode.
The disc is advanced by one frame each time the button
is pressed.
l When the button is kept pressed, consecutive frame
advance works.
To return to normal play
Press PLAY.
10
Enjoying Karaoke
Enjoying Karaoke
Changing the audio channels [Virtual Duet]
[DVD Karaoke only]
Preparations:
l It is recommended to connect the audio equipment
when enjoying Karaoke. (See page 6.)
DVD Karaoke discs are provided with two master
vocals (male and female parts). This function is
convenient to practice singing a duet song.
Example of DVD Karaoke disc (5ch):
lch: Stereo accompaniment (left)
2ch: Stereo accompaniment (right)
3ch: Guide melody
4ch: Master vocal (male part)
5ch: Master vocal (female part)
l The contents may differ depending on the disc,
Press KARAOKE MODE during play.
Each time this button is pressed, the audio channel
changes depending on the disc. (See
on page 12)
Notes:
l NO sound will be delivered from the center or surround
speakers or subwoofer during playback of DVD Karaoke.
l NO sound will be delivered from the center or surround
speakers or subwoofer when the microphone is connected
or the Karaoke function (Key Control/Voice Changer/
One Touch Karaoke) are activated for the DVDs which
are not designed for Karaoke.
Basic Karaoke play
1 Connect the microphone(s) (optional) to the
MIC jack(s).
l Microphones with 6.3 mm plug can be connected.
2 Start playback. (See page 9)
3 Rotate the MIC LEVEL control(s) to adjust the
voice volume of the microphone.
Enjoying Karaoke only with the Accompaniment
[Guide Melody] [DVD Karaoke only]
For some DVD Karaoke discs, the guide melody for
vocal is recorded as well as the accompaniment. To
enjoy Karaoke only with the accompaniment, turn off
the guide melody.
Press GUIDE MELODY during play.
The guide melody is turned off.
l Pressing the button again turns on the guide melody.
4 Rotate the ECHO control to adjust the echo level if
necessary.
Notes:
l If you hear strange noises (squealing or howling) while
using the Karaoke feature, move the microphone away
from the speakers. Turning down the microphone volume
or the speaker volume is also effective.
Changing the key of a song
[Key Control]
Increasing the volume of the master vocal
automatically [Voice Changer]
While you are singing, the master vocal volume is
decreased and when you stop singing, the volume is
increased automatically. This function is convenient
when practicing a new tune.
Press VOICE during play.
The voice changer function is turned on.
l Press the button again turns off the voice changer
function.
Press KEY CONTROL during play.
Enjoying Karaoke using the ordinary discs
[One Touch Karaoke]
l To lower a half tone
Press
l To return to the original key
Press
l To raise a half tone
Press #
l The key changes up to 6 steps (both of "
For your reference:
l For multi audio Video CDs/CDs, different sounds are
recorded in the left and right channels as follows:
1 ch (left): Monaural accompaniment
2ch (right): Monaural accompaniment + master vocal
Press ONE TOUCH during play.
The master vocal volume is reduced like a Karaoke
software.
" and "
")
l Press the button again resumes the normal play.
Notes:
*Depending on the type of prerecorded songs, master
vocal volume cannot be reduced.
l A mono-recorded disc cannot be used.
11
Karaoke request play
1 Press REQUEST during play or in the STOP mode.
The Karaoke request screen is displayed.
Enjoying Karaoke using Karaoke GUI screen
No.
Remarks
To jump to the desired title/track
number
To change the key of a song
(See page 11.)
l (To lower a half tone),
(To return to the original key)or
(To raise a half tone)
To turn the guide melody on or off
(See page 11.)
l OFF or ON
To turn the voice changer function
on or off (See page 11.)
l OFF or ON
2 Press the numeric button(s) to enter the desired
song(s).
l Select the title number for DVDs or the track number
for Video CDs/CDs. (Refer to the jacket of the disc
concerned for the title/track numbers.)
l Up to 8 titles/tracks can be programmed.
l To select a 2-digit number, use the > 10 button.
For example, press" >10", “2” and “5” to select “25”.
To change the Karaoke mode
(See page 11.)
l For DVD Karaoke (1 vocal):
ON or "- - -" (OFF)
l For DVD Karaoke (2 vocals):
1+2, V1, V2 or "- - -" (OFF)
l For Video CD/CD:
LR, L or R
To turn the one touch Karaoke
function on or off (See page 11.)
l
(OFF) or
(ON)
3 If REQUEST is pressed in the stop mode
Press PLAY.
Play of the selection now begins.
To clear the Karaoke request screen
Press REQUEST.
To clear the program(s)
Tilt the joystick to the
direction to select the program to
be cleared and press SELECT. Pressing CLEAR clears the last
program.
Changing
Method
or
Numeric/
SELECT
l "
" means tilting the joystick to the
direction and “Numeric” means pressing the
numeric button.
Enjoying Karaoke using Karaoke
GUI screen
1 Press KARAOKE DISP. During play.
The Karaoke GUI screen is displayed.
l Pressing the button again clears the Karaoke GUI
screen.
2 Tilt the joystick to the
the preferred item.
3 Tilt the joystick to the
direction to select
direction to select
the preferred item.
(Continued on the right page)
12
General information about GUI
screen
This unit features GUI (Graphical User Interface)
screens consisting of icons showing disc information
(title/chapter/track number, elapsed playing time,
audio/subtitle language, and angle) and player
information (repeat play, play mode, marker, picture
mode, Karaoke vocal ON/OFF, master volume, etc.)
[A]
Common proccedures [A]
1 Press DISPLAY during play or in the stop
mode.
Each time this button is pressed, the TV monitor
changes as shown below.
GUI screen for selecting disc information
GUI screen for selecting player information
GUI screen for slow-motion play and rapid advance
(reverse)
GUI screen is cleared
l Some functions cannot be accessed from the stop
mode.
.....................................
[B]
2 Tilt the joystick to the
direction to select
the preferred item.
l The currently selected item is indicated by the yellow
frame on the GUI screen.
3 Tilt the joystick to the
direction to select
the preferred setting.
l When numbers are displayed (e.g. title No.), the
numeric buttons are also effective for setting instead
of the joystick.
l For some functions the setting will be registered
immediately; for others, SELECT must be pressed.
Press DISPLAY, RETURN, or CLEAR to clear the GUI
screen.
.....................................
[C]
Example of GUI screens
(The screens may differ depending on the disc contents.)
l DVD [A]
l Video CD [B]
l CD [C]
For your reference:
Depending on the type of DVD software and a TV with
automatic picture zoom function enabled, the GUI
screen may not be displayed or only partially displayed
on the TV screen.
In this case, select the appropriate TV screen type by
consulting the operation manual of the TV.
l
13
Detailed description of each GUI icon
Screen fro disc infromation
No.
(1)
(2)
(3)
(4)
Remarks
To show the current title No. [DVD] or
track No. [Video CD/CD] to jump to
the desired title No. Or track No.*1
To show the current chapter No. or to
jump to the desired chapter No.
[DVD only]
To show the elapsed time and to directly
select scenes by the elapsed time*2
[DVD] or to show the elapsed time
[Video CD/CD]
To show the current audio soundtrack
language No. And to change to the
desired one [DVD only] (See page 19.) (DVD only)
(5)
(1)
Changing
method
or
Numeric/
SELECT
or
Numeric/
SELECT
(2)
(3)
Numeric/
SELECT
(4)
or
Numeric
(5)
To show the audio soundtrack language
selected using the above icon
To show the audio attribute (type) of the
disc currently being played (DVD only)
[Dolby
l LPCM (Linear PCM),
Digital (AC-3)]
To show the audio attribute (sampling
(7) frequency or channel No.) of the disc
currently being played [DVD only]
l For Linear PCM disc: 48 kHz or 96kHz
l For Dolby Digital (AC-3) disc: 1ch to 5ch
(6)
(6)
(8)
(9)
(10)
(11)
(12)
(13)
(14)
(15)
To show the audio attribute (bit No.) of the
disc currently being played [DVD only]
l For Linear PCM disc : 16 bit to 24 bit
To show the number of recorded vocals
(DVD Karaoke only) (See page 19.)
l 1 vocal: ON or "- - -" (OFF)
l 2vocal: V1 +V2, V1, V2 or "- - - " (OFF)
or
To show the current subtitles language
No. and to change to the desired one
Numeric
(DVD only) (See page 18.)
To show the subtitle language selected
using the above icon (DVD only)
To display/clear subtitles (DVD only)
(See page 18.)
or
To show the current angle No. and to
change to the desired one [DVD only]
Numeric
See age 18.
To select the audio mode
[Video CD (See page 19.)
l LR, L or R
To show whether Video CD menu play is
ON or OFF [Video CD with playback
control only] (See pages 9 and 10)
(7)
(8)
(9)
(10)
(11)
(12)
l "
" means tilting to the joystick to the
/ direction
and “Numeric” means pressing the numeric button.
*1 The track number cannot be selected during menu play
of the Video CD.
*2 This function does not work with some DVDs
14
Detailed description of each GUI icon
For your reference:
l For the language abbreviations used for the audio soundtrack and subtitle language icons, see the table [A].
Screen for player information [B]
Changing
method
To start A-B repeat play (See page 17.) SELECT
[A]
CHI
ITA
SVE
PRO
ENG
VIE
Chinese
Italian
Swedish
Portuguse
Englidh
Vietnamese
FRA
EPS
NOR
RUS
KOR
THA
French
Spanish
Norwegian
Russian
Korean
Thai
DEU
NLD
DAN
JPN
MAL
*
German
Dutch
Danish
Japanese
Malay
Other
Remarks
No.
(1)
To select the repeat play mode
(See page 17.)
l C (chapter repeat), T (title repeat) or
OFF (normal play) [DVD]
l T (track repeat), A (disc repeat) or
OFF (normal play) [Video CD/CD]
To show the current play mode
[Video CD/CD only] (See page 16.)
l “---“ (normal p!ay), PRG (program
play) or RND (random play)
SELECT
To store a marker
To recall a marker
(2)
(3)
(4)
......................................
[B]
To clear a marker
CLEAR
(5)
(See page 18)
To select the picture mode
[DVD/Video CD only]
l N (normal), S (soft), or F (fine)
means tilting the joystick to the
direction
*1 This function does not work with an interactive DVD or
during menu play of Video CD.
..................................................
Screen for slow motion play and rapid
advanced ( reverse) [C]
Still/pause
Tilt the joystick to the A direction to select "
Slow-motion play
Tilt the joystick to the
direction.’
: Backward (DVD only)
: Forward (DVD/Video CD only)
[C]
"
Play
Tilt the joystick to the
direction to select " "
Rapid reverse/advance
Tilt the joystick to the (Backward)/ (Forward)
direction?
*1Each
time the joystick is tilted, the speed increases in
up to 5 steps.
15
Program play [Video CD/CD]
The player plays the tracks in the disc in an order you
specify.
Program play [Video CD/CD]
Clearing the program
When the program playback screen is displayed
Choose a track, then press SELECT
Note:
l The program play function cannot be used when
connected to a PAL TV.
1 7
13
19
2 8
14
20
3 9
15
21
4 10 16
5 11 17
6 12 18
Clear last
Clear all
Press PLAY to start
1 Press PLAY MODE in the stop mode.
The program playback screen appears on the TV
monitor.
Choose a track, then press SELECT
Track numbers
included in the disc
1 7
13
19
2 8
14
20
3 9
15
21
4 10 16
5 11 17
6 12 18
Clear last
Clear all
Press PLAY to start
2
8
3
5
6
2 Tilt the joystick to the
direction
and
press SELECT, or press the numeric button(s),
to select the preferred track number.
The selected track is stored in the memory.
Choose a track, then press SELECT
1 7
13
19
2 8
14
20
3 9
15
21
4 10 16
5 11 17
6 12 18
Clear last
Clear all
Press PLAY to start
2
8
3
5
6
Random play [Video CD/CD]
The player plays the tracks in the disc in random order.
1 Press PLAY MODE twice in the stop mode.
The random playback screen appears on the TV monitor.
Random Playback
2 Press PLAY.
Choose a track, then press SELECT
19
20
21
l To clear the last program one by one
Move to “Clear last”, and press SELECT.
Press CLEAR of the remote control unit also clears
the last program]
l To clear all the programs
Move to “Clear all”, and press SELECT.
(The programs are also cleared when the power is
turned off or the disc is removed.)
Press PLAY to start
l Repeat step 2 to select another track.
l Up to 18 tracks can be programmed.
1 7
13
2 8
14
3 9
15
4 10 16
5 11 17
6 12 18
Clear last
Clear all
2
8
3
5
6
2
8
3
5
6
Press PLAY to start
3 Press PLAY.
Play now begins in the programmed sequence.
After playback
Play is stopped and the program playback screen is
displayed.
Returning to normal play
1 Press STOP. (Program play is suspended.)
2. Press PLAY MODE twice.
3. Press PLAY.
Normal play begins.
(The content of the program is still retained in the memory.)
Play now begins in the random order.
After playback
Play is stopped and the random playback screen is
displayed.
Returning to normal play
1 Press STOP. (Random play is suspended.)
2. Press PLAY MODE.
3. Press PLAY.
Normal play begins.
16
Repeat play
Repeat play
Repeat viewing (listening)
To enjoy program repeat play
If REPEAT MODE is pressed during program play (see
page 16), the display changes as follows
Press REPEAT MODE during play.
Each time this button is pressed, the TV monitor
changes as shown below and the disc will repeat a
chapter or title (DVD) or a track (Video CD/CD).
l DVD
Repeat of chapter being played
Repeat of programmed track
being played
Repeat of all programs
Repeat of title being played
Cancel repeat mode
(Normal program play)
Cancel repeat mode
(Normal play)
Repeating sections between two specific
points (A-B repeat)
l Video CD/CD
Repeat of track being played
1 Press A-B REPEAT during play at the point
where repeat play is to commence (A).
Repeat of entire disc contents
2 Press A-B REPEAT at the point where repeat
play is to be concluded (B).
Repeat play of the selection between points A and B starts.
Cancel repeat mode
To return to normal play
Press A-B REPEAT several times until "
To return to normal play
Press REPEAT MODE several times until "
is displayed.
OFF "
Notes:
l Repeat play works only with discs for which the
elapsed playing time appears on the unit’s display
during playback.
*Repeat play may not work correctly with some DVDs
l" l
Notes:
l A-B repeat play works only within a title (DVD) or a
track (Video CD/CD).
l A-B repeat play works only the discs for which the
elapsed playing time appears on the unit’s display
during playback.
l Some subtitles recorded around point A or B may fail
to appear. (DVD)
17
Storing markers in memory to be
viewed (listened) again
Storing a marker in the memory
1 Press MARKER during play.
" l " indicates no marker has
been stored yet.
Changing subtitle language
[DVD only]
The subtitle language of your player has been factory
pre-set to English (This operation works only with discs
on which multiple subtitle languages are redorded.)
1 Press SUBTITLE during play.
l When no subtitles are recorded "--" will be dis-
played instead of the language number.
2 Press SELECT during play at the starting point to
be viewed (listened) again.
Indicates “MARKER 1” is stored
in the memory.
(If SELECT is pressed where any
number is already displayed, the
previous starting point will be
replaced by the new one.)
Up to 5 markers can be stored in the memory.
l Press MARKER to clear the display.
2 Tilt the joystick to the
direction until the
preferred language is selected.
Pressing the numeric
button(s) also changes
the subtitle language.
Recalling/clearing a marker
1 Press MARKER during play
l Press SUBTITLE or SELECT to clear the display.
2 Tilt the joystick to the
direction to
select the marker to be recalled/cleared.
To clear/display the subtitles
Tilt the joystick to the
direction to select ON
or OFF at the step 2.
Note:
l In some cases, the subtitle language is not changed
immediately to the select one.
3 Tilt the joystick to the A direction to recall a
marker.
or
Press CLEAR to clear a marker.
Play resumes from the point corresponding to the selected
marker. (The display will be cleared automatically.)
or
The selected maker is cleared. (Press MARKER to clear
the display.)
For your reference:
l When the preferred language is not selected even after
tilting the joystick several times, it means that the
language is not available on the disc.
l When the power is turned on or the disc is removed,
subtitles appear in the language selected at the initial
settings. If this language is not recorded on the disc,
they appear in the disc’s priority language.
Notes:
l These operations work only with discs for which the
elapsed playing time appears on the unit’s display
during playback.
l Some subtitles recorded around the marker may fail to
appear. [DVD]
For your reference:
l Al1 the markers are cleared when the power is turned
off or the disc is removed.
18
Changing audio soundtrack
language [DVD only]
Viewing from another angle
[DVD only]
The audio language of your player has been factory
pre-set to English (This operation works only with discs
on which multiple audio soundtrack languages are
recorded.)
Some DVDs may contain scenes which have been shot
simultaneously from a number of different angles. For
these discs, the same scene can be viewed from each of
these different angles using the ANGLE button. (The
recorded angles differ depending on the disc used.)
1 Press ANGLE during play.
1 Press AUDIO during play.
l When no audio soundtrack is recorded, "--" will be
displayed instead of the language number.
Number of the audio
soundtrack language
being played back
Number of angle being
played back
2 Tilt the joystick to the
preferred angle is selected.
2 Tilt the joystick to the
direction until
the preferred language is selected.
Pressing the numeric
button(s) also changes
the audio soundtrack
language.
l Press AUDIO or SELECT to clear the display.
direction until the
Press the numeric button(s)
also changes the angle.
l Press ANGLE or SELECT to clear the display.
Notes:
l This function only works for discs having scenes
recorded at different angles.
l The ANGLE indicator on the unit lights up at scenes
recorded at different angles to indicate that angle
switching is possible.
The angle number can be programmed beforehand; the
angle will be switched to the selected number when the
ANGLE indicator lights up.
For your reference:
l When the preferred language is not selected even after tilting
the joystick several times, it means that language is not
available on the disc.
Using a title menu [DVD only]
l When the power is turned on or the disc is removed, the
language heard is the one selected at the one selected at the
Some discs with movies, for example, may be available
initial settings. If this language is not recorded on the disc, only with two or more titles. If the disc has a title menu
the available language on the disc will be heard.
recorded on it, the TITLE button can be used to select
the movie title. (The details of operation differ
depending on the disc used.)
Switching vocals ON or OFF for
Karaoke disc [DVD/Video CD]
TITLE MENU
1 Press TITLE during play.
1 Press AUDIO during play.
A list of the titles on the disc
is now displayed
2 Tilt the joystick to the
direction until
the preferred setting is selected.
l DVD Karaoke (1 vocal)
ON
--- (OFF)
l DVD Karaoke (2 vocals)
(OFF)
l Video CD
R
l Press AUDIO or SELECT to clear the display.
Note:
l This operation does not work with CDs.
Dogs
Castles
Lovers
Birds
(Example)
l Press TITLE again resumes play from the scene when
TITLE was first pressed.
2 Tilt the joystick to the
direction
and press SELECT or PLAY, or press the
numeric button(s), to select the preferred title.
TITLE MENU
Dogs
Castles
Lovers
Birds
Birds
of the world
The selected title now starts playing.
19
Using a DVD menu [DVD only]
Some DVDs have unique menu structures called DVD menus. For
example, DVDs programmed with complex contents provide
guide menus, and those recorded with various languages provide
menus for audio and subtitle language. Although the DVD menu's
contents and operation differ from disc to disc, the following
explains basic operation when this feature is used.
1 Press MENU during play.
The DVD menu available on the
disc is now displayed.
DVD MENU
1 SUBTITLE
2 AUDIO
3 ANGLE
(Example)
l Press MENU again resumes play from the scene when
MENU was first pressed.
2 Tilt the joystick to the
direction
and press SELECT, or press the numeric
button(s) to select the preferred item.
DVD MENU
To cancel during setup operation
Press RETURN or select "0". (The previous screen is
displayed.
To clear the initial settings screen
Tilt the joystick to the
direction to select “0” and
press SELECT. (Pressing SETUP or RETURN also
clears the initial settings screen.)
For your reference:
l The numeric buttons can also be used for selecting
items or values instead of the joystick: in this case,
pressing SELECT is not neccessary.
Selecting disc language [DVD only]
Refer to "common procedures of initial settings "on page 20
Selecting rating level [DVD only]
This is to disable the playing of specified DVDs which
are unsuitable for children.
l Some DVDs are encoded with specific rating level. If
the rating level of the disc is higher than that preset in the
setup operation, playback of the disc will be prohibited.
1 At the initial settings screen
Select “2 Ratings” by the joystick and press
SELECT.
1 SUBTITLE
The selected item is now executed.
2 AUDIO
3 ANGLE
When the menu continues onto another screen Repeat step 2.
Initial settings
Once the initial settings have been completed, the player
can always be operated under the same conditions
(especially with DVD discs).
The Settings will be retained in the. memory even after
turning the power off until the settings are changed.
Note:
The initial settings function cannot be used when
connected to a PAL TV.
Common proccedures of initial settings
1 Press SETUP in the stop mode.
2 Tilt the joystick the
direction to select
the preferred item and press SELECT.
Each screen for setting the value is displayed.
1 Disc language (see page 20)
2 Ratings (see page 20)
3 Menu language (see page 21)
4 On-Sreen Messages (see page 21)
5 FL Display (see page 21)
6 TV Aspect (see page 22)
7 Digital Audio Output (see page 22)
8 Speaker Settings (see page 23)
9 Other Settings (see page 23)
3 Tilt the joystick to the
direction to select
the preferred value arid press SELECT.
l Some items require additional steps. (See the
respective page.)
Settings is finished and the initial settings screen is displayed
All DVDs can be
Played back.
(Factory setting)
DVDs for general
audiences/children
can be play back
(DVDs) for adults
are prohibited.)
DVDs for children can be
played back (DVDS for
adults/general audiences
adults are prohibited.)
Playback of all DVDs is
prohibited (e.g. to prohibit
playback of DVDs for
which are not encode with
rating level information)
2 Select the preferred level by the joystick and
press SELECT.
3 When level 7 or lower is selected
Input a 4-digit password and press SELECT.
The lock symbol
appears closed to
show the rating is
locked.
Example: “4344”
Do not forget your
password.
4 Press SELECT.
Setting is finished and the initial settings screen is
l The rating is locked. Any discs whose rating is higher
than the setting cannot be played back unless the
correct password is entered.
Also refer to "Common proccedures of initial settings" on page 20
20
Initial Settings
Initial Settings
To change the
settings
Switching the On-Screen Display ON or OFF
1. Select “2” by the
joystick at the initial
settings screen and
press SELECT.
You can select whether On-Screen Display messages
such as PLAY and STOP will be displayed or not.
1 At the initial settings screen
Select “4 On-Screen Messages” by the joystick and
press SELECT.
2. Input a 4-digit password and press
SELECT.
2 Select the preferred item (1 or 2) by the joystick
and press SELECT.
3. Select the preferred item (1-4) by the joystick and press
SELECT.
4. 1 Unlock Player
Press SELECT.
2 Change Password
Enter a new 4-digit password and press SELECT.
Press SELECT again.
3 Change Level
Select a level and press SELECT.
4 Temporary Unlock
(The rating is unlocked temporarily only for the
current disc.)
Press SELECT.
5. Select “0” and press SELECT to exit.
Setting is finished and the initial settings screen is
displayed.
Selecting the display brightness
1 At the initial settings screen
Select “5 FL Display” by the joystick and Dress
Setting is finished and the initial settings screen is
displayed.
Note:
l Some discs may not be encoded with specific rating level
information though its disc jacket says that is for “adults”.
For those discs, the age restriction will not work.
Setting language of On-Screen Display menu
Refer to “common procedures of initial settings” on
page 20.
2 Select the preferred item (l-3) by the joystick
and press SELECT.
Setting is finished and the initial settings screen is
displayed.
For your reference:
l Even if “3 Dim During DVD/CD Play (Auto)” is
selected, the display resumes brightness when a button
for special play such as SLOW/SEARCH and
STILL/PAUSE is pressed.
Also refer to "Common procedures of Initial settings" on
page 28
21
Initial settings
Selecting TV screen Type
Select the appropriate screen type according to your TV
set; conventional size screen (4:3) or wide-screen (16:9)
1 At the initial settings screen
Select "6 TV Aspect" by the joystick and press
SELECT.
2 Select the preferred item (1 or 2) by the joystick
and press SELECT.
4:3 Select when a conventional TV set is
connected. (factory setting)
The video material
formatted in the
Pan & Scan style is
played back in the style
(the left and right edges
are cut off).
The video material not
formatted in the Pan &
Scan style is played
back in the letterbox
style (black bands
appear at top and
bottom of screen).
16 : 9 Select when a wide-screen TV set is
connected.
Play in “FULL”
size. (Setting the
wide-screen TV to
“FULL” mode is also
necessary.)
*Each screen shows an example when the video
material for a wide-screen is played.
(This setting does not affect the video material for
conventional size.)
Setting is finished and initial settings screen is
displayed.
Also refer to "Common procedures of initial settings"
page 20.
Initial settings
Selecting digital input
Select the digital output to be output from the optical/
coaxial digital audio output connector of the unit
1 At the initial settings screen
Select “7 digital Audio Output” by the joystick and
press SELECT.
2 Select the preferred item (l-3) by the joystick
and press SELECT.
When "1" LPCM(DVD) is selected
Off: Only linear PCM of 48kHz/16 bit is output from
the digital audio output connector. During playback of the DVD recorded in the linear PCM of
48kHz/20 bit/24 bit or 96 kHz no digital audio
is output. (Factory setting)
PCM: During playback of the DVD recorded in the
linear PCM of 48kHz/20 bit/24 bit or 96kHz
digital audio converted to 48kHz/16 bit is output
(Digital output of PCM audio is restricted to
48 kHz/16 bit or below for copyright protection.)
When "2" Dolby Digital is selected
Bitstream: Dolby Digital (AC-3) bitstream (2ch-5.1ch)
is output. (Factory setting)
PCM:
PCM (2ch) of 48khz/16 bit is output.
3 Select the preferred value by the joystick at each
screen and press SELECT.
The screen at the step 1 is displayed. Select “0” by the
joystick and press SELECT to return to the initial settings
screen.
For your reference:
l Make settings as shown in the following table
depending on the kind of amplifier that is connected to
the optical/coaxial digital audio output connector.
Recommendable setting
Type of amplifier to be
connected
LPCM (DVD)
Dolby
Digital
No amplifier is connected
Off
Bitstream
AV amplifier including
PCM*
Bitstream
Dolby Digital decoder
*Audio output from the unit’s audio output connectors is
converted to 48 kHz/16 bit in addition to audio to audio
from the audio output connector.
To enjoy high quality sound at 48 kHz/20 bit/24 bit or 96
kHz, connect the amplifier or decoder directly to the audio
output connectors, not to the digital audio output connector.
[Select “off’ at the “1 PCM (DVD)"]
Also refer to "Common procedures of initial settings"
page 20.
22
Initial settings
Initial settings
Speaker Settings
1 At the initial settings screen
Select “8 Speaker Setting” by the joystick and
press SELECT.
Centre
Large/Small
Centre
Delay time
Centre
Large/Small/None
For your reference:
l TO output the test signal
1. Select “Test” by the joystick, and then press SELECT.
(Test signals will be output consecutively from each
speaker clockwise.)
2. Select the appropriate volume (-6db through +6db)
by the joystick while the test signal is being output
from the speaker.
3 Press SELECT. (The test signals are stopped.)
Other Settings
1 At the initial settings screen
Select “9 Other settings” by the joystick and
press SELECT.
Surround (L)
Large/Small/None
Surround (L/R)
Delay time
Surround (R)
Large/Small/None
l Underlined item is a factory setting.
2 Select the preferred item by the joystick and
press SELECT.
3 Select the preferred value by the joystick and
press SELECT.
Speaker icons
l If the speaker is connected , display the icon.
Clear the icon if the speaker is not connected.
l If the speaker supports low-frequency (under
100 Hz) reproduction, select the large icon. If the
speaker’s low-frequency (under 100 Hz) reproduction ability is poor, select the smaller icon. [When the
subwoofer is not connected, be sure to select “Large”
for the front speakers (L/R).]
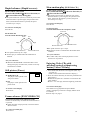
Delay time
If the surround speaker or the center speaker can’t be
installed at an equal distance to (or further away) the
front speakers from the listening position, change the
delay time to get better surround effect.
l When D2 or D3 is equal to or larger than D1, no
setting is necessary ( [A]). Otherwise, change the
setting according to the table below.
Speaker
Delay time
Center
speaker (D2)
1.3 ms
2.6 ms
3.9 ms
5.3 ms
5.3 ms
10.6 ms
15.9 ms
Surround
speakers (D3)
Difference
between
D1 and D2/D3
approx. 50 cm
approx. 100cm
approx. 150 cm
approx. 200 cm
approx. 200 cm
approx. 400cm
approx. 600cm
Channel balance:
While listening to the test signal, adjust the volume of
the center, surround (L), surround (R), speakers and
the subwoofer so that the volume is equal to that of
the front speakers.
4 Select “Exit” by the joystick and press SELECT.
Setting is finished and the initial settings screen is
displayed.
Note:
l The “Large/Small” setting has no effect on DVDs
recorded in MPEG 2 audio.
2 Select the preferred item (1-4) by the joystick and
press SELECT
When "1" still mode is selected
Automatic: “Frame still” and “Field still” are
automatically selected during the still mode
When "2" audio during search is selected
On: Factory setting (When noises during search are
disagreeable, select “Off’.)
Off: Select this setting if audio during search is not
necessary.
When "3" TV mode (4:3) is selected
Pan&Scan: the video material for a wide screen
will be played back in a Pan&Scan style on
a conventional size TV.
Letterbox: select this setting to play back the video
Material for a wide screen in the letter box style
on a conventional size TV.
When "4"D.(Dynamic) range compression is selected
OFF: normal audio range is selected
ON: select this setting to enjoy listening to
dynamic sound even on a low volume.
This is useful for latenight listening.
this function only works with Dolby
Digital (AC-3 DVD's) ]
3 select the preferred value by the joystick at
each screen and press select
The screen at the step 1 is disabled. Select "0" by the
joystick and press SELECT to return to the initial
setting screen.
Also refer to "common procedures of initial settings on
page 20
[A]
Center speaker
Front speaker (L)
Front speaker (R)
Subwoofer
Surround speaker (L)
Surround speaker (L)
23
Definition of terms
Angle
Recorded onto some DVD discs are scenes which have
been simultaneously shot from a number of different
angles (the same scene is shot from the front, from the
left side, from the right side, etc.). With such discs, the
ANGLE button can be used to view the scene from
different angles.
Chapter number
These numbers are recorded on DVD discs. A title is
subdivided into many sections, each of which is
numbered, and specific parts of video presentations can
be searched quickly using these numbers.
DVD
This refers to a high-density optical disc on which high
quality pictures and sound have been recorded by means
of digital signals. Incorporating a new video
compression technology (MPEG 2) and high-density
recording technology, DVD enables esthetically pleasing
full-motion video to be recorded over long periods of
time (for instance, a whole movie can be recorded).
DVD has a structure consisting of two 0.6 mm thin discs
which are adhered to each other. Since the thinner the
disc, the higher the density at which the information can
be recorded, a DVD disc has a great capacity than a
single 1.2 mm thick disc. Since the two thin discs are
adhered to each other, there is the potential to achieve
double-side play sometime in the future for even longer
duration play.
Playback control (PBC)
This is recorded on a Video CD (version 2.0). The
scenes or information to be viewed (or listened to) can
be selected interactively with the TV monitor by looking
at the menu shown on the TV monitor
Subtitles
These are the printed lines appearing at the bottom of
the screen which translate or transcribe the dialogue.
They are recorded on DVD disc.
Time number
This indicates the play time which has elapsed from the
start of a disc or a title. It can be used to find a specific
scene quickly. (It may not work with some discs.)
Title number
These numbers are recorded on DVD discs. When a disc
contains two or more movies, these movies are numbered
as title 1 title 2, etc.
Track number
These number are assigned to the tracks which are
recorded on Video CDs and CDs. They enable specific
tracks to be located quickly.
Video CD
This contains recordings of pictures and sound whose
quality is on a par with that of video tape. This player
also supports Video CDs with playback control (version
2.0).
Specification
Power
Requirements:
Power
Consumption:
AC 110 -240 V, 50/60 Hz
22W (approx. 3.5 W when power
is OFF by the power button or
the remote control)
Signal system:
Weight:
Dimensions:
NTSC/PAL
3.8 kg
430 (W) x 325 (D) x 87.5 (H) mm
(excluding protrusions)
Operating temperature : +5~+35 0C
Operating humidity range: 5~90% (no
condensation)
Discs played:
(1) DVD-VIDEO disc
12 cm, single-sided, single-layer
12 cm, single-sided, double-layer
12 cm, double-sided, double-layer (one layer
per side)
8 cm, single-sided, single-layer
8 cm, single-sided, double-layer
8 cm, double-sided, double-layer
(2) Compact disc (CD-DA, VIDEO CD)
12 cm disc
8 cm disc
S-video output:
Y output level:
1 v p-p (75 )
C output level:
0.300 V p-p (75 ) (PAL)
0.286 V p-p (75 )(NTSC)
Output connector : S terminal (1 system)
Video output:
1 V p-p (75 )
Output level:
Audio output:
2Vrms (1kHZ, 0 db)
Output level:
5.1 ch discrete output
Audio signal output characteristics:
(1) Frequency response:
l DVD (linear audio):
2 Hz-22 Hz (48 kHz sampling)
2 Hz-44 Hz (96 kHz sampling)
l CD audio:
2 Hz-20 Khz (EIAJ)
(2) S/N ratio:
l CD audio: 110 db (EIAJ)
(3) Dynamic range:
l DVD (linear audio): 100 db
l CD audio: 99 db (EIAJ)
(4) Total harmonic distortion
l CD audio: 0.0025% (EIAJ)
Digital audio output:
Optical digital output: Optical connector
Coaxial digital output: Pin jack
MIC jack: 6.3mm jack (2 systems)
Pickup: Wave length: 655 nm
Laser power: CLASS 2
Specifications are subject to change without notice.
Weight and dimensions are approximate.
24
Troubleshooting
Before requesting service for this unit, check the chart below for a possible cause of the problem you are experiencing.
Some simple checks or a minor adjustment on your part may eliminate the problem and restore proper operation.
Symptom (Common)
No Power
Power turns its self off.
l Play fails to even when
Remedy
Insert the power plug into the scoket
The power is automatically turned off after apporx. 30 minutes have elapsed in the
stop mode (auto power off). Turn the power back on.
PLAY is Pressed
l Play commences but stops
immeditately
No Picture
l
l
l
l
l
l
l No Sound.
l Distorted sound.
l Ensure that the equiment is connected poperly
l Ensure that input setting for the TV and stereo system are proper.
Condensation has formed: wait about 1 to 2 hours to allow the player to dry out.
This player cannot play discs other than DVDs, Video CDs and CDs.
The disc may be dirty and may require cleaning.
Ensure that the disc is installed with the label side up.
Ensure that the equiment is connected poperly
Ensure that input setting for the TV is "Video".
Picture is distorted during rapid
advance or rapid reverse
No 4:3 (16:9) picture
The picture will be somewhat distorted at times: thisis normal
No on-screen display.
The "Off" setting is selected for "On-Sceern Messages": select "ON"
No surround sound
Choose the correct setup "TV Aspect" item which matches the TV set used.
l Choose the correct setup at the "Speaker setting" which matches your stereo system.
l No surround sound is output during playback of DVD Karaoke.
l No surround sound is output when a microphone is connected or the Karaoke
function are activated for the DVDs which are not designed for Karaoke.
Disconnect the microphone, return to the orginal one ( )and/or set the
Voice Change/One Touch Karaoke to OFF.
No operation can be performed
with the remote control.
No key operation (by the unit
and/or the remote control) is
effetive
TV set cannot be operated by the
remote control.
GUI Screen not displayed or only
partially displayed on the TV screen
l
l
l
l
Check the batteries are installed with the correct polarities (+ and -).
The batteries are depleted; replace them with new ones.
Point the remote control unit at the remote control sensor and operate.
Operate the remote control unit at a distance of not more than 7 meters from the
remote control sensor.
l Remove any obstacles between the remote control unit and the remote control sensor.
Turn the unit off and then back on. Alternatively, turn offthe unit, disconect
the AC power cord and the re-connect it. (The player may not be operating
properly due to lightning, static electricty or some other external factor.
Not all TV models and brands can be operated with the universal remote control
supplied
Select th apporpriate TV screen type by consulting the operation manual of the TV.
Symptom [DVD]
Remedy
No subtitles.
l Subtitles appear only with discs which contain them.
l Subtitles are cleared from the TV monitor. Perform the steps on page 18 to
Alternative audio soundtrack (or
subtitle) languages fail to be
selected.
l An alternative language is not selected with discs which do not contain more than
display the subtitles.
one language.
l In the case of some discs, the alternative language cannot be selected by operating
the AUDIO or SUBTITLE button. Try selecting it from the DVD menu if one is
available.
25
Remedy
Symptom [DVD]
Angle cannot be changed.
The password for age restriction
has been forgotten.
This function is dependent on software availability. Even if a disc has a number of
angles recorded, these angles may be recorded for specific scenes only (when the
ANGLE indicator on the unit lights up.)
Please contact the local dealer.
Remedy
Symptom [Video CD]
This function works only for Video CDs with playback control.
No menu play.
Self-diagnosis display function
When an error or trouble is detected during operation, a service number appears in the display window.
When a service number has appeared, check out the details given below.
Service number
U11
H
Player status
Disc is dirty.
Trouble is likely to have occurred. The
number following “H” differs depending on the status of the player.
Remedy
Wipe the disc clean.
Turn the unit off and then back to on. Alternatively, turn
off the unit, disconnect the AC power cord, and then reconnect it.
Disc handling and maintenance
Hold the disc by the edges so the surface will not be soiled with fingerprints. (Fingerprints, dirt and scratches can cause
skipping and distortion.)
Do not write on the label side with a ball-point pen or other writing utensils.
Do not use record cleaning sprays, benzine, thinner, static electricity prevention liquids or any other solvent.
Be careful not to drop or bend the disc.
Do not install more than 1 disc on the disc tray.
Do not try to close the disc tray when the disc is not installed properly.
Be sure to store the disc in its exclusive case when not in use.
If the surface is soiled
Wipe gently with a soft, damp (water only) cloth. When wiping discs, always move the cloth from the center hole toward
the outer edge.
(If you wipe the discs using a circular motion, circular scratches are likely to occur, which will cause noise.)
If the disc is brought from a cold to a warm environment, moisture may form on the disc
Wipe this moisture off with a soft, dry lint-free cloth before using the disc.
Improper disc storage
You can damage discs if you store them in the following places:
Areas exposed to direct sunlight
Humid or dusty areas
Areas directly exposed to a heat outlet or heating appliance
Discs which cannot be played with this player
DVD-ROM
DVD-R/DVDRAM
CD-ROM
CDV
CD-G
Maintenance
Be sure to turn the unit off and disconnect the AC power cord before maintaining the unit.
Wipe this unit with a dry soft cloth.
If the surfaces are extremely dirty, wipe clean with a cloth which has been dipped in a weak soap-and-water solution and
wrung out thoroughly, and then wipe again with a dry cloth.
Never use alcohol, benzine, thinner, cleaning fluid or other chemicals. And do not use compressed air to remove dust.
26
PALSONIC WARRANTY CARD
DVD PLAYER
MODEL: DVD-2000
This Palsonic DVD Player ( “the product” ) is warranted by PALSONIC CORPORATION PTY. LTD.
("the company” ) to be free from defects in material and workmanship under normal use and reasonable
care (in the opinion of the company) within Australia for a period of 12 months from the date of original
purchase covering both parts and labour
This product can only be repaired under this warranty by the company or by an Authorised service agent
as appointed by the company. In home service is not available on this product under the terms of this
warranty. Products requiring service pursuant to this warranty should be returned to PALSONIC
CORPORATION PTY. LTD. (the company”), an authorised service agent or to an authorised retailer
enclosing a copy of the purchase docket together with written instructions indicating the defect or faulty
operation of the product. All freight and insurance charges are the responsibility of the owner and must be
prepaid by the owner. Wherever possible the product should be returned in its original carton and packing
or alternatively in a suitable carton and packing so as to prevent damage to the product. The company
shall not accept any responsibility caused by inadequate or unsuitable packing.
Thiswarrantydoesnotcoveranyproductwhichhasbeensubjectedtomisuse,abuse,neglect,accidental
damage,heat,moisture,dust,impropervoltageoranyalterationwhichaffectsthereliabilityorperformance
oftheunit,notattributabletofaultymanufacture,partsorlabour
This warranty does not cover free parts and labour for any product which is faulty of defective in condition
(in the opinion of the company) as a result from the owner not using the product as per instructions
contained in the owner manual, misadjustment of controls, reception problems arising from inadequate
antenna systems/or associated television receivers, outside interference main supply problems, tampering
by unauthorised persons or incompatibility with other equipment.
This warranty does not cover charges resulting from service rendered outside normal business hours and/
or mileage charged by Authorised service agents. The company accepts no additional liability pursuant to
this warranty for transportation expenses of the product or parts to and from the service agent or dealer.
This warranty does not cover the cleaning of Audio/Video heads as this is considered routine maintenance.
In the event that the supply of goods or services pursuant to this agreement is a supply of goods or
services to a consumer as defined in the Trade Practices Act 1974(as amended) ("the Act” ), nothing
contained in this agreement excludes, restricts or modifies any condition, warranty, right or remedy which,
pursuant to the Act, applies to this agreement or is conferred upon the customer, provided that to the
extent that the Act permits PALSONIC CORPORATION PTY. LTD. to limit its liability for a breach of a
condition or a warranty implied by the Act, then PALSONC CORPORATION PTY. LTD. liability for such
breach shall be limited to
a) in the case of goods supplied pursuant to this agreement, the payment of the cost of replacing
the goods or of acquiring equivalent goods;
and
b) in the case of services supplied pursuant to this agreement, the payment of the cost of services
supplied again.
PALSONIC CORPORATION PTY.LTD
(Incorporated in NSW)
1 Joynton Avenue
WATERLOO NSW 2017
Ph: (02)9313 7111
Customer Toll Free: 1300 657 888
Fax No: (02)9313 7555
PALSONIC CORPORATION PTY LTD
1 JOYNTON AVENUE
WATERLOO NSW 2017 AUSTRALIA
TEL:(02)9313 7111
FAX:(02)9313 7555
PALSONIC CUSTOMER SERVICE
TELEPHONE
Australia: 1300 657 888